- contact@scarhandpainting.com


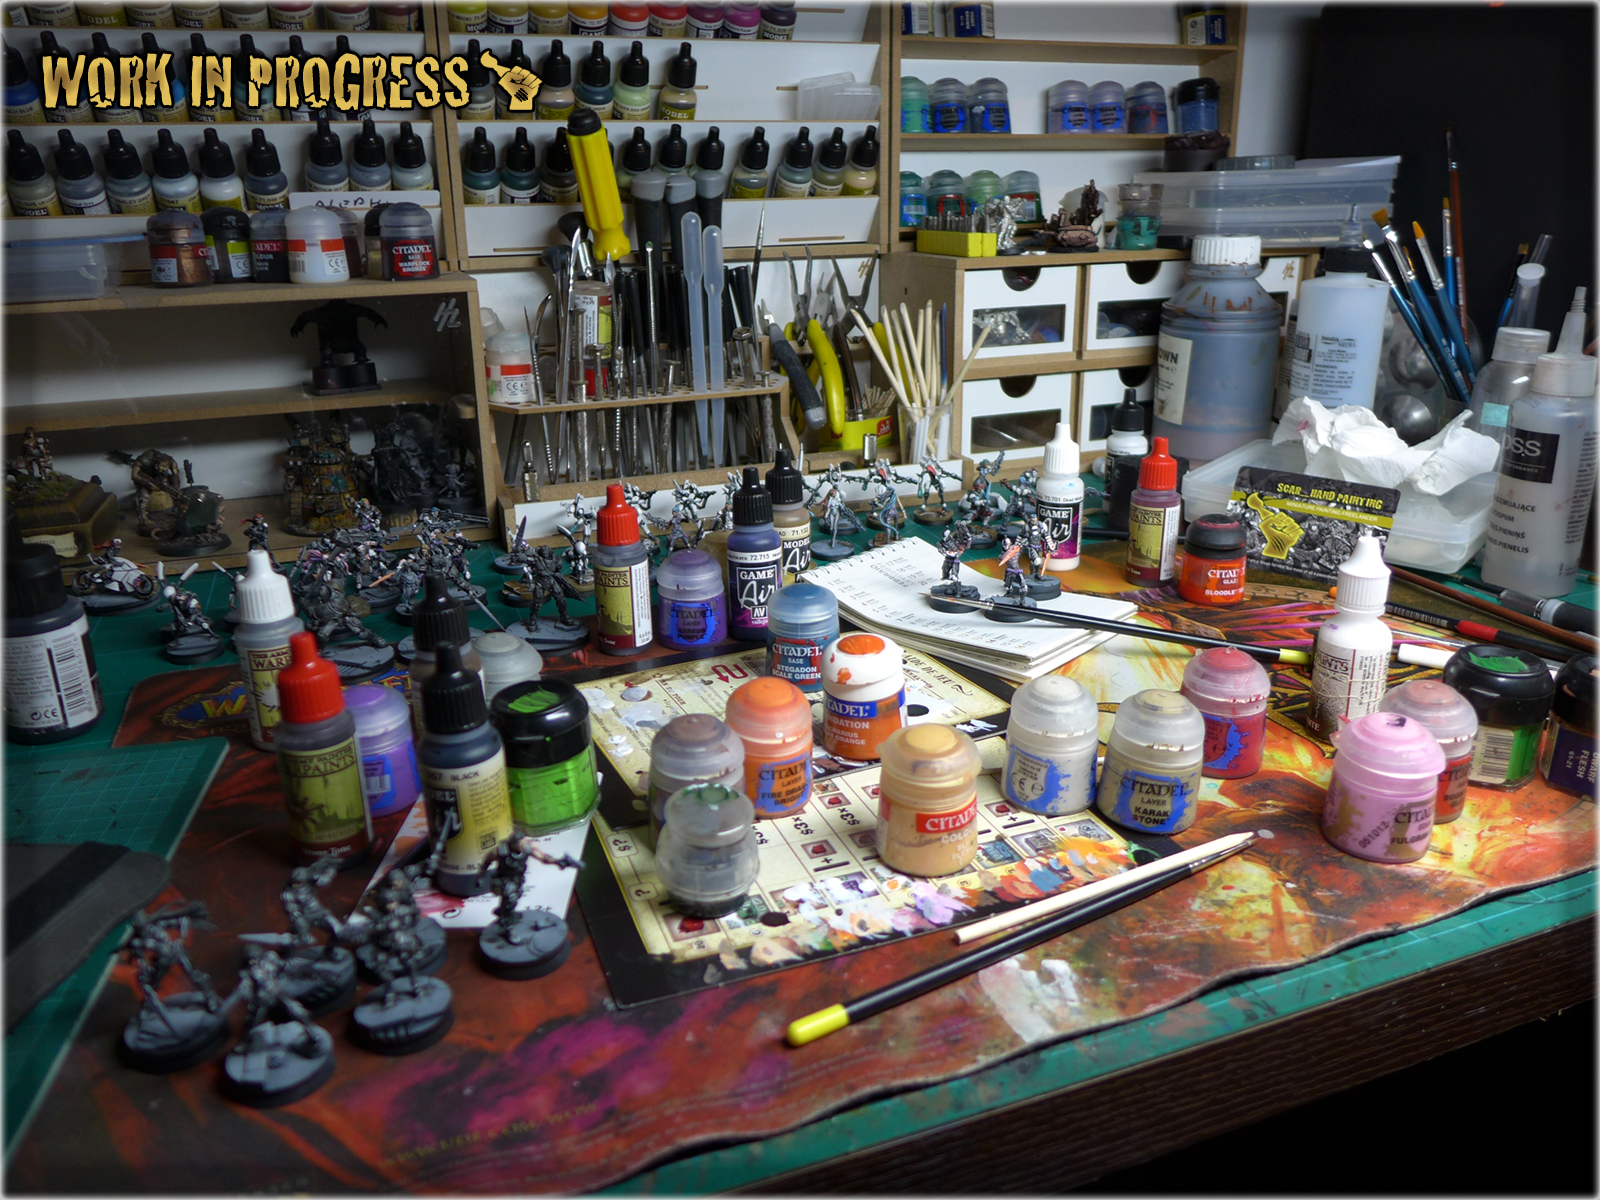
Foreboding my previous lifestyle in favor of painting for hire was the best decission in my entire life. Not only that I have a lot of fun in my ‘job’ but also plenty of time for my own projects. For those who knew me before scarhandpainting.com the number of Special Projects appearing lately might be quite a surprise. I myself am taken aback by the sheer numbers of personal projects I can work on. Below is a visual step-by-step of just such a project.
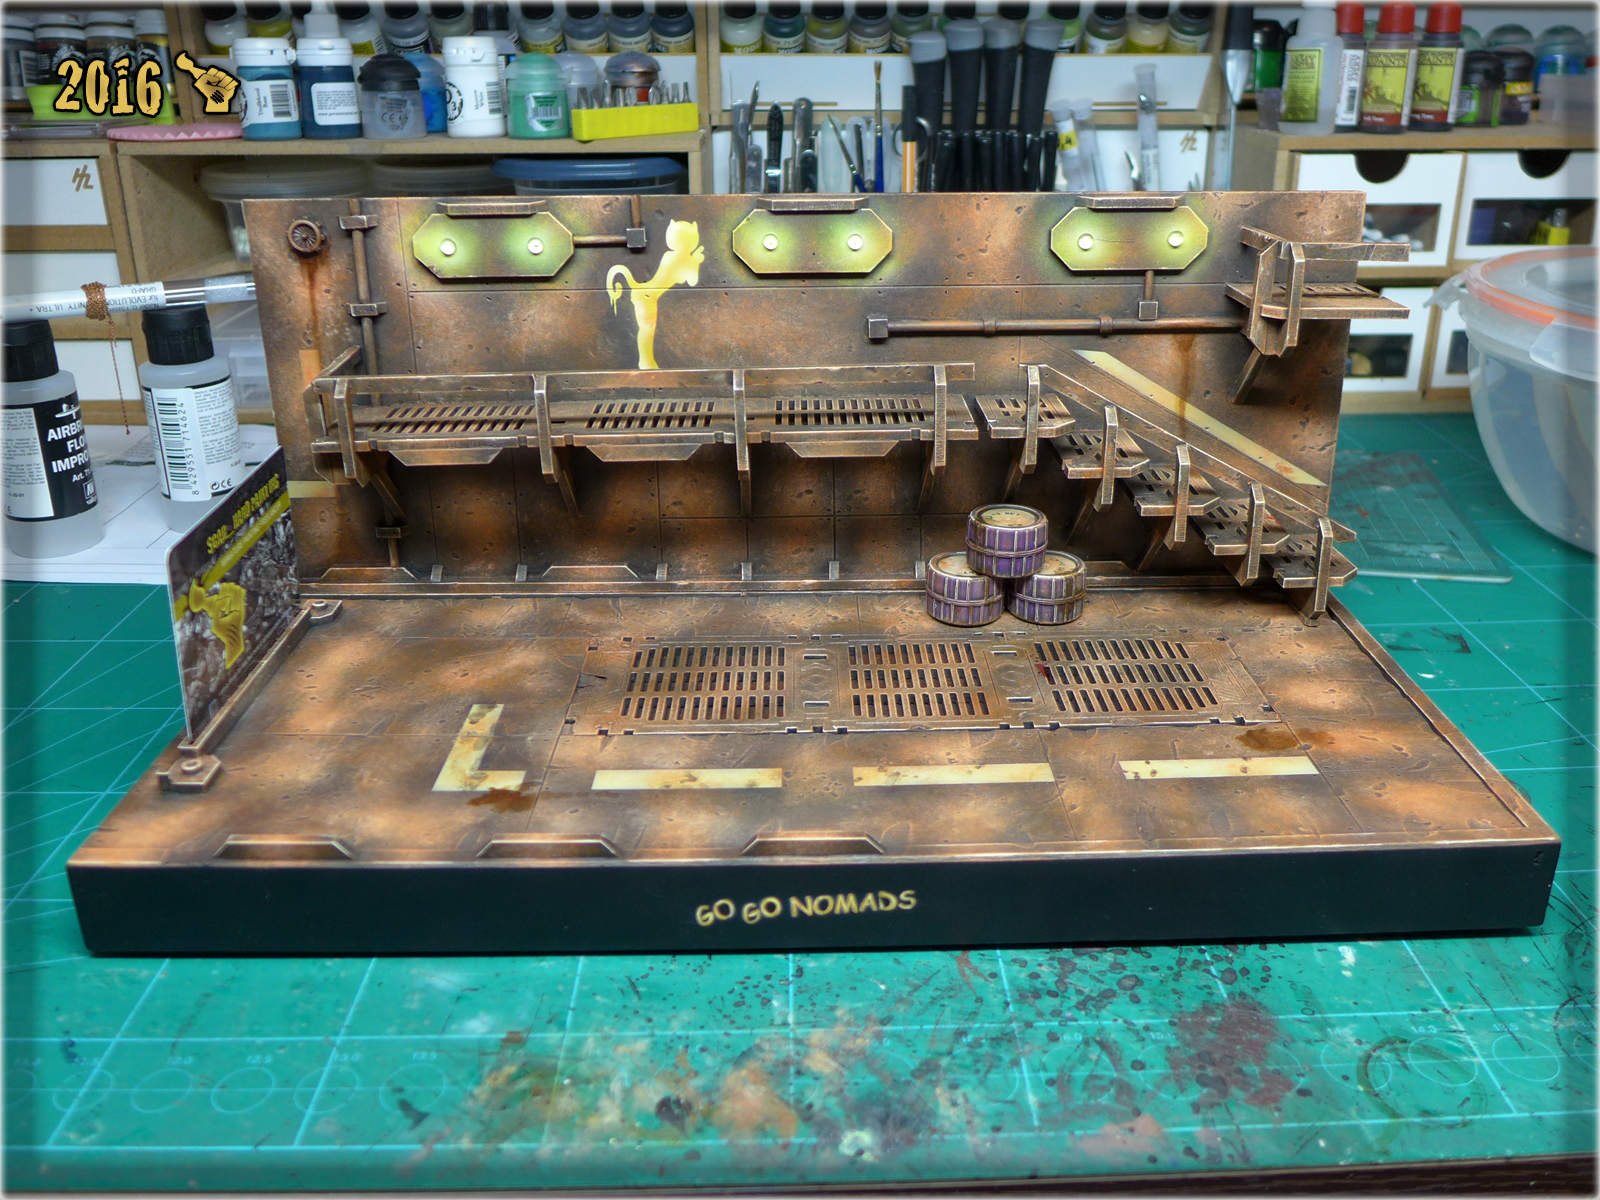
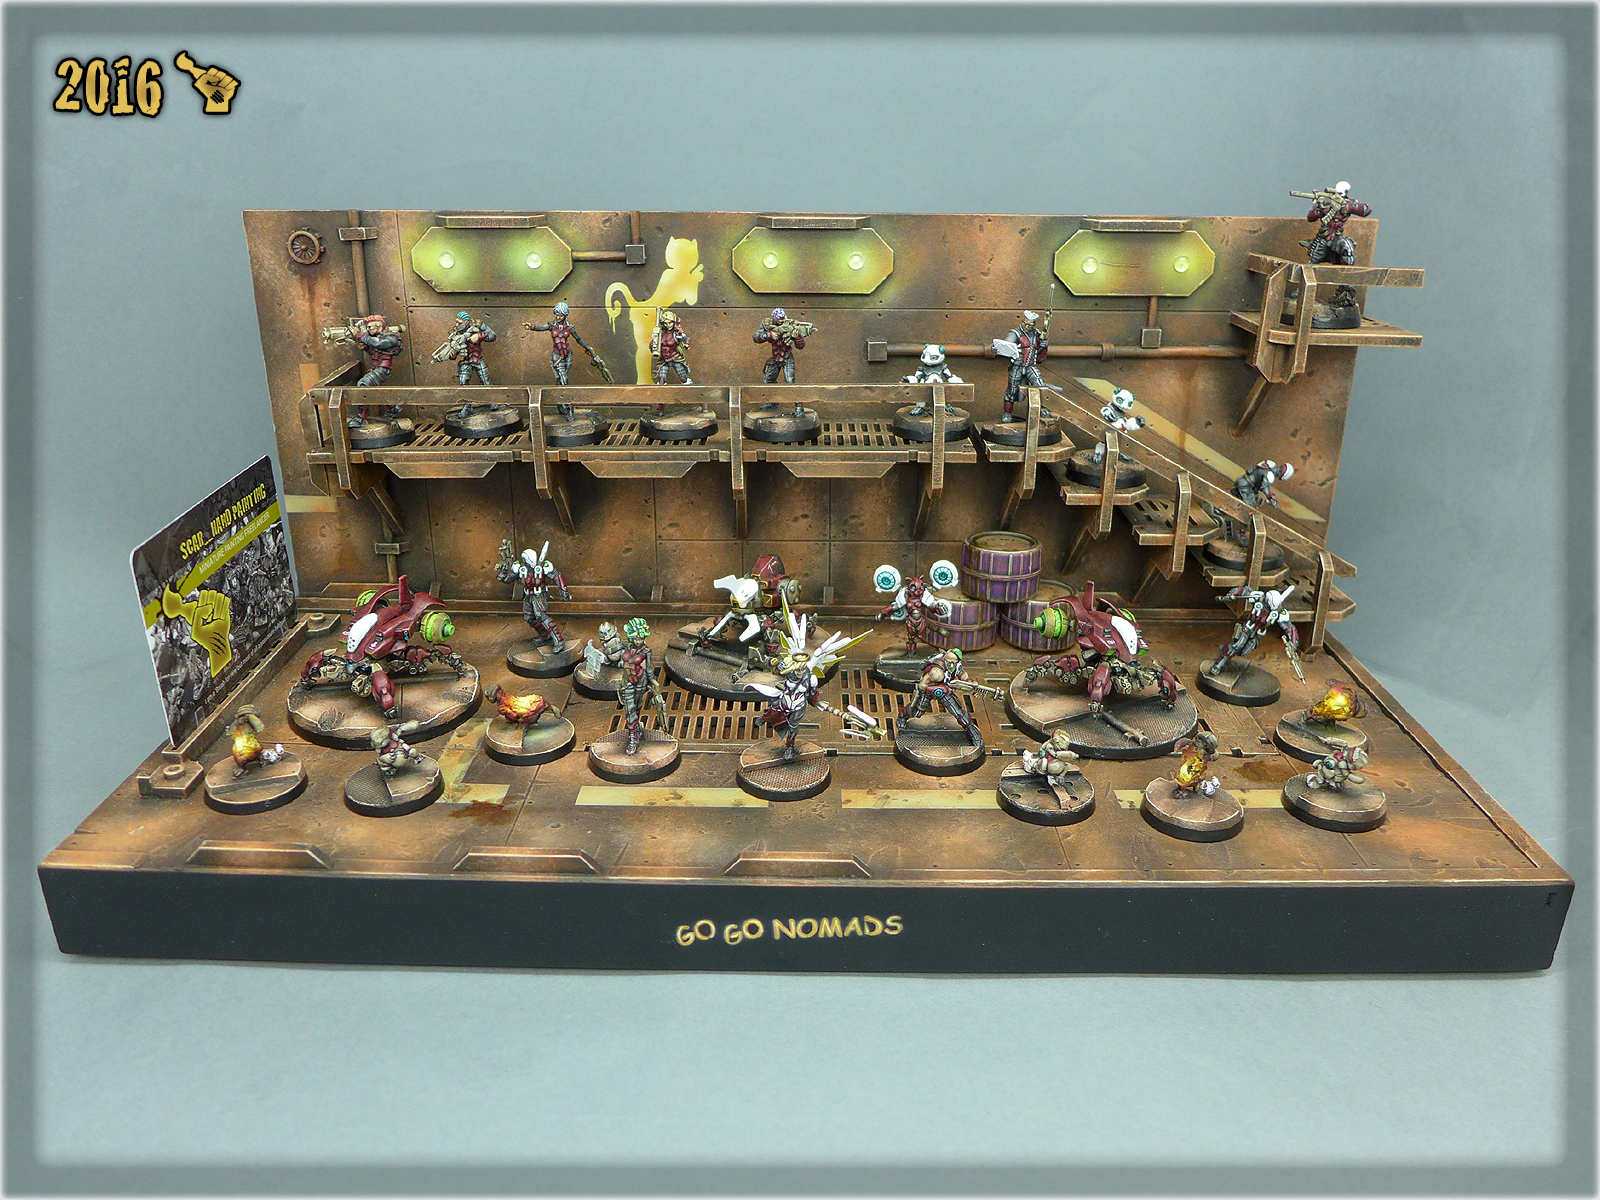
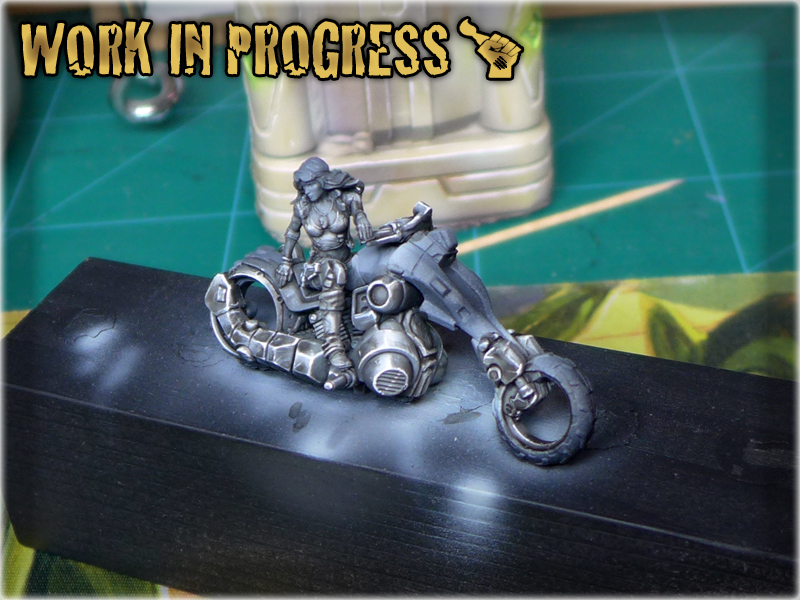
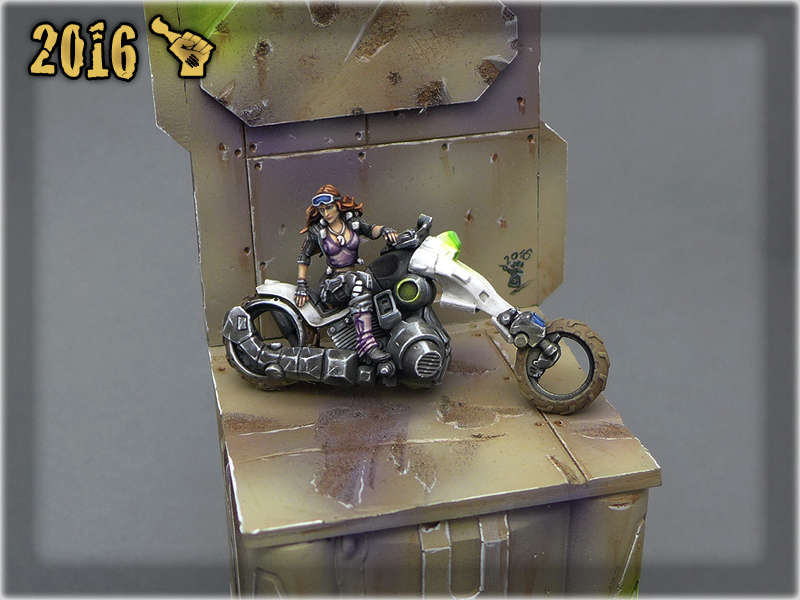
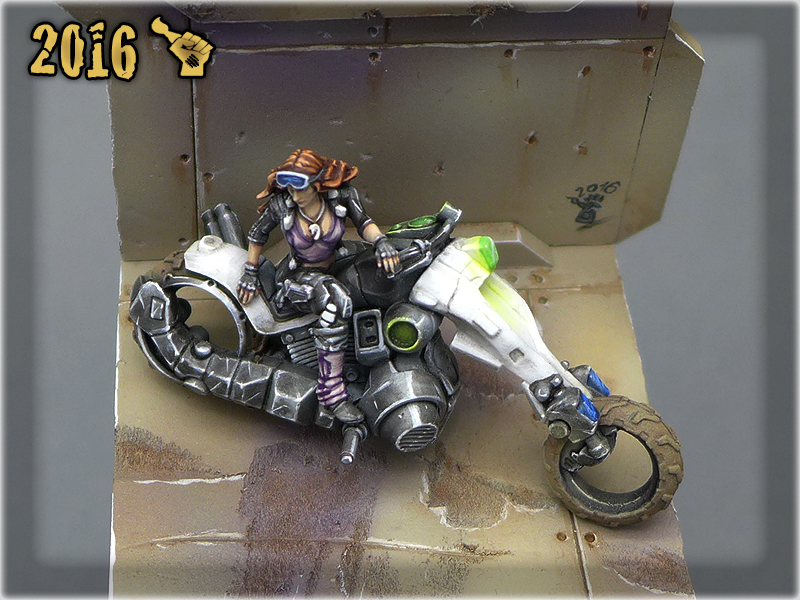
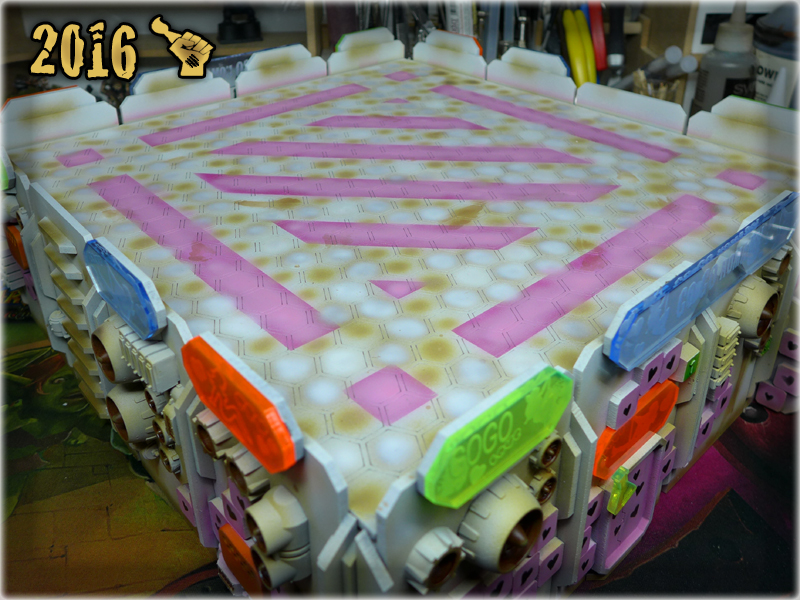
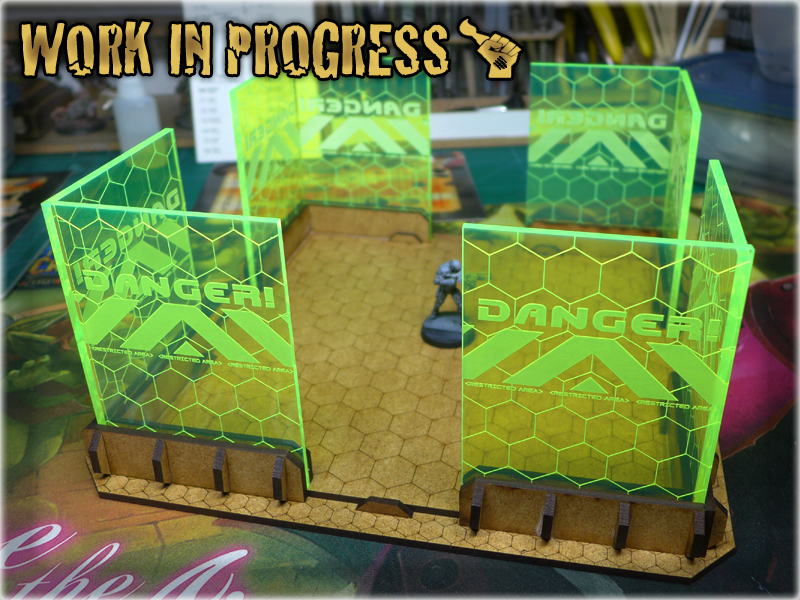
A big Infinity Event is closing in. ‘Polish Championships’ will take place tomorrow and I’ve trained my Corregiror army and dice rolling hard in preparation. Along with the usual mano-a-mano combat, a Painting Contest will also take place at the event. Each player is eligible to select one of his army rosters and present the miniatures for everyone to see and vote. I thought long and hard to think of anything that could deliver my miniatures to the podium. I know very well that there’s plenty of awesome painters among the Infinity community in Poland and that competition will be very strong. My miniatures look nice but not awesome enought to compete with paint jobs that literally blow my mind. I’ve figured something special – a Nomad-like trick to fight for the attention of voters. A special display diorama to compliment my army’s visuals as a nice background, built and painted in the same theme as the bases of my Corregidor army.
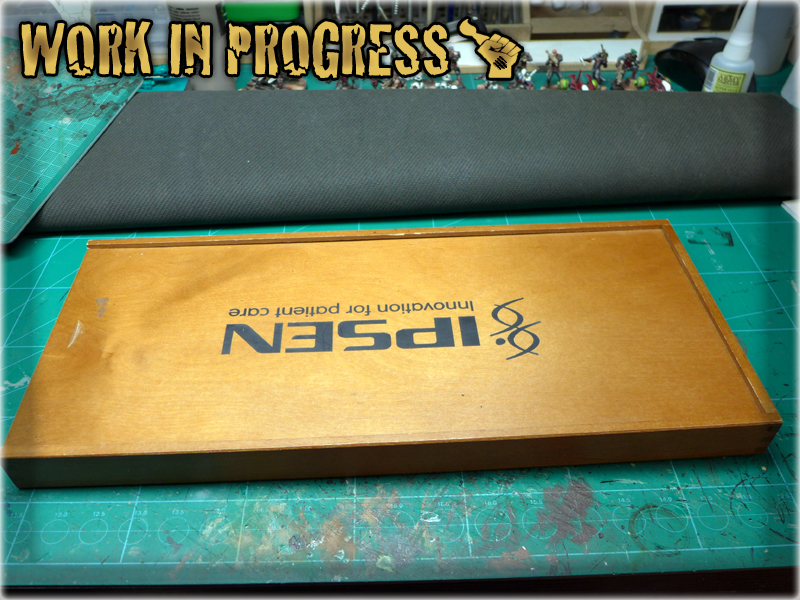
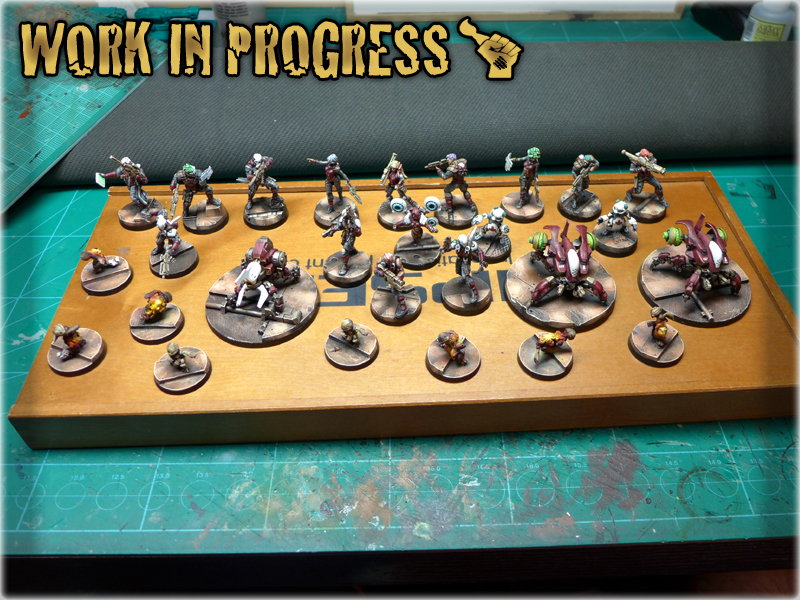
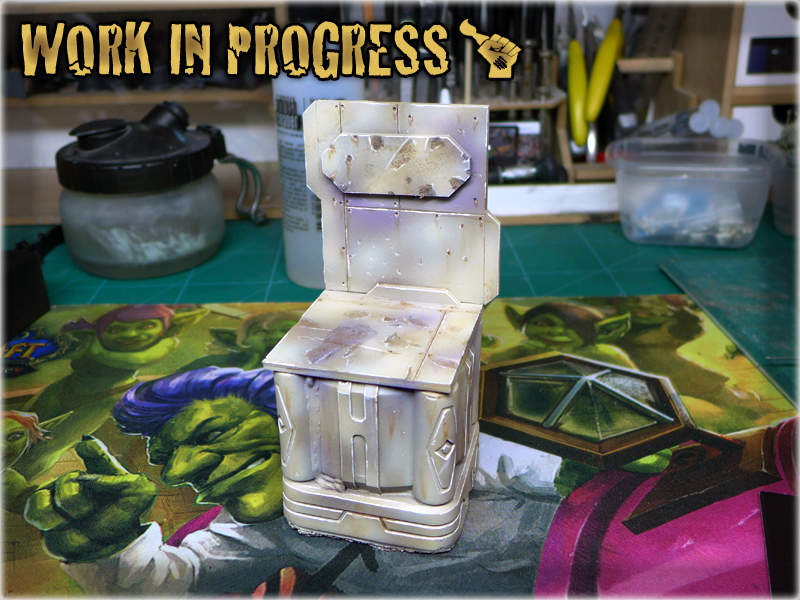
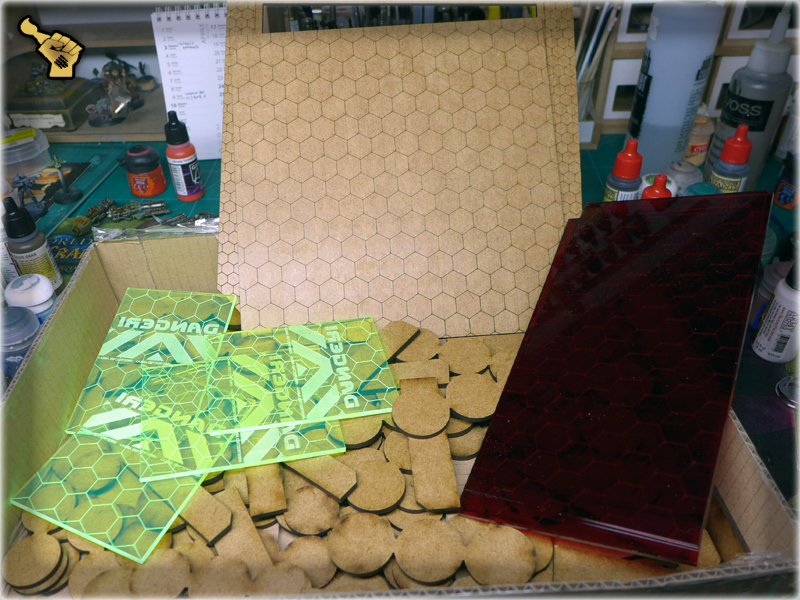
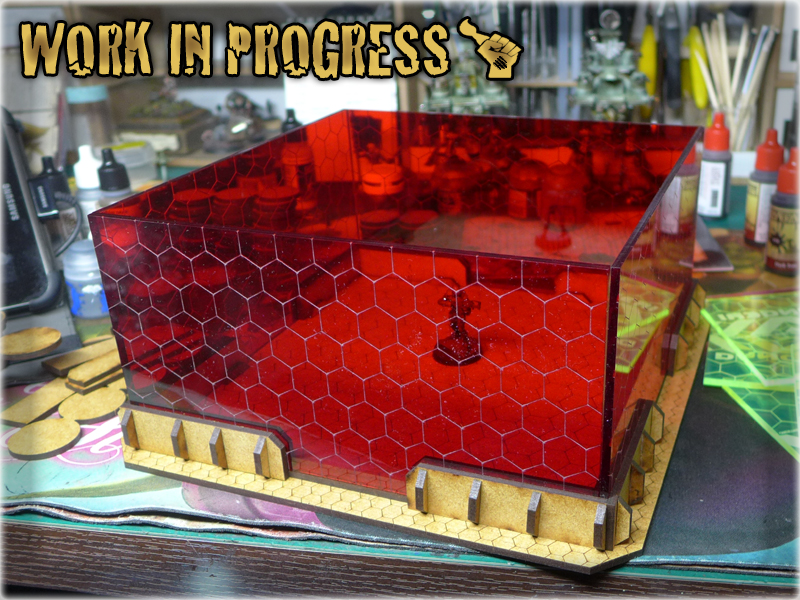
For this purpose I found a suitable wooden crate to be used as the base for entire diorama. I’ve also set up a makeshift display of miniatures to see if the base is large enought to accomodate them.
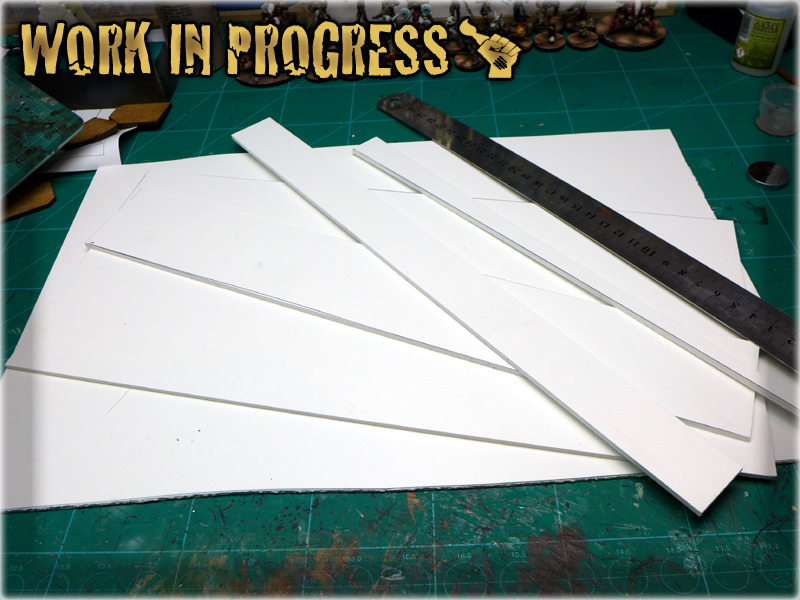
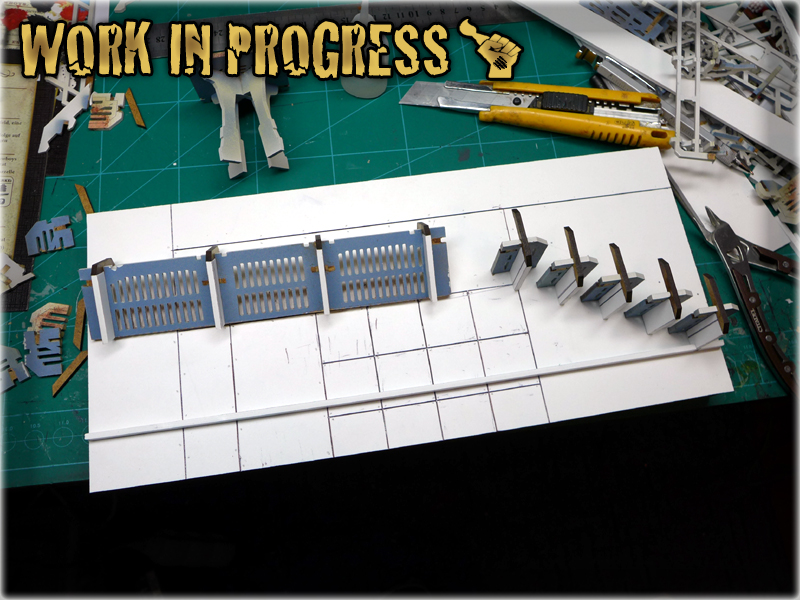
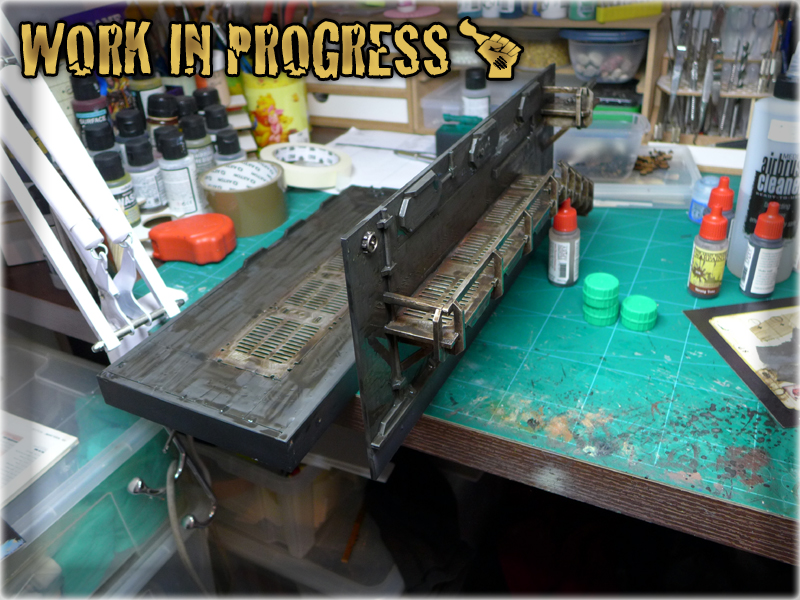
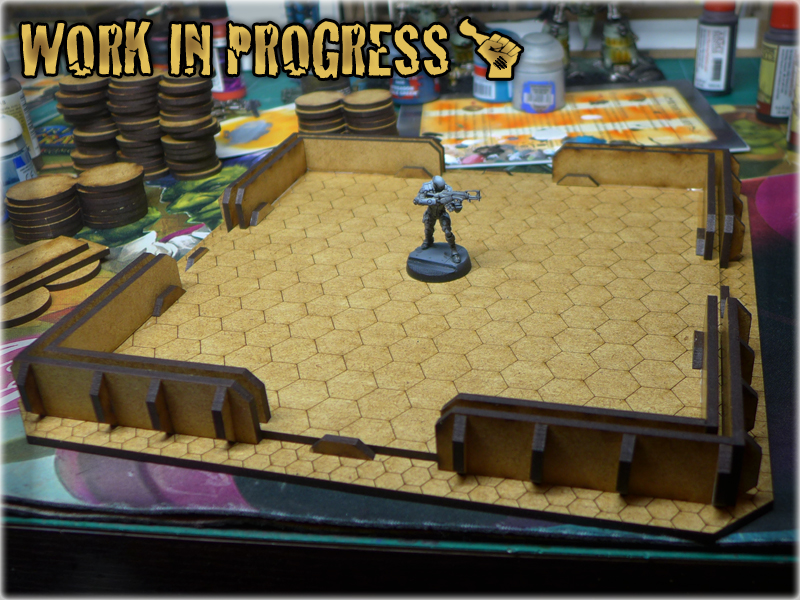
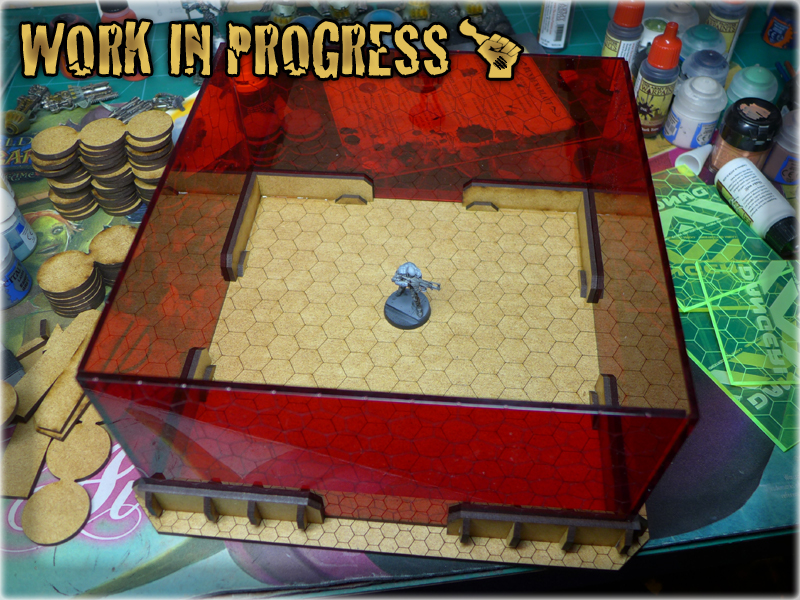
The wooden crate passed this test so I’ve gathered 3mm PCV and some HDF leftovers. The entire layout of the diorama was taking life in my mind’s eye as I started to work on it. I’ve used the wooden crate as a template to cut a floor and a wall for the diorama. After that an idea to build a small balcony with stairs and a sniper point came to my mind. I quickly dig through any materials and pieces that might be used for that and found my good old Micro Art Studio’s walkways set. The set had some sweet looking pieces that I implemented into this project.
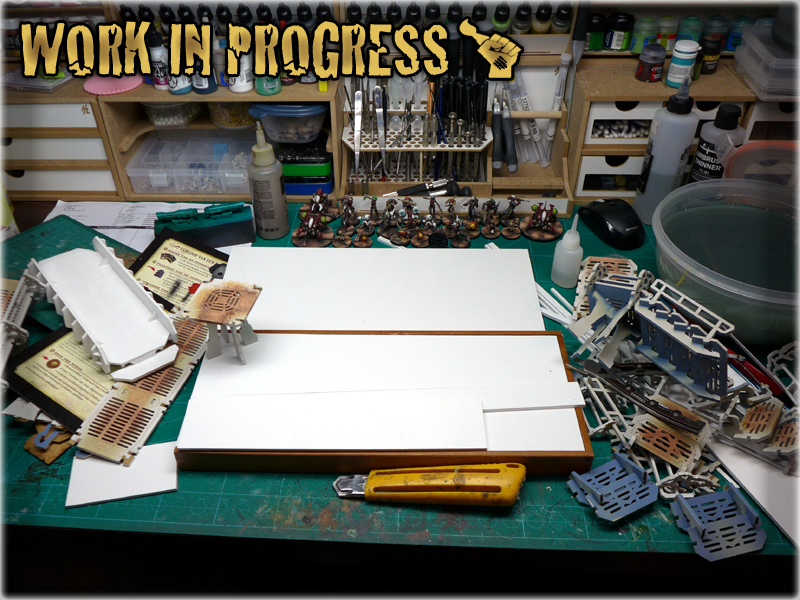
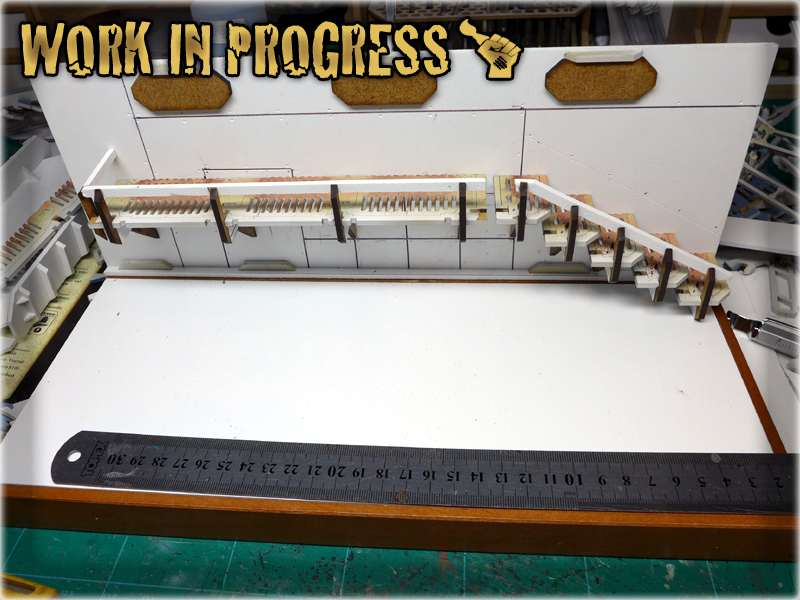
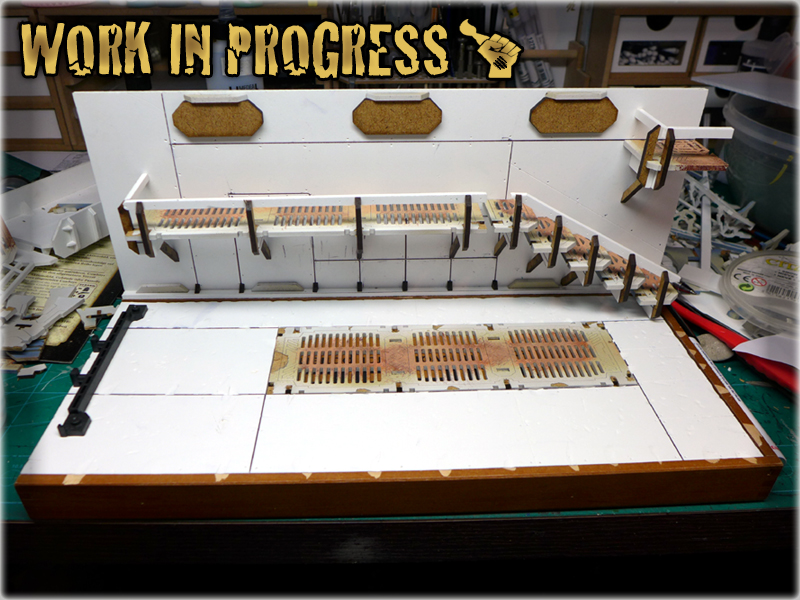
Using a ruler and a pen I drawn some makeshift panels and bolt holes on the ‘wall’ and prepared space for MDF pieces to be put into. I also shortened the MAS’s stairs and added elements of my own to make them look more industrial. Floor followed in a quick succession with the center being switched for a big MAS’s MDF panel. I also moundet the ‘wall’ using three screws. Initially I wanted to use magnets to keep the thing removable, but in the end I wanted for my miniatures to be safe. After that I’ve mounted three wall panels to be used as a base for glow globes. I also made some dents, marks and holes in the concrete panels of both wall and floor. Once I was done I’ve made a last check of display. Just before undercoating I had an idea to add some pipes and a vent along the walls to build even more industrial theme of the diorama. I used lollipop sticks and some leftovers to do that and proceeded to the undercoat.

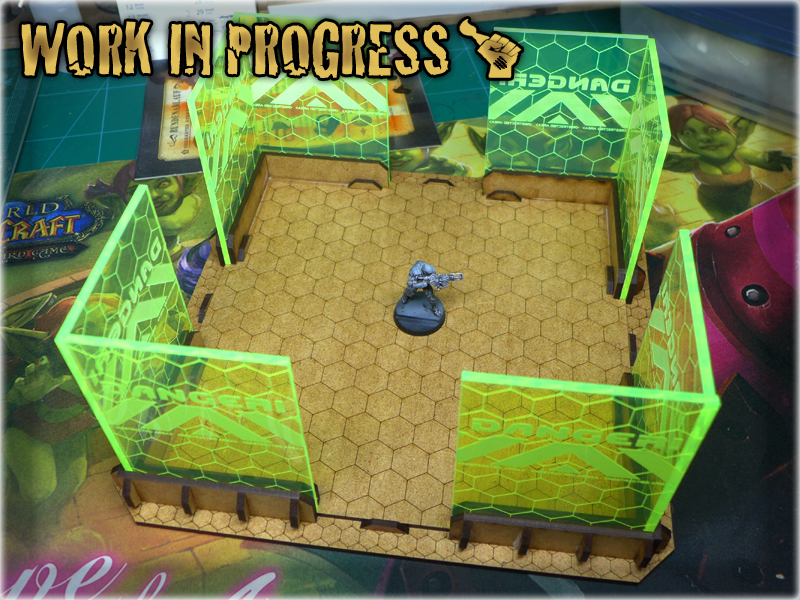
Once it was dry I have covered the entire thing in two strong layers of Eshin Gray, then painted up all metal elements with a Tin Bitz, Boltgun Metal, Mithrill Silver layers and then washed entire thing with Devlan Mud two times. I slowly applied layer after layer starting with Scorched Brown, then following with Calthan Brown, Ryza Rust, Lugganath Orange and lastly Flayed One Flesh. This is the same colour scheme as the one used for my Concrete Bases. Actually both metal and concrete were painted the same way as in these tutorials:
TUTORIAL: CONCRETE BASES part 2: Painting
TUTORIAL: PAINTING ‘FIVE LAYERS’ METAL
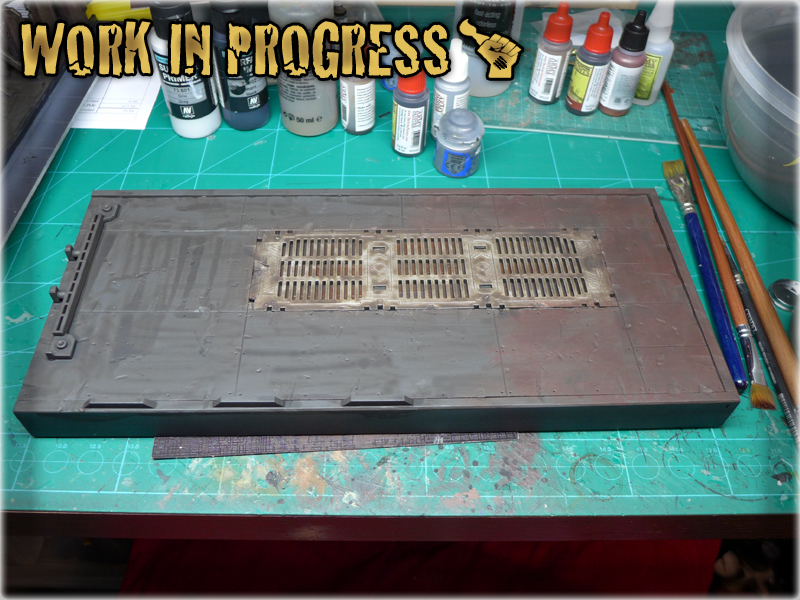
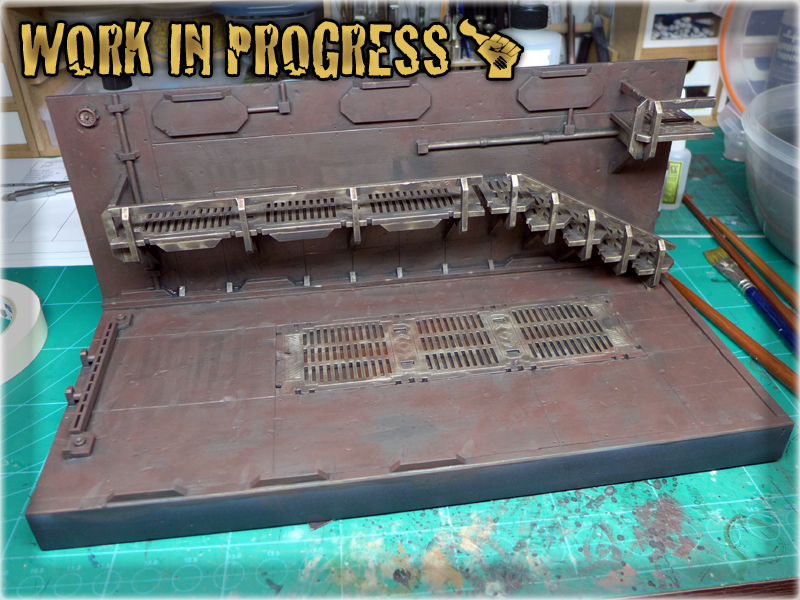
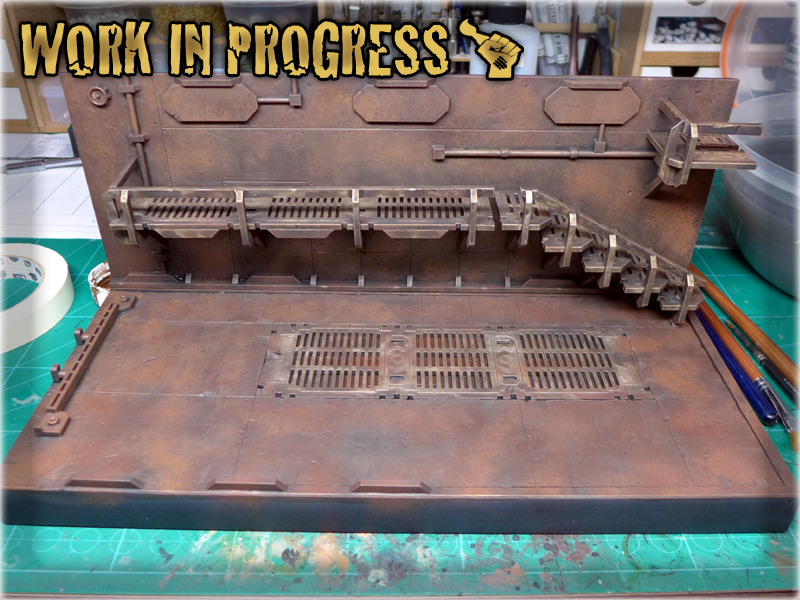
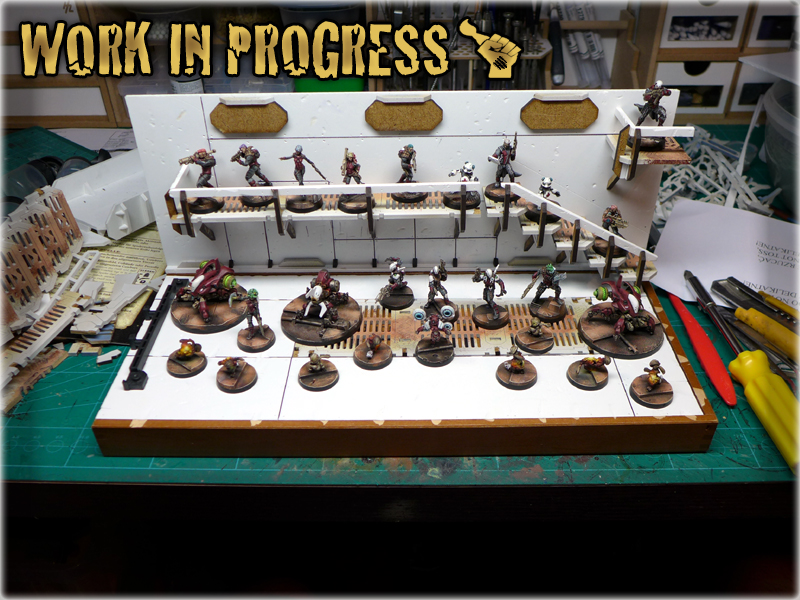
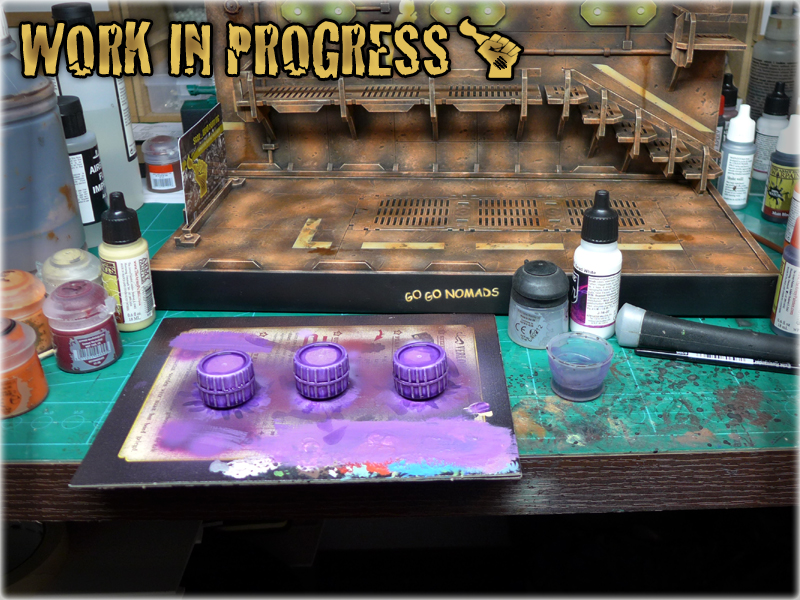
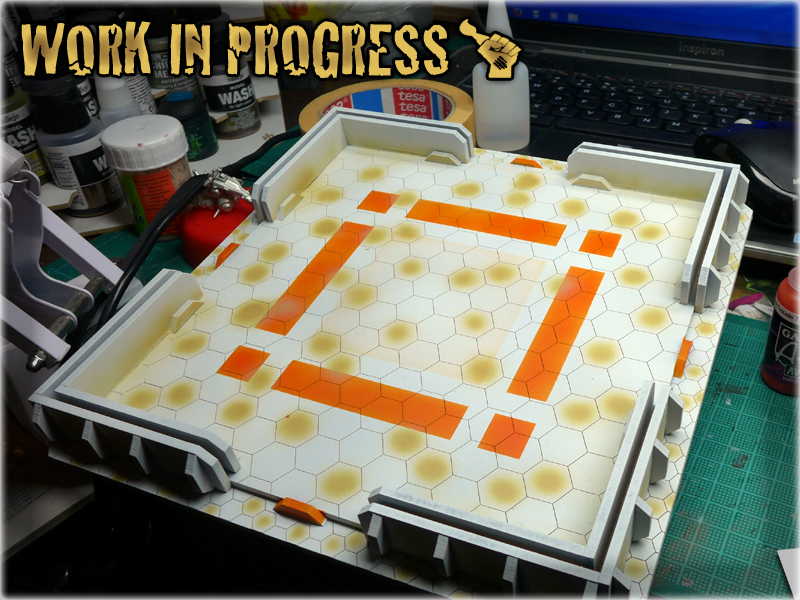
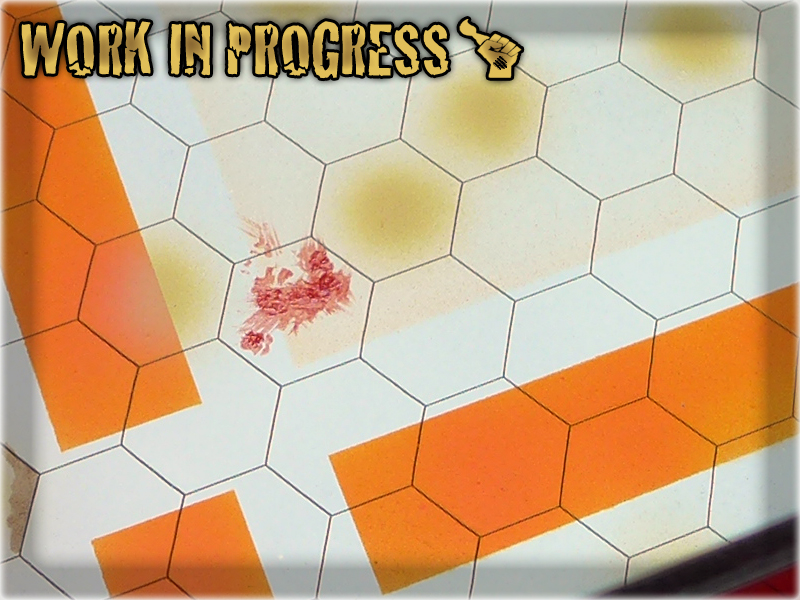
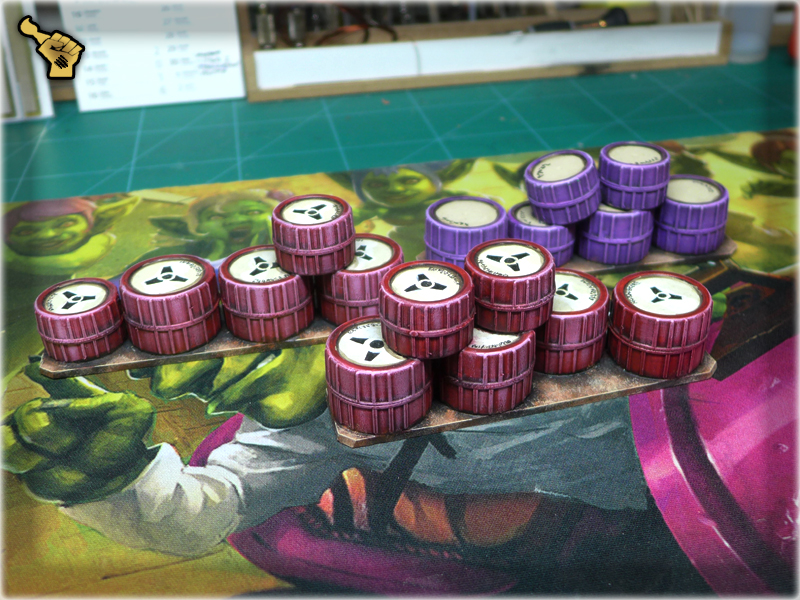
Starting with Calthan Ryza Rust I’ve covered metal elements along with concrete panels, but before that I’ve made a short pause to airbrushed white-creeme lines and a Nomad graffitti. Ryza Rust, Lugganath Orange and Flayed One Flesh went over the lines to create an impression of them being damaged and eroded along with the concrete panels. Once Flayed One Flesh layer was done I lined/edged all the angles using the exact same piant. I also added grease/Rust streaks and oil stains here and there to bring the diorama closer to a life scene.

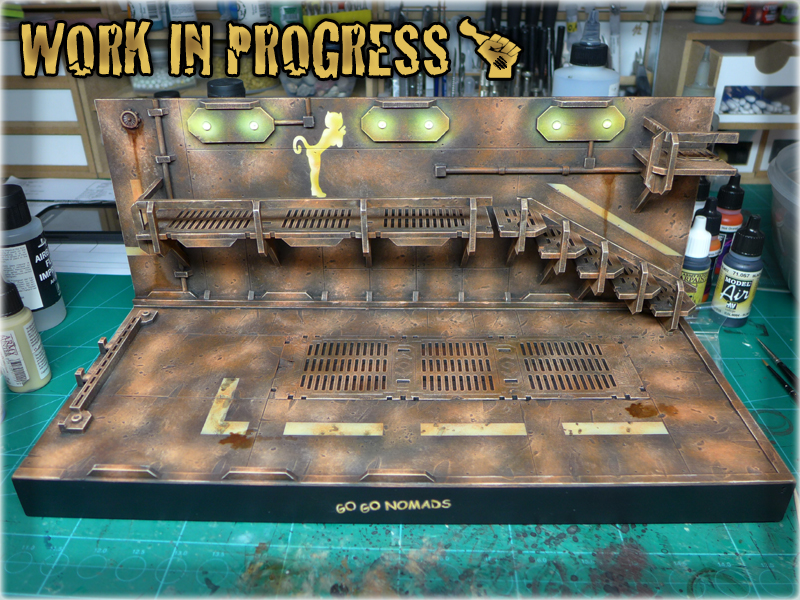
In the end I had to add a name, so I used a template created for me by Reycast Miniatures and airbrushed another graffitti onto the now black edges. Simple OSL was airbrushed and I mounted glow globes in the center points of each light. I also added three purple barrels to compensate glow globe’s green in preparation for red miniatures.
The final piece exceeded my expectations. Even my Girlfriend said it looks cool – and that’s rare! Damn – I count on this one to help me climb the ladder in the contest. If not – well, at least I have a fine piece to set up behind glass along with some less used Nomad Miniatures XD


27.6.2016: I actually won the painting contest XD Ultra happy about the fact! Here’s the entry:
This mini diorama is a ‘special’ kind of a Special Project. The Penthesilea, Amazon Warrioress is a part of ALEPH collection, but I was asked by a friend to make her somehow unique – just to stand out on a display.
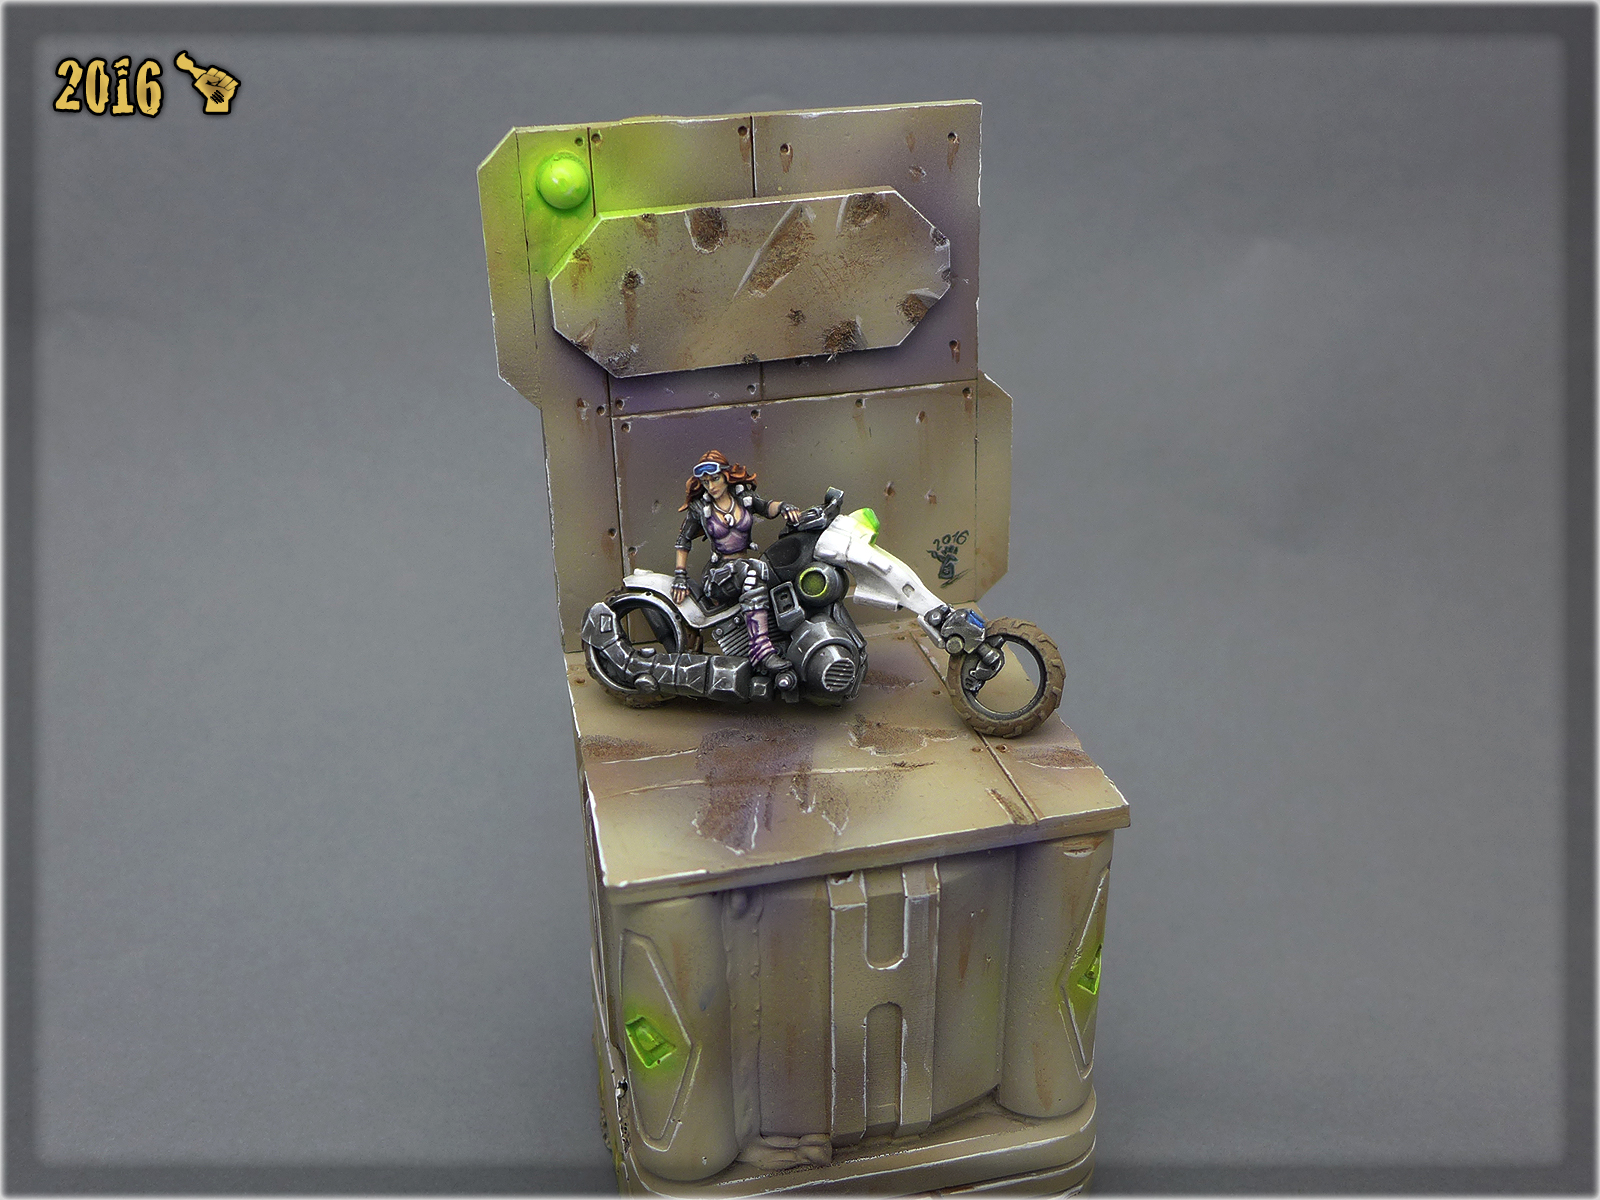
It took three failed attempts to base Penthesilea, as I was torn between many different options of a scenic base. I have tried to use a photo frame and model a wild west highway on it. I’ve tried to make a futuristic enviroment on a small wooden plinth. I even tried to use a coffee cap to base Penthesilea, but each time I just torn her off and tossed my creation into garbage (or hid it in the closet for later use). Salvation came to me in the form of a Micro Art Studio’s container, with which these guys filled a package of stuff I’ve ordered from them. “One man’s trash is another man’s treasure” and guys from MAS knew that I will have some use of their’s Kickstarter’s misscasts and leftovers. I cut the container in two and set up a nice background on it. Here’s a WIP pic:
This is how I actually started to work on this particular miniature – with a base instead of a model. After that it went pretty smooth with three days of painting, along with other miniatures. Each time I’ve ended up a key stage of this project, I was able to take a respite with another miniature, and then get back to Penthesilea. This pace kept me going with a lot of vigour, but also enabled me to look at Penthesilea with a bit of critique. I’ve corrected my mistakes at the start of each new stage and then followed adding new colours to the paint job. In the end I am very happy of how this one came out to be.
Here’s the final piece: “PENTHESILEA”
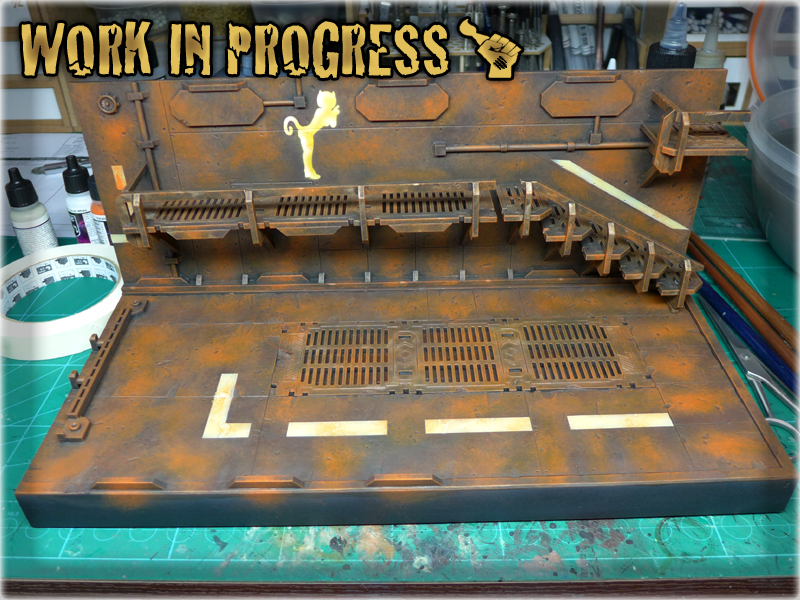
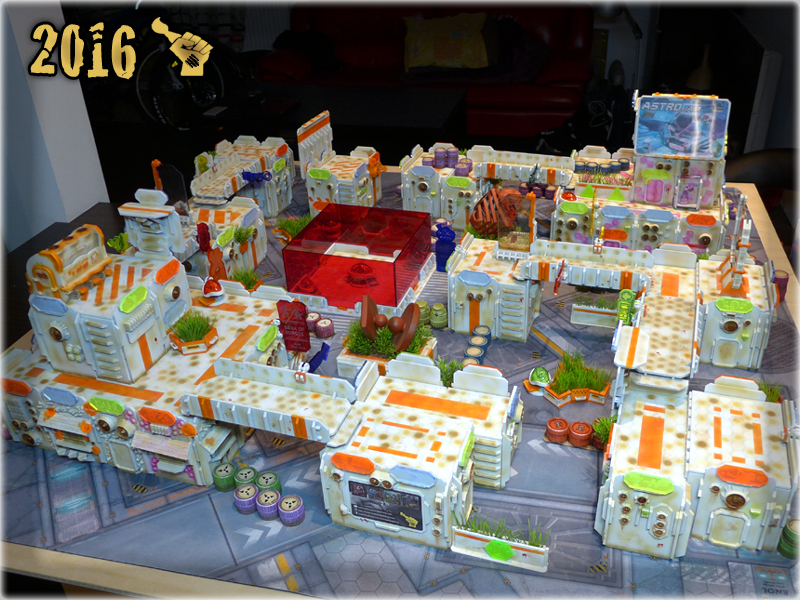
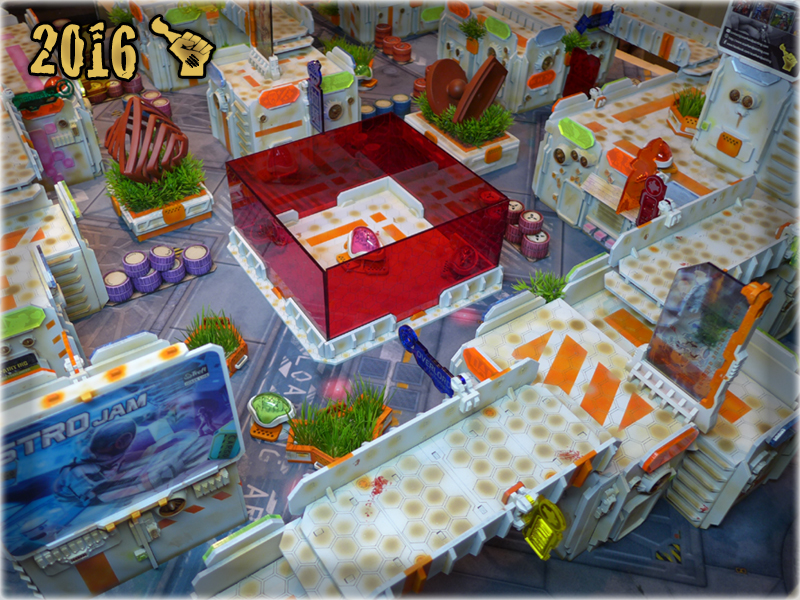
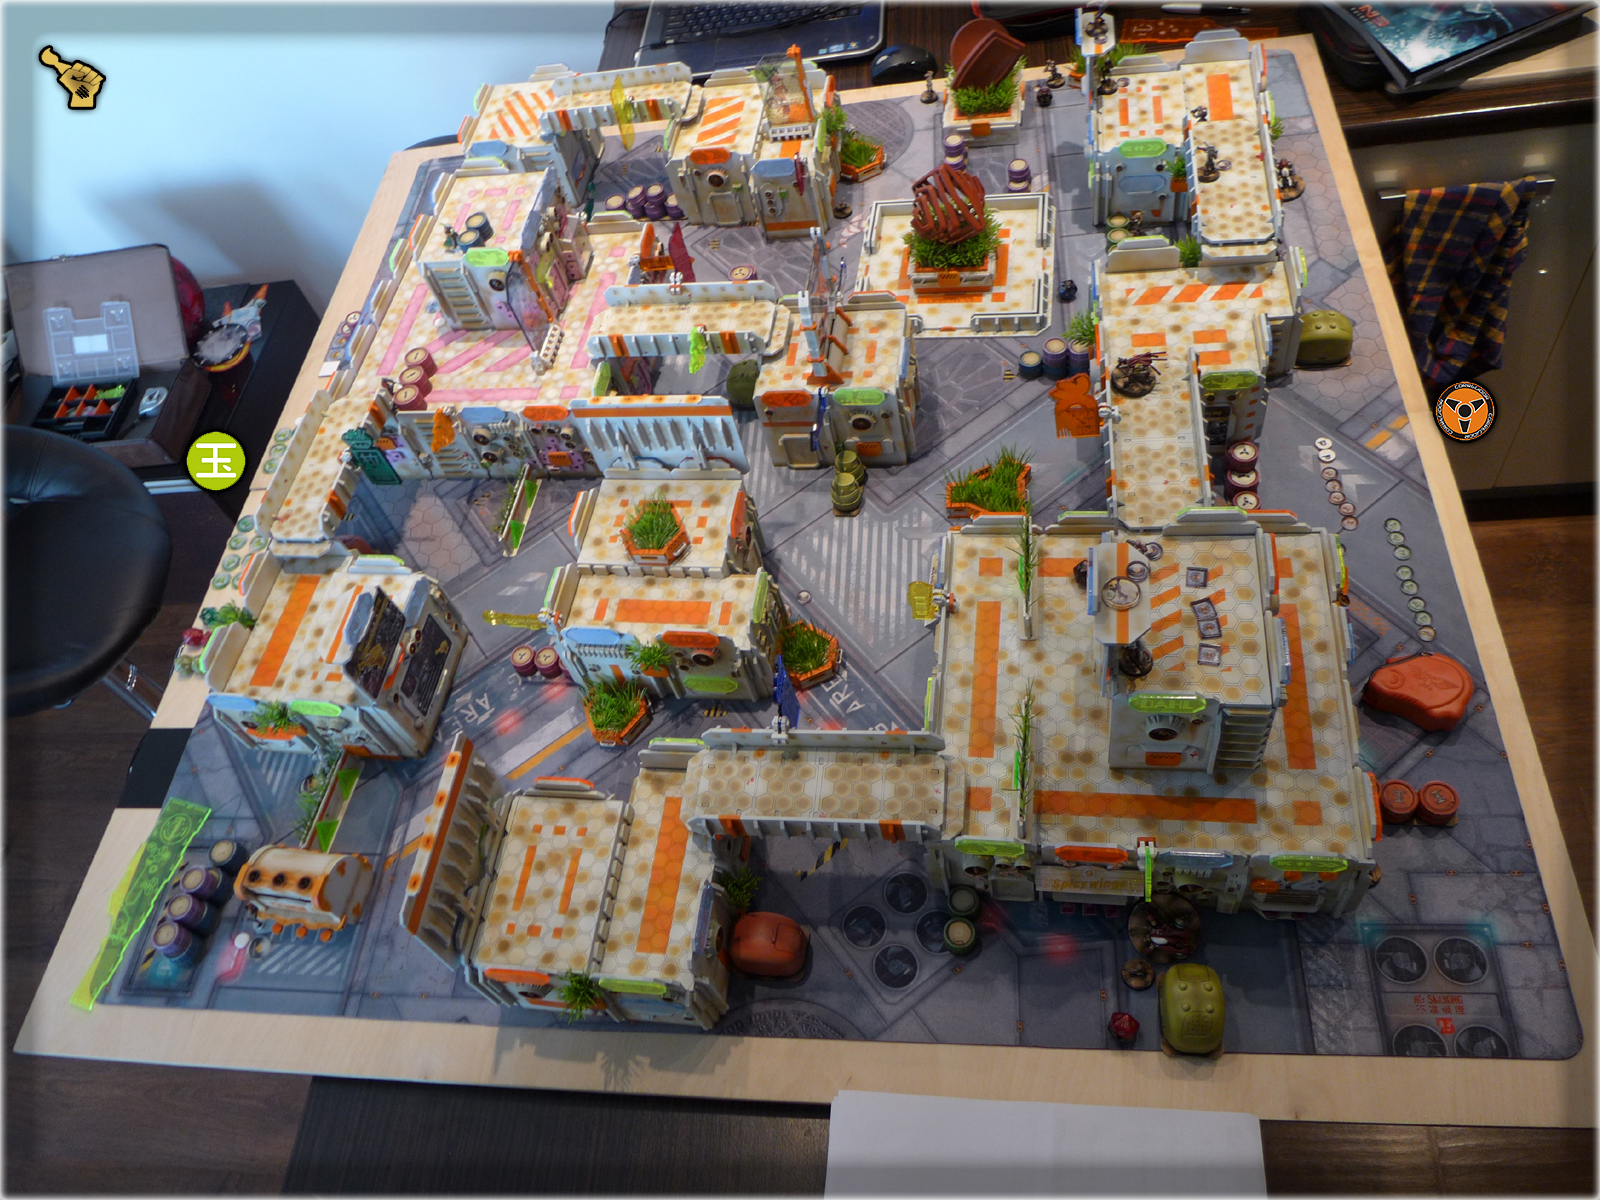
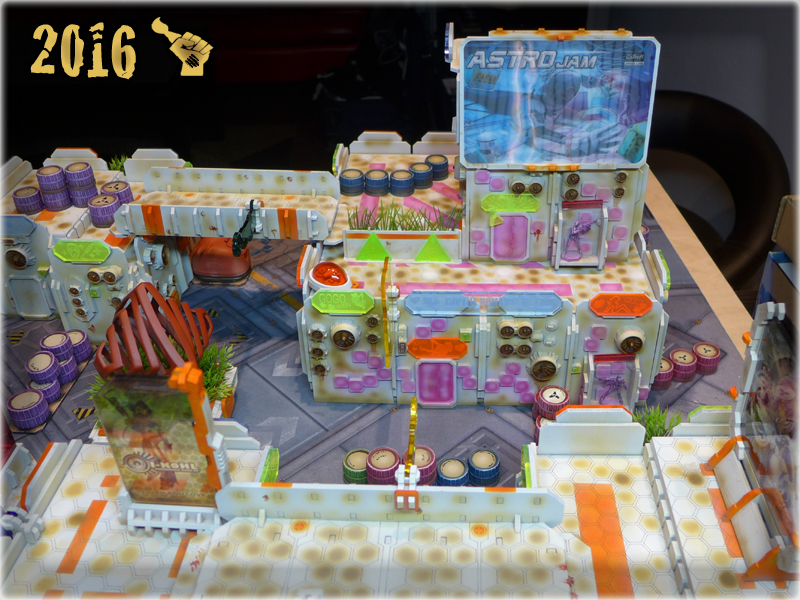
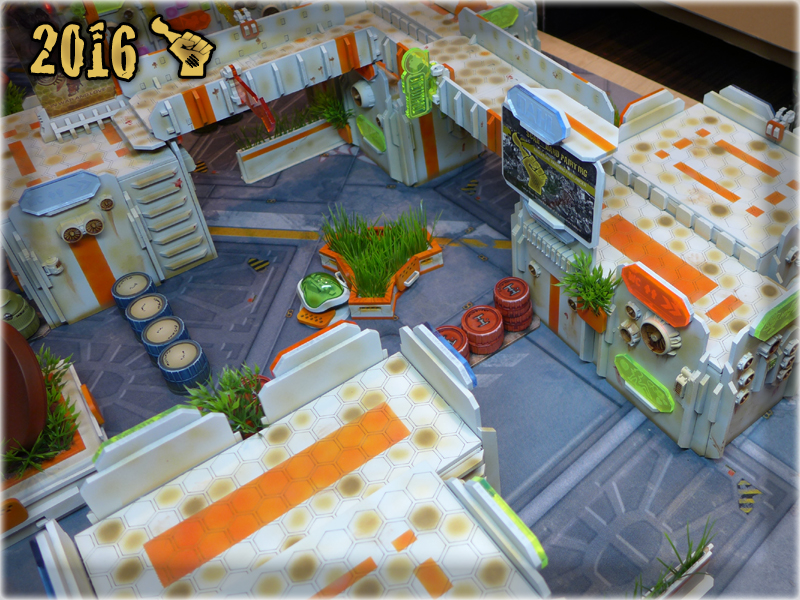
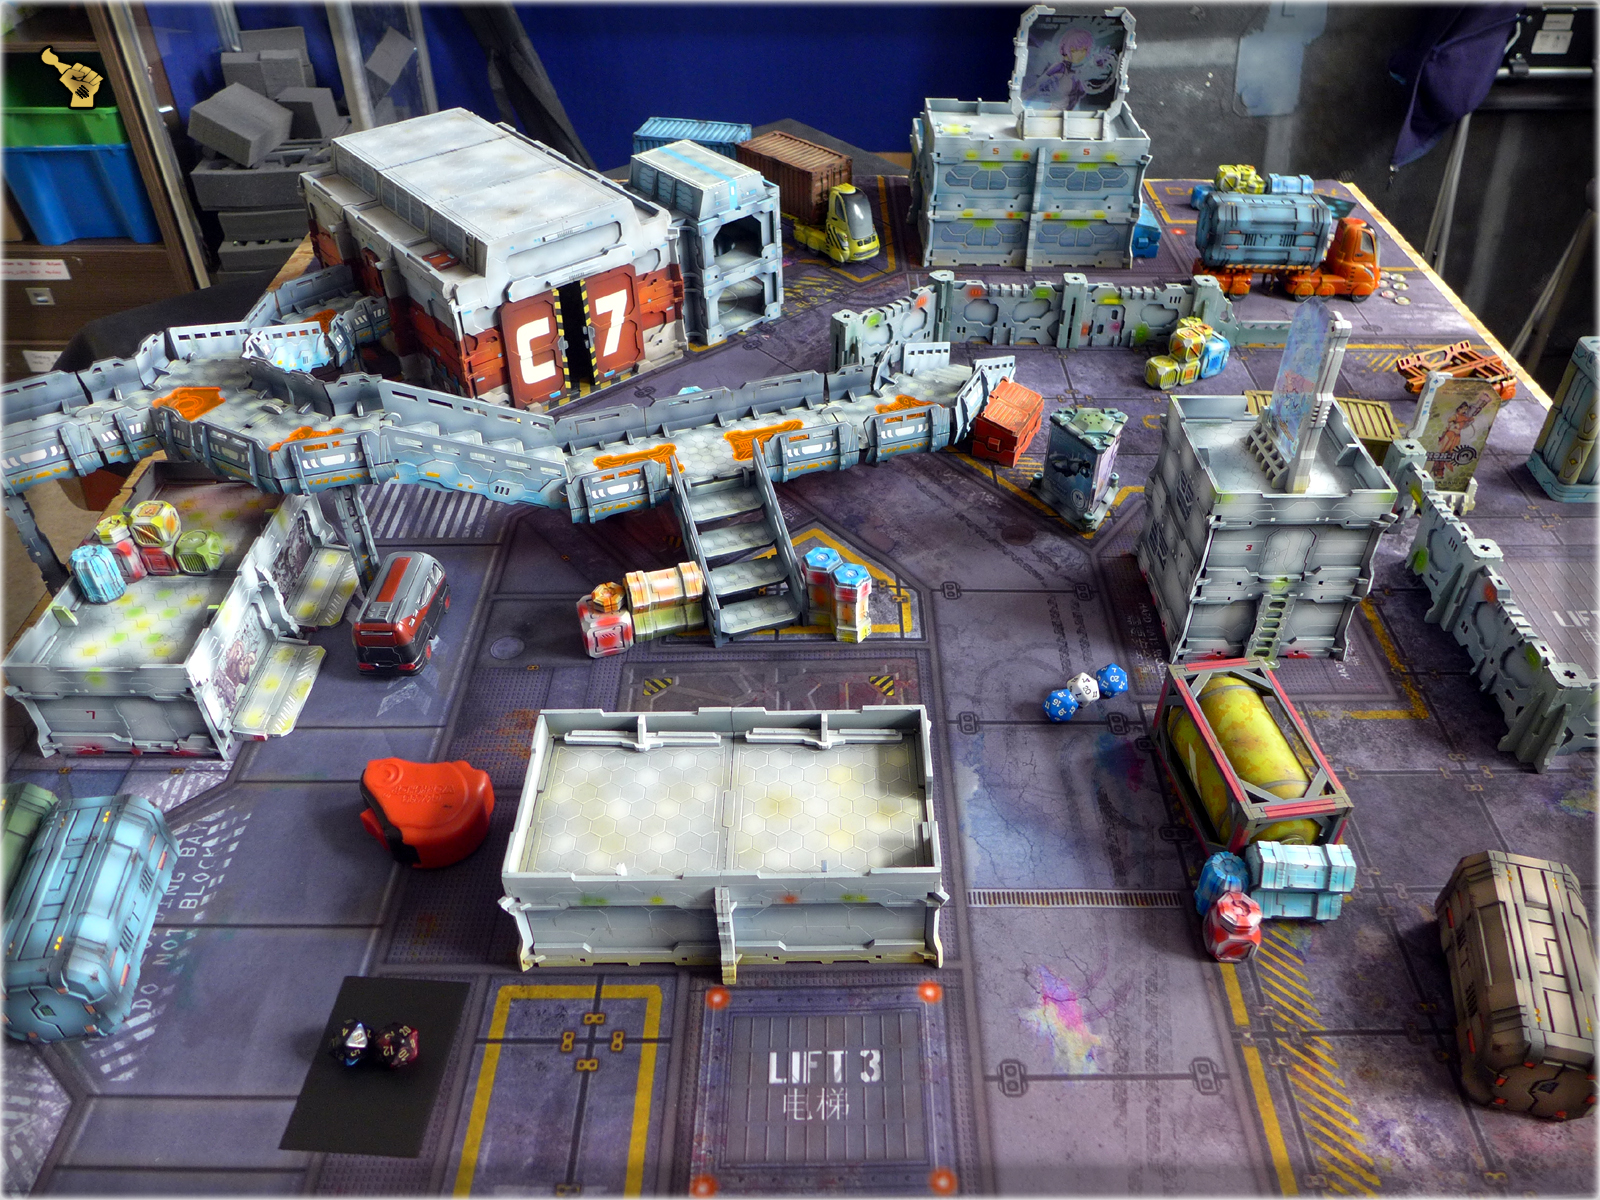
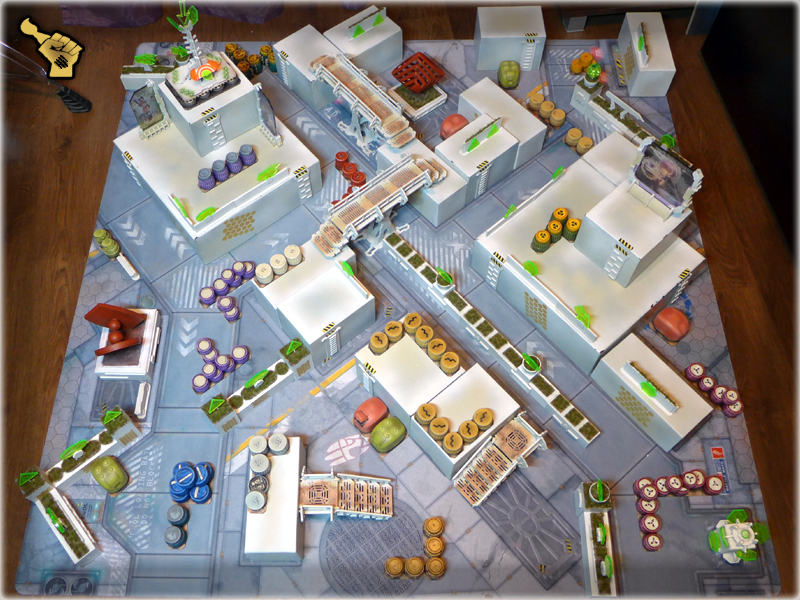
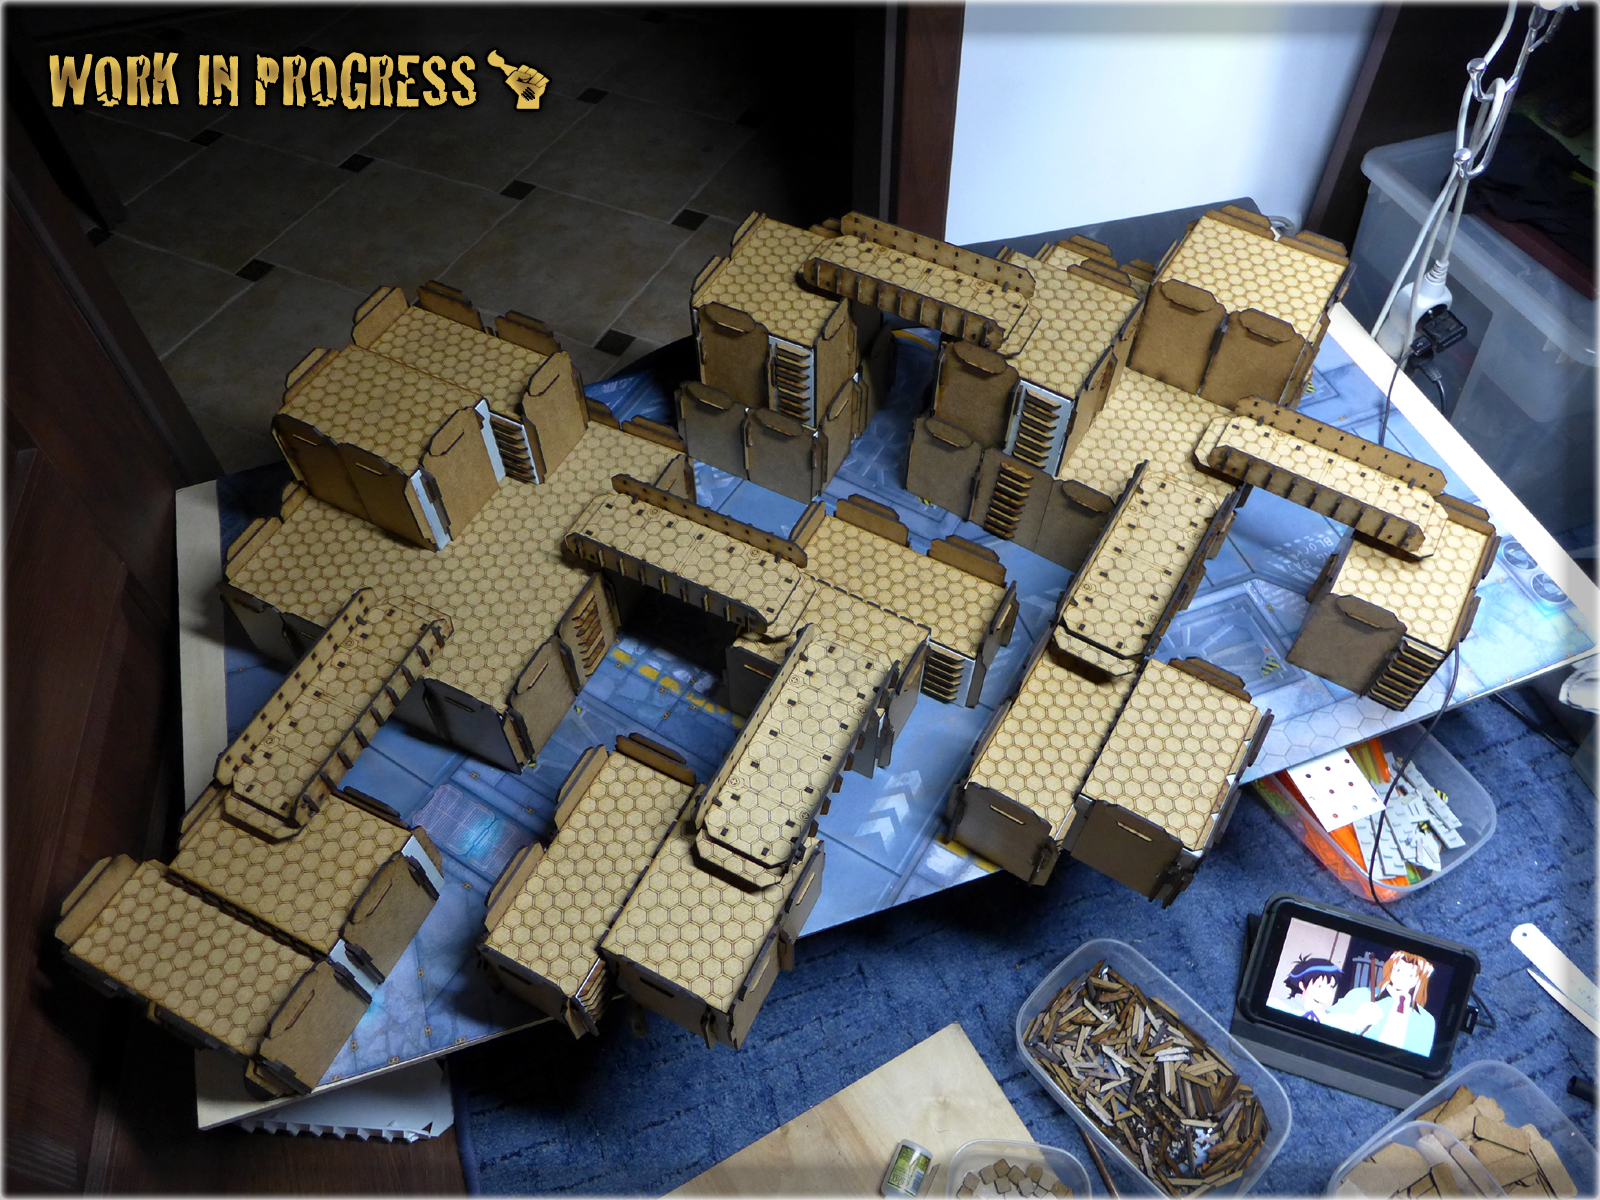
Half a year of waiting, two months of working and four days of painting have finally seen “THE COLONY” SPECIAL PROJECT finished. Last week, after adding some final detail which you can check out in “The Colony” Special Project part FOUR and FIVE, I was engaged with painting all the terrain. It was a hell of a hard work, as the enormity of surface being painted overwhelmed me to a point where I slept around three to four hours each day, woke up to paint, made a break, then got back to painting etc. Still, my work has paid off – as right now my gaming table for Infinity is complete!
Or so I have thought till the moment of taking first pictures came by. Not only the ‘GO GO NOMADS!’ night club looked like if painted by a three-years old, (Which my beloved GF announced just as soon as she layed eyes on my masterpiece…) but also some key colour wheel synergies were missing. Here and there I overkilled colours or just made plain mistakes. Couple of improovements had to be done ASAP, as otherwise I’ve risked my mind being overheated with self-directed anger. So I’ve started working on things that triggered my self-loathing, eliminating them one at a time.
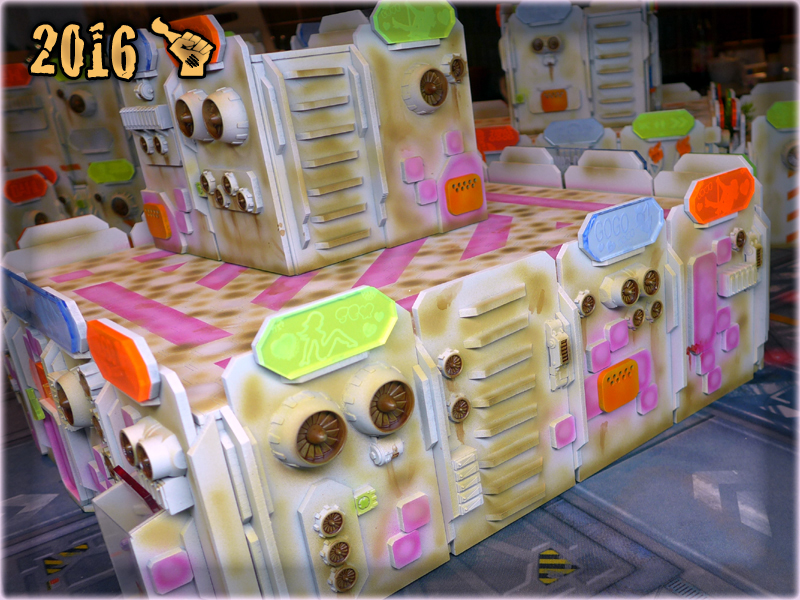
‘GO GO NOMADS! Night Club’ was the first one to undergo a small redesign. I’ve dimmed the pink, and ‘browns’, adding much more white to consolidate colour scheme and black to set a strong, but natural contrast. This change did the trick of dimming the effect of “child’s dream”… It’s still ugly as fuck, but my concious is clear – it was planned from the beginning to make this one into a nice easter egg.
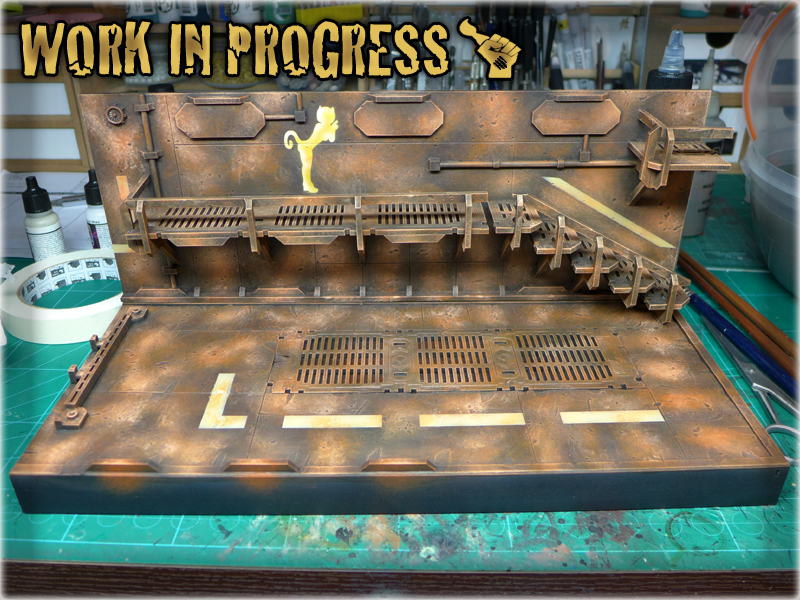
Next thing to add was “detail” as my buildings clearly lacked it. The simplest way to do it was to use some already existing, tiny wall features, paint them using a variety of colour and also add more plexi-glass holos.
In the end I also harmonized the main colour scheme by adding much more green. I used aquarium plants and some MDF leftovers for this. Green plants broke the flat colour scheme of the walls, and complemented the overall colour scheme – now all the Holos were once again moved to the visual background.

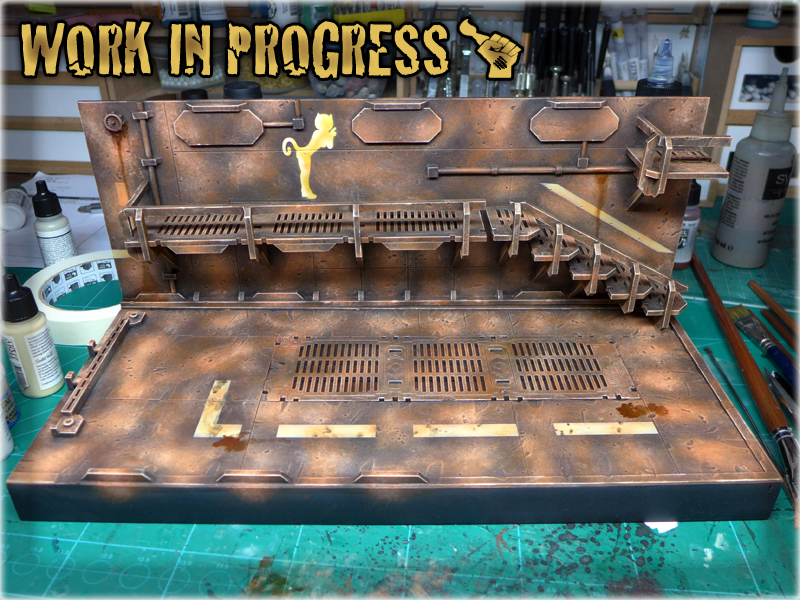
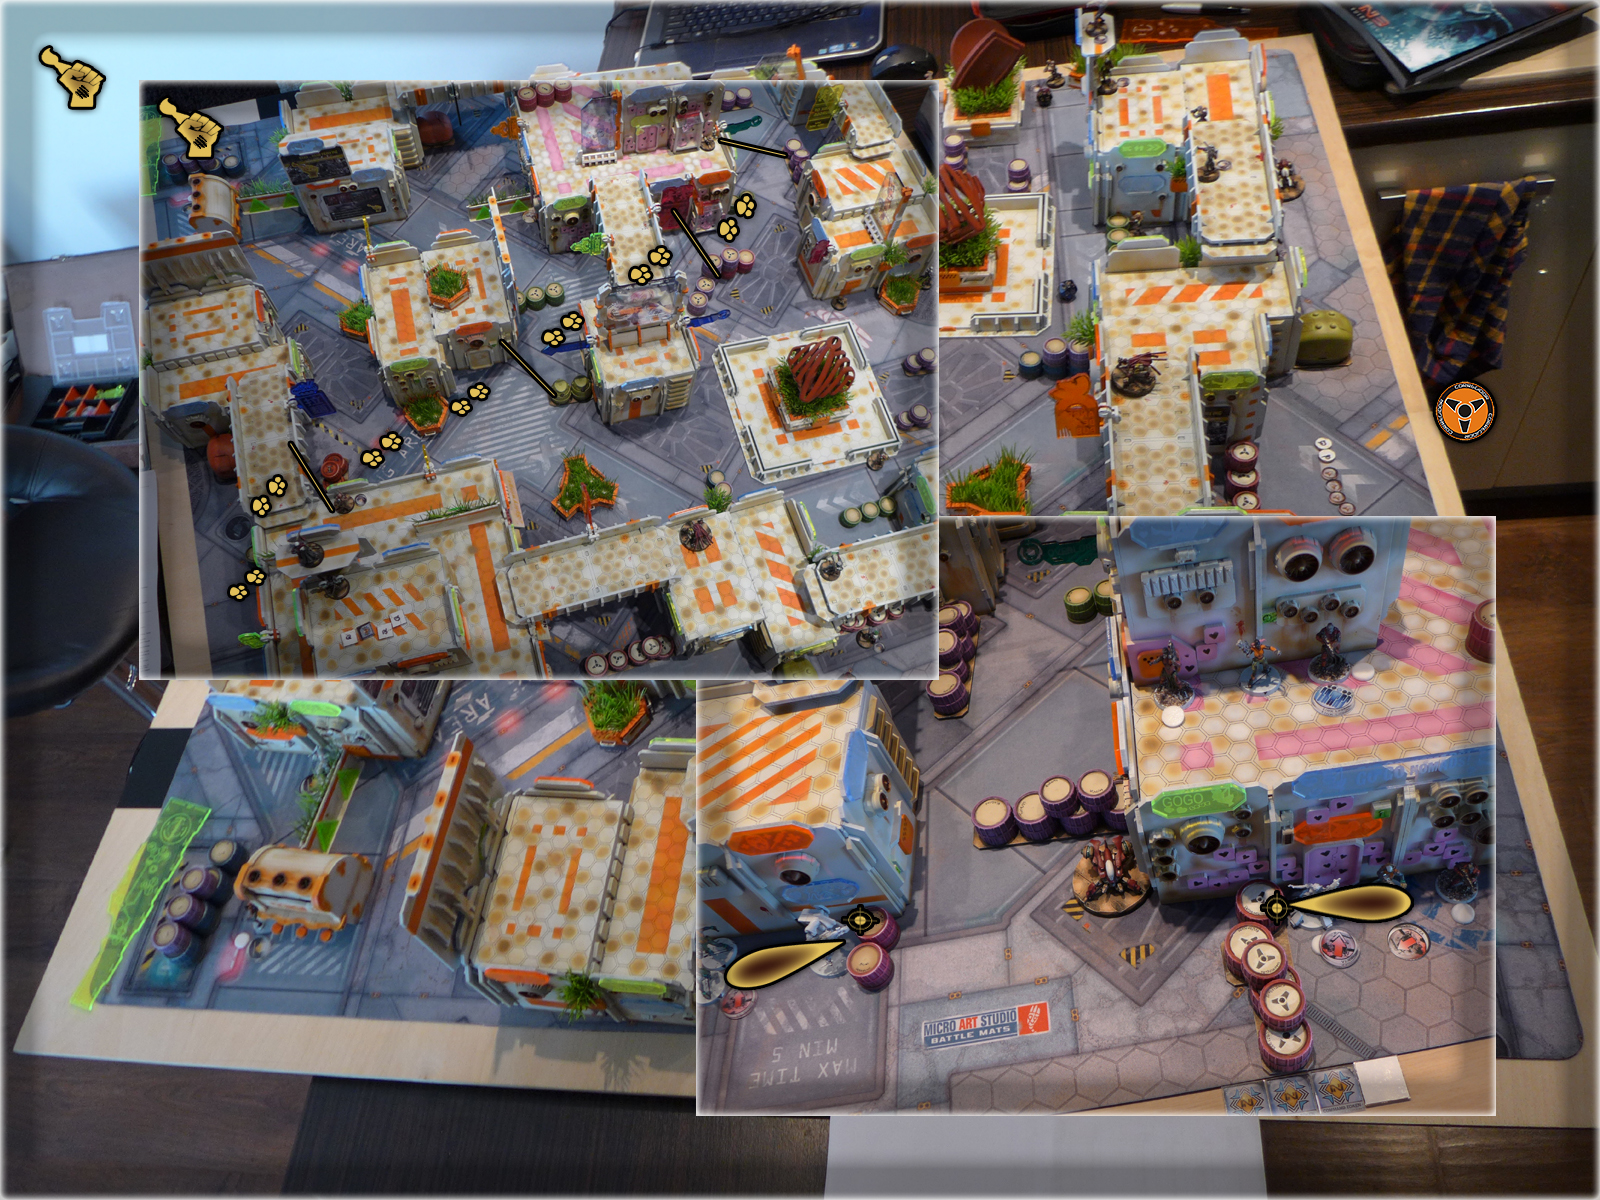
Inbetween all these changes and upgrades, I was able to made a short photo session. You can view the entire GALLERY HERE, while below is a small sample:

Also as a bonus – I’ve already played one battle on the table – taking some in-game pictures and preparing a short video about how terrain was set up for it.


Is this the end of The Colony? Judging by how necessity is the mother of invention I think that we will see some more of The Colony in the future. Especially with such kind of things around… just be sure to visit this site from time to time 😉
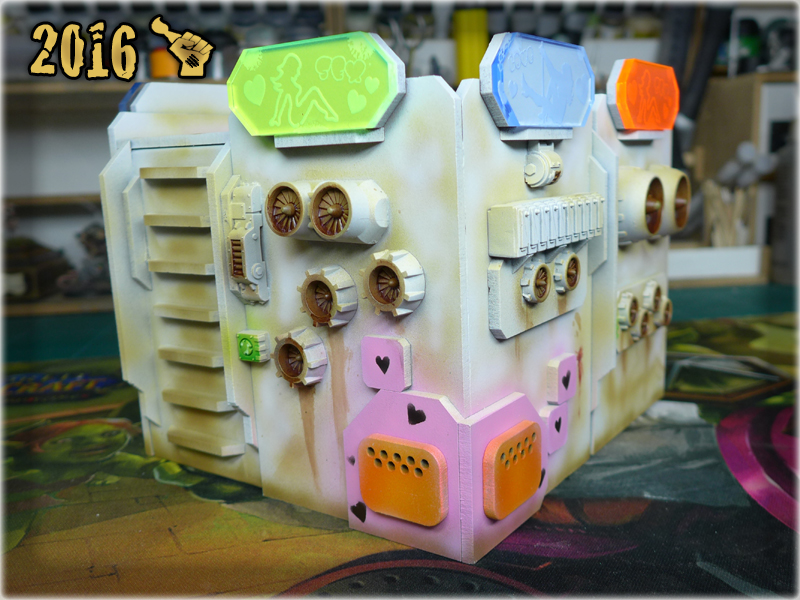
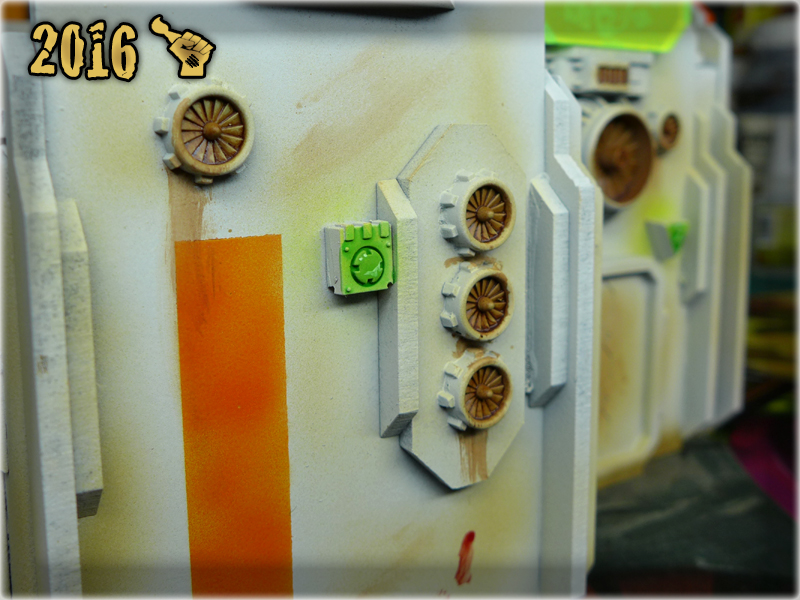
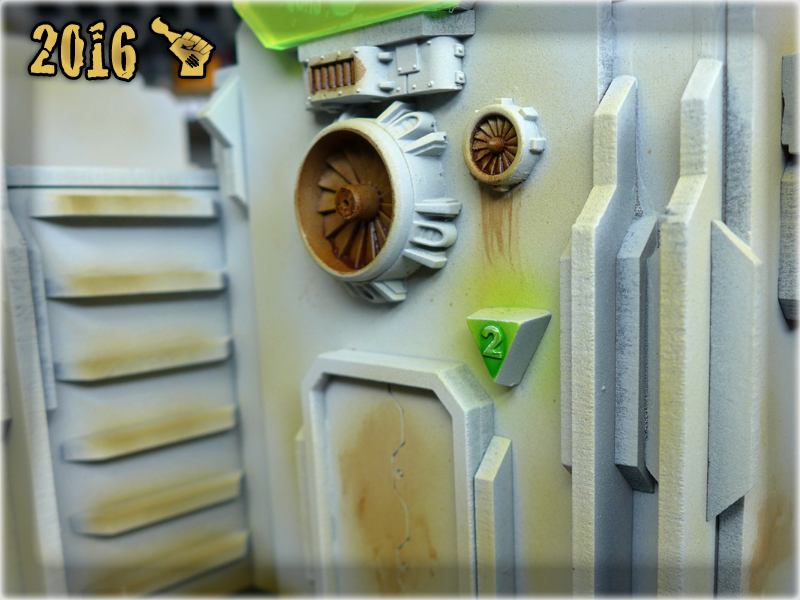
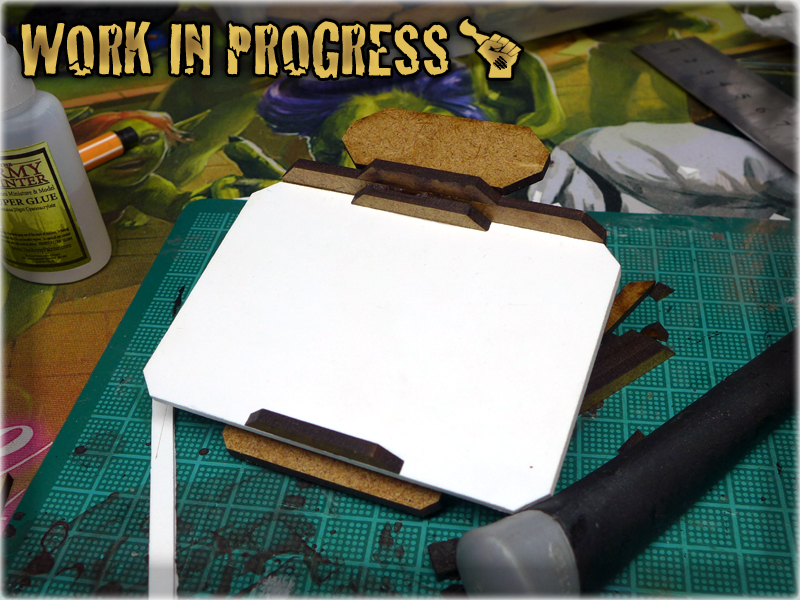
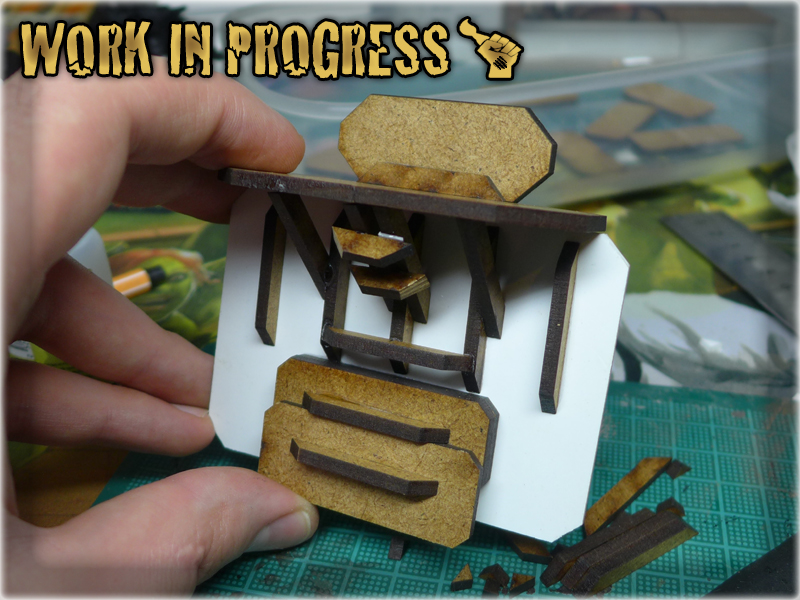
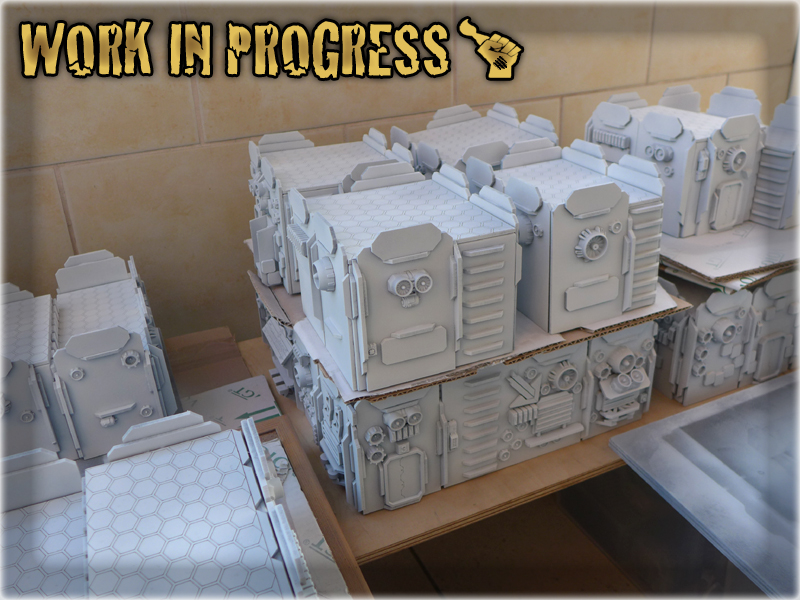
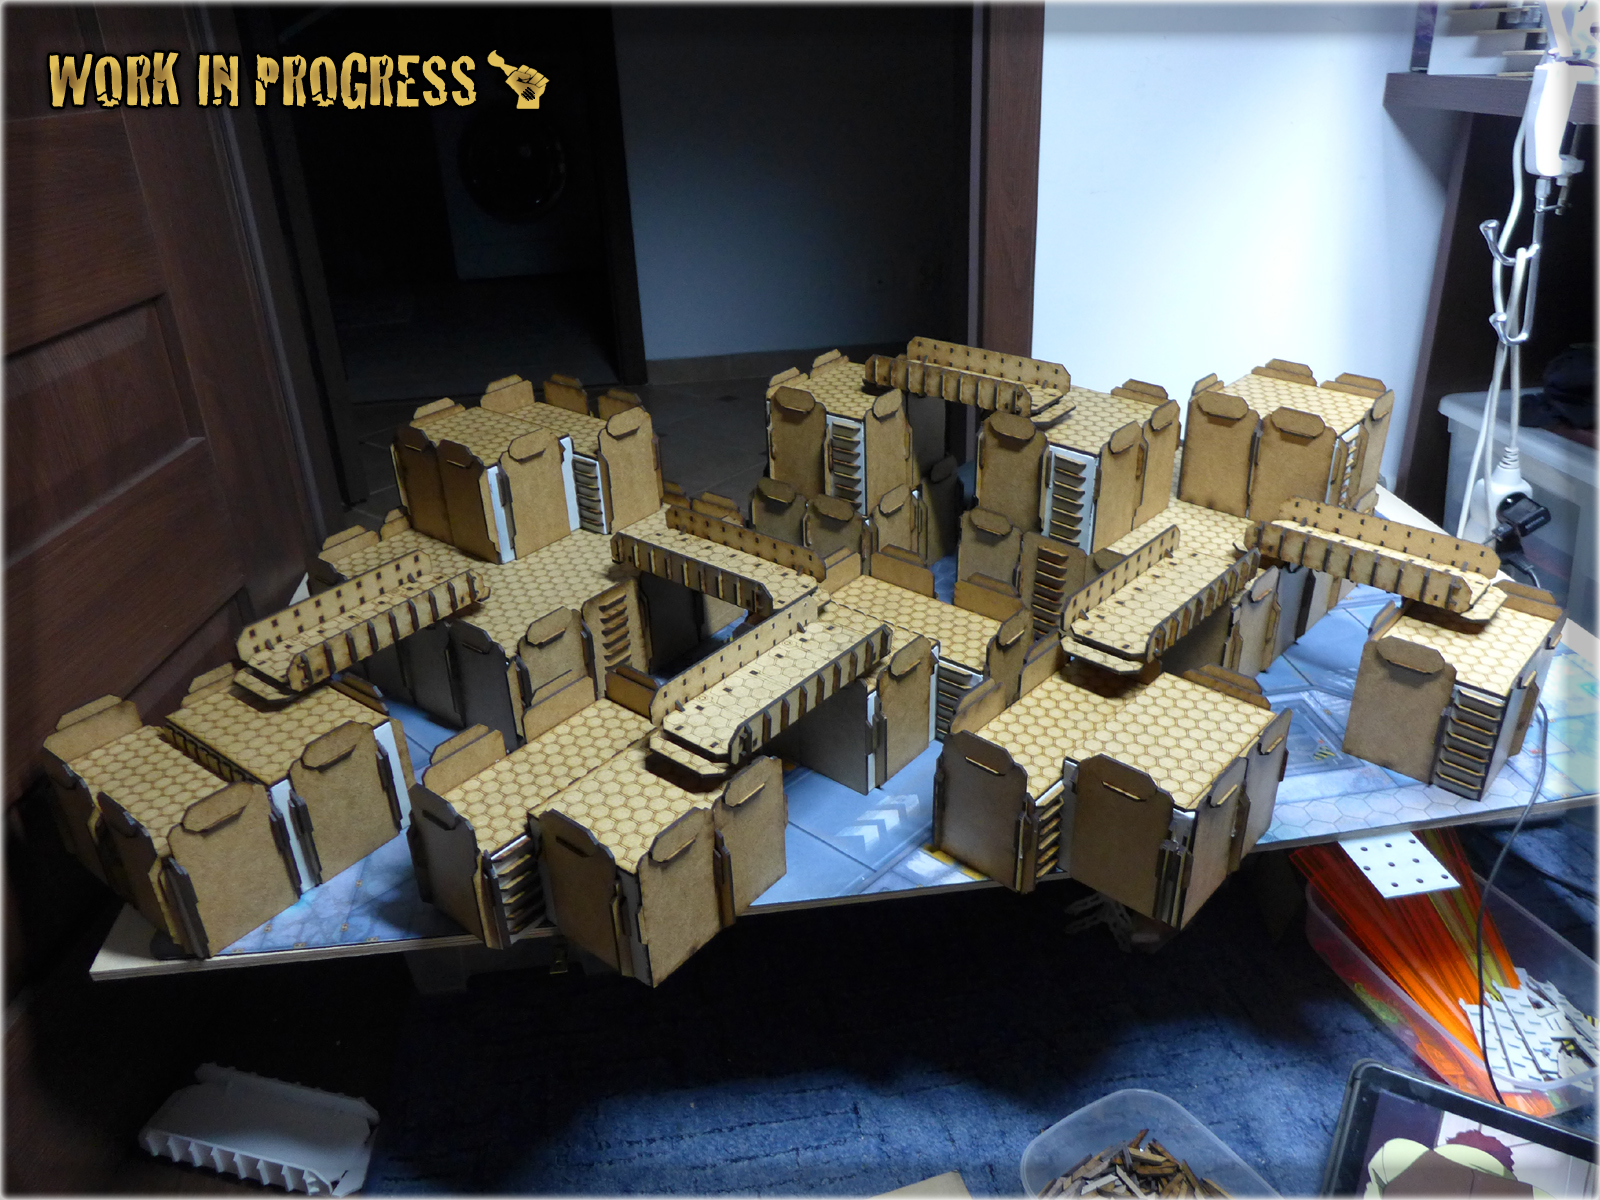
The story of “The Colony” Special Project is closing to an end. In FOUR’th part of this article I’ve started to add detail to all my buildings. The quantity of vents and additional stuff was so enormous, that I had to support with a help of a friend, to prepare all of them – still it took more than a week to complete. Once vents were in place I started to paint all the buildings, which was a challenge in it’s own way. I never imagined that painting buildings can be so exhausting and so many mistakes can be made during such a (should be) easy and relaxating task. Still – I was confronted with the ‘unexpected’ and had to improvise more than couple of times…
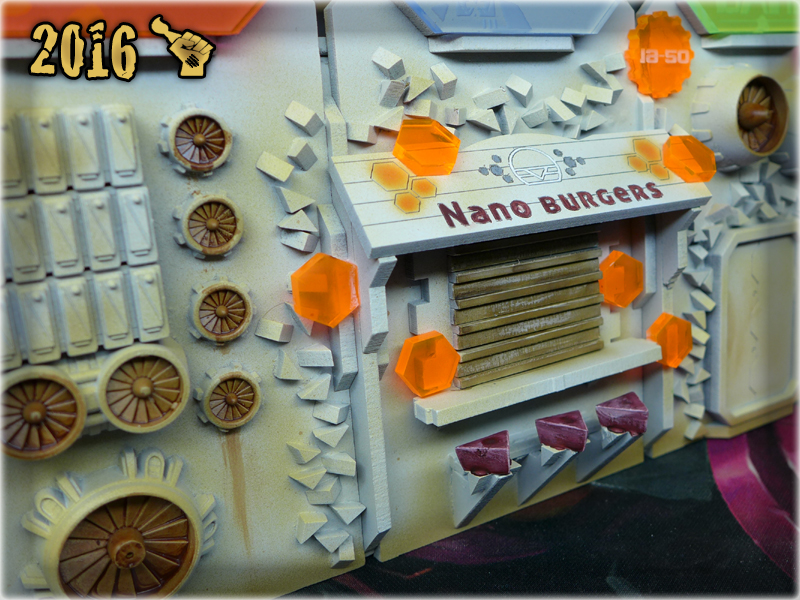
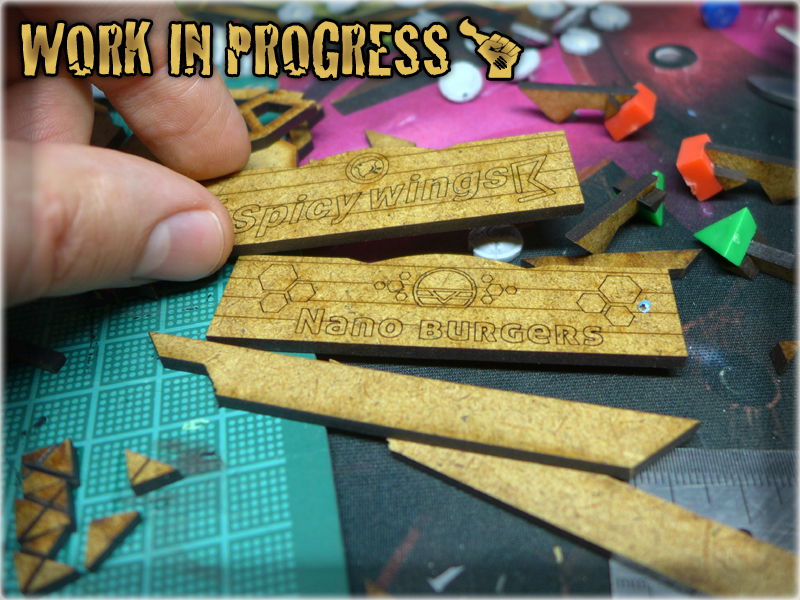
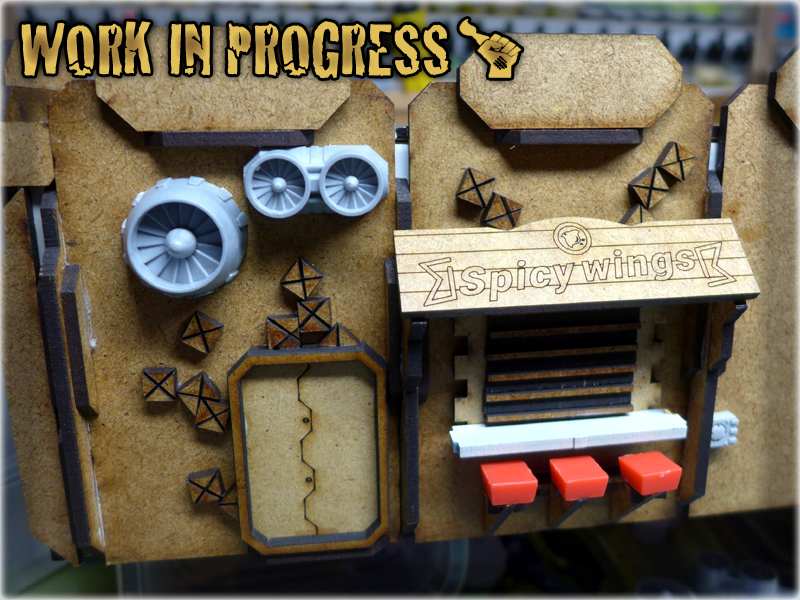
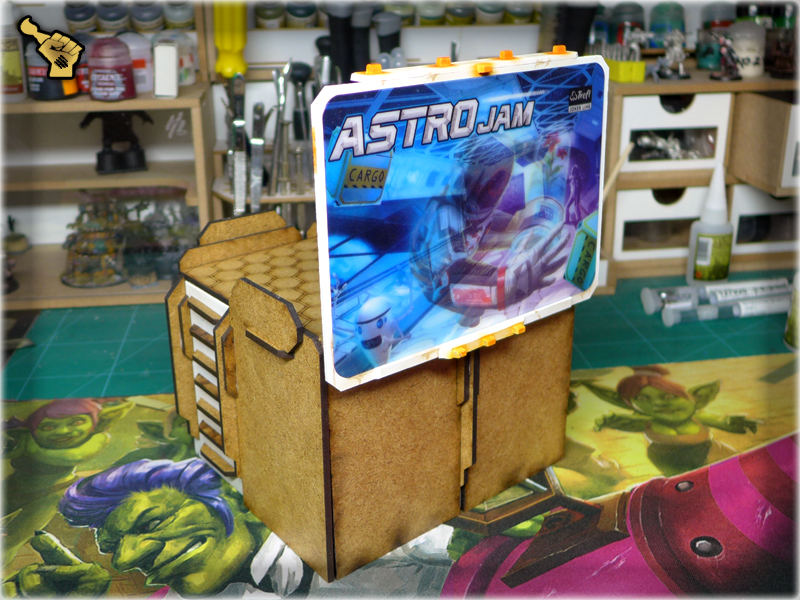
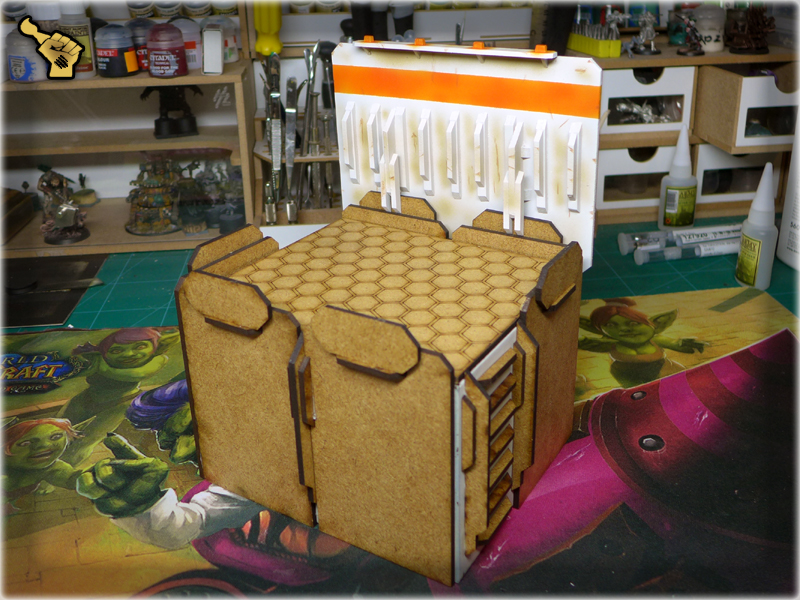
Before we proceed to actual ‘painting stuff’ it is vital for me to continue where I’ve finished “The Colony” Special Project part FOUR. I’ve introduced you to ‘Astro-Gastro Center’, which was one of my table’s centerpieces. A single picture is not enough to show the number of detailed food boths added all around the building…
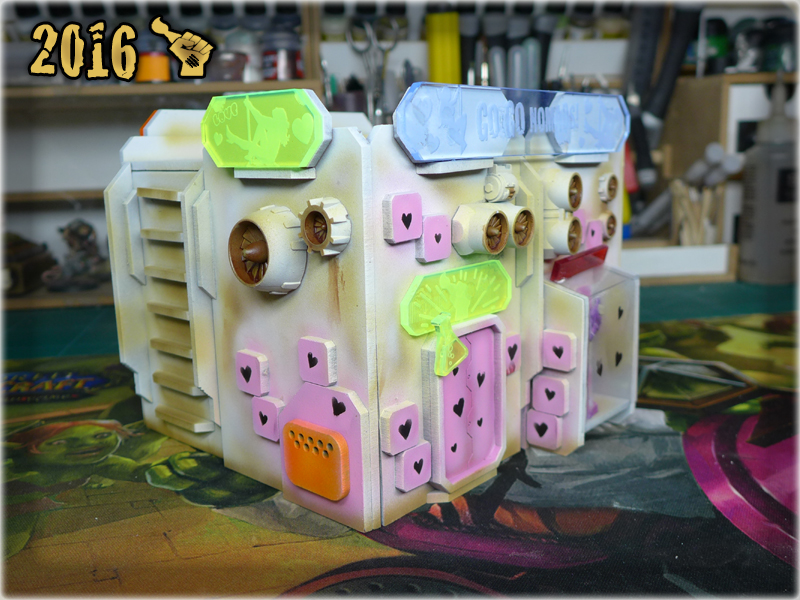
The idea was born out of necessity. After deciding to differentiate both of the ‘big’ buildings – I had to find a nice theme for this one. I had a lot of trash and leftovers from purchased terrain sets. I was also supported with couple rare pieces (like Zen Terrain’s food both signboards) provided by a friend. I’ve picked the best pieces and decided to build the theme around them, for this building to be at least as special as the ‘GO GO NOMADS’ night club.
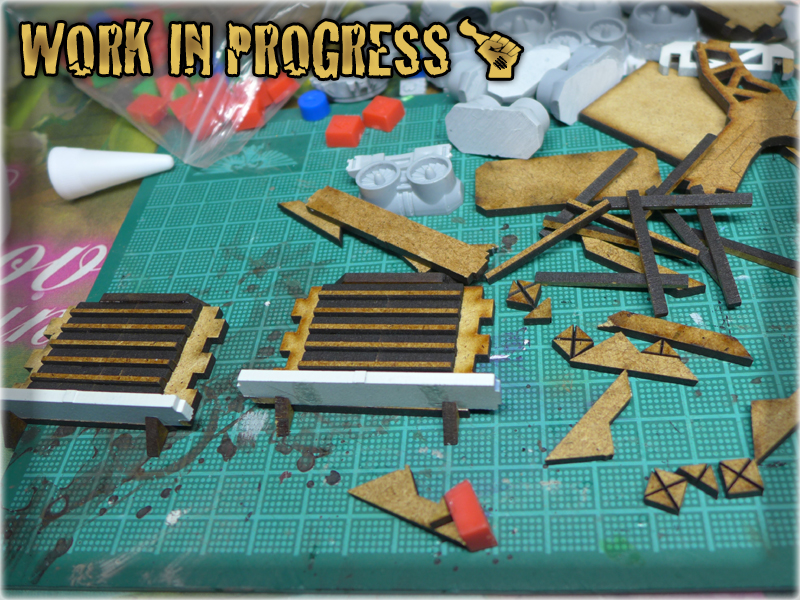
It started with some small adjustements to the building’s walls. Once I had the boths made and in place – I started to add some small elements to try to give each both a special theme.
One day’s work resulted in Astro-Gastro Center being born out of scratch.
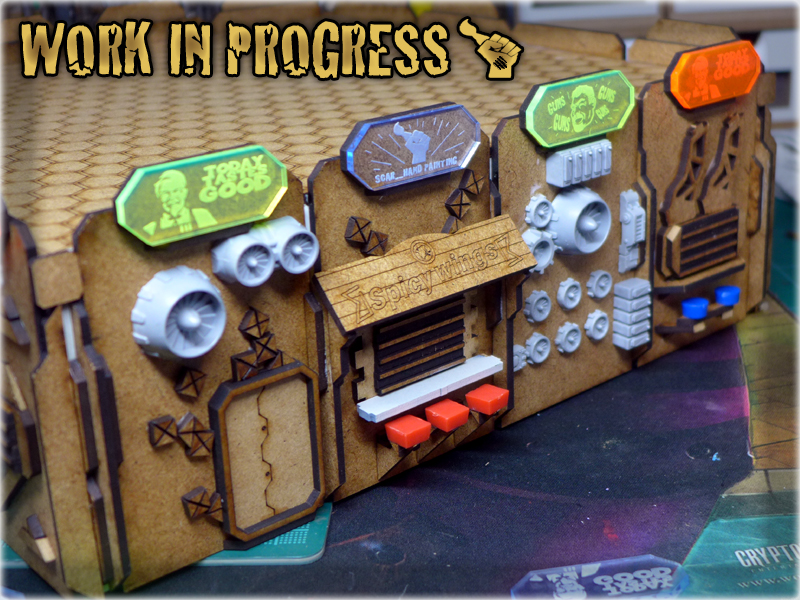
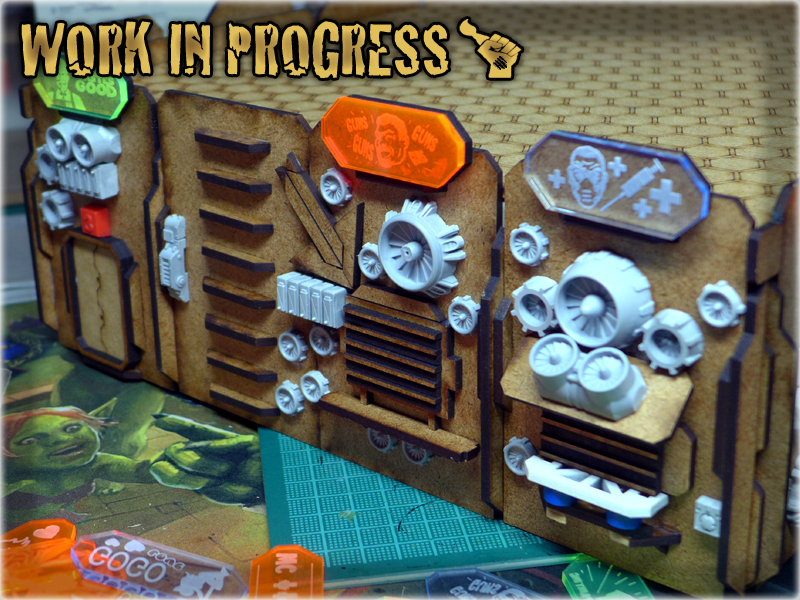
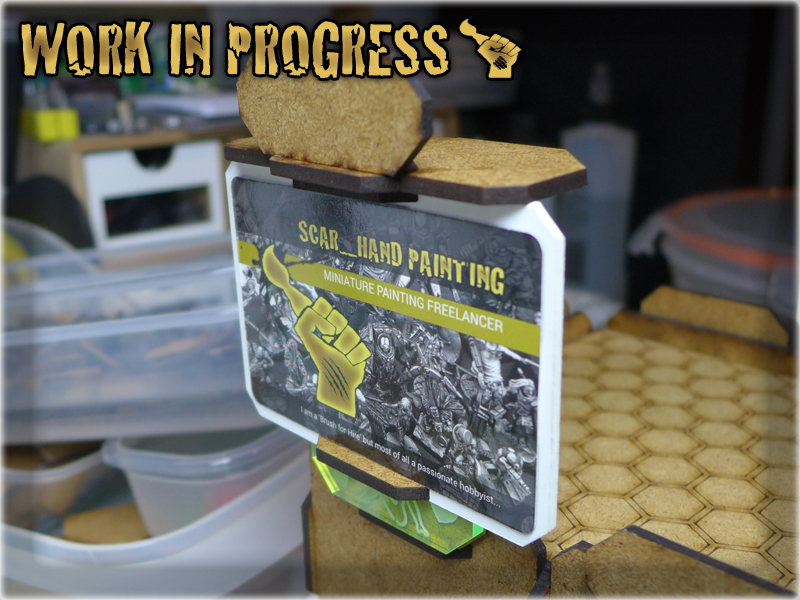
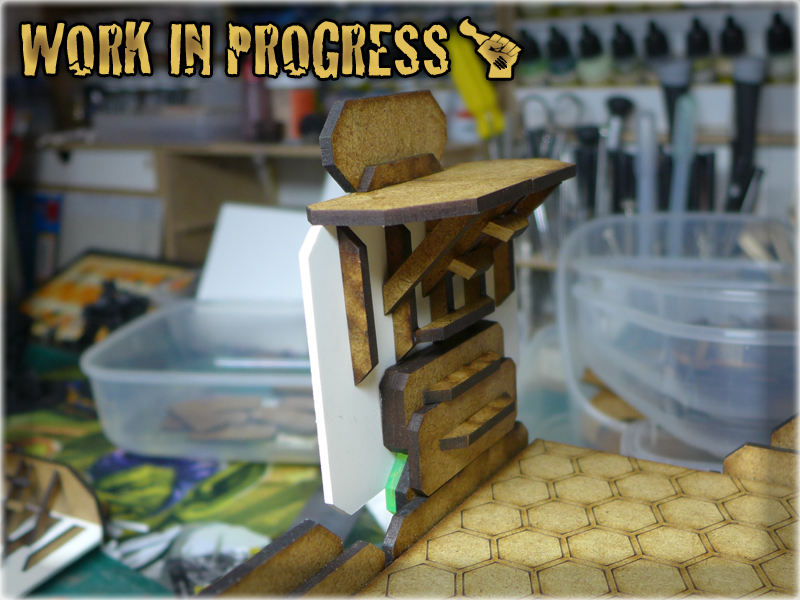
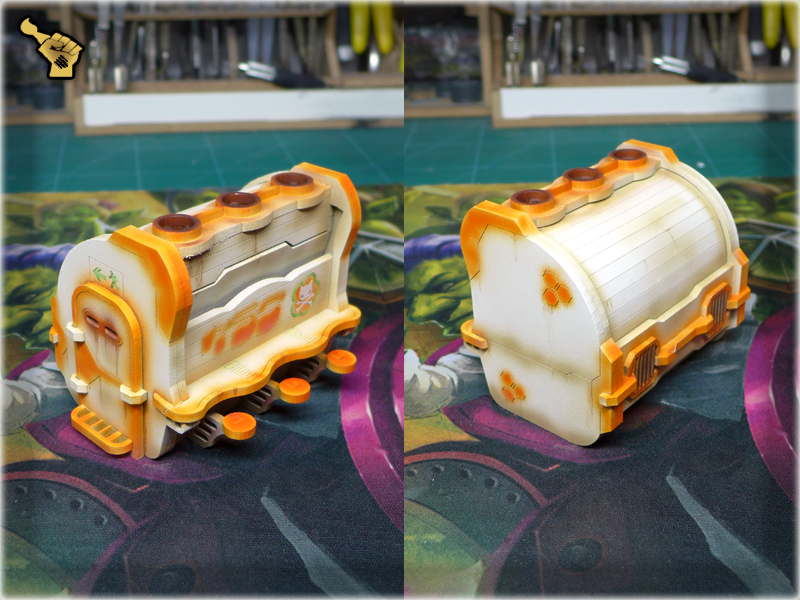
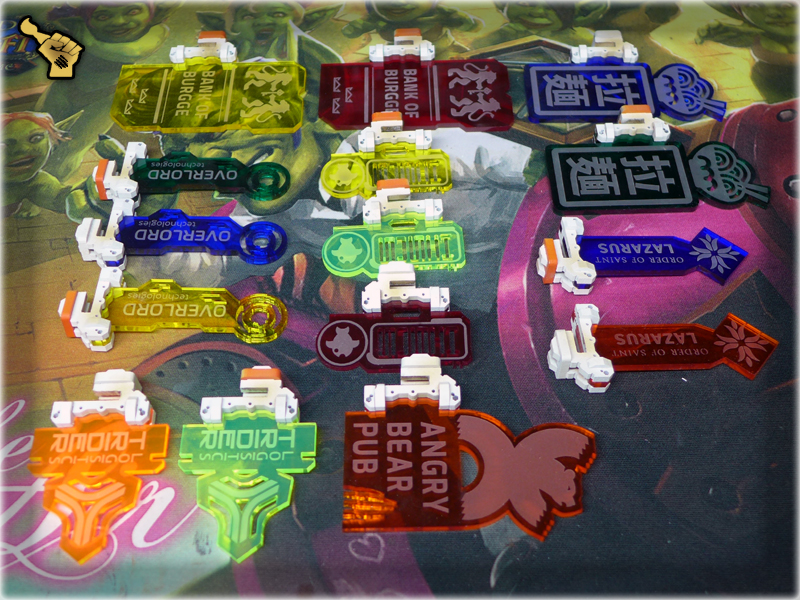
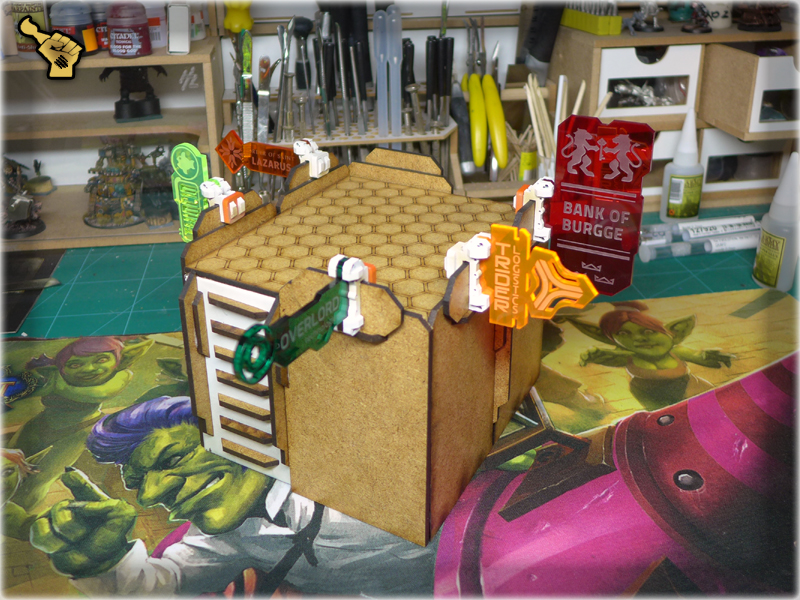
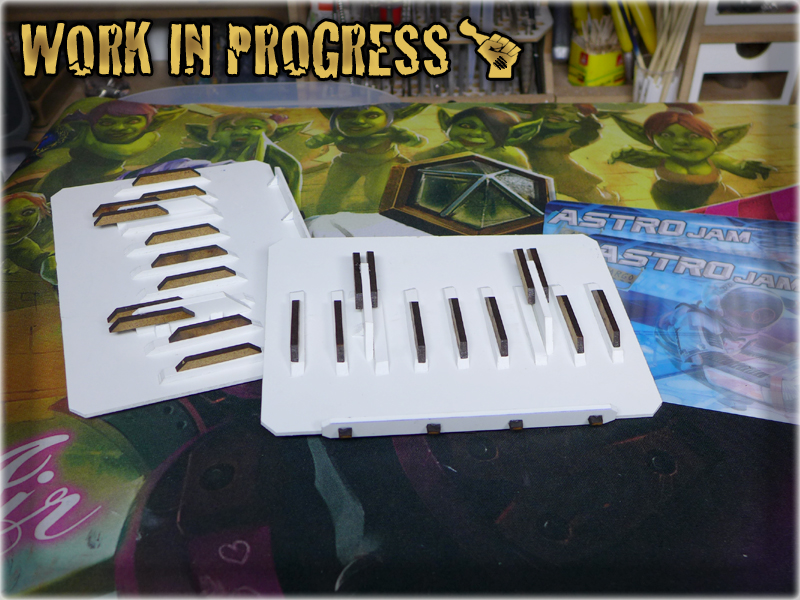
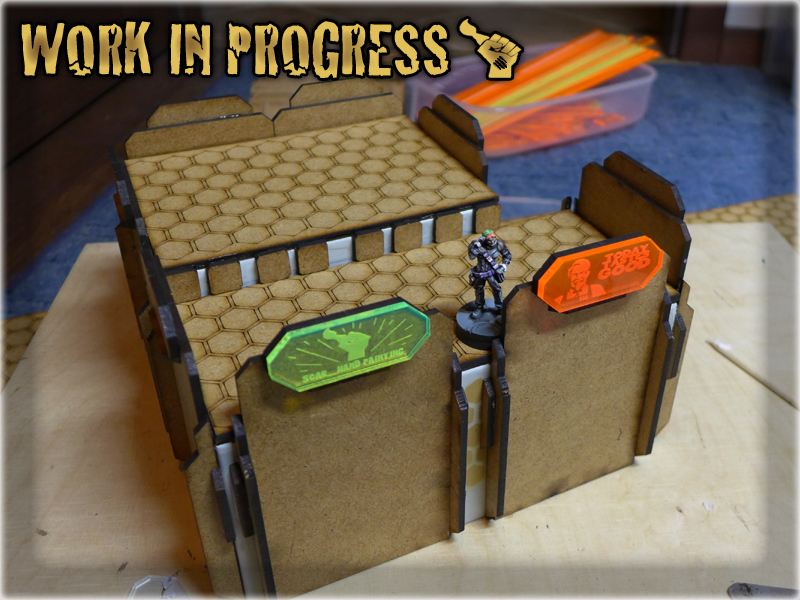
I’ve been already head to toe in building stuff, so I decided not to stop at decorating the buildings, but also work at adding some high placed spots, for snipers, forward obserwers and linked ‘shooty’ troops. Not too much – just enought to raise the area of play – one level up. I used what was left of my MDF pieces, added some Plasticard and prepared these, fully detachable advertisement banners. As a filler I used the only thing that I had around – the Scar_hand Painting bussiness cards 🙂
[I have already played on these – they have a nice impact on gaming style, along with just being useful).
Now I can focus on the actual painting, which started just as it always does – with a proper undercoat. For my colour scheme I require three strong layers of undercoat. It starts with grey, proceeds through either creeme/bone or soft grey and finally get’s whitened with Games Workshop’s Skull White spray. Skull white is vital to the overall looks of this Colour Scheme, as it’s really white and matt. It goes well with MDF terrain, covering all with a nice, strong layer. Whole process of undercoating ate an entire day – with me sitting on a balcony, spraying each individual terrain piece – one after another. Three rounds of undercoating, with my nosdrills clogged, eyes irritated and head on a verge of exploding. At least my neighbors did not protest about the smell…

One day later the regular ‘painting’ started. It took three days of labour with a lot of painting and not much sleep. I used an Airbrush, while a regular brush applying some Fire Hot Orange to keep up with my table’s main theme (Orange + White/Creeme + Greenery). I used a masking tape for this – providing some curious, industrial shapes on the roofs and walls of all buildings. I also used a colour wheel to check out which colour will go well along with orange/green in a tri-colour scheme. The wheel told me that purple-pink should do, so I decided to try it out on ‘GO GO NOMADS!” night club. (which I actually regret by now as while ‘solo’ the building looks just ugly as fuck :P).
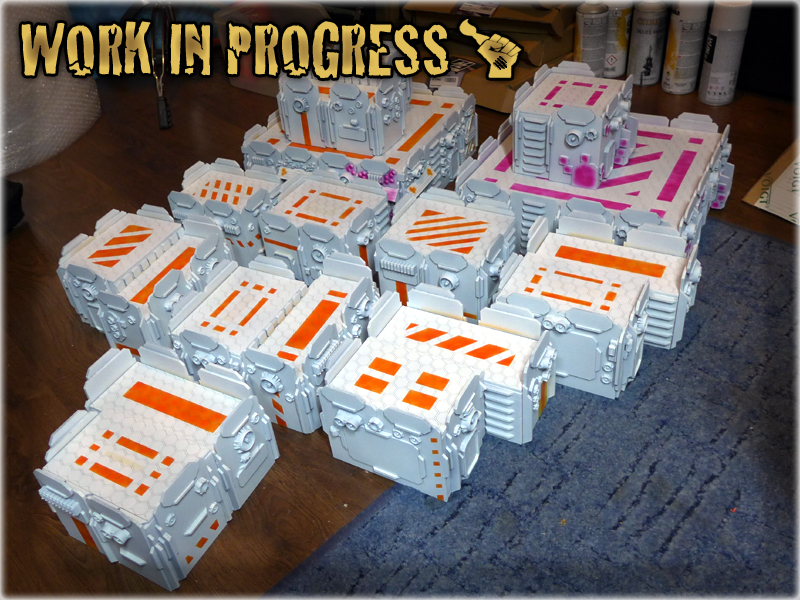
Another ‘layer’ was composed of sandy yellow and soft brown. I applied them both in certain hexes along the roofs and in much smaller quantity over the walls.
Finally added some blood splatters and grease, which sounds pretty easy if not taking their enormous quantity and dimensions of the buildings I had to work with.
I also added some soft points od dust and dirt along with smudges here and there. Then decided to fill all vents with dark brown/rust Vallejo effect and add more smudges – comming out of them.
My work is finally done and I have mixed feelings about the end result. While the entirety of “The Colony” presents itself great – particular buldings require some additional work. Especially the infamous “GO GO NOMADS!” night club is one to build up my concerns – will surely make some corrects and keep working on it in the days to come. A proper gallery is under construction but now I can provide you with this small sample of how “The Colony” looks like.
See you in “The Colony” Special Project part SIX next week 😉

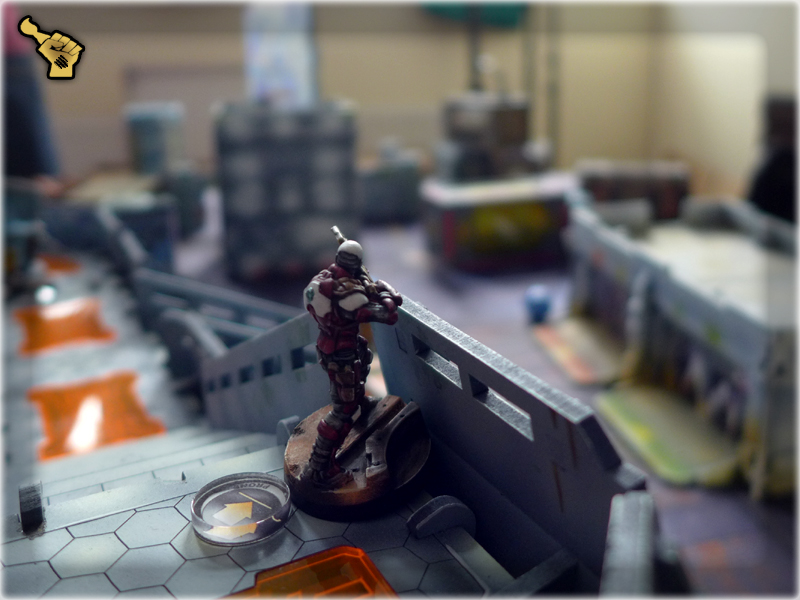
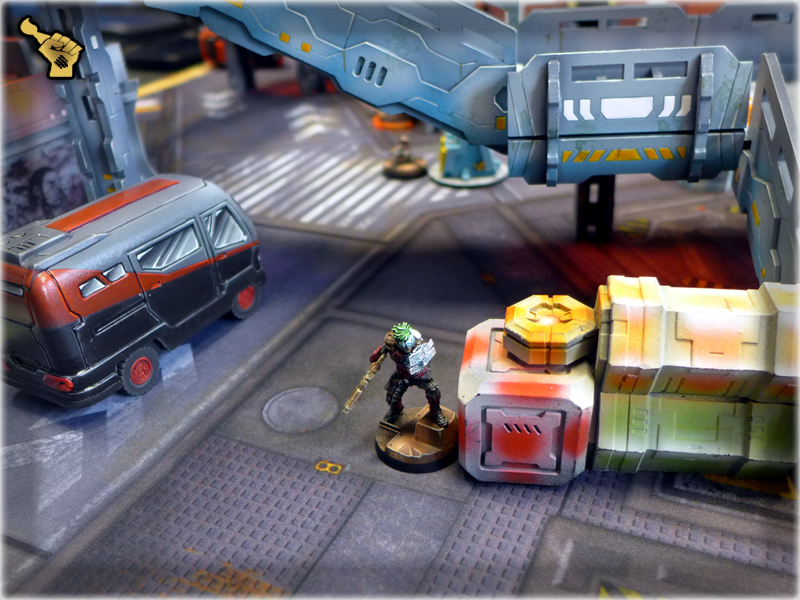
I’m back with another Infinity Battle Report! Such articles are uncommon here, cause this is clearly a site about painting miniatures – still what would painting mean if not for gaming in the end?
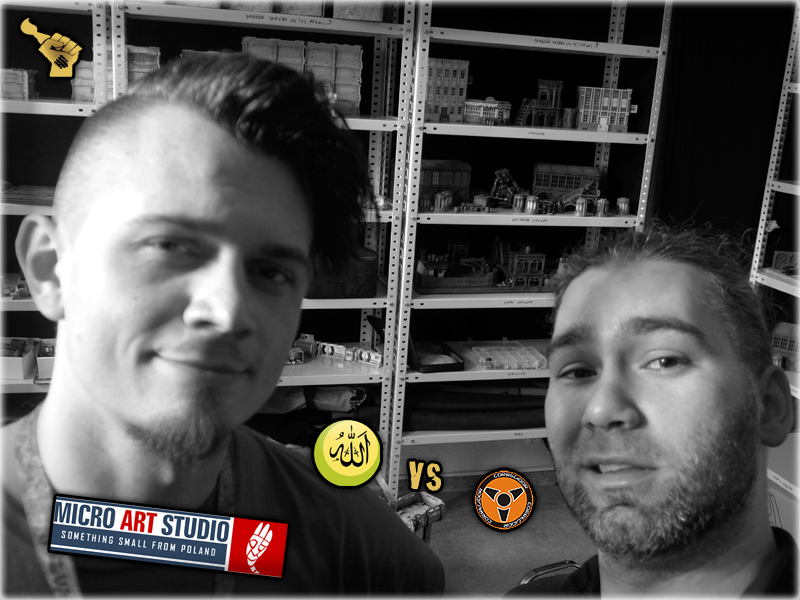
I went on a short vacation, on a trip to 3city (Gdańsk, Gdynia and Sopot – all located over the Baltic Sea, up notrh from Toruń, where I currently live). As it happened – I took my miniatures with me and used free time to game some Infinity. One of my ventures took me to Micro Art Studio’s headquarters, where i visited my friends. I was given a chance to play one game against Micro Art Studio, represented by Jan Horydowiec aka ‘Jezus’. For the sole purpose of this game, a splendid gaming table was prepared, with use of all the cool stuff made by Micro Art Studio and presented at Kickstarter, early this year! Well, ain’t I lucky?!
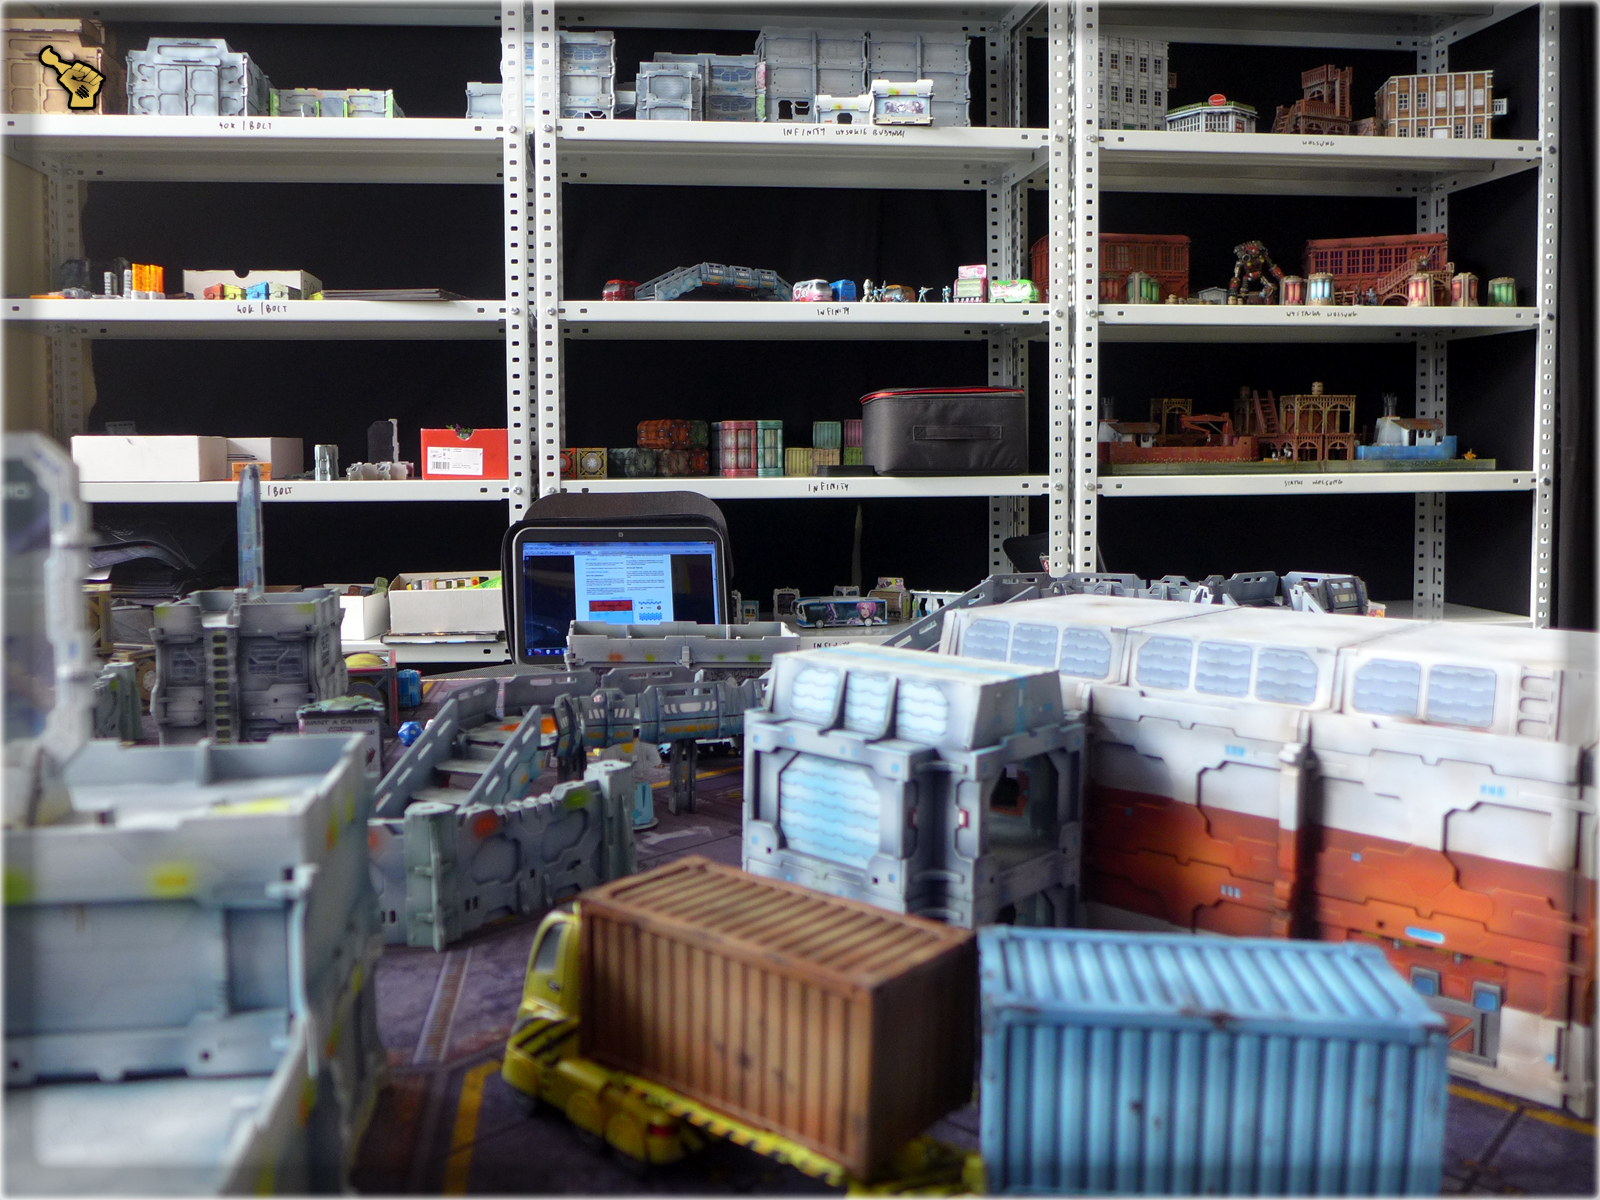
When I was taken to the MAS’s Gaming Room – I was awed. So many fantastic terrain pieces. Almost one half of the walls was covered with shelves from top to botom, and each shelf was filled with masterpieces. The table itself looked just amazing and I was shocked to see how superior these terrain pieces really were. Kickstarter does bearly cover the amount of AWESOME that I myself have witnessed.
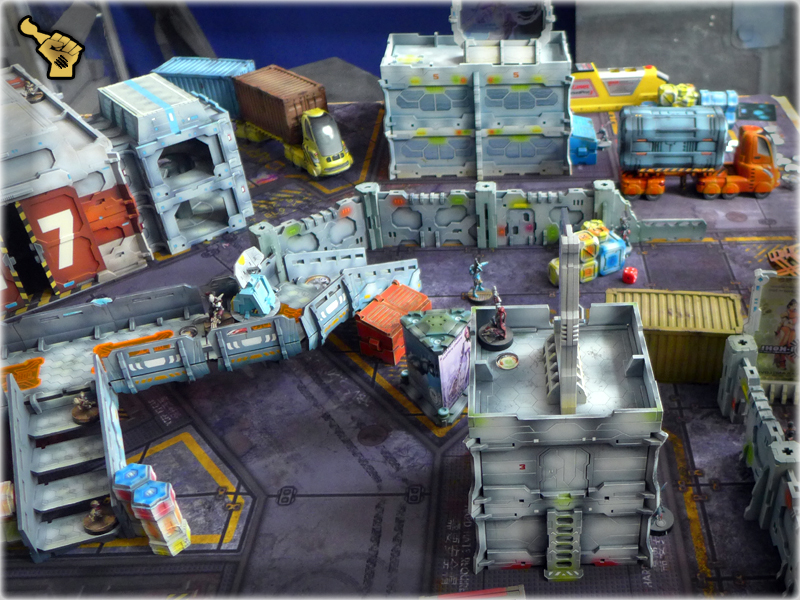
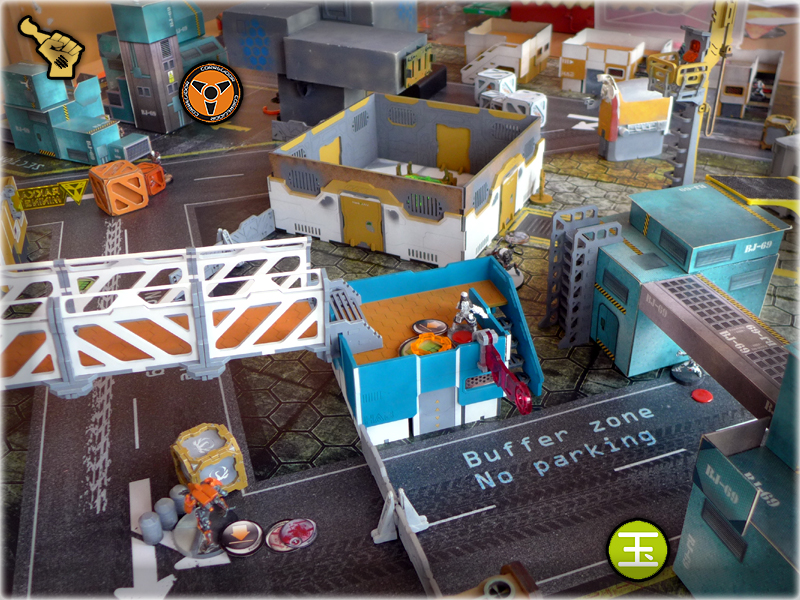
LOCATION: Zhurong Power Plant, Flamia Island
SCENARIO: ARMIES: Seize the Antennas
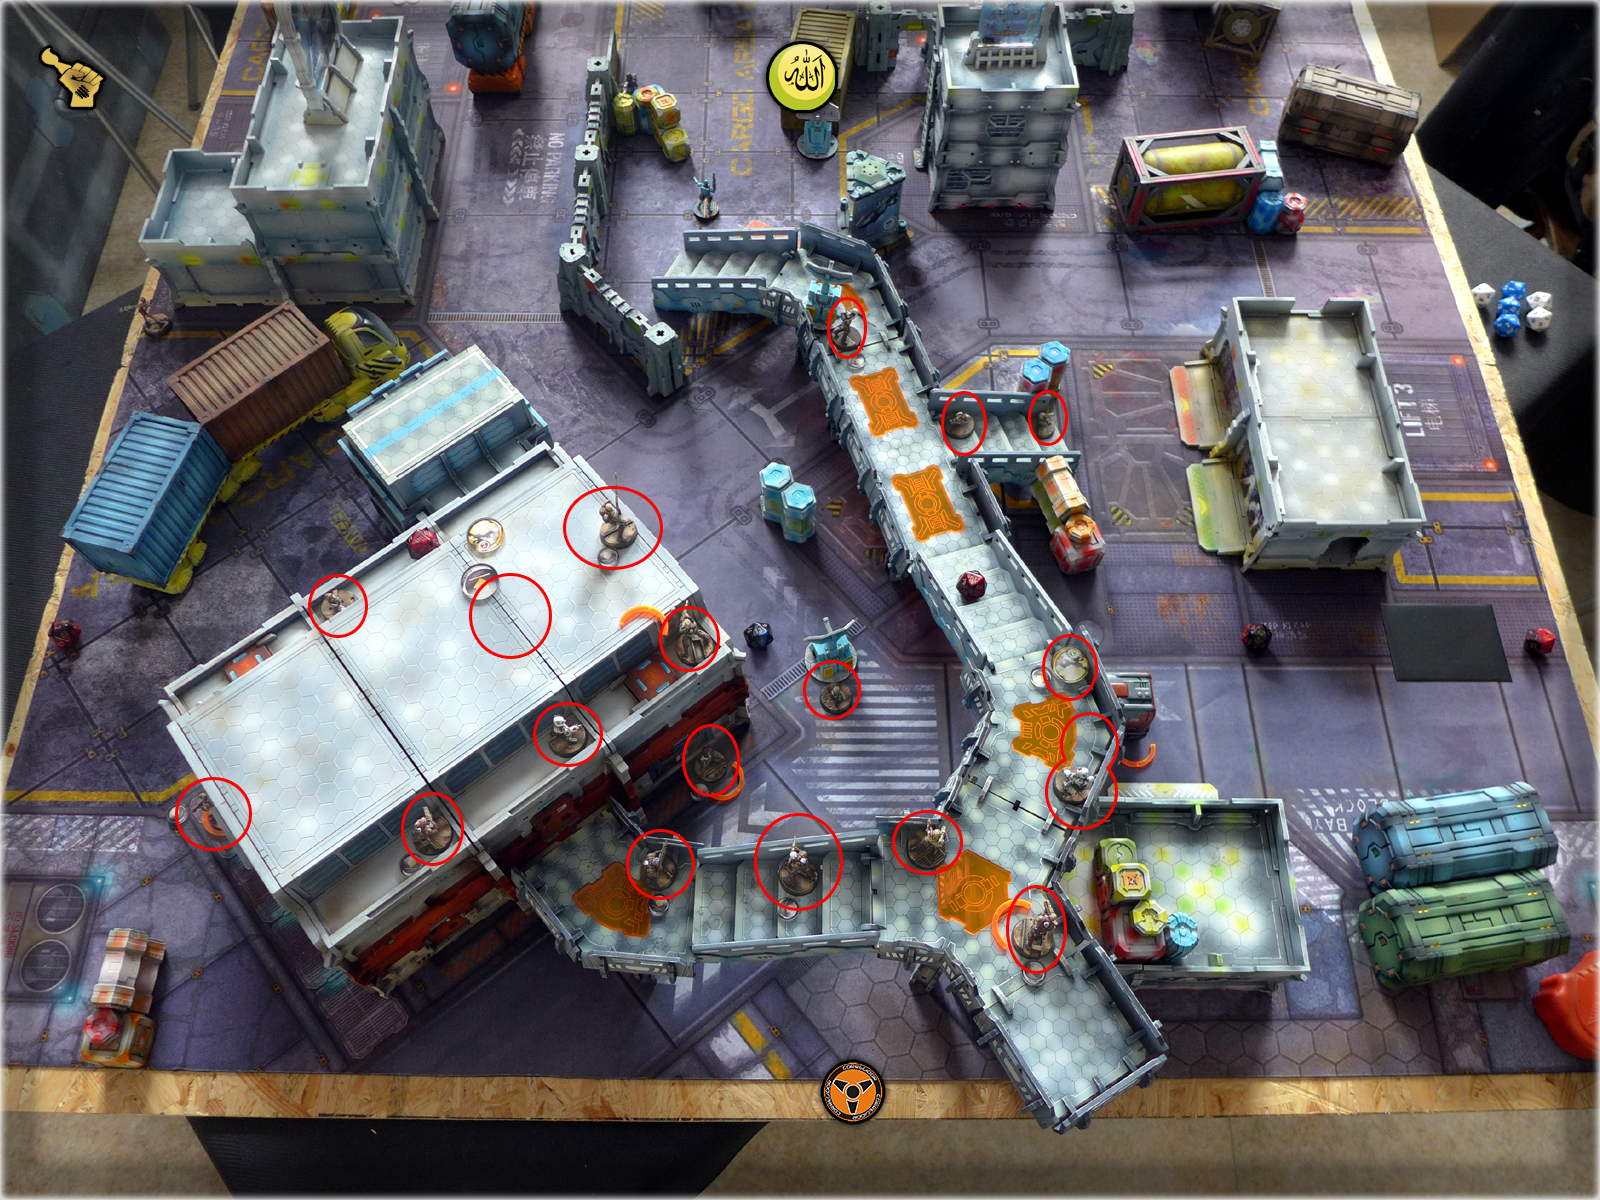
ARMIES: Nazroth, Corregidor vs Jezus, Qapu Khalqi
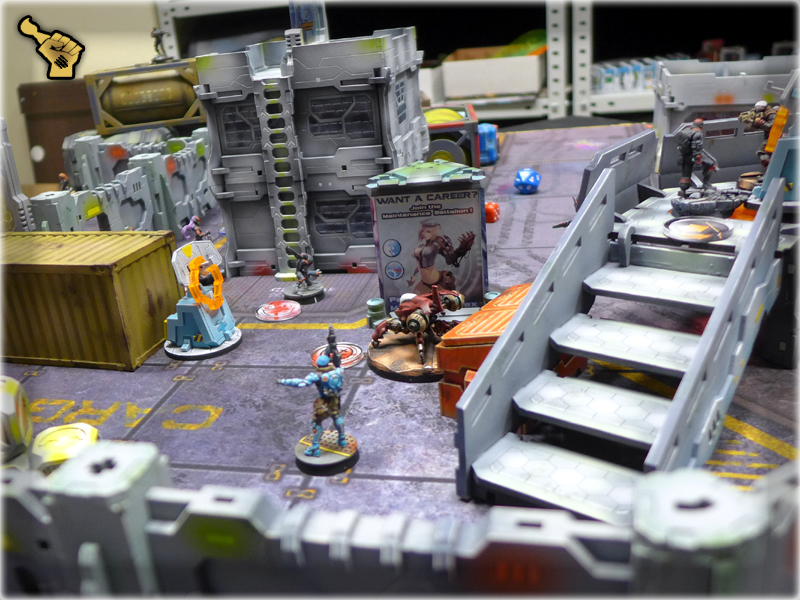
The game itself started with me being so impressed by my surroundings, that I almost exploded! Jezus in the other hand was rather calm and at ease. I now can’t help but wander – what does he felt like, seeing me adrenalized to the point of overheating, spilling thousand word per second etc… Well, at least he is a Nomad player so he had some experience dealing with freaks like me…
Either way – I asked him to use an alternative army, so that in case I won – the points will be scored for the RED team in Operation Flamestrike. He picked some sweet looking Haqqislam miniatures and used a pre-made Army List, prepared by the armie’s owner (another old friend from MAS). We picked a simple scenario, which would compliment the Terrain, already set up on the table. Made Command Rolls (I won) and started the dance of war. This was my first game against Qapu Khalqi so I decided to keep Deployment. Wanted to see what would be fielded against me – before I could decide what to do about that. Jezus decided he will start then, and set up his army first, on the side appointed by me. Qapu Khalqi looked rather regular, with some nice 360* Odalisque chicks (in my opinion defenders), a link, a doc, some FO’s here and there, three Yuan Yuans and a MSV2 HMG guy. This one could become a real problem so I deployed covering him with five ARO’s including both Intruders and some Linked troops. That was supposed to deliver my victory along with supremacy over that sweet looking battlefield.
J Jezus's 1st turn:
That also prooved to be my undoing, as once the game started with me stealing two orders from Jezus’s Order Pool – I was shocked to see a Smoke Grenade landing before HMG DJANBAZAN! Damn – that is a second time I was took by surprise with a Smoke – being sure that Corregidor (using the same tactic) is somehow Smoke-proof. I totally missjudged the situation and deployed like target-practice against a superior firepower. First shot took down my MSR Intruder (I made an ARO and failed), while soon after some of my Alguacils followed (Unconcious). Jezus ate my Crazy Koalas with a Nasmat rush – then used Odalisque to annihilate my Moran. He also seized the central Antenna. After that I lost another Intruder. Ended up with both Intruders DEAD along with Spec Ops. Two out of four remaining Alguaciles were Unconcious. In that state I started my first turn.
N Nazroth's 1st turn:
I tried to make the best out of this situation. Used Daktari to revive both fallen Alguaciles (Lupe being one of them), then using Tomcat Doctor to (what I thought would be) outflank enemy forces. I lost my Tomcat but managed to send one Odalisque to Unconcious. I reformed a Link with four remaining Alguaciles and managed to overshoot second Odalisque, Husam and Djanbazan one by one. I also managed to seize the closest Antenna, made some reshuffle then ended up my turn.

J Jezus's 2nd turn:
Jezus’s turn was more about healing, with one Odalisque getting back on her feet. Yuan Yuans were advancing, alongside a Camo Marker. Due to lack of most of my heavy hitters my ARO’s were somehow diminished with Qapu Khalqi’s superior firepower. Linked Ghulams advanced and seized another Antenna, still I managed to loose Lupe Balboa to a HMG Ghulam’s mad firepower… She was meant to seize the central Antenna, so I had to change my plans a bit…
N Nazroth's 2nd turn:
My second turn was to be Lunokhods great debiut. He managed to survive, hidden in the District5 Warehouse, and I used that huge cover to get him into position. One Yuan Yuan went down, peppered with Heavy Shotgun shells. I smoked the way forward and sent Lunokhod advancing. I hoped to burn Ghulams to a crips and dig deep into enemy lines, so that Alguacil Hacker, or Daktari be able to get to the cenrtal Console and seize it. Just when I got close to Linked Ghulams I felt like something was wrong. I knew that this was my last line of offence – once dead, I had no means to actually keep the enemy out of the Antennas. I pimped Lunokhod with Marksman L2 and went to eliminate a single Ghulam FO that was keeping watch over his fellows. That’s when it strucked me – I was sure that a single fck’n Critical Hit would end this action – I said it aloud and THAT’S WHAT ACTUALLY HAPPENED merely seconds later. (OH GOD WHY?!?!?). At that point I was sure to loose this game. Still – show must go on. I tried to move my Hacker closer to the central Antenna, was cought off-guard by enemy Hacker, but managed to Burn his Brain in responce. (That was the first time ever, when I killed enemy Hacker with an actual Hacker Attack!). I went Sup.Fire with my Hacker and ended my turn.

J Jezus's 3rd turn:
Jezus moved his troops into position, fullfilled a ‘Telemetry’ Classified Objective, tried to overshoot my HMG Alguacil, but lost with three Ghulams in a row, depleeting his Command Token pool and achieving much less than we both anticipated. He finally killed my HMG speciallist, then repositioned his troops and took another Nomad life – Alguacil Hacker was dead.
N Nazroth's 3rd turn:
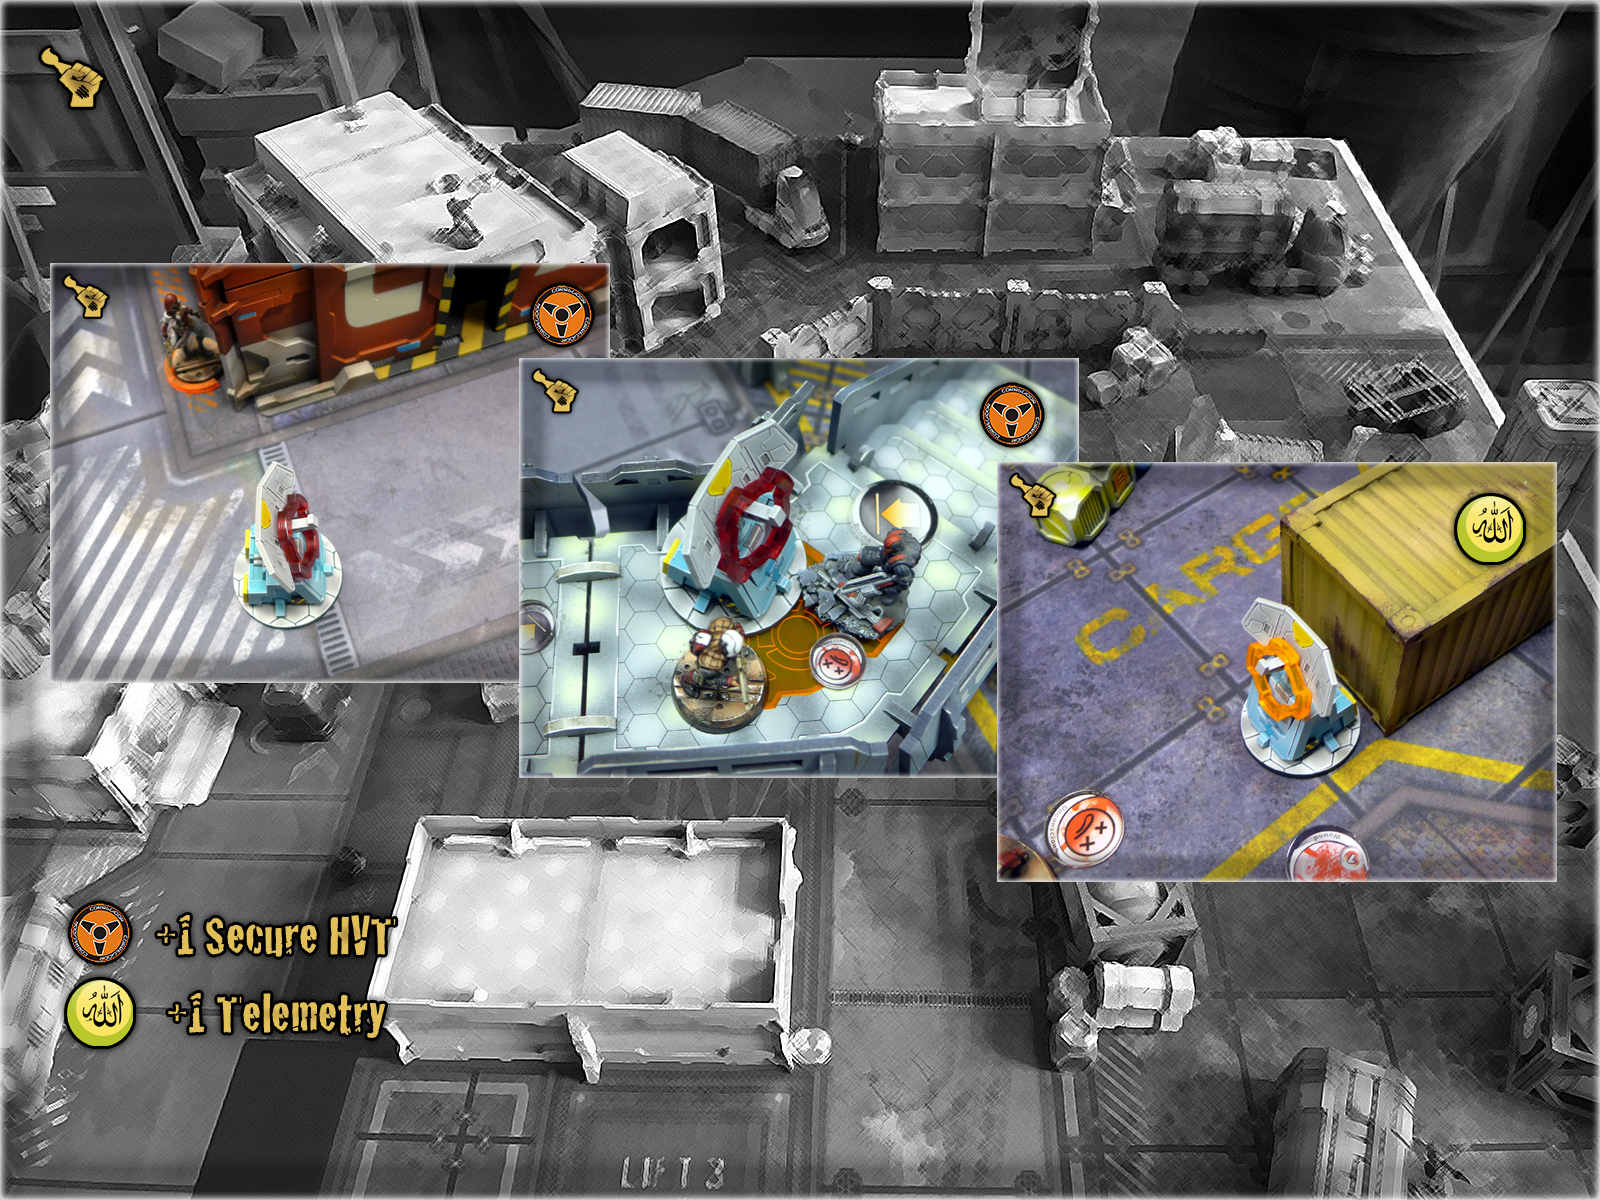
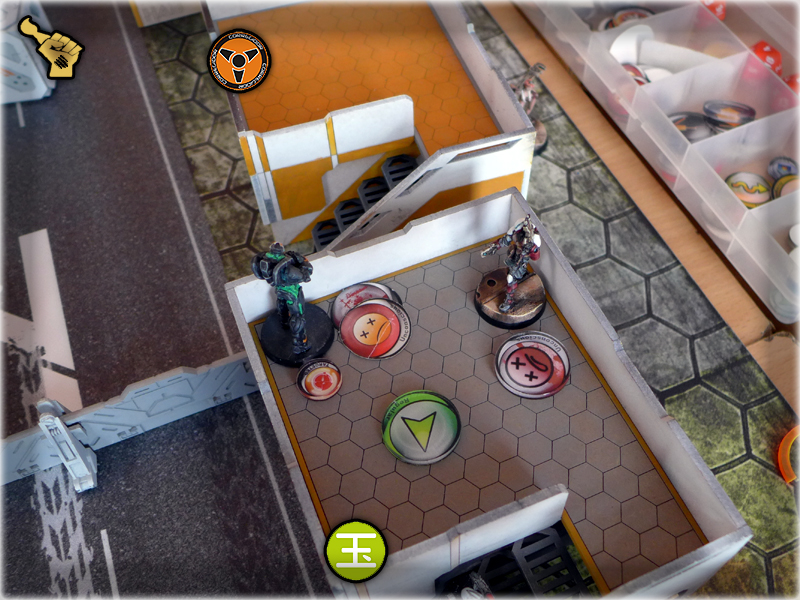
With not much orders left I tried to figure out a plan that would let me grab the Antenna, I so desperately needed to win. I started with a Jaguar, smoking the way, then moving and smoking some more – and finally moving firward with last smoke grenade being thrown – and failed with a roll of 19. That screwed the plan, as with a final grenade in place I coul’v easily move Alguacil Paramedic to the Antenna and make two attempts of seizing it. Without the final smoke – this game became a gambit. I moved Paramedic forward to the limits of the second Smoke Grenade, then went down, moved two inches and ended up with a final order to try and seize the Antenna. I went for it – with three ARO’s received in response – ALL FAILED! The final roll – I seized the Antenna! OMG – that was so fortunate! I did not believe in this one and was more than happy to see it actually worked! The rush of adrenaline was so intense that I almost jumped. It got even better when I saw that this last move took my Paramedic into ZOC of enemy HVT and I was able to grab an additional point for it.

The game ended up with my forces depleted, but victorious. Two Antennas and one C.O. vs one Antenna and one C.O. meant I won 7 to 4.
Hero of the match: Alguacil Paramedic – for sure!
Worst performance: Nazroth, for playing it like a retard… XD
This was a fantastic game against a cool opponent. I do appreciate the fact I was able to play on legendary MAS gameboard, surrounded all over by my favorite hobby. If theres a Disneyland of Wargaming – that certainly was one for me. Can’t wait to visit Gdańsk once again!
In case of any questions about the terrain performance, or just about the game – feel free to comment!
And be sure to Commend me HERE 😛
Go Go Nomads!
The long awaited moment is finally here – I acquired all the materials necessary to proceed with “The Colony Special Project”! Somewhere along this month I have received packages filled with stuff from Titan Forge, Reycast and Micro Art Studio. Each time I got one, I almost jumped out of my pants with excitement, but kept my precious ‘bitz’ for later, when all the components be here. 26th of April the last delivery arrived and not being able to wait any moment longer, I jumped straight to this project! By the way – if you need to catch up to this project – visit “The Colony” Special Project part ONE, TWO or THREE. If you are like ‘Show me more of this stuff, now!’ then proceed below…
The longer I waited for the missing parts, the more ideas came to my mind. More designs were added to the toll and I kept ordering stuff from Micro Art Studio and Reycast. In my mind’s eye “The Colony” gaming table was expanding with each new addition. Having some of the parts at my immediate disposal, inspired me to improve some early solutions, along with creating new ones…
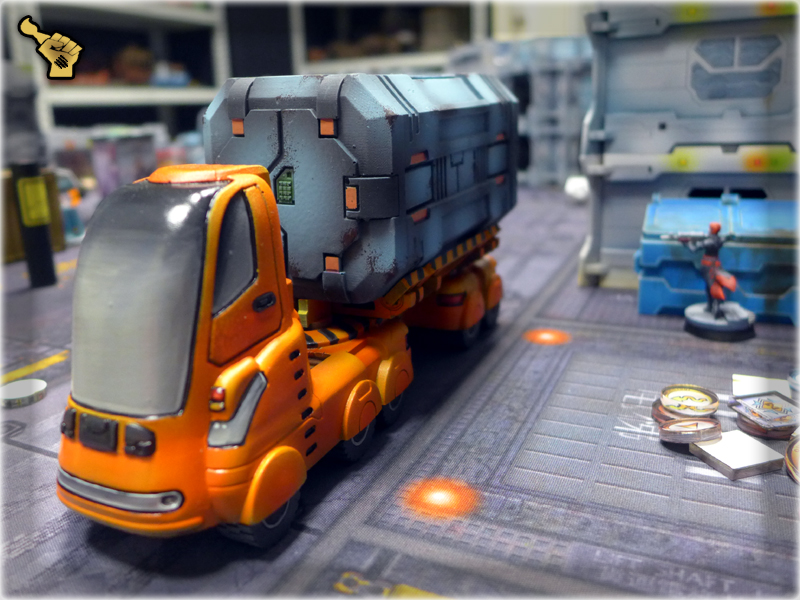
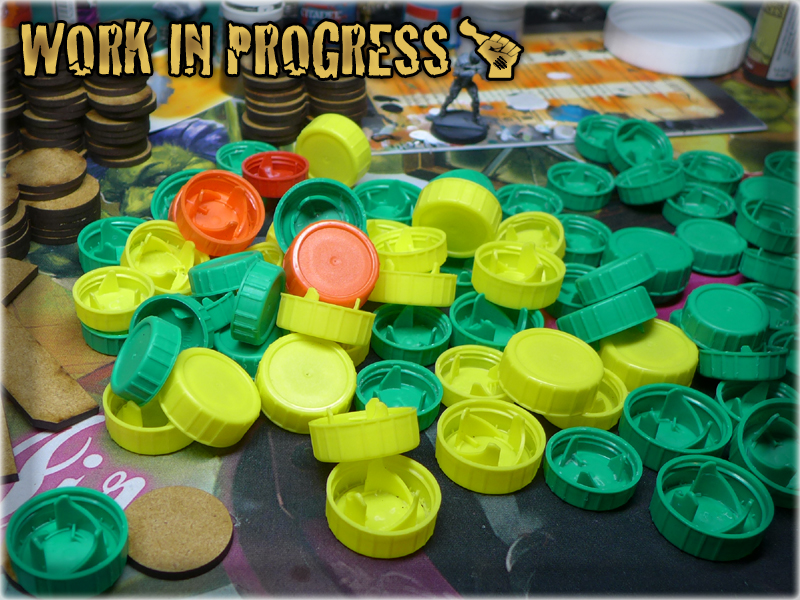
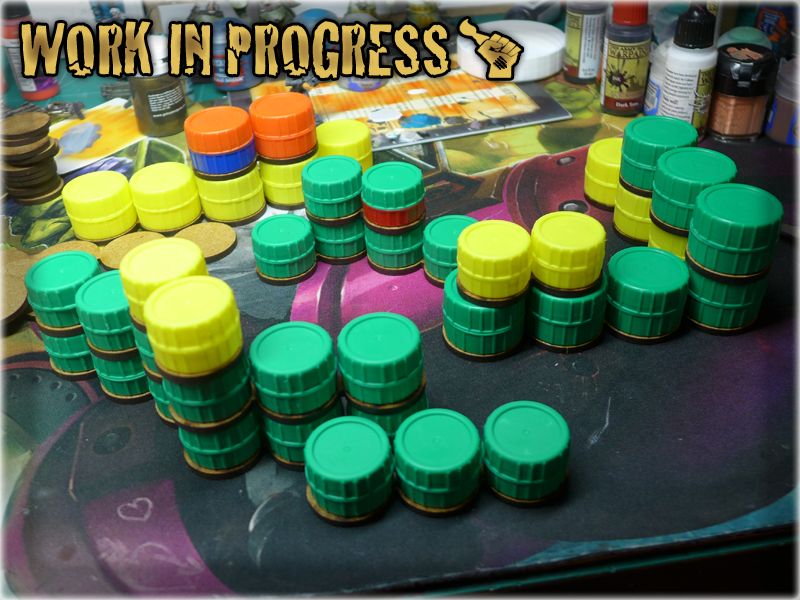
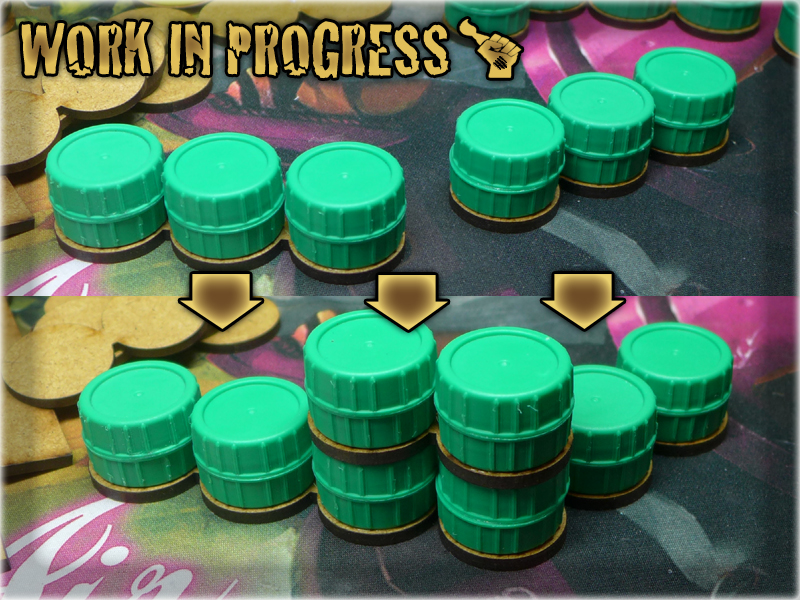
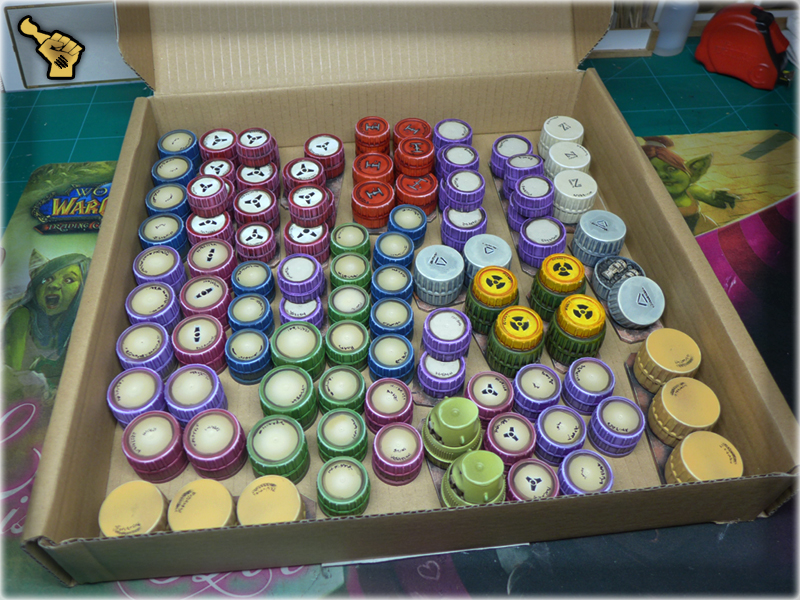
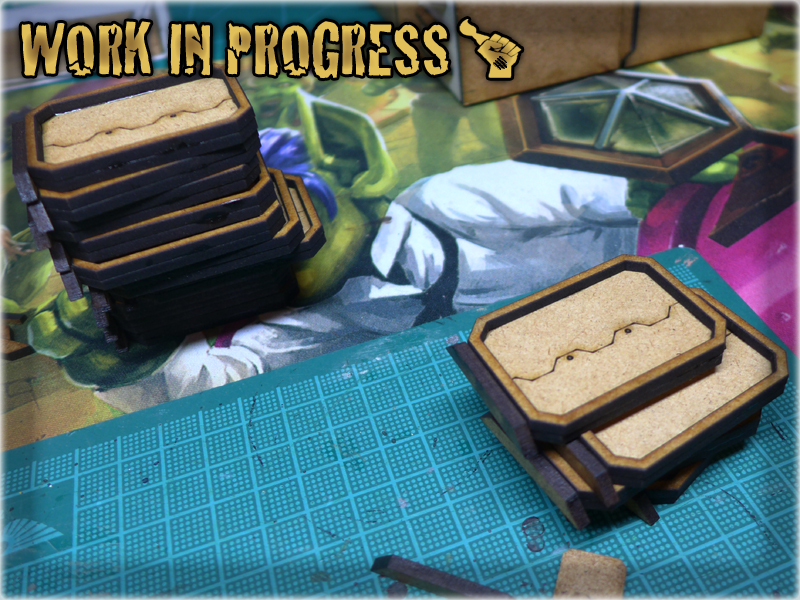
This one came to me just like that – one day I was totally happy with the way my cap-made barrels worked, next I was disgusted by how limited the idea was. My barrels were firm structures, with uncomfortable bases, difficult to shape them into a bigger mass. The solution was obvious – I had to get rid of the bases somehow. Still a base was the only thing that kept the barrels together and I really didn’t wanted to keep each barrel separate. (Which would be totally unplayable, with all the barrels moving around etc.) So I decided to improve, rather than remove the bases – a quick drawing and Micro Art Studio was working with my new design.
 Using these re-designed bases let me combo my barrels in many new ways, while maintaning their firm and durable form.
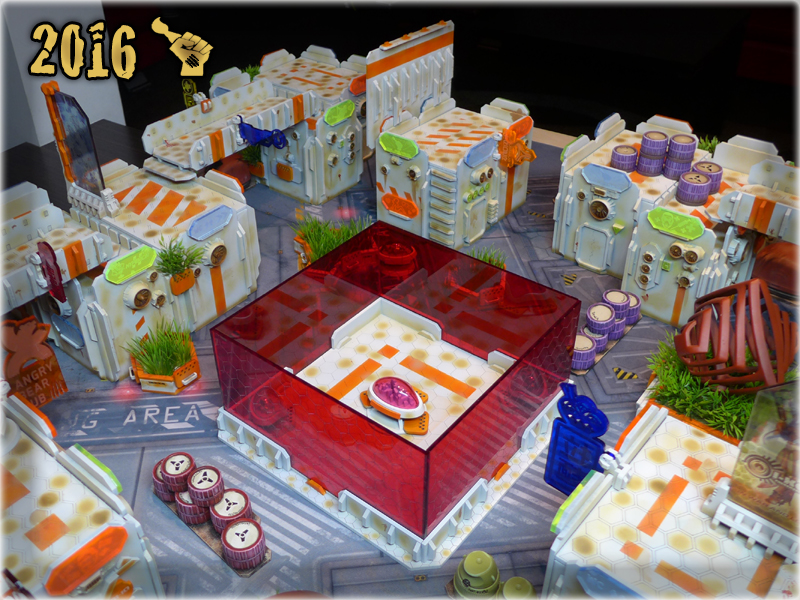
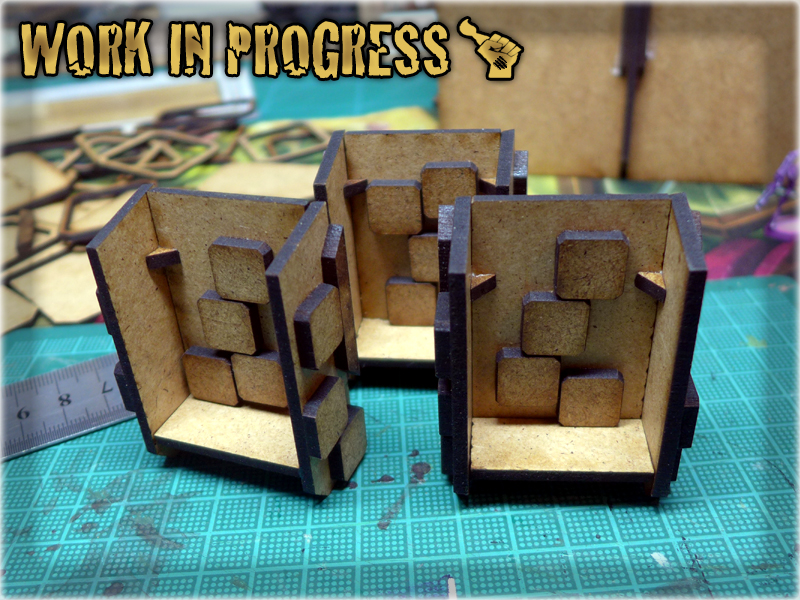
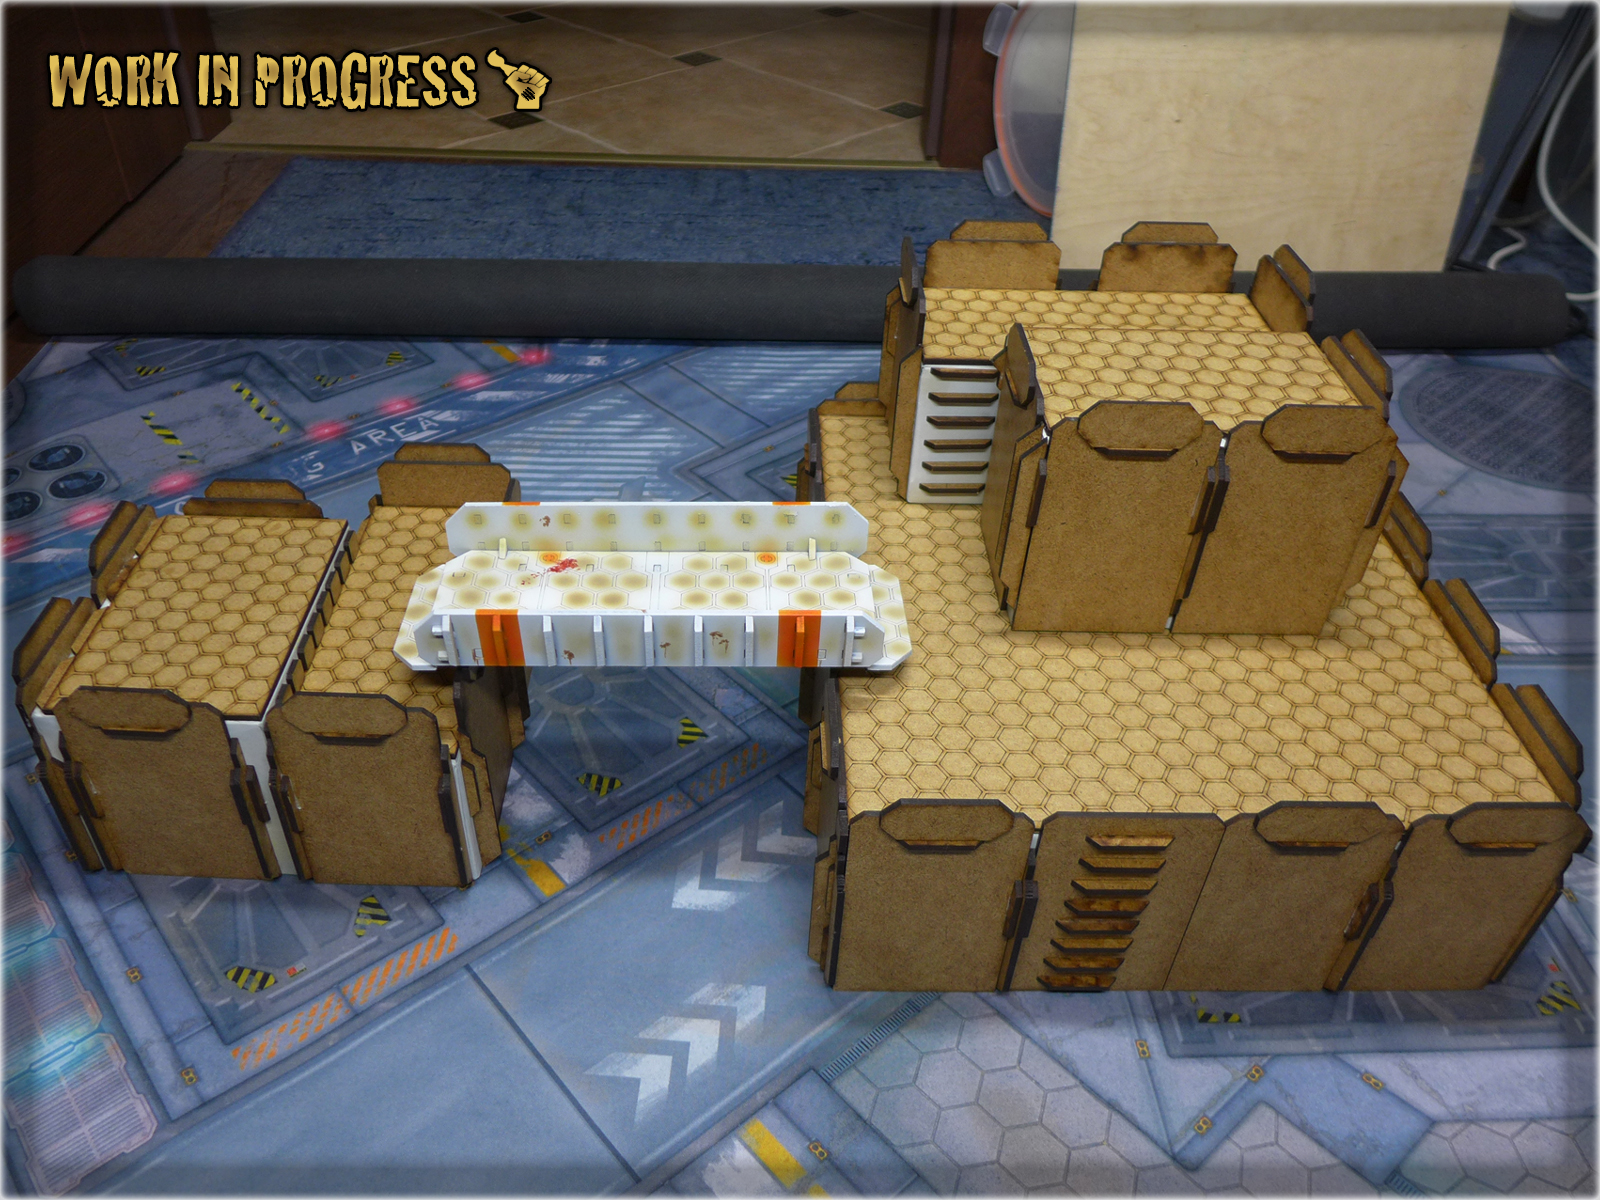
Somewhere between second and third part of this article I felt like something is amiss. Some vital part of gaming tables designed for Infinity that I hadn’t thought about. The ‘Objective Room’ – that was it! So important, yet I totally forgot about it when preparing my initial designs. I started thinking about choosing an Objective Room from among all the cool looking terrain provided by many different companies. In the end I couldn’t find any that would fit into “The Colony”. I wanted to implement something that would compliment all the sparkling holo-ads used to fill this gaming table at some point. In addition to that, I’m not a fan of roofed Objective Rooms. These should be of infinite height and I really wanted to design an objective room that could be considered to fill the role, not being a scyscraper at the same time. I’ve figured out to use a force field theme! It was perfect in it’s simplicity and would go well with holo-ads. In order to keep the cubic force field in the theme of “The Colony” I’ve designed a base that would be used to contain it. Just imagine a futuristic city space, where a permanent force fields are set up in the key locations, like around the antennas, some military consoles etc. VIP’s have access to these, while regular citizens are denied entry. So that’s the bassic idea of my Objective Room. It was made into reality by the courtesy of Micro Art Studio, which used my initial scetch to provide me with the final product. Just take a look at it…
The idea on the paper:

Pieces have arrived:
The base for the force field: Built using a method of errors and corrects, using one MDF piece as a universal ruler and the idea as an actual instruction…
Objective room – closed doors (access denied):
Objective Room – open doors (access granted):
Ingame pictures:
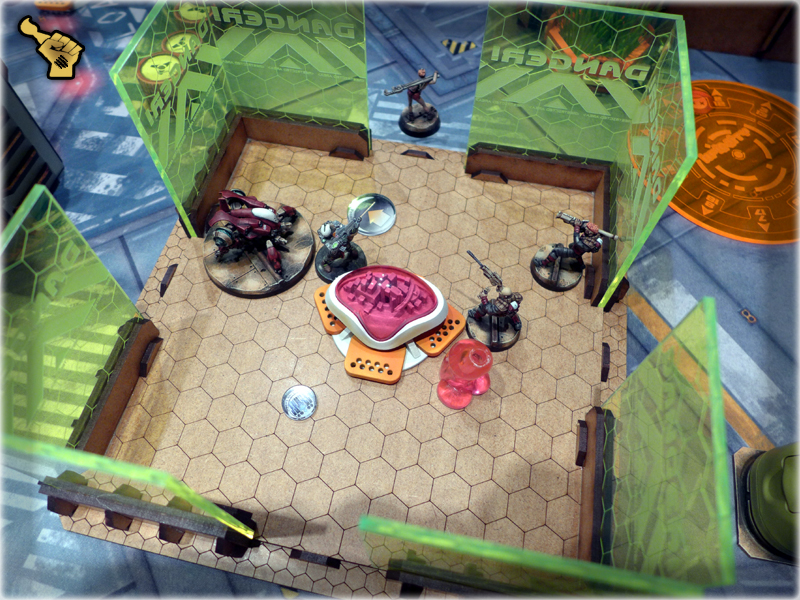
I really do like the end result, and cannot wait to paint this stuff. If anyone is interrested in purchasing one – please contact Micro Art Studio. It is somehow exclusive with a price set to around 50€ and that’s because of the production costs. Still I’d love to see my own design on some random battle report pictures around the internet. I hope that some of you will find the price sufficient and purchase one of these.
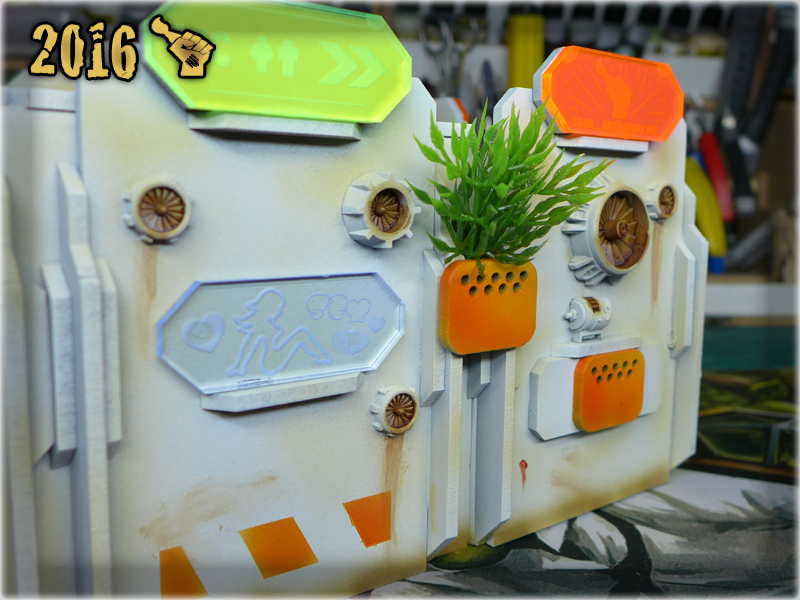
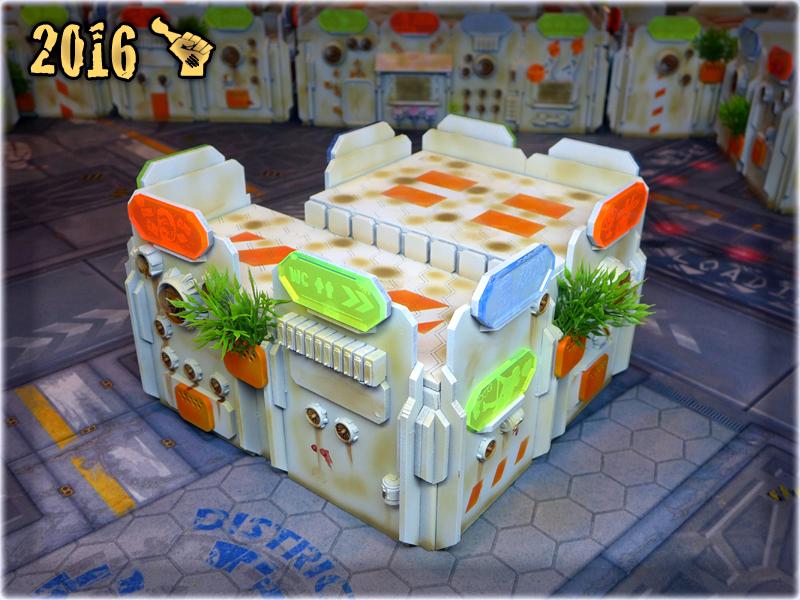
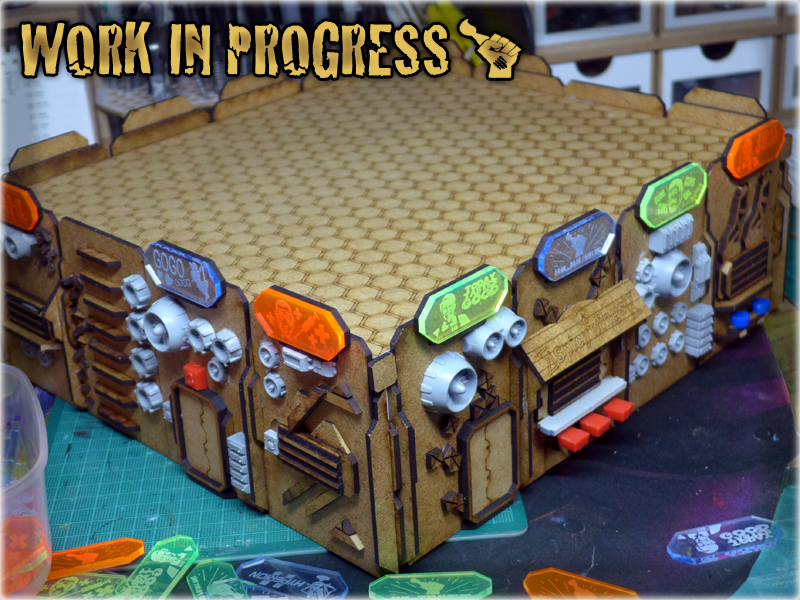
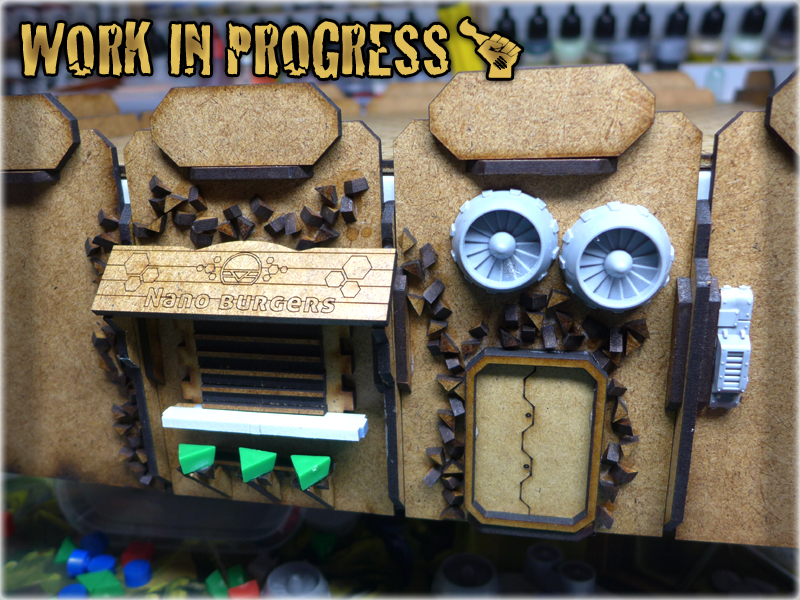
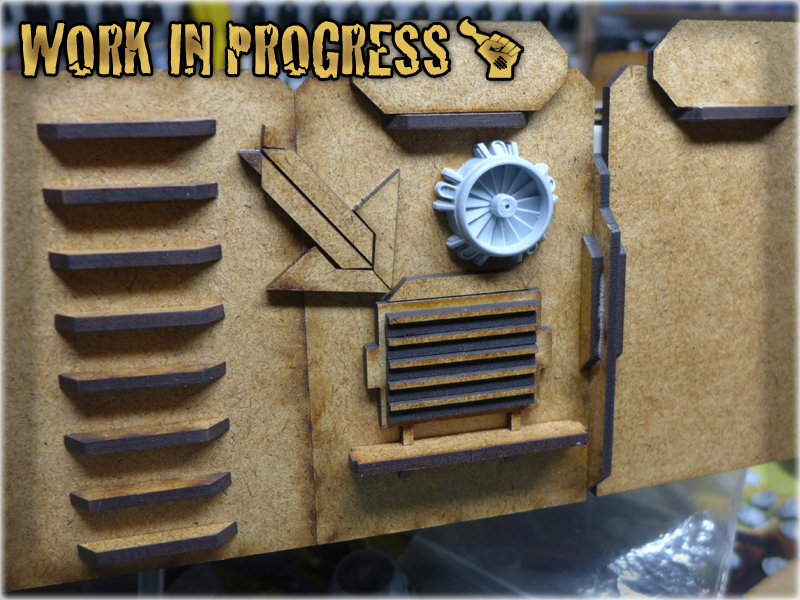
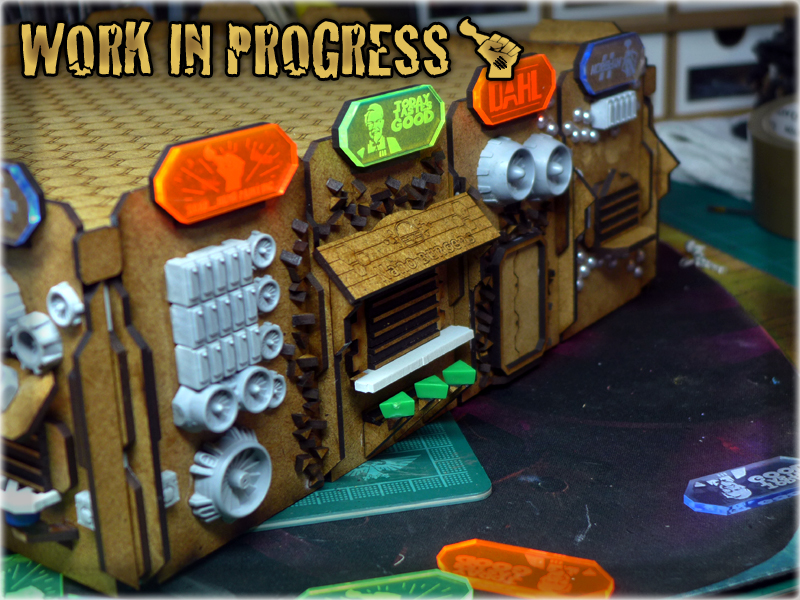
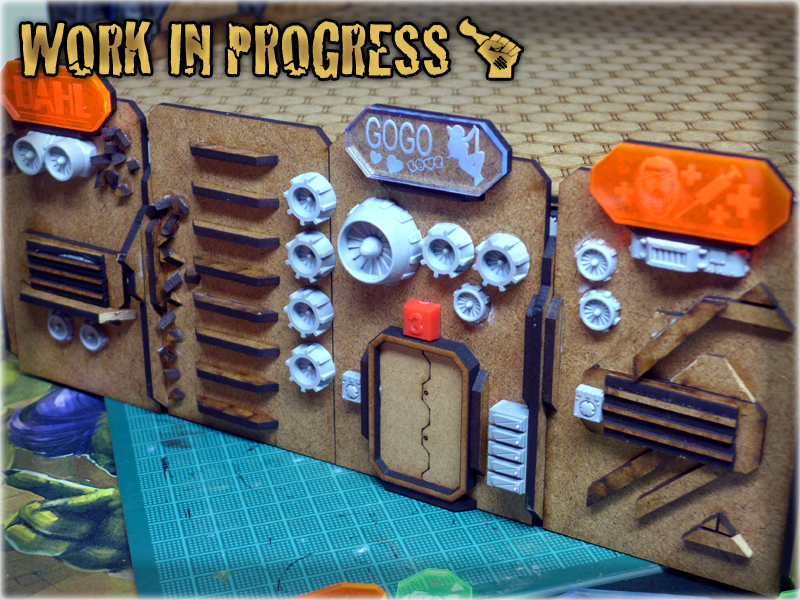
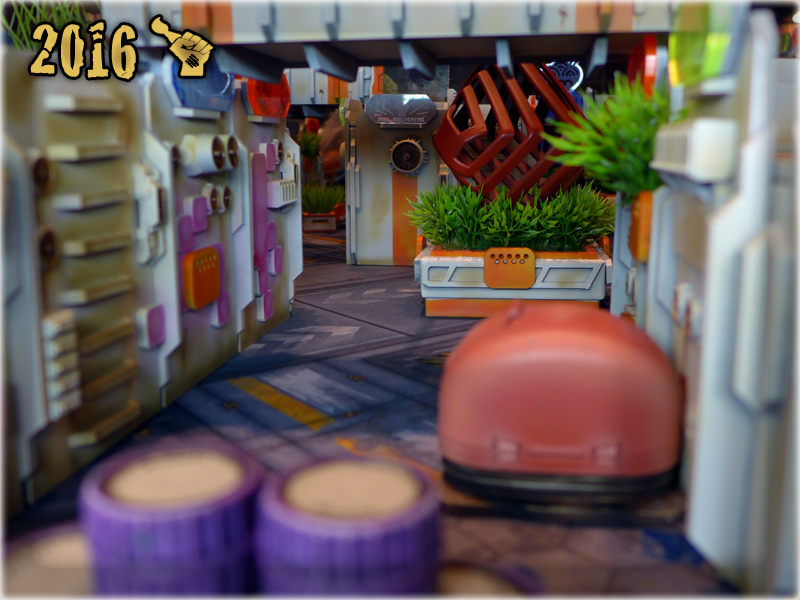
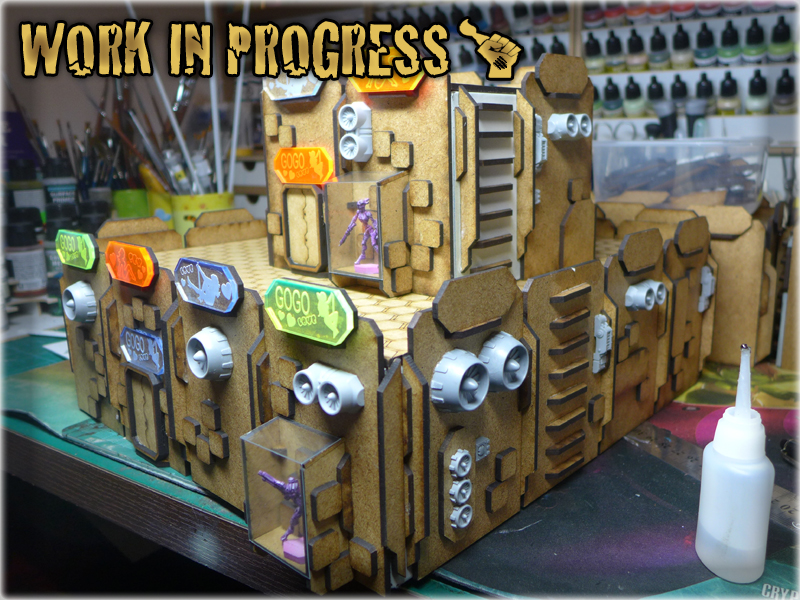
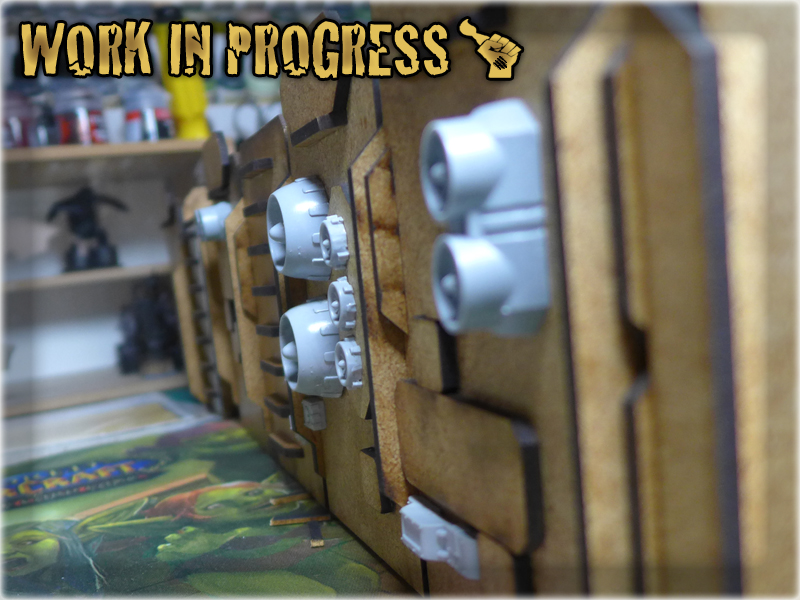
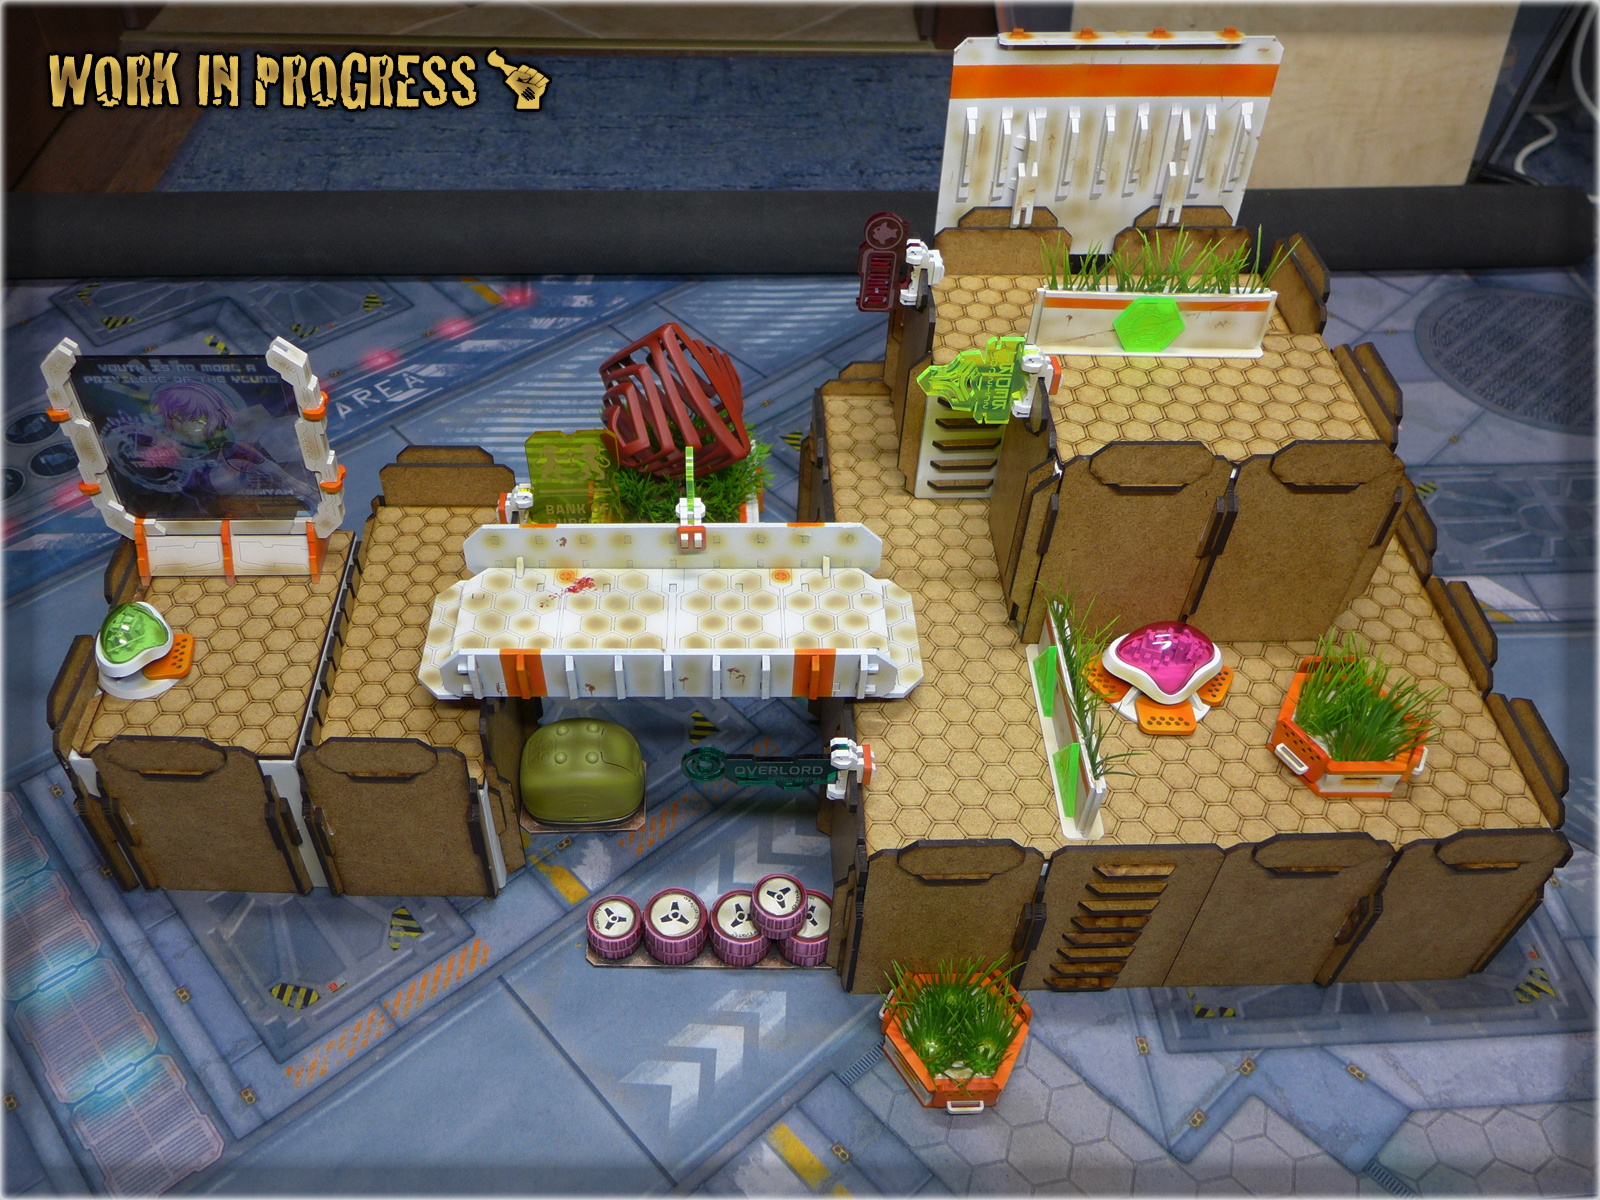
Up from the start the idea was to decorate my buildings, at some point, with use of cool looking stuff like vents, doors etc. My buildings are tall and without some detail – could look really intimidating and cold. In order to breathe life into my gaming table I had to forfeit a small percentage of my terrain’s playability tho. This decision was not an easy one, but in the end – once I started to decorate with common stuff – I just couldn’t force myself to stop and started adding some sweet looking details like food booths and Robo-Prostitues enclosed in special display casings. I also decided to distinct both big buildings by giving them a theme. One became a “GO GO NOMADS!” night club, while the other became a small restaurant center.
Doors:

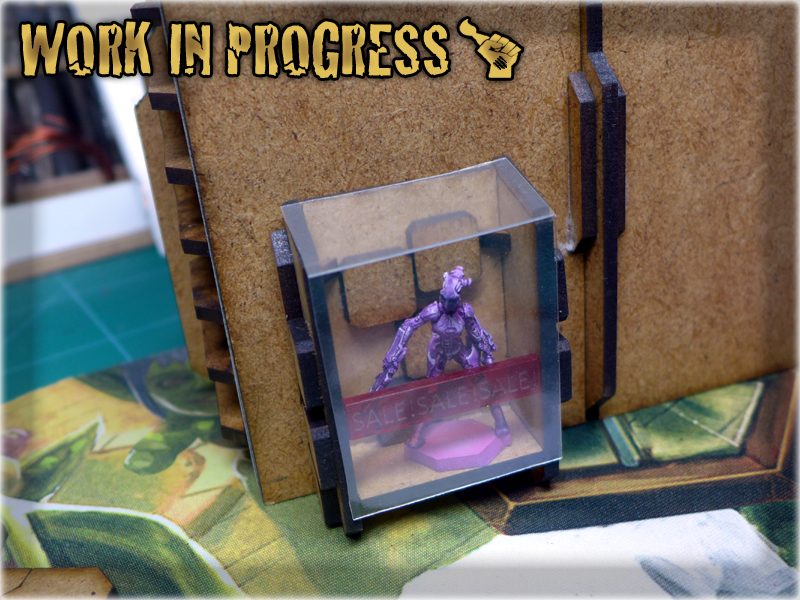
Robo-Prostitutes displays: The idea goes like this: I liked Karakuri miniatures, ordered them to use them at some point, still didn’t had any idea how. Once they came, I figured to display them around the strip club. I made some simple math, asked Reycast to cut some pieces for me and once they came in, used some trash to complete my designs. In meantime I already painted Karakuris, leaving their weapons in place (Cause this is a Nomad club, and Nomads do love guns just as much as the robo-chicks!)

“GO GO NOMADS!” strip club: Is still being decorated, but I can show you how it looks by now. Will have to prepare some of the bitz to finish decorating tho – and I also ordered two larger Holo-Ads with club’s name – Will have to wait for these…
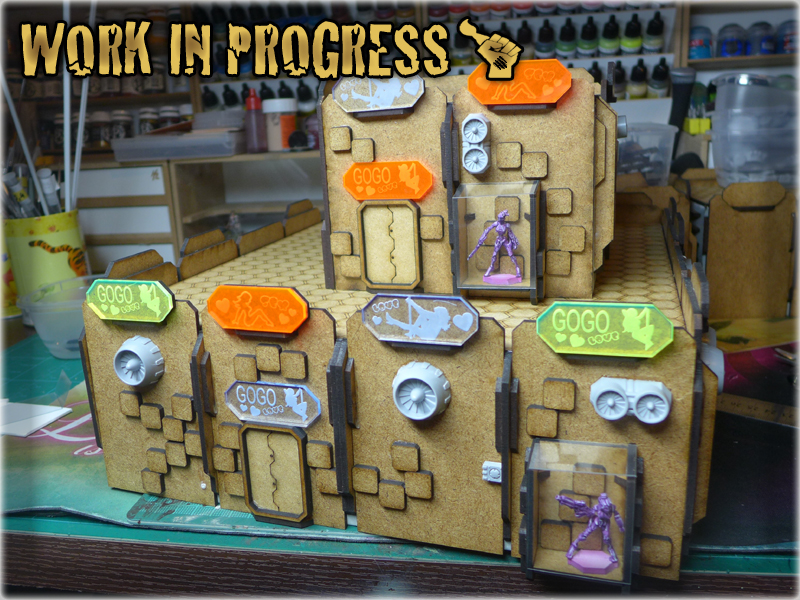
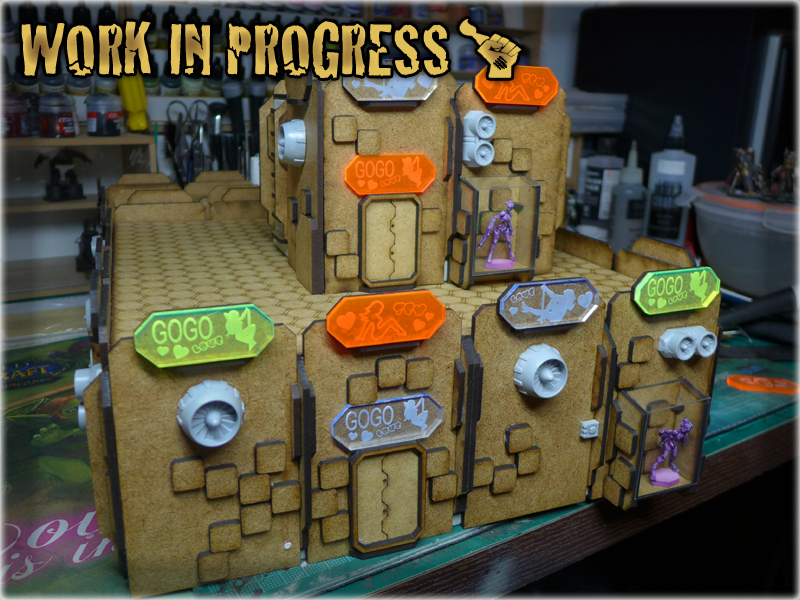
“Astro-Gastro Center”: The whole idea was about a big building with couple of food booths in it’s bowls. I had some leftovers from Zen Terrain’s food booth, along with some trash I used to create my won mini-bars. Some of them simple, while others with their personal theme and all. And here’s where I would like to stop this part of “THE COLONY” SPECIAL PROJECT article. I will leave you with shis little teaser. (Hope you don’t mind.)
I do hope to see you soon in the next part of “THE COLONY” SPECIAL PROJECT article. Keep your fingers crossed for me, as there’s a lot of work awaiting my attention. In meantime, feel free to ask any questions about this project – here, or at my Facebook.
Ever been in a situation when you really wanted to work on a certain project but couldn’t? I just found myself in such. I’m almost ready to paint my gaming table, with almost all of the pieces already assembled. I even purchased a big stock of sprays and paints required to complete “The Colony” in one go. (Yup – at this point I already picked a perfect Colour Scheme for “The Colony”, being White-Creeme with addition of Grey and Orange elements.) If you read “The Colony” Special Project part two – then you know that once I’m into something – I usually do it at once, regardless of weariness and time required to do it. This time I feel like a trapped animal. The erge to continue my project is killing me, but I cannot proceed without vital pieces that are still to arrive. That’s why I decided to deceive the system.
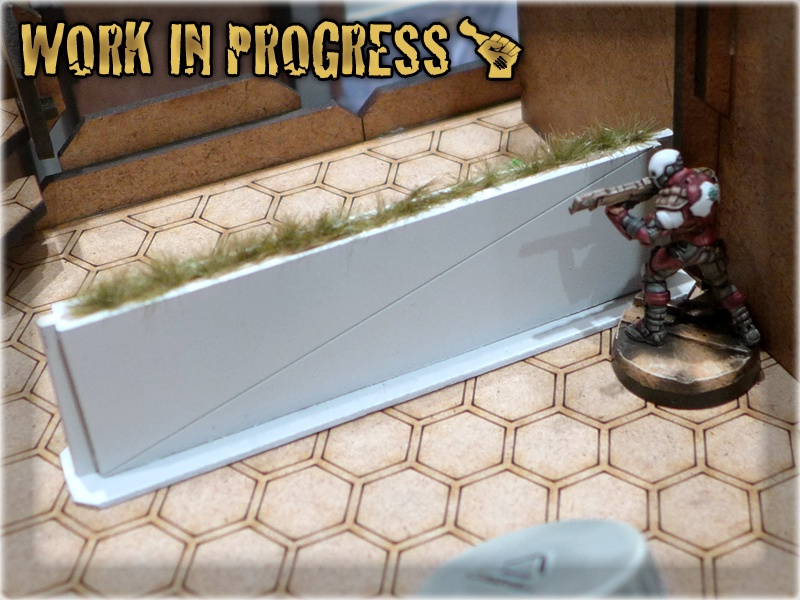
Being unable to proceed with “The Colony” buildings I focused on add-ons instead. I had some cool ideas for new ‘filler’ type terrain pieces, along with some old ones that needed refitting. If you have a gaming table than you know that buildings provide a variety of different levels and shooting corridors, but it is the fillers that build up the table’s theme and atmosphere. Just take a look at this picture:
Looks kinda empty doesn’t it? Well that’s because it is completely devoid of climate. Just like my old ‘White Boxes’ were. Ok – it is still very playable, with all the additional features, but for a gaming table to have a soul – there must be a plenty of small, sweet looking fillers to attrack the sight. As I am very impressed with Zen Terrain’s design, I decided to incorporate some of their style and colour scheme around my rather industrialised, cumbersome buildings.
Not much to say about these, except for a fact that they are just awesome – It’s love from the first sight 🙂
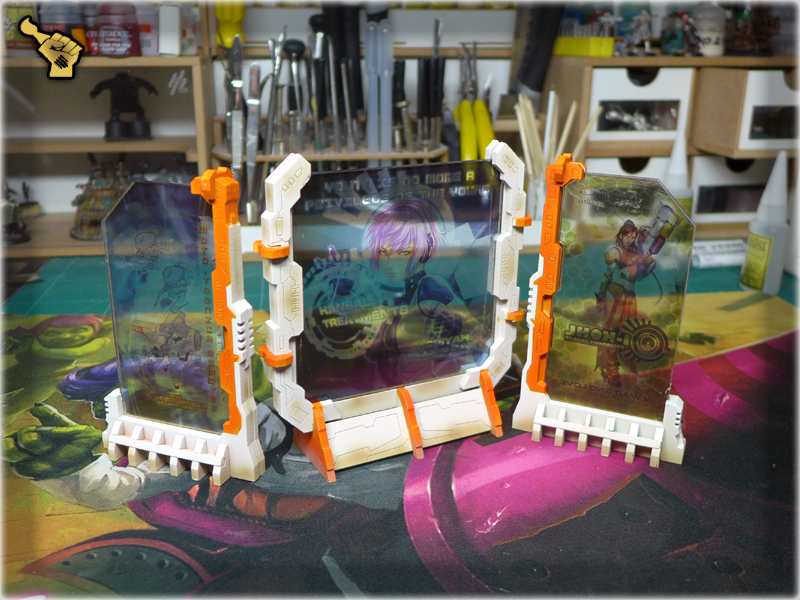
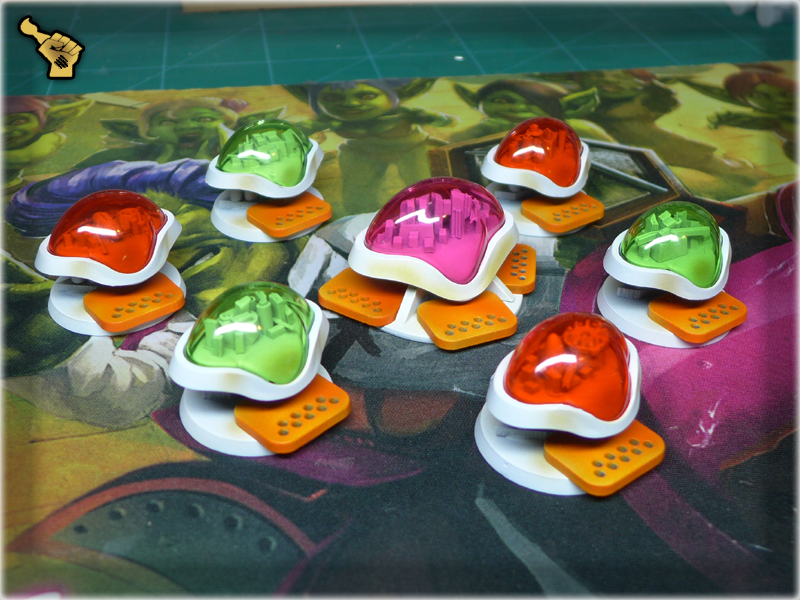
Micro Art Studio’s Kickstarter campaign just finished and I’m sure to purchase some of their new fillers. What I like the most are standing tripple-holo-ads and benches, but since these are not available for purchase right now – I concentrated on repainting a set of best in the market MAS Holo-Ads. One cannot complete an Infinity Gaming Table if one does not possess these!
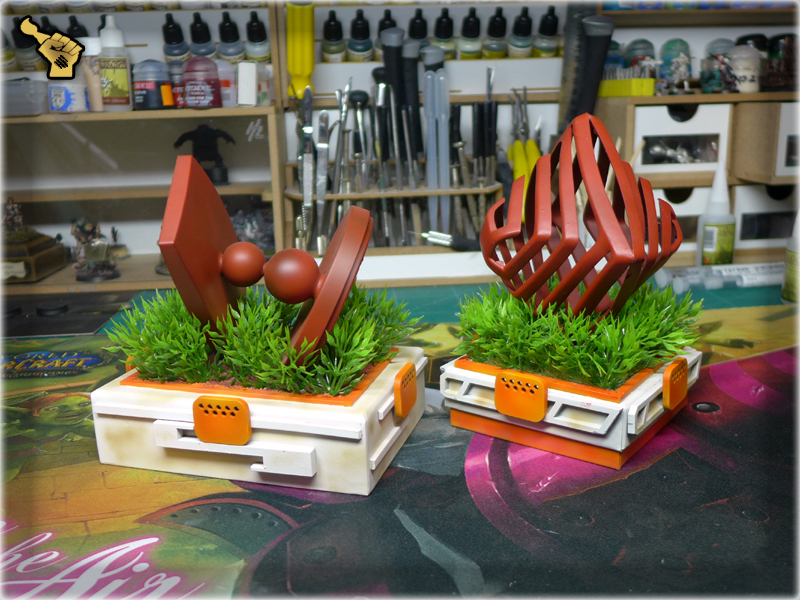
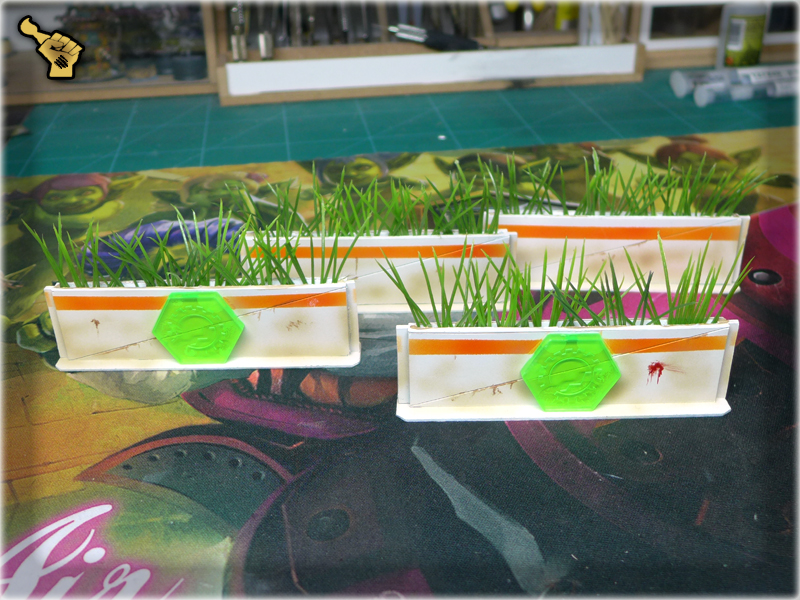
I already had a lot of fillers made for my previous gaming table. You can see them all in Tutorial: ‘Do it Yourself’ Gaming Terrain article. All of them could use some additional paint job, or rebasing to better suit the new theme, but the ones that needed it the most were: medium sized walls and (my favorite) futuristic sculptures. I really wanted to provide them with some extra love, cause they looked like this:
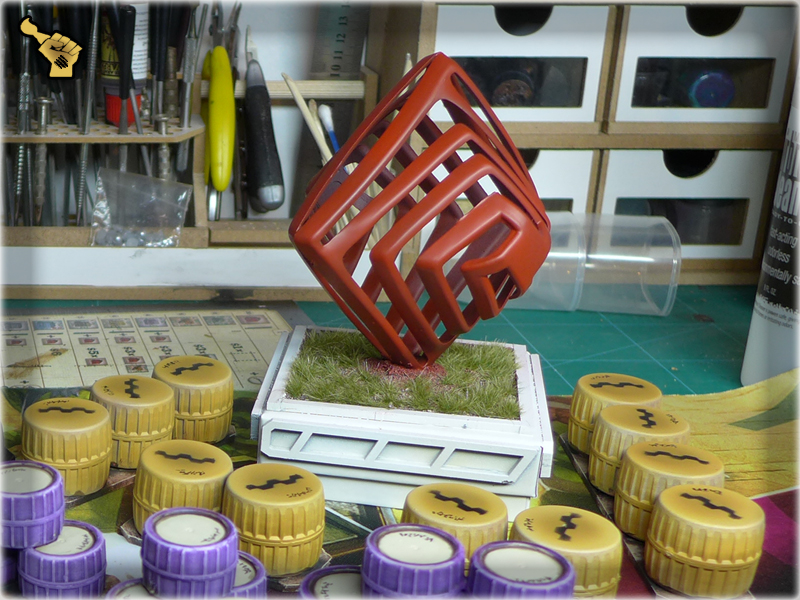
I invested some time to redevelop these pieces, adding cool looking plants and a new-themed paint job. I also used a Zen-based pieces to solidify the theme. The end result is exactly as it should – futuristic & juicy.
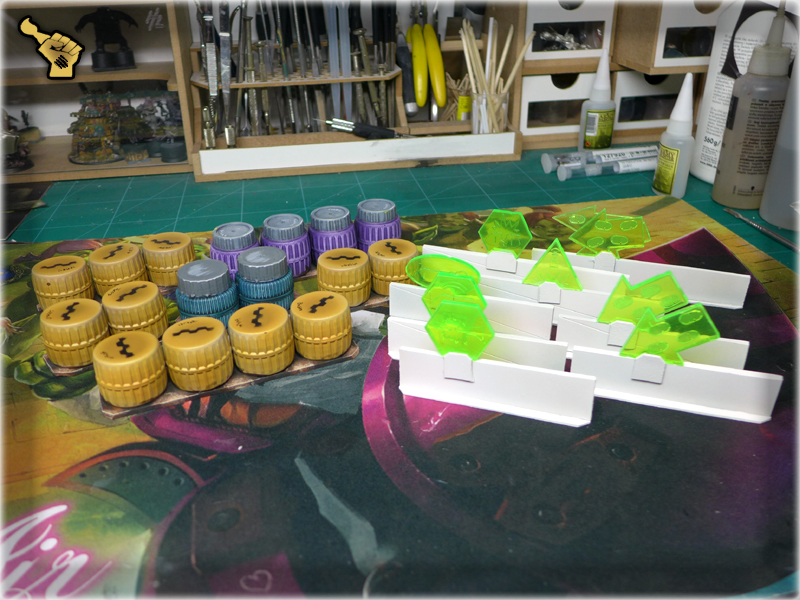
Inspiration strikes like a lightning and I’m pumped with urge of creation. New ideas come and go – some of them just too good to be skipped. One of such ideas came to me more than a year ago, when I saw a pile of leaflets. These were so ‘Infinity’ styled, that I took couple to use them at some point. As it happened – now, with a new project on the run – these funny, 3d hologram leaflets were perfect to base a terrain piece on. Just some PCV, MDF pieces and twenty minutes provided me with two of these:
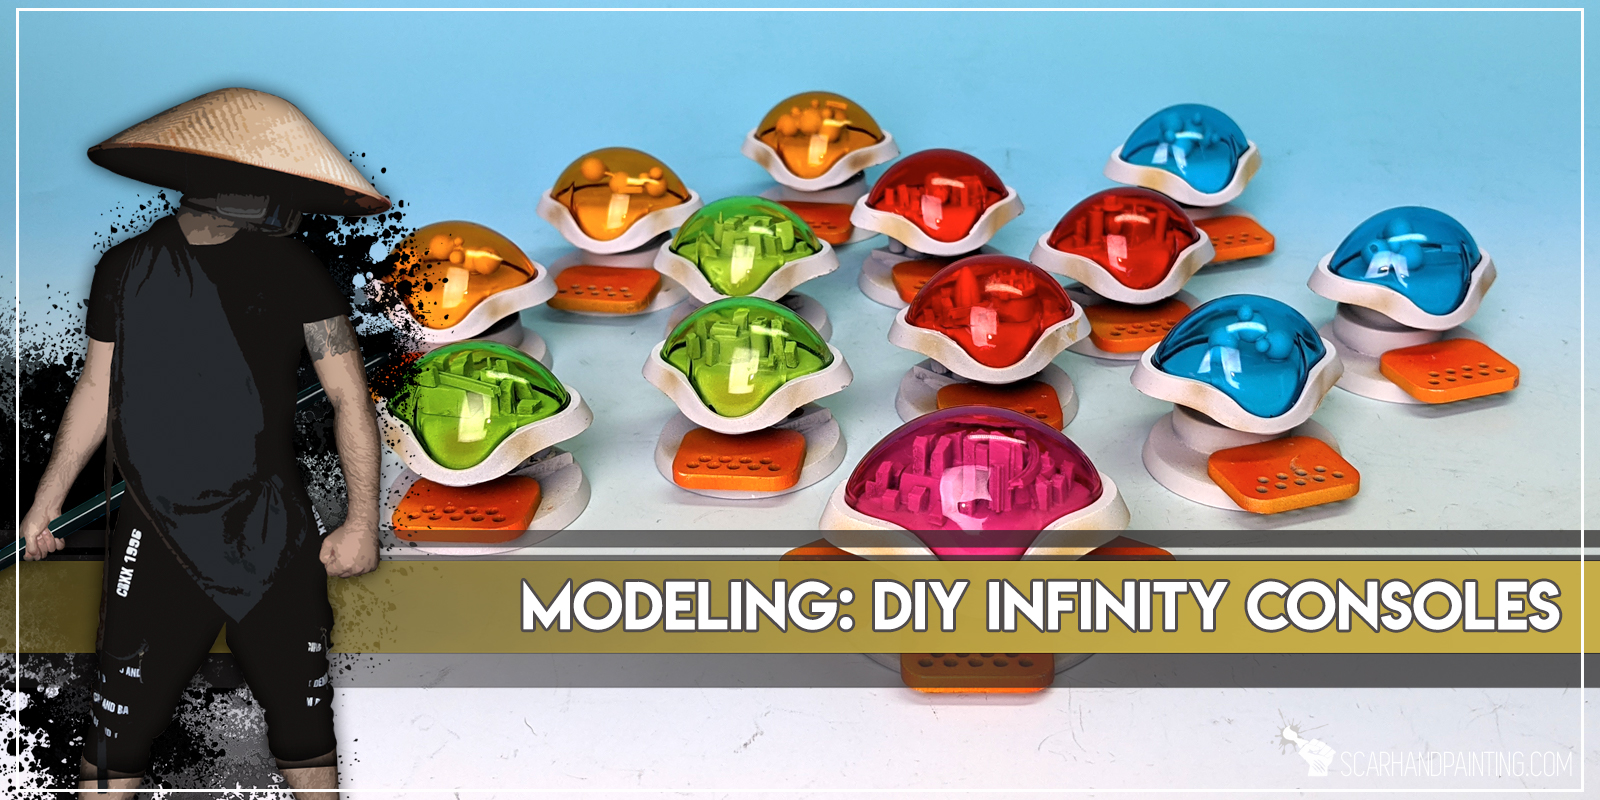
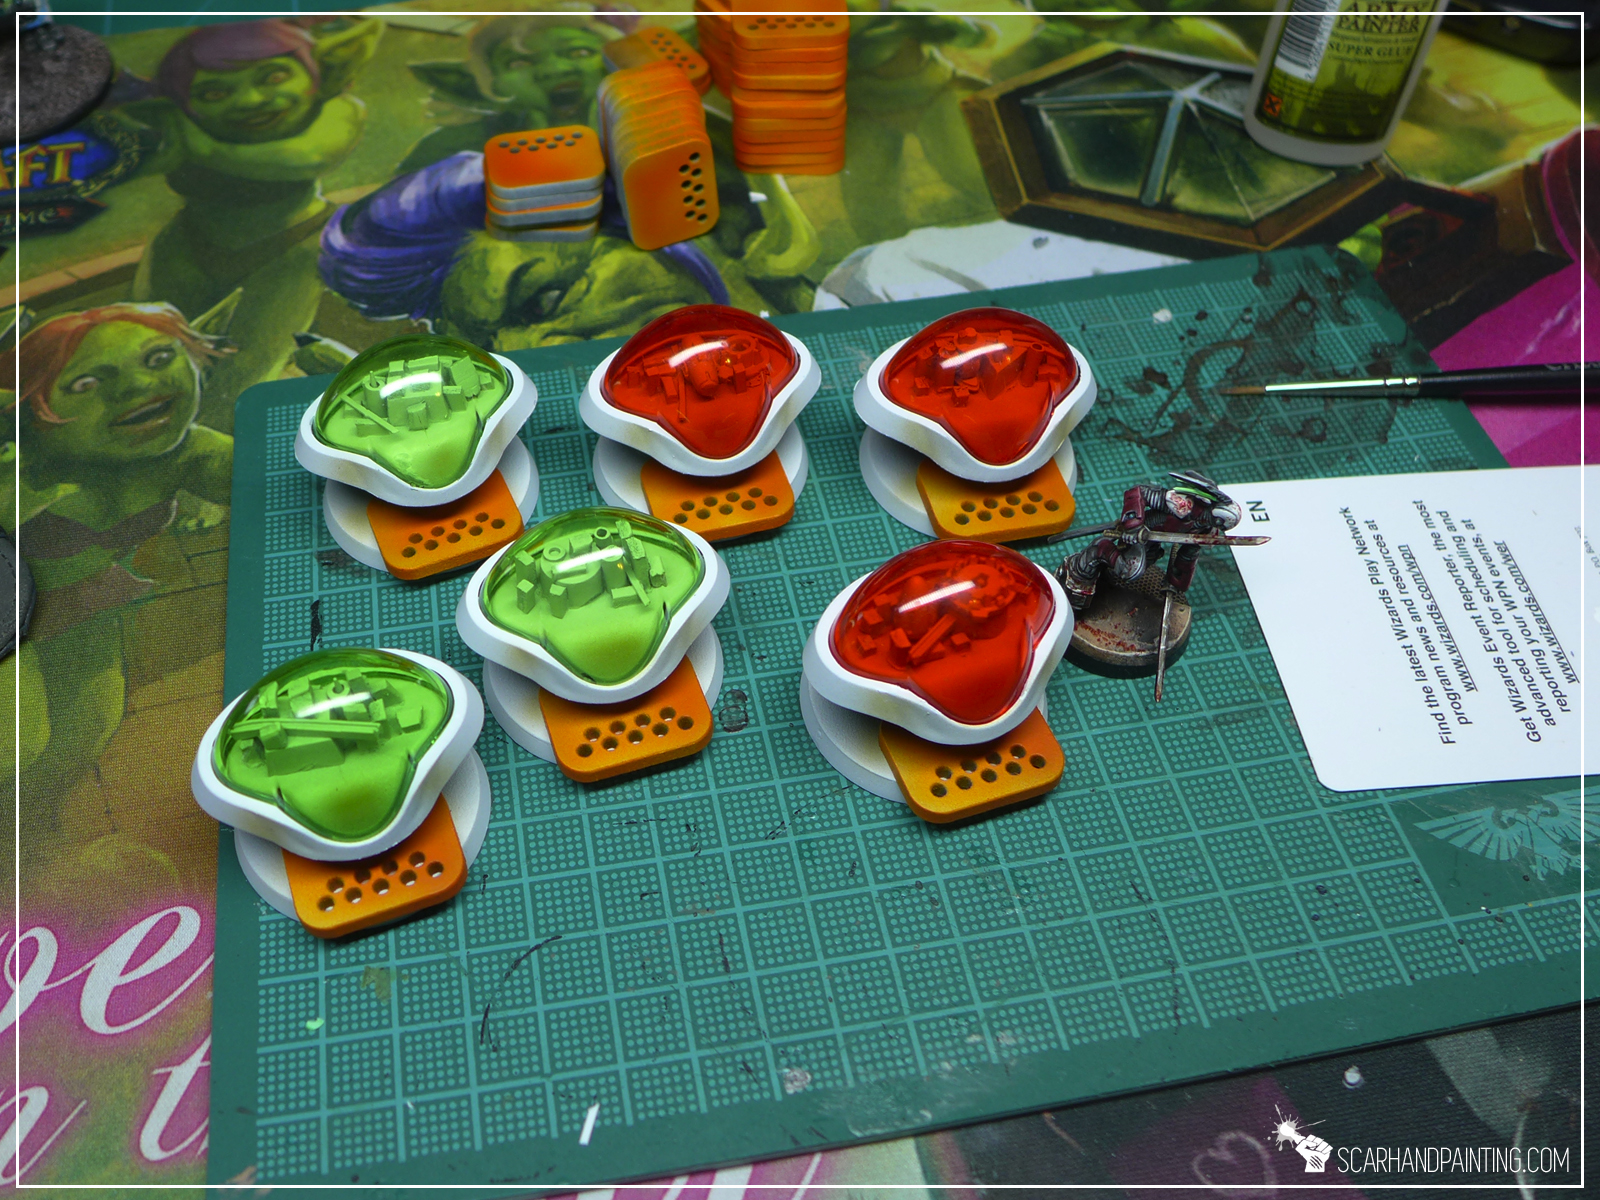
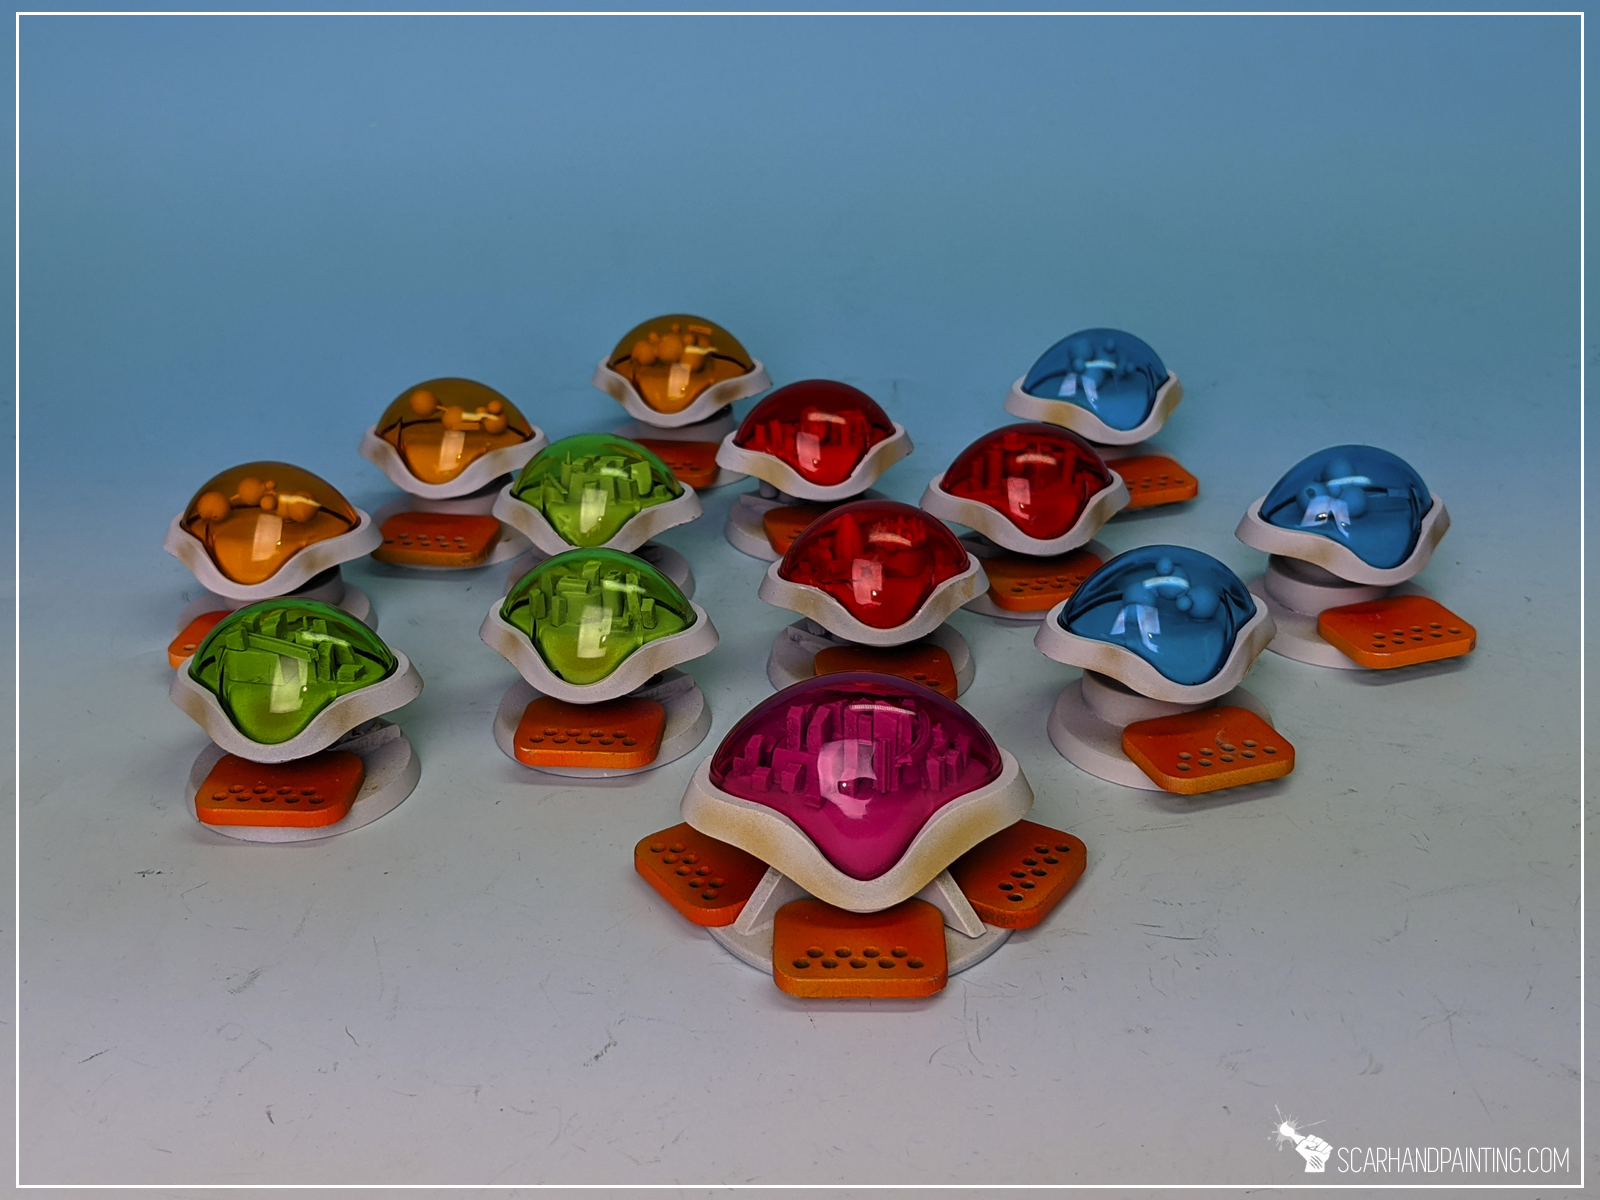
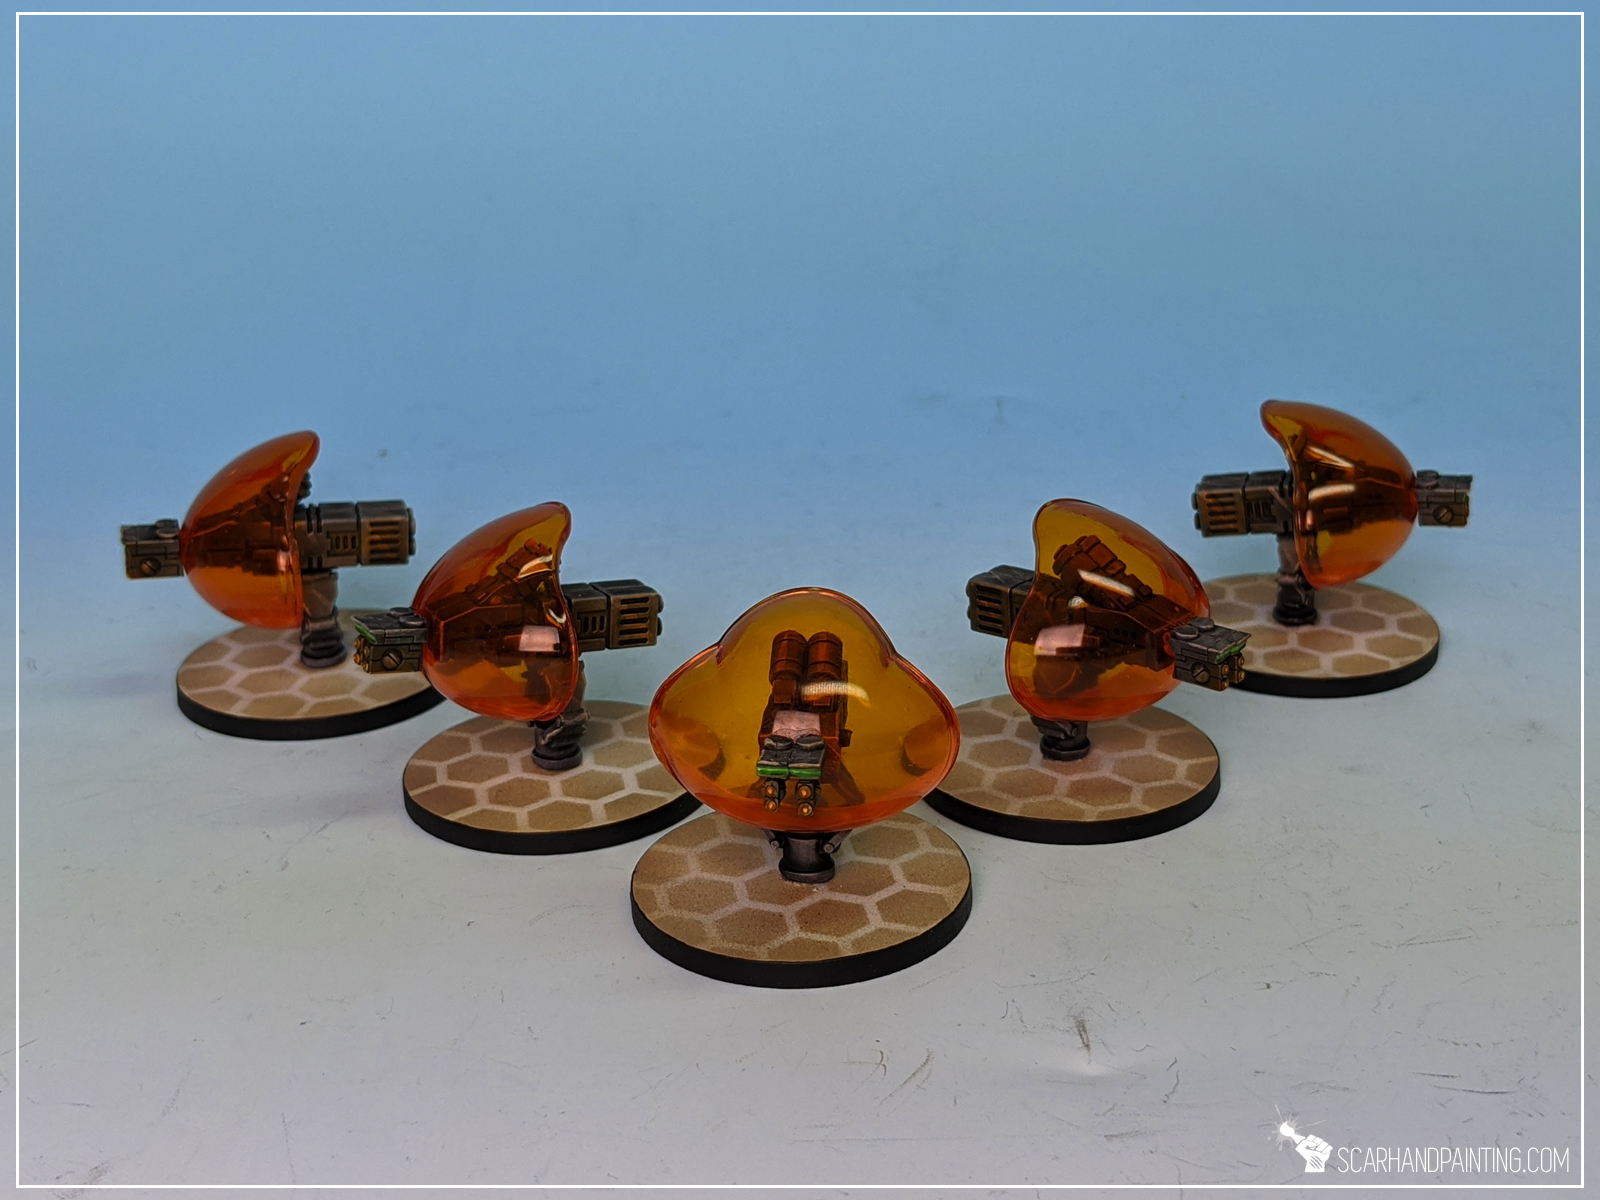
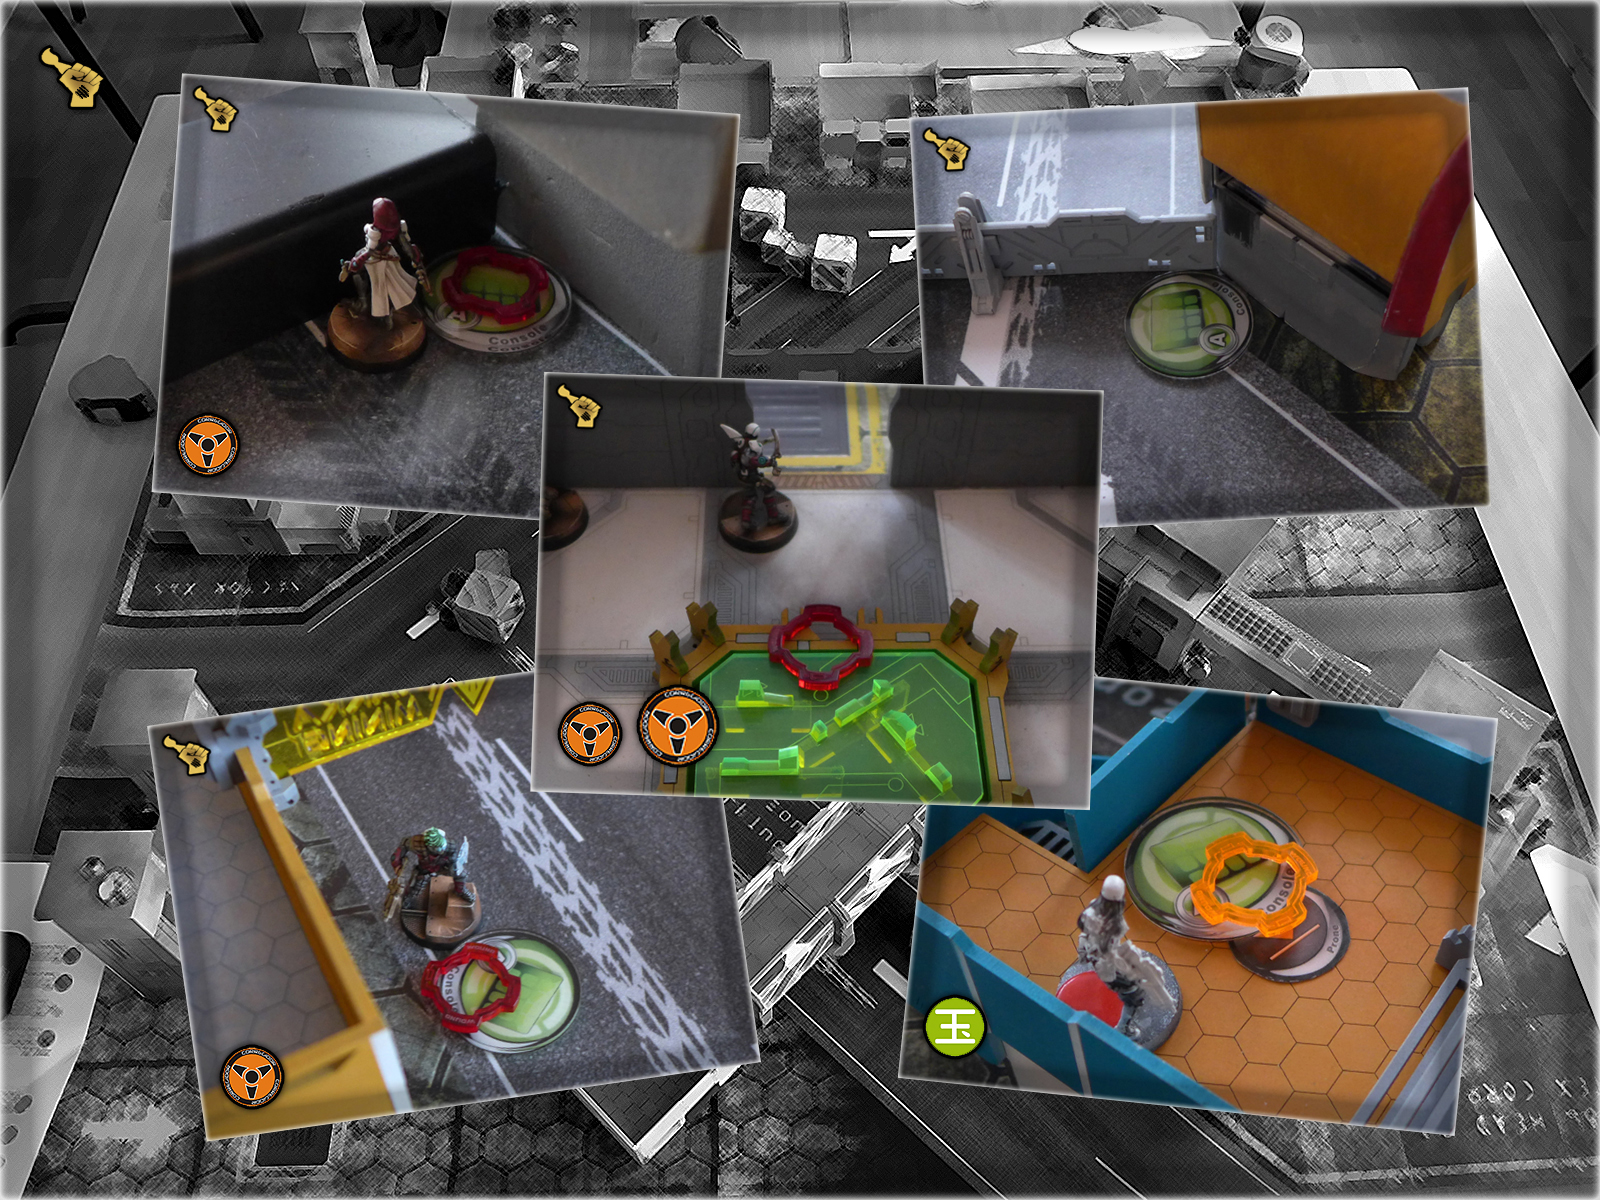
Another idea came to me last week, during shower. It sounds stupid, but once you see the end result, you won’t be laughting 🙂 This was certainly the best idea of 2016, yet to be beaten. Infinity 3d Consoles instead of usual tokens, born out of thin air in a matter of two days.
You can read some more about how these were made in Tutorial: Infinity DIY Console. If you like them – be sure to spread the word, so that more people will see them 🙂
Having so much terrain pieces left me with a dilemma of what to do with some of them. Gaming on “White Boxes” required a lot of playable fillers to expand table’s properties. Now, with brand new design some pieces are too big, or too many to be used. Still don’t know if I should try to sell these, strip bare and re-use the parts or redesign against reason…
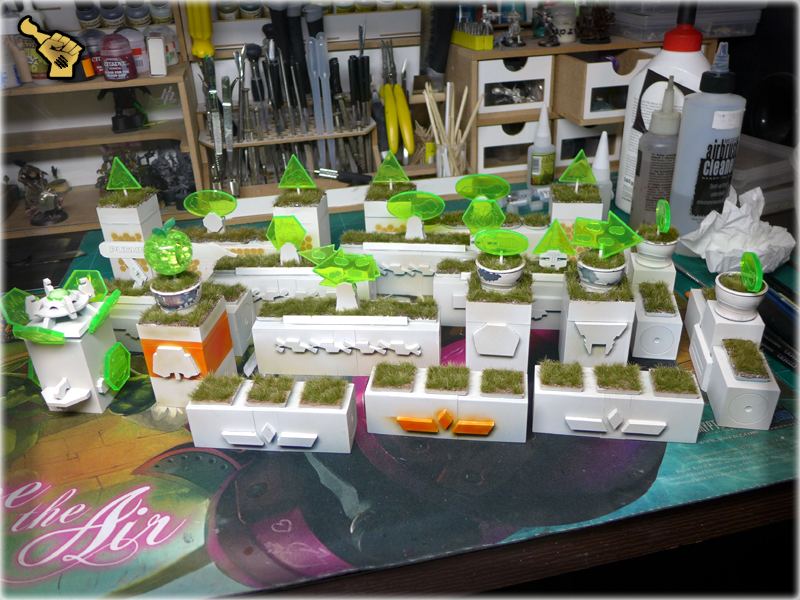
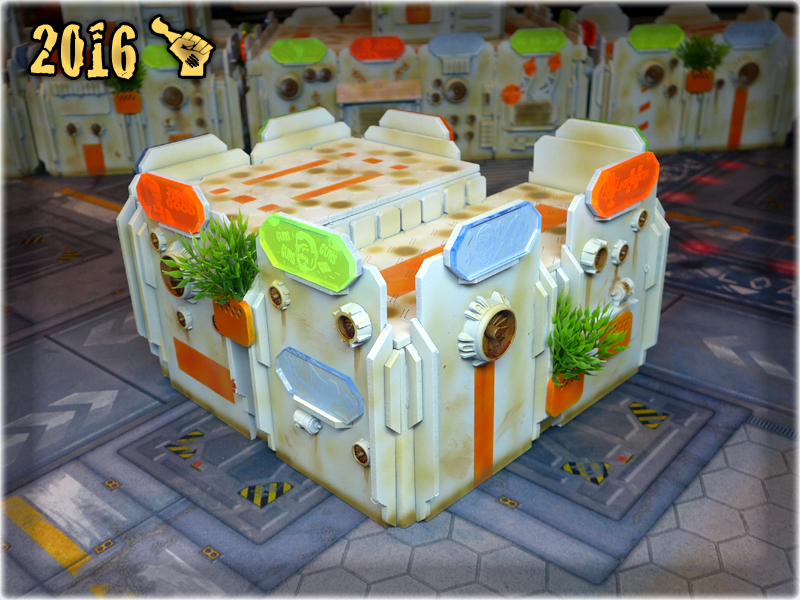
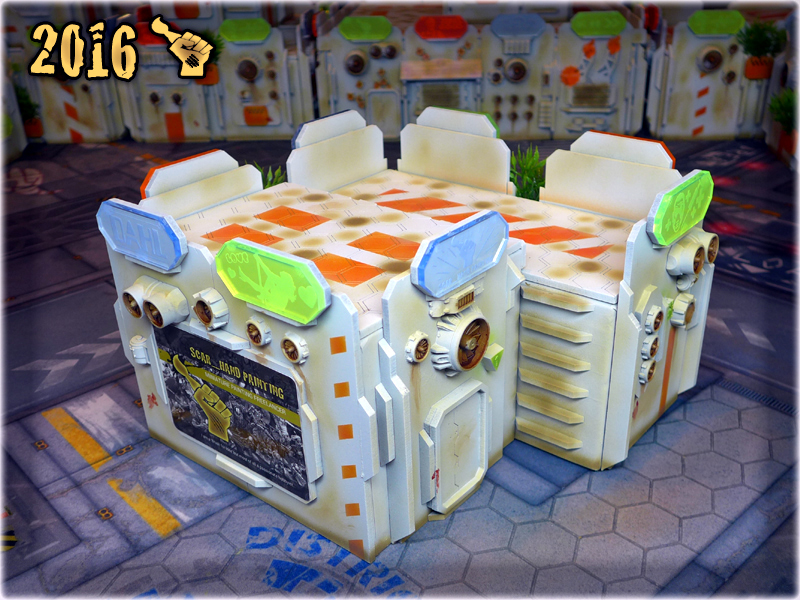
Now you have seen all the fillers I currently worked on. Why are they so important? Well… do you still remember that poor looking terrain at the top of this article? Take a look at this and tremble with ecstatic shiver!
There were supposed to be at least three parts of this article. With outdoor Objective Room in development, buildings awaiting some substantial parts, new table’s playability being regularly tested, Now I’m pretty sure that two to three more are yet to come. Who knows – If I have to wait more for a delivery of resin pieces – I might loose some of my sanity but also come up with some more ideas! Stay tuned for “THE COLONY” SPECIAL PROJECT part four!

Welcome to Modelling Infinity Console tutorial, a short Step-by-step trip through a process of creating Consoles perfect for objective markers in Infinity the Game and other Sci-fi wargames.
You may consider this article to be an extension of “Tutorial: Infinity ‘Do It Yourself’ Gaming Terrain”, in which I tried to inspire you to hunt for some awesome everyday items. Pieces of what might be considered garbage, and yet an awesome source of unlimited potential, when it comes to scenery making.
Before we start, some notes:

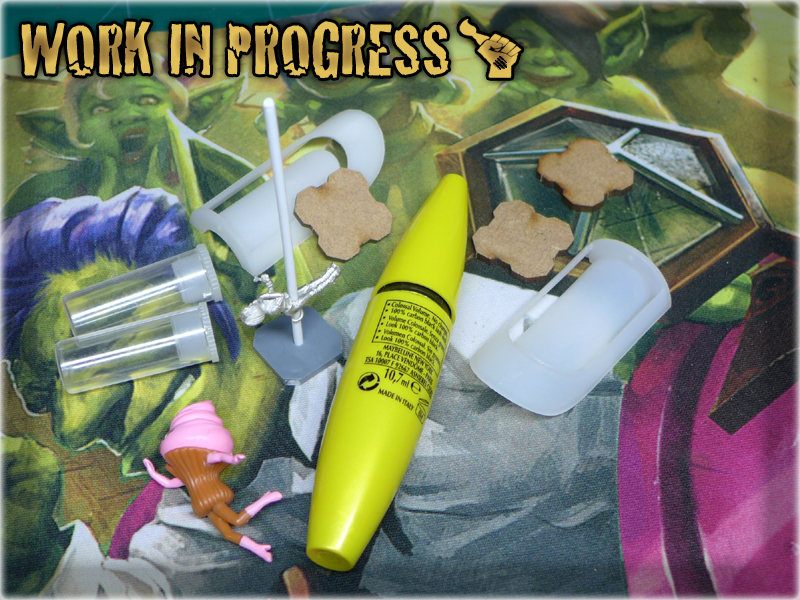
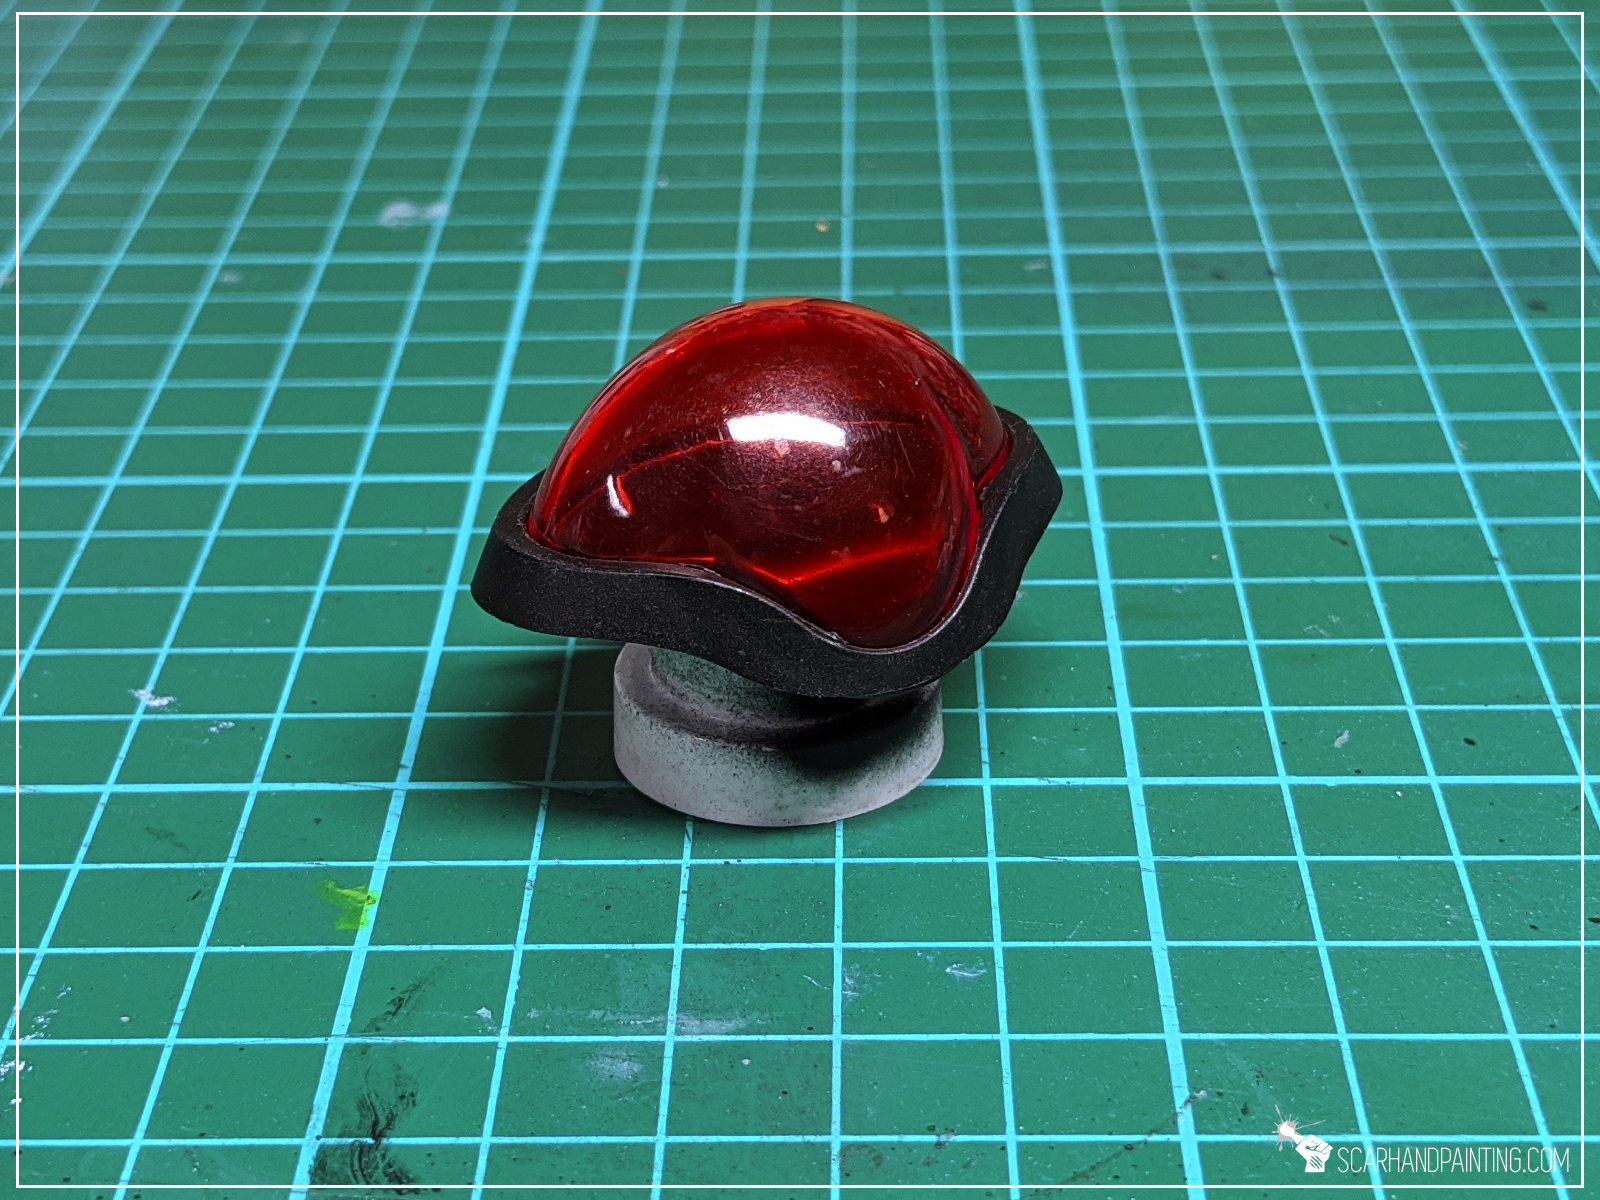
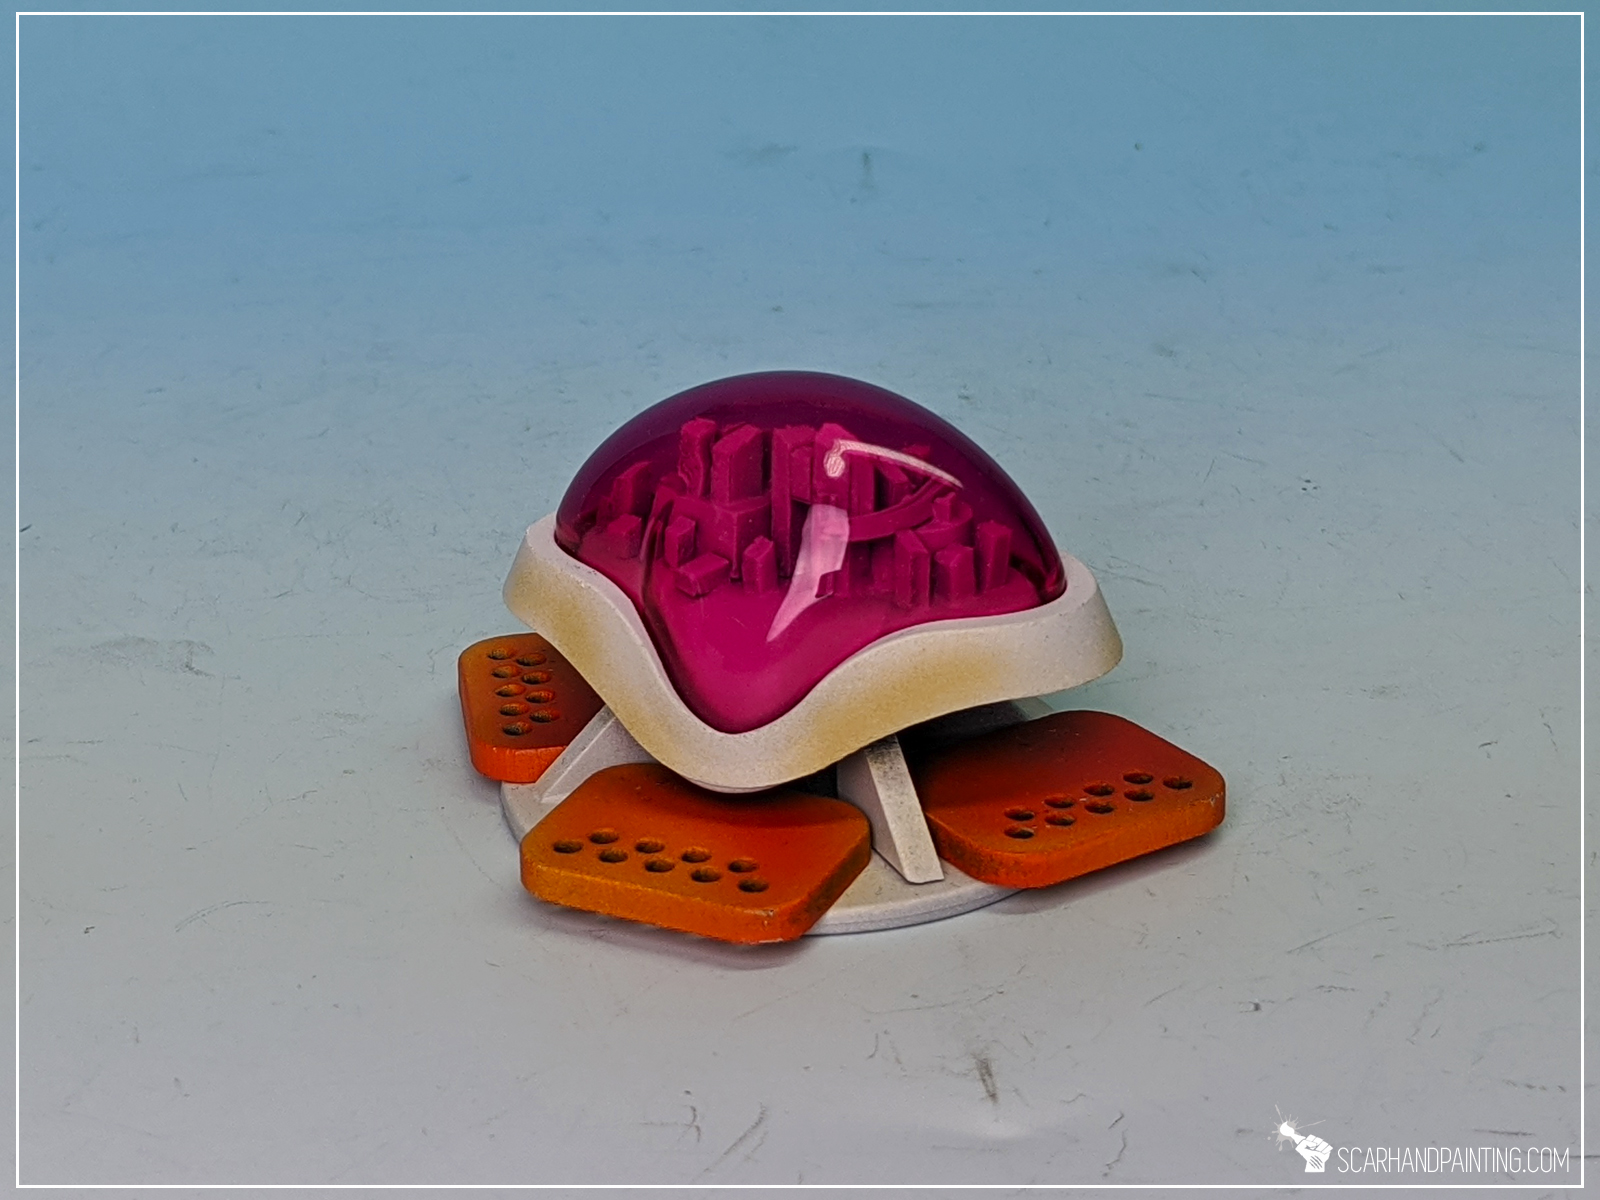
The story behind the idea is rather trivial. Years back I was taking a shower, saw my wife’s shower gel bottle and was instantly struck by a surge of inspiration. Colored, clear top element was just too cool to pass by. Transformation from a shower gel plug to a tiny console came natural. Just see for yourself.

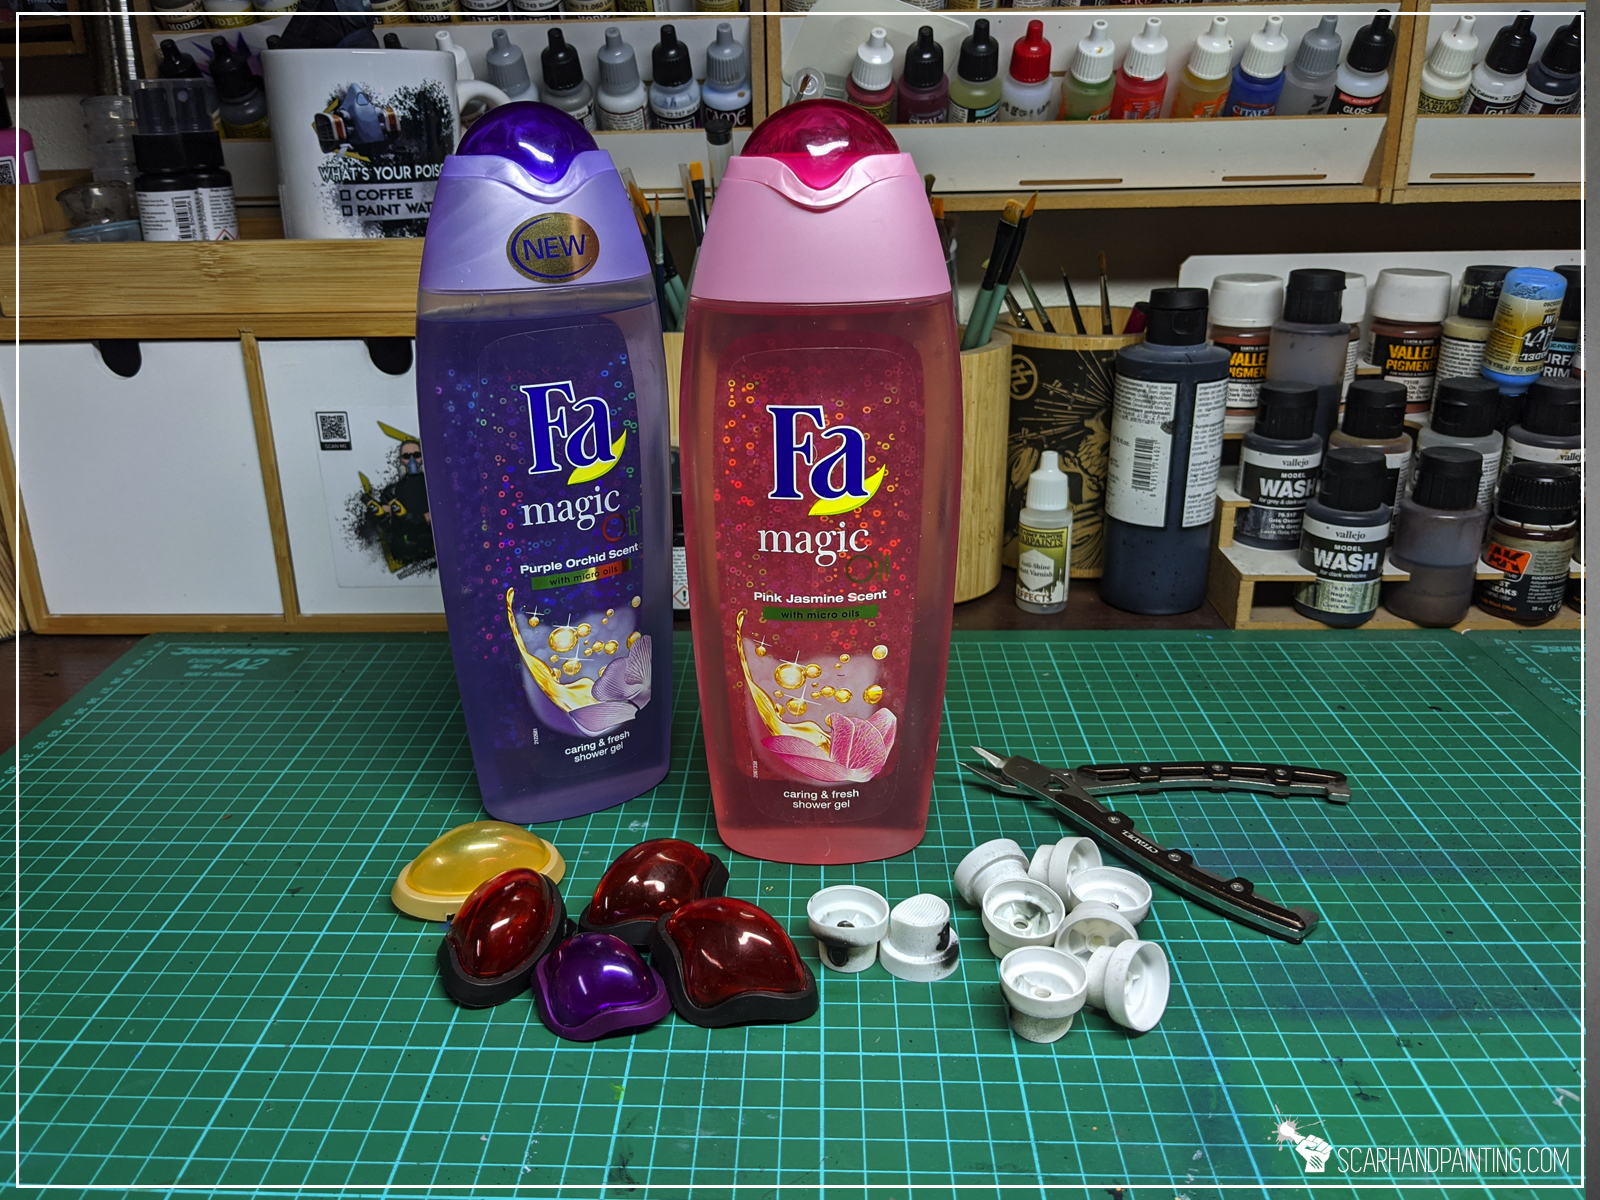
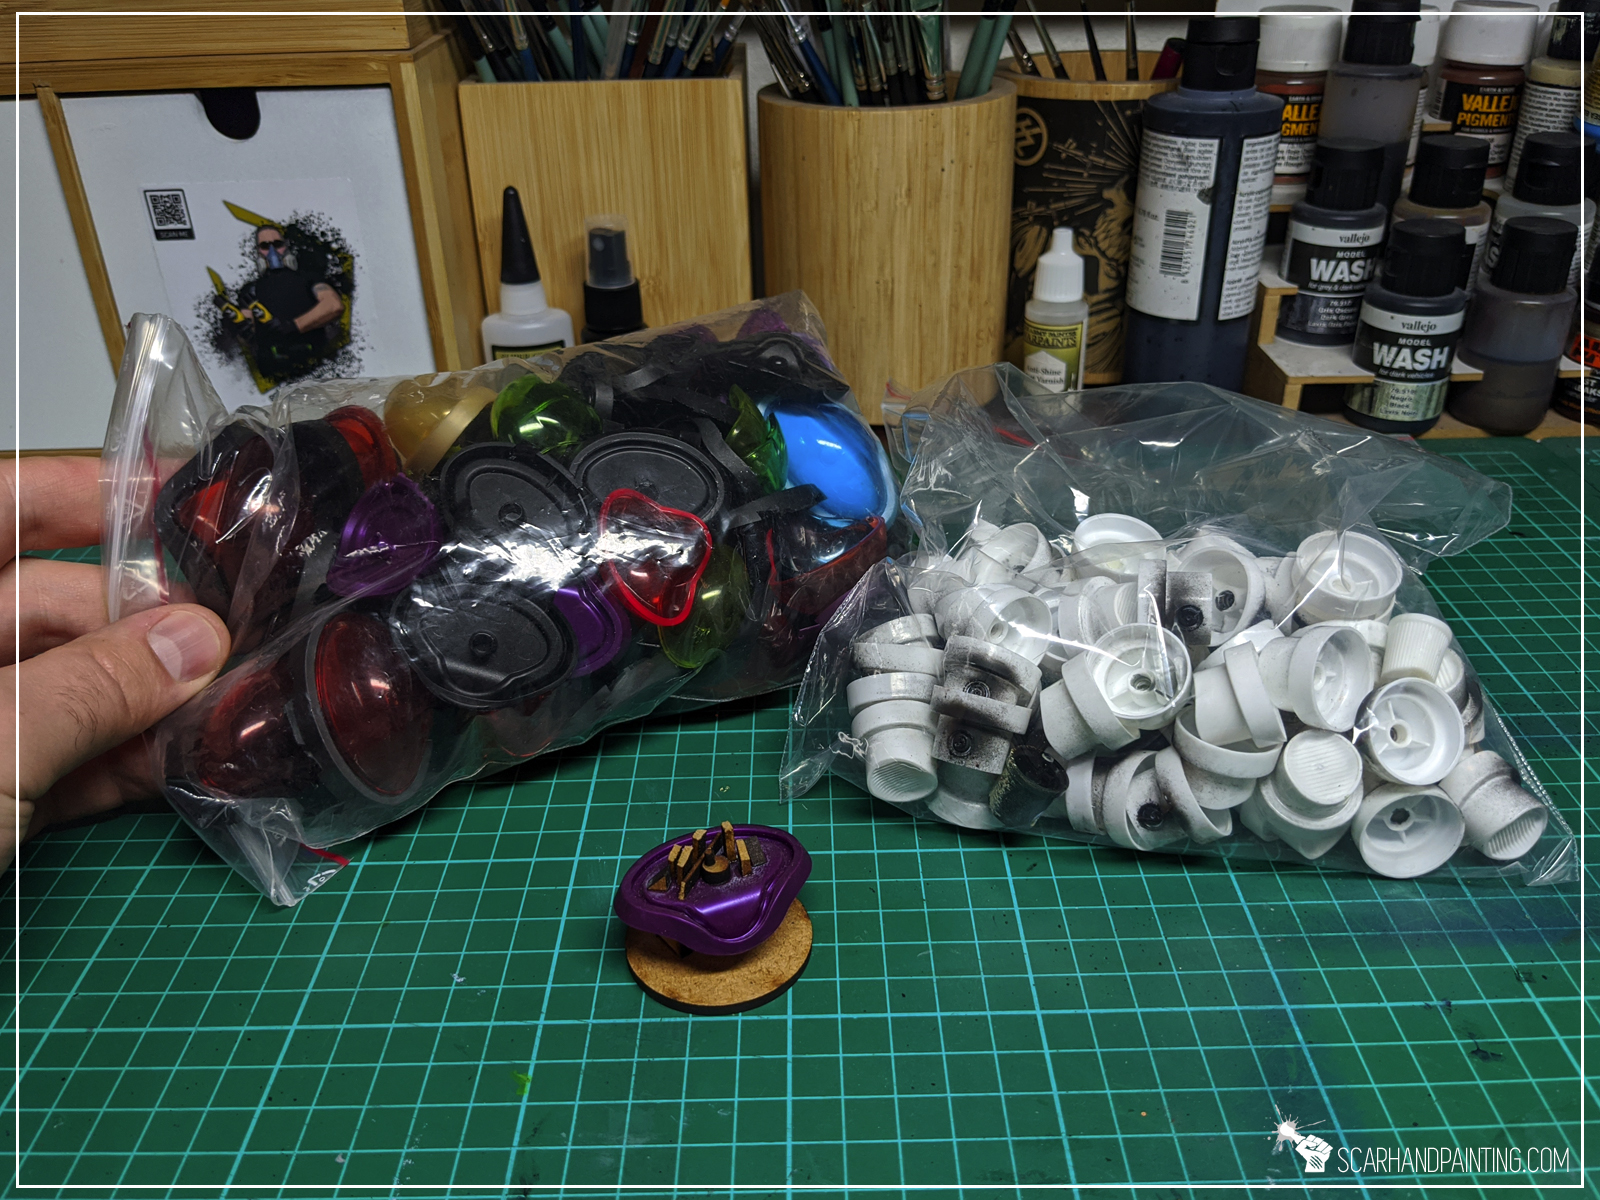
I used:

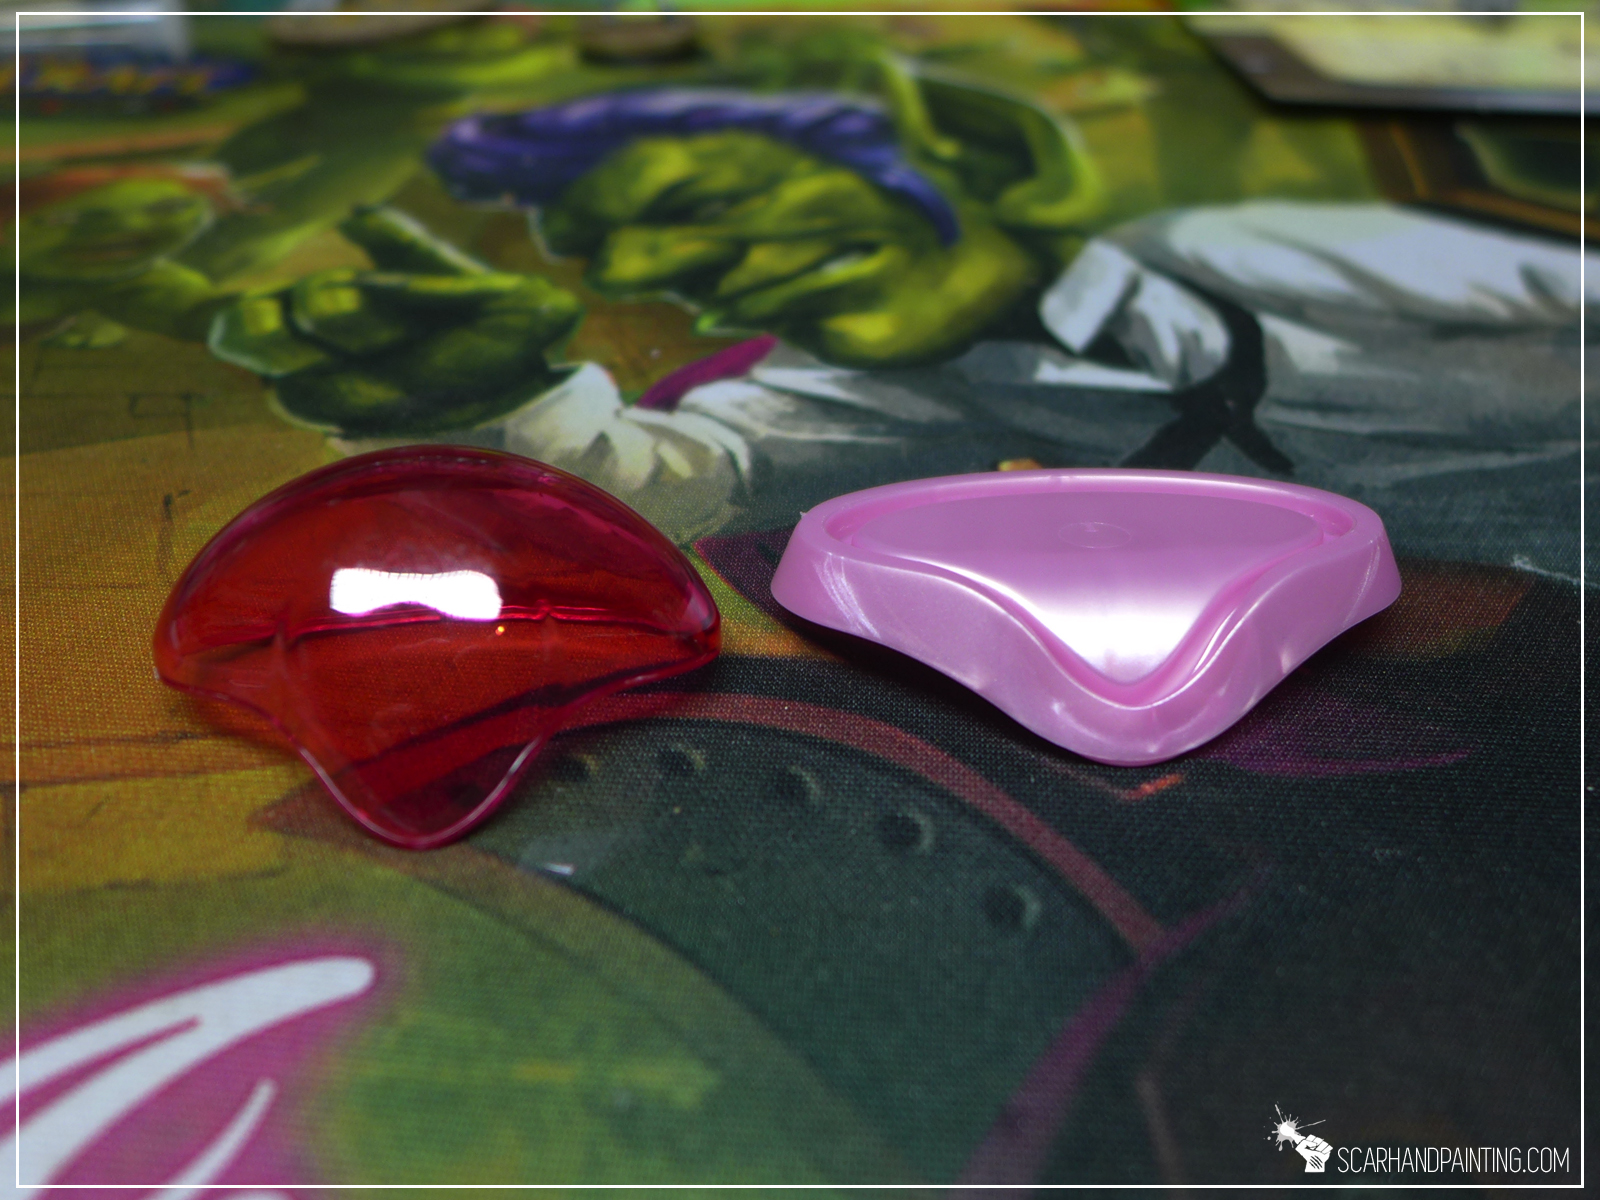
Step one: Main Body
I started by cutting off the plug and pulling out the acrylic part. I then used a hobby knife to thin down the bottom of the acrylic part so that it went in and out smoothly.
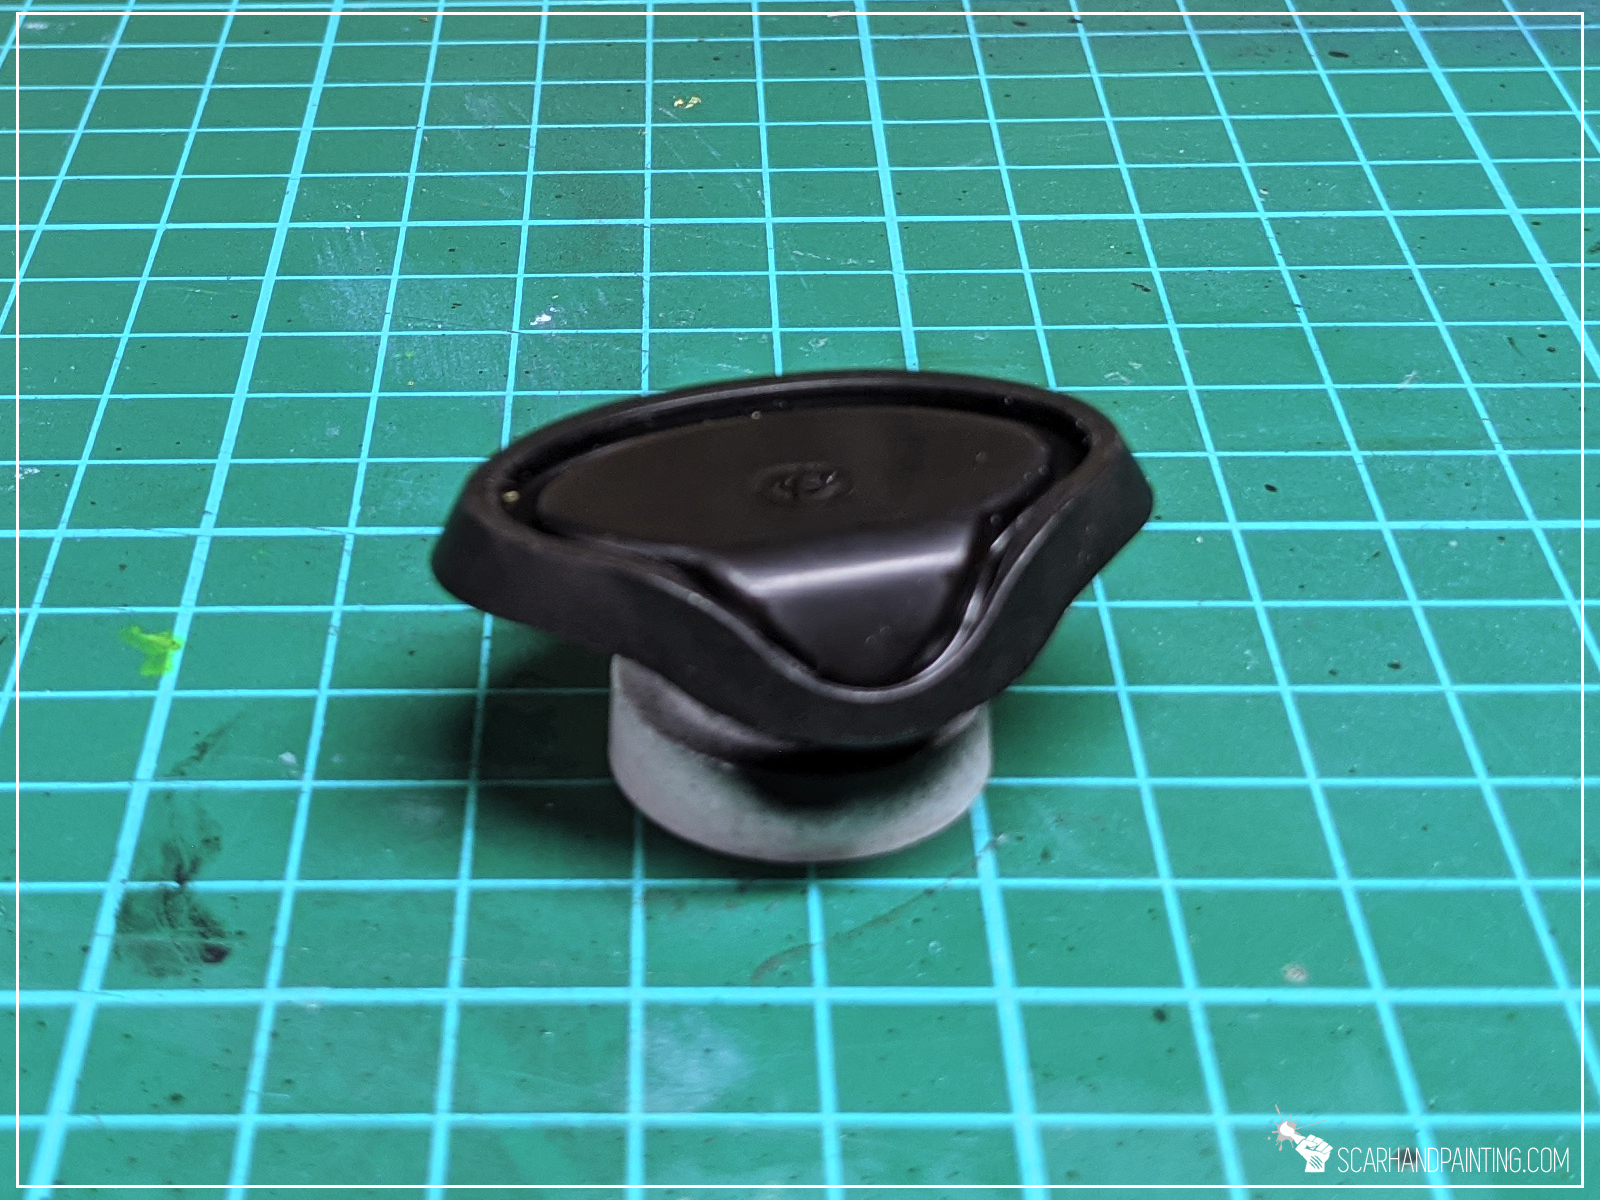
Step two: Support
Back in the days I cut 3mm thick PCV and created four legs for the console. On the next attempt, being more experienced, I used an old Spray nozzle. Since then I tested a lot of random stuff, but given a choice I prefer the nozzle above anything else. One man’s trash is another man’s awesome Console support!

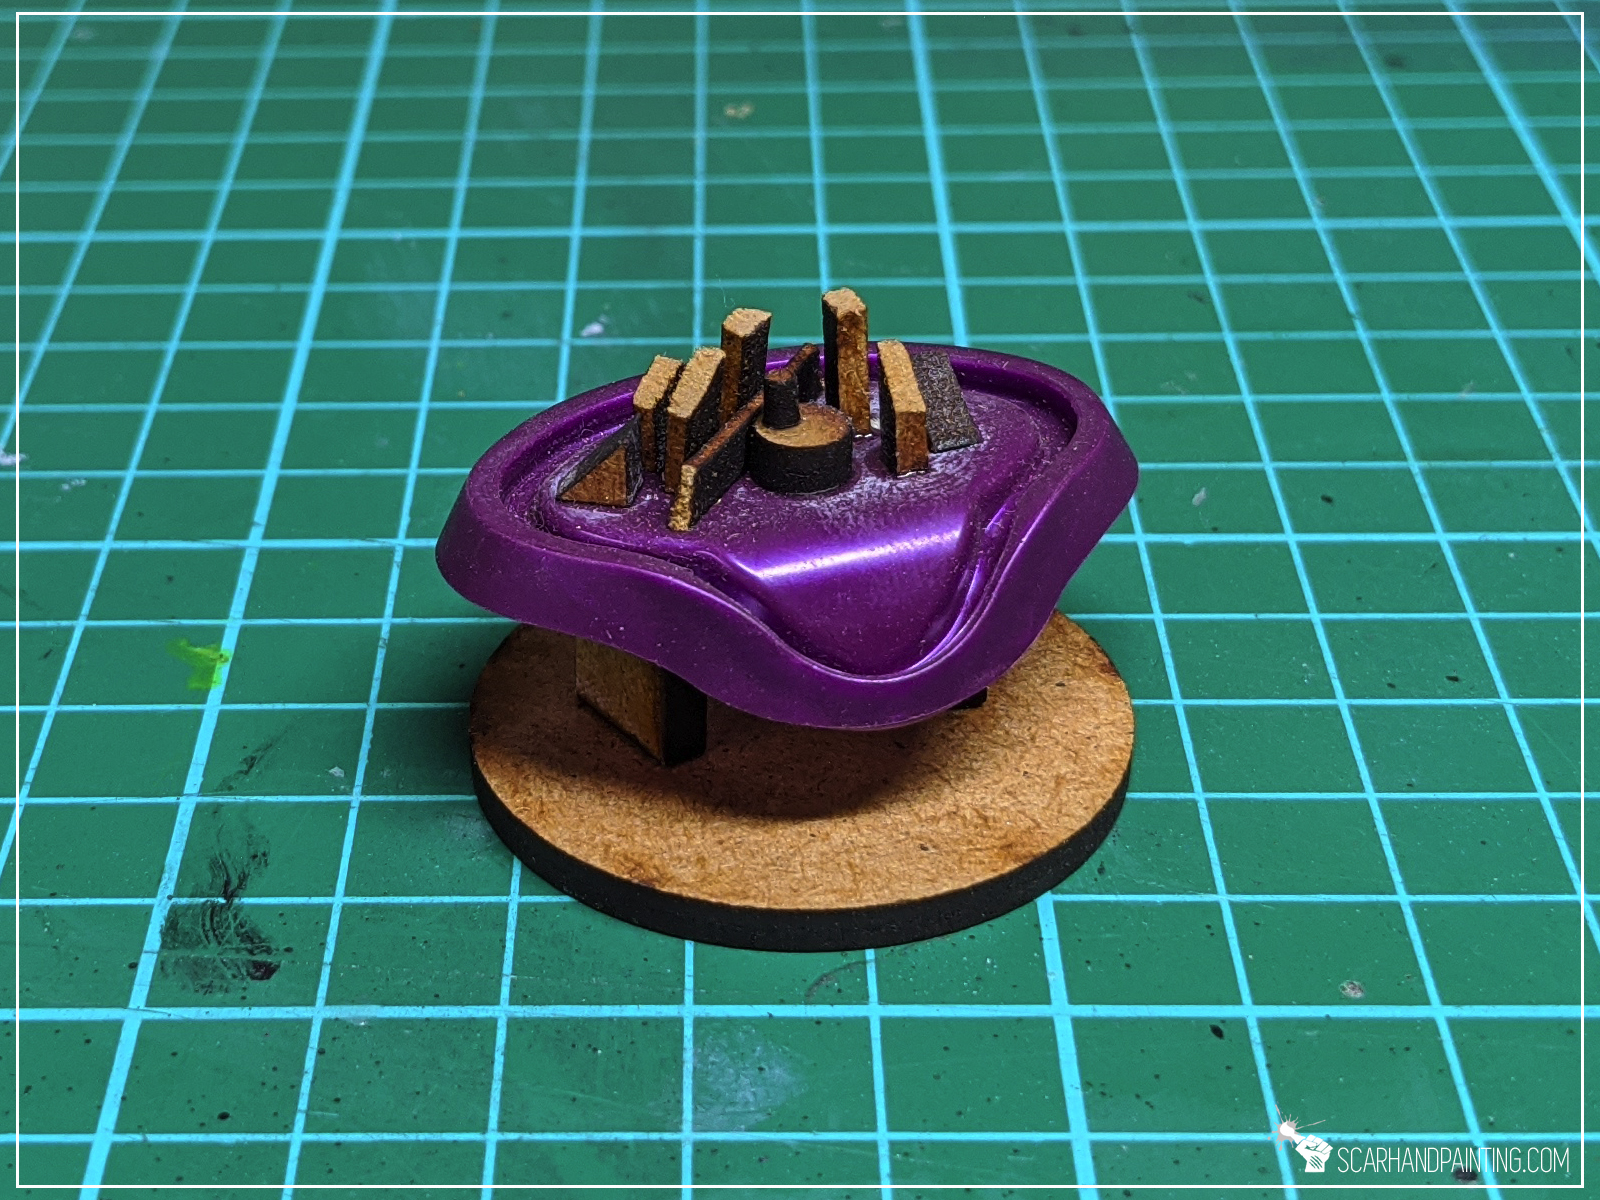
Step three: Detail
Thin pieces of PCV, lollipop sticks, Airsoft Gun ceramic balls, plastic miniatures bitz – anything will do for an awesome filler. The idea behind the console is a 3d hologram of a city space, or and enhanced molecule view. Whatever is put inside and sprayed white will look great. I leave this to your imagination.

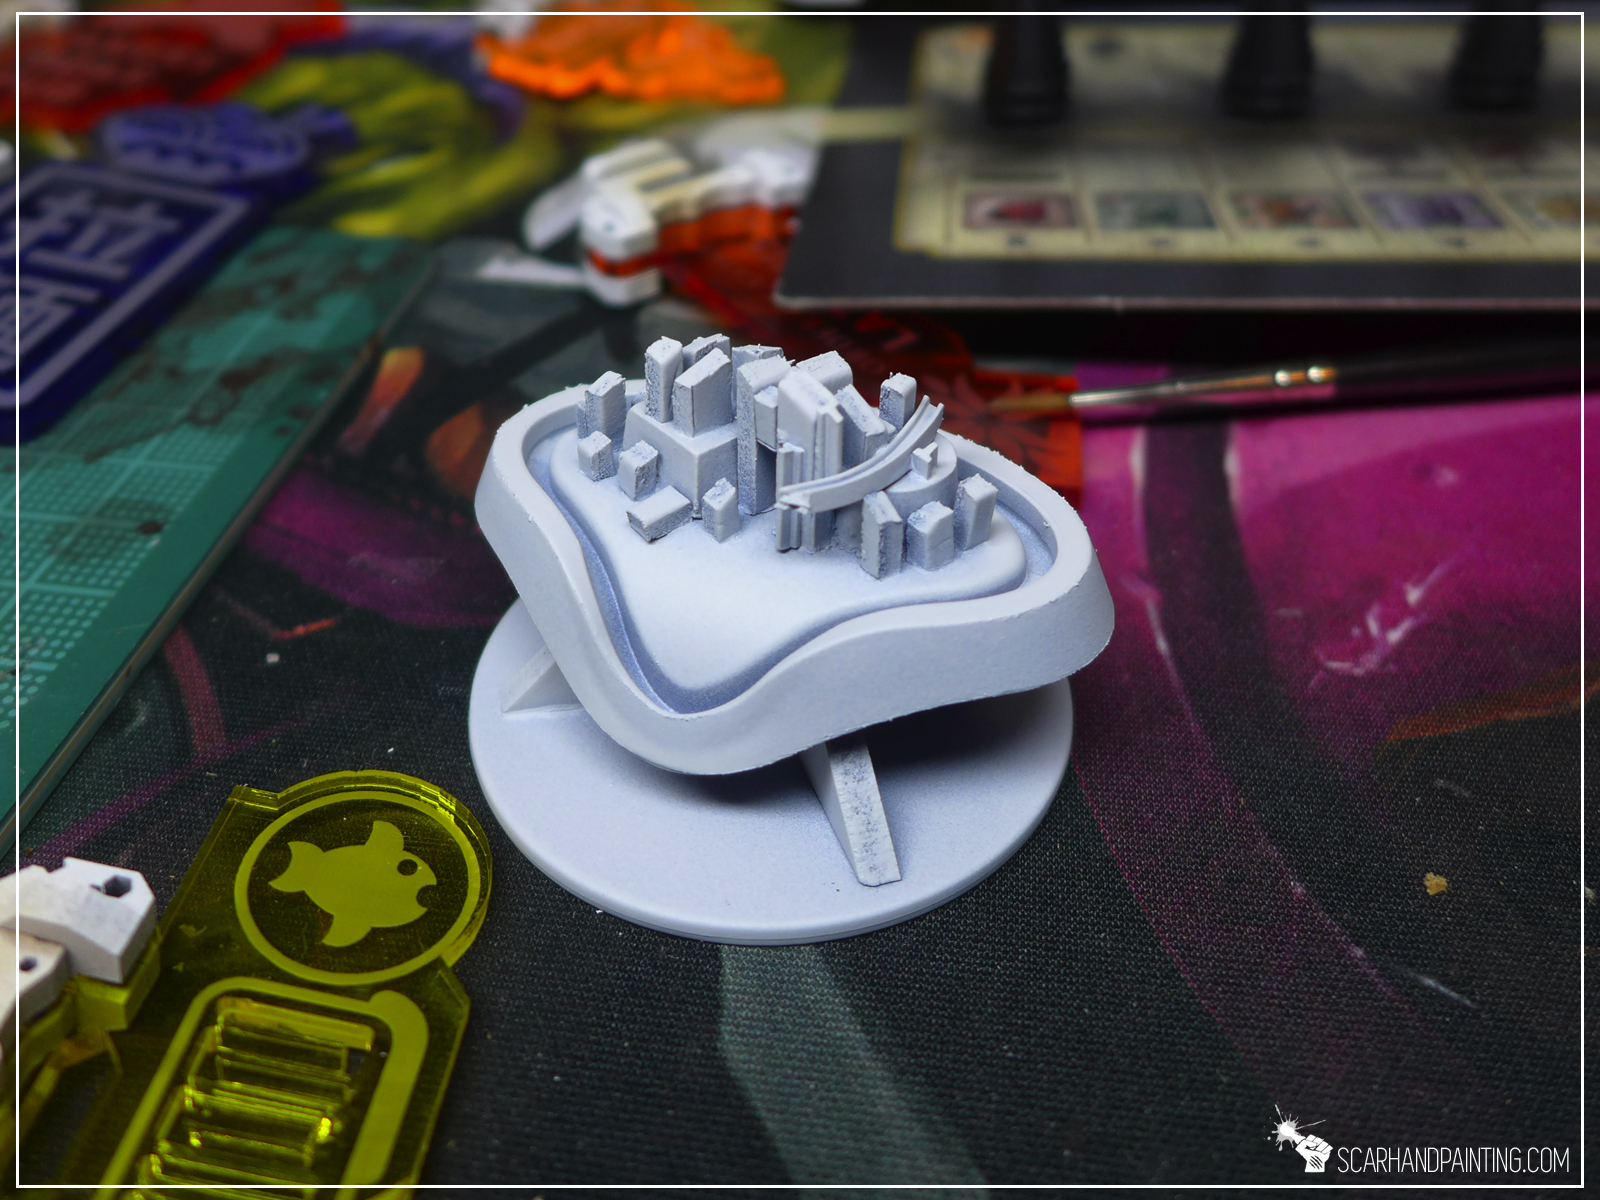
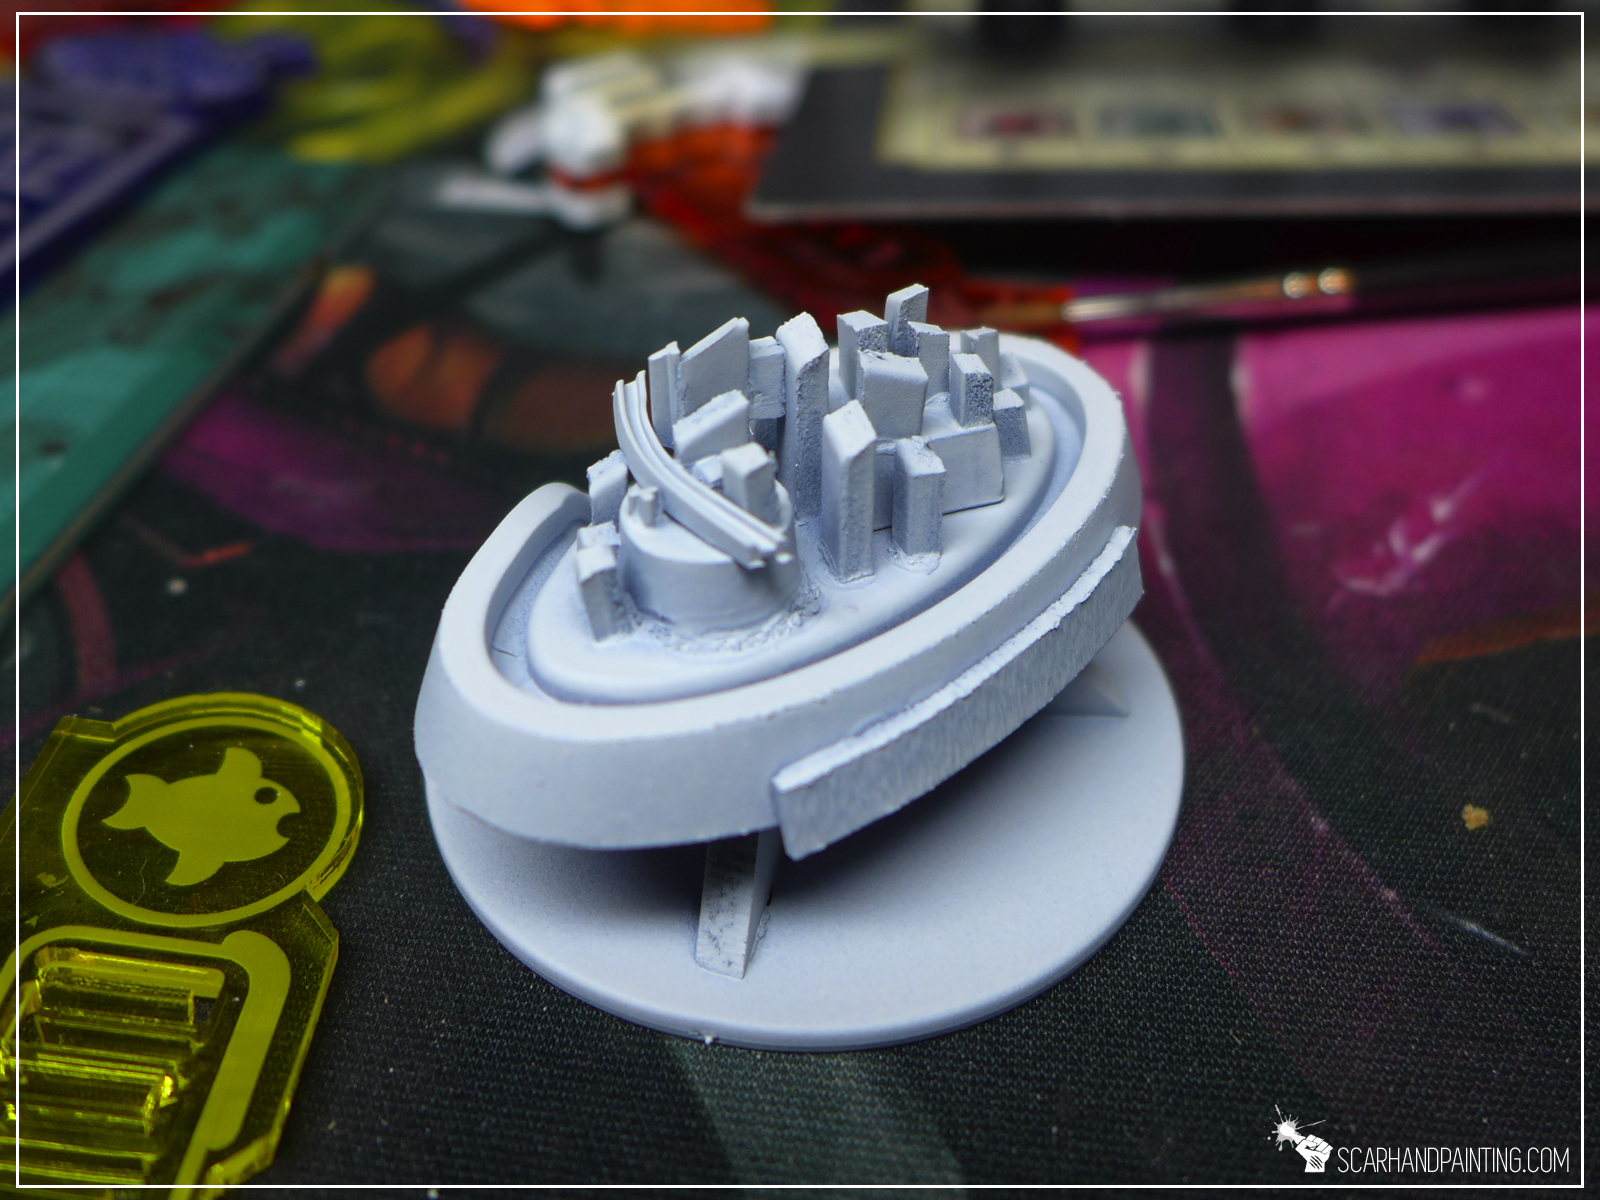
Step four: Paint job
I painted entire console white to fit my own gaming board. Looking back I strongly recommend painting the inside white to take advantage of the vibrant color mounted on top. Other than that anything will do.


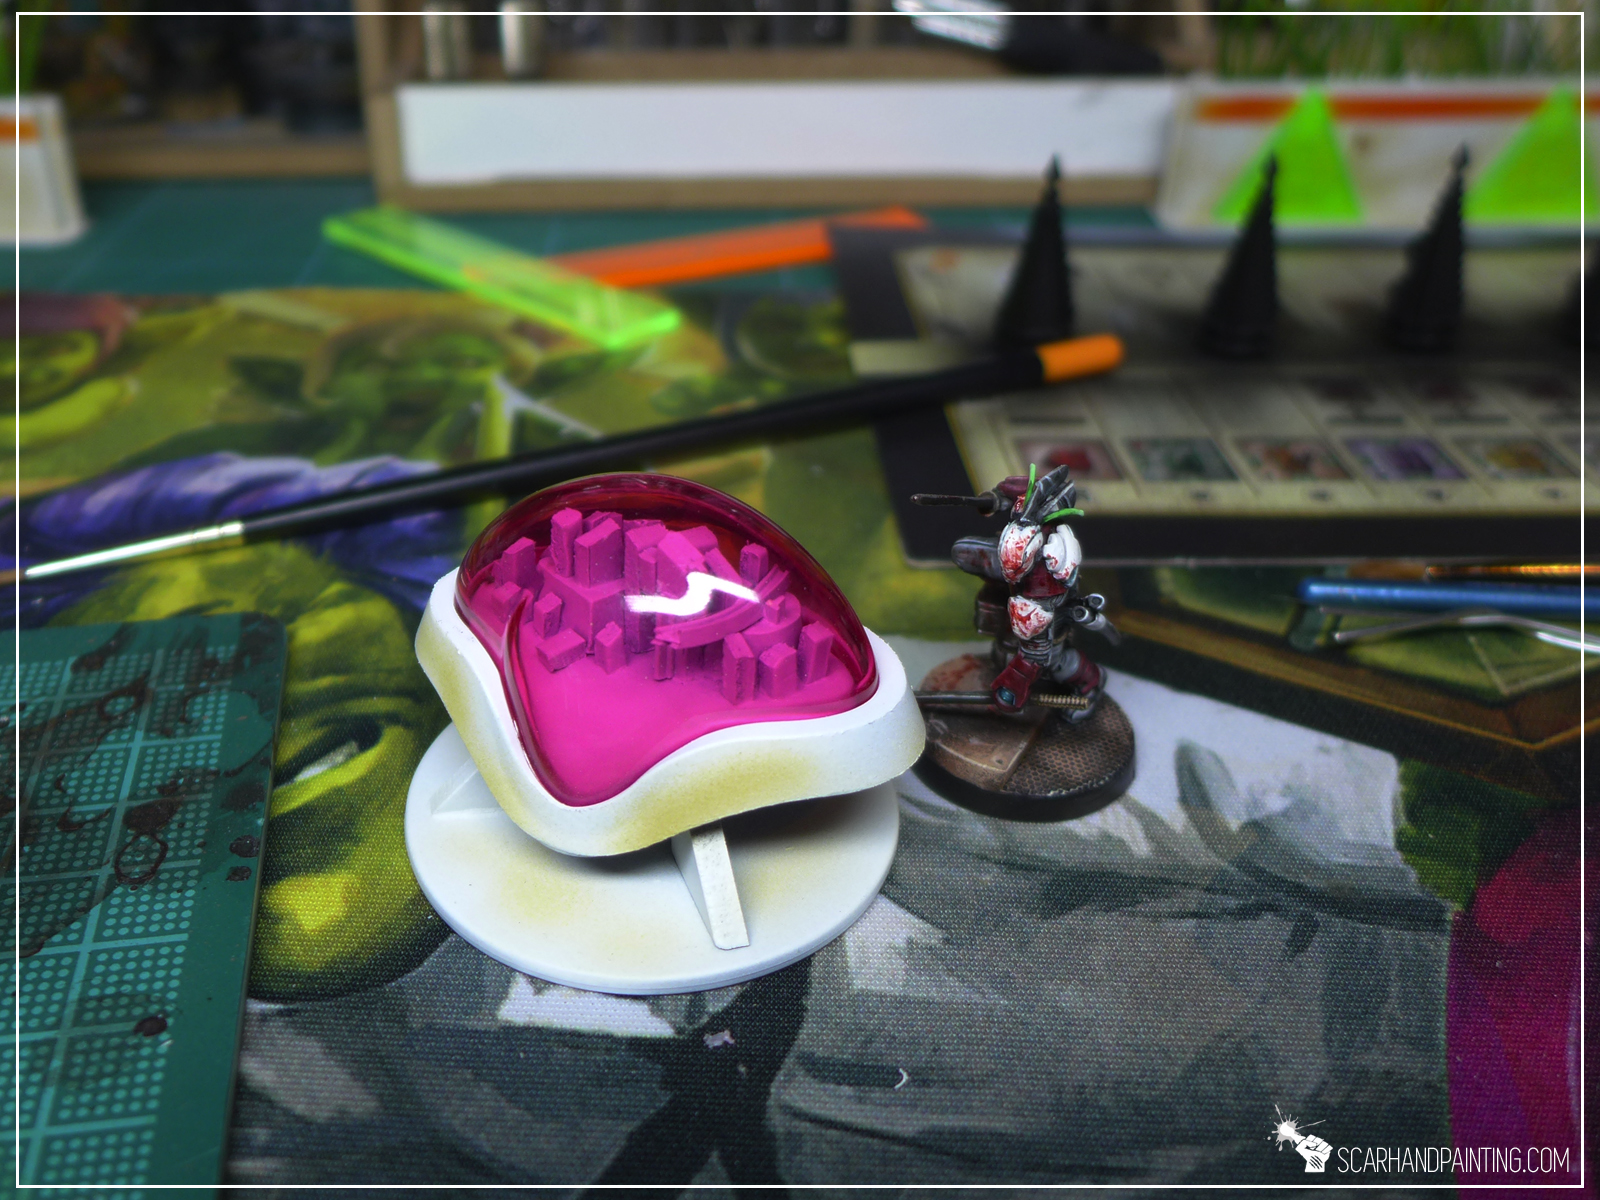
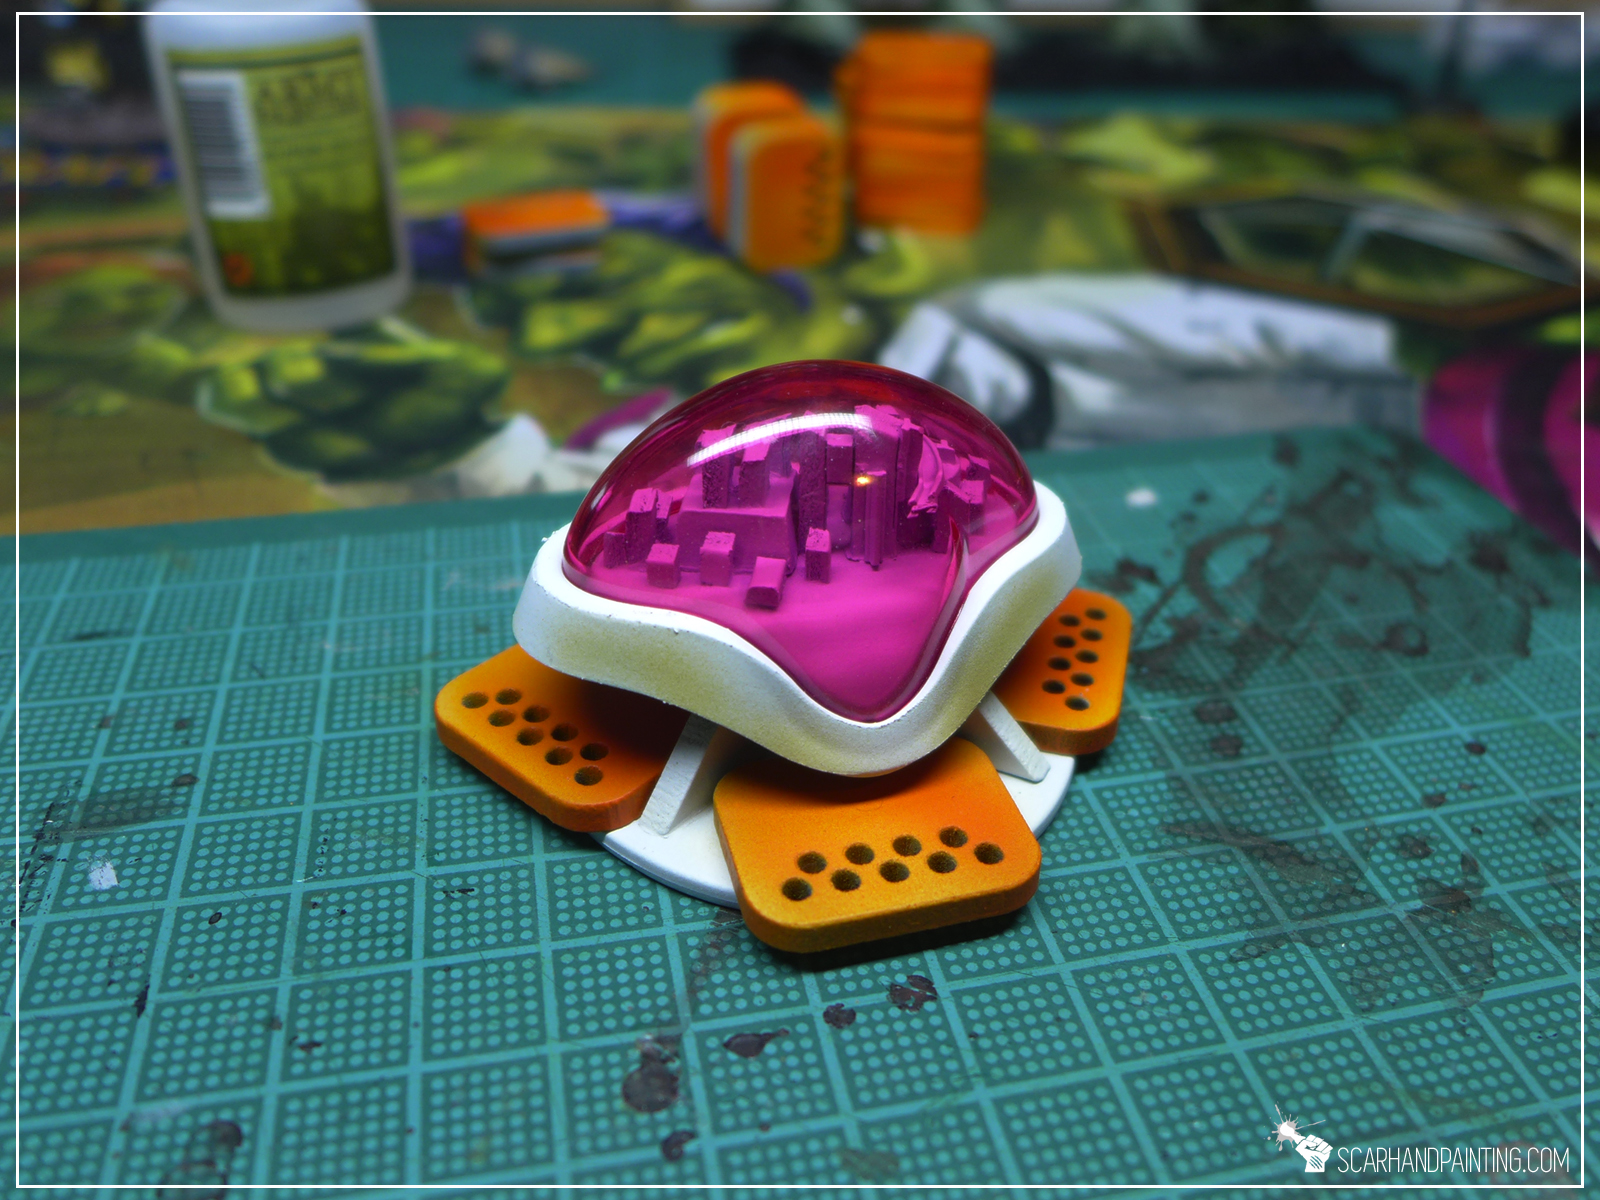
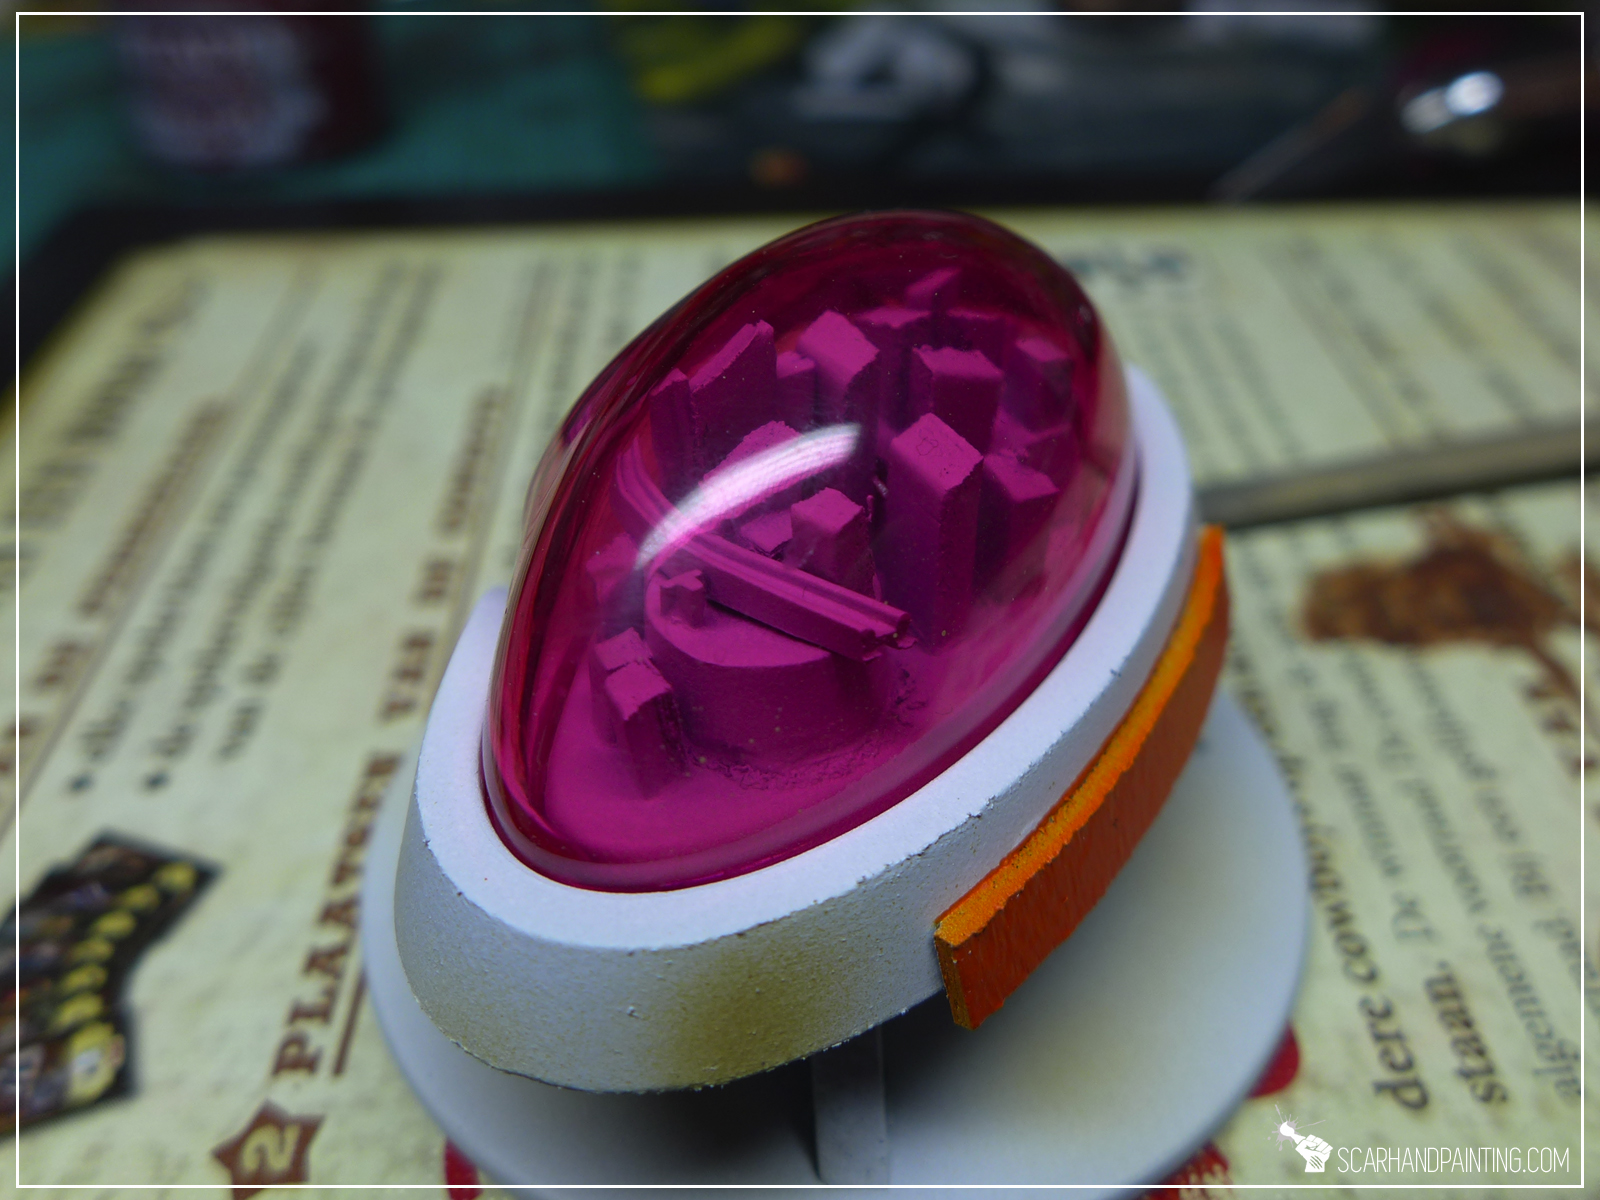

Final result:
Since 2016 I made few dozen consoles. These, being the first set, will always have a special place in my heart.
Bonus Pic: (different scenery piece)
I hope you like the article. If it ever inspires you to make your own Fa Shower Gel consoles, be sure to tag me at Facebook @scarhandpainting or Instagram _scarhandpainting so I can enjoy your work. Cheers!
Last time I wrote about how “The Colony” Special Project came to life. A road from a tiny speck of an idea to a fully developed gaming table is a long one and I just begun my travel. I have gathered almost all of the items required to build my terrain set. I have revised my ideas and made peace with some circumstantial decisions. I was ready to start the construction process!
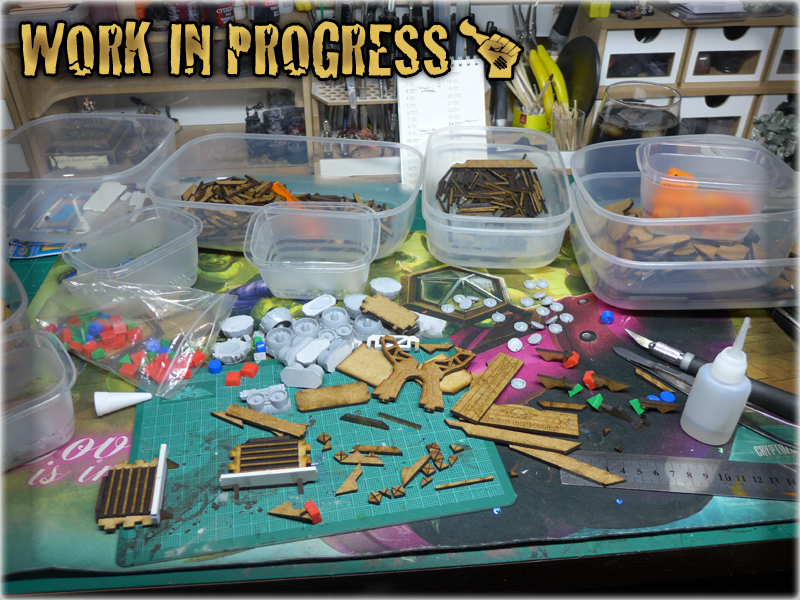
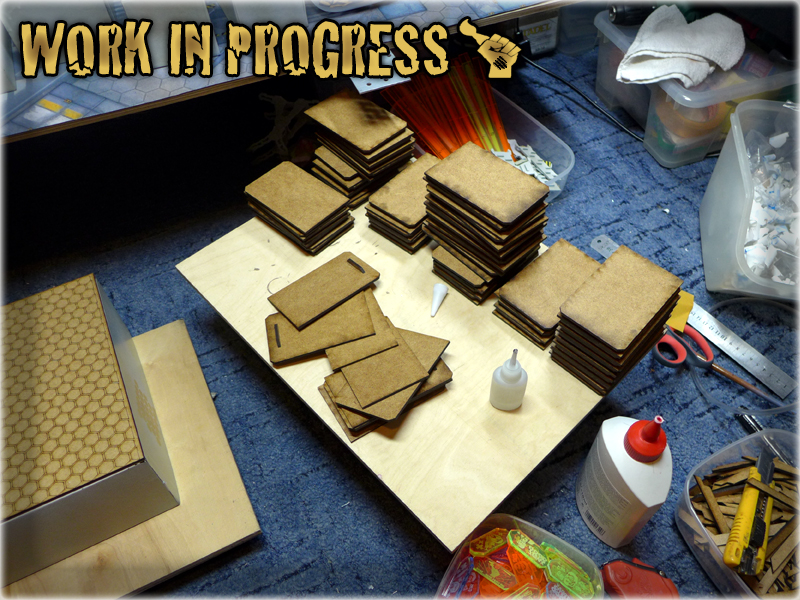
It all happened so quickly. One day I was engaged in my usual activities, painting miniatures, checking out facebook, writing articles… The other I got up to find myself knee deep in bitz, terrain elements, empty glue bottles and with my hands thickened with too much of dried out glue. It was as much glorious as scary. I couldn’t stop. Half kneeling on the ground, due to my workdesk being currently occupied with THIS – I felt like a child playing LEGO. Well – when inspiration comes a man is gotta do what a man is gotta do – I let myself be swallowed by passion and worked till all the buildings were ready to enter next stage.
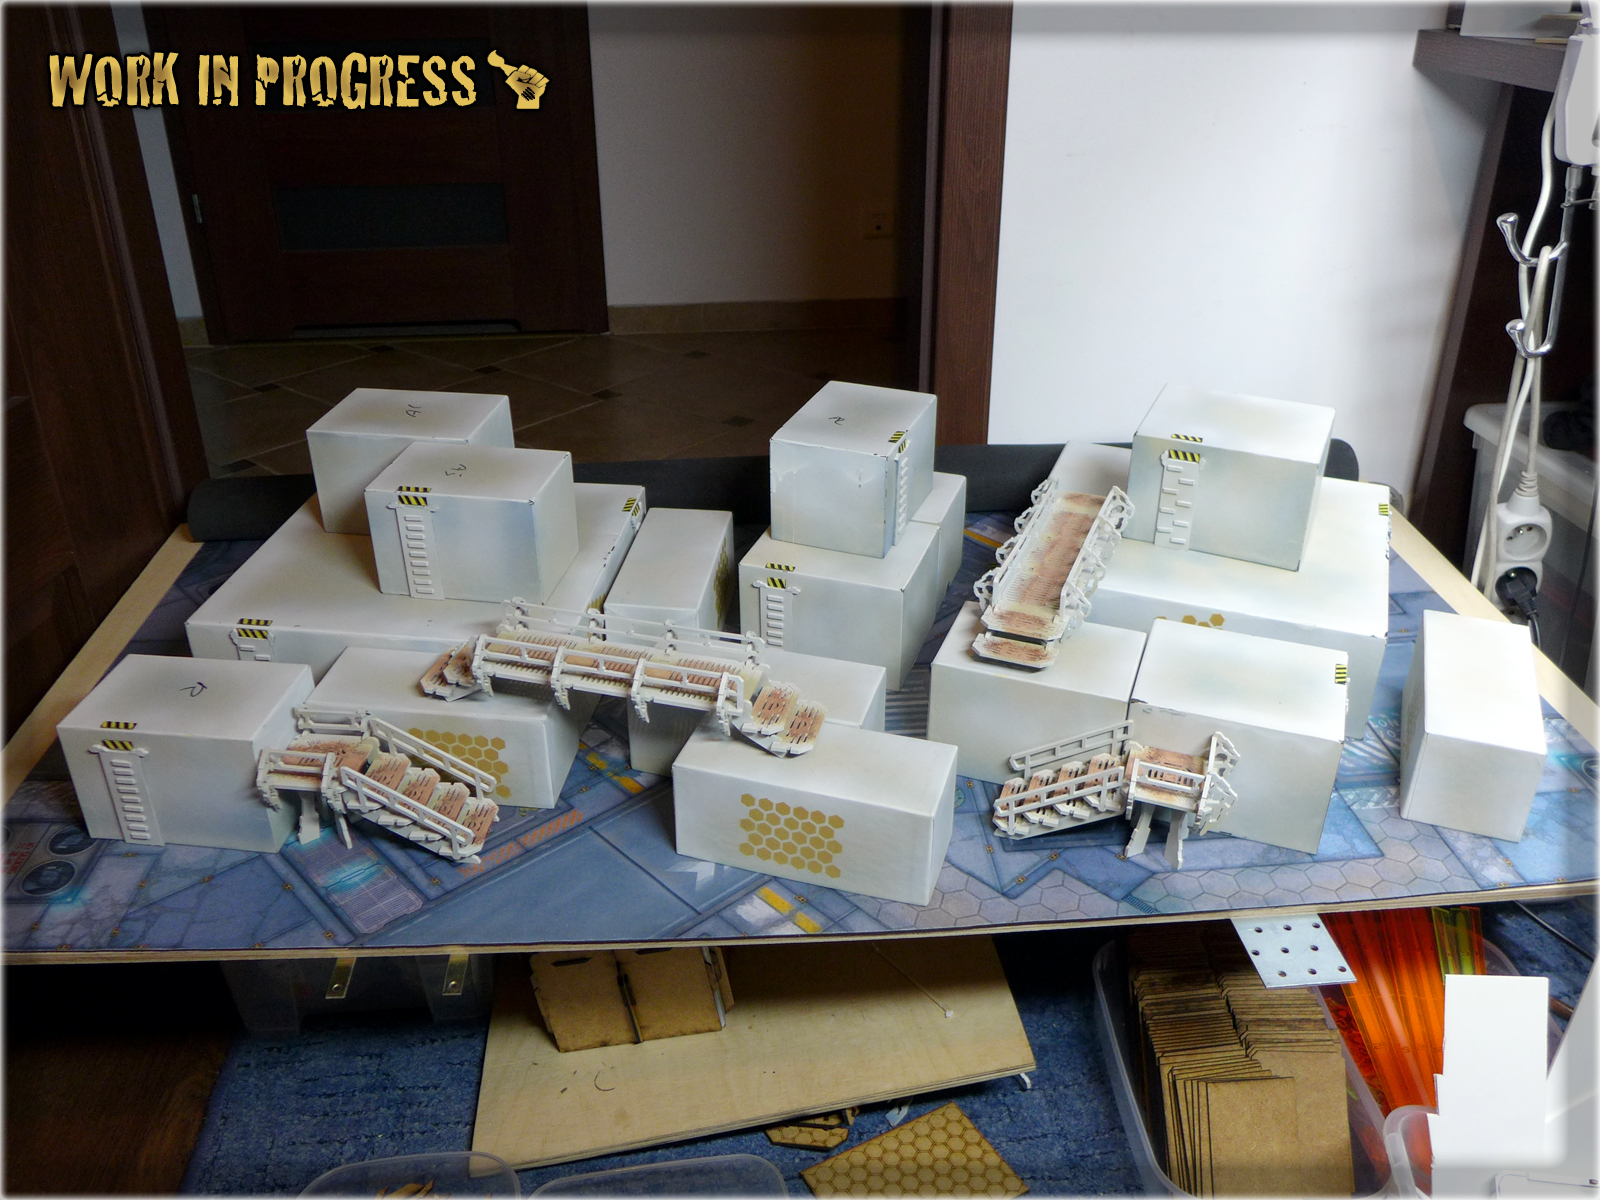
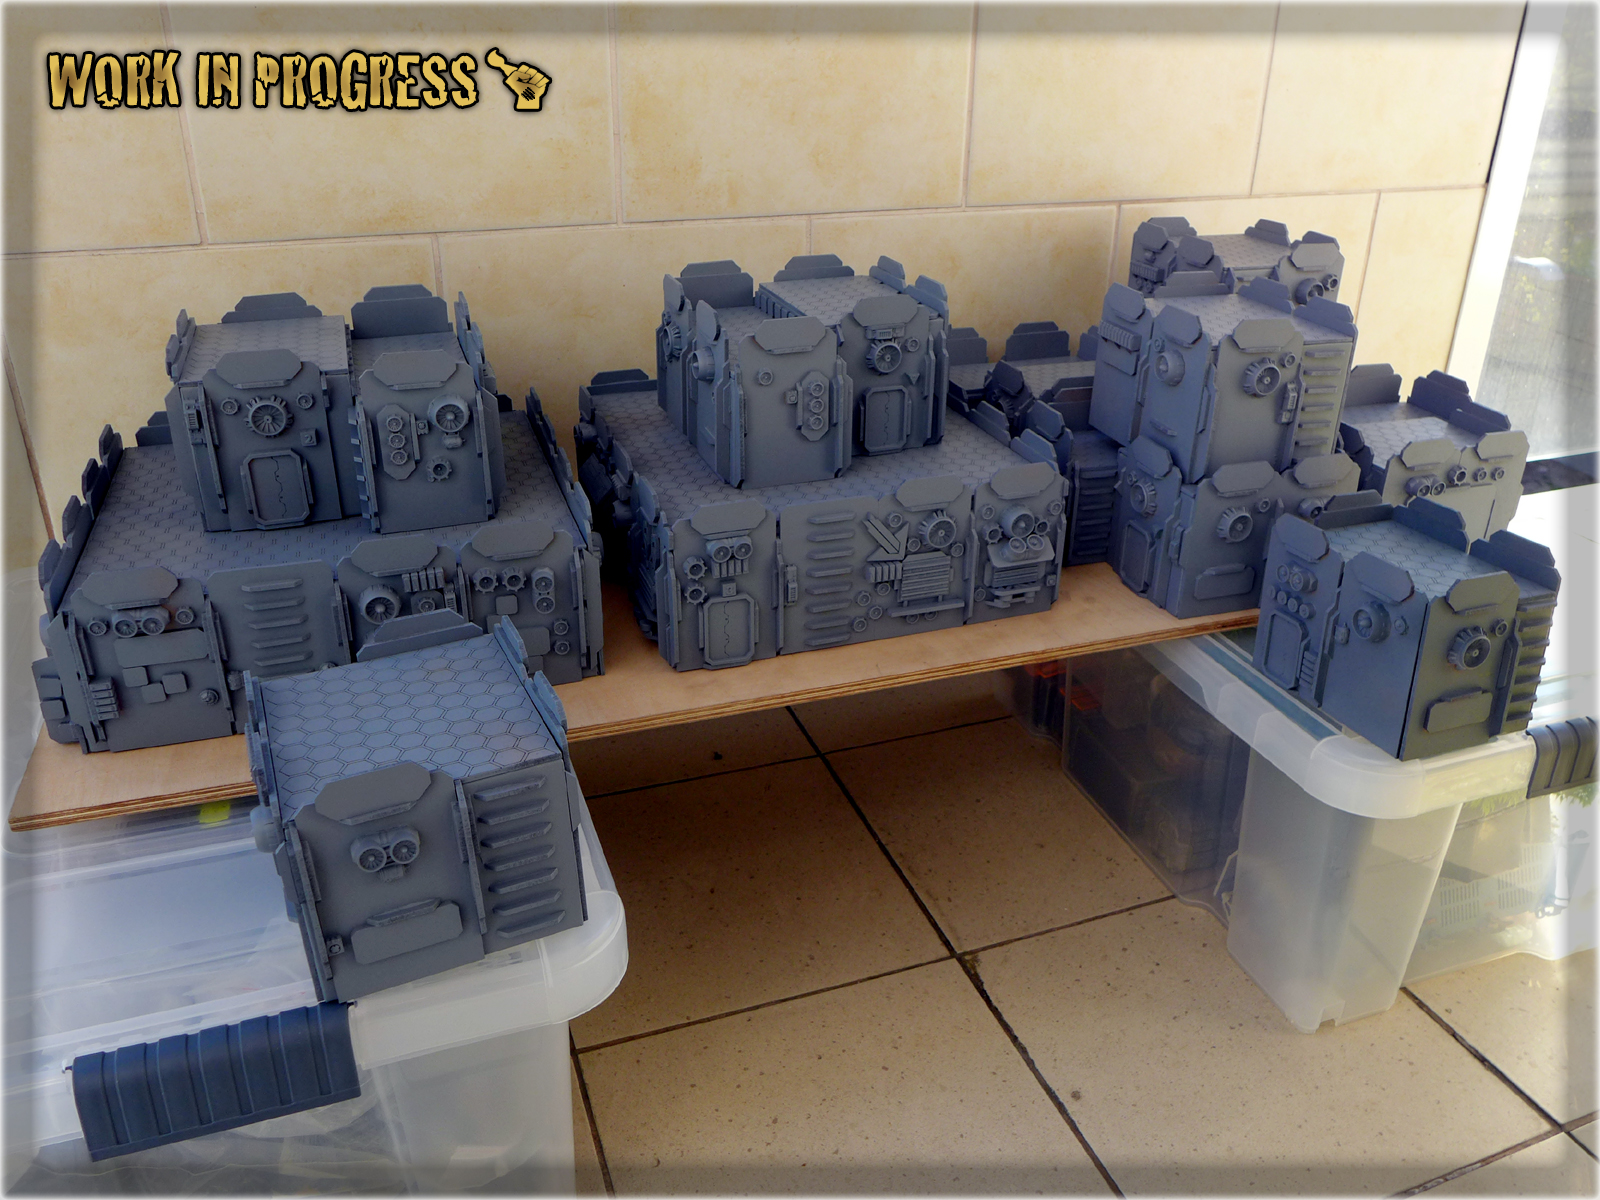
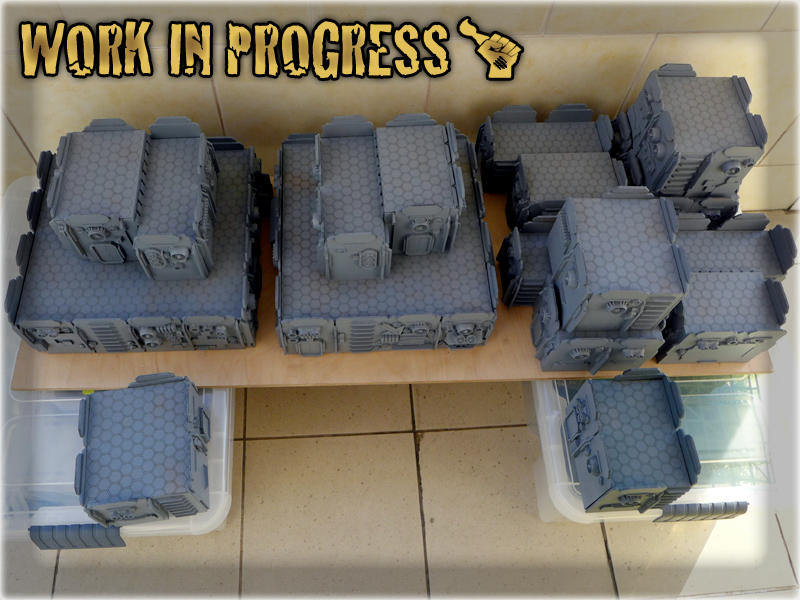
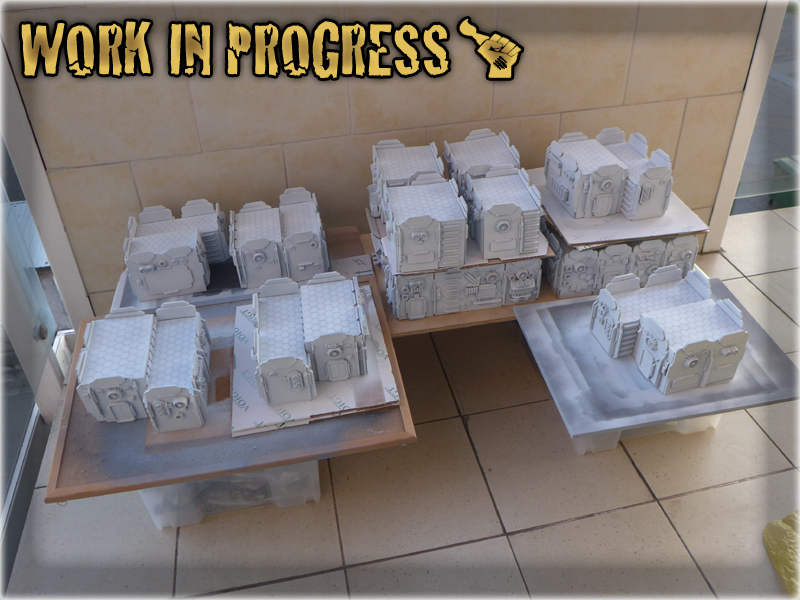
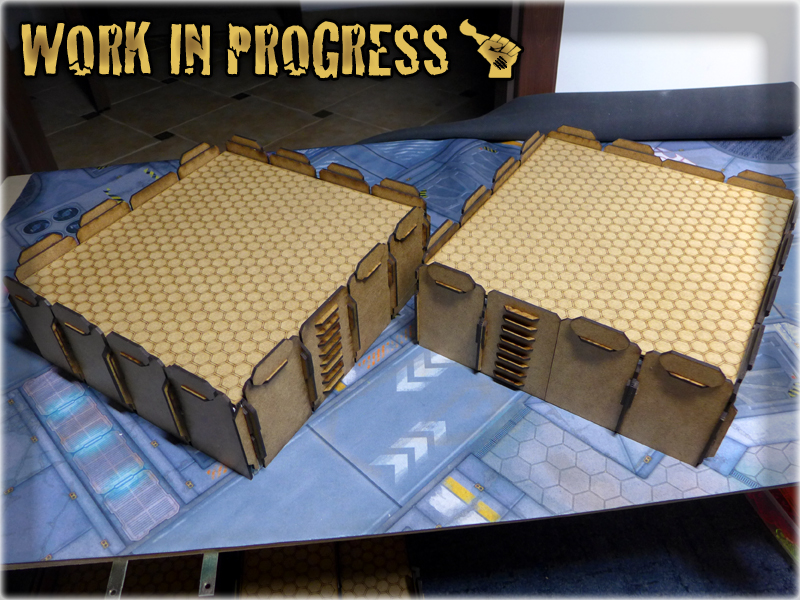
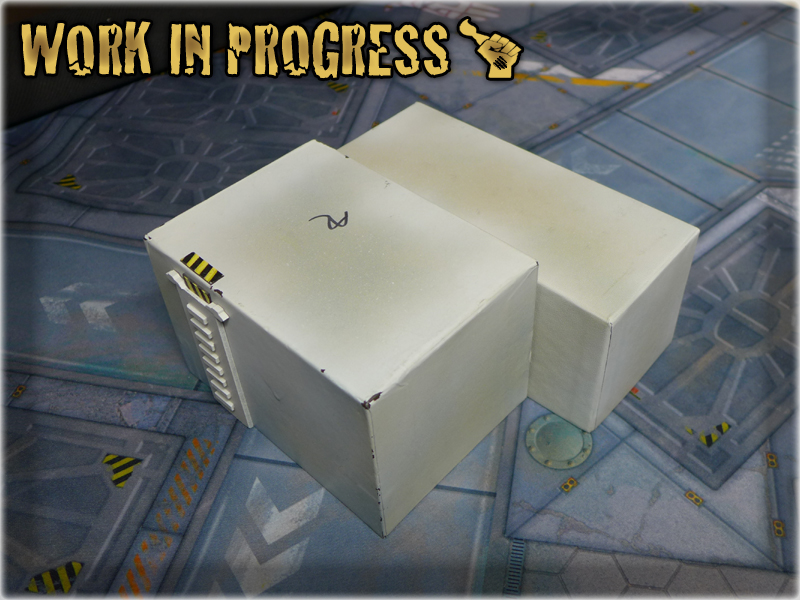
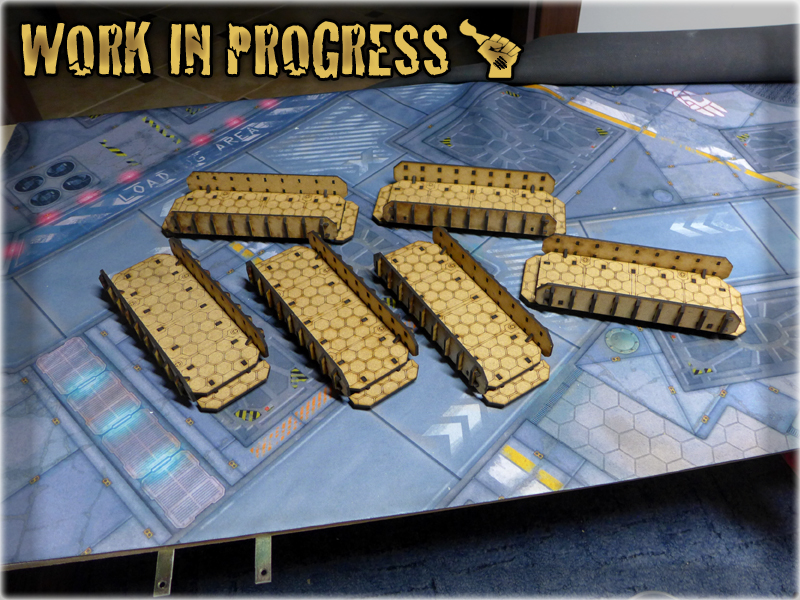
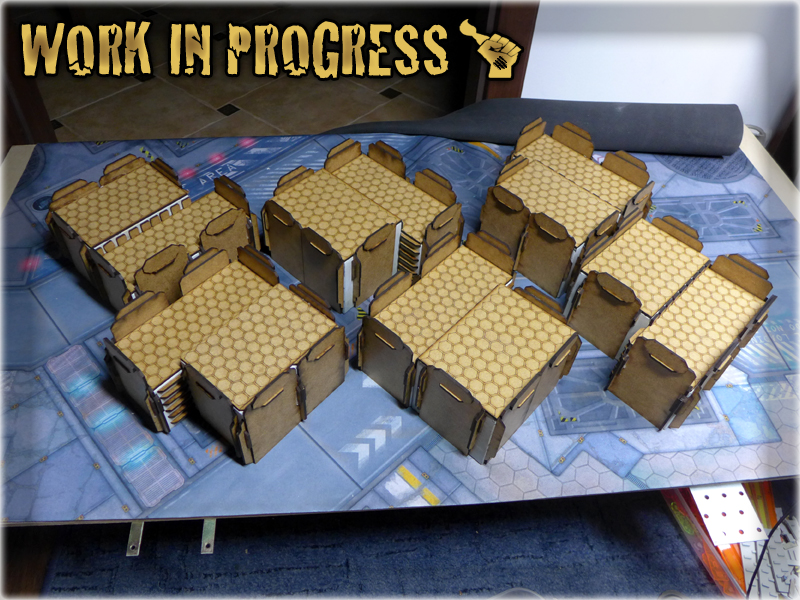
So – this is what I had to work with. My ‘white boxes’ in all their glory. So many different sizes, that excluding six thin ones, no two are alike! I really love these boxes. Thanks to them I was able to play a lot of Infinity games and they received a really good feedback from my oponents. Of course I adorned them with different smaller terrain pieces for the purpose of quality gaming. Still these are my favorites and I can’t imagine gaming at my place with a different buildings set. That was the main reason why I choose to expand their properties instead of exchanging the whole set…
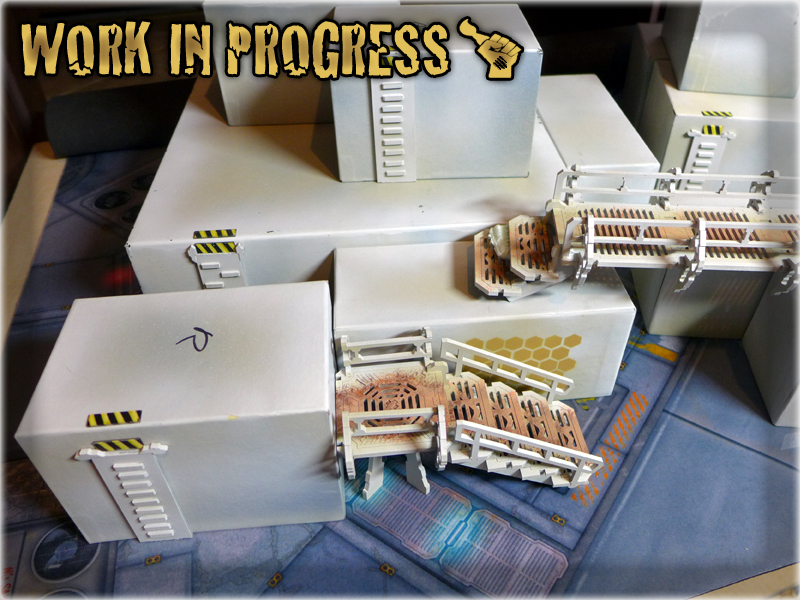
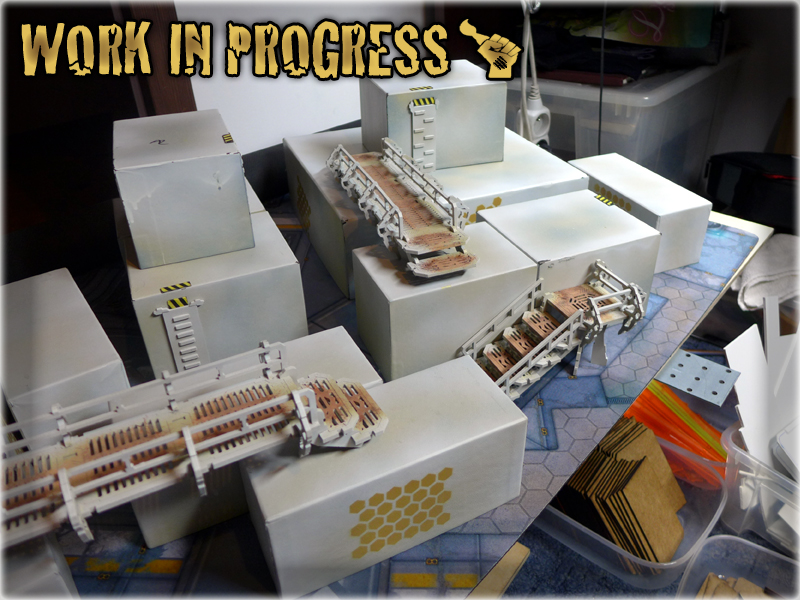
Fortunatelly for me both ReyCast and Micro Art Studio delivered a variety of cool pieces required to evolve my ‘to be’ buildings. It wasn’t easy and took over twelve hours to achieve, but I prevailed – I sorted all the pieces, counted them, divided them into groups (a separate group for each building type), marked my ‘white boxes’ for their corresponding rooftops and started putting walls together. A single test building at first, then whole set. I knelt on the ground, surrounded by a gaming table comming to life all around me…
Test building,
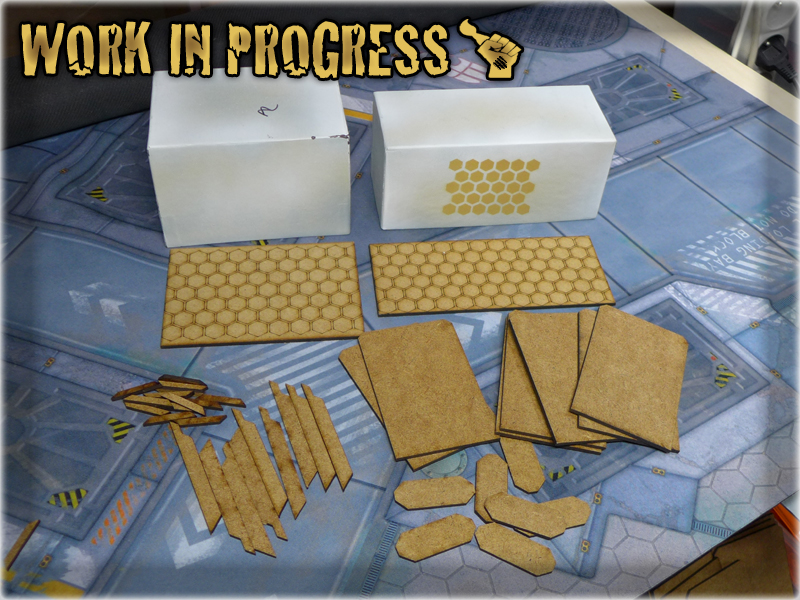
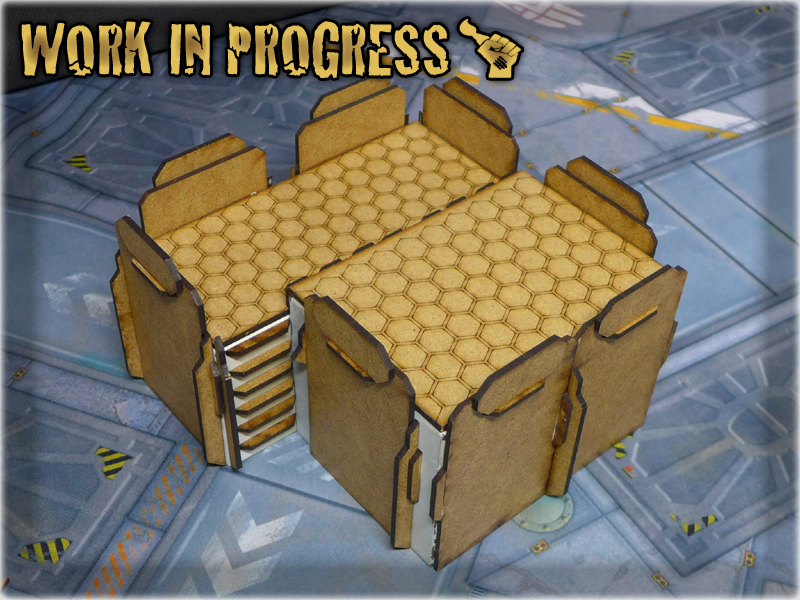


Mass production,
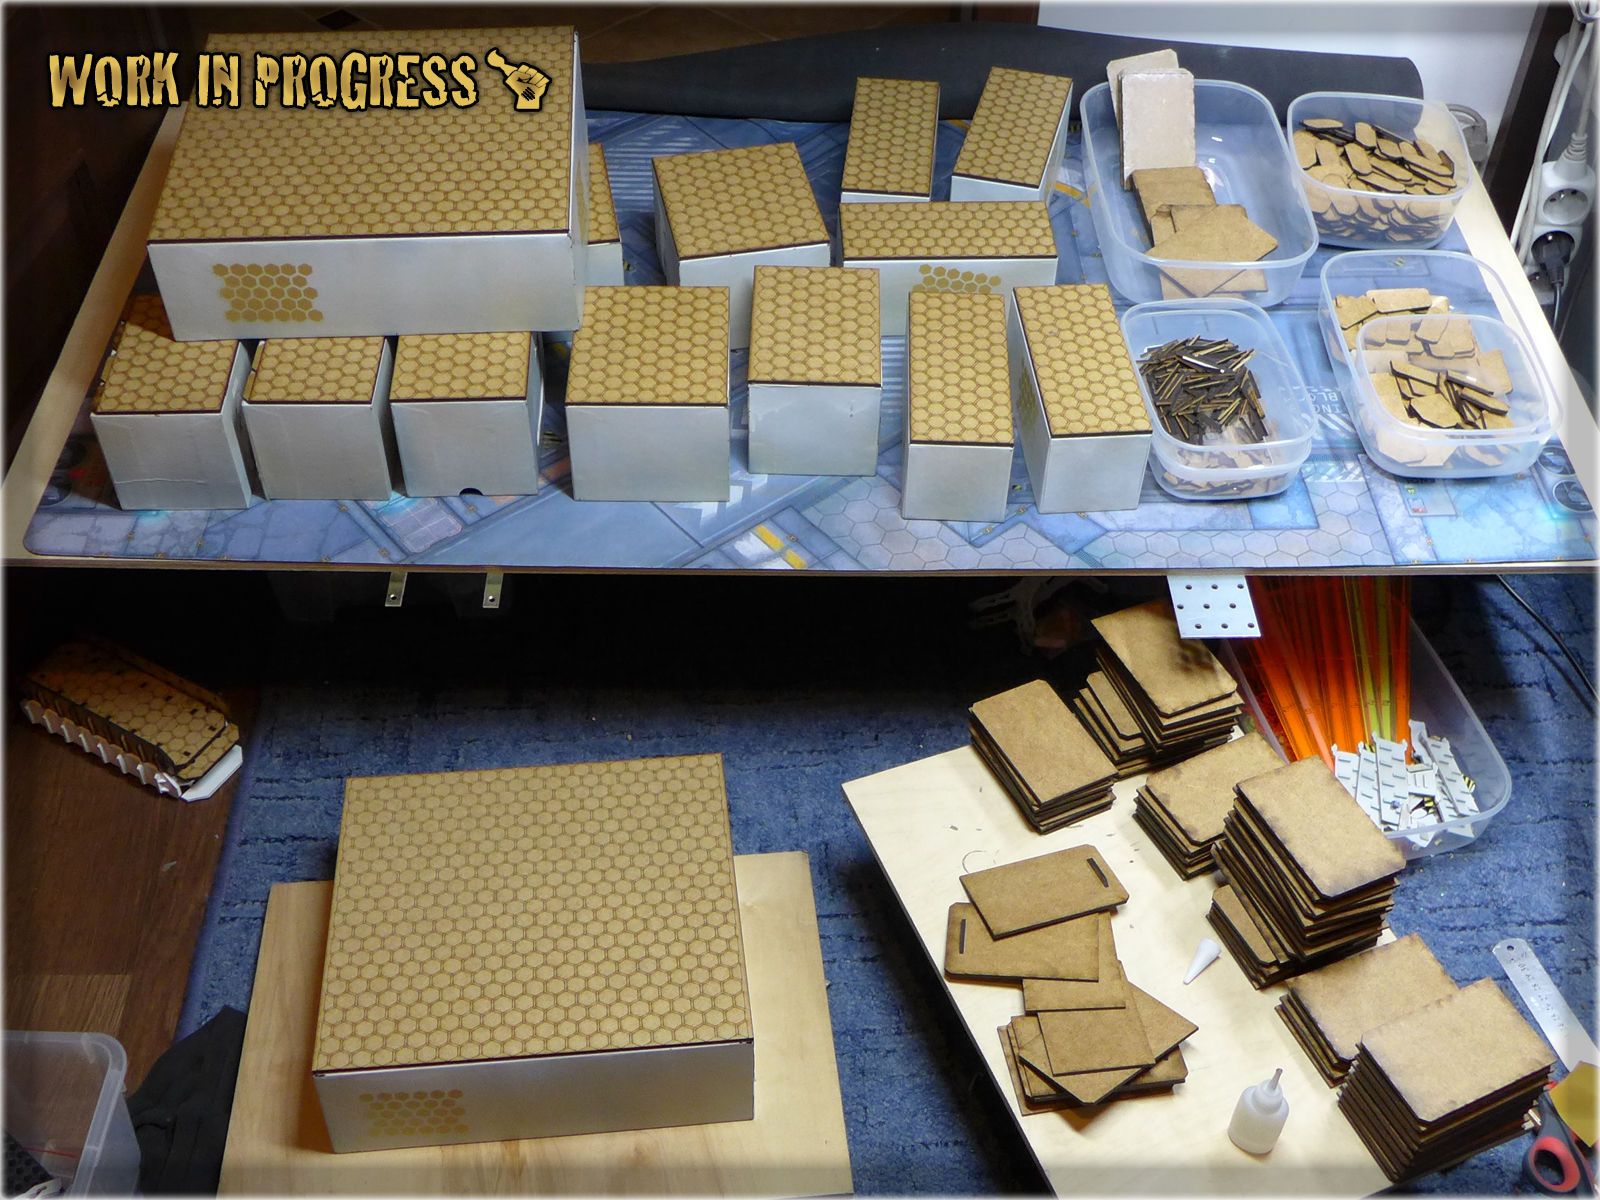
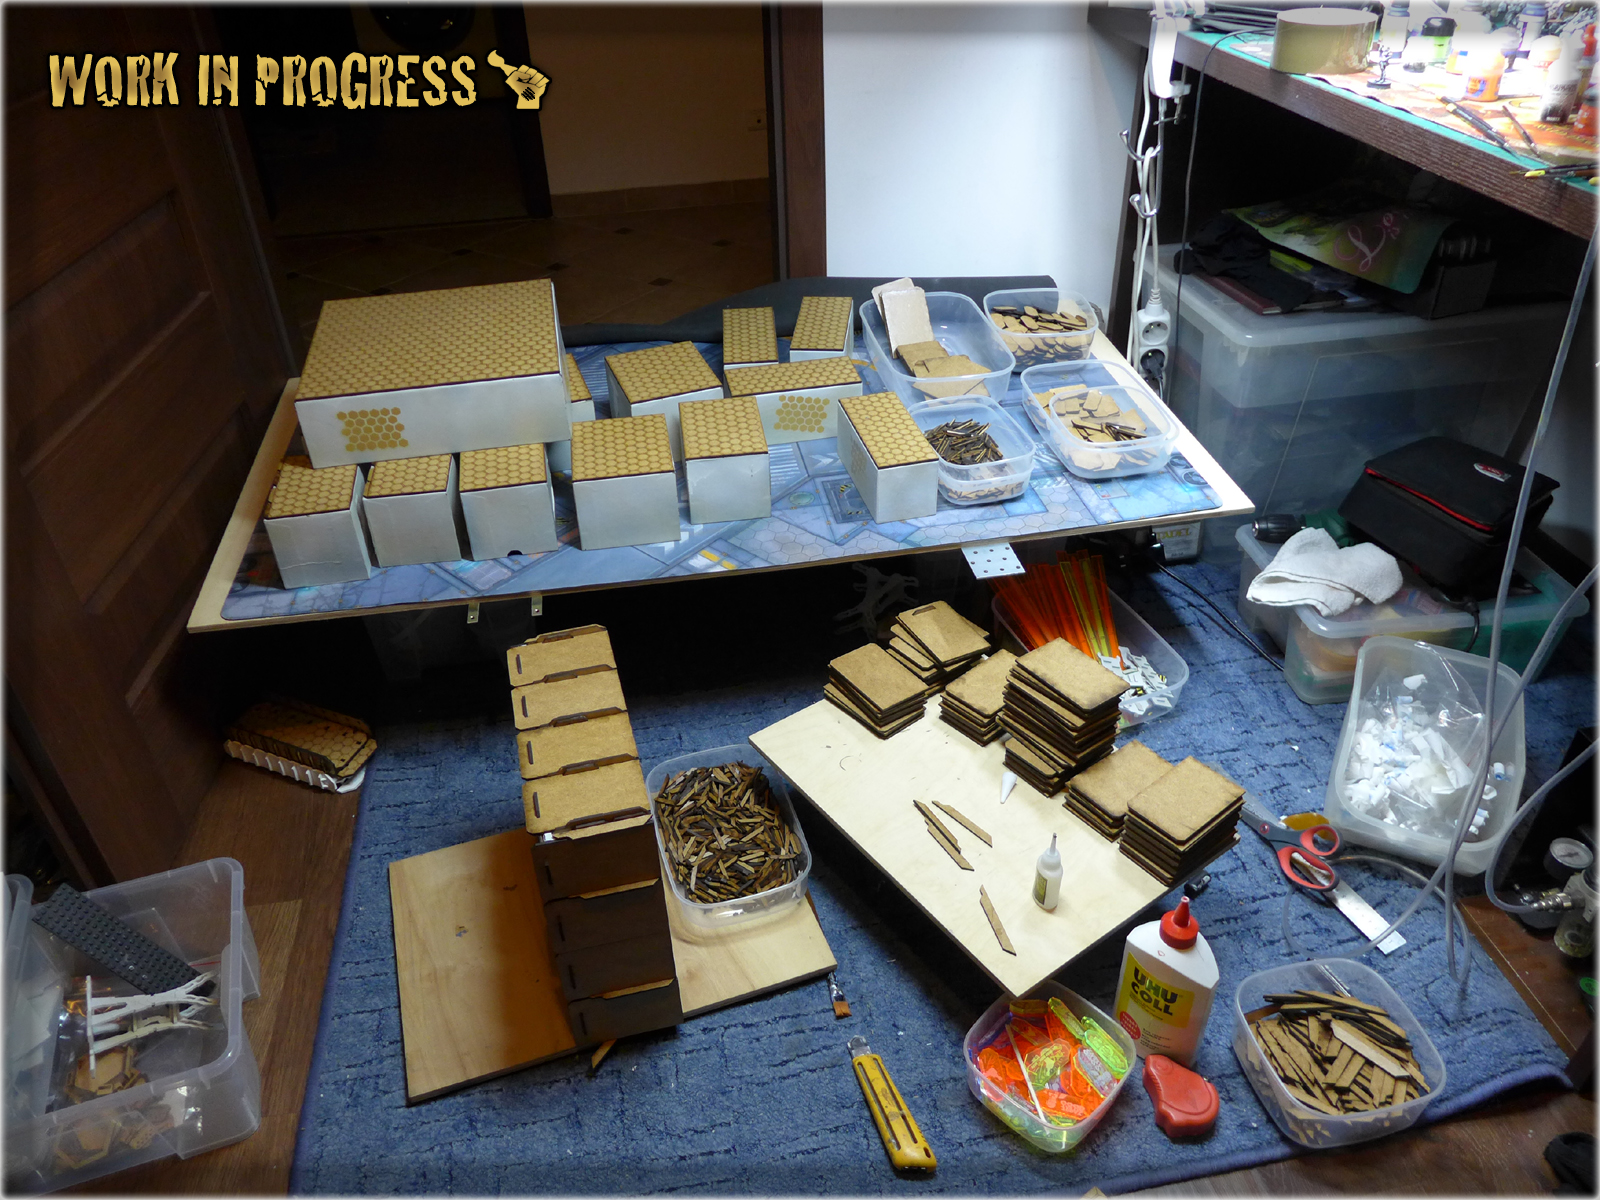
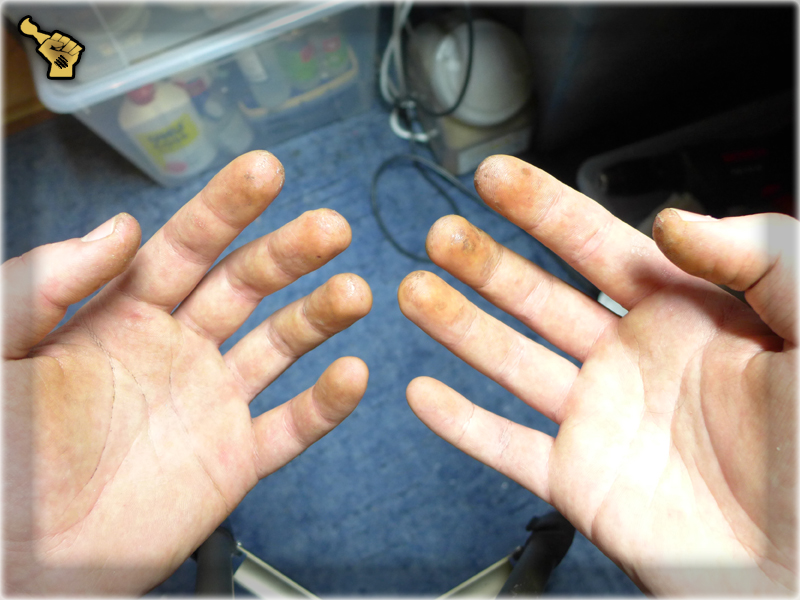
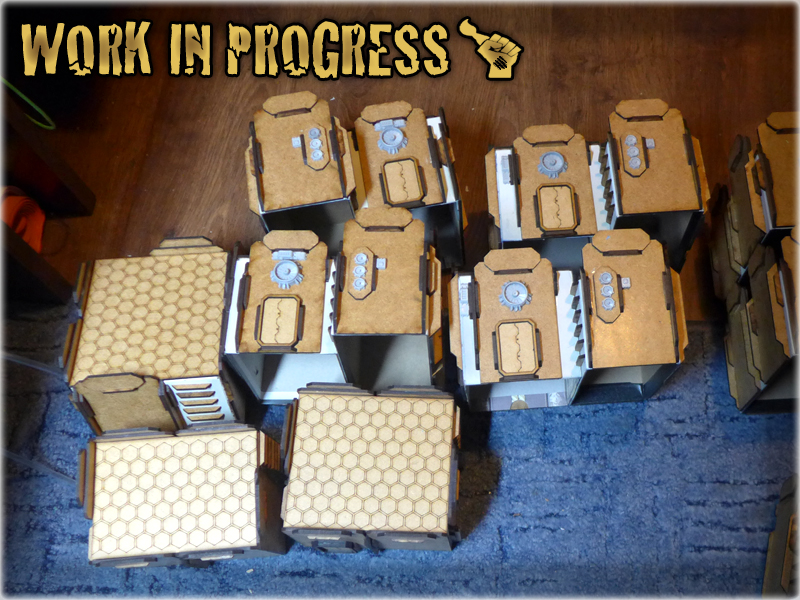
Somewhere about twelve hours, five Army Painter’s Super Glues spilled on my hands, their fumes stuck firm in my nosdrils, thousands of MDF pieces put together, dozen back hurts, hunders sporradic insane scientist’s laughters and one sympathetic look on my wife’s face, later – I was finally done! Done both literally and methaphisically, as my evil slavemaster – the muse – pushed me into yet another task. Battered, with my hands dirty and glued, with my head being dizzy – I started to write the first part of this article. I wasn’t even sure if it will be interresting to other hobbyists – just needed to write it. Couldn’t stop. Some of you know this feel for sure. But I’m starting to miss the topic – My gaming table was finally taken one step further on a road to it’s ultimate form.
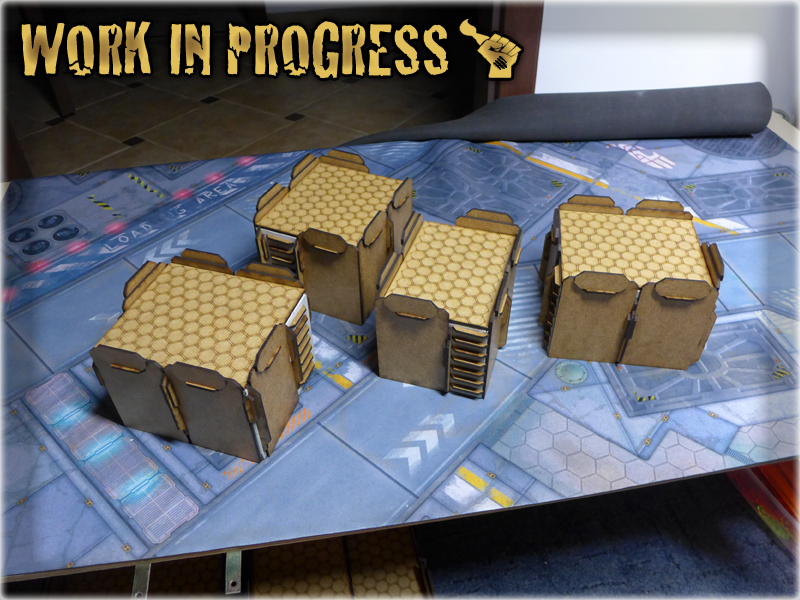
Base layering stage is now complete. The buildings are ready to enter next stage, which is external layering along with addition of some cool looking details. Unfortunatelly I can’t proceed before receiving my order from the Titan-Forge. I don’t mind it, as except for the muse nagging me to work on this project, there’s no reason to rush things. At least I’m able to game on my good ol’ gaming table, taking advantage of all these cool new features. I just can’t wait to test these buildings next week. I’m sure they will not dissapoint me! If I’m lucky – delivery will come right after next game and I’ll be able to proceed to “THE COLONY” SPECIAL PROJECT part three. Keep your fingers crossed for me 😉
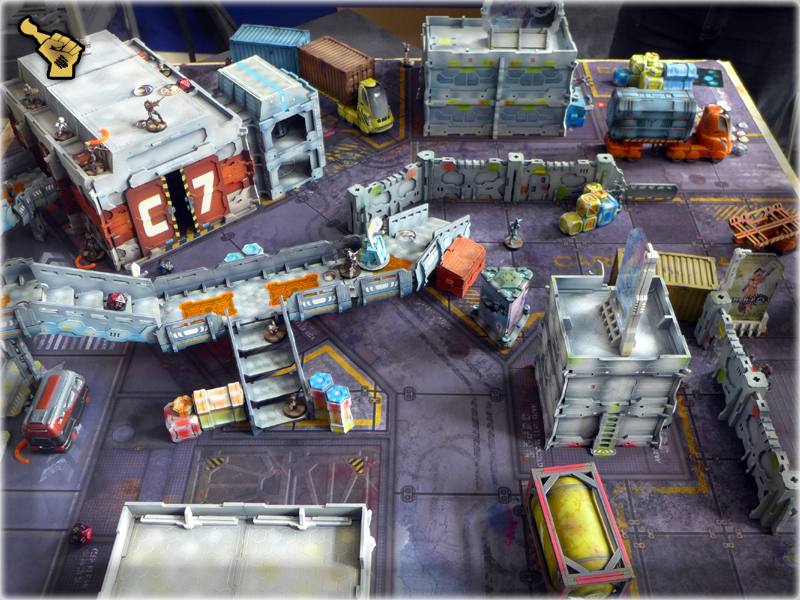
Hello there my awesome readers! As some of you may know – I play Infinity the Game. A new form of global Campaign is currently on the run – you can check it out at OPERATION: FLAMESTRIKE, but for now I invite you to read my latest blog entry – a Battle Report from my Campaign game against Yu Jing army!
LOCATION: Zhurong Power Plant
SCENARIO: Engineering Deck
ARMY: Nazroth – Corregidor vs Garran – Yu Jing,
This time I took my Corregidor on a ride to a Chełmża city, close by. There’s a strong gaming community there along with an arsenal of terrain and a pretty awesome gaming place – “Chełmżyński Ośrodek Klutury” (Chełmża’s Culture Center) – CHOK. I game there from time to time, participating in a local Infinity league. We all agreed in advance to use Flamestrike rules so this time I was prepared, with my Camera being on standby, notes and destined scenario at hand. I arrived just in time to form a pair with a local Warcor – Garran, which happend to be a great coincidence, as we haven’t had chance to game against each other yet! We both agreed to fight for Zhurong Power Plant. (I was eager to finally play a scenario that I failed to pick last time while Garran is a Yu Jing player – so the choice was pretty obvious.)
Along with some small talk we have exchanged our open information and rolled Wip’s. My Leutenant failed (as usual) and I was thrown into defensive by Garran’s decision to keep the initiative. (I actually like to play second as both my roster and game style are mostly defensive. Playing a rather ‘shooty & tricky’ army I tend to deny the field to enemy, covering vital movement/shooting corridors with Koalas and firepower. Once my Reactive turn is over I move to eliminate high value threats with precise amount of offense power. It works for me most of the time.)

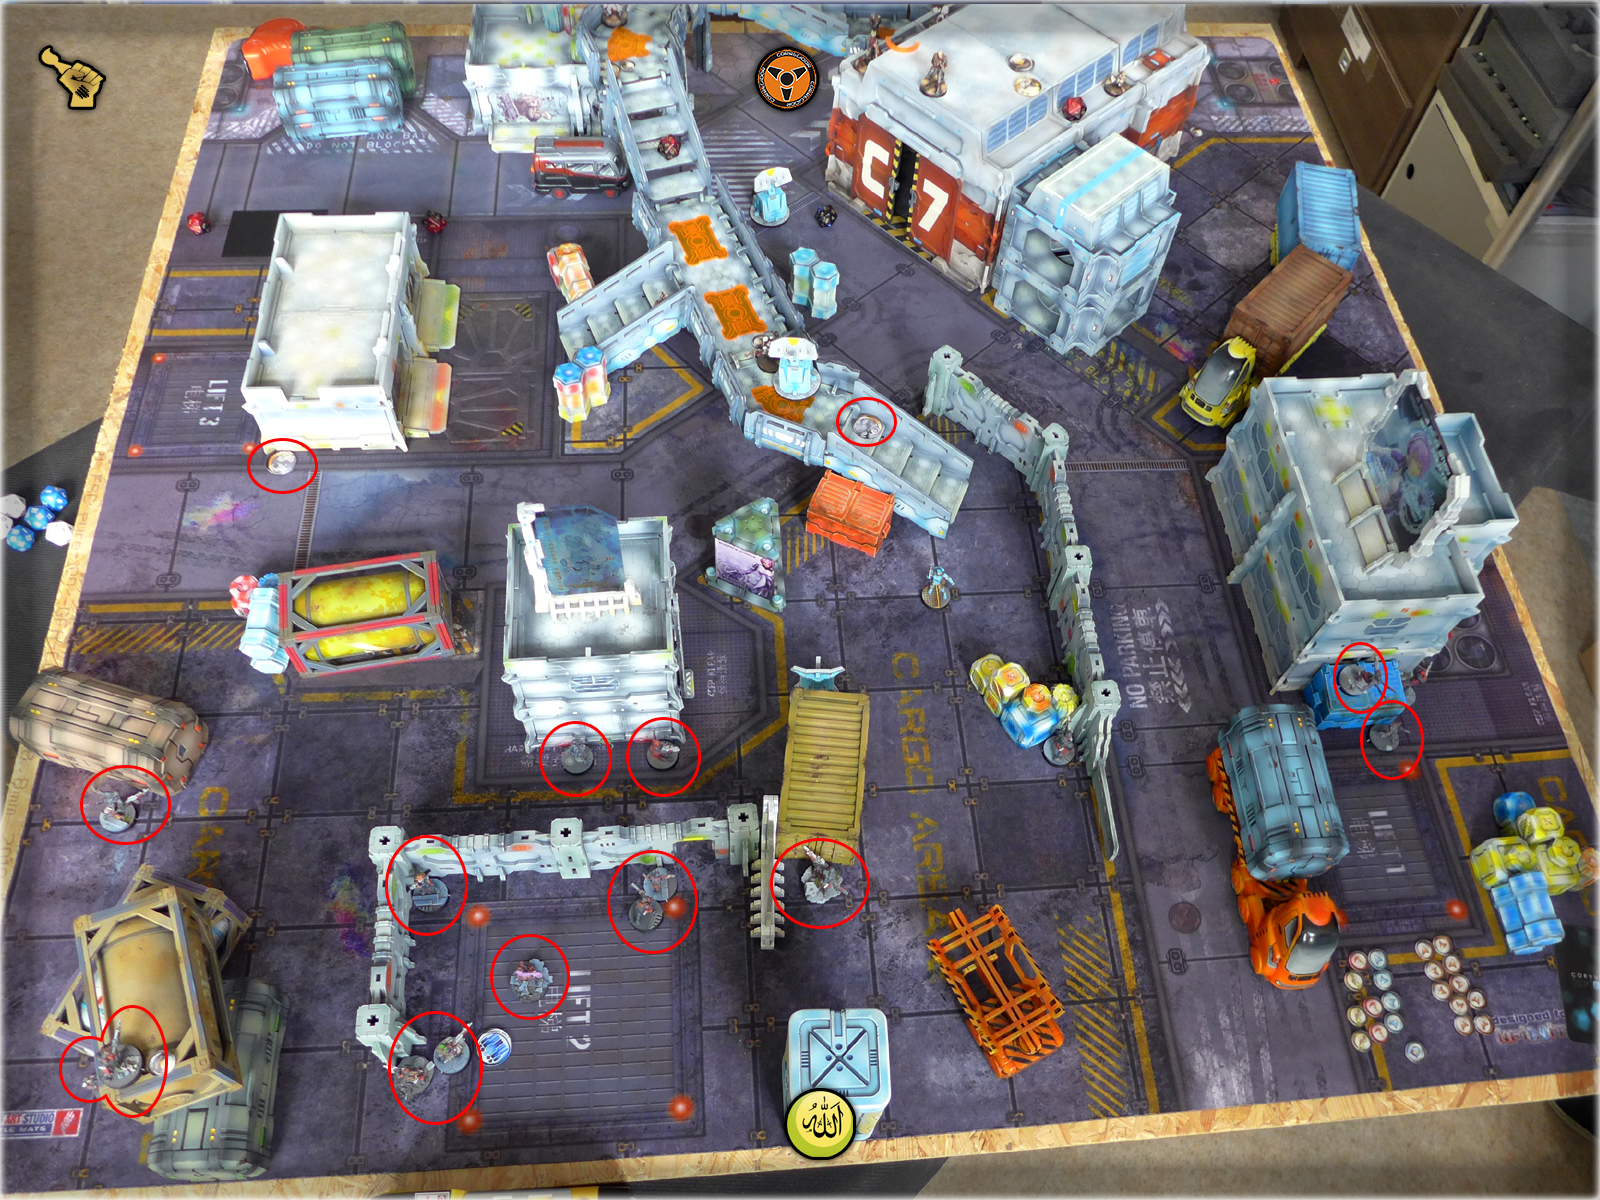
I used the opportunity to pick up the Deployment Zone, and asked Garran to deploy first. He covered both sides of his Deployment Zone with specialists and the Yao Zao’s. He also hid Kuang Shi’s and set up a Rui Shi in the center of his Depzone. Now was my turn to do my tricks…
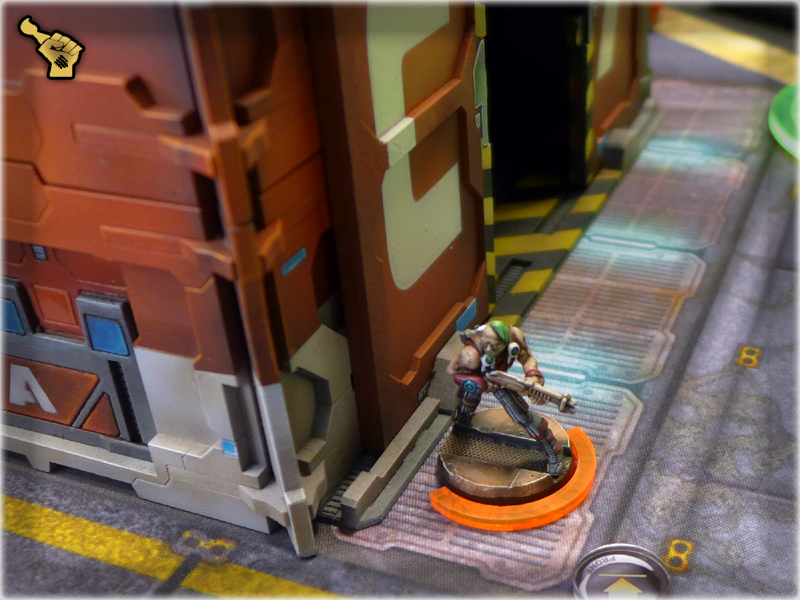
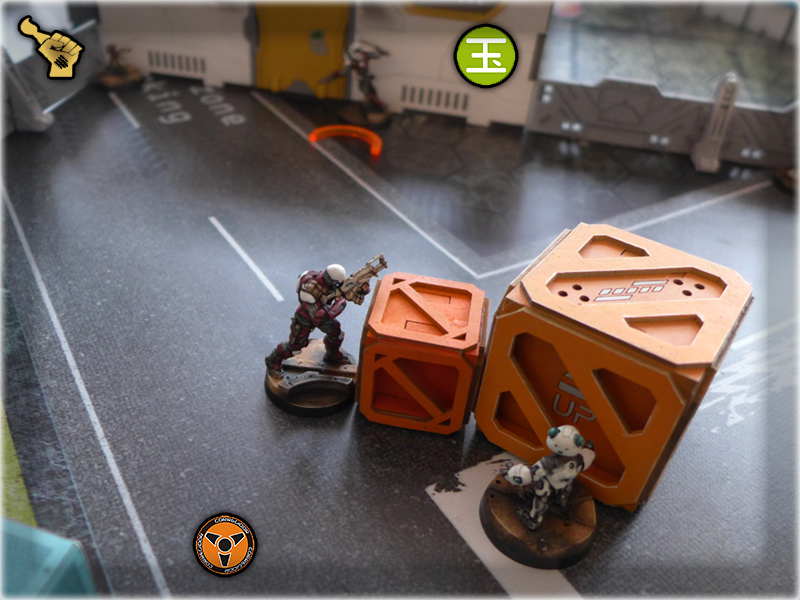
Seeing a rather symmetric deployment I choose to keep left flank covered with my Alguacil Link. They had a really nice, covered spot there and were deployed to ARO one Cuang Shi and Rui Shi at the first sign of movement. Having Rui Shi covered I deployed my MSR Intruder on the high spot, far to the right – adding an ARO punch against Rui Shi if needed and covering the whole right side of the table. HMG Intruder is both my agressive unit and backup in case of Sniper’s death so I deployed him in the middle of my Depzone along with a Daktari and one Smoke-giving Jaguar. While Daktari was close to one Objective Console I choose to cover another one with Alguacil Hacker, hidden just around a corner on the right. Moran Maasai Hunter infiltrated a nice spot outside the Objective Room, with both Koalas being spread wide and in cover. I also hid my last Jaguar behind a small piece of cover and hoped for the best.
Garran made a wise decision and deployed Su Jian from reserve onto my right flank (far away from my death dealing Link).
I responded with a counter-unit, hiding Lunokhod behind a high wall on the same flank as Su Jian. I made my prayers and let him enter the sloughterhouse…
G Garran 1st turn:
– I use a Command Token to restraint Su Jian’s wild charge (-2 Orders from the 1st Combat Group).
The game then started for good with Garran’s Impetous units.
– Firstblood went to Lupe Balboa for obliterating Shaolin with a short burst from her Combi-Rifle.
– Soon after one of Kuang Shis followed to the land of the dead, guided by missiles from Alguacil’s HMG.
(I have deployed after Garran so I covered these miniatures with ARO’s from both girls.)
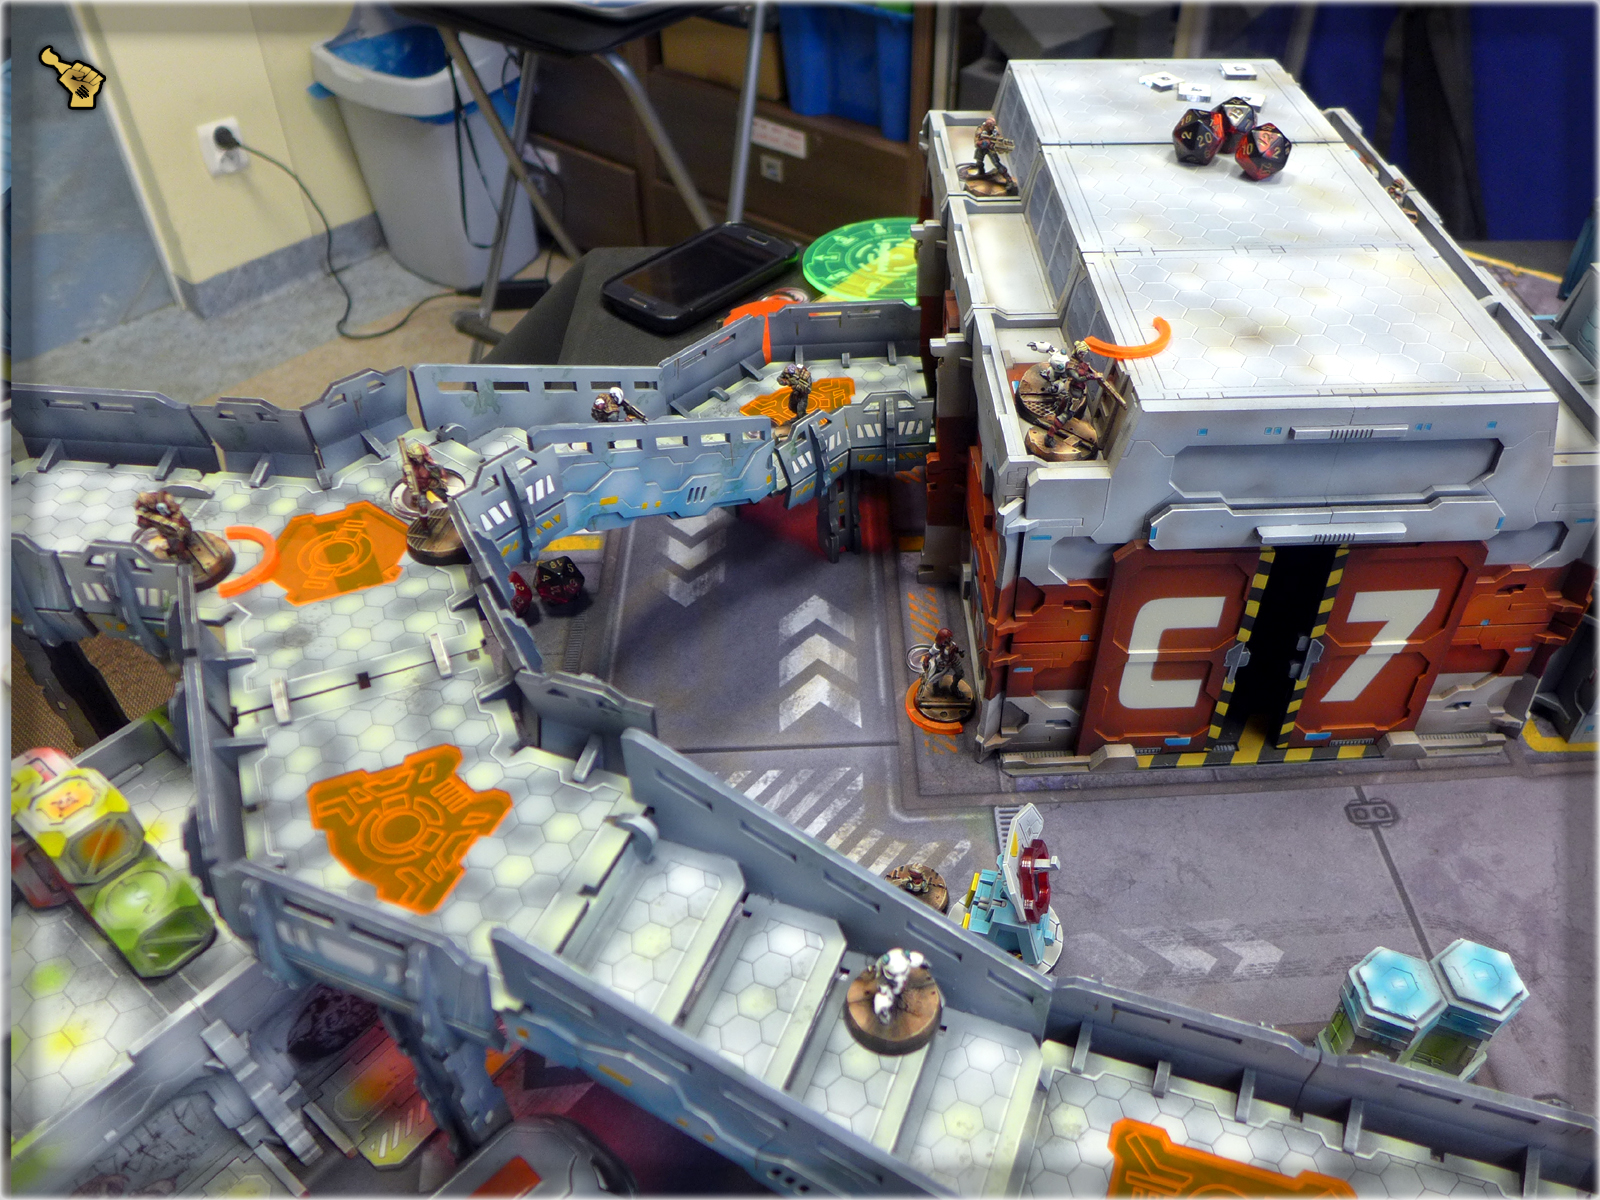
– Su Jian used the first order from it’s group, moving ahead. MSR Intruder reacted to this fast moving targed with a single round. A burst from Su Jian’s Spitfire was not enough to overshoot my “Sniper’s” Critical Hit and it lost 1 STR.
– Not intimidated, Su Jiand moved along it’s selected route and closing in for better distance against my Sniper. This time more ARO’s replied as Su Jian’s movement took it throug a path covered by HMG Intruder and one rearguard Alguacil. Let’s say that NWI state was the least punishment it could have received.
Battered and a bit helpless Su Jian Cosy cuddled behind a medium piece of cover for the time being and the action moved to the other side of the combat zone.
– Hac Tao appeared out of thin air. Both of my linked Combat Beasts (Lupe and HMG Alguacil) replied with fire, overshooting Hac Tao and peppering him with holes. One Panzerfaust hit and Hac Tao was halved in W attribute.
– Still Hac Tao is a tough bastard. Regardless of his wound he shrugged and sprayed my girls with another burst. One shot vs Lupe missed, while HMG specialist got hit with three rounds. I laughed loud while she saved all three of them. Garran not so much 🙂
– With persistence worth a commendation Hac Tao tried his best to eliminate my Link once more. This time tho HMG Alguacil went freenzy like Blain from Predator the movie and cut him down screeming!
– At that point I was pretty sure that Hac Tao’s reing has ended, but Garran corrected me with a successful heal delivered to the fallen warrior by a Yao Zao standing in base contact, just behind a short wall. (“not again” – I thought, seeing this behemoth of steel rising up from the ashes and threatening my Alguacils once more.) For the worst of it – a successful healing provided Garran with a Victory Point as he choose ‘Experimental Drug’ as one of his Hidden Objectives!
– The sounds of fire begun anew whith Hac Tao shooting three rounds against my HMG specialist and one vs Lupe. Both girsl survived and I decided to fail Guts Roll and let them rest behind a cover for a bit. (Shame to loose them at this point, where one solid burst of 5 could cut down that Hac Tao bastard for good at my turn).
– I turned out that Garran was waiting just for that, as soon after he moved his Rui Shi and forced my ARO’ing MSR Intruder into a defensive.
– A bit late, still Celestial Guard Hacker buffed Rui Shi with Marksmanship L2, thus increasing it’s chance against my covered long-barreled killer. One Critical Hit later my MRS Intruder was a memory as his headless carcass fell to the ground.
– Free of his terror Su Jian came to life once again, leaning out of cover and shooting against second Intruder, who replied with an ARO but achieved nothing.
– With most of my forces occupied by hiding behind cover the field was clear for Garran’s forces to advance. Keisotsu Paramedic choose this moment to climb the stairs and connect a Console (YJ table half, on my right flank).
– Last ‘Irregular’ Order sought my Jaguar being slain by advancing Has Tao, as Garran exchanged it for a Regular one with a Command Token.
TURN 1 SUMMARY: Lost: Shaolin, Kuang Shi, / Killed: Intruder MSR, Jaguar Chain, / Objective: 1 Console, 1 Hidden (experimental Drug),
N Nazroth 1st turn:
With order count of 8/4 and two miniatures lost I was sure to hit back hard. Advancing enemy forces were exactly where I wanted them – with their fronts turned to my forces. Both Hac Tao and Su Jian were bleeding out with a single hit required to send them flying. Discarding these two, only Rui Shi was posing a threat to my strike units (Lunokhod and HMG Intruder). I waged my options and opened with a gambit:
– I moved onto the board with a Tomcat Engineer (left flank, behind Hac Tao and Toketsu Engineer) forsing them to either turn around or face certaind doom. To my surprise Engineer failed to face the newcomer, while Hac Tao turned a bit just to see my Tom’C if he decided to climb the building wall and get him.
– I then moved the action onto the central part of my Depzone, where Jaguar crawled a bit and smoked the way for HMG Intruer.
STP READINg, GO TO YOUTUBE, PLAY THIS TRACK, GO BACK TO READING 😉
TURN 1 SUMMARY: Tomcat Engineer, / Killed: Celestial Guard (KSCD), Rui Shi, Tokusetsu Engineer, Hac Tao (u), / Objectives: 1 Console,
Garran: Lost: Shaolin, Kuang Shi, Celestial Guard (KSCD), Rui Shi, Tokusetsu Engineer, Hac Tao (u) / Objective: 1 Console, 1 Hidden (Experimental Drug),
Nazroth: Lost: Intruder MSR, Jaguar Chain, Tomcat Engineer, / Objectives: 1 Console,
G Garran 2nd turn:
– Loss of Leutenant saw Garran’s forces in dissaray. Impetous warriors moved and lost yet another of their brethren due to HAM Alguacil’s fire.
– Toketsu Doctor moved Yao Zao risking G:servant’s life in an attemt to heal Hac Tao. With a final effort Yao Zao bringed Hac Tao from the verge of death, then his lights went off ang he stop moving himself. Both Alguacil girls made surethat it won’t heal anyone else.
– The dance of death begun anew as Hac Tao tried his chances vs my girls with no avail, as my indestructible ladies rolled saves, laughing wildly. (One Irregular Order exchanged for a Regular with Command Token.)
– Garran made his last attemt so silent my Linked heroines, exchanging his last Command Token. This time HMG Alguacil had no mercy and cut Hac Tao’s body in half with a concentraded fire from her Heavy MG’.
– An order later Su Jian avenged his death by slaying my second Intruder.
– Having nothing better to do Guilang opened the door to the Security Room.
TURN 2 SUMMARY: Lost: Kuang Shi, Hac Tao, Yao Zao (doc), / Killed: Intruder HMG, / Objectives: Objective: 1 Console, 1 Hidden (Experimental Drug),
N Nazroth 2nd turn:
Left with no Intruders I had only one universal assault unit at my disposal – the Lunokhod. With order count of 7/4 I left the things be and started activations.
– I first tried to eliminate a potential threat to my Lunokhod in form of enemy Hacker. I used my own Hacker to do that, shuffling him behind cover and sending a burst meant for the hostile unit. He dodged and hid from LOF.
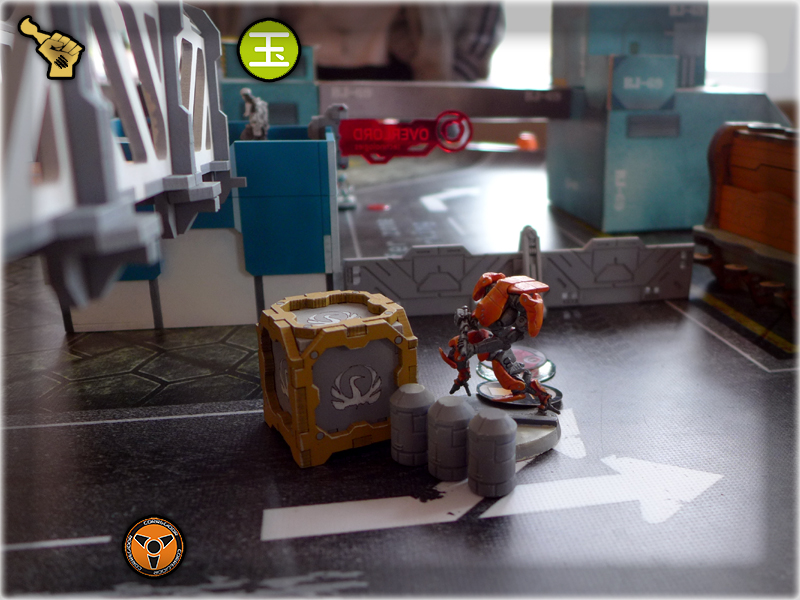
– Now I could move Lunokhod from behind his initial cover, so he went straight for Su Jian. I kept him hidden, occasionally shooting enemy Hacker once he was revealed. First attempt failed as Lunokhod’s Heavy Shotgun range is rather short, but I hit the mark during another activation. I also los a Koala, who was careless enough to cross Su Jian’s line of fire.
– Third Lunokhod’s activation took him out into Su Jian’s ARO but Heavy Shotgun prooved to be enough to finally slay the beast.
(Enemy in retreat and with Loss of Leutenant – I moved to gain advantage in Objective Points. Zhurong Power Plant and Nomad’s wellbeing were on the line!).
– I cleared the path killing a Guilang FO with a single Burst of ‘5’ shot by Alguacil HMG specialist.
– Path cleared, Moran Maasai Hunter broke into the Security Room and Connected central Console at second attempt.
– Alguacil Hacker followed, moving forward and connetcing the Console on my right flank.
– I was left with no competitive options, but to try and complete my Hidden Objectives which was “Experimental Drug” (lol, yea, whatever) and “HVT: Designation”. I went for the last one, first leaning Mooran out of the Security Room and targeting enemy HVT, then using him as a repeater for Alguacil Hacker and Spotlight’ing the target with my final order.
TURN 2 SUMMARY: Lost: none, / Killed: Celestial Guard Hacker, Su jian, Guilang FO, Objectives: 3 Consoles, 1 Hidden (HVT: Designation),
Garran: Lost: Shaolin, 2x Kuang Shi, Celestial Guard (KSCD), Rui Shi, Tokusetsu Engineer, Hac Tao, Yao Zao (doc), Su jian, Celestial Guard Hacker, Guilang FO, / Objective: 1 Console, 1 Hidden (Experimental Drug),
Nazroth: Lost: Intruder MSR, Jaguar Chain, Tomcat Engineer, Intruder HMG, / Objectives: 3 Consoles, 1 Hidden (HVT: Designation),
G Garran 3rd. turn:
Garran’s forces were in Retreat along with a Loss of Leutenant. (Which was the missfortunate Guilang FO.)
Not many options with both Kuang Shi being far away from combat, and near to all specialist troops gone.
– Garran took a final attempt of earning Victory Points by mowing his regular Keisotsu into my HVT’s Zone of Control. The plan failed by Keisotsu being shredded with ARO fire from my Alguacil Link.
No need for further actions – we shook hands of one another and counted our remaining points.
TURN 3 SUMMARY: Lost: Keisotsu, / Killed: none, / Objectives: 1 Console, 1 Hidden (Experimental Drug),
Garran: Lost: Shaolin, 2x Kuang Shi, Celestial Guard (KSCD), Rui Shi, Tokusetsu Engineer, Hac Tao, Yao Zao (doc), Su jian, Celestial Guard Hacker, Guilang FO, Keisotsu, / Objective: 1 Console, 1 Hidden (Experimental Drug),
Nazroth: Lost: Intruder MSR, Jaguar Chain, Tomcat Engineer, Intruder HMG, / Objectives: 3 Consoles, 1 Hidden (HVT: Designation),
I got back home around 16:30, sat straight to this Battle Report. It’s past 23:00 now so as you can see – writing something like that is a lot of work. I really respect the work of guys from Corvus Belli and other cool content authors, as right now I want only to take a bath and ‘Reset’ 🙂 Hope you like my article – be sure to ‘Commend it’ at Flamestrike Campaign official site 😉