- contact@scarhandpainting.com


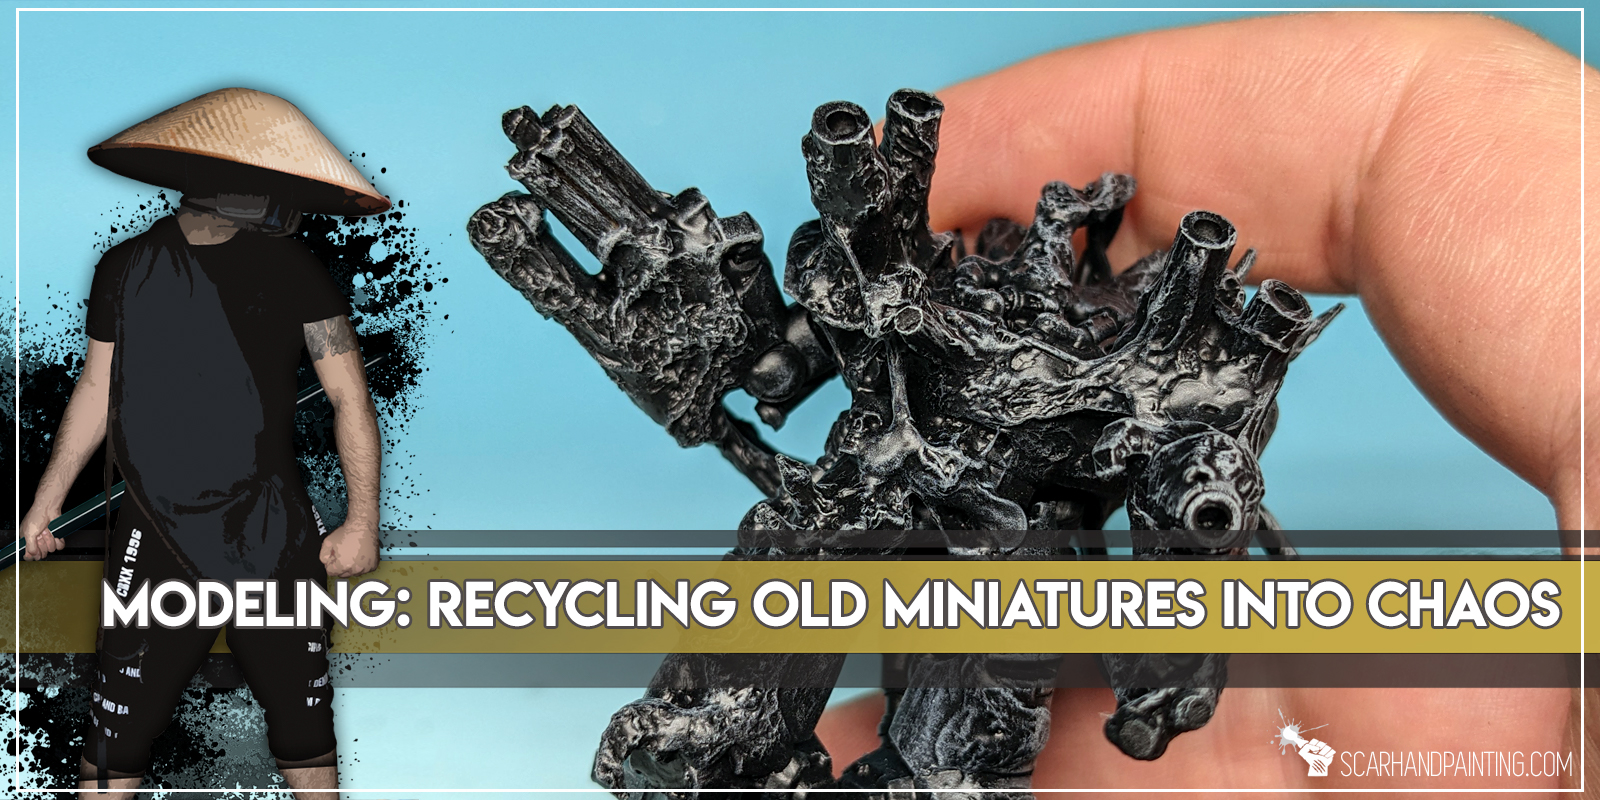
What if I told you it is possible to turn almost any old, damaged, badly painted Space Marine model into an Obliterator using trash and a bit of modeling magic? Sounds good? How about I just show you!
Before we start, some notes:
I have been playing Warhammer for over two decades now. Throughout that time I had multiple armies that I built, then painted, then sold out to get dough for another dose of ‘plastic crack’. At times I had to get rid of some really badly painted, out of date sculpts. Easy to say, I came up with a variety of ideas on how to make such miniatures more desirable in the eyes of potential buyers, one of which was turning old minis into Chaos Obliterators and Spawns. The key was to use an old miniature and as little extra bitz as possible to up the value on the gaming board. Nowadays Obliterators come in plastic and look cool, but I believe there is still value in recycling old minis, especially if you’re short on cash and would like to play CSM proper by spamming these bad boys all over the place. The method shown below can be used for anything, including turning Marines/Vehicles Death Guard, making Possessed or Mutants and more. I deliberately chose to make an Obliterator, but stay open minded and let me know in the comments if you would like to see some kind of dedicated Nurge’esque magic in the future.
Now buckle up and let’s jump straight into it!

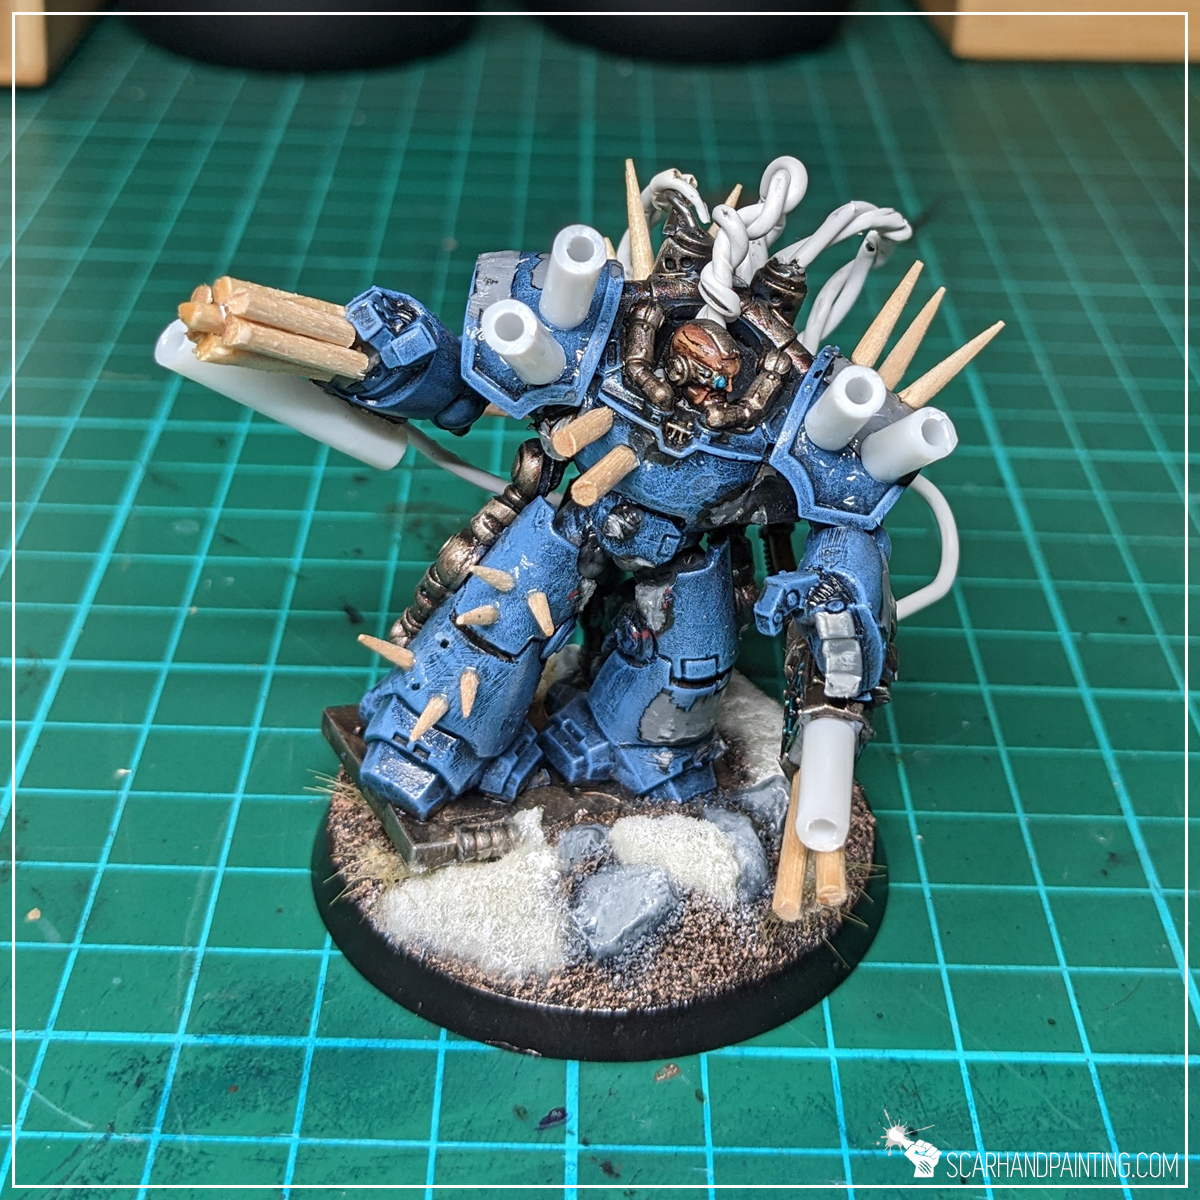
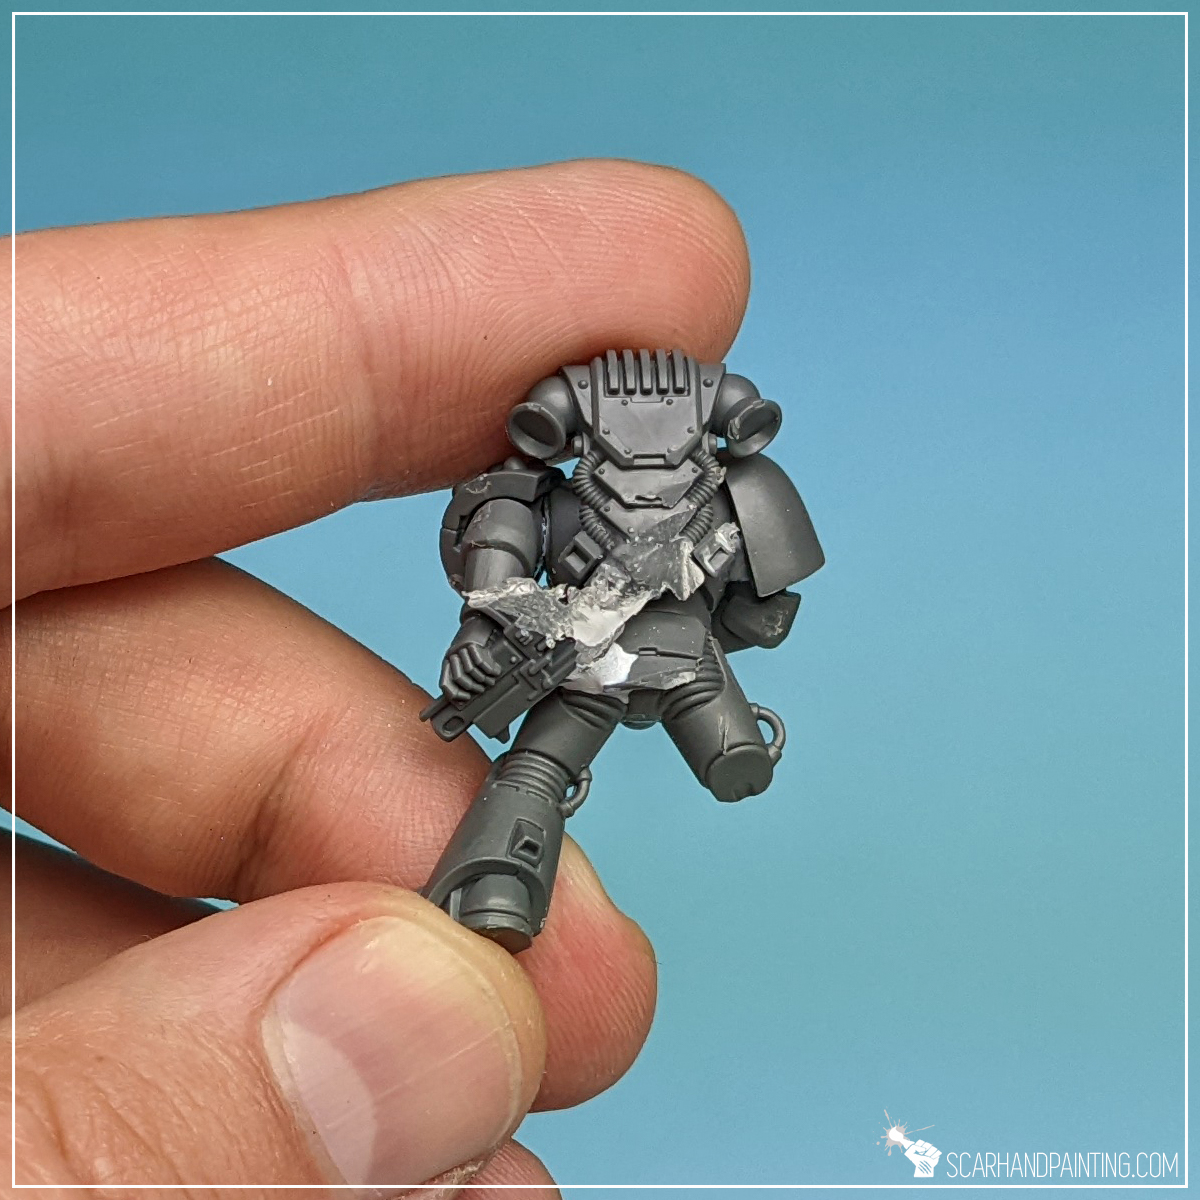
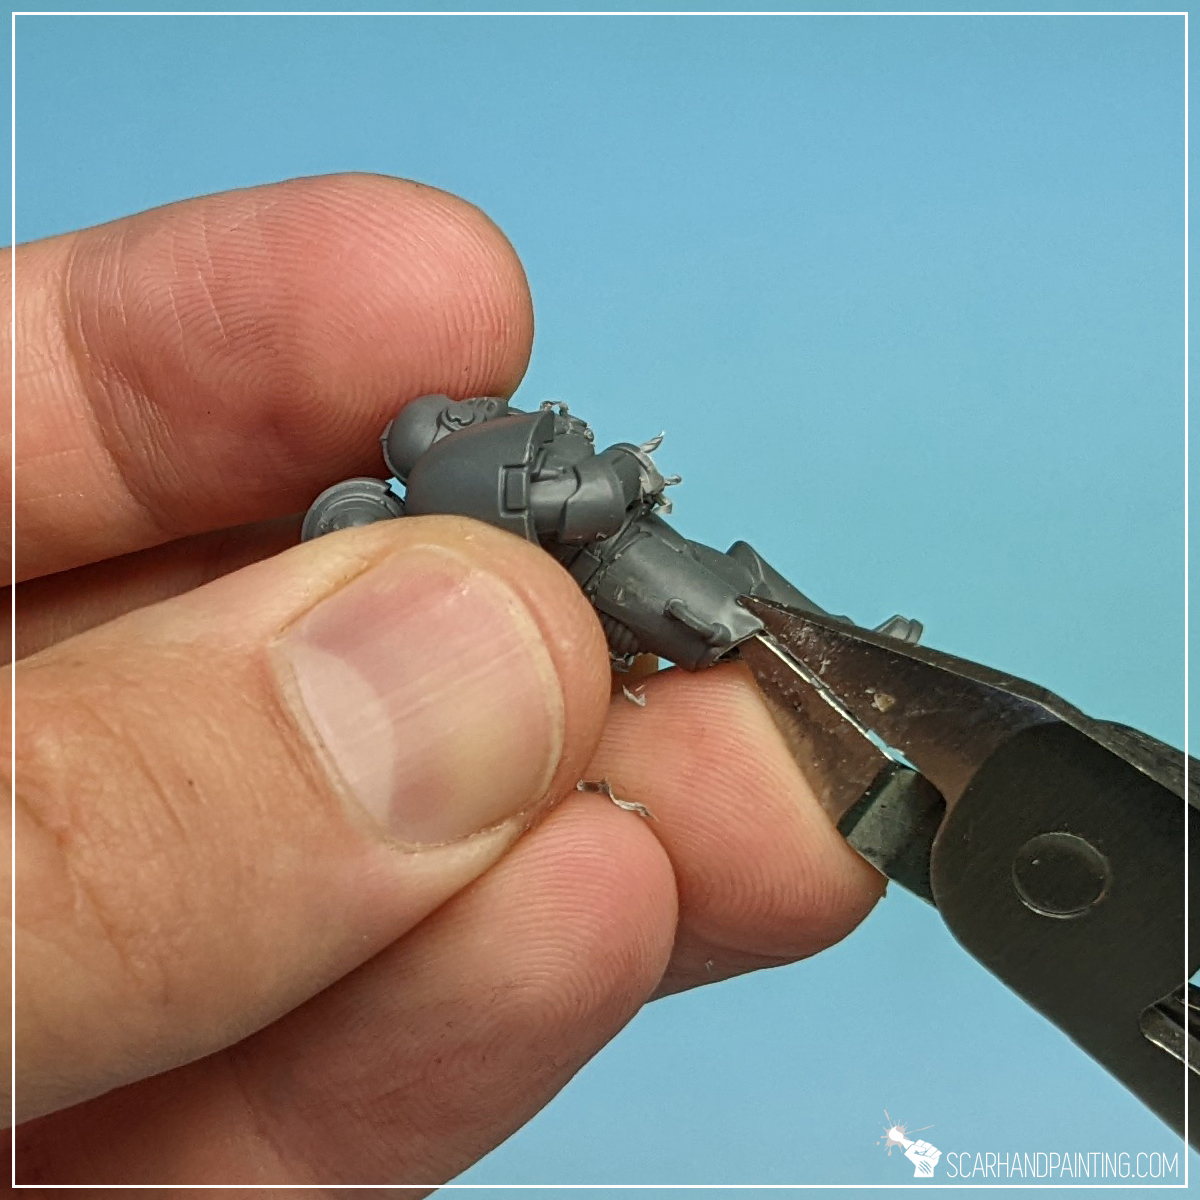
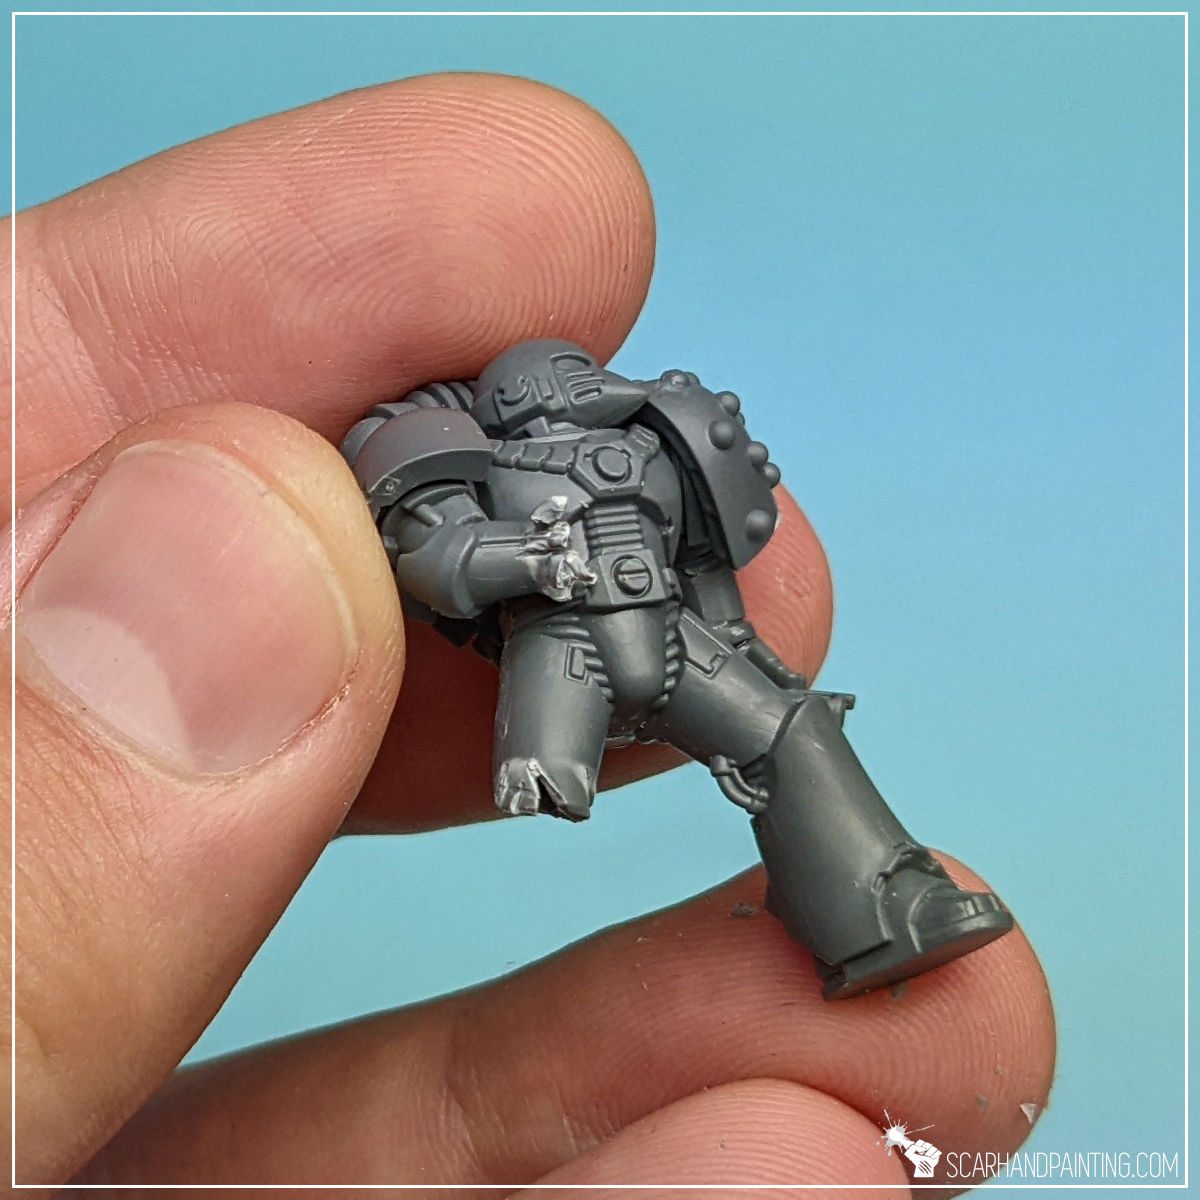
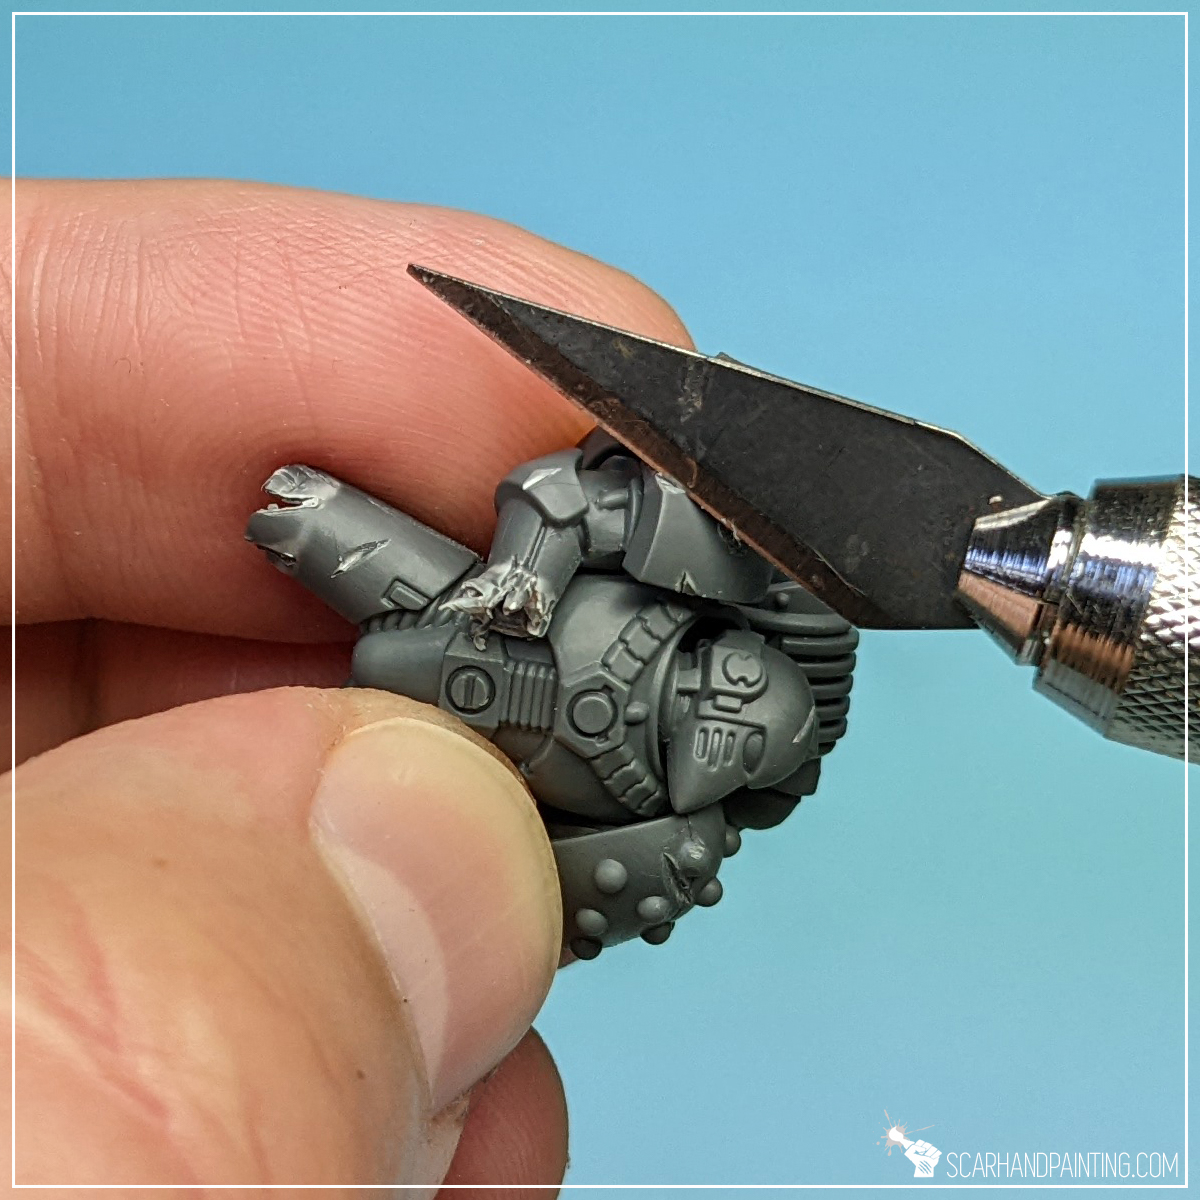
Step One: Preparing the Miniature
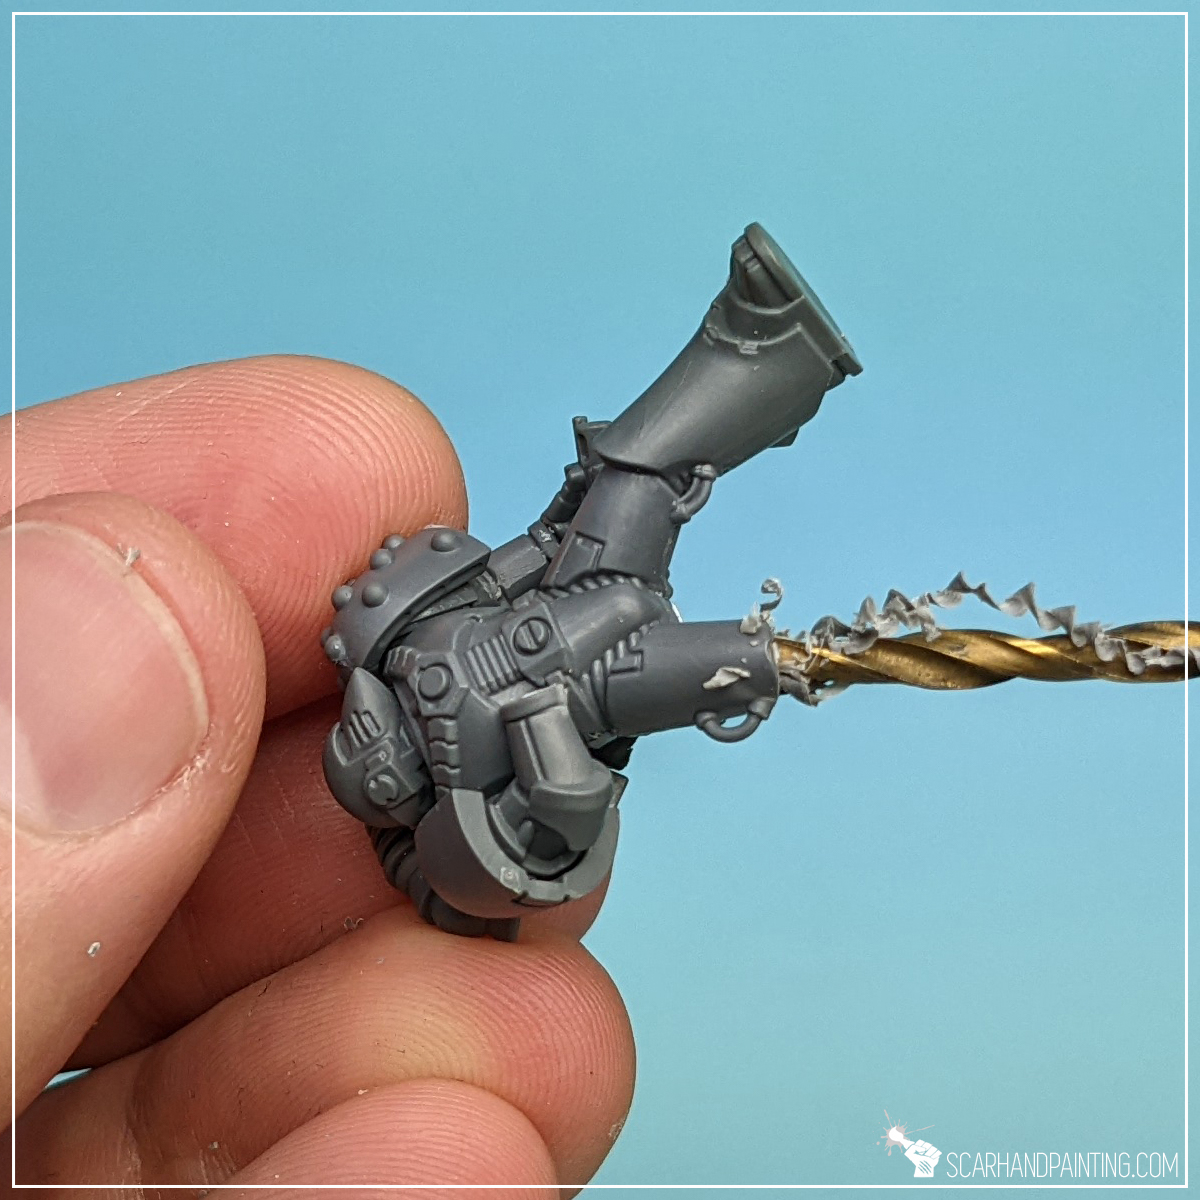
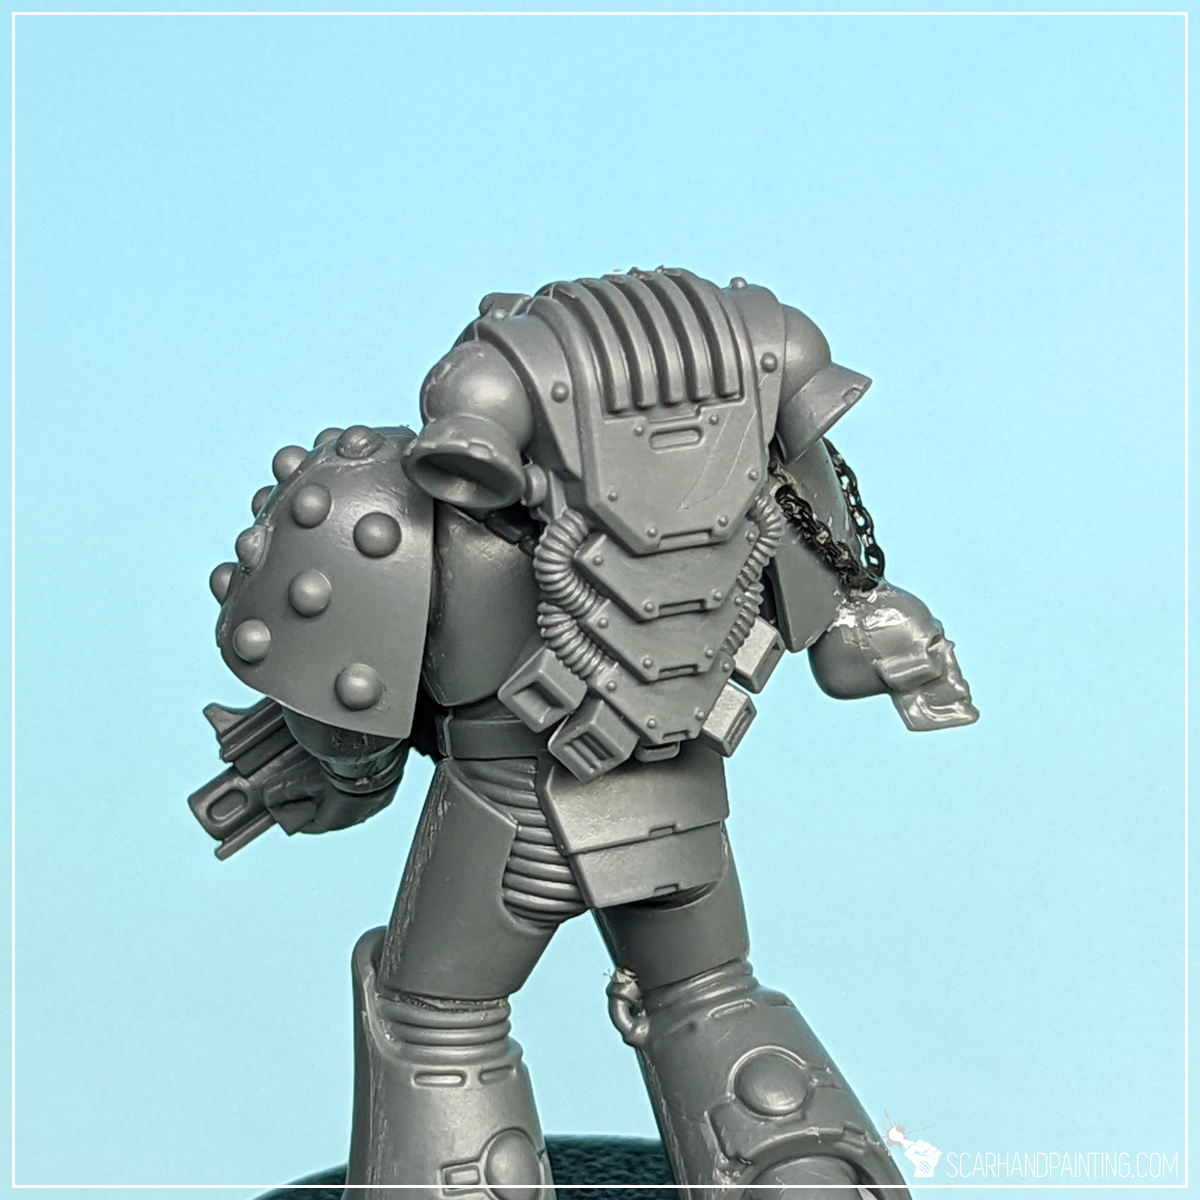
Using Hobby Cutters and a Hobby Knife I removed front parts of the miniature’s arms to make space for the upcoming weapon extensions. I also removed any Imperium related symbols.

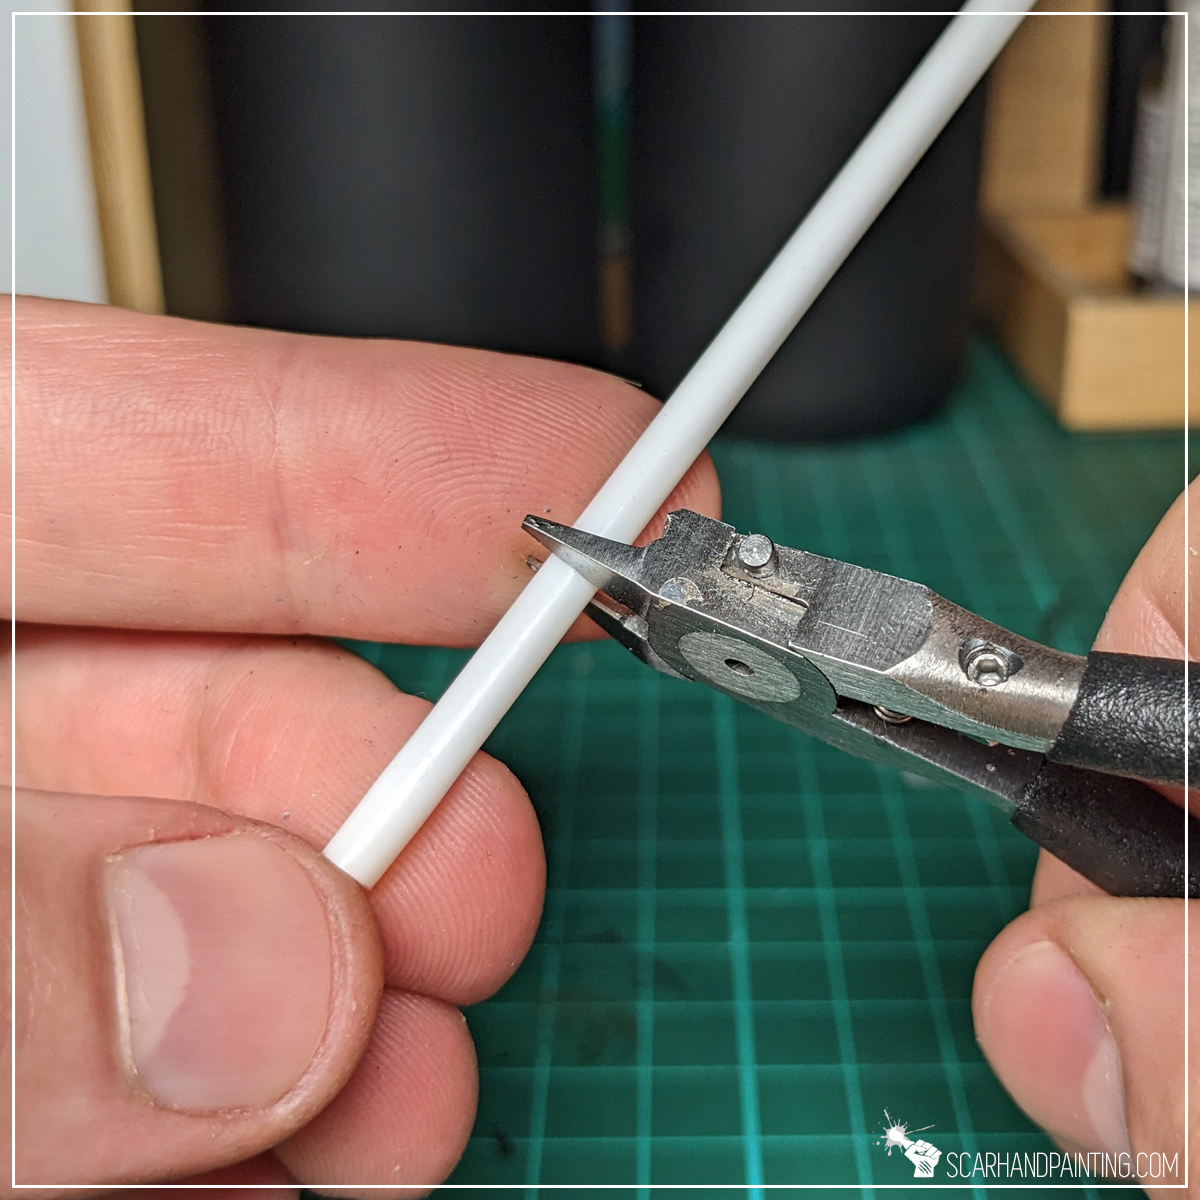
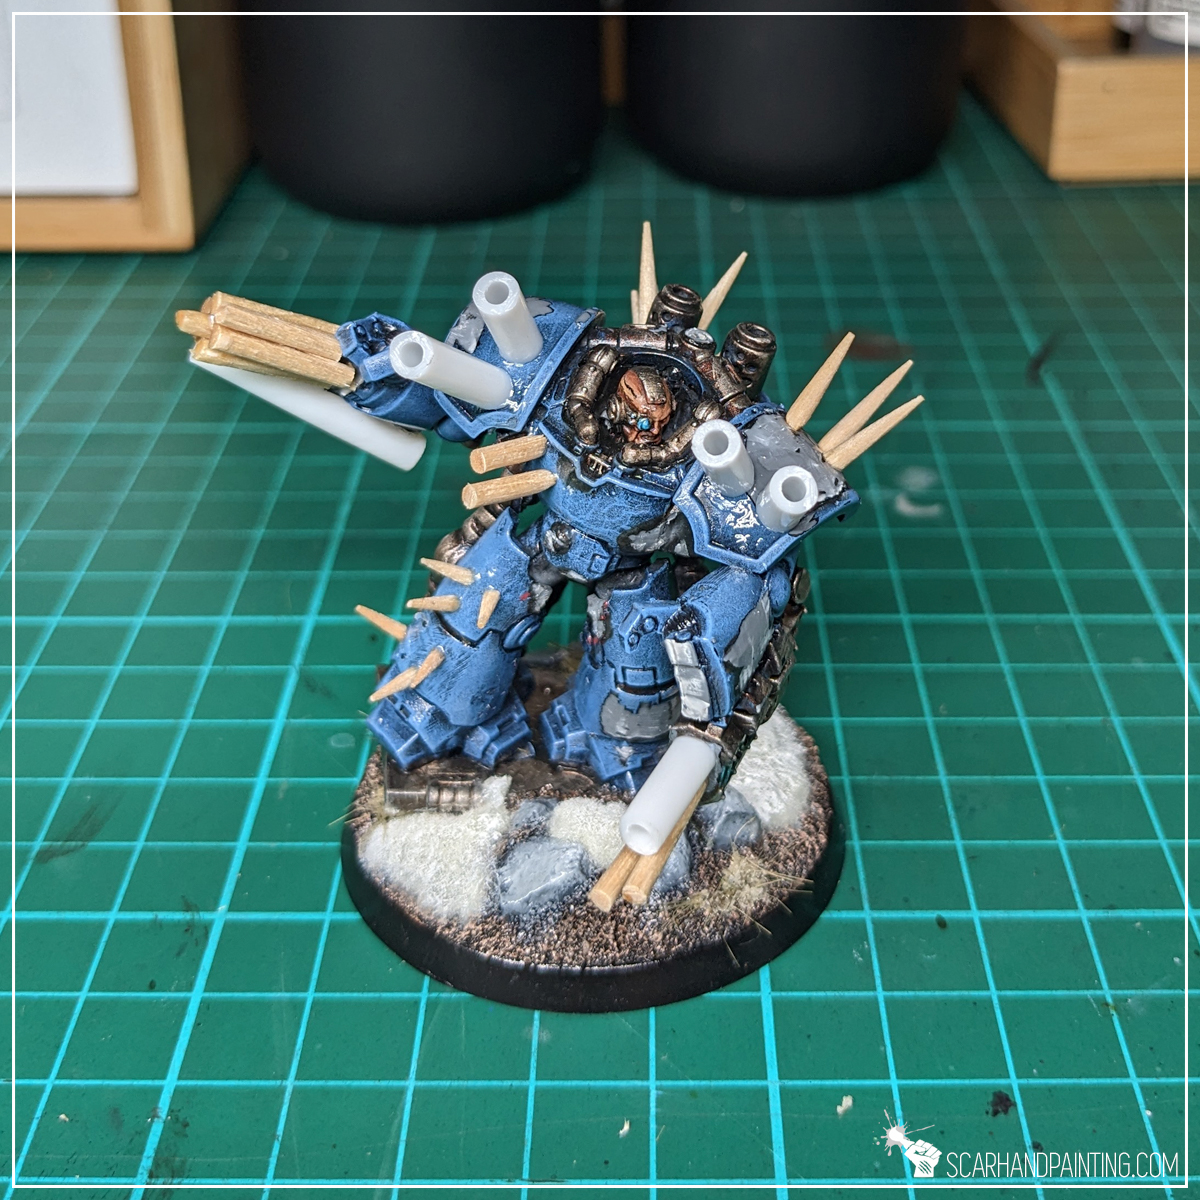
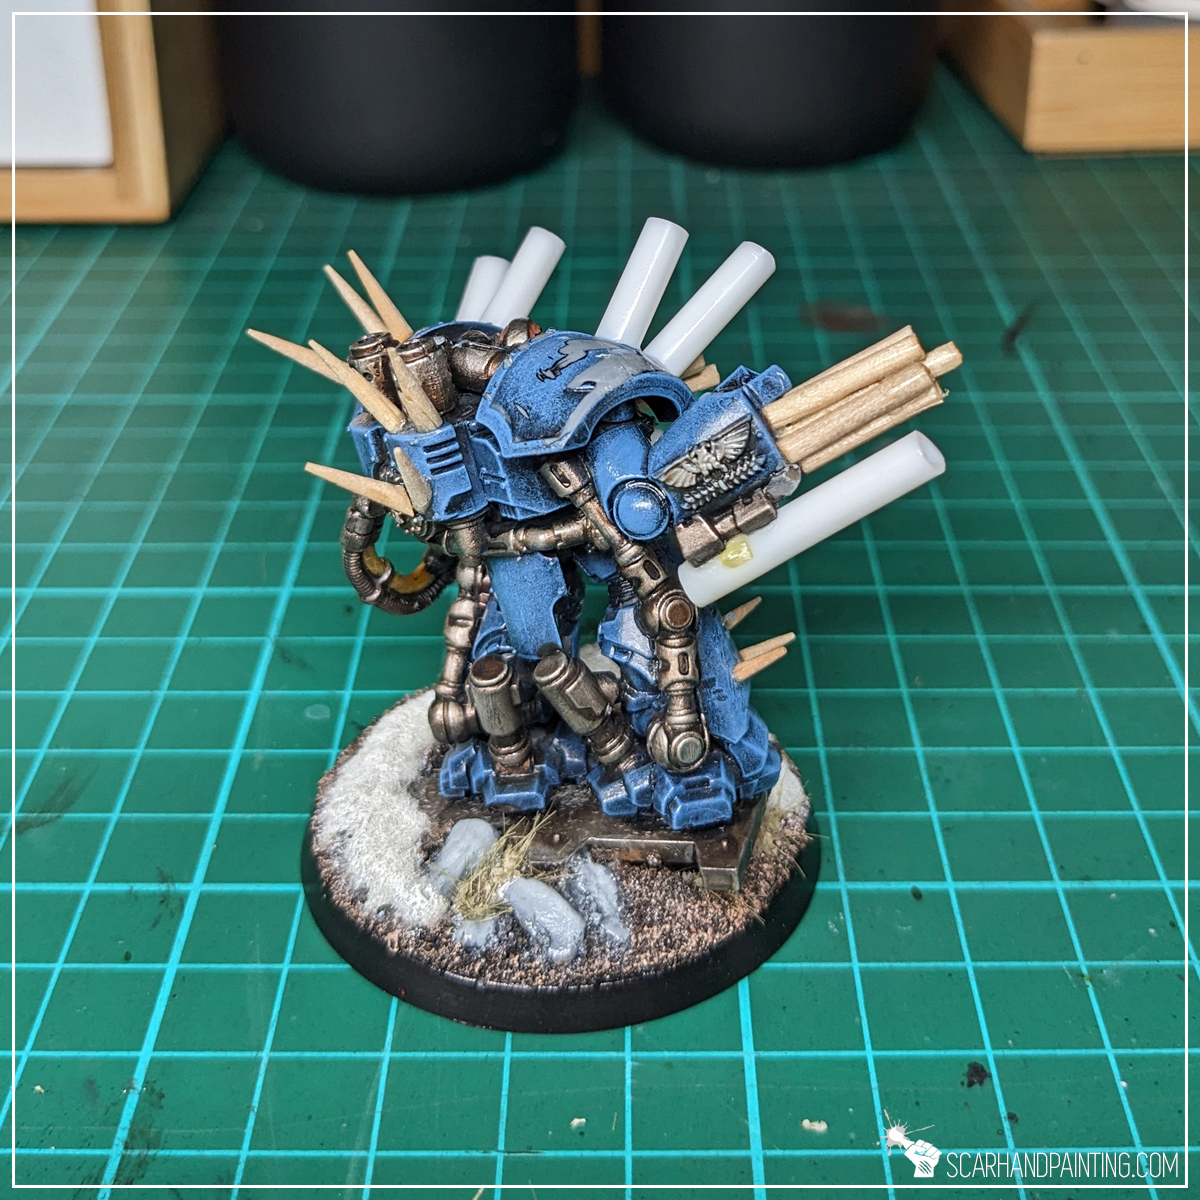
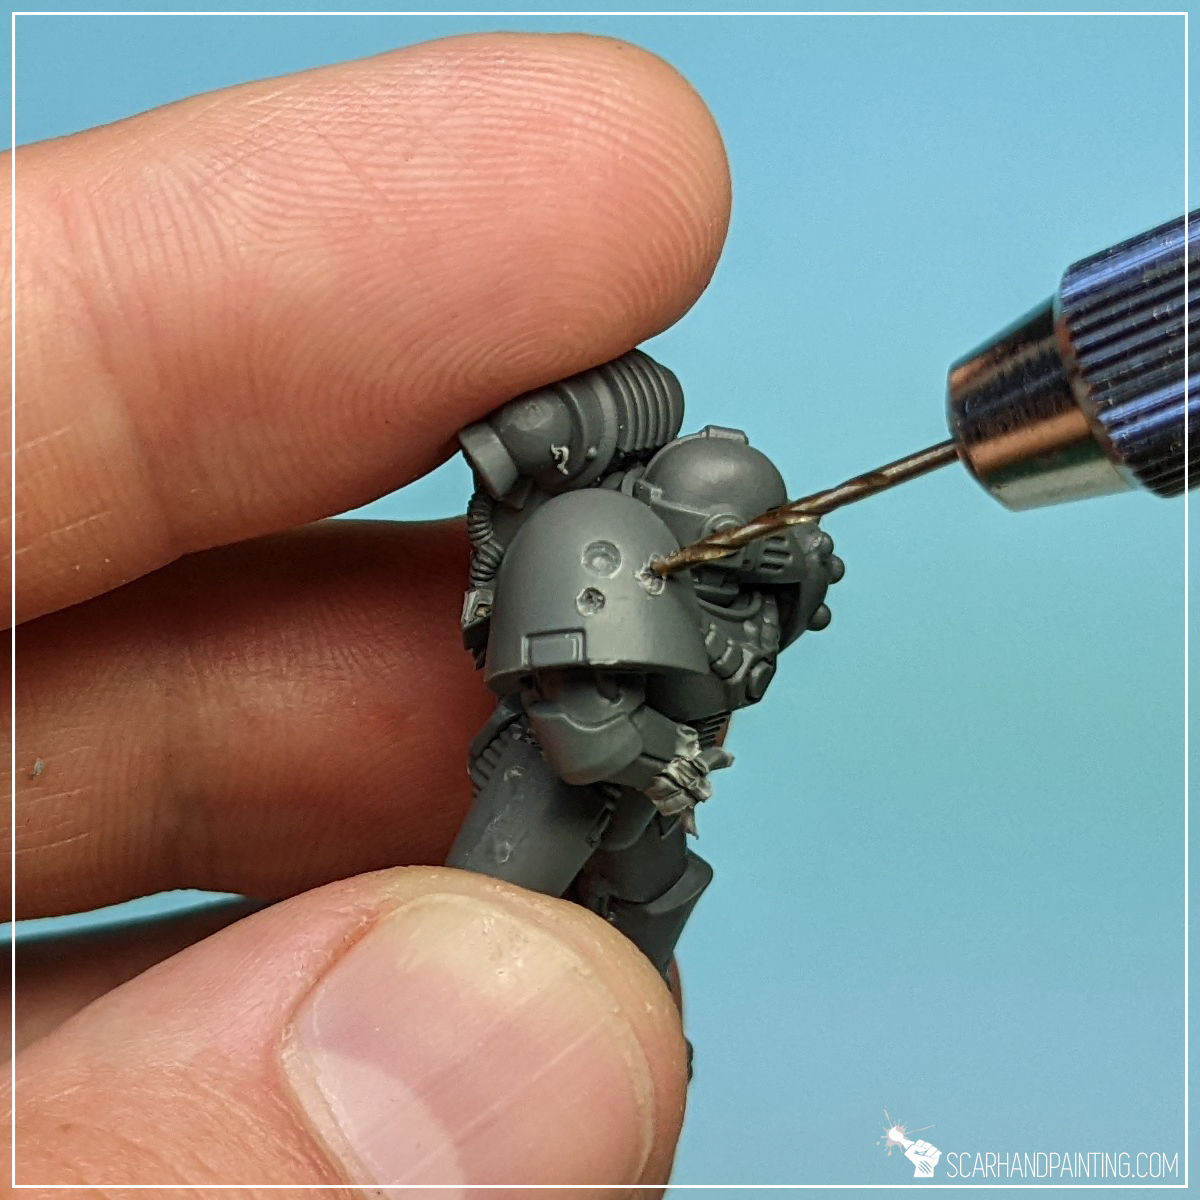
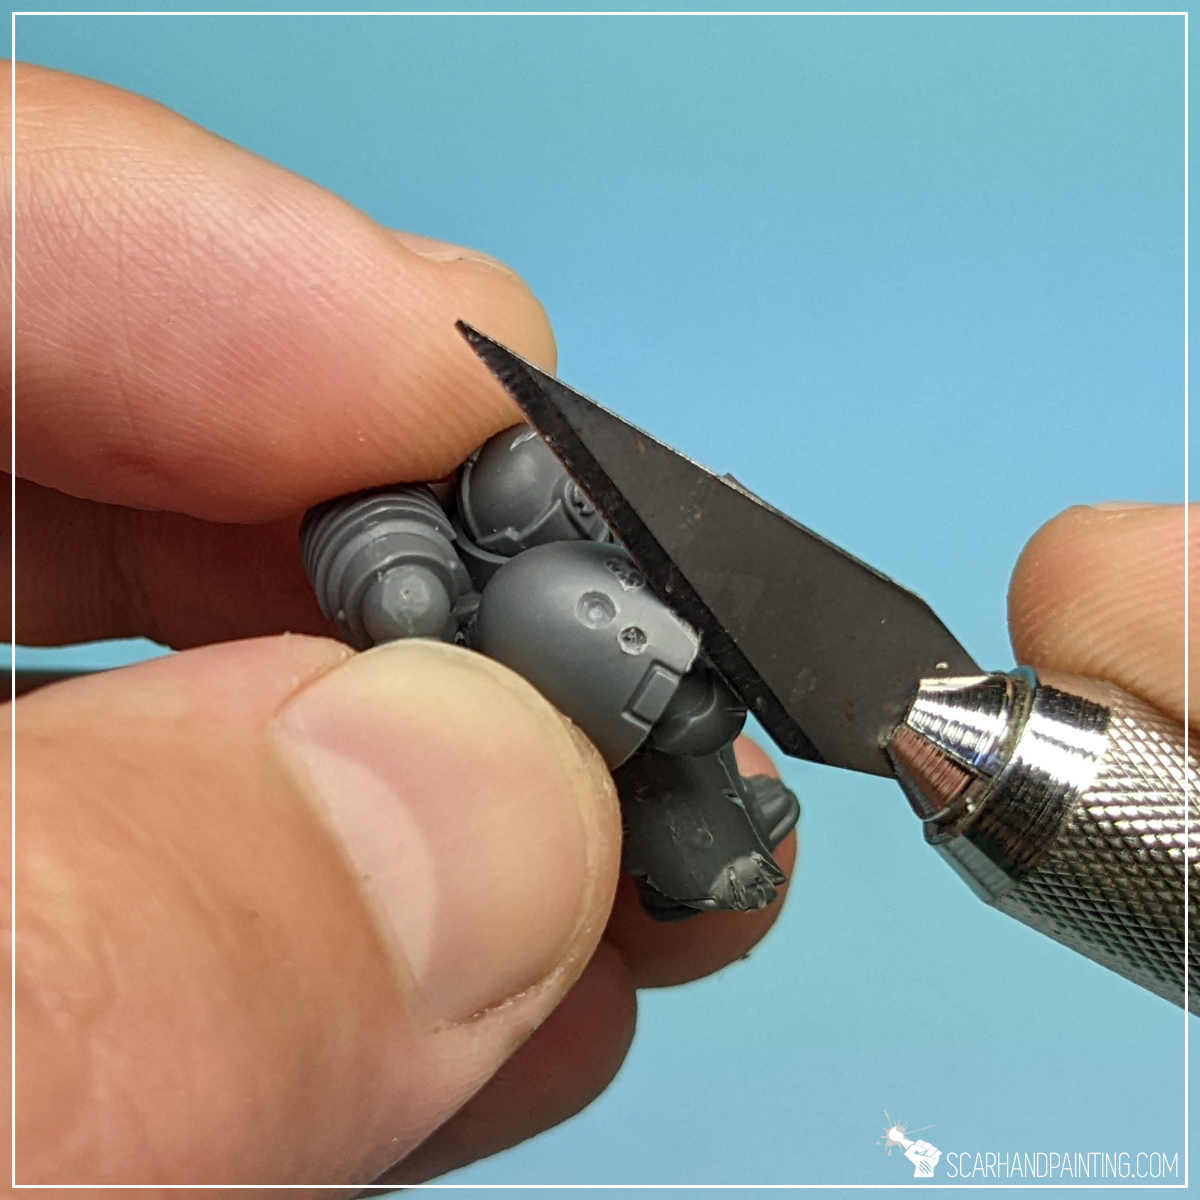
Step Two: Weapon Barrels
Next I cut an old lollipop stick and a few toothpicks into short pieces, then glued them onto the shoulder guards and arms of the miniature with Super Glue. I used remaining sharp toothpick ends to form spikes on one leg and the back of the miniature.

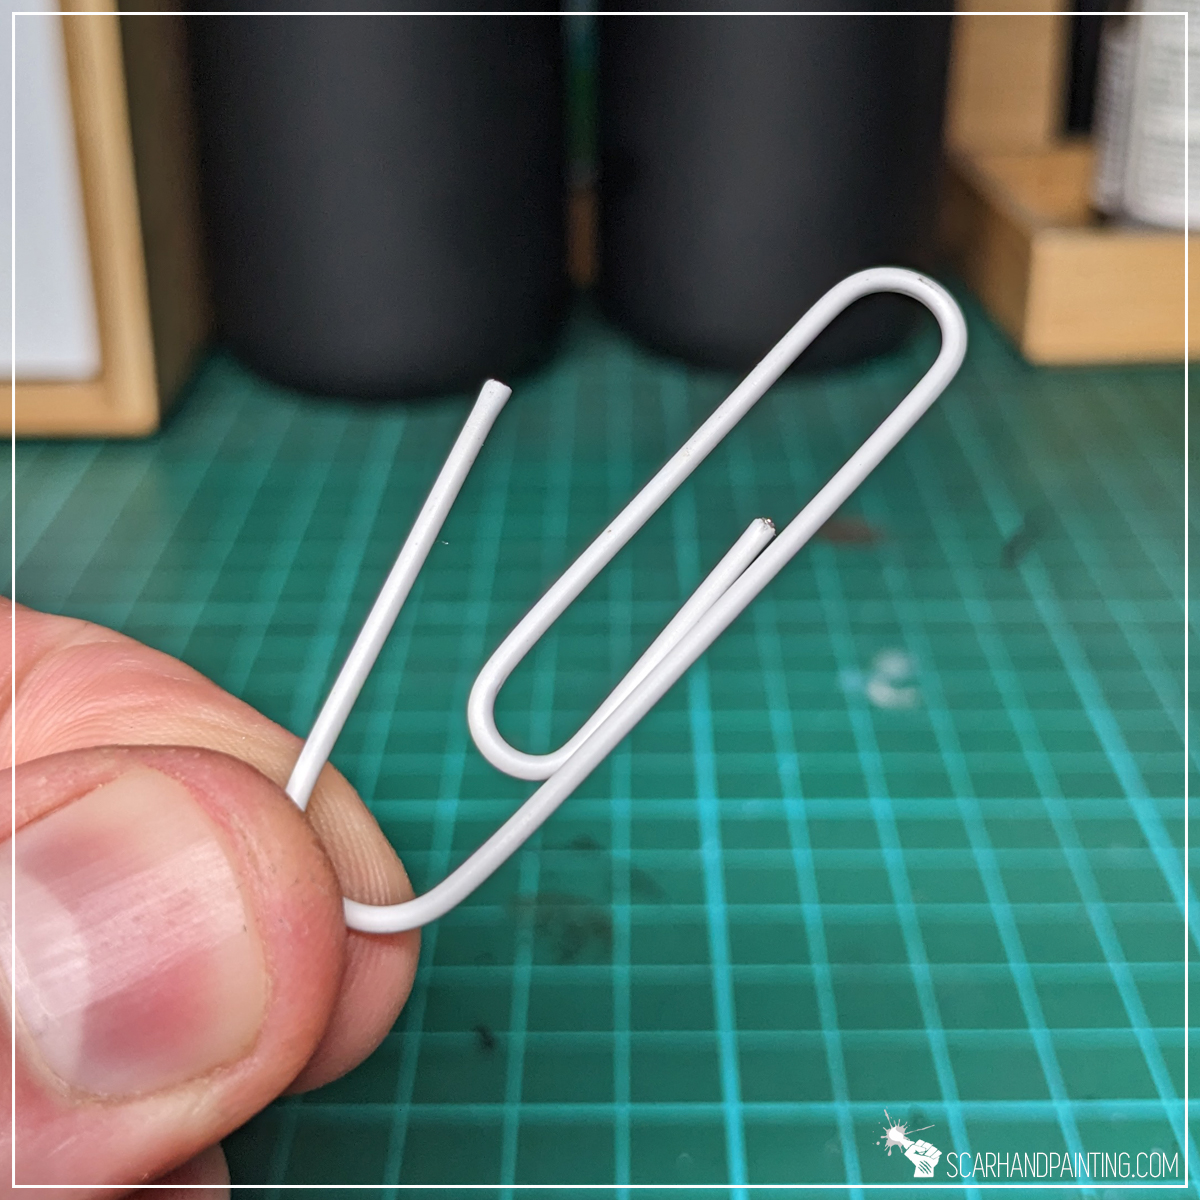
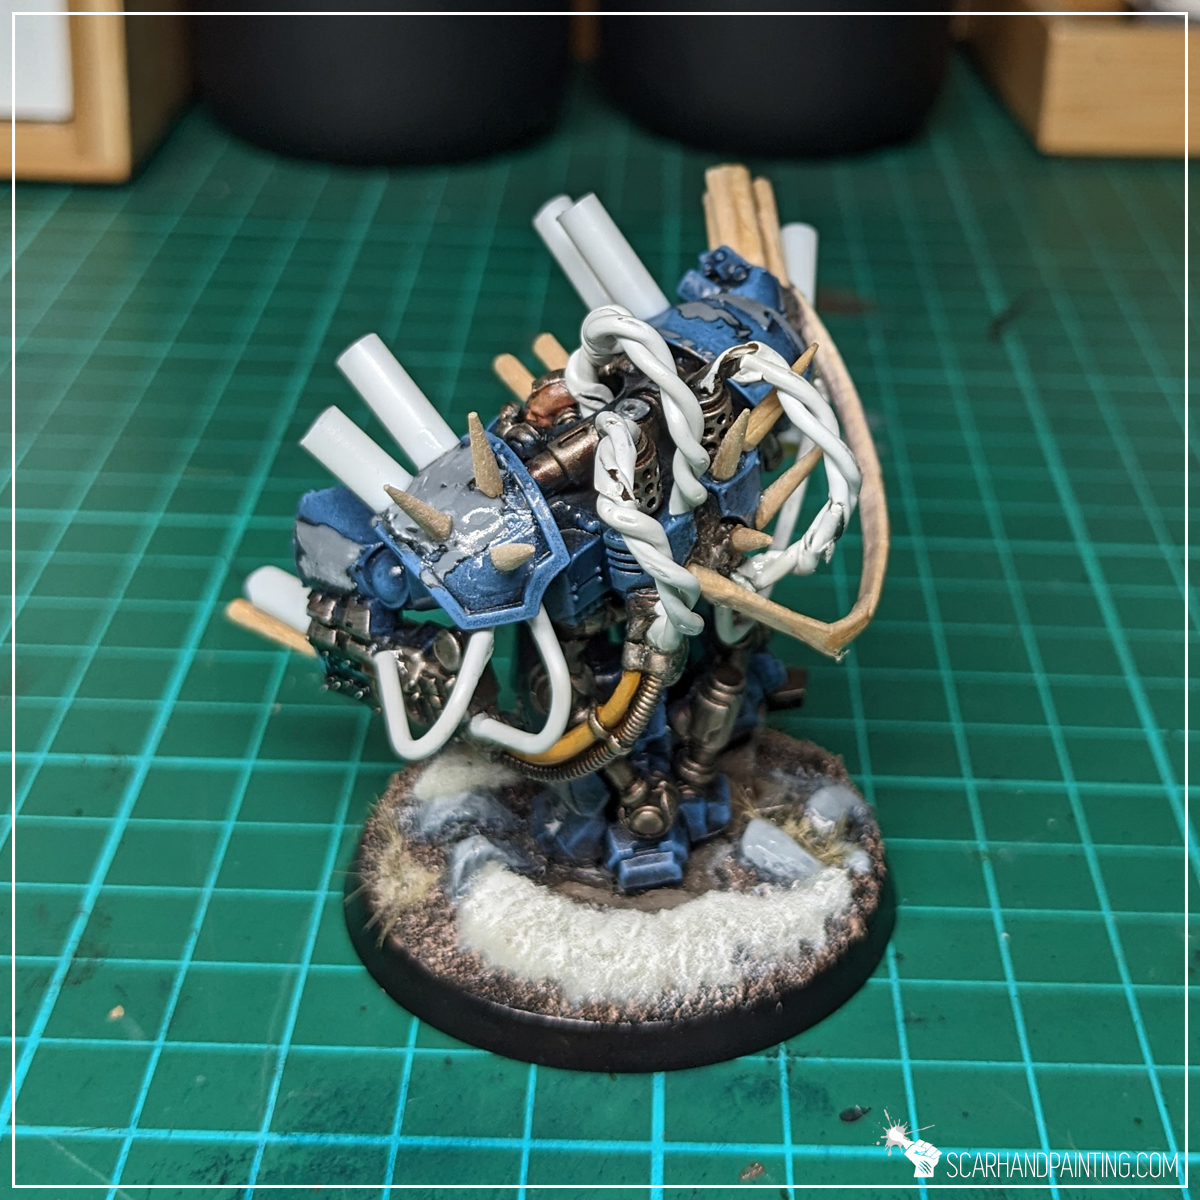
Step Three: Veins and Cables
I then added another thematic detail by cutting paper clips into small pieces, then bending them to form swathes of cabling. I also twisted a few to form double cabling/veins then glued all of them onto the miniature. Again with Super Glue.

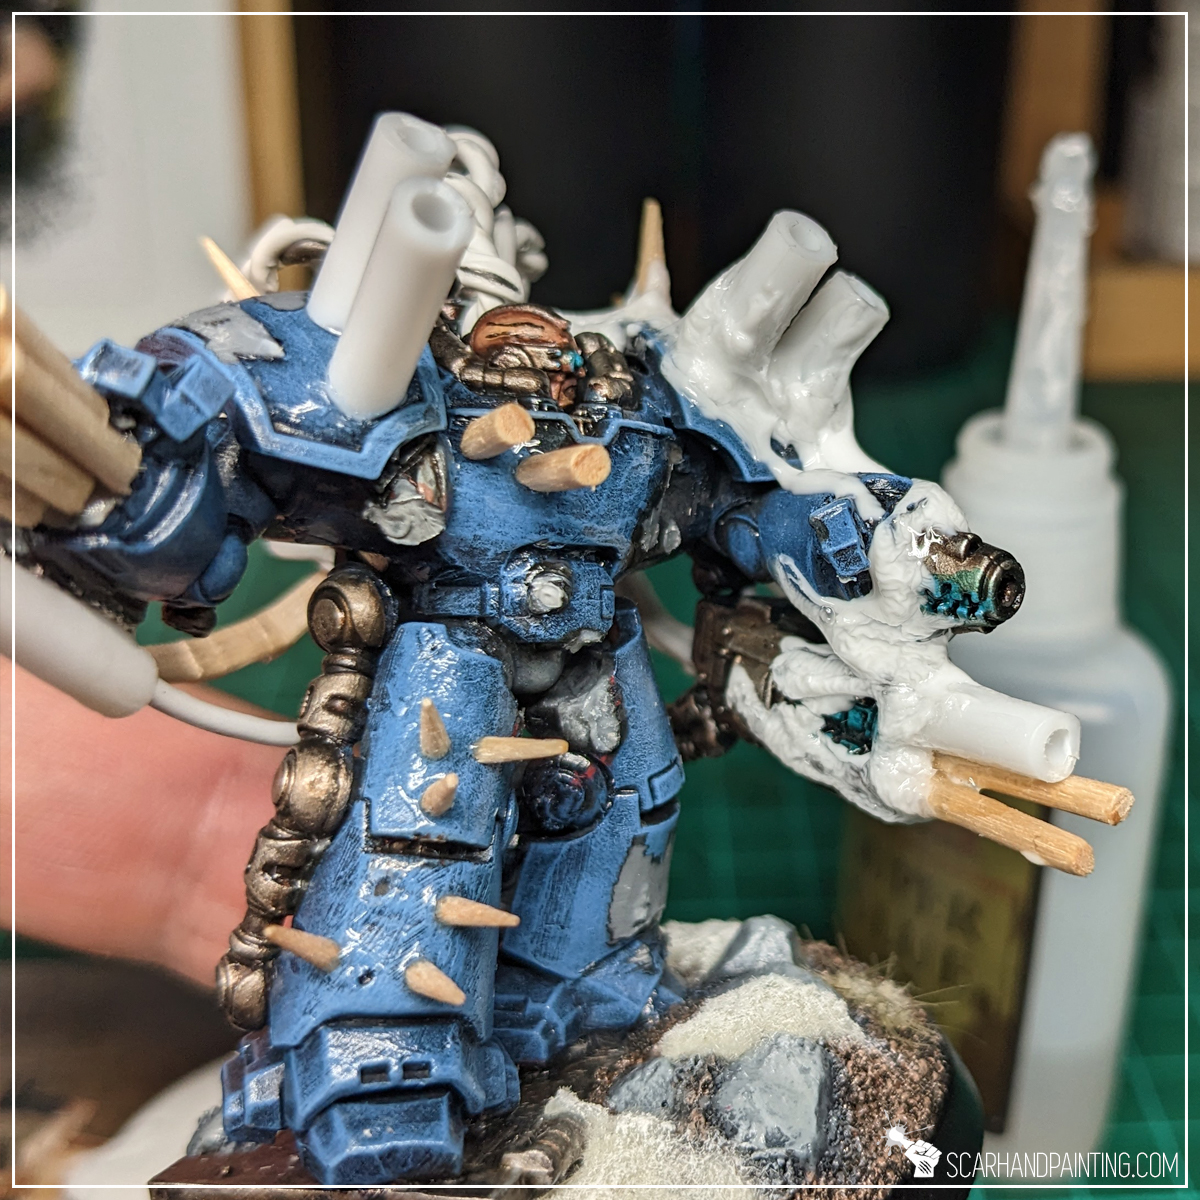
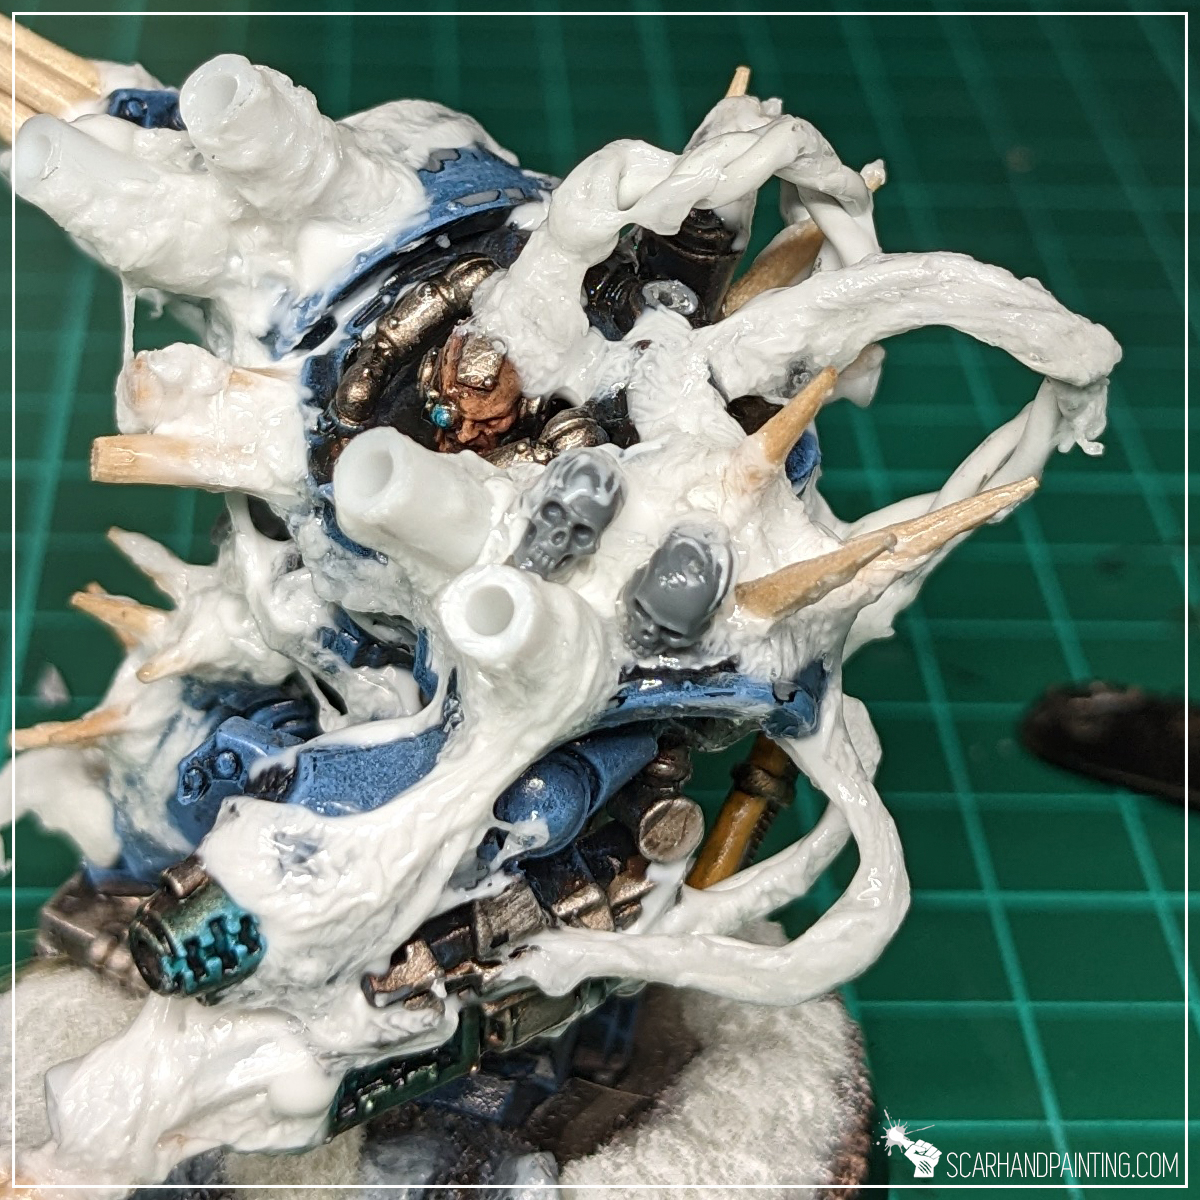
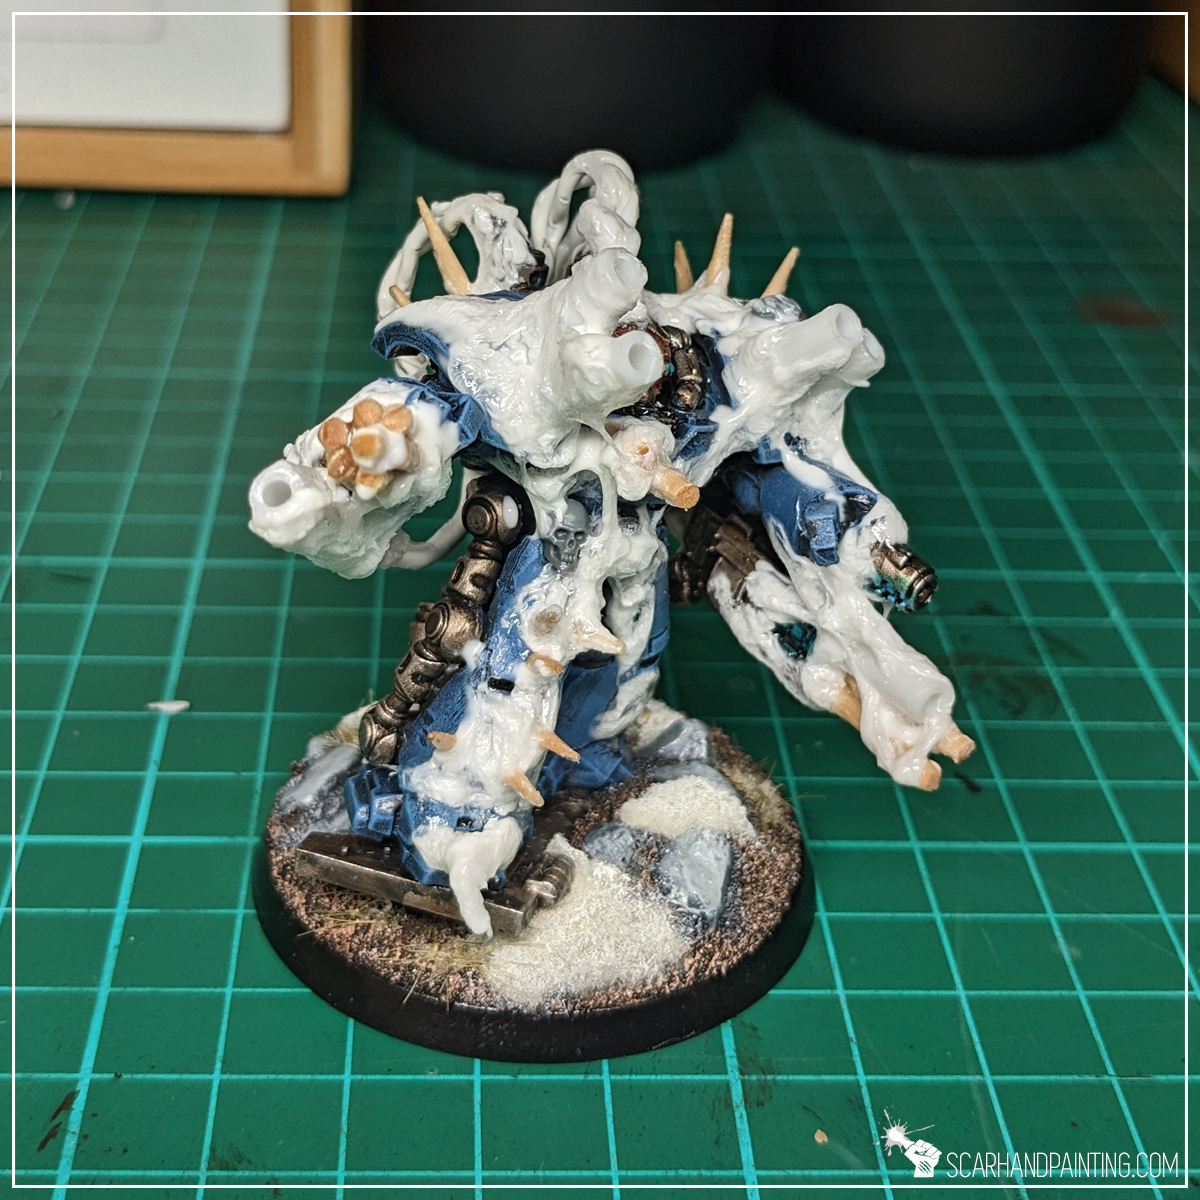
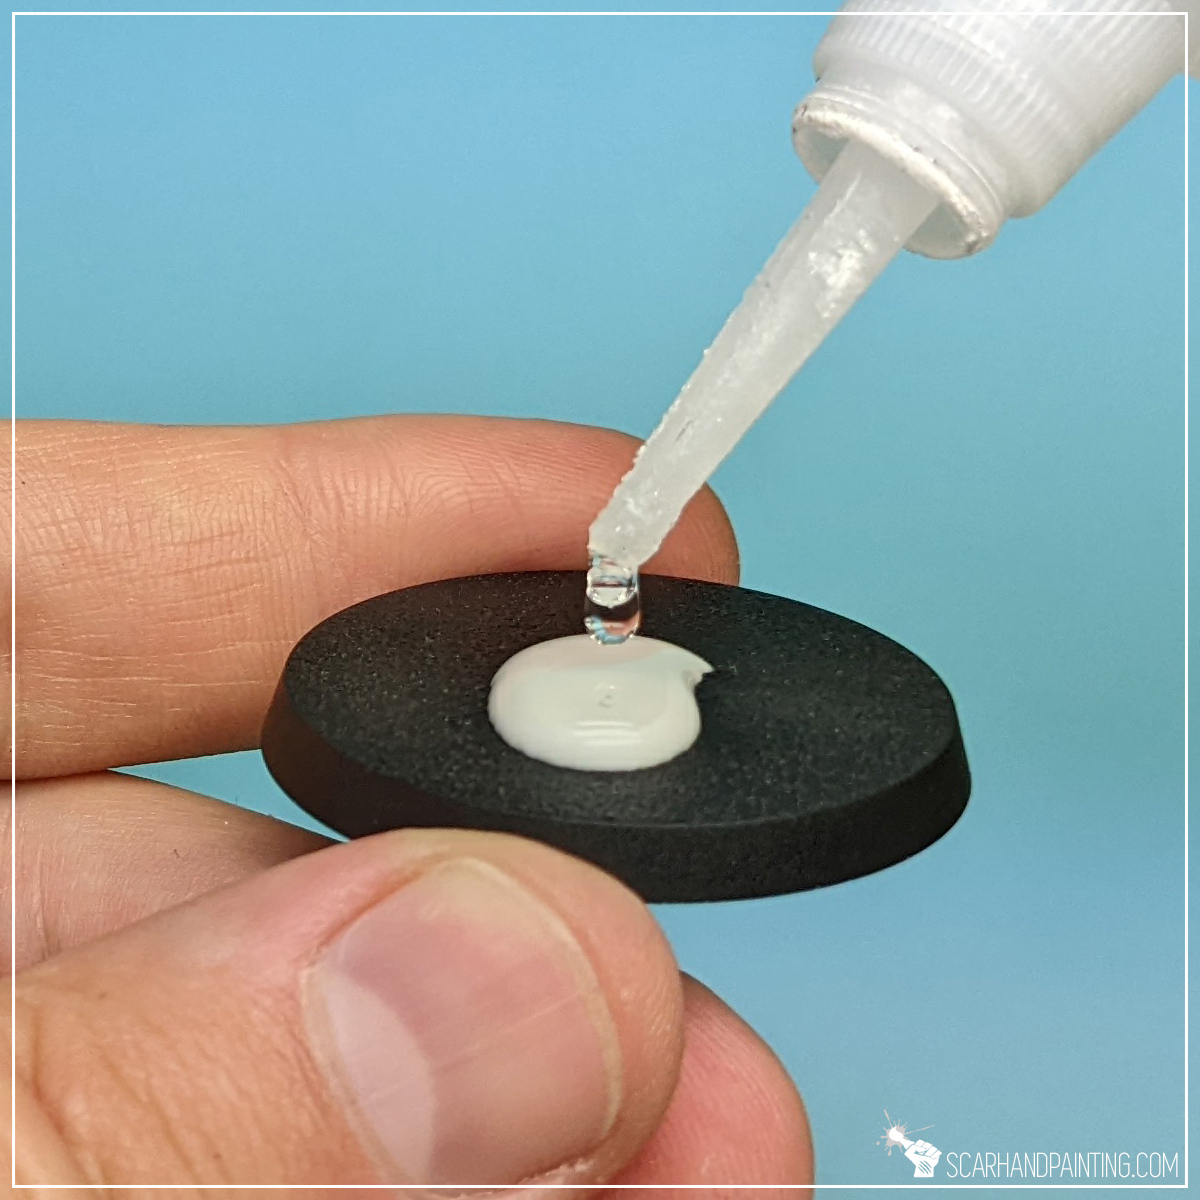
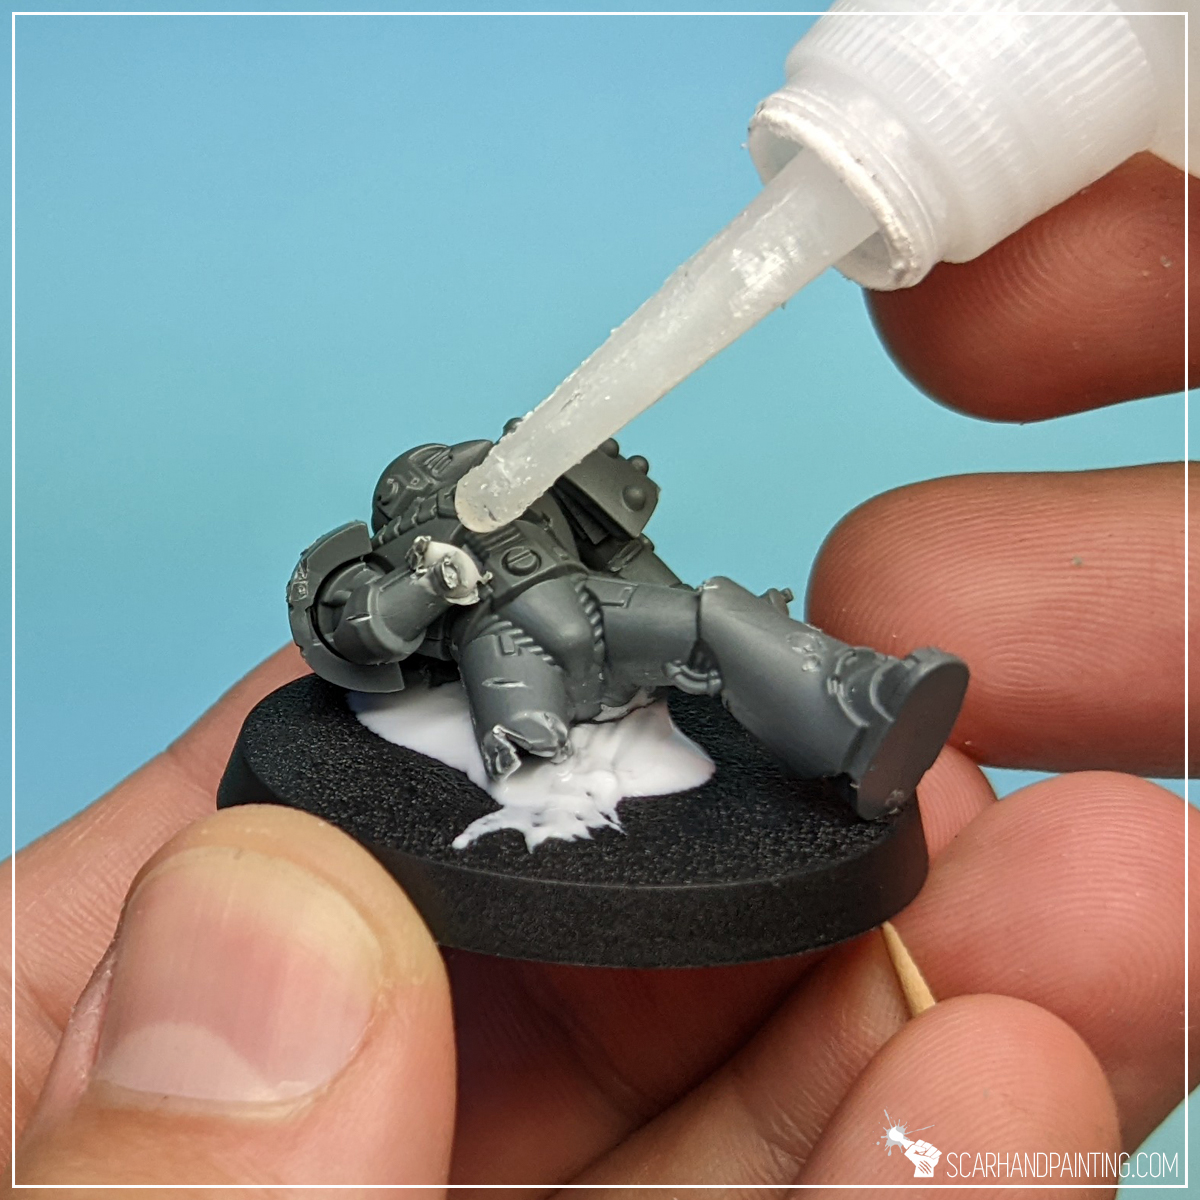
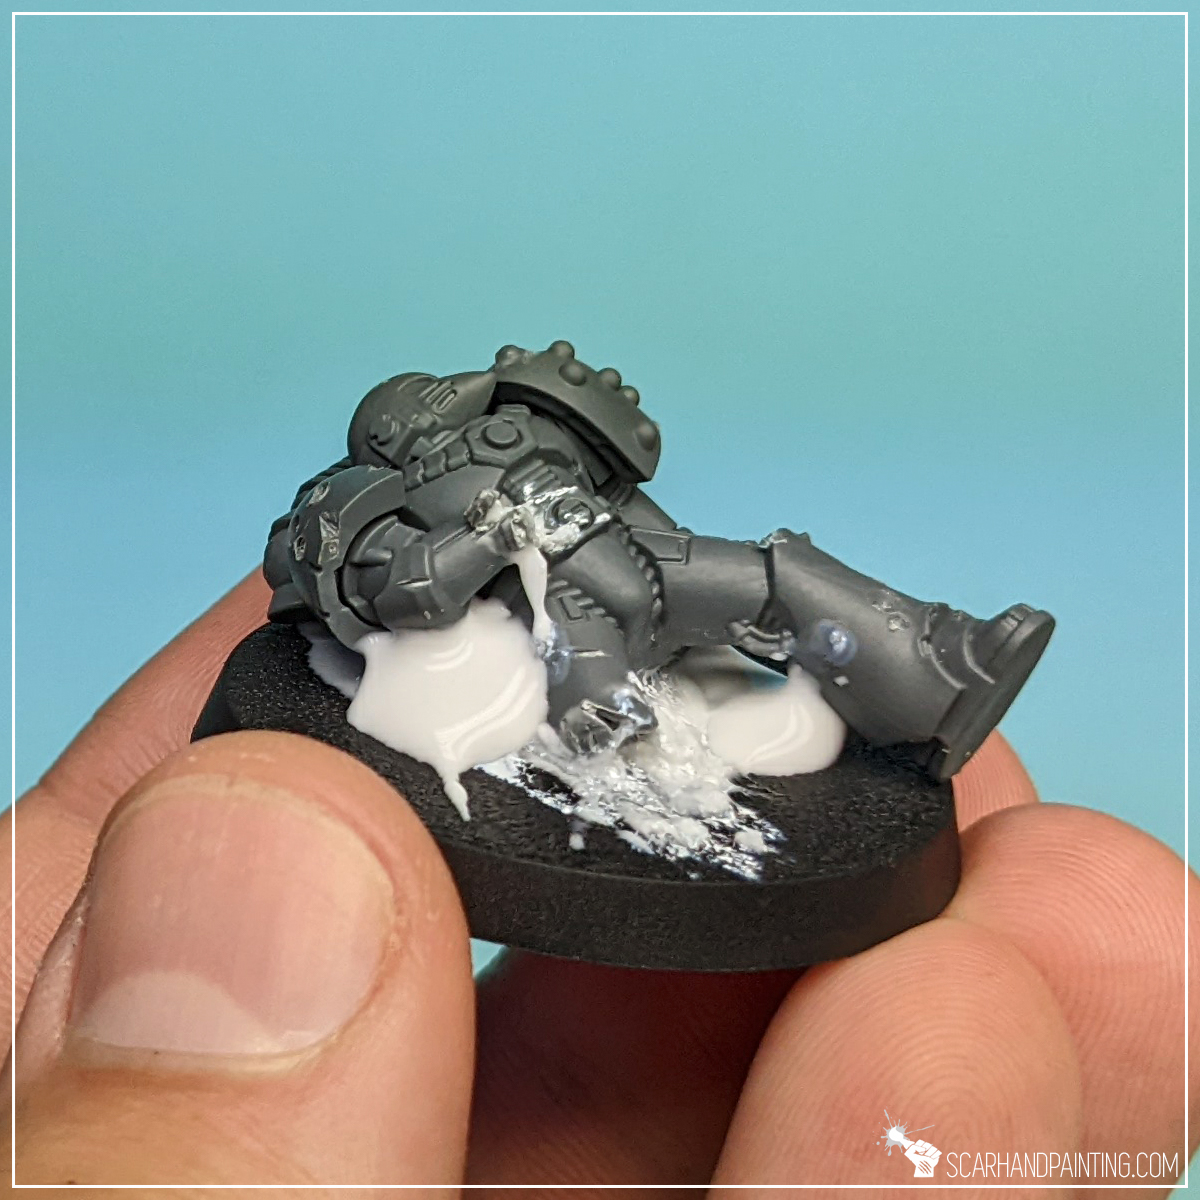
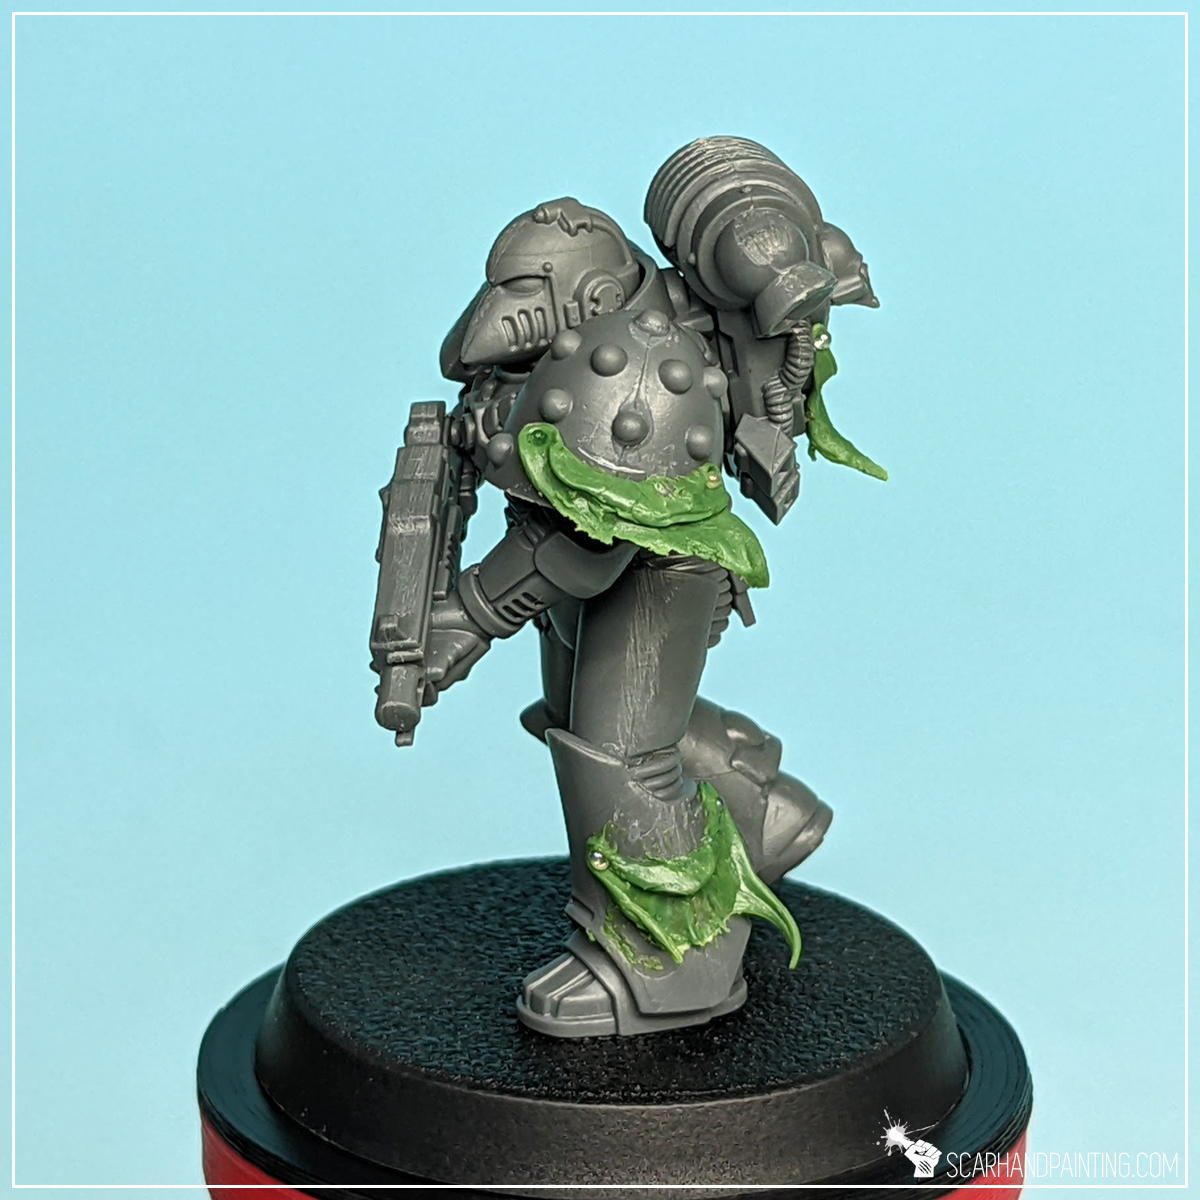
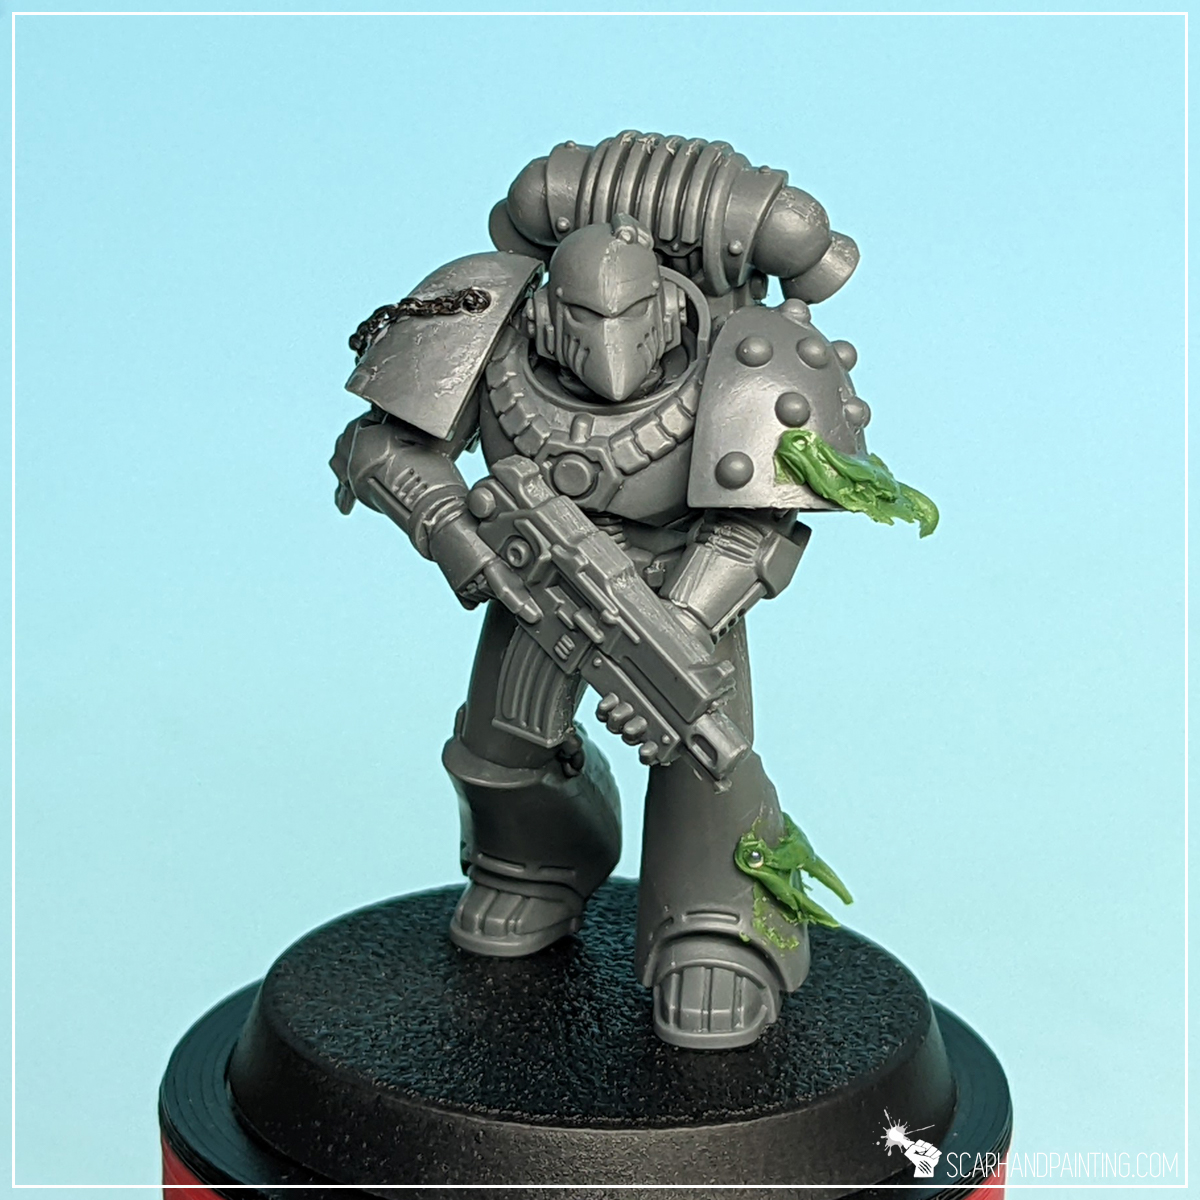
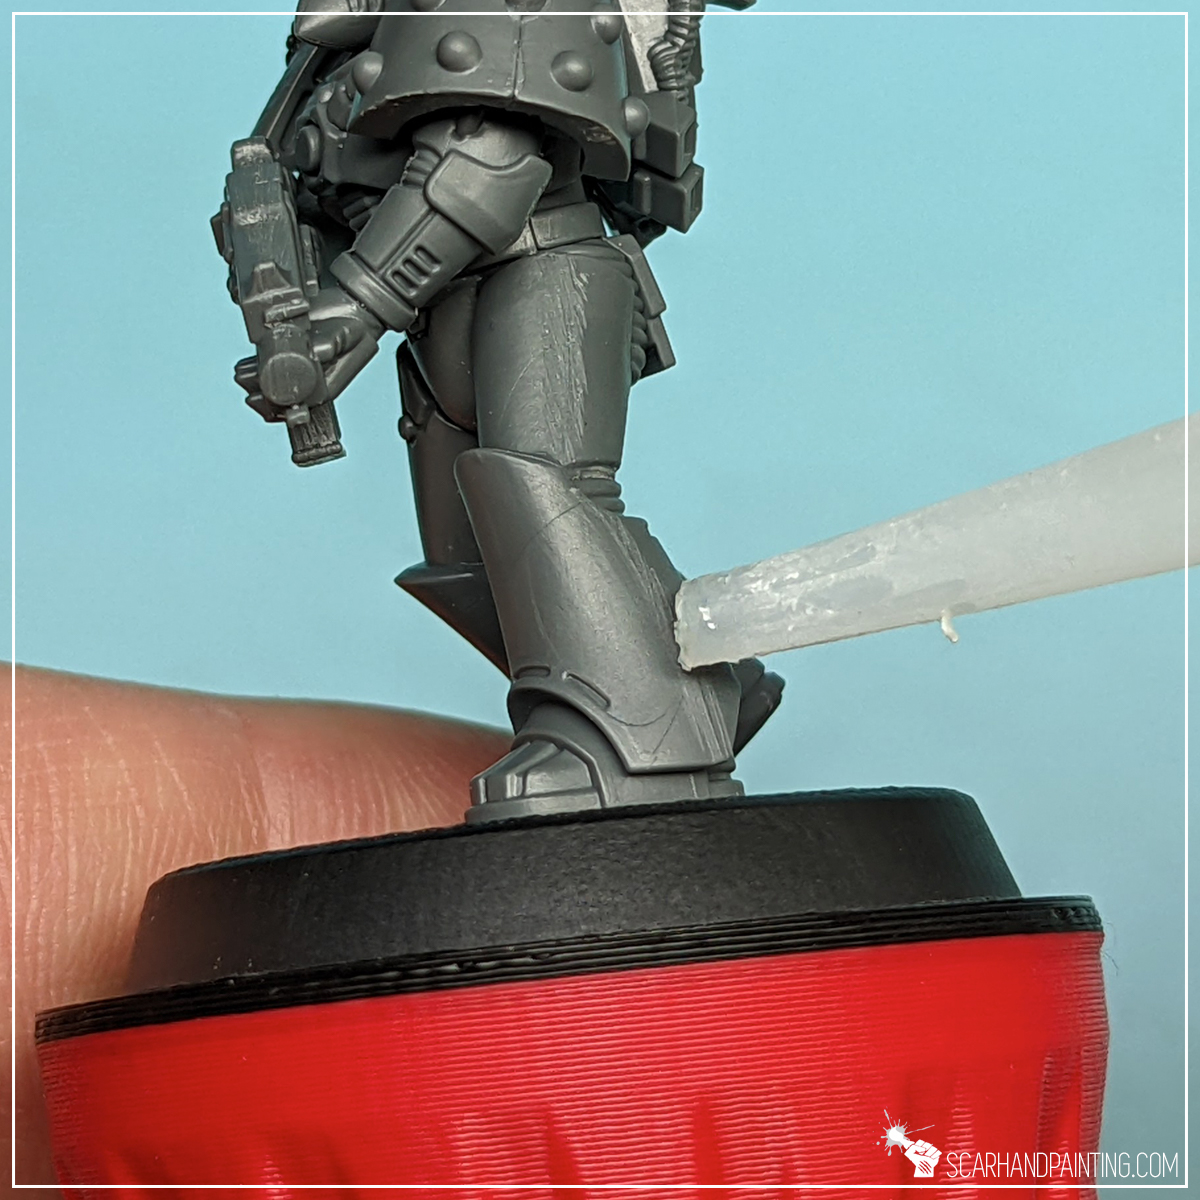
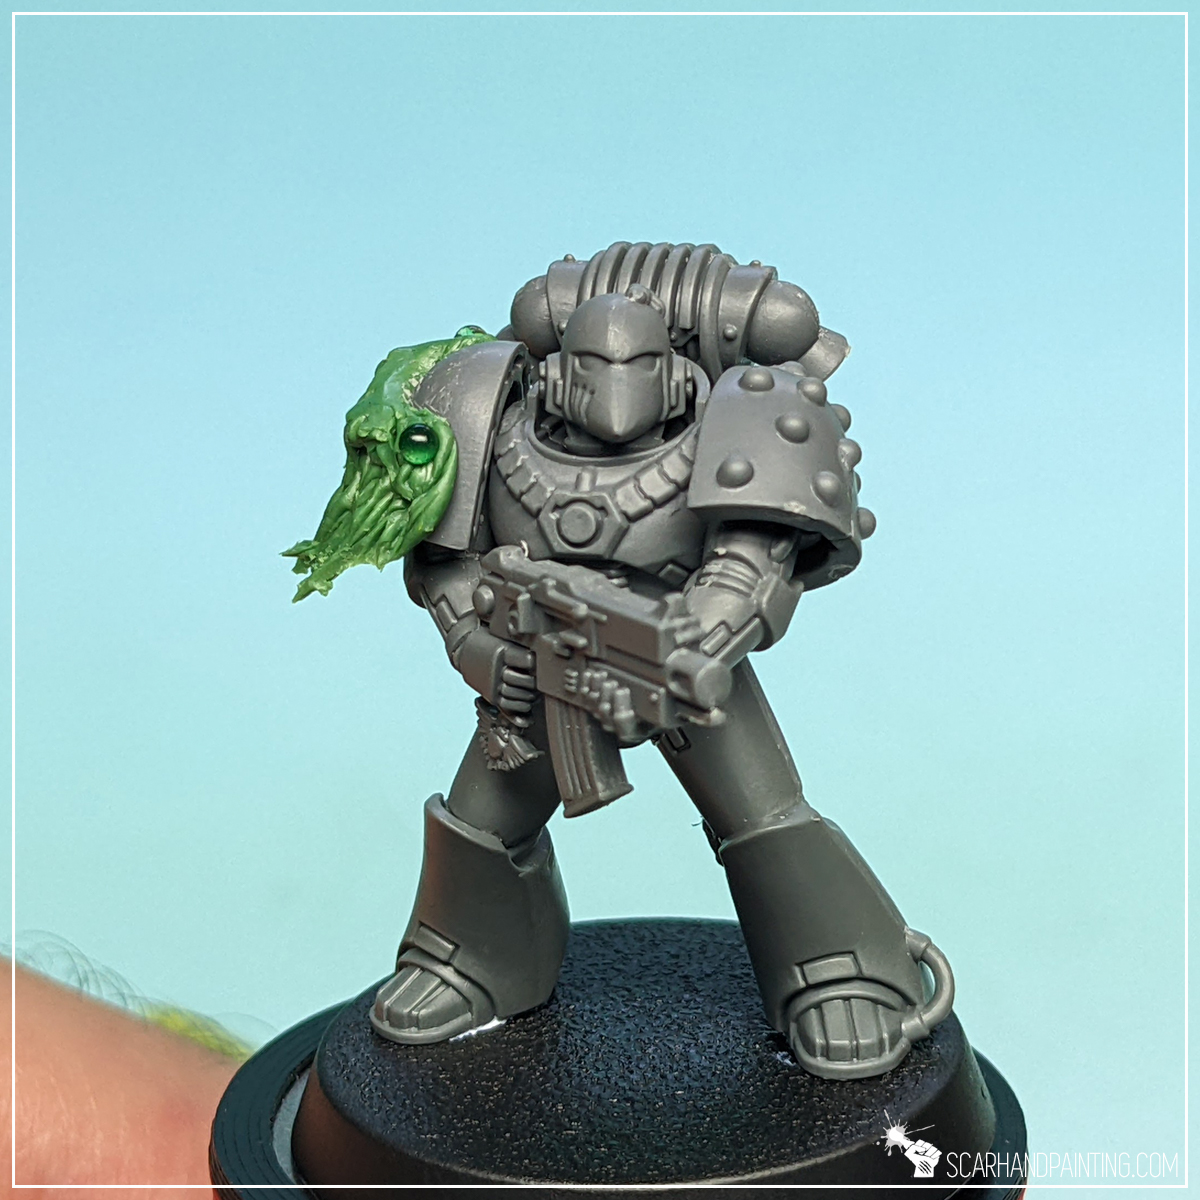
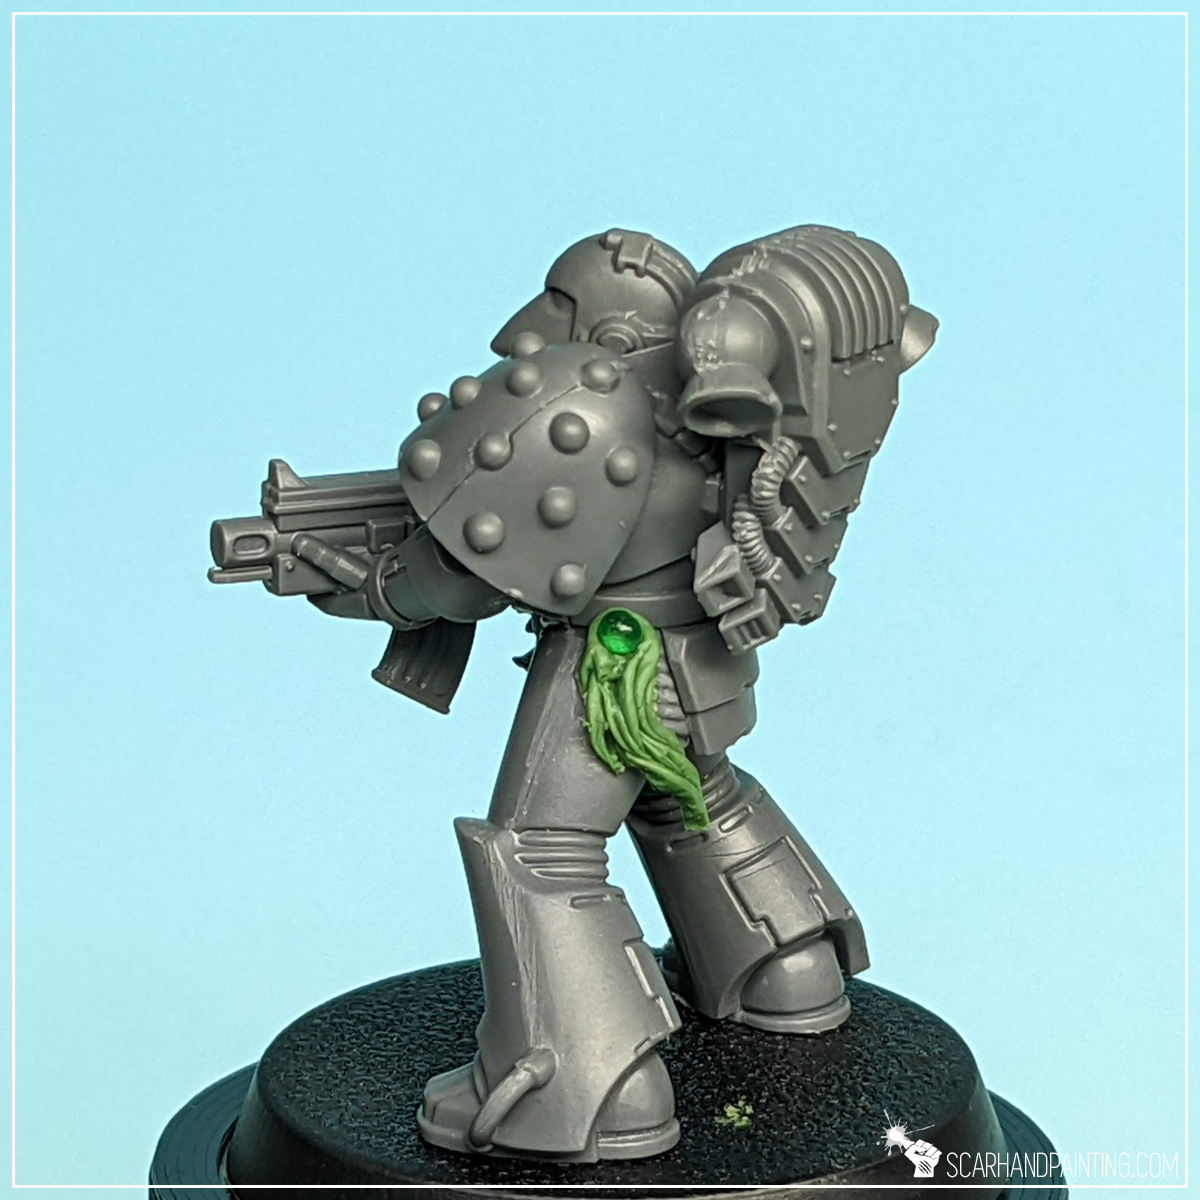
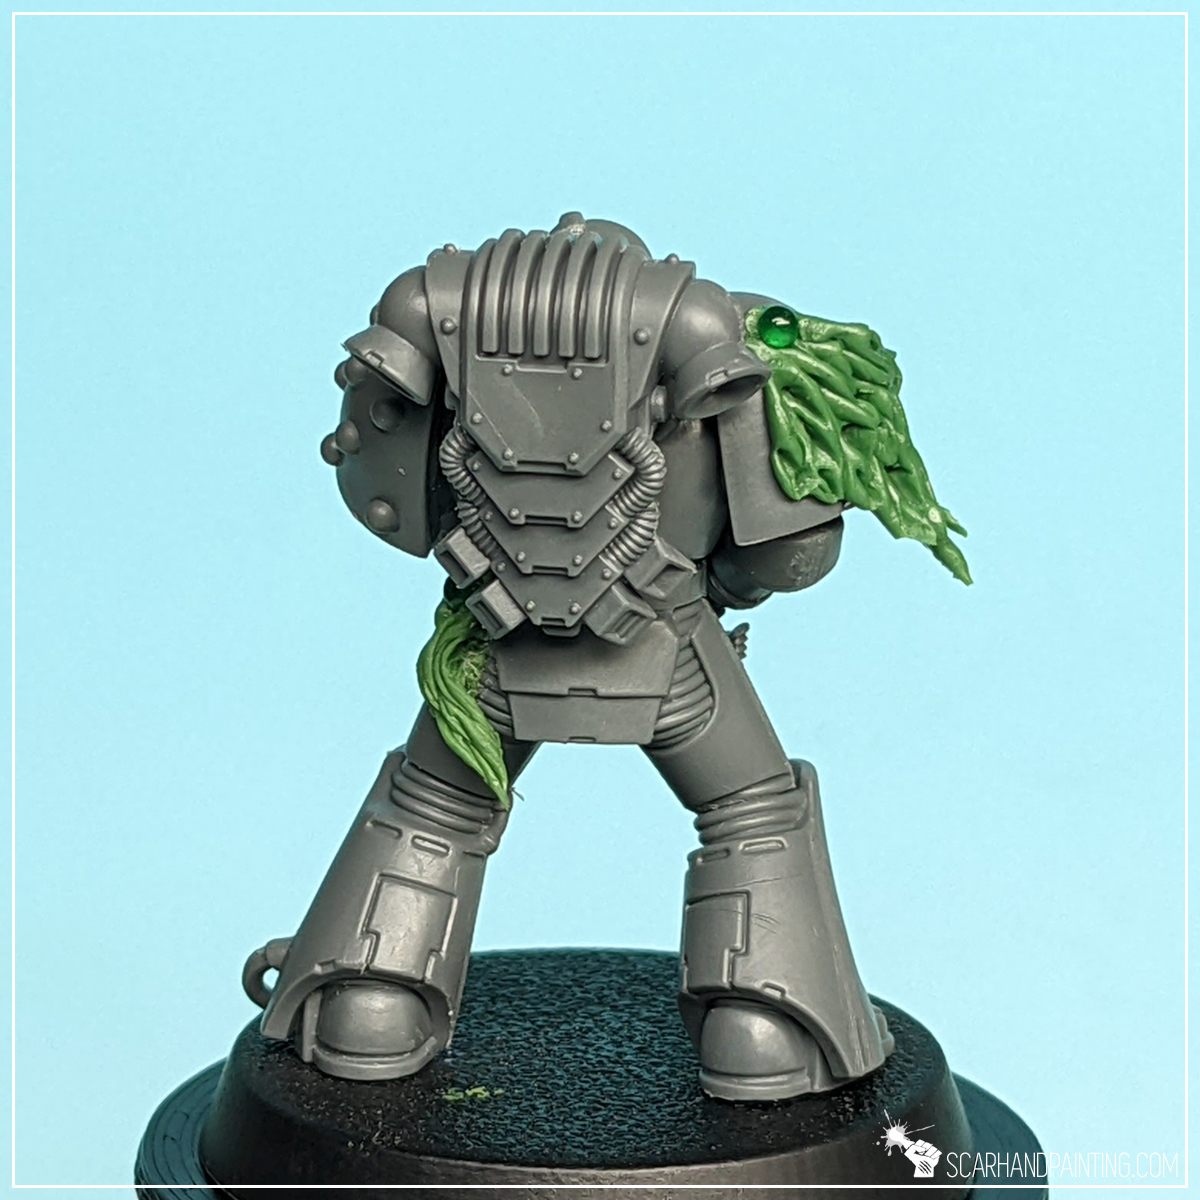
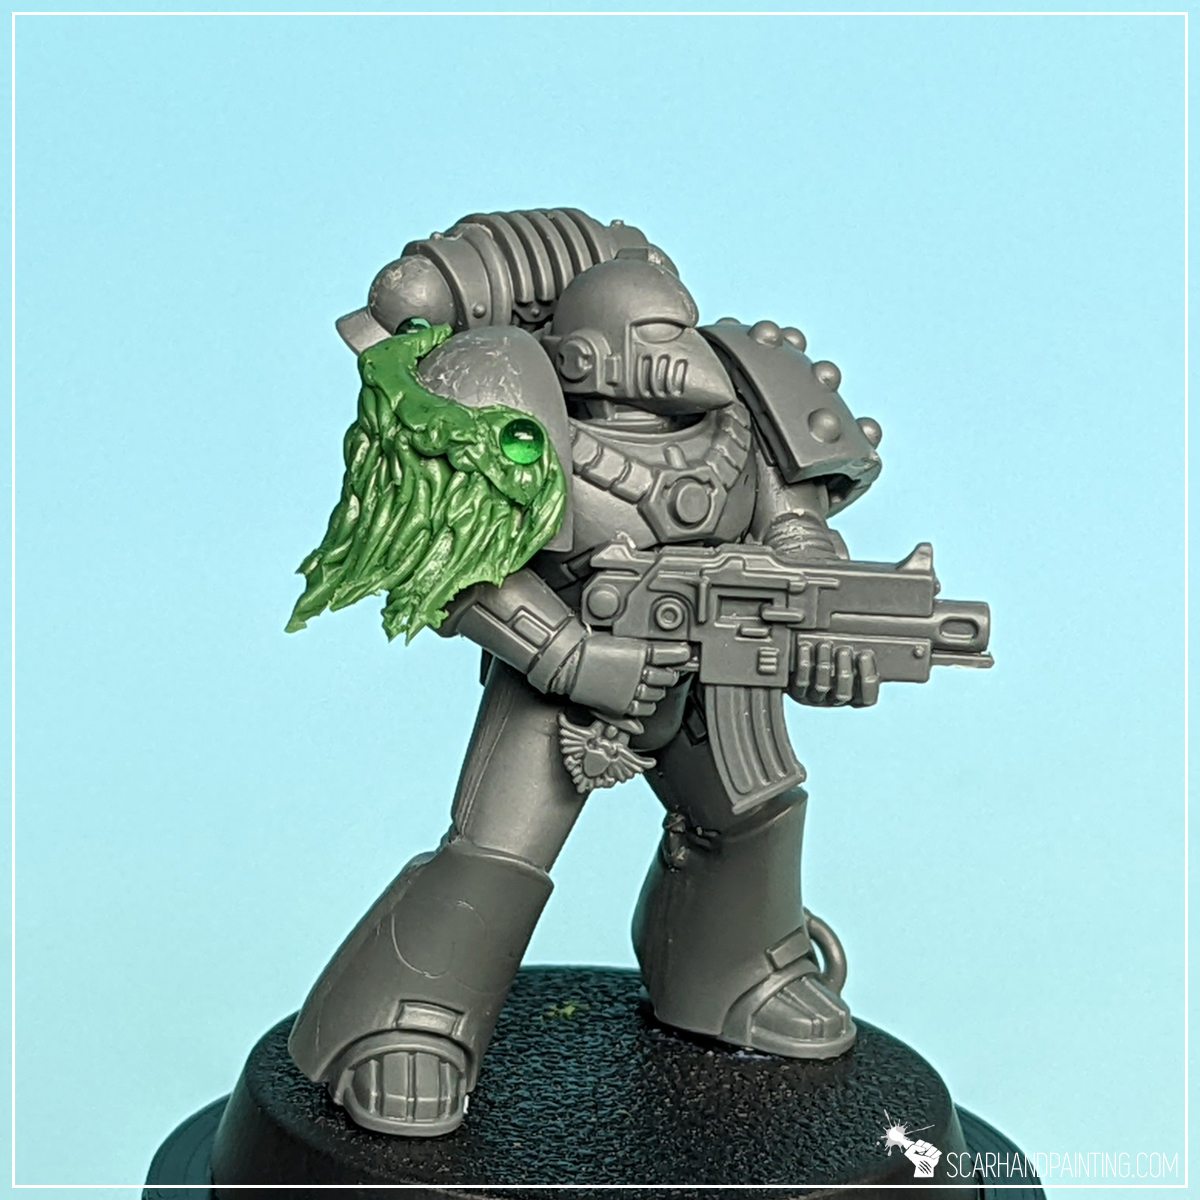
Step Four: Glue Goo Magic
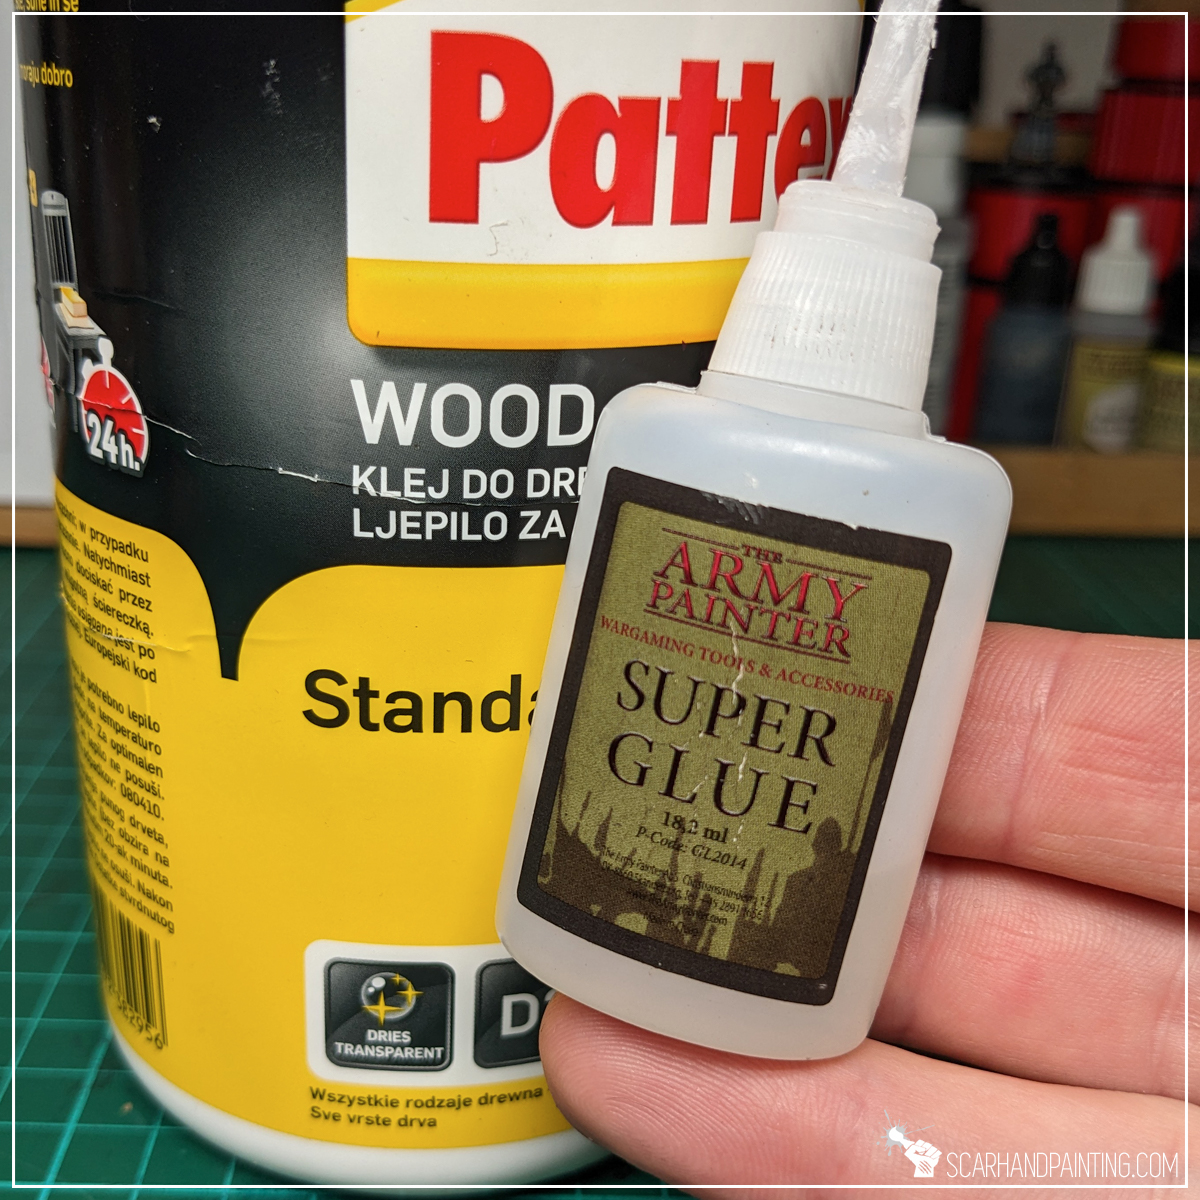
I followed up with the favorite trick amongst my arsenal – a mix of PVA glue and Super Glue. First I applied some PVA onto the miniature, then right after, I applied Super Glue on top. I then started ‘dragging’ the goo around with a tip of a toothpick to form veins and some sort of meat chunks. The curing Super Glue twisted and hardened the PVA glue underneath – MAGIC!

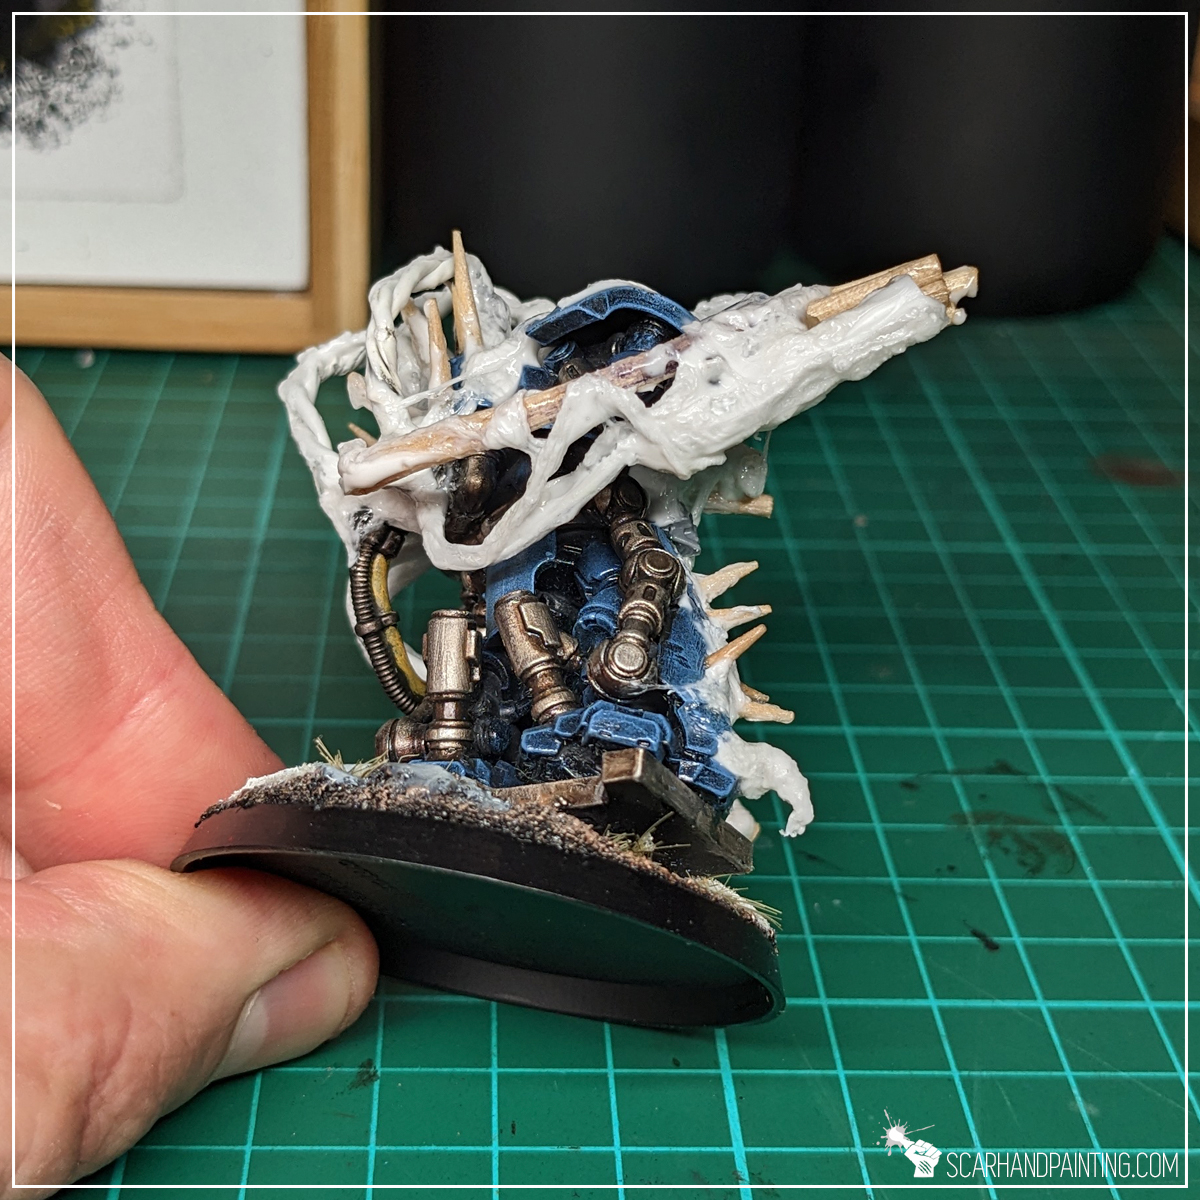
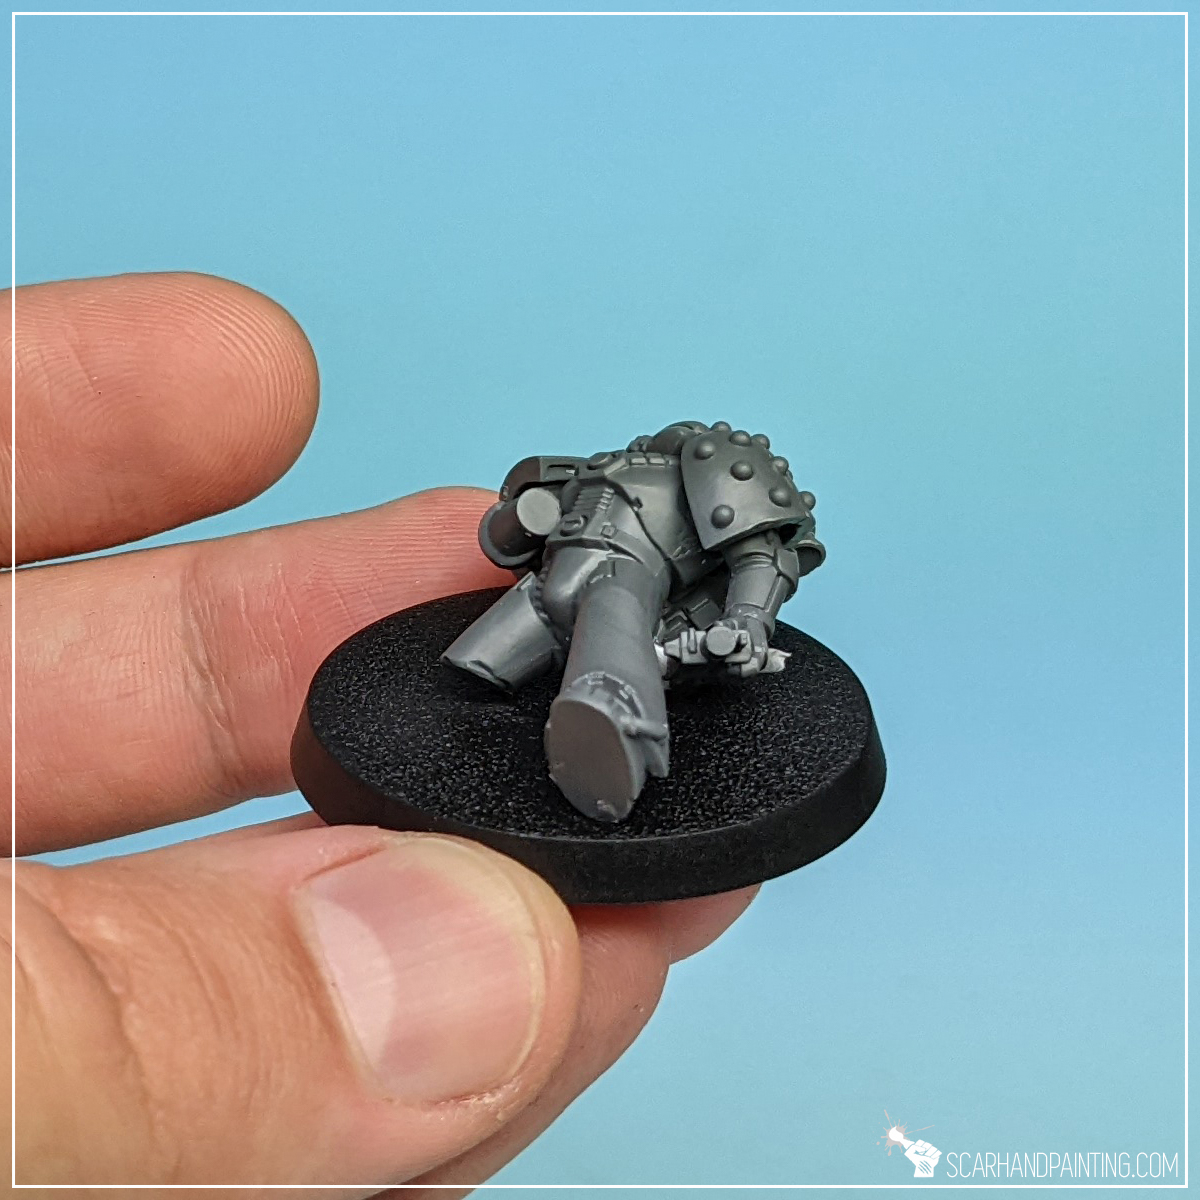
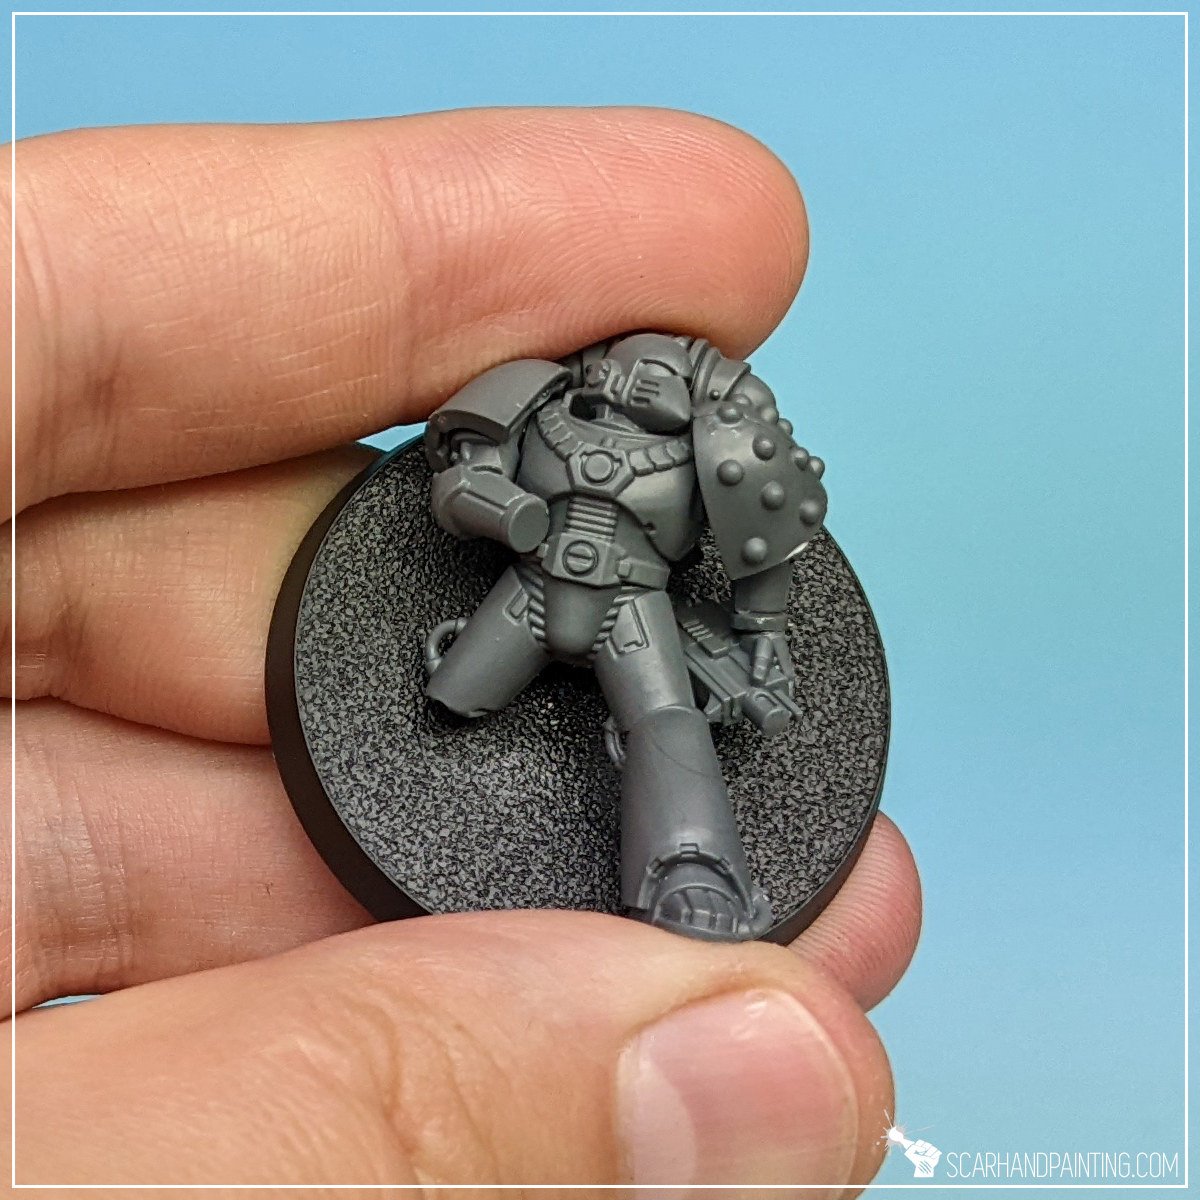
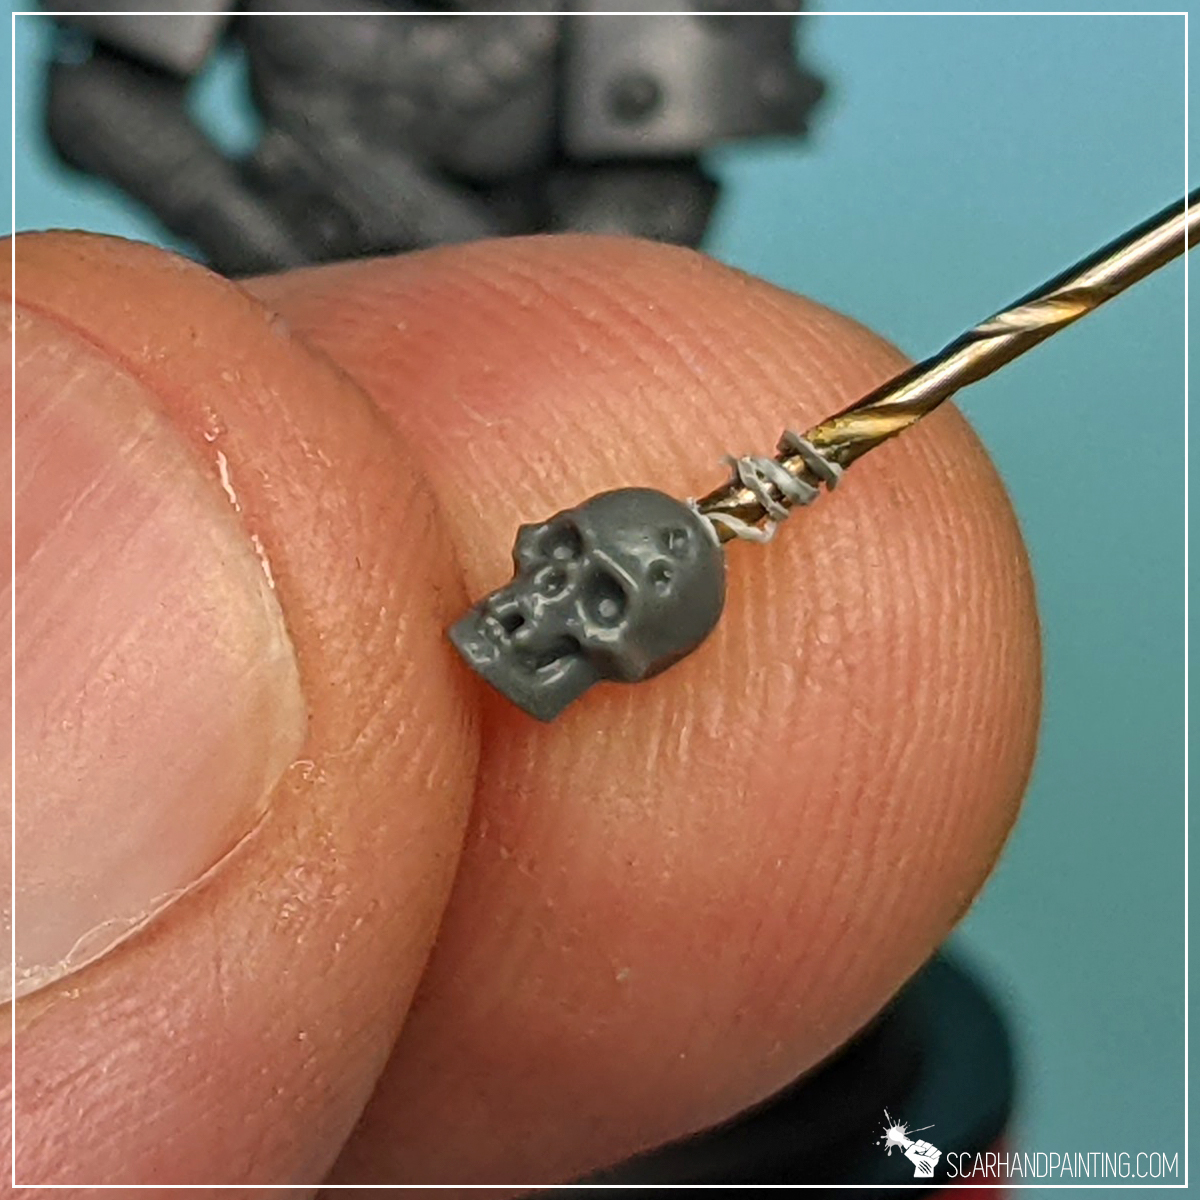
Step Five: Additional Detail
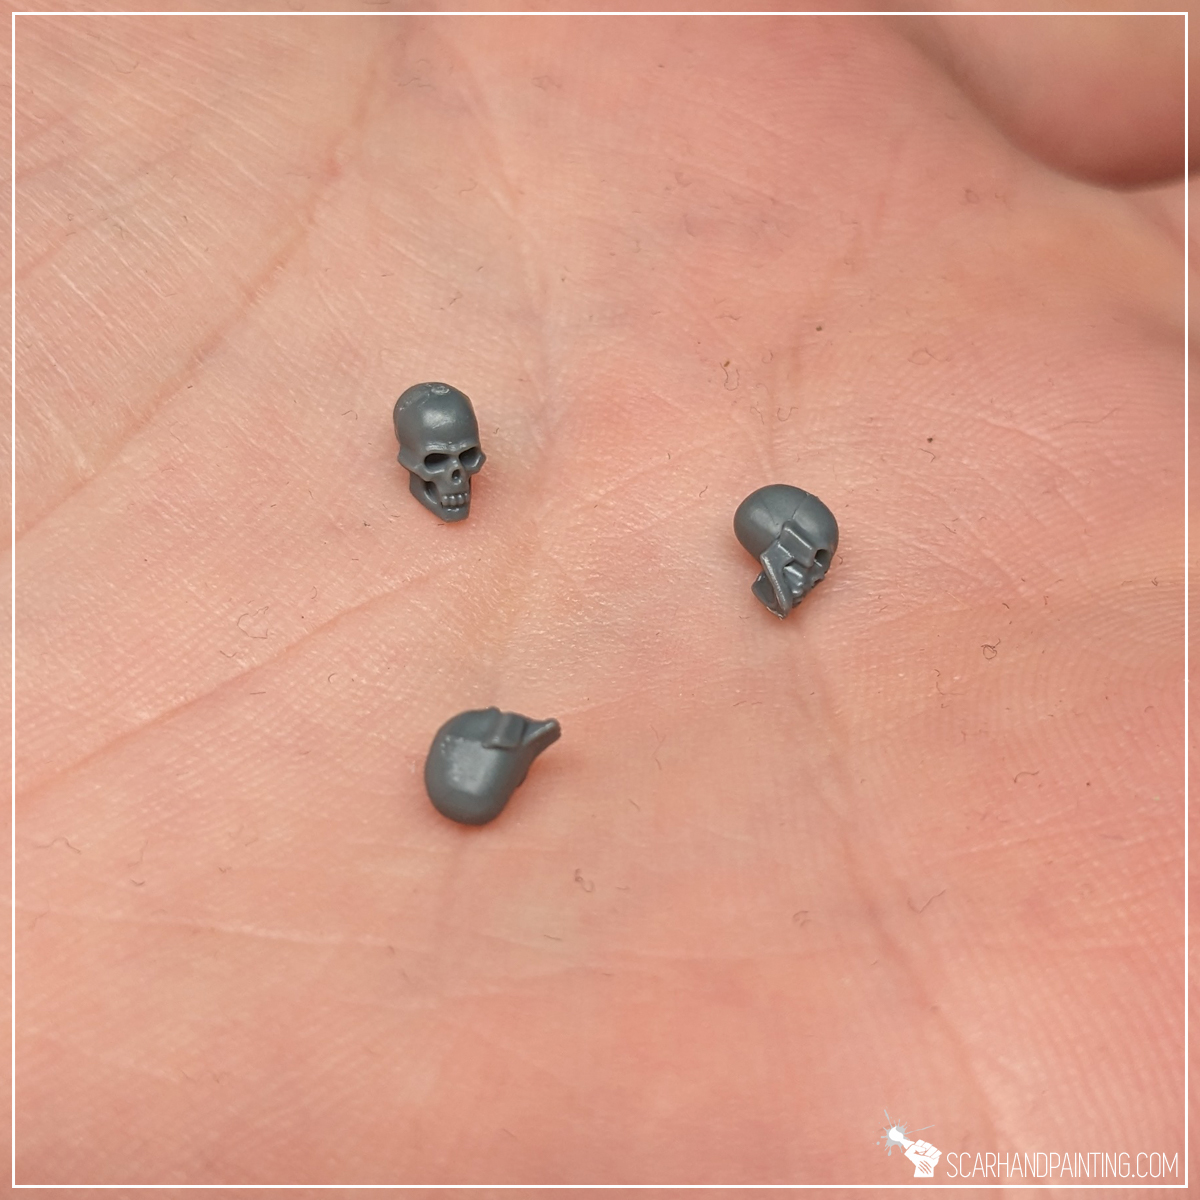
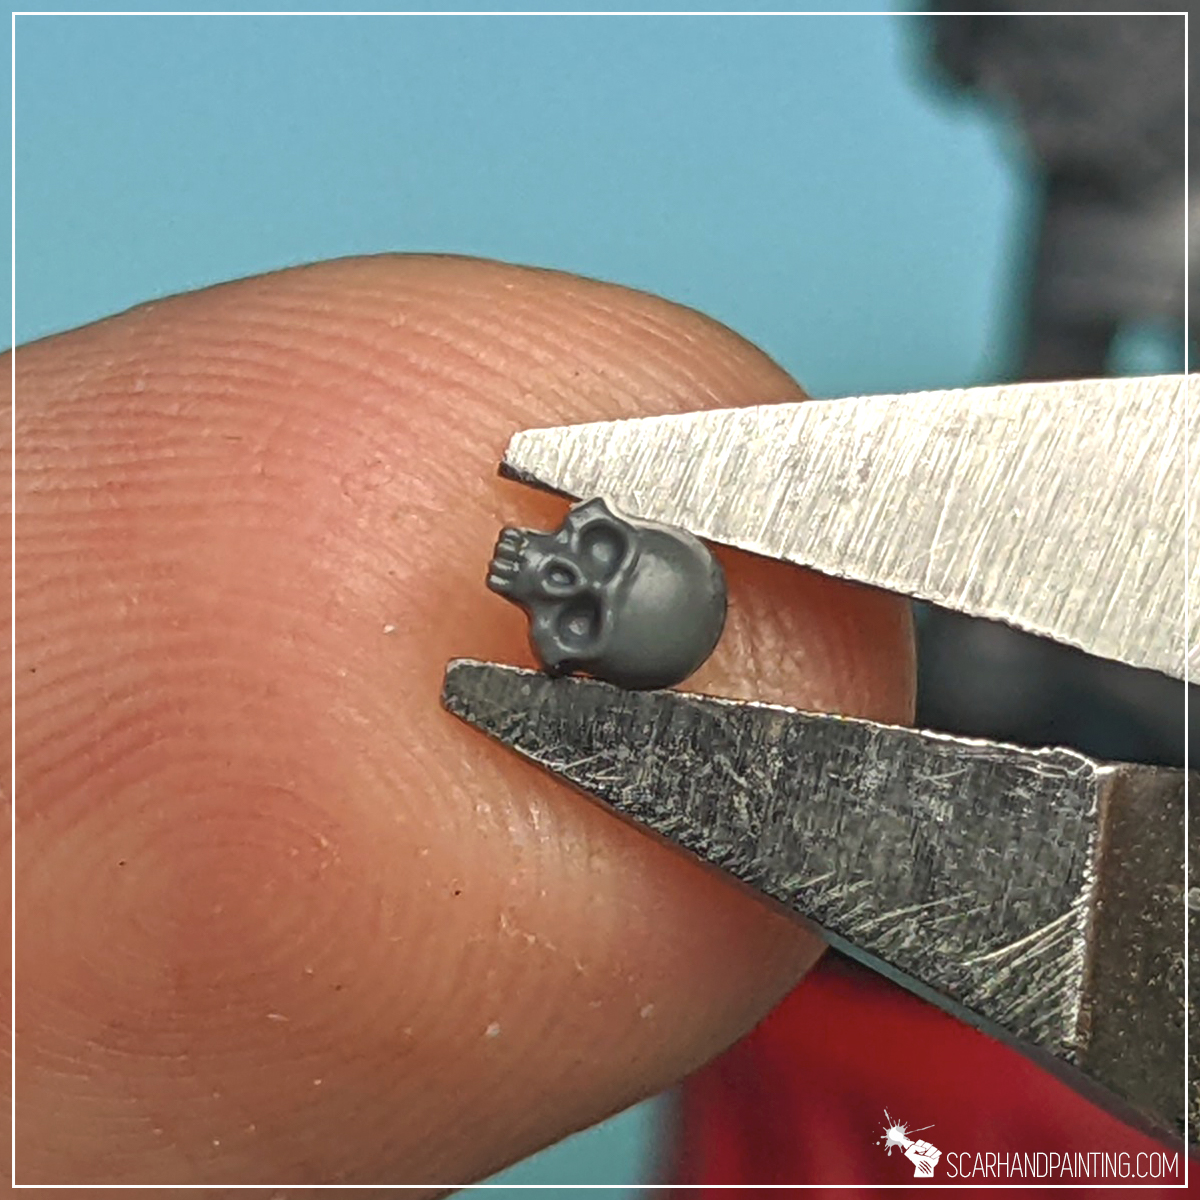
Here’s where I would usually add some leftover bitz. For this particular miniature I glued three skulls here and there to better represent the theme of ‘big bad Chaos thing’, but I invite you to experiment with stuff. I just wanted to keep things simple.
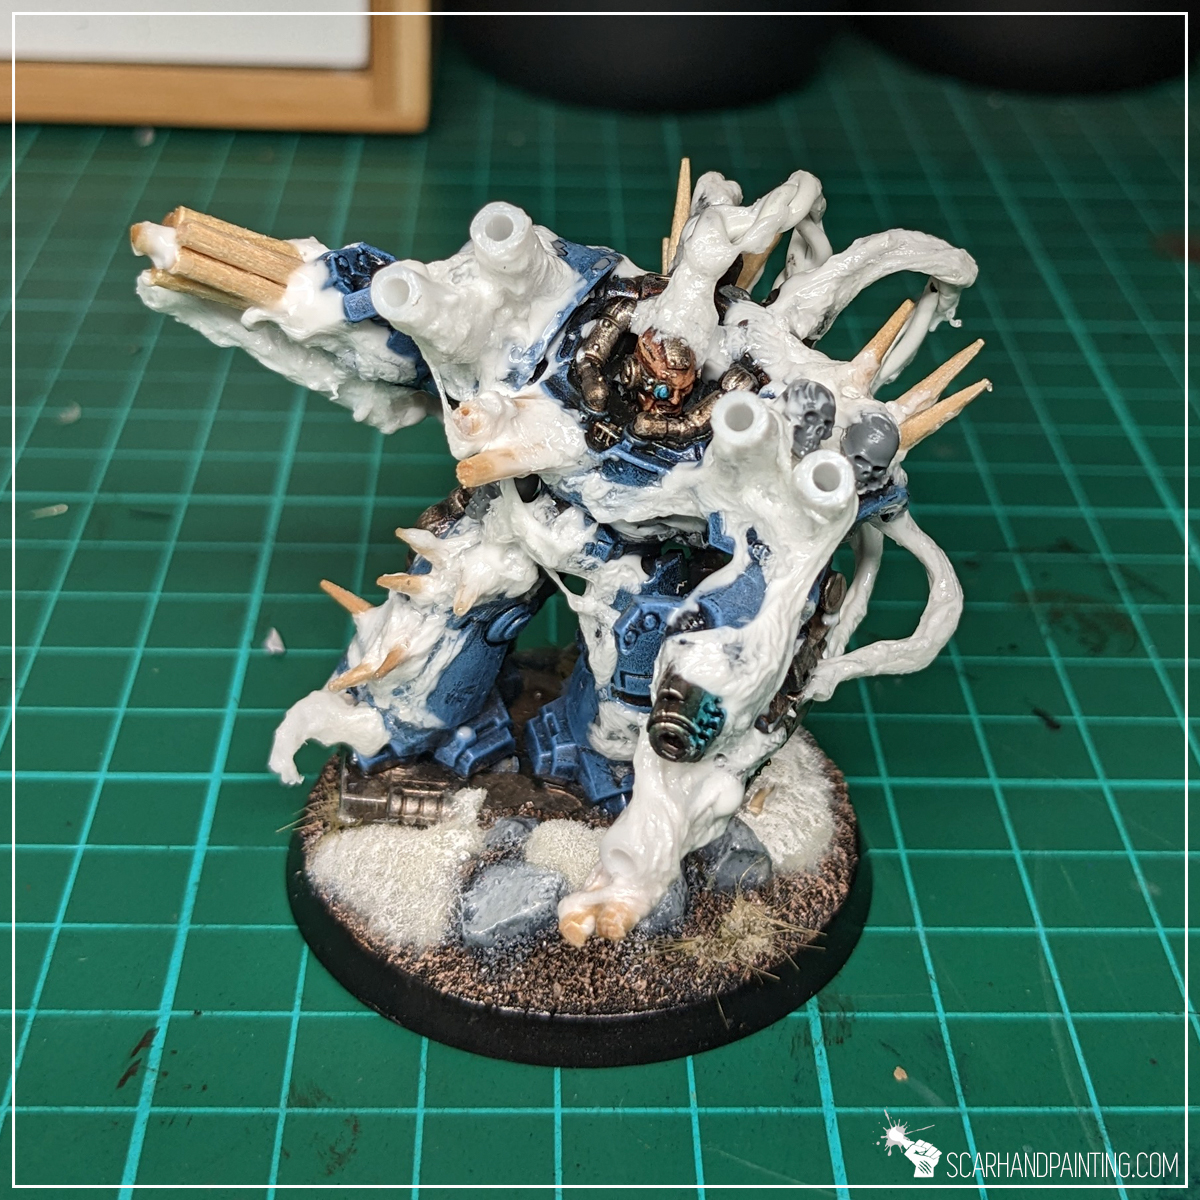
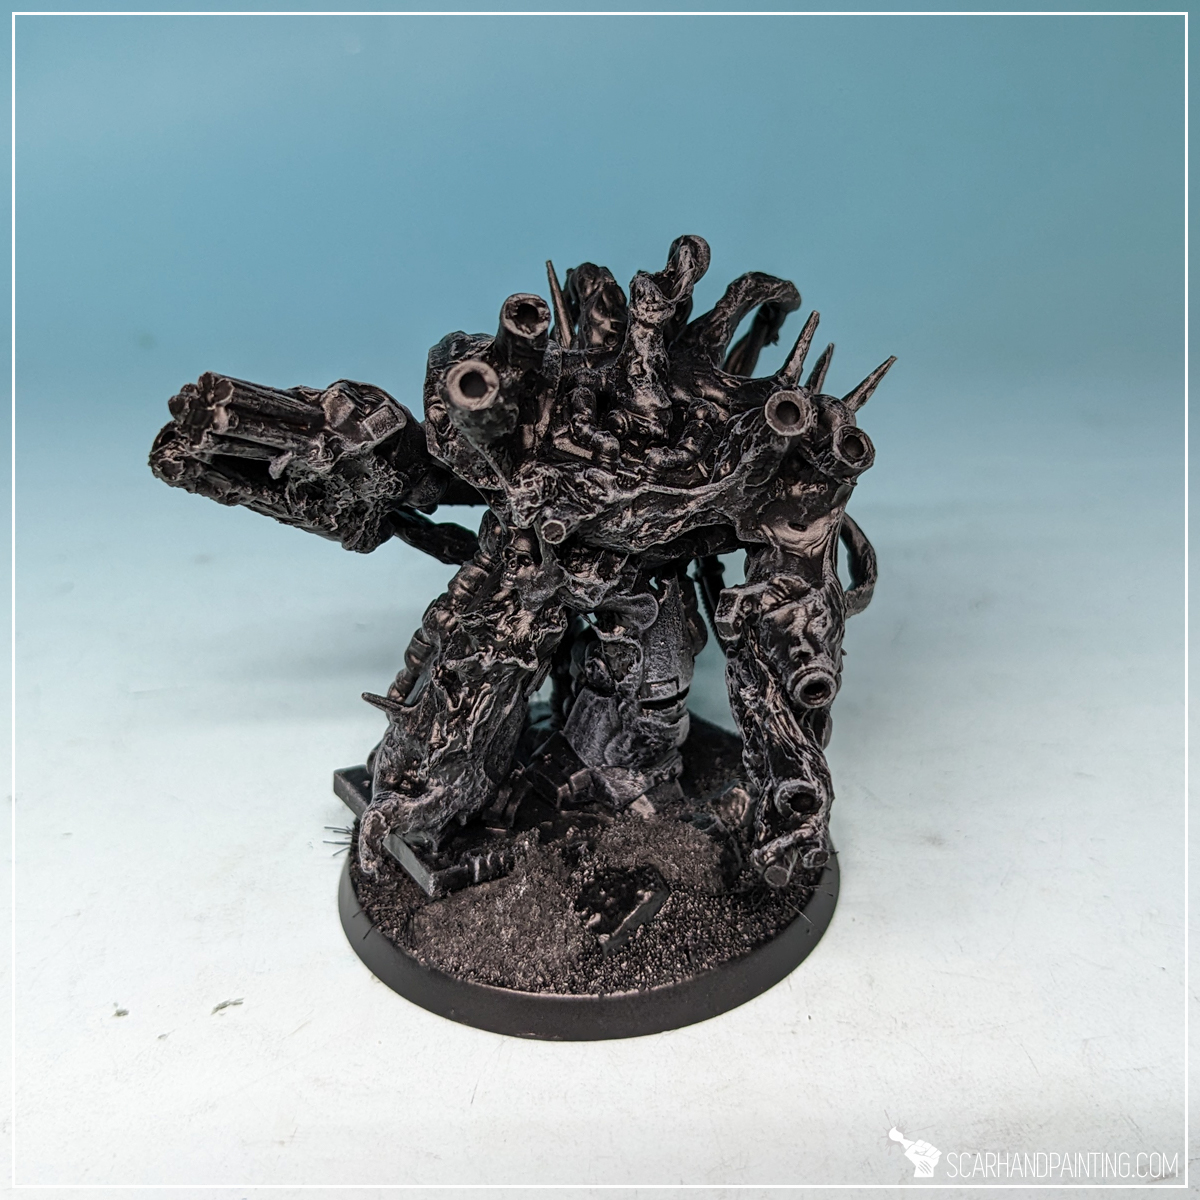
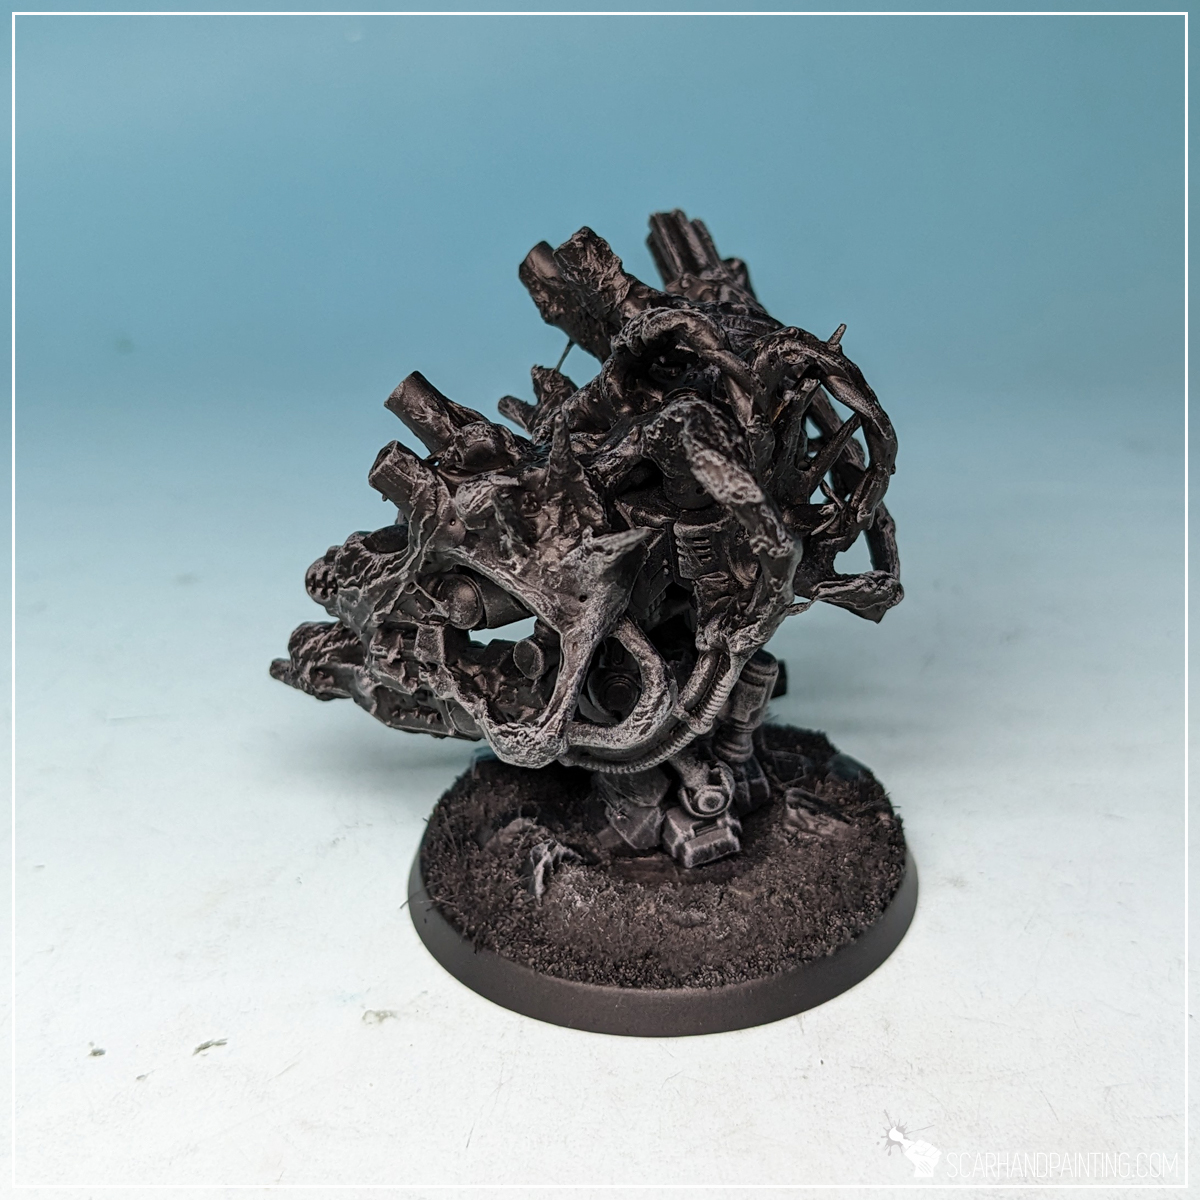
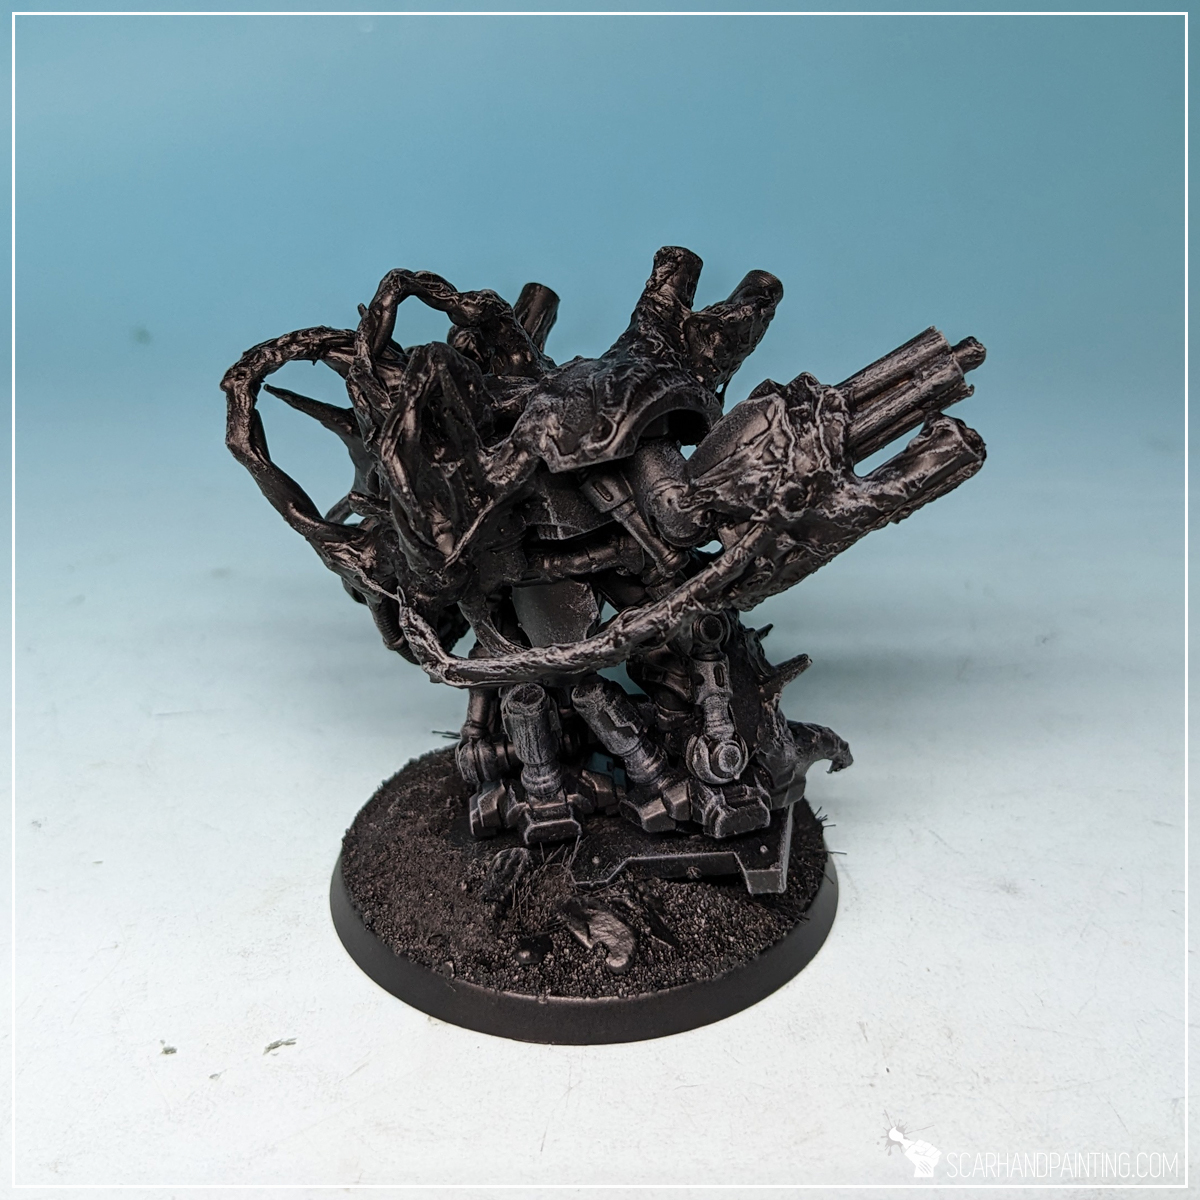
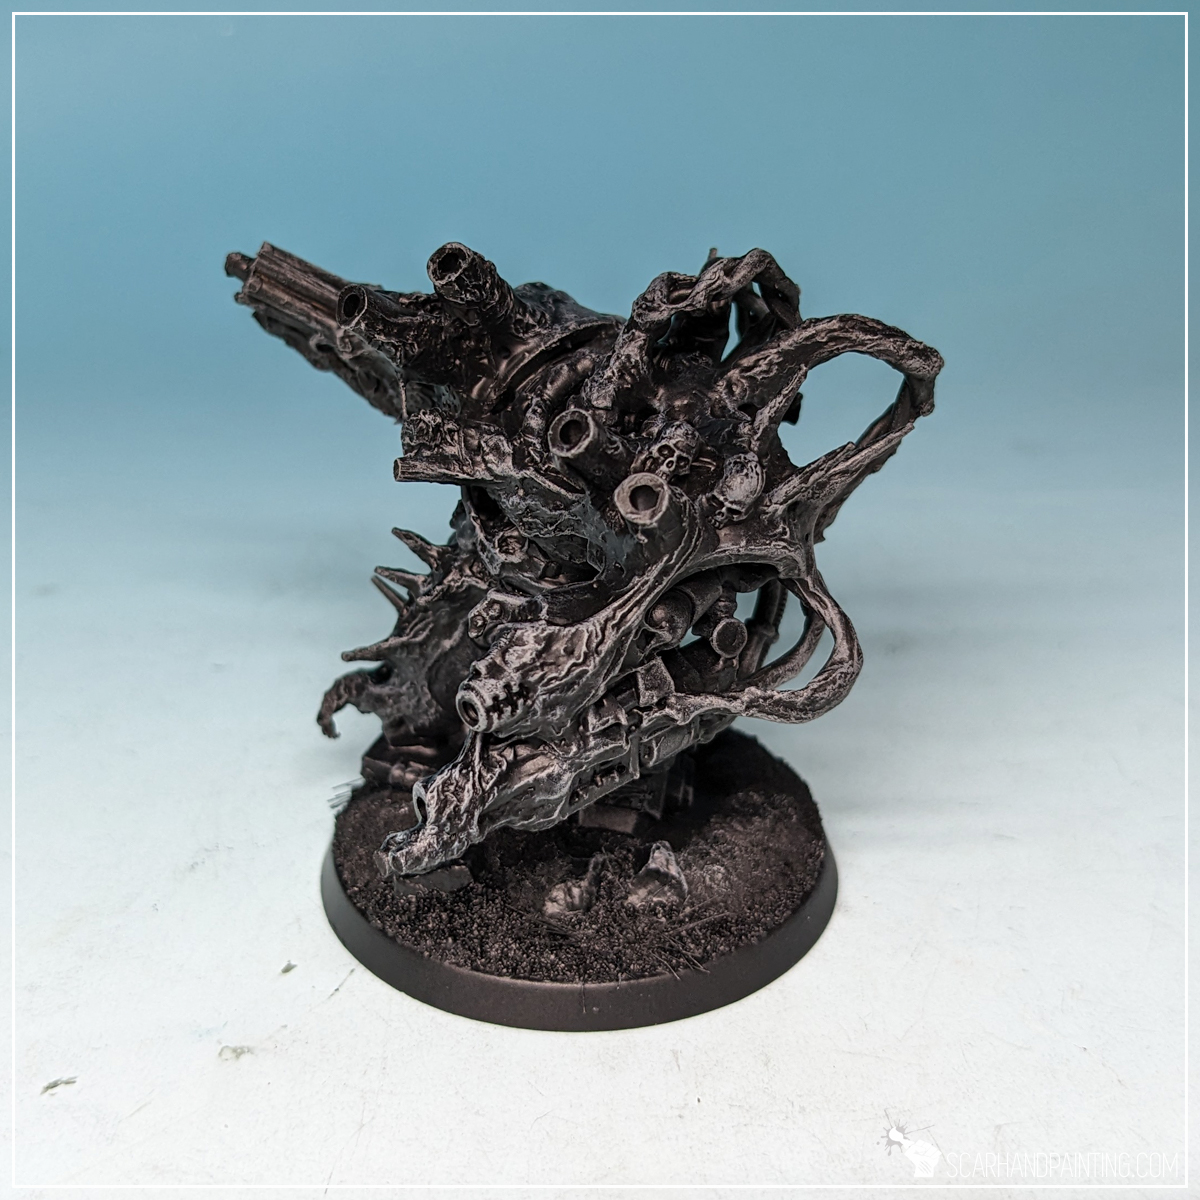
Job done – seriously. I know the miniature above looks like crap, but just take a look at this undercoated, drybrushed Chaos Obliterator below. It took me less than ten minutes to make and cost as much as an old mini that hadn’t seen action in a decade!
I hope you’ve enjoyed this article. Be sure to let me know your thoughts in the comments below or via Facebook or Instagram. I would also appreciate it if you considered sharing this content with your friends, who might find it interesting. Finally if you are looking for a professional miniatures painting service, be sure to contact me with this contact form. I always reply within 24 hours, after which please check out your spam folder.
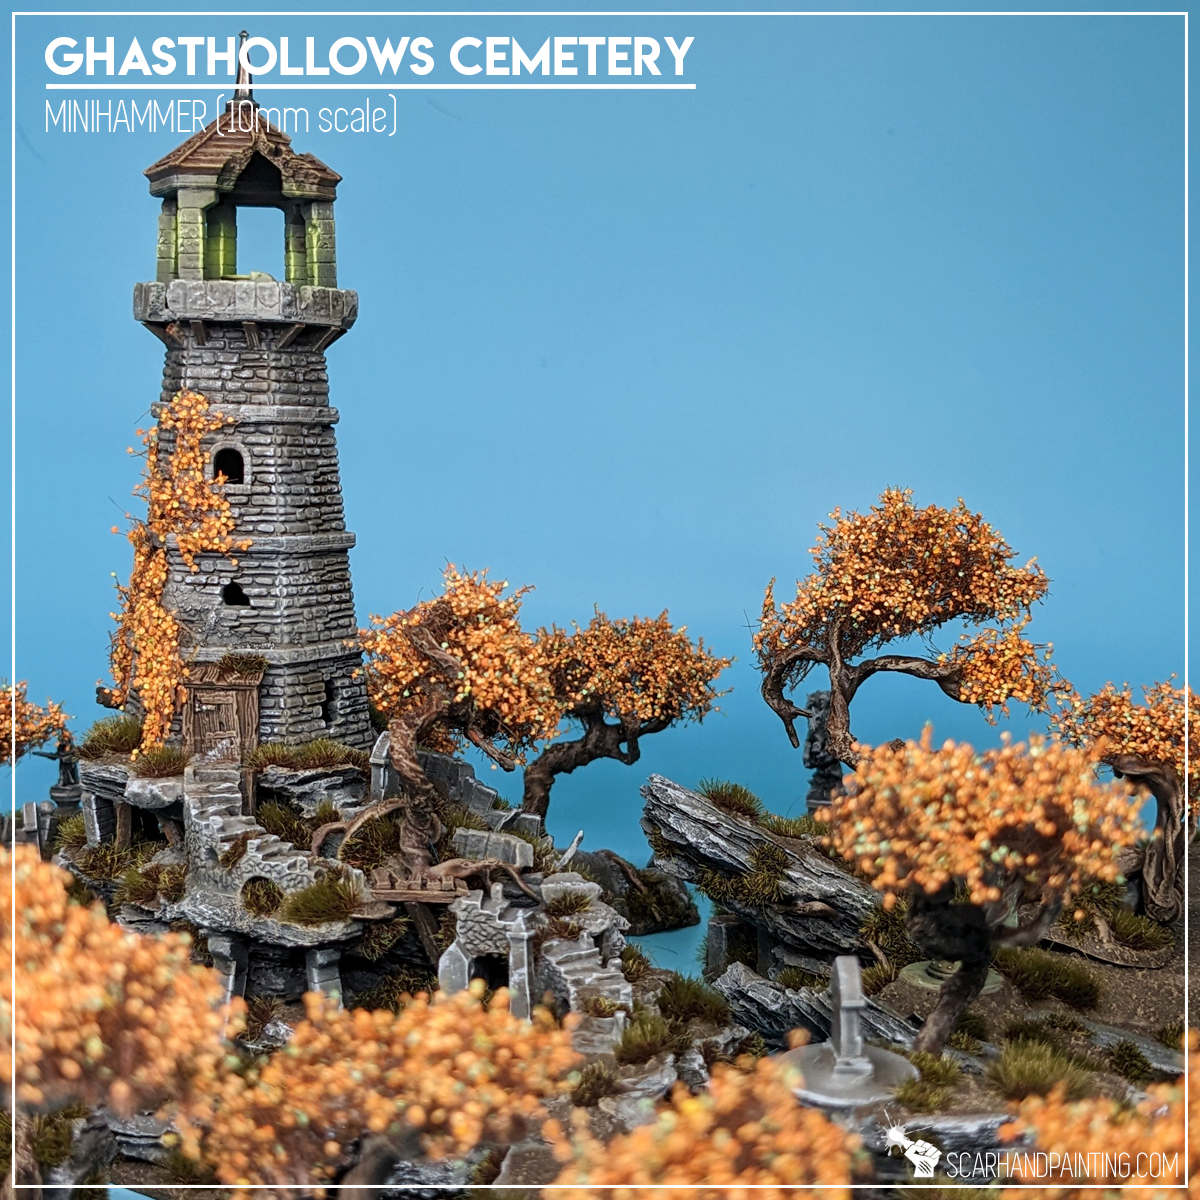
Who wouldn’t like to play games on a highly detailed, great looking scenery? Fortunately for us – hobbyists, we’re living in times of abundance. Not only is the market saturated with ready to buy awesome scenery elements, but there are many ways to make our own scenery from scratch. Today I’m here to share with you the latter – my method of scratch building well textured, interesting looking trees, of any size and shape!

Before we start, some notes:
Just recently I decided to finally let my 10mm scale itch loose and commit to a new scenery related project. I chose a dark, fantasy theme for it, so alongside crumbling ruins, rocky hills peppered with tombstones I needed some twisted, creeping trees to better tell a story of the glory times long gone. Making scenery from scratch allows us to tell a different short story with each individual piece. This can only be enhanced with self made trees of any size and shape, thus I decided to go this route. The resulting Ghasthollows Cemetery set speaks for itself.
Without further ado here’s how I went about it…
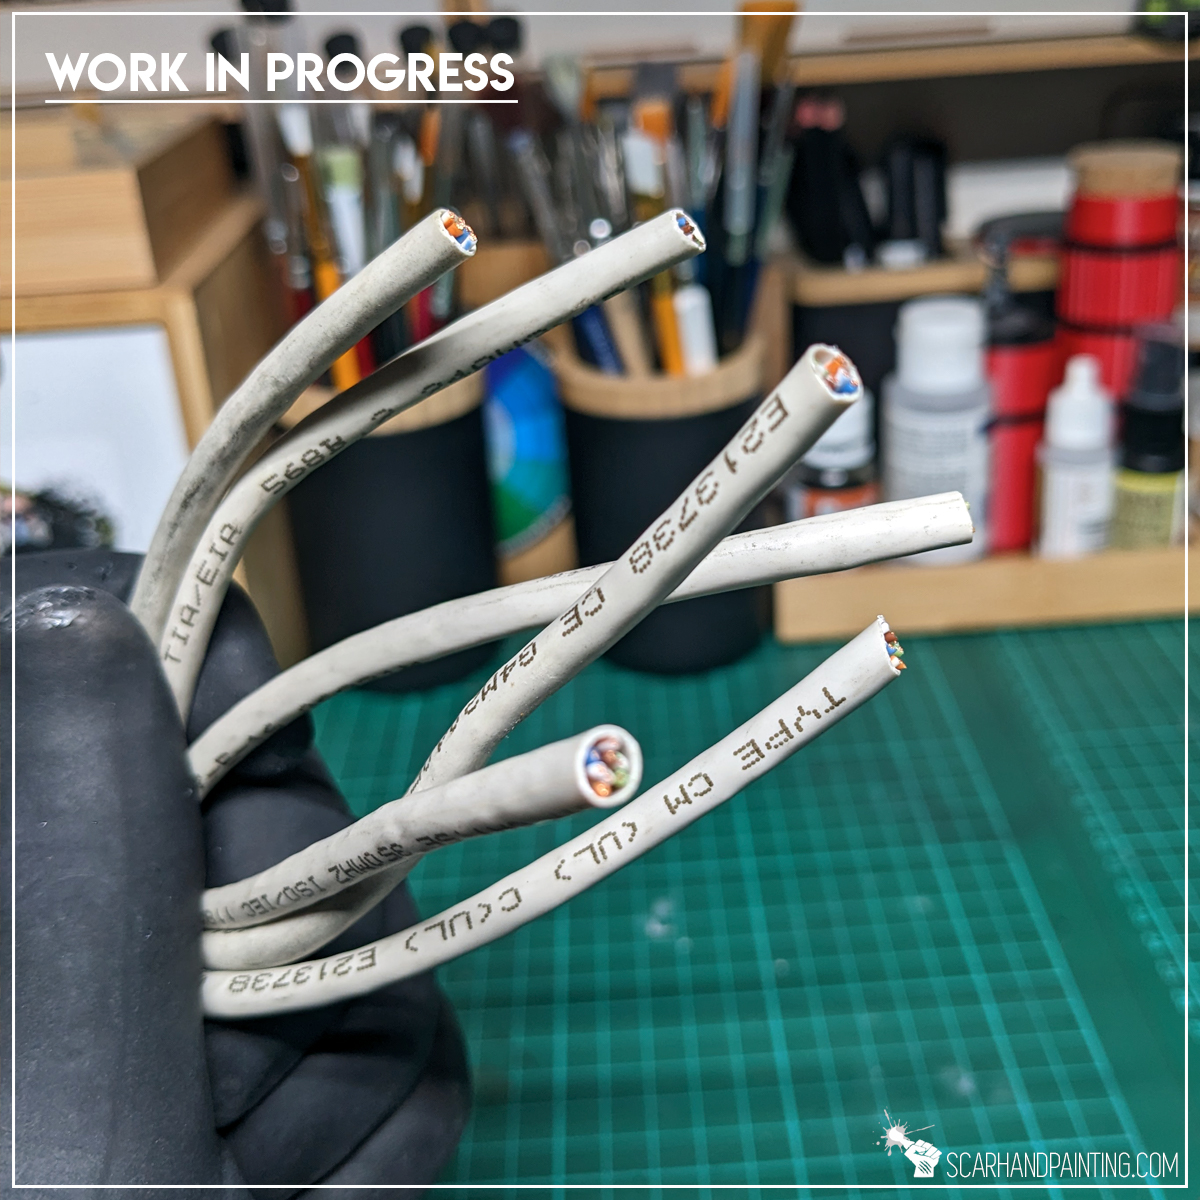
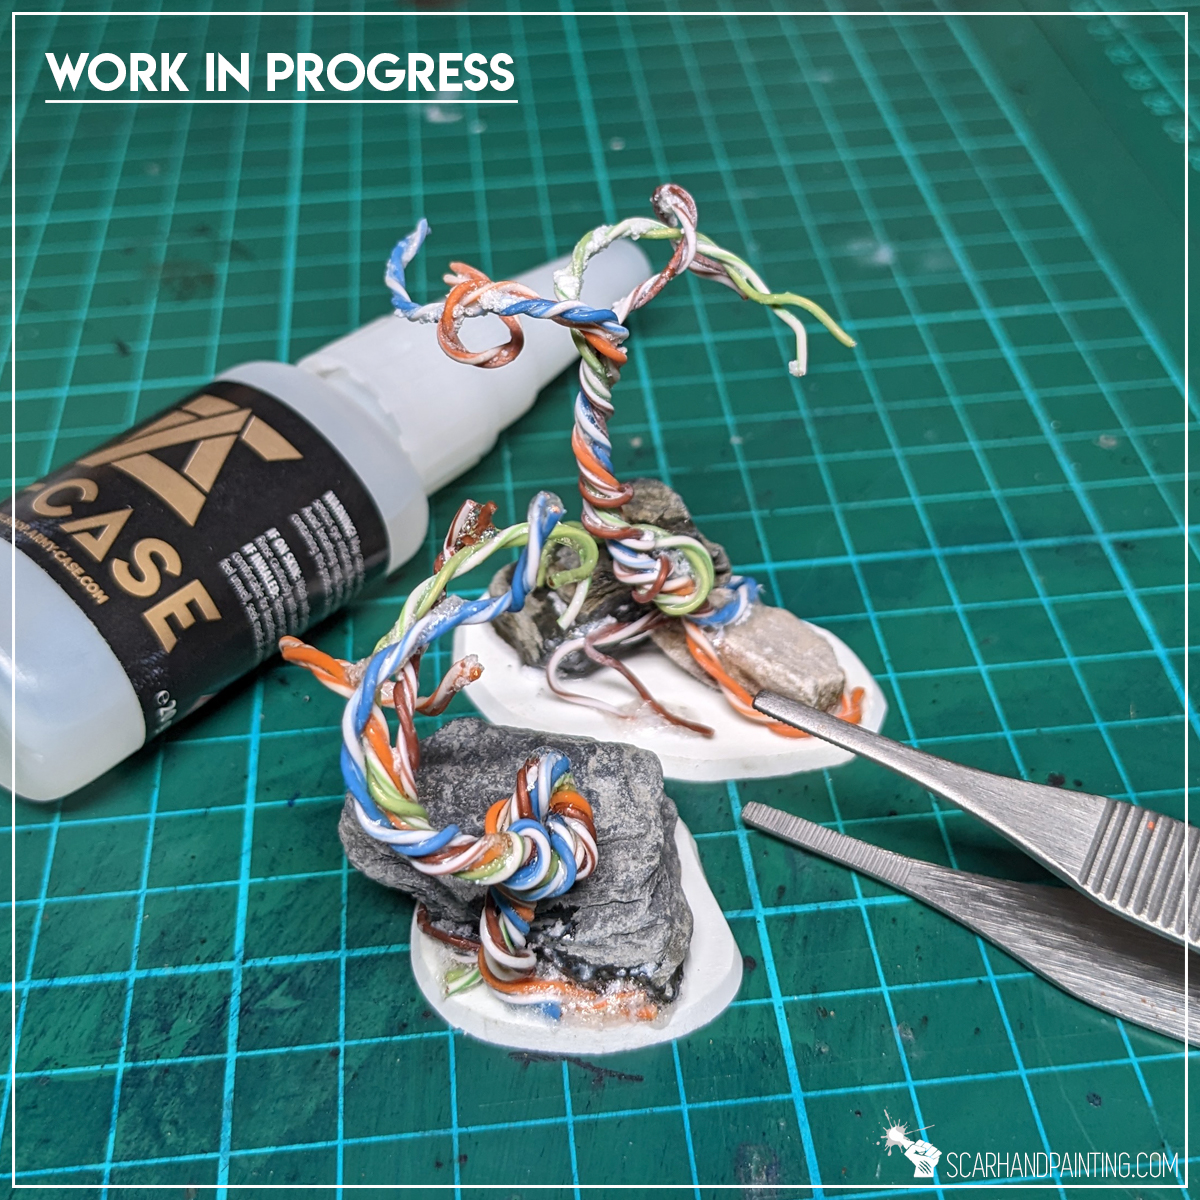
Step One: Trunks
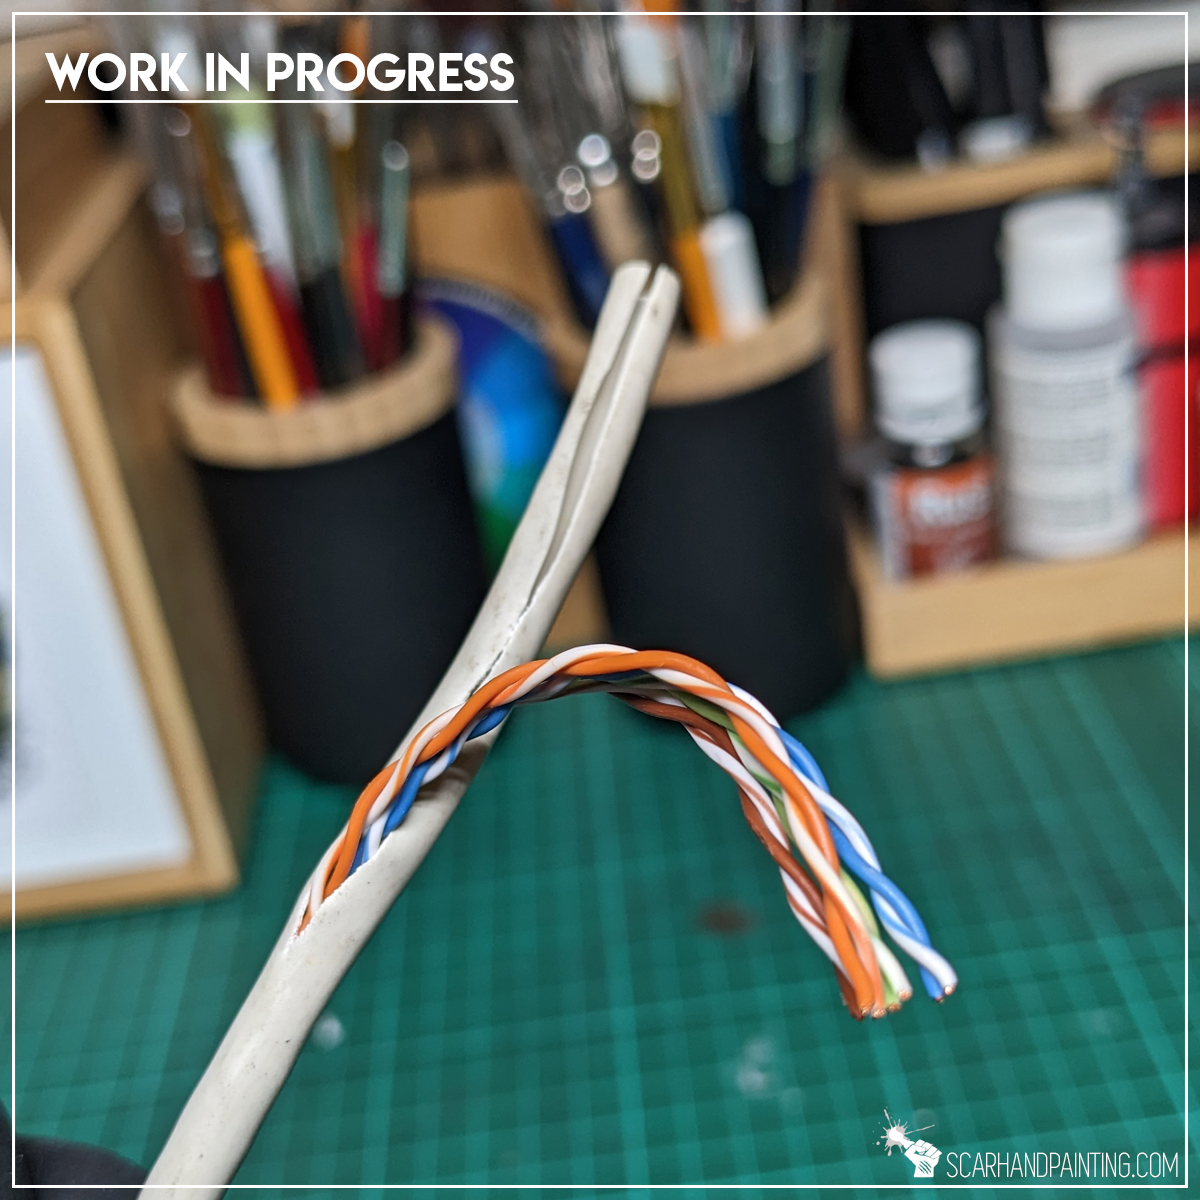
I have started by butchering an old Ethernet cable, removing the rubber cover and pulling out small rubber protected ones. I deliberately chose this type of cable because of the rubber shielding the wires inside. I have observed paint sticking onto it much better than to smooth metal surfaces.
Next I have cut a few pieces of similar size and bundled them together, twisting them in the middle to form tree trunks and leaving top and bottom parts separated.

Step Two: Roots and Branches
Next I based the tree, first forming roots from the lower wires with a set of solid tweezers and then sealing them alongside the trunk with Super Glue. Once dry I then formed upper branches and sealed them with Super Glue using the same method.
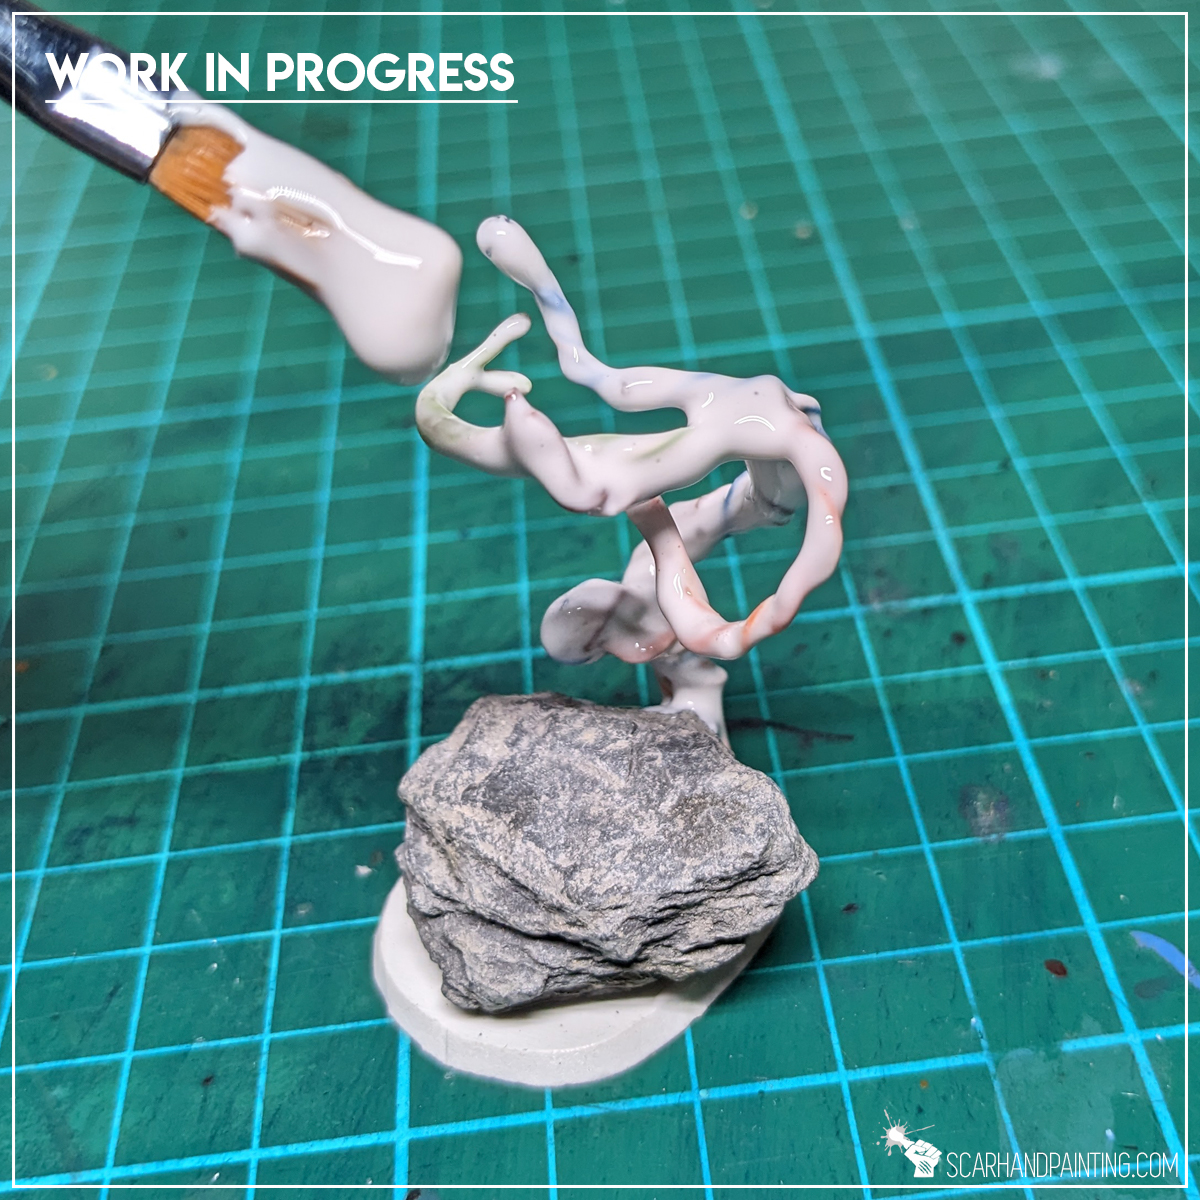
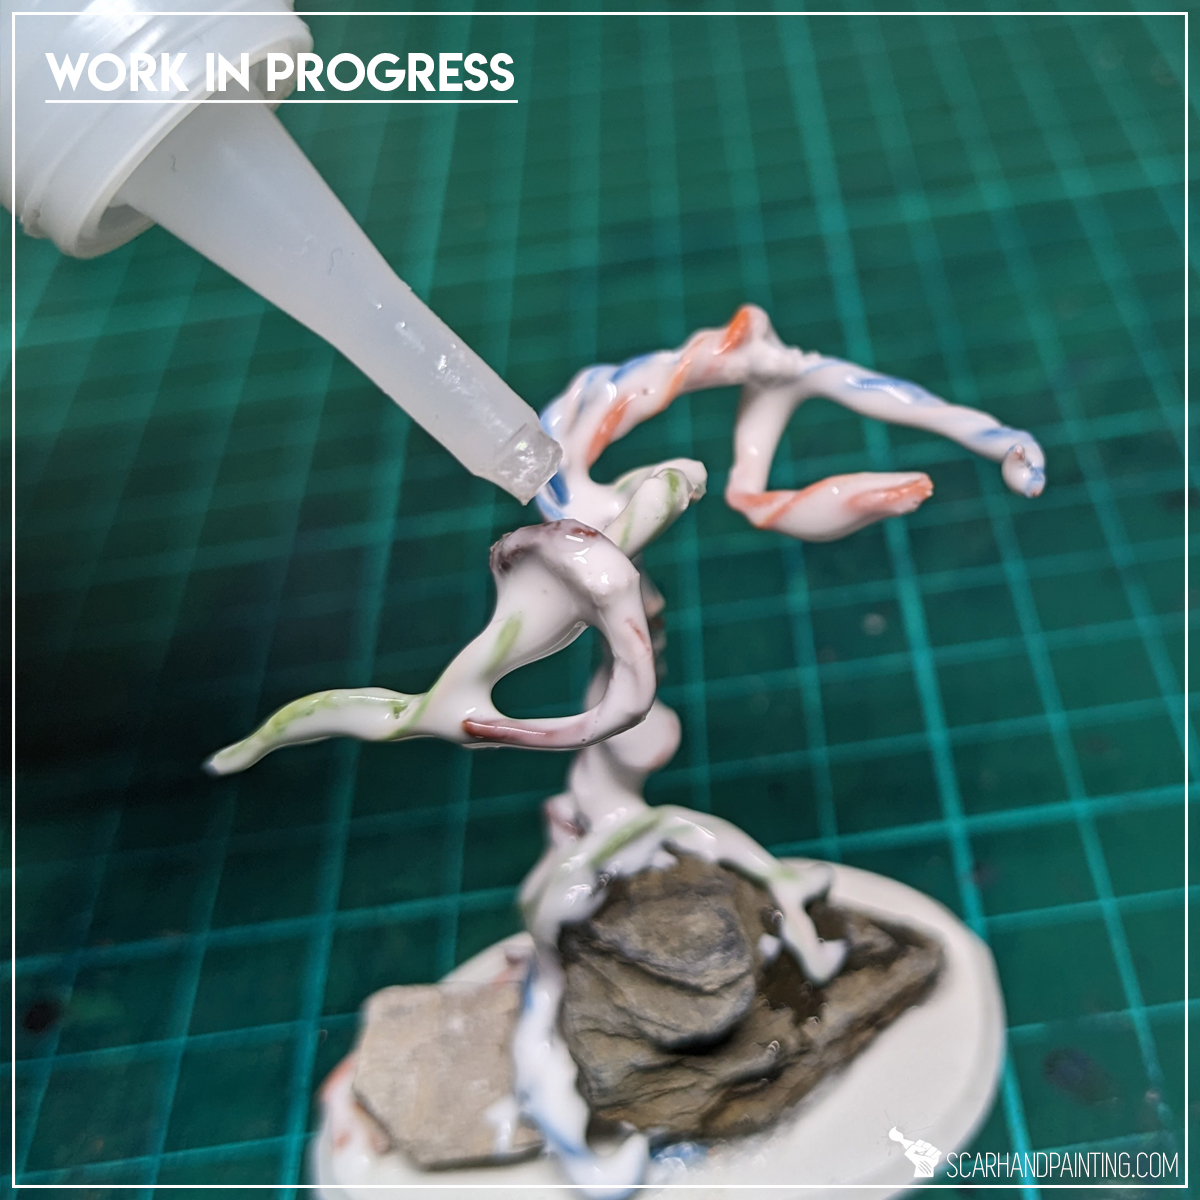
Step Three: Texture
To add texture and increase durability I covered the entire tree with PVA glue, immediately applied Super Glue on top and sealed it with Super Glue Activator. This way I ended up with solid, sturdy trees covered with a mix of twisted veins / rough bark-like texture.
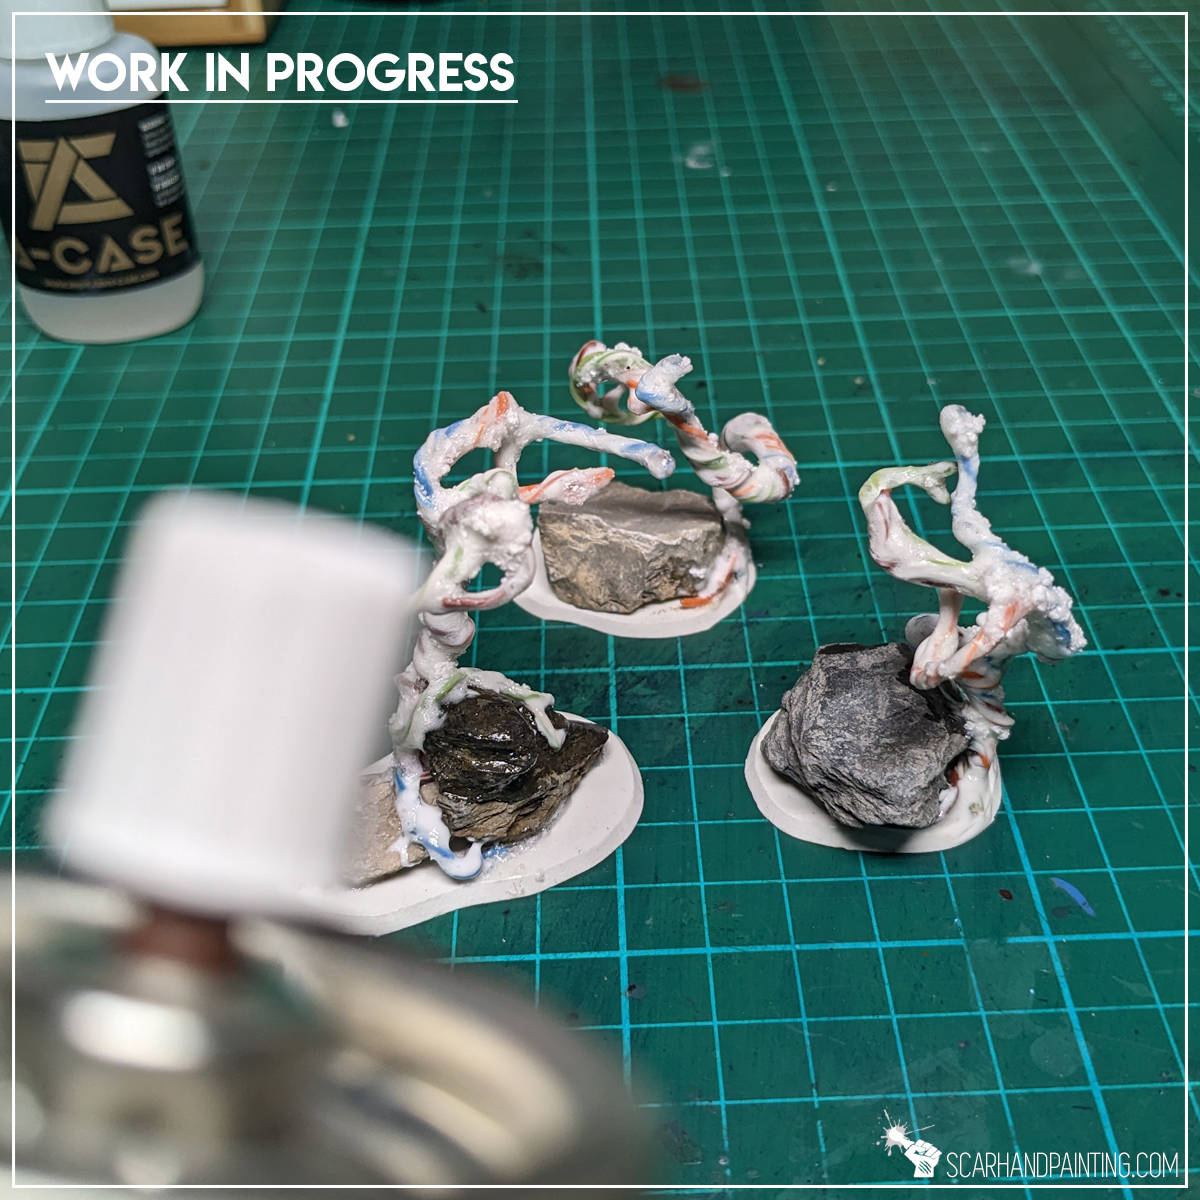
…Painting
This one I leave up to you. Everyone have their own painting preferences, depending on scale and the effect they’re aiming for. My set was painted with grey pre-shades on black undercoat, then covered in brown contrast like paint to finally get a drybrush od bright sandy-brown. Nothing special, but on a 10mm scale it really does the job.
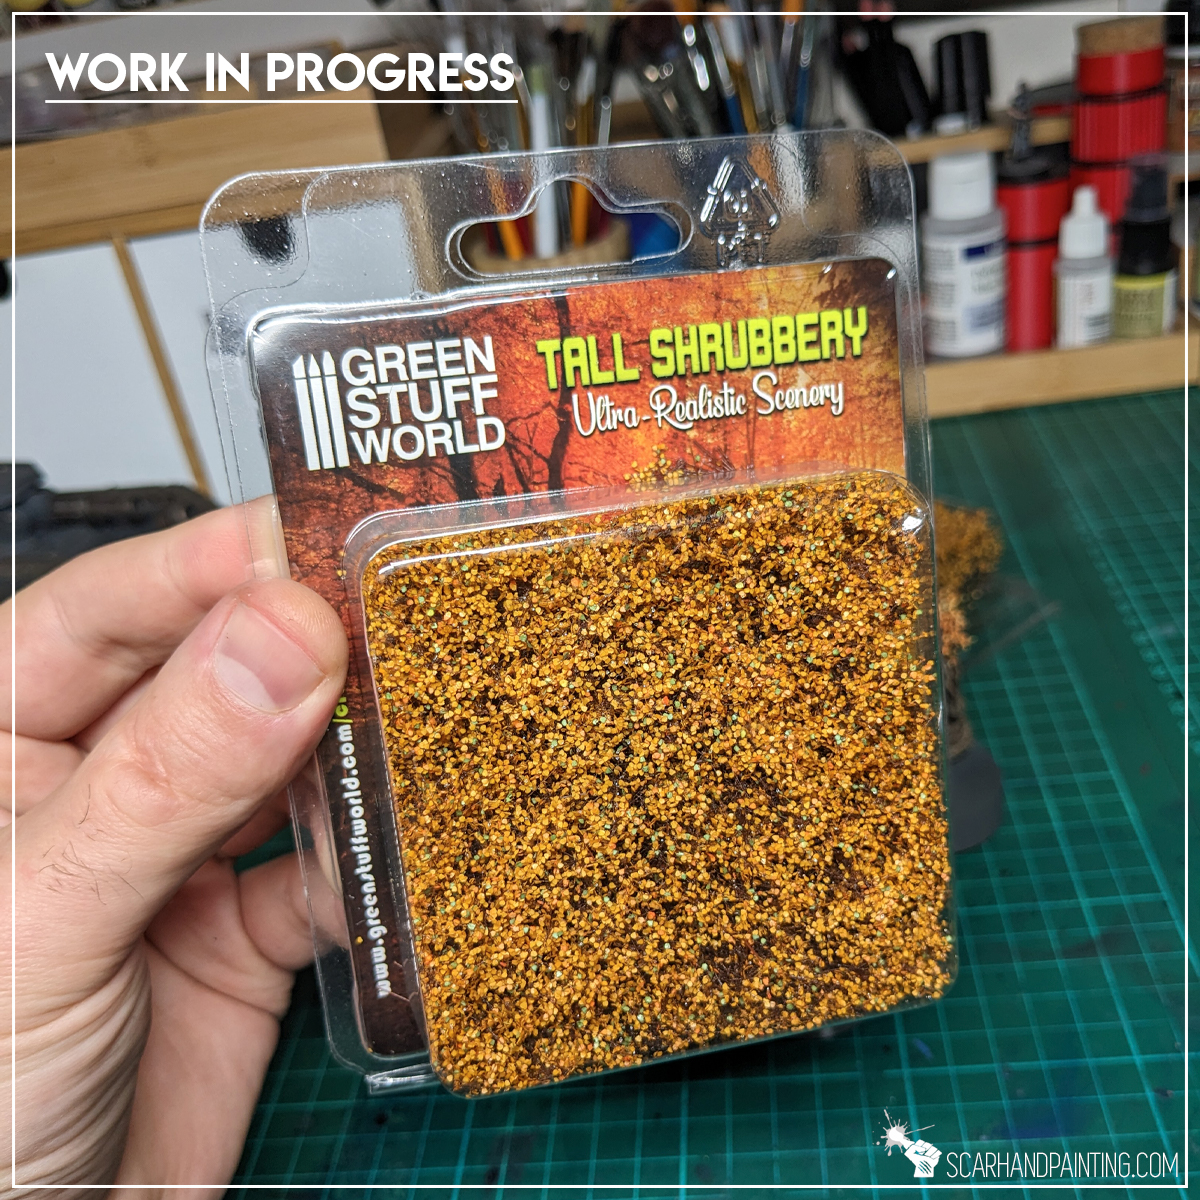
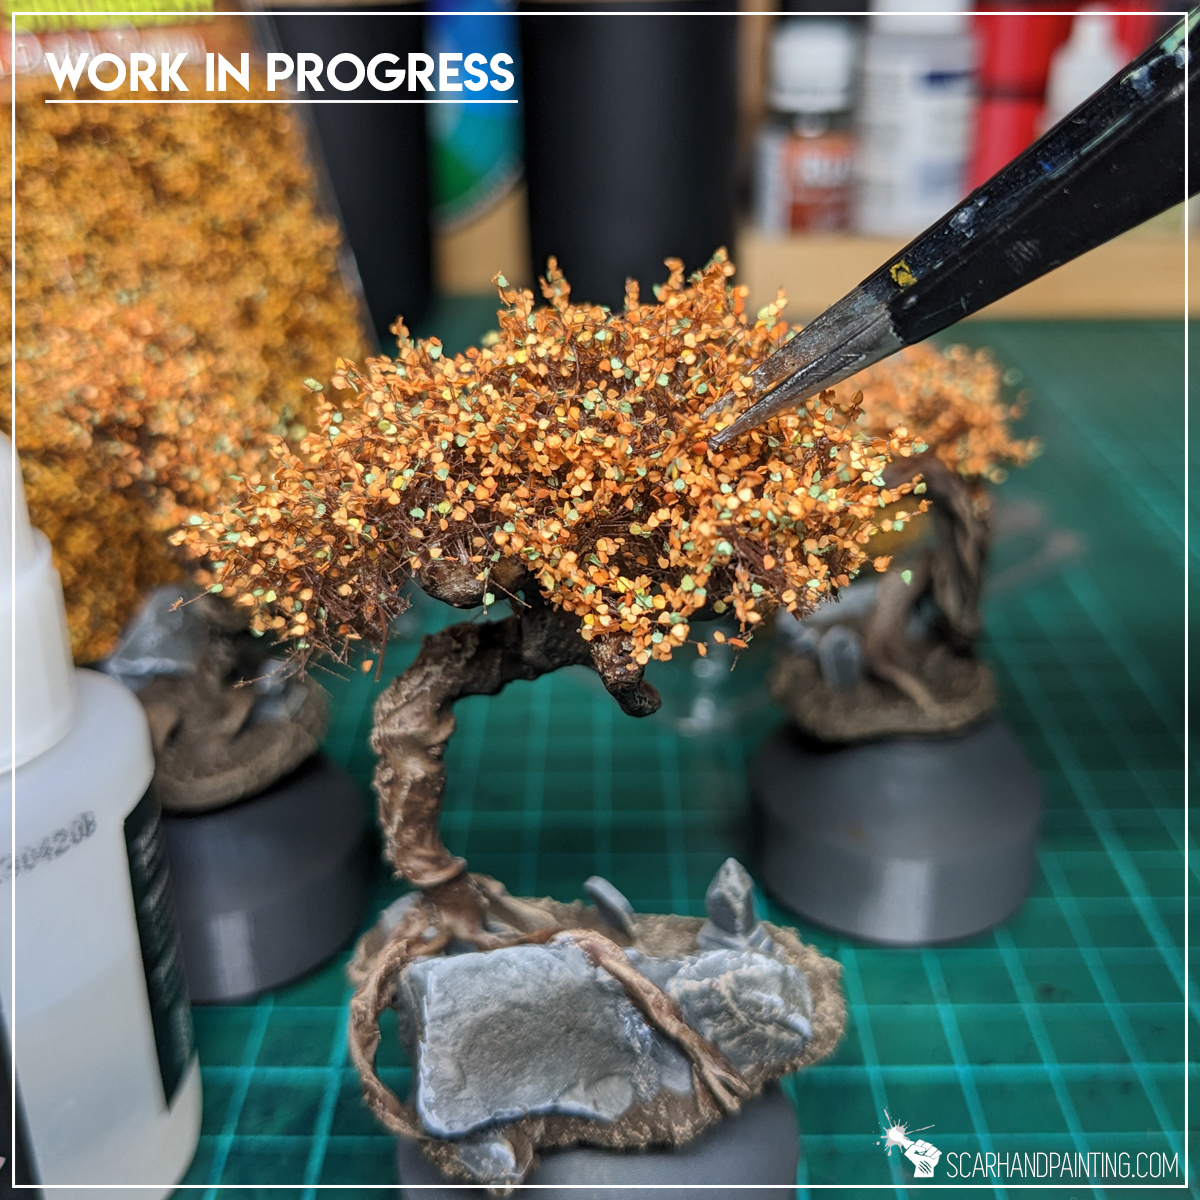
Step Four: Foliage
As a final touch I applied just a bit of Super Glue on top of each branch then, using a set of tweezers, glued a small canopy made of Green Stuff World Tall Shrubbery on top. I then sealed it with Vallejo Polyurethane Matt Varnish airbrushed all over, to keep small specks from falling off.
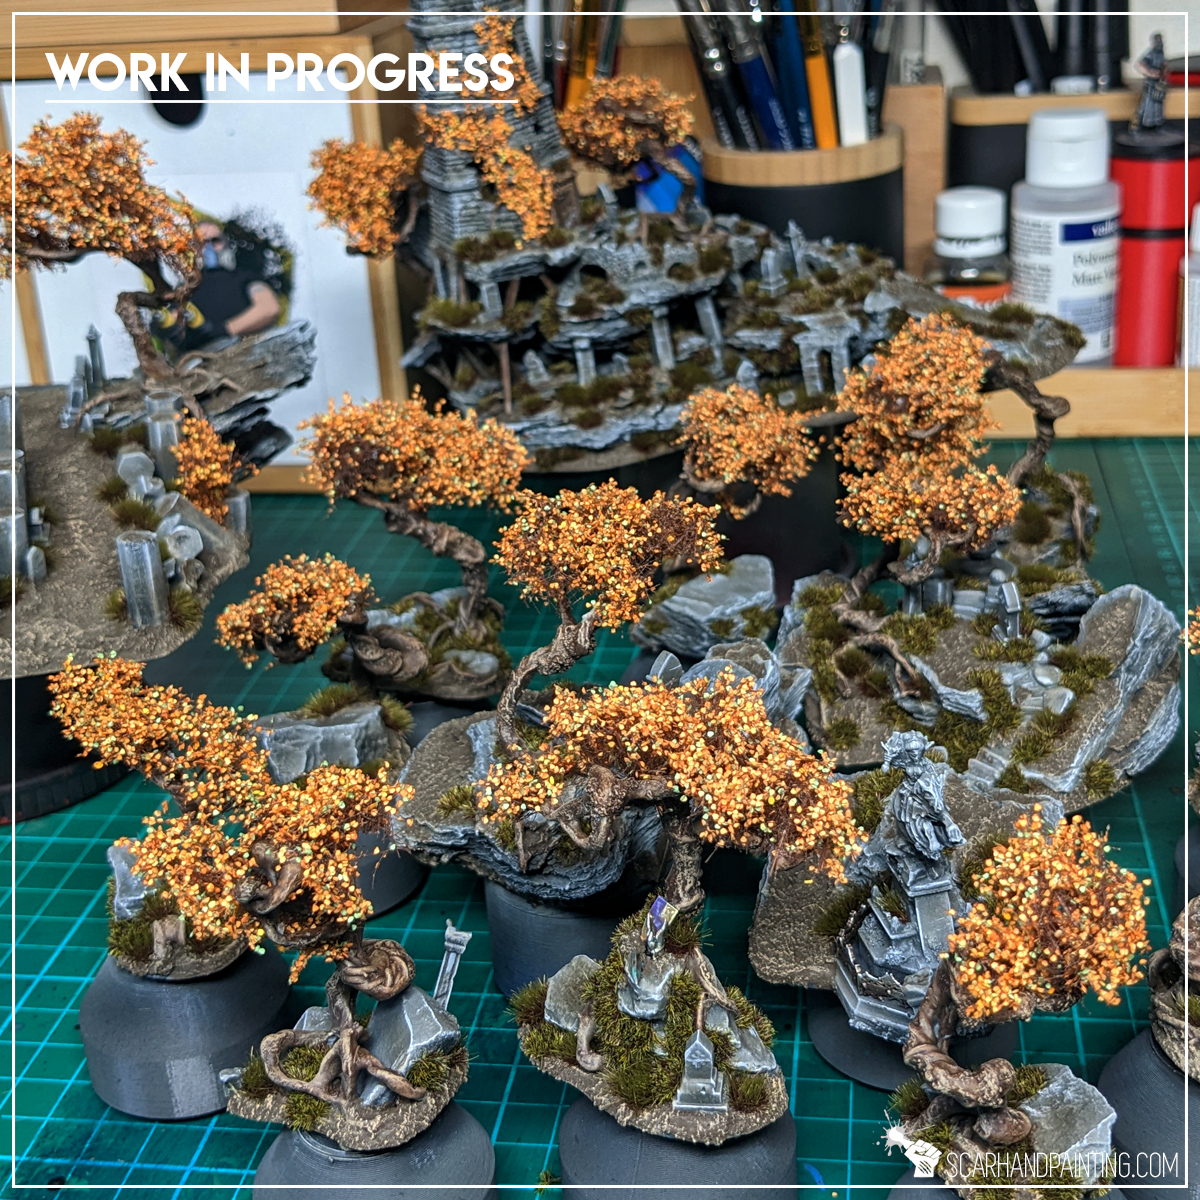
That’s all – a set of awesome looking trees for miniatures is now within your reach. As a final word I recommend staying open minded – there’s plenty of different materials you can use to make your own trees, not just the ones I presented. It is worth experimenting. Be sure to share your result with me.

I hope you’ve enjoyed this article. Be sure to let me know your thoughts in the comments below or via Facebook or Instagram. I would also appreciate it if you considered sharing this content with your friends, who might find it interesting. Finally if you are looking for a professional miniatures painting service, be sure to contact me with this contact form. I always reply within 24 hours, after which please check out your spam folder.
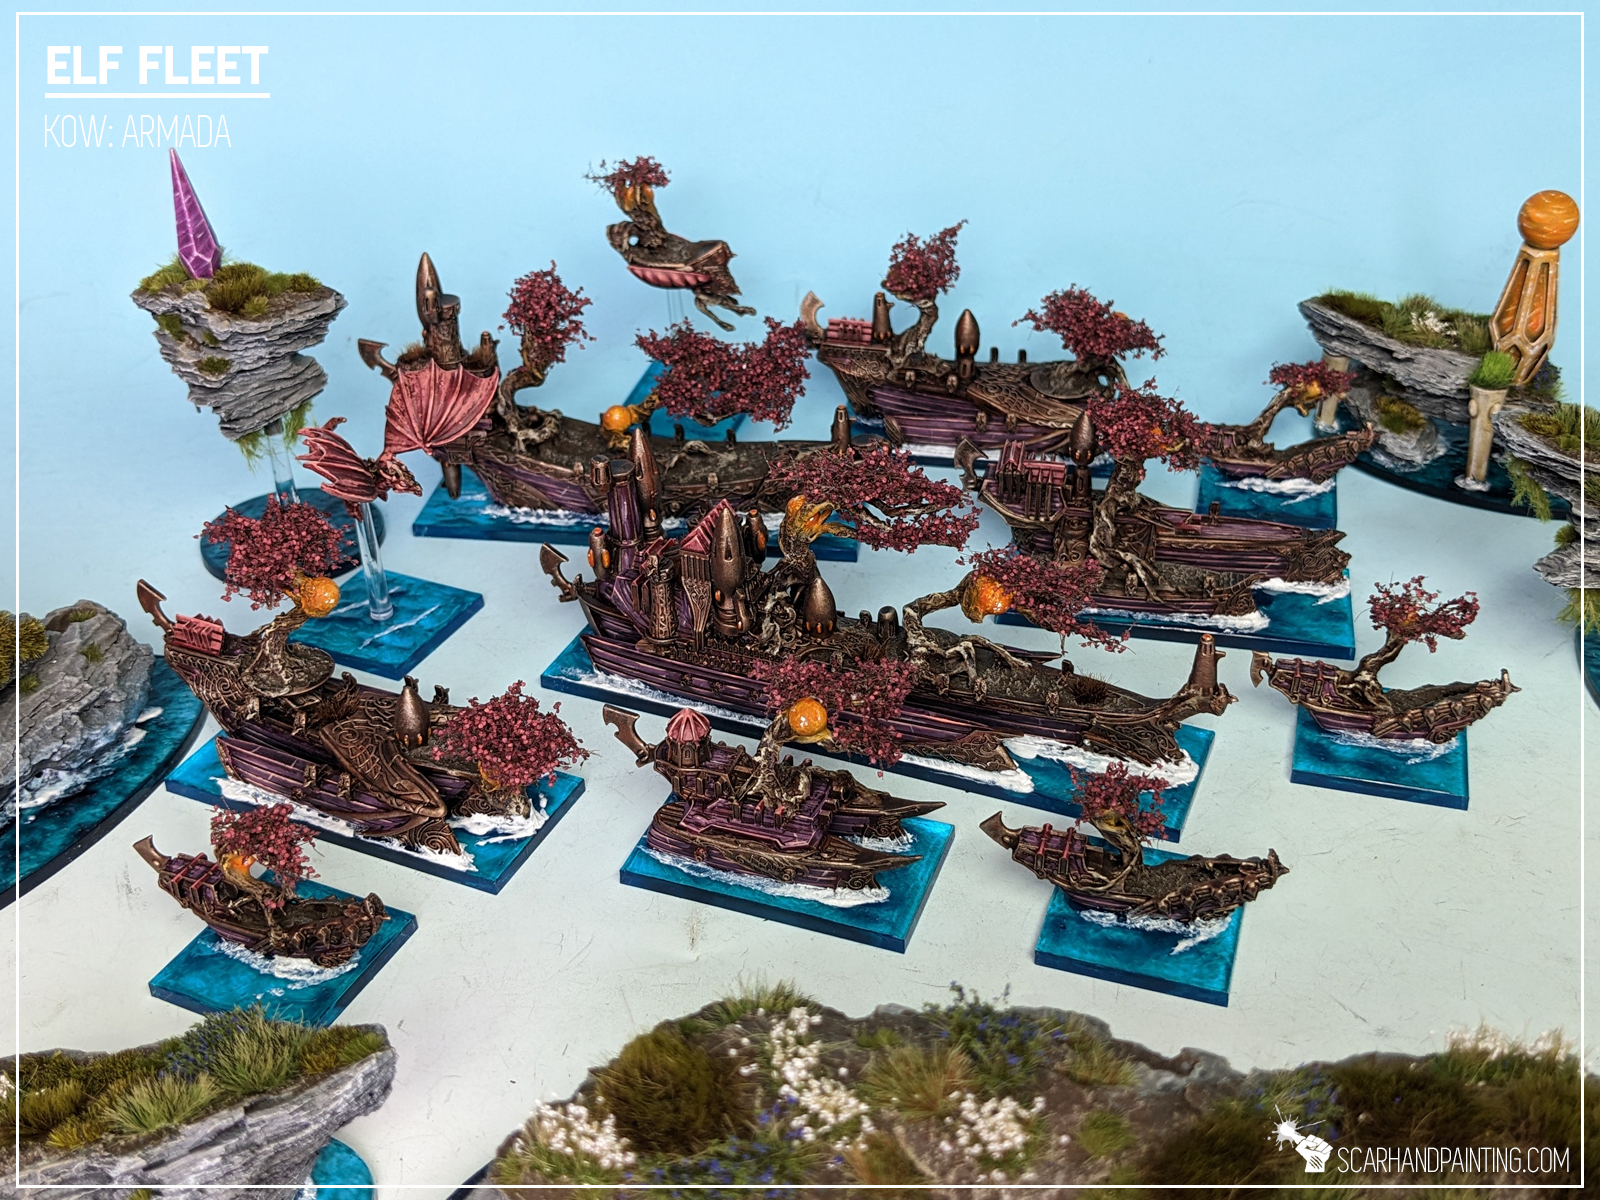
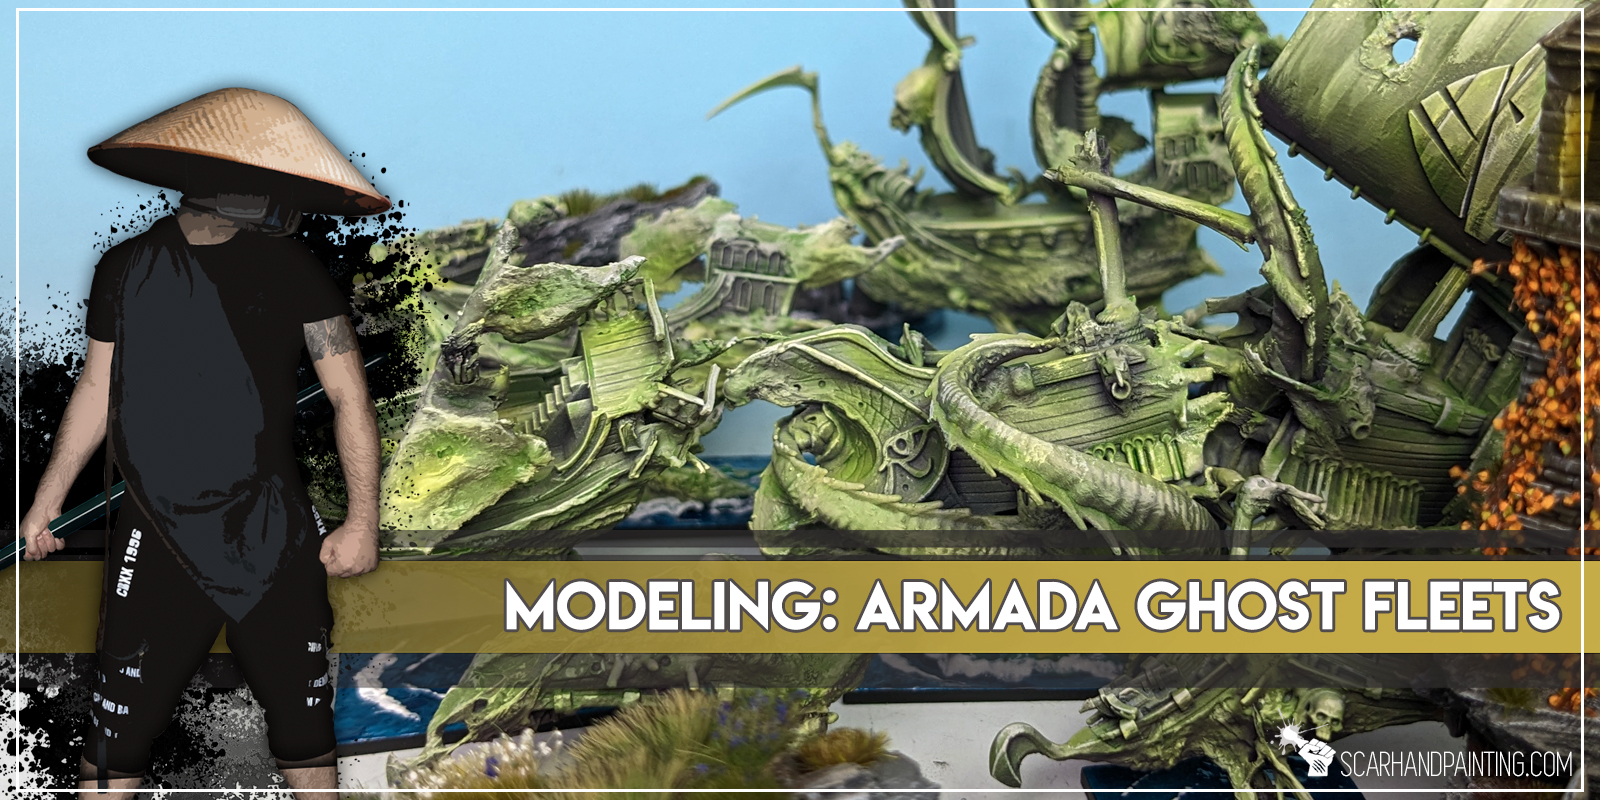
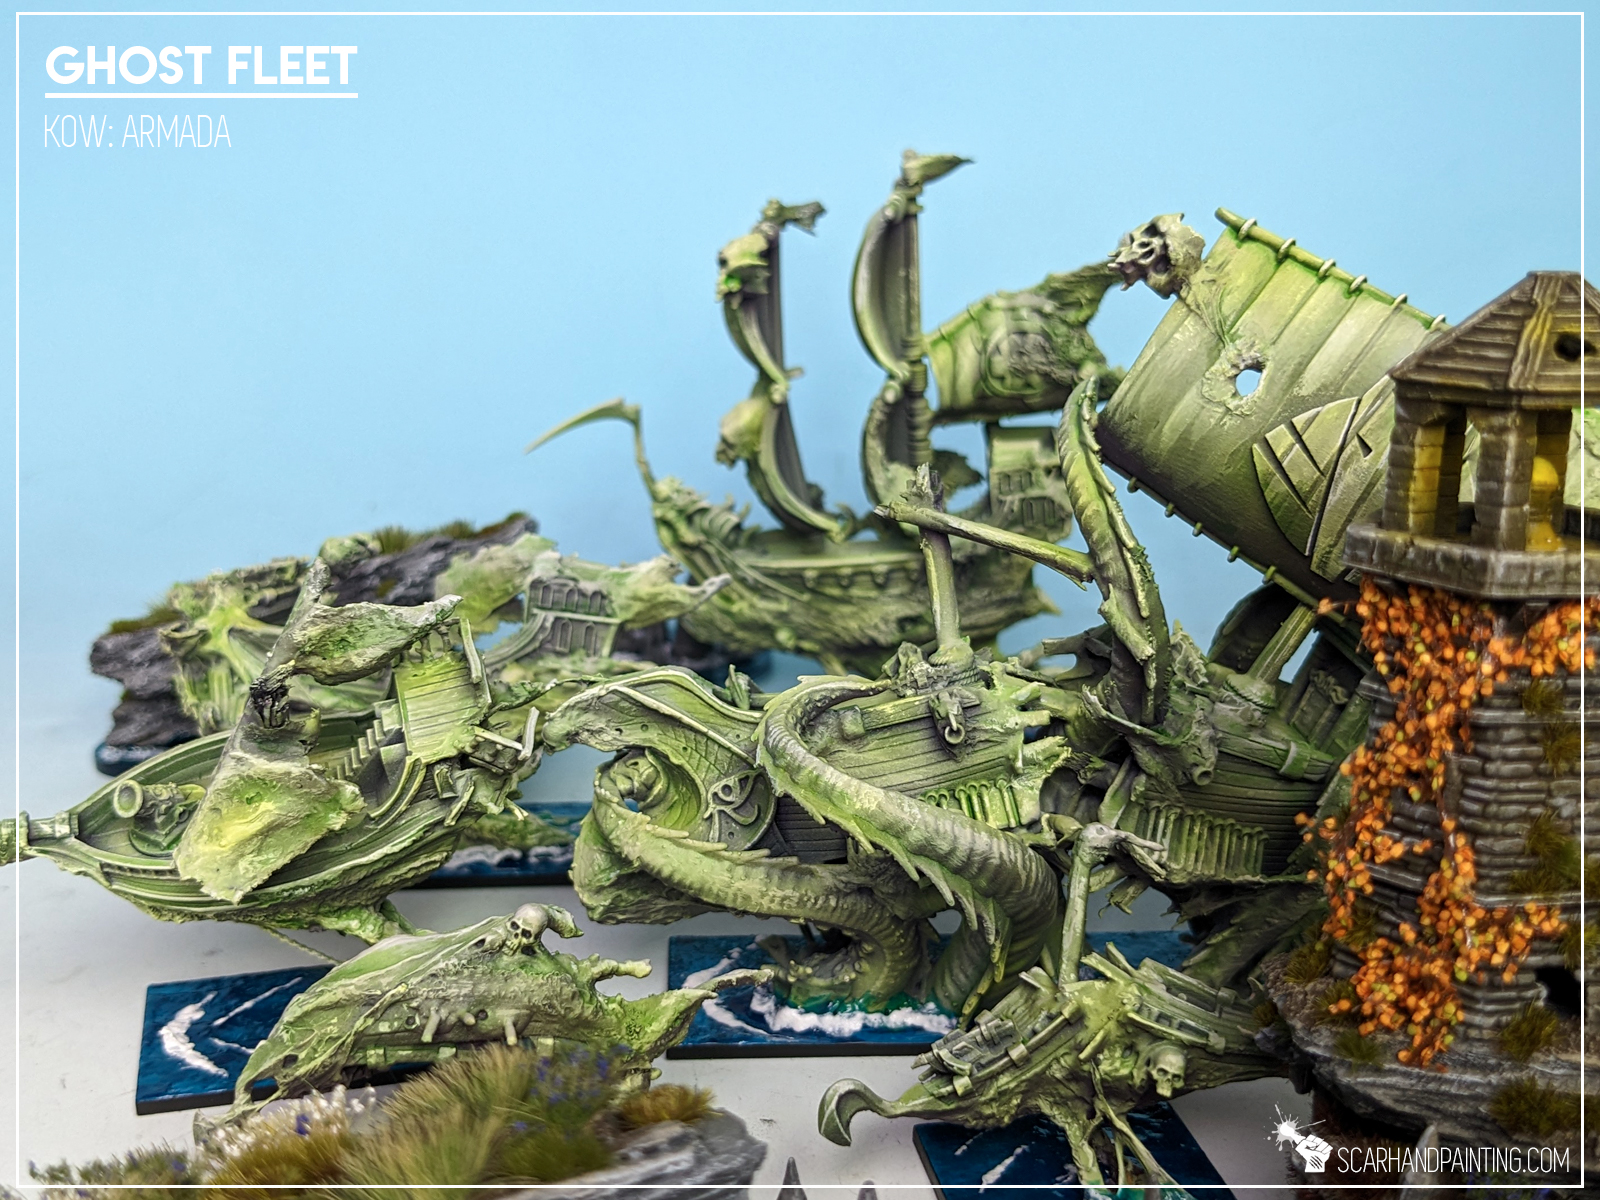
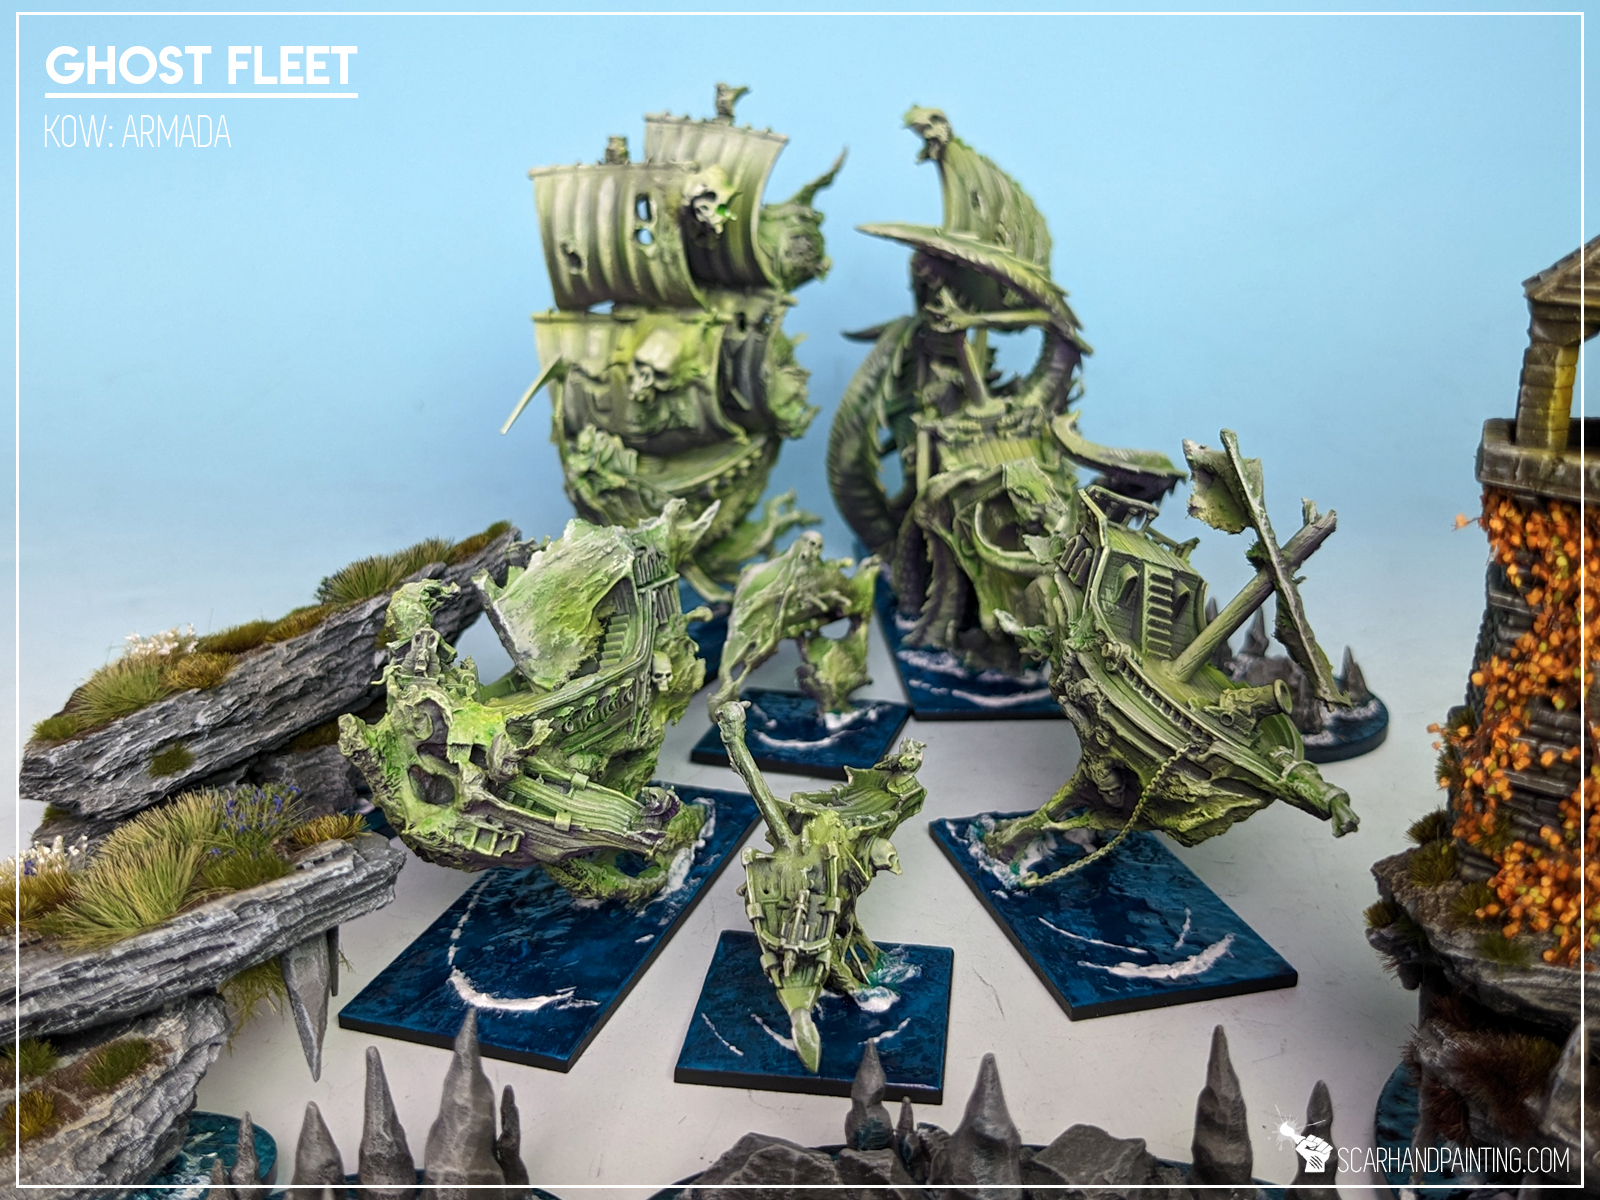
Converting miniatures, am I right? There’s probably nothing more satisfying for Armada hobbyists, other than tinkering with their tiny resin ships. Adding bits and relocating parts to add more personality to one’s miniatures has always been an important part of the hobby, but with Armada it really takes a collection to the next level. This is doubly true for Ghost Fleets, that does not have dedicated miniatures. Still not everyone enjoys converting miniatures. There are many reasons for it, not having enough skill or idea to name some.
What if I told you converting ghost ships is far more easy than you might think? What if I showed you…
Before we start, some notes:
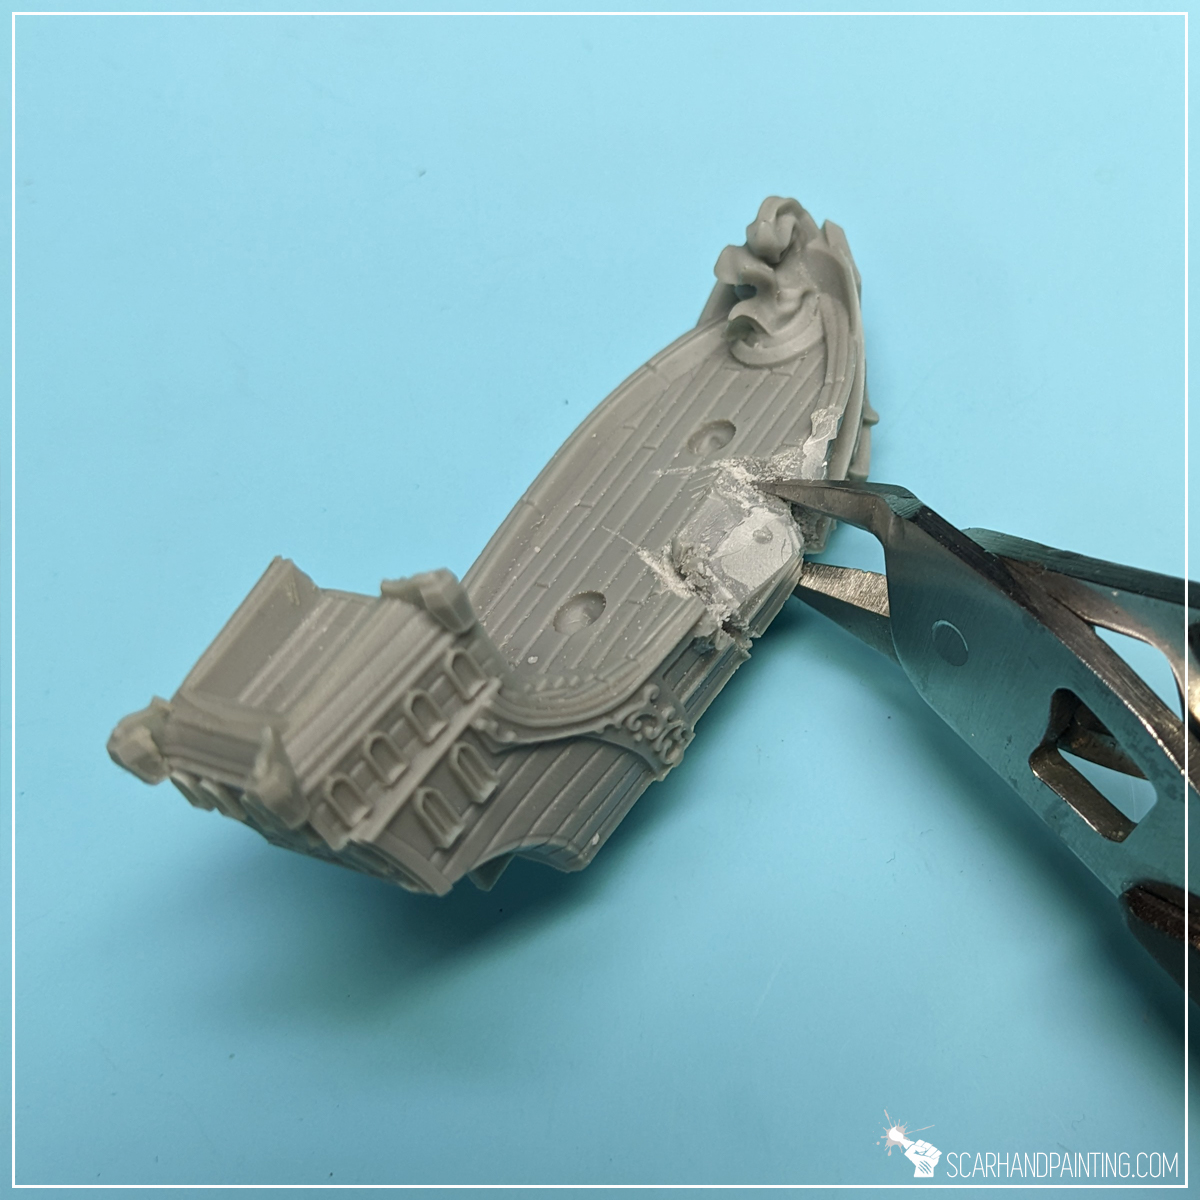
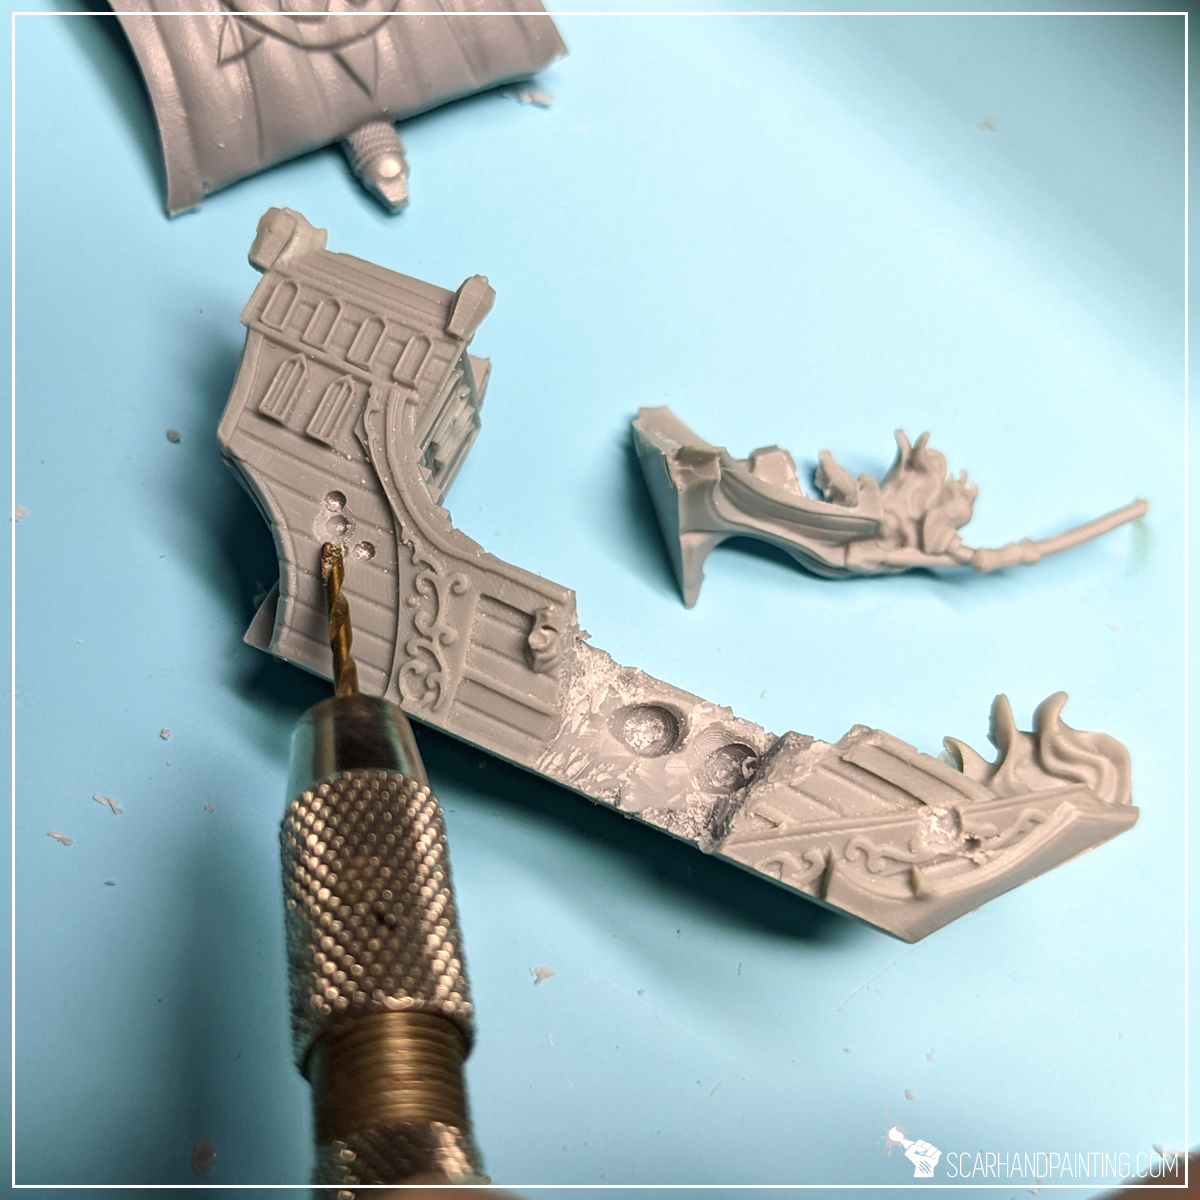
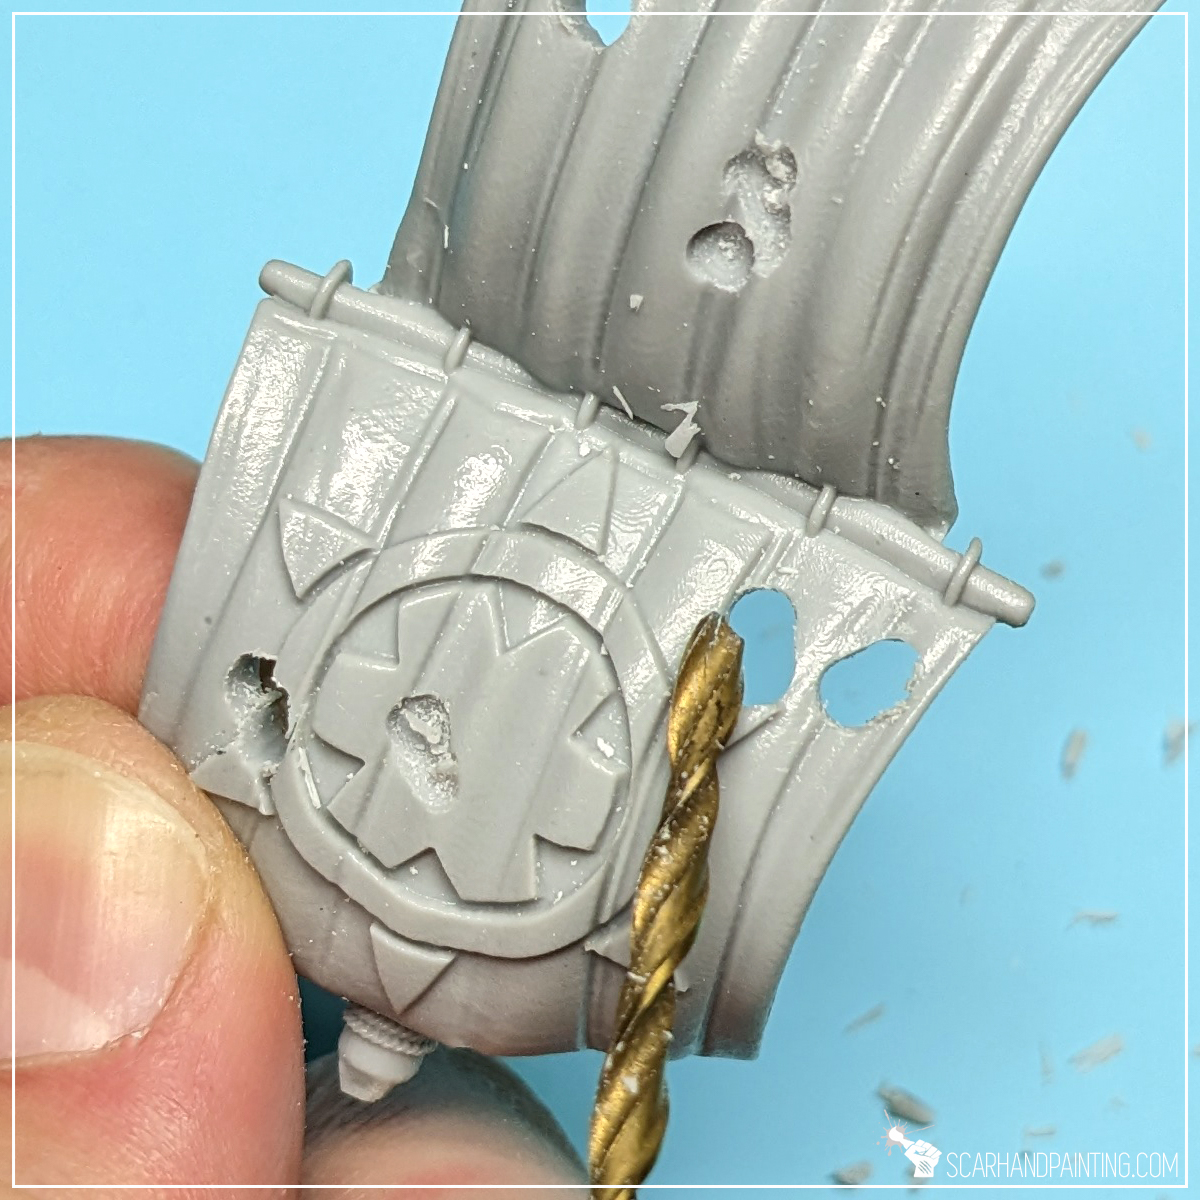
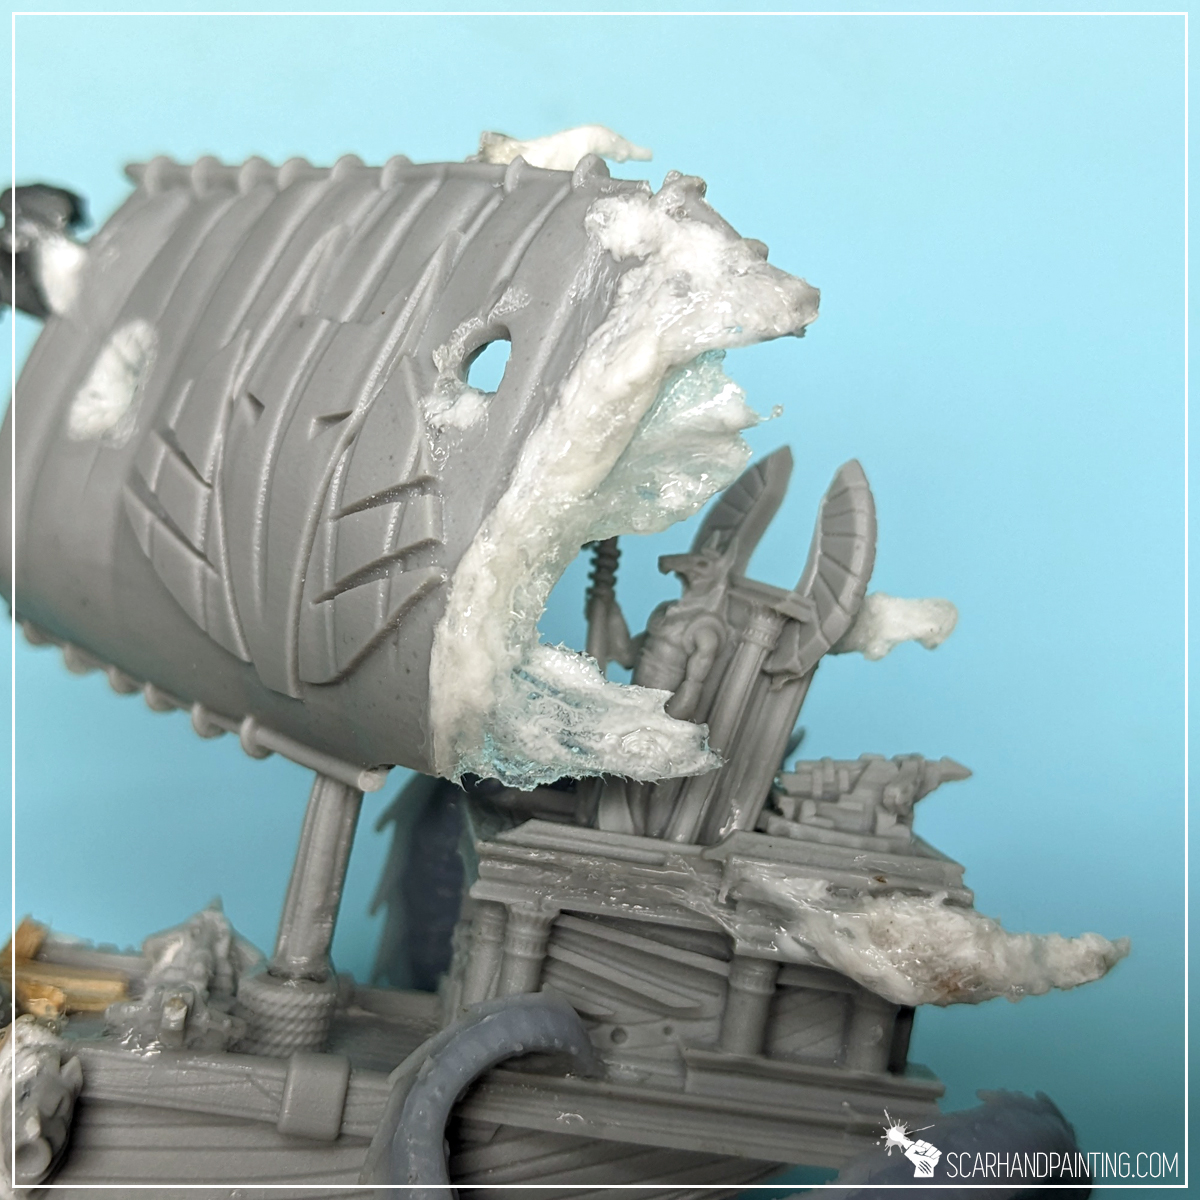
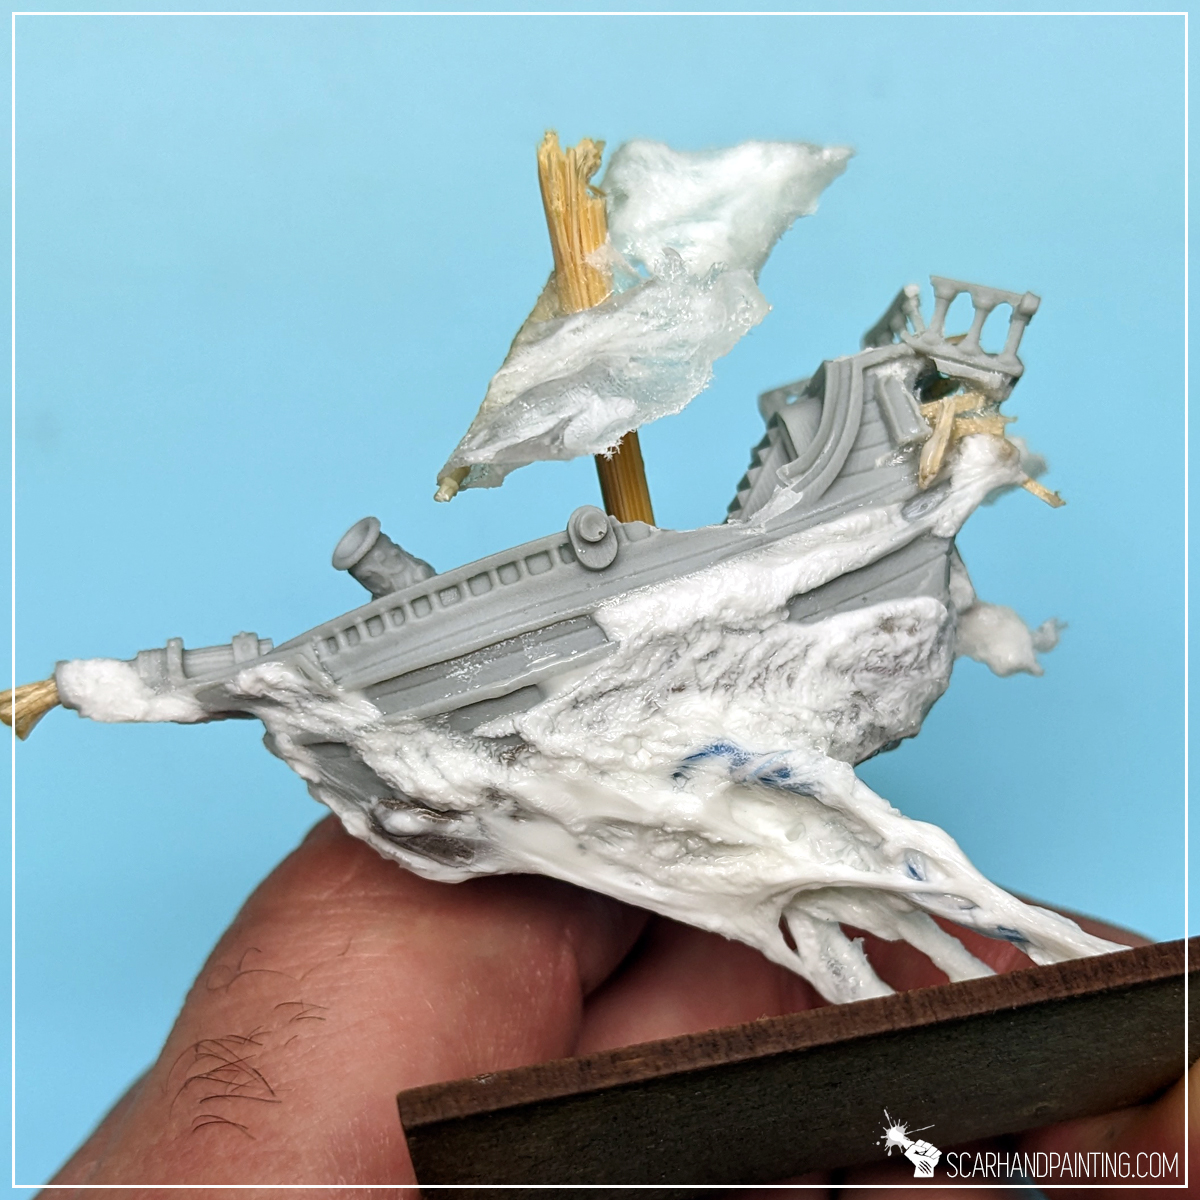
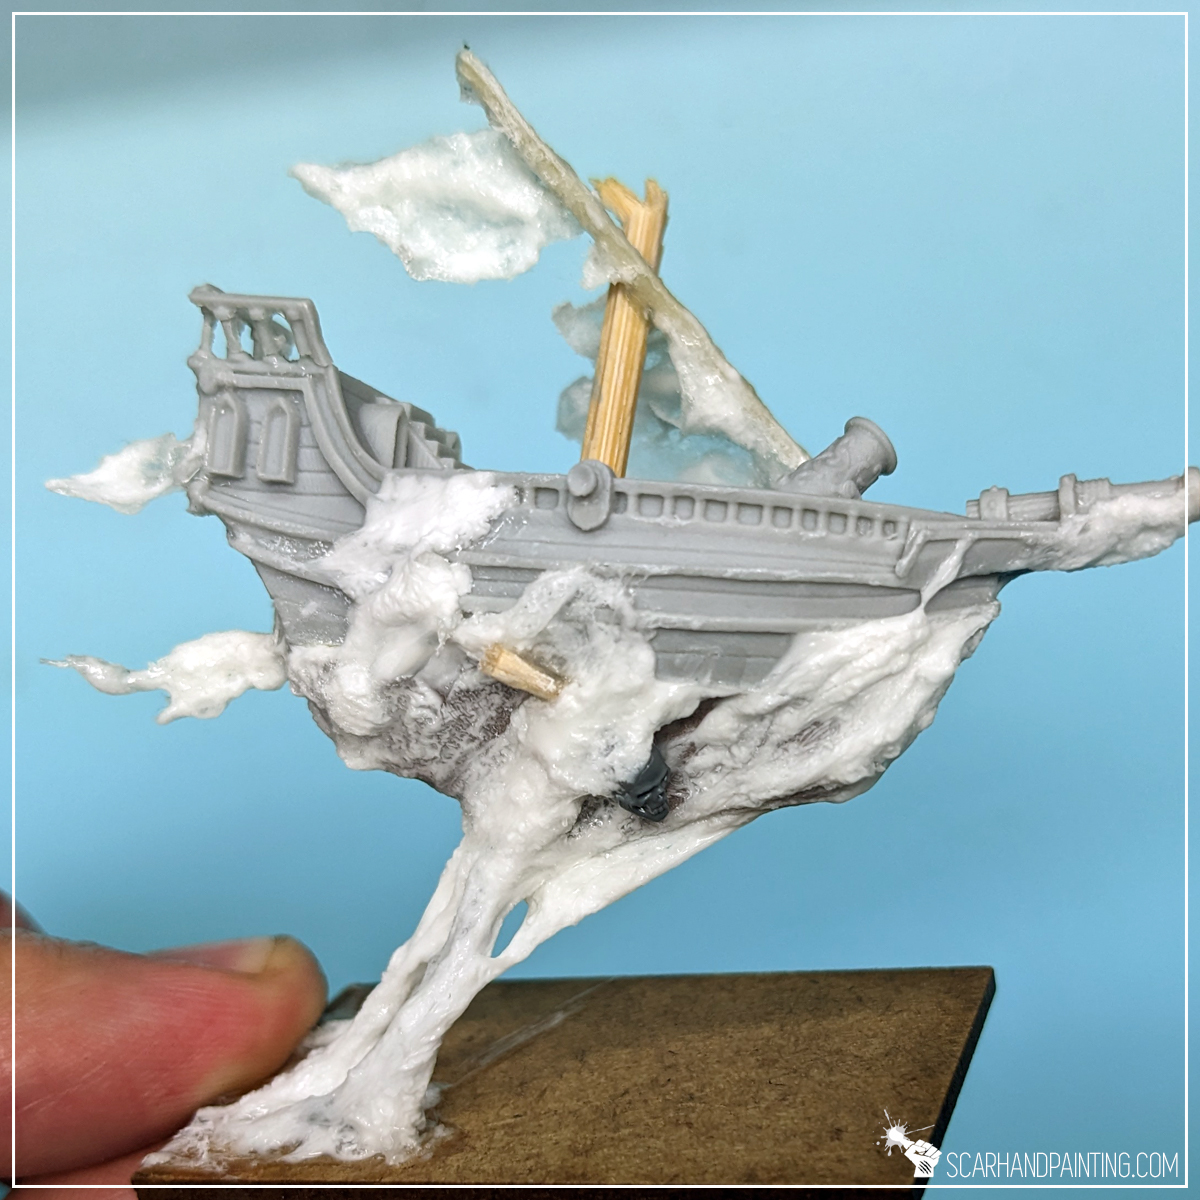
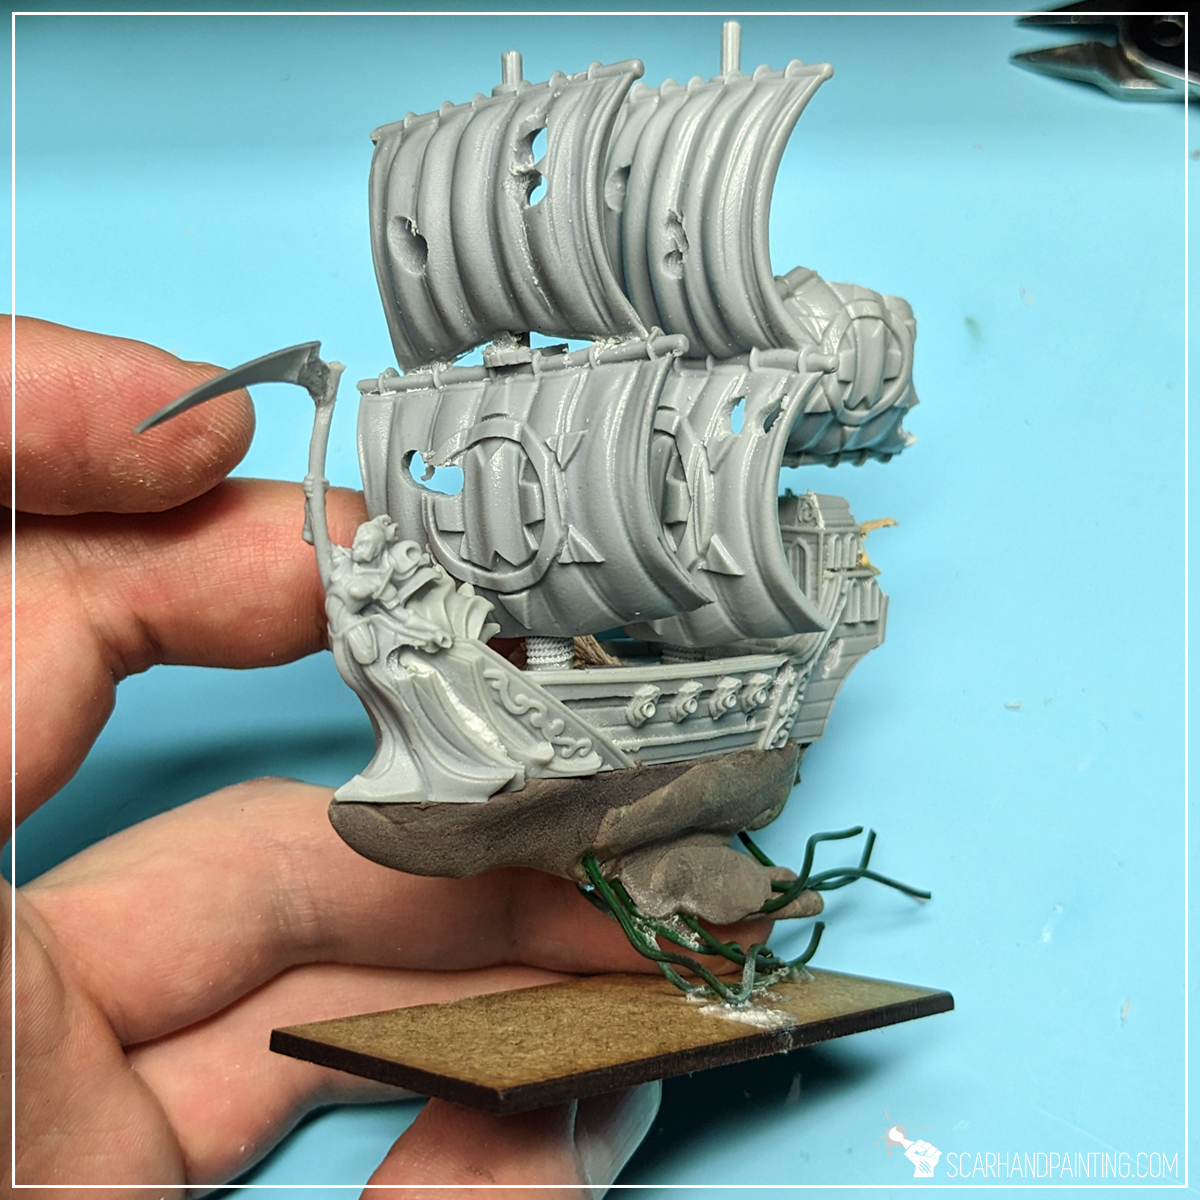
A good way to distinguish ghost ships amongst other fleets is to add significant hull damage. This can be done easily by cutting a chunk of hull with a pair of piers and/or drilling holes with a hand drill. The latter is perfect for damaging sails. For a natural damage look I drilled some holes then moved the drill bit up and down to produce a slightly more irregular shape.

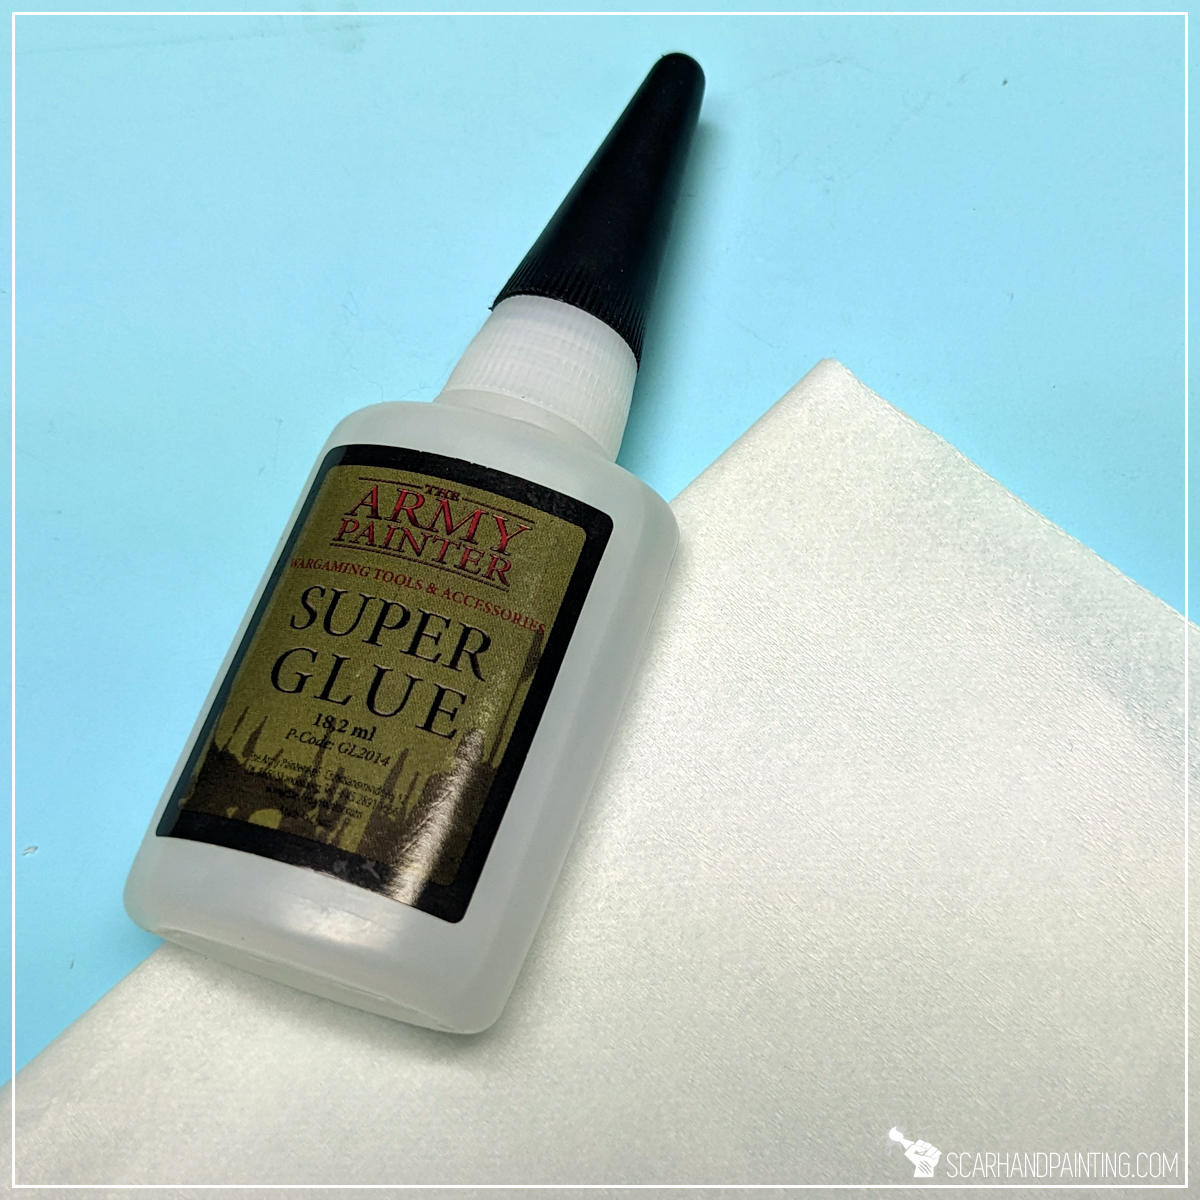
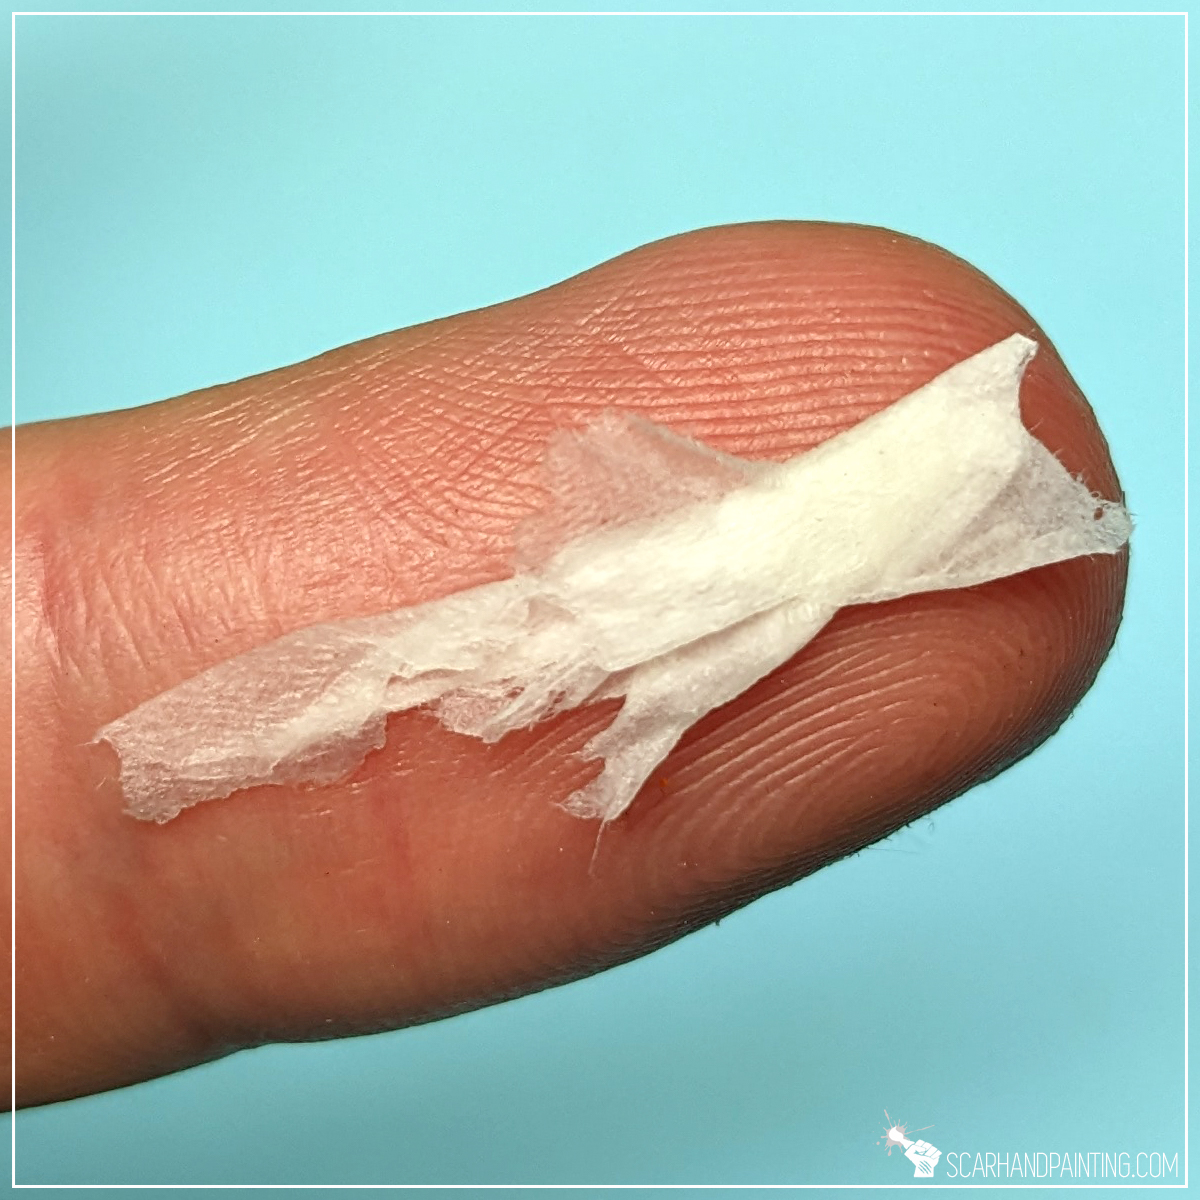
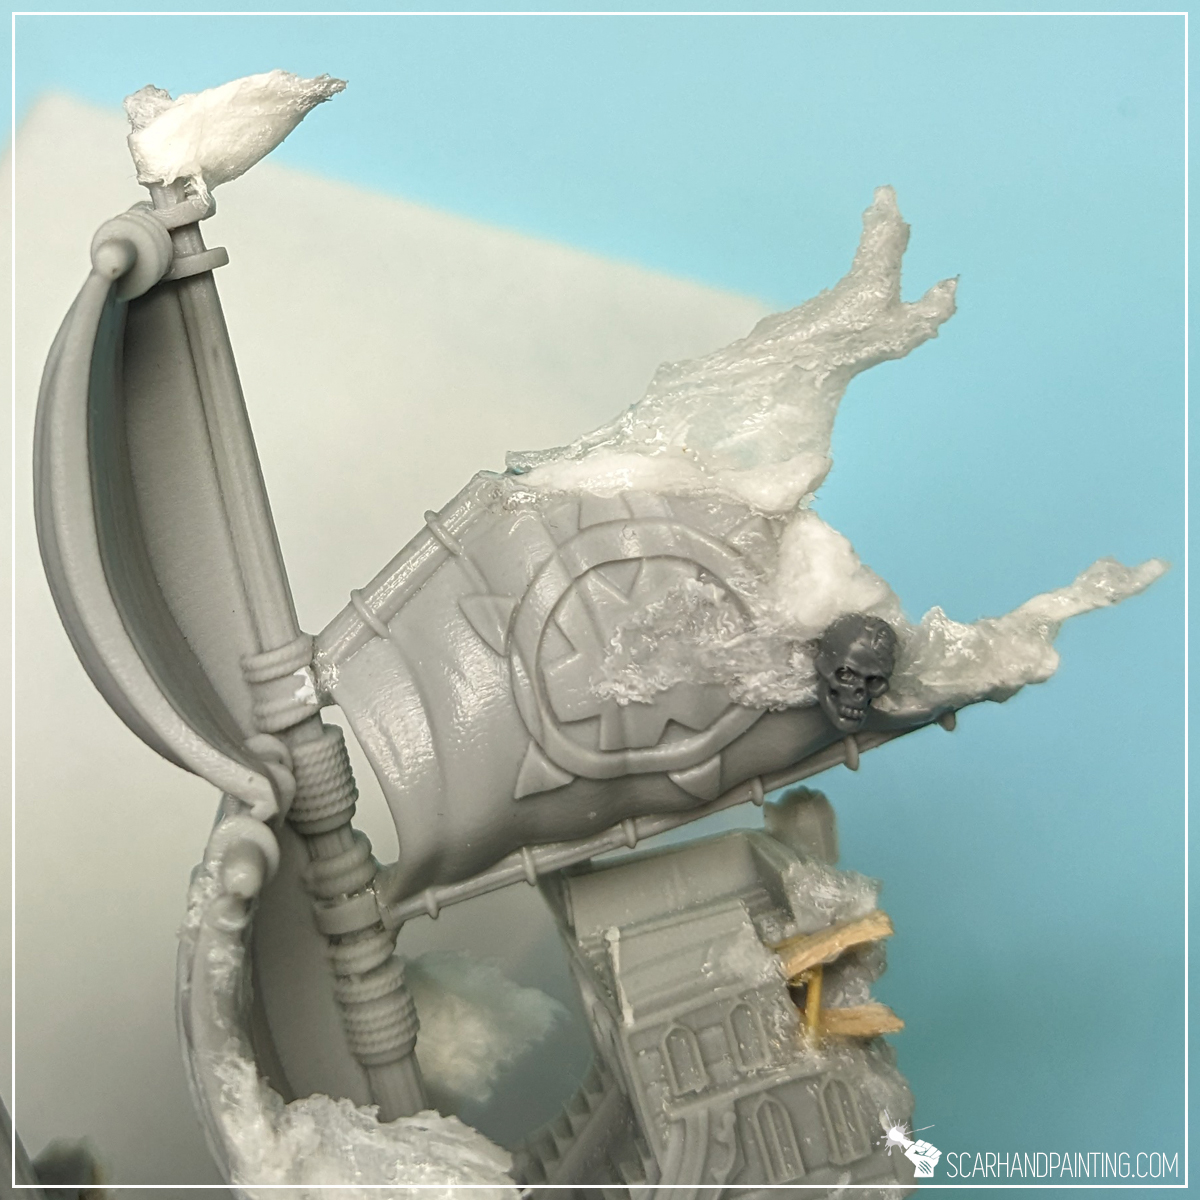
To add more dynamism to the sails and some key features I used a tissue trick. First I moisten a piece of tissue and form a basic shape. I then glued the shape to the ship with Super Glue. I followed by smearing more Super Glue on top of the tissue with a tip of a toothpick. Once hardened the shape made a solid foundation for some more advanced techniques.
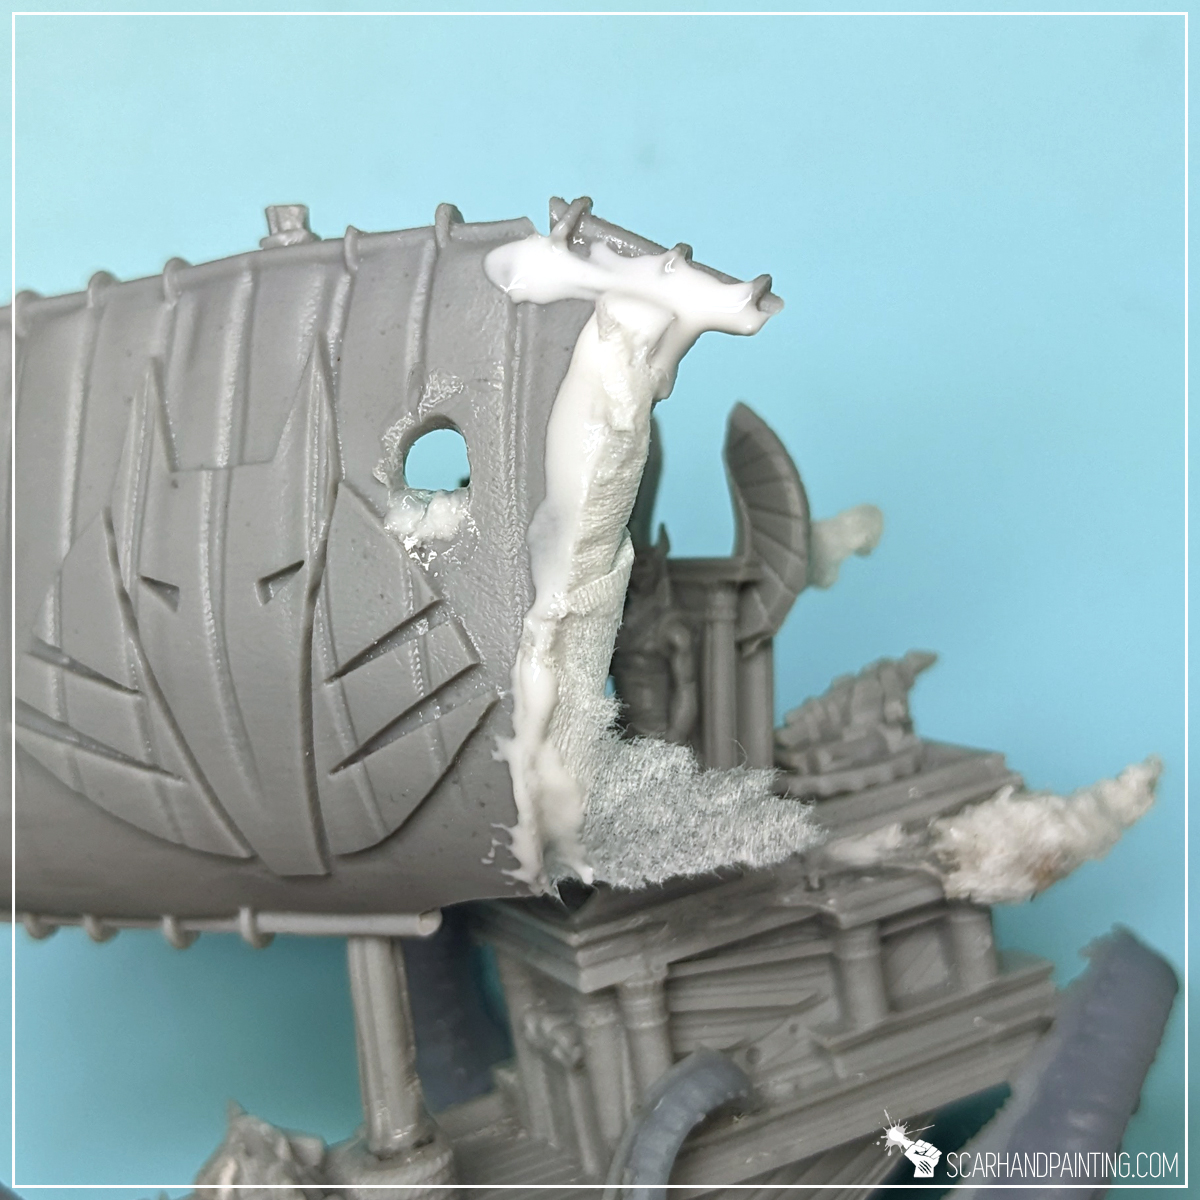
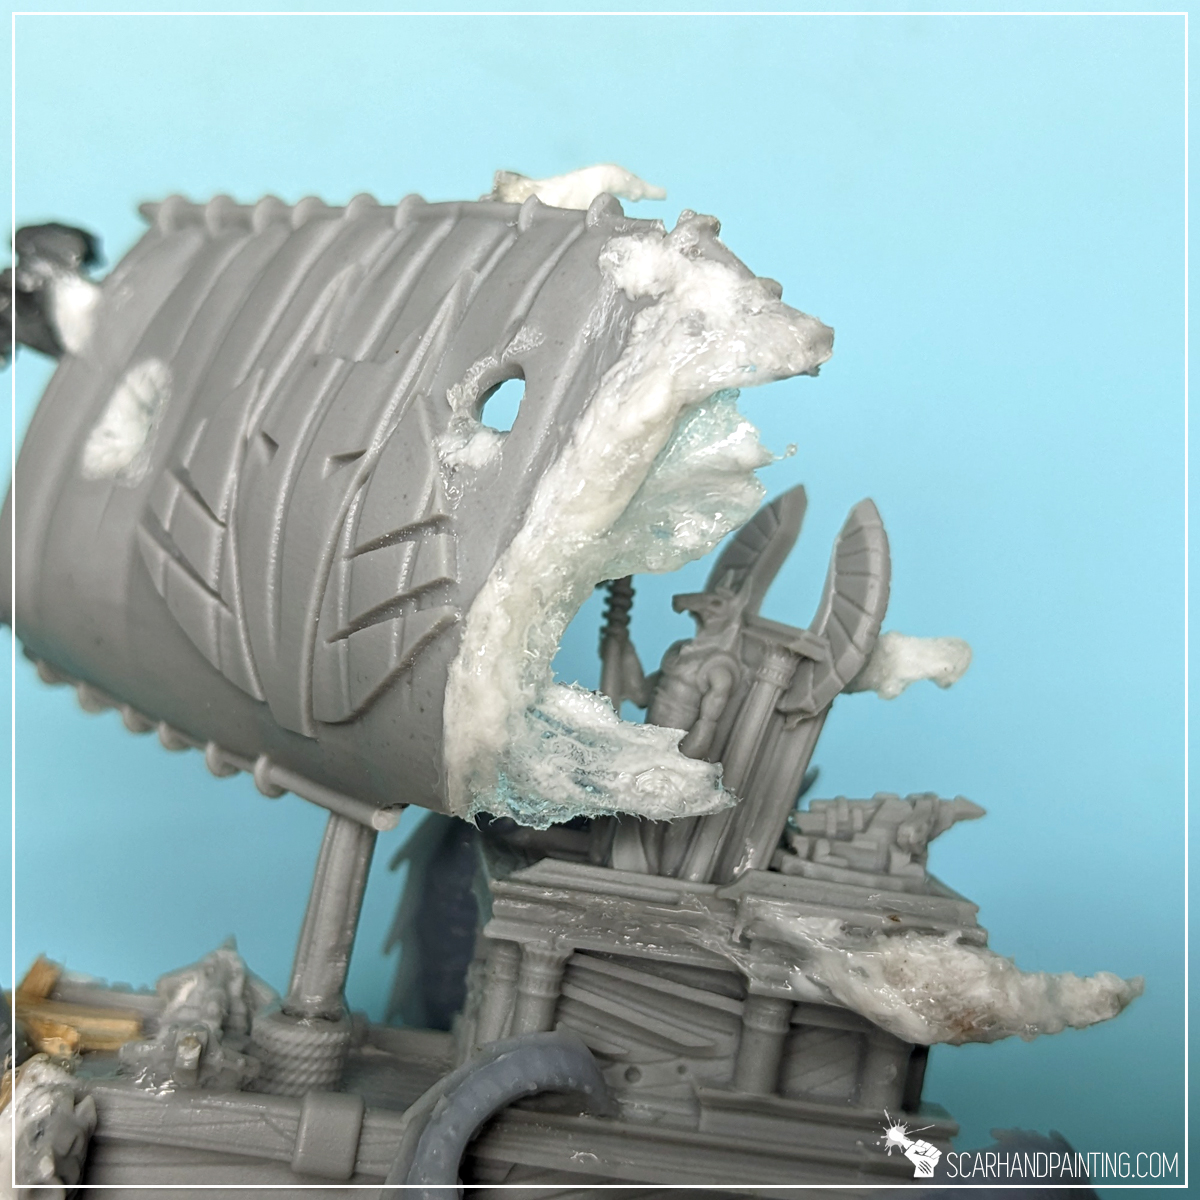
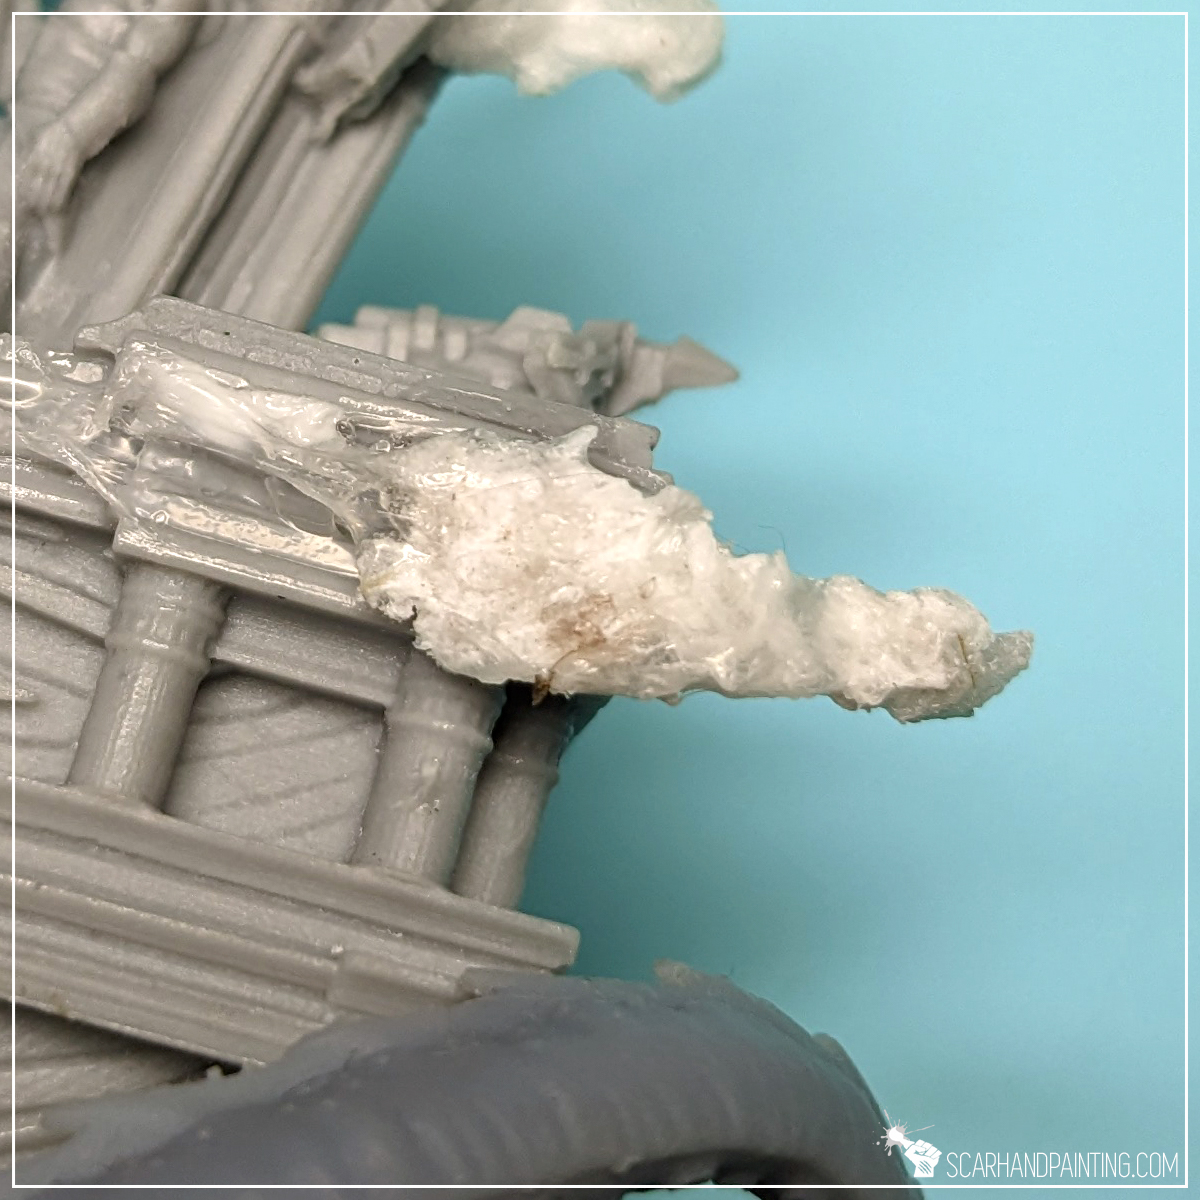
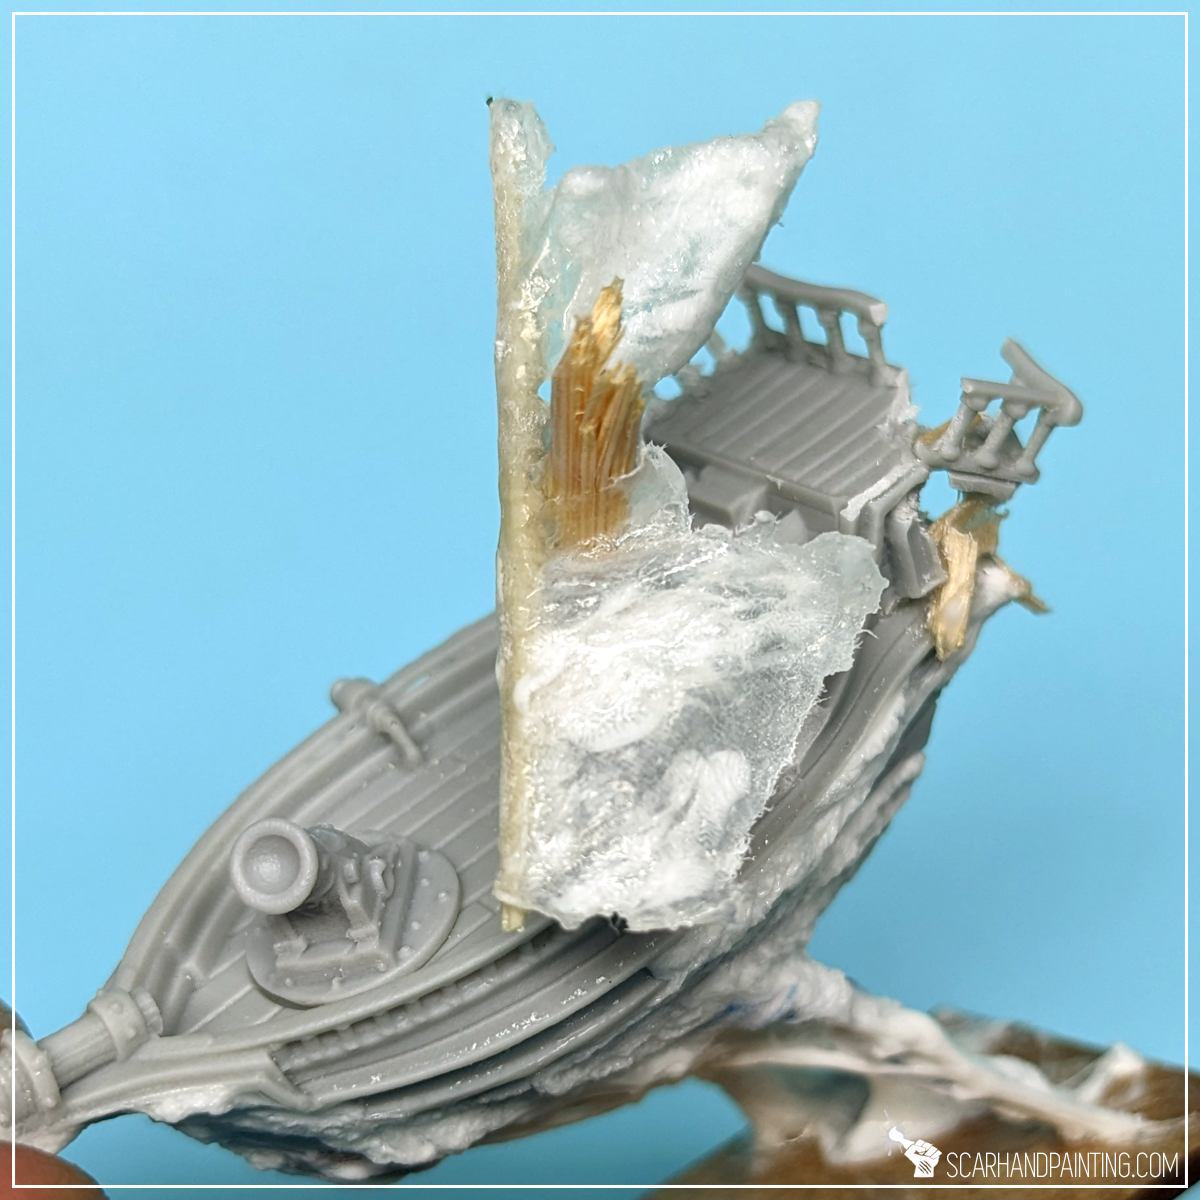
One of the most recognisable ghostly features is the body/hull distortion dragged by the etheric winds. A good way to represent this is by mixing PVA and Super Glue (cyanoacrylate) then smearing and dragging the resulting goo on top of ship features. The way I usually go about it is to apply some PVA glue on the surface, then apply Super glue on top and start smearing with the tip of a toothpick. I always try to smear the ‘glue goo’ in one direction to form dynamic shapes and interesting texture. Once the base shape is formed I let it dry and just let the goo do its thing.
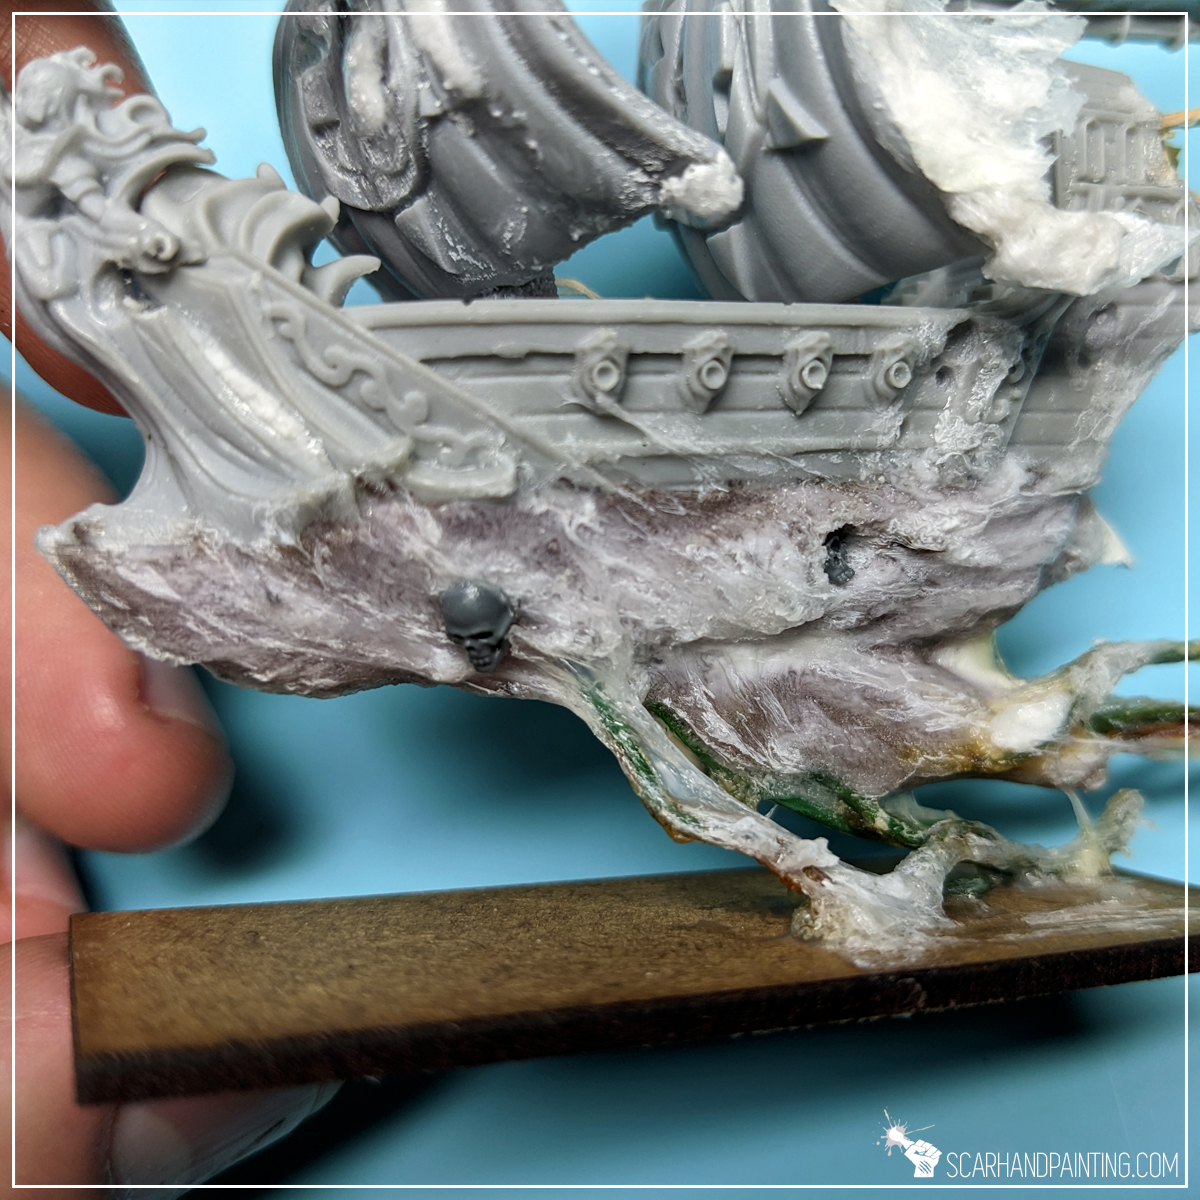
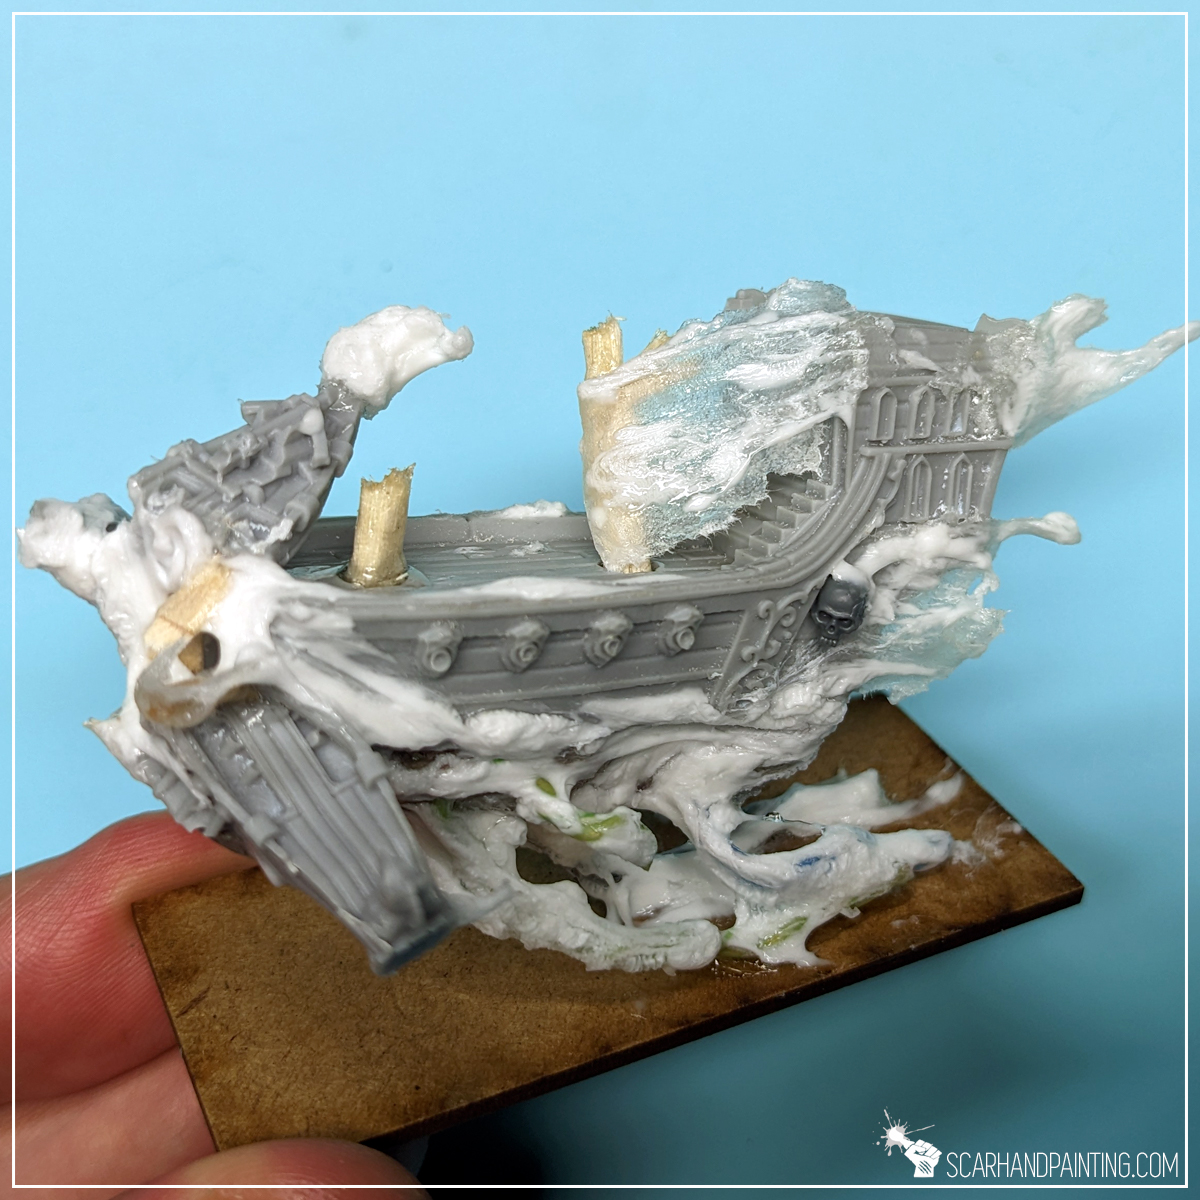
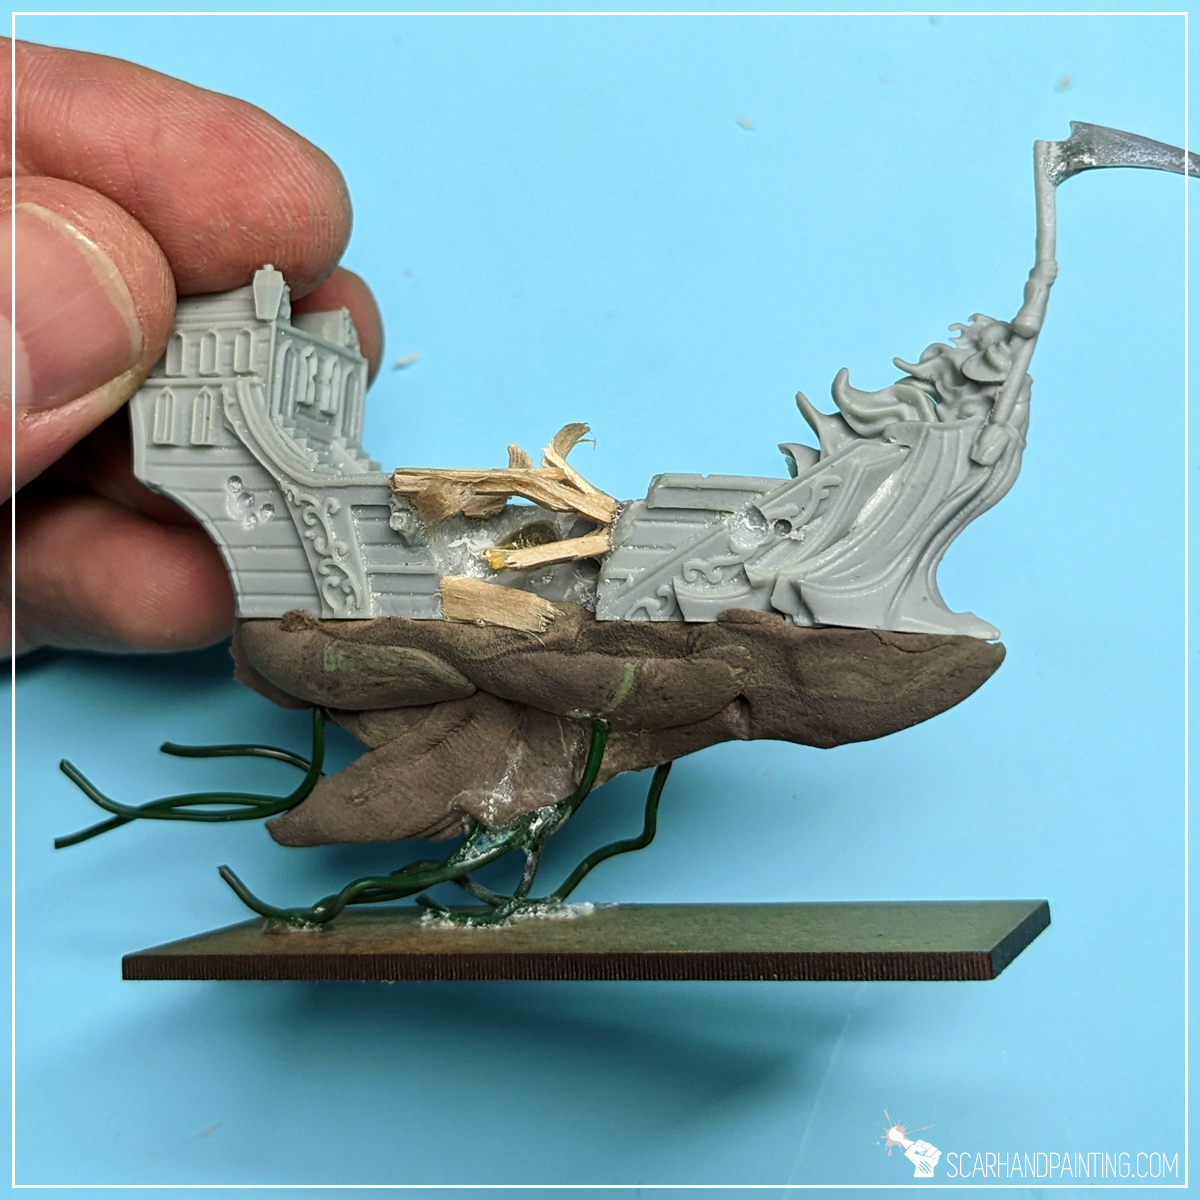
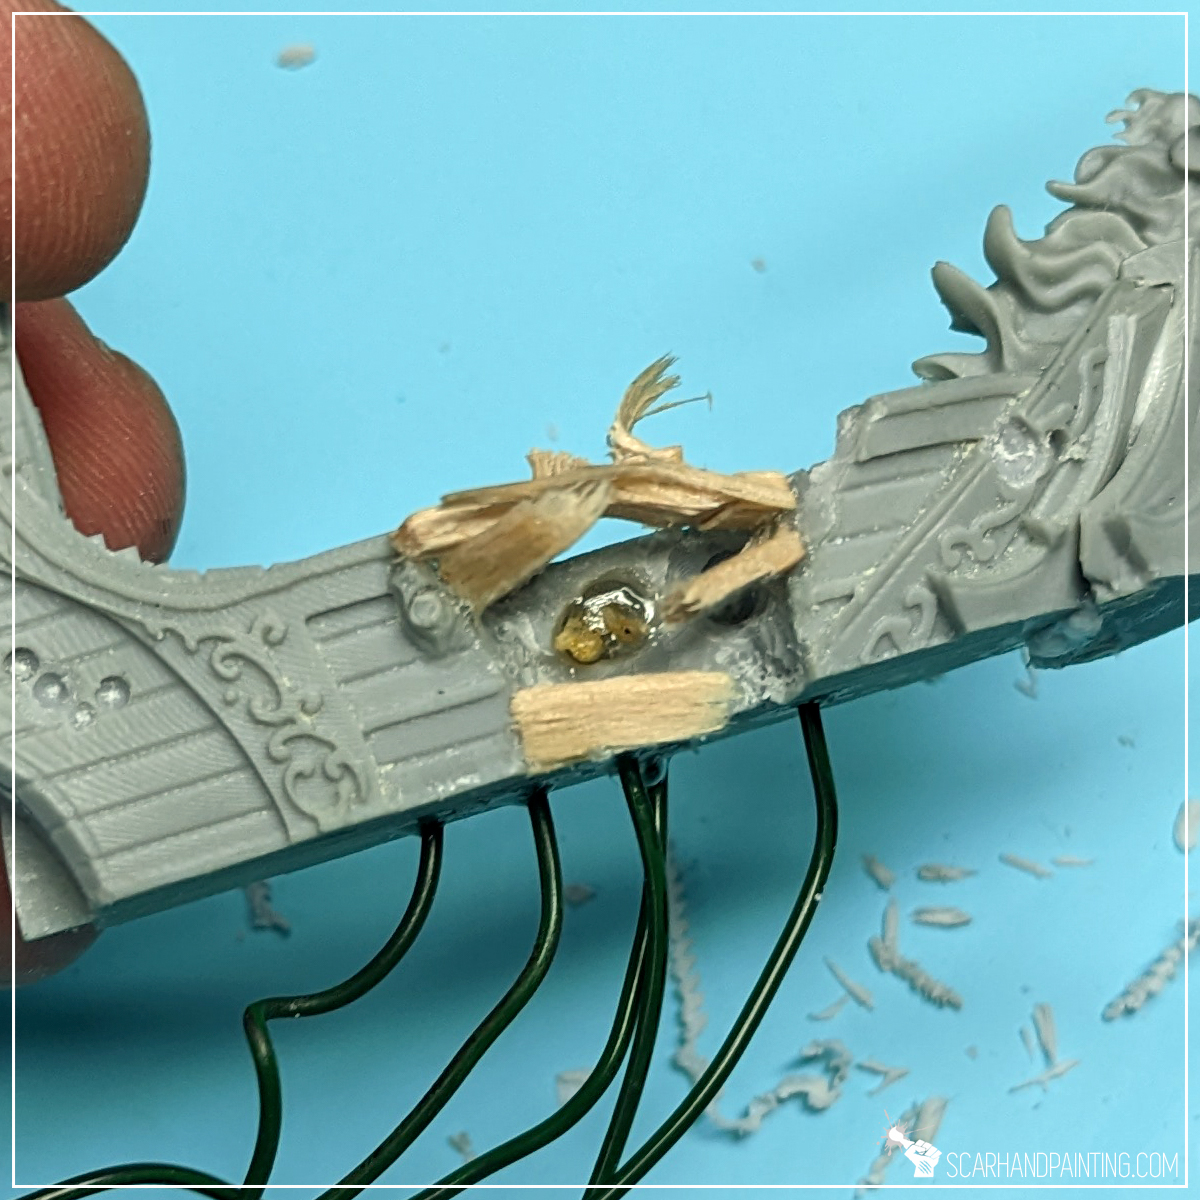
An interesting way of presenting a ghost ship is to take it out of the water. A ship drifting in the air has a truly menacing feel to it. The way I did it was to drill small holes in the underside of the ship, then glue metal wires into them. Once glued firmly I then bent the wires to look like floating under the ship.
Next I modeled an underside of the hull using a Hey Clay, which is a plasticine-like toy for kids. It dries firmly pretty fast, becoming semi hard and very lightweight afterwards. Perfect for this kind of work, with glue goo to further improve its durability and texture.
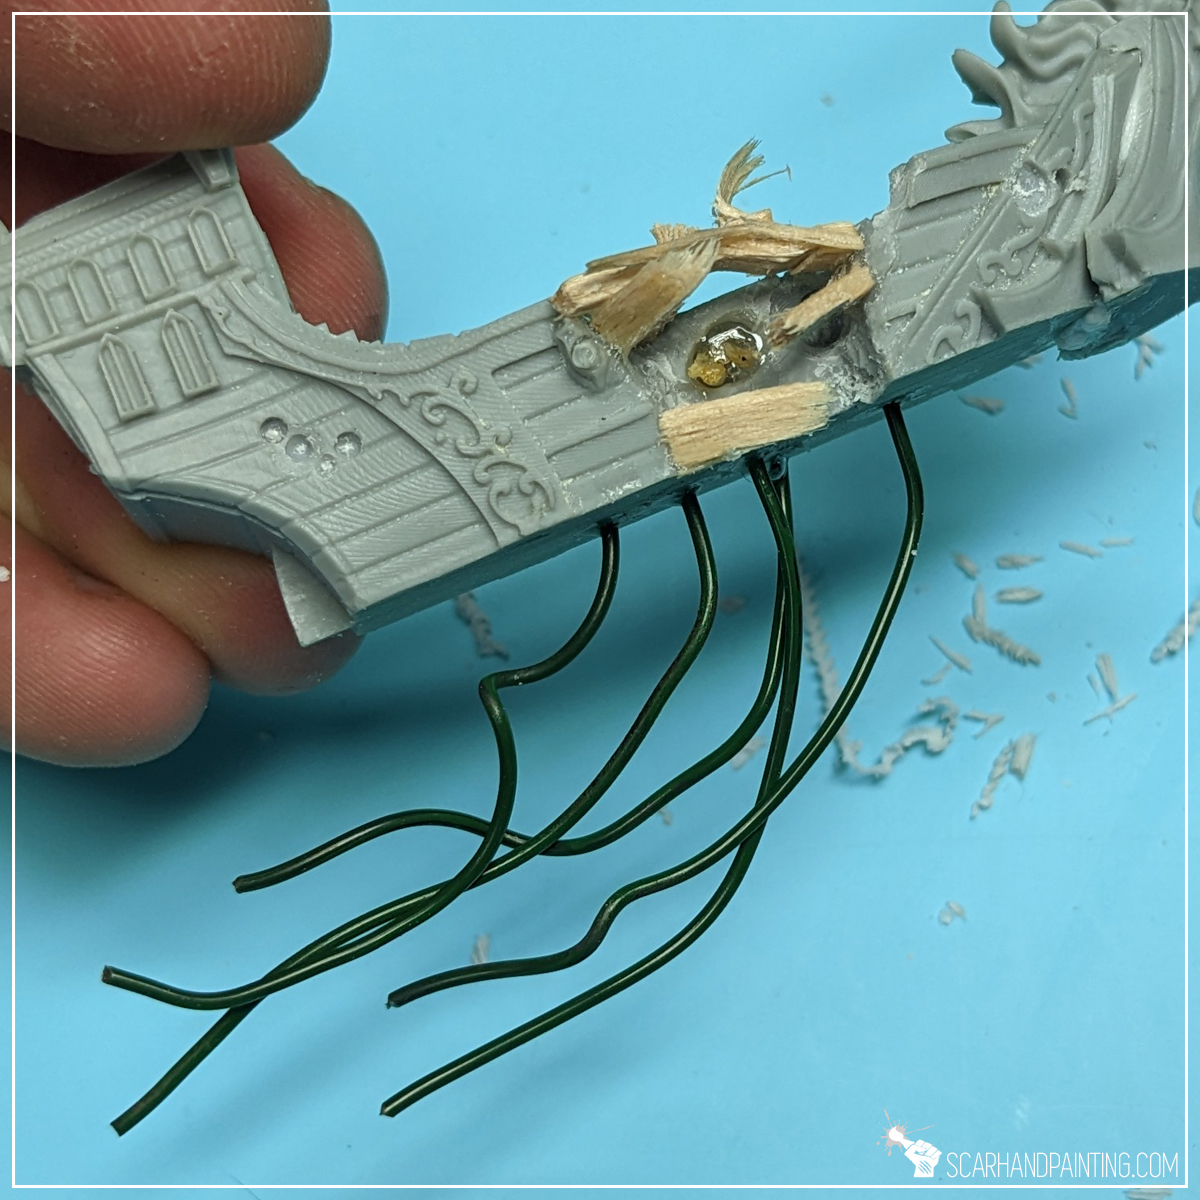
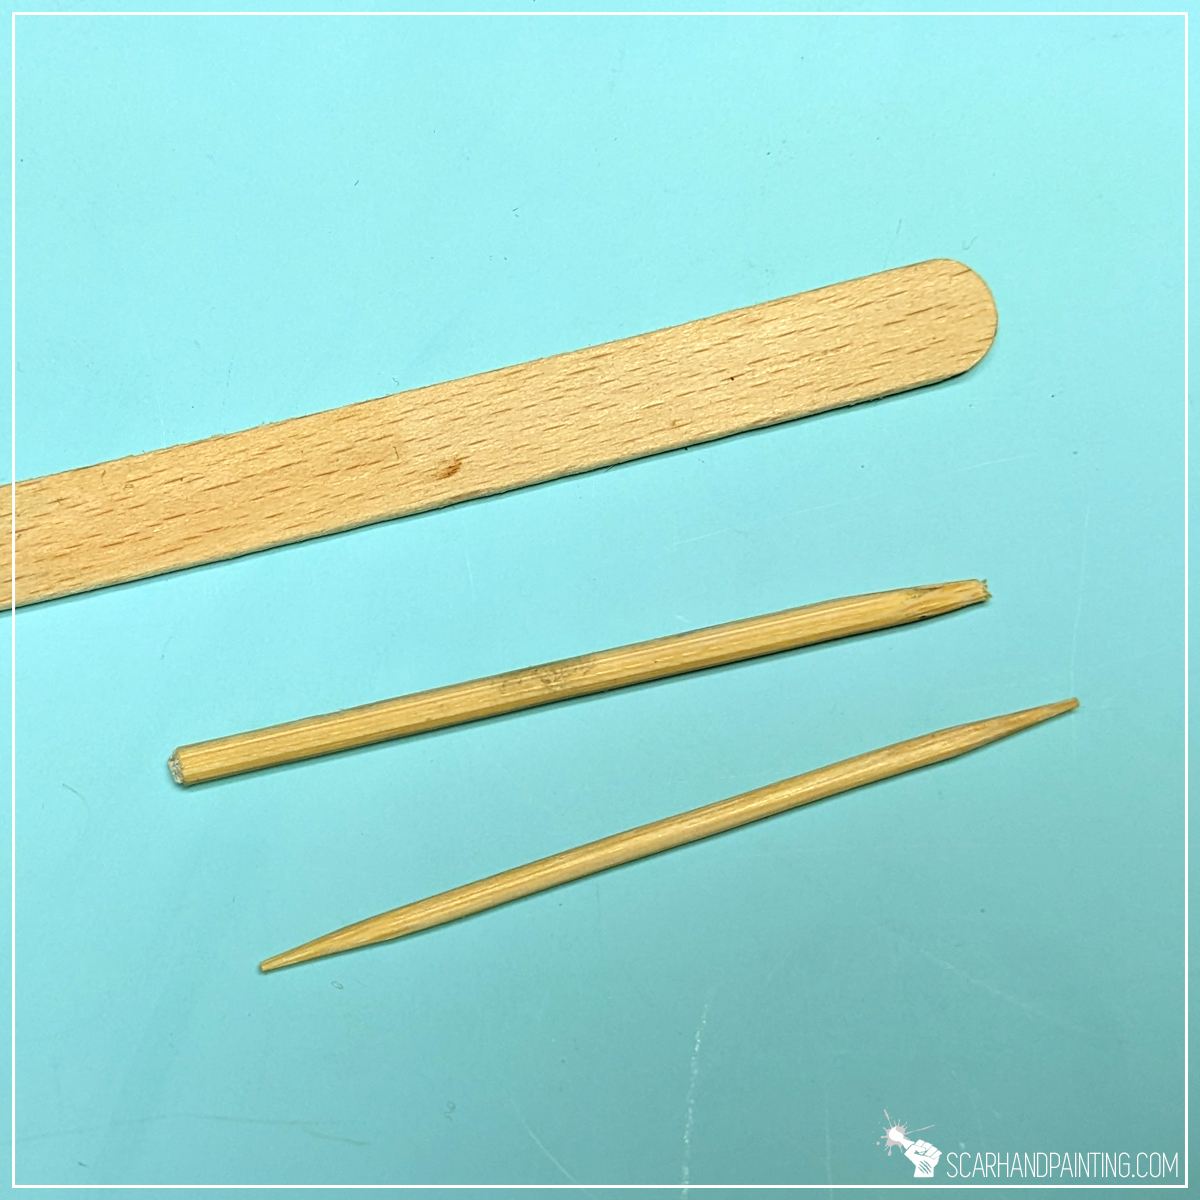
To greatly enhance the theme of battle damage I have added some damaged woodwork. Ice cream sticks, toothpicks and skewer sticks are all a good source of properly shaped wood. First I cut them into small planks and mast elements, then broken each in half to get that extra feel of splintered wood. Once glued onto the ship it was all covered with thin Super Glue. This increased durability, which is pretty important when considering gaming with such stuff in the future.


Either 3d printed or pieces of other sets, a few extra bits to add character. I fancied myself an anchor dragged on a chain behind one ship – simple stuff once special chains for miniatures are around. Same for any ghostly visages coming out of hulls and sails. Nothing that a bunch of 28mm scale skulls can’t handle.
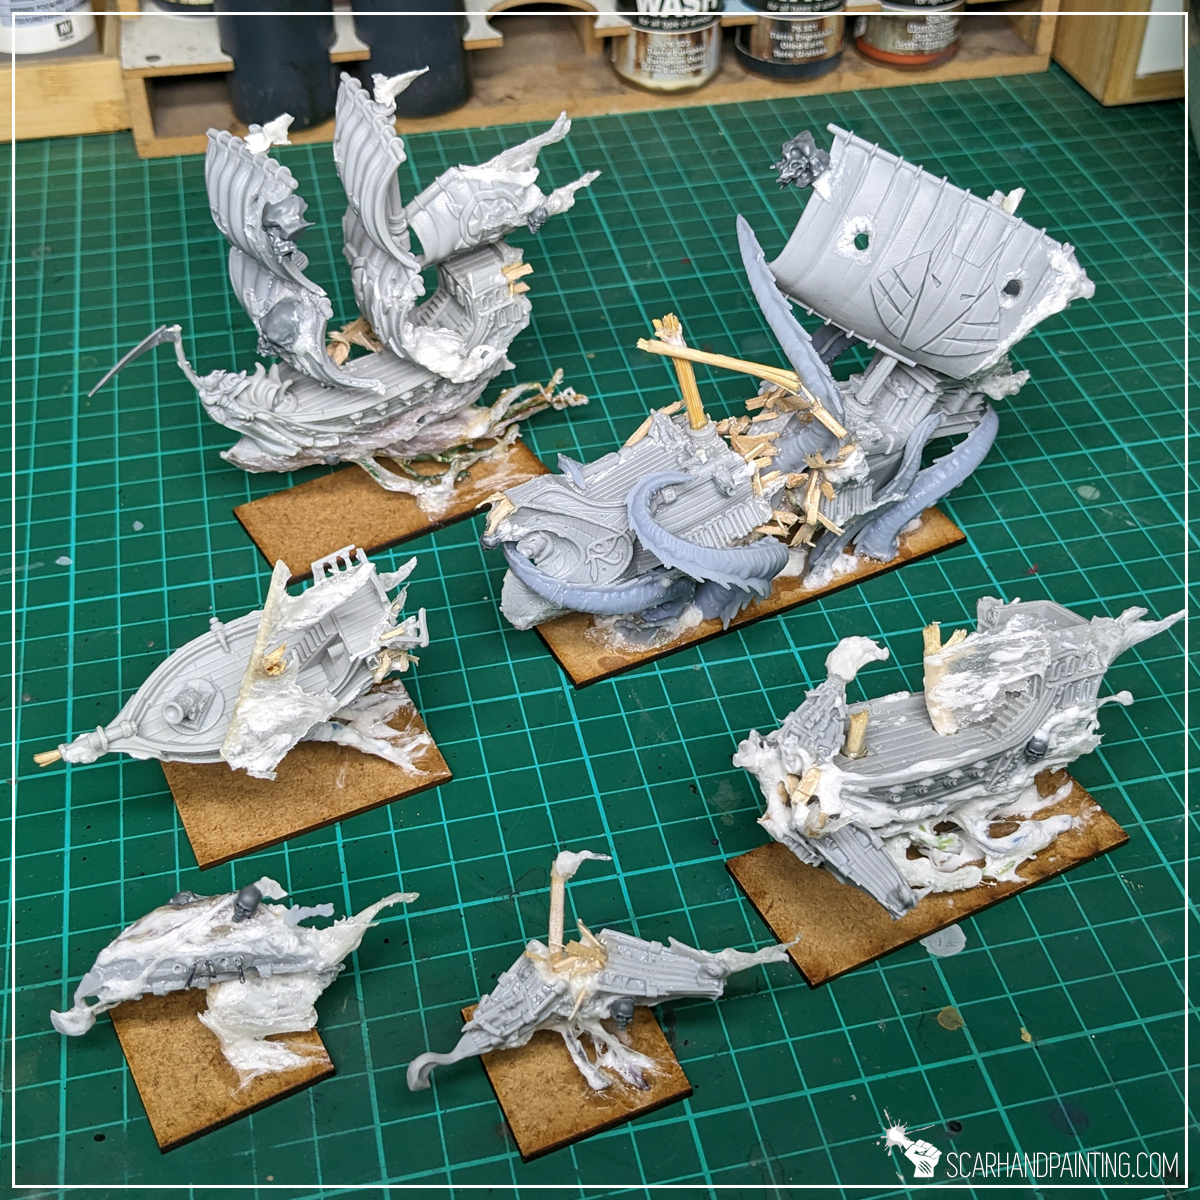
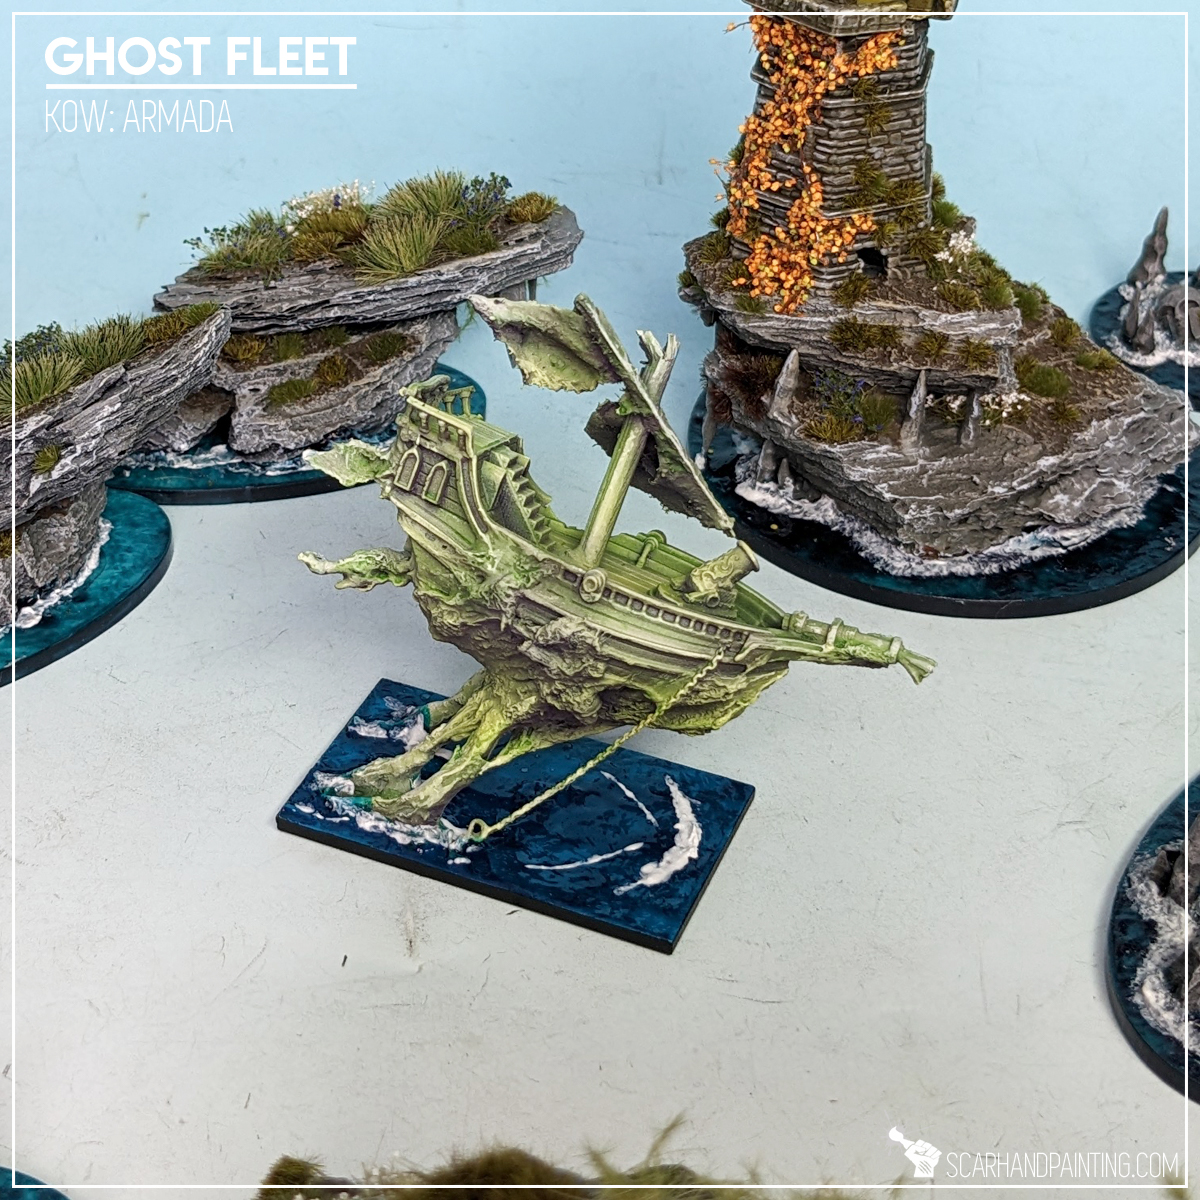
These are basically all the tricks I used while converting Ghost Fleet ships. The end result can be seen below and in Armada: Ghost Fleets gallery.
I hope you find this tutorial interesting. Be sure to let me know your thoughts in the comments below, or at Facebook or Instagram. I would also appreciate it if you considered sharing this content with your friends, who might find it useful. Finally if you are looking for a professional miniatures painting service, be sure to contact me with this contact form. I always reply within 24 hours, after which please check out your spam folder.

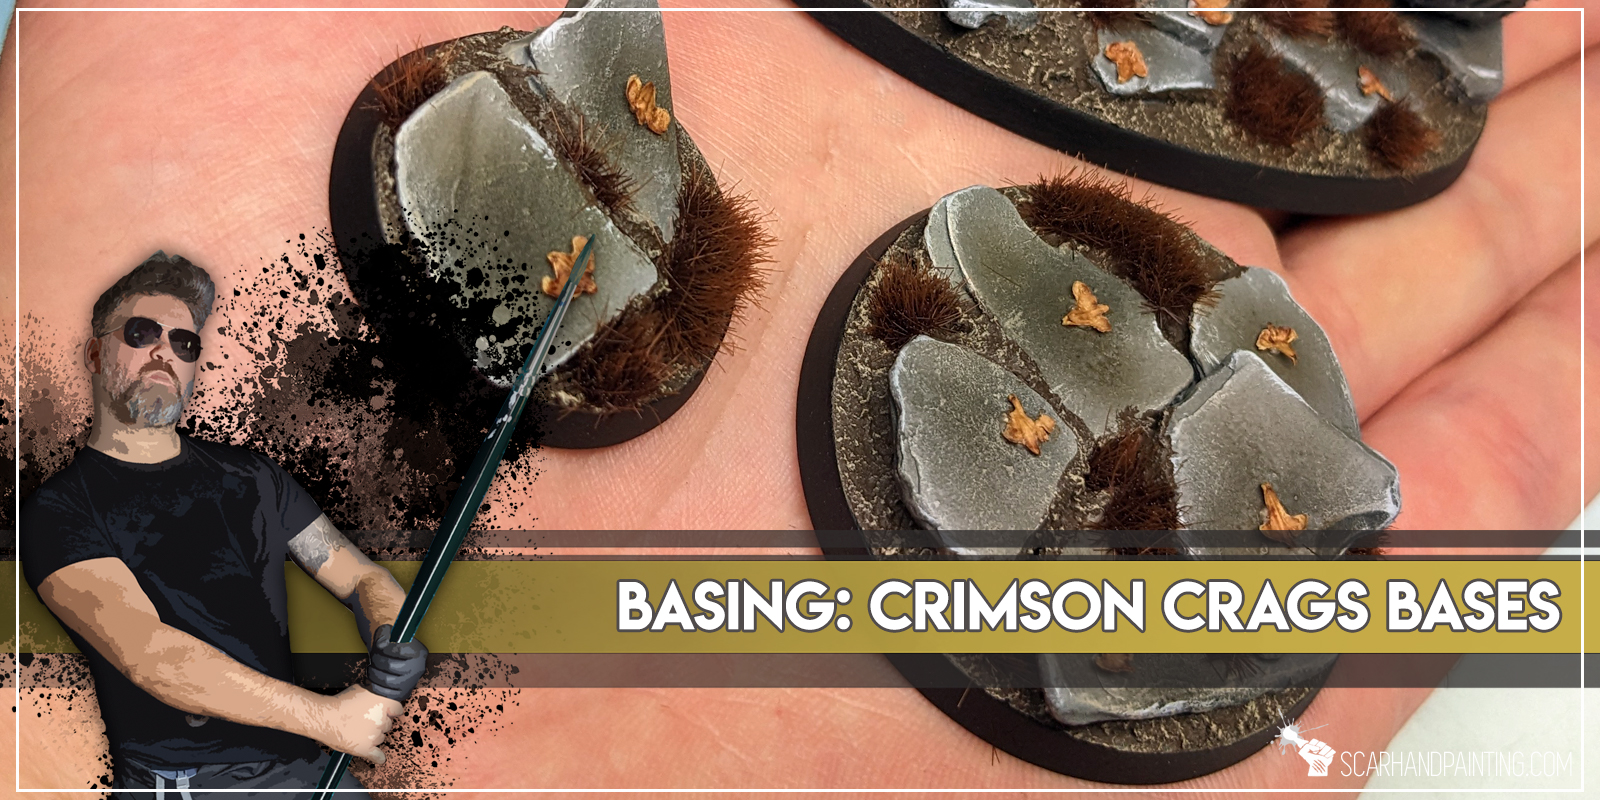
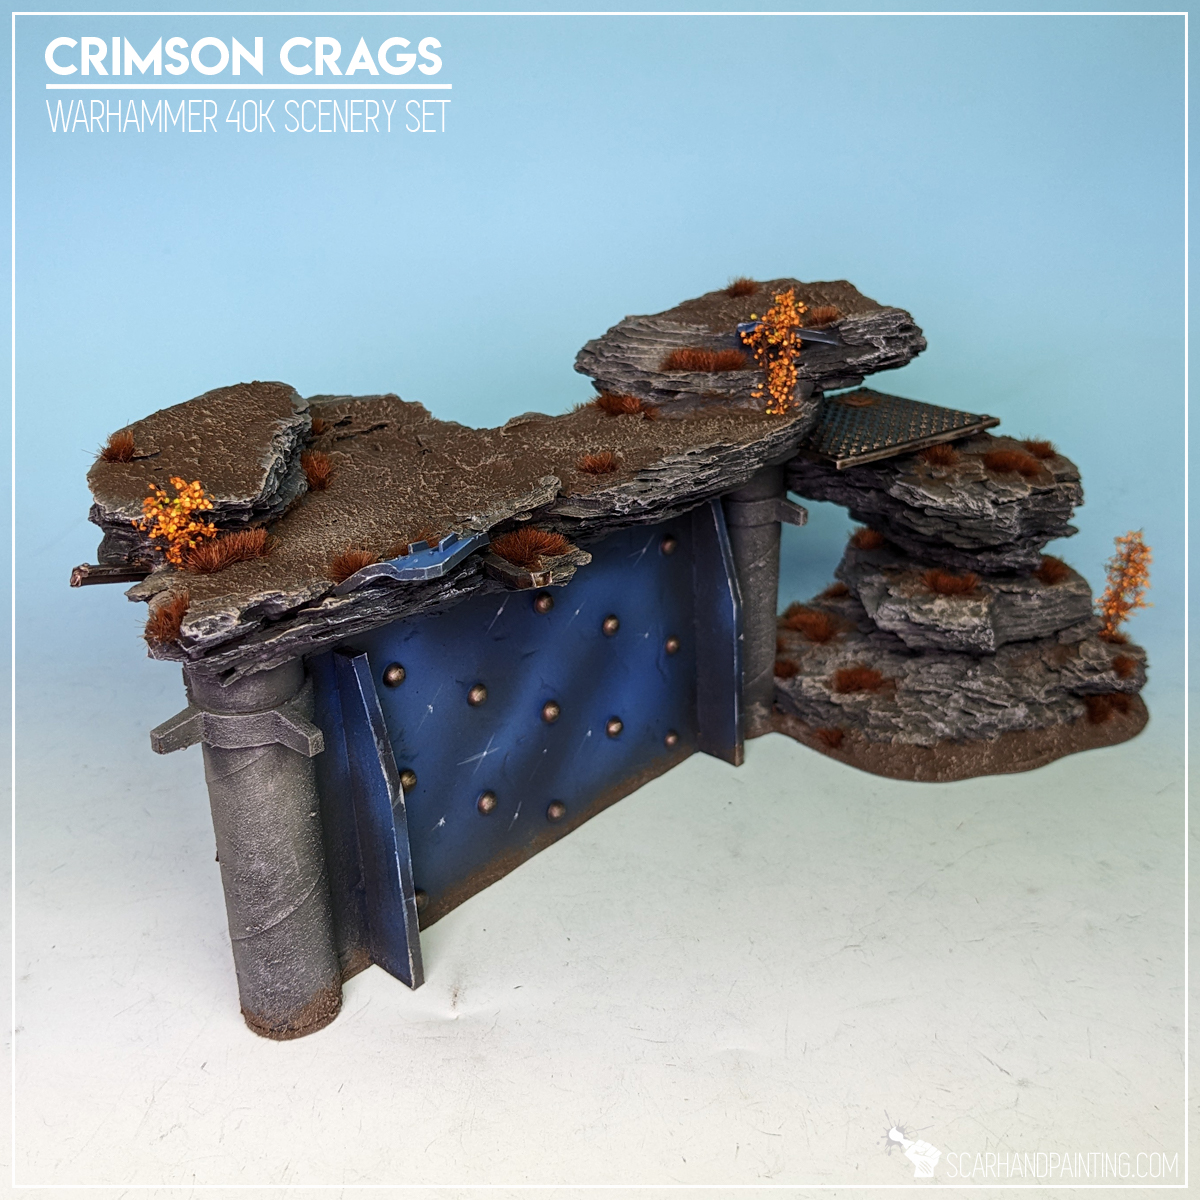
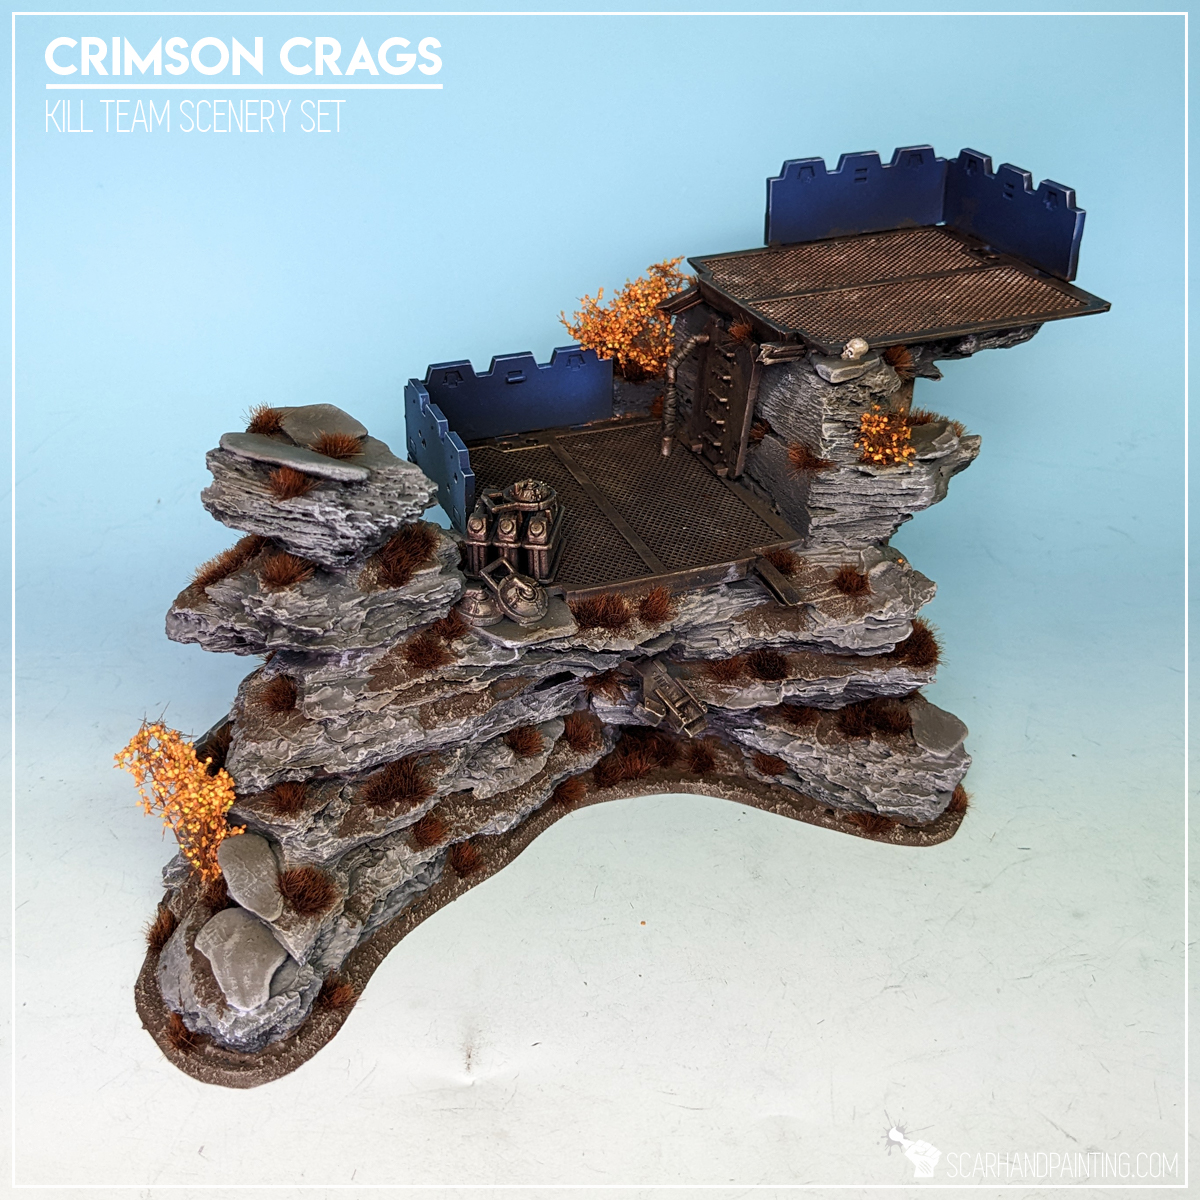
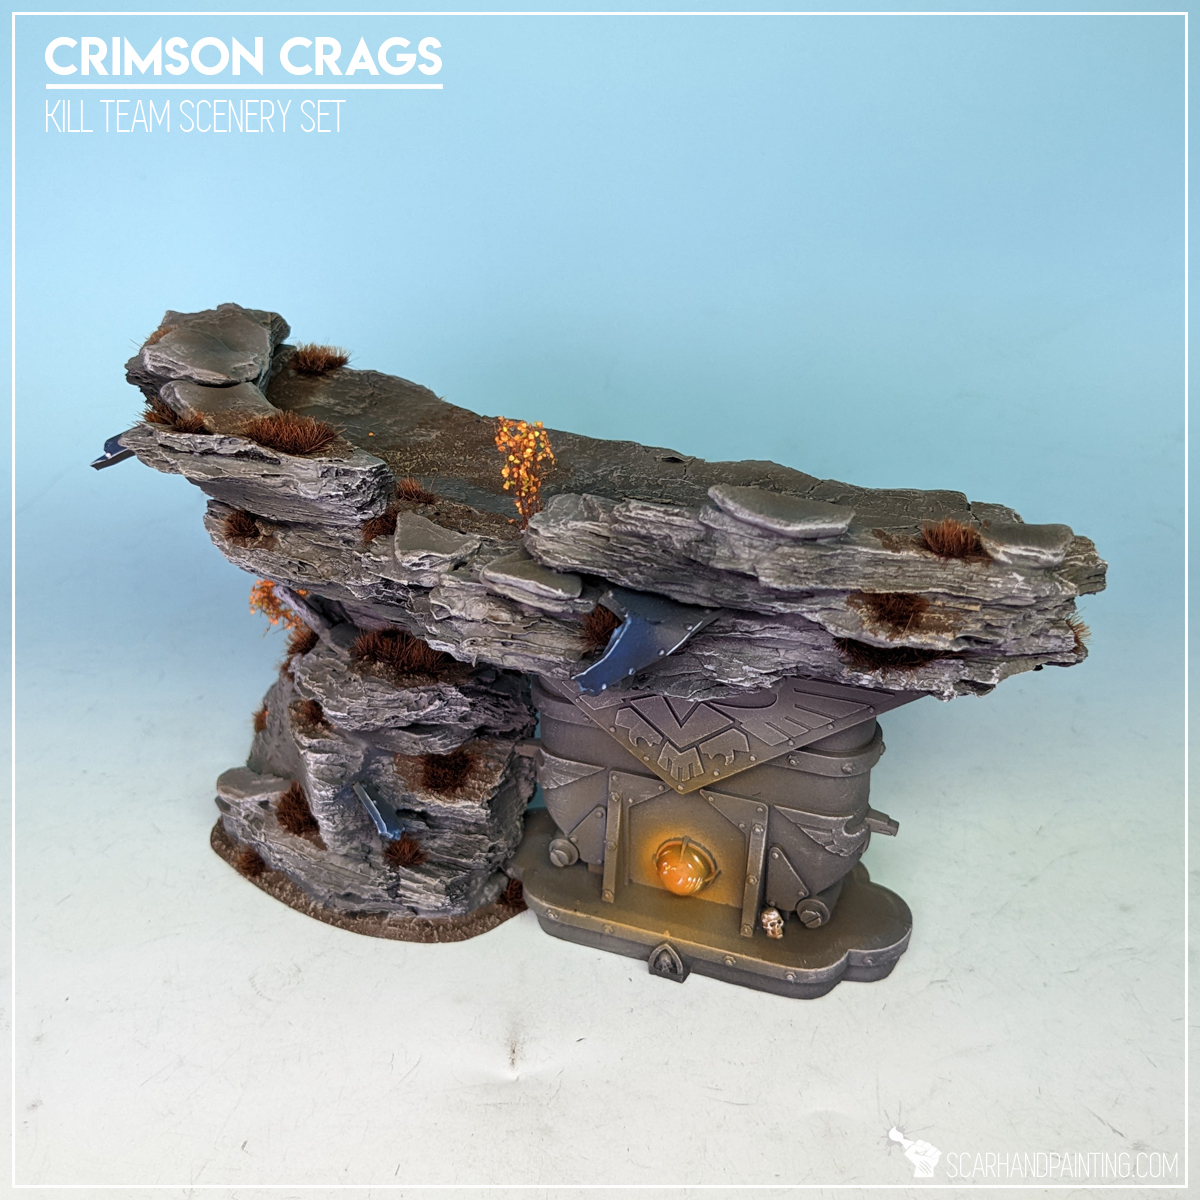
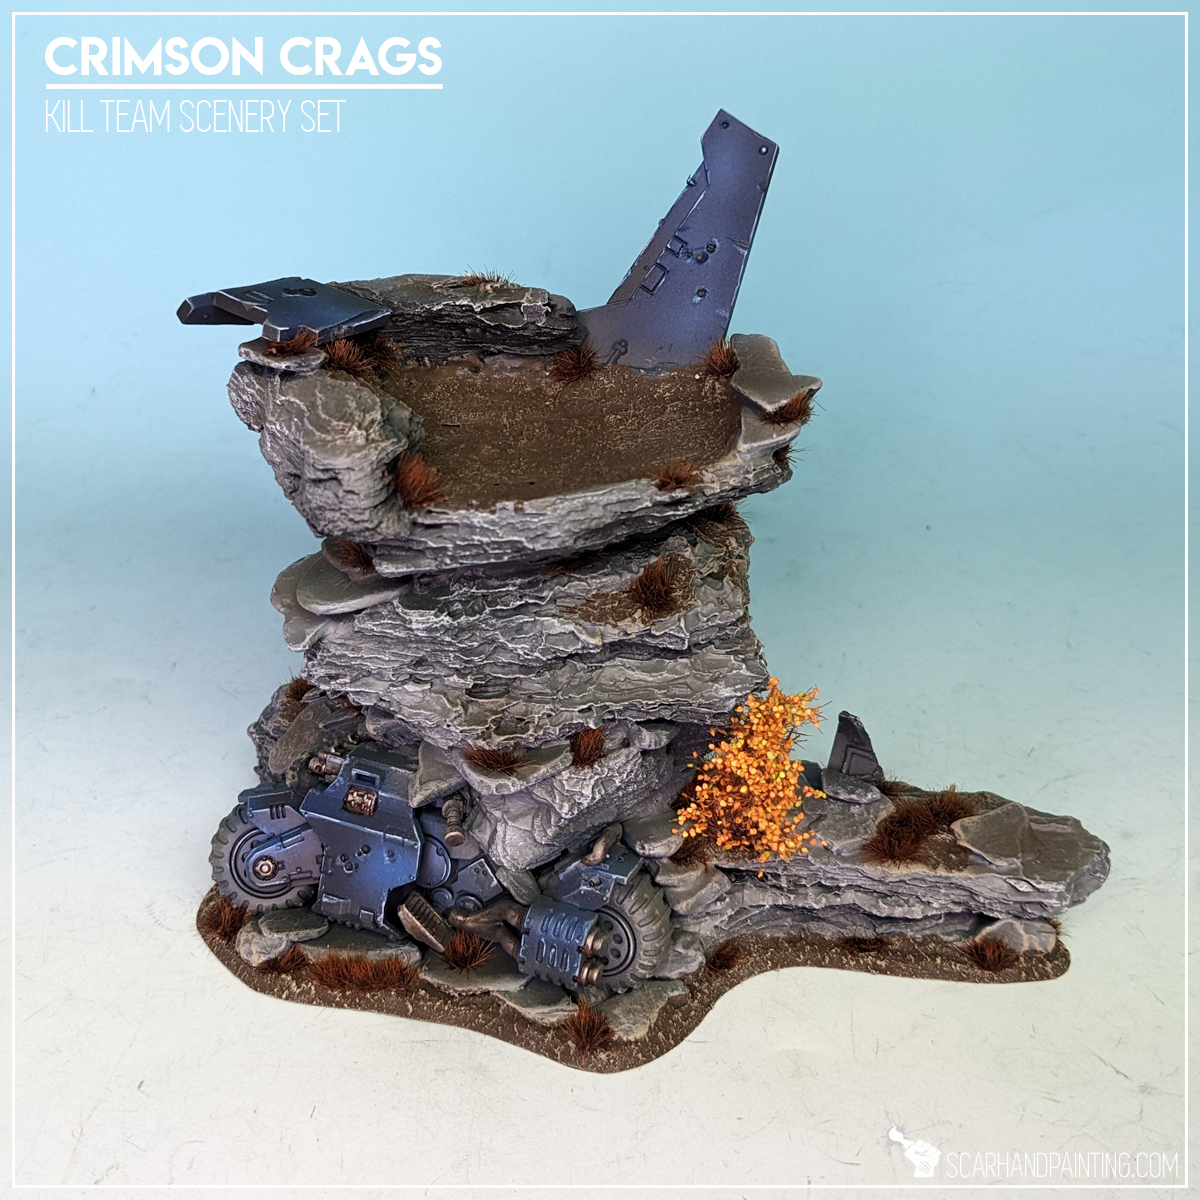
Welcome to Crimson Crags Bases tutorial. Here I will take you on a Step-by-step trip through the process of creating Crimson Crags themed Bases the same way as seen at: Gallery: Warhammer 40,000 Crimson Fists.
Before we start, some notes:
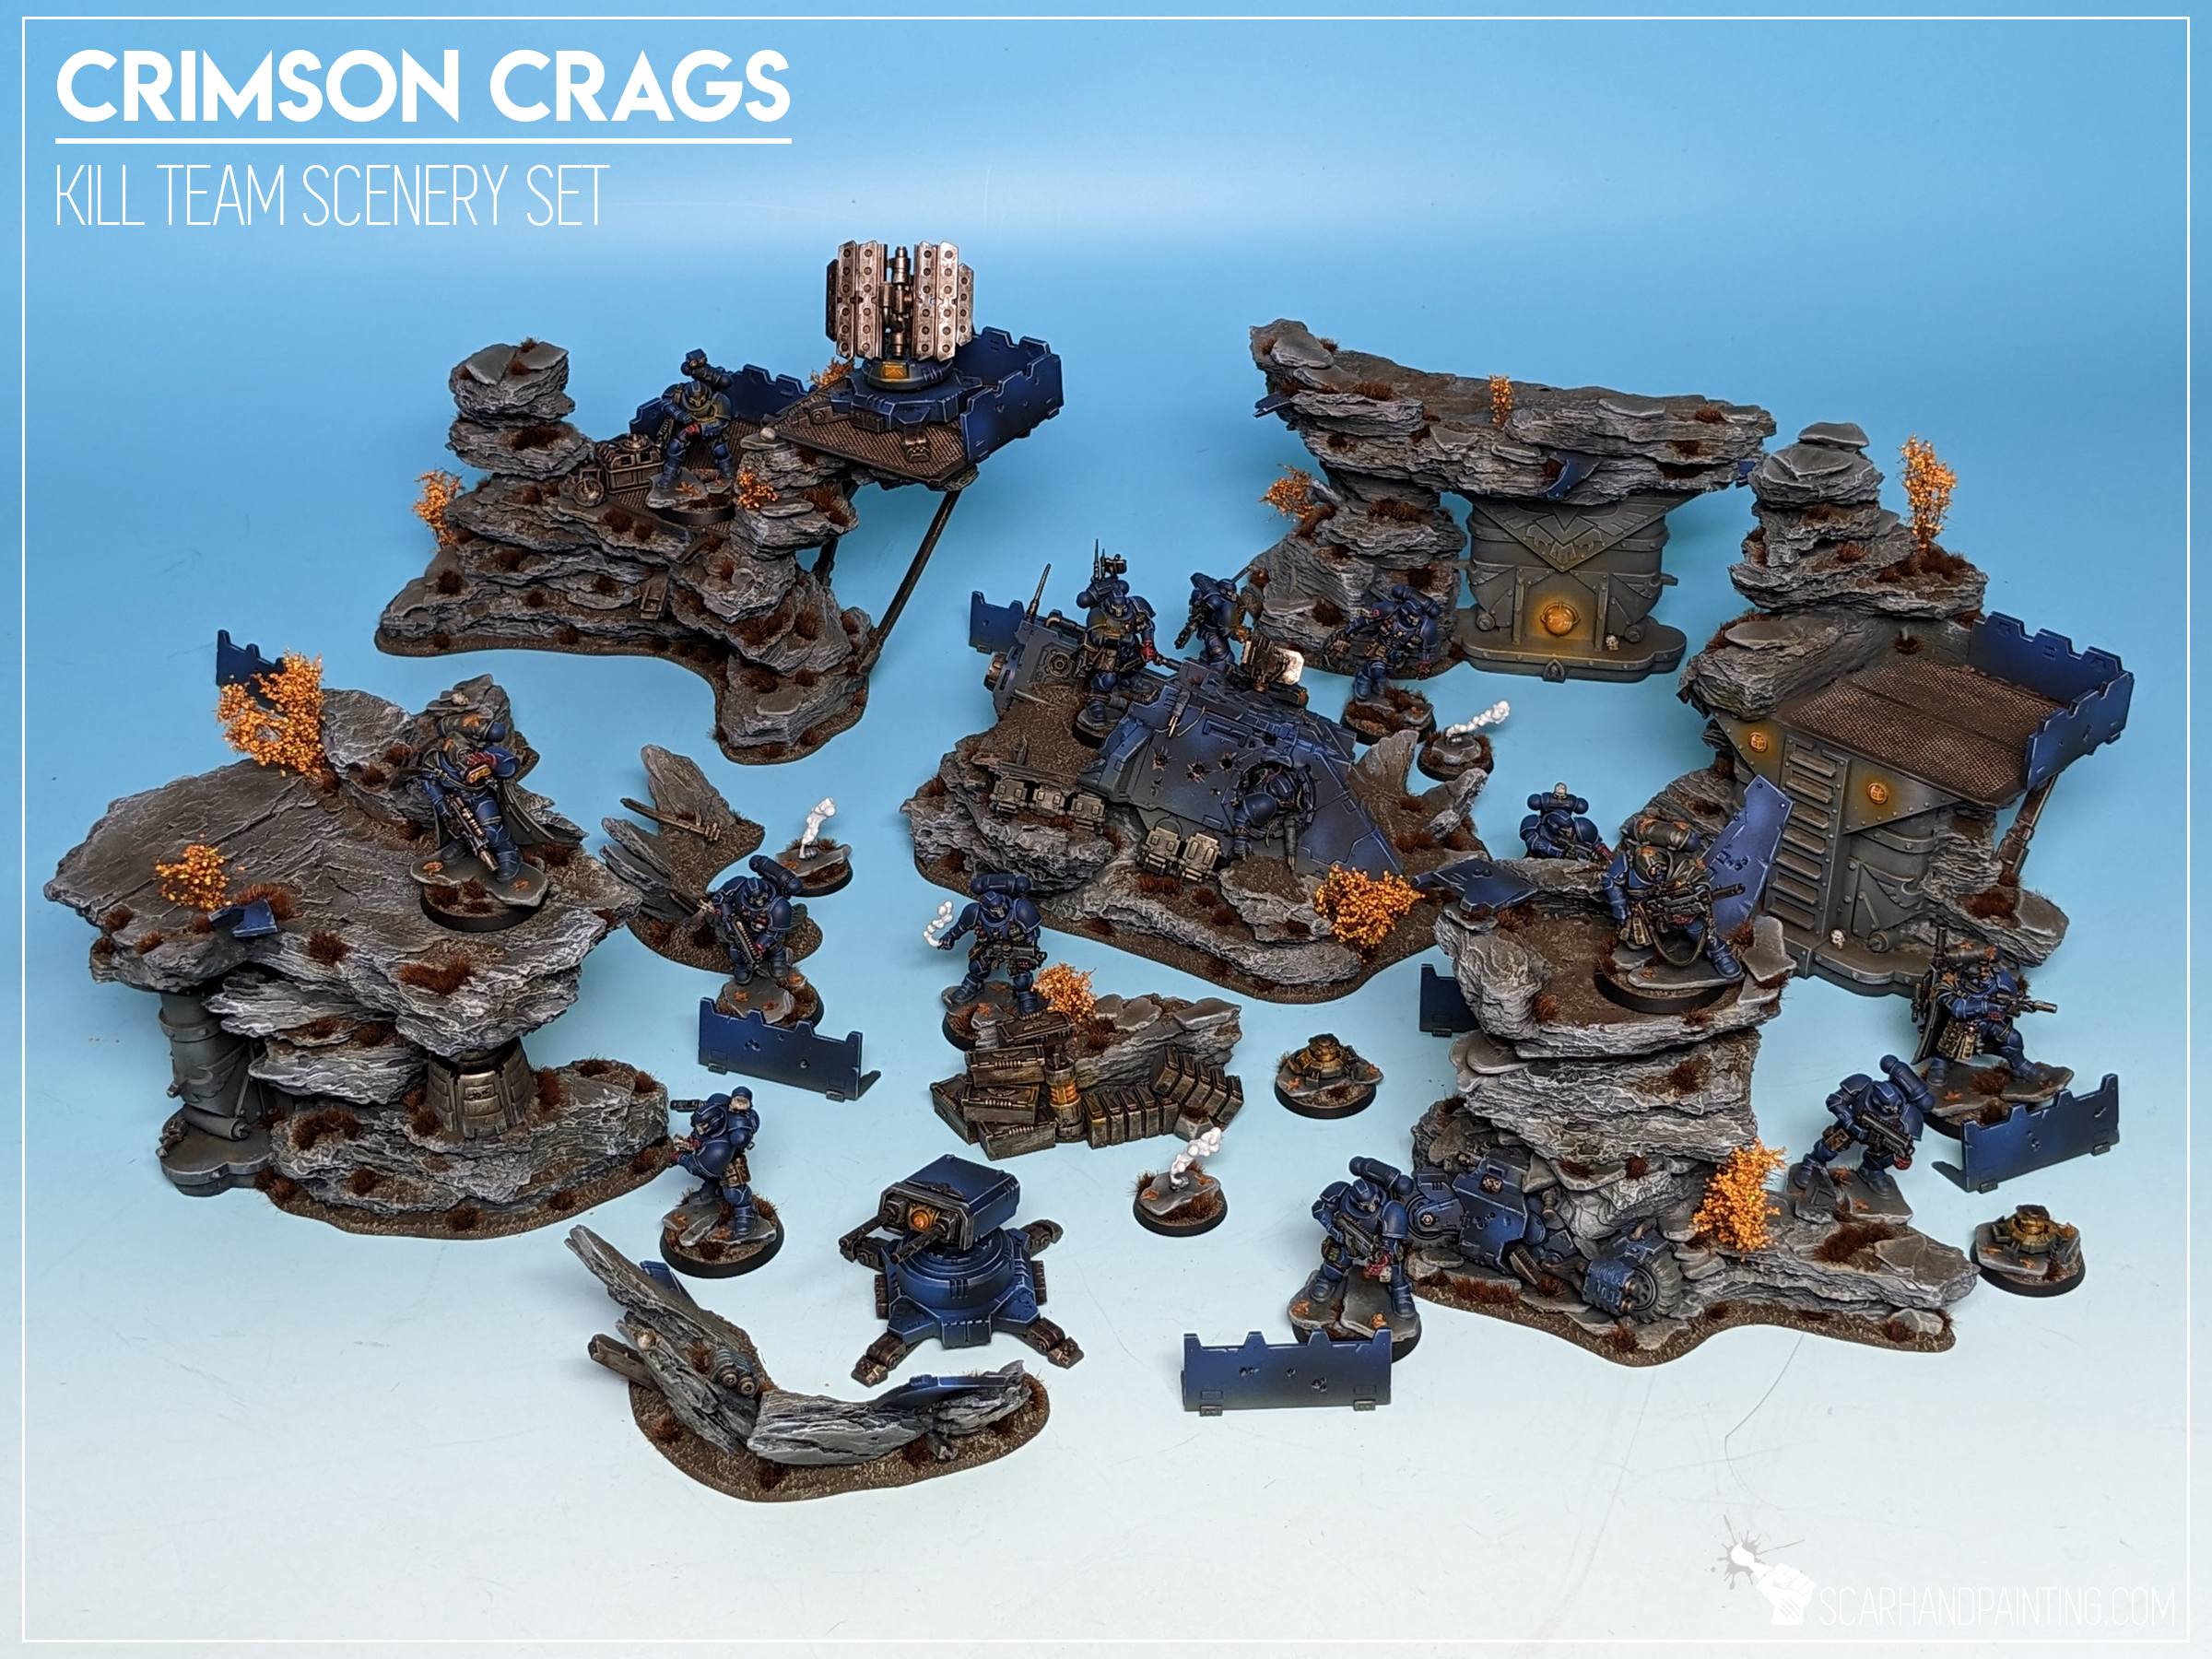
The “Crimson Crags” is a name of a self designed Warhammer 40,000/Kill Team scenery setting themed around my Crimson Fists Astartes collection. The idea behind the setting is reinforced rocky ravines ravaged by war. You can see more examples of the scenery and basing in the Killzone Crimson Crags gallery. I have already covered painting Crimson Fists and modeling the scenery in previous hobby articles. Now is time to present to you the basing.
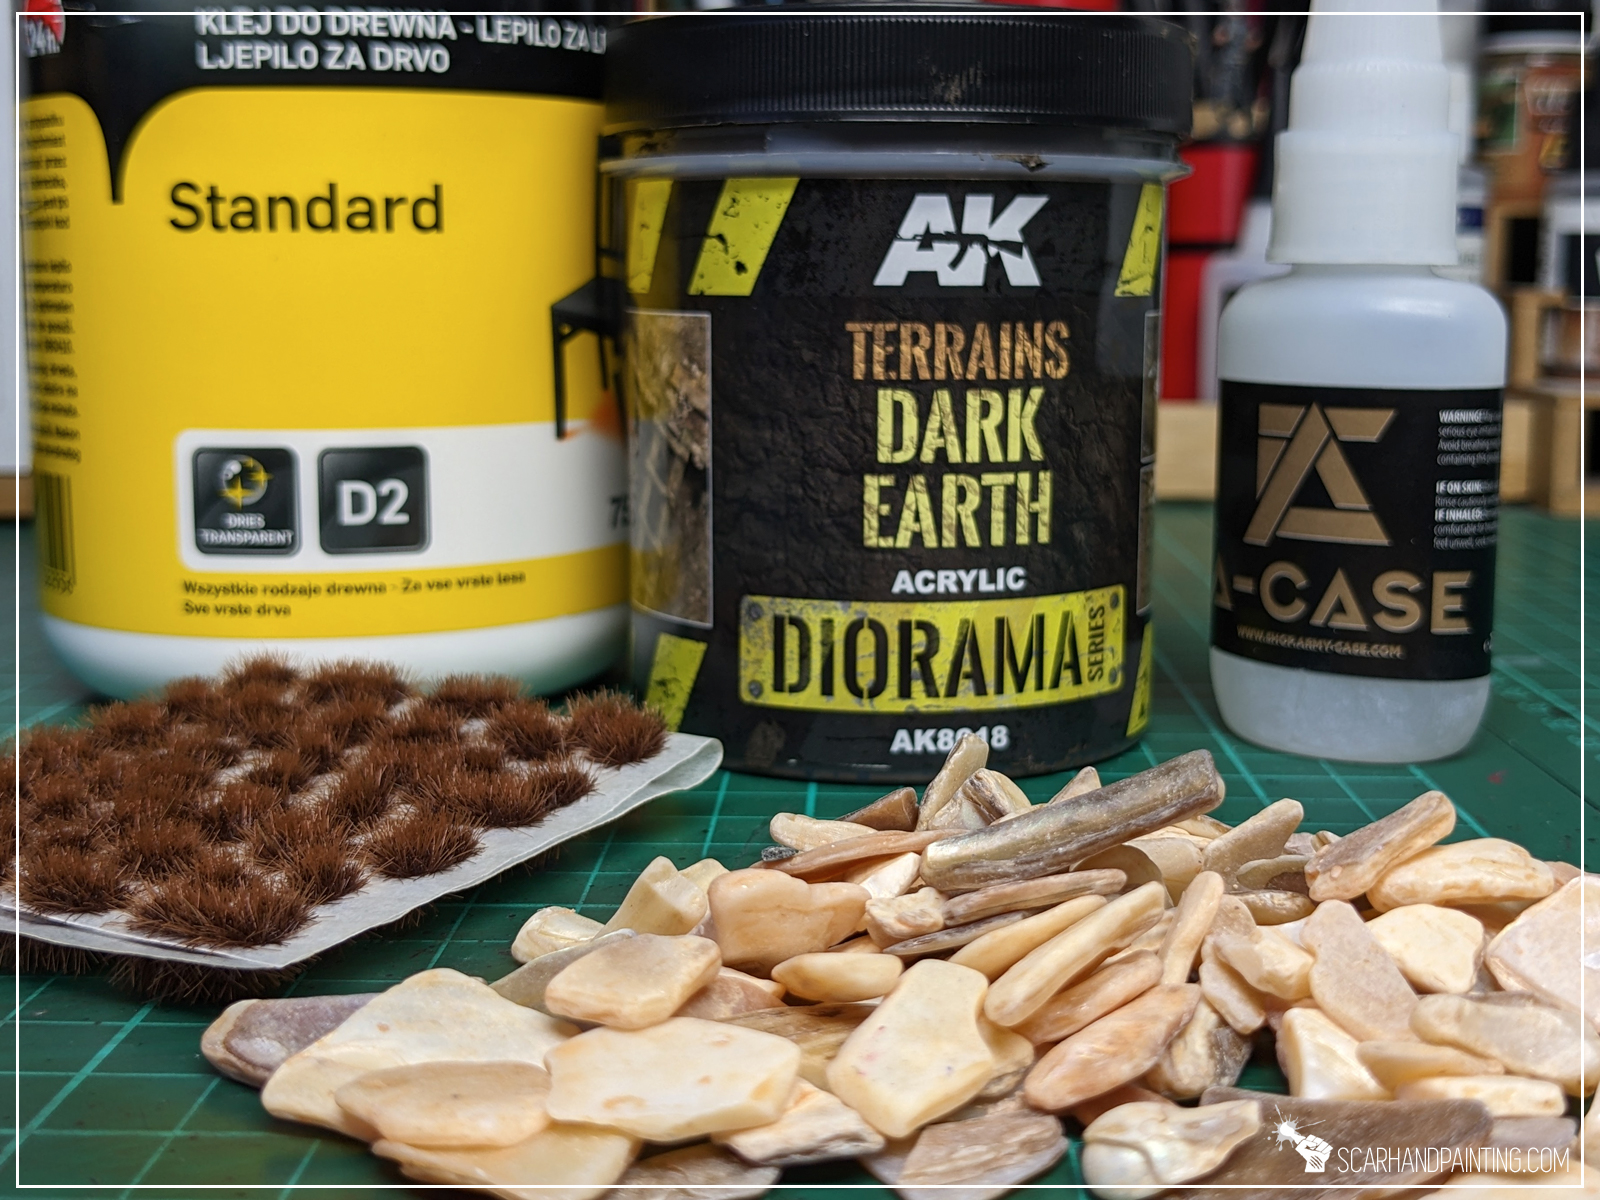
For this tutorial I will be using:
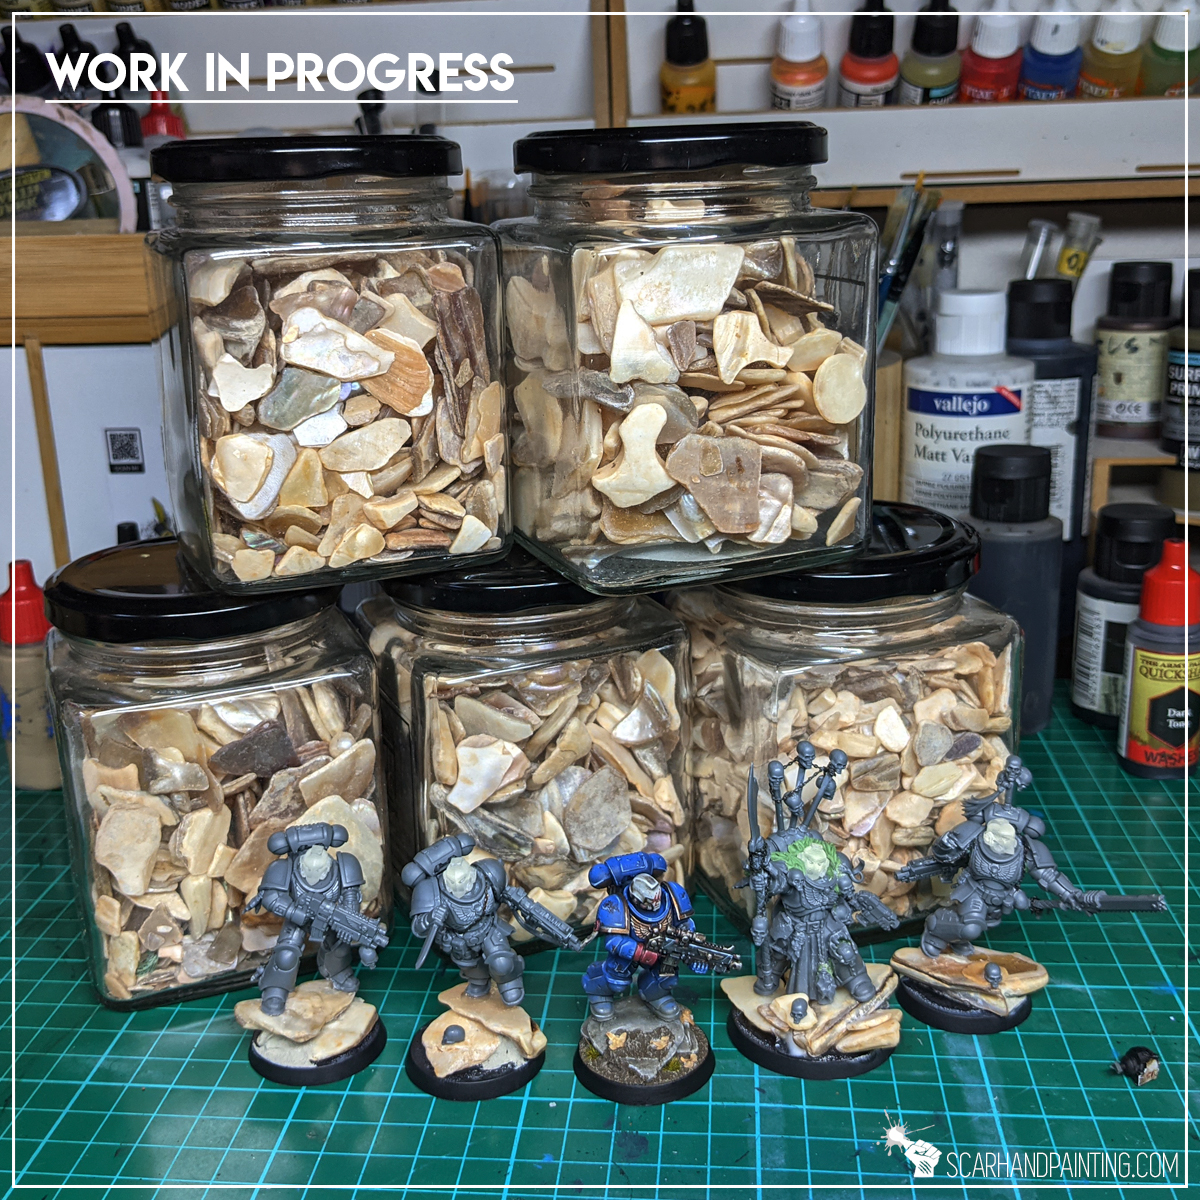
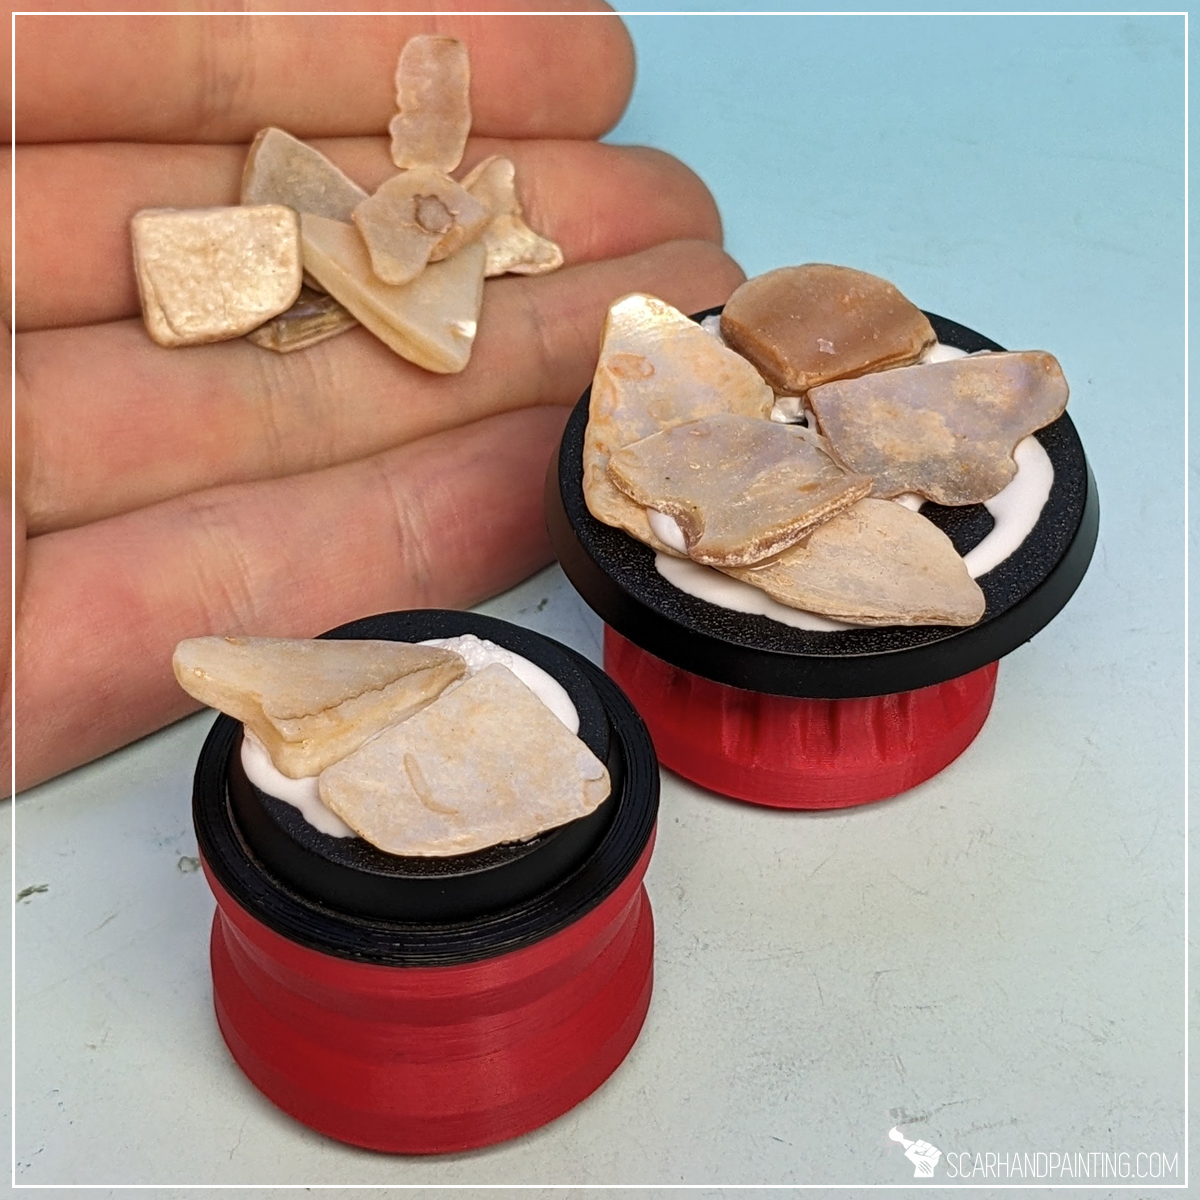
Let’s get it out of the way – yes, I am using natural stones. I like to have my miniatures heavy and stable on the board, plus trying to imitate the effect with self made elements would be rather time consuming. These particular stones are something I’m being asked about a lot, so here’s what I can tell you about them. The stones I’m using are regular decoration gravel from construction/home/garden stores. They are sold in small packages for about 1-2€. Unfortunately I do not know the professional name for this kind of stone, but am sure you will find similar stuff in either Ikea, or other home/garden stores. Below an old pic for reference.
Rocks out of the way, let’s rock! (You see what I did there?).
The modeling process is pretty straightforward, starting with base rock formation, after which the miniatures are mounted on top, everything gets undercoated then painted. Lastly the second part of modeling kicks in with textures and finishing touches.

Step one: Rock formation
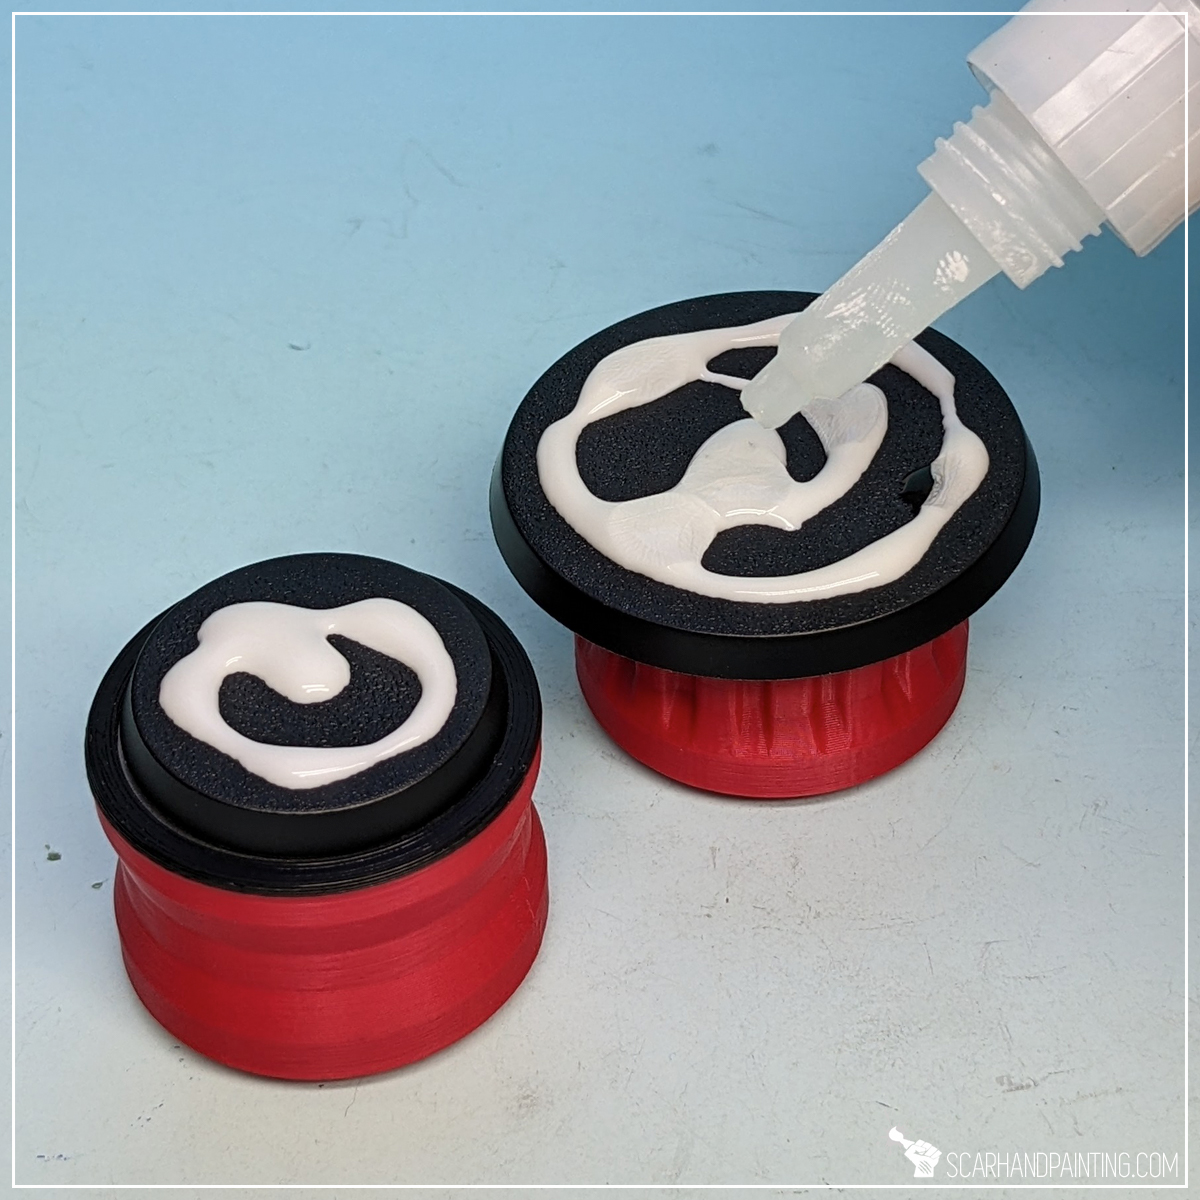
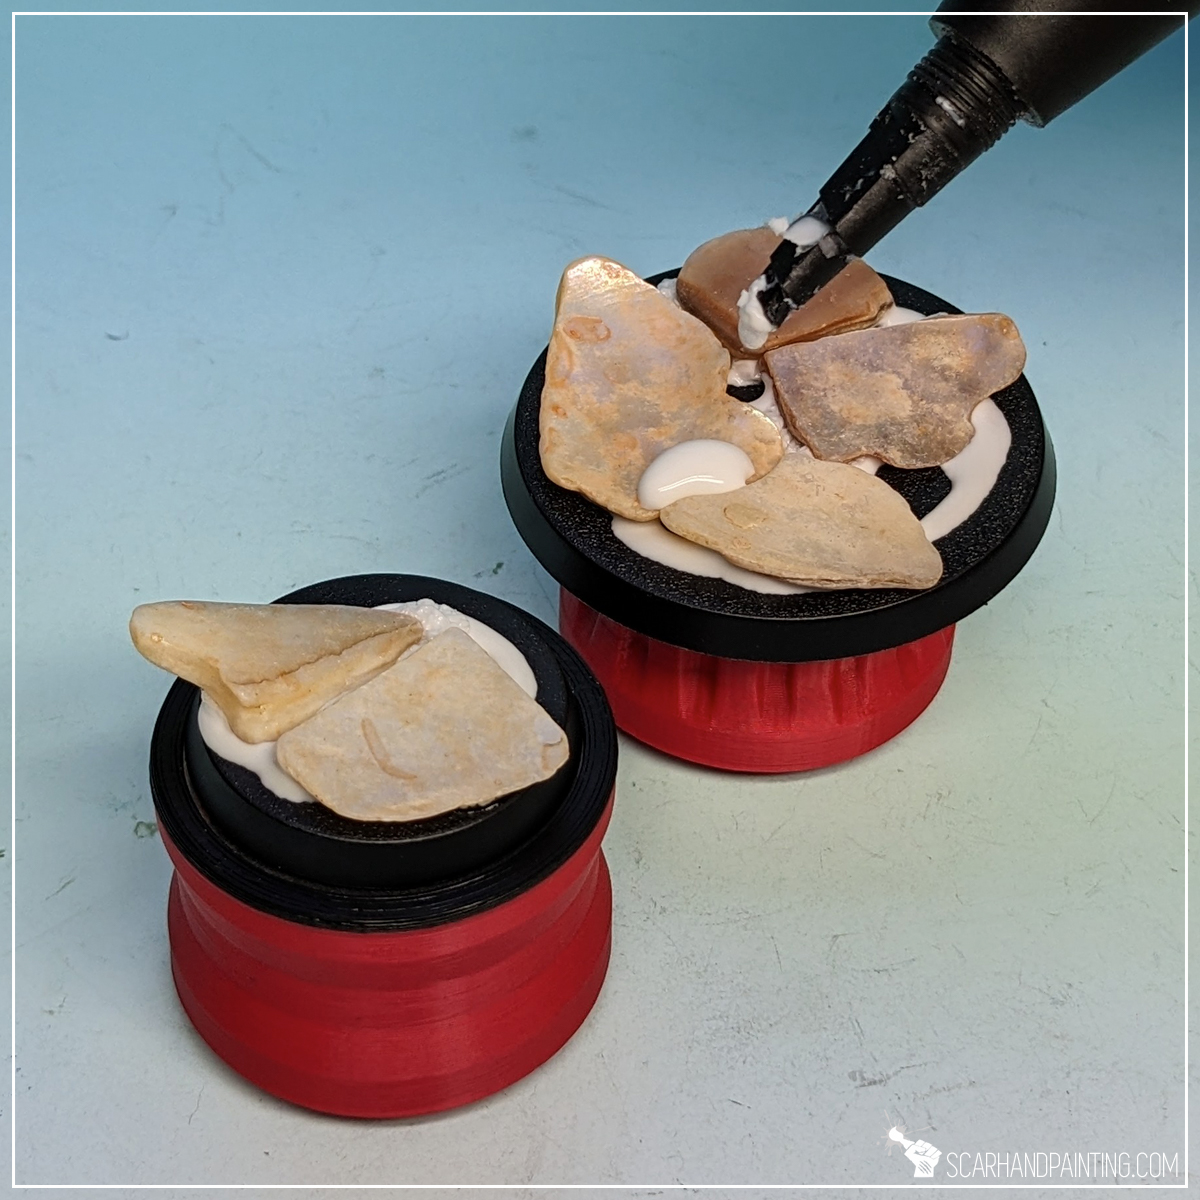
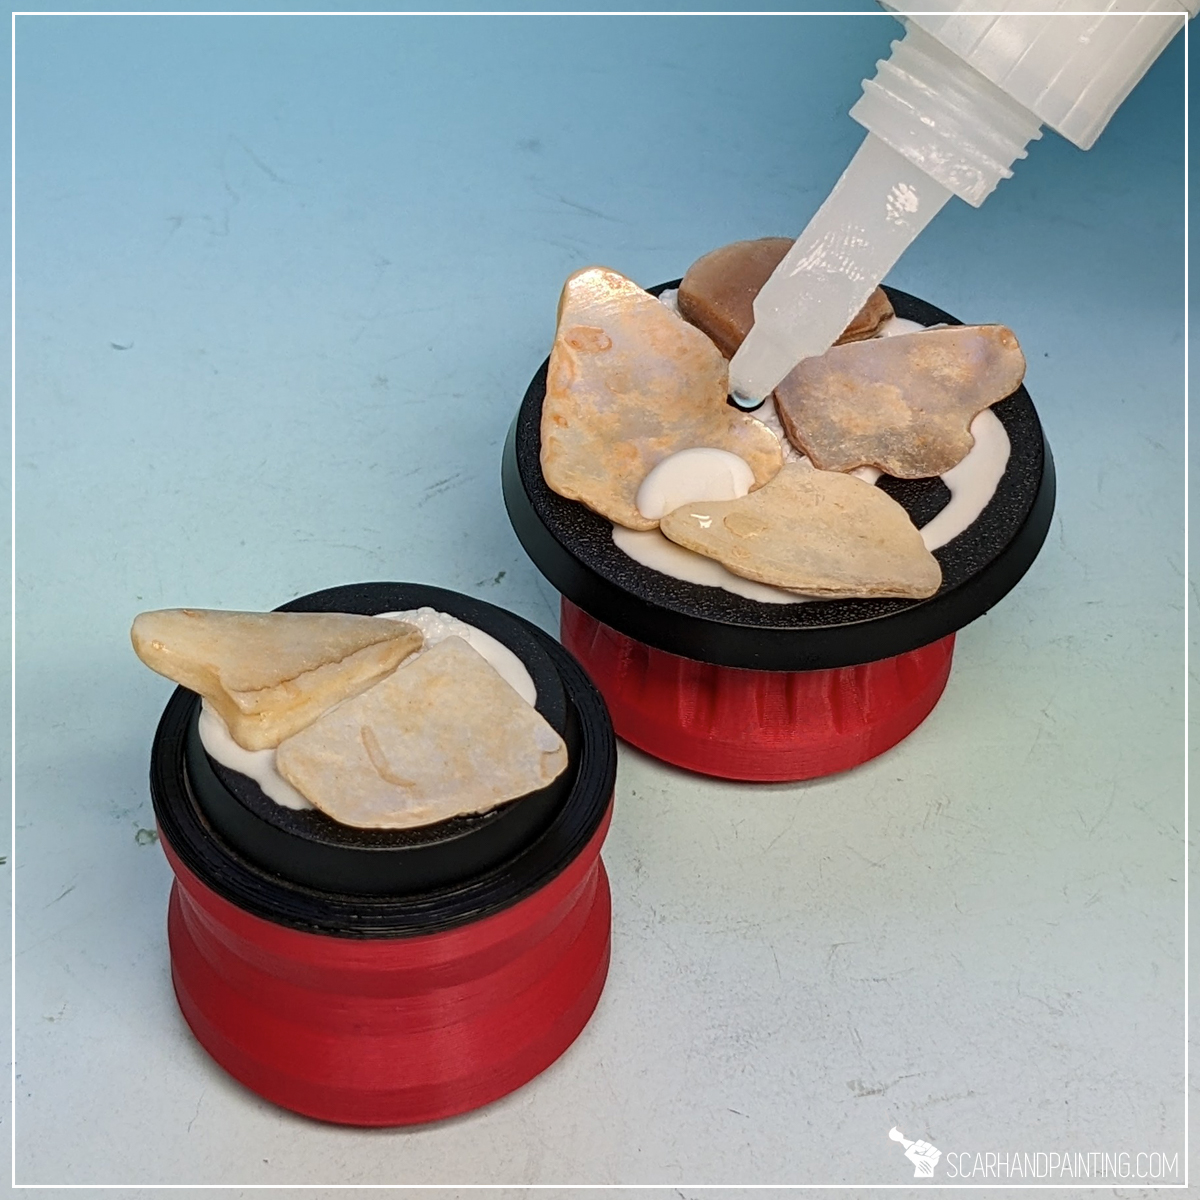
I started by applying PVA glue on top of the base. There’s no need to keep this one smooth – a clumsy random layer will suffice. Next I applied few drops of super glue on top. Finally I put few flat stones on top. Both glues mixed under preassure, filling most gaps between the stones and keeping them in place.

Step two: Increased Volume
Depending on the size and future assignment of the base I sometimes add volume to the rock formation. Some miniatures have one leg slightly raised, or I just want to get a more dynamic posing for my Astartes characters. Having that in mind I applied a drop of PVA glue followed by a drop of super glue and added another stone on top.
Step three: Undercoat
Once the mix of glue dried up nicely I moved to undercoating. This was done with a smooth layer of Citadel Chaos Black spray primer.
Step four: Base Color
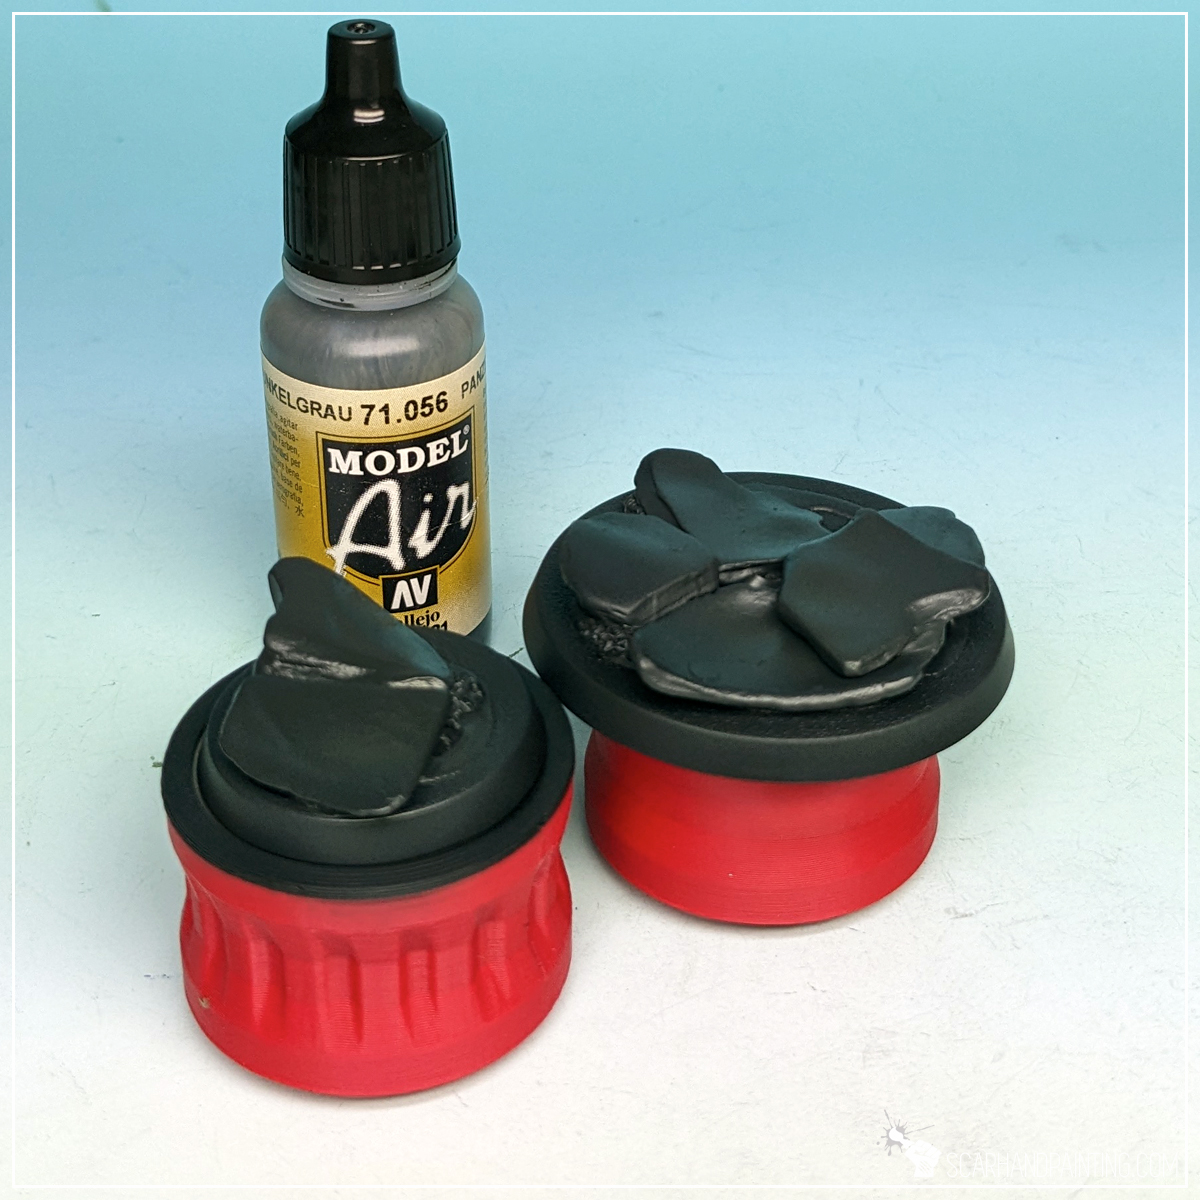
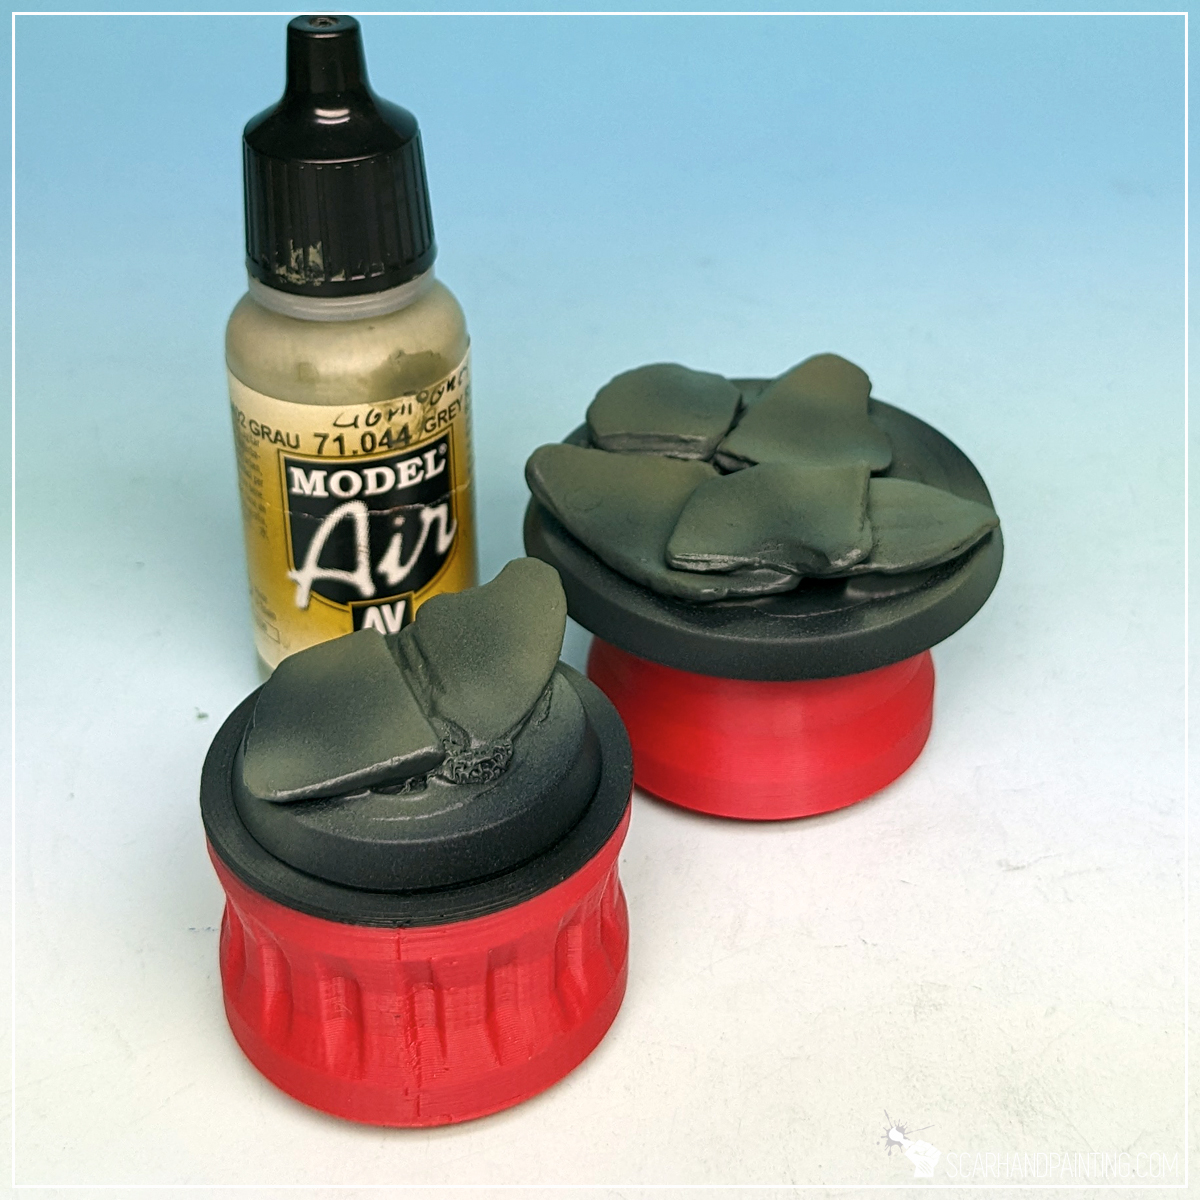
I started painting by airbrushing a strong layer of Vallejo Panzer Dark Grey (air), straight from the pot. I then applied a slightly thinned Vallejo Light Grey Green (air), followed by Vallejo Cold Grey (air). In both cases I tried to reduce the area of paint to add color differentiation.

Step five: Highlights
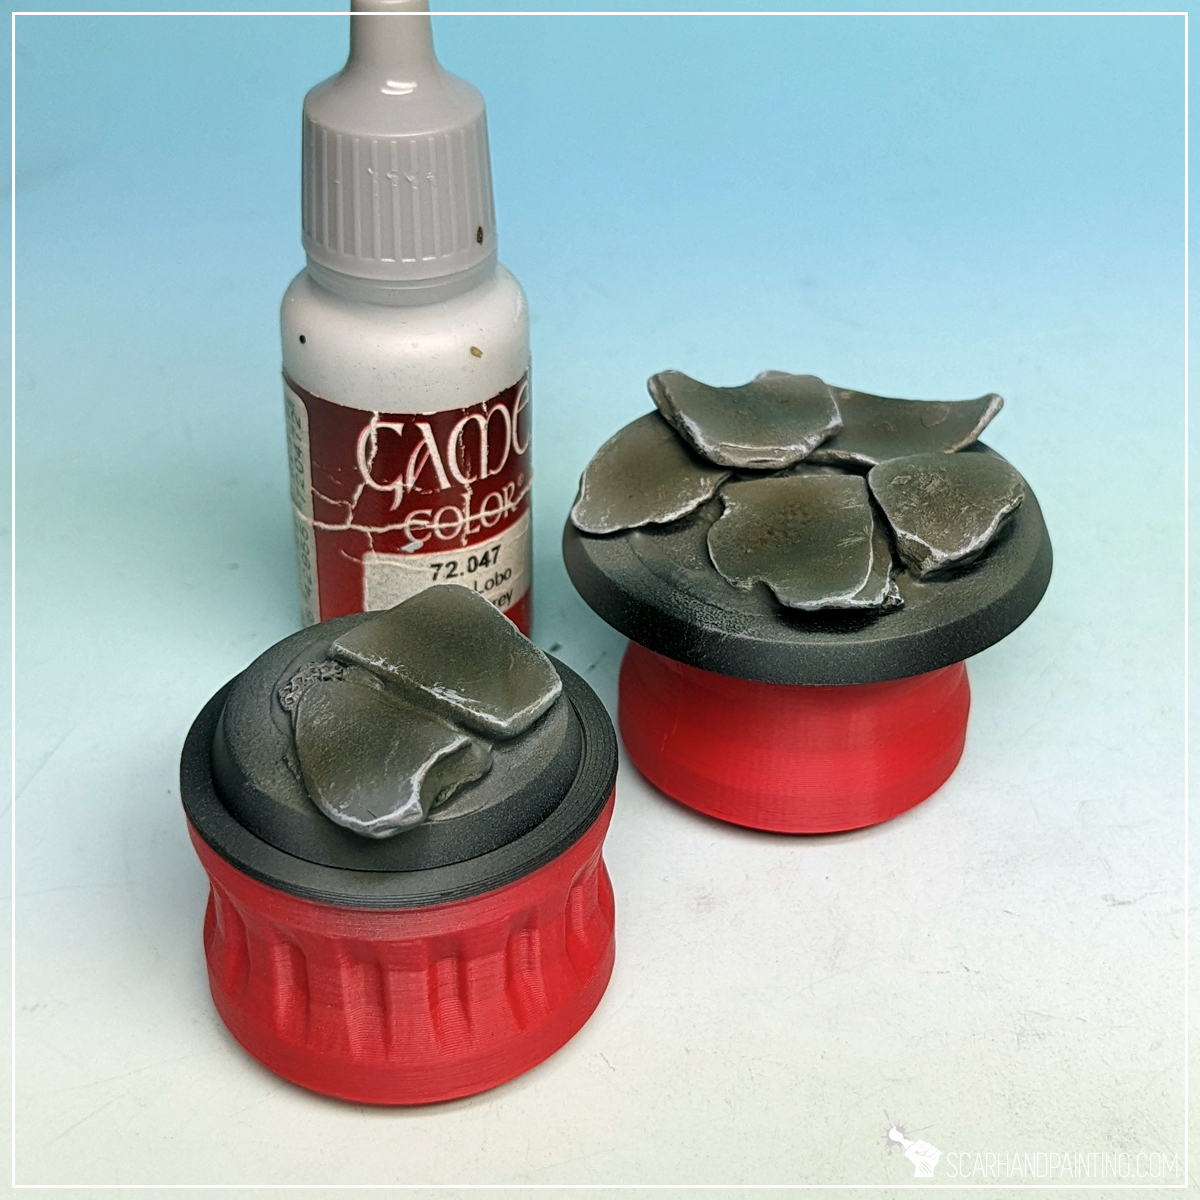
Next I applied a drybrush of Vallejo Medium Sea Grey all over the bases, followed by edge drybrush of Vallejo Wolf Grey. Finally I softly airbrushed Army Painted Strong Tone Quickshade onto the middle points of each individual stone on the base, and slightly around. All of this to add more visual volume.


Step six: Final Highlighs
I then stippled a bit of Vallejo Wolf Grey on the edges of each individual stone, to make them stand out a bit more.
Step seven: Ground Texture
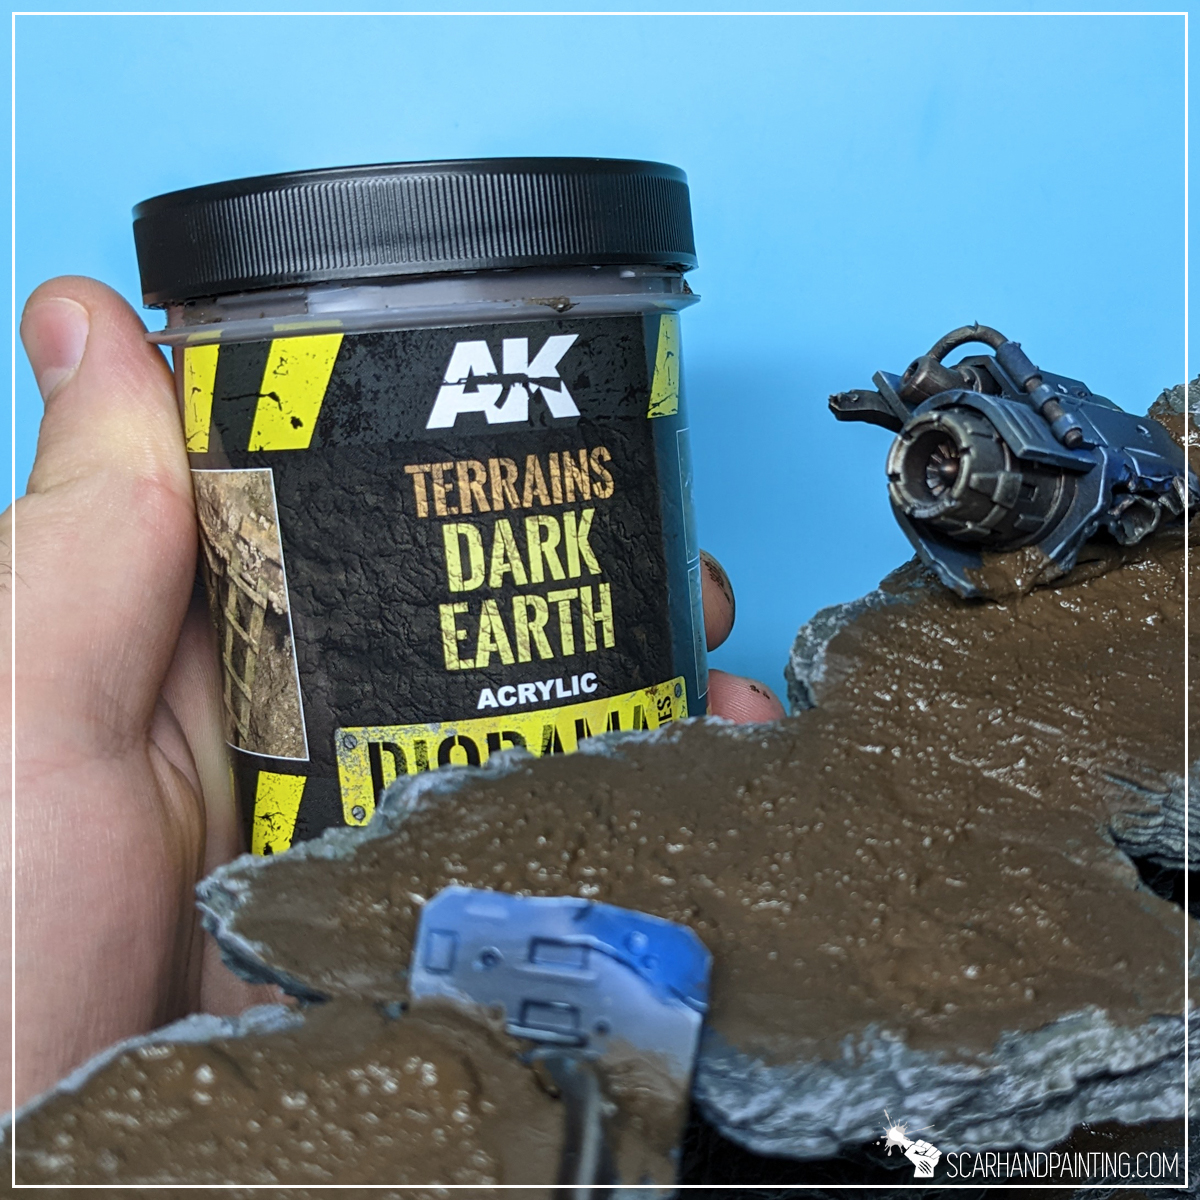
Next I moved to my favorite texture of all time – AK Interactive Dark Earth diorama series that you can learn more about here. I applied a thick layer of the texture, let it dry than drybrushed Citaled Karak Stone on top.

Step eight: Leaves
Then I applied few small drops of super glue and put a Birch tree seed on top of each. Once dry, leaves got painted with Army Painter Soft Tone Quickshade, to add color depth and just some durability.

Step nine: Final Touches
Finally I repainted base’s edges black and airbrushed a strong layer of Vallejo Polyurethane Matt Varnish all over. Job done.
I hope you find this tutorial interesting. Be sure to let me know your thoughts in the comments below, or at Facebook or Instagram. I would also appreciate it if you considered sharing this content with your friends, who might find it useful. Finally if you are looking for a professional miniatures painting service, be sure to contact me with this contact form. I always reply within 24 hours, after which please check out your spam folder.

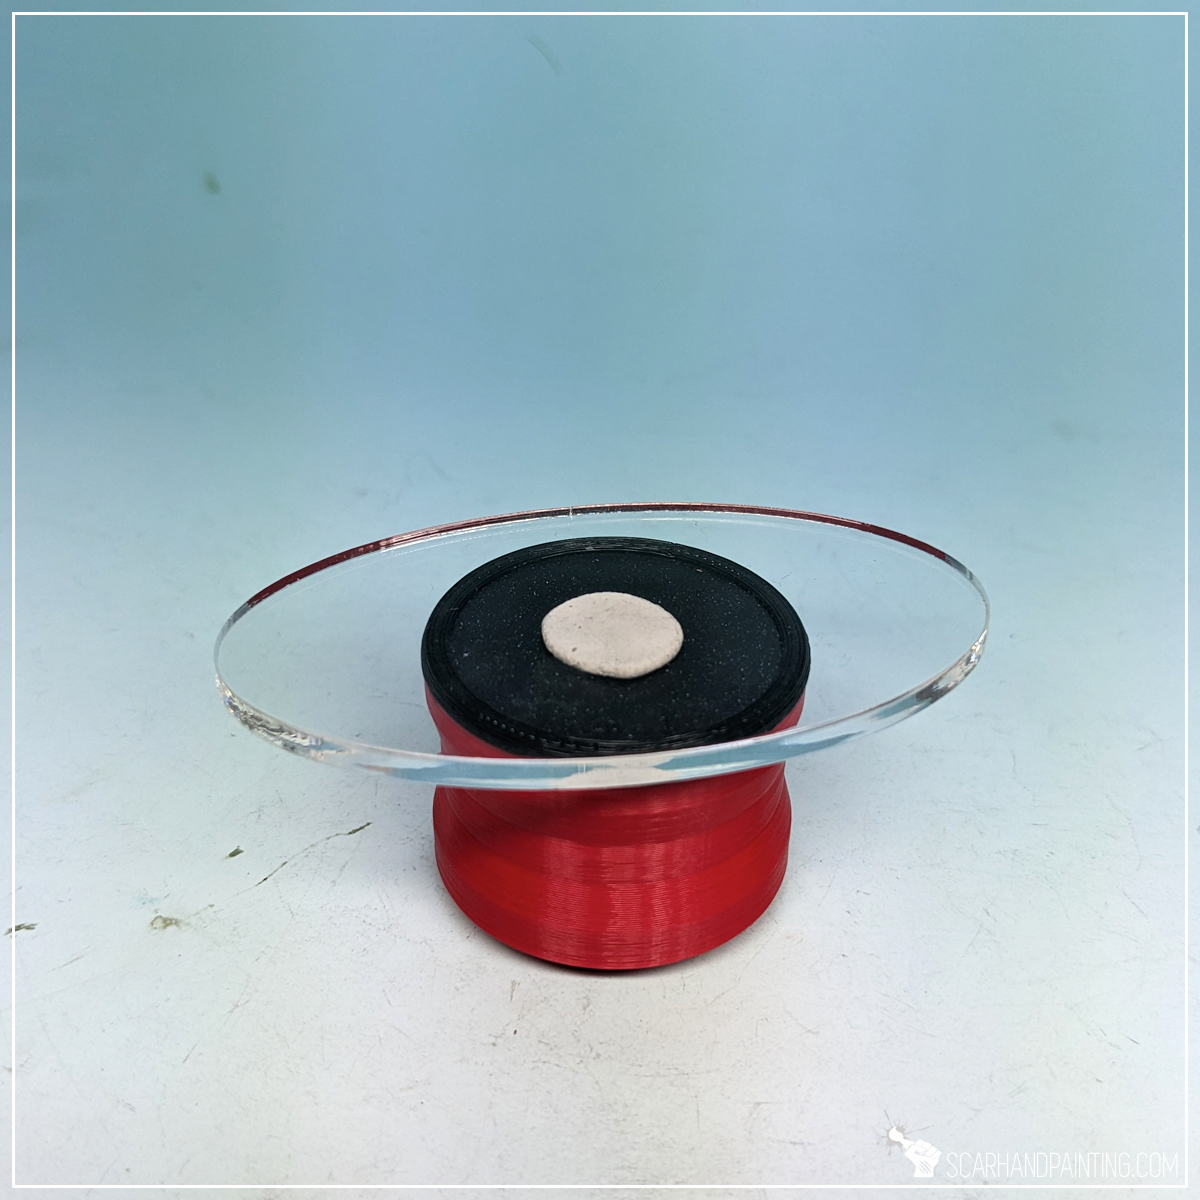
When it comes to spicing up your miniatures naval games, there’s nothing better than nice looking scenery. This is especially true for games full of finely detailed miniatures, such as Kings of War: Armada. Today I would like to take you on a Step-by-step trip through the process of creating and painting an alternative scenery for Armada – the Sargasso. These can be used as either Sandbanks proxy, or as something completely new, as you see fit.
Some notes:

High end materials right from the get go. I do prefer my scenery to be durable and high quality, thus I went with laser cut translucent acrylics. That being said, there’s nothing preventing you from using a cheaper and more accessible material, such as clear plastic – maybe food packaging leftovers, or miniatures blister package? As long as it’s clear and sturdy enough you should be fine with any substitutes.
I started by applying some Citadel Militarum Green Contrast in a random pattern all over the base. I used a large, soft brush and applied few large drops of the paint, then added some more to link them.
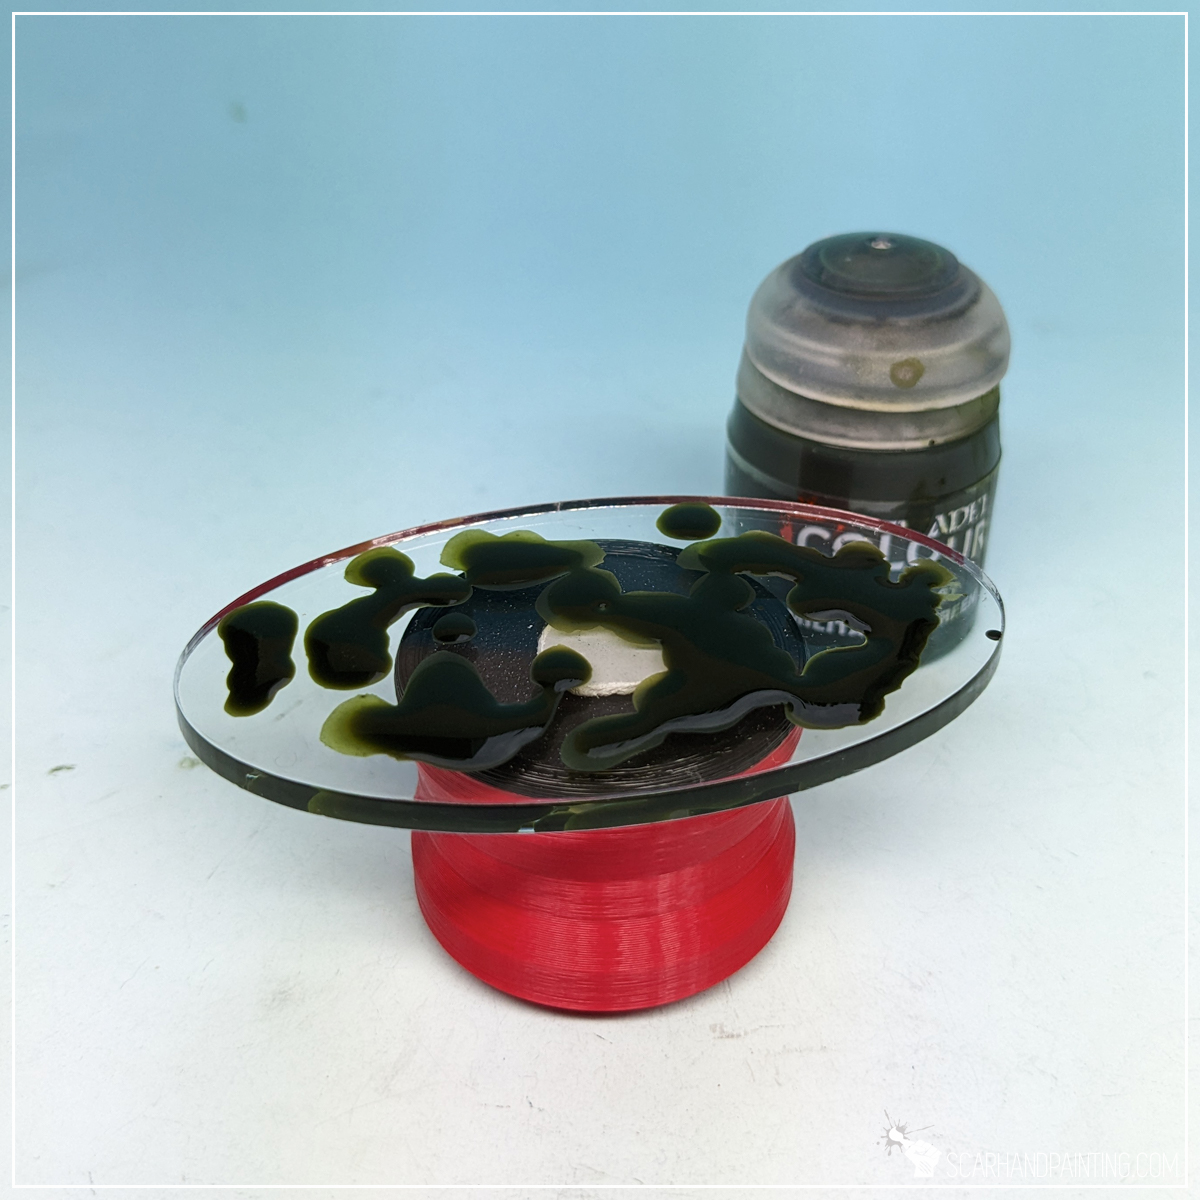
Next I used a large, round brush to stipple Citadel Nurgle’s Rot paint on top of still wet Militarum Green. This was a bit tricky and I used a paper towel to clean the brush very often. The idea is to apply Nurgle’s Rot from the top by touching the previous layer, bot not smear nor mix the two paints too much.
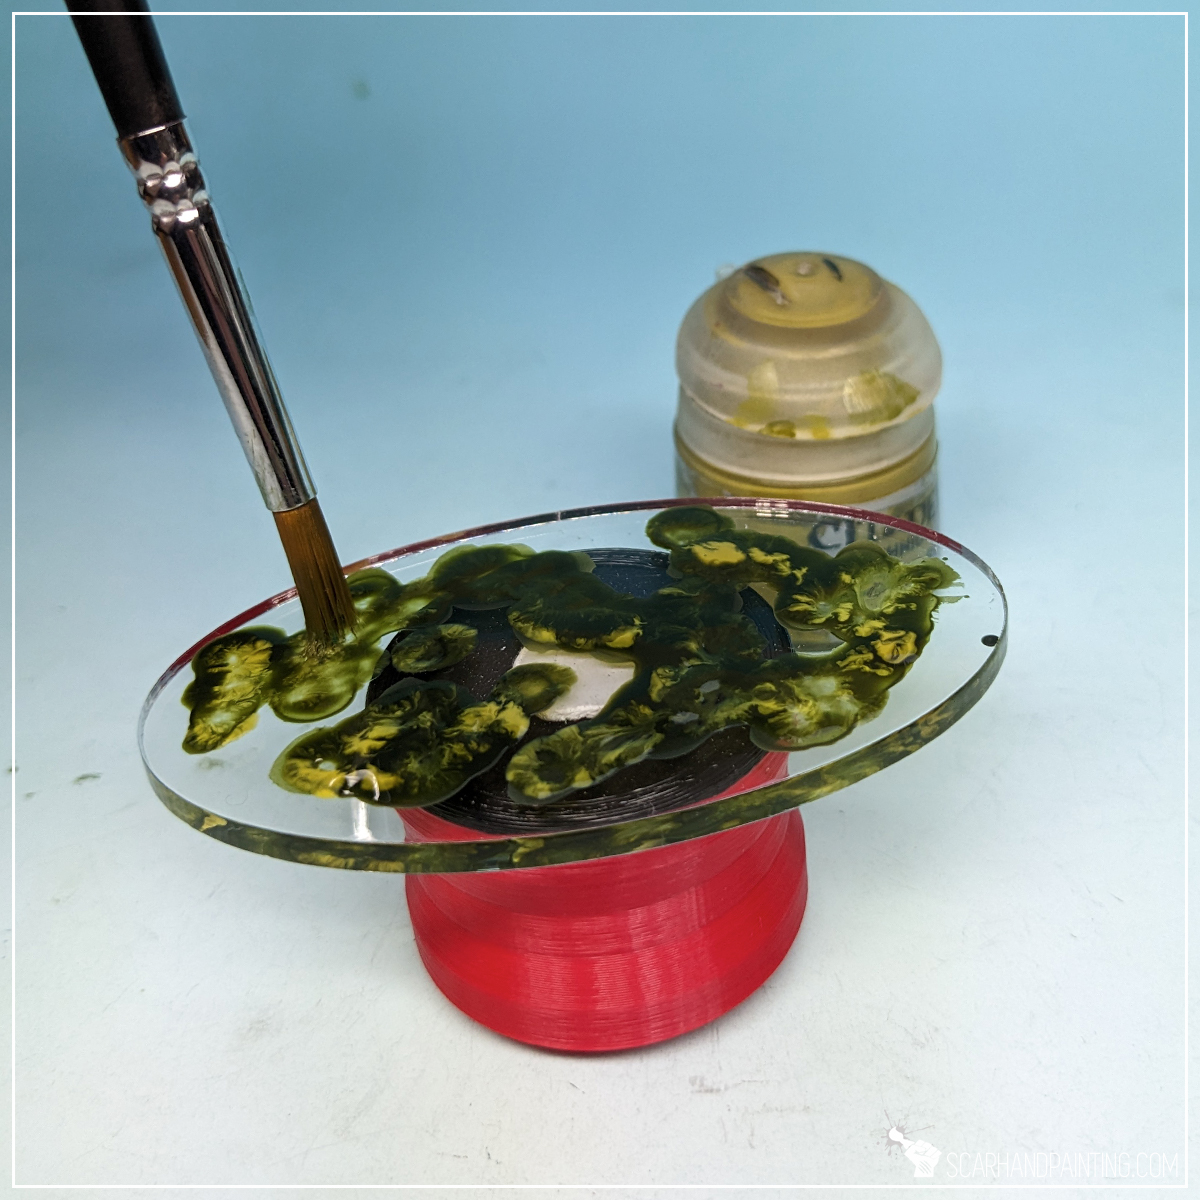
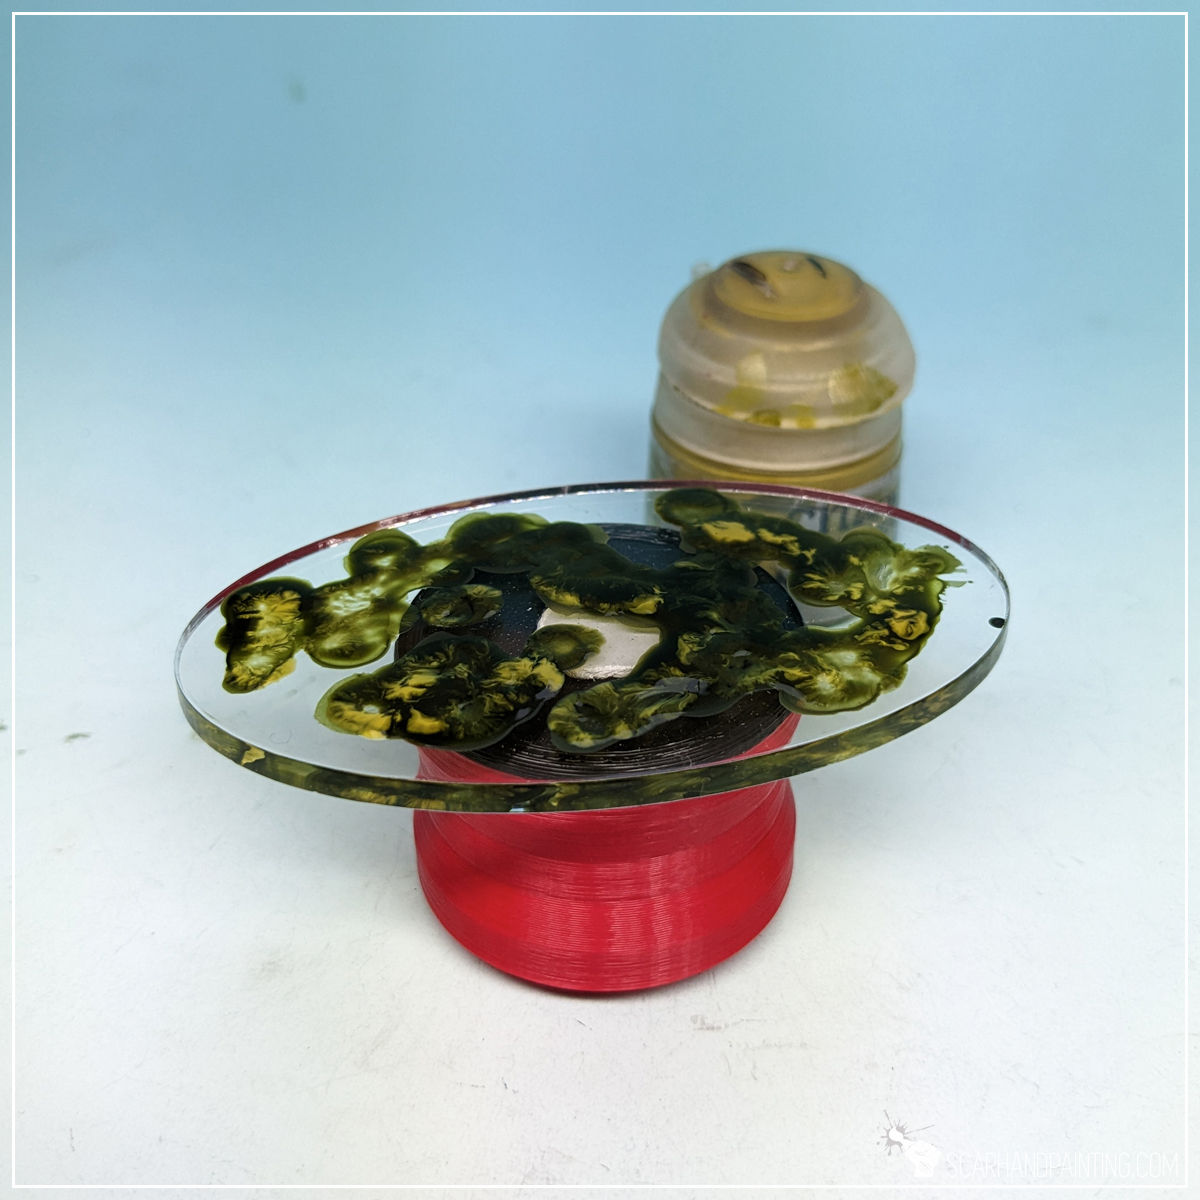

Once the paint dried I decided to add more live to the mix. Using a large, round synthetic brush with a flat tip I stippled wet Vallejo Heavy Khaki paint all over the previous layer.

Next I applied a thick layer of AK Interactive Pacific Blue. I usually go with Atlantic Blue instead, but this time I aimed at a brighter, more translucent effect.

Finally I applied few lines of AK Interactive Water Foam texture. I then used a clean synthetic, flat tip brush to reduce volume and shape thin waves.


And that is basically all. Sargasso, Seaweed, alternative Sandbanks or some sort of awesome new Armada scenery is now complete.

I hope you find this tutorial interesting. Be sure to let me know your thoughts in the comments below or via Facebook or Instagram. I would also appreciate if you considered sharing this content with your friends, who might find it useful. Finally if you are looking for a professional miniatures painting service, be sure to contact me with this contact form. I always reply within 24 hours, after which please check out your spam folder.
One of the most exciting parts of Warhammer hobby is playing games on awesome looking scenery sets. Still not all of us can afford high end scenery outright, as usually the miniatures comes first. Fortunately a top tier looking scenery is not that difficult and time consuming to make from scratch as it might seem. On top of that it’s much cheaper than most hobbyists can even imagine!
In this article I will present to you an easy way to make highly detailed rock formation perfect for anything Warhammer and many other miniatures wargames as can be seen in Crimson Crags Gallery.
Some notes:
The Basics:
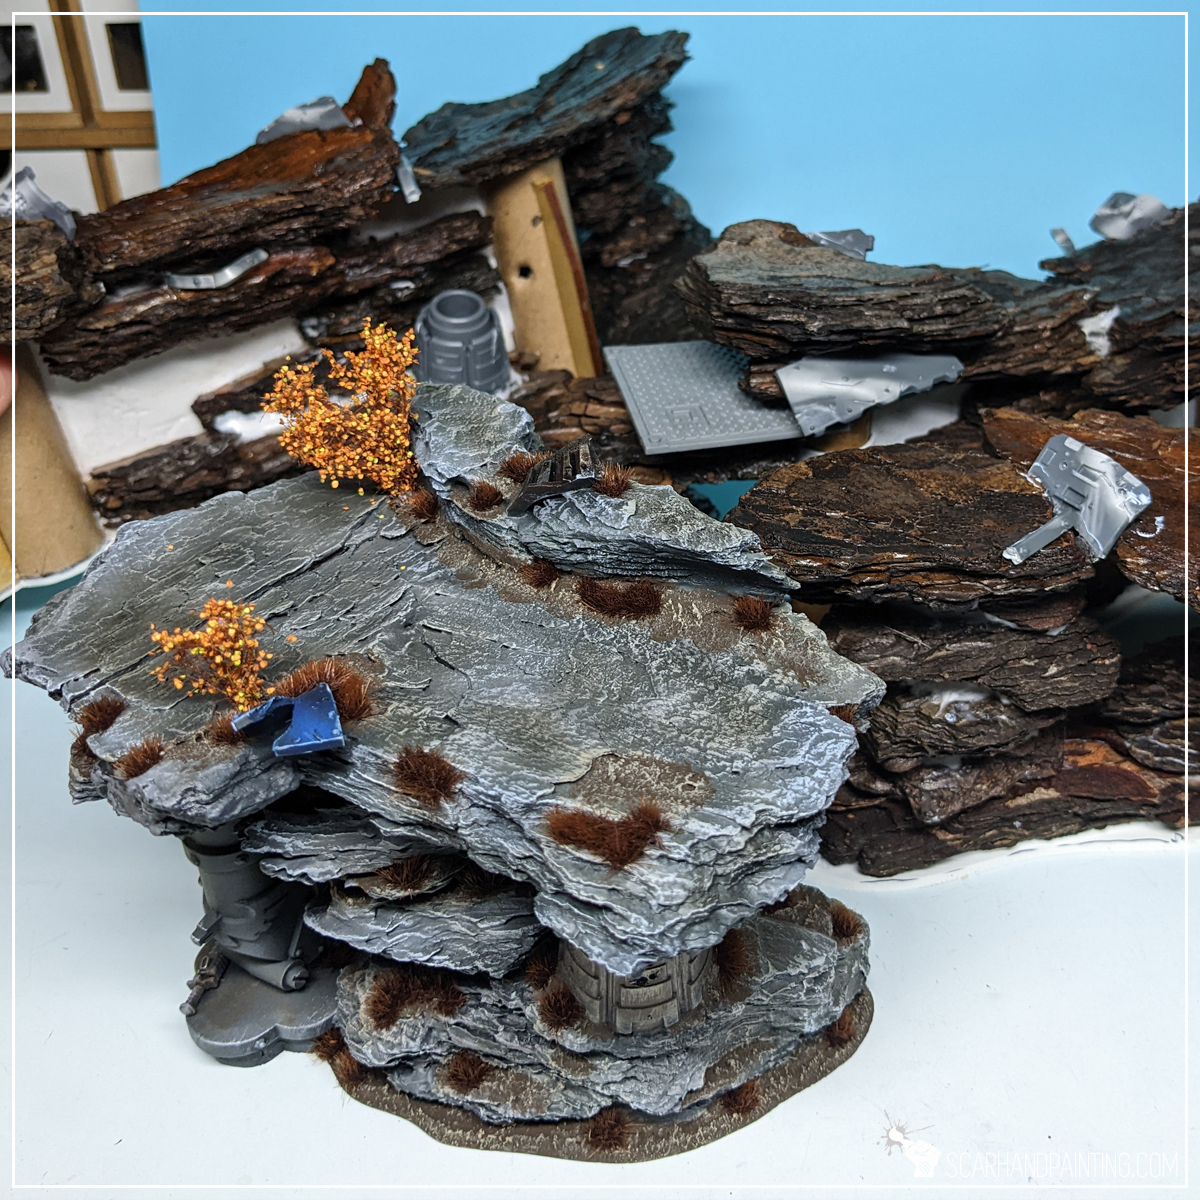
When making miniatures scenery with looks in mind a detailed texture and interesting shapes are usually my go to. These can be difficult to come by and might require a purchase of existing sets, but not in case of rocky formations. Fortunately for our wallets nature have come up with the best source of awesome looking, house budget friendly miniature rocks – Tree Bark. Unless you’re living on the North Pole there should be some sort of trees around. Bark, being the main source of shapes and textures, can be used as the main bulk of miniature rocky scenery, providing an abundance of layers to surround focus points with. This is why for the purpose of this tutorial bark and related know-how will be my main focus.
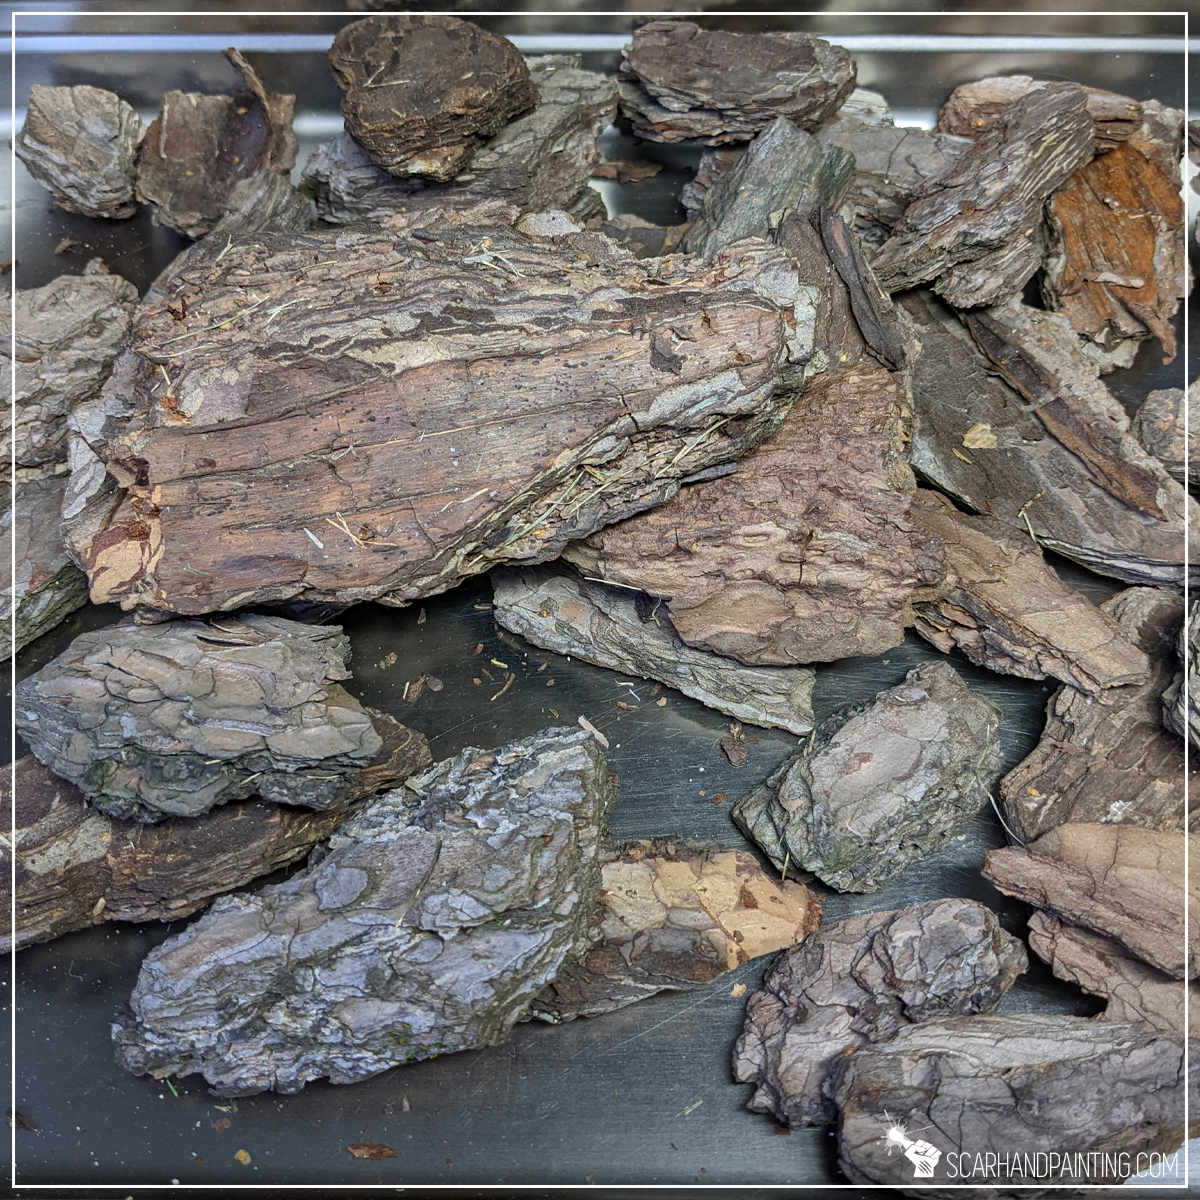

Bark preparation:
Depending on where you live and weather bark might come wet and dirty. In my case it’s early Autumn, everything is moist and hand picked bark does not cut it without some preparation. Because of that I started by drying bark pieces for about twenty minutes in a stove set to 100* degrees Celsius. Once dry I then brushed any dirt and residue with a hard synthetic brush. This left bark dry, clean and ready to use.
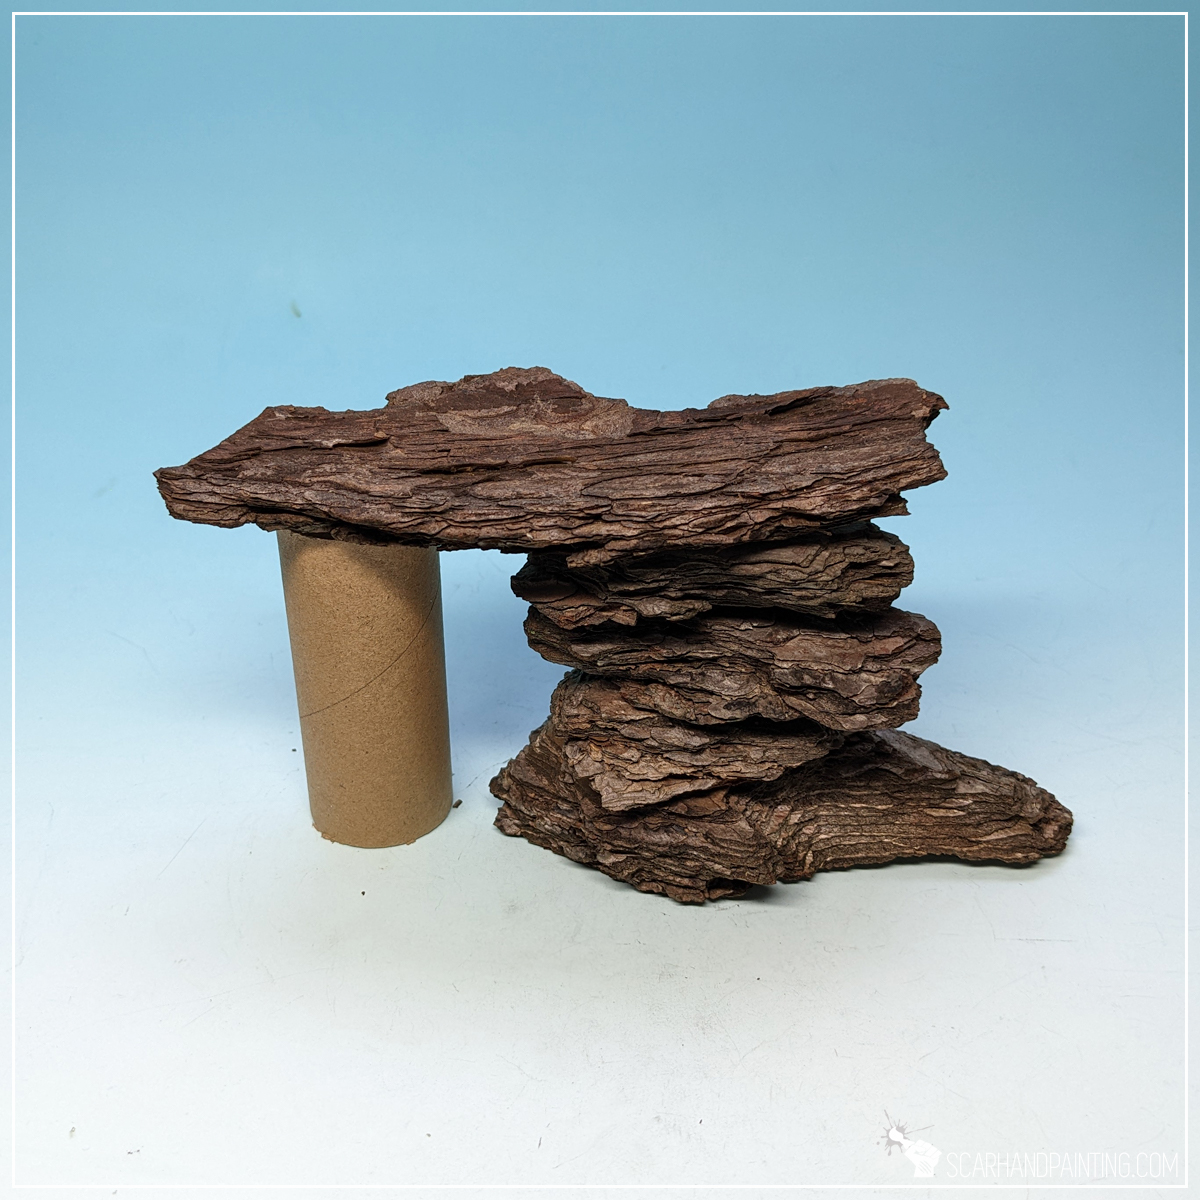
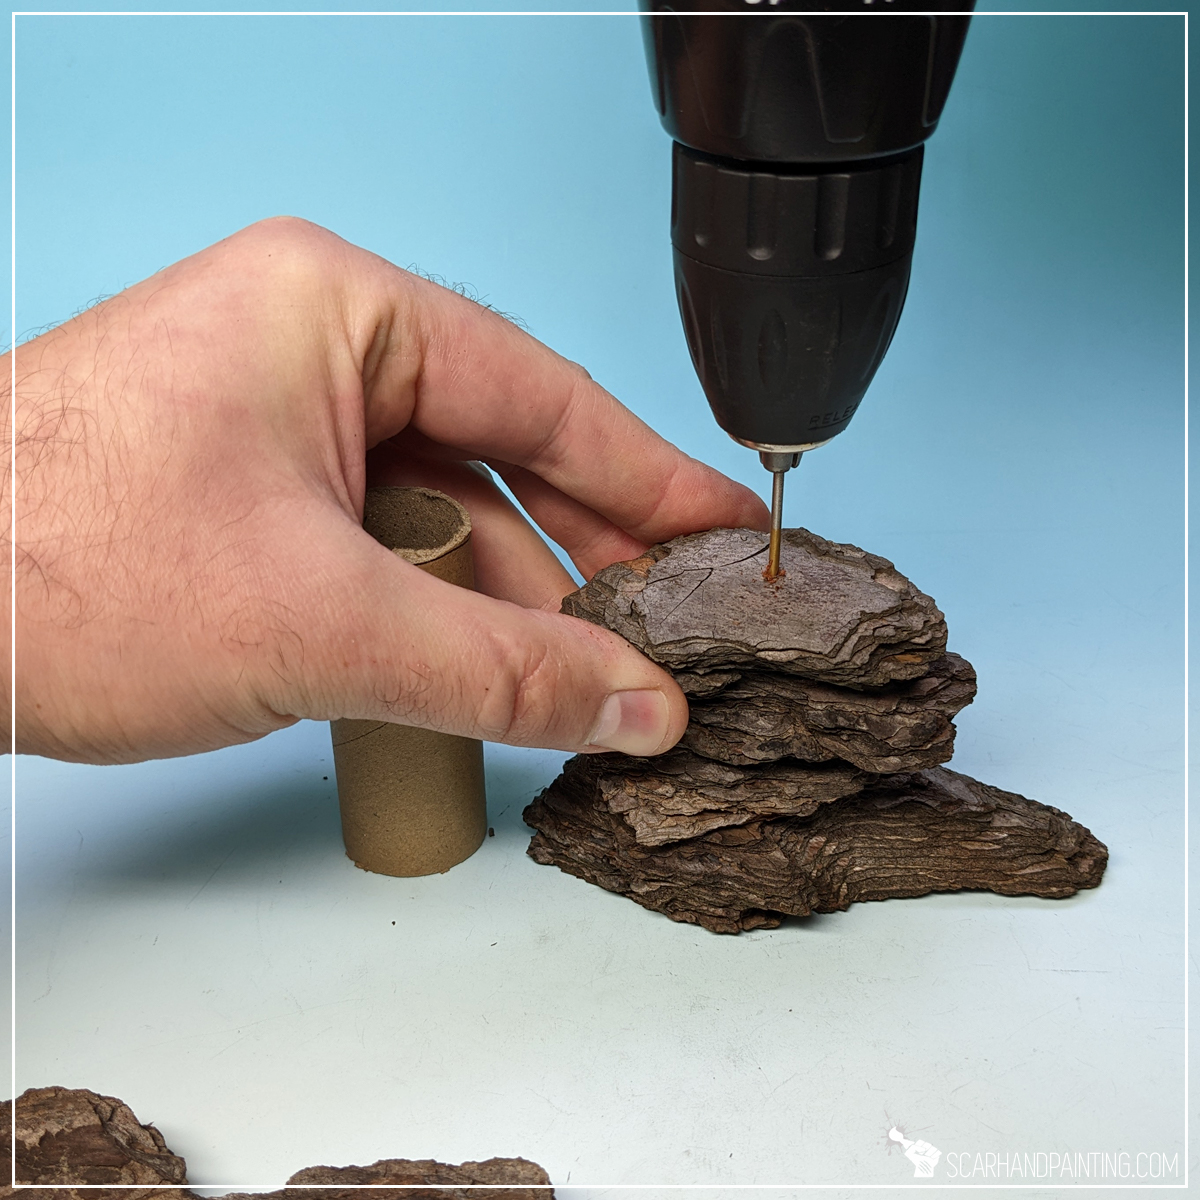
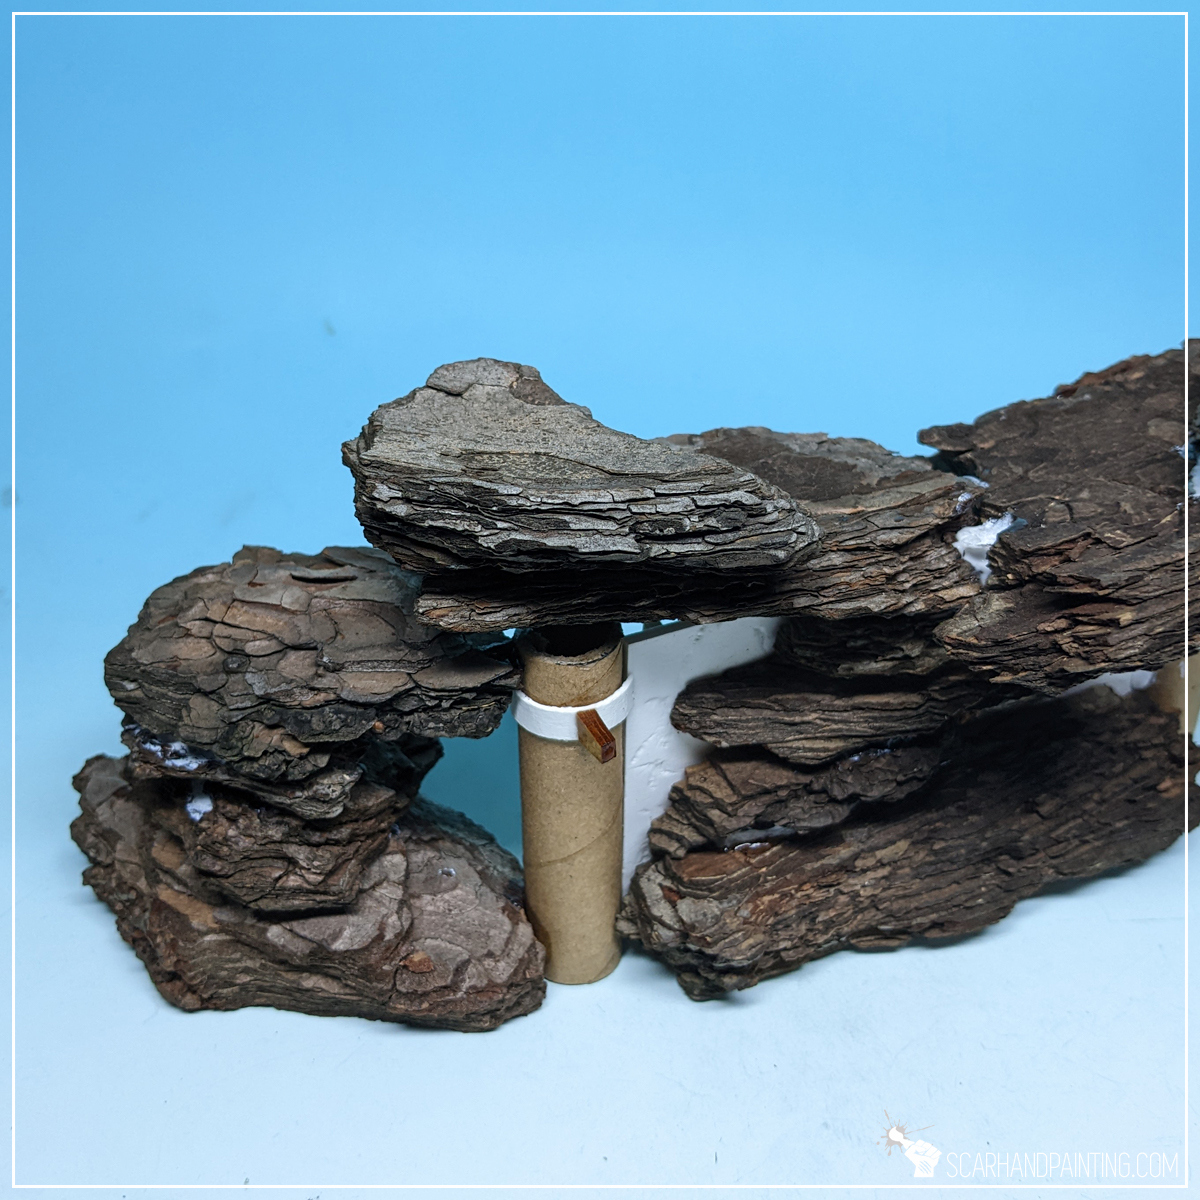
Composition:
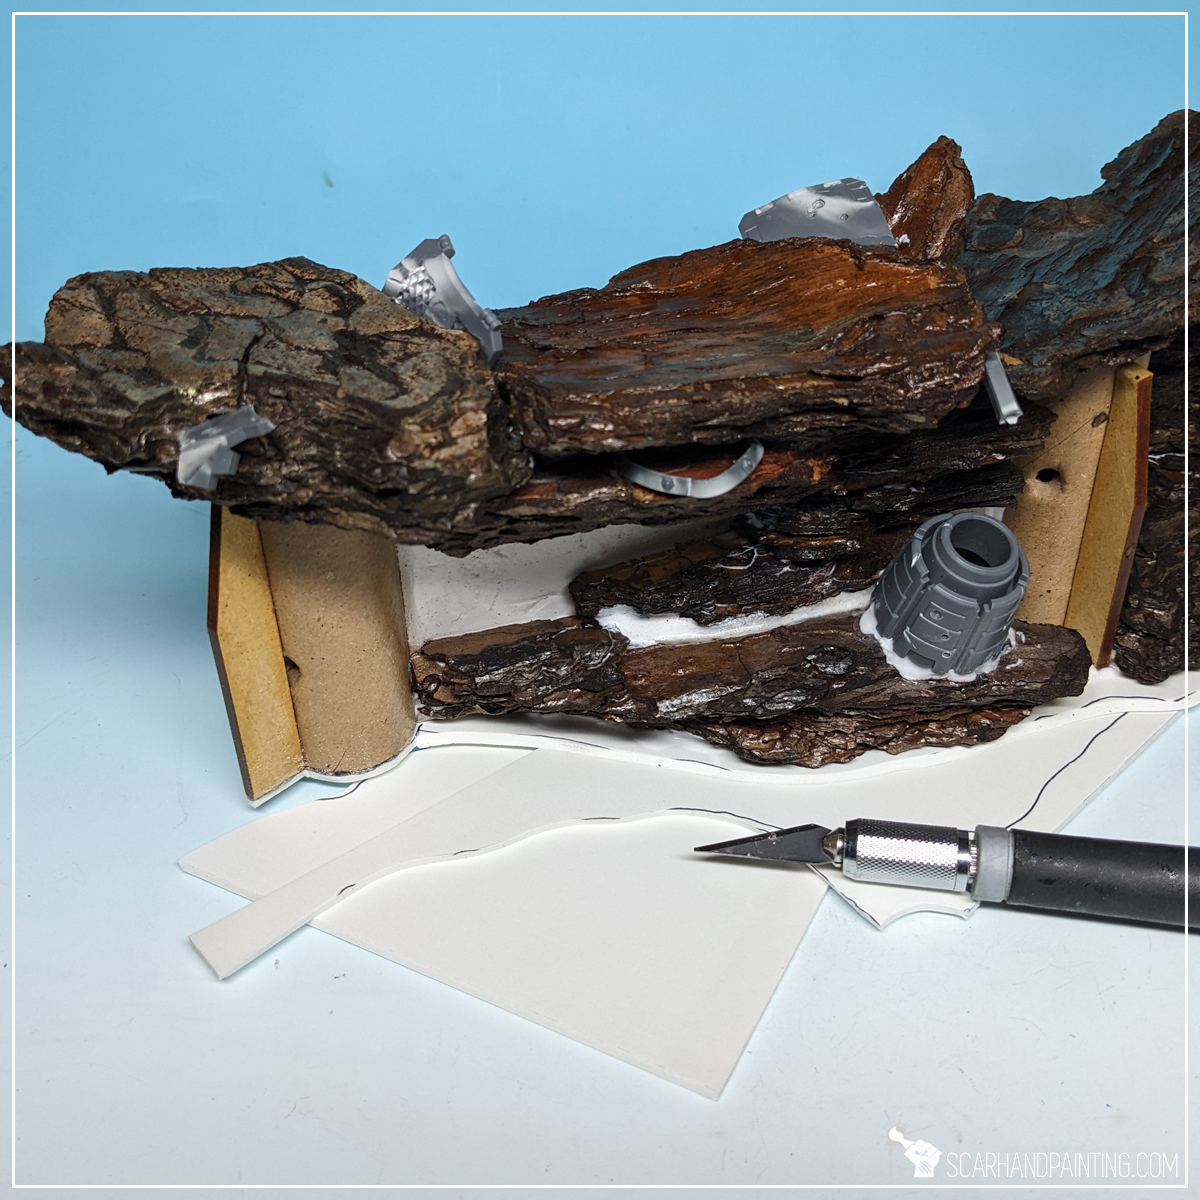
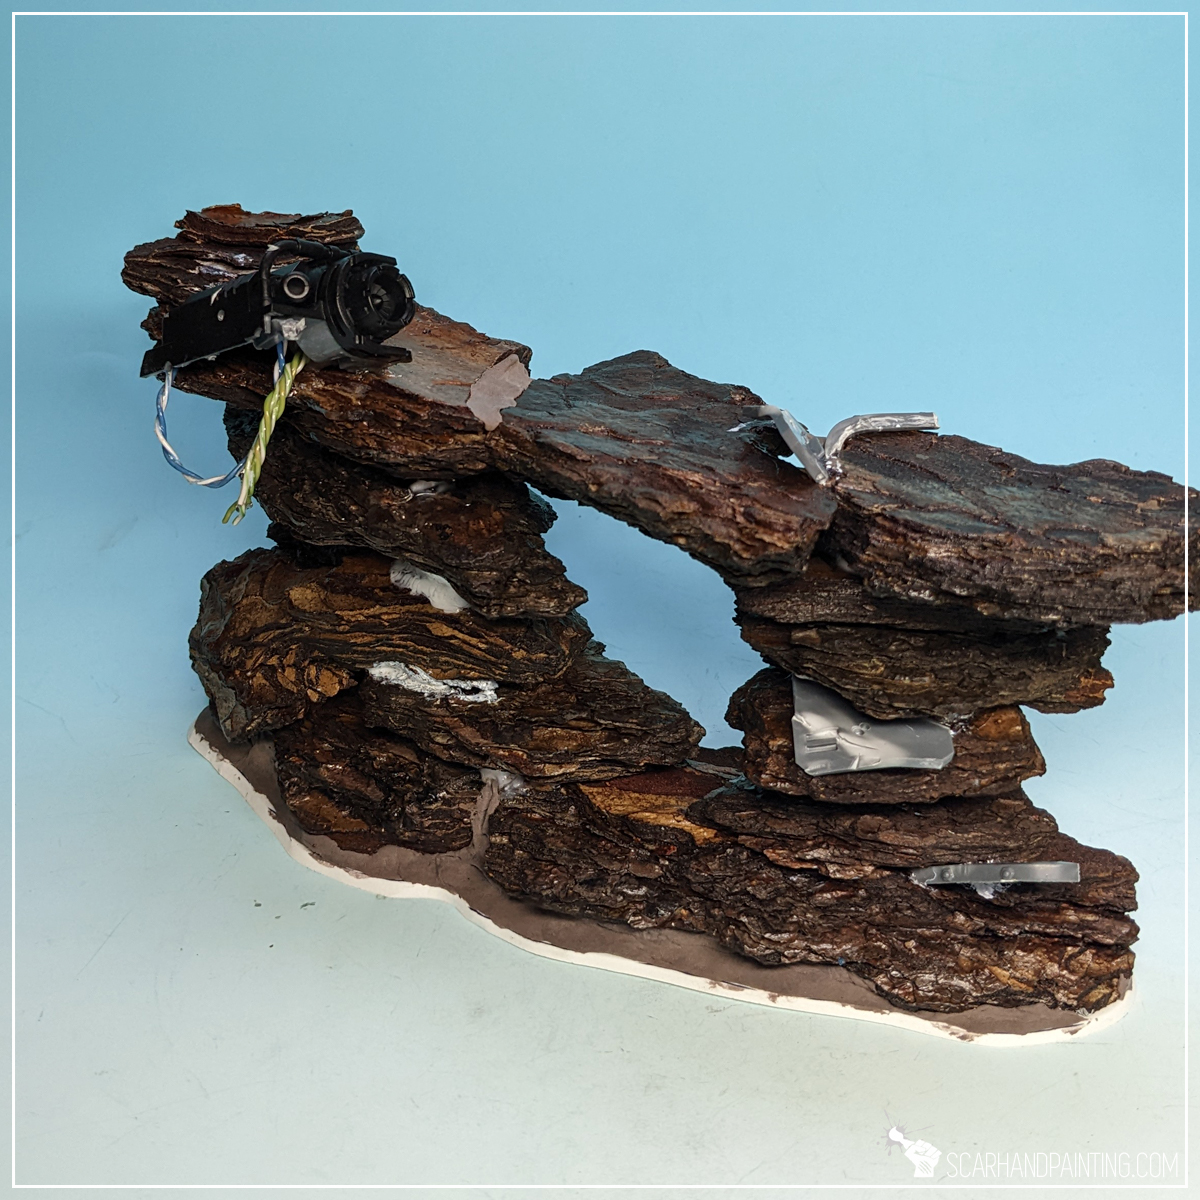
I then created few basic compositions, using a pre-cut piece of hard paper pipe to measure overhangs height. This allowed me to fit any additional elements I had in mind, but also kept all the scenery at a relatively similar height. Once composed I drilled horizontal holes through entire scenery piece and put toothpicks through to ‘save’ the composition shape.
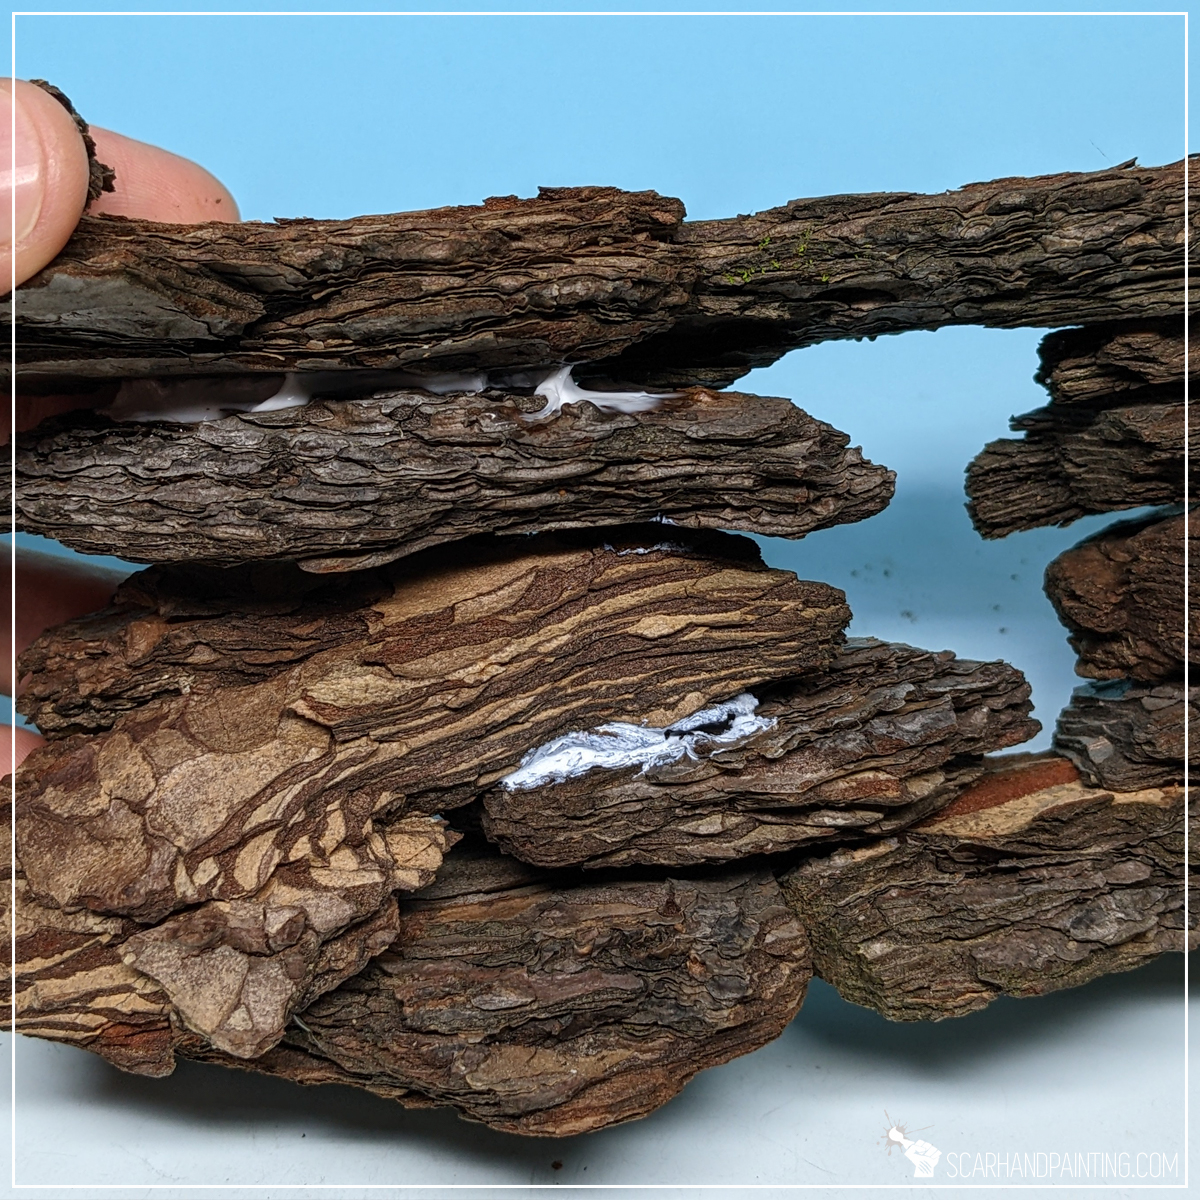
Gluing:
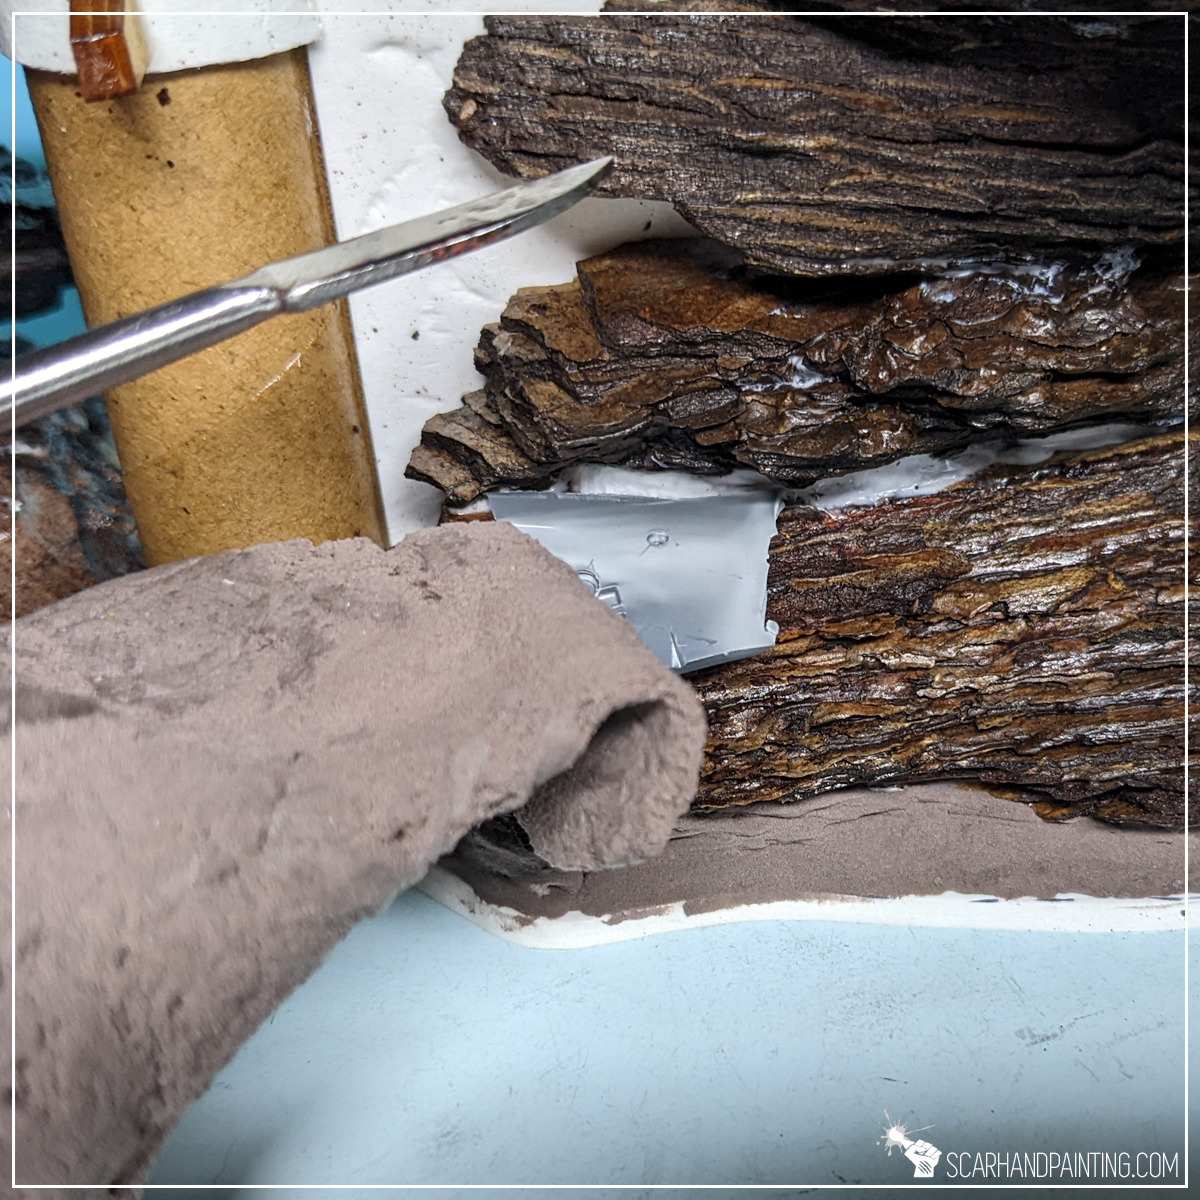
Using PVA glue on bark can be lengthy whereas Cyanoacrylate requires multiple layers to build volume sufficient to hold dry bark pieces. Because of that I took the best of both worlds and glued the compositions firm with a mix of PVA and Cyanoacrylate glue. The mix not only dries much faster than solo PVA, but also leaves rough, textured layer outside. It’s perfect for this kind of scenery.
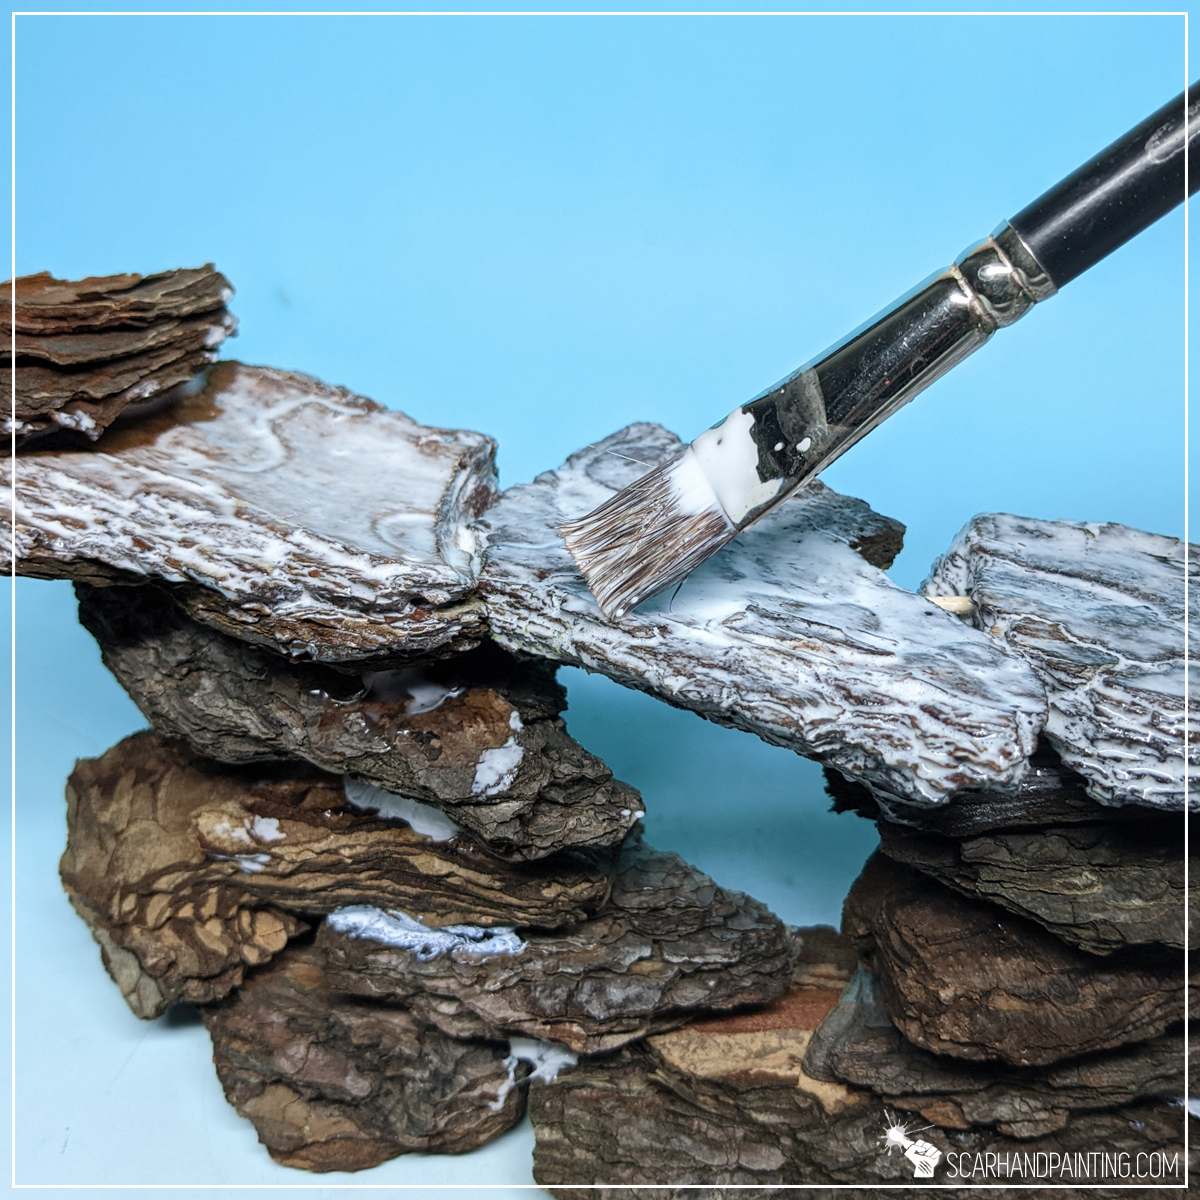
Sealing:
Dry bark tends to cheap and crumble a lot, not to mention it doesn’t take paint that well. To ensure durability and sturdiness of my gaming scenery I sealed the surface by applying a mix of PVA glue with a bit of water. This left the surface a bit smoother, glossy and much more durable.
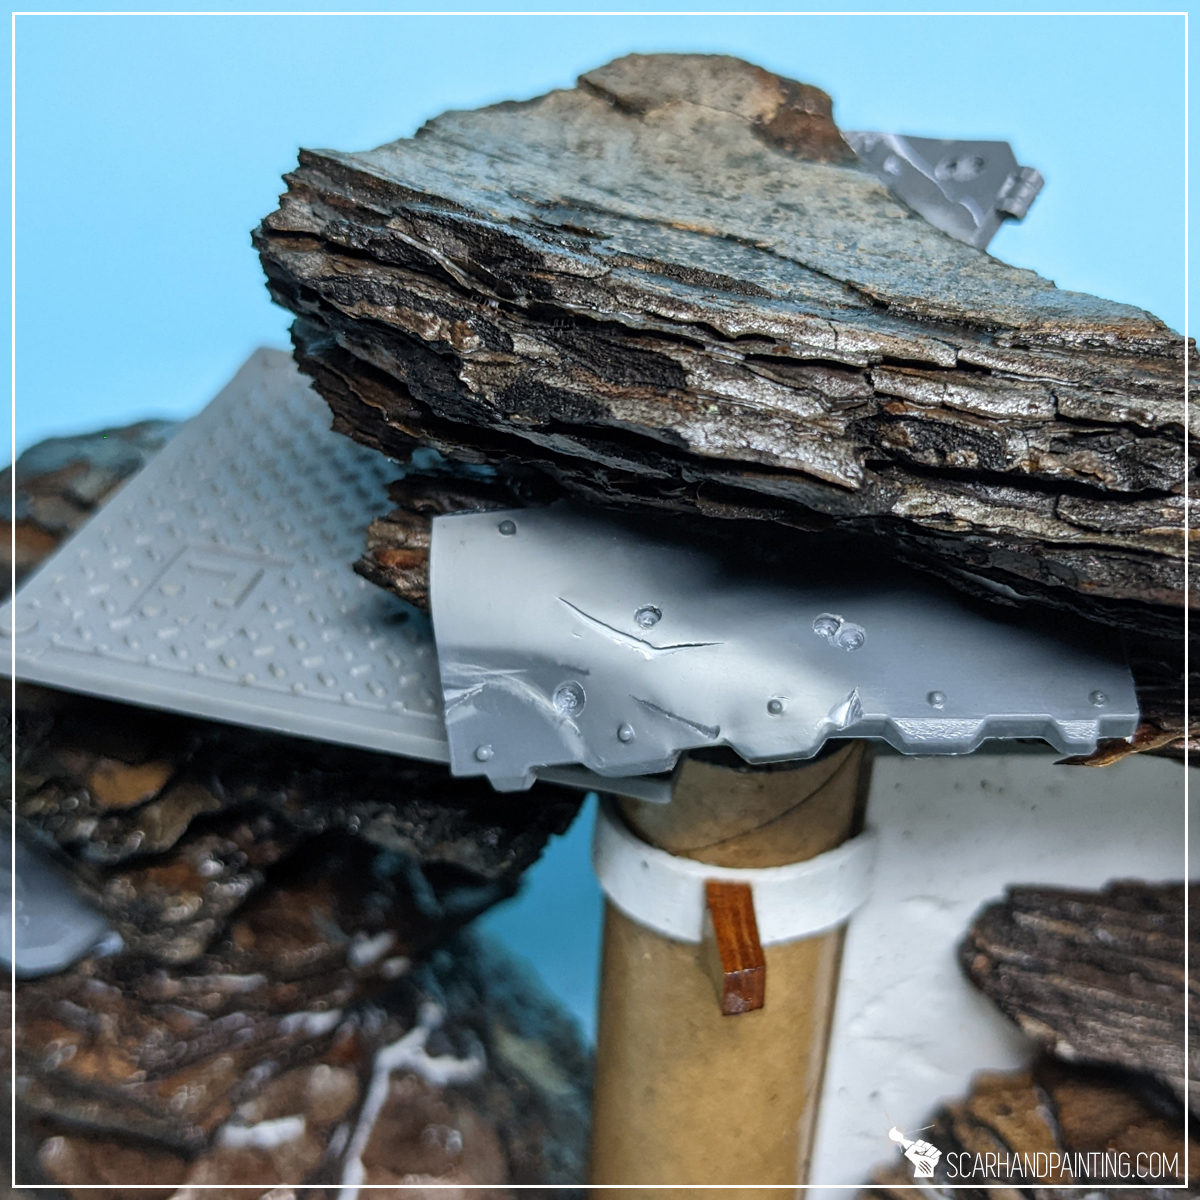
Extra detail:
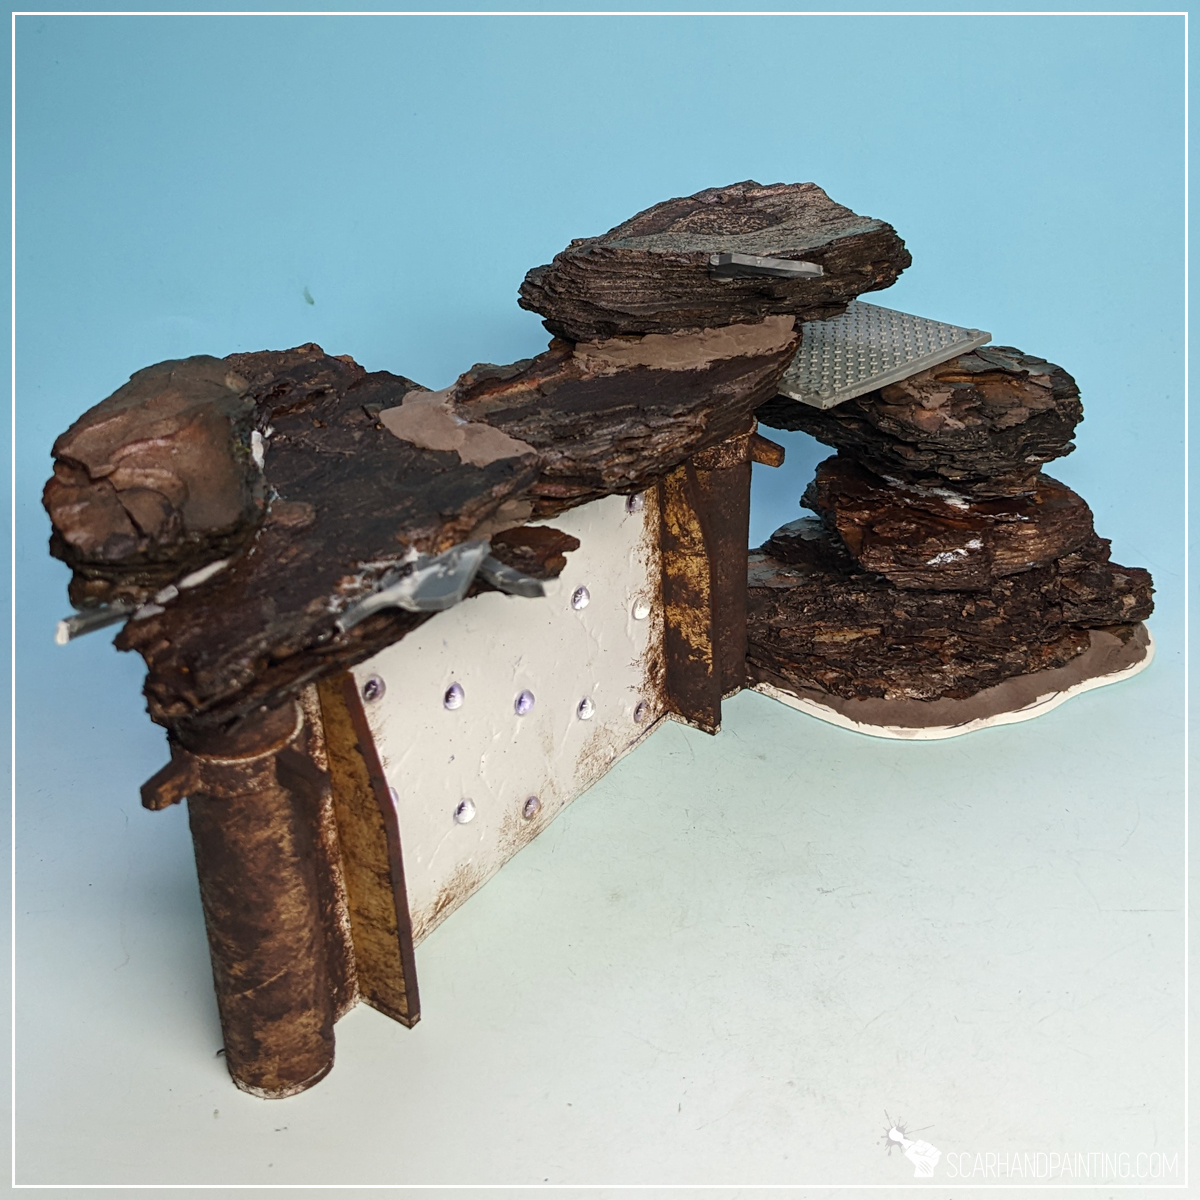
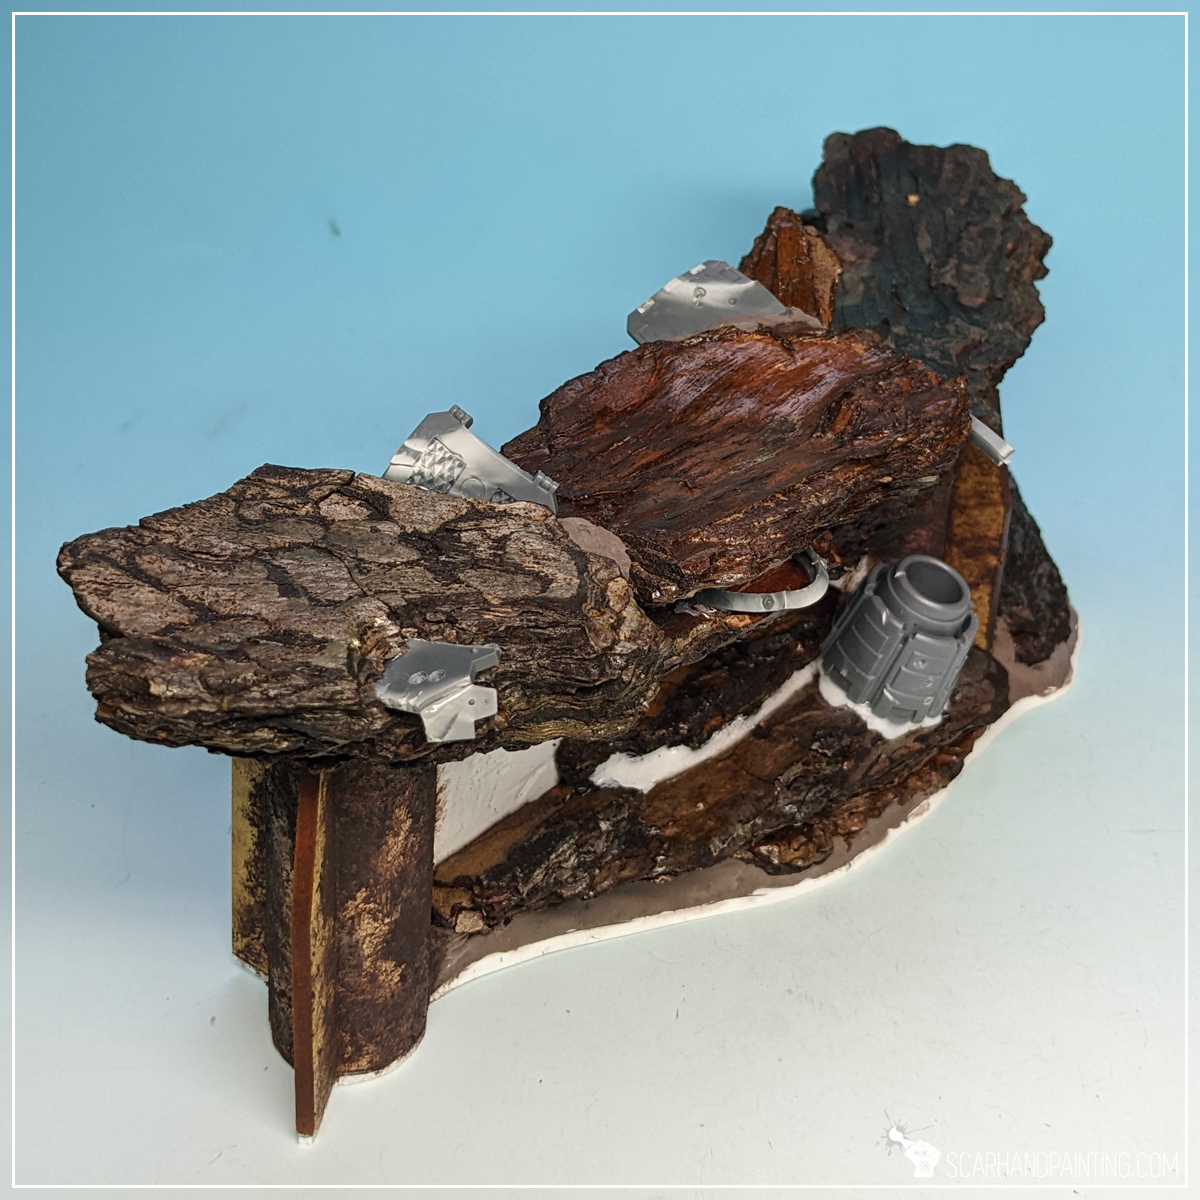
Focus points are an important part of gaming boards, adding life but also variety to otherwise simple scenery. With sealing done I moved to adding detail. Because this particular set was meant for Kill Team and Warhammer 40k I added some damaged Space Marines vehicle elements, but depending on the game and setting – anything will do the job just as well. Simply pick a theme and follow up with proper details as you see fit.
Basing:
In my opinion nothing ruins gaming scenery more than being wobbly. No matter how good it looks, it gotta be playable and lay flat on the board. I cut simple bases for the scenery out of a 2mm plasticard and glued them firmly under scenery pieces. Any flat, relatively sturdy material will do. I chose plasticard because it is very easy to work with and lightweight.

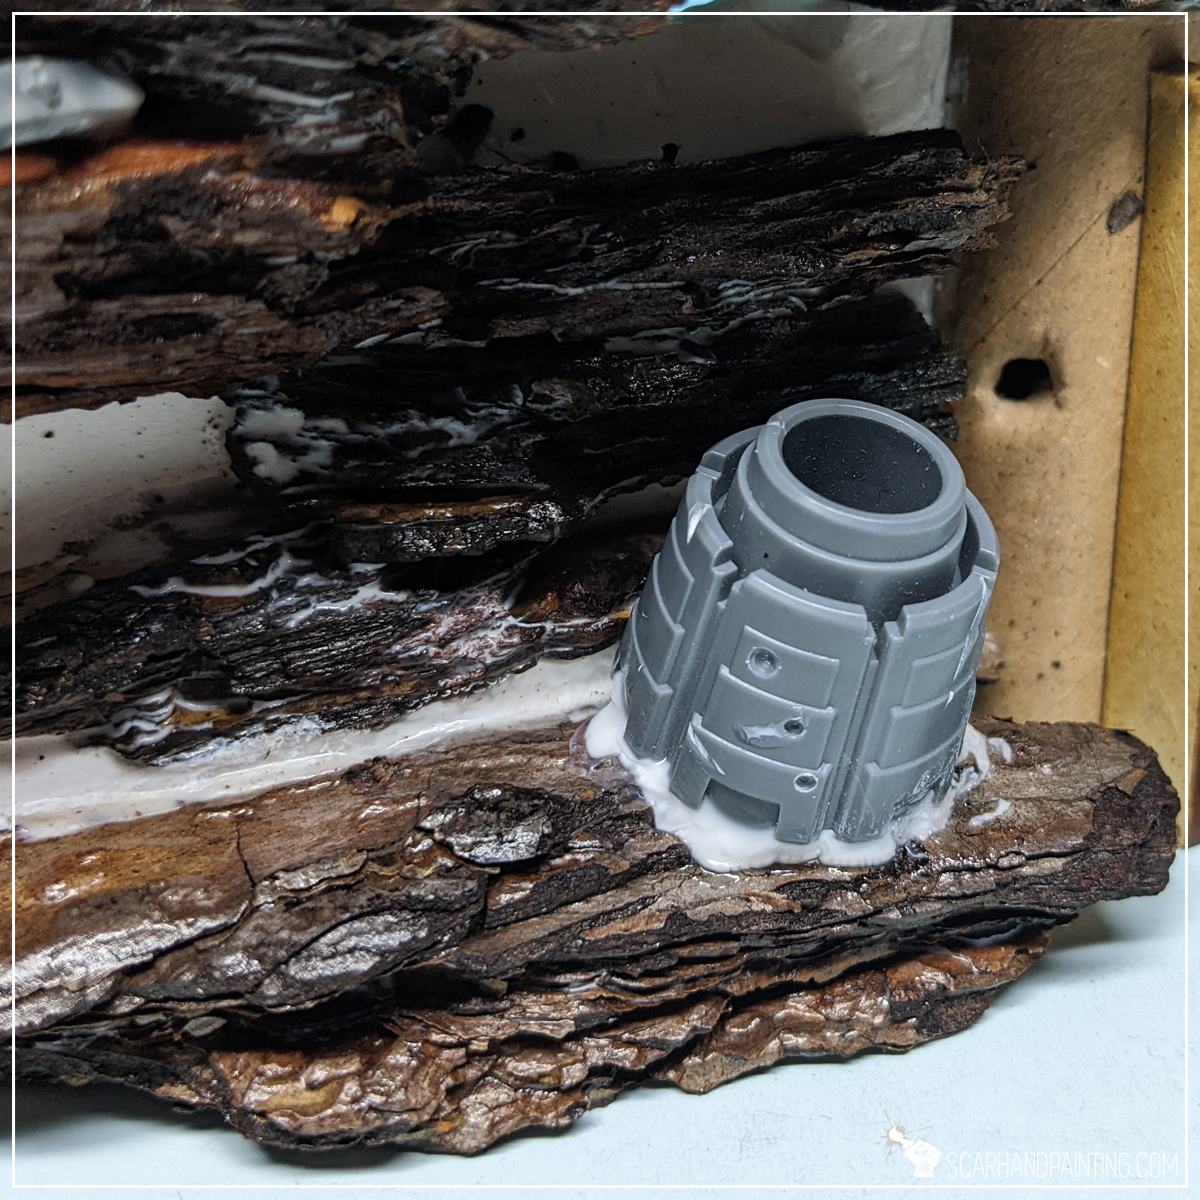
Filling gaps:
Once based I filled gaps with Hey Clay. This one might come as a surprise to some of you, Hey Clay being a toy for kids. It is similar to plasticine but very lightweight and dries up to a semi-hard state in a matter of few hours. I found it very easy to work with and perfect for this kind of job.
Initial textures:
Everything looked fine already but I wanted to add some variety on paper and HDF elements. For this purpose I stippled Citadel Typhus Corrosion on some of the flat areas. Any texture will do and this step can even be skipped completely depending on what kind of detail is being added.
Undercoat:
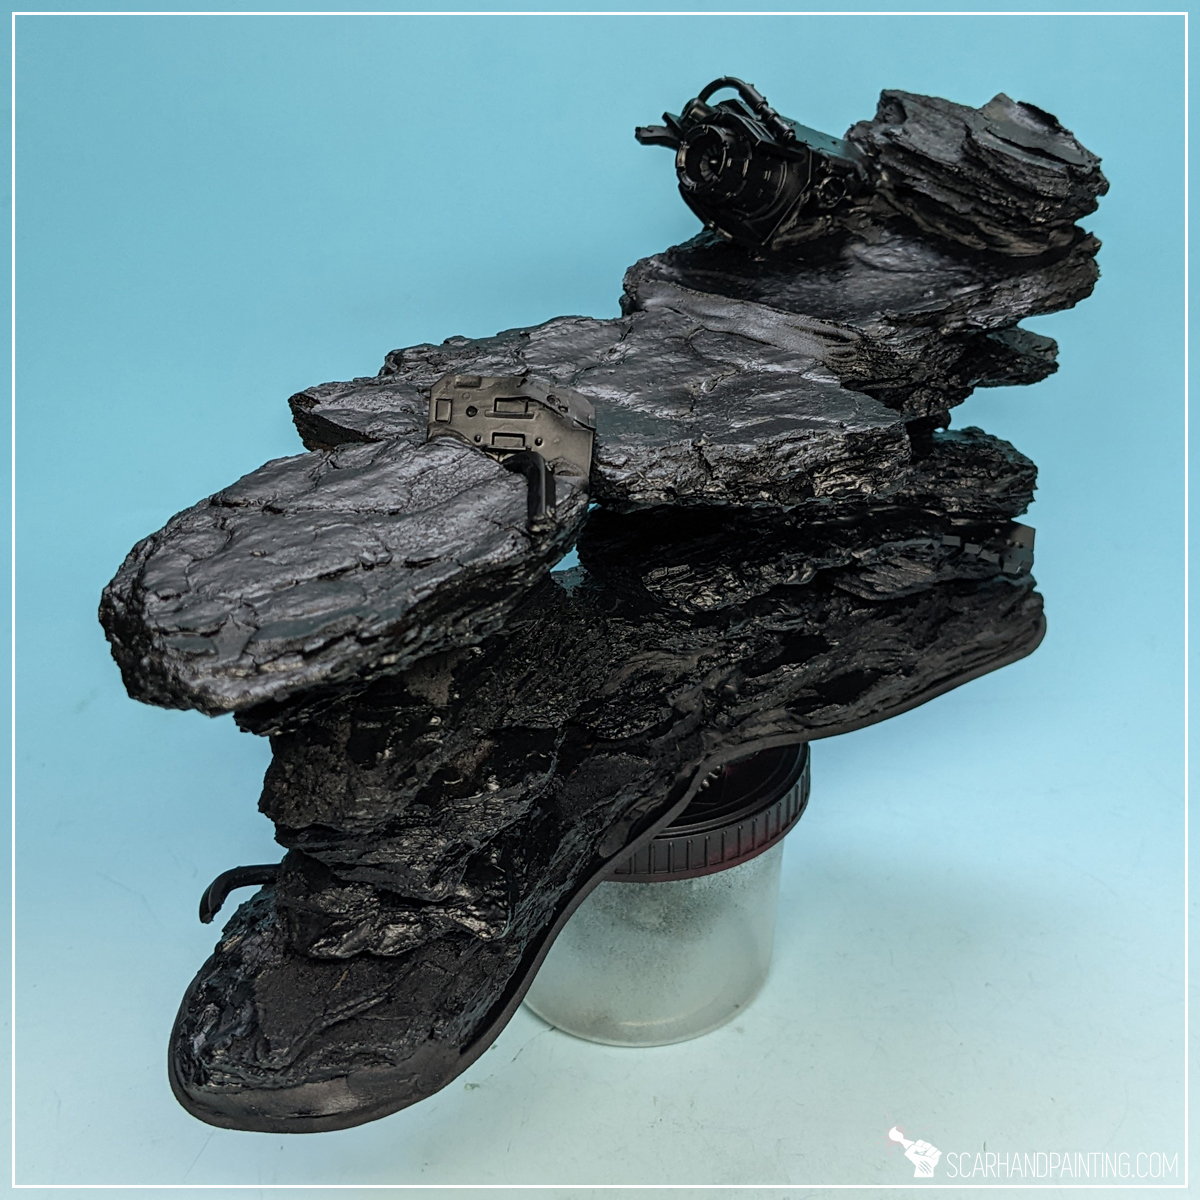
There are few ways to go about it. Usually when it comes do Styrofoam and wood I tend to undercoat manually with thick acrylic paints. In this case I had entire thing sealed with a mix of PVA glue and water, which allowed me to go with a spray can. I sprayed everything with a cheap matt black spray. I always undercoat miniatures with Citadel Chaos Black. With DiY scenery I found crude cheap sprays work very well, providing a thick, hard layer and adding a bit of additional protection from scratches.
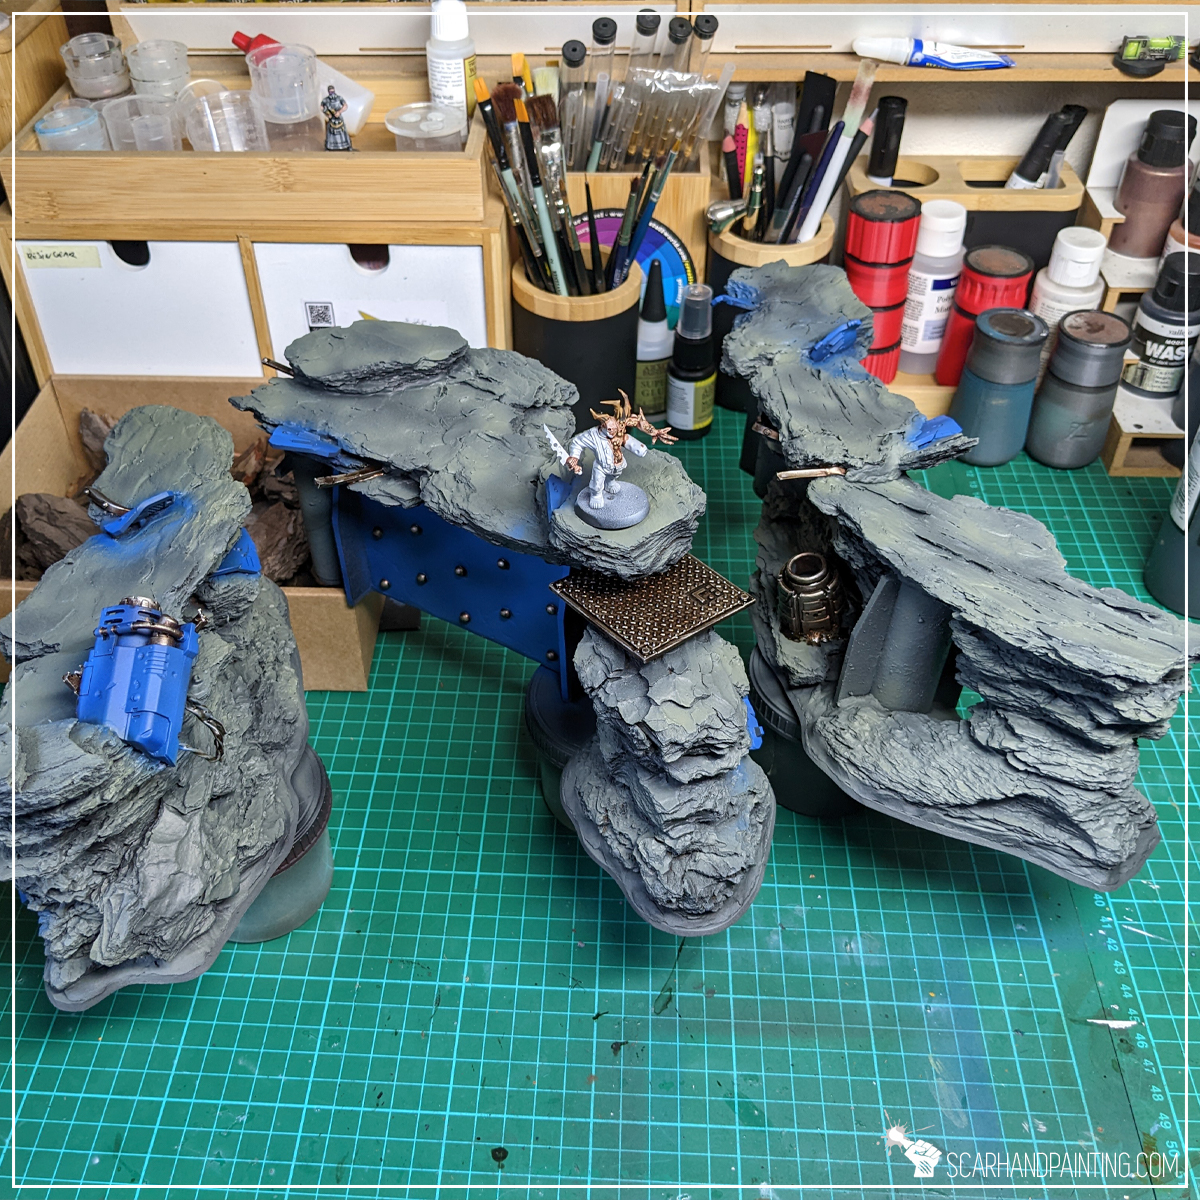
Painting and Textures:
This one I will allow myself to skip, as there is plenty of tutorials and color recipes available on my blog already. Painting is more about personal tastes and available tools. One thing of note is AK Interactive Dark Earth texture. I used it on this particular scenery set and I really recommend this product to everyone. You can learn more about this godlike texture in this article here.
Anyhow – that’s it! Pretty neat looking rocky formations, in this case fit for both Kill Team and Warhammer 40,000, are done! I wasn’t saving on extra detail, but if I did, the entire set would cost me pocket change.


I hope you find this tutorial interesting. Be sure to let me know your thoughts in the comments below or via Facebook or Instagram. I would also appreciate if you considered sharing this content with your friends, who might find it useful. Finally if you are looking for a professional warhammer 40k miniatures painting service, be sure to contact me with this contact form. I always reply within 24 hours, after which please check out your spam folder.
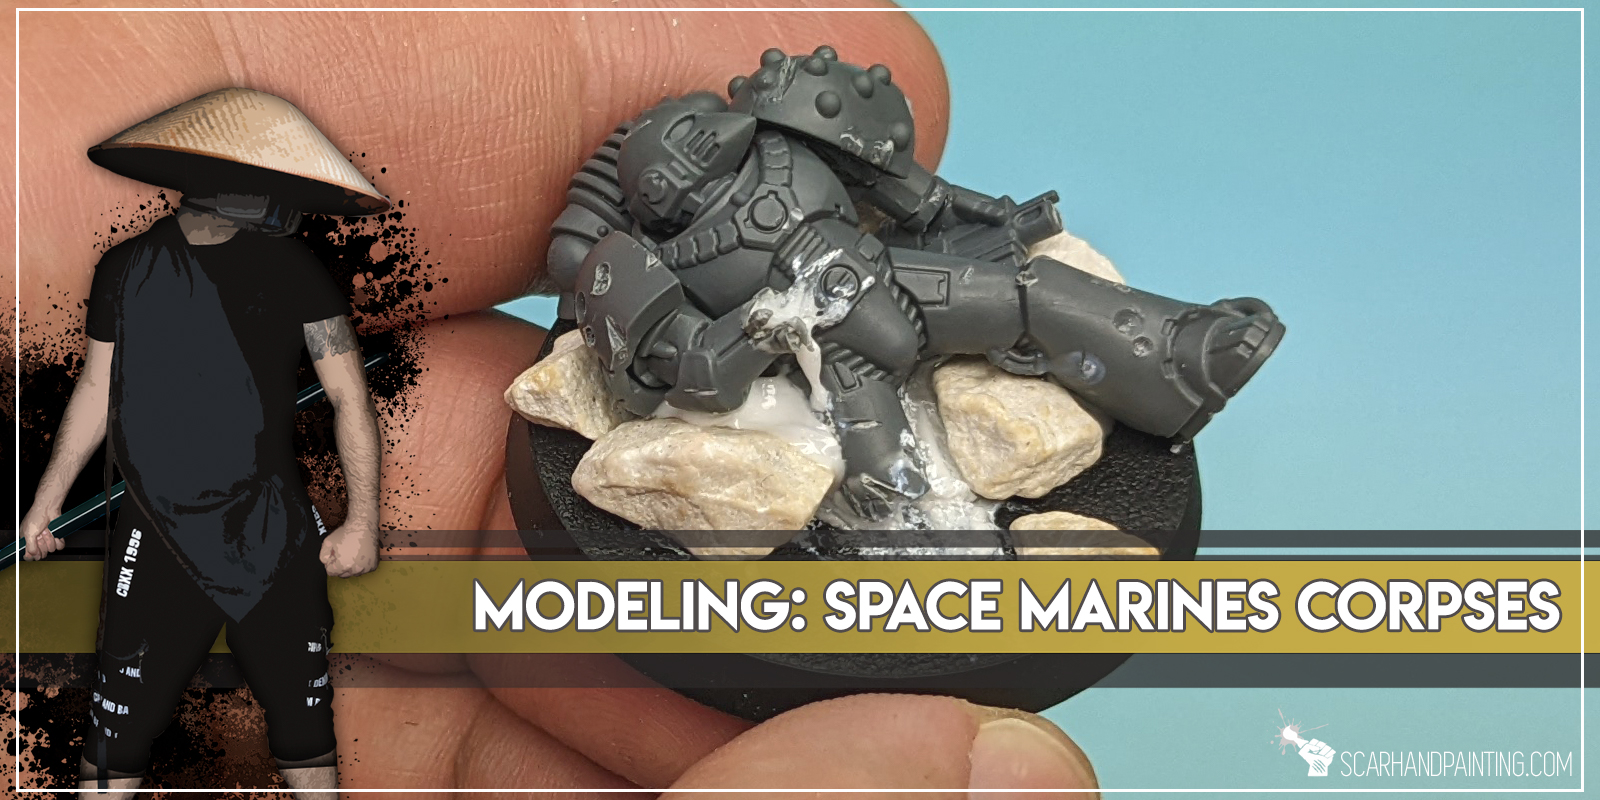
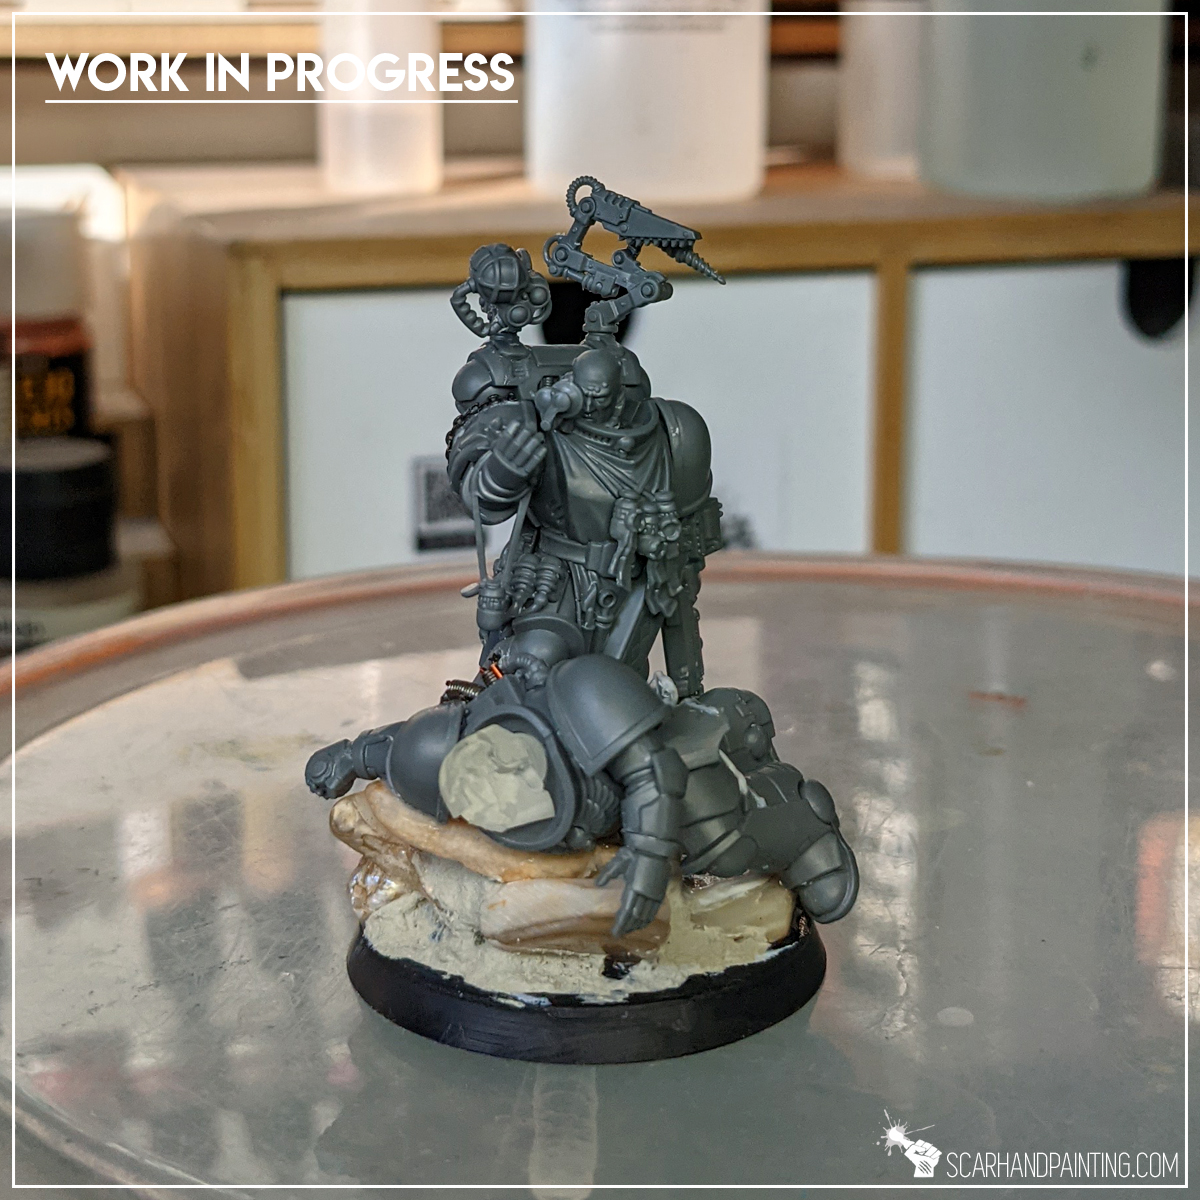
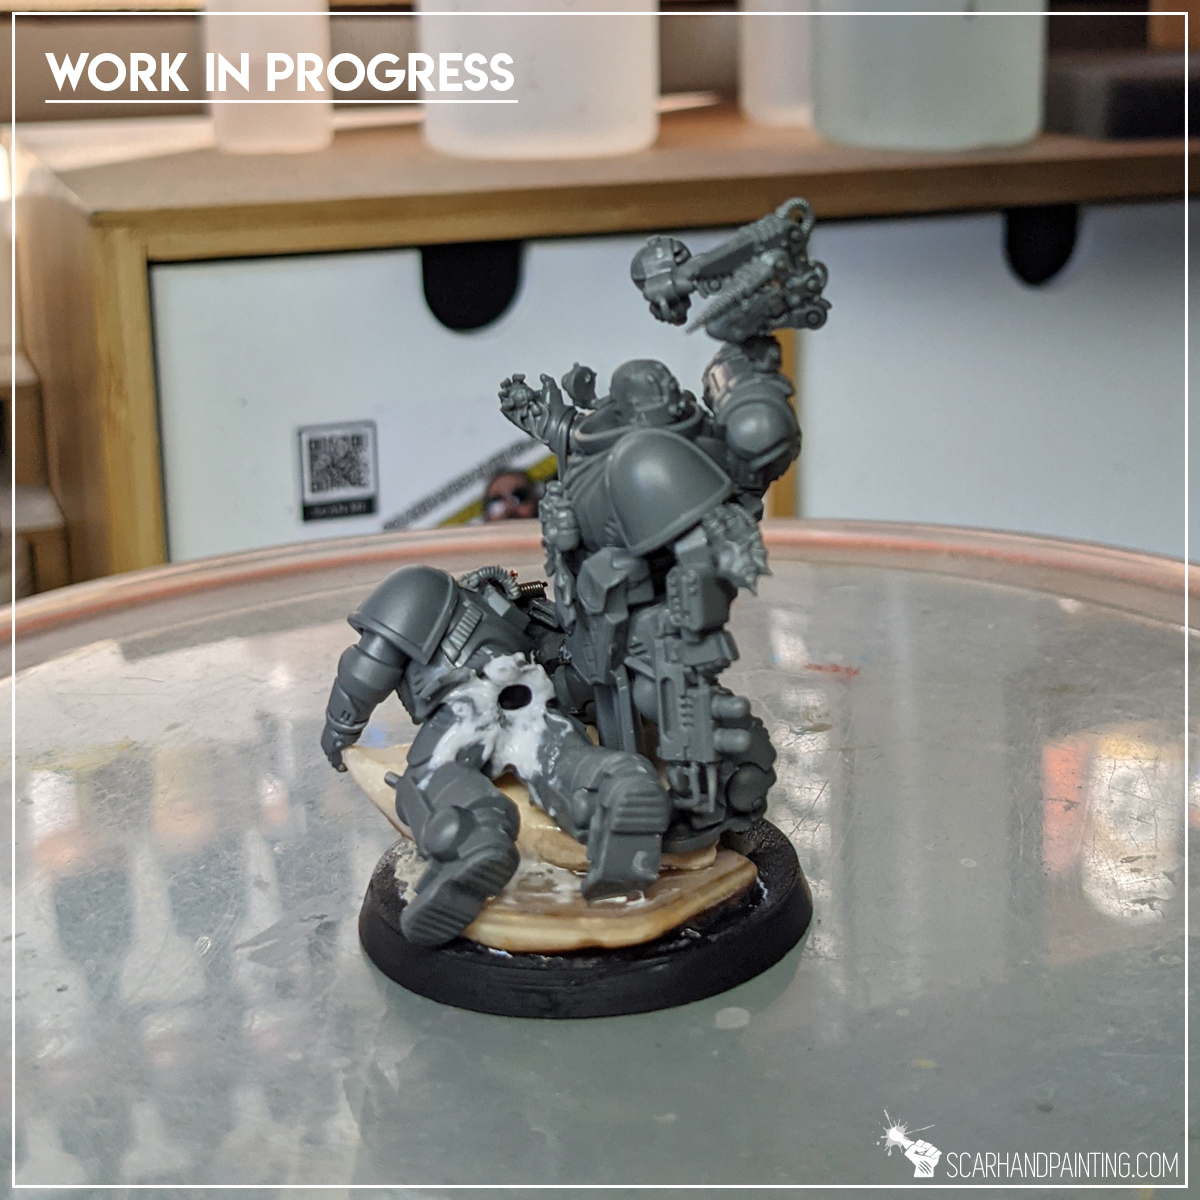
Space Marines are the very core of Warhammer 40k universe, not to mention the most popular army. For this reason, be it on the countless battlefields of 40k, or dust covered remnants of Horus Heresy atrocities, there’s probably gonna be plenty of dead Marines laying around. These could do for a very thematic prop on a scenic base for one of your characters, or even for an emerging theme across multiple bases of your army.
Today I will present to you few basic techniques of turning Space Marines into battle ravaged ones.
Some notes:
The Basics:
Before we fill the battlefield with uncountable dead Marines, let’s go through some basics. The techniques presented in this article can be used to create some outstanding looking bases but also to turn regular Space Marines into battle ravaged veterans. I focus on simple techniques that can be employed without high end specialist equipment and that do not require any advanced modeling skills. I deliberately used materials that are easily accessible and focused on presenting what can be done with a single out of the box Space Marine miniature without any outside parts. The goal is to take a cheap Marine and turn him into an awesome scenic base worthy of a character with low effort and fine end result.

Miniature preparation:
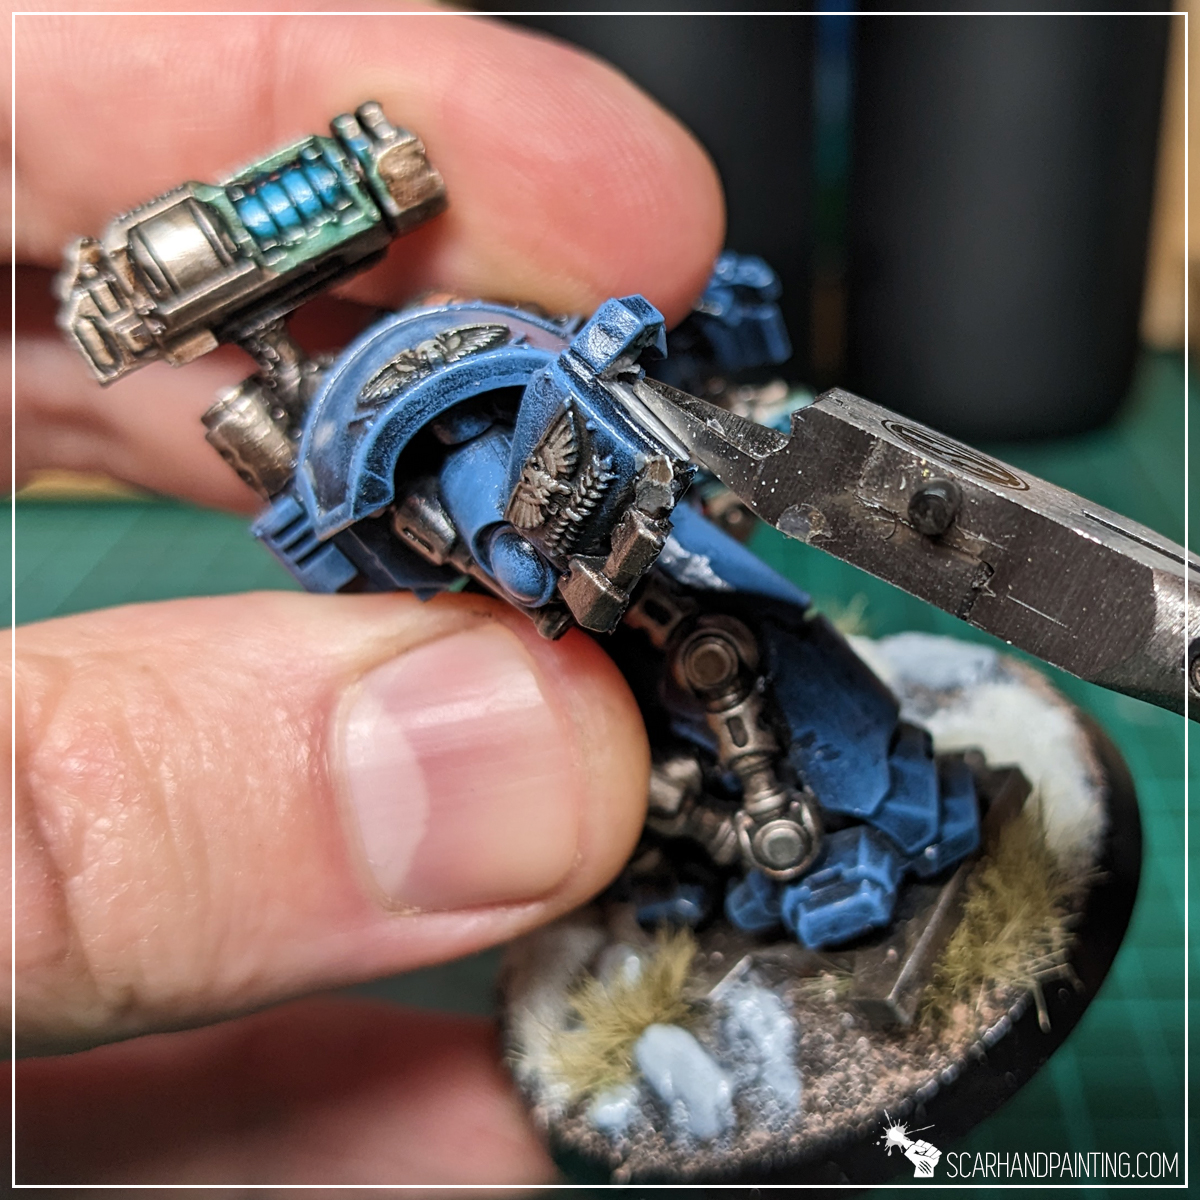
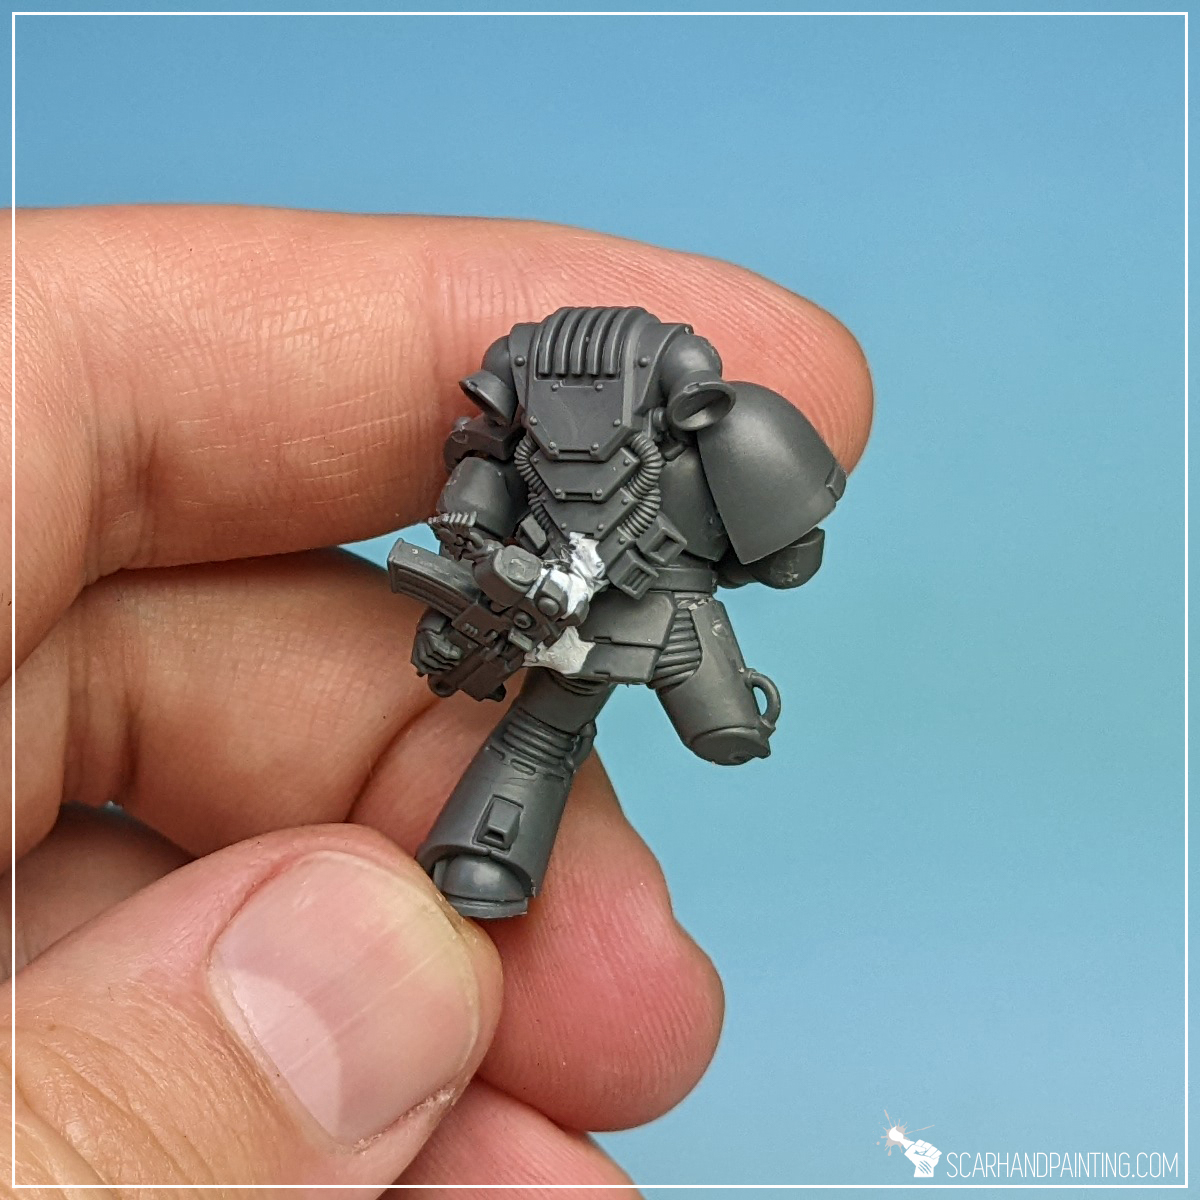
I started by cleaning all parts of flash lines and building a single Space Marine miniature. When gluing parts together I already had a pose in mind. This is why I glued Bolter hand in a rather uncommon way. Usually I would remove a limb or two, but in this case I just skipped on gluing one leg and left one hand.

Composition:
Once I had a build miniature in hand I could finalize the pose on a base. For this purpose I cut off the excess Bolter and a part of a backpack with plastic cutters. Looking back I wish I cut a piece of the left heel as well, thus leaving the intact leg less exposed compared to main body. Sadly I rushed through the process in order to drop the Tutorial as soon as possible.


Severed limbs:
Severed limbs are a good way to show large amount of damage done to a power armored fighter. I started during building phase by skipping on two limbs, but this can also be done later on by simply cutting the limbs off. Next I drilled holes into the the stumps. This was done to add depth but also ease the next step, which was cutting the edges with a pair of plastic cutters.

Battle damage:
This step can be done in a lot of ways including bones and cables sticking out of severely damaged Power Armor. I really wanted to keep the tutorial basic, thus concentrated on cuts and bullet chipping instead. I begun by drilling shallow holes, grouped together on one shoulder guard and one leg. Connecting few large and small holes adds additional realism. Next, using a hobby knife, I made some cuts on exposed areas and armor edges. The marine started looking like after a really rough day at work.


Blood and guts:
Next on the menu was the actual basing and the bloodied flesh sticking out of the armor. I used a mix of PVA and cyanoacrylate glue to mount the corpse on a base, then added just a drop of both glues into each wound to then rough it up with a tip of a toothpick. This created a nice wet wound effect, that can be further enhanced with a proper paint job later on.
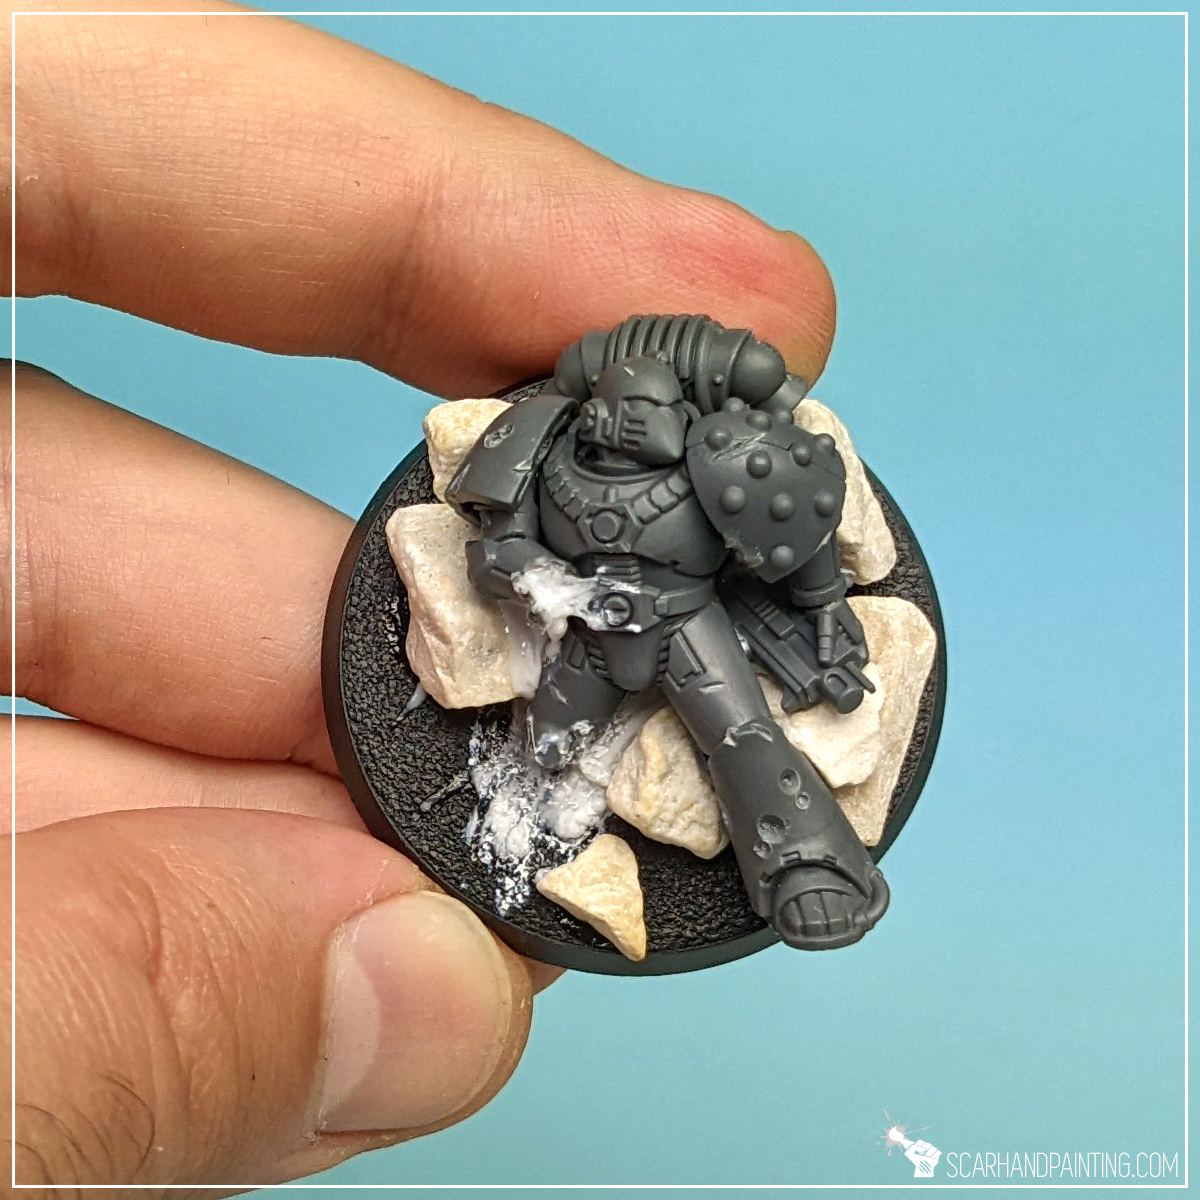

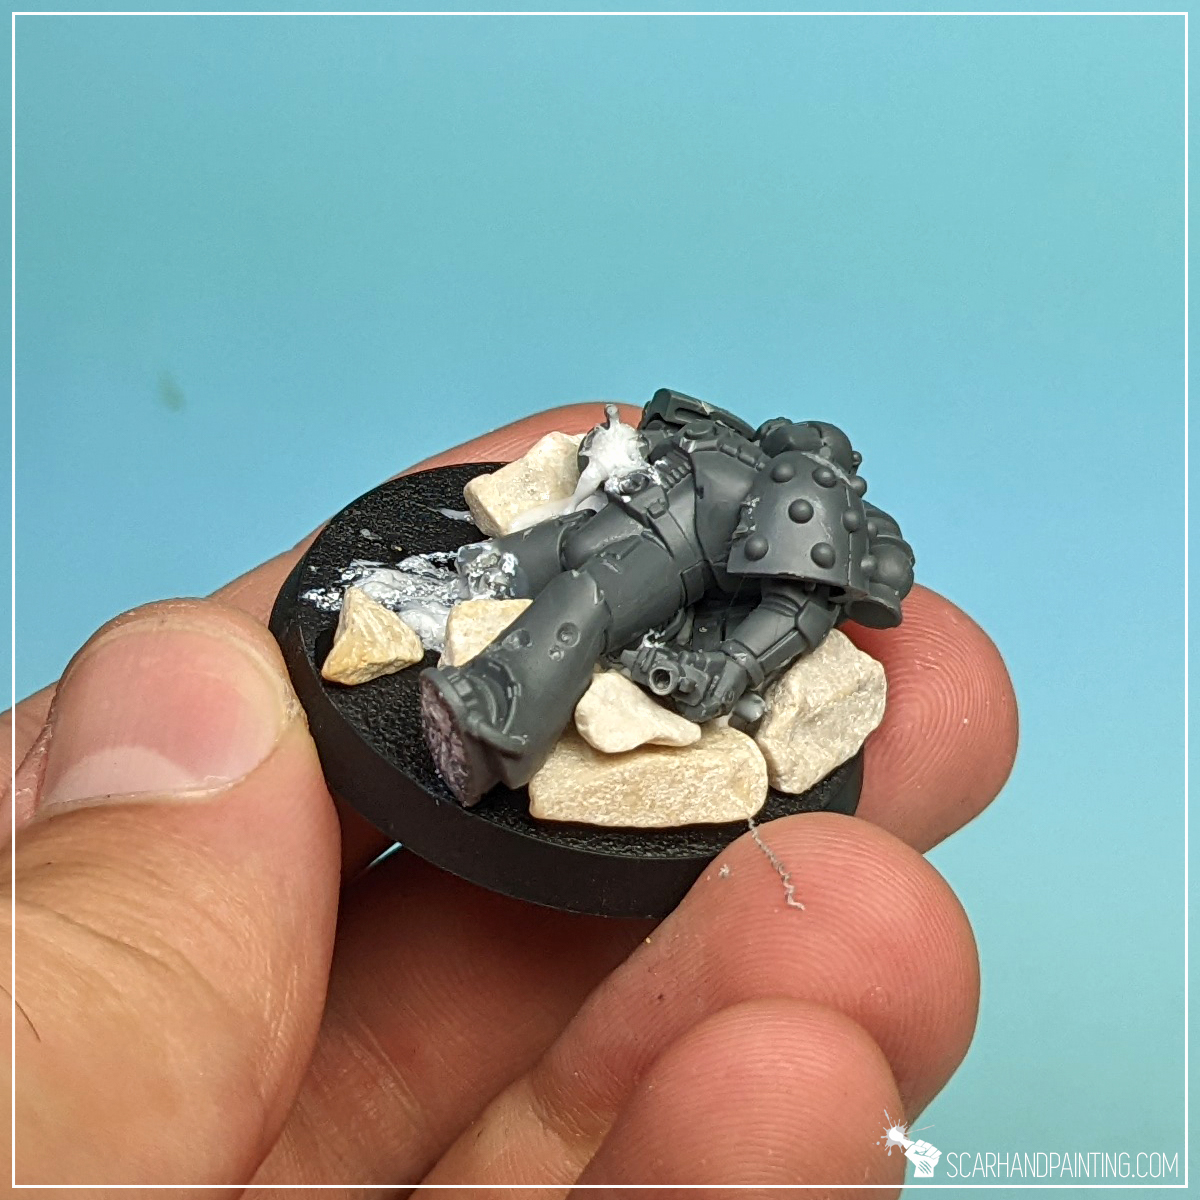
Rubble:
I great way to fill empty space and set the corpse within a certain scene is to add rubble around and underneath it. For this purpose I used some decorative gravel obtained in a local house & garden store. Once again I applied a mix of PVA and cyanoacrylate, then slid few stones in place. The addition of cyanoacrylate makes the mixture harden rather fast, ensuring all stones stay in place without issues.
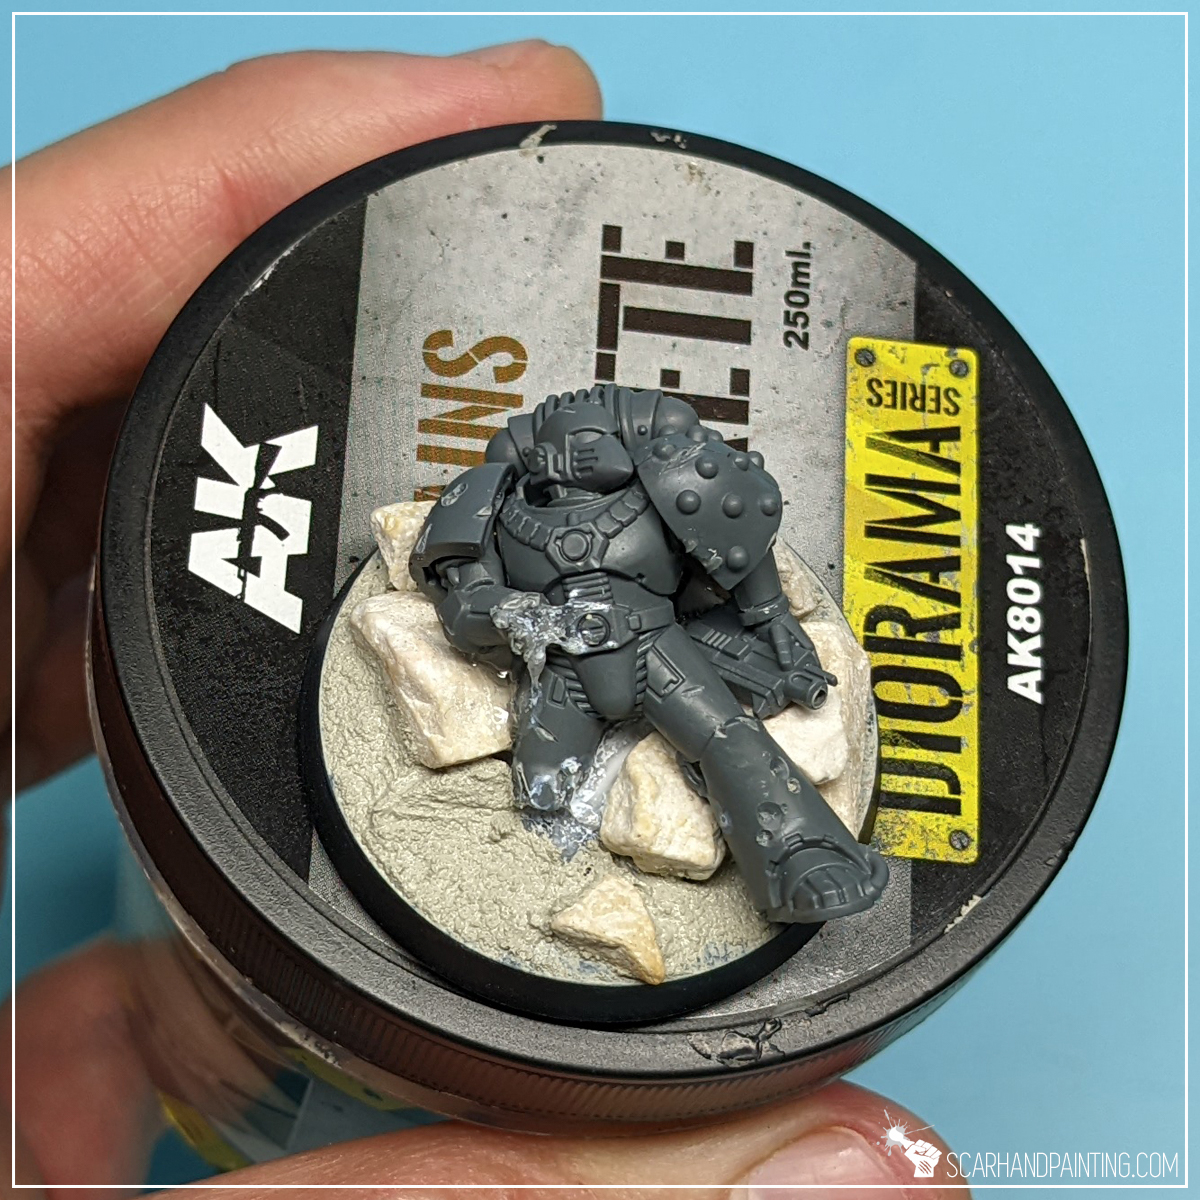

Finally I added a basic texture by applying AK Interactive Concrete. This is my go to when I want to build a volume of texture around a base. It can be further built upon with colored textures or simply painted for a great effect later on. Anyhow the miniature is now laying there, bleeding, power armor ravaged by enemy shots. Surrounded by rubble and own guts the Space Marine is ready to give his life for the Emperor and serve as a nice scenic base. Just like the one below…
Imagination is the only limit when it comes to modeling miniatures. On that note I would like to end this tutorial. Until next time friends!
I hope you find this tutorial interesting. Be sure to let me know your thoughts in the comments below or via Facebook or Instagram. I would also appreciate if you considered sharing this content with your friends, who might find it useful. Finally if you are looking for a professional warhammer 40k miniatures painting service, be sure to contact me with this contact form. I always reply within 24 hours, after which please check out your spam folder.
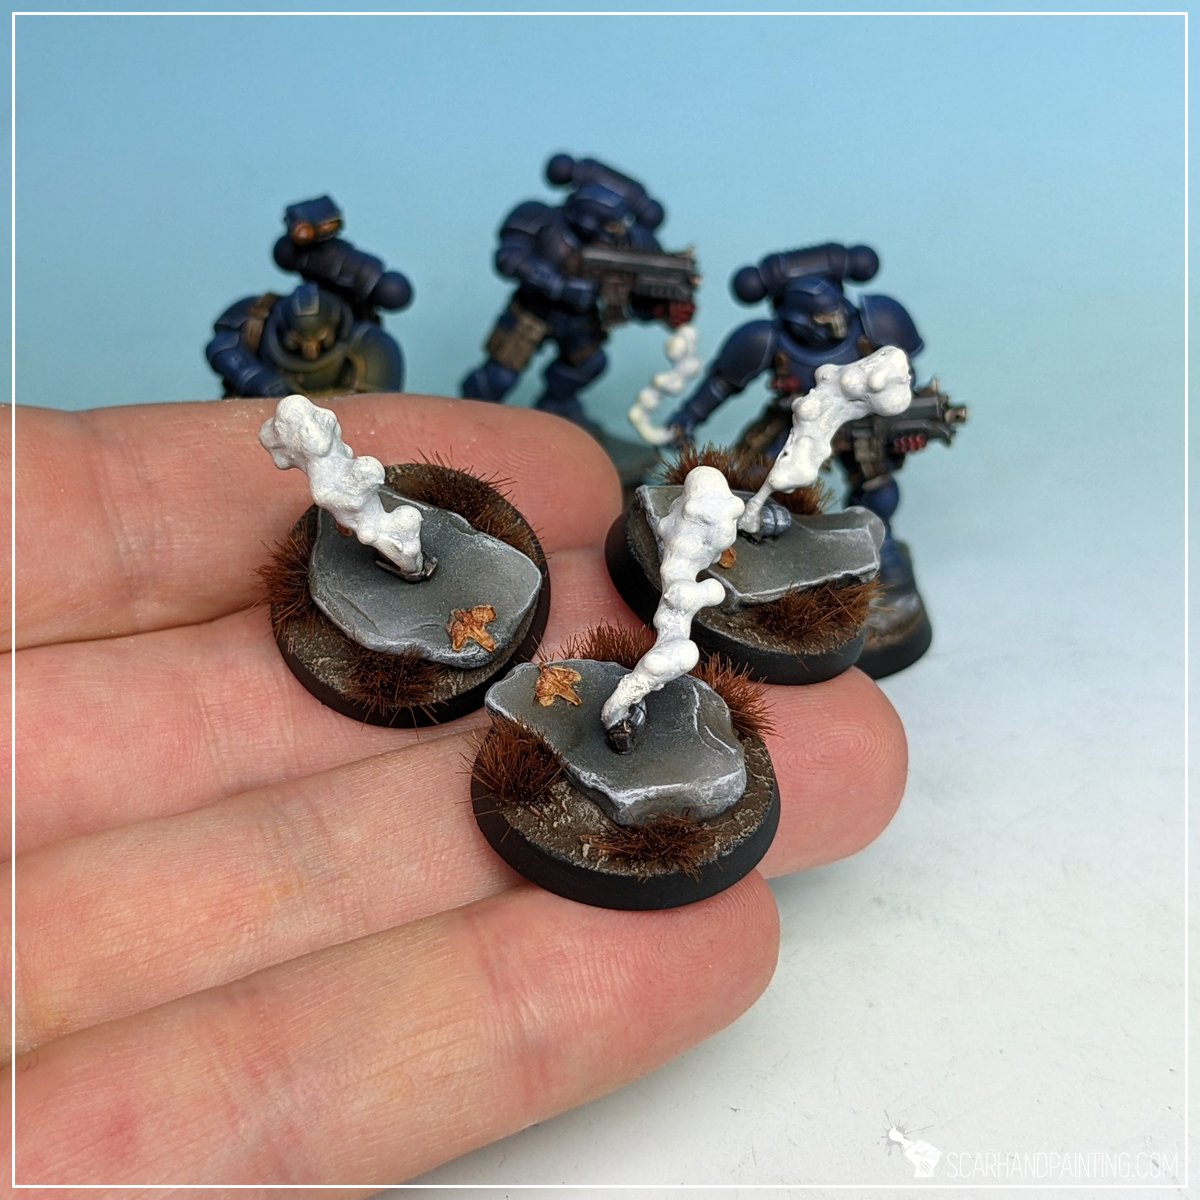
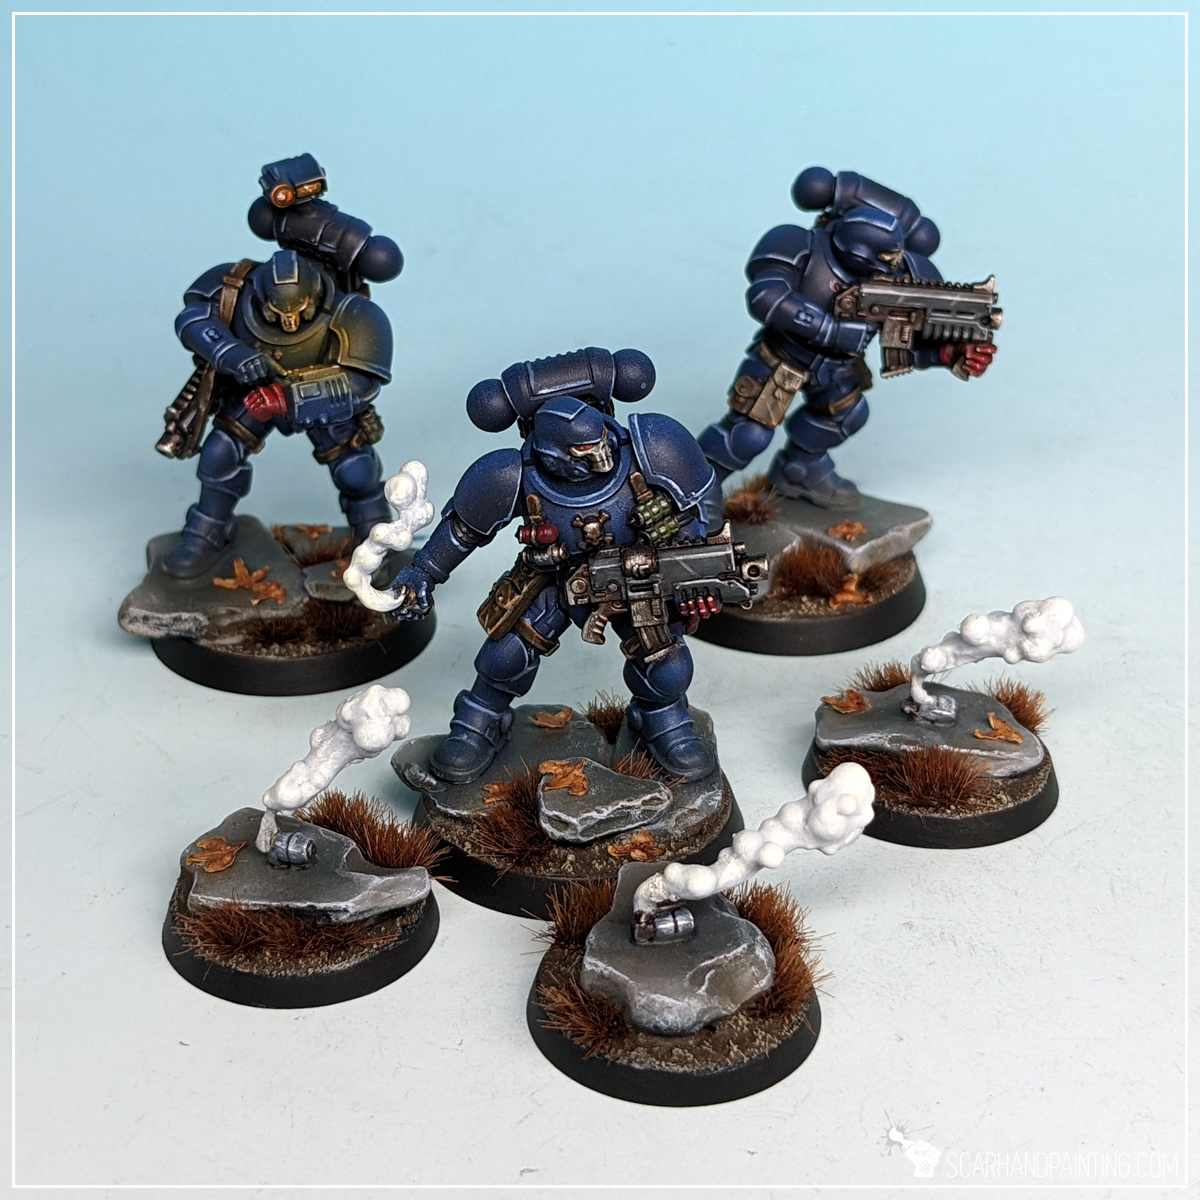
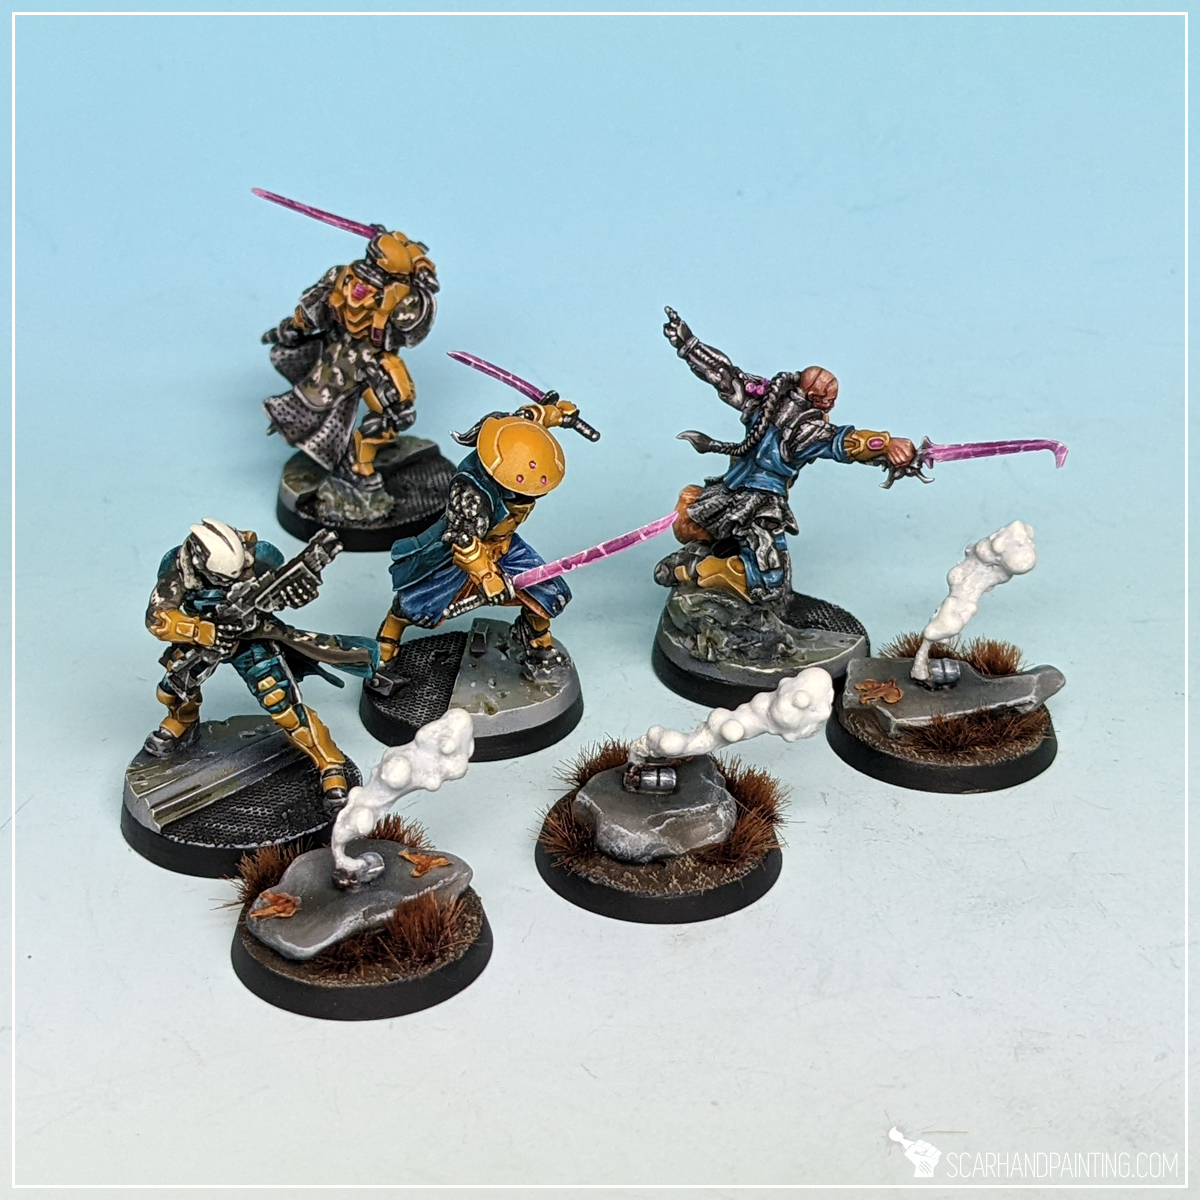
Oh those sweet looking puff of smoke. Such a fine detail. So much character. So many conversion possibilities. Be it fumes from magic cauldron, engine exhausts or freshly tossed smoke grenades. There’s only that many Kill Team Moroch boxes a hobbyist can get their hands on, am I right?
What if I told you there exists an unlimited source of similar, miniature scale puffs of smoke and they come as cheap as a bottle of PVA and Cyanoacrylate glue combined? Witness Me!

Before we start, some notes:

The Basics:
Just before we turn everything milky white with miniature smoke, a word of introduction. I recently purchased a Warhammer 40,000 Phobos Kill Team to add flavor to my existing army. Inside there was a single piece that really got my blood rushing. A tiny grenade with a cone of smoke. Such a wonderful piece. I wished to get more to use as tokens, but also cut and re-purpose for other projects. Sadly this piece is rare across the 40k range and I was left with only one way forward: Completely back engineer and make my own miniature smoke.
Fortunately it wasn’t that difficult and today I bring to you a relatively easy step-by-step tutorial so that you can follow me into the smoke!
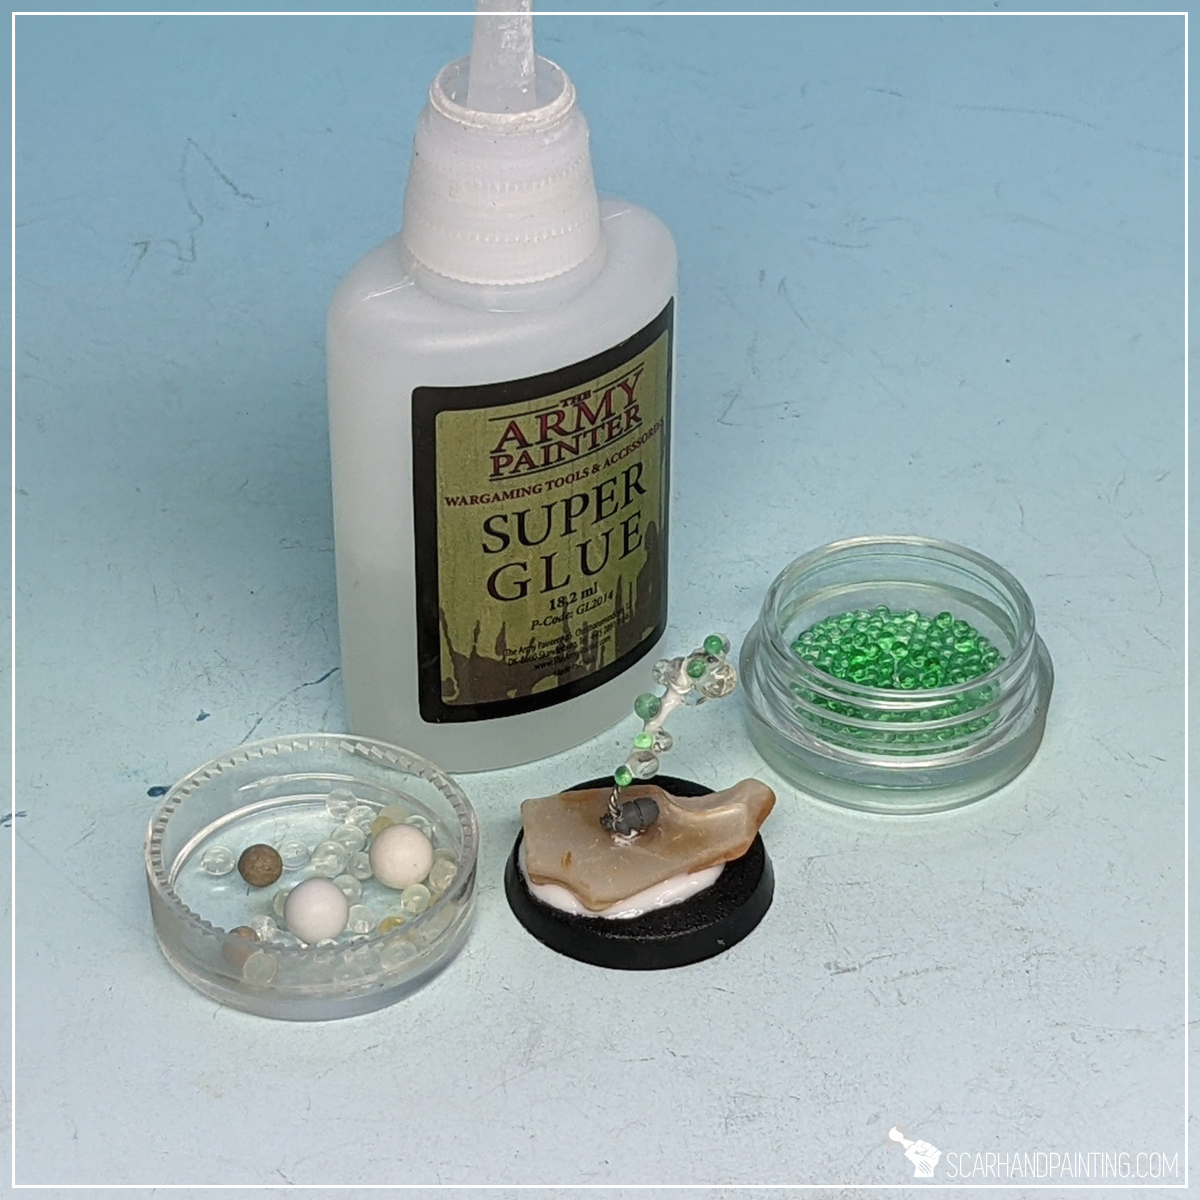
The method described here requires a piece of wire, wire cutters, cyanoacrylate glue, PVA glue, hobby drill, tweezers and some tiny balls. The latter can be made with Green Stuff, but I strongly recommend you to read this article and save yourself the hustle instead: Unlimited Tiny Balls for Modelling
Let’s get into it!
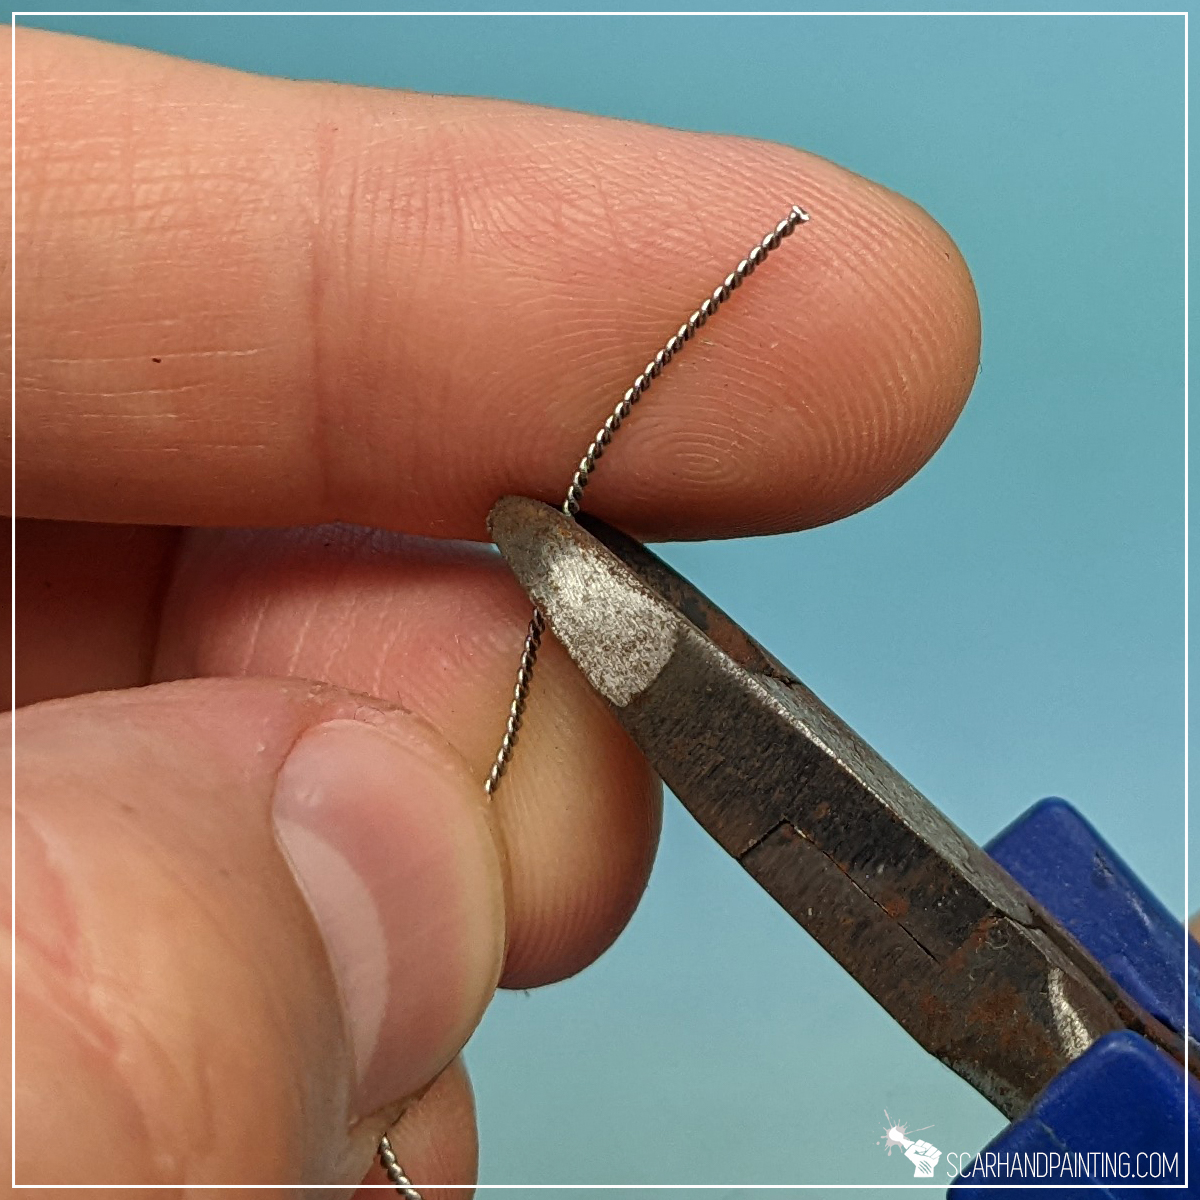
Step one: Wire
I started by cutting a piece of soft wire into smaller fragments. The size of these fragments depends on the size and complexity of planned smoke cones. I also found that double twisted wire works better than single line, because it holds the cyanoacrylate plus PVA glue mixture much stronger.
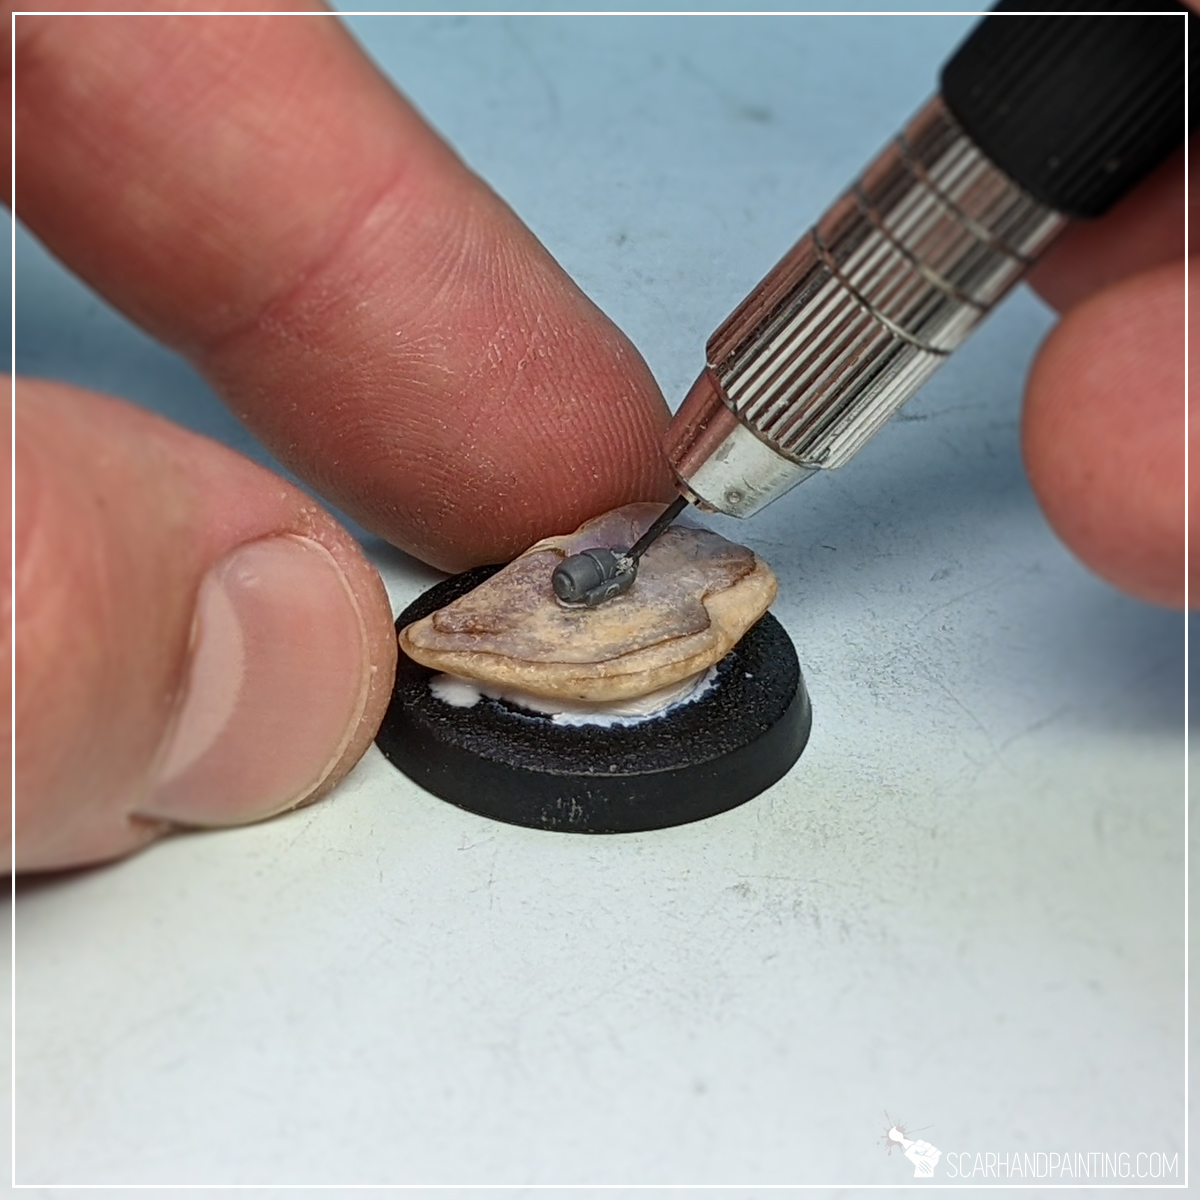
Step two: Mounting place
Next I drilled a tiny hole in the spot where I wanted the smoke to originate from. In this case it was at the head of a tiny grenade, glued firmly to a base.
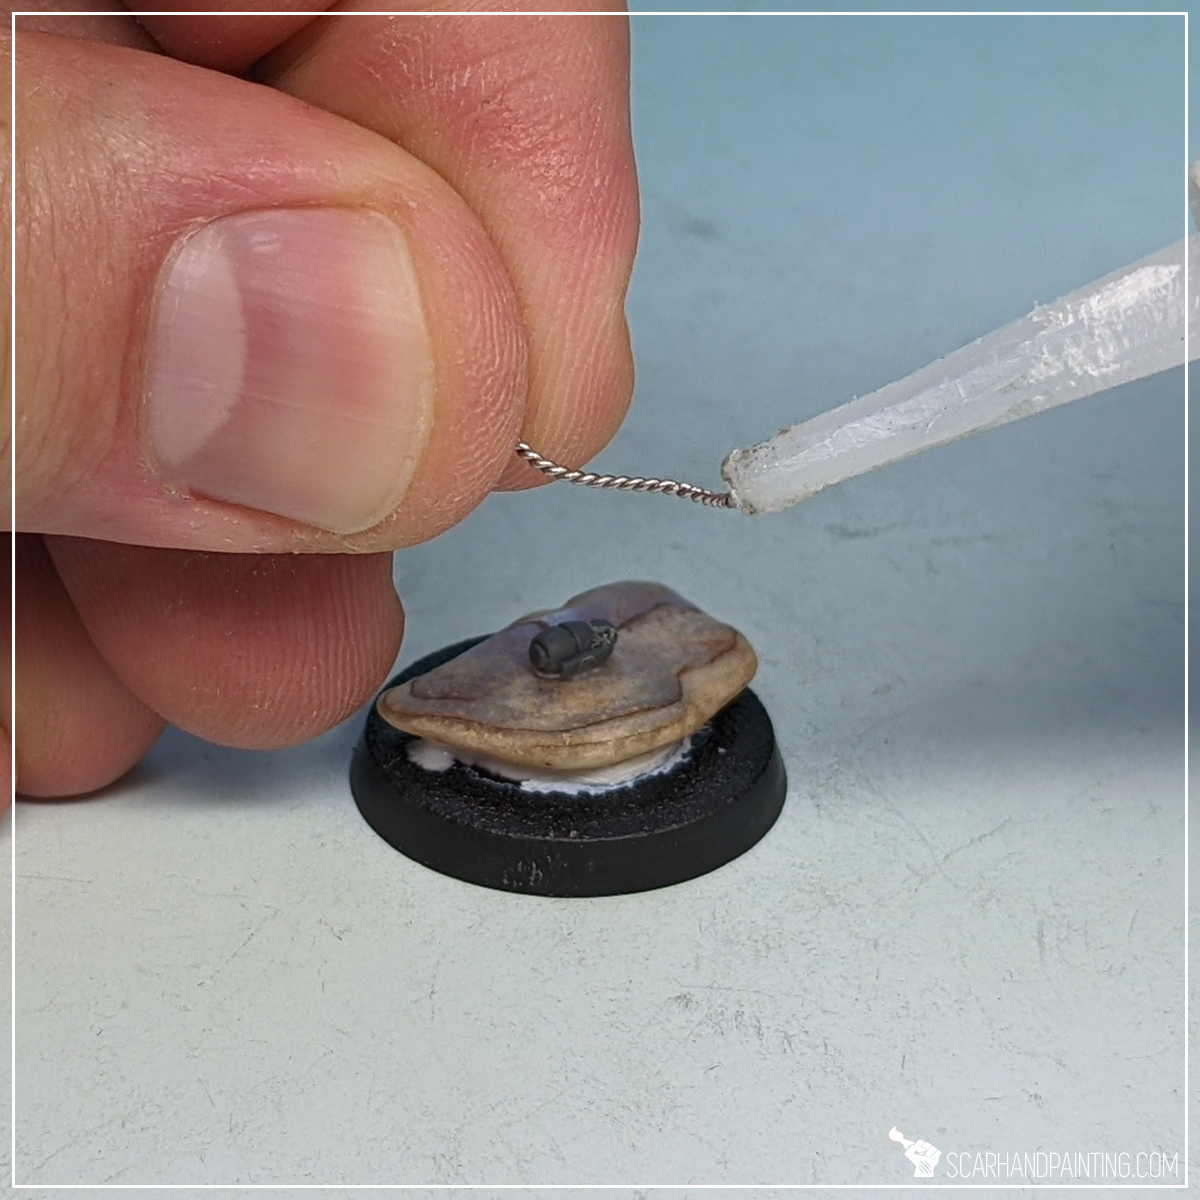
Step three: Mounting
Using cyanoacrylate glue I then glued a piece of wire into the hole.

Step four: Shaping
Once dried firmly, I then shaped the wire to resemble a basic smoke streak. This can be done with either tweezers or by using soft finger pressure on a wire rested on a rounded surface, such as a side of a brush etc.
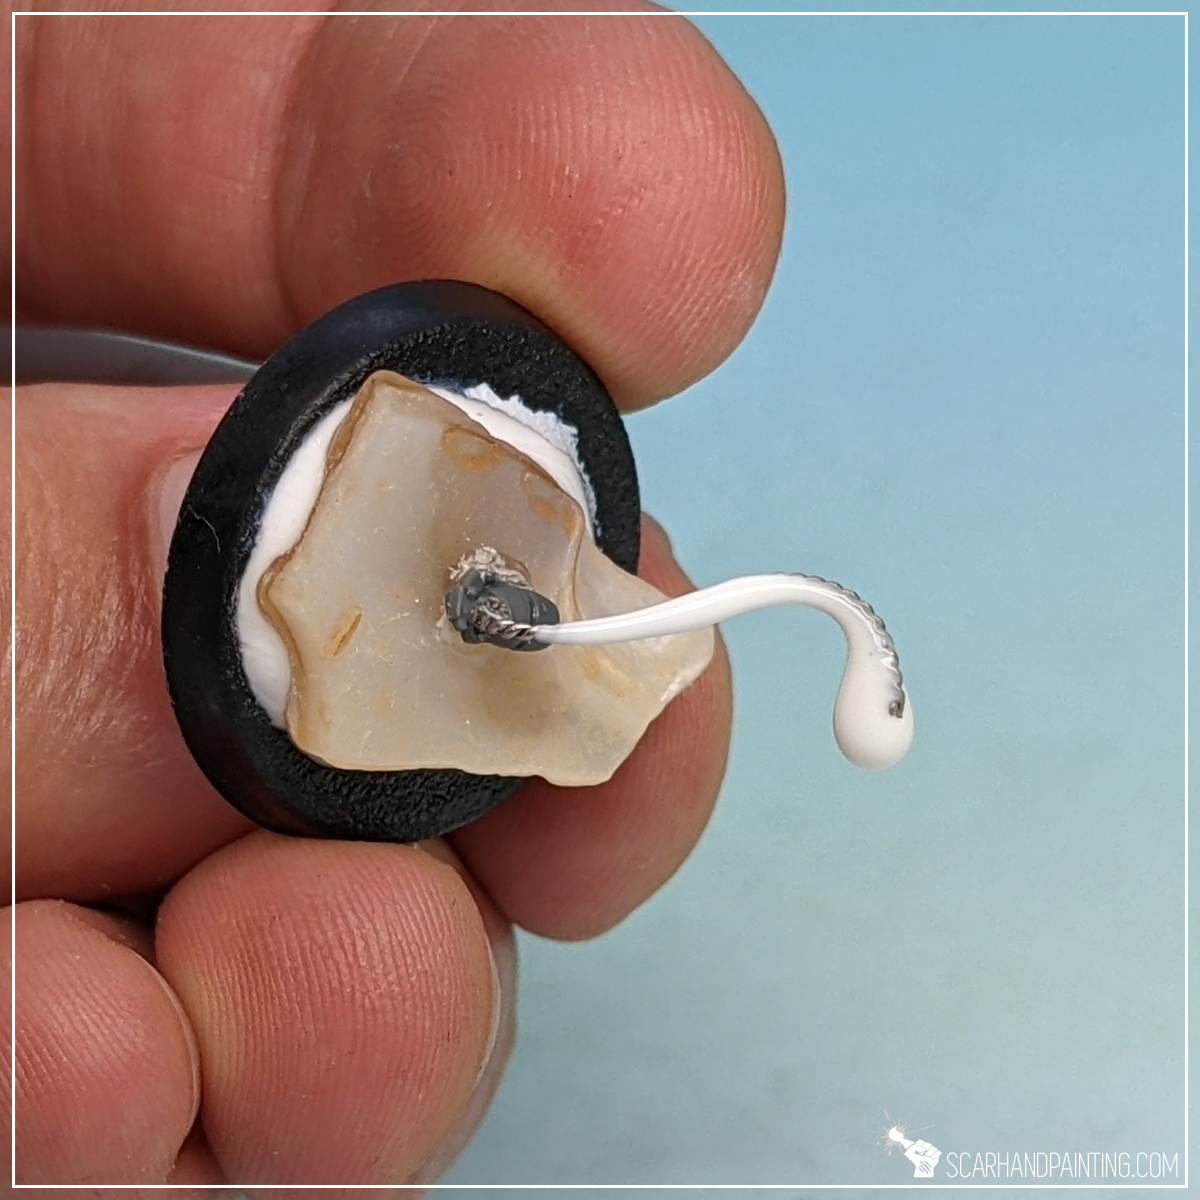
Step five: The Mixture
Next I applied some PVA glue and then cyanoacrylate glue onto the wire, in this order. I didn’t wait for these to bind…

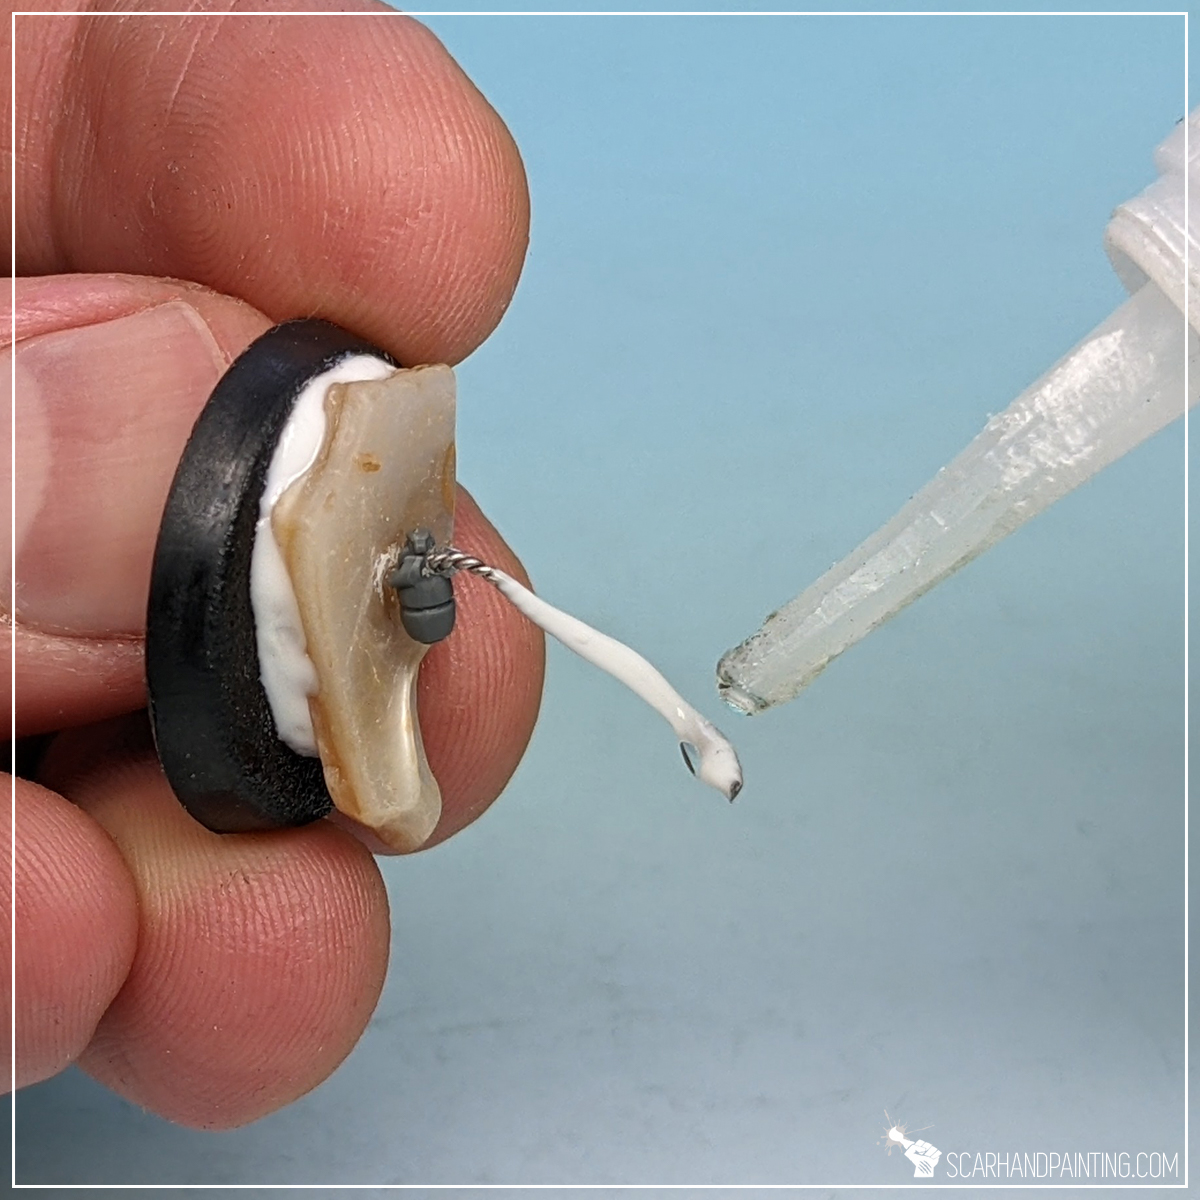
Step six: Volume
… and glued a bunch of tiny balls around to form volume. This step requires some creativity and precision, but gets much easier with a pair of slightly wet tweezers and a bowl of ready-to-use balls. Once again I advise you check this article out: Unlimited Tiny Balls for Modelling

Step seven: Finishing touches
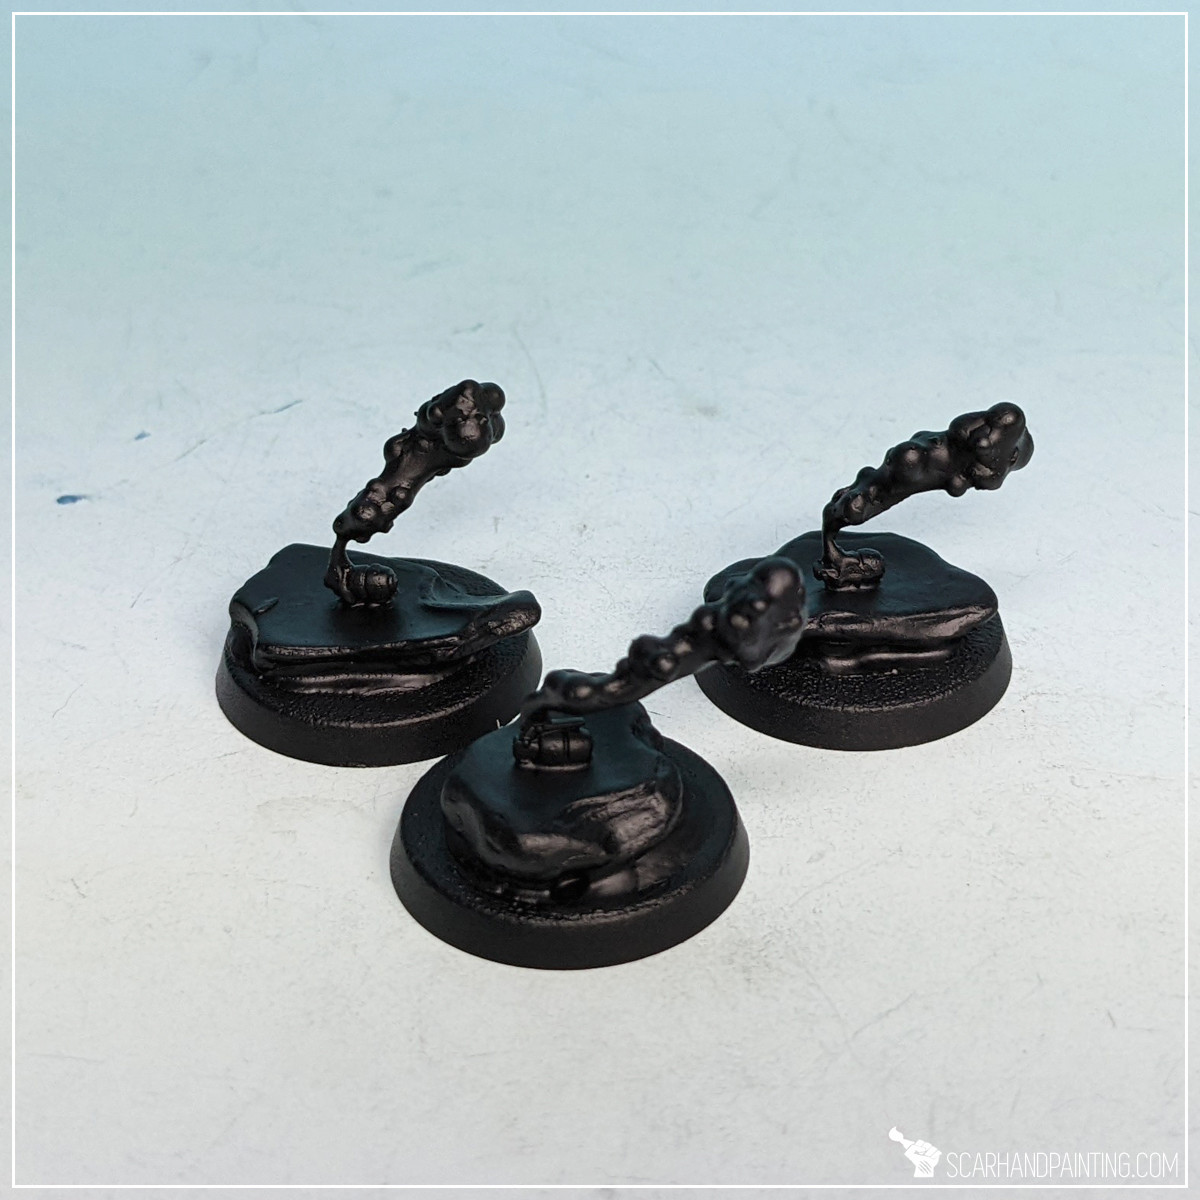
Finally I used cyanoacrylate glue with activator to add more volume around the wire and finalize the shape. Activated Super Glue does not run down so easily, allowing it to bind larger areas with a nice, smooth surface.
Done! Prime, paint and ready to play. Smoke away!
I hope you find this tutorial interesting. Be sure to let me know your thoughts in the comments below or via Facebook or Instagram. I would also appreciate if you considered sharing this content with your friends, who might find it useful. Finally if you are looking for a professional warhammer 40k miniatures painting service, be sure to contact me with this contact form. I always reply within 24 hours, after which please check out your spam folder.
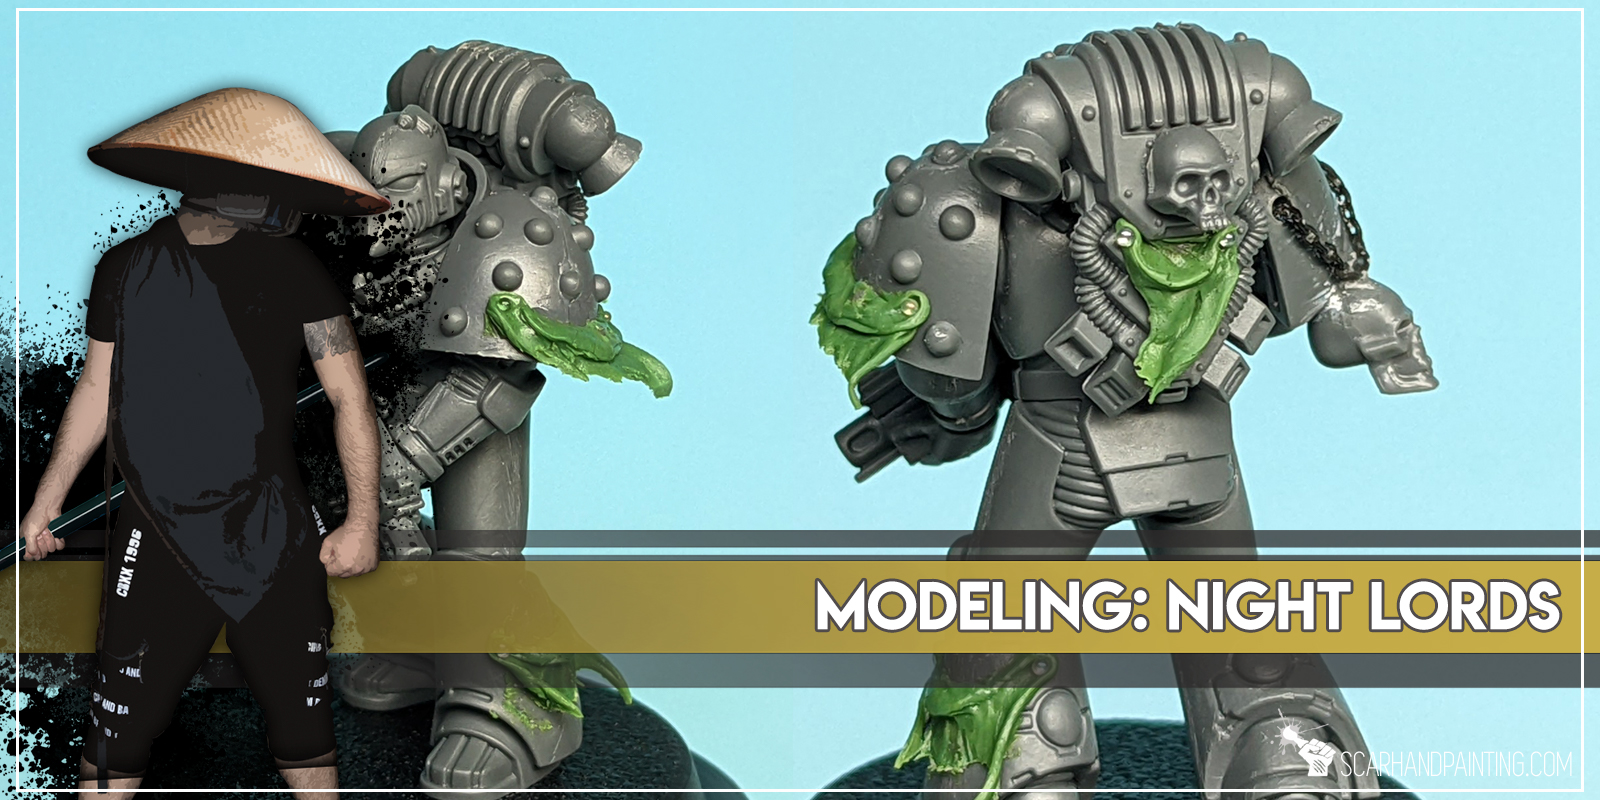
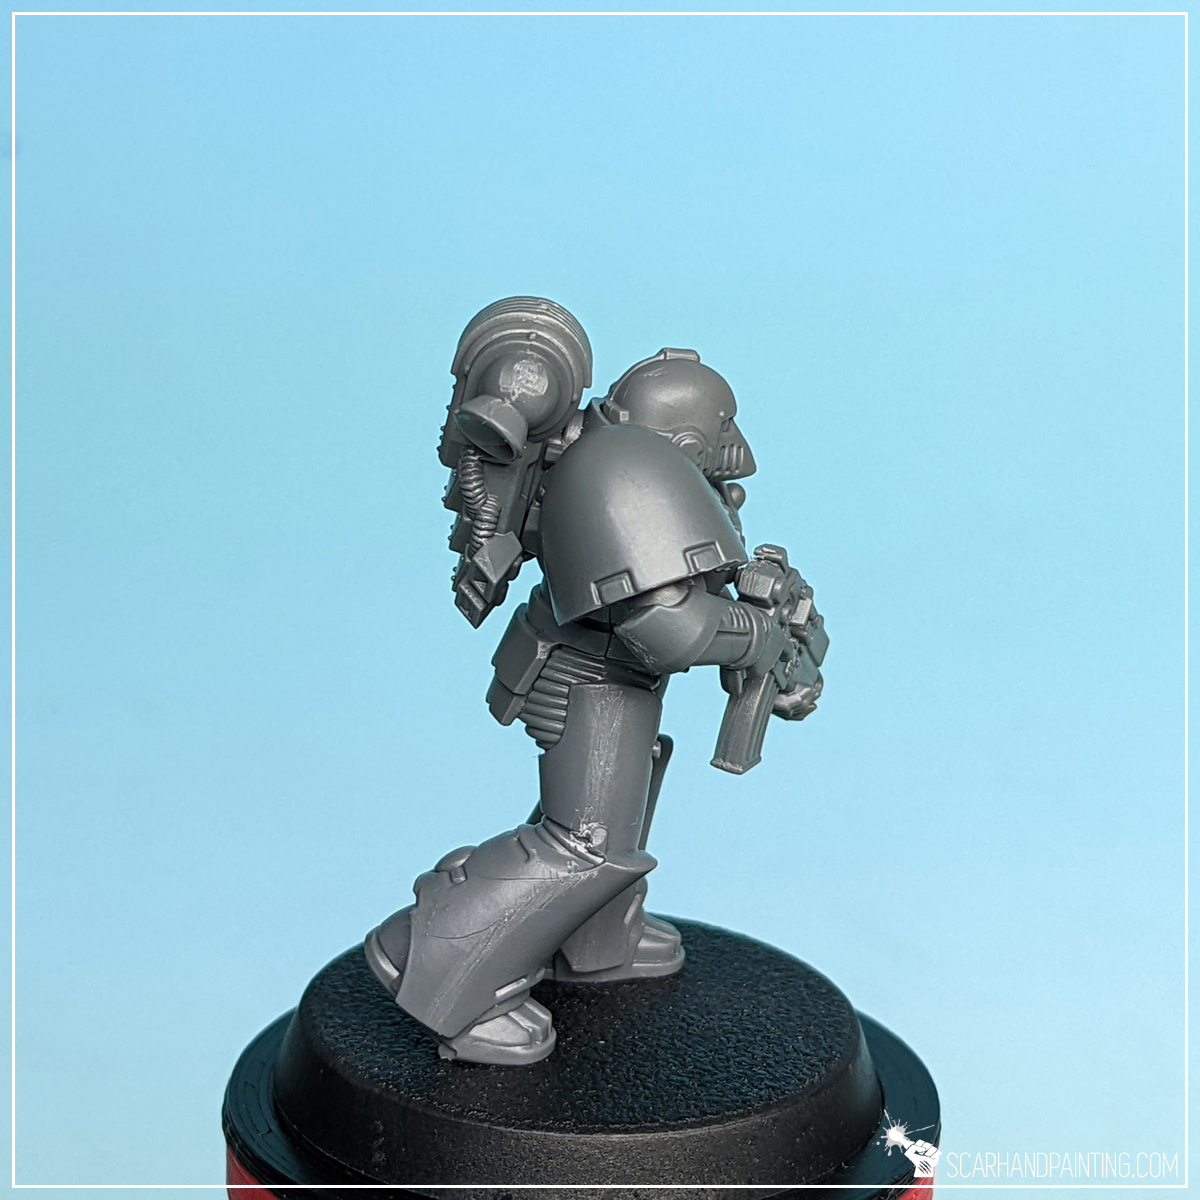
It is middle of the night. You and the boys just engaged Prey Sight and head out in search for the guilty. “In Midnight Clad”, but not without some fancy ‘fleshy’ adornments. Time to pimp that Night Lords armor.
If this sounds like something that tickles your fancy, or if you just want to make your Horus Heresy Night Lords feel like the real Eight Legion, then this tutorial is for you. Ave Dominus Nox!
Before we start, some notes:

The Basics:
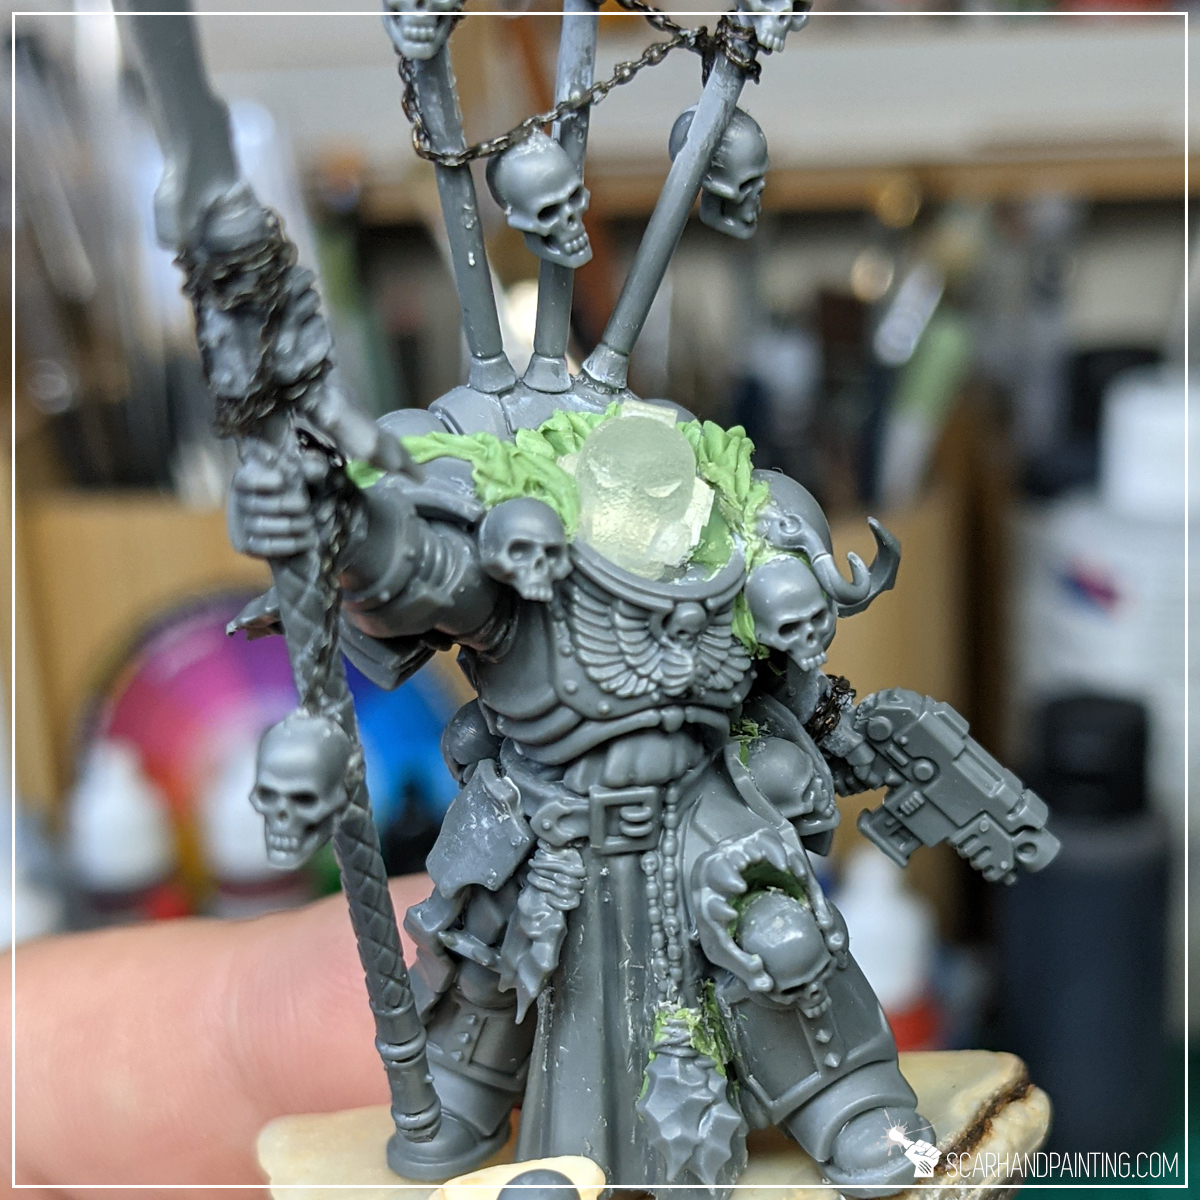
Before we head into the night to wreak sculpting havoc, let’s go through some basics. Night Lords are all about skulls, chains, flapping coats of tanned flesh, hooks, bones and bat wings. Some of these are easier to get than others. Skulls come in a phenomenal package straight from GW. Bones and hooks are plenty amongst Games Workshop boxes, be it Drukhari, Savage Urruks, Kroot, Skeletons and more. Getting these is usually as simple as asking around friends who might have a pile of leftovers. Bat Winged Helmets are really something that you’d rather get 3d printed as the effort and time required to sculpt these greatly exceeds the value. As for all the rest, here’s where I come in, to help out my VIII Legion brothers.
Chains:
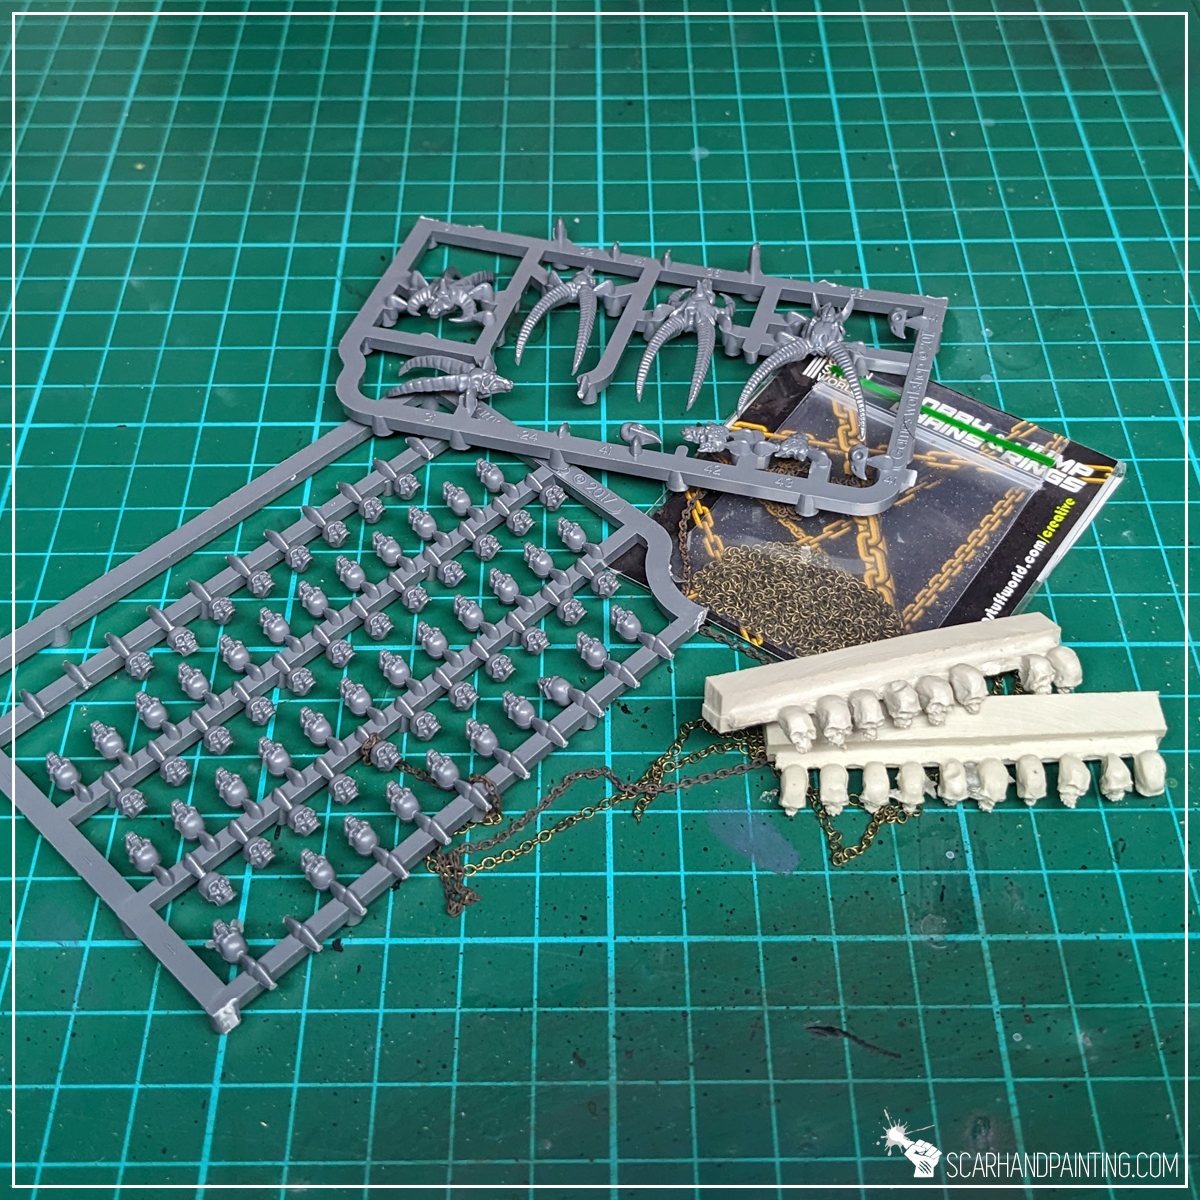
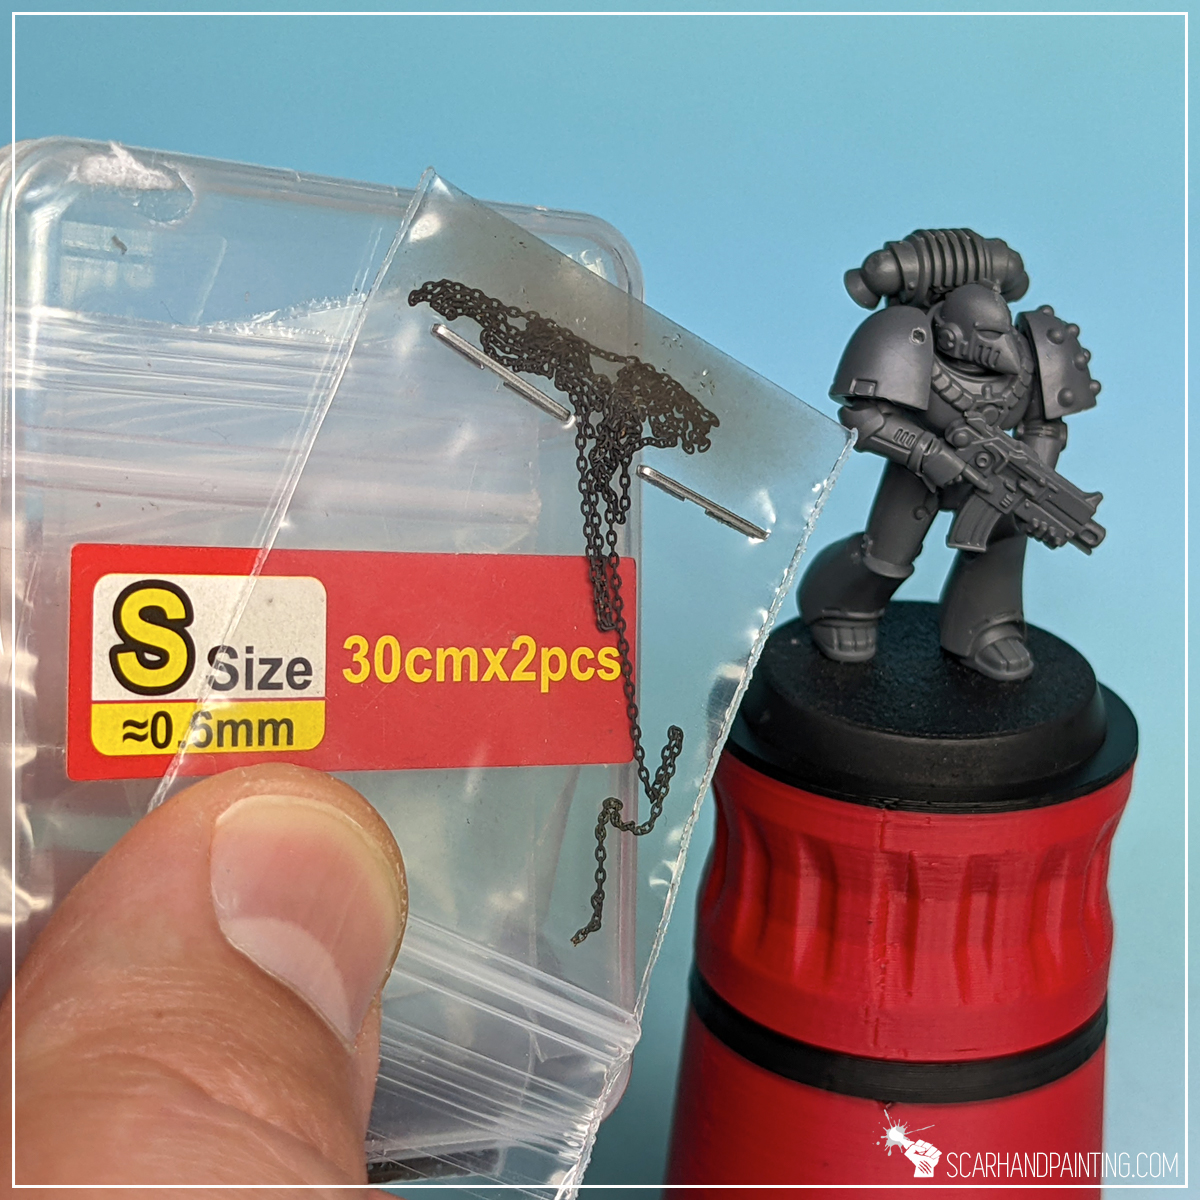
I’ve been searching for a cheap source of miniatures-compatible chains for a long time. Went through some of the classic wargaming related products, like Green Stuff World, but without good results. Most chains were just too big to fit the theme. Finally after a thorough research I found Trumpeter Universal Fine Chains and for the love of the Long War, my hobbying changed instantly. These come in three different sizes, are relatively affordable and are great to work with. They tend to come a bit rusted, but it is all the better as paint and glue stick stronger this way.
Ok, so we have them chains. This is how I go about mounting them on miniatures.

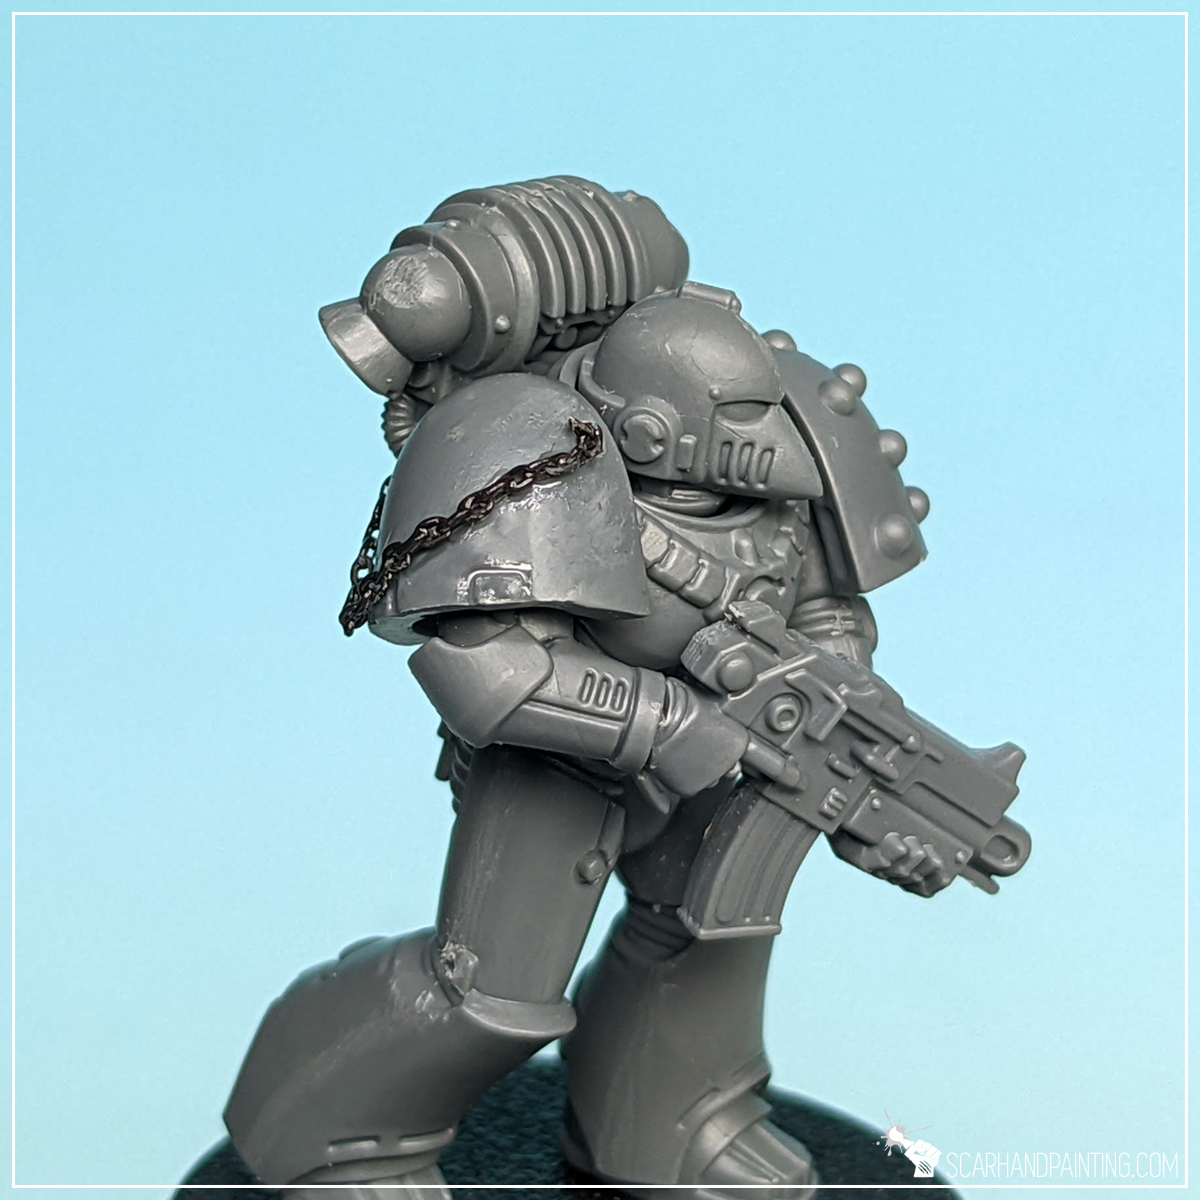
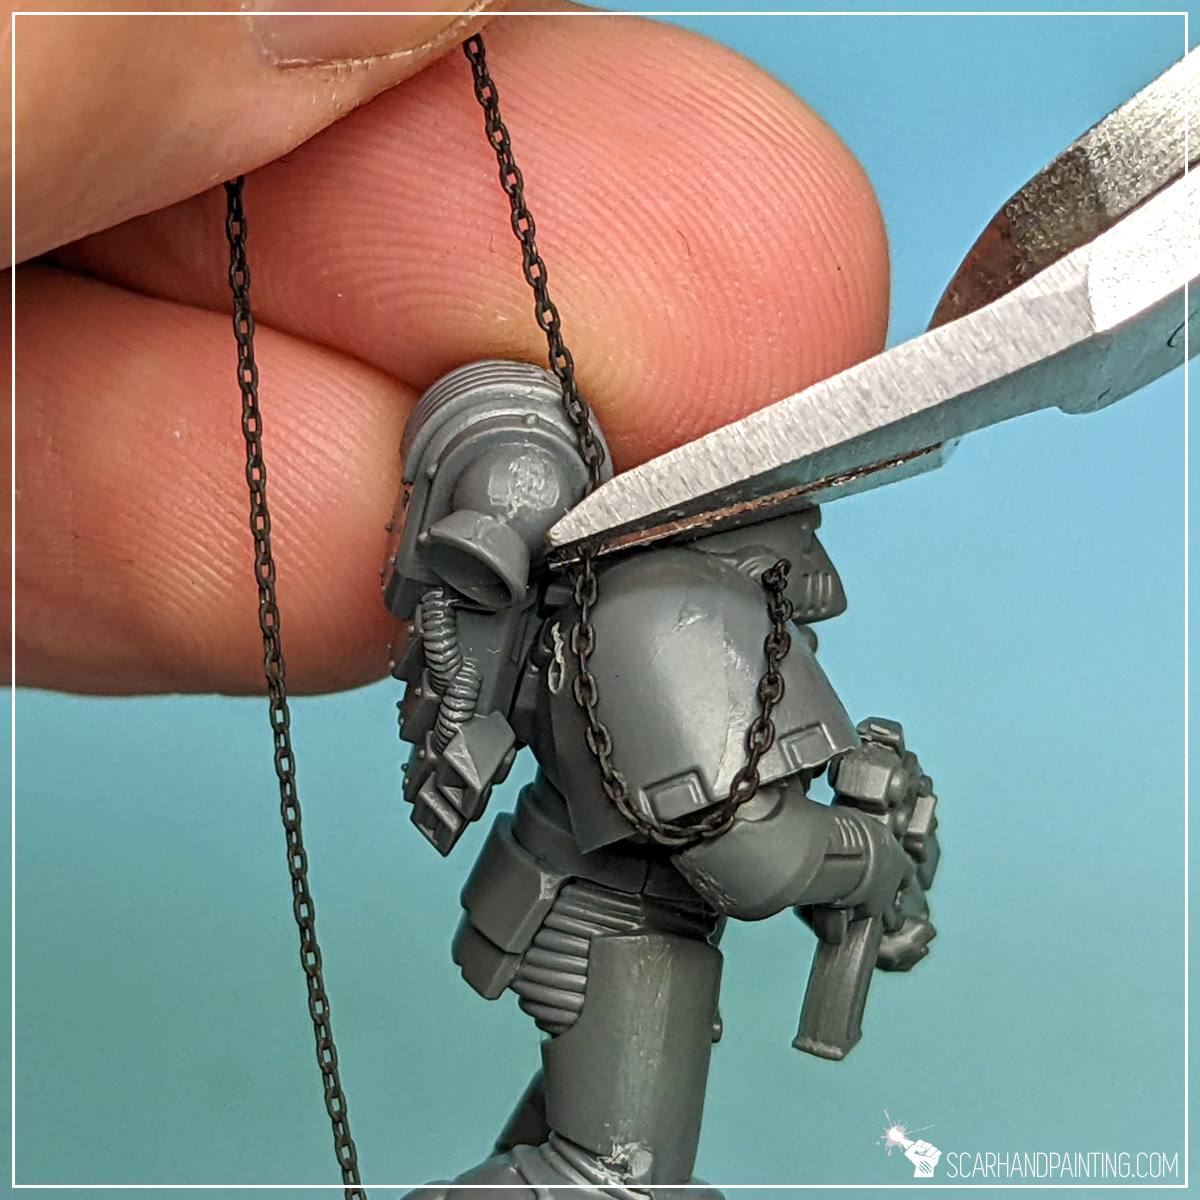
Step one: Drill
First I pick spots where I want to mount the chain and drill small holes with a hand drill. At times I skip this part and hide ends of the chain behind pauldrons, or in recesses, but most of the time I like to have a clear spot where a chain is mounted at.
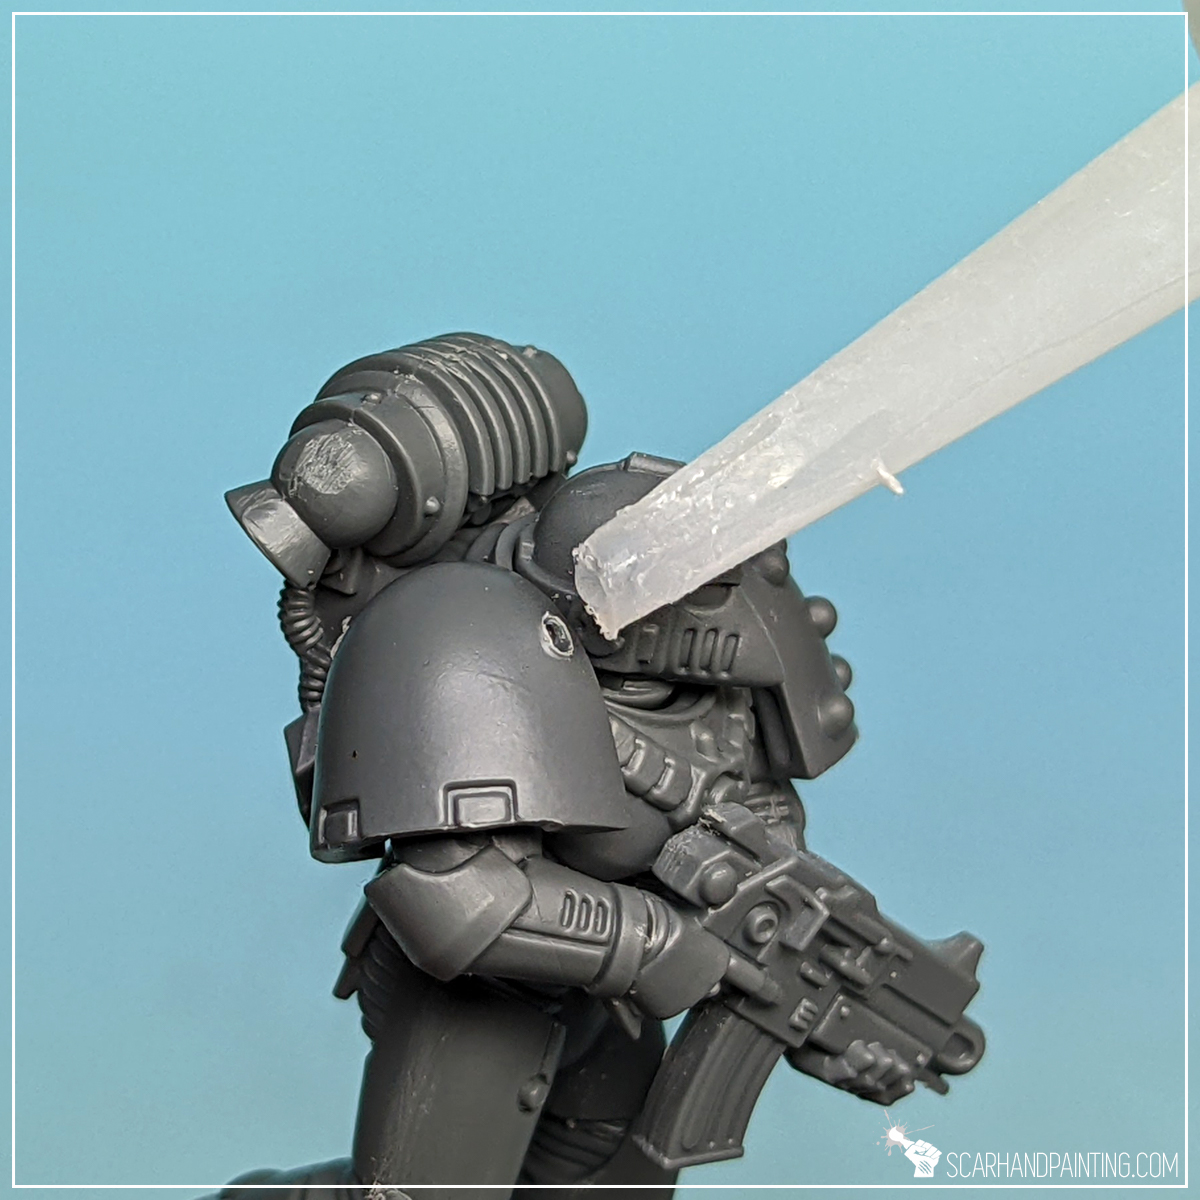

Step two: Glue
Next I apply a small drop of Cyanoacrylate glue (Super Glue) on the hole and use tweezers to insert the end of the chain inside. This way I have a chain mounted strongly onto the miniature and doesn’t have to worry about keeping it in place myself.

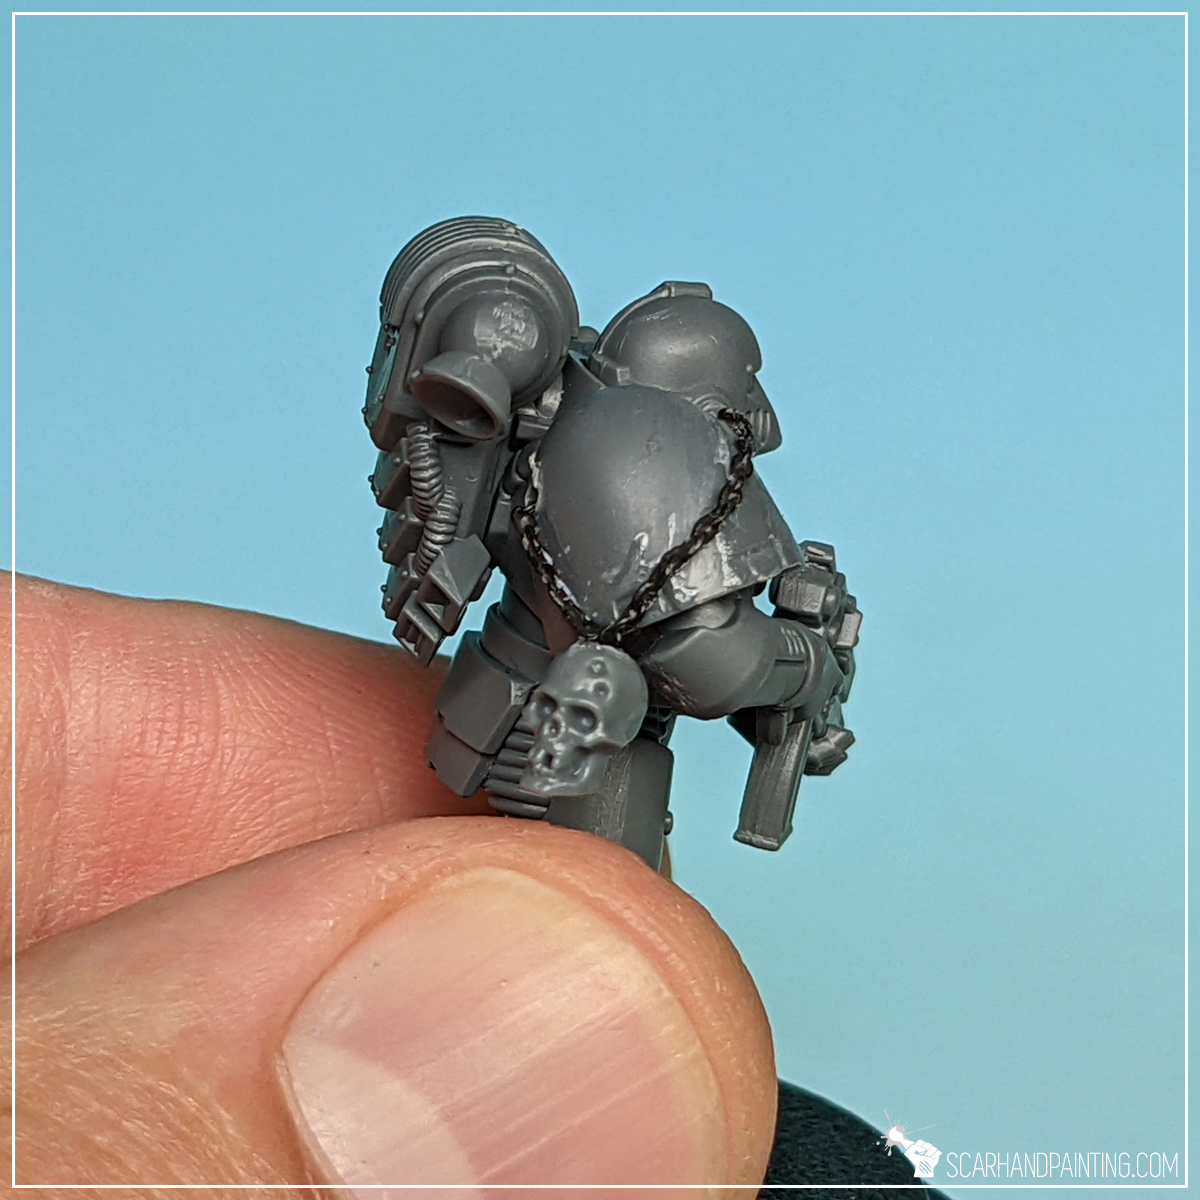
Step three: Other end
I then fit the chain on the surface and between the holes. Once I am satisfied with how it looks I cut a proper length and glue the other end inside another hole.


Step four: Seal it
With everything dangling around it’s time to seal the chain in place. To do this I apply a drop of Super Glue onto a toothpick and slide the tip around the chain. This is also the last moment to add some shape corrections before it’s finalized.

Skulls:
Skulls are perfect to add a bit of character to your miniatures. They’re positive, always grinning and just funny to have around. Fortunately for us, the hobbyists, Games Workshop put out the best possible source of Skulls in the history of wargaming – the Citadel Skulls! Now what’s left is to siimply mount them onto our miniatures. Here’s how I go about it.
Option A:
I drill a small hole in the upper part of a skull to then mount it on a chain, partially supported by a piece of plastic in close vicinity to the point of contact. I use Super Glue to bind it in place.

Option B:
I mount a piece or an entire skull in place with Super Glue. This works very well as a piece of ornamentation.
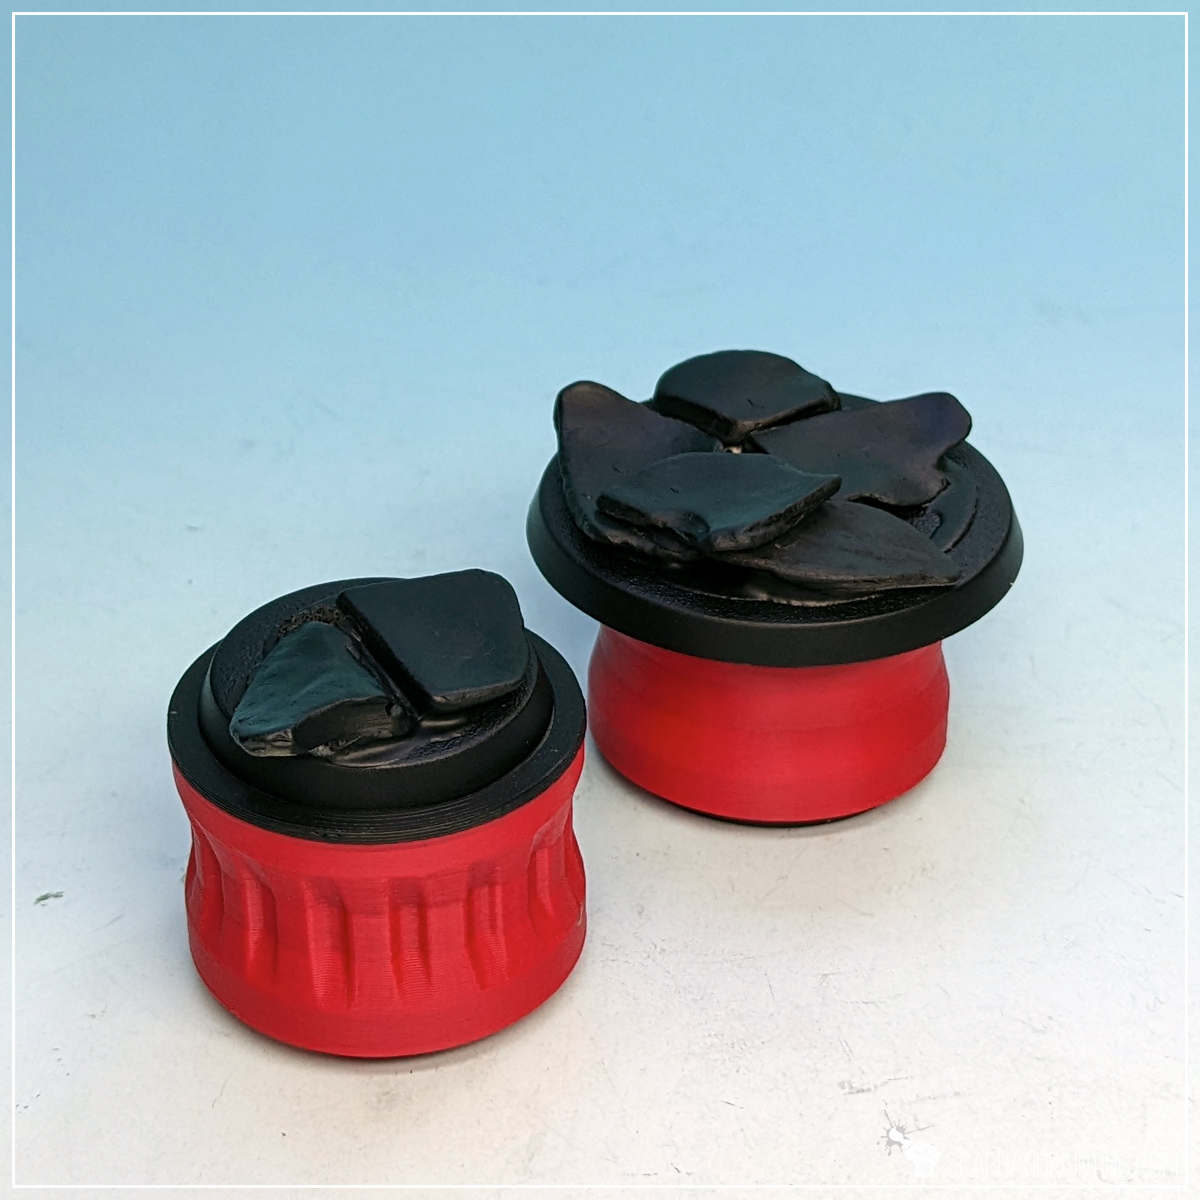
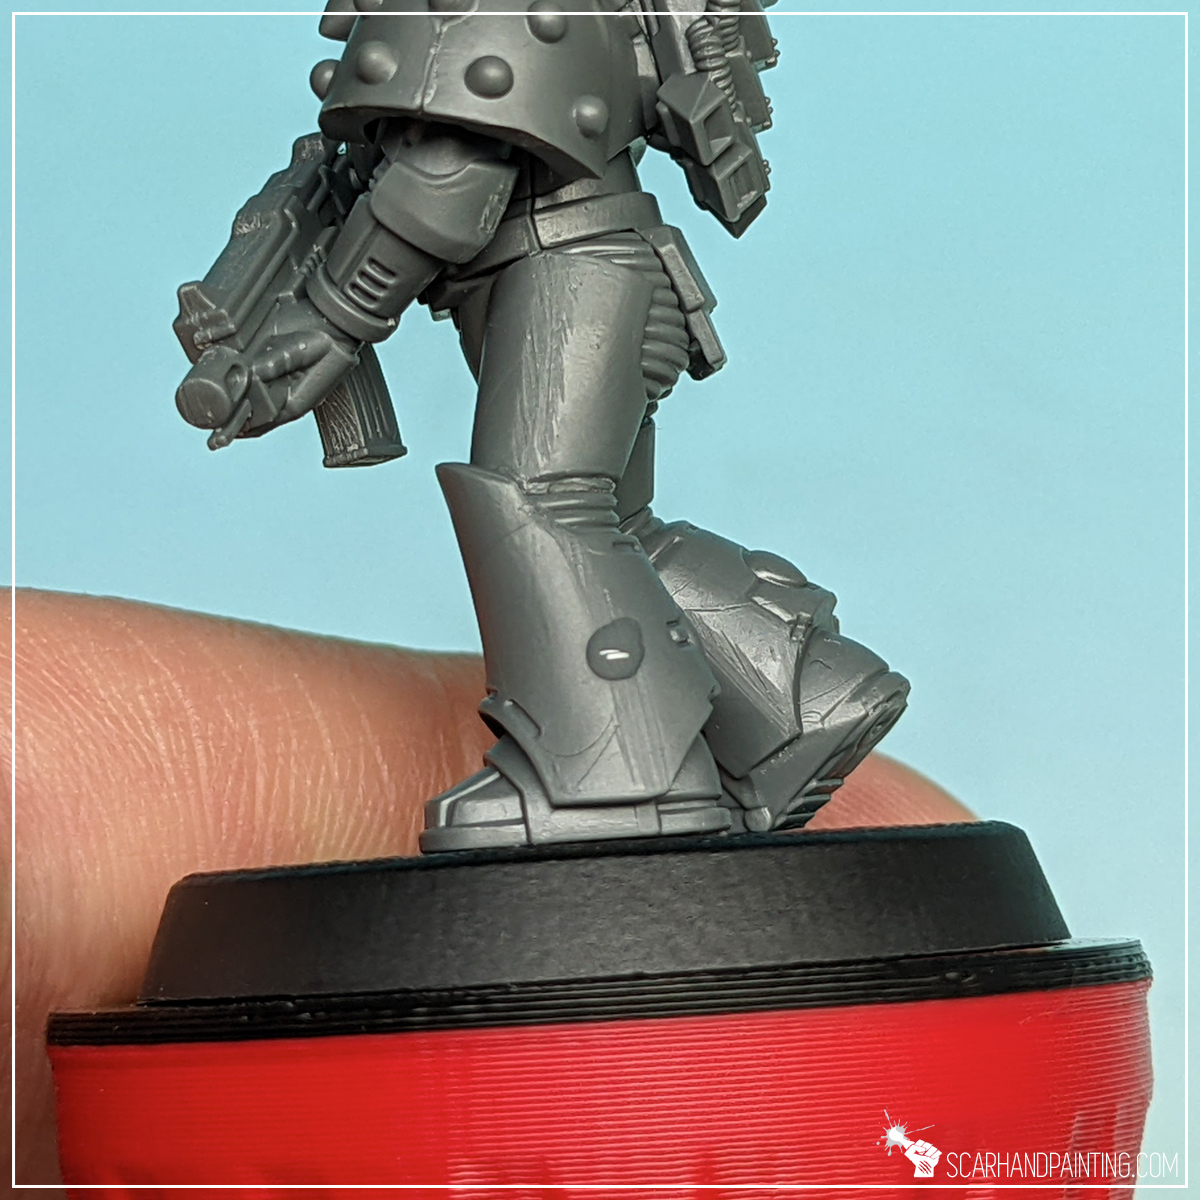
Flesh:
Alright, here’s what most of you really came here for. Sculpting tanned flesh.
The process itself is rather easy and does not require sculpting skills. I started by mixing Green Stuff into an evenly colored green mass, then divided it into few small balls.
Step one: Glue
Similarly to other sculpting tutorials I begun ‘sculpting’ by applying a small drop of Super Glue into a chosen surface. This is to keep Green Stuff from coming off and sliding left and right during work.
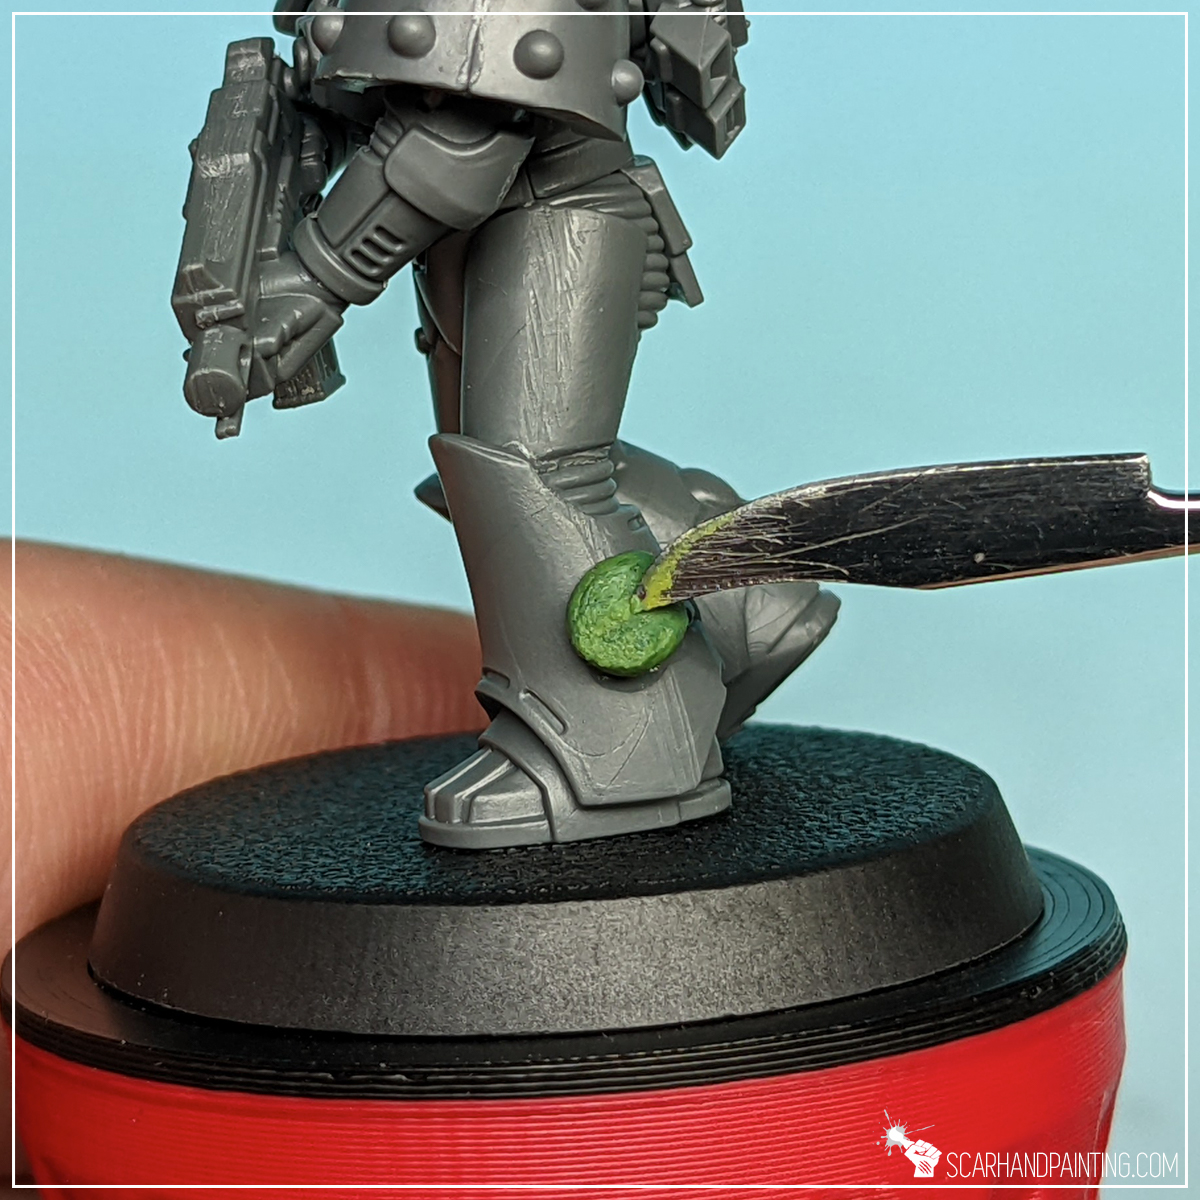

Step two: Green Stuff
Next I glued a small ball of Green Stuff on top, flattening it with a wet finger. Keeping your tools (and fingertips) wet makes Green Stuff less sticky.
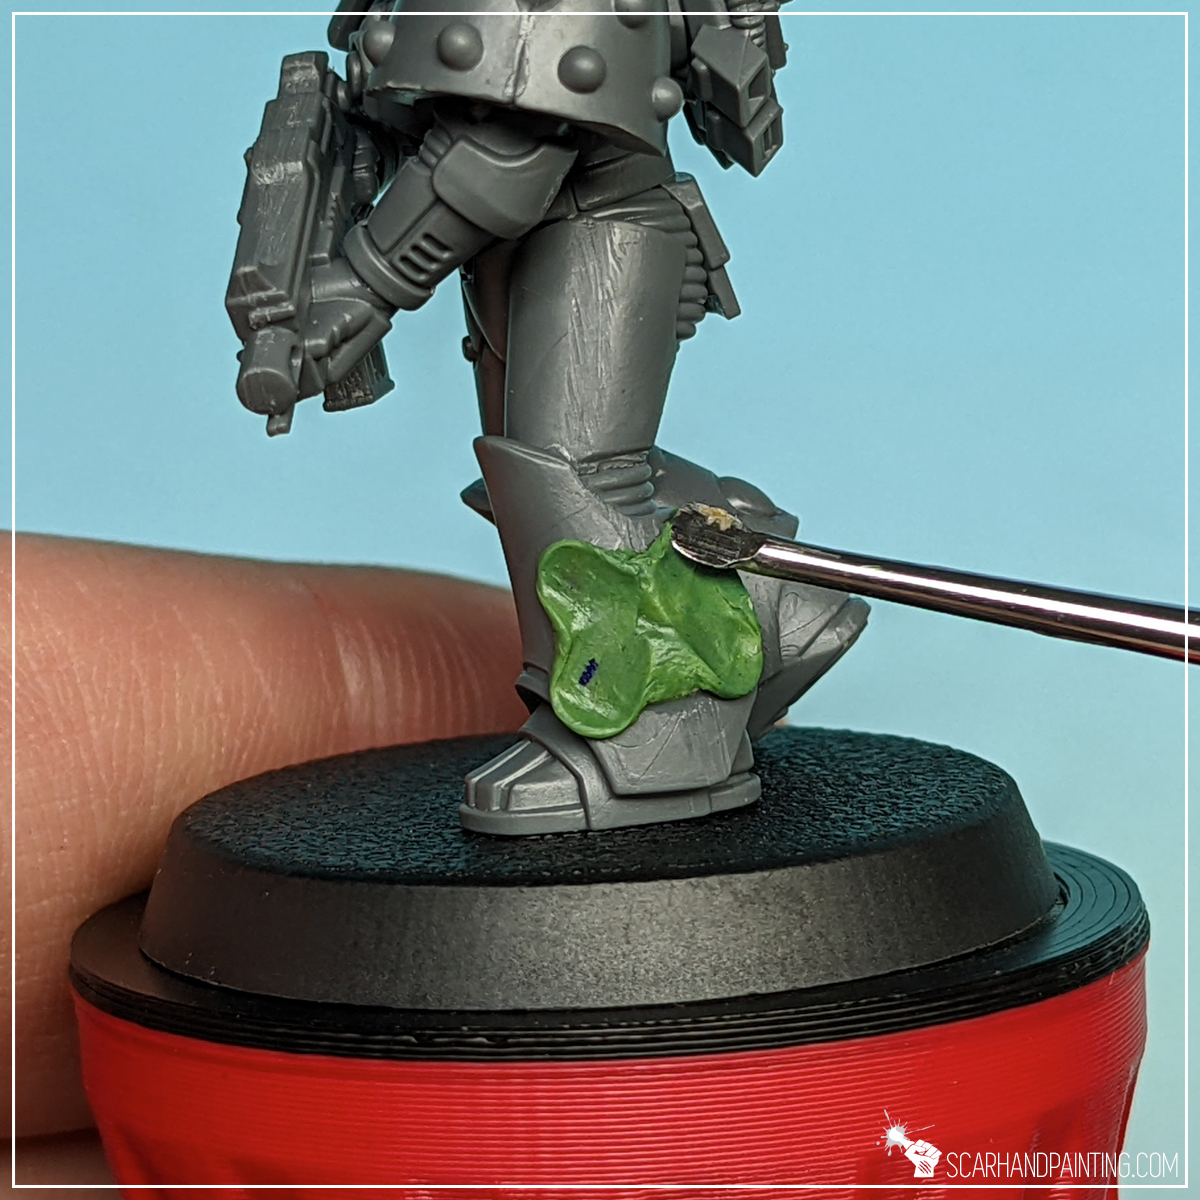

Step three: Basic shape
I then used the rounded tip of a sculpting tool to shape the ‘flattened ball’ into something resembling a butterfly. Four diagonal moves in total.

Step four: Upper edge
Next, using the same rounded tip of the sculpting tool I flattened the upper edge of the ‘batterfly’, resembling a flapping piece of skin. The more rough it is, the more texture it will retain later on so there’s no need to smoother it to perfection.
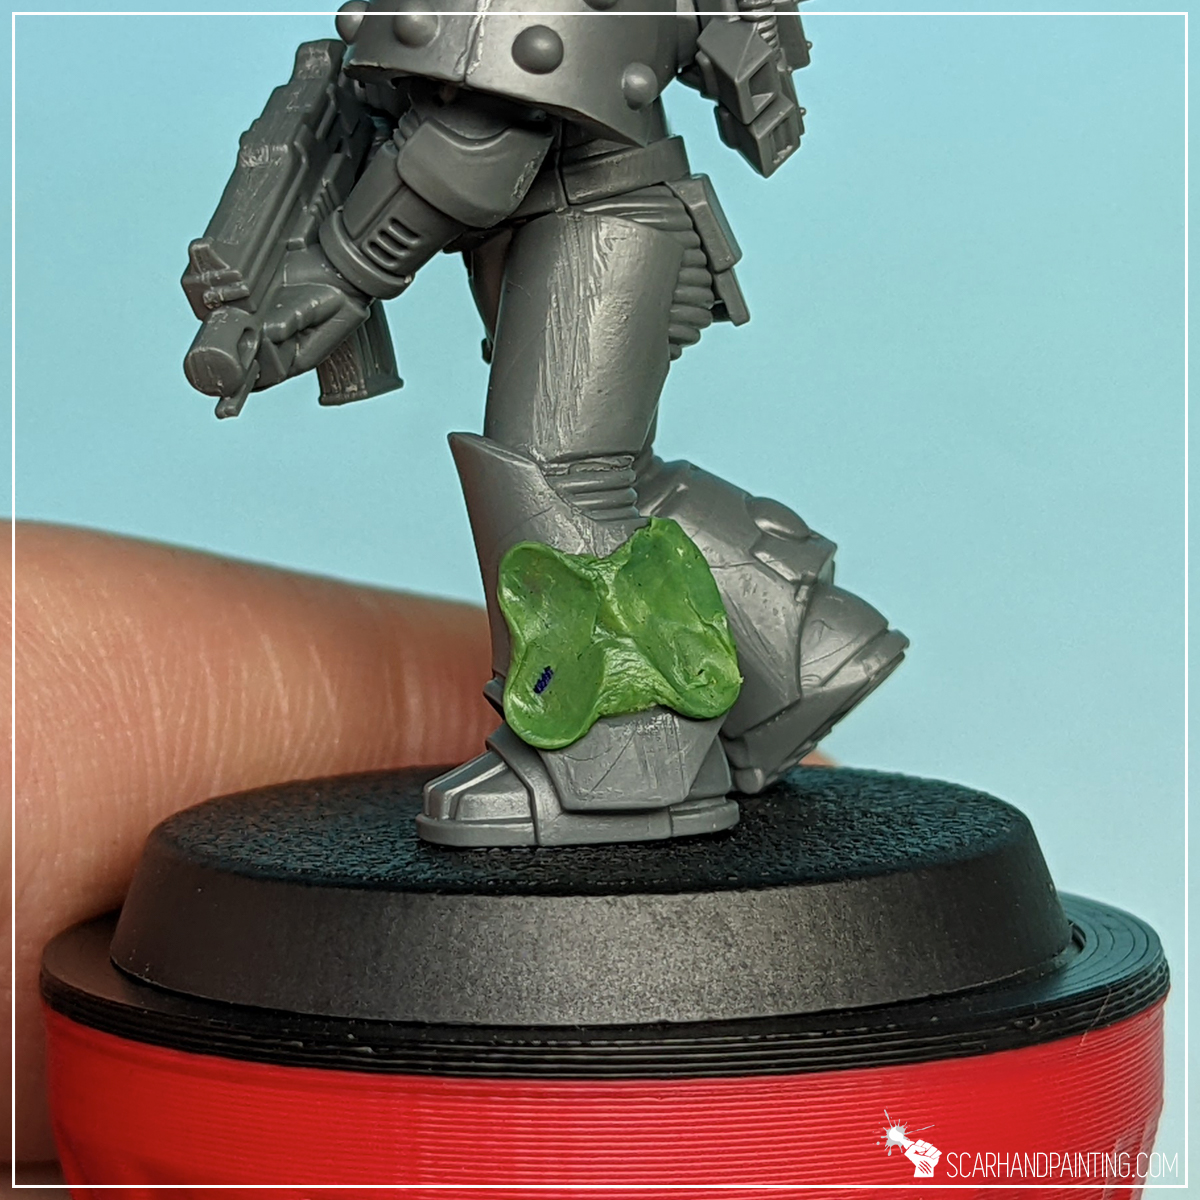
Step five: Lower edge
Finally I flattened the lower edge of the ‘batterfly’ just a bit, so there was a line of overhang below where glue kept Green Stuff in place.

Step six: Shaping
Using a pair of tweezers I then grabbed, teared and shaped the lower part of the sculpt to add an impression of movement. Job well done… although something still seemed missing.

Step seven: Studs
That’s what I’m talking about! A pair of studs to bolt a piece of flapping skin to the armor.
These can be made of anything really, starting with a tiny piece of a toothpick, or some sort of plastic leftovers. Personally I like to use nail cosmetic glass balls. You can read more about them in Unlimited Tiny Balls for Miniatures article.


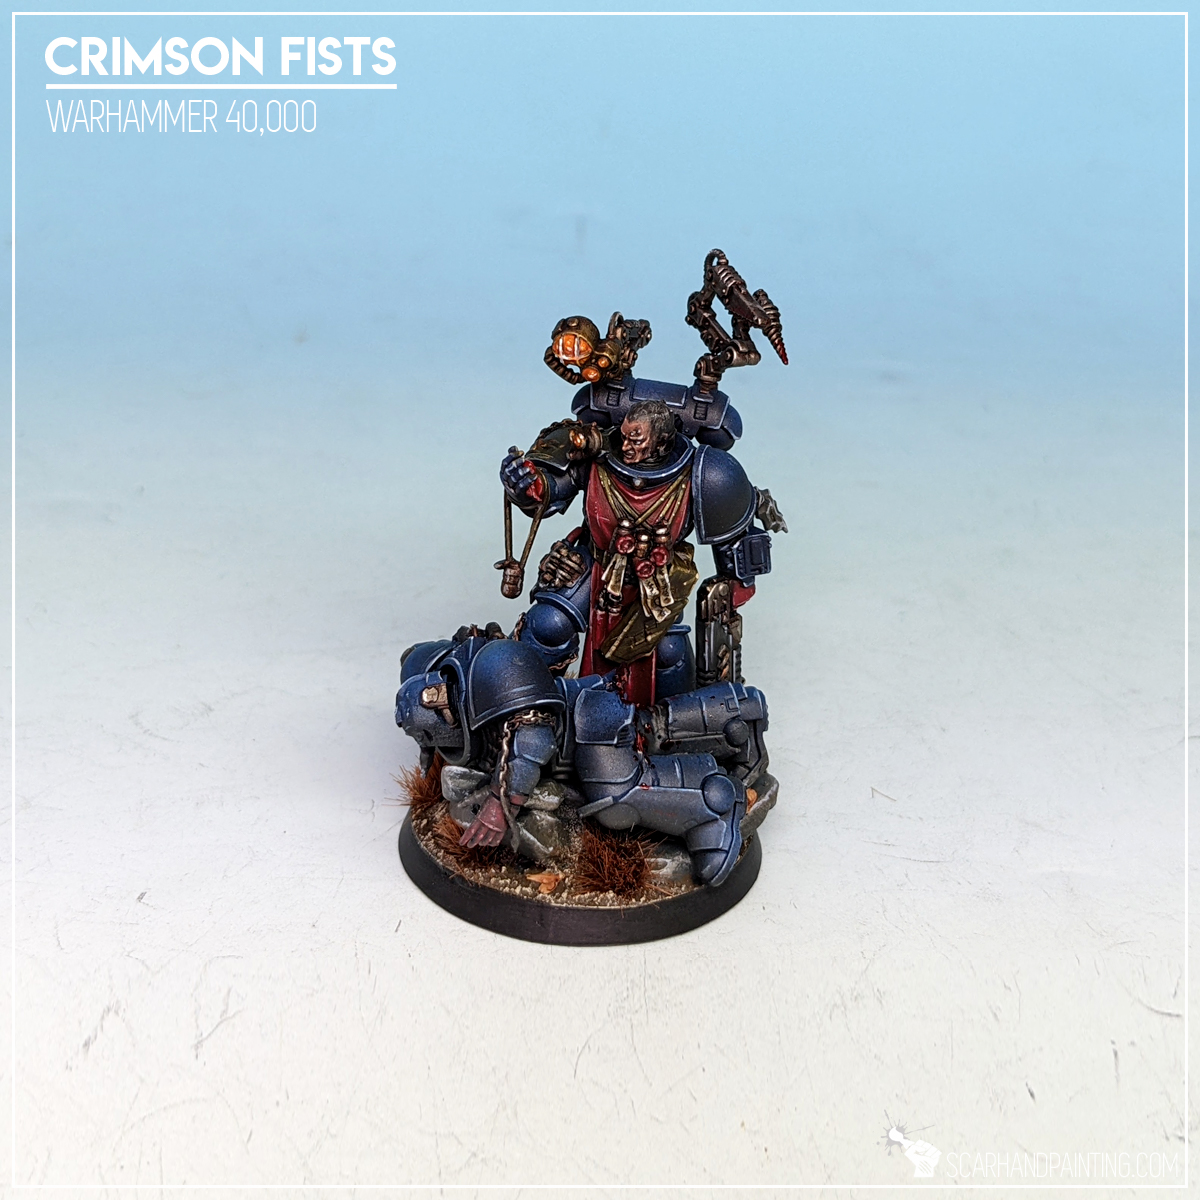
Now look at this serious lad. All the skulls, a chains and some fancy fleshy souvenirs from previous raids. I bet no one will joke around this guy!
Below are some pictures of how I went about skulls and chains on my personal collection:

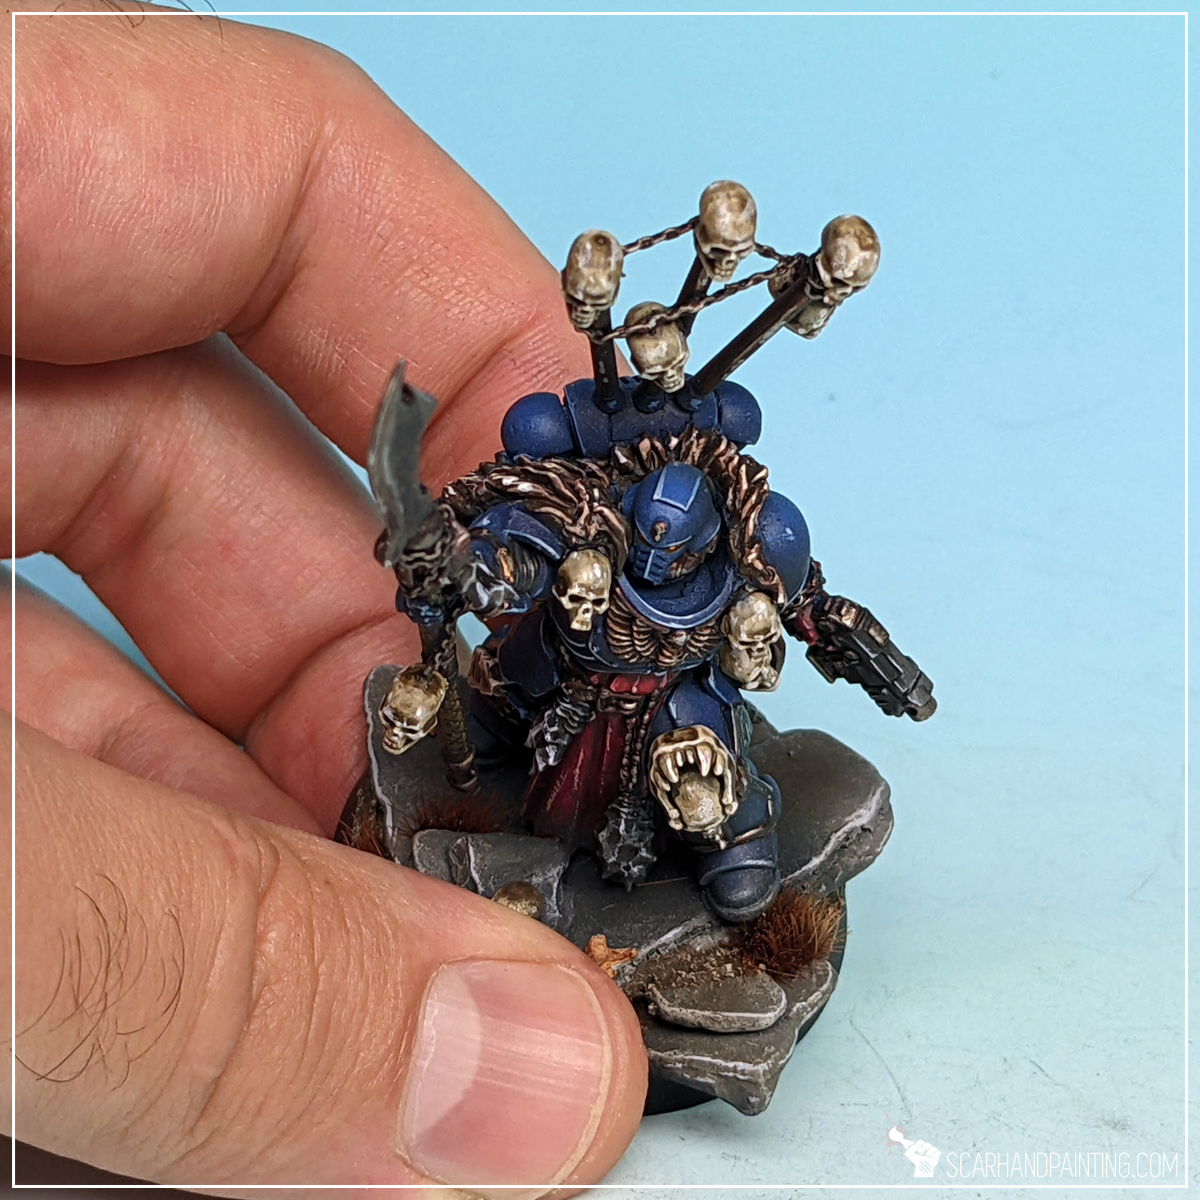
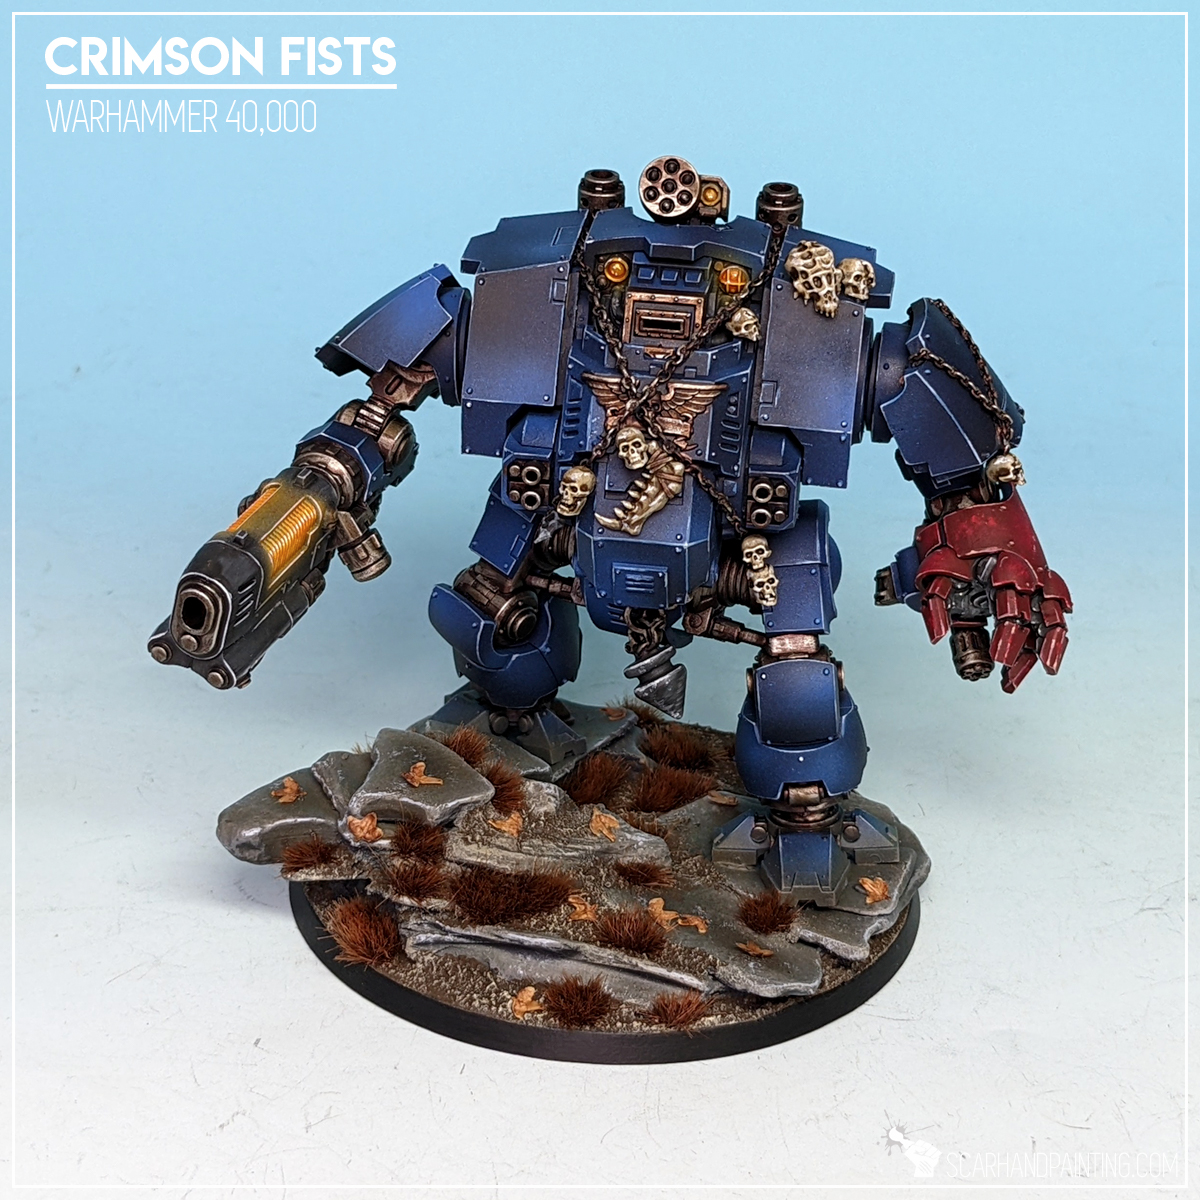


And if you require even more inspiration, why not check Gallery: Crimson Fists, for plenty more pictures of my heavily Night Lords themed 40k army. Ave Dominus Nox!
I hope you find this tutorial interesting. Be sure to let me know your thoughts in the comments below or via Facebook or Instagram. I would also appreciate if you considered sharing this content with your friends, who might find it useful. Finally if you are looking for a professional warhammer 40k miniatures painting service, be sure to contact me with this contact form. I always reply within 24 hours, after which please check out your spam folder.
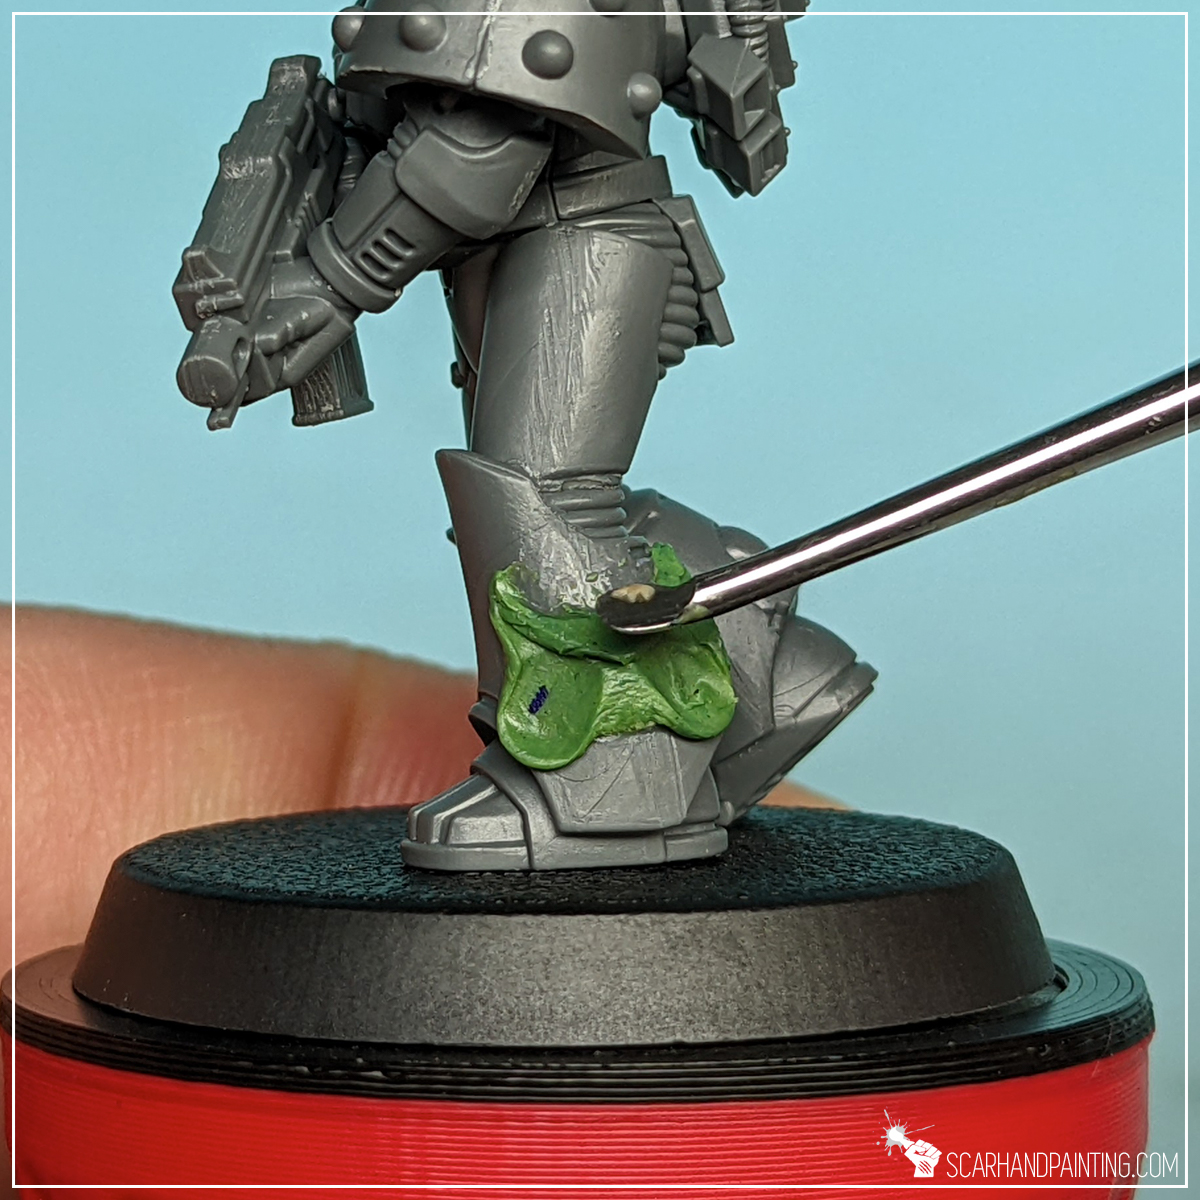
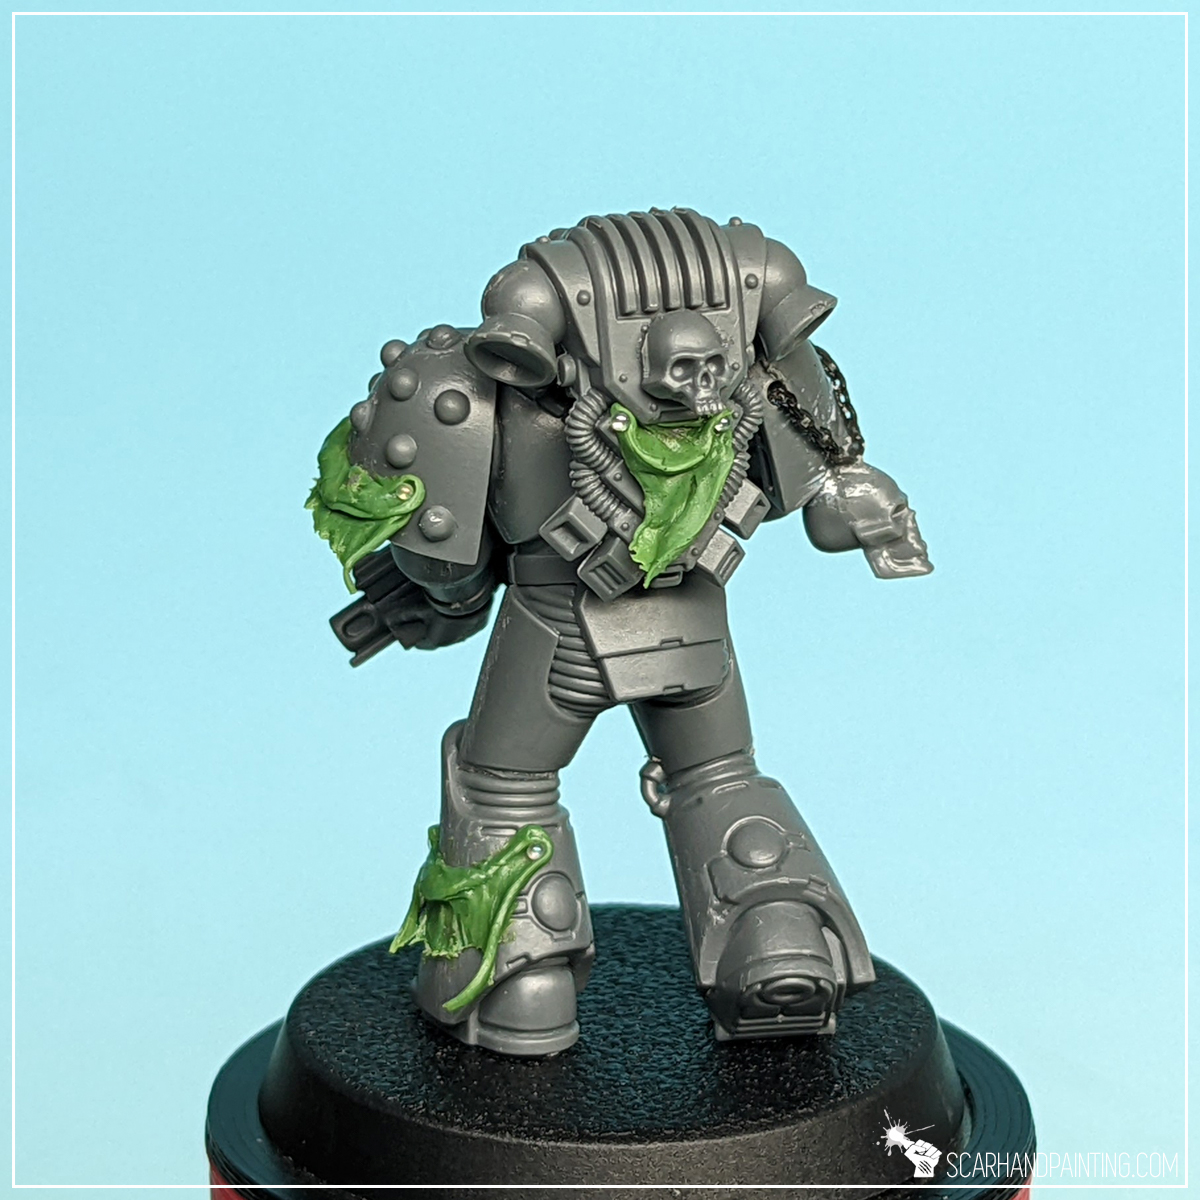
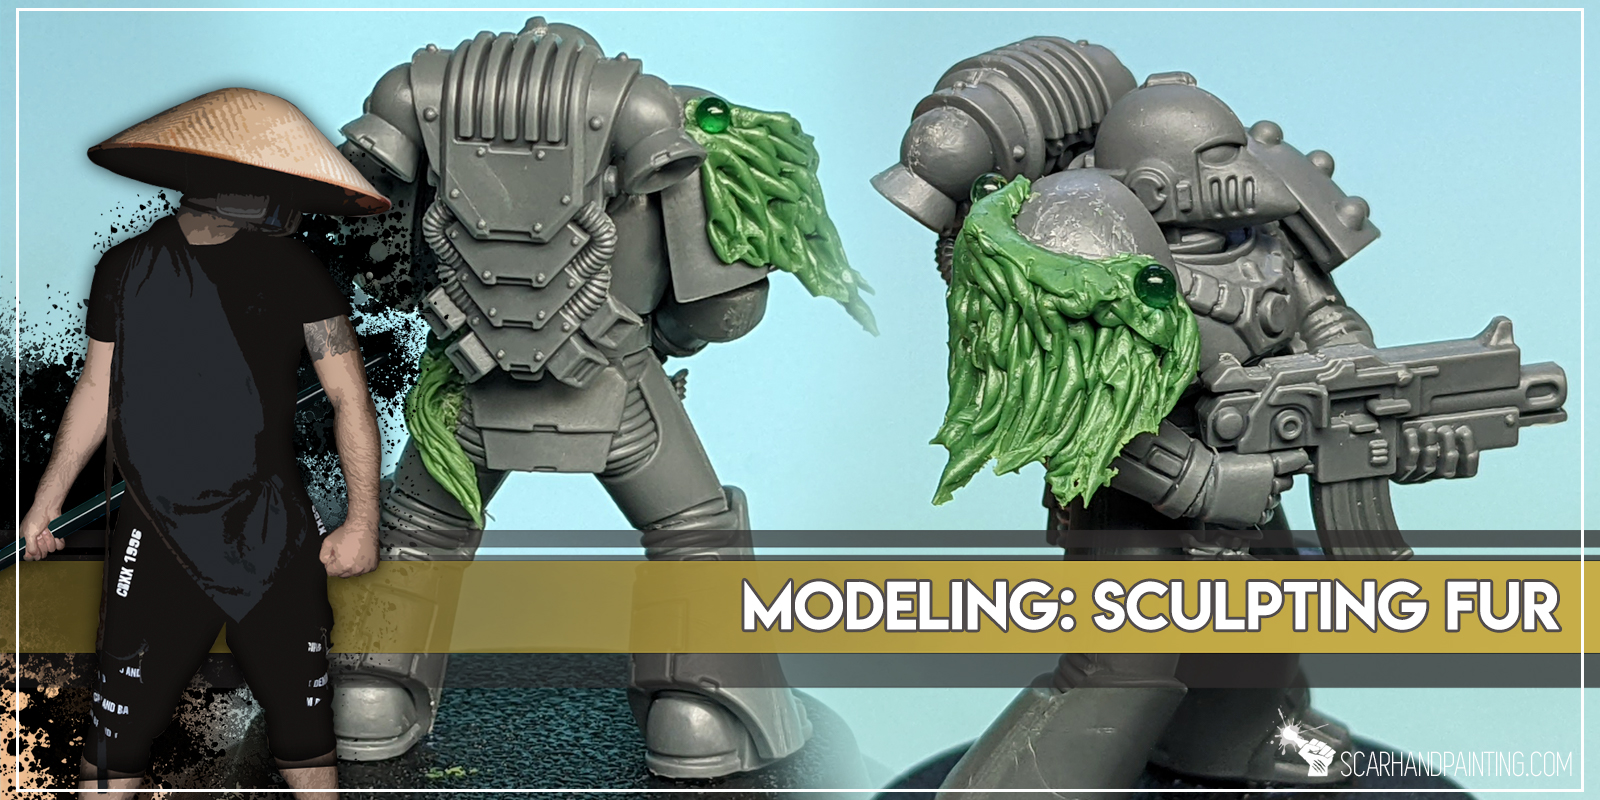
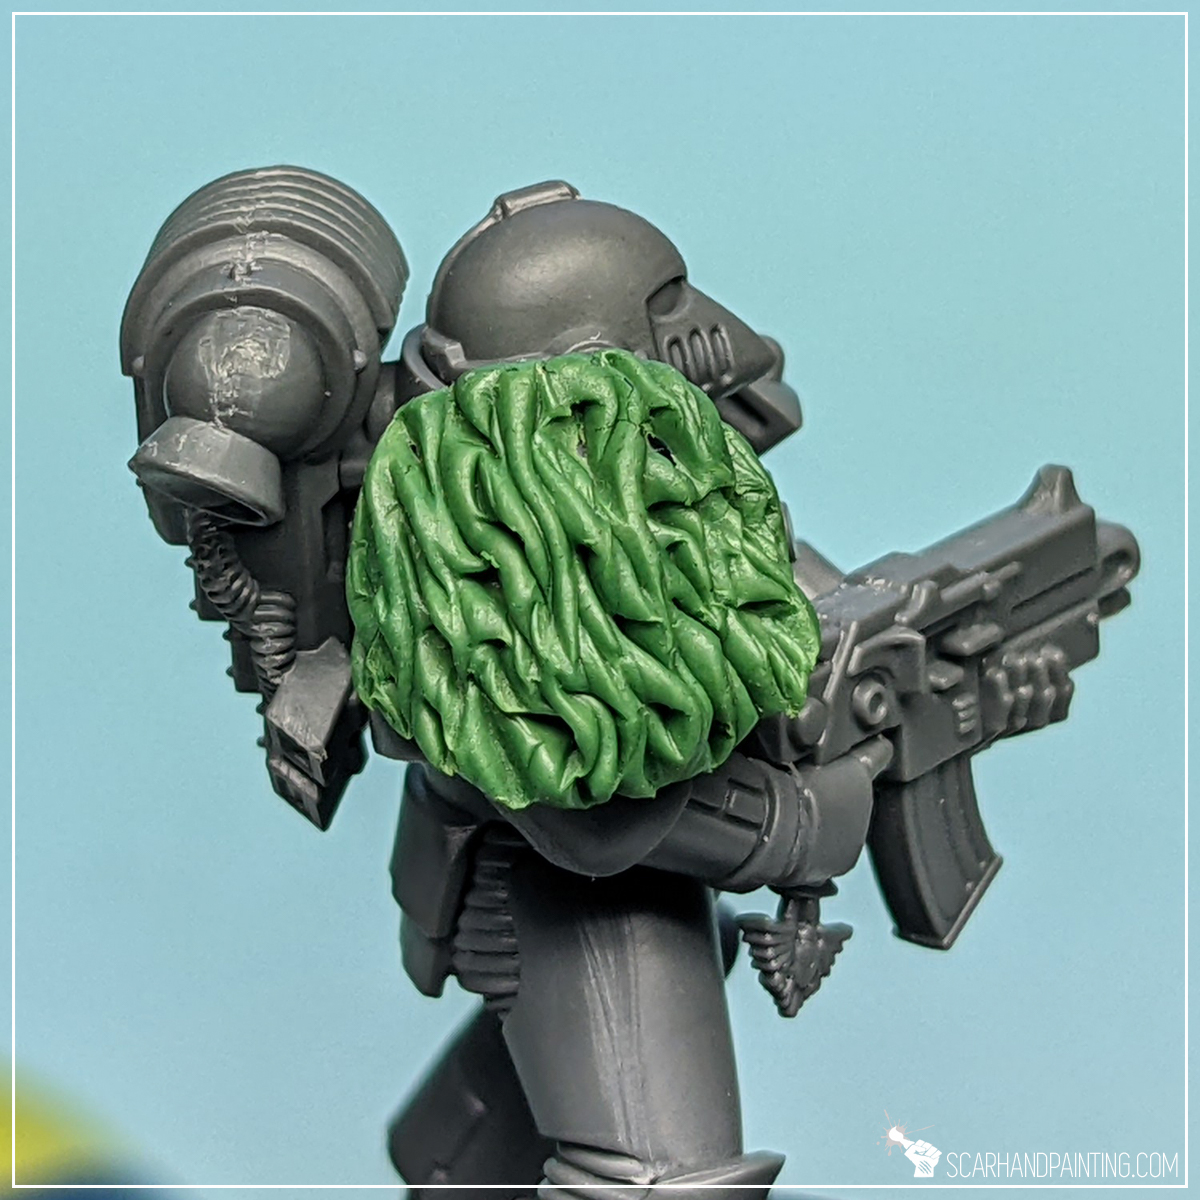
Sculpting fur on miniatures might seem a bit difficult. Still with new Codes: Chaos Space Marines hitting the stores, 2nd edition of Horus Heresy ravaging countless battlefields, Warcry: Heart of Ghur at the horizon and oldies such as Mordheim living the life as never before (not to mention furry going mainstream) – I’d imagine a lot of miniatures hobbyists wouldn’t mind a simple yet effective fur sculpting tutorial. I actually managed to post one many years ago, sadly it’s not up to nowadays standards. This is why I decided to completely revamp the article. If you’re one of the hobbyists aiming to adorn some of them Horus Heresy Space Wolves, or dig the furry style of Mordheim Kislevites – buckle up and enjoy, as this tutorial is for you!
Before we start, some notes:

The Basics:
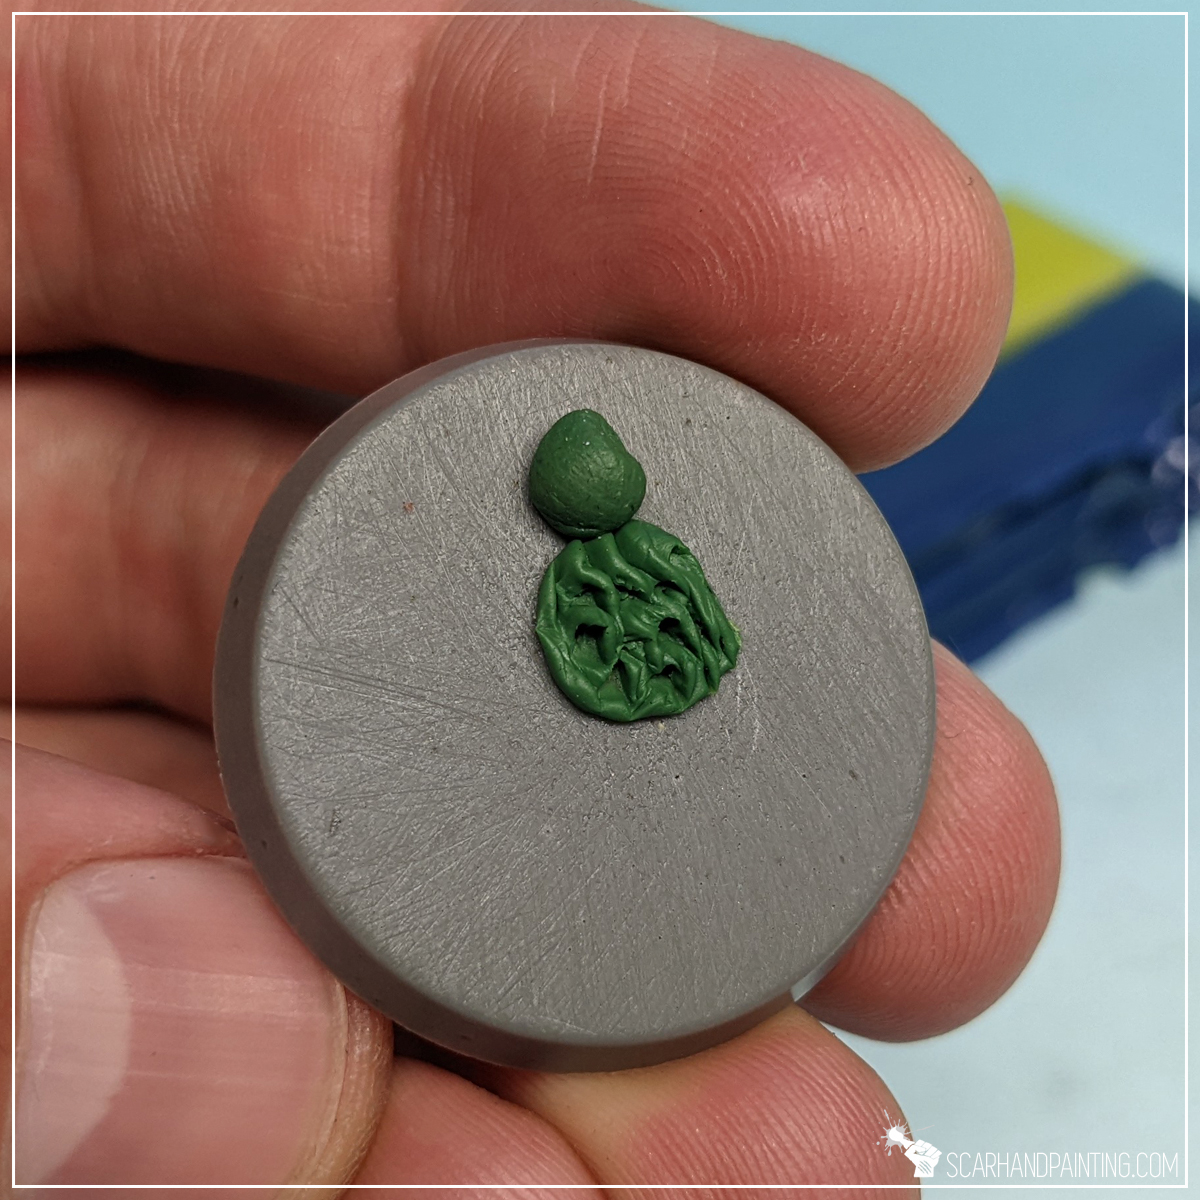
Before we go on a sculpting rampage, let’s talk some basics. The entire process is rather simple and consists of preparation and few main steps, after which you repeat the steps until satisfied. I assume standard Green Stuff is the most popular and available sculpting material out there thus I chose to use it for this tutorial. Apart from Green Stuff you will also need a proper sculpting tool, some cyanoacrylate glue and a miniature to work on.
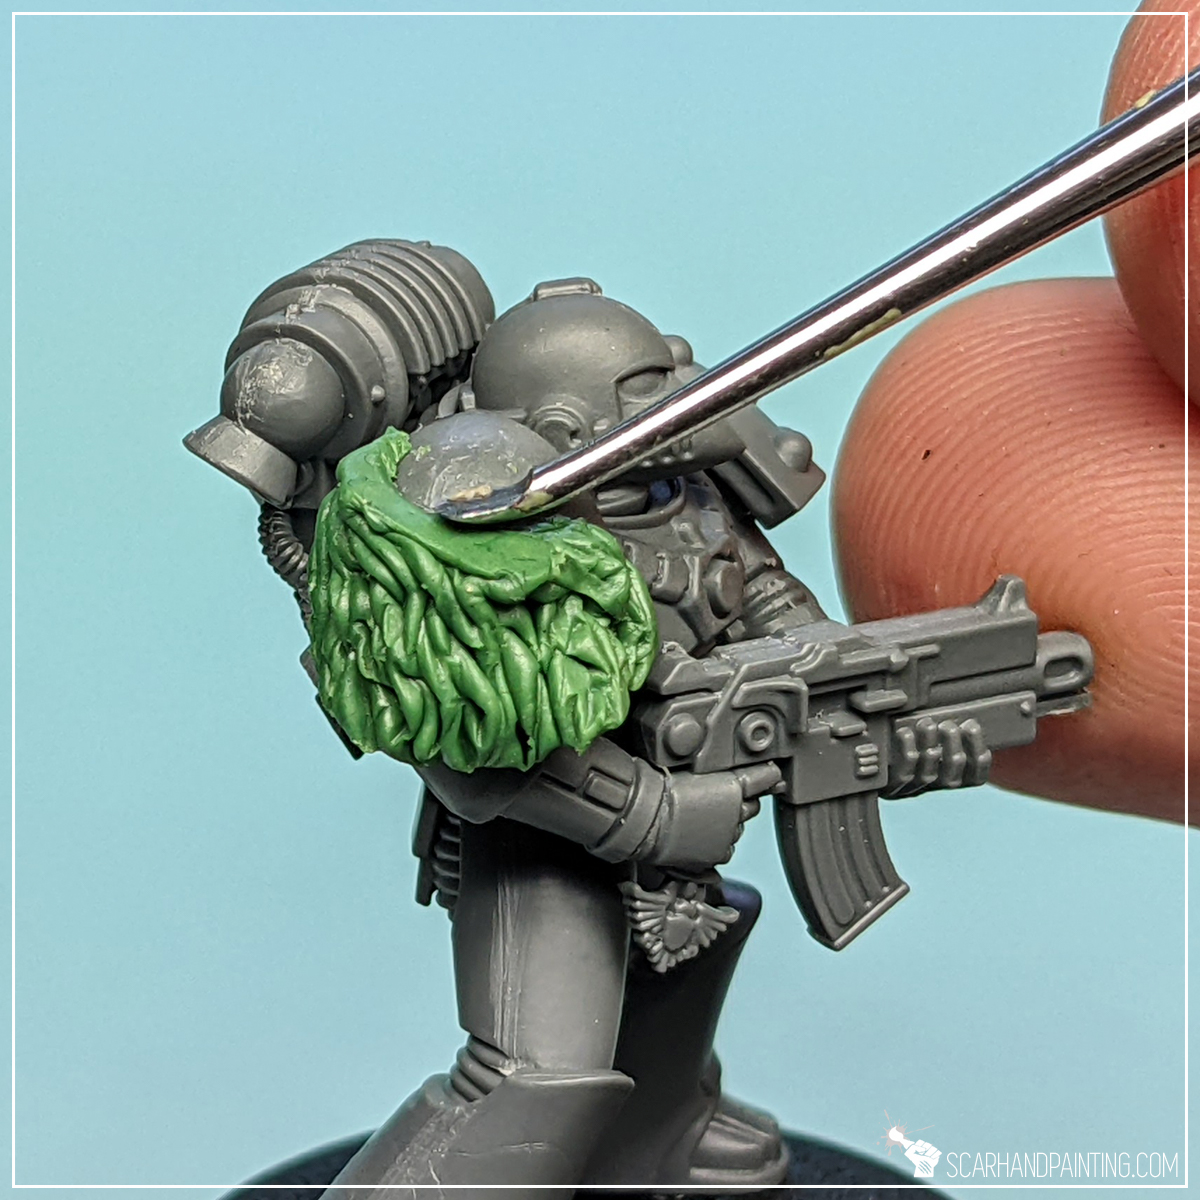
Mix a piece of Green Stuff until it’s ready and make small balls out of it. Once done, we are ready to begin fur sculpting.
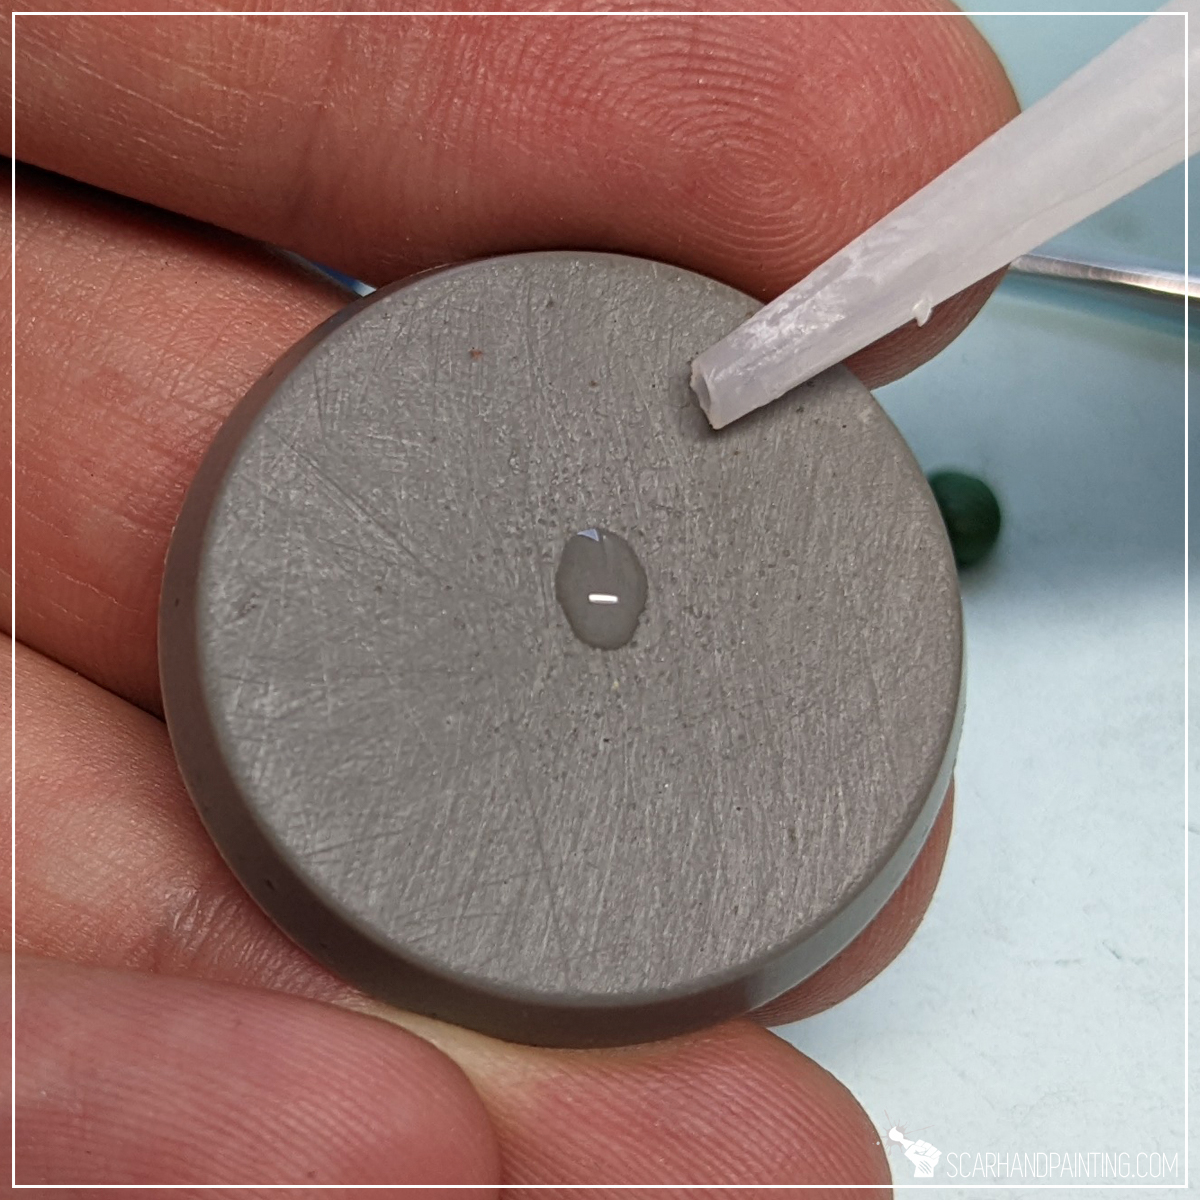

Step one: Glue
I started by applying a small drop of cyanoacrylate glue (Super Glue) onto the surface. This is to ensure instant binding between Green Stuff and the miniature, thus making the sculpting process so much easier.


Step two: Apply Green Stuff
Next I applied a small ball of Green Stuff on top of the glue and flattened it slightly with a fingertip.

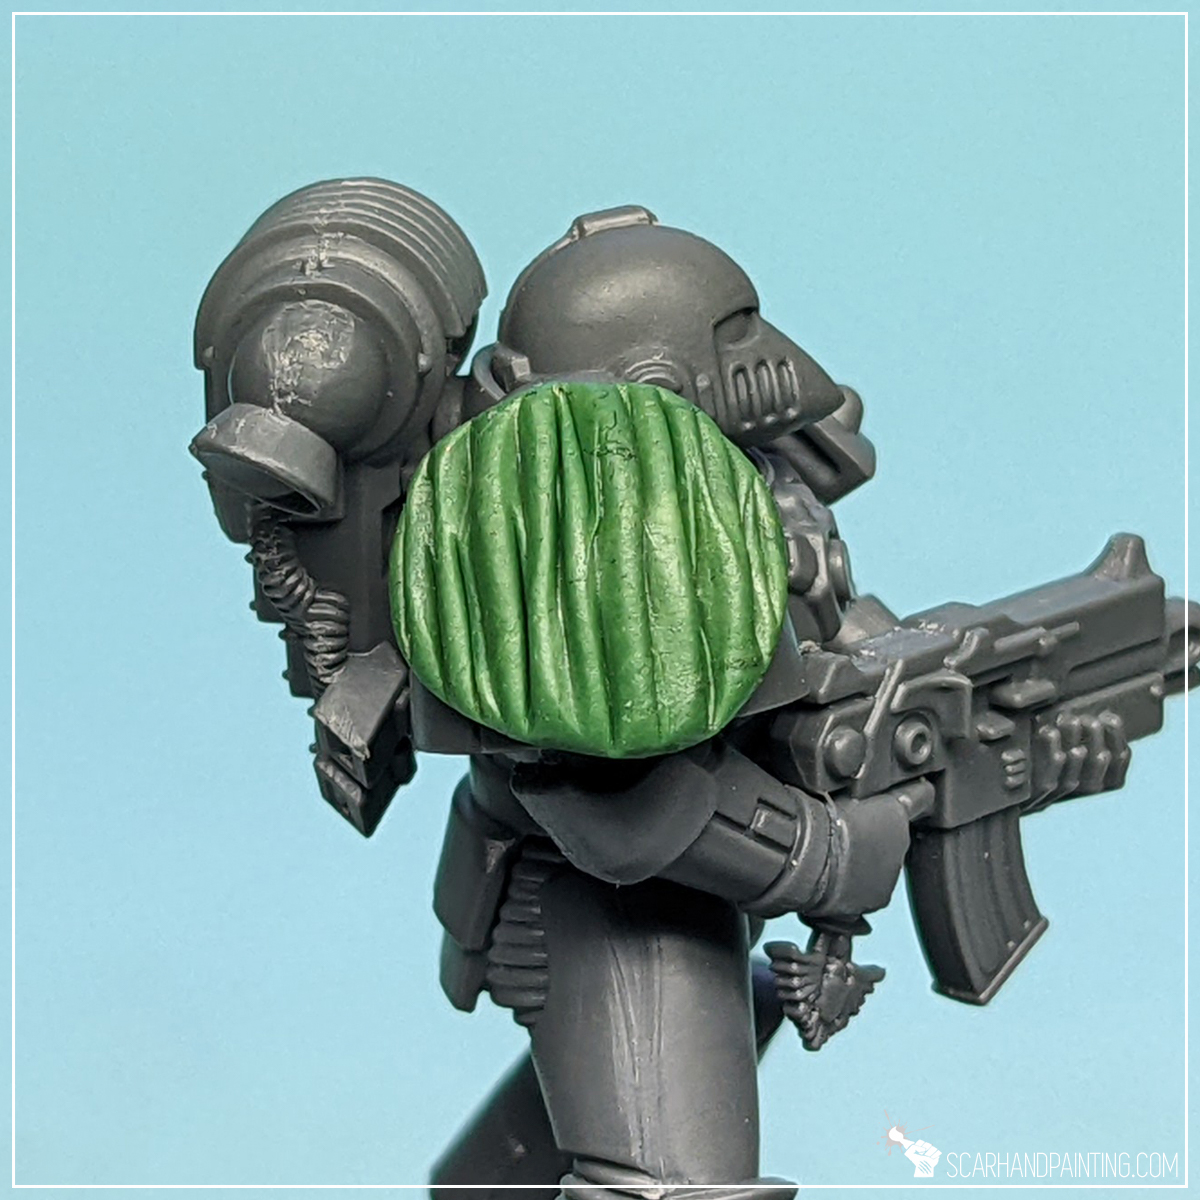
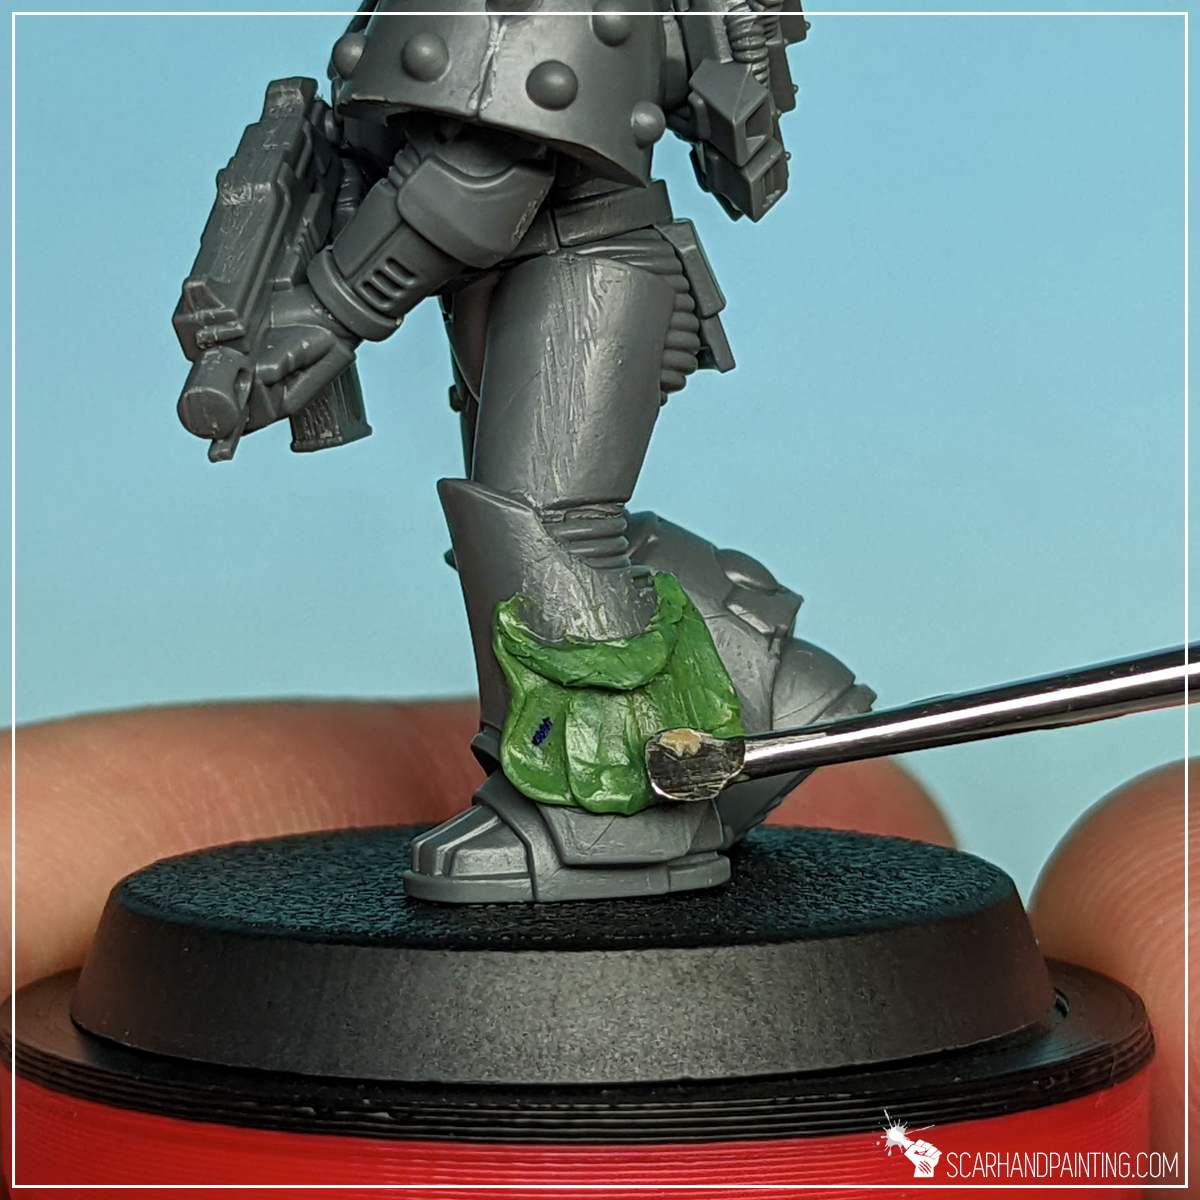
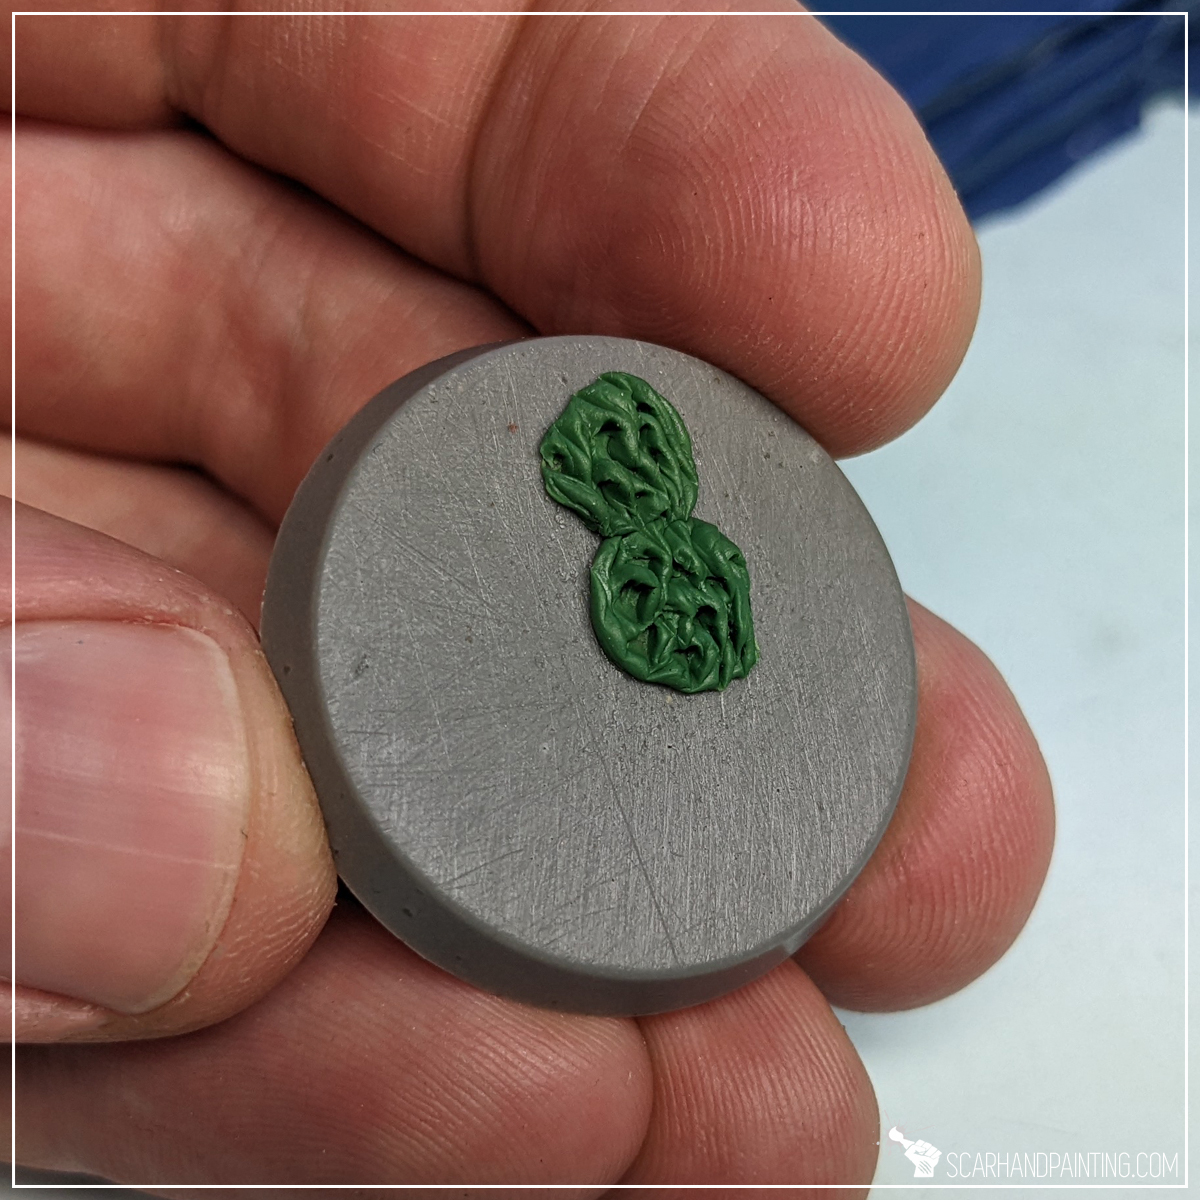
Step three: Straight lines
Using an edge of a sculpting tool, I then sculpted a series of relatively straight vertical lines. These doesn’t have to be perfect or even. Just a bunch of lines from top to bottom as can be seen in the pictures above.
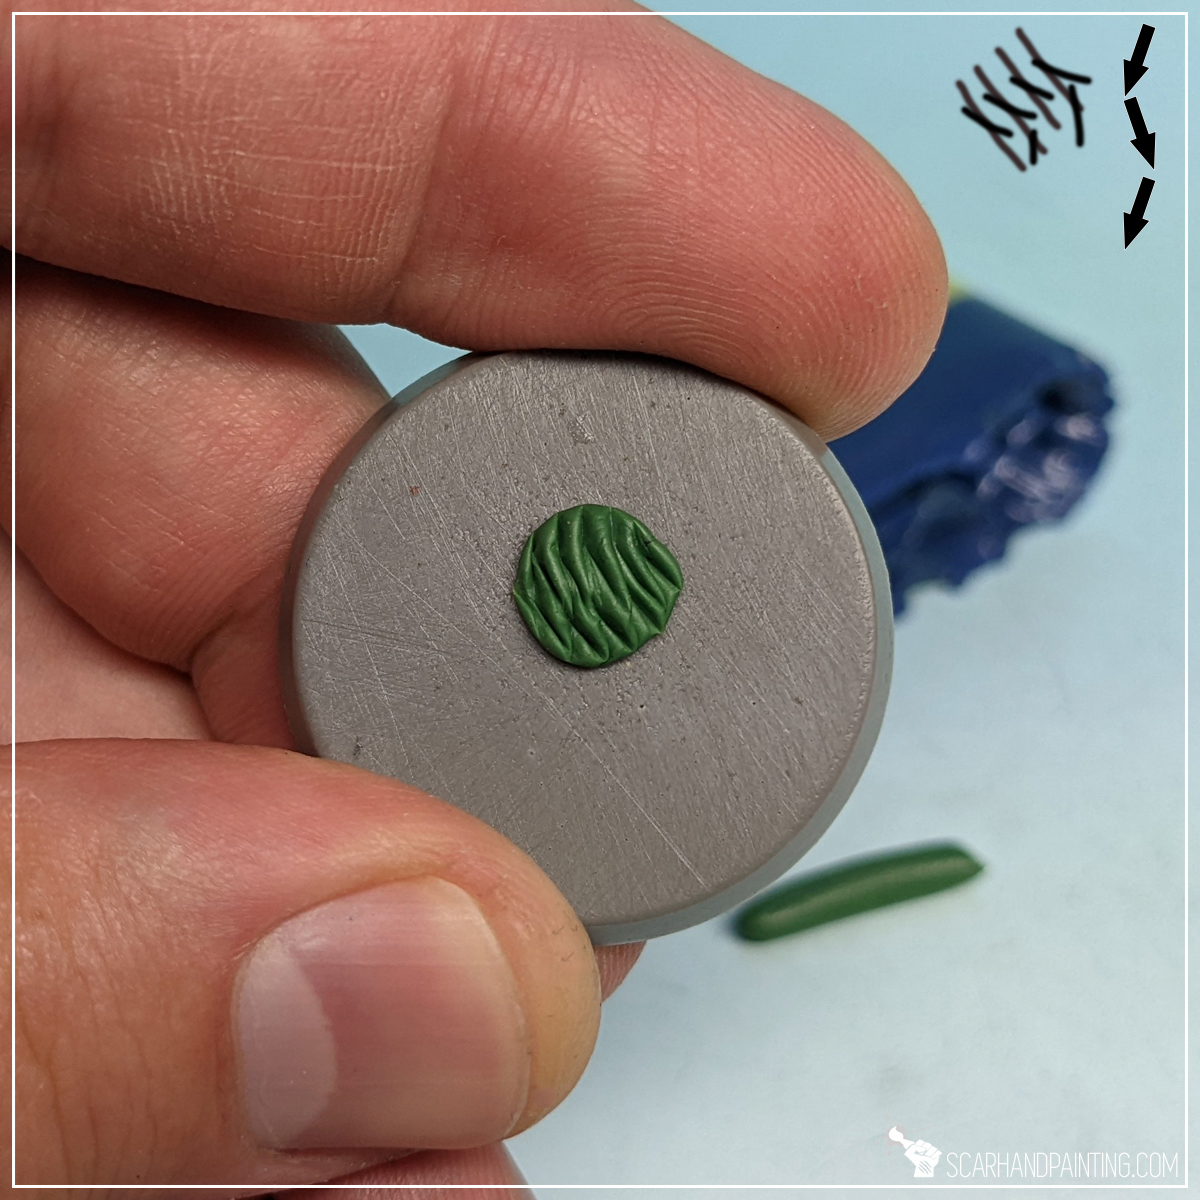
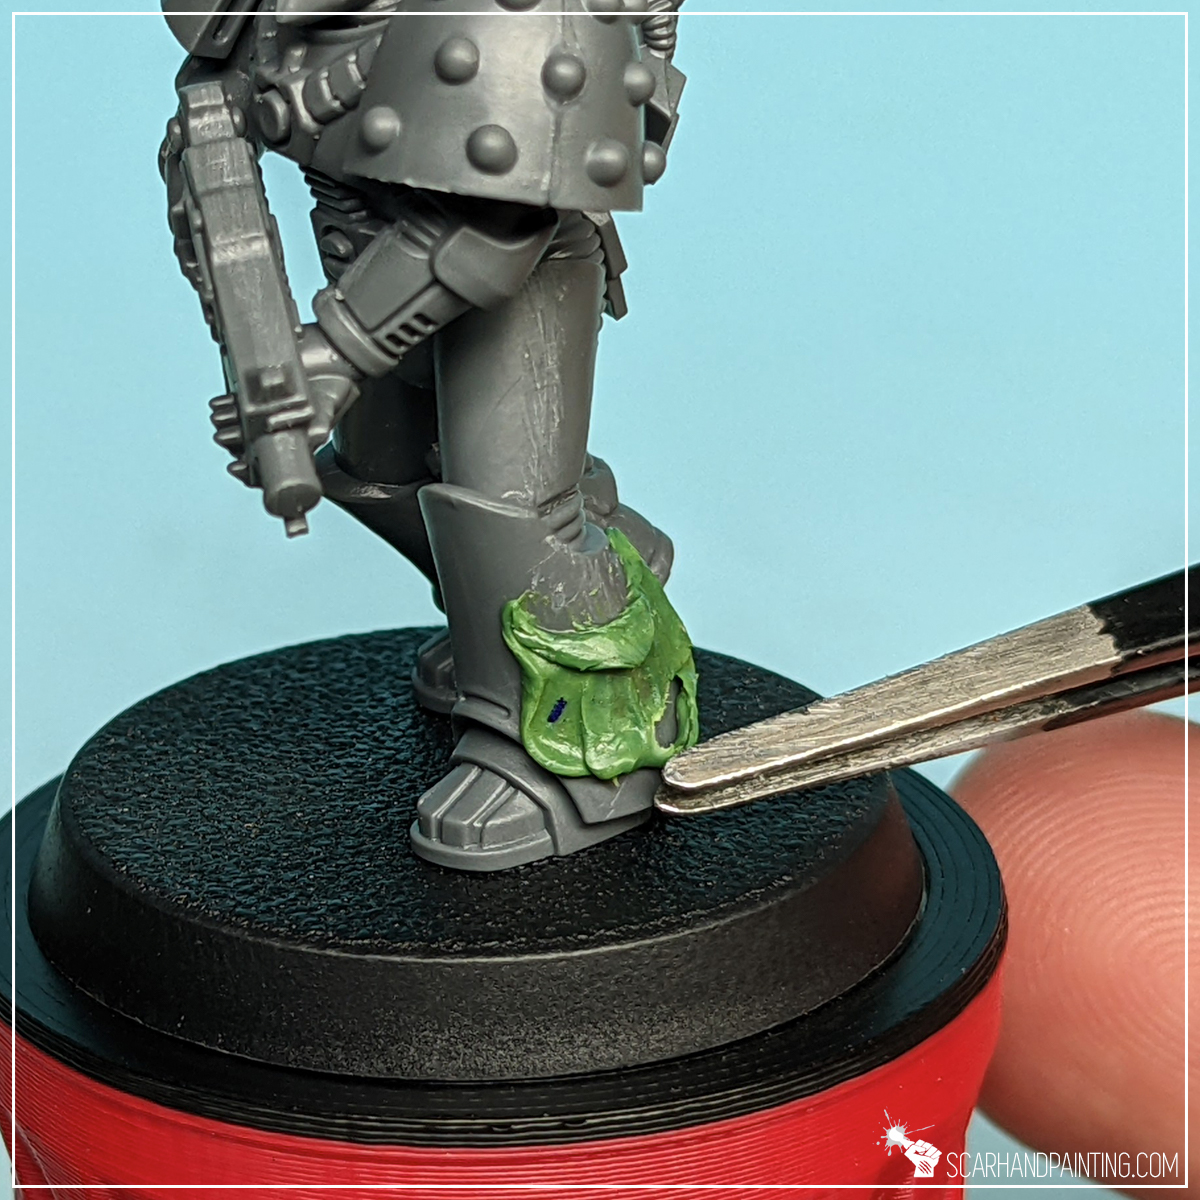
Step four: Diagonal texture
I then cut and pushed with a tip of a sculpting tool to add some diagonal lines, shortening and sharpening the lines from previous step.

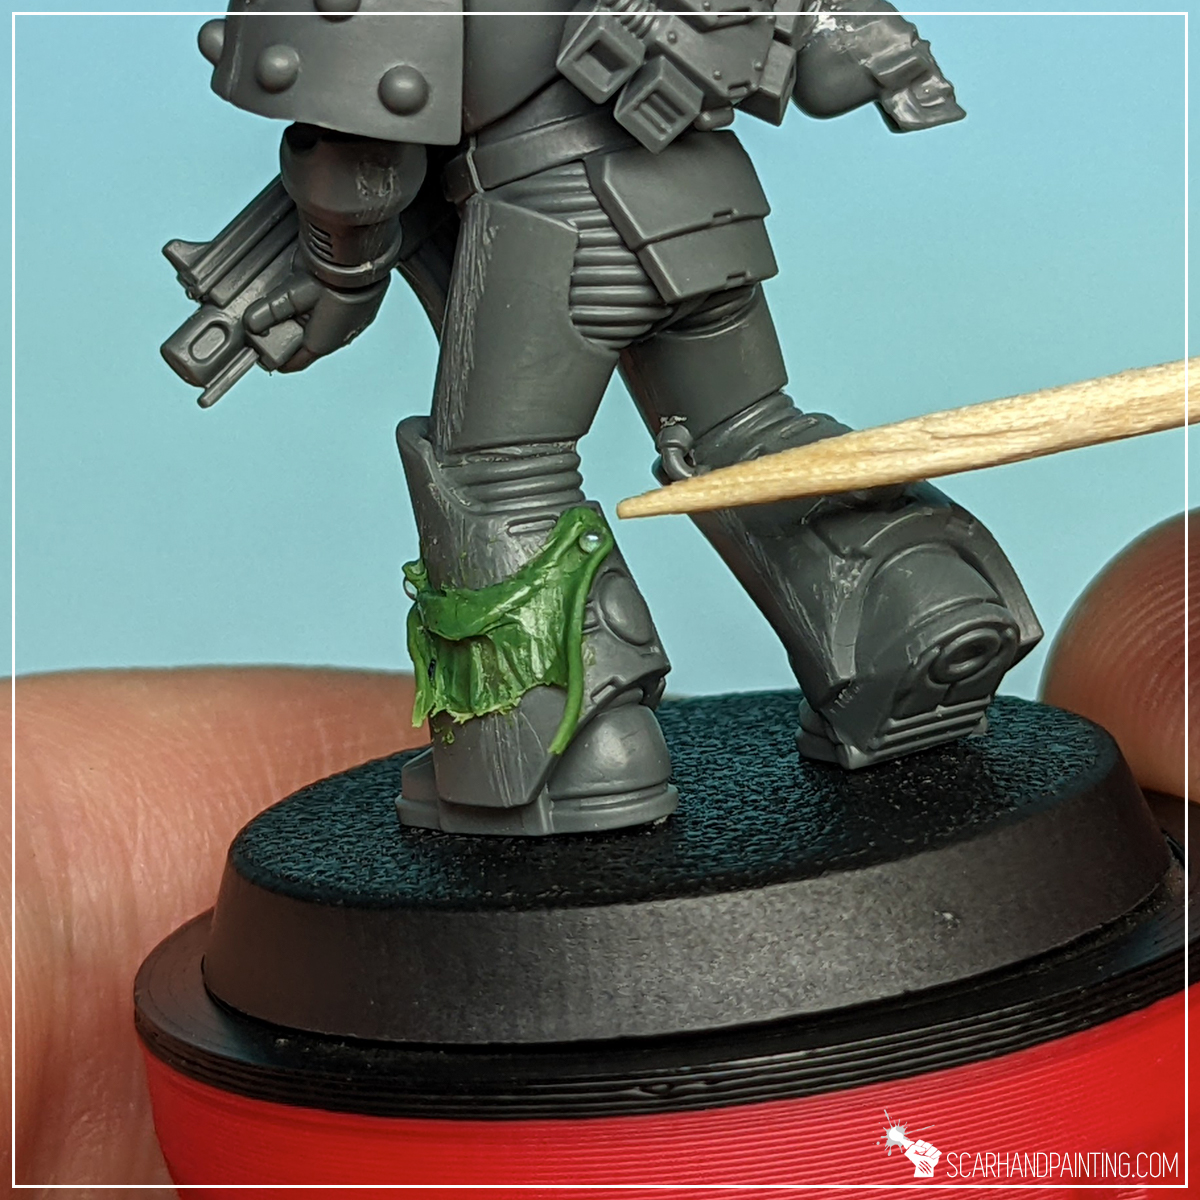
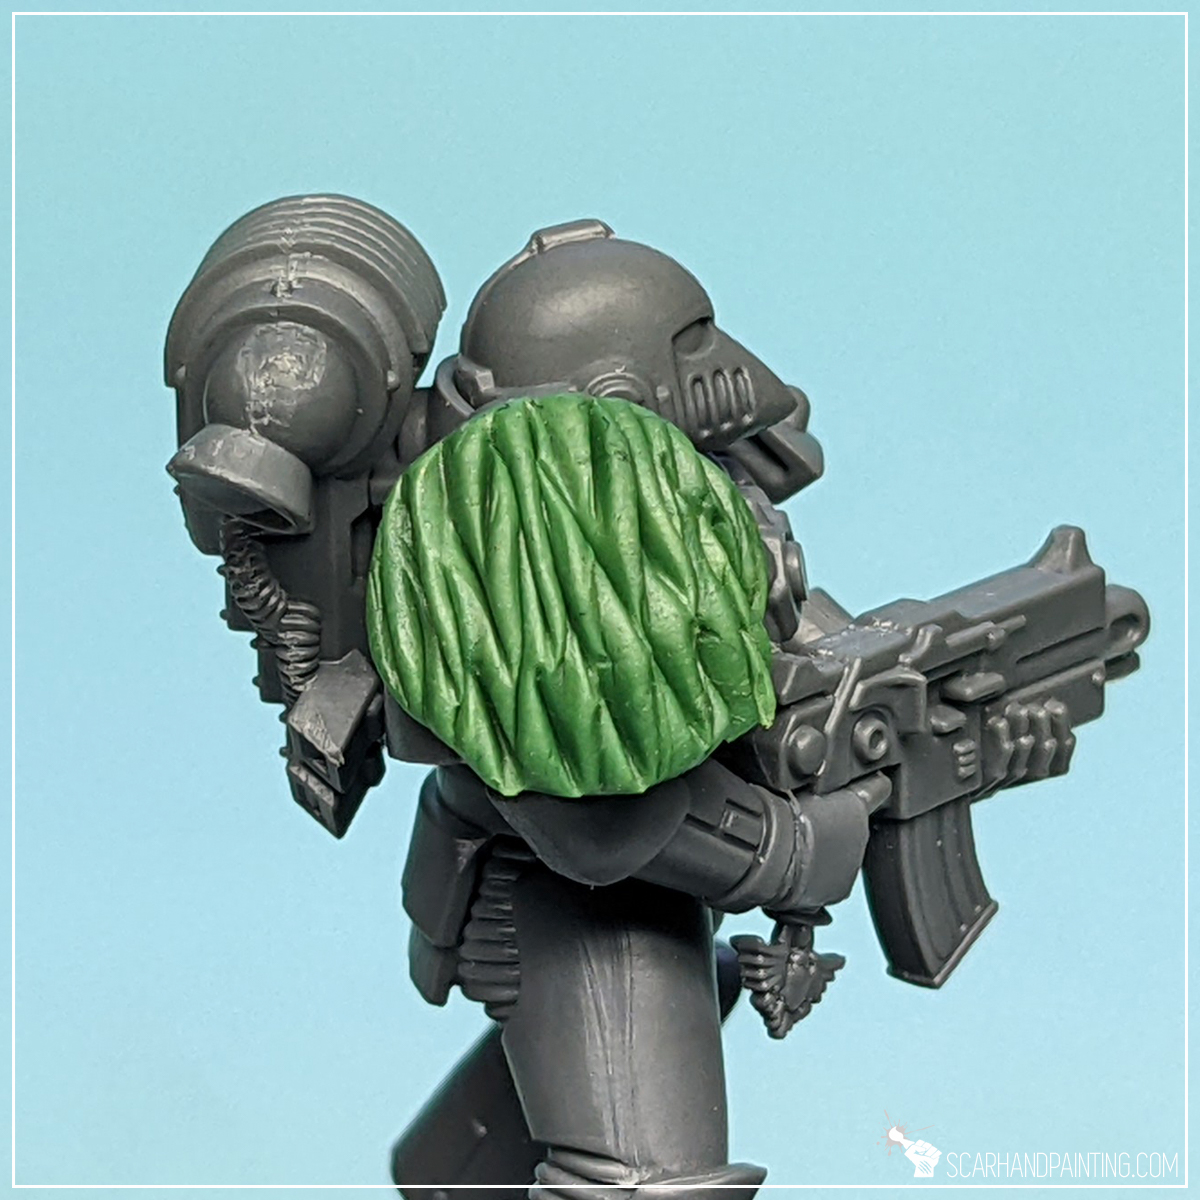
Step five: Messy texture
Finally I used the very tip of the sculpting tool, gently pushing it in and leveraging, pushing particular strains of fur up and to the side, so they became rounded and a bit shaggy. This is basically how I sculpt fur on different surfaces.
TIP:
You can repeat this step multiple times, by adding more balls of Green Stuff and sculpting intertwined layers on a larger surface, or to add volume.
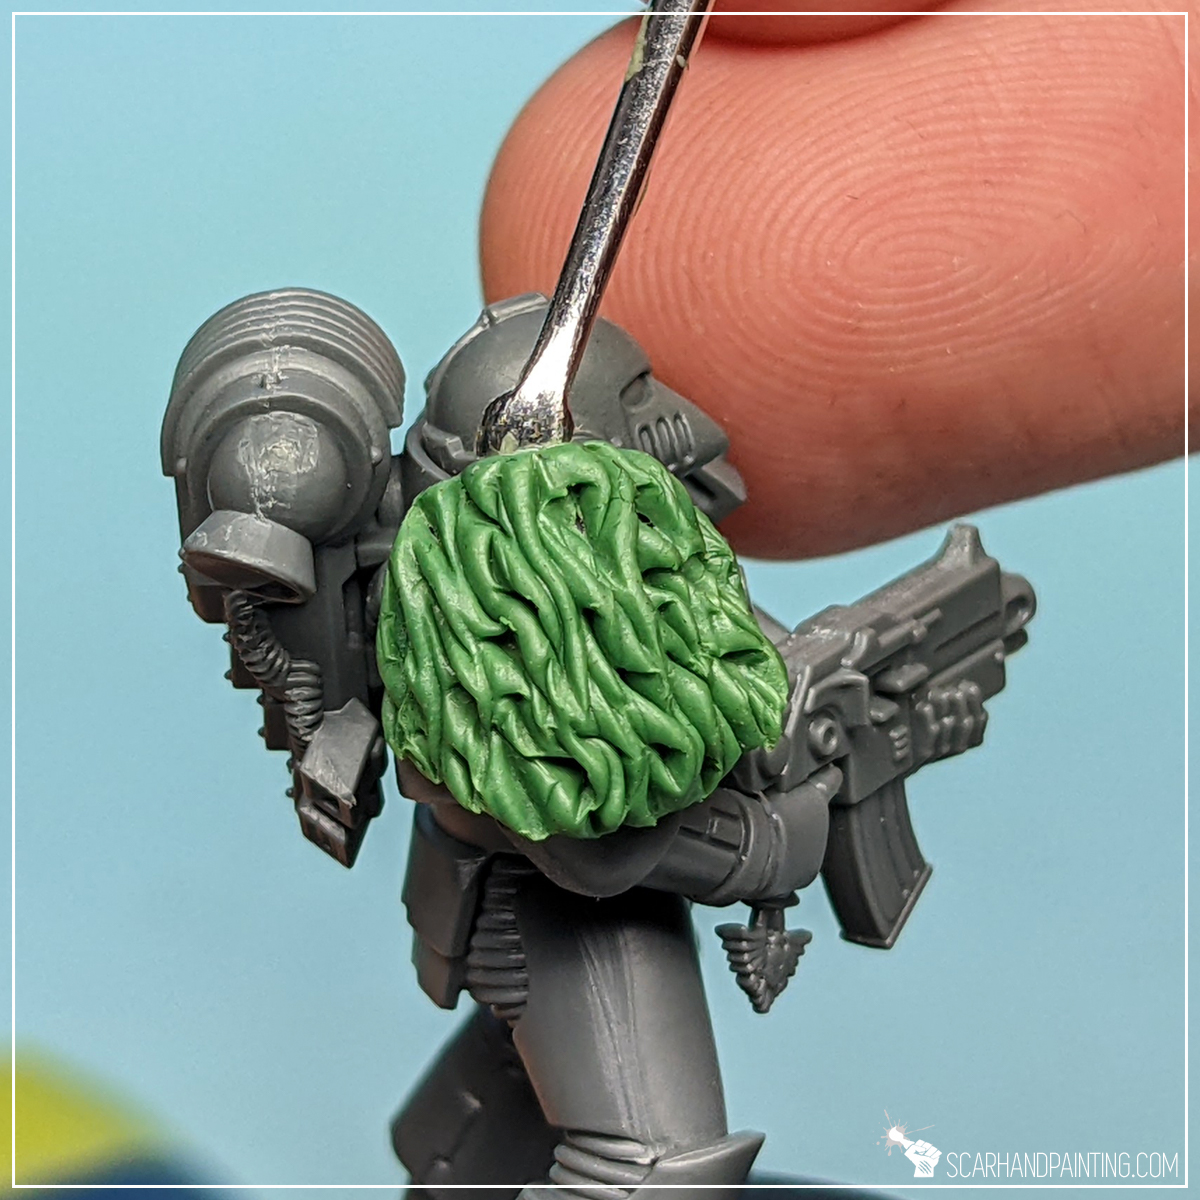
Step six: Shaping
Having a fur covered coat or a piece of gear is great, but to really make it feel at place, I recommend shaping it’s upper part to resemble a piece of tanned leather. It is quite simple. First I pushed a rounded tip of the sculpting tool between excess fur on top and plastic surface. I then pulled down gently, to squeeze the upper fur. I’ve done this multiple times to get a nice smooth line, then smoothed if further. Depending on how much fur gets underneath the flat area it can either rest on top, or be squeezed further to look like flapping around. It’s all up to your personal tastes.
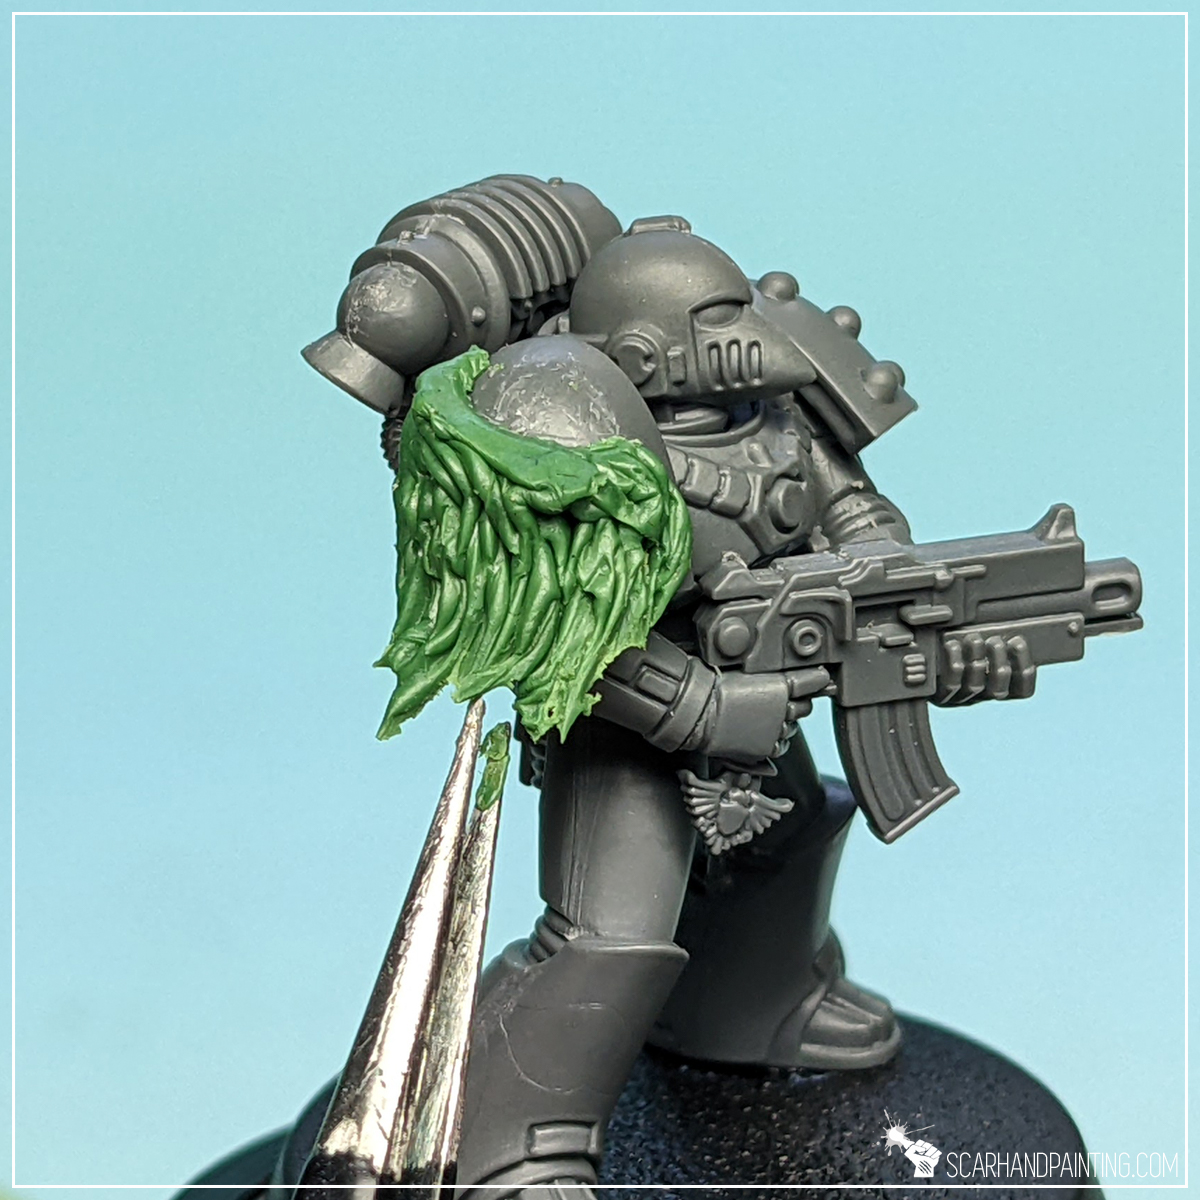
Step seven: Ragged edges
Very last step was to add motion and rough up the lower edge. I used pliers to gently grab and pull the lower part in the direction of where I felt the strains would lean. This technique allows for a really good control of the final shape.
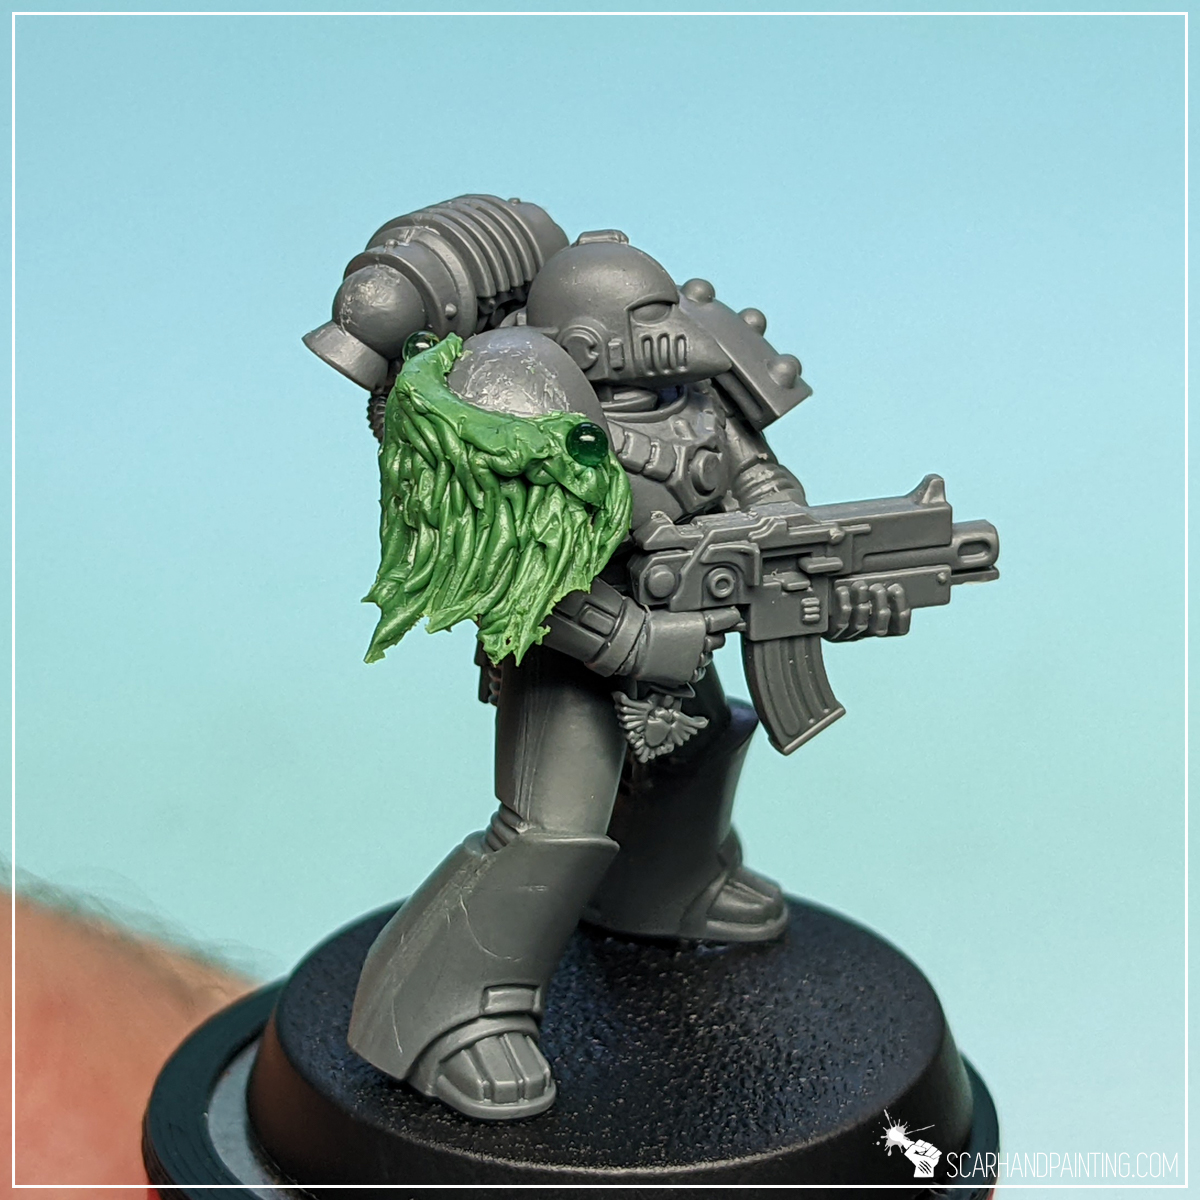
That’s it. Job done. Few bolts, skulls or other adornments here and there to give an impression of fur being bolted to the armor and the sculpting process is complete. Nothing special, just a piece of leather with fur dangling around to buff that Space Wolf theme.
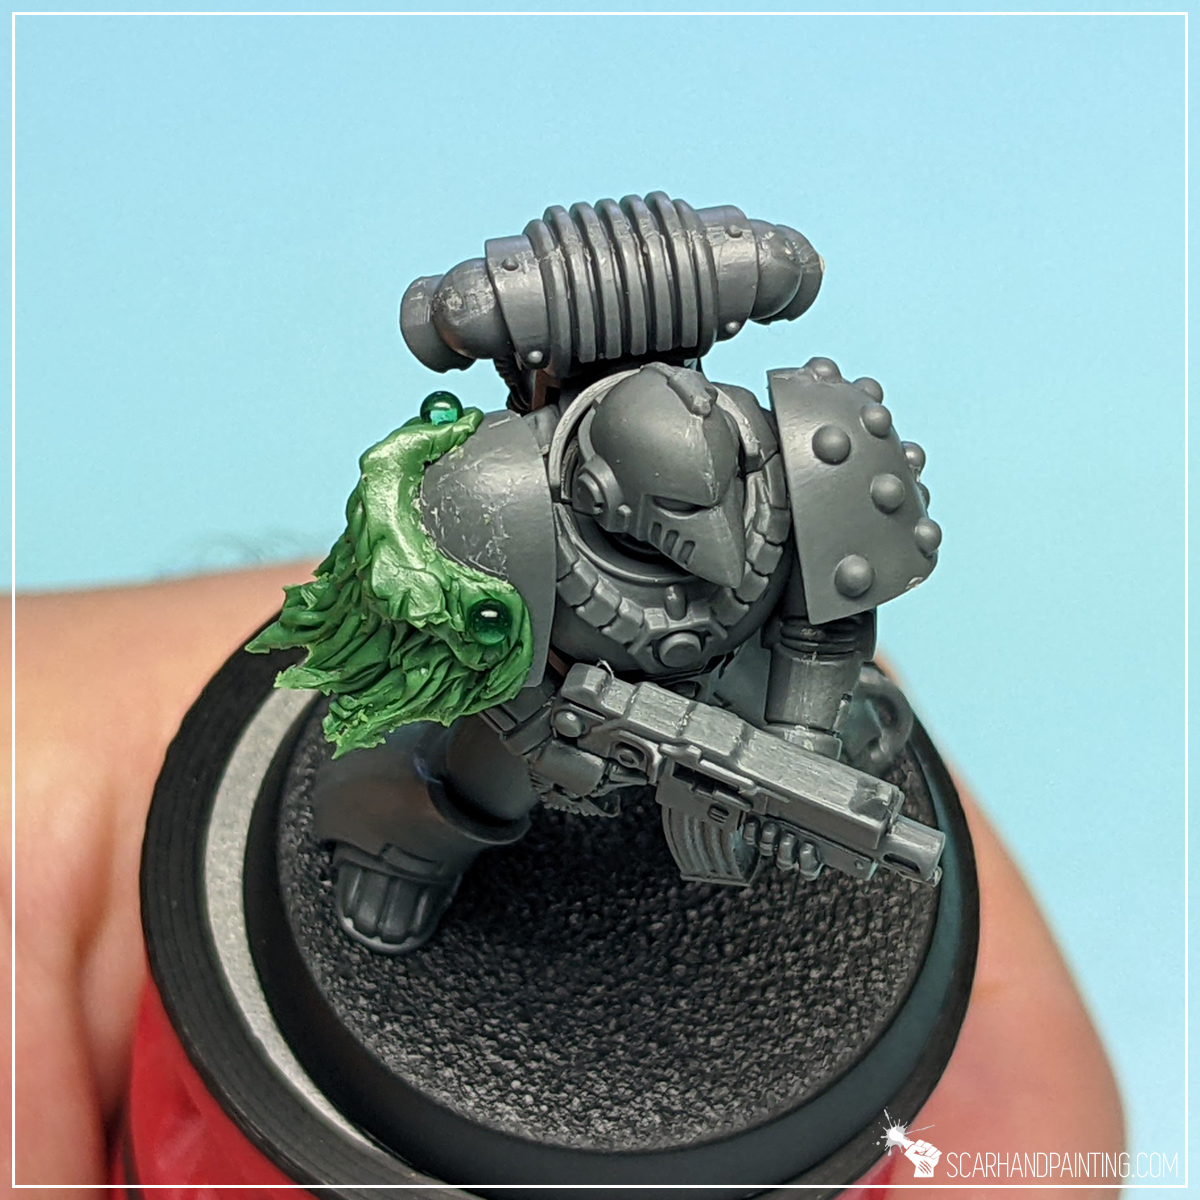
Below are some other examples of this tutorial being used in practice.


I hope you find this tutorial interesting. Be sure to let me know your thoughts in the comments below or via Facebook or Instagram. I would also appreciate if you considered sharing this content with your friends, who might find it useful. Finally if you are looking for a professional warhammer 40k miniatures painting service, be sure to contact me with this contact form. I always reply within 24 hours, after which please check out your spam folder.