- contact@scarhandpainting.com


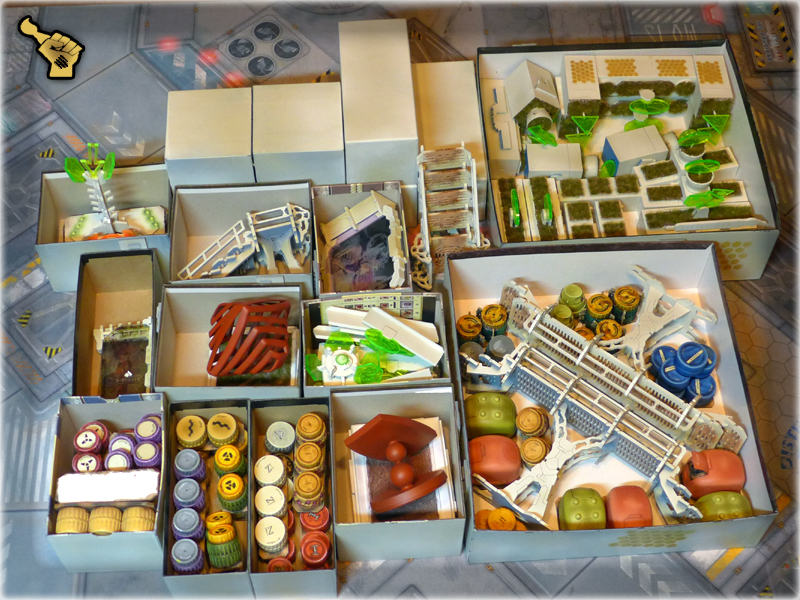
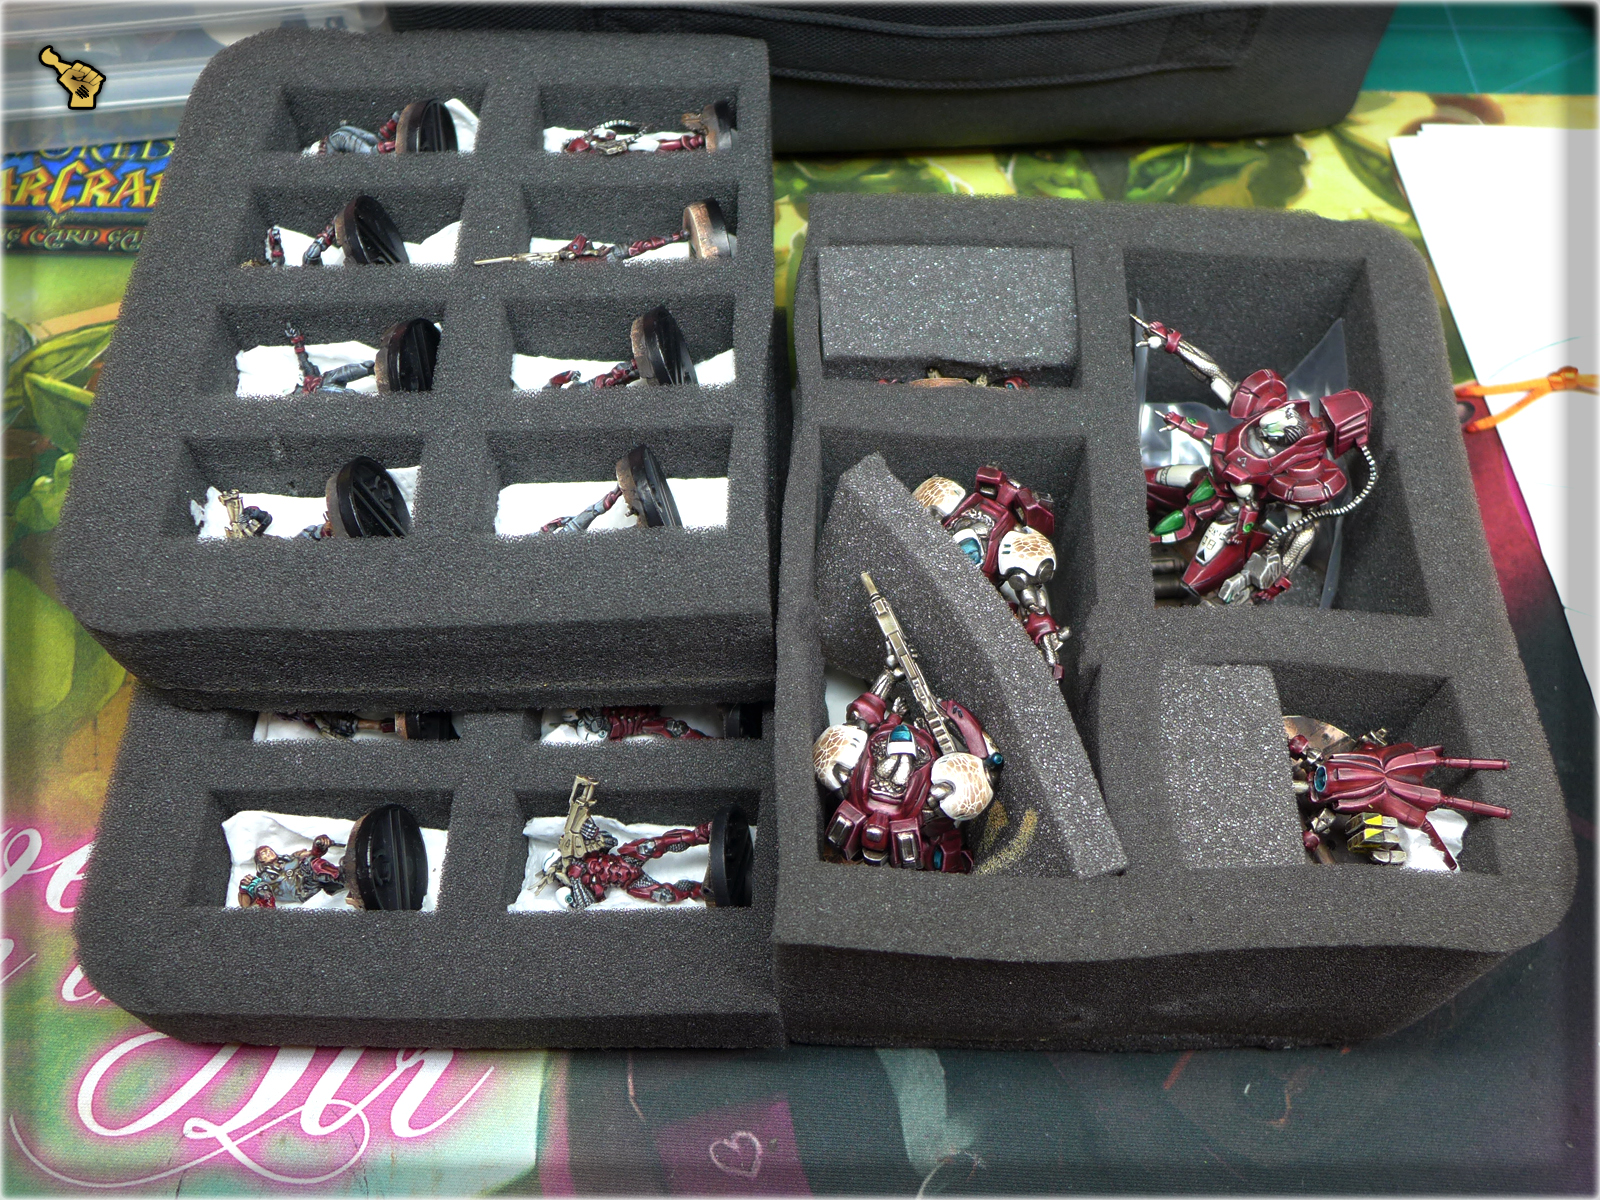
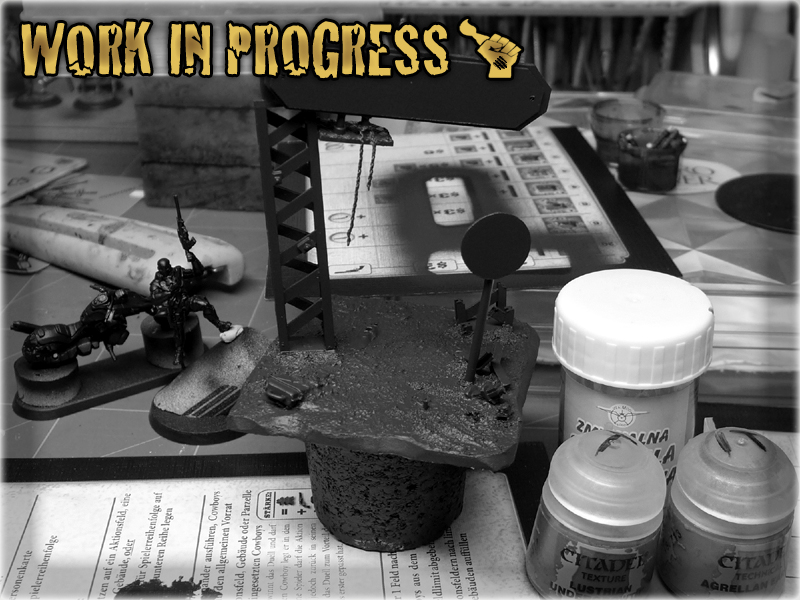
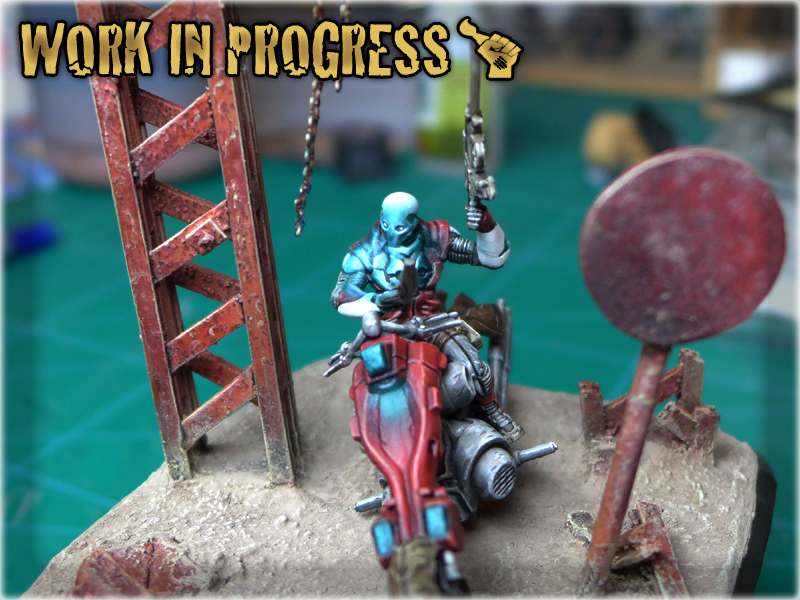
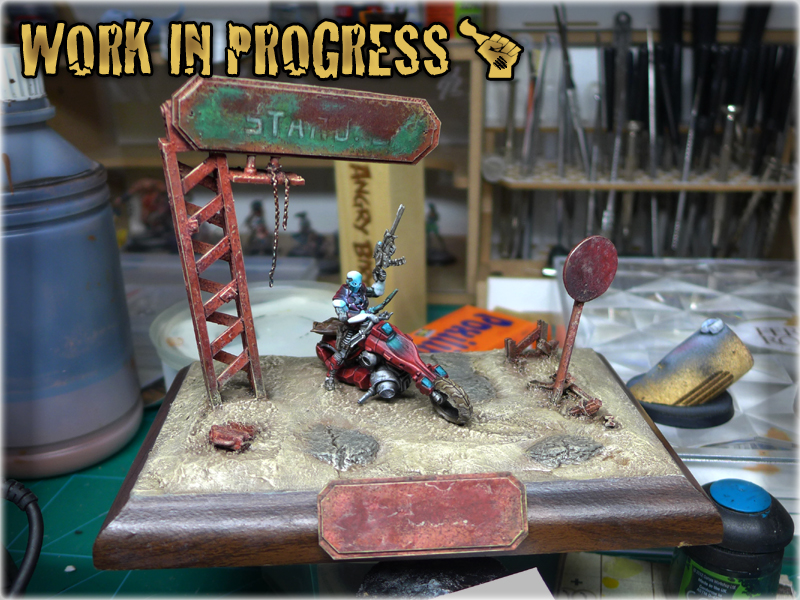
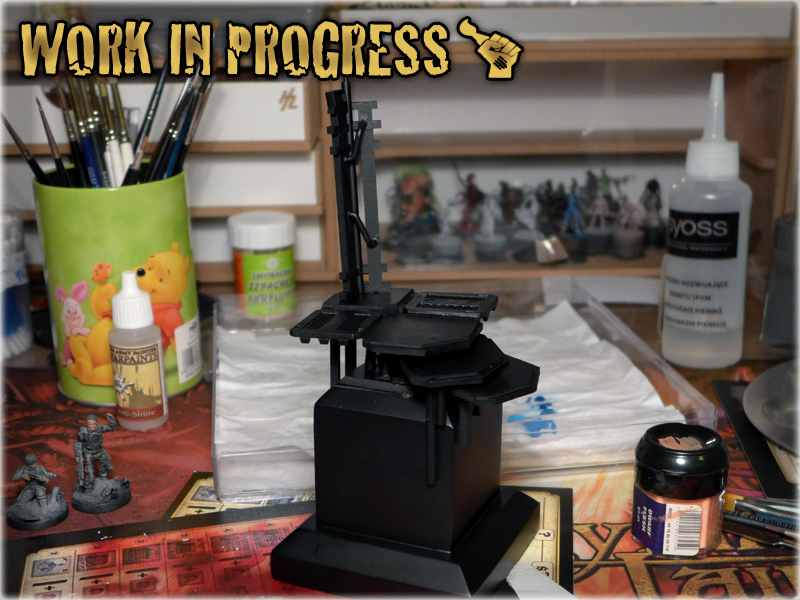
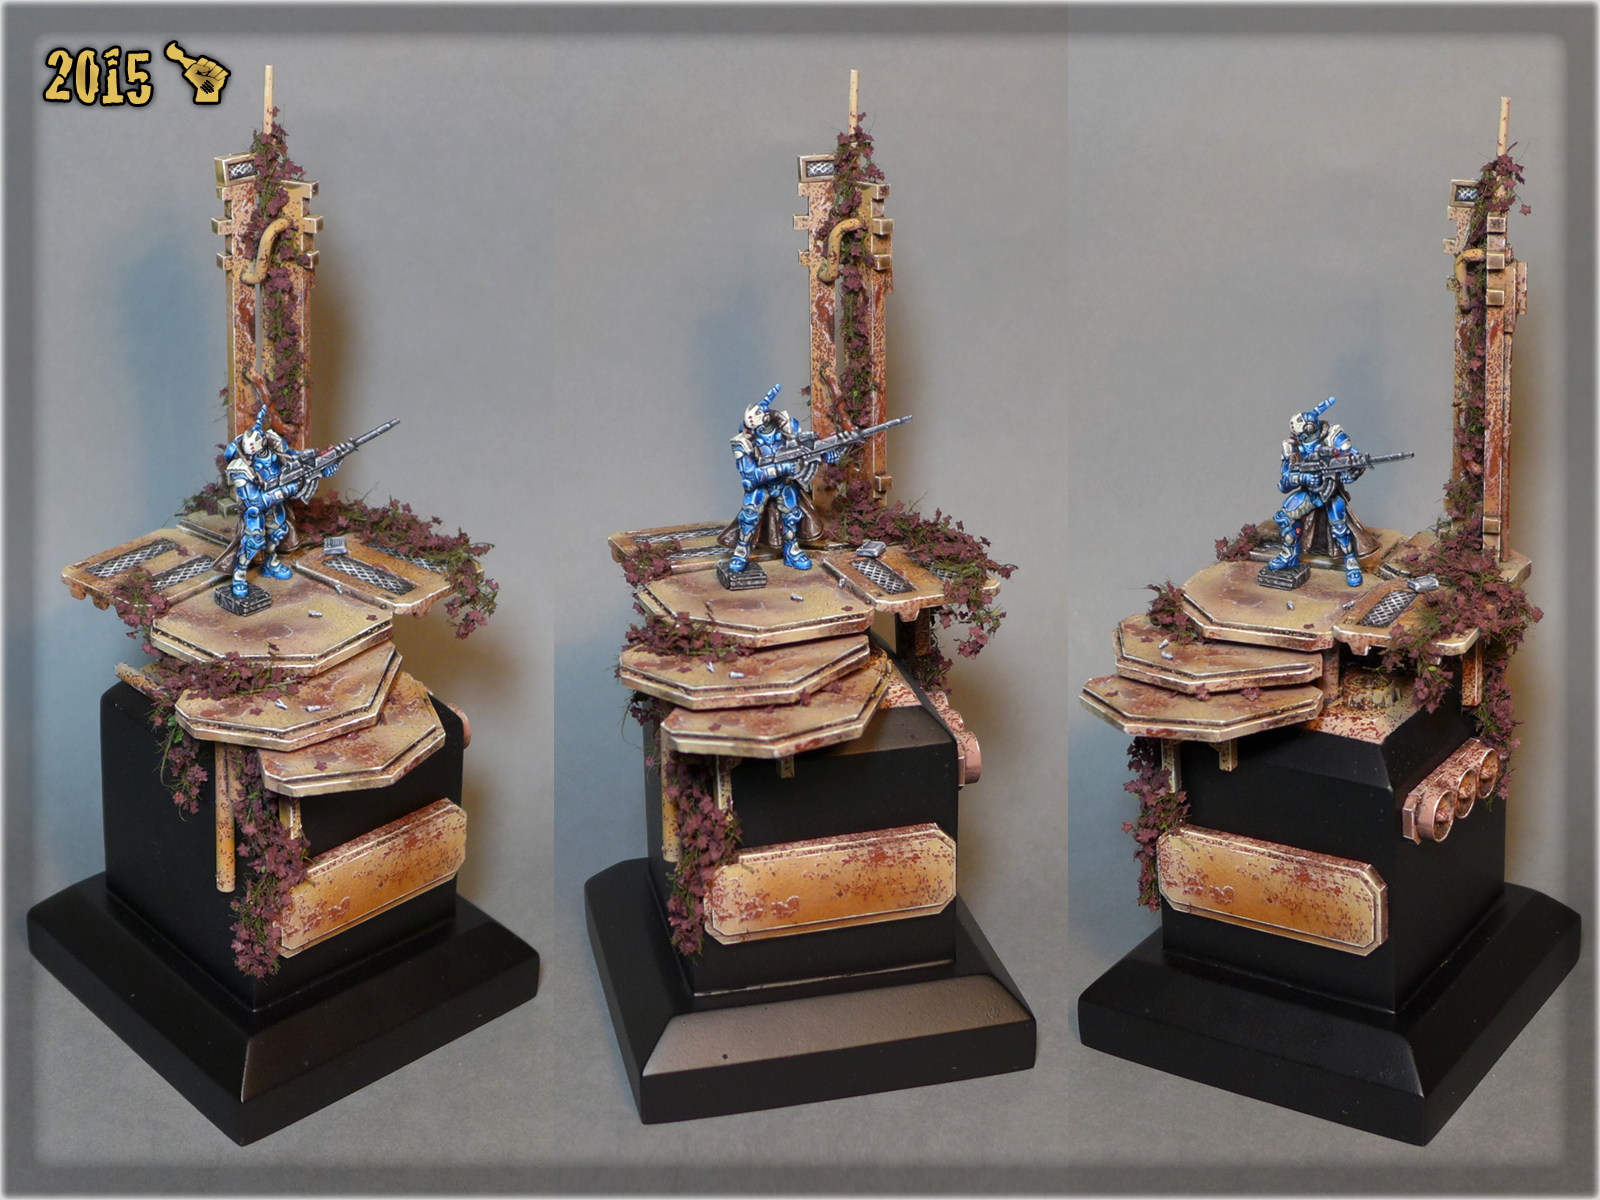
First of all I would like to announce that this project is huge. It is wast on a scale not seen here at Scarhandpainting.com ever before. The genesis of this project reaches January 2015, yet back then, I didn’t knew how things will go for this particular concept. To think that it started with a bunch of hardboard boxes being sprayed white makes me wanna laught. Right now some of you may recall ‘white boxes’ from my Tutorial: ‘Do it yourself’ Gaming Terrain. That is the right course of thinking as that gaming terrain and this Special Project have a particular thing in common – “Infinity the Game”. The hero of this article is none other than INFINITY GAMING TABLE: “THE COLONY”.
At first it was supposed to be, a cheap and easy to make, gaming terrain set. Me and my friends were hyped for Infinity and needed a proper table with a variety of terrain pieces. I am a man of action so in few days I had my first Infinity Gaming Table fully thinked through and half way done. The terrain set expanded steadily throughout the year to finally crystallize into a fully developed and densely packed gaming table. That was the end of stage one and a beggining of an entirely new concept. In the late 2015 I was pretty much sure that my gaming table is very playable. I got a lot of feedback from more experienced gamers and got to know Infinity as much as to make a final decision – I decided to use both my financial and material resources to transform my gaming table into a new and extraoridinary form. Once again I was overwhelmed by the need of creation and started to work…
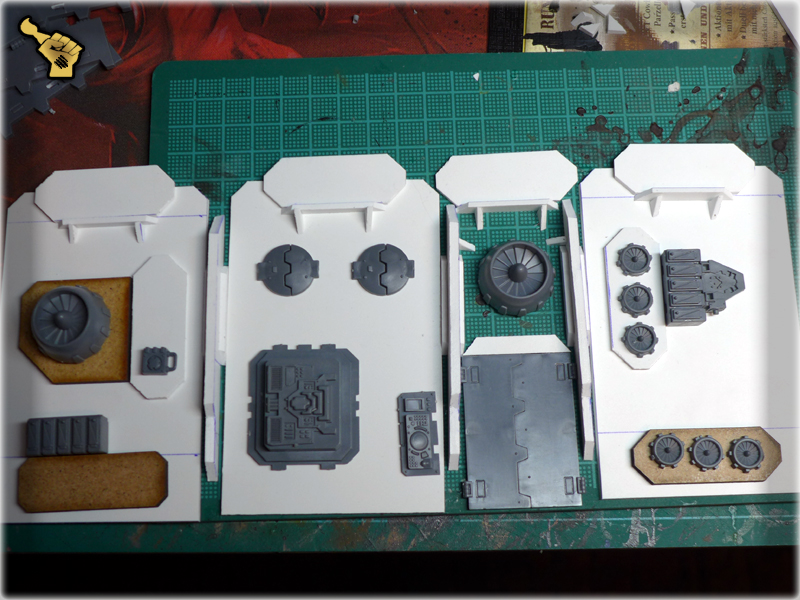
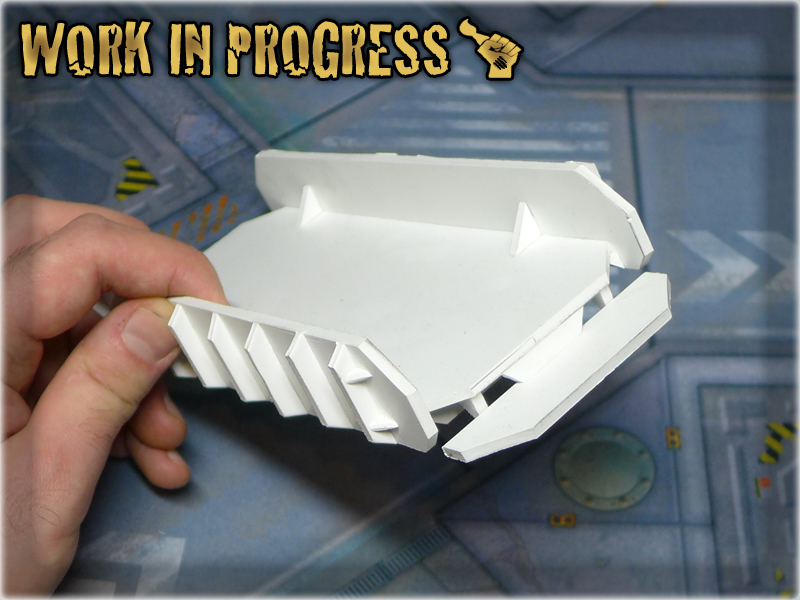
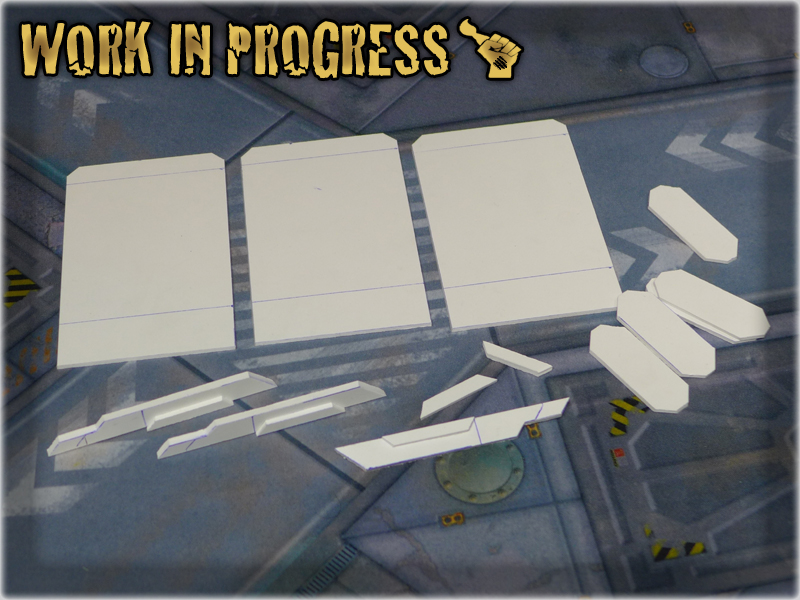
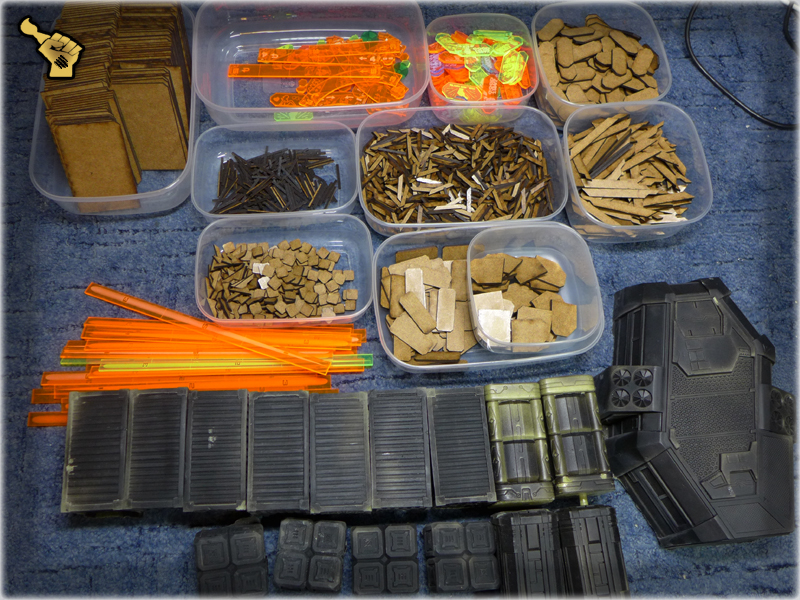
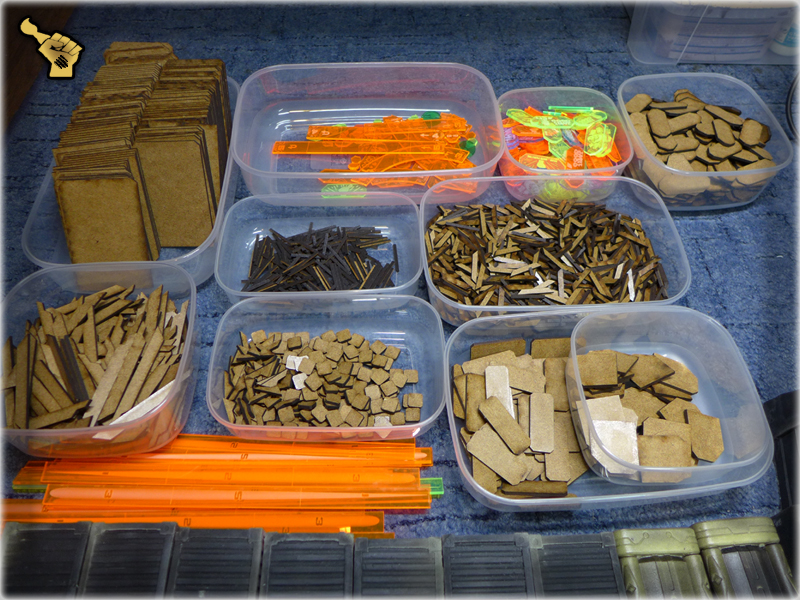
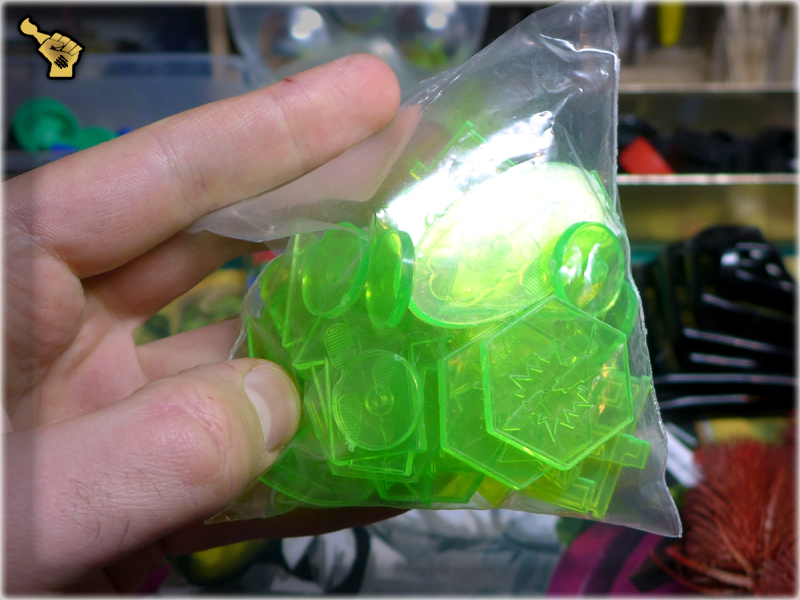
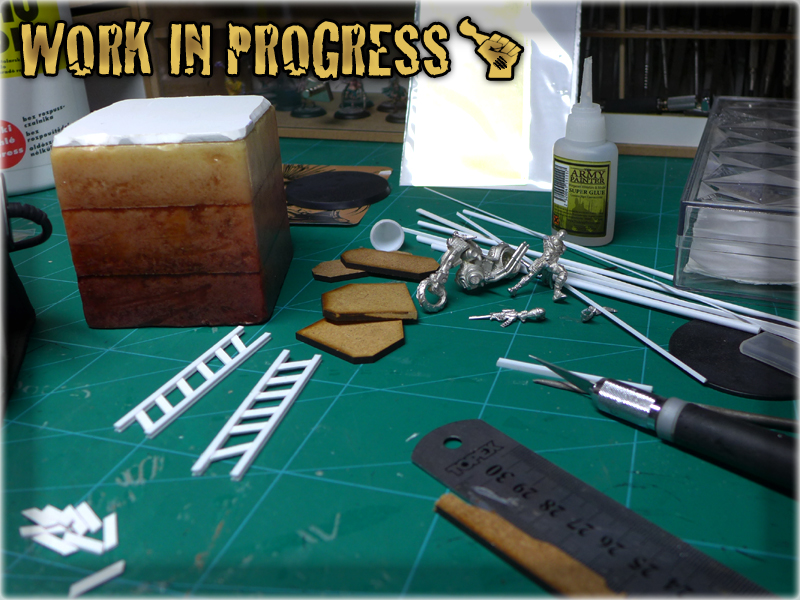
The easiest and most effective way to improove my existing terrain was to prepare a template for basic pieces and then use them to decorate my ‘white boxes’. The ideas came to me one by one and it took less than two hours to cut a sample for each type of piece needed. As they say – “One’s man trash is another’s man treasure” and that is more than true as I supported myself with some trash left out of Micro Art Studio’s bridge set. All the basic pieces you now see, were made using just a couple of HMD leftovers and a hobby knife. This way I prepared two major templates:
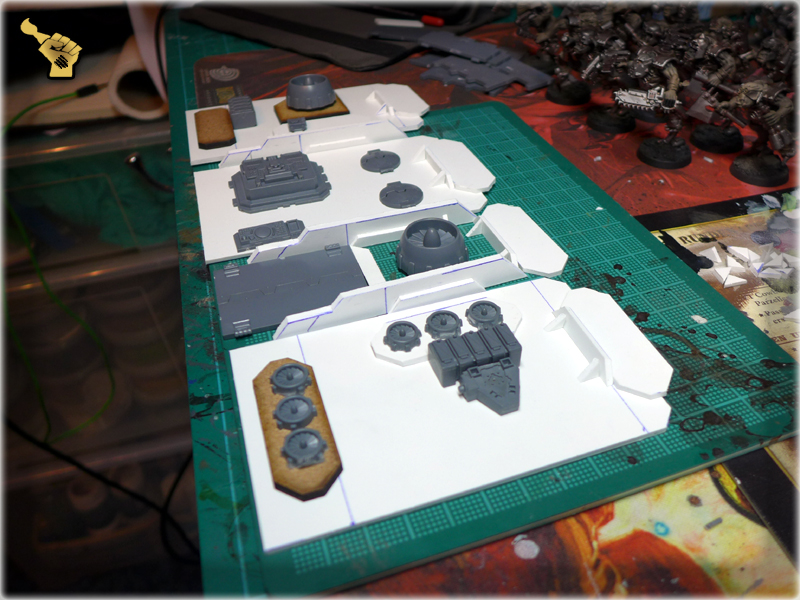
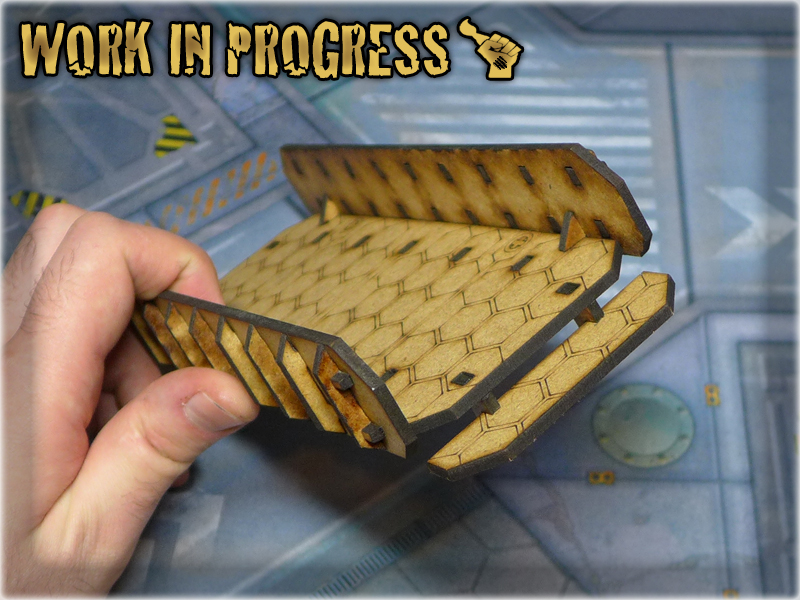
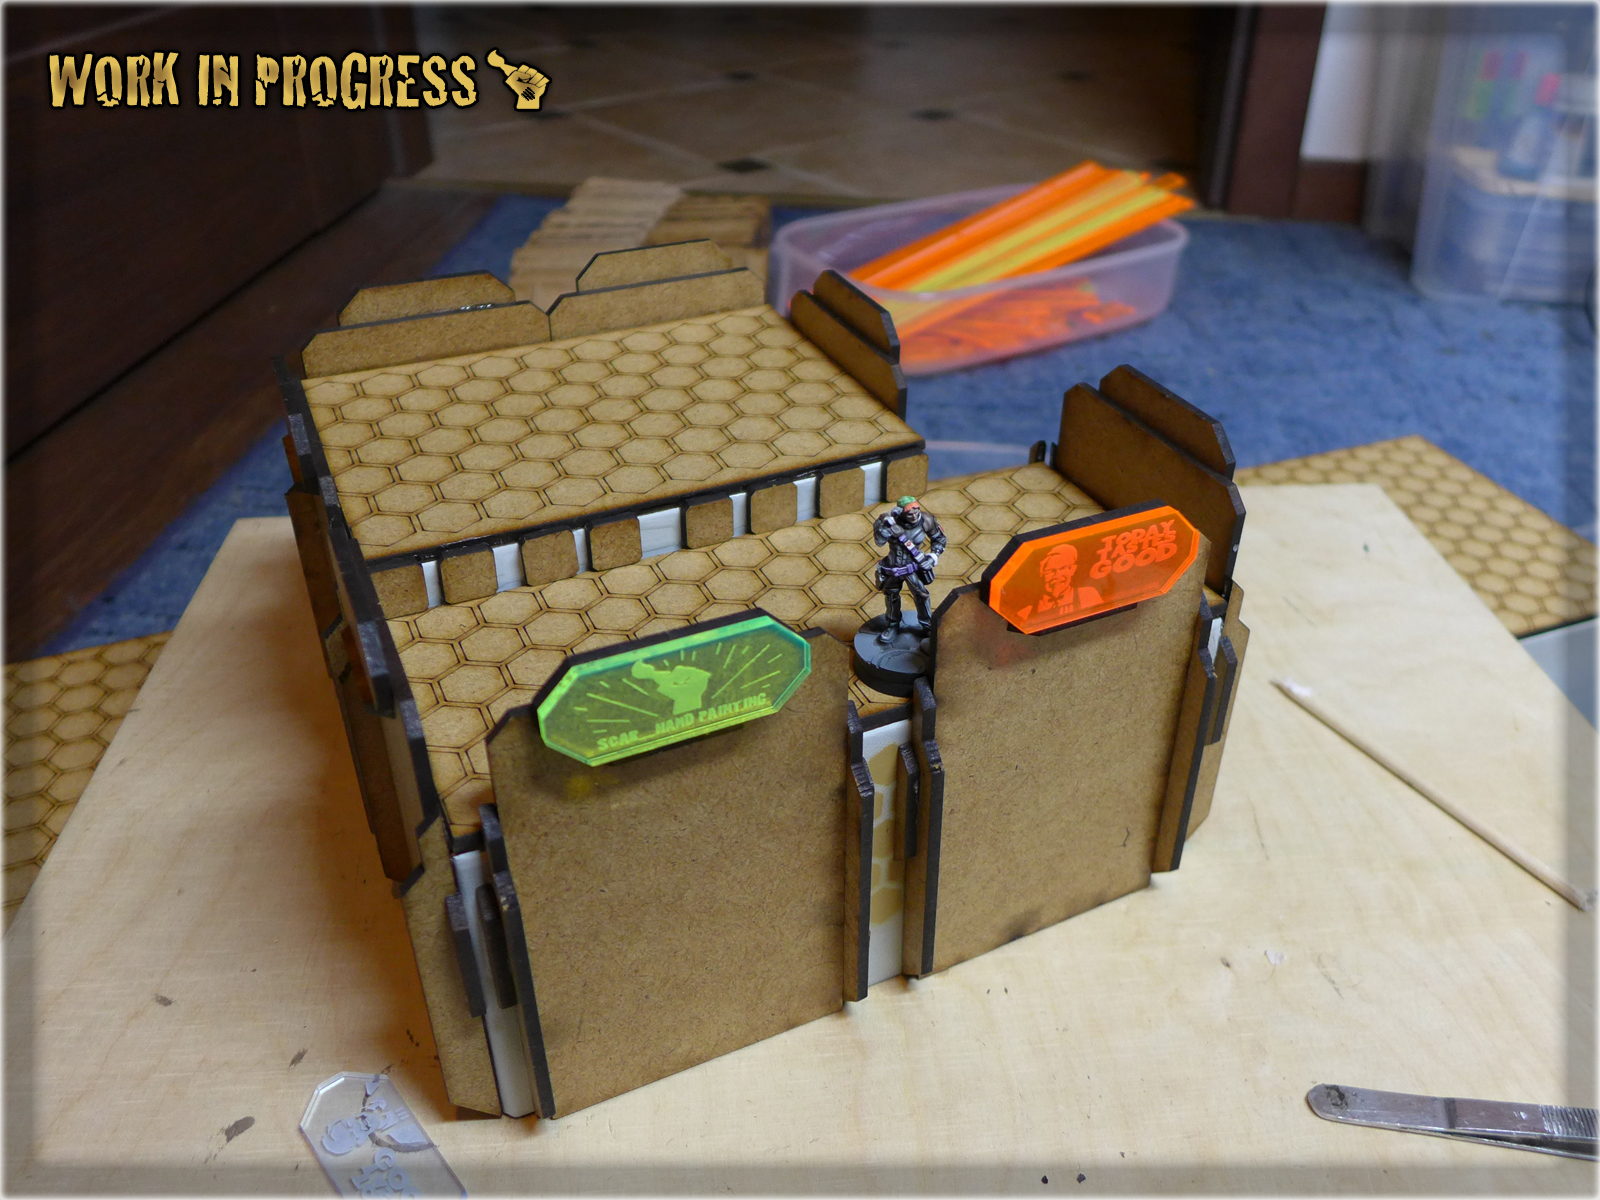
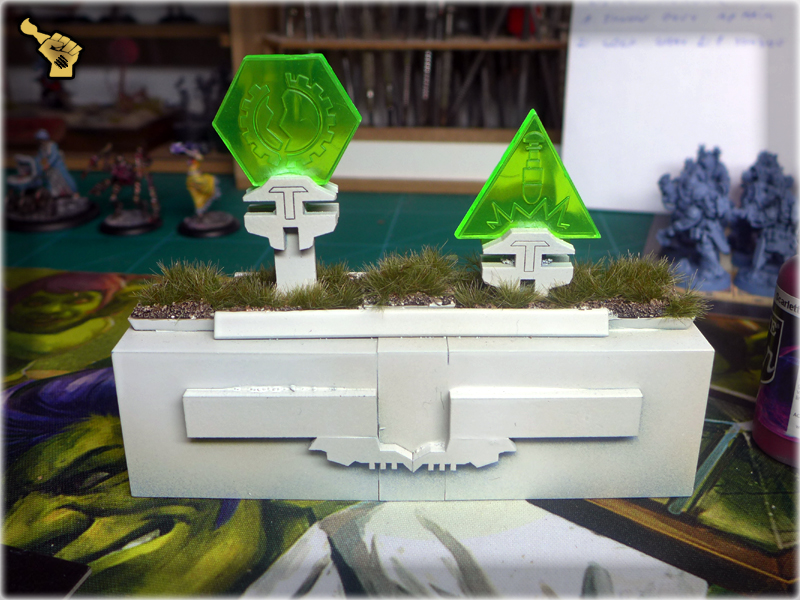
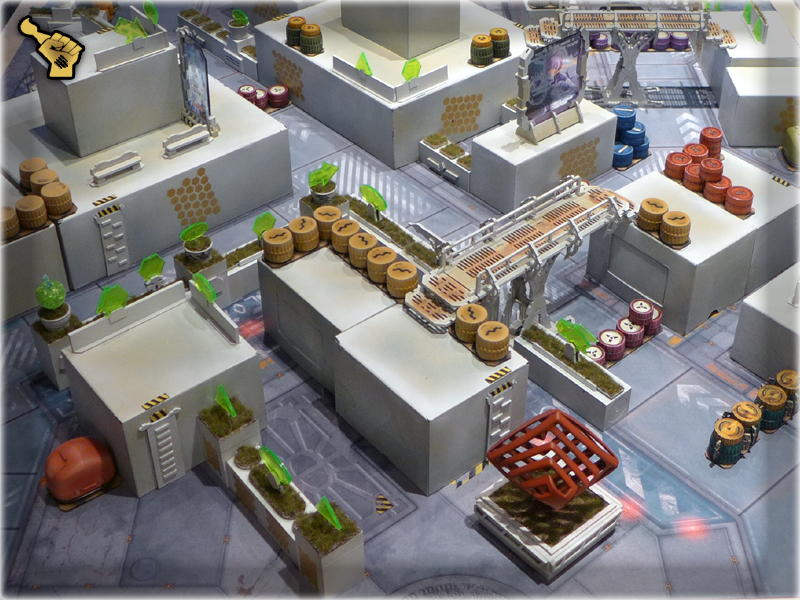
Walls: Designed as 7/11cm pieces to let me decorate each and every ‘white box’ from all sides. Some additional fillers were also designed, to fill the space, if a box happens to be too long for a certain number af wall pieces. I hoped to keep wall pieces separate to let players position their miniatures in selective cover, move with causions movement etc. Once these were done I used some Warhammer 40,000 bitz to see how the overall will look before painting. It passed the test.
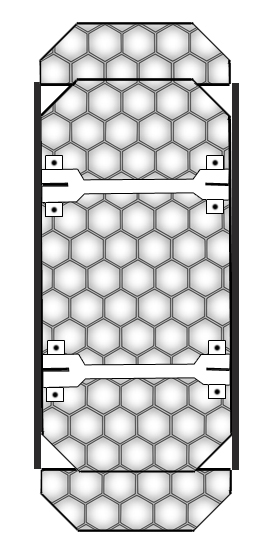
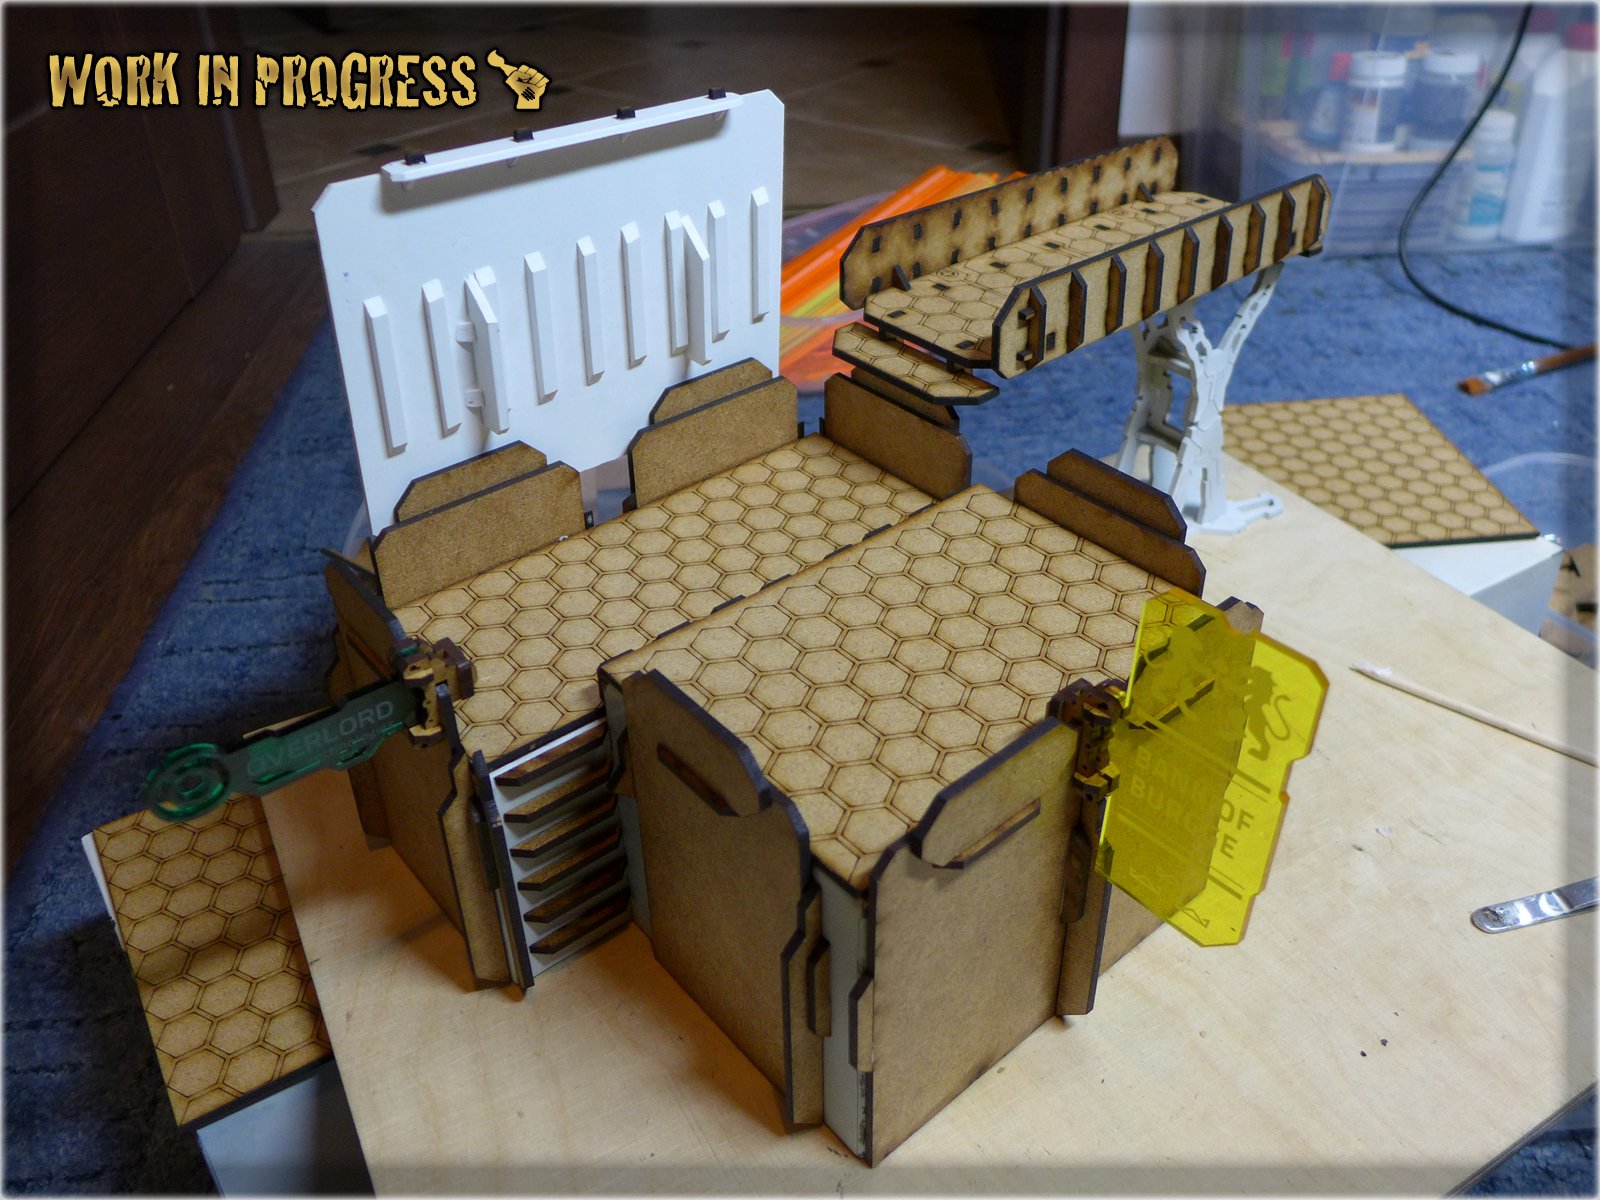
Bridges: It seemed that all the bridges in the market lacked something. In my opinion they were either cool looking and not very playable or playable but ugly. Left with no other choice I designed my own bridge to fit into my new gaming table theme and provide a good cover.

Now the only matter to attend was to copy these templates a dozen times and more. At that moment I knew that to achieve my goal I will need some help…
1 REYCAST
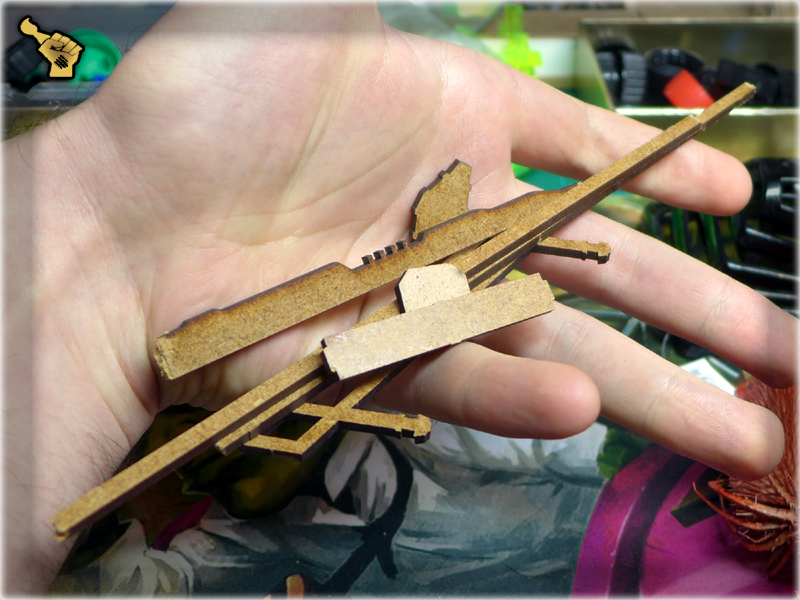
I went forth and back through Facebook in search of possible allies. An obvious choice appeared in form of ReyCast.pl who evidently had hype for Infinity terrain and seemed to be an honest guy. Not only he prooved to be just that but also joined me in my quest for glory. Once I provided him with my prototype he took the burden of drawing and then producing a Bridge. He also designed roofs that would later be used for my ‘white boxes’ and all for a really fair price.
My initial drawing and prototype:

 Final product:
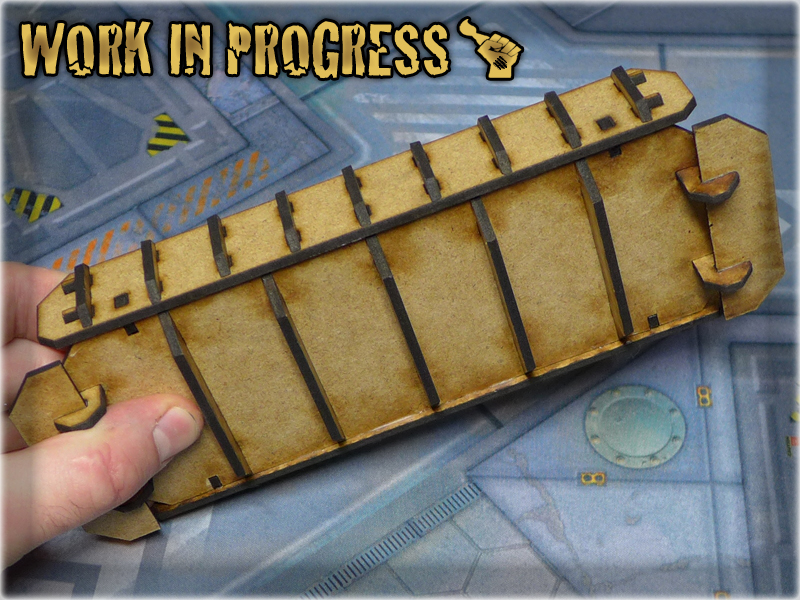
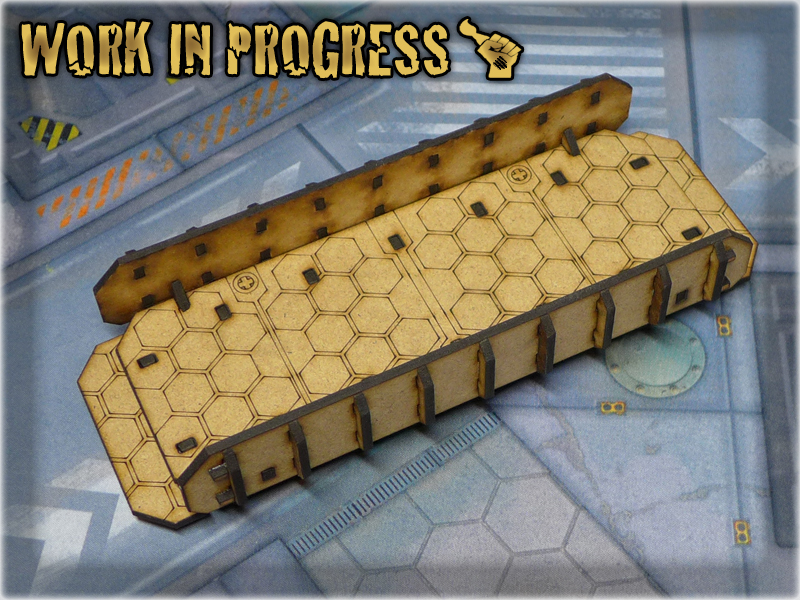

ReyCast did a magnificent work for me and I was very satisfied with the results. The one thing he couldn’t provide was quantity. I required only couple of bridges and roofs but the walls – pieces varried in quantity from thirty up to four hundred with a total of over one and a half thousand pieces! We both decided that it would be better if I try and find another provider for these.
2 MICRO ART STUDIO
Thus I went straight to my good old friends from Micro Art Studio. We have a history me and MAS – For long time we gamed Warhammer 40,000 together at many tournaments. At some point I used to order a lot of different things from them including gaming tokens, bases and designs ‘for demand’. The final product they provided was always of the best quality and good price. Now I wonder why didn’t I go to them in the first place – but, spur of a moment – ReyCast was there, he was eager to cooperate and I was in the middle of my creation battle rage. I do not regret it as ReyCast did a hell of a good job for me and hopefully not for the last time. So I sent my project to Micro Art Studio and well… must say that they delivered in a crazy, fckn’ awesome way!
My initial drawings and prototype:

Final product:

And the package… I felt like if I had my tenth birthday. Let’s say that the guys from MAS bought my eternal loyalty and gratitude.
3 TITAN FORGE
For the final set of pieces – an enormous quantity of ventilators, electric boxes and other stuff used to decorate, I went to my friends fom Titan Forge. They possess both the technology and expertise needed to provide me with such quantity. Unfortunatelly I’m still waiting for this gargantuan order to be fulfilled – but hopefully I won’t be waiting long.
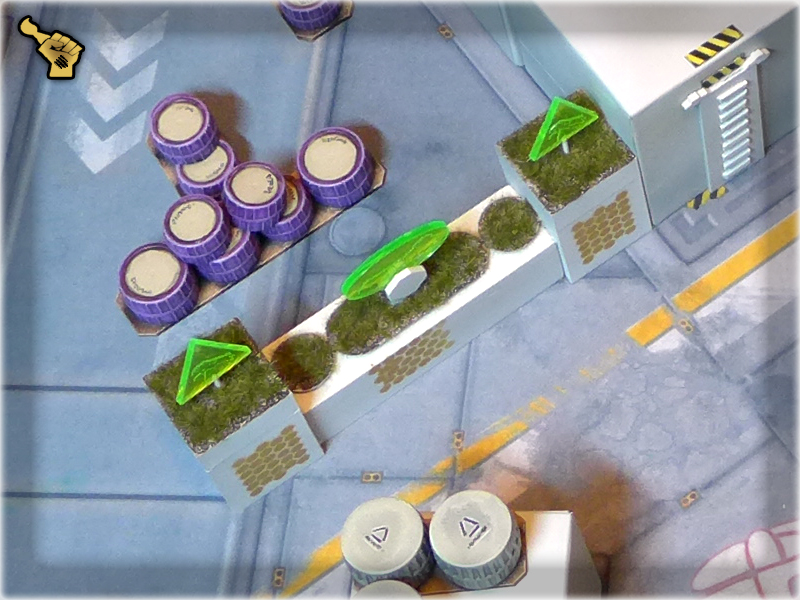
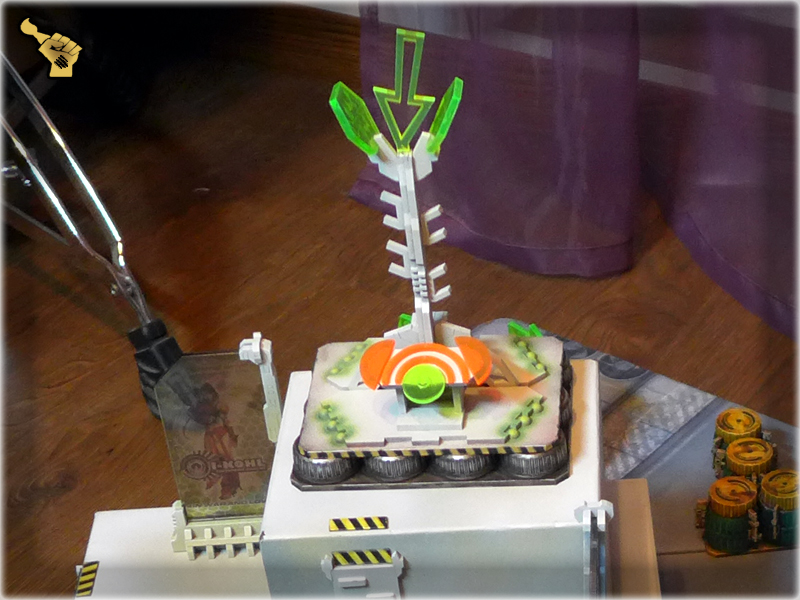
In modelling you never know what you will need unless you stumble upon it by accident. For me it happened during a local Infinity Tournament where I stumbled upon a gaming table designed by Zen Terrain. Soon after that, I purchased a set of sweet looking Neon City Signs and Planters. Surely I could have made my own but Zen Terrain has a unique desing that I just fell in love with.
I also ordered a set of plants to use in the end step of decorating my gaming table. As it happened the courier delivered these in less than two hours after MAS’s package came in. I was just finnishing a test building which can be seen in the picture below 🙂
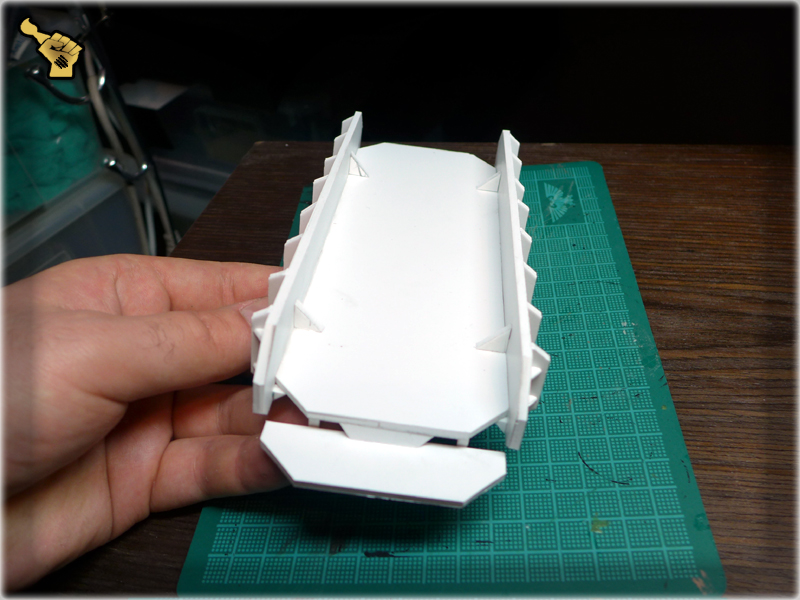
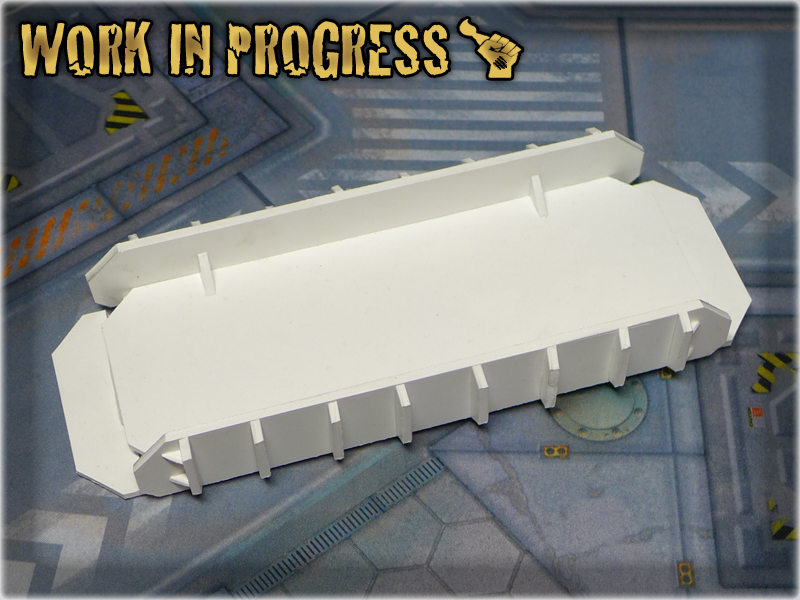
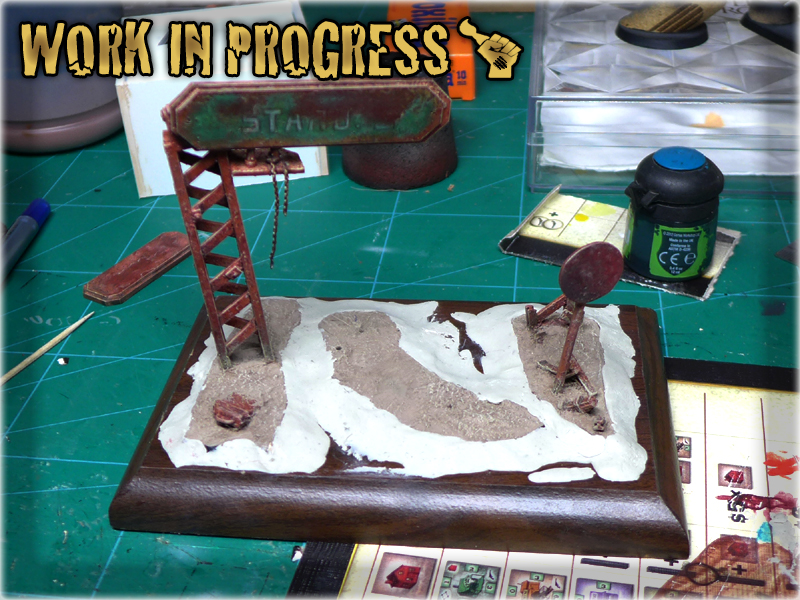
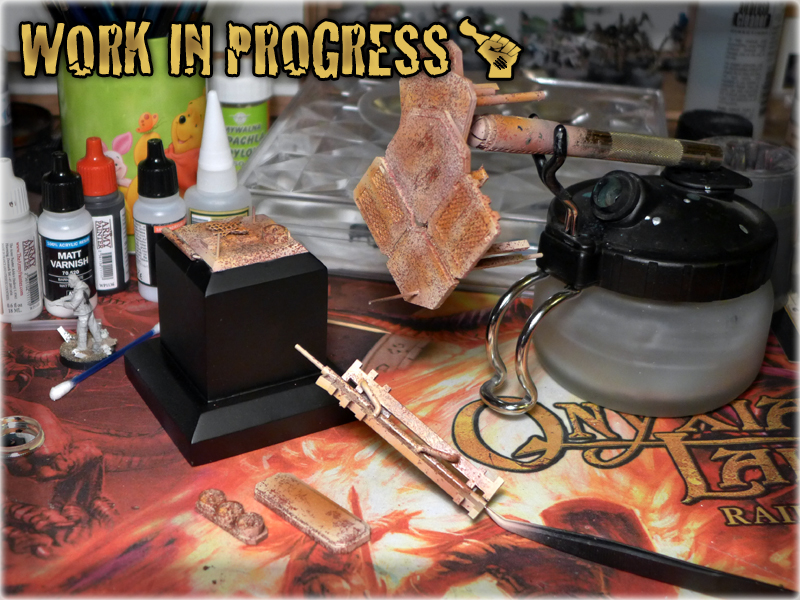
After two months of waiting I was finally able to lay my hands on most of the items needed to continue my project. I managed to wall-up all the ‘white boxes’ which from now on are no more boxes, but buildings. All bridges are also done. I’m eager to share some pictures, but it is really late and I’m weary after over twelve hours of terrain making. “This projecs it huge” and it deserves at least three entries as much as I deserve some sleep. Let this building be a glorious end of the first part of this article. See you soon in “THE COLONY” SPECIAL PROJECT part two 😉
Third ‘Special Project’ and this time it is much different than the previous ones. It’s worth mentioning that I had this one in mind for more than five years. Actually since Dec 2011 when I made these True Scale Night Lords. The paint job with which I provided them was near to ugly and I sworn to redeem myself one day. That day came and ‘AVE DOMINUS NOX’ project was realised. Eight Legion’s Rhino transporter was born into the late night of Feb 8ght 2016.
It all started with an easy yet most important conversion.
The soul of the project lies within the plastic bounds of this particular piece. Rest of the preparation went pretty easy. It was so fast that I forgot to take pictures throughout the process.
Inner Paintjob.
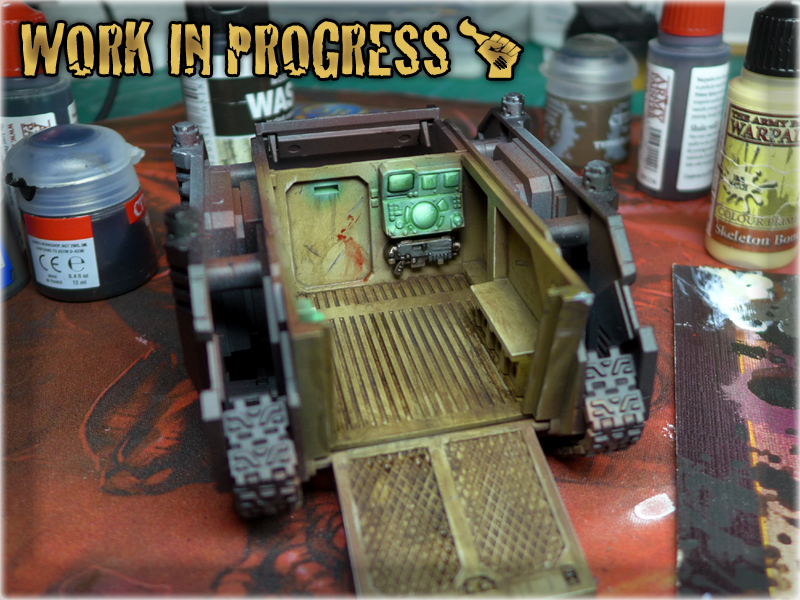
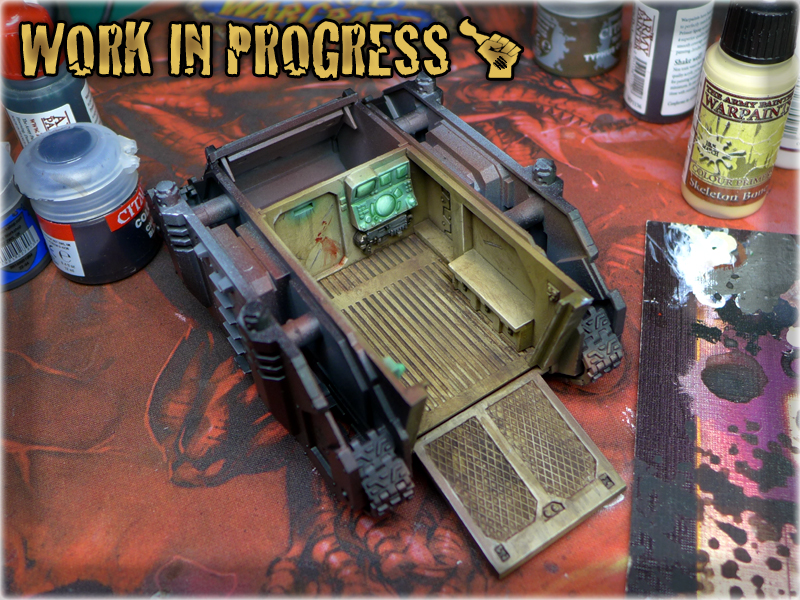
One of the reasons that makes this project ‘Special’ is that I actually painted the innards of a vehicle! I paint for more than 15 years now and I haven’t done this even once ever before. I used to pillage the innards of my vehicles, then fix a D6 dice with a ‘six’ on top into them to boost their survivability and glue all the doors shut forever.
Lightning Strike!
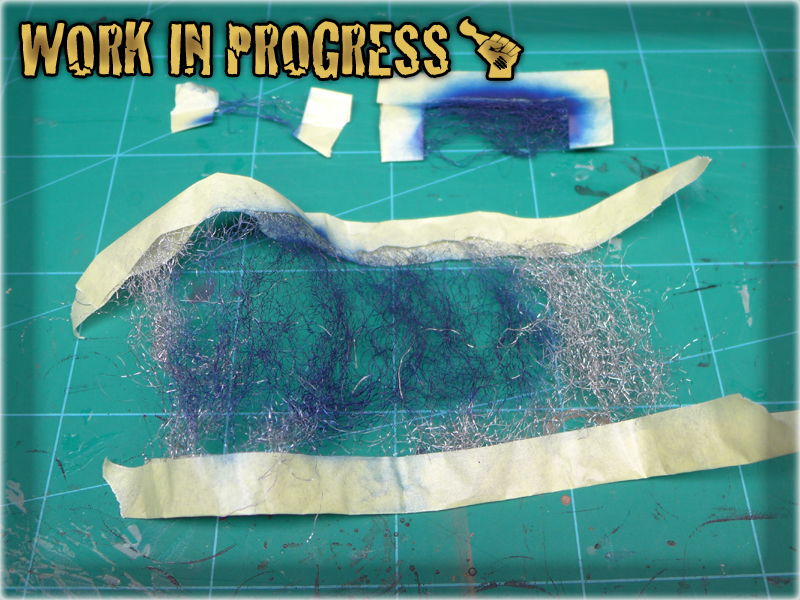
Lightning is the worst nightmare of paintjob. This is the true Terror that One must overcome so that One may stand In Midnight Clad. Fortunately I found a great tutorial of how to paint Lightning using Steel Whool. Must say that it did the job.
First night’s end result.
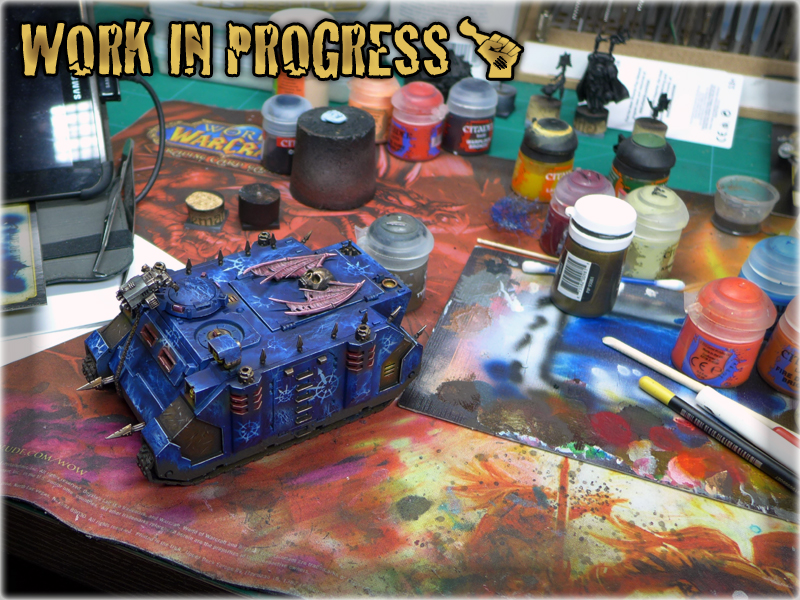
This is how it looked like when I decided to finally forfeit my task for the day and fell into slumber. Next day I was a bit dissapointed with my work. The colours seem to not go well with each other. Something was wrong. I decided to continue paintjob and blend all the Lightning and Chaos markings with blue. I also redone the upper Night Lords simbol, making it a bit more juicy with sharpened edges and key points. Small points of white/yellow were added to the main lights and white lining adorned the red ones. The Rhino finally looked like a whole.
Here’s the final piece: “AVE DOMINUS NOX”


In this tutorial I will show you a shortcut to some awesome Terrain Making. Together we will plunge head on into the distant future of ‘Infinity the Game’. We end up knee deep in terrain pieces, surrounded by half cheved bitz of plasticard, with our fingertips bleeding, clothes devastated by super glue and wallets full of unspent cash! A truly manly adventure awaits us and that’s why I’ve prepared some Terrain Making theory to prepare you for what is to come and remodel the way you think about it.
Terrain Making is a topic to write a book about. There is just so many different aproaches a modeller can take on a road to create some awesome gaming terrain. I would be lying if I told you that I am able to cover all of that here, in this tutorial. Instead I will concentrate on some key points of Terrain Making that I keep in mind whenever I happen to make some scenery.
The first thing to do is planning. I’m not a big fan of this part and usually skip it, still some key points of planning take place almost unconsciously. Just sort the ideas, prepare funds for eventual purchases, set a theme and go for it!
– Price of beauty. Long years of gaming and terrain making showed me that a nice looking table may look even better if pumped with some pre-made stuff. Just throw some money into this project and see how much it changed when it comes to how it looks. Think of a sum that you would like to invest in your gaming table – have in mind that except for some necessary stuff like paints, glue, spray, your gaming table can still be built with 0 cash involved.
– Avoid Expensive stuff. I just told you to spend some cash but be thoughtful with that. Try to pinpoint the most expensive elements of your future gaming table and substitute them with some cheap alternatives. This way you not only save some cash but also will not brind huge visual diversity to your terrain set. [A good example of an expensive terrain piece that could be easily replaced.]
– Be a pragmatist. Keep it fast and simple to build. I too had a boner when seeing this gaming table but hey – it’s like a billion € and countless hours spent on putting these things together. Remember that cash equals time and vice versa. If earning cash to purchase a terrain piece and putting that piece together will take you less time than making one yourself – just go for it. Otherwise it’s worth to keep it at speed. A nice looking gaming table can be built and painted in less than 16 hours!
– Select a theme. A ravaged battlefield, futuristic city, space hulk hallways, huge magazines, train station, rich district – what you will choose will affect the materials you will need and a level of complexity ergo ‘time’ you will need to build your gaming table. A good theme is an average between price, time of build and LOOKS. Low on cash and time? Try out Magazine space full of barrels and containers. Plenty of cash and time? Go for a pristine Rich Quarters with fountains, streets, bridges and detailed buildings.
In order to create a gaming table you will need a lot of different materials. Plasticard, cardboard, thin wood are considered to be ‘common’ while bitz and parts of particular shapes are more difficult to obtain.
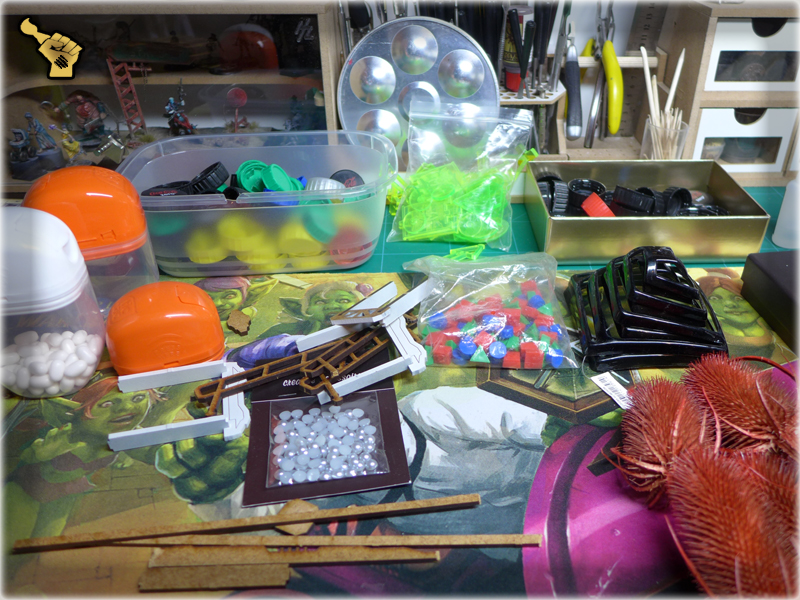
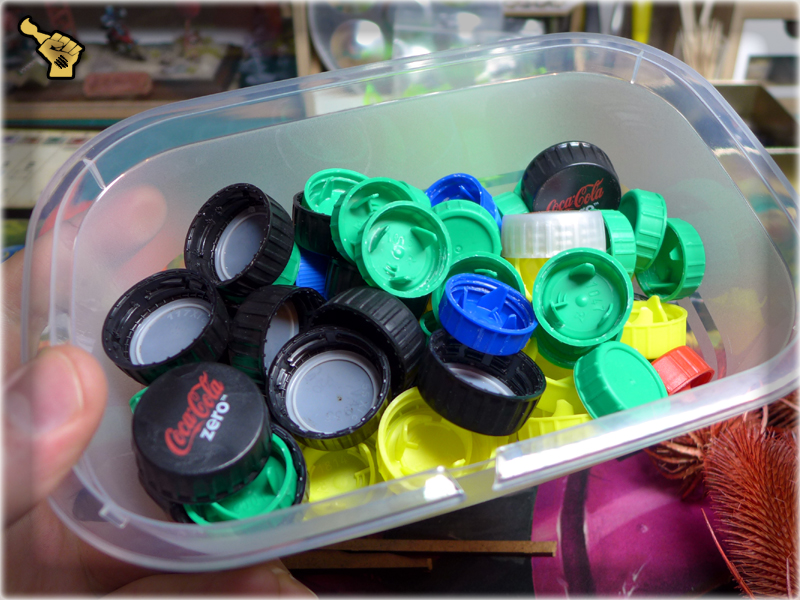
– Have an open mind. There’s plenty awesome items surrounding you all of the time. Most of them end up as trash while they might be used as modelling material of exceptional value. Just go to the kitchen and look around. Plastic bottle caps of different shapes and sizes, coffee jar lids – these are the tip of an iceberg!
– Ride the outside world. Home ‘trash’ is your brick and mortar when it comes to Terrain Making but true pearls belong to the world outside. Just outside your doors you can find some nice looking stones and sticks but further you venture the better your loot will get. Go ahead and visit a supermarket. Toys, hair utensils, cheap (crappy) plastic jewelry, tools section, decorations – these places are marked with ‘X’ for ‘treasure’!
– Be like modern China, steal blueprints. Many different companies created a variety of splendid gaming terrain. Once you type “Infinity Gaming Terrain” in google you will find a lot of great inspiration to draw your ideas from. You can even purchase some and use leftovers to pimp the visual effect of your home made terrains or go even further and rearrange purchased terrain to have some additional spare bitz left!
Finally a part of raw hard work! If you picked a theme that goes along with your funds and time that you are willing to invest – this part will be a lot of fun for you.
– Durability. Gaming terrain should be tough as otherwise you risk games ended up being forced to do some repairs. Try to create terrain that is well ballanced and easy to game with. I recommend that you base all of the smaller terrain pieces as this will improve their balance along with visuals. Just remember to never use cardboard for basing as it usually bends over time. The recommended materials are: plasticard, plywood (both can be seen in the picture above).
– Utility. Gaming terrain is supposed to be gamed upon. I know – some small, sweet looking, extremely detailed pieces makes me wanna cry with joy, but are they as playable as simple, angular blocks of terrain? The answer is NO and have that in mind. Additionally it is worth to measure some heights to better fit the miniatures. For example: A barrel of the same height as a miniature will usually force you to wonder if a miniature standing behind it has LOF to other miniatures? Well usually it does due to use of silhouettes so it’s better to build barrels that are half the miniature’s height. Etc.
[Once again a good example of an expensive and not very playable terrain piece.]This building is looking great but it is expensive, the cover it provides on the ground level is limited, it is too high for some miniatures to go to the roof in a single action forcing you to remember where the miniature is left hanging.
– Clusters. When it comes to small terrain pieces it is the best to keep them clustered on a single base. They will stay in place and provide a wide cover instead of falling apart and moving around the table each time someone ccidentally pushes it.
– Clones. I’m an enemy of a ruler. I just hate to spend lots of time measuring plasticard/cardboard pieces of same dimensions. I preffer to measure up one piece, then cut the rest using the ‘primary’ piece as a template. Even if some pieces get a bit different from one another this will only add some extra touch to the overall looks of my gaming terrain. [Use this technique at your own discretion.]
– Production line. Plan your work accordingly. Start by preparing all the necessary pieces, put them together and base all the terrain pieces. Do not start to paint before all the terrain is ready for it. This way your work will be a bit less rewarding but you will save a lot of time. Same goes for painting: Do not paint a single terrain piece but paint them in droves instead. Just as you end up applying a layer to the last piece, the first one will get dry and ready for the next layer.
So here’s a shortcut recipee for you:
– Prepare funds then cut the expensives off,
– Plan what to buy/build and how long it’ll take, (be a pragmatist),
– Choose a theme according to your capabilities,
– Pillage your house for free trash material,
– Pillage nearby supermarket for some key material pieces, [keep it cheap.]
– Use some purchased terrain and leftovers to create your own variations,
– Make your terrains durable, balanced and playable,
– Keep small terrain pieces based together,
– Save time while preparing particular bitz by using one as a template to cut the rest out,
– End one stage before moving to the next one,
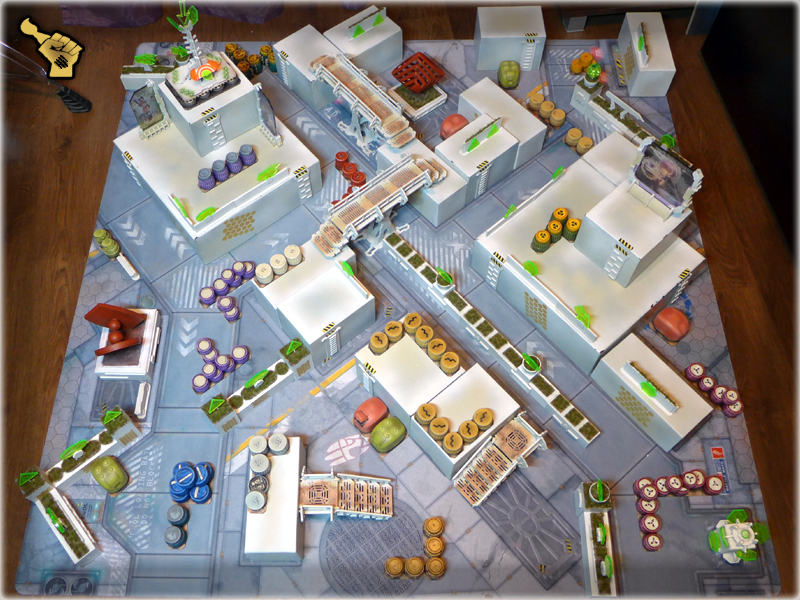
I feel your pain. That wall of text above is probably as hard to read for you as it was for me and I read it more than thrice. Let’s go to the Practical part of this Tutorial with some examples and more pictures. I will use my own gaming table prepared last year as an example of how to do it in accordance to above tips.
Back then I was short of time and wanted to create a gaming table designed for Infinity ASAP. I love Micro Art Studio’s terrain and wanted to purchase a whole set of it along with some Spartan Scenics. Cash was not an issue but once a test purchase was delivered I almost dropped the project due to time consuming process of putting these terrains together. It was a hell of a boredome so I decided to go ahead and prepare my own gaming table. I choose something between Mass Effect ‘Citadel’ and Death Star outer surface style Theme and already owning a Micro Art Studio’s catwalk set I decided tu cut off the most expensive thing: Buildings. Small part of the surplus cash was to be used on static grass and a Battle Mat that would eventually pump the visual effect of the gaming table.
Being a pragmatist I decided to use a hard cardboard boxes as the main bodies on the gaming board. Easy to obtain in friendly local hobby store, easy to prepare, light (transportaion), stable, very playable – the cardboard boxes prove to be an extrmely good pick. Some spare parts from catwalk set let me upgrade my ‘buildings’ with a nice set of futuristic ladders. The plan was to improve the visual effect by adding some facture with paintjob.
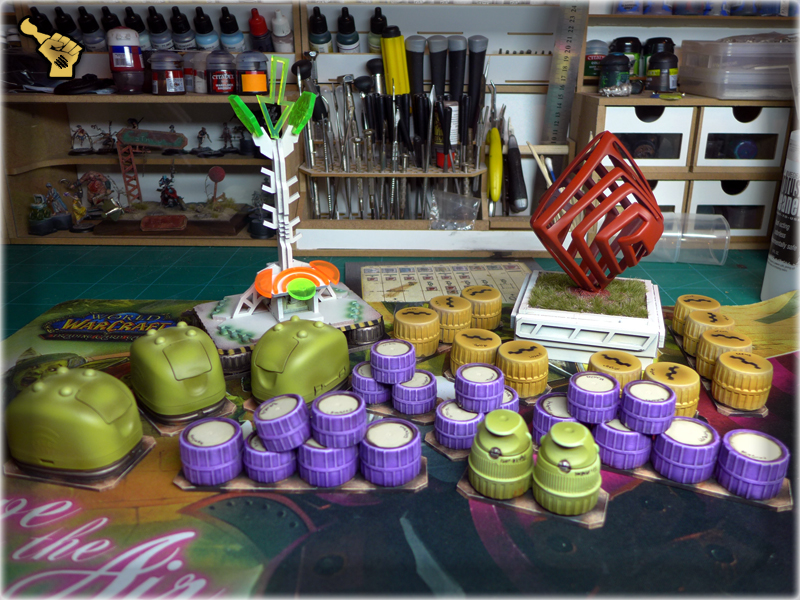
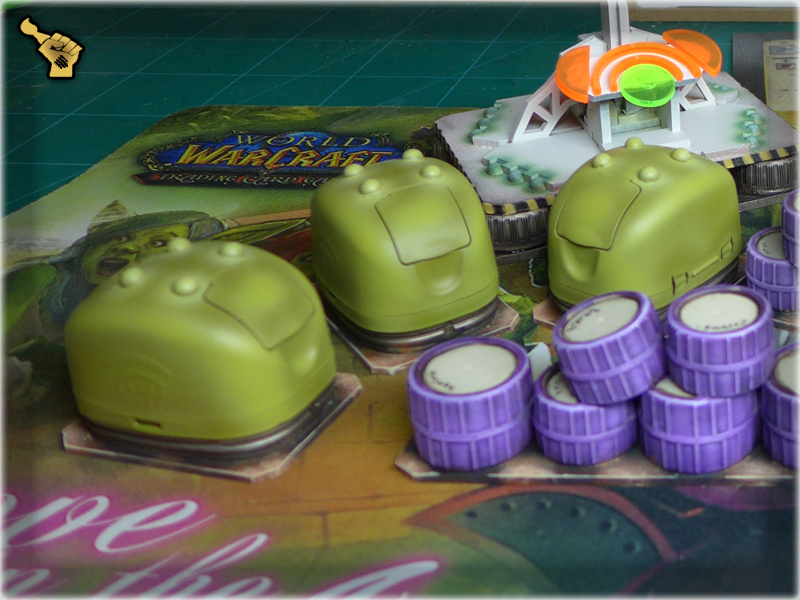
Once I was done with the buildings I moved to all the other stuff. Less futuristic but very playable and bringing some colour to my gaming table came Barrels, Trash Containers, Holograms, inner walls and some key terrain pieces. Here’s an example:
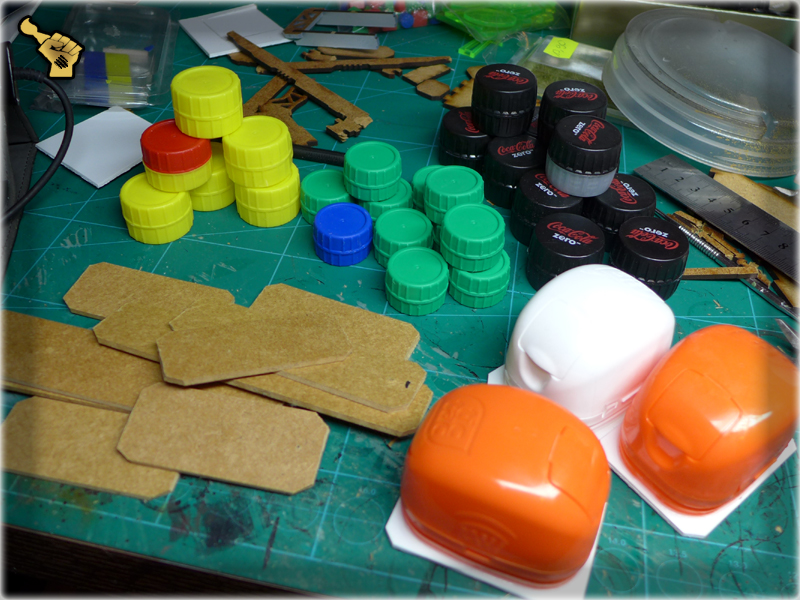
Barrels: Plastic bottle caps of coca cola, milk and water. I find the ones with less facture being the best as the paint looks much better on irregular flat areas. I drink a lot of Coca Cola Zero in addition to milk and water so I used most of the caps being kept in home 🙂
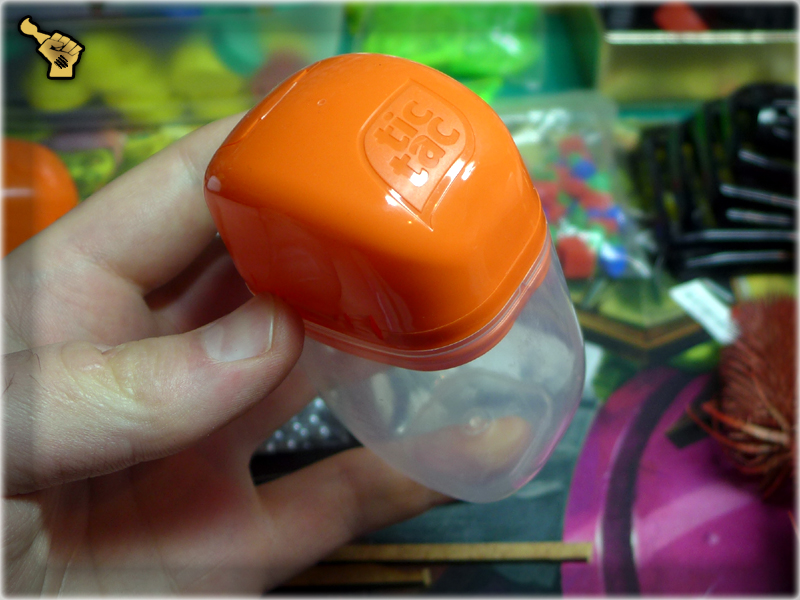
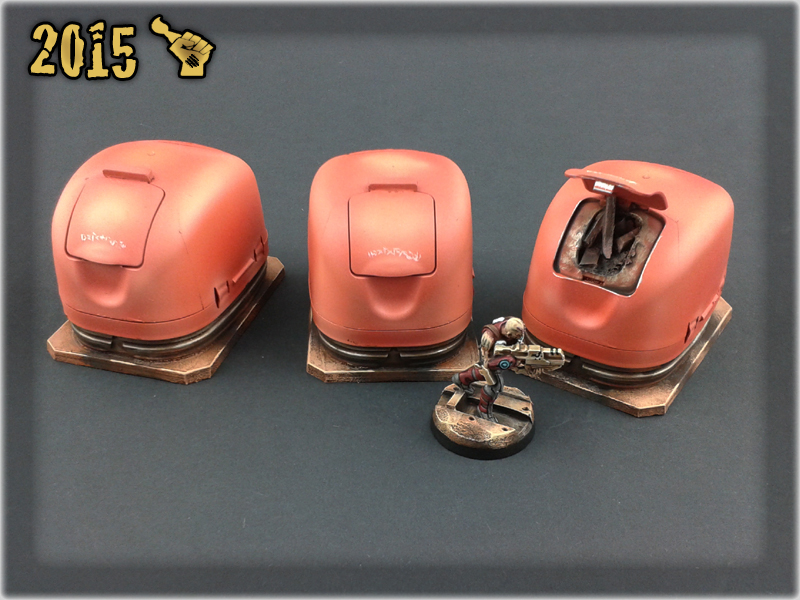
Trash Containers: Tic-tac pack upper parts. Some were additionally converted but looking past I think that I should leave them be as they have a perfect shape on their own.
Holograms: Old Warhammer 40,000 tokens, easy to obtain at second hand market and as these are rarely used – they come in cheap. I had some left from my own Warhammer 40,000 collection and purchased another set from a friend.
Inner Walls: Rectangle Chessex Dice packs being emptied and thrown away by a local hobby store. Some walls were also made of wooden blocks. Some have been updated with facture made of wooden spare parts left from Micro Art’s catwalk set.
All the leftovers were used to build this Relay Beacon, leaving not a single bitz unused.
This particular gaming board was made with rush thus I had to update it from time to time adding extra touch with new sets of scenery. Just recently I wandered into the Supermarket in search of some final pieces to strengthen the theme of Sci-fi quarters. I found these cool items:
Plastic hair holder / 1,5€is a masterpiese of both architecture and art. A fine centerpiece for my gaming table. I bought two of these and made them into this:
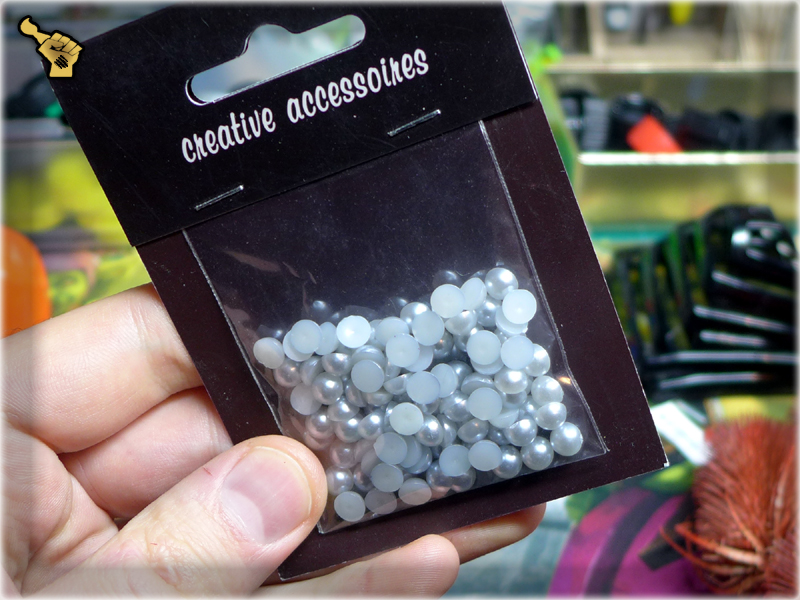
Decorative beads / 2€ will one day be used to make a set of awesome light globes all around my flat white buildings. For now they served as additional facture for new set of Trash Containers.

So here we are. My gaming table took less than 24hrs in total to complete and that if all the add-ons are being counted. The overall cost of this project is Micro Art catwalk set, Micro Art hologram banner set, Micro Art gaming mat, warhammer 40,000 tokens, two hair holders, a pack of decorative beads, a can of white spray, some paints, glue, brushes. It’s around 150€ + 24hrs worth of my work (which could be much less if I only made all these stuff in one go). All the other items I’ve managed to get for free. Now I have a very playable and rather nice looking gaming table, designed for Infinity and fully packable into a single box XD
! If i haven't purchased Micro Art Studio's awesome stuff the overall cost of this gaming table would be close to 50€

I hope that you will find this tutorial both helpful and inspiring. In case of any questions just leave me a comment in the comment section below.
PS: The pictures below were made couple of days ago in a local mall, which was modernized recently. Now it looks just as my vision of what this gaming table is supposed to represent 🙂 Welcome to the future – few years from now and we will see some Heavy Infantry in live action 🙂


Being a Wargaming hobbyist is not always related to miniature painting. Some of us just like to collect miniatures, others enjoy competitive play. There are those who do not feel joy of having a brush in one hand and a miniature in the other all the time. That doesn’t make them any less a ‘hobbyist’ than the actual painters. Needless to say that regardless of what makes us into true hobbyists we have one important thing in common: we love miniatures.
Having that in mind I’ve prepared something not exactly related to painting miniatures. It is a small Tutorial about Preparation before an ‘Infinity the game’ Tournament. A preparation that in my opinion is especially important from the ‘beginners’ point of view but will benefit all the players present at the evet, and here’s why:
The game lives on as long as it sells and it sells as long as it’s fun. ‘Fun’ is the principal of hobby, still a lot of players consider miniature wargaming tournaments of being ‘all about competitive play’. The fact that both sides should have the same amount of fun is pushed to back burner as once the adrenaline kicks in, there’s no thinking about ‘what the oponent feels?’ – only what he ‘thinks’ and only if related to the current game 🙂 Sometimes that leads to stressful situations or even unpleasant behavior. On the other hand there are players more interrested in throwing some dice and moving miniatures enjoying scenario flavor and nice looking scenery pieces. These happen to misstriger some reactions, forget rules or equipment vital to play the game according to the rulebook. So in order to bring fun to the tournament and have some fun ourselves we shoud both prepare mentally and grab some gear for the upcomming event.
Mental Conditioning: First of all try to think about what the opponent feels? Off course it won’t be fun to be massacred by some unpainted ‘tournament ready in 15 minutes’ miniatures of a guy who ‘must win this one to get to top 3’. Stone face and lack of sense of humour is your’s enemy as much as it is for your opponent, regardless of which kind of player you face. At the same time have in mind what’s going on in your opponent’s head while you shift back movements and can’t make your mind for what seems to be an eternity. Or while you whine about your opponent’s miniatures being unpainted and how ‘devoid of climate’ that is instead of facing this match like a man.
– You play against ‘non competitive flavor snail’? Even when you behave nice and point out some vital rules, that your opponent may to forget, try adding a joke or some short battlefield anegdote to smooth the atmosphere. It is possible to win literally obliterating oponents army and still to achieve fun for both sides. Try to keep your adrenaline glands dormant as once they flare up you only worsen the opponent’s reaction time.
– You play against a ‘rookie’? Keep the atmosphere calm and friendly having in mind your own first tournament experience. Try not to use tournament slang and abbreviations – your opponent nodding does not have to mean he understands what you said. Tutour your oponent (ok, do it after some actions have been taken so he learns on mistakes) to help him understand what did just happened but also to become a better opponent for the future matches. This way you also become a better player.
– You play against a ‘tight ass pro’? Don’t treat some rules as not obligatory, for example be thorough while moving your miniatures (don’t steal some vital inches due to being lazy). Be calm and accurate but at the same time try to decide fast even if it costs you a loss of confidence on the table. Better to loose and learn from your opponent than to win and stagnate without evolving your skills. Remember that once you estabilish an accurate form of contact you will be able to ask some vital questions thus fastening the game and having less difficulties with making important decisions.
– You play against ‘Luck’? Don’t be angry at dice. This game is all about RNG, also luck is a bitch. You will take your time to position a sniper in full advantage just to be taken out by a stupid pistol’s ARO while at the same time some Combi Rifle grunt will multikill on a spree! Infinity is just ‘that kind of a game’. Deal with it or move on to ther systems;)
– Clock is ticking! Keep track of time as you may be the one overthinking too much.
– Hands off! Under any circumstances do not touch opponent’s miniatures unless he lets or asks you to.
– Obtain certainty! Ask your opponent for any ARO’s or other actions available to him so that he won’t misstriger. Have in mind that the harder it is to win the better player you’ll become.
– Buckle up and disengage! When game ends just pack your stuff and report results to a judge. Then transfer your things to a neutral place (parapet, empy table…). Most people tend to leave their belongings scattered around the table and dissapear to be late for another round. In that case you being late and unprepared means that four players, yourself included, will be awaiting while you chaotically collect your stuff from around the table.
– Keep noting! Write down every major choices so that there won’t be any doubt about them. For example which Camouflage Marker reffer to which miniature etc.
! Additional tip - Read the official Infinity Tournament System rules and Scenarios that will be played at the event.
Gear Preparation: Gaming is so much easier when you don’t have to borrow stuff from all the peeps at the tournament. Usually it’s also much faster! Being professional does not mean that you go straight for Power Gaming, it means to play according to the rules thus reducing a number of conflicts to a minimum.
Pro: If you consider yourself a Pro then I don’t need to tell you of how important some of this stuff actually is. You probably own your personal tournament set and know your own ways of waging war.
Rookie: One of the reasons why Infinity is such a great game is that you don’t have to spend a lot of cash on a bunch of useless items (say ‘hi’ to Games Workshop from me) and can focus your finances on miniatures instead. Rulebook, Unit Profiles, Unit Silhouettes, Tokens and Markers are all printable. Just fallow to Download section at Infinitythegame.com. Even the Classyfied Objective Deck is not obligatory as rulebook includes a special table that you may use instead! That leaves you with some vital stuff like Tape Meausure, Dice, Templates and off course Miniatures to obtain. So regardless of what kind of Tournament Gear you have – it’s time to pack it correctly.
– Pack your bag! Try to pack your bag/box to the optimum. An optimal packed bag will let you move swiftly on the tournament ground, embark your miniatures fast after the game (to let other use the same table) and unpack them rapidly when facing next opponent! Some vital stuff will be within reach all the time also!

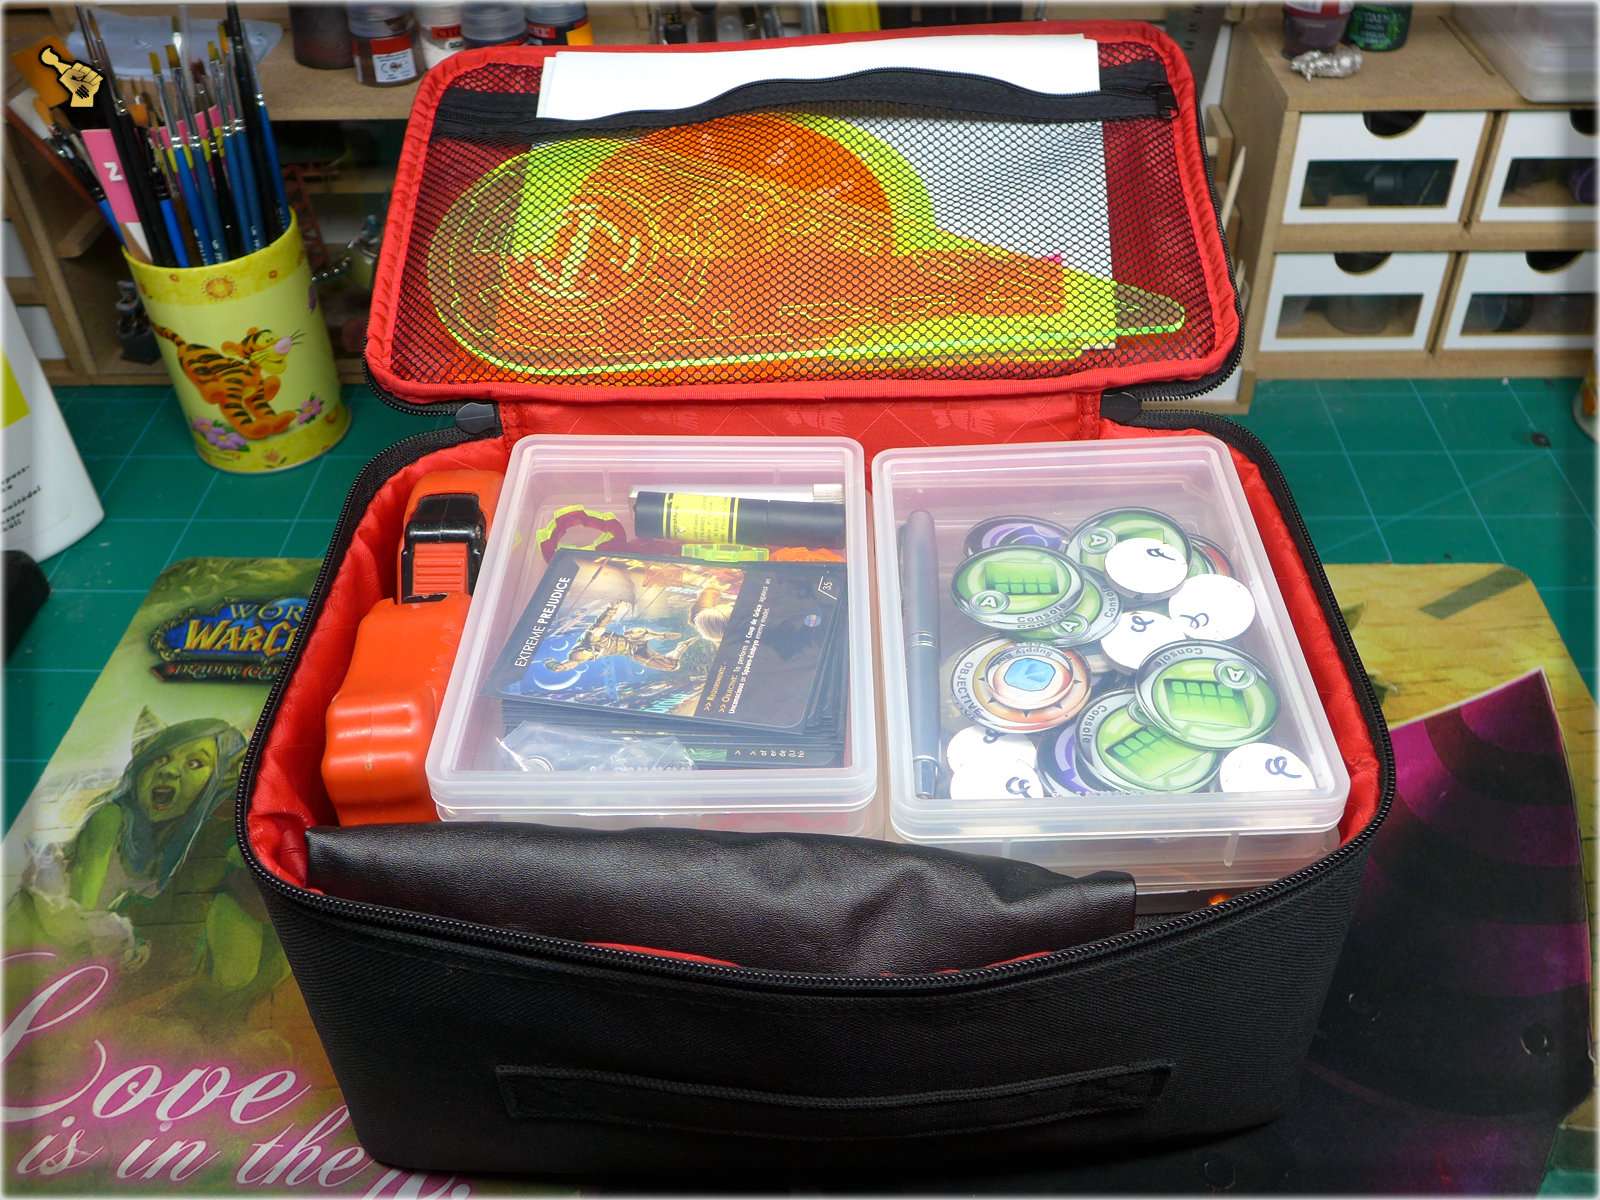
– Print an Army Roster! That goes both for your’s and ‘Courtesy’ one to show it to your opponent. A printed roster is easy to apprehend and will fasten the ‘game preparation’ process. Also you will be able to decide on strategy easier when facing plain enemy roster yourself. Did I mentioned that wothout it you won’t be able to participate?
Use ARMY program to prepare your army list and don’t forget to print ‘Courtesy’ roster for your opponent.
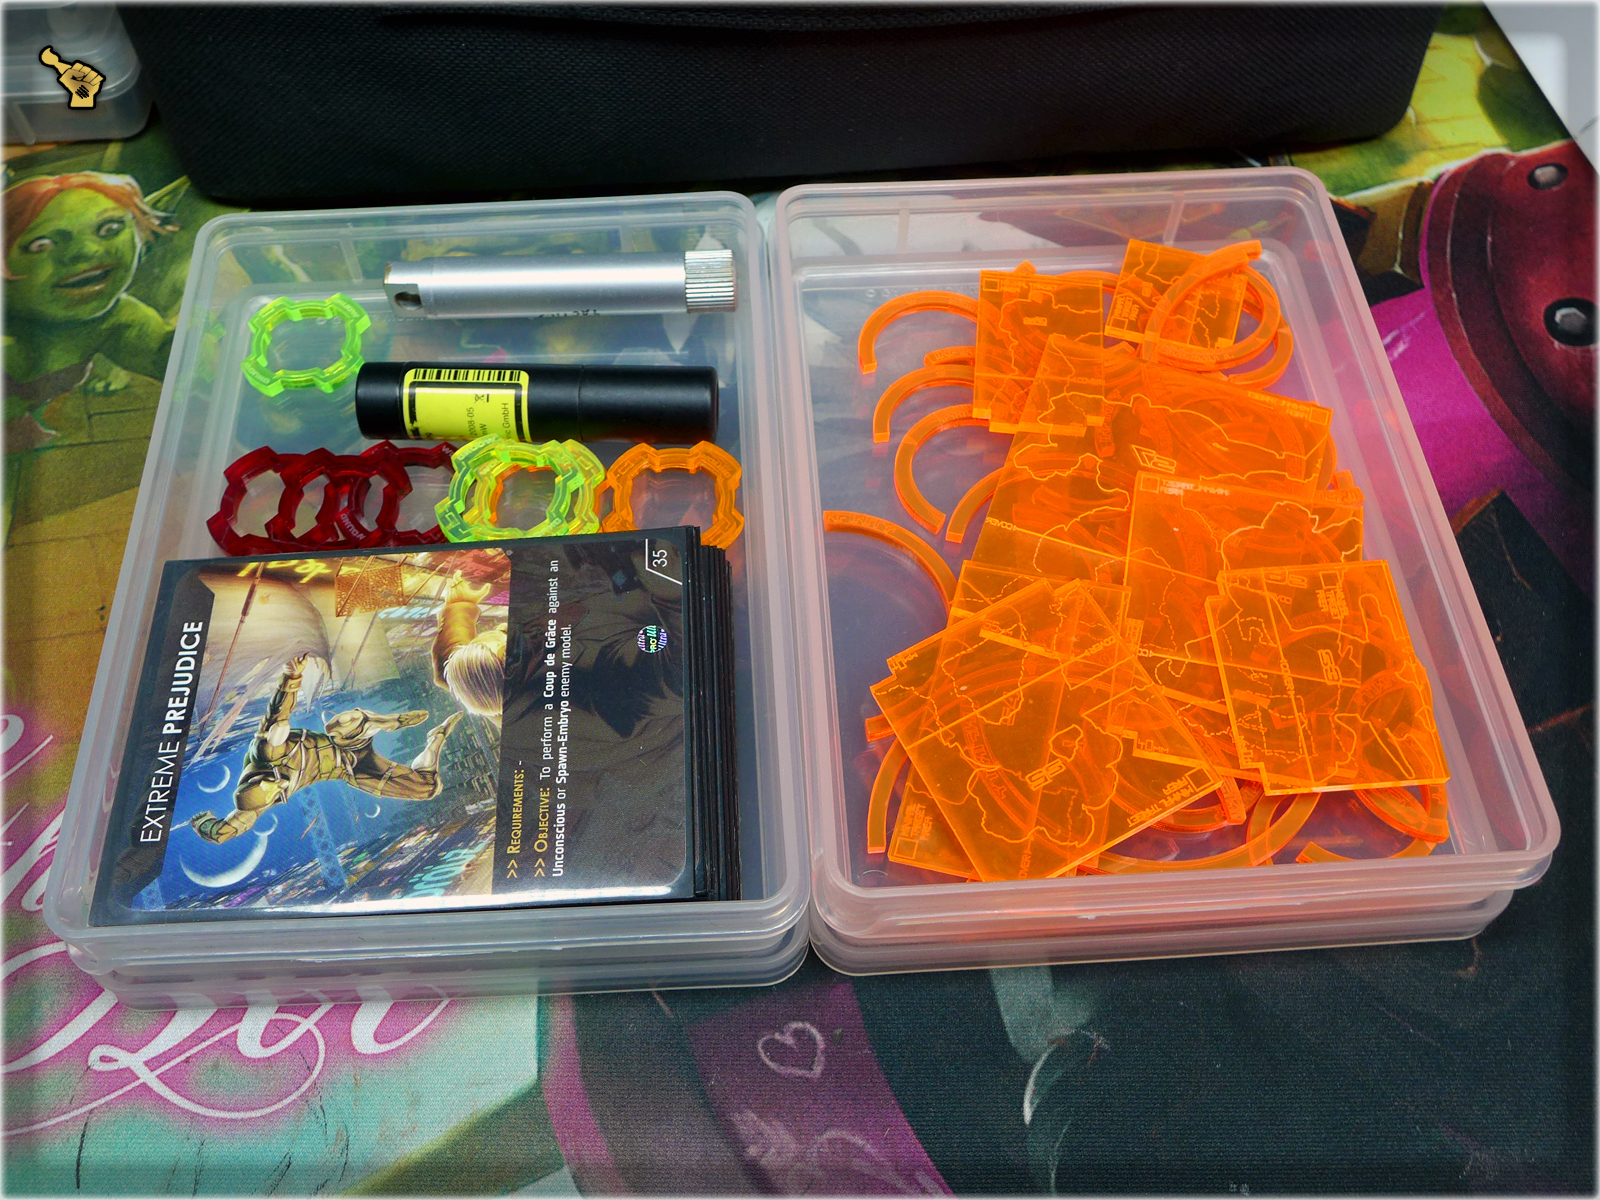
– Templates (‘teardrops’), Blast Markers (‘cookies’): Must have, just don’t show without them!
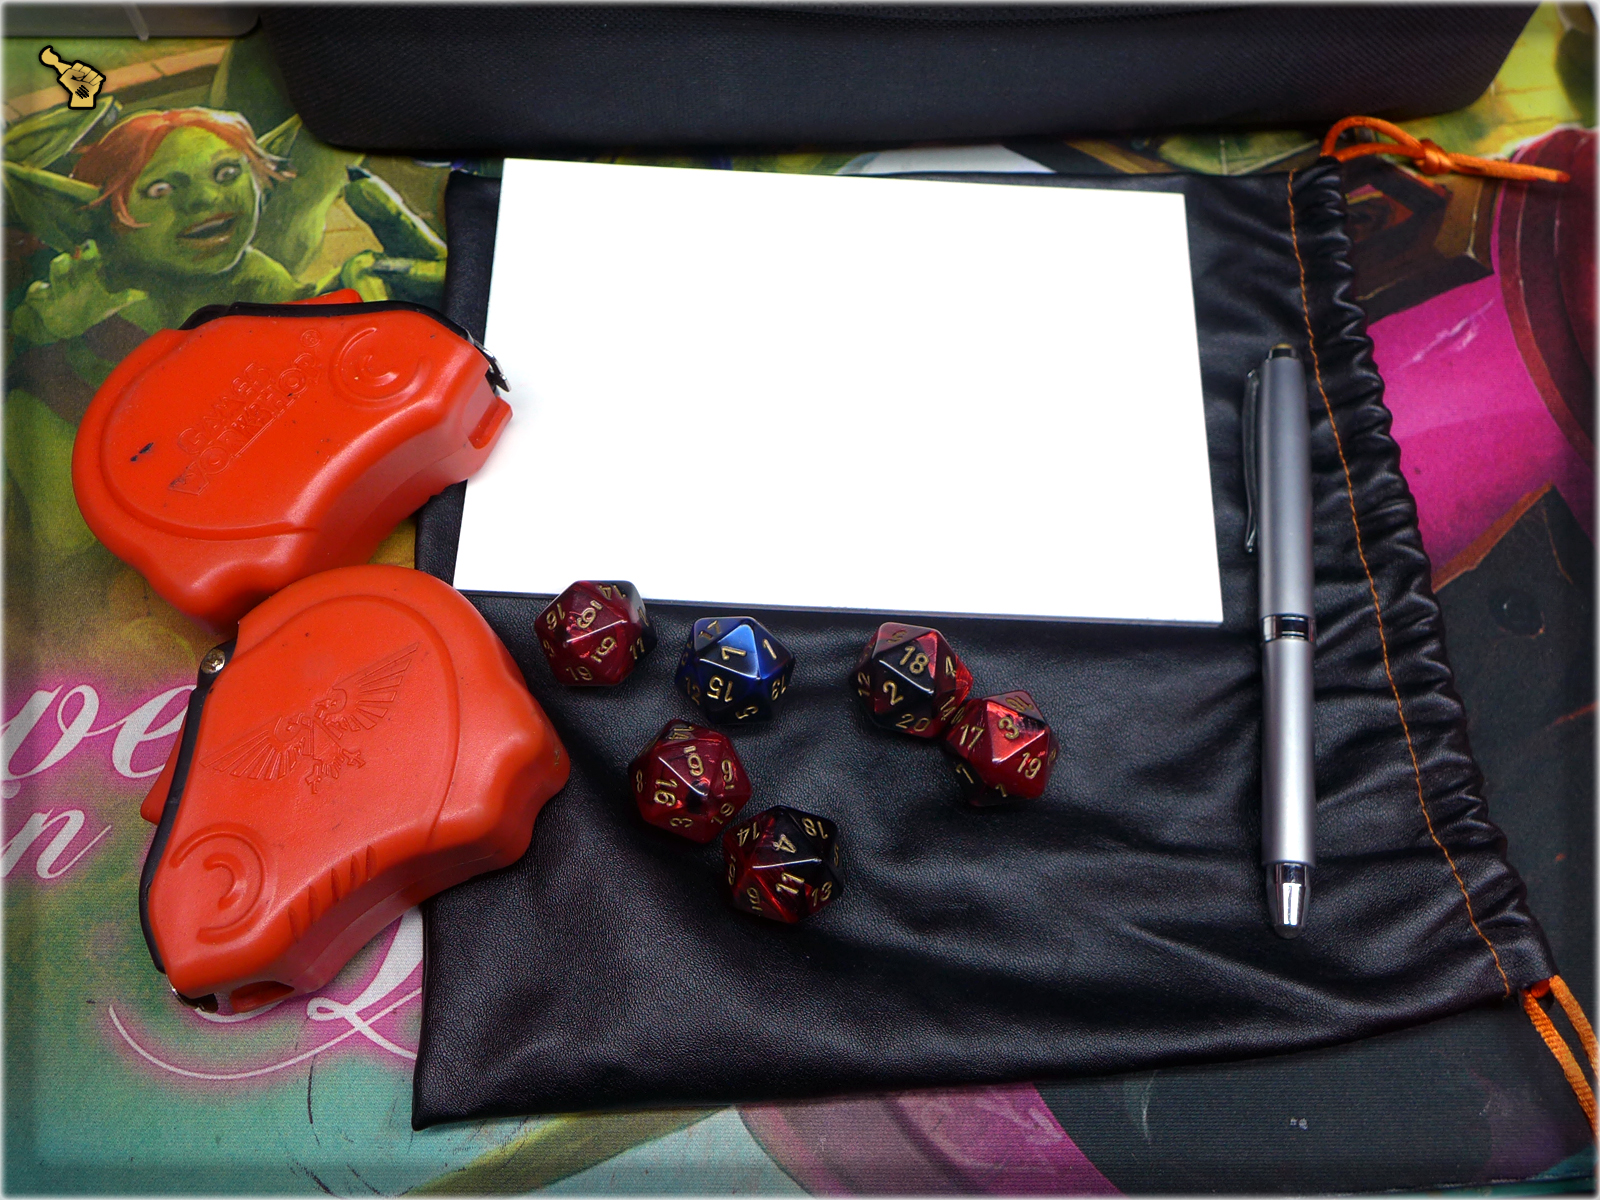
– Precise Measures: Precise Measure is in my opinion the most important tool of precise gaming so I recommend you bring one. It comes in handy while moving miniatures and checking their Area of Control. It makes the game a lot more pleasant.
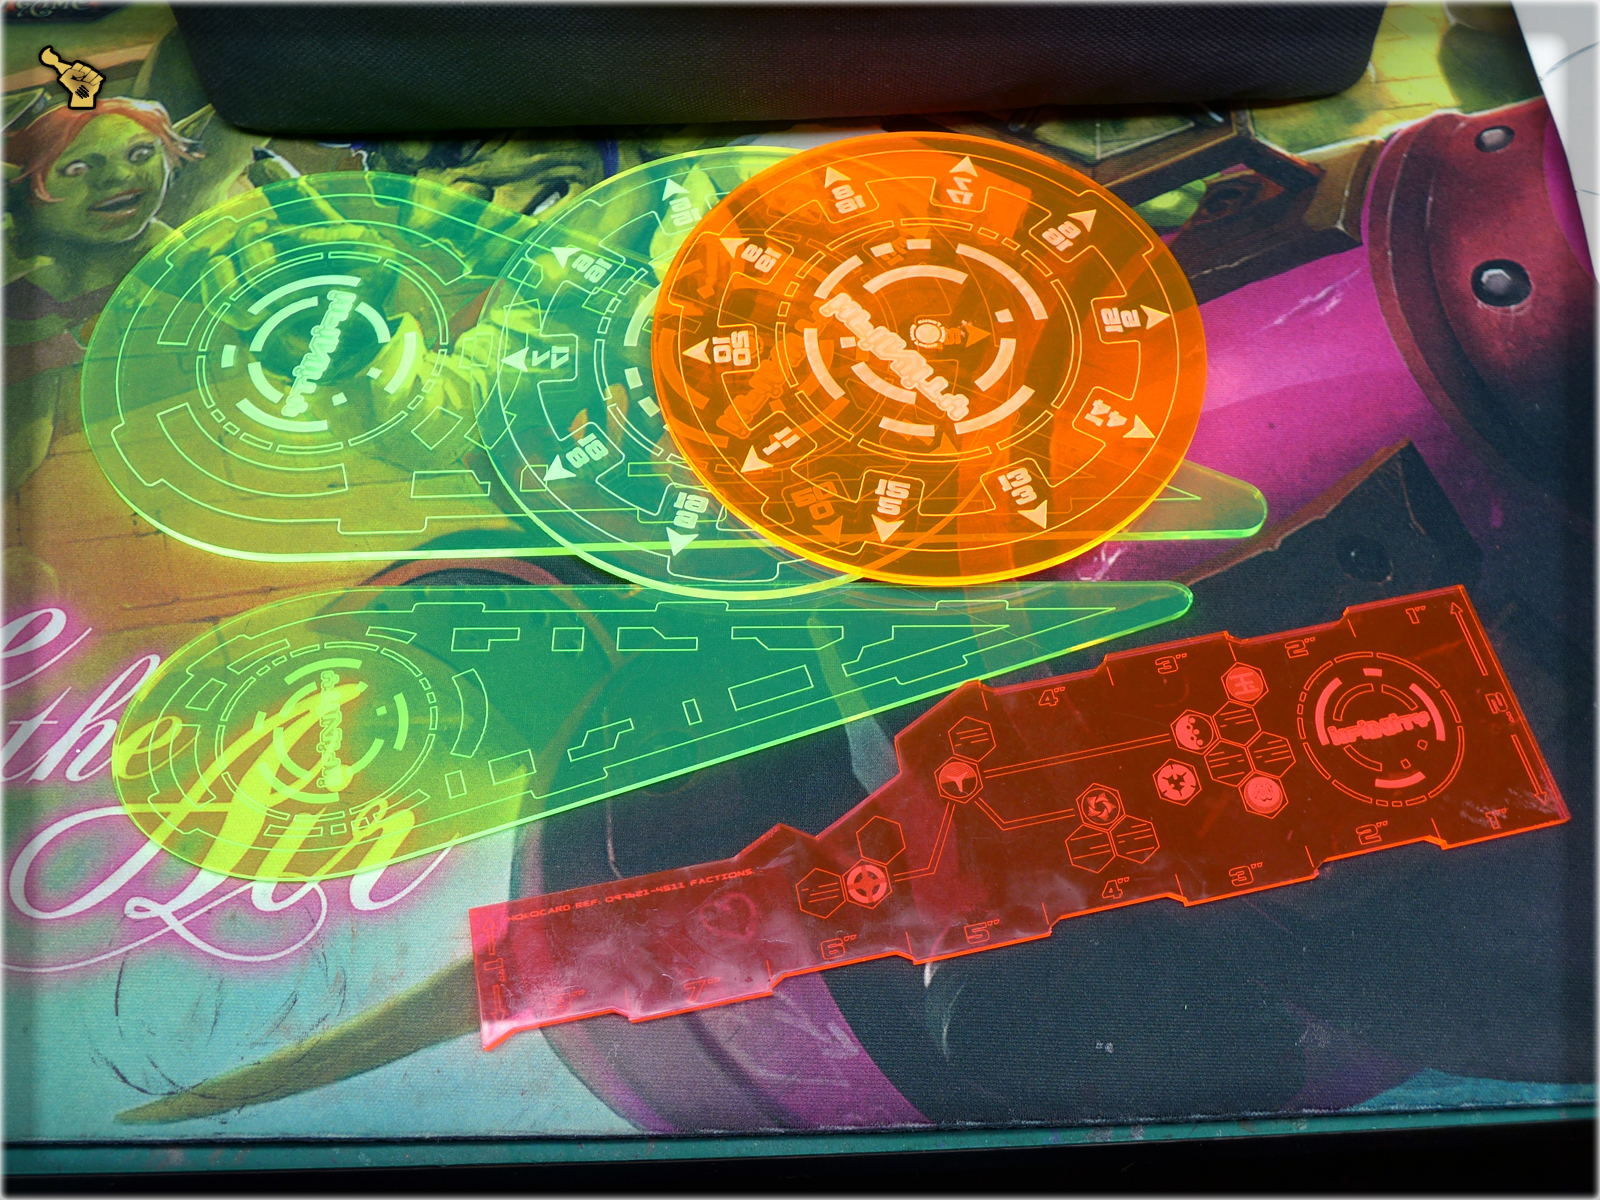
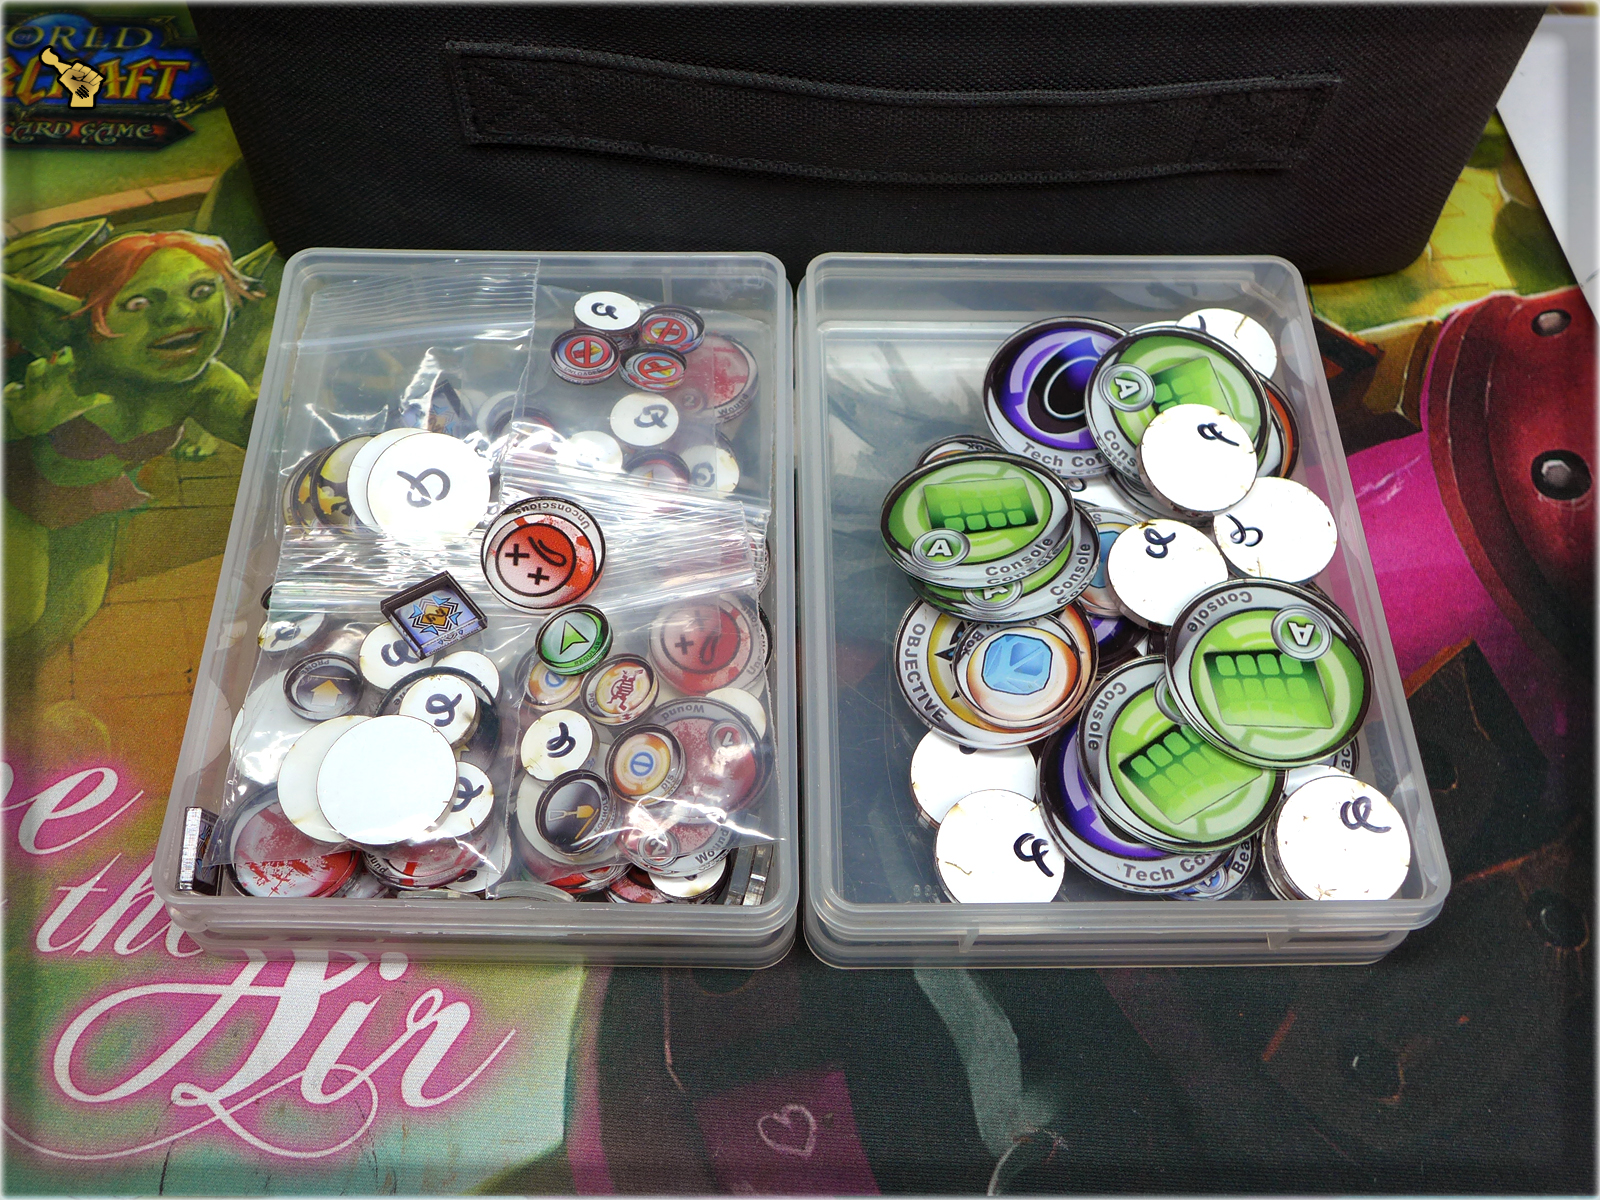
– Tokens: Wounds, Unconsious, Prone, Regular Orders, Impetous*, Irregular Orders*, Camo*, Command Tokens (*if your army uses these) are vital to the game performance. These are must have and if you lack some cash to purchase fine versions of these – you can always print and cut yourself.
– Objective Markers: Objective Markers are not obligatory but they come in pretty handy. All for the sake of keeping track of what’s going on at the table.If you lack these yourself then probably your opponent will provide his own set, but what if he thought exactly the same?
– Silhouettes: Silhouettes* are a must have in N3 (*if your army uses these) and they tend to be used at some point in the game. They are being used if a certain Line of Fire situation is not clear. At first you will probably mean they are an inconvenience but after couple of tries you won’t be able to play without them.
– Classified Deck: This item is just awesome. All the rolling involving a special table and then searching how does a certain secondary objective works is just frustrating. You can either buy one of these along with your friends or print a copy. Whatever you choose you won’t regret!
– Laser Pointers: No more Line of Fire arguments, no more asking other players if a miniature sees another miniature, no more judge involvement needed. Fast and awesome method to check out LoF!
– Facing Markers: Facing Markers are a whim, as you can just mark facings on the miniature’s base. Still I preffer these instead of destroying smooth, black surface of my miniatures’ bases.
– Wound Rings: Wound Rings have one advantage over Wound Tokens – they fallow the miniature wherever it goes without you being involved.
– Tape Measure, Dice: These must be present. They all are vitat to the game and not taking one is like forgeting to put your pants on for the event. (Well if you actually happen to like going out without pants consider this actidentally putting them on instead!).
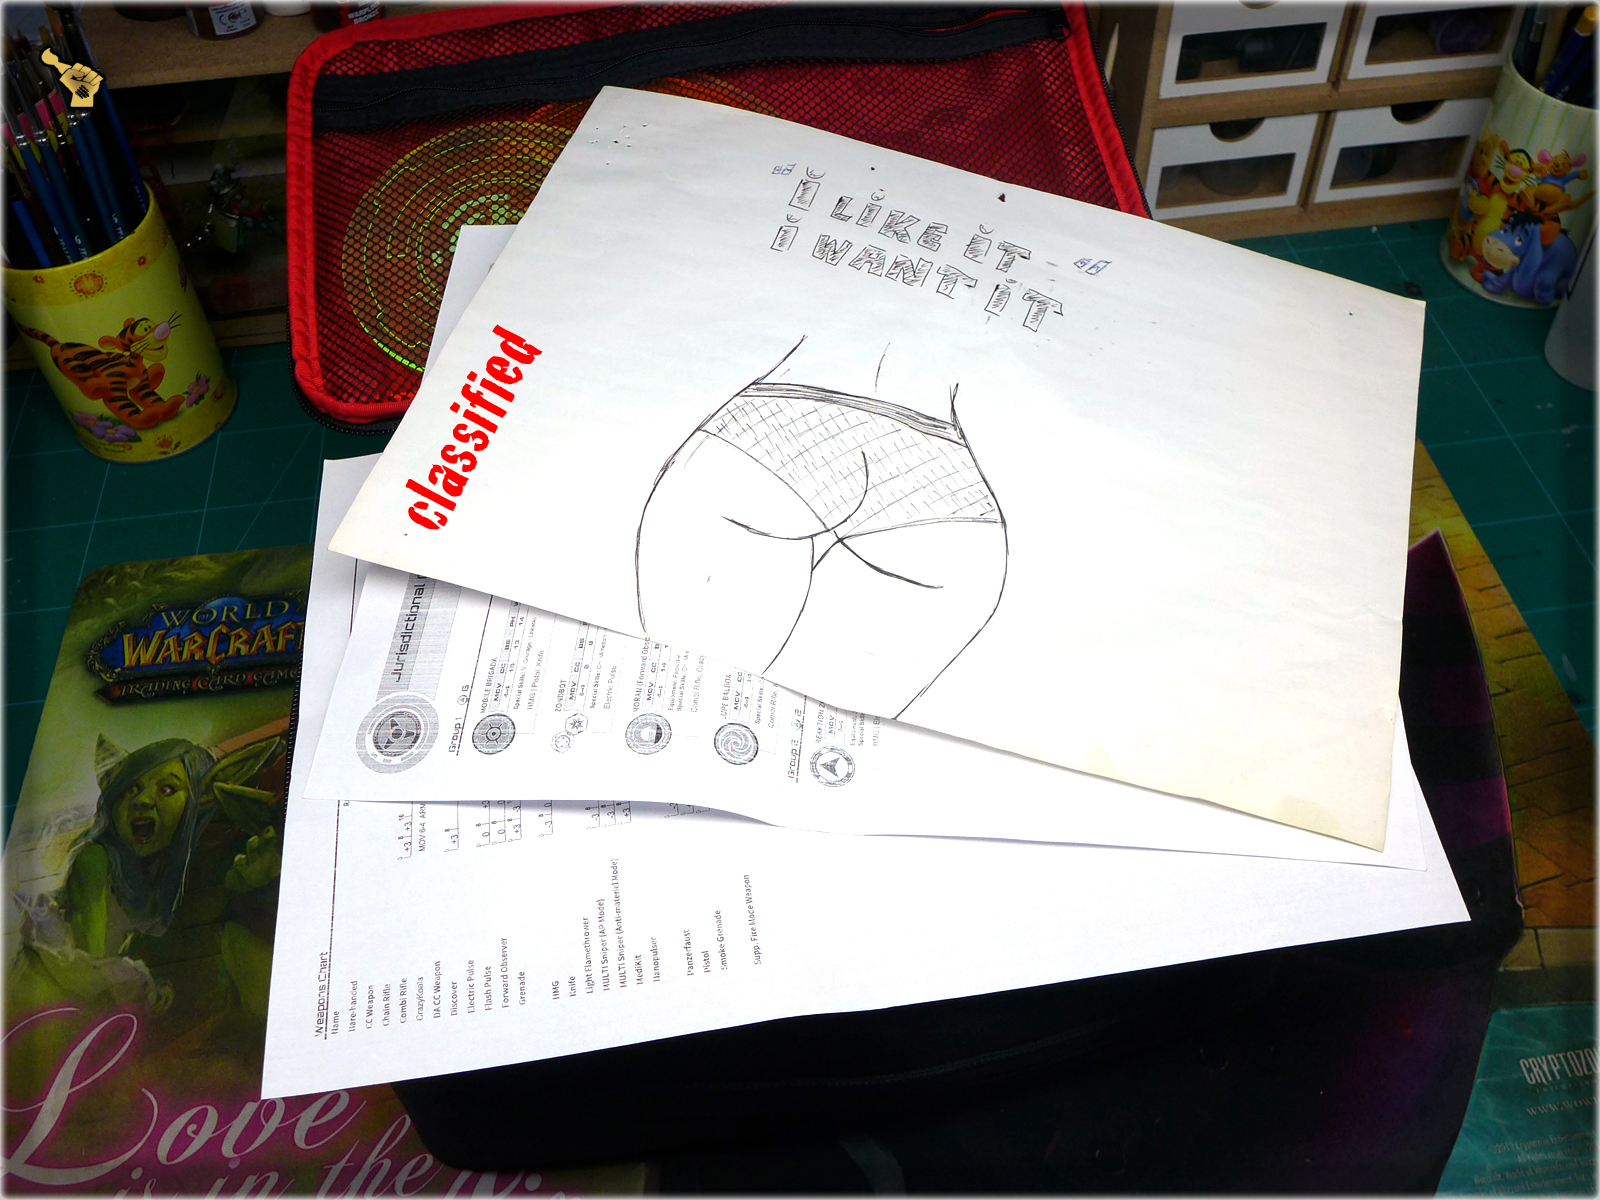
– Pen & Paper: Pen & Paper are important as you will be asked to write some vital information like which Camouflage Marker is related to a certain miniature etc.These ARE OBLIGATORY regardless if you consider yourself a Pro or a newbie.
– The Miniatures: Try to pack only the necessary ones and in a configuration that will be easy to access and won’t require lots of time to be deployed/swiped back.

The Rules: No one demands that you take a paperback Rulebook with you, not to mention all the errata, Paradiso, FAQ, whatever. A mobile phone with basic Rulebook.pdf will usually do. Be advised tho, as leaving on a tournament without any means of consulting a Rulebook is a mistake. Syre you may be able to memorise all the rules but I doubt that and a Rulebook is much cheaper than amphetamine.
A mobile phone with internet access to check out Infinity Wiki is also a nice thing to have.
So a lot of what must and musn’t be done here 🙂 Please remember that this is my own opinion based on personal experience acquired during over fifteen years of miniature wargaming including some world class tournaments. As for Infinity I’m still a noob so I will have to confront my ways with a bunch of tournaments but I’m sure that most of these will prove true.
Infinty Tournament Checklist:
Must haves:
– Miniatures,
– Roster for you and the opponent,*(printable)
– Pen & Paper,
– Tape Measure,
– Dice set,
– Tokens, (printable) / WHERE TO PURCHASE
– Silhouettes, (printable) / WHERE TO PURCHASE
– Templates and Blast Marker, (printable) / WHERE TO PURCHASE
– Rules,** (printable)
Usables:
*- Printed Roster for you and the opponent,
(printable)
– Precise Measure, / WHERE TO PURCHASE
– Objective Markers, (printable) / WHERE TO PURCHASE
– Classified Deck, (printable)
– Laser Pointer, / WHERE TO PURCHASE
**- Paperback Rulebook, (printable)
Convenience:
– Facing Markers, (may be painted) / WHERE TO PURCHASE
– Wound Rings, / WHERE TO PURCHASE
**- Printed Errata, FAQ,
**- Paperback/printed Paradiso etc,
Feel free to add some stuff in the comments – In the future I will gladly expand this article according to wise advice.

Recently I’ve decided to take my previous Hacking Device Holoprojector concept to a higher level. The key point was to use the same base material: a Coca Cola bottle plastic, but instead of painting simbols and lines on it – make it look more like a complex holo projection with many ‘windows’ opened at once. A devious plan formed in my mind and here I am sharing it with all who are eager to read it!
* Scissors,
* Twizzers,
* Super Glue,
* Coca Cola bottle XD
* Piece of plastic/brass mesh,
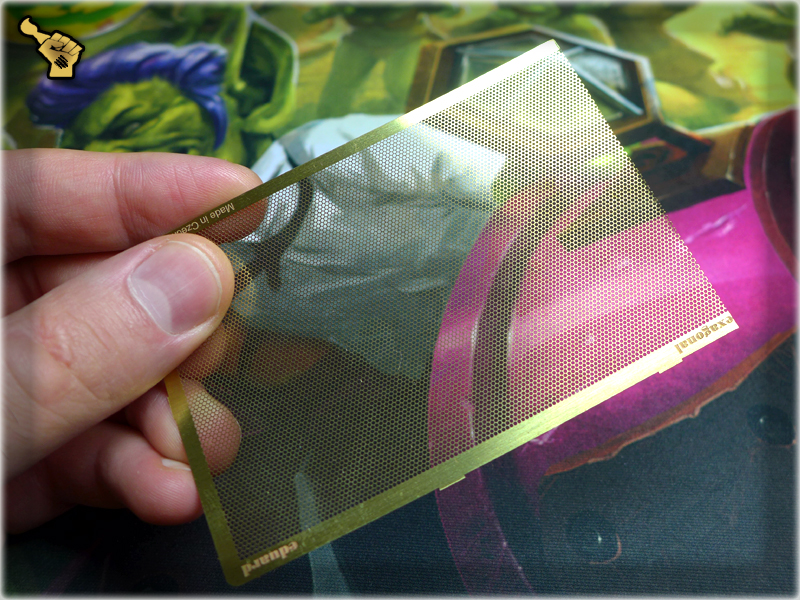
1 Using Scissors cut a small piece of Brass Mesh and a small piece of Coca Cola bottle.
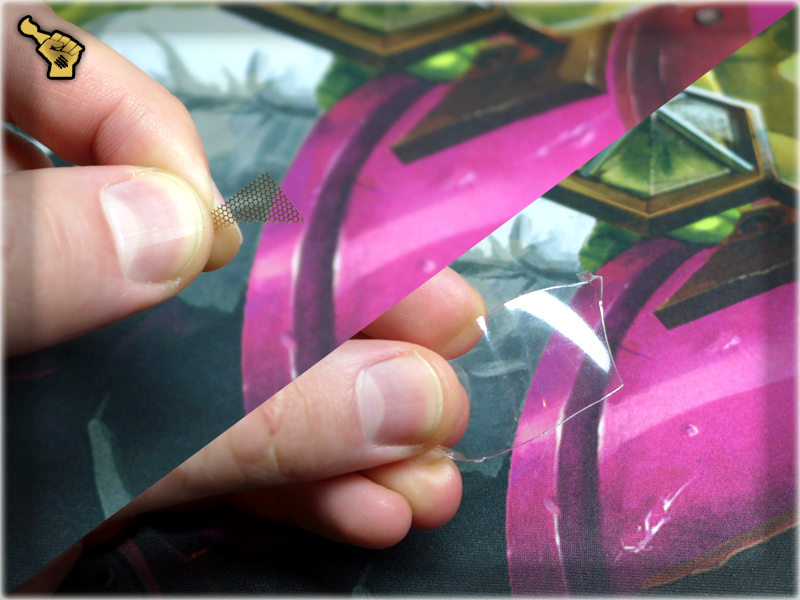
2 Still using Scissors cut a piece of Plastic into small rectangles.
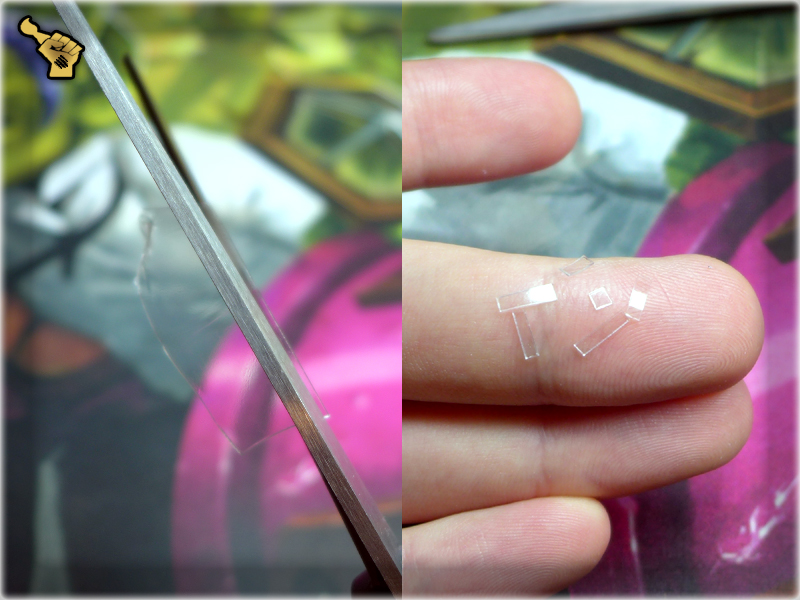
3 Use some oval shaped tool to softly bend both the Brass Mesh piece and Plastic rectangles.
4 Using Super Glue, attach the Brass Mesh piece to a miniature.
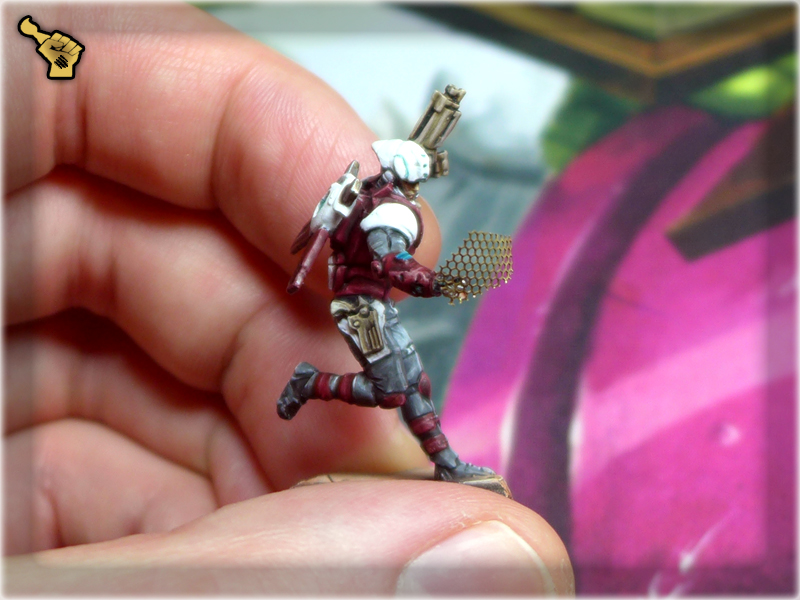
! I recommend to paint the miniature along with Brass Mesh piece at this point.

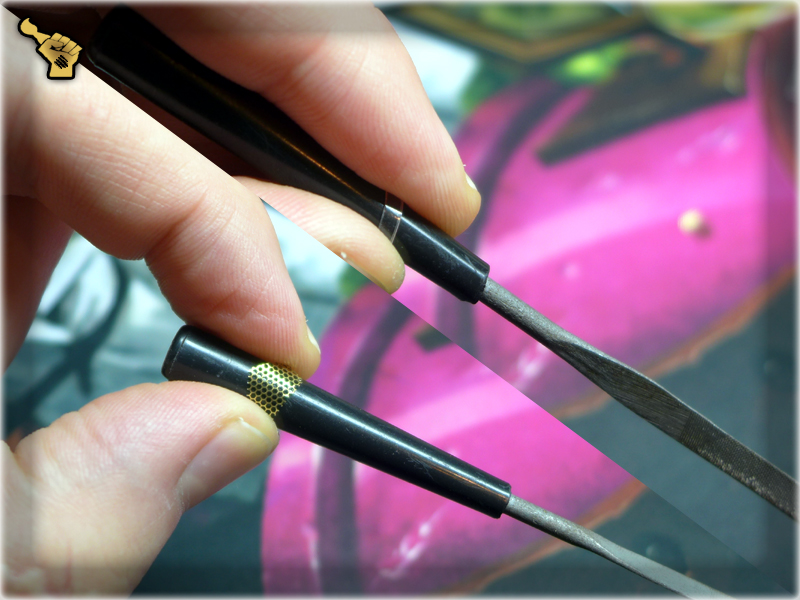
5 Using Tweezers and Super Glue attach Plastic rectangles to a painted Brass Mesh.
6 It is done, but you can apply some Skull White onto the edges of Plastic rectangles to make them look more 3D.
And that’s it 🙂 Whole process takes up to 10 minutes so I decided to remove old Holoprojectors from my Nomadic Hackers and install brand new ‘software’. Hope you give it a try 😉
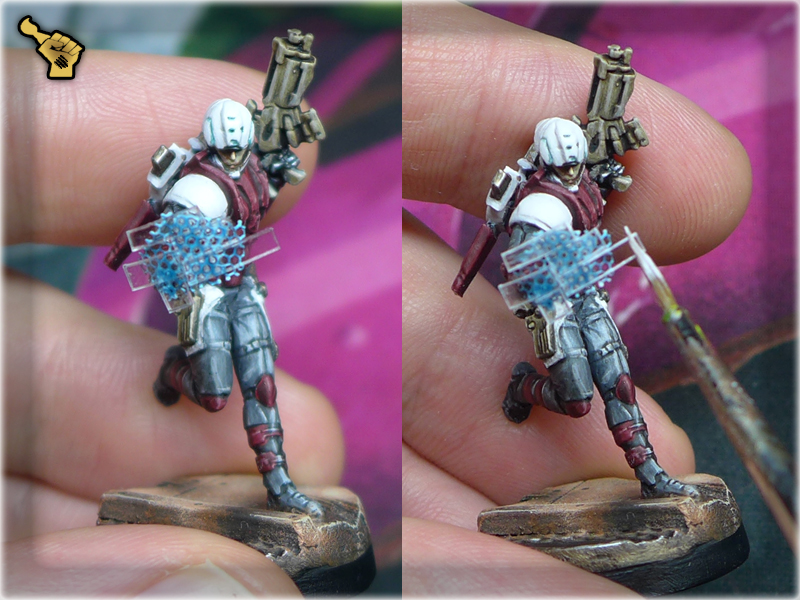
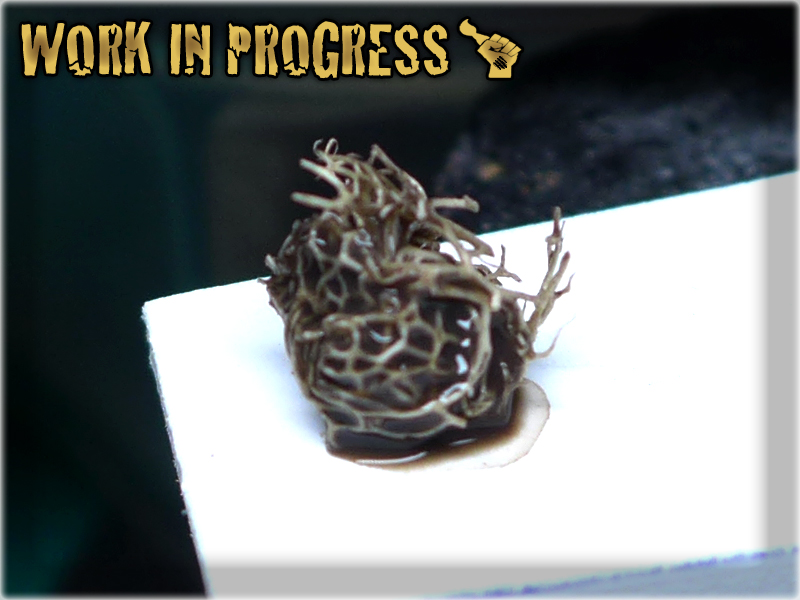
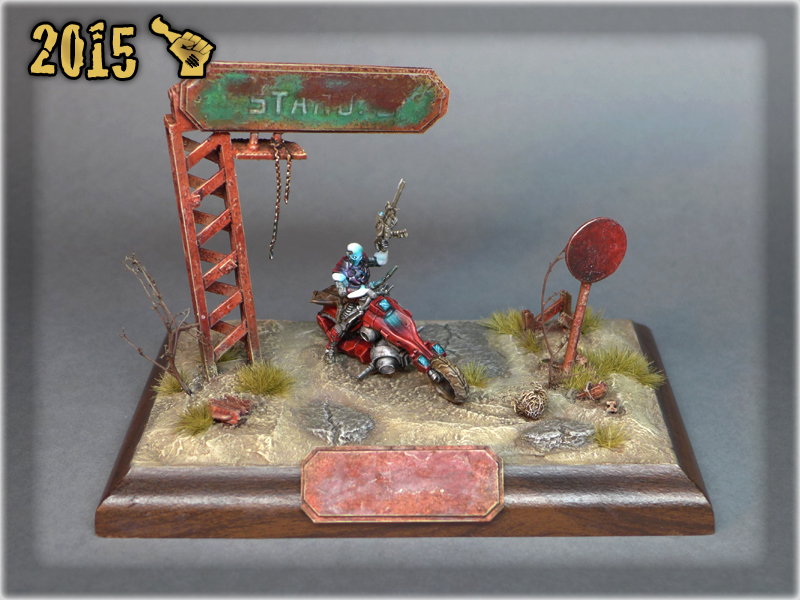
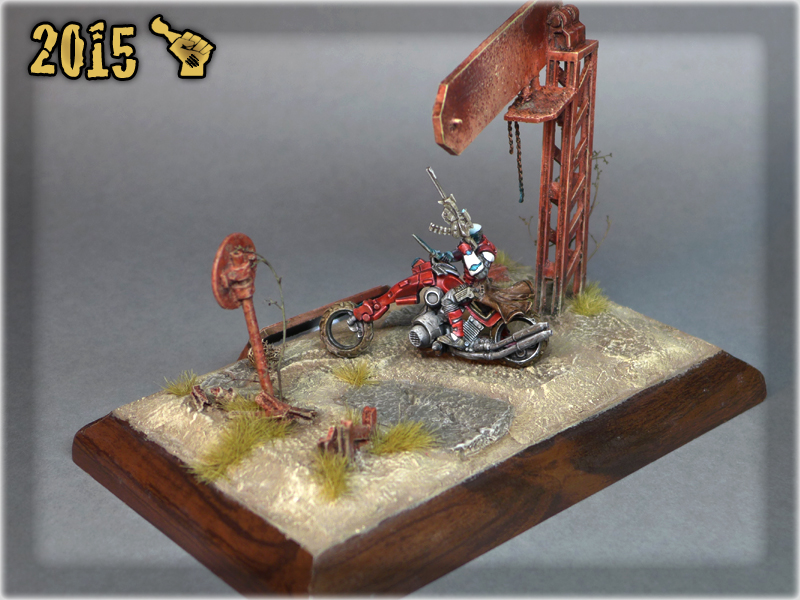
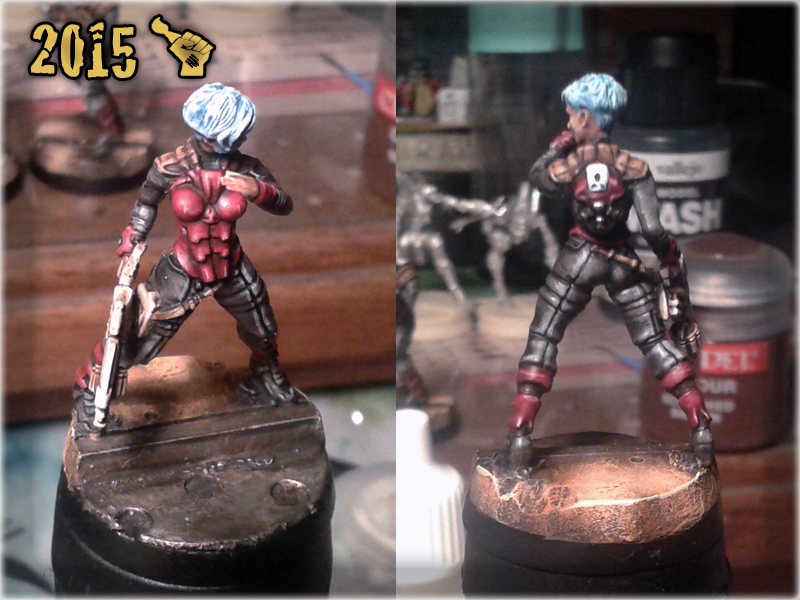
Second ‘Special Project’ in 2015! It was emerging between my thoughts once in a while for some time before I was finally motivated to work on it. The crucial point for me was to accidentally bump into an online Painting Contest at Data-Sphere forum. I already had the concept and materials to make this piece so an opportunity for a nice competition was the final push I needed.
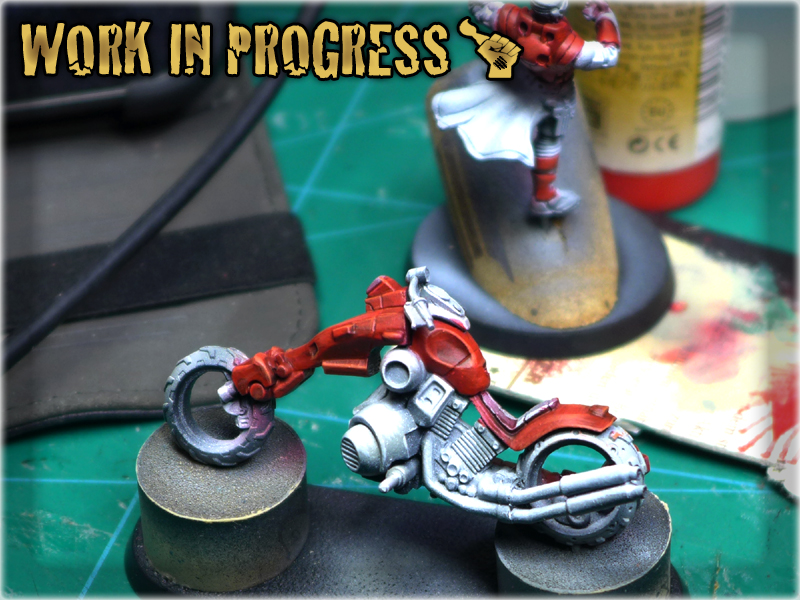
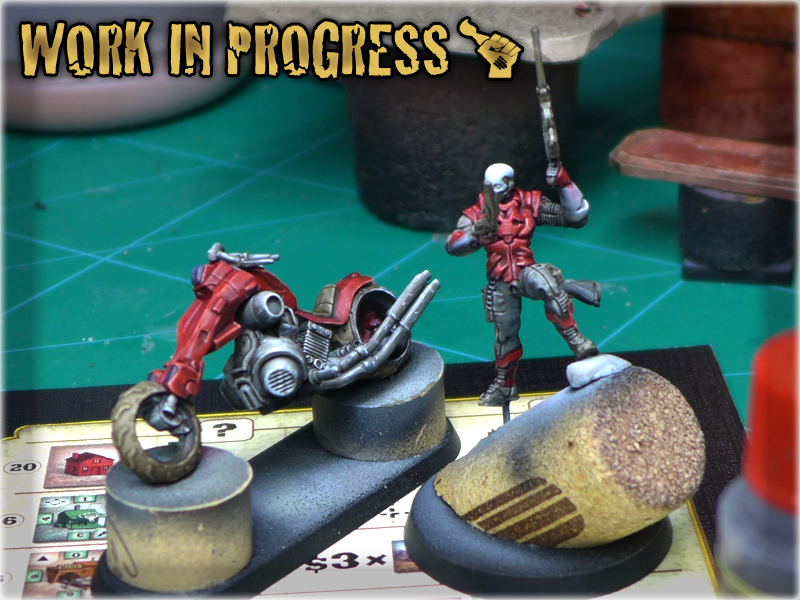
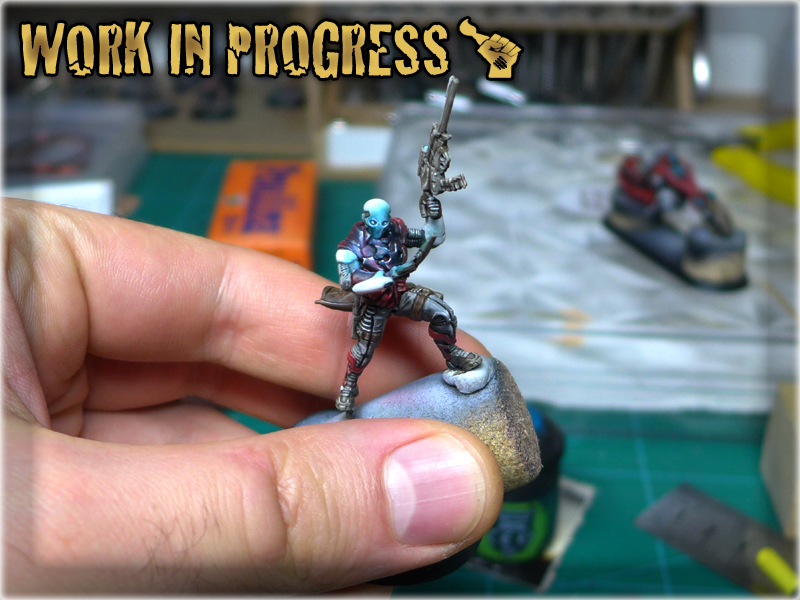
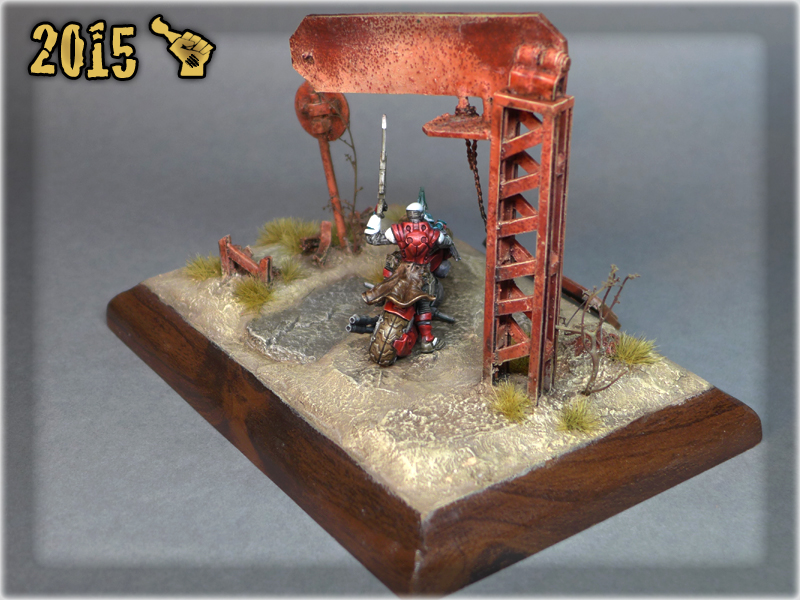
This time I choose a Nomad miniature as a centerpiece of the Diorama. It is my favorite faction in Infinity the Game, and the Grenzer model I’ve picked just ‘screamed’ to let him ride that awesome haqqislamic bike. The pose was almost right if only I done something with the coat and the only thing holding me at bay was a pair of hands. In the end I used original Sniper Rifle left hand of a Grenzer, Shotgun right hand of a Jagguar and stripped a Spektr of both arms.PanOceanic antennae was added and after rearrangement of the pose some Green Stuff Sculpting had done the rest.
A ‘concept art’ which shows my overpowering drawing skills.
First step was to arrange the miniature on a bike.
Some conversion and Greenstuff sculpting.


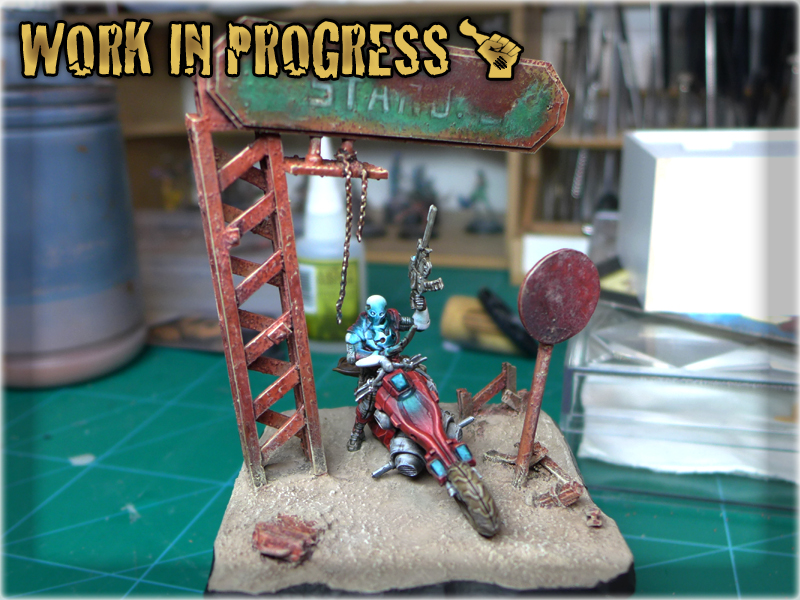
Next step was to create a diorama thus fulfilling my mind’s eye concept. I’ve picked a nice candle for a diorama’s base and starterd to work with main arrangement of things…
Preparation of diorama.
Basics of diorama and miniature composiotion.
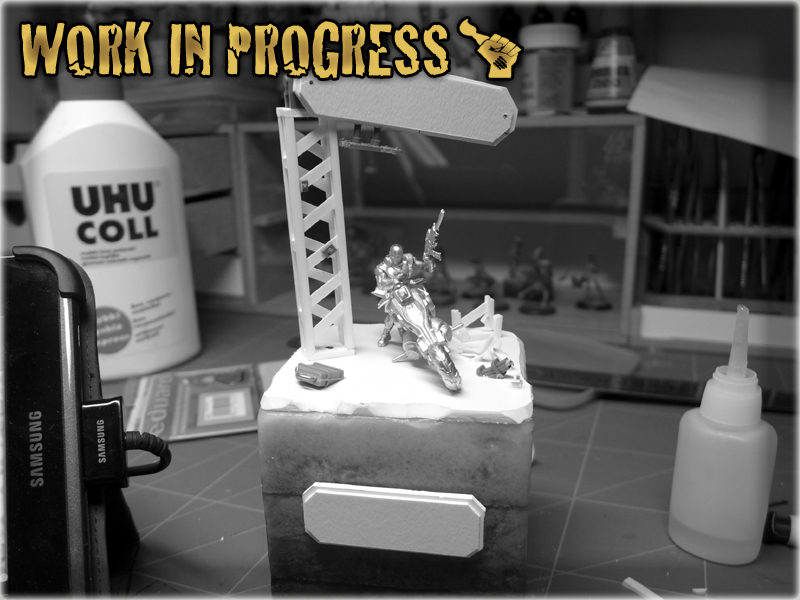
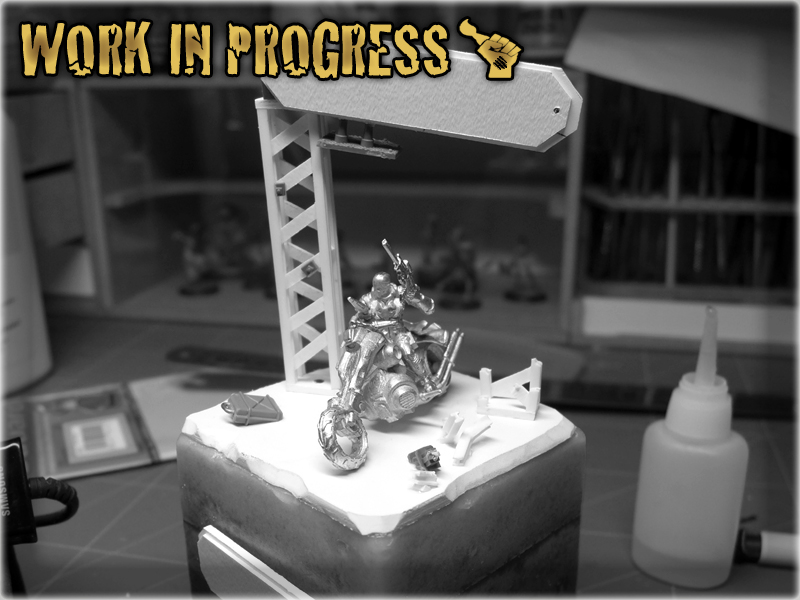
Facture added.
Then came the ‘Painting Time’. Usually I start by painting the miniature but this particular project was an exception. I’ve started with diorama instead to be certain that in the end I will be able to paint it correctly. Painting rust and dust is still new to me.
Diorama paintjob in progress.
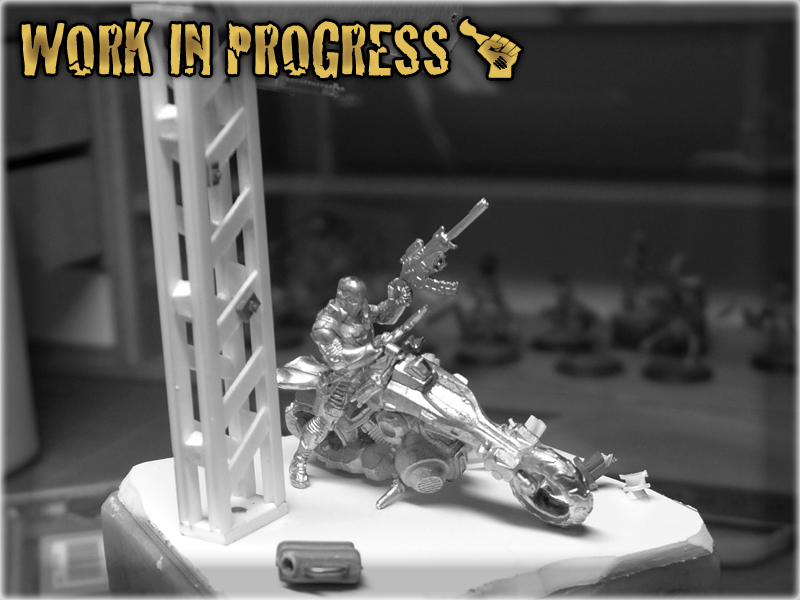
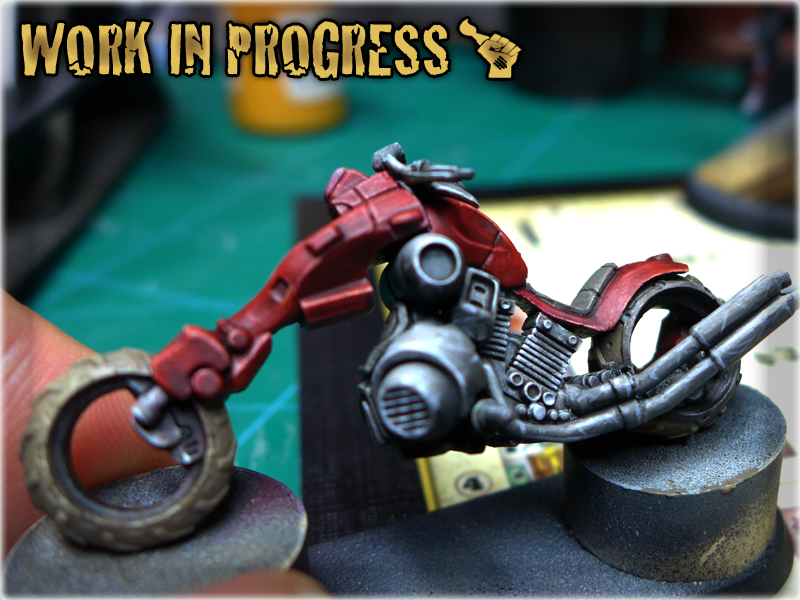
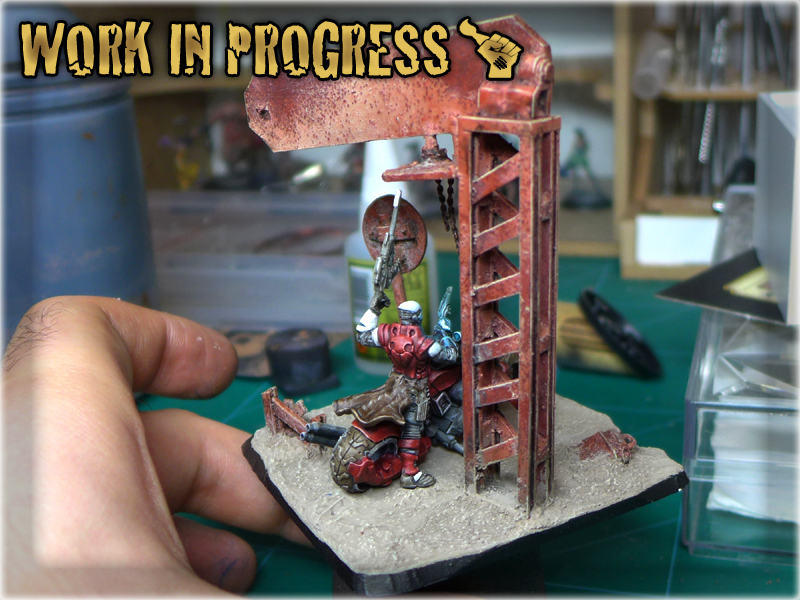
Once I was sattisfied with diorama’s result I’ve focused all of my attention on the miniature. I tried to begin in accordance with Angel Giraldez’s online Kum Bike tutorial and it wen’t rather off at some point. Still I was able to create something unexpected and extraoridinary if compared to my other miniatures.
The actual miniature preshaded and with red armour in midpainting.
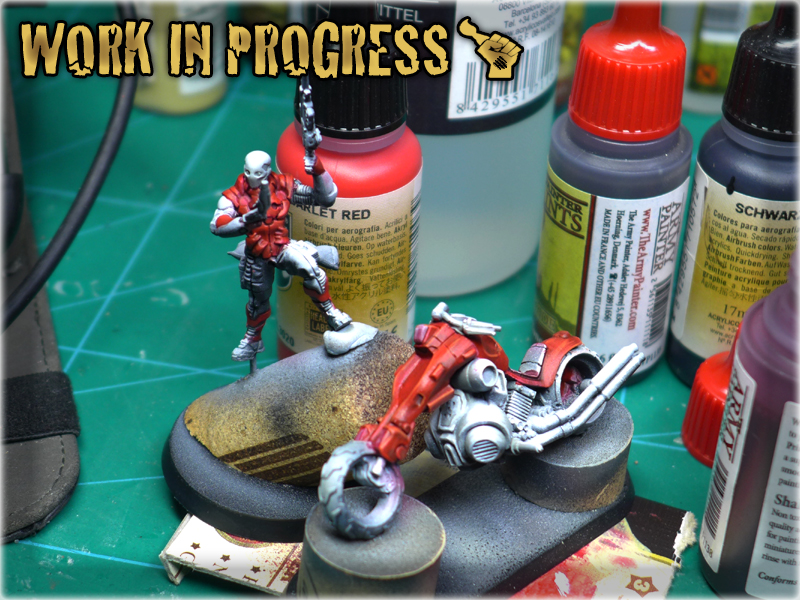
Something to look like NMM appeared on the bike. Armour lined and shades appplied.
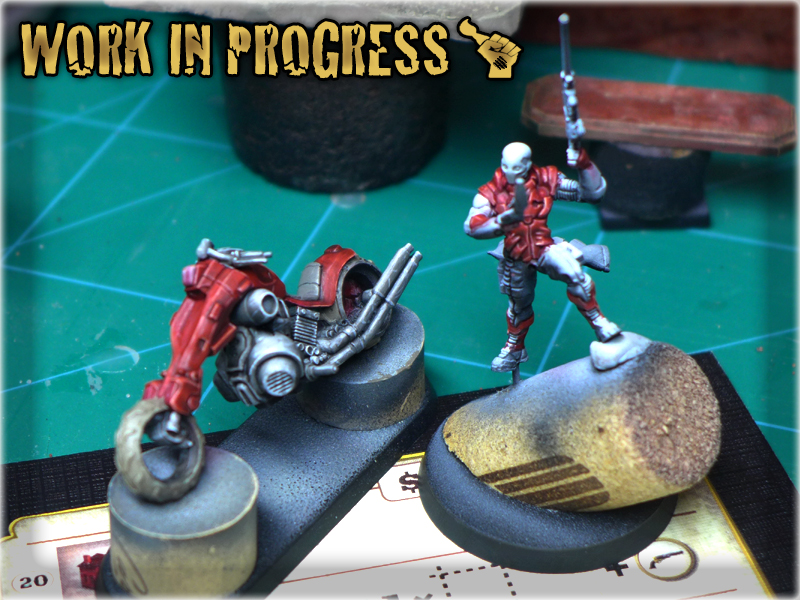
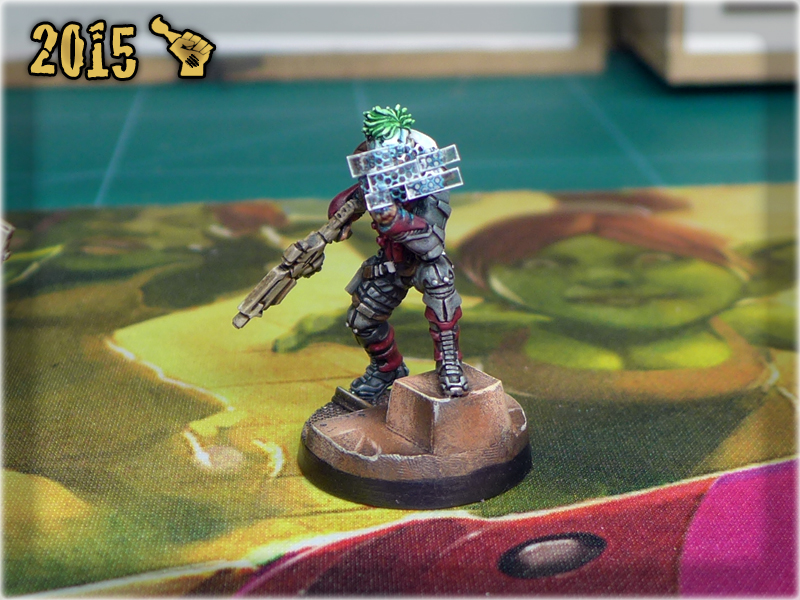
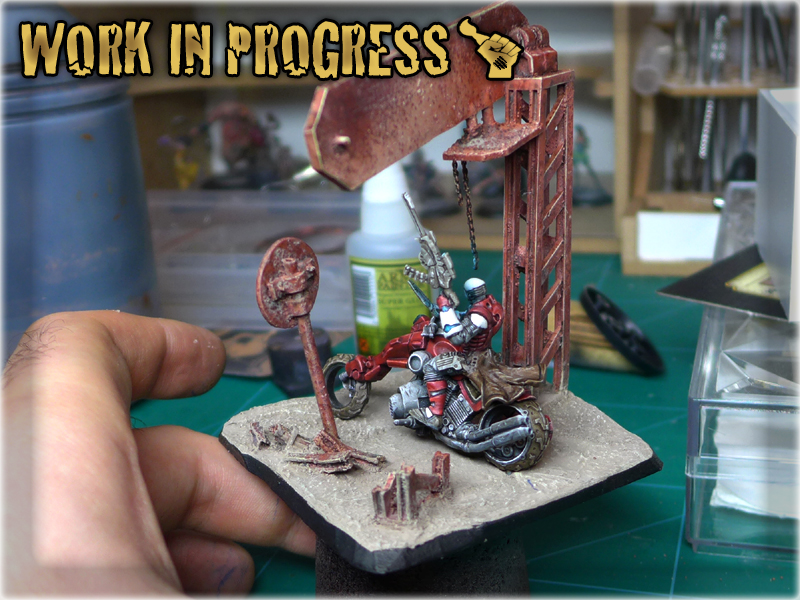
Closing to finish line I’ve figured that something went really wrong. I couldn’t pinpoint the cause – just felt taken aback while observing the pice. It took me half a day of painting different miniatures to finally understand: The diorama sucked! It was a total disaster! There was not enough space for the biker which was posed so that only a small part was visible. Black rant of the base made too much bad contrast while the candle… oh the candle justed didn’t fit…
It went wrong in the forums too as I was told that my ‘OSL looks more like a nuclear blast’ to which I actually agreed…
Bad – bad diorama… bad nuclear blast…
I’ve made my mind then and remade the diorama totally. I cut the stuff into pieces which I used to create foundation for another ‘faster, harder, better, stronger’ diorama. This time I picked a much more suitable base for it too. I also fallowed an advice of Claudius Sol and dimmed the OSL.
Diorama cut and rebased.
At some point the diorama needed just the final touches.
Here’s the final piece: “NOMAD SOUL”

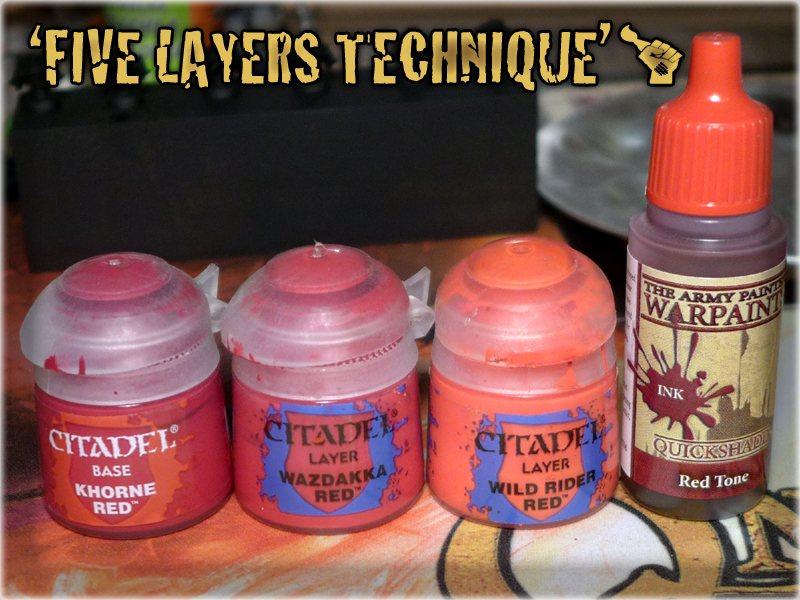
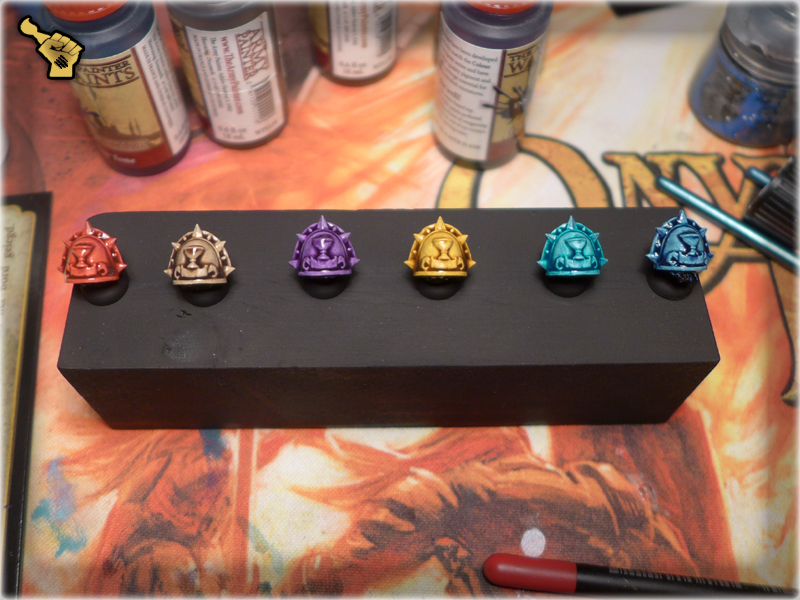
Here is a technique that I have developed through years of painting and find it most usefull up to this day.
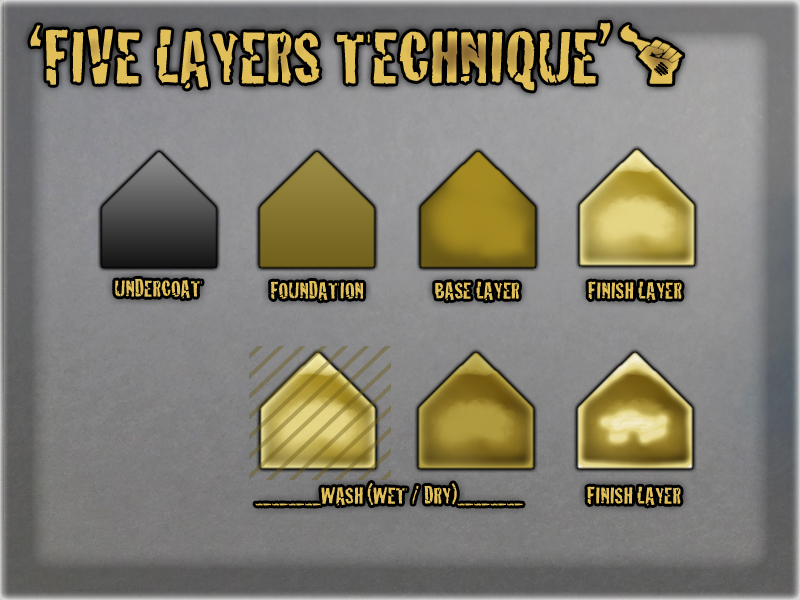
Five Layers Technique is a basic technique of choosing and applying colours. I especially reccomend it for begginers as it is simple, easy to learn, fast and rewarding. You can apply almost every colour using this technique and achieve good results as long as you choose proper paints to do so. It is especially good for either painting entire army ‘tabbletop level’ or preparing a miniature for much more complex paintjob.
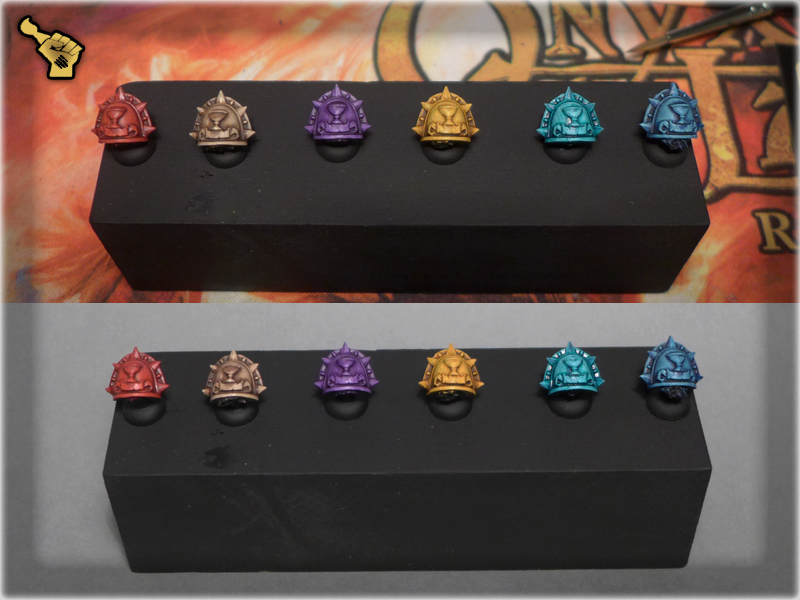
The main concept of Five Layers Technique is to paint different colours using five layers of paint. Starting with a foundation layer, covered with base layer, finished with highlights, all being washed and edged. Here’s an example of how does it look like when finished:
It does not matter if you have a steady hand and a lot of patience – if you pick your paints badly this method will not work. Choosing proper colours is the key to succeed. The colours should pe picked in this order:
* Base layer: pick up a medium tone colour,
* Foundation layer: choose darked version of the base colour,
– The exception to this rule is if you would like to keep the colour bright such as bone, vibrant purple, creme, yellow, etc. In this case a little bit brighter, preferrably pastelle foundation colour will do.
* Finish layer: choose a brighter version of the base colour.
– Try to keep it the same distance as it is between Base and Foundation layer.
* Wash layer: use either same colour wash or brown.
– Brown wash fits in most cases. Be aware tho – it will do much damage if you pair it with pink, purple, violet or white.
Here’s and example of a proper layer set:
Let’s talk about how to apply choosen colours. There are some rules that must be followed. Below is the order and all the important leads:
– Foundation layer: Must be painted thoroghly. Paint should be delivered into recesses and cover all the flat areas, in the same time it must be kept from obscuring details too much. Some water may be added to the paint to ease the process.
– Base layer: May be painted scruffy and without dedication. Paint should be applied to all the flat areas and bulges leaving some of the Founation layer visible around it. Protruding areas should be ‘base’ covered wholly. I susually use flat brush for this layer to quicken the process and leave some Foundation layer visible without effort.
– Finish layer: Is the hardest part. Only protruding elements, central parts of flat and bulged areas should be covered. Some ‘edging’ may be done but next layer will render it almost invisible.
– Wash layer: Is the easy part. A lot of wash should be applied onto efery surface with no regard for details. Medium brush is good for the job as brushes too small won’t keep a lot of wash in them.
– Finish layer: Goes once again. Only protruding elements, central parts of flat and bulged areas should be covered but some parts of previous Finish layer should stay visible. At this point ‘edging’ is desirable.
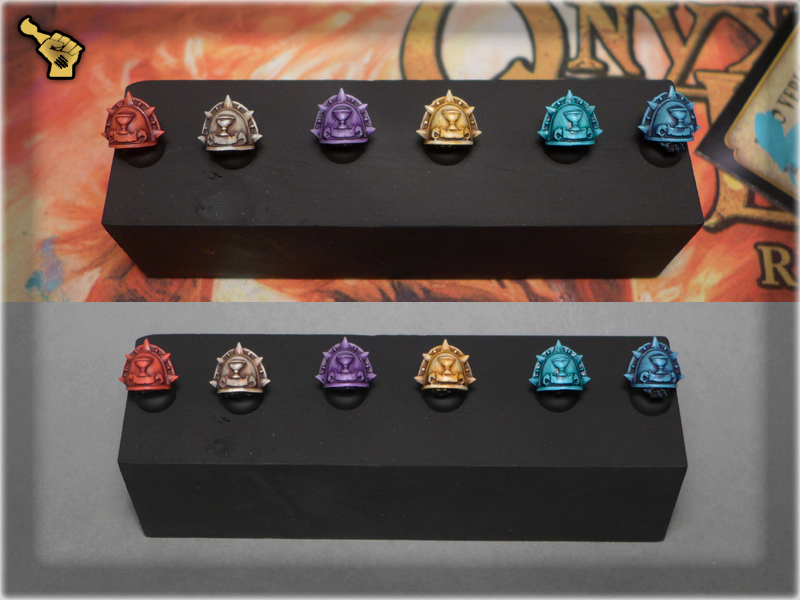
Here’s a step-by-step example of this method:
That’s it 🙂 Below are some colours recepee examples for this tutorial:
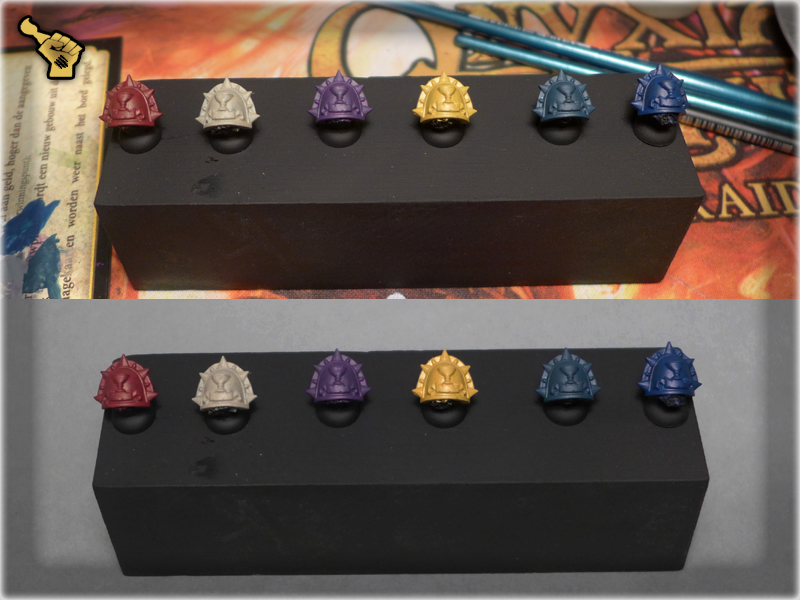
Foundation: Khorne Red (GW), Karak Stone (GW), Xereus Purple (GW), Tausept Ochre (GW), Stegadon Scale Green (GW), Regal Blue (GW),
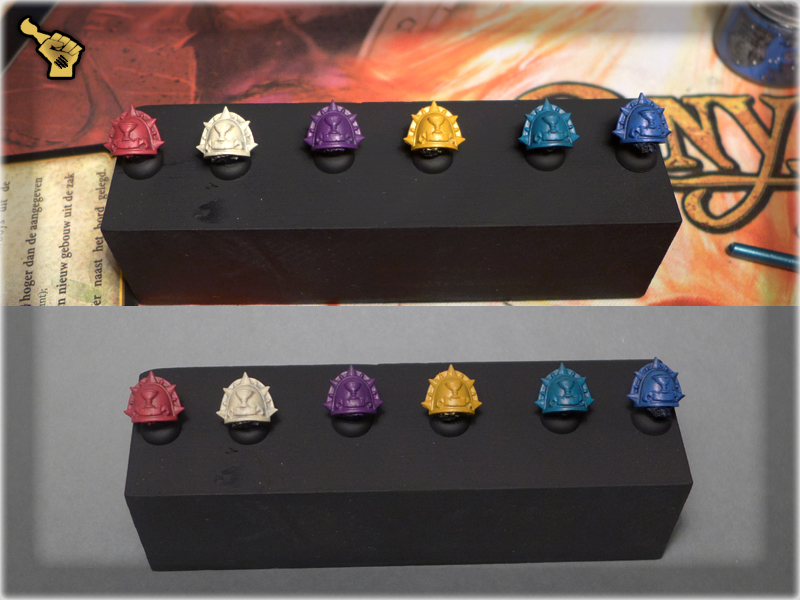
Base: Wazdakka Red (GW), Skeleton Bone (AP), Liche Purple (GW), Golden Yellow (GW), Hawk Turquise (GW), Ultramarine Blue (GW),
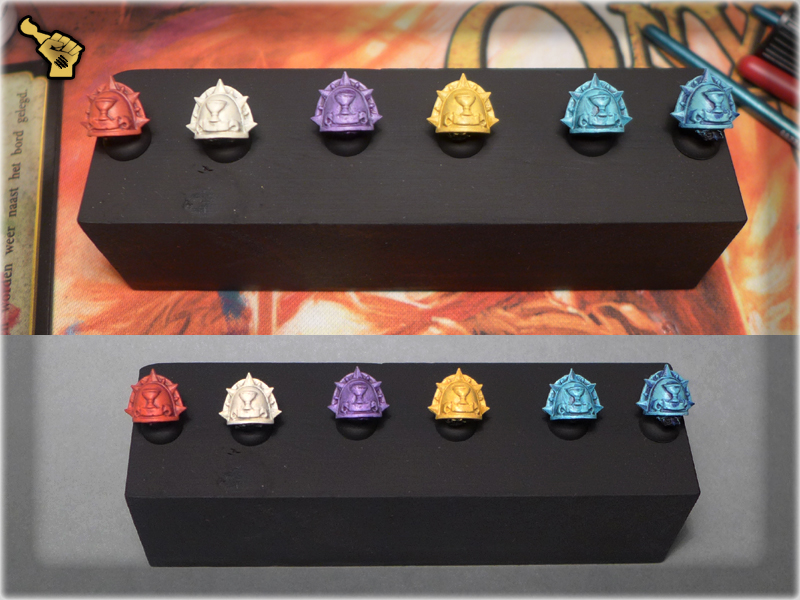
Finish: Wild Rider Red (GW), Skeleton Bone (AP) + White, Genestealer Purple (GW), Golden Yellow (GW) + White, Hawk Turquise (GW) + White, Lothern Blue (GW),
Wash: Red Tone Ink (AP), Strong Tone Ink (AP, Purple Ink (AP), Seraphim Sepia (GW), Turquise Ink (P3), Blue Tone Ink (AP),
This how it looks like when Wash dries up,
Final Finish: Wild Rider Red (GW), Skeleton Bone (AP) + White, Genestealer Purple (GW), Golden Yellow (GW) + White, Hawk Turquise (GW) + White, Lothern Blue (GW),
I hope you’ve enjoyed this tutorial and found it helpful.
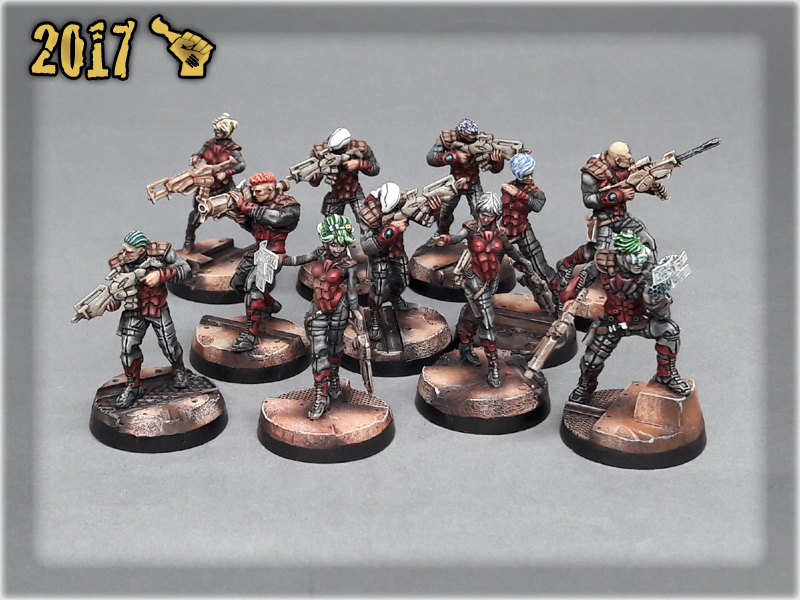
Recently I spent a lot of time working on a ‘Special Project’. I have read/watched tutorials and acquired Know How in a hope of expanding my painting skill. I even visited a friend from Fantasygames Painting Studio to watch and learn. In the end I feel like if I ‘gained a level’. Here is a shortcut of a tremendous amount of hours spent on learning and a week of hard day and night labour:
“LONE SENTRY”


FINAL RESULT:

Shizune (Made by Shizune) – for Painting Panoceania Blue Armour Tutorial
C’tan (Fantasygames Painting Studio) – for all the help, know how and this awesome Salt & Hairspray Tutorial


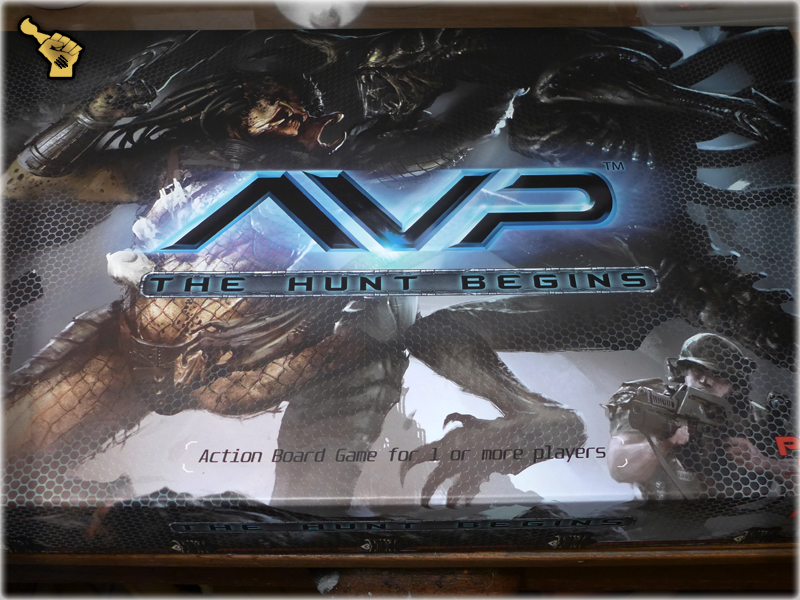
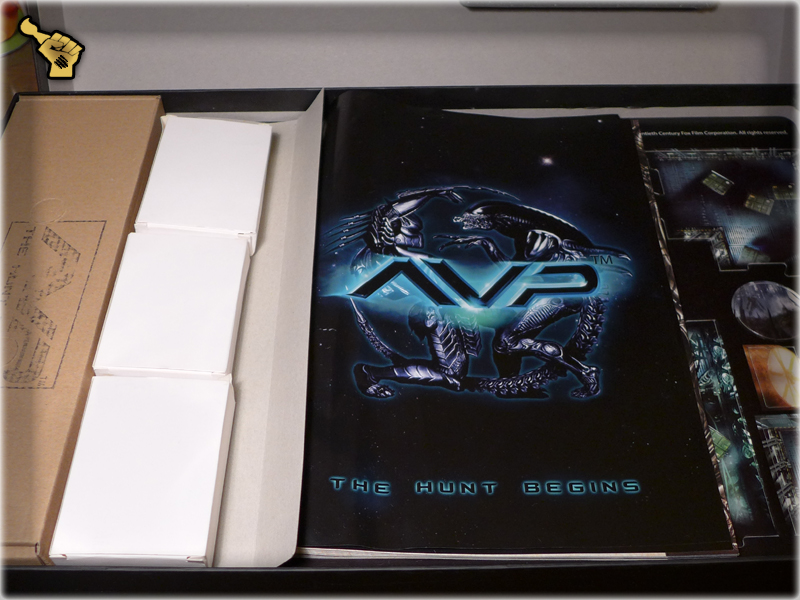
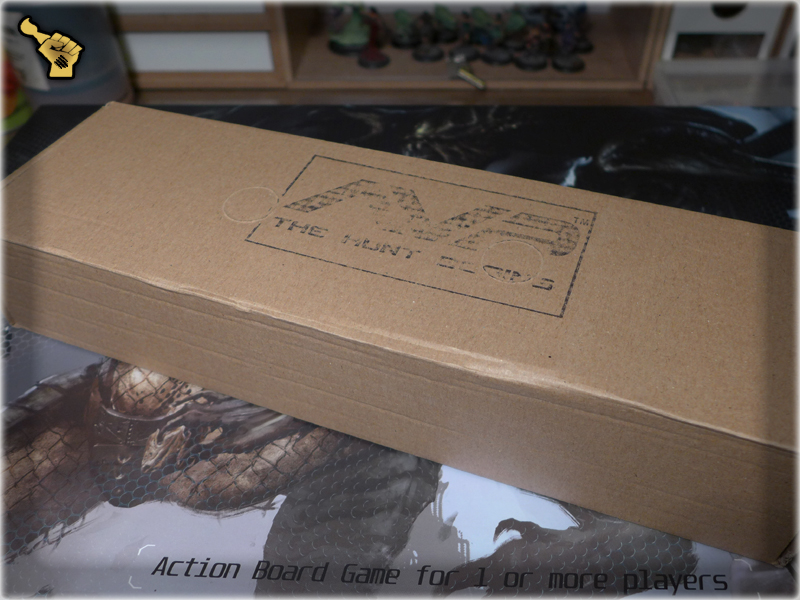
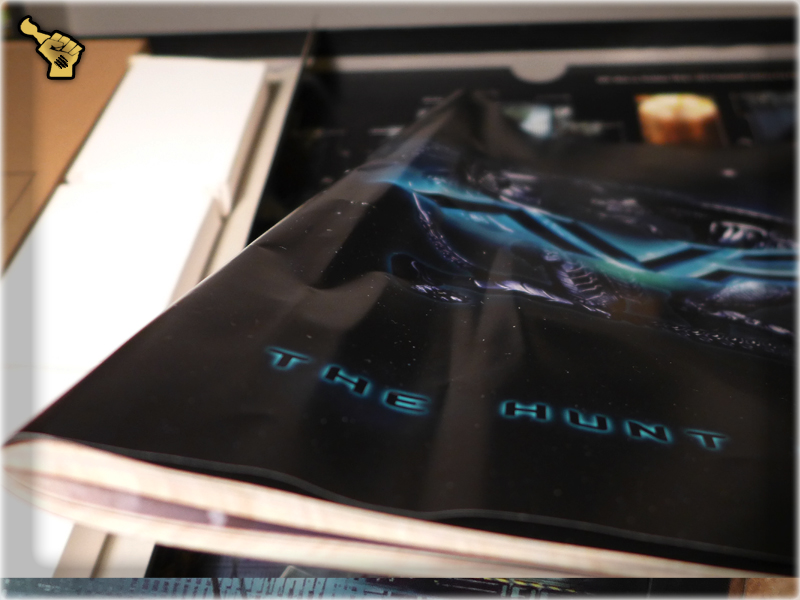
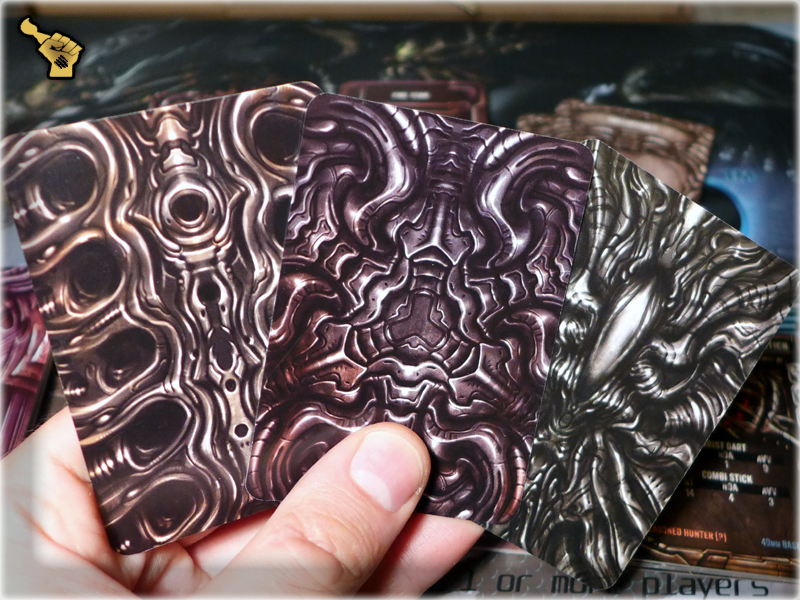
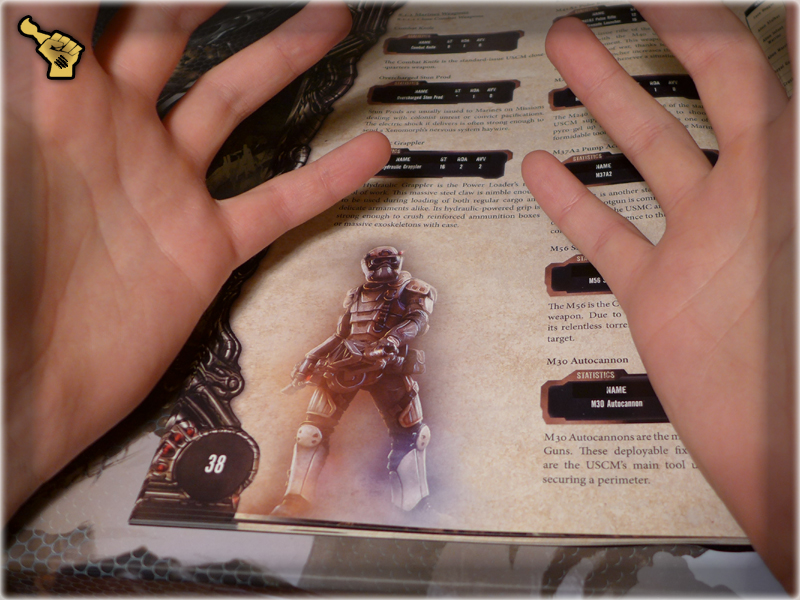
Hey guys! Some of you may find this interresting. Recently I bought a hot stuff: AVP The Hunt Begins boardgame and what I found inside the box forced me to write this review.
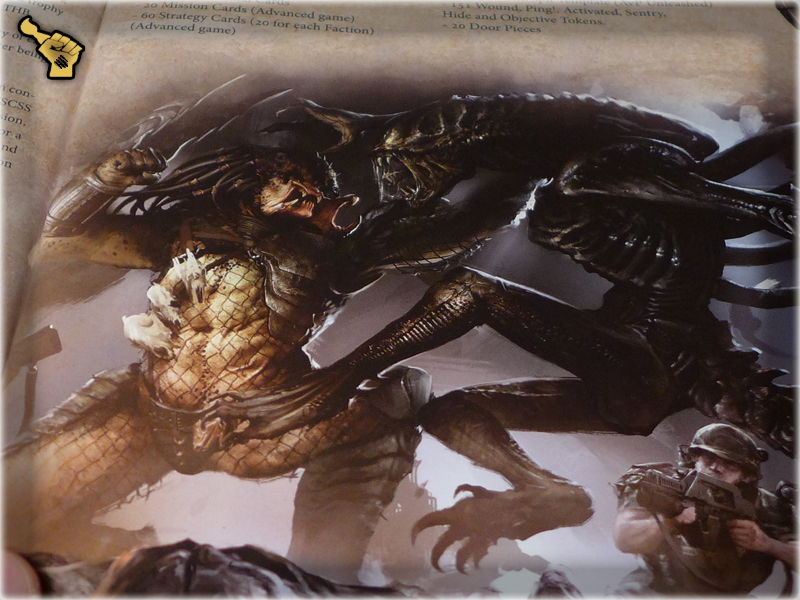
About Aliens vs Predator franchise: I personally love AVP. The retro futuristic setting and it’s owerwhelming dark mood keeps my heart burning with desire for more and more AVP stuff to buy. In AVP universe human is reduced to the role of prey. Even tho Colonial Marines are tough bastards equipped with deadly Smartguns and Pulse Rifles they still fall to Alien predation and are no match against masters of the hunt, the Predators. Hunted for sport or means of breeding they must cooperate to survive the inevitable doom.What I find the most important in all AVP products is for them to be based on Aliens (2nd movie) and Predator (1st movie). So we have some armed to the teeth Colonial Marines, being thrown between an angered Aliens hive and dreadful Predator hunters. They try to survive, while their number dwindles slowly. All the time the terror is multiplied, but still badass Marines cheer up the mood with good, oldschool oneliners. This is how I see it. That’s the way I love it.
So when I found out about AVP board/miniature game being released I was extatic! I jumped right onto Kickstarted and was taken aback by the information of who releases it: Prodos Games. After seeing the difference between Prodos’ Warzone Kickstarter and Warzone final products I wasn’t sure if I wanted to spend some cash in advance. I’d held my hand and awaited KS campaign results. After it came to an end Prodos surprised me with an option to buy the game via their site. That was unexpected and bothered me a little so once more I held my hand and didn’t made the purchase. Finally the AVP The Hunt Begins hit the stores and this time, being sure that I will get my copy, I made the purchase.
The box looks amazing and weights a lot so once you will hold it in your hands, you’ll probably buy it 🙂
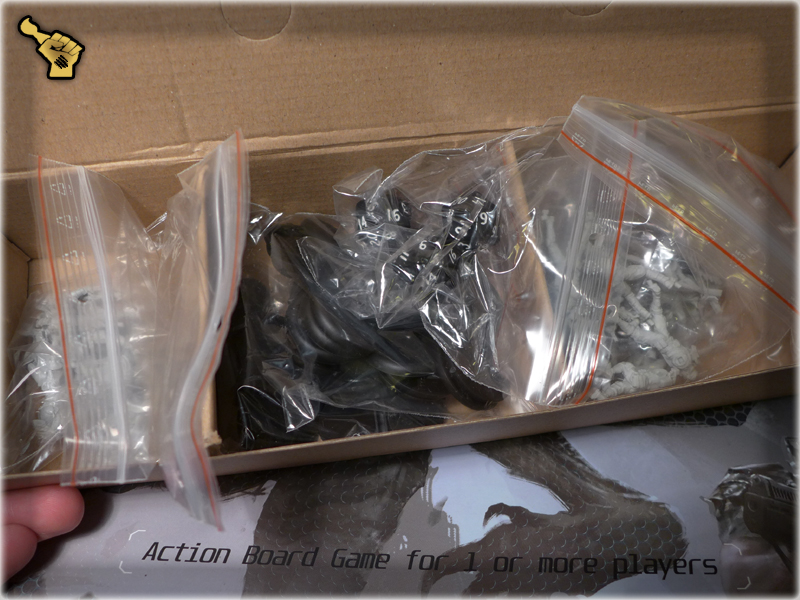
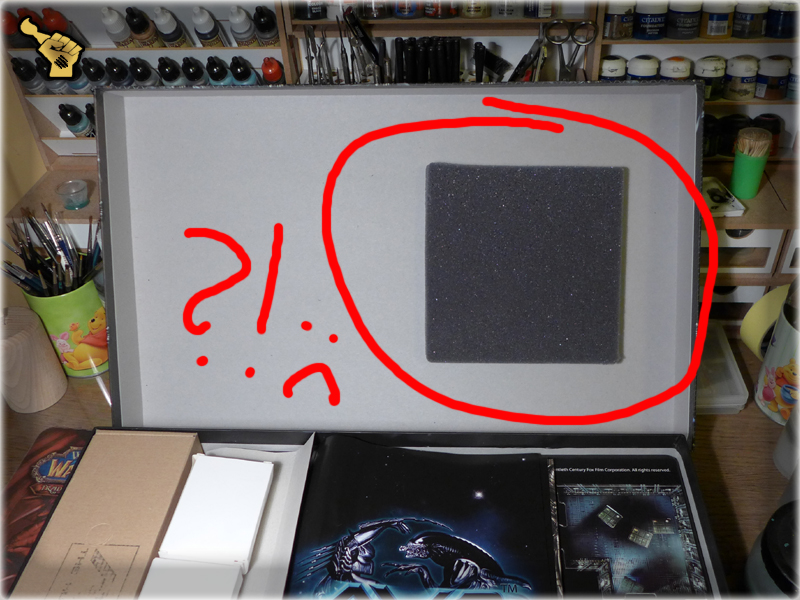
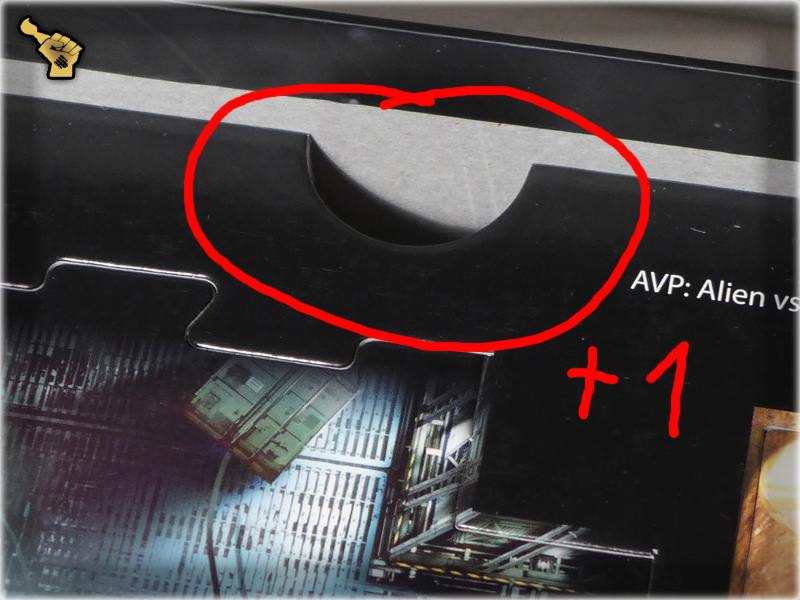
THE BOX: The way with which game elements are packed is mediocre. Cards packed in small paper boxes. Miniatures packed in zip bags. All zip bags packed into a medium cardboard box. A huge foam square glued still inside the cover of the box (what the fuck?! Why have you damaged my beautiful box Prodos?). Regardless of the foam my Rulebook was already damaged so this sole fact halted some of my enthusiasm. It was balanced with an easy but clever move with which Prodos prepared Cardboard Sprues to be taken out of the box. A small hole big enough for a finger was cut in the sprues. (Why haven’t I seen anything similar in other board games – I don’t know, but it’s a nice idea).
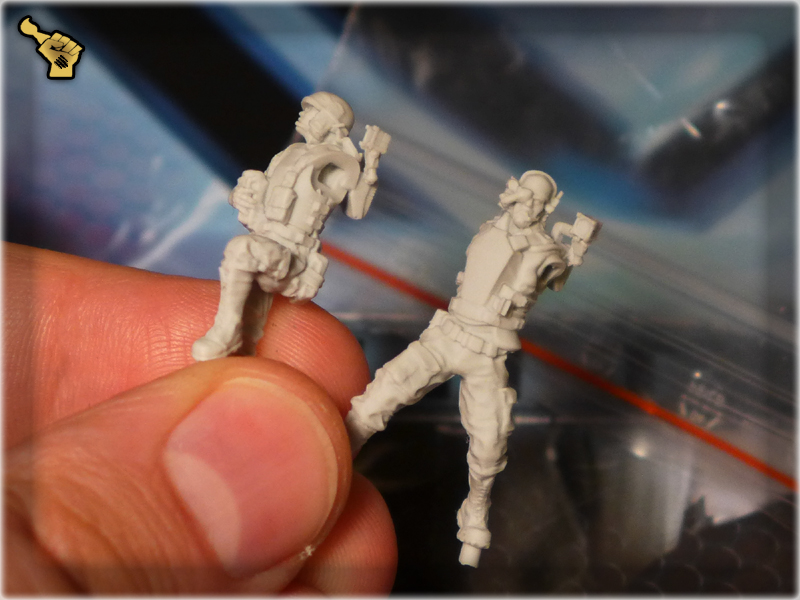
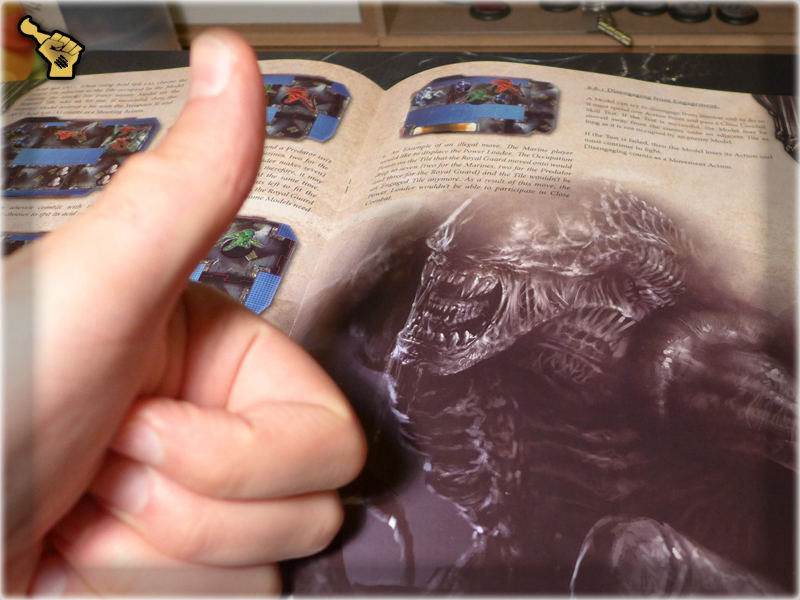
MINIATURES: Miniatures are amazingly detailed and kept to the scale. Look at these Colonial Marines. These look amazing!
Still some molding solutions are just idiotic. Take a look at this Alien miniature. It has mold channels inside it’s hands! I work with miniatures for more than fifteen years now and I’ve rarely seen such stupid way of placing the mold channels. Some of the hobbyists may have a real problem dealing with these.
And now the worst thing. My Disc Predator was a miscast and looked like this. Yeah Chinese – you fucked up my Predator Miniature and then packed it into my copy of the game. What do you think I feel like right now? This miniature is trash. Instead of painting it and playing the game I placed a complaint to my local store and await a new miniature.
I thought that Prodos Games evolved a bit after Warzone. A lot of mistakes in production process there. As it stands I was wrong – Prodos seems not to learn from it’s failures.
CARDS: In my opinion Cards are the biggest disappointment in the whole product. The material with which they are made is bad. Boardgame Cards where made this way like ten years ago. The differences between Prodos Cards and Fantasy Flight Games’s ones are huge. The quality is light years away. Still it gets worse. The cards lack all the climate that made AVP what it is. For example: there are no quotes from the movies, no one liners that built the Alien and Predator franchises. Not a single ‘theme’ motive on the objective cards. Even card backs are devoid of thought through theme. These looks like if Prodos Games forced the product at speed and without taking theme and AVP mood into consideration. “Just print the rules”. Here, take a look:
[This looks ok,]
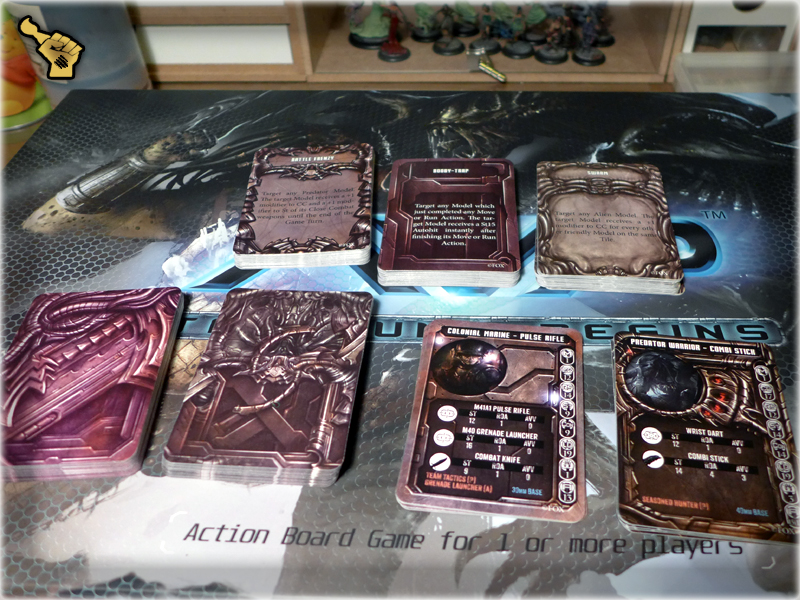
[These are faction cards and they look ok,]
These are faction cards backs and I can’t help myself not to wander – where the Fuck are Colonial Marines cards? Was it so difficult to make them look more like card fronts?
These are Enviromental Cards. Wow Prodos Games – so much climate, so strong AVP theme… How have you planned to build the atmosphere of the game without a plot/story/setting motive?
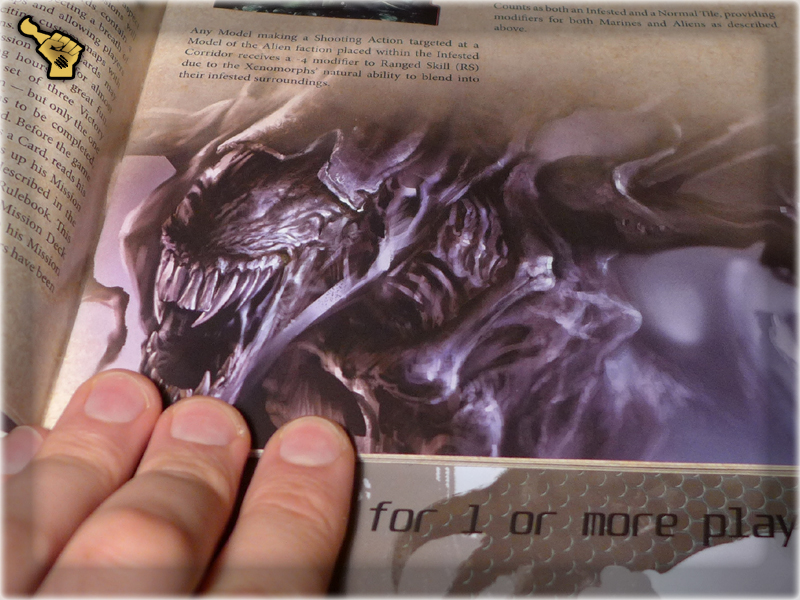
[Predator and Alien stat cards look nice.]

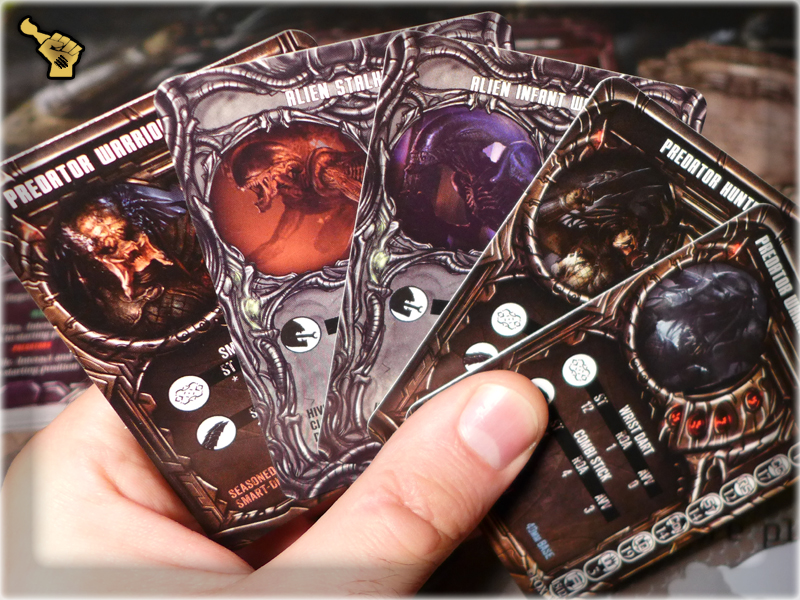
And now the worst shit ever: Colonial Marines stat cards look ALL THE SAME! Hey grunts, which one of you is an awesome Smartgunner? Anyone called for a Medic? Really? Couldn’t these be done differently? It’s not that there’s plenty of graphics in the game with not more then a dozen in the Rulebook and half a dozen on the stat cards…
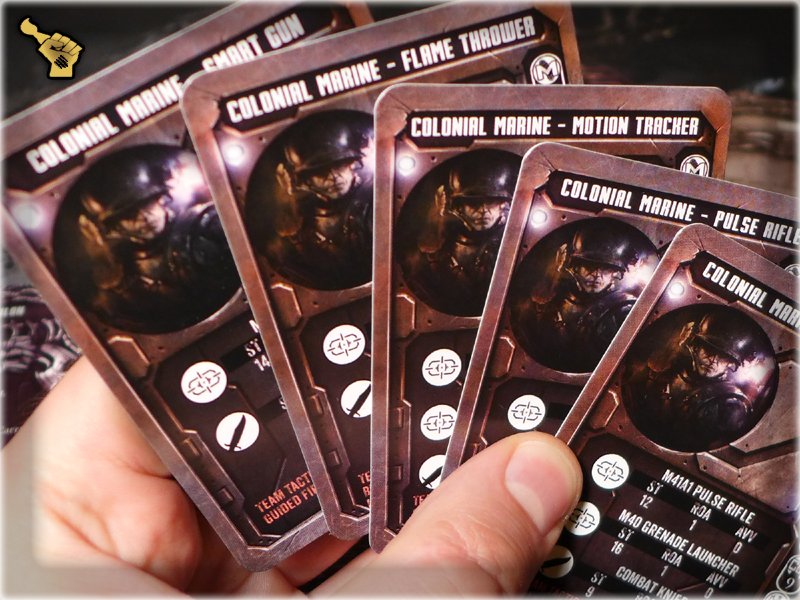
And where are all the Marines? I’ve looked through the Rules and there’s only a single Colonial Marines picture (well not exactly as it depicts a Weyland Yutani commando) and like two or three pictures with a Colonial Marine being a background. It seems Prodos forgot about Human species being the epicenter of the AVP theme. Sure I like a feel of the call of the hunt as a Predator or to stalk the dark corridors as the Alien, but as a human the faction I feel the most related to is Colonial Marines.
CARDBOARD TOKENS: I have mixed feeling about these. The cardboard material is bad still the visual aspect is quite nice. Take a look at this:
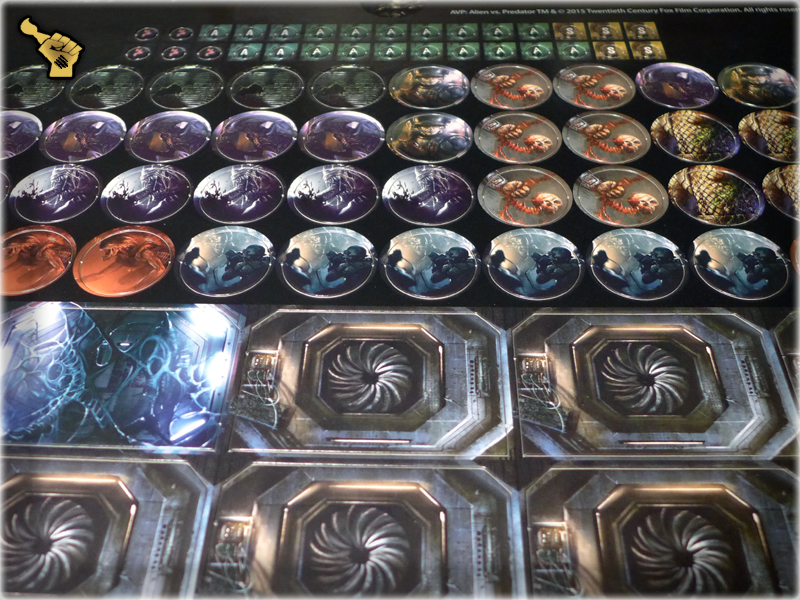
Looks good doesn’t it? And now let’s do the things Prodos style, with as much minimalism as one may have. Sentry, Hidden, Activated tokens all look like shit. Devoid of climate and pathetic in design. Other tokens look ok but not awe worthy.
[I just can’t understand the reasoning behind designing Acid Damage token to be one sided. It was childishly easy to copy/paste the same graphic to the other side.]

THE RULES: The final part of this Review – the Rules are BAD. I’ve played a lot of games both miniature and board games in the past years. I love Space Hulk for it’s simplicity, Rune Wars for many strategies and easy to learn rules, Zombicide, Catwallon: City of Thieves, Super Dungeon Explore, Warhammer 40,000, Infinity, Mordheim and more. All these games are more than playable and rewarding. I find AVP The Hunt Begins rules rather easy but written in such a way that I was forced to jump between the pages and search for some rules all the while these were formed in a way that my Wargaming hardened mind couldn’t comprehend. AVP rules are just unreadable, full of missing letters, idiotic key words and above all – they are totally devoid of flavor. Prodos Guys – just see to Zombicide rulebook and you will know what I mean by climate!
So in the end I give this game a 5 out of 10 and am very, very disappointed in the product I have waited so long for. If nothing changes in the way Prodos Games designs their products I will reconsider spending my cash on their products in the future. If not for the miniatures – this game would’ve been a stain on the AVP franchise as big as PC Aliens – Colonial Marines was.
And Prodos – this is a 10 out of 10 and it’s a fucking mascot. You were owned by a Facehugger mascot! Let it be a warning to you – that purchasing a copyright to a franchise does not mean you can blew all the rest up. You should’ve made sure that your rules and game components would stand to the great AVP franchise and you have failed in that. Shame!
Agree/Disagree? There’s a comment section below where you can stand for your opinion 😉
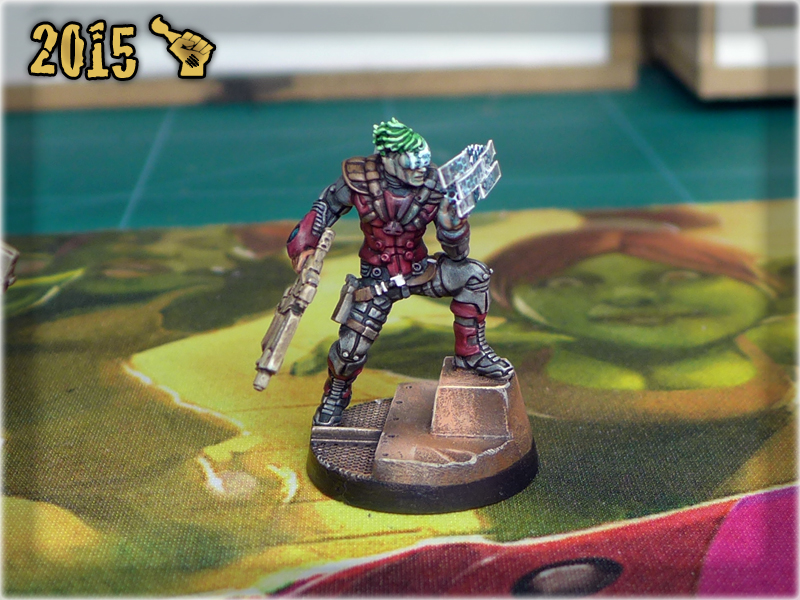
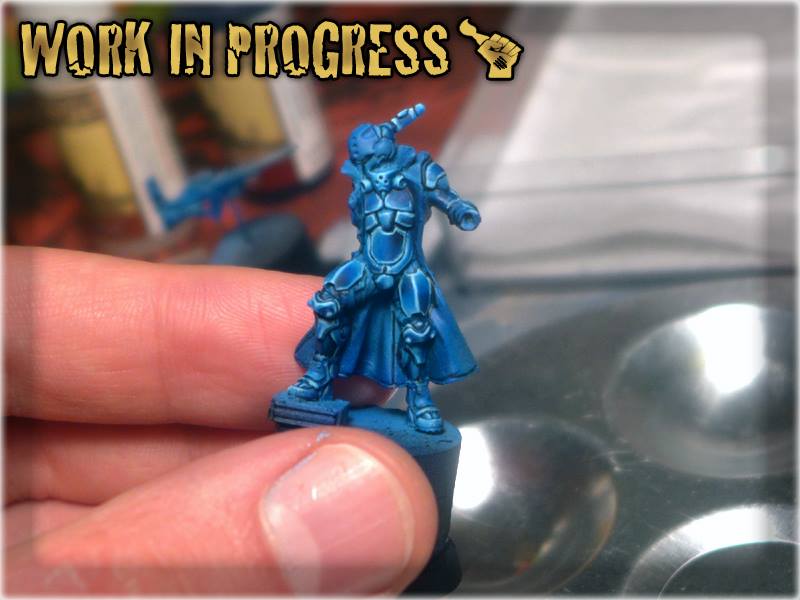
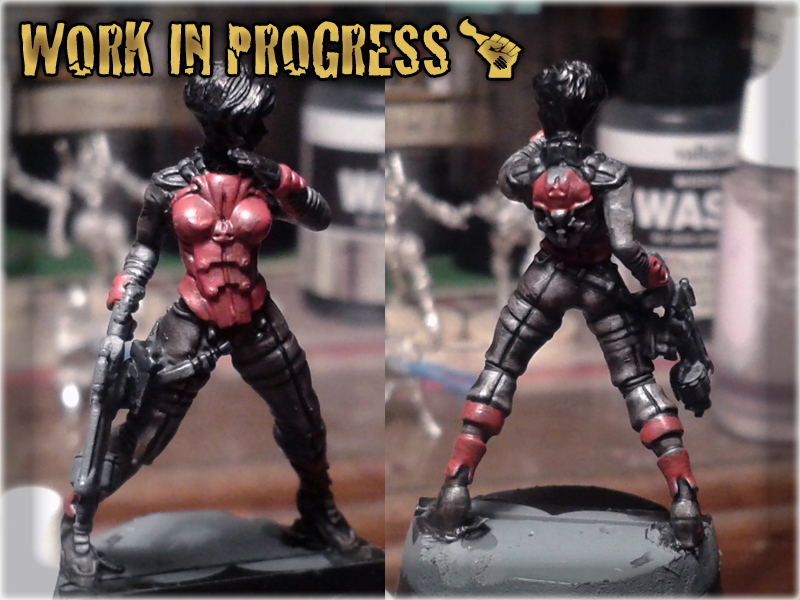
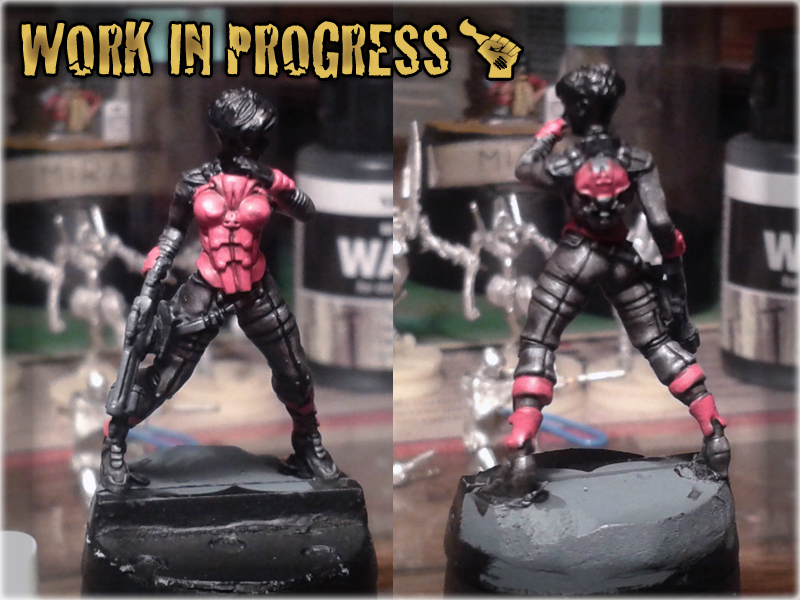
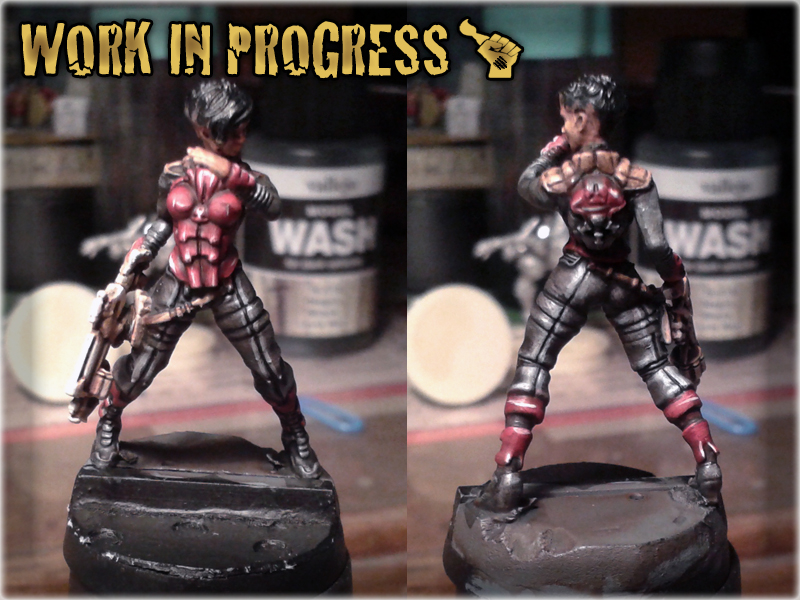
Here is a Step-by-step guide of how to paint Infinity Nomad Red Armour – Scar_hand Painting’s style 🙂
A complete Recipee used to paint my Infinity Nomads may be found in COLOUR RECIPEES: INFINITY NOMADS. You can also find some additional pictures in the NOMADS: CORREGIDOR lvl 4,5 Gallery.
* GW Standard Brush,
* Tamiya Modeling Brush HG,
* AP Wargamer: The Psycho,
* GW Chaos Black Undercoat,
* GW Mechrite Red, (When this one runs out i’ll switch to P3 Formula ‘Sanguine Base’ instead),
* GW Wazdakka Red,
* AP Skeleton Bone,
* White,
* AP Strong Tone Ink,
* AP Red Tone Ink,
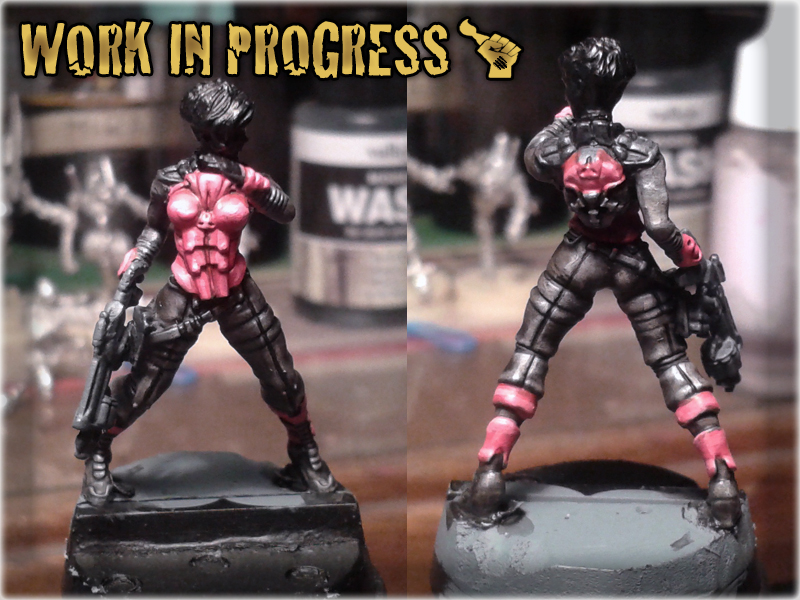
1 I used Chaos Black spray to undercoat the model. I usually do this by applying eight layers of undercoat from eight different angles (four at the front and four at the back of the model, each at the same 45* angle with one directed up, one down, one left and one right side of the model).
2 The first layer of Red was made with Standard Brush and Mechrite Red. I tried not to fill the recesses too much and to cover all buldes smoothly.
3 I switched to Tamiya Modeling Brush and applied Wazdakka Red to all bulges and flat surfaces of the armour, leaving cavities Mechrite Red'ed. This madethe armour look more smooth and ready to be highlighted.
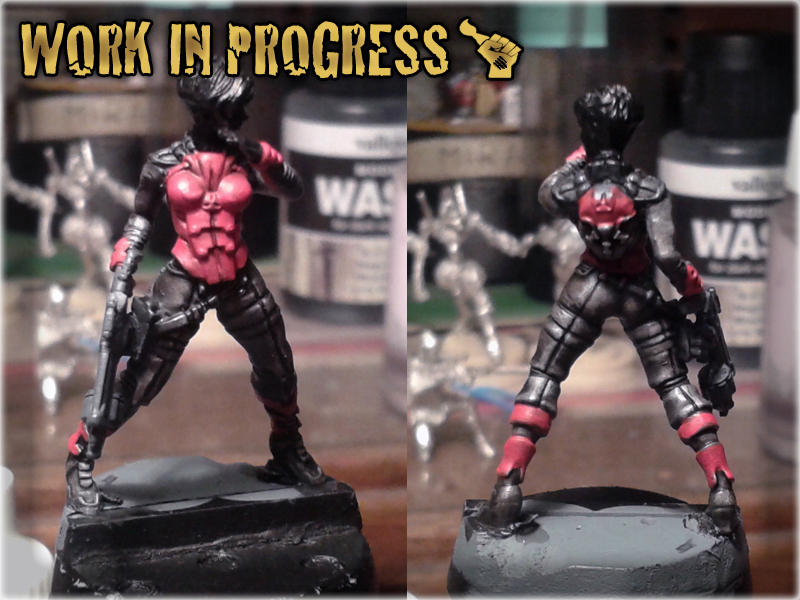
4 I applied a 50%/50% mix of Wazdakka Red and Skeleton Bone in the middle and on the edges of particular surfaces.
5 I added White to the Wazdakka/Skeleton mix and further lined the model.
6 More White was added to the mix and another layer of lines and points was made.
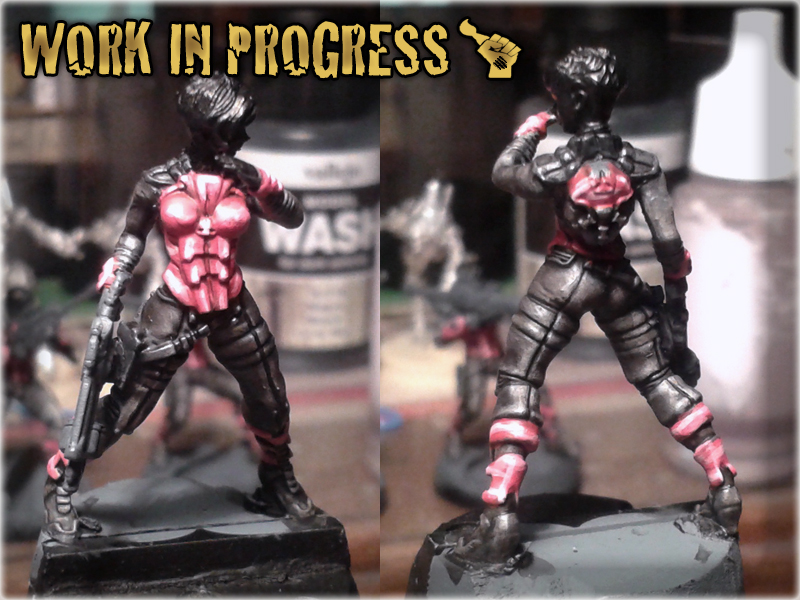
7 I switched back to Standard Brush and washed the armour with Strong Tone Ink.
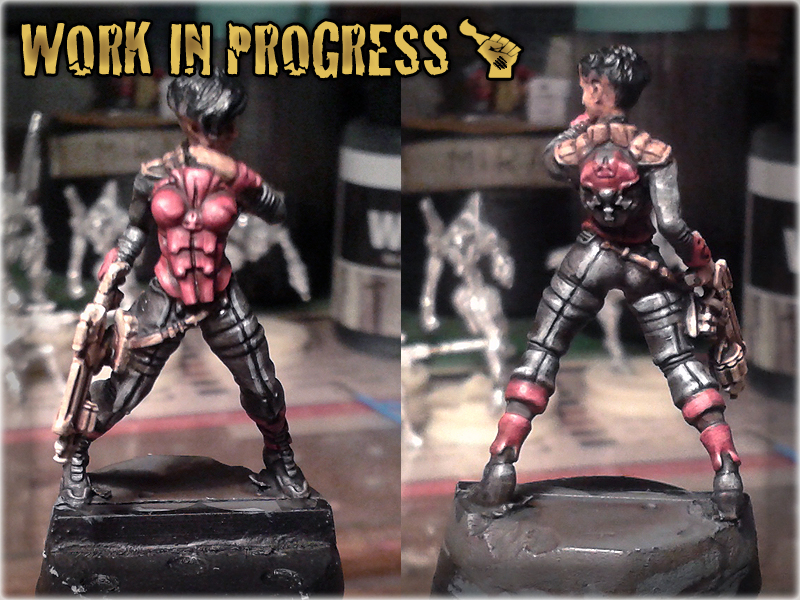
8 I switched to The Psycho to add some Skeleton Bone/White lining in the key points of the armour.
9 I switched to Tamiya Modeling Brush and washed the armour with Red Tone Ink.
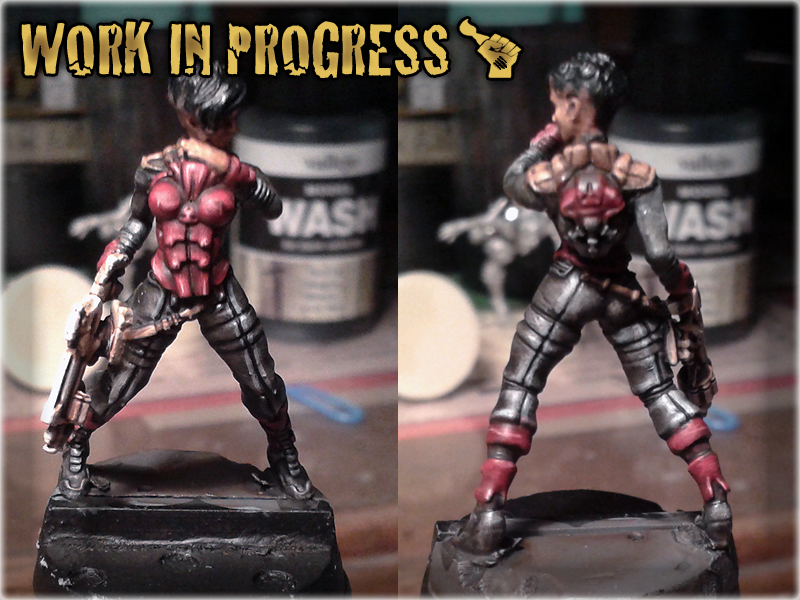
9 Oops! I did it again washing all the armour with Red Tone Ink to finally finish it.
Hope that you find this little tut useful and that you will post some pictures of miniatures painted this way 😉