- contact@scarhandpainting.com


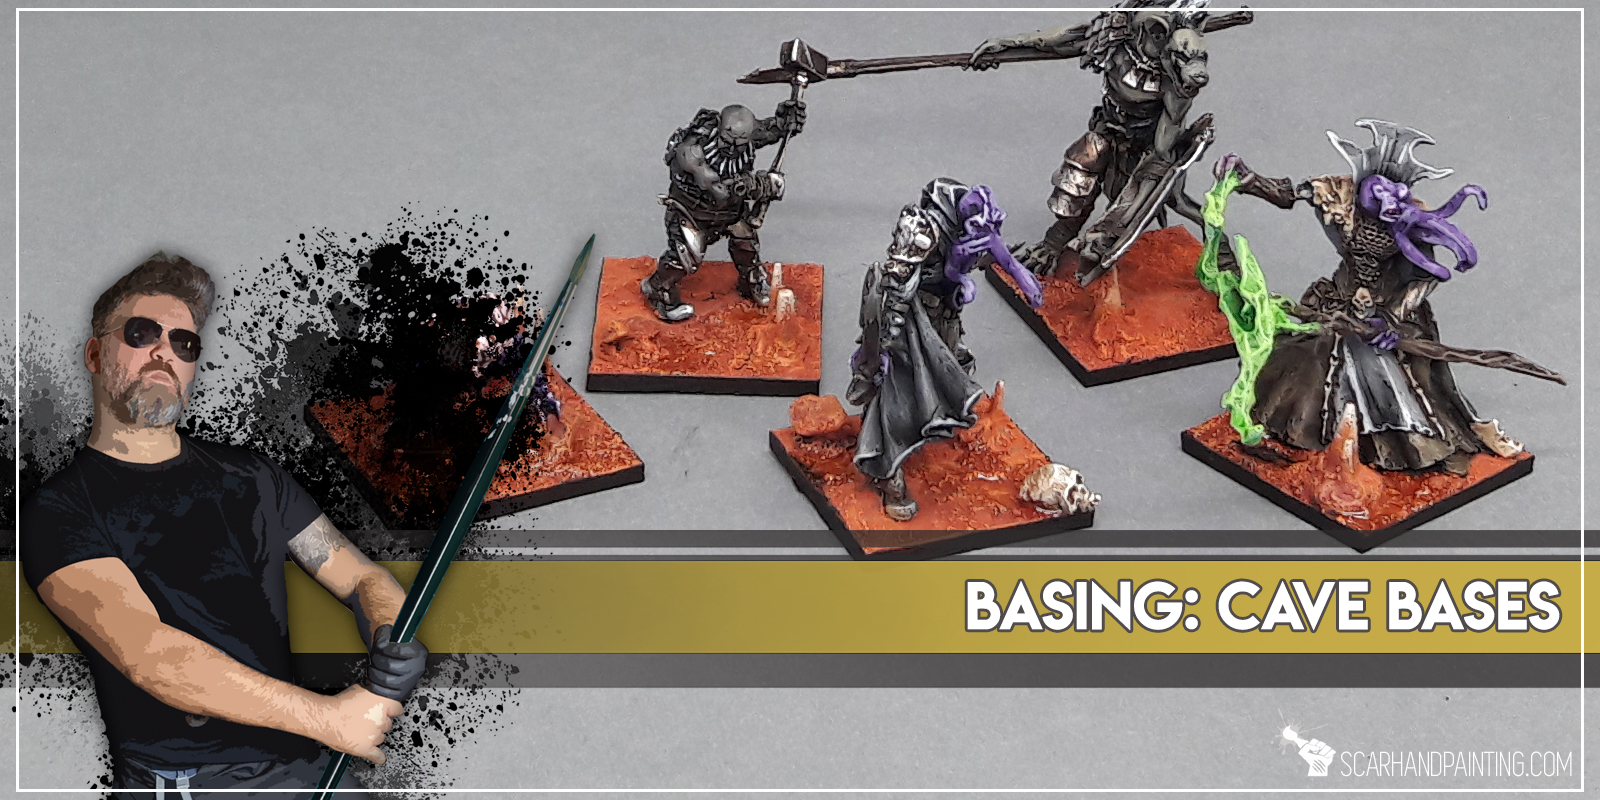
In this easy, step-by-step tutorial I’m going to show you how to create a Cave Base.

*Ask your GF if you don’t know where to obtain the latter.
**Search in IKEA or any home/garden store. A lifetime stockpile of these is less than 5€.
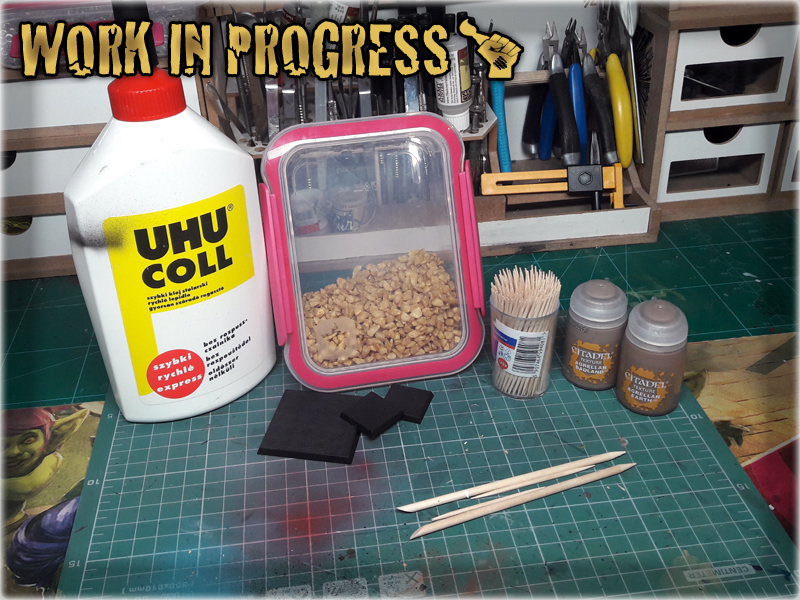
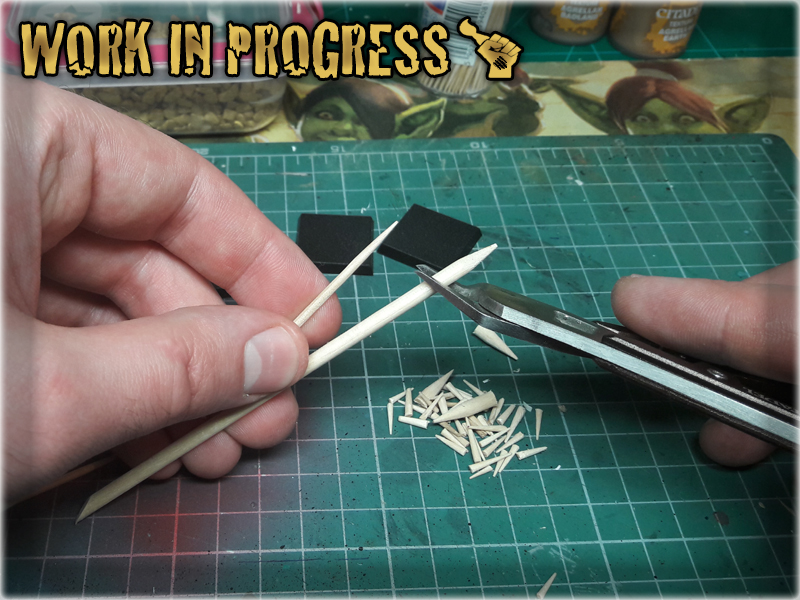
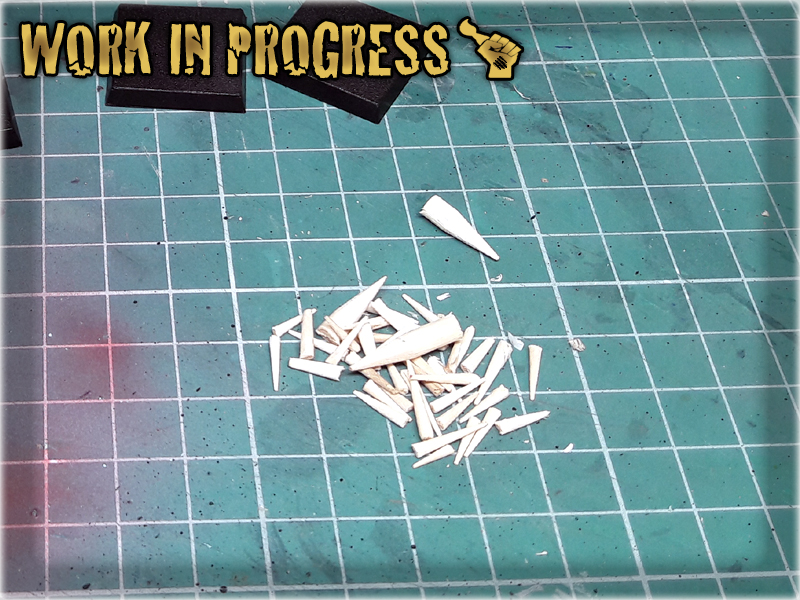
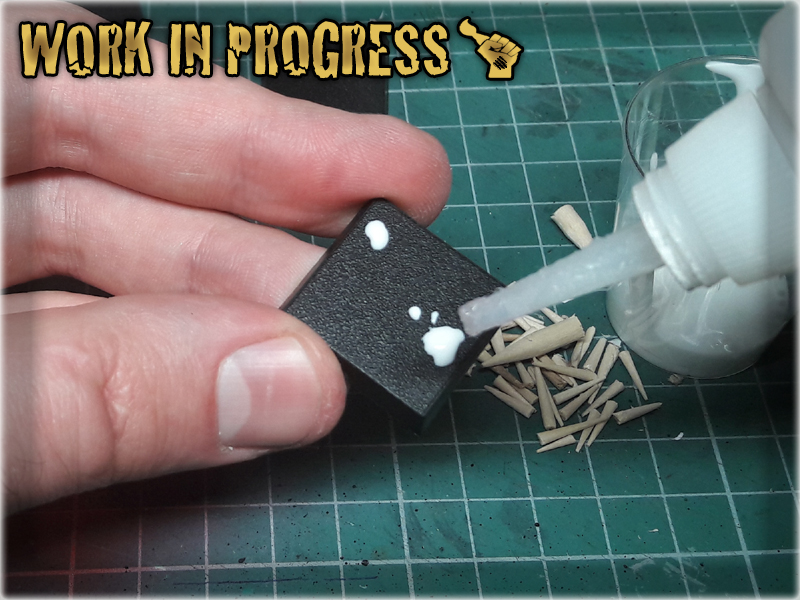
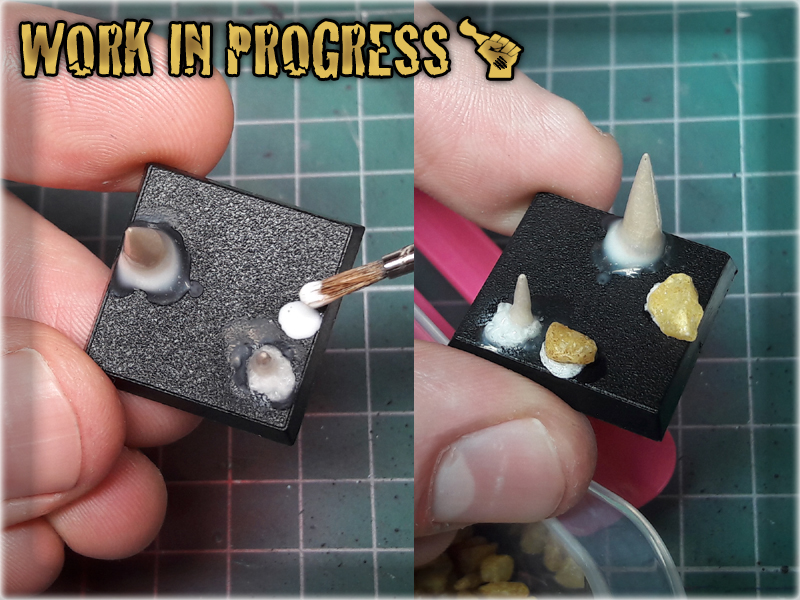
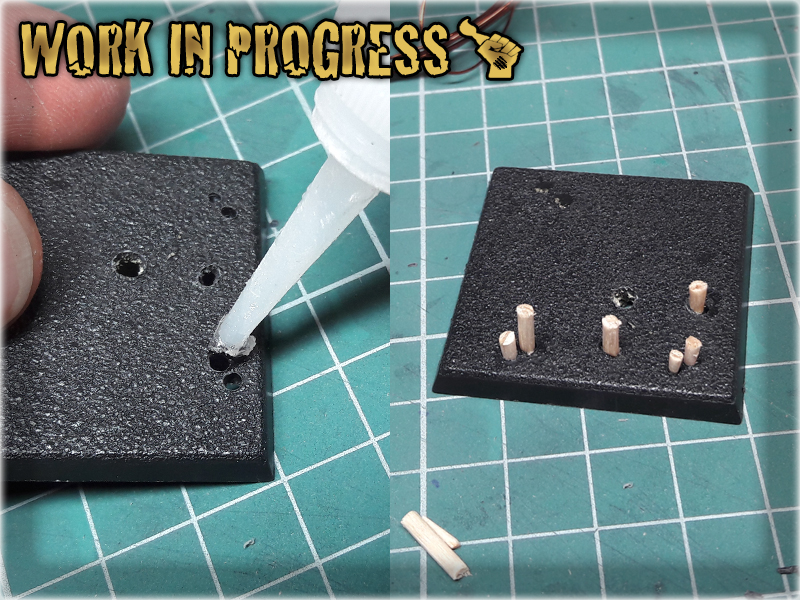
1 I started by cutting off the tips of both toothpicks and nail sticks. These would do for fine stalagmites later on.
2 I then applied couple of drops of basing glue onto the base. Before it dried out I applied Super Glue on it and mounted stalagmites, tip upwards, on the mix.

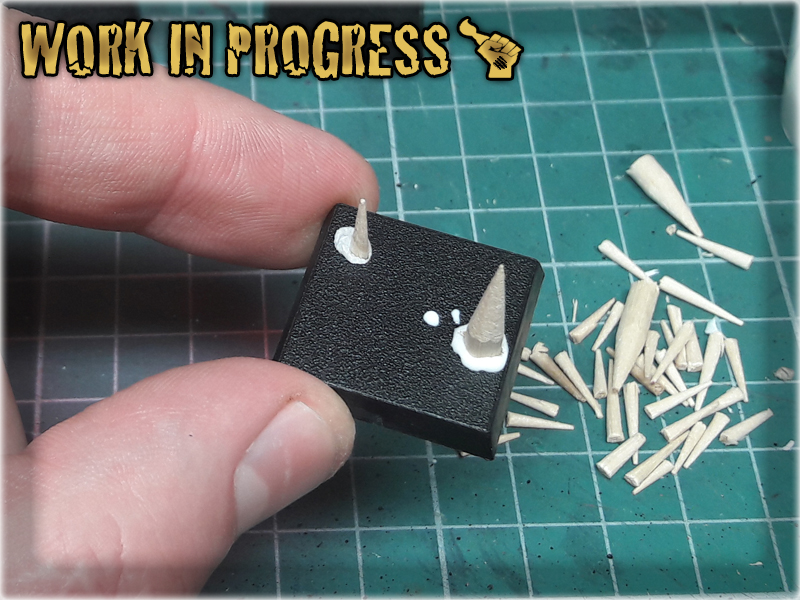
3 Next I covered entire stalagmites with basing glue and left it to dry. The excess glue, moved by the power of gravity, was drawn downwards, where it rested around the base of the stalagmites, making them look smooth and natural.
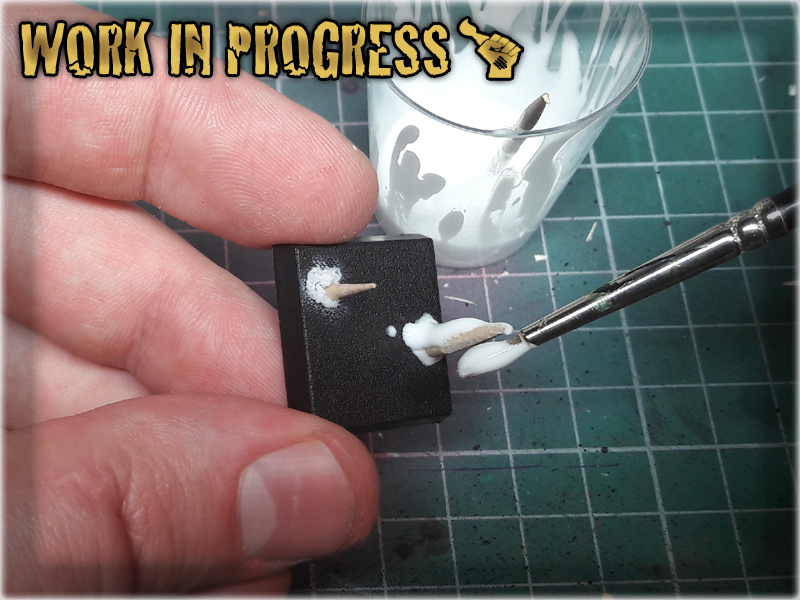
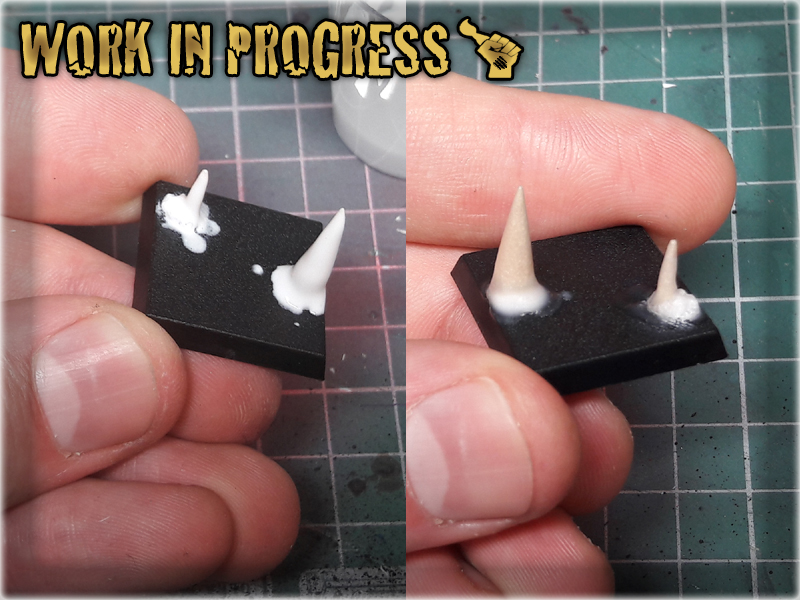
4 Using the previous technique I applied some basing glue in few spots and then Super Glue'ed some gravel over it. You can actually glue any type of stuff with this - like skulls, some pieces of armour etc.
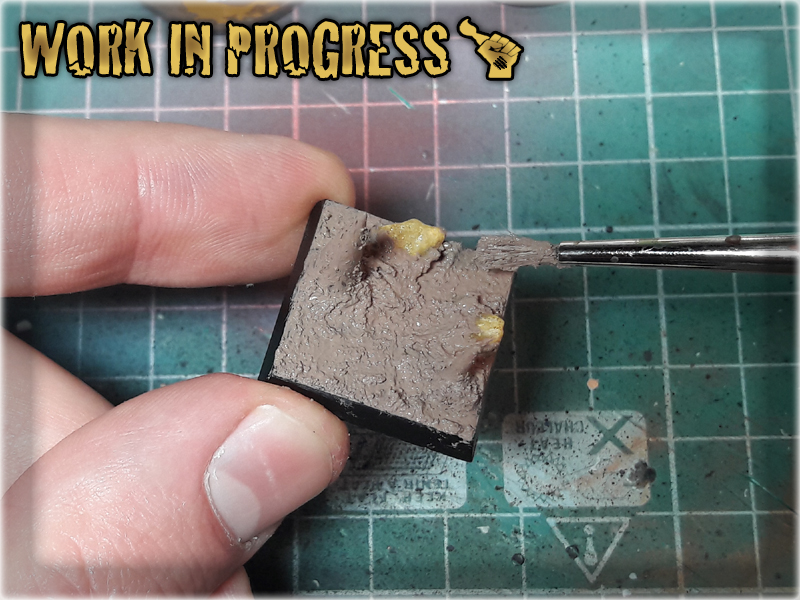
5 I then covered antire surface, except for any fillers, with Games Workshop's texture paints. I used a mix of Agrellan Earth and Agrellan Badland for this tutorial, but actually any of the range will do - as long as you would like to undercoat the base afterwards.


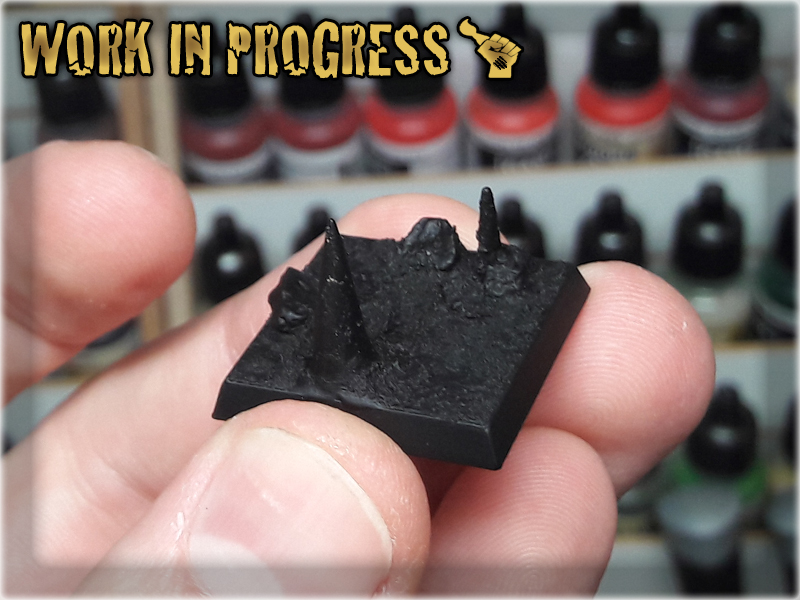
6 The final step was to undercoat dried out base with Chaos Black spray...


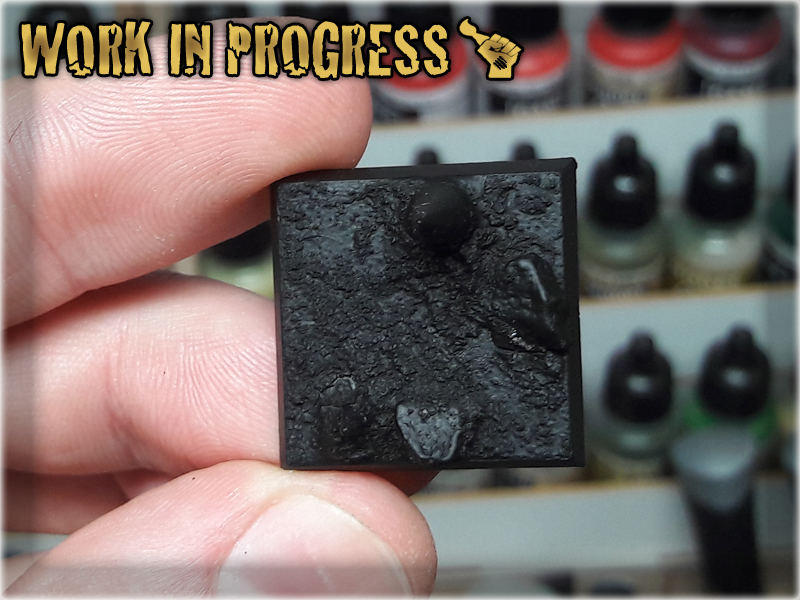
Now, what’s left is just to paint the bases with your preferable colour scheme. I chose to go red/copper style similar to ‘the Wave’ and watered some spots with clear resin, but the number of potential colour schemes is unlimited.
If you ever use the tutorial – be sure to let me know and send some pictures via FACEBOOK. I will be happy to see how it turned out 😉

In this easy, step-by-step tutorial I’m going to show you how to create an ‘explosion from inside’ effect on the miniatures. Personally I use this method to create exploding mines or in this case Crazy Koalas from Infinity the game, but the number of potential uses is limited only by your imagination. That being said, buckle up and have a nice ride.
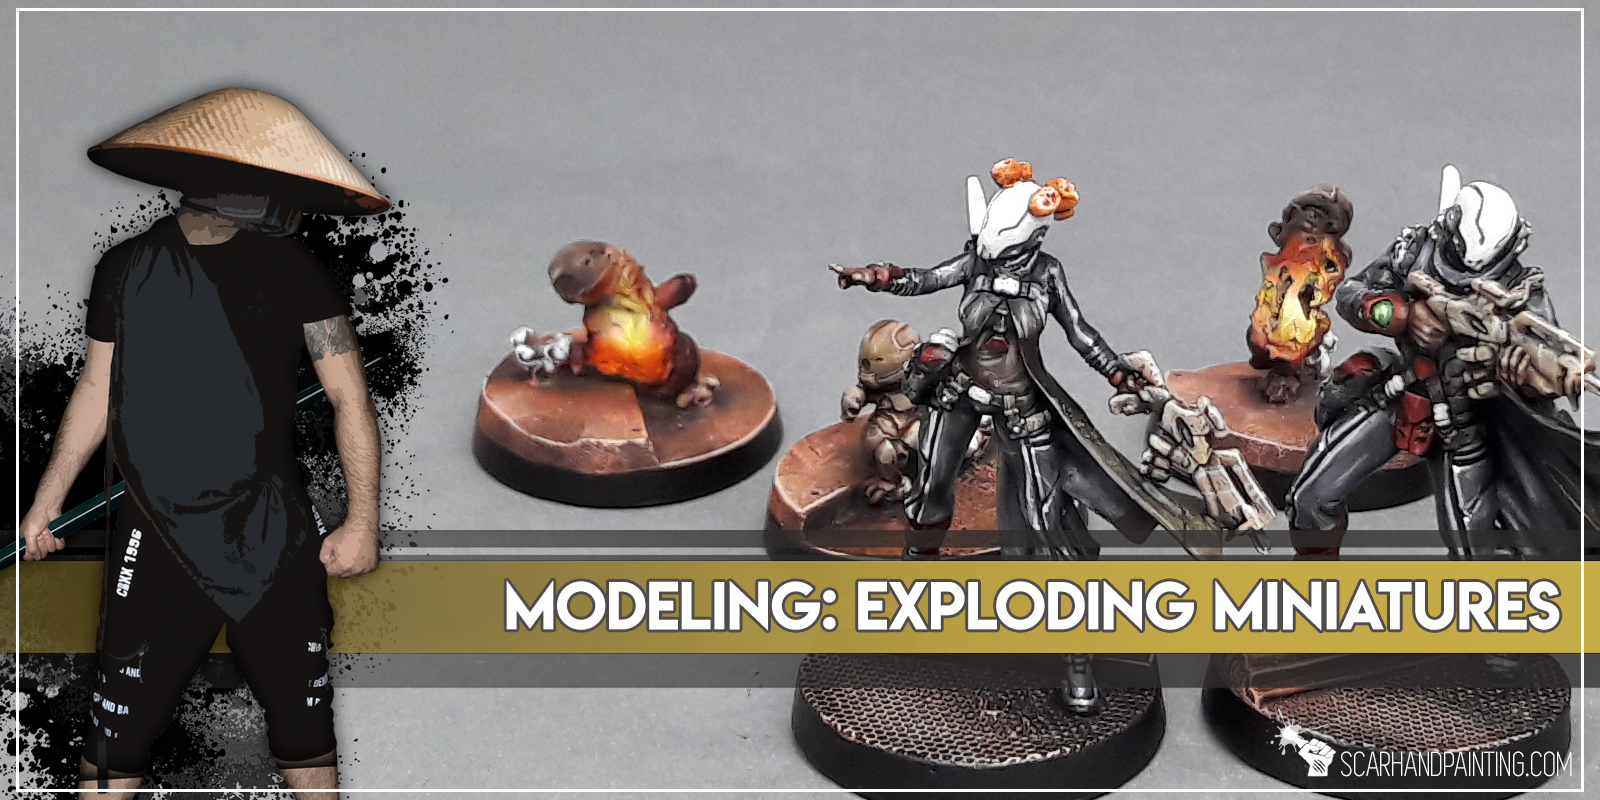
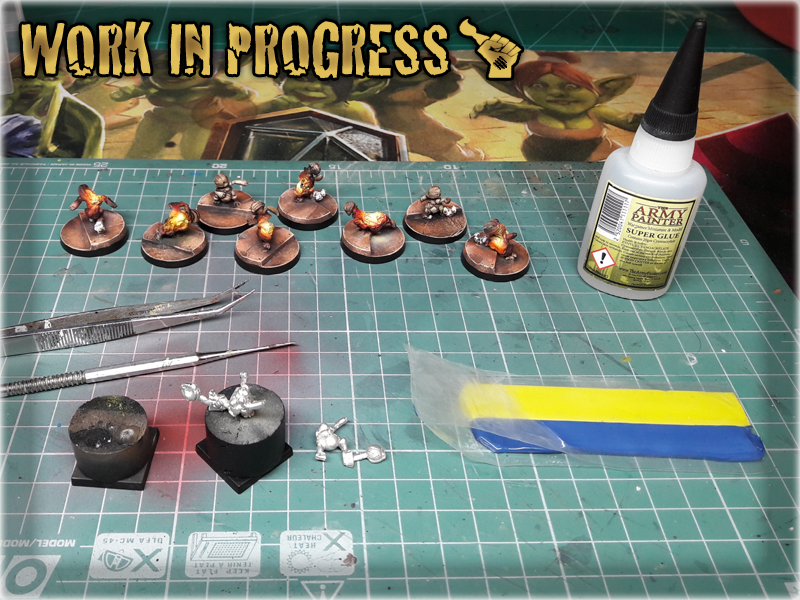
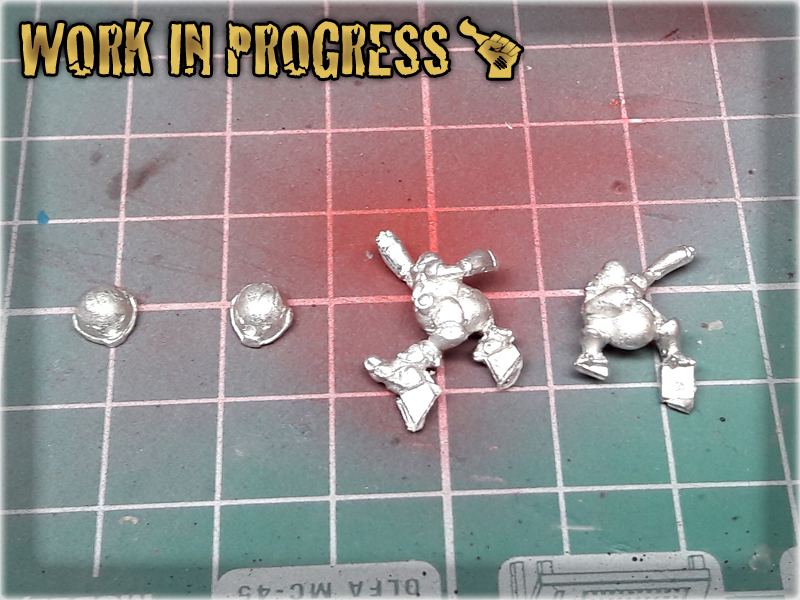
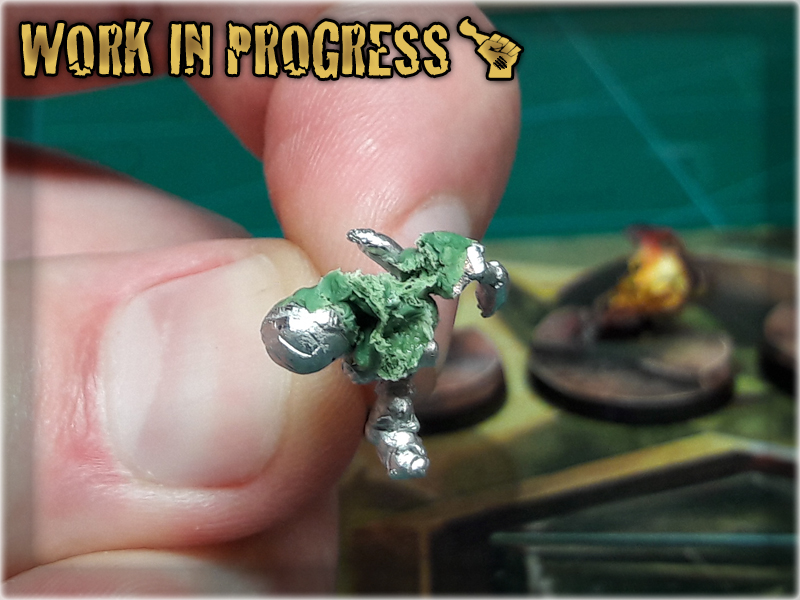
1 I started with cutting the miniature diagonally in two. I didn't thought too much about where to cut, just about the waist, leaving one hand attached to the lower part of the body.

2 I then rolled some Green Stuff and glued it onto the lower body part.
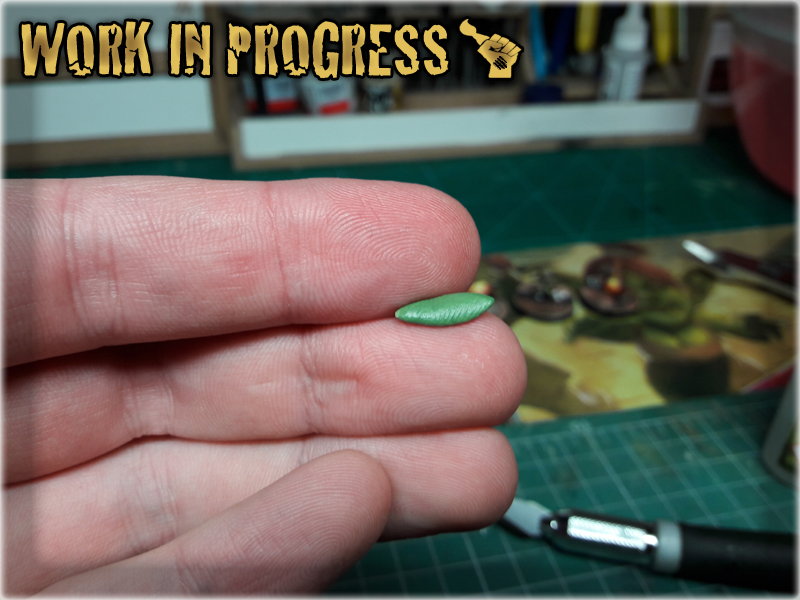
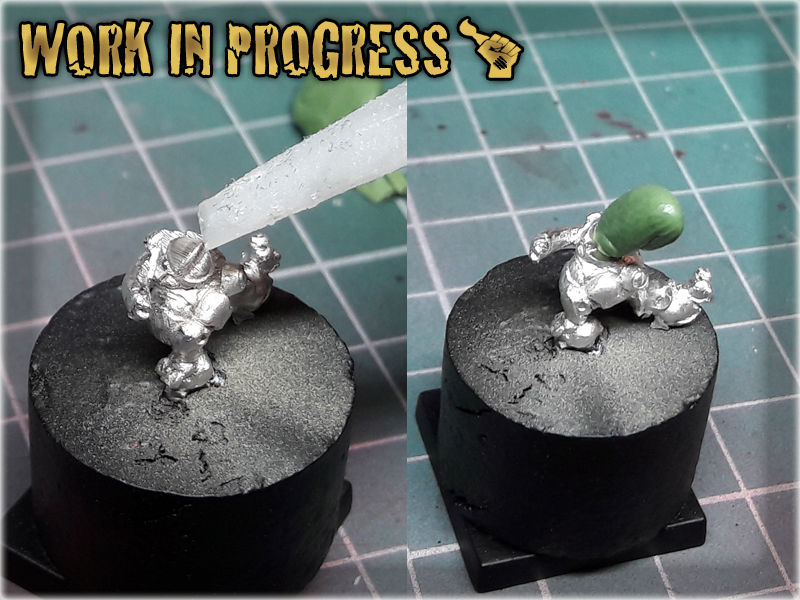
3 Next I applied a small drop of Super Glue onto the Green Stuff and attached the upper body part to it.

4 Then I squeezed both part, forcing the Green Stuff out.
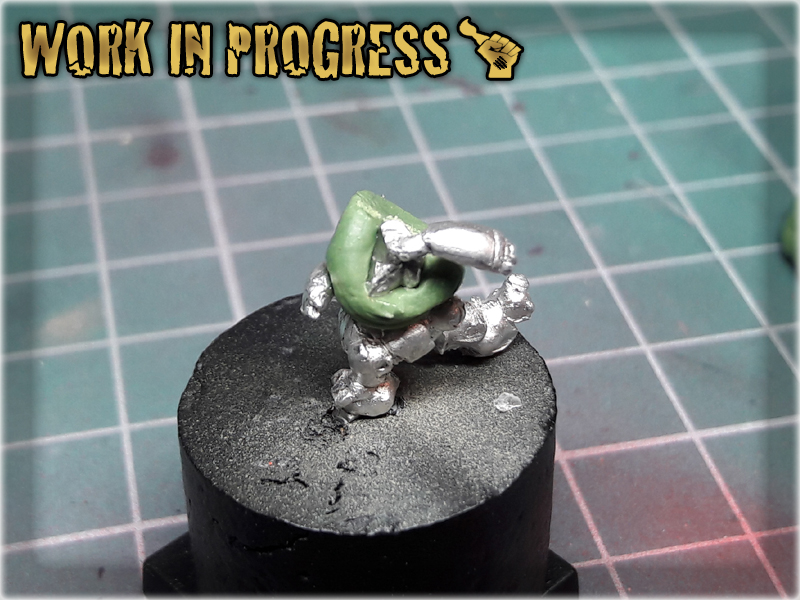
5 Next I gently pulled both body parts away, creating a gap with rended Green Stuff inbetween the parts.
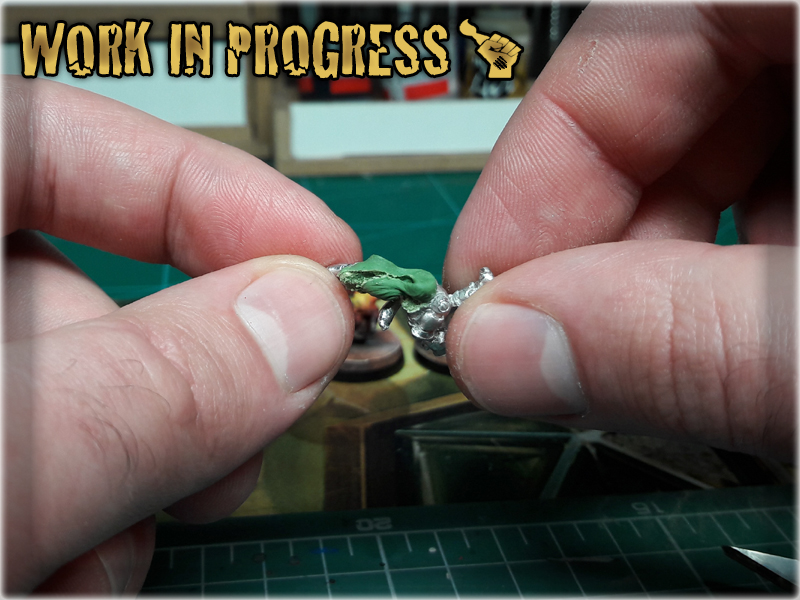
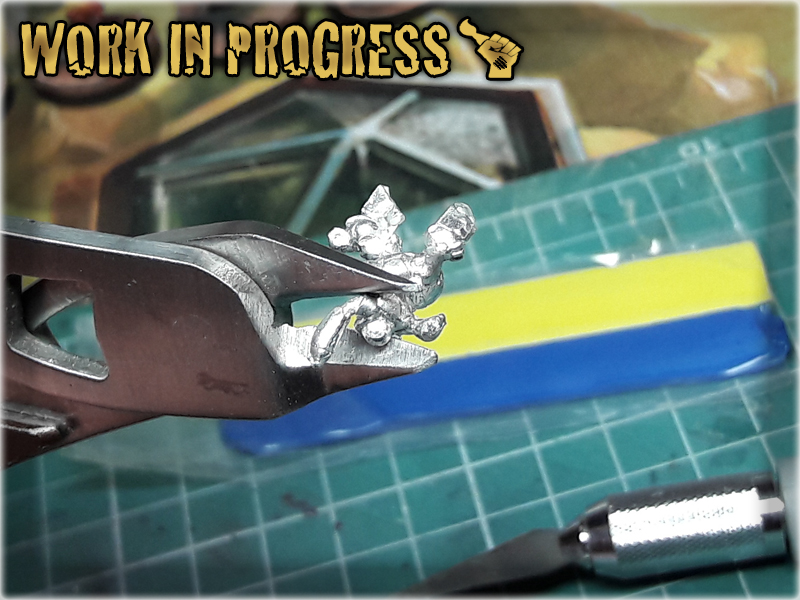
6 Next I rolled another piece of Green Stuff and repeated the technique, adding head to the miniature.

7 After pulling the head away I used a modelling tool to stretch the excess Green Stuff to the sides.
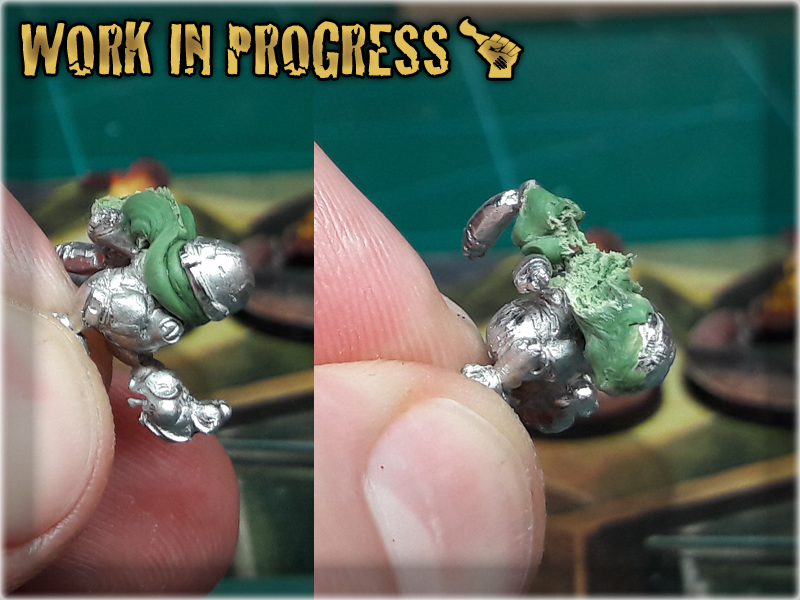
8 I also applied Super Glue onto the Green Stuff to fasten it's hardening.
The end result is below:

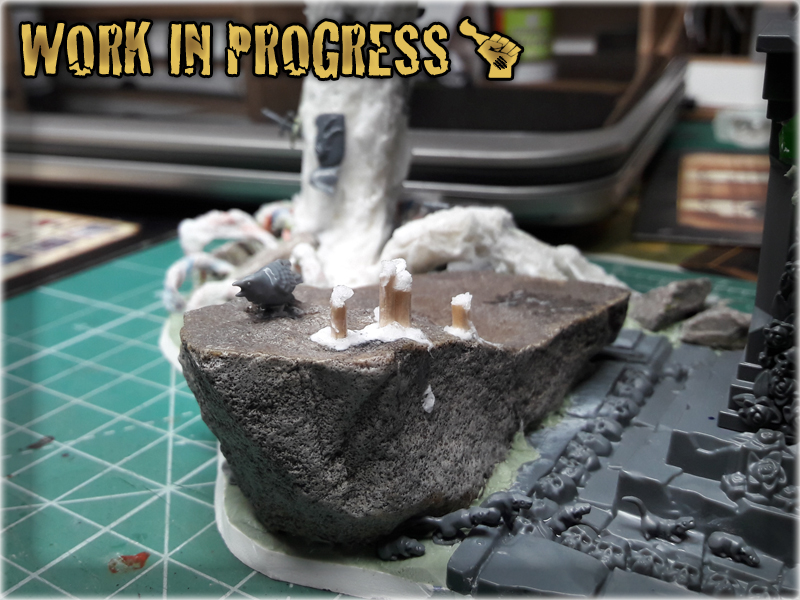
Winter is already here thus I thought about warming the theme a bit by introducing a tutorial of how to make candles for 28-30mm scale. Why produce such things? In miniatures hobby candles are rare bitz among what you get in the sets designed by main miniature producers. Even if a set contains some, their number is scarce. Why not make your own and adorn bases, miniatures and even scenery with them? Be it Age of Sigmar, Mordheim, Warhammer 40,000 or just a fantasy dungeon – candles will provide mood to both miniatures and scenery. Below is a quick and easy step-by-step of how to produce your own 28-30mm scale candles. Enjoy…
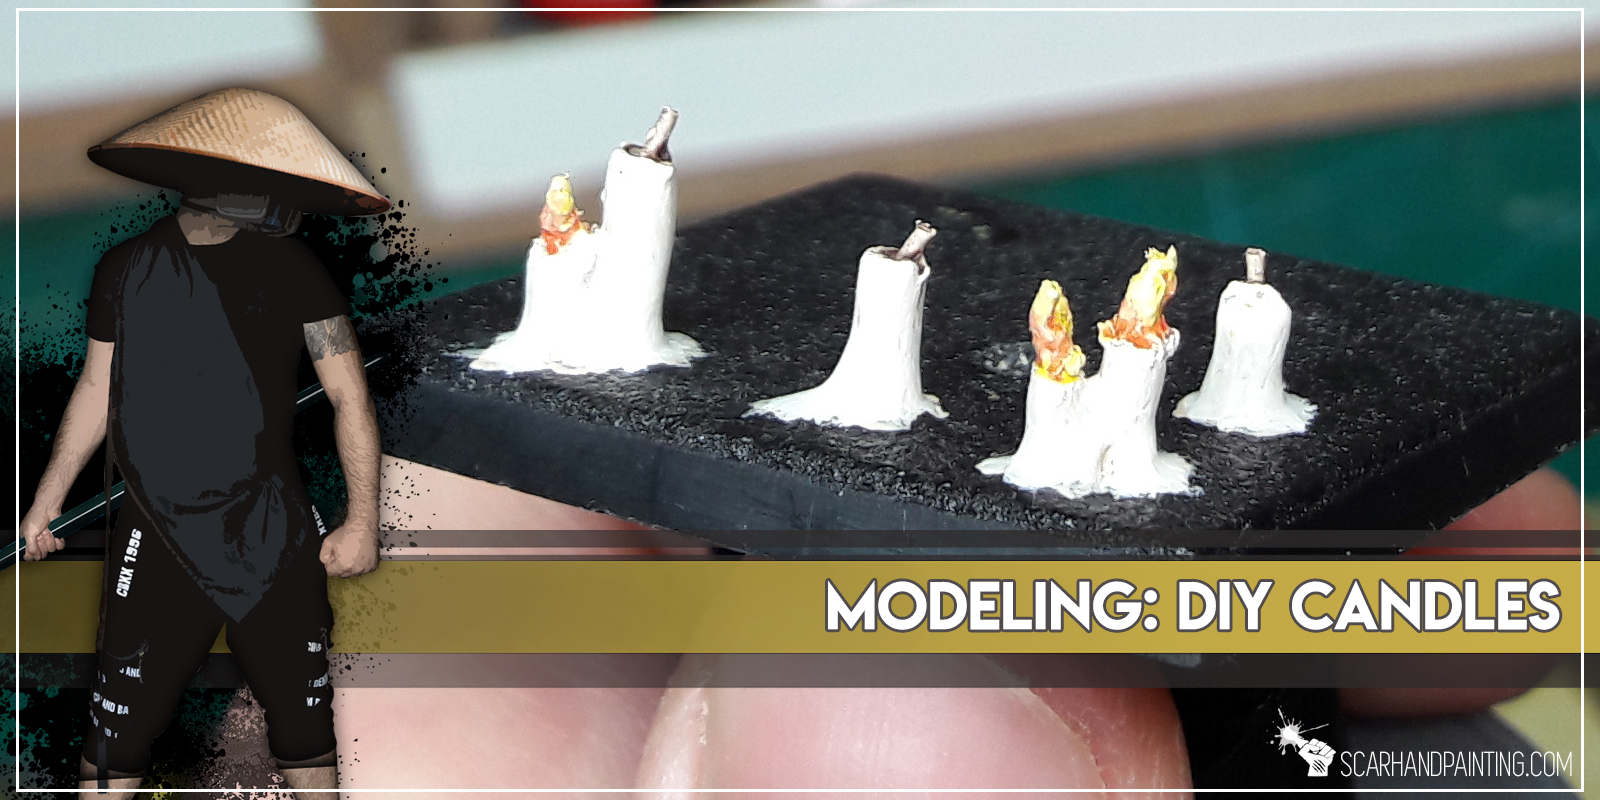

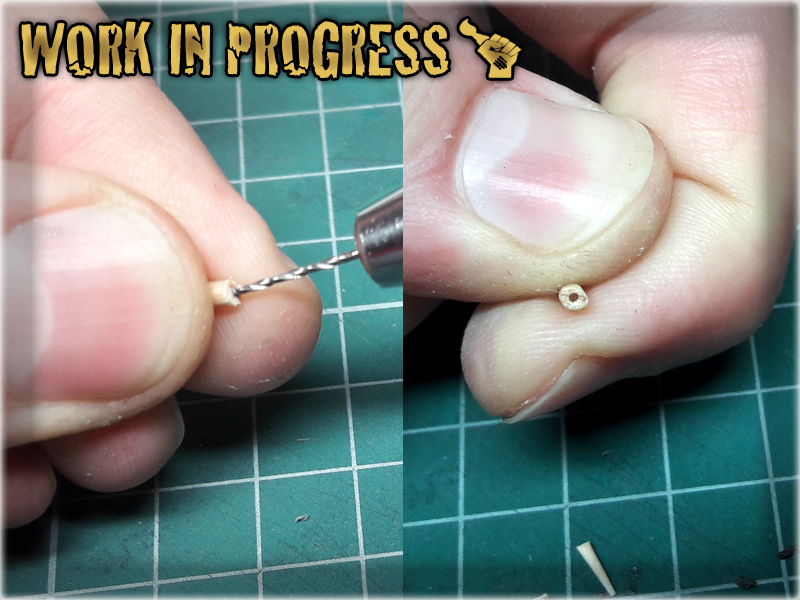
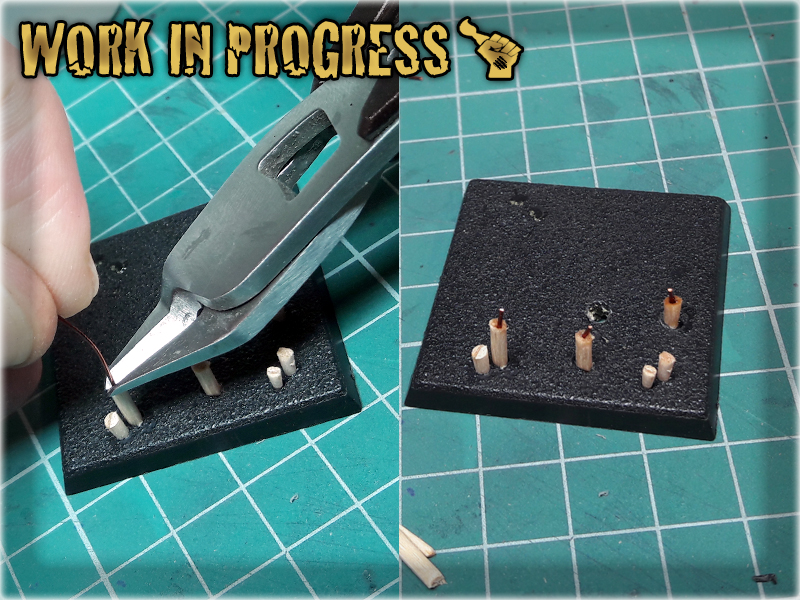
1 I started with preparation of candles-to-be by cutting toothpicks into small pieces. I tried to keep all of them between 5-10mm long, to better fit into the 28-30mm fantasy scale. Once I had couple pieces done I choose some of them and drilled small holes from one side. These will be used later to hold candlewicks.

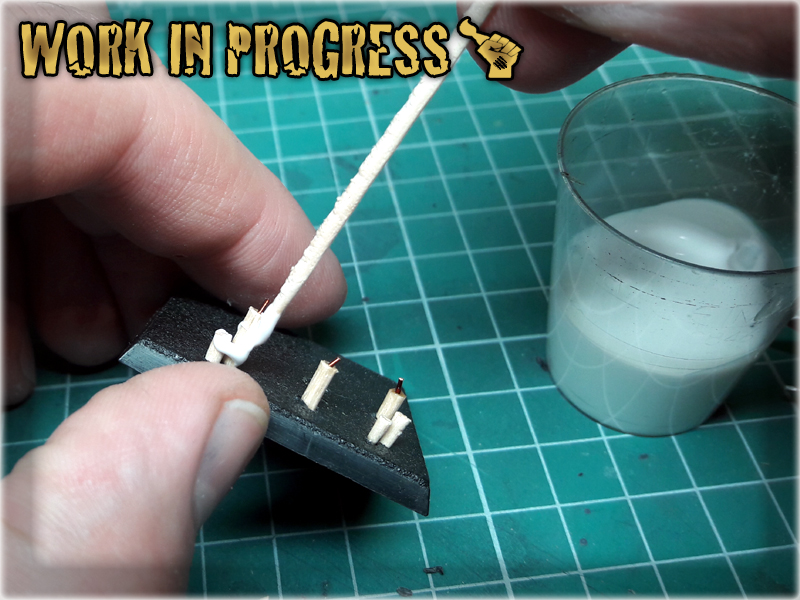
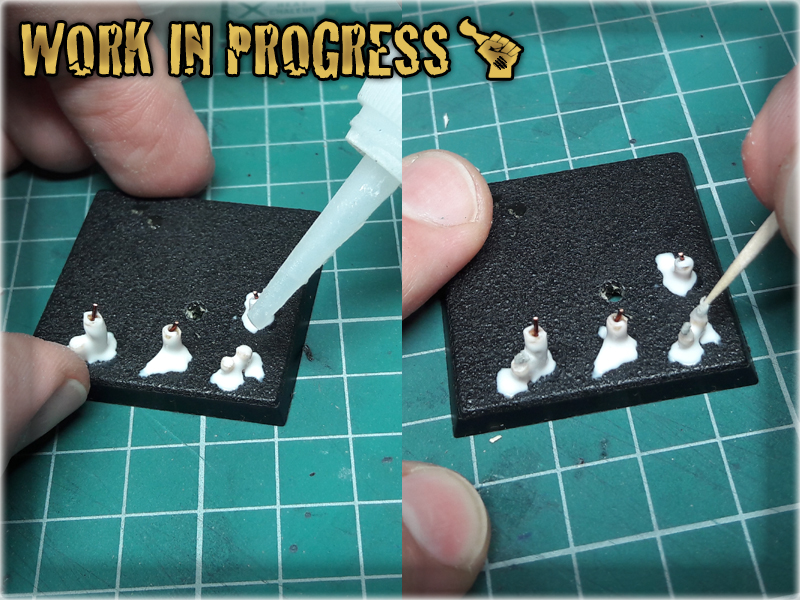
2 Next I glued the candles onto the base. In case of scenery I usually drill small holes to hold the candles in place or just glue them as it is if I'm sure the scenery won't require enchanced durability. For the purpose of this tutorial I drilled some holes in an old square Warhammer base.
3 I then glued small pieces of wire into the holes, to look like candlewicks.
4 Then came the time to cover the candles with a basing glue, applying additional glue around the base of each candle to create an effect of spilled wax.
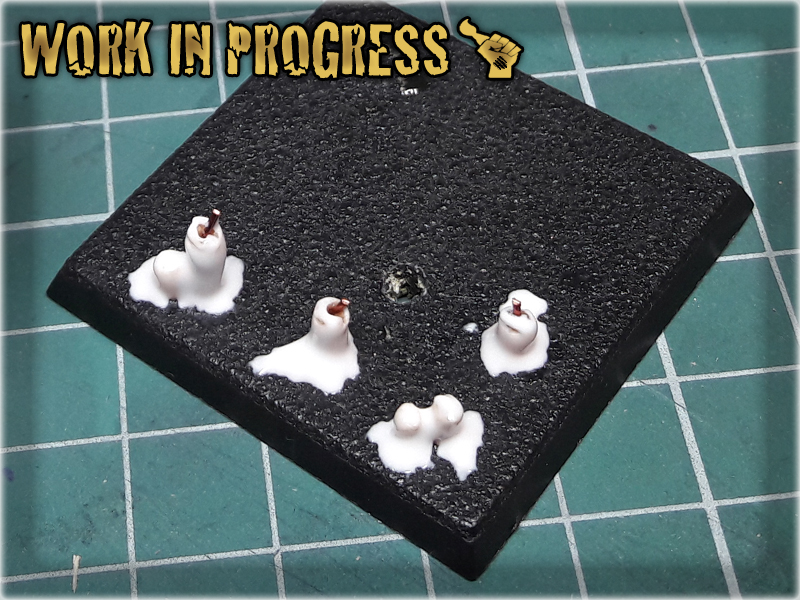
5 Next step was to prepare couple of small flames, using a wet paper tissue. I just rolled, then cut it into small pieces, which I then rolled once again.
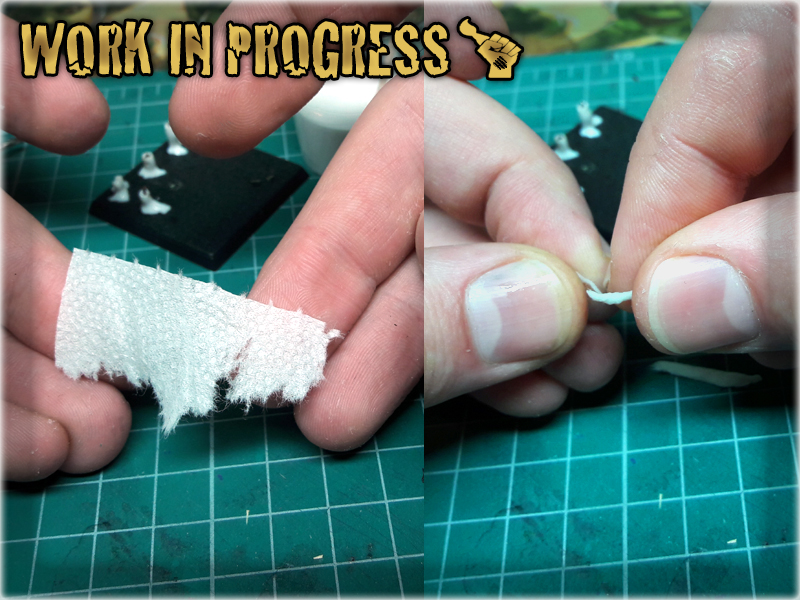

6 The flames where then glued to the candles with super glue and once in place - covered with glue to harden entirely.

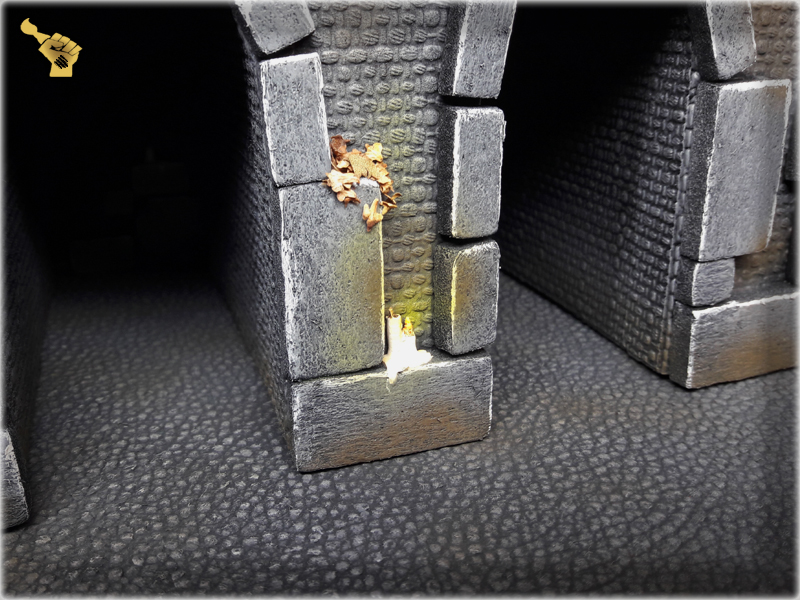
7 I left the stuff to dry, then painted it with mix of creme and white, washed the candlewicks and flames with some washes.

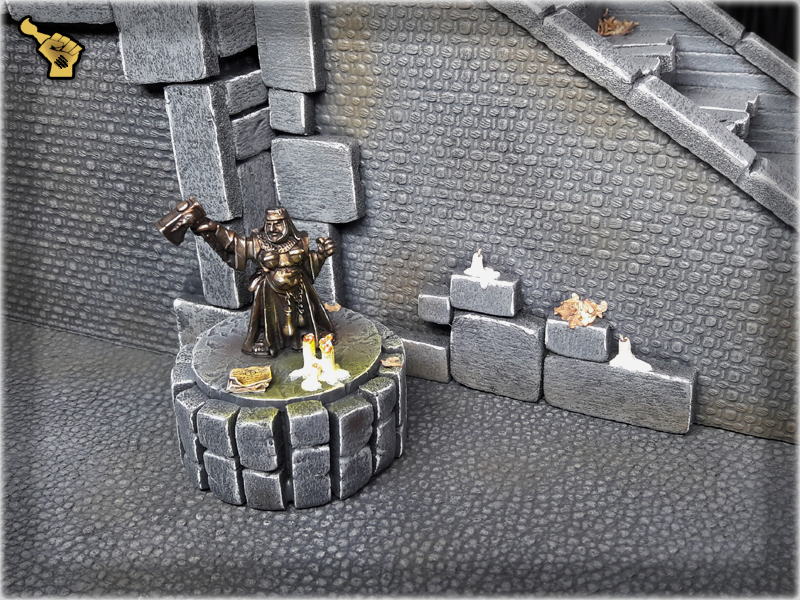
The end result will look more or less like this:

“It is a Dark Time.
The might of the Empire is dust, their crown is lost to them and their glory forgotten.
The promise of an age of peace and prosperity is drowned in blood.
This is your time. For the ruins of Mordheim hold prize beyond imagination: stones of power which can grant all your wishes.
But beware of your enemies.
Fear the Possessed, the Beasts of the Pit which roam the night.
Watch for the thieves of the Rat men, the Skaven of the Underworld.
Dread the corpses who walk like the living: the foul Vampires and their rotting minions.
This is Mordheim, the city of the Damned. This is the home of all your hopes. Be wary or it will be your grave as well.”
Mordheim rb.s.124
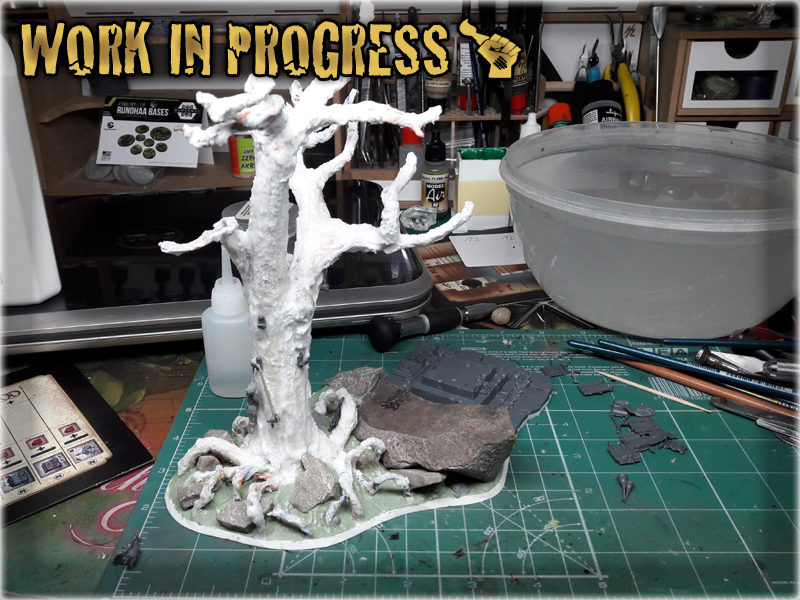
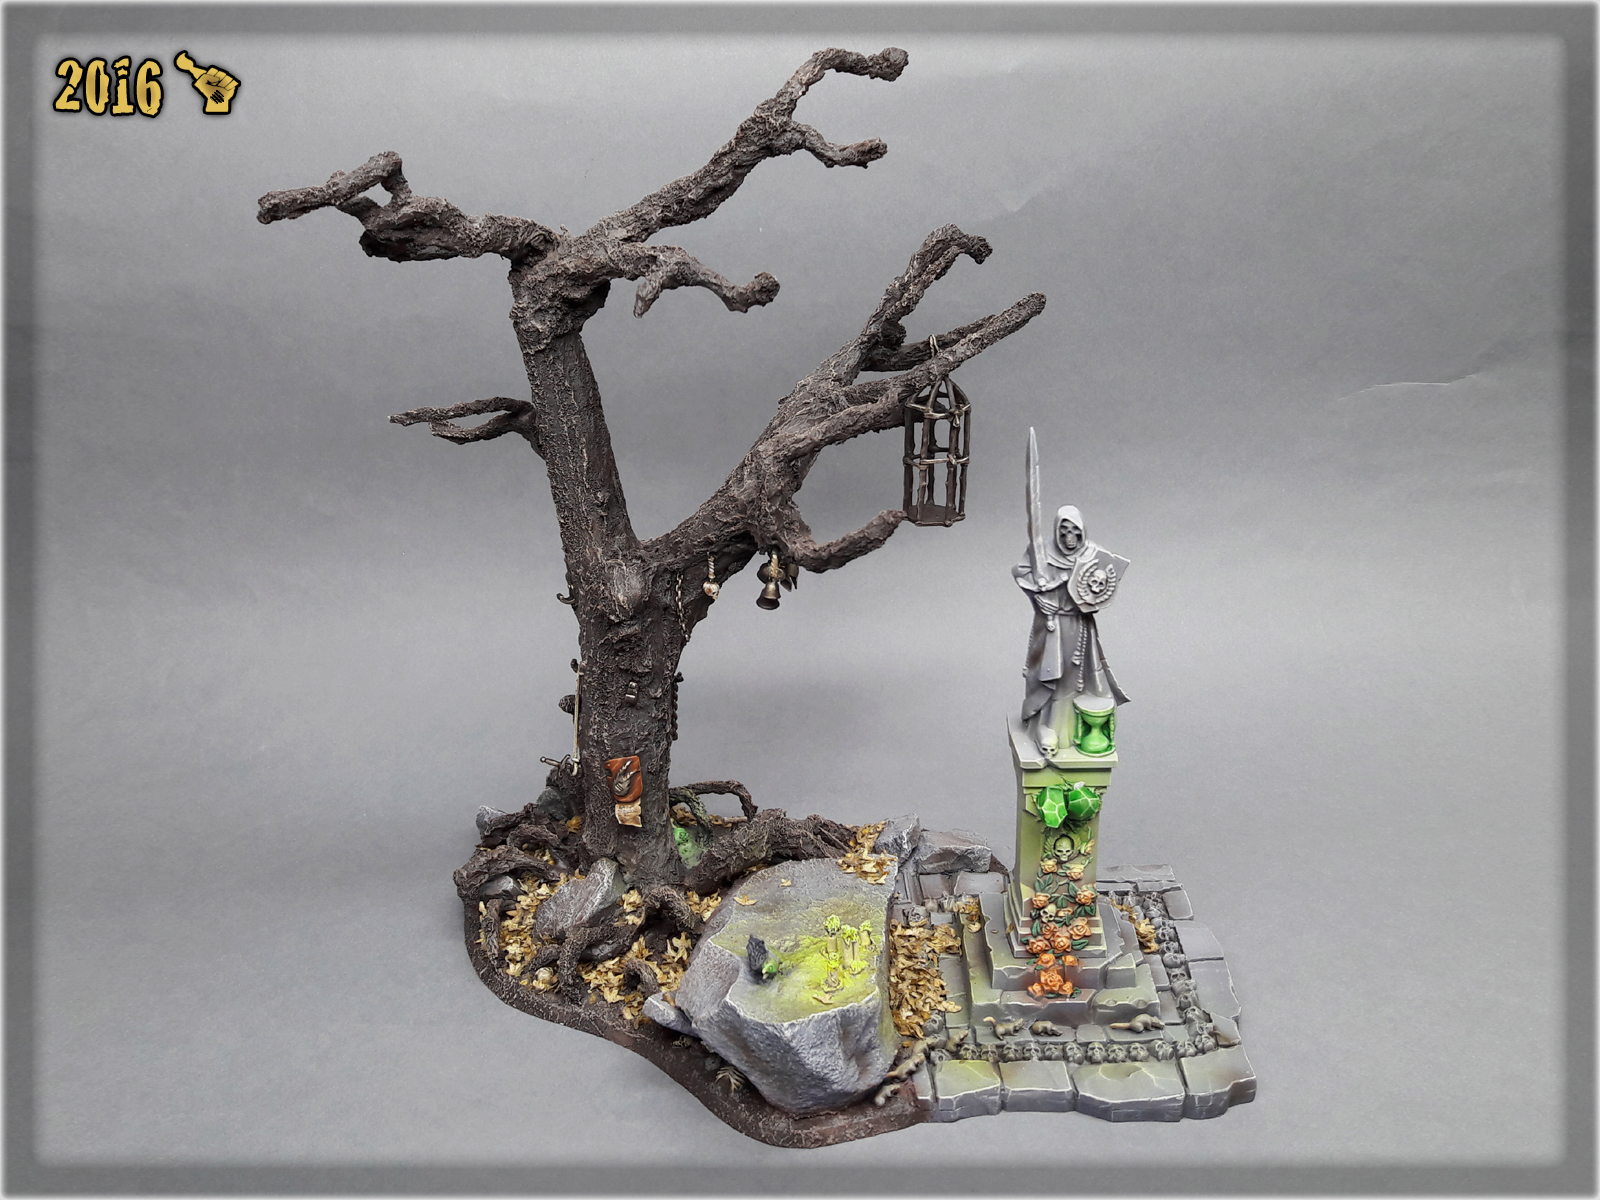
Working with some awesome Tabbletop World terrain bringed back memories of Mordheim and how I used to create fantasy scenery for my own gaming table. The idea to revitalize entire gameboard surfaced in my mind on more than one occasion but such a feat was somehow beyond my reach. To satisfy the muse and pacify my deepest Mordheim desires I decided to go one small step at a time. My attention focused on a piece I wanted to create since the earliest days of Mordheim – a creepy, dead tree. I already made an attempt to bring life to this piece couple of years ago, but the overall effect was rather poor and I ditched the project. This time I was much more experienced and much more hyped, but most of all I have acquired a lot of new skills and got to know new techniques during these last few years. I was ready to take on this Special Project head-on.
The idea was to make a sickly looking tree, hung some stuff on it then compose the surroundings so that the entire piece of scenery would create a nice visual effect. It was supposed to be a cool looking, mood providing centerpiece. The most important features were to be looks and being totally impassable so that the terrain piece won’t cause any placement problems during the game. Along with the tree there supposed to be some sort of eye-candies in form of small detail like a hidden treasure, bones, animals etc. Also I wanted to include either a small crypt or a monument somewhere on the base to provide a stronger mood to the piece.
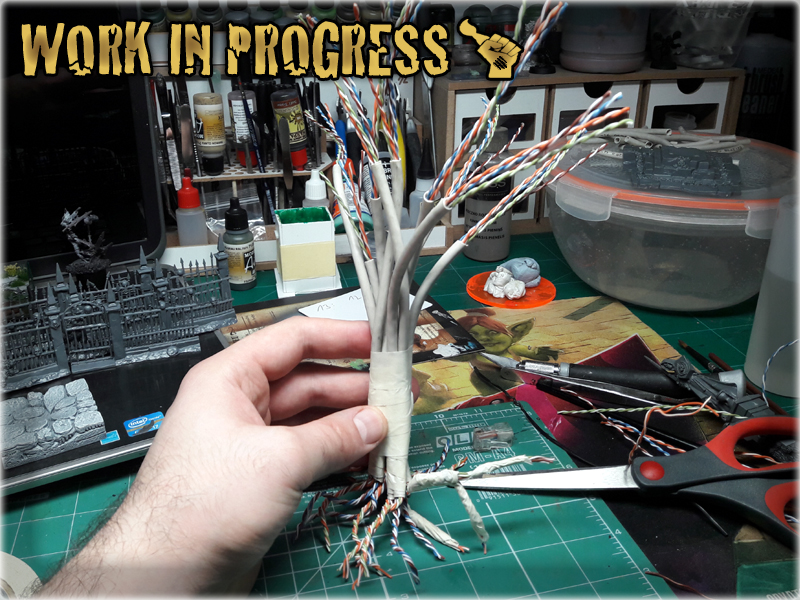
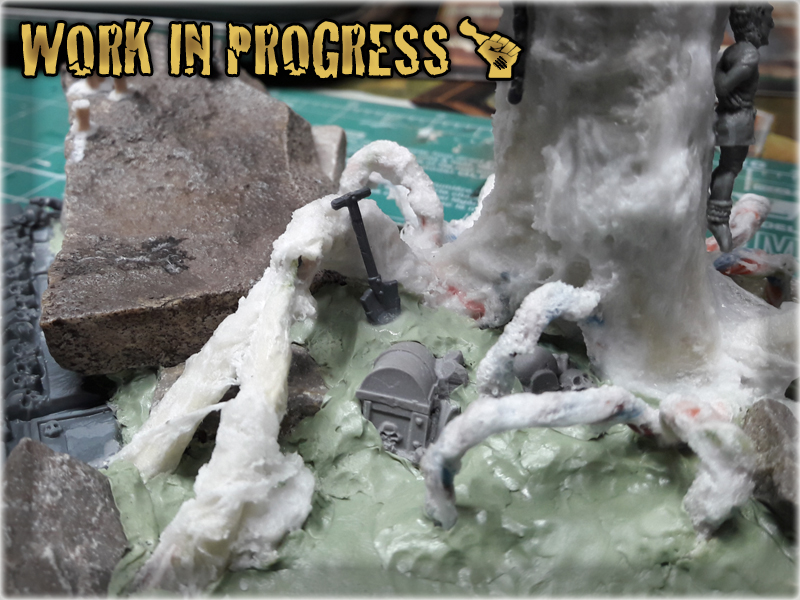
After selecting most of the initial materials and bitz for the project I started with the tree. I thought long and hard about where to get a long wire to base the tree upon, but in the end was able to get my hands on an old Ethernet cable. At that point I knew that I will have to strenghten the entire construction, but for the time being I concentrated on the base shape. I cut the cable into pieces, removed the excess of the outer layer and reshaped the inner wires into branches/roots on both ends of each piece. Then I grouped the pieces in twos and threes, taping them around the main trunk with a paper-tape. In the next step I composed the tree out of the newly created pieces and taped them together…
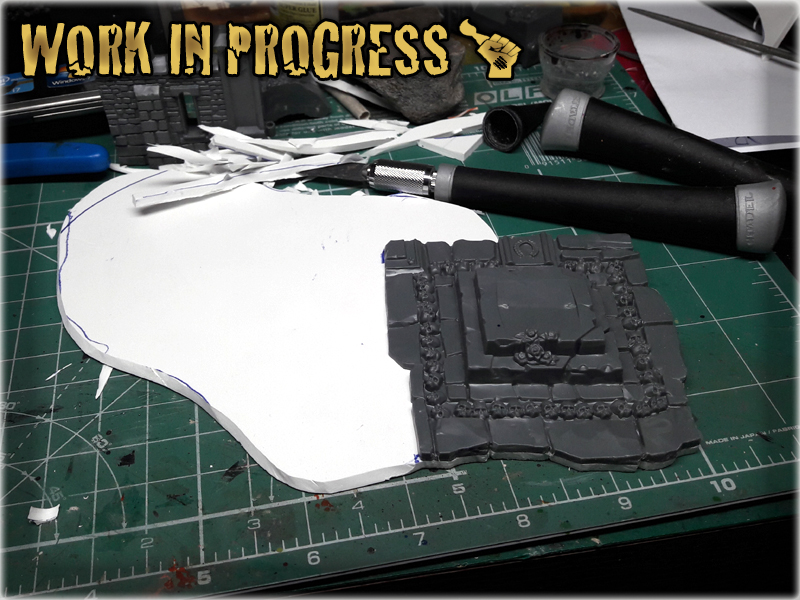
Having a tree I concentrated on basing it. Used a piece of PCV to cut the basic shape and glued a bottom piece of the statue I was going to add to the composition. I then cut the excess of PCV and modelled it a bit around the newly aded piece. I based the tree and added a huge natural rock to the base to serve as a sort of a sacrificial altar or something related to occultism (And to add weight to a base that was supposed to hold a big tree). I then used a basing glue on the entire trunk of the tree and taped it around with pieces of moisted paper towel. Left the entire thing to dry out for the night…
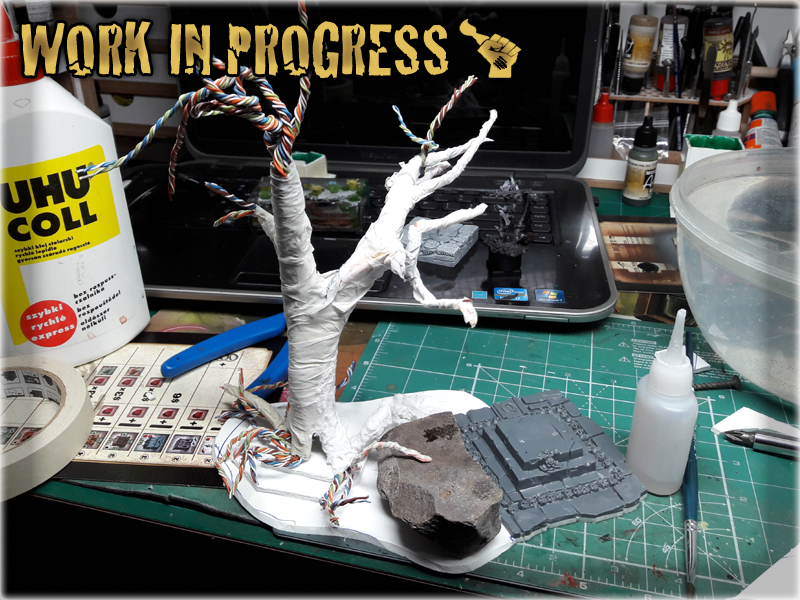
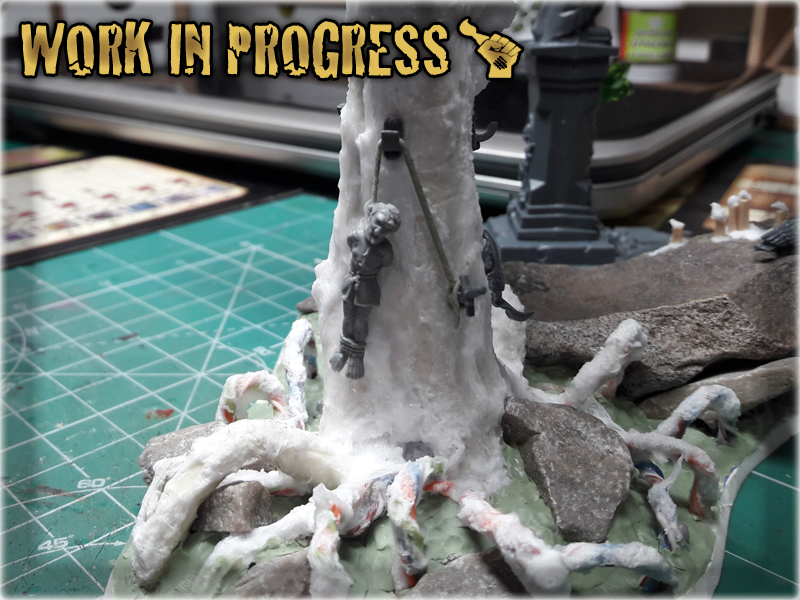
Upon waking up I started to add texture to the tree. There were two possible ways to achieve a durable and good looking effect. The first one was to use Green Stuff along with other sculpting putties to provide a nice texture. This one would take up a lot of time and cash so I ditched it in favor of the more simple and quicker way. Once again I used basing glue, but this time I covered entire tree. Once it was hard enough I added another layer and used a dryer to help it harden. I also applied a lot of Mourn Mountain Snow – texture paint from GW. Modelled a bit and then finished with a lot of Super Glue to harden the entire surface and strenghten the construction. This way I ended up with a nice looking, durable and highly textured tree…
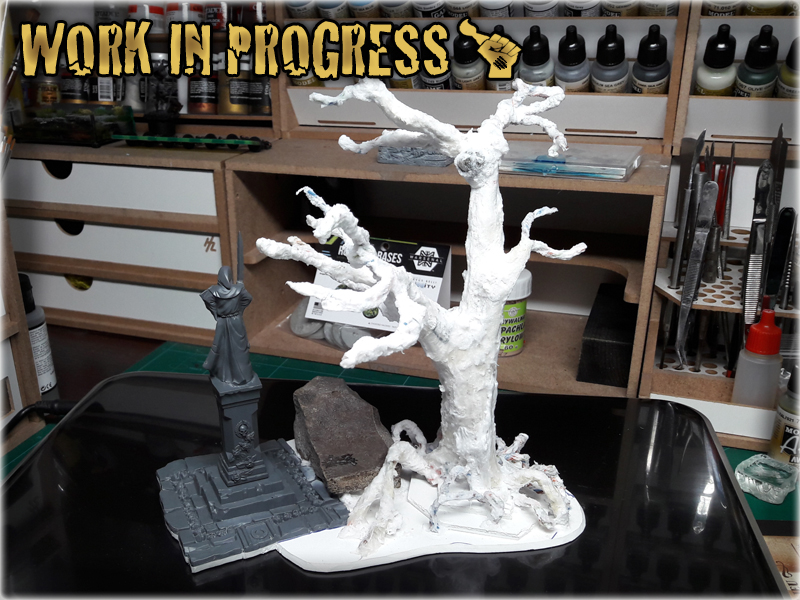
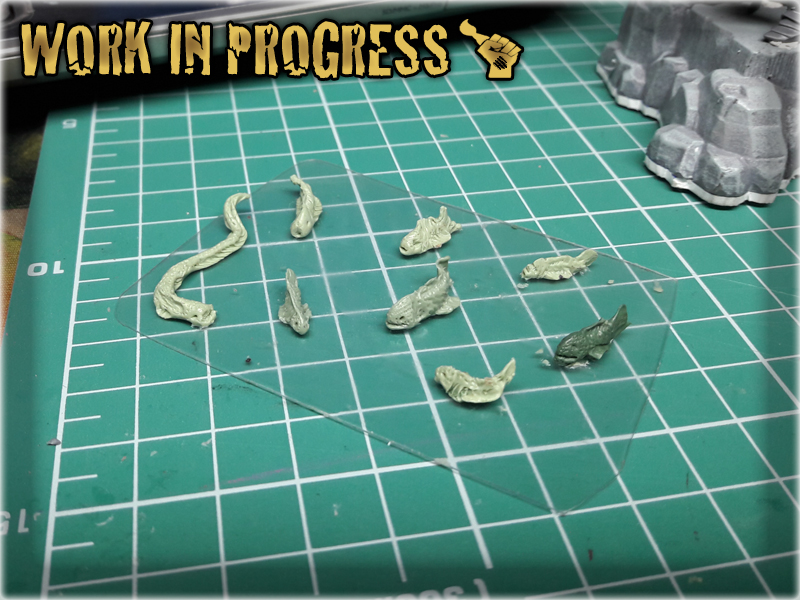
Next step was to add more stones onto the base and provide a more natural shape to it. I used Green Stuff and some other modelling putties to create the base shape. It was a bit expensive, but I hadn’t had plaster around and wanted to progress without any delays. I even used up excess of the putty to quick-sculpt some fish and mutated creatures for another Special Project going on beside this one. Somewhere on the way I also started to add bitz to the tree so that it looked more Mordheim-like with hooks, nails, a dead body hunging by the neck etc…
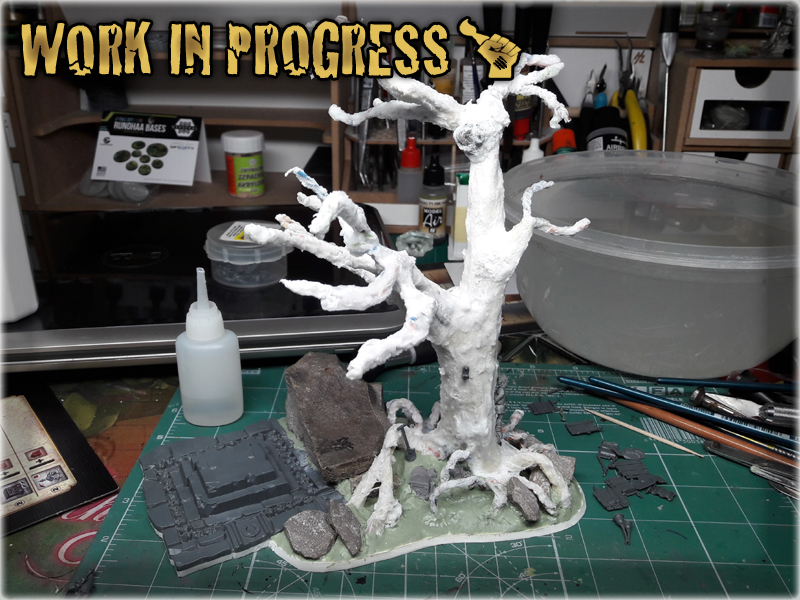
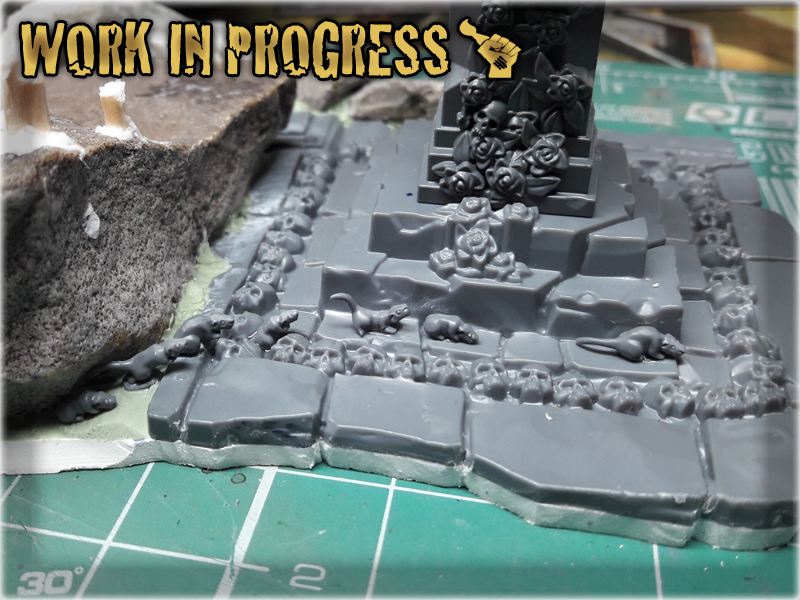
Detailing took some time as I wanted to bring life to the piece. A short line of running rats here, A bird interrested with the candles there and a half burried treasure chest somewhere else. The work moved steadily forward and with each new feature the ‘Dead Tree’ look much more alive.
Once everything was in place I covered the entirety of the base with Stirland Mud – tecxture paint from GW. Usually I just use basing glue and sand, but this time I wanted to create something more detailed. ‘No shortcuts’ I told myself when applying the texture. Ended up with a complete piece looking like this:

What can I say – I was totally in the mood. Once I sat to paint this thing I couldn’t take a break even if only to take a work in progress picture. Just couldn’t stop. Took couple of hours to complete with me testing new recipes – wanting this one to look superior to all my previous Mordheim scenery. It turned out to be a concept foundation on which I intend to build my new Mordheim gaming board terrain series.

One thing that I can say about the paint job is that most of it is made using Vallejo Air paints and actually airbrushed. Some surfaces were drybrushed just to be lined with Flayed One Flesh. What is unusual for me is that I almost used no washes, which usually are the main source of highlights in my works. This time tho I decided to go in the direction of a proper airbrushing, rather than risk unpredictability of a wash. Either way – I finished the project by applying Birch-tree seeds to imitate leaves all around the base and in particular small spots over the altar and monumet. This complimented the entire colour scheme and deepened the mood of the scenery piece.
Here is a picture of the finished piece, but theres a lot more in the “MORDHEIM DEAD TREE” Special Project gallery…
Some pictures can be also found at CoolMiniOrNot, where you can leave your votes for this one if you like.
“Dead Tree” is not my last word when it comes to Mordheim Terrain. Even now I’m working on a brand new pieces, not to mention the ‘Toad Fountain” which was completed in the same time as this one. Hope you like this piece and will enjoy the entire series. I encourage you to leave feedback, especially in case of any questions related to the project.

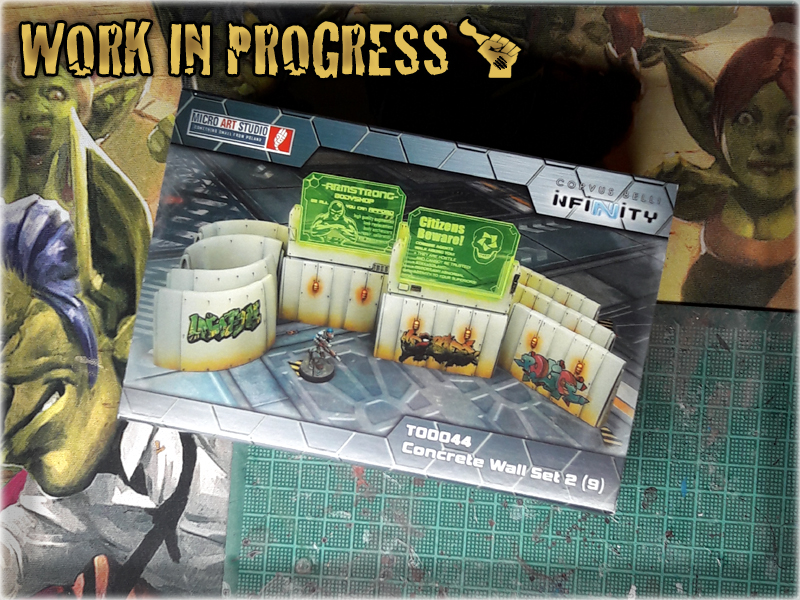
Micro Art Studio does some fantastic paint job on their stuff. At some level it might even be considered a bit intimidating. Thoughts like ‘This stuff is amazing, but I will never be able to paint it anything like they did’ had kept me from purchasing some awesome terrain pieces in the past. I bet that some of you feel the same right now. Well – that is clearly a bad way of thinking. That’s why I prepared this small Step-by-step painting tutorial with which I hope to bring you closer to your ideal of a Gaming Table.
For this purpose I picked a Concrete Wall Set 2 by Micro Art Studio and tried to copy their style with a small variation of the colour scheme.
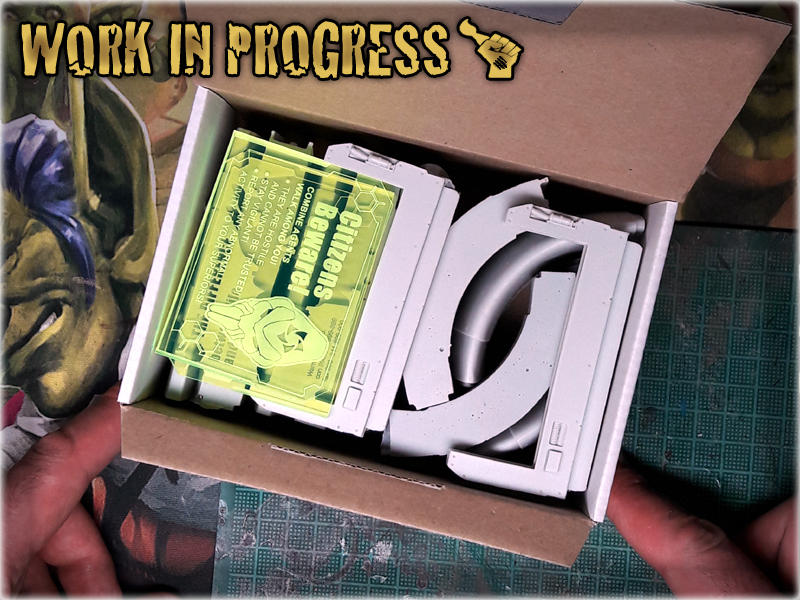
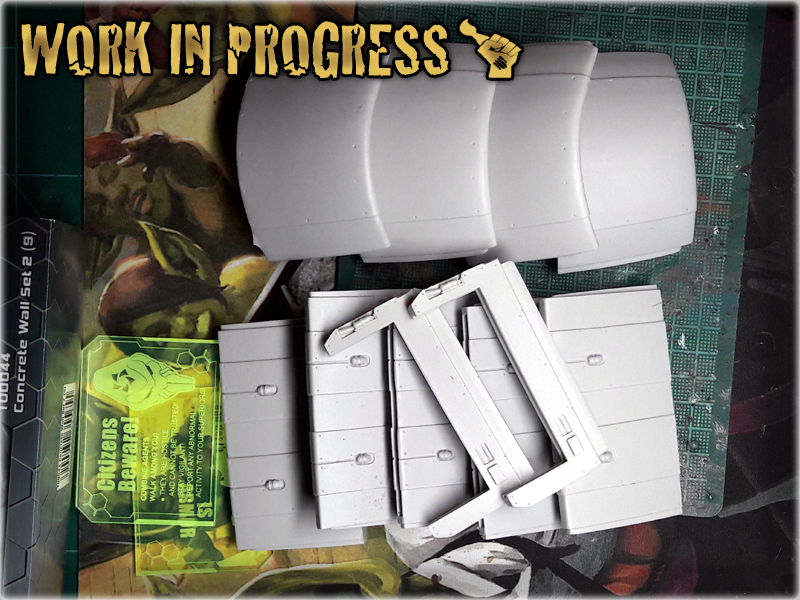
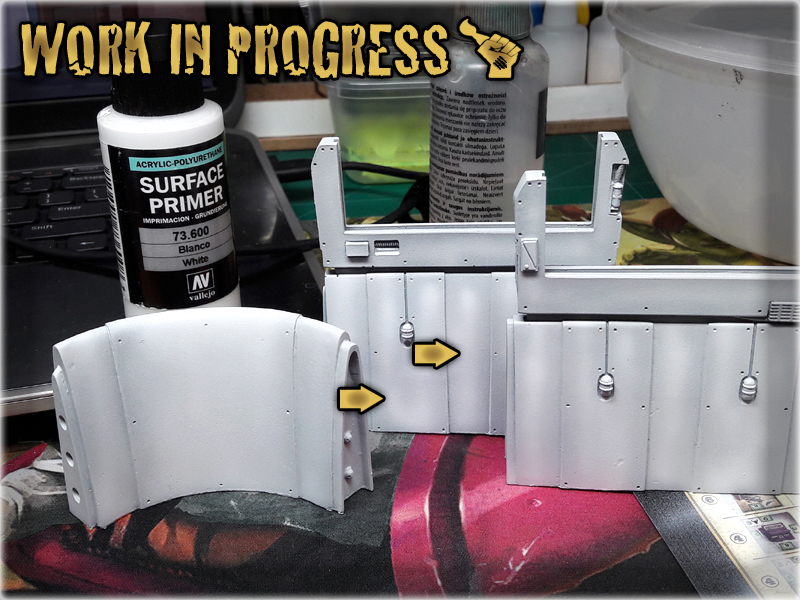
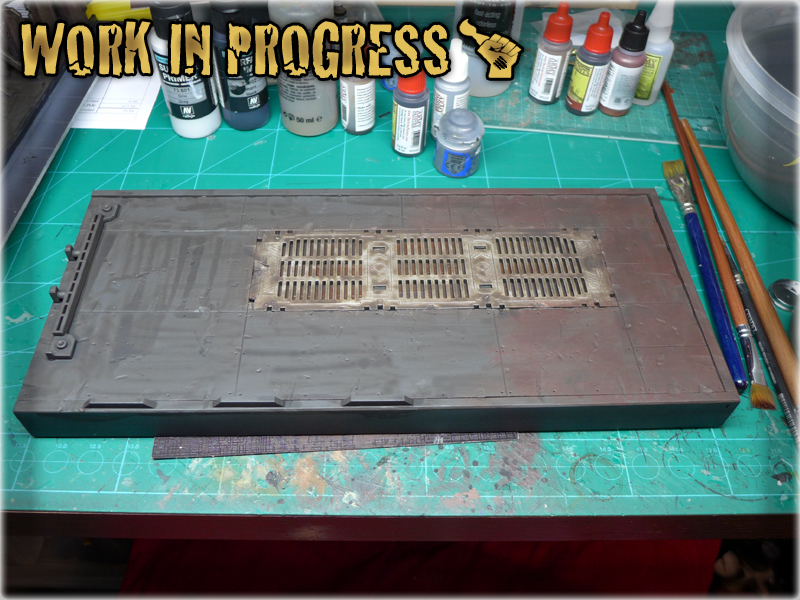
1 After unpacking the set I have cleared any extent of resin and prepared each piece for the undercoat.
I used THIS METHOD
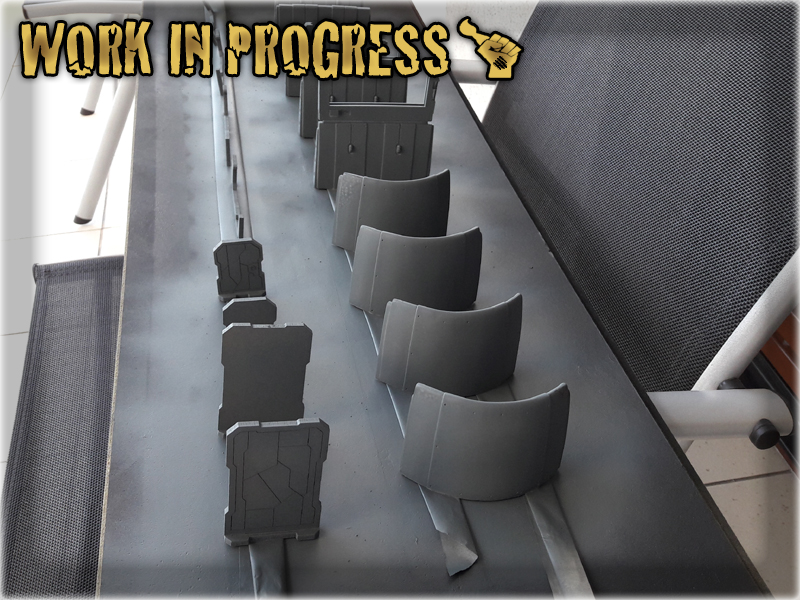
2 I have covered entire set with Games Workshop's Mechanicus Standard Grey primer. Usually I use Black Undercoat first, but in this case the surface was smooth and I knew it will work well with a Grey undercoat. Do not feel obliged to use the exact same primer - you can easily use Vallejo Grey Surface Primer instead and Airbrush it over the surface. I used spray just to save some time.
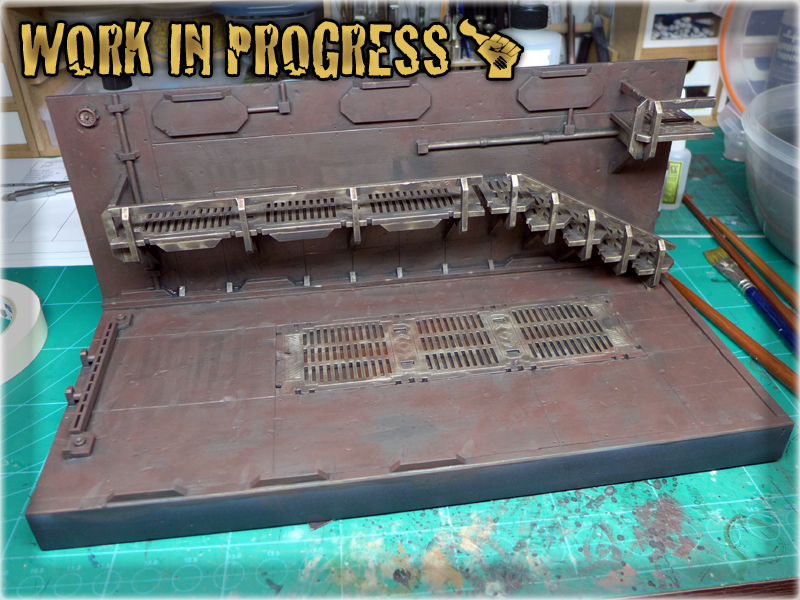
3 I gently arbrushed Vallejo White Surface Primer over the set. First I tried to cover entire surface from afar (15cm distance, constant flow, see pic - dark spots), then I outlined center of each flat surface with additional layers (5cm distance, soft puffs of paint, see pic - light spots). This resulted in the surfaces gaining some extra shadows.

4 I used airbrush to apply Vallejo Light Brown onto the lower parts of each Wall piece. I mixed a bit of Airbrush Flow Improver to build up a nice transition from brown to white. The key is to paint in smooth lines, then go backwards building up colour. Too much paint in the same spot will result in paint spilling all around and ruining the paint job.
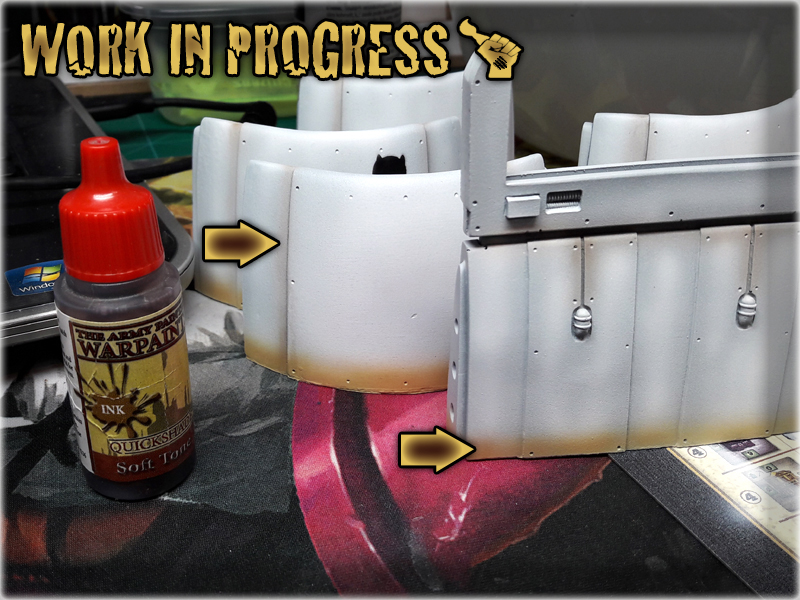
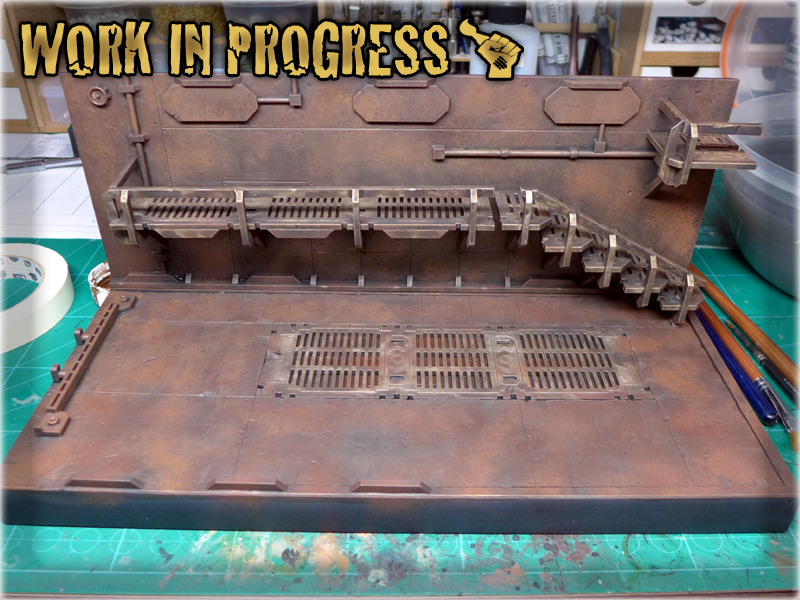
5 Then I moved to Army Painter's Soft Tone Ink and airbrushed it over Light Brown, with an addition of single strokes over the recesses of four oval Wall pieces. I was careful not to apply too much paint as in this particular case I wanted to build up a nice hume of colour, instead of 'washing' the surface with it.
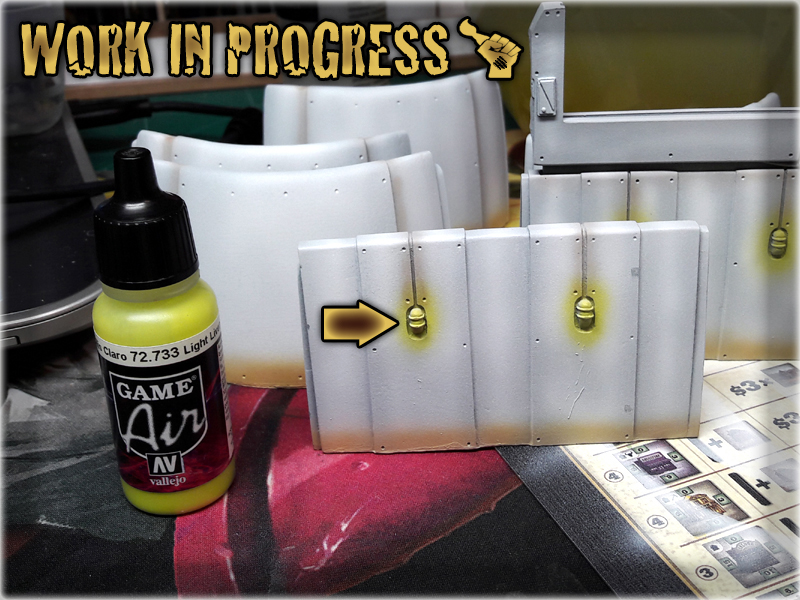
6 Then I applied a thin layer of Vallejo Light Livery Green over and around each lamp. A lot of small puffs of paint helped me to keep the base shape of light around the lamps. Even if one or two puffs went too far, they were so delicate as to remain unseen once the majority of colour was applied.
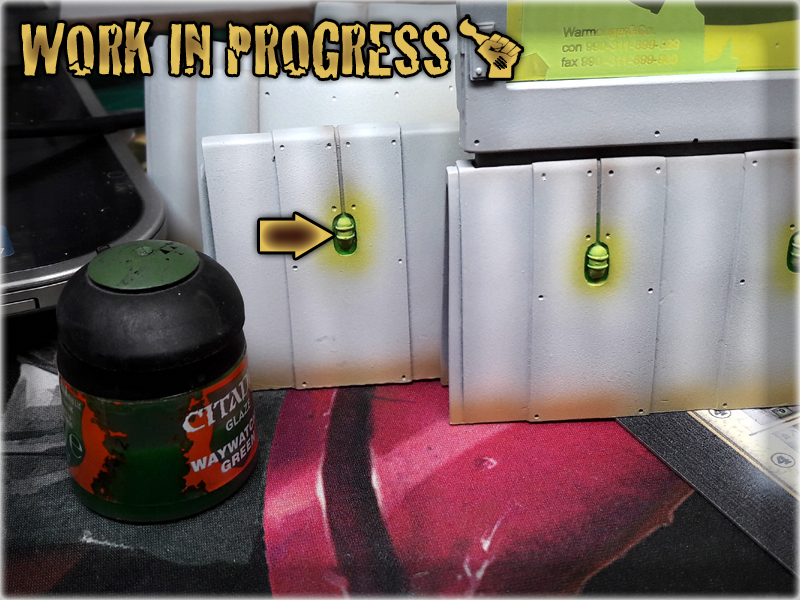
7 To strenghten the colour I used a small brush and applied Games Workshop's Waywacher Green onto the lamps. I tried not to exeed the boundries of their slots and in case I did - I used a small piece of paper towel to clear the paint out.
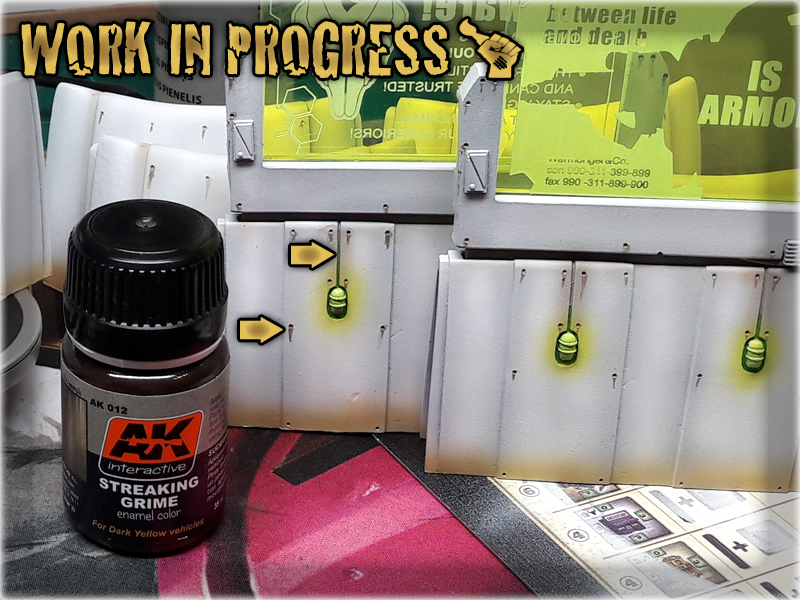
8 Finally I applied AK Interactive Streaking Grime. Using a small brush I poured this weathering effect paint into holes, then smeared it dow with a tip of the brush. The more irregular it went, the better to the overall visual effect.
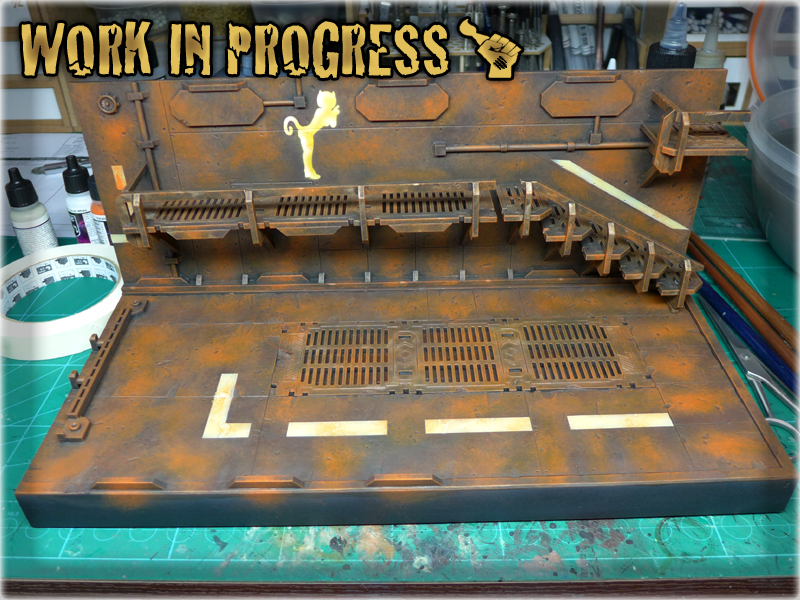
In the end I used a template provided by Reycast to airbrush a small Nomad prank onto the wall, with a Vallejo Black Paint. What’s left now is to purchase Micro Art Studio’s S-F Graffiti Transfers and job will be done.
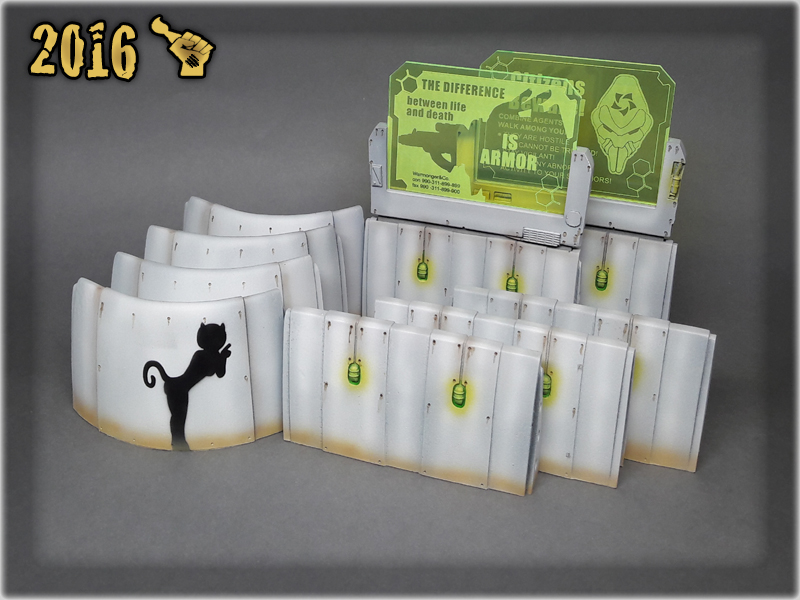
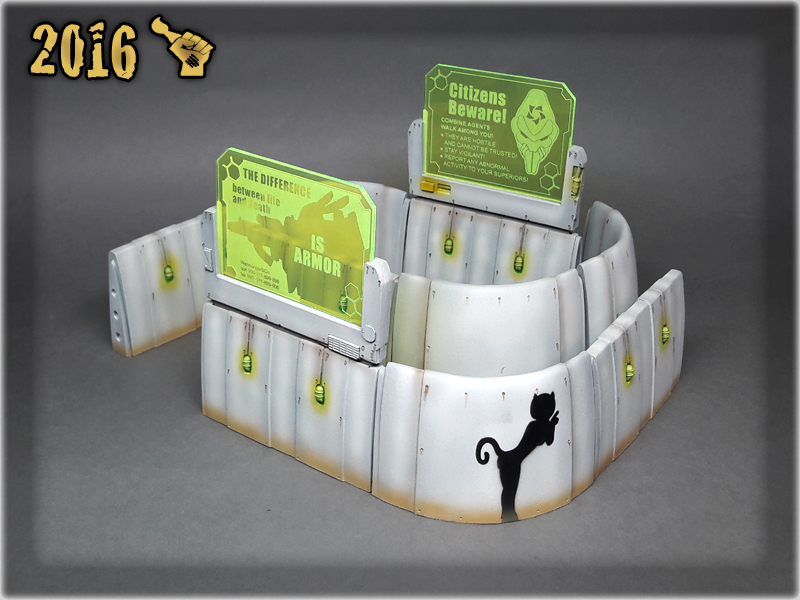
Here is a result of my paint job:

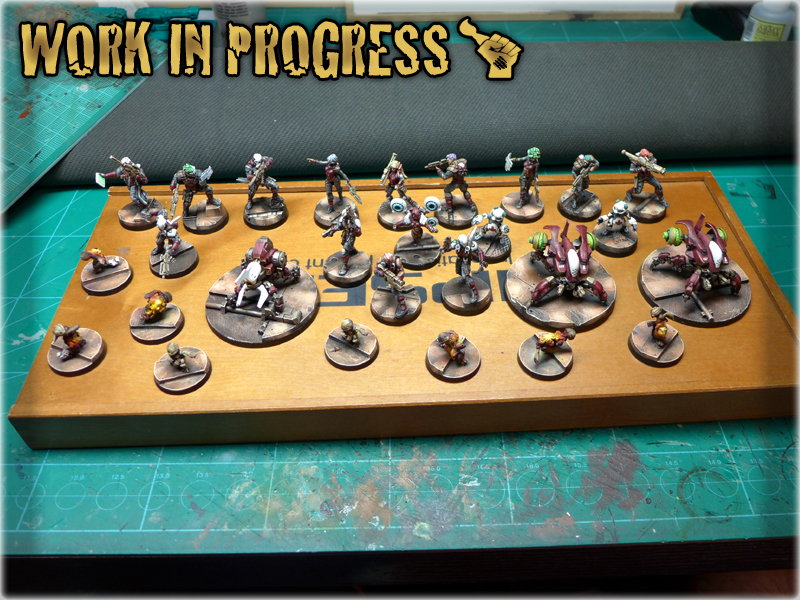
Foreboding my previous lifestyle in favor of painting for hire was the best decission in my entire life. Not only that I have a lot of fun in my ‘job’ but also plenty of time for my own projects. For those who knew me before scarhandpainting.com the number of Special Projects appearing lately might be quite a surprise. I myself am taken aback by the sheer numbers of personal projects I can work on. Below is a visual step-by-step of just such a project.
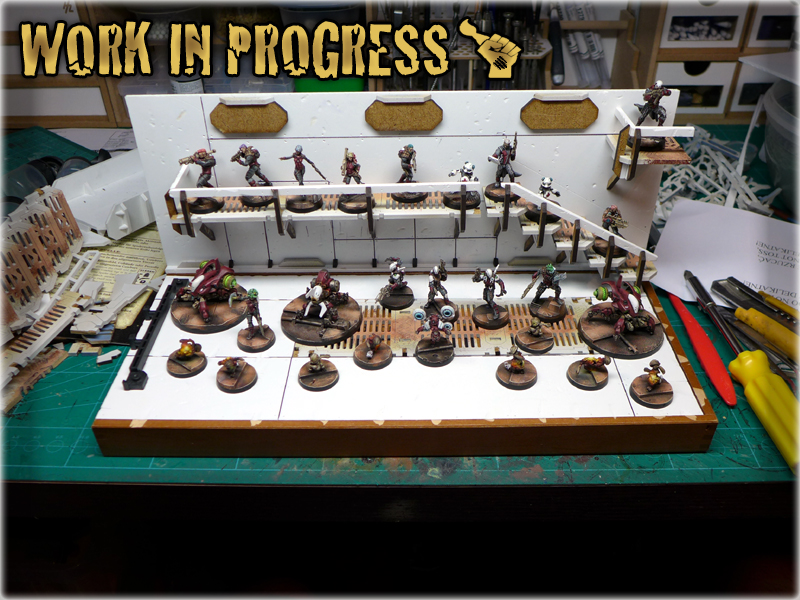
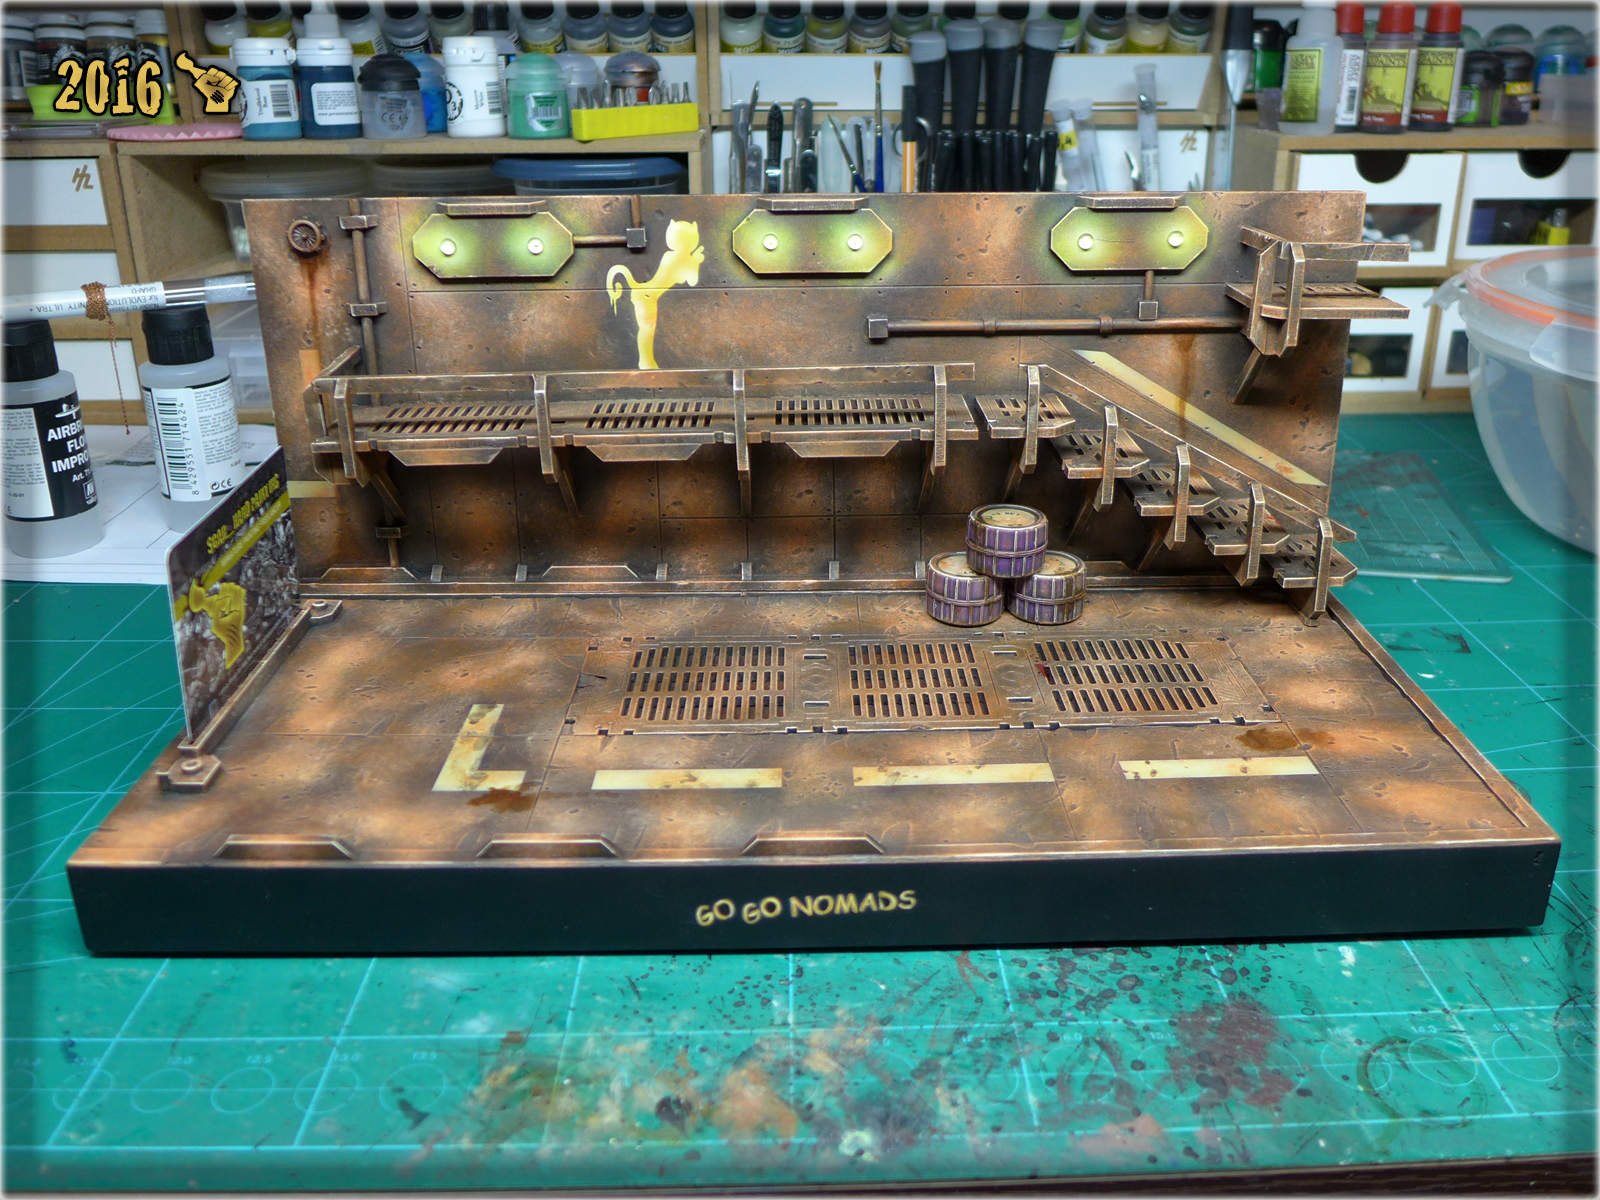
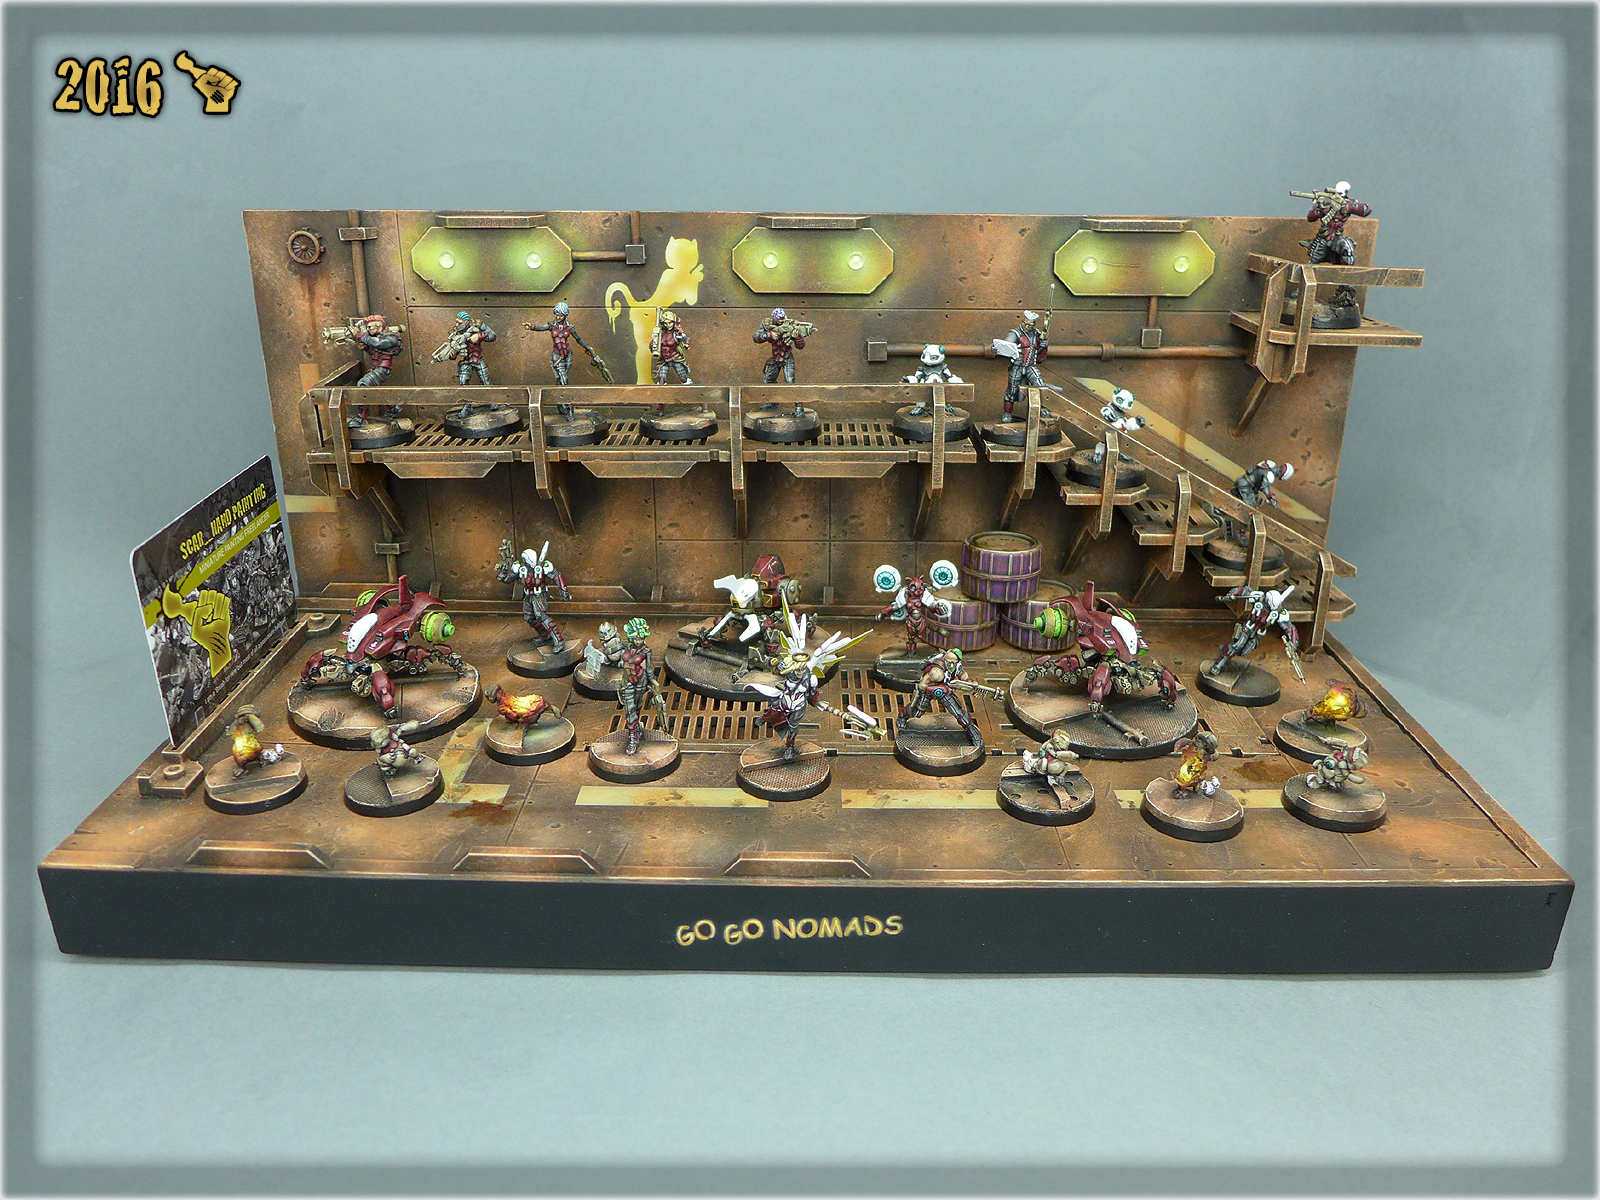
A big Infinity Event is closing in. ‘Polish Championships’ will take place tomorrow and I’ve trained my Corregiror army and dice rolling hard in preparation. Along with the usual mano-a-mano combat, a Painting Contest will also take place at the event. Each player is eligible to select one of his army rosters and present the miniatures for everyone to see and vote. I thought long and hard to think of anything that could deliver my miniatures to the podium. I know very well that there’s plenty of awesome painters among the Infinity community in Poland and that competition will be very strong. My miniatures look nice but not awesome enought to compete with paint jobs that literally blow my mind. I’ve figured something special – a Nomad-like trick to fight for the attention of voters. A special display diorama to compliment my army’s visuals as a nice background, built and painted in the same theme as the bases of my Corregidor army.
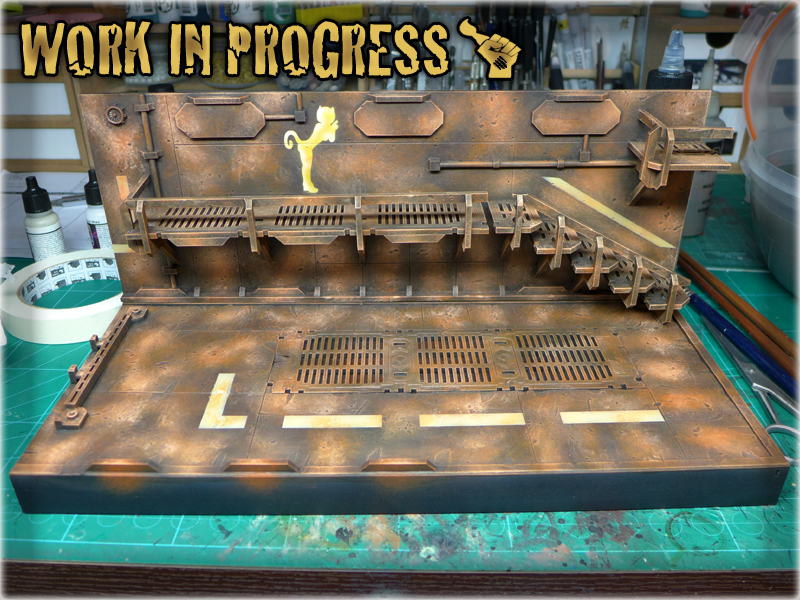
For this purpose I found a suitable wooden crate to be used as the base for entire diorama. I’ve also set up a makeshift display of miniatures to see if the base is large enought to accomodate them.
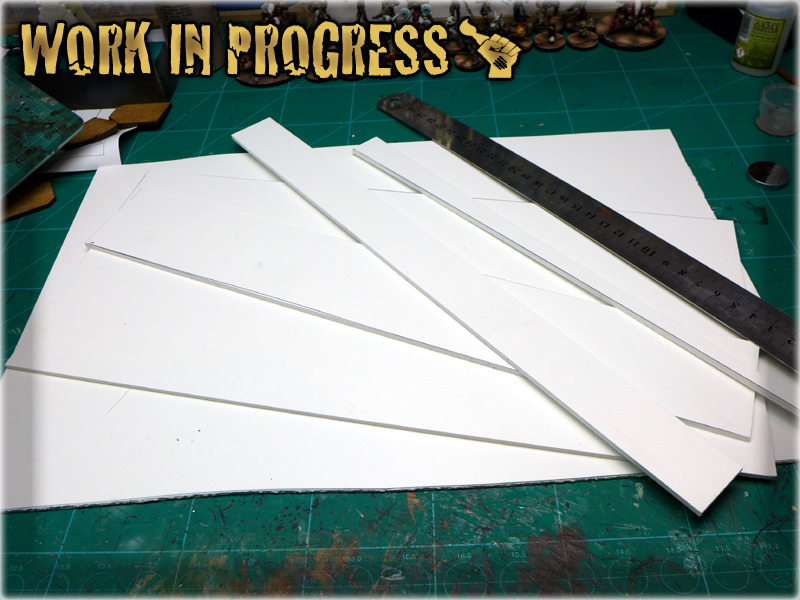
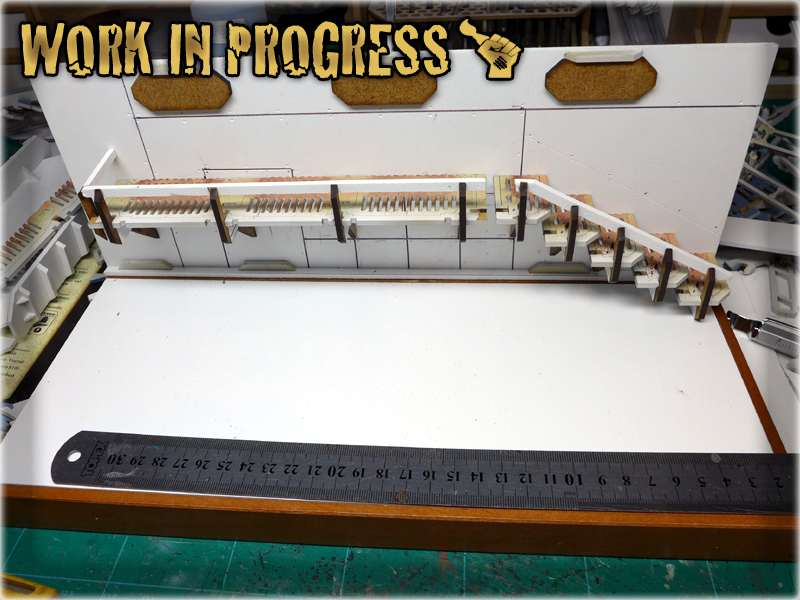
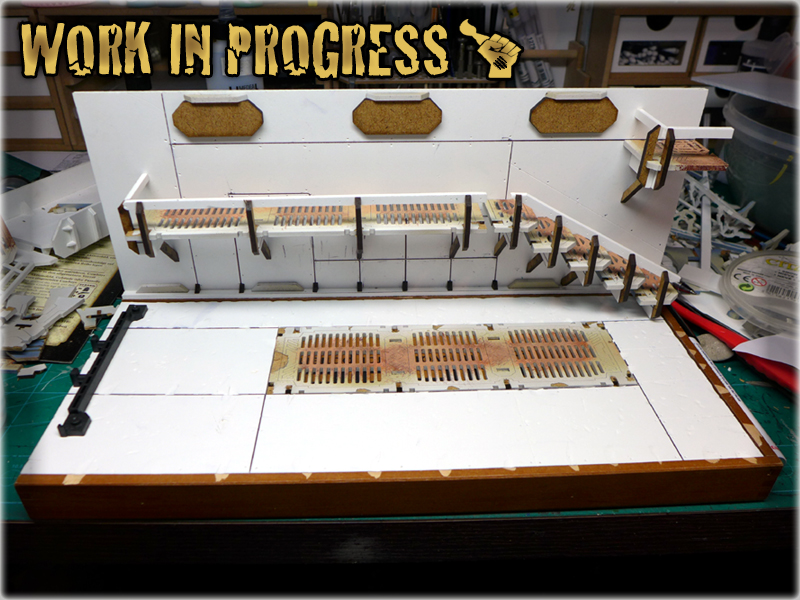
The wooden crate passed this test so I’ve gathered 3mm PCV and some HDF leftovers. The entire layout of the diorama was taking life in my mind’s eye as I started to work on it. I’ve used the wooden crate as a template to cut a floor and a wall for the diorama. After that an idea to build a small balcony with stairs and a sniper point came to my mind. I quickly dig through any materials and pieces that might be used for that and found my good old Micro Art Studio’s walkways set. The set had some sweet looking pieces that I implemented into this project.
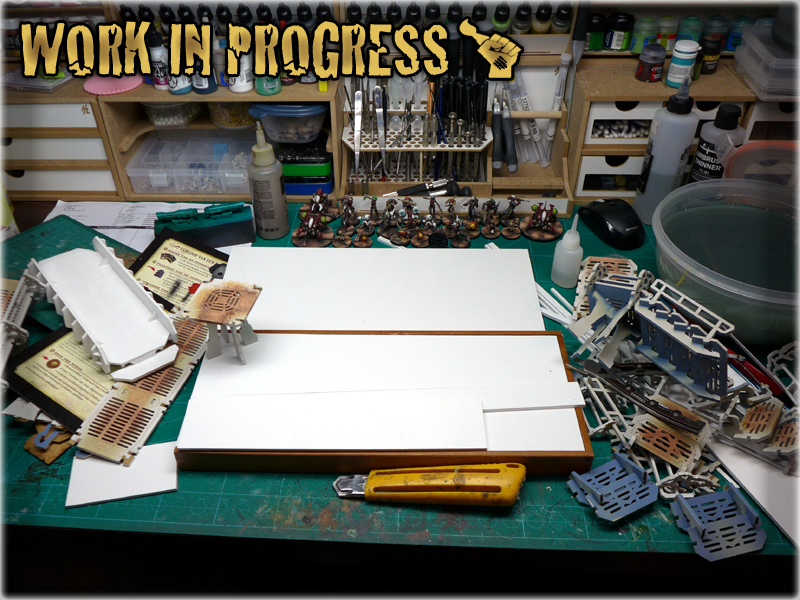
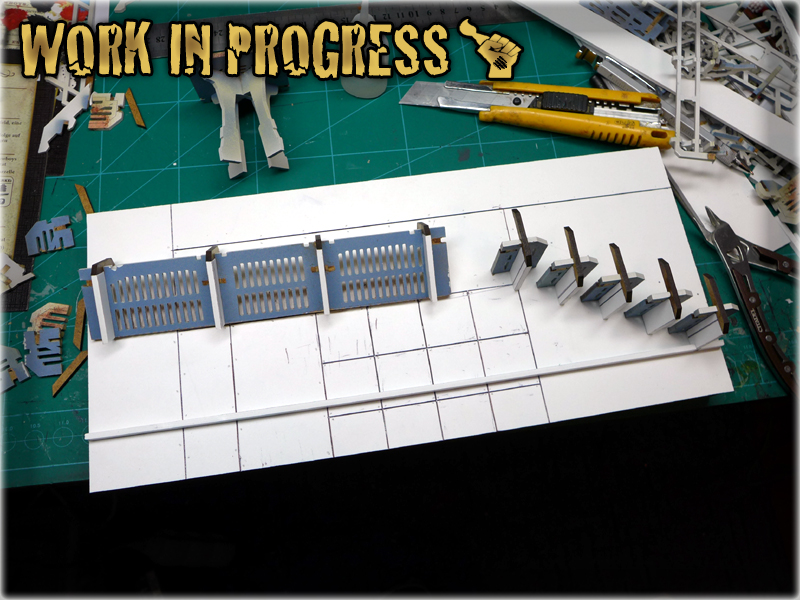
Using a ruler and a pen I drawn some makeshift panels and bolt holes on the ‘wall’ and prepared space for MDF pieces to be put into. I also shortened the MAS’s stairs and added elements of my own to make them look more industrial. Floor followed in a quick succession with the center being switched for a big MAS’s MDF panel. I also moundet the ‘wall’ using three screws. Initially I wanted to use magnets to keep the thing removable, but in the end I wanted for my miniatures to be safe. After that I’ve mounted three wall panels to be used as a base for glow globes. I also made some dents, marks and holes in the concrete panels of both wall and floor. Once I was done I’ve made a last check of display. Just before undercoating I had an idea to add some pipes and a vent along the walls to build even more industrial theme of the diorama. I used lollipop sticks and some leftovers to do that and proceeded to the undercoat.

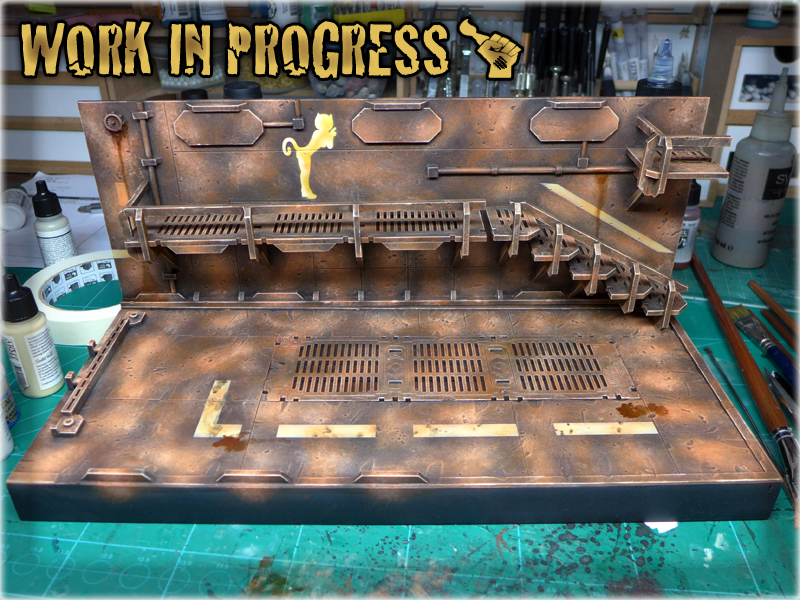
Once it was dry I have covered the entire thing in two strong layers of Eshin Gray, then painted up all metal elements with a Tin Bitz, Boltgun Metal, Mithrill Silver layers and then washed entire thing with Devlan Mud two times. I slowly applied layer after layer starting with Scorched Brown, then following with Calthan Brown, Ryza Rust, Lugganath Orange and lastly Flayed One Flesh. This is the same colour scheme as the one used for my Concrete Bases. Actually both metal and concrete were painted the same way as in these tutorials:
TUTORIAL: CONCRETE BASES part 2: Painting
TUTORIAL: PAINTING ‘FIVE LAYERS’ METAL
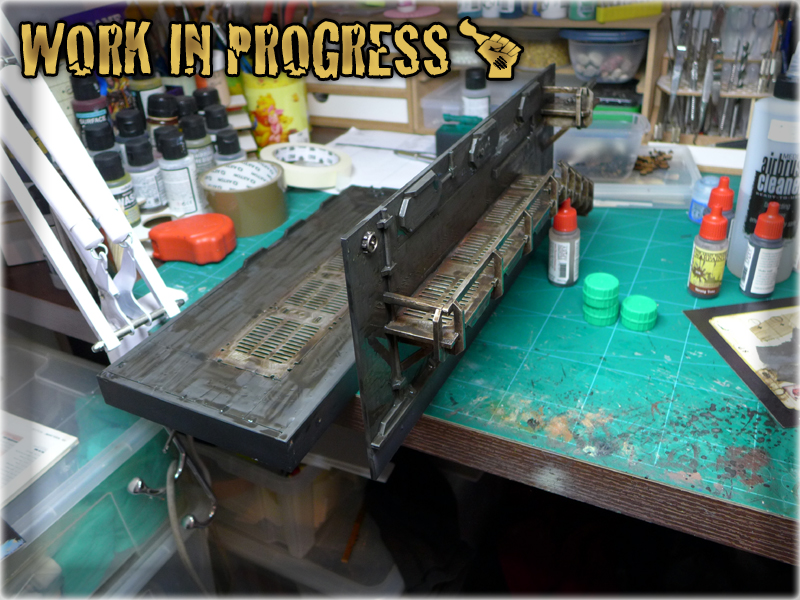
Starting with Calthan Ryza Rust I’ve covered metal elements along with concrete panels, but before that I’ve made a short pause to airbrushed white-creeme lines and a Nomad graffitti. Ryza Rust, Lugganath Orange and Flayed One Flesh went over the lines to create an impression of them being damaged and eroded along with the concrete panels. Once Flayed One Flesh layer was done I lined/edged all the angles using the exact same piant. I also added grease/Rust streaks and oil stains here and there to bring the diorama closer to a life scene.

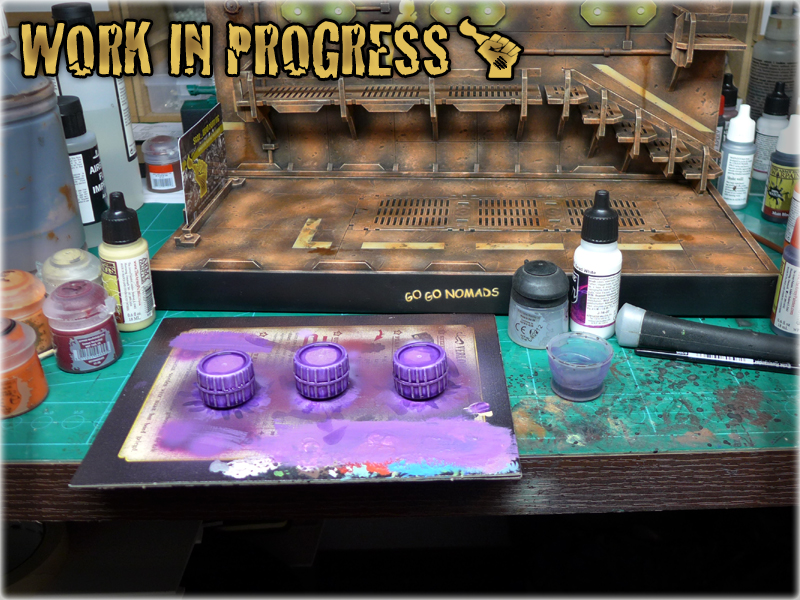
In the end I had to add a name, so I used a template created for me by Reycast Miniatures and airbrushed another graffitti onto the now black edges. Simple OSL was airbrushed and I mounted glow globes in the center points of each light. I also added three purple barrels to compensate glow globe’s green in preparation for red miniatures.
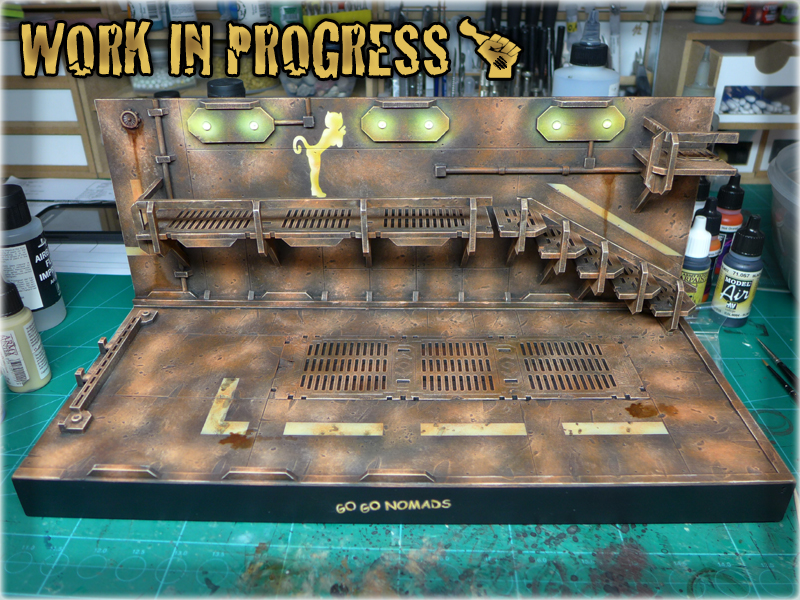
The final piece exceeded my expectations. Even my Girlfriend said it looks cool – and that’s rare! Damn – I count on this one to help me climb the ladder in the contest. If not – well, at least I have a fine piece to set up behind glass along with some less used Nomad Miniatures XD


27.6.2016: I actually won the painting contest XD Ultra happy about the fact! Here’s the entry:
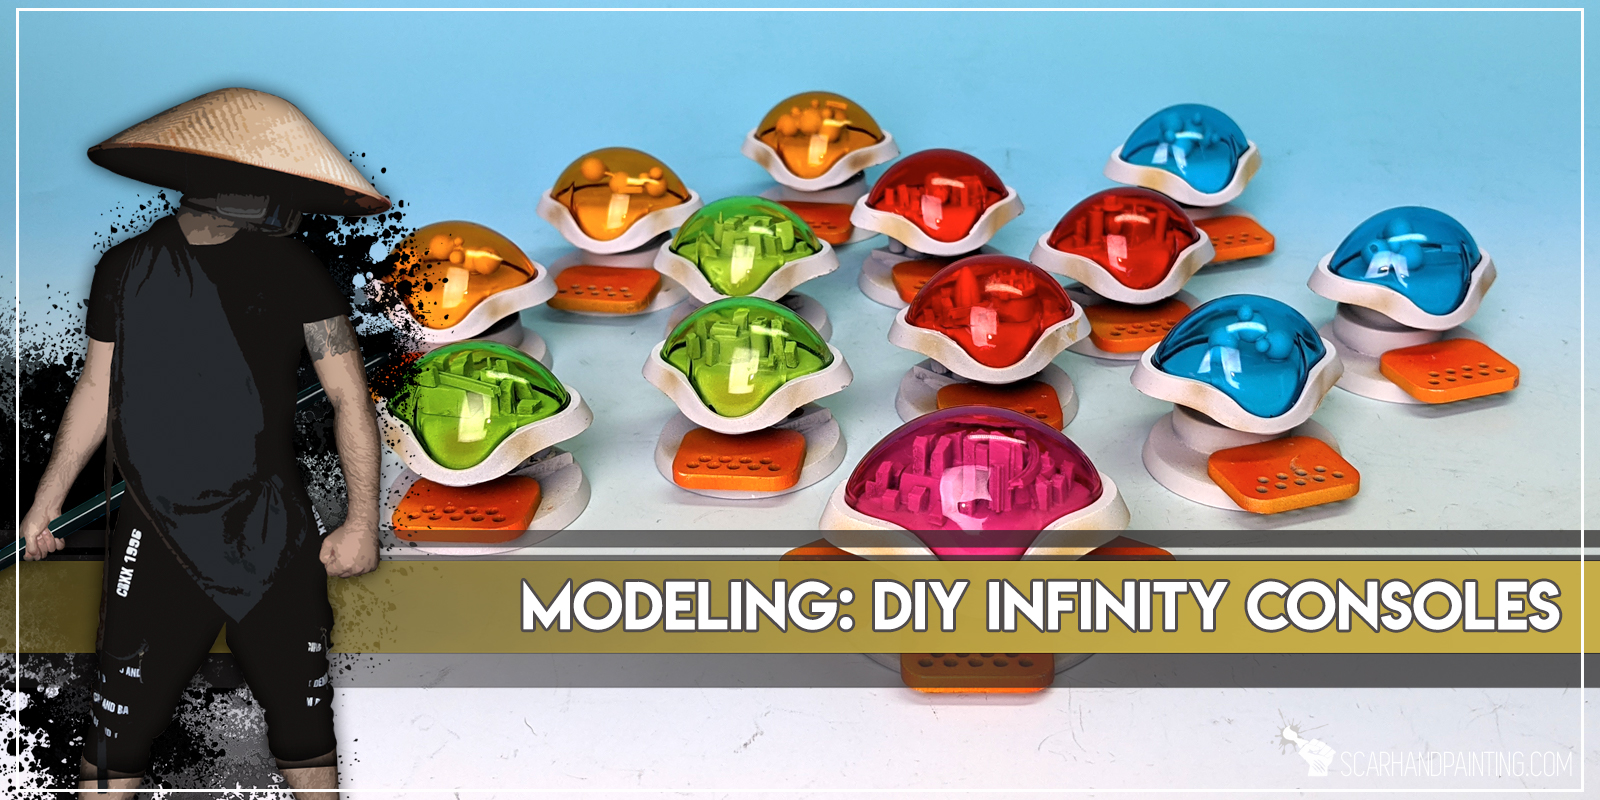
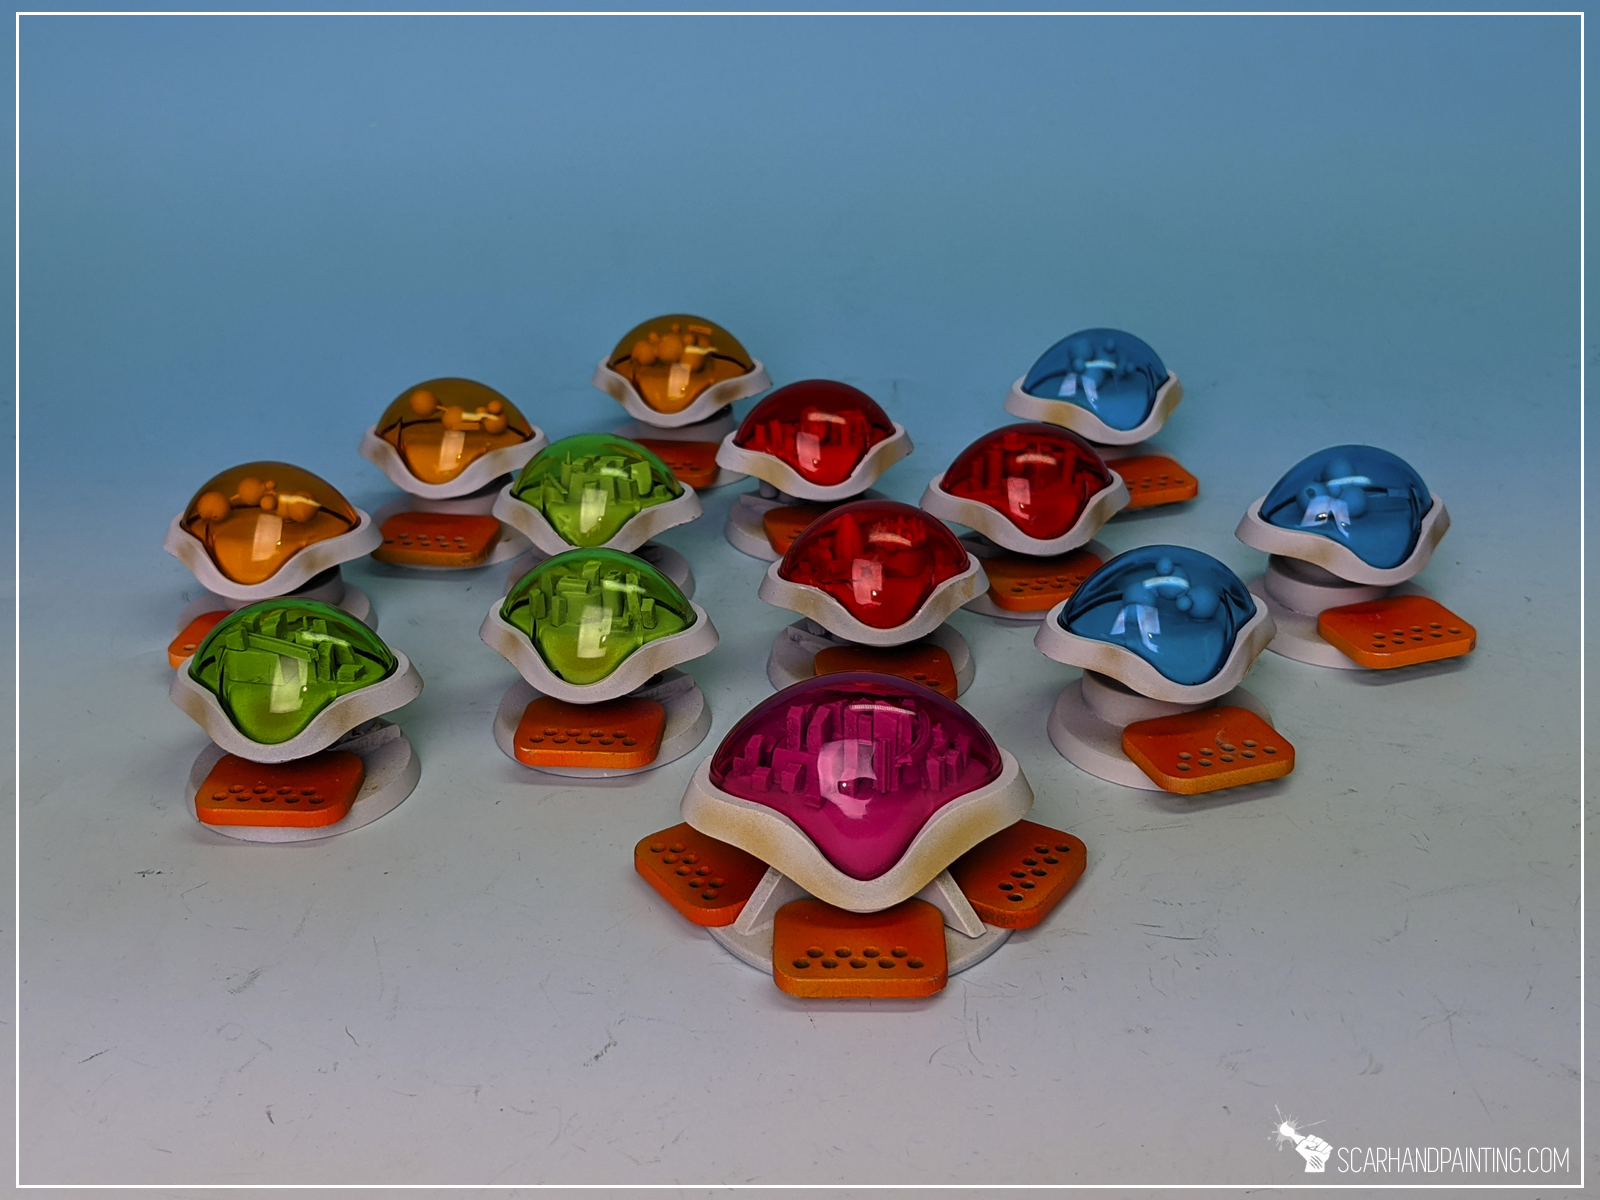
Welcome to Modelling Infinity Console tutorial, a short Step-by-step trip through a process of creating Consoles perfect for objective markers in Infinity the Game and other Sci-fi wargames.
You may consider this article to be an extension of “Tutorial: Infinity ‘Do It Yourself’ Gaming Terrain”, in which I tried to inspire you to hunt for some awesome everyday items. Pieces of what might be considered garbage, and yet an awesome source of unlimited potential, when it comes to scenery making.
Before we start, some notes:

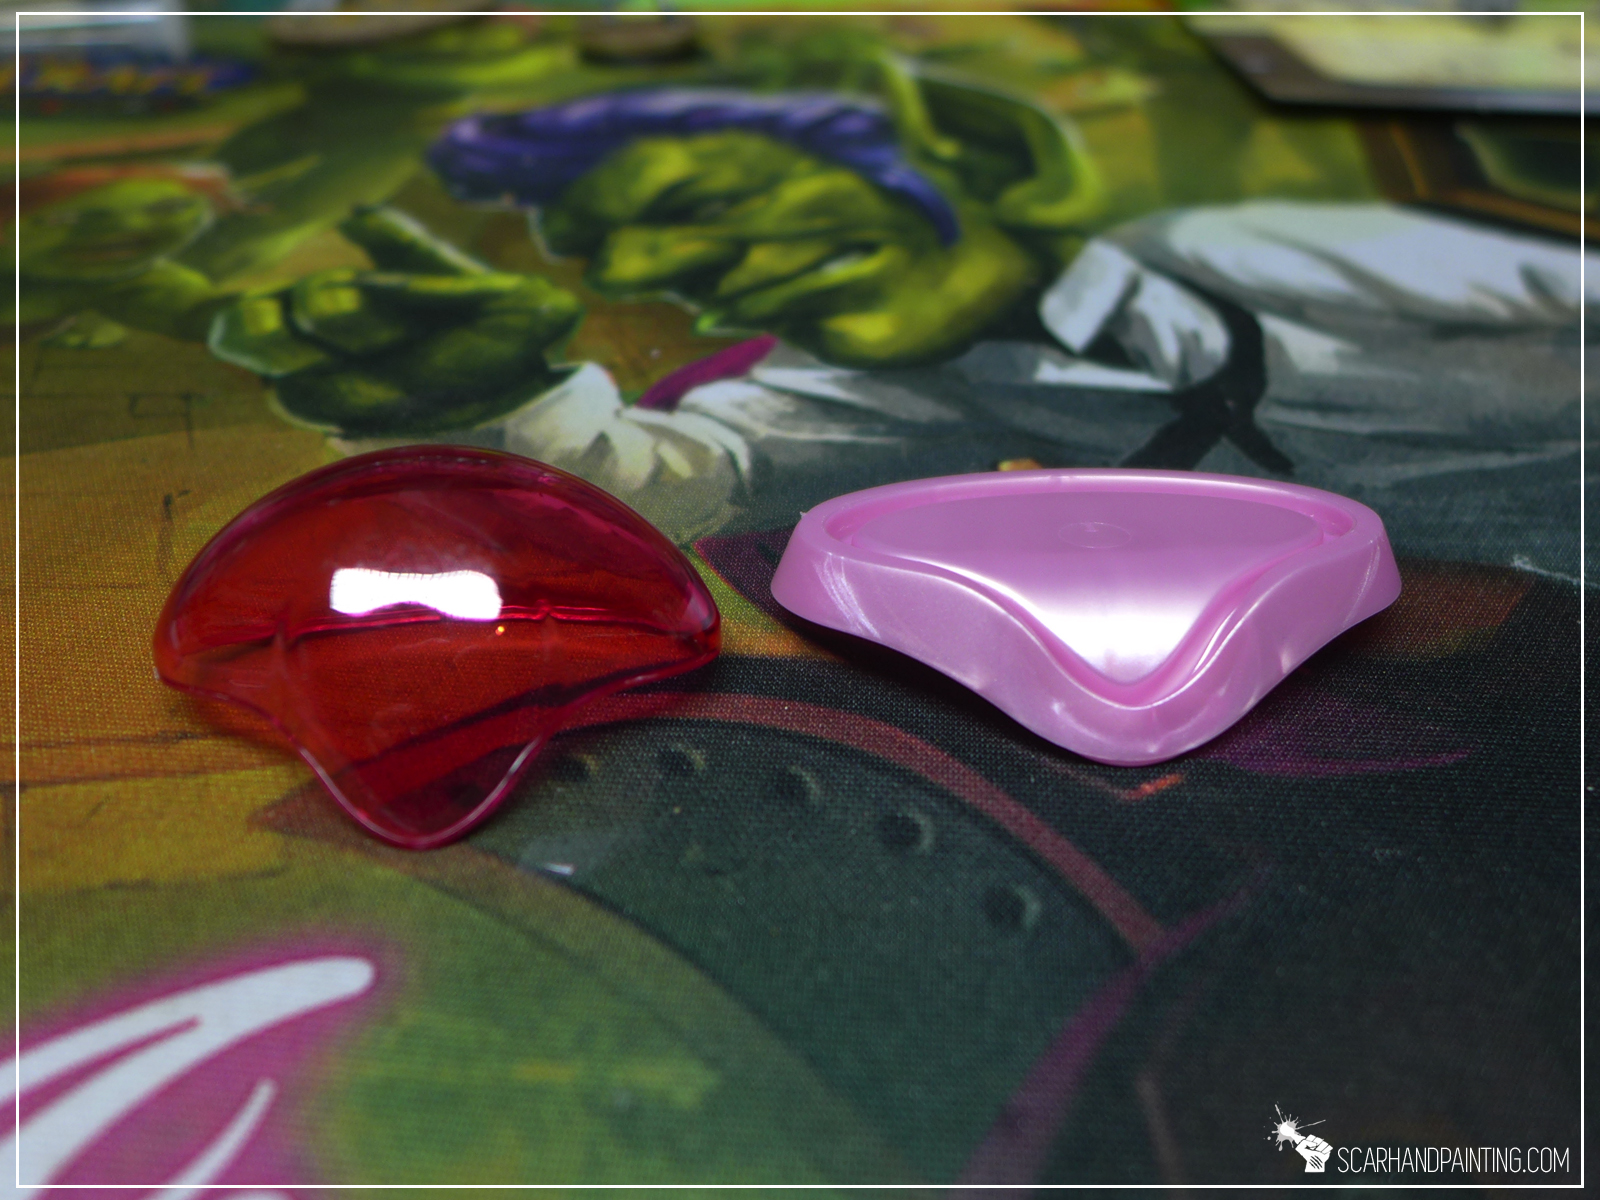
The story behind the idea is rather trivial. Years back I was taking a shower, saw my wife’s shower gel bottle and was instantly struck by a surge of inspiration. Colored, clear top element was just too cool to pass by. Transformation from a shower gel plug to a tiny console came natural. Just see for yourself.

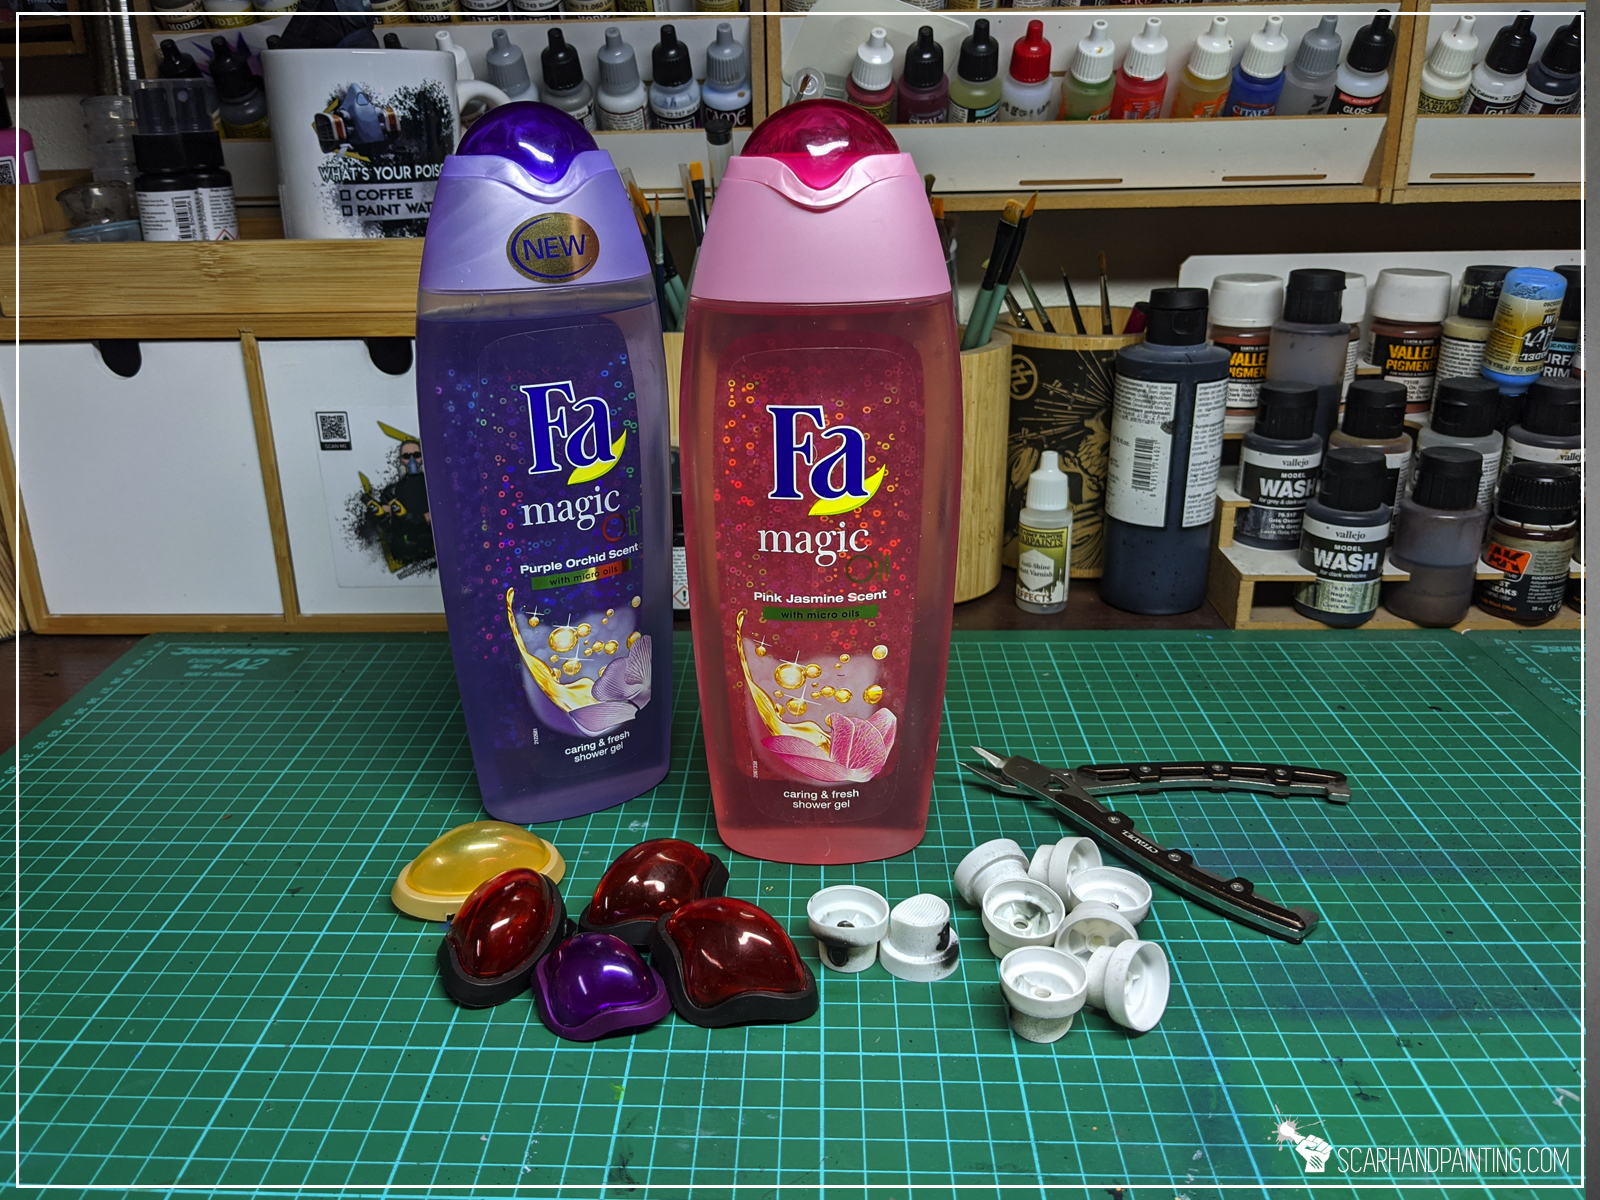
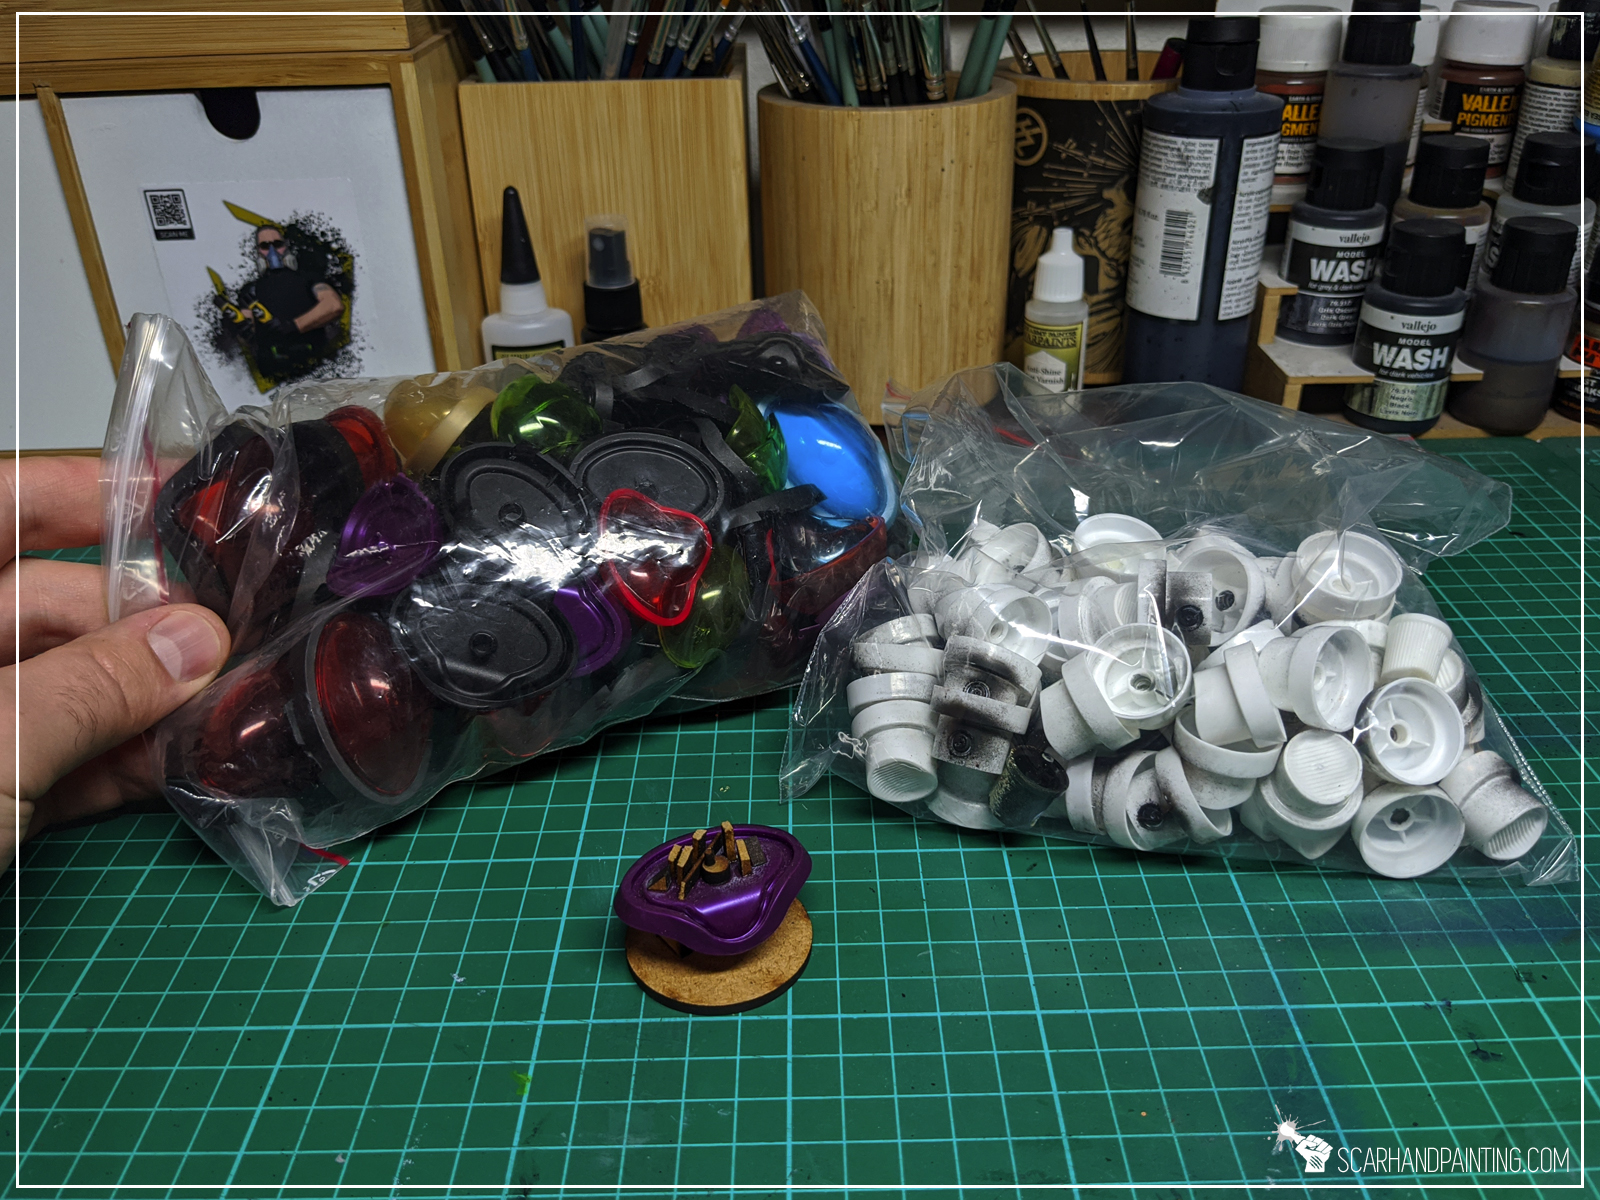
I used:

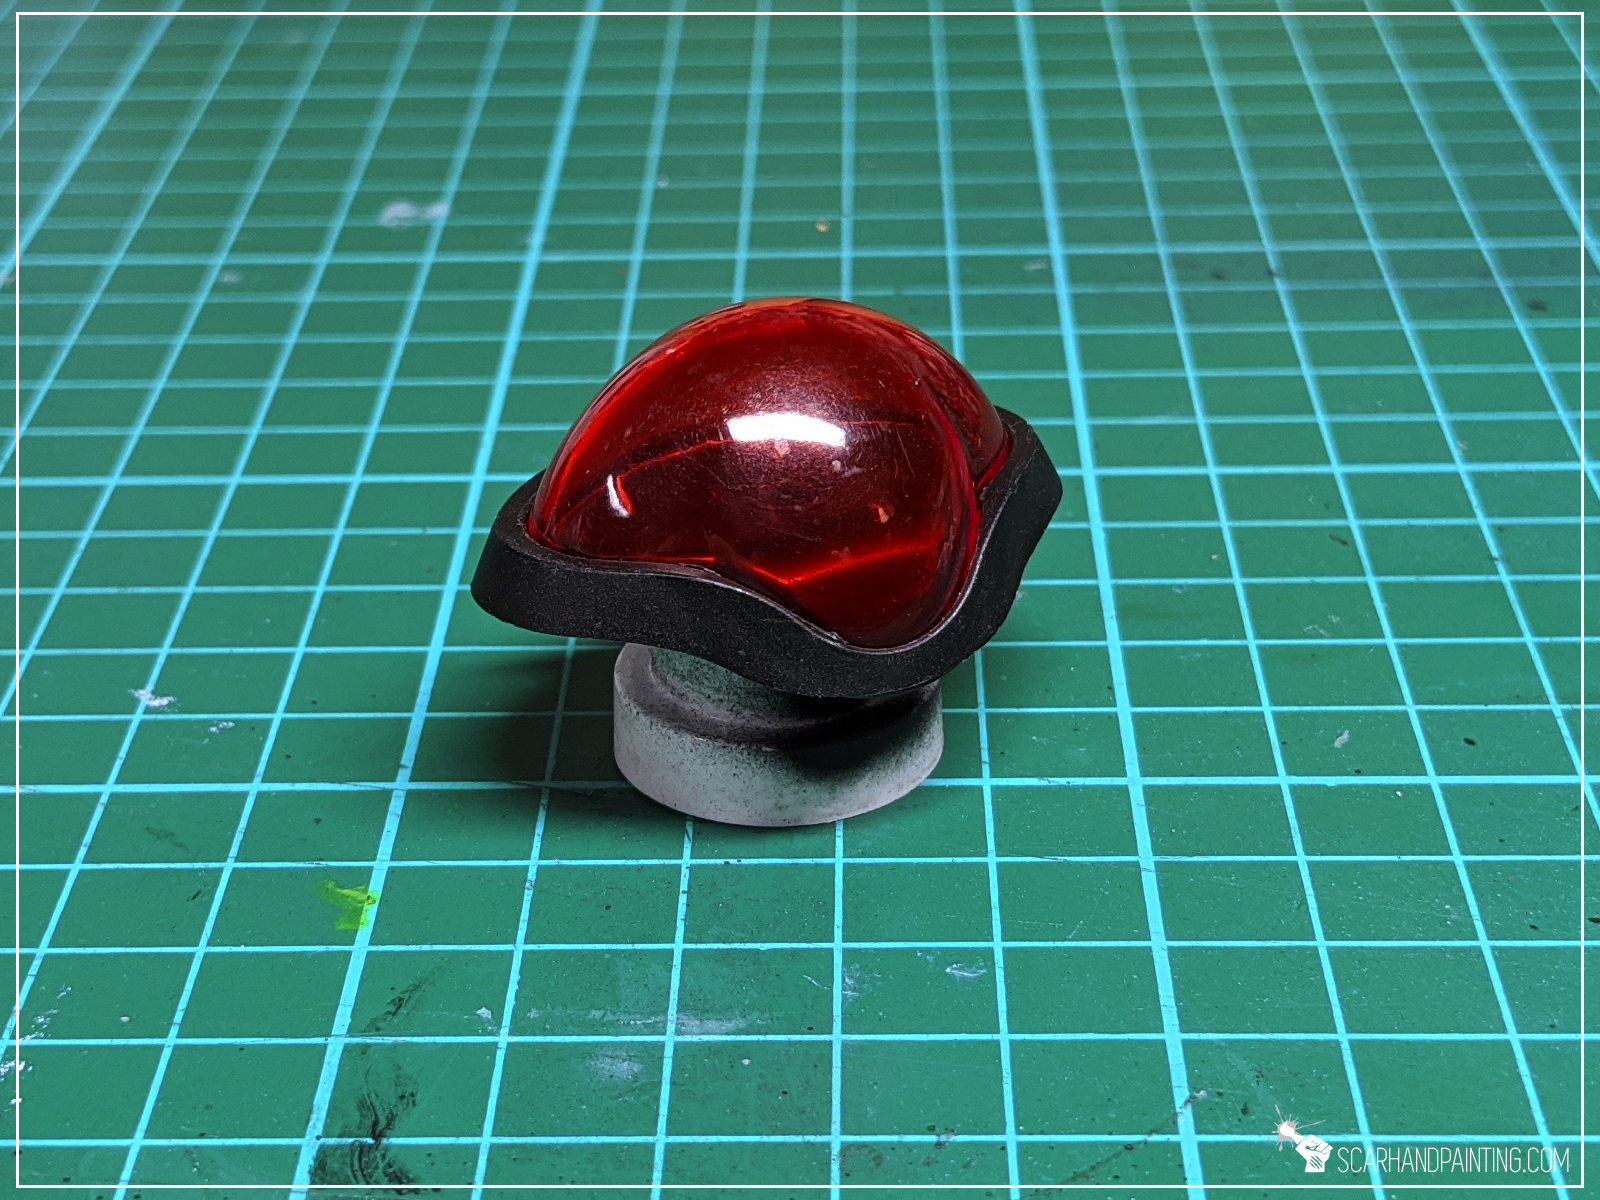
Step one: Main Body
I started by cutting off the plug and pulling out the acrylic part. I then used a hobby knife to thin down the bottom of the acrylic part so that it went in and out smoothly.
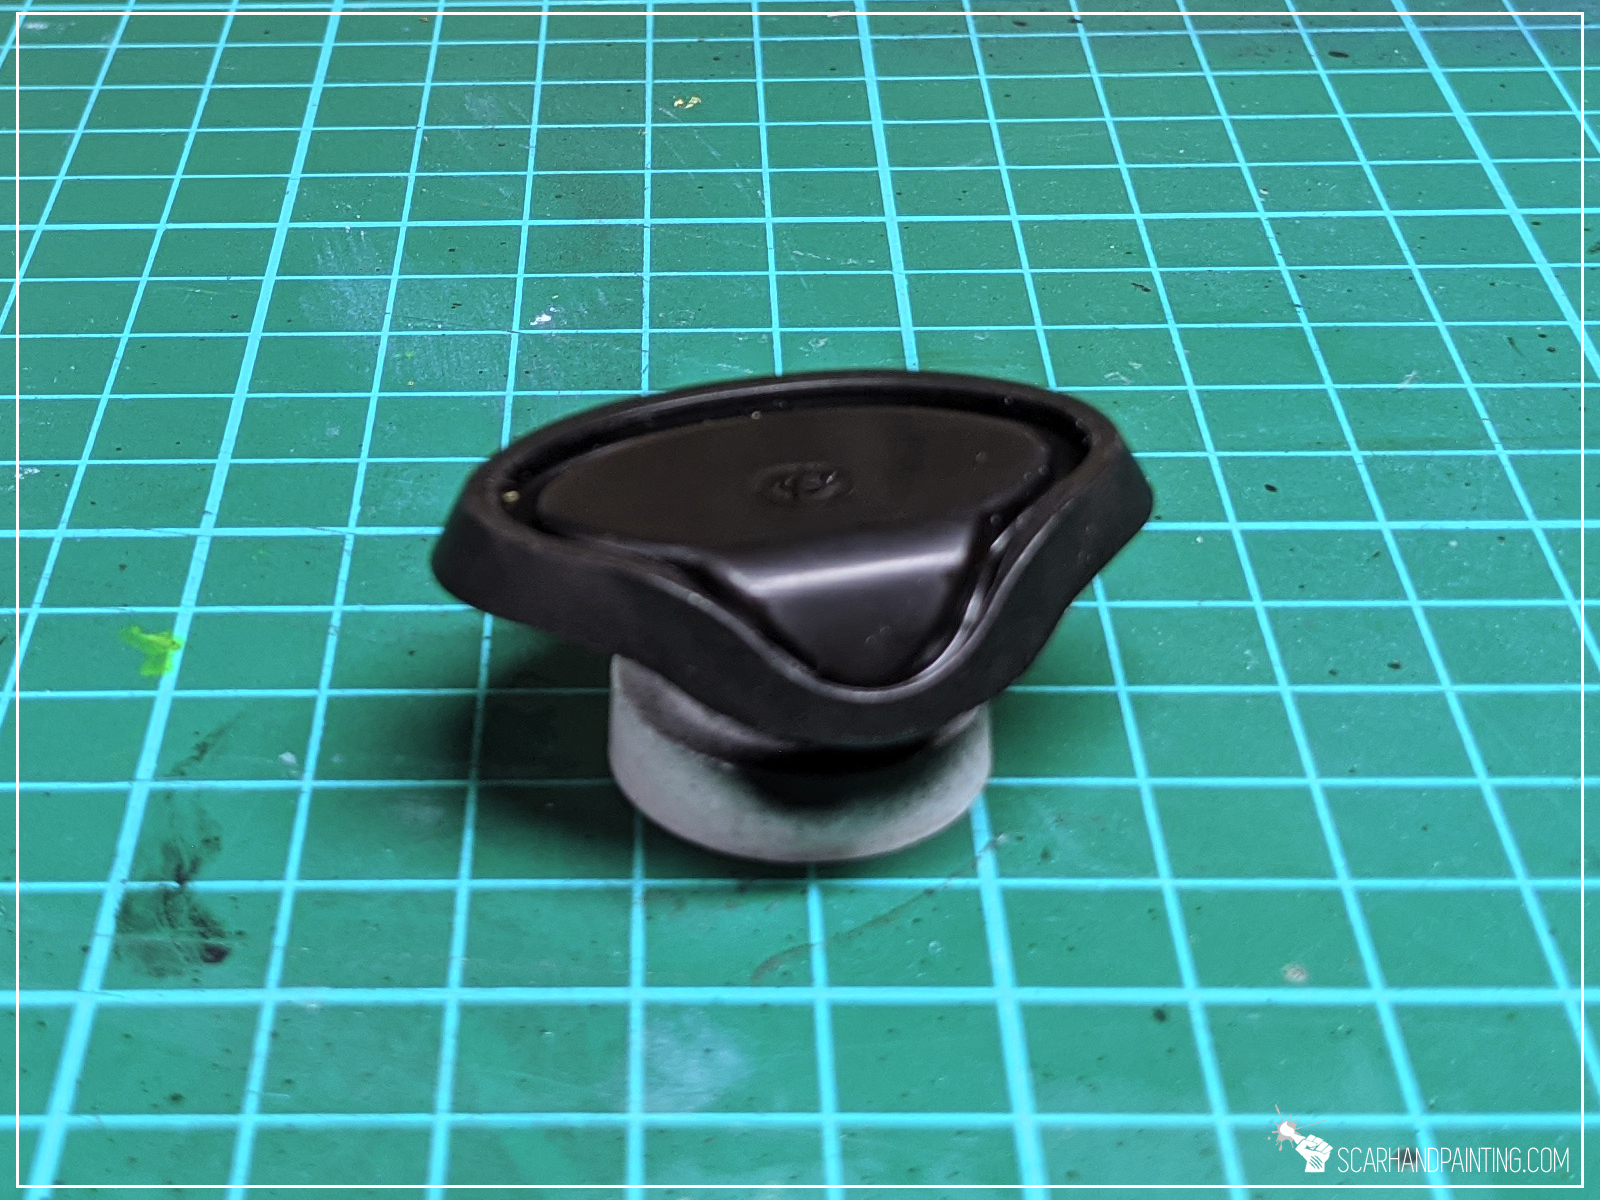
Step two: Support
Back in the days I cut 3mm thick PCV and created four legs for the console. On the next attempt, being more experienced, I used an old Spray nozzle. Since then I tested a lot of random stuff, but given a choice I prefer the nozzle above anything else. One man’s trash is another man’s awesome Console support!

Step three: Detail
Thin pieces of PCV, lollipop sticks, Airsoft Gun ceramic balls, plastic miniatures bitz – anything will do for an awesome filler. The idea behind the console is a 3d hologram of a city space, or and enhanced molecule view. Whatever is put inside and sprayed white will look great. I leave this to your imagination.
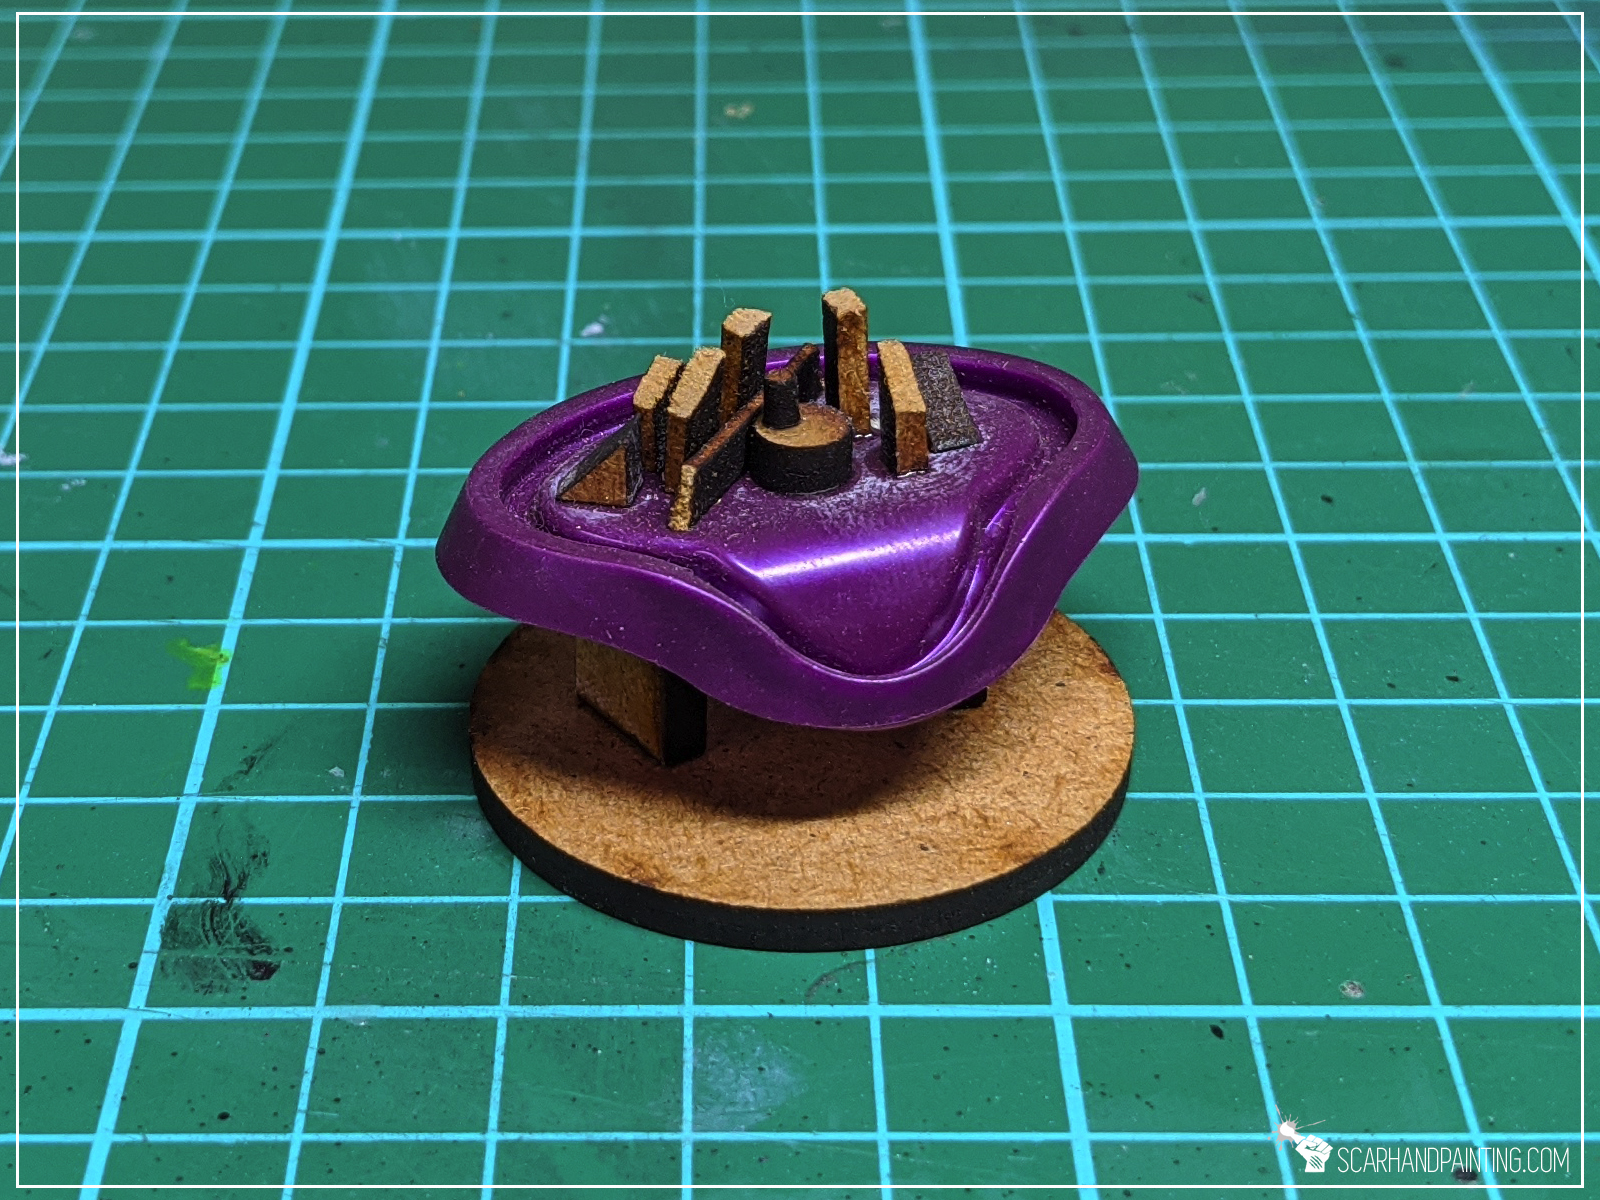

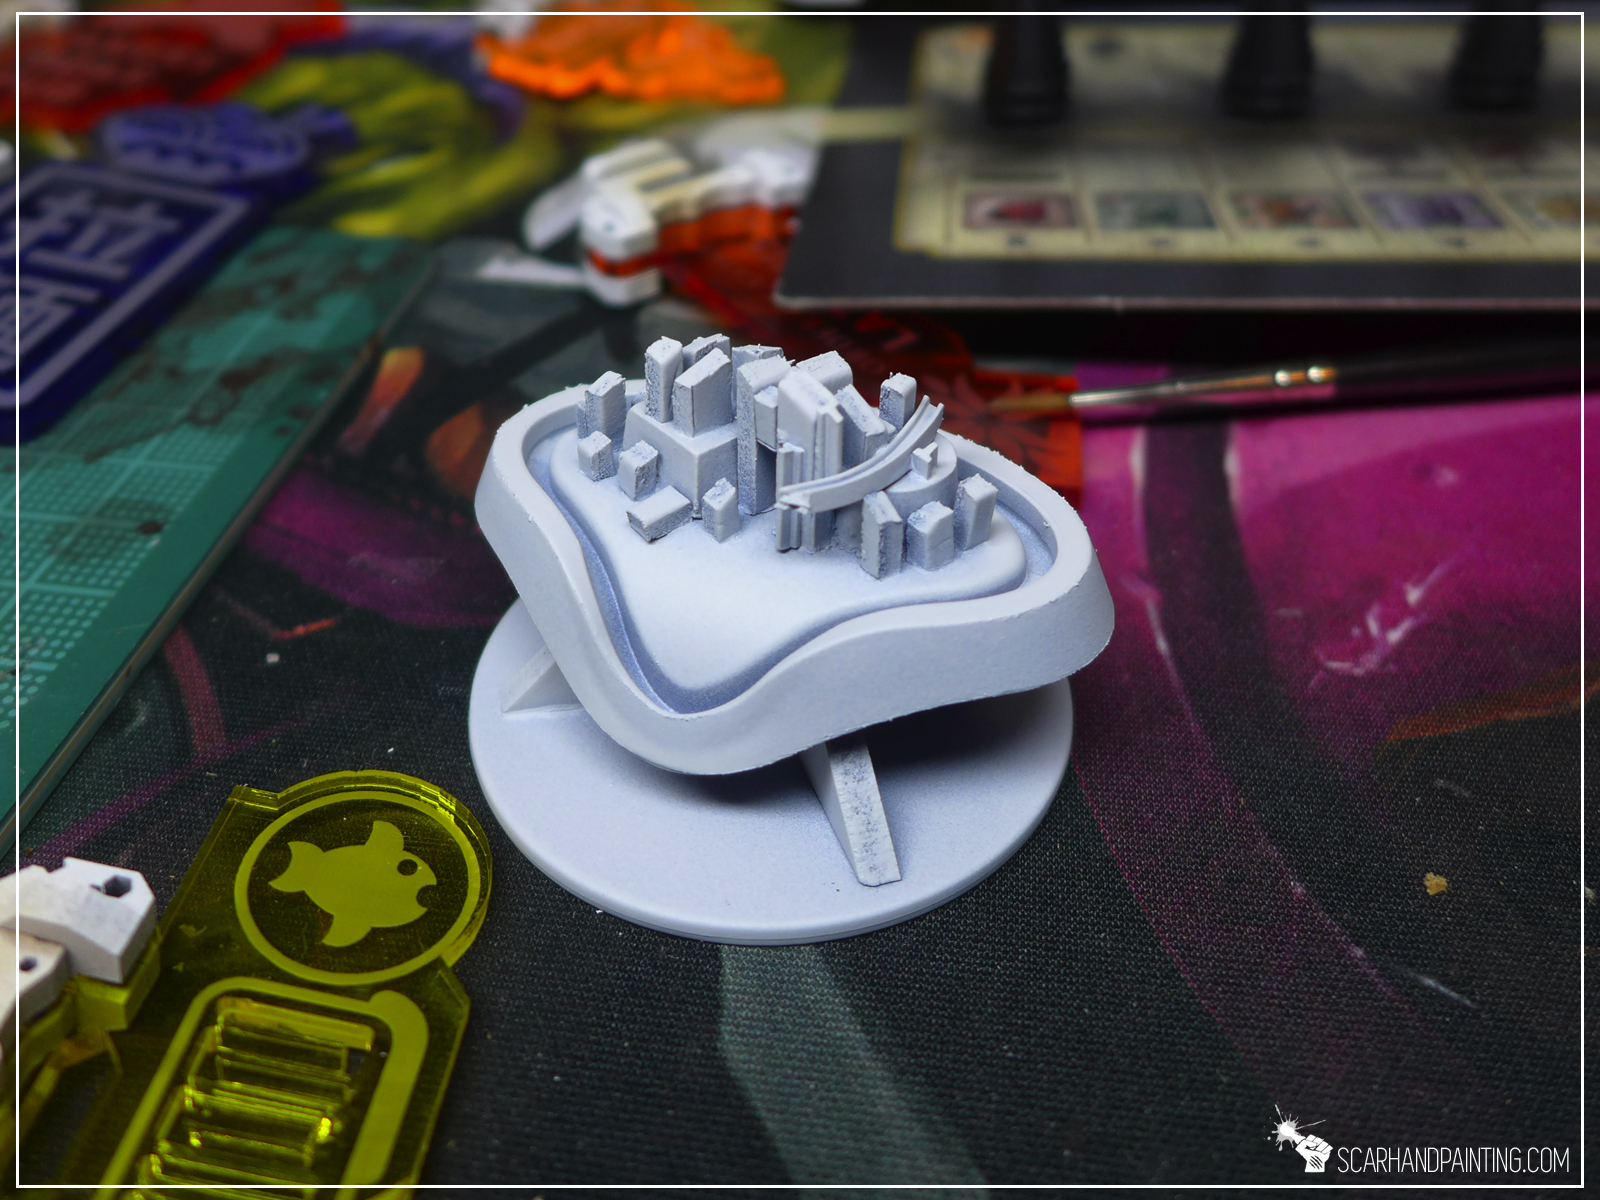
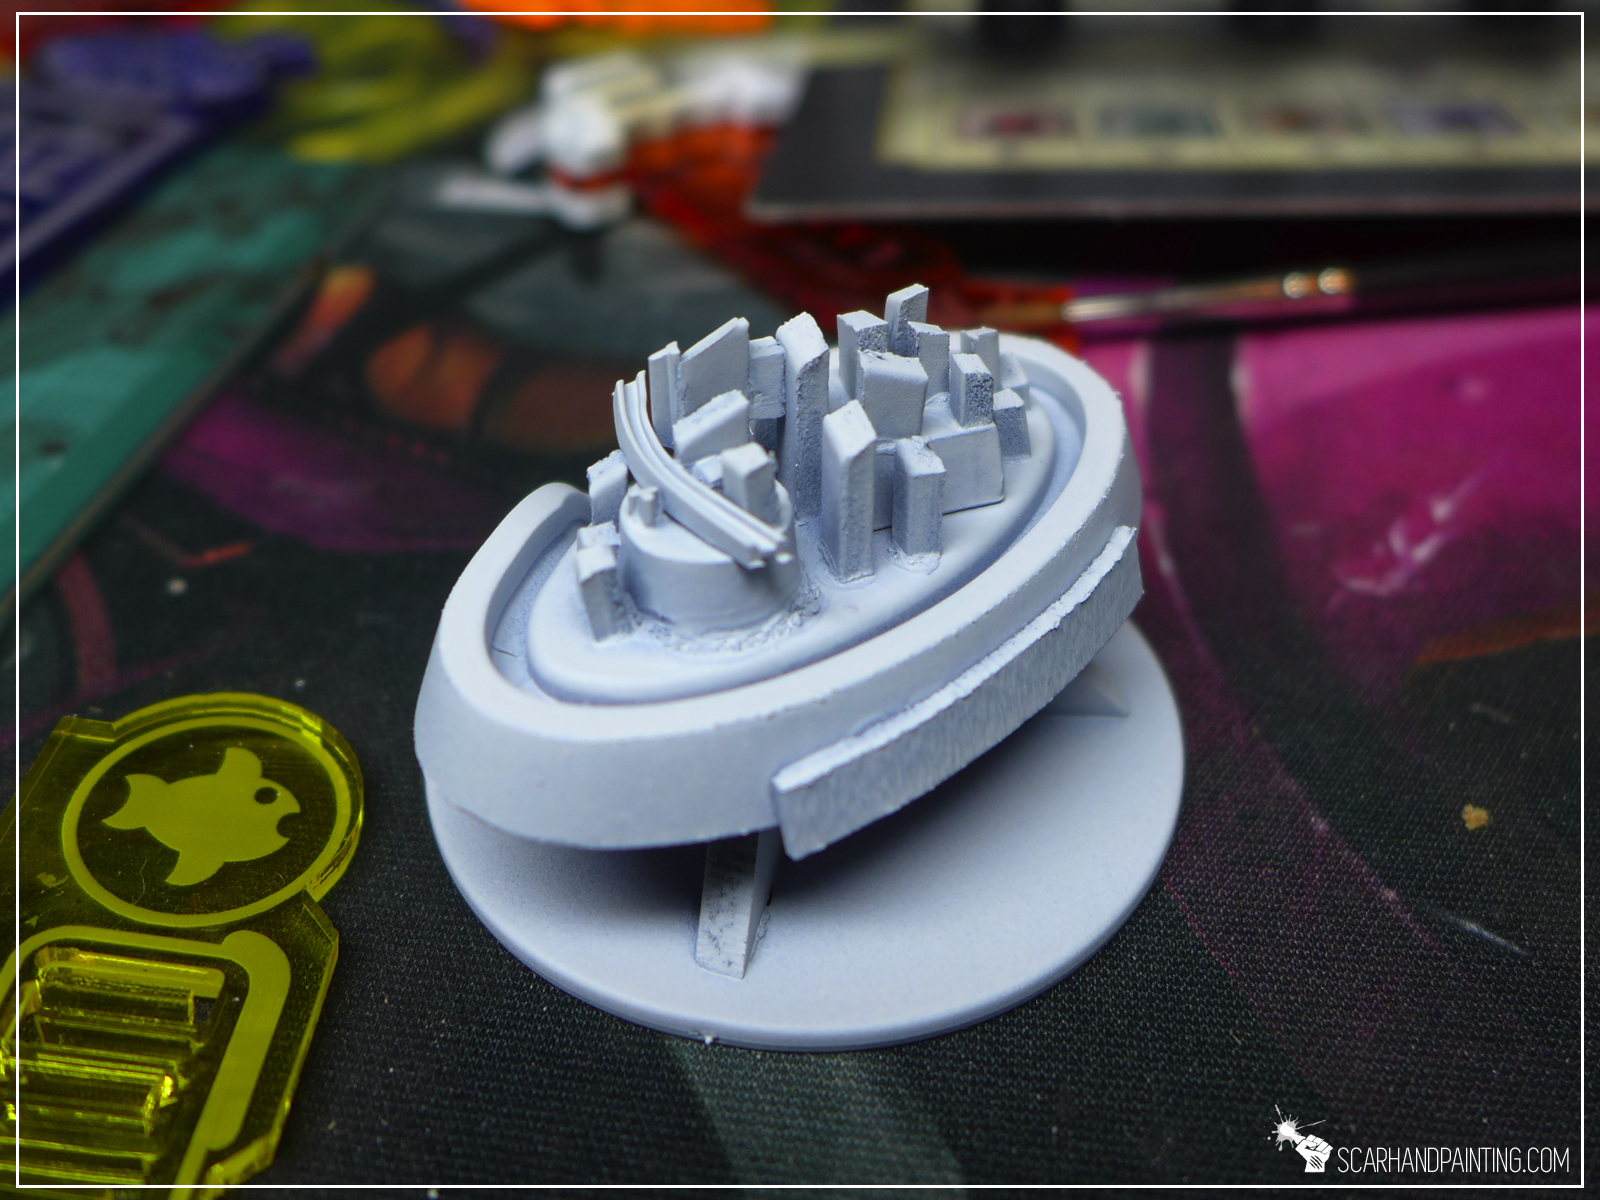
Step four: Paint job
I painted entire console white to fit my own gaming board. Looking back I strongly recommend painting the inside white to take advantage of the vibrant color mounted on top. Other than that anything will do.


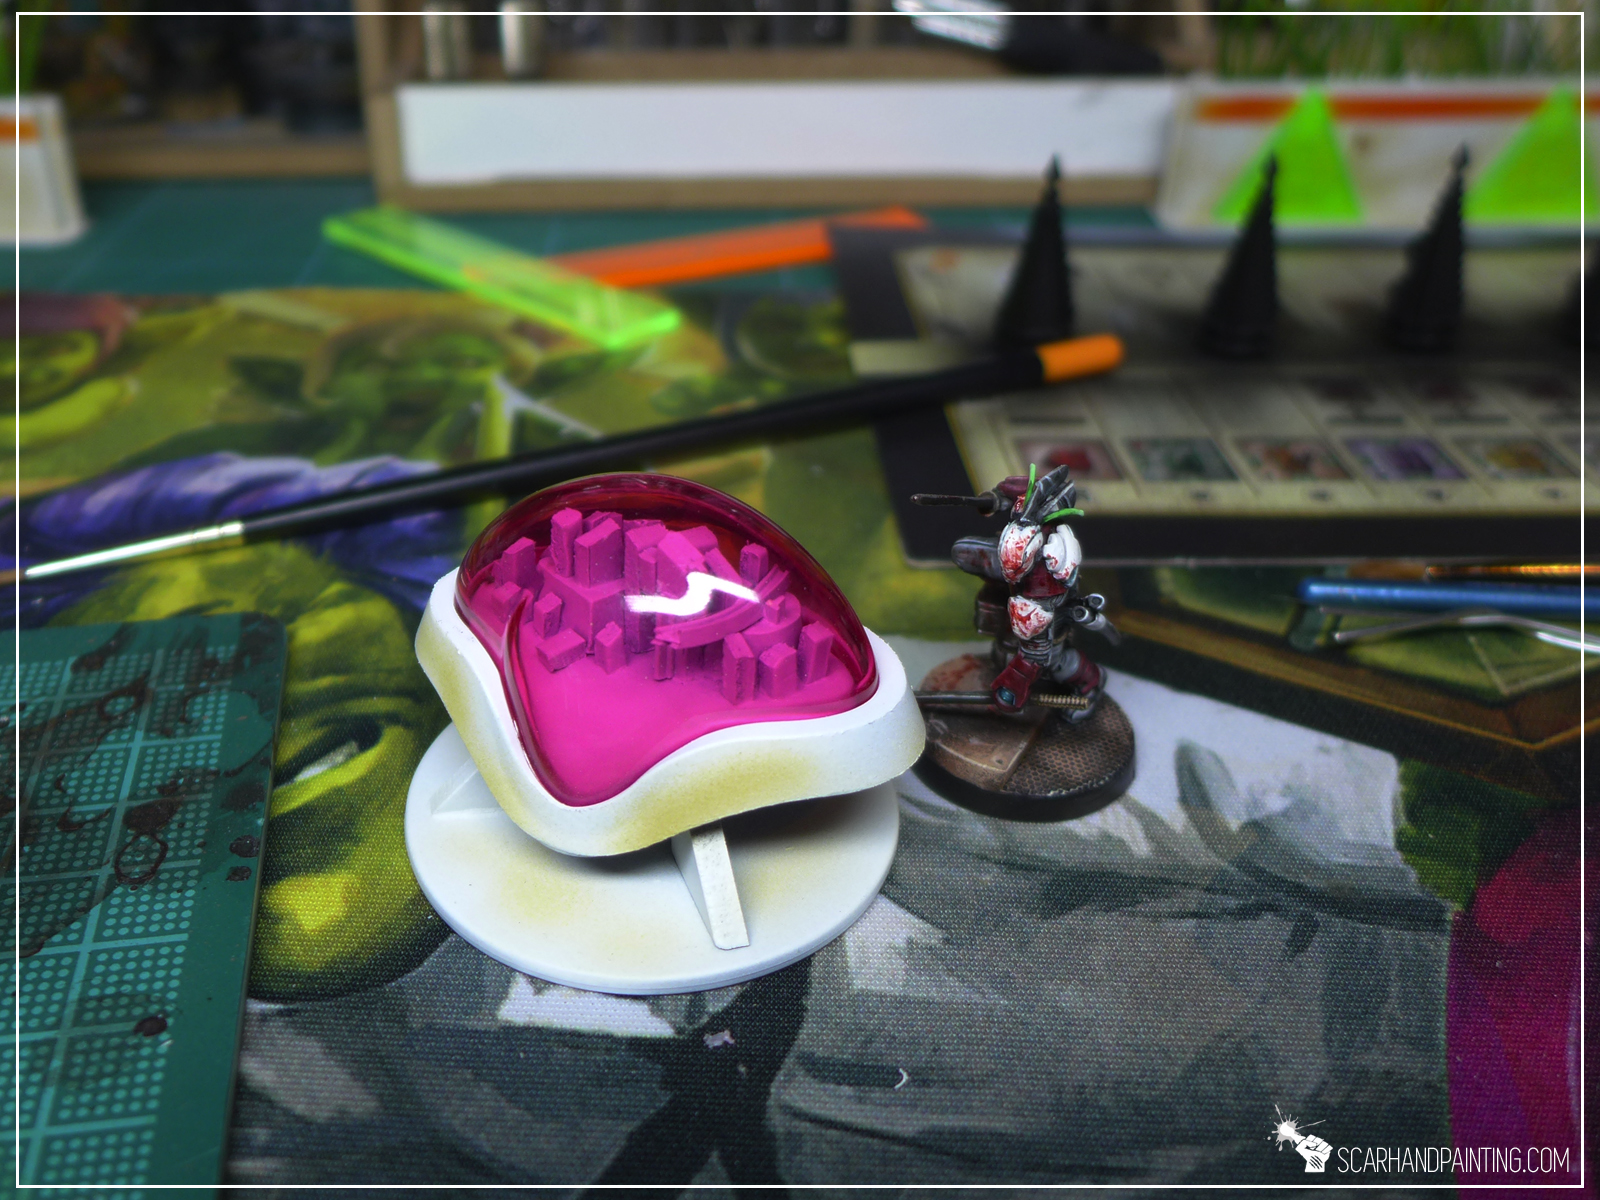
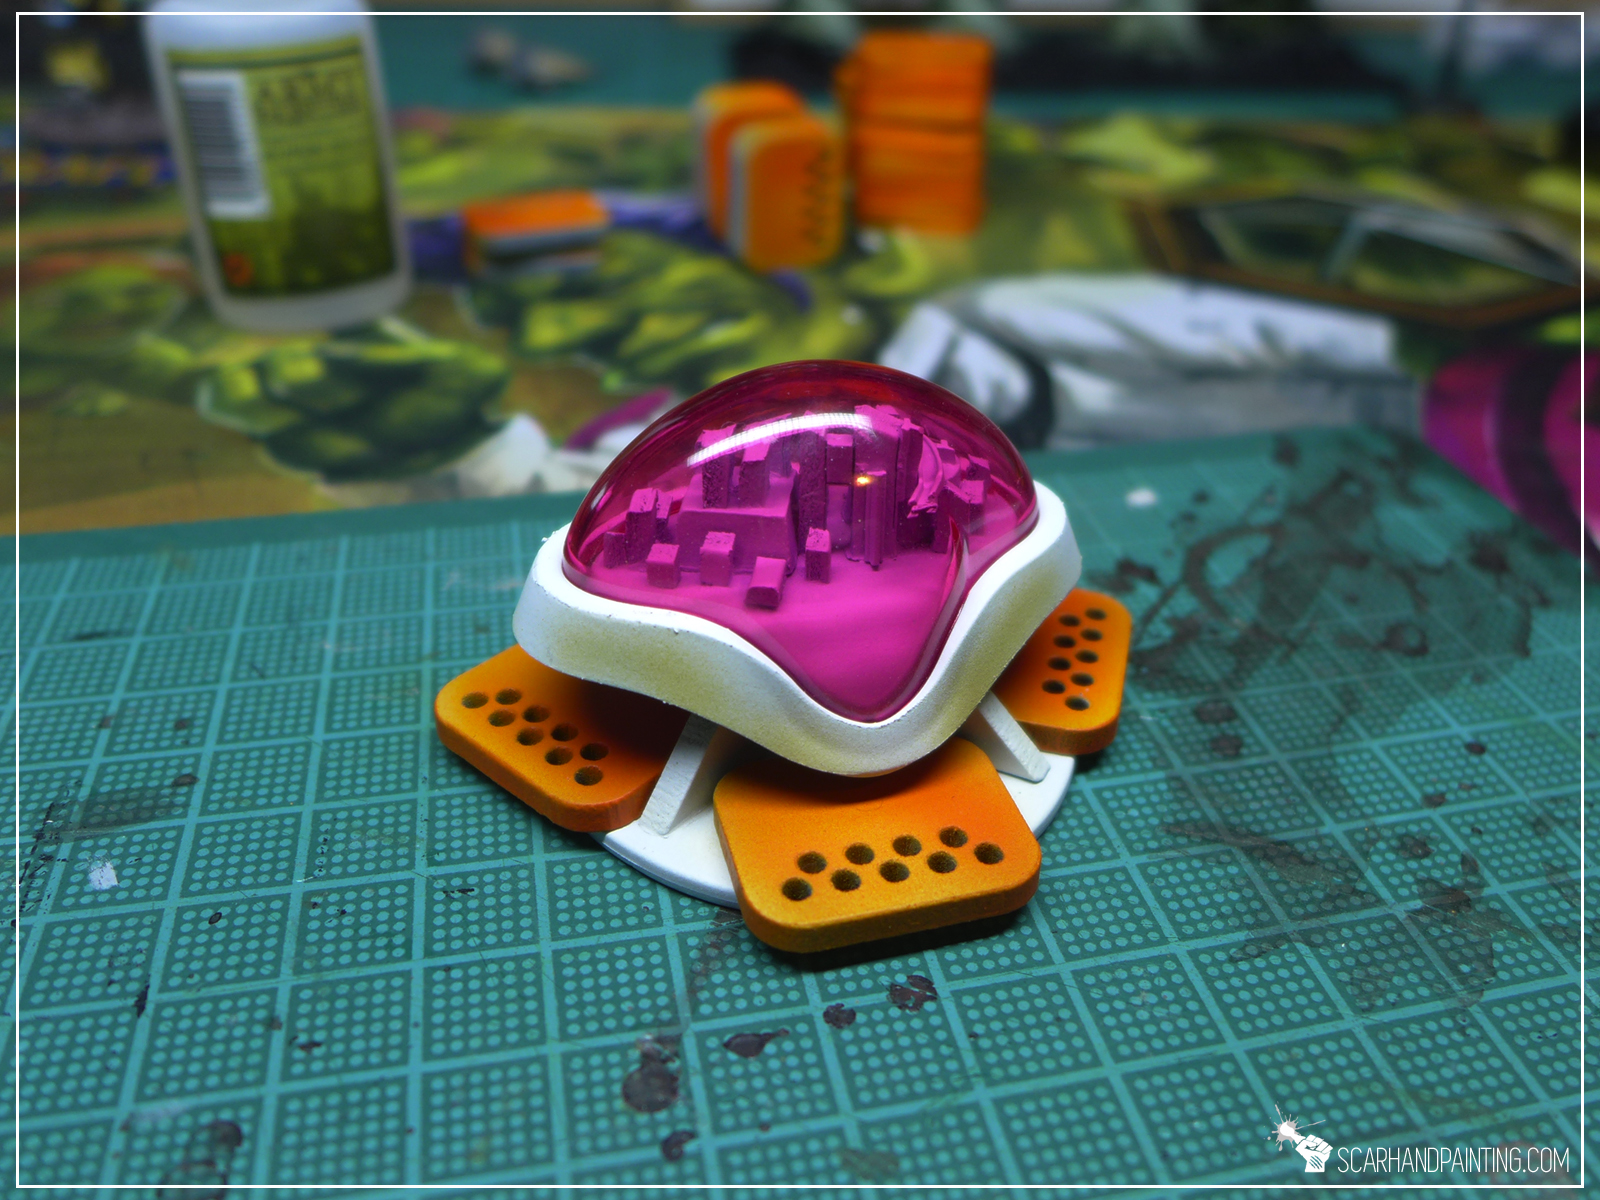
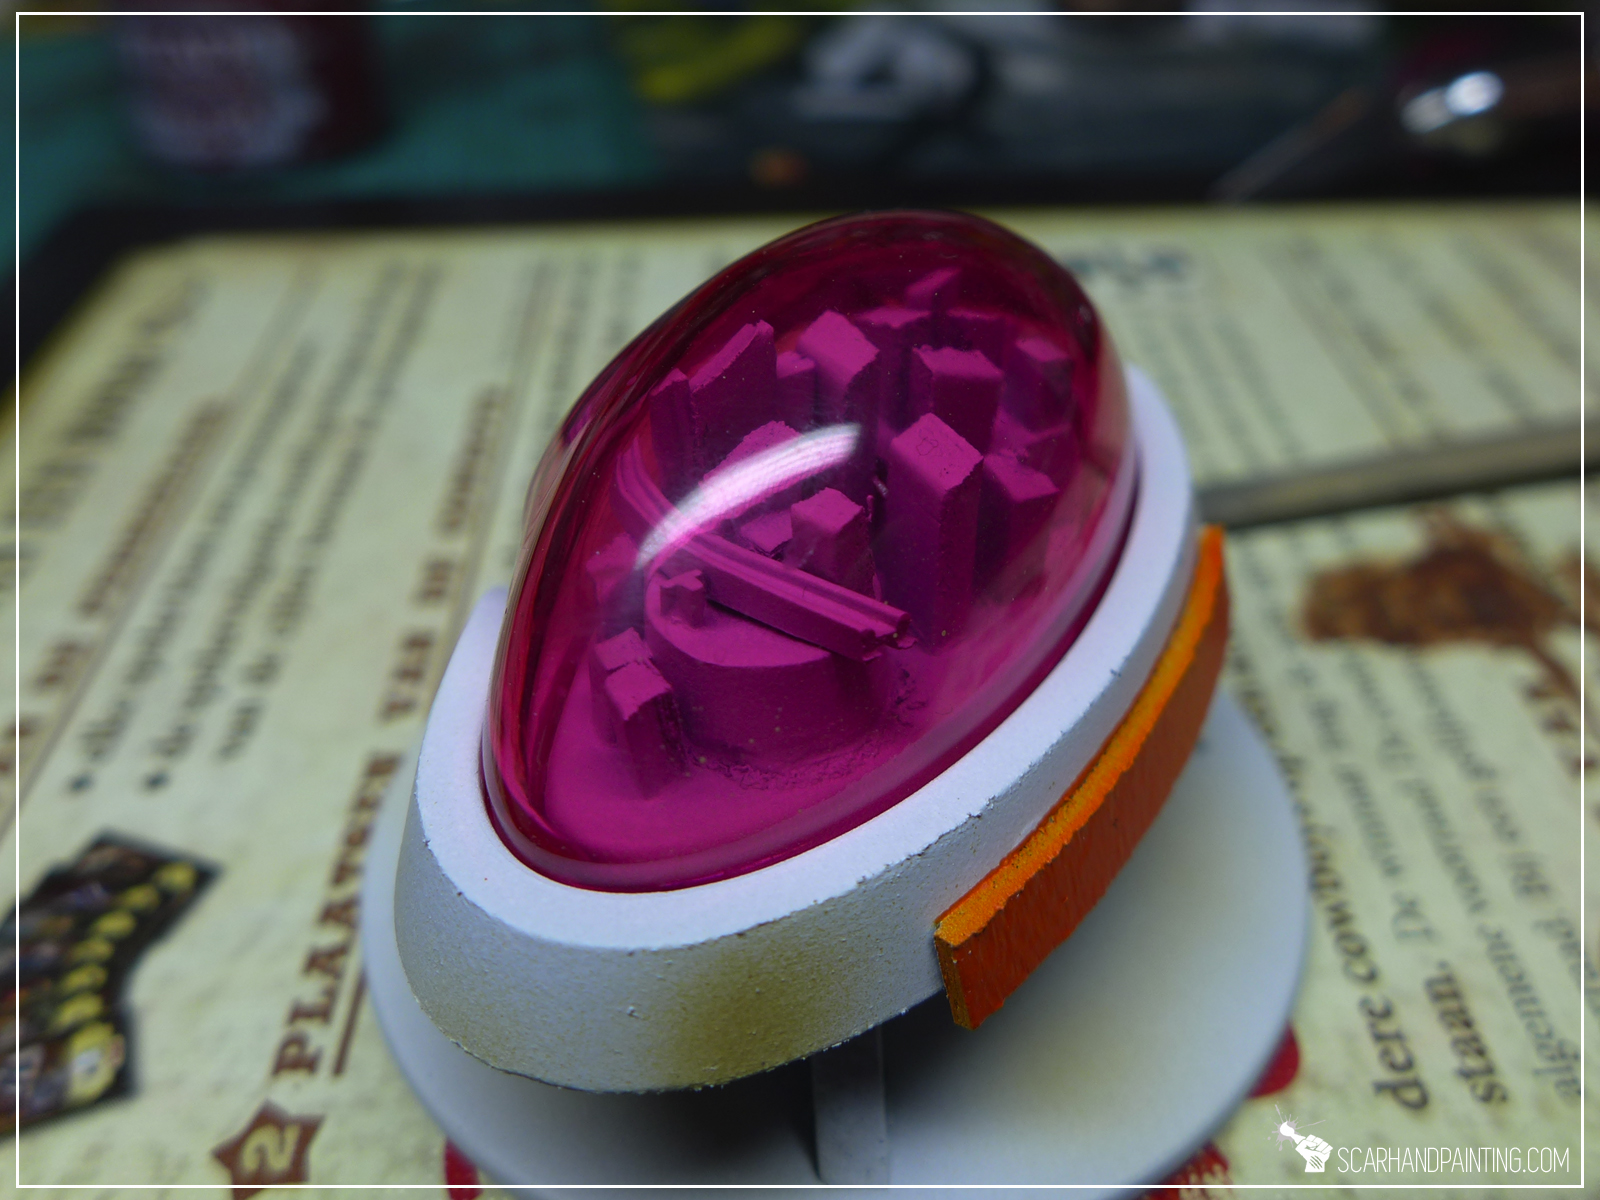
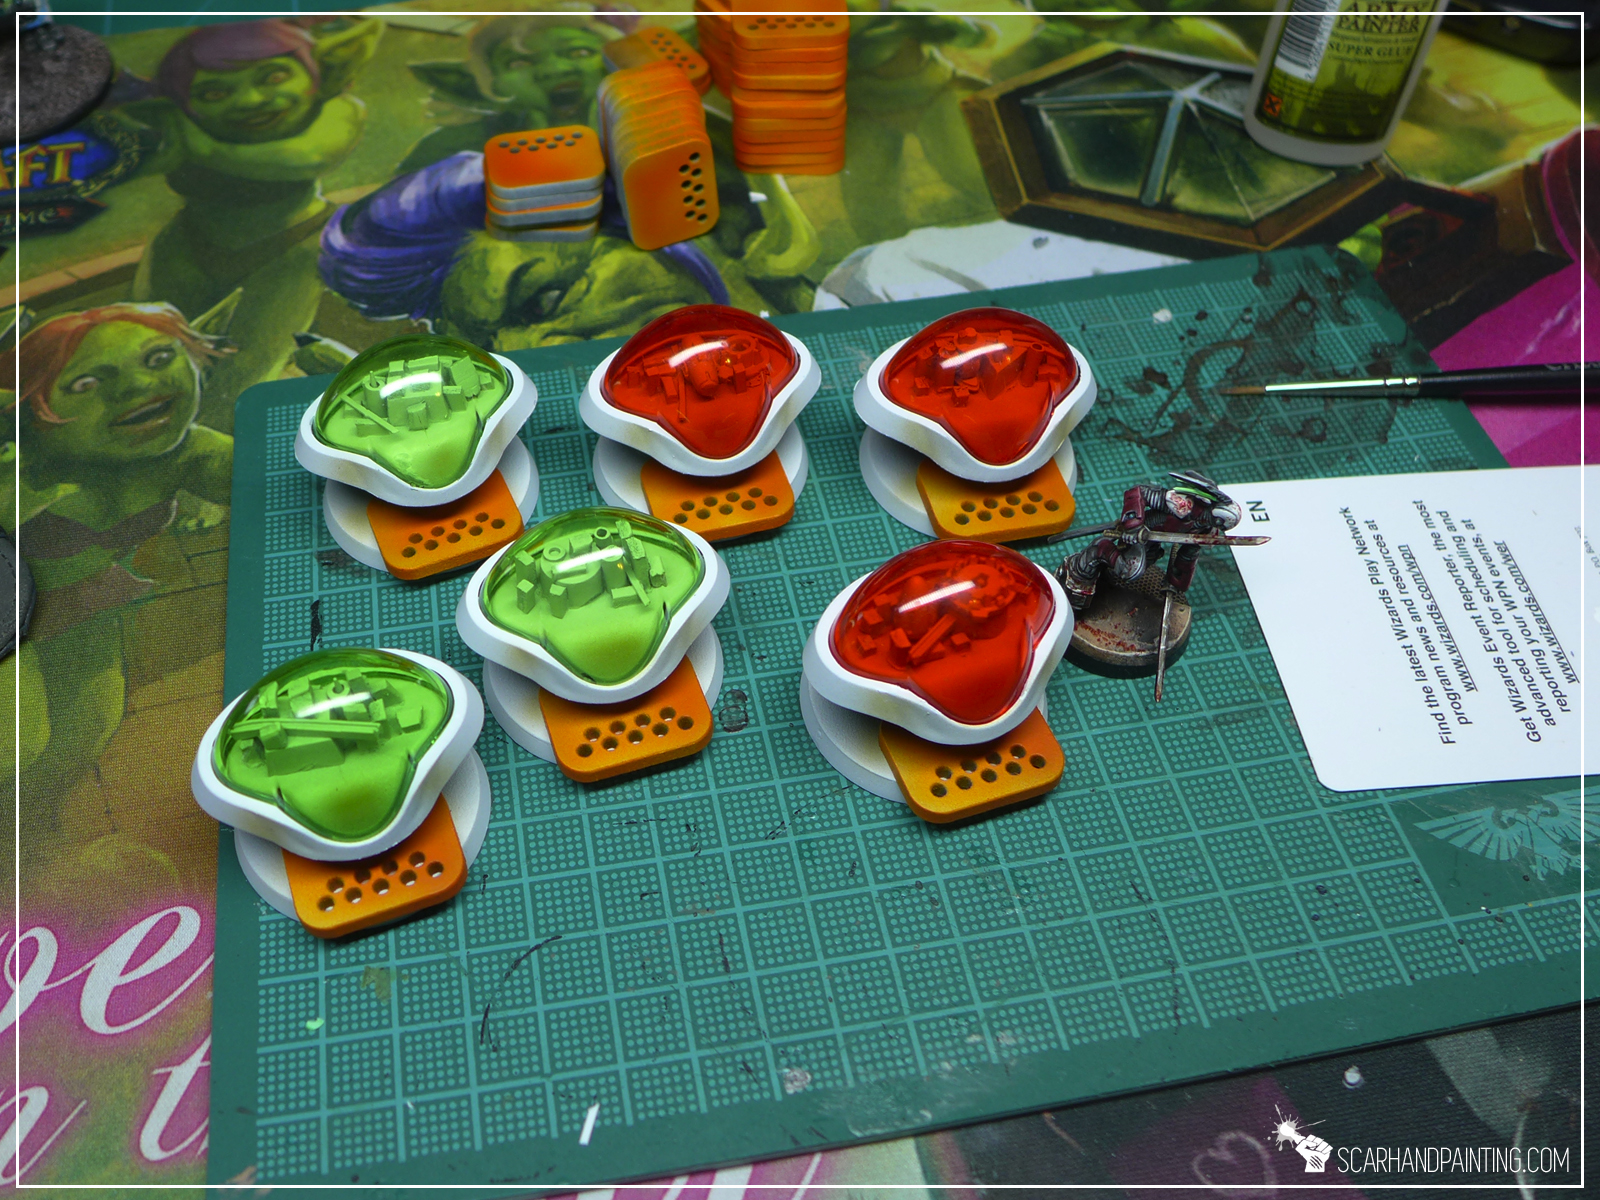

Final result:
Since 2016 I made few dozen consoles. These, being the first set, will always have a special place in my heart.
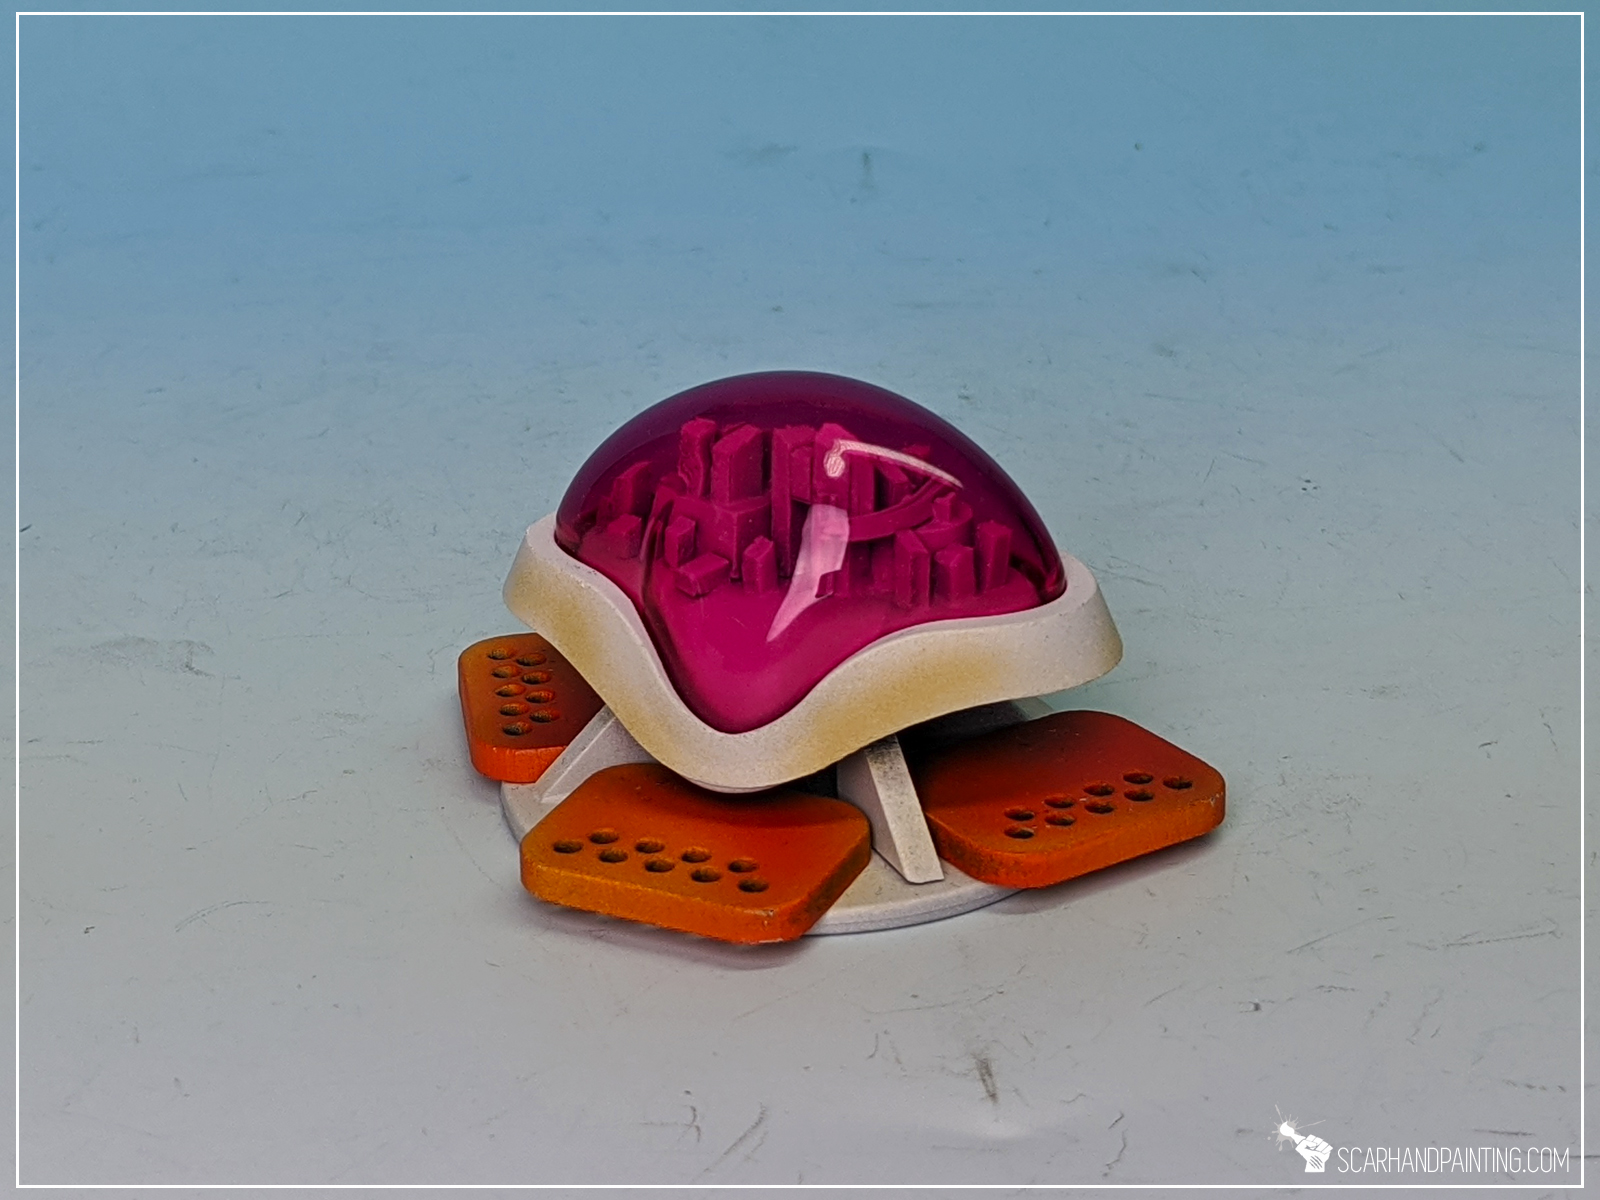
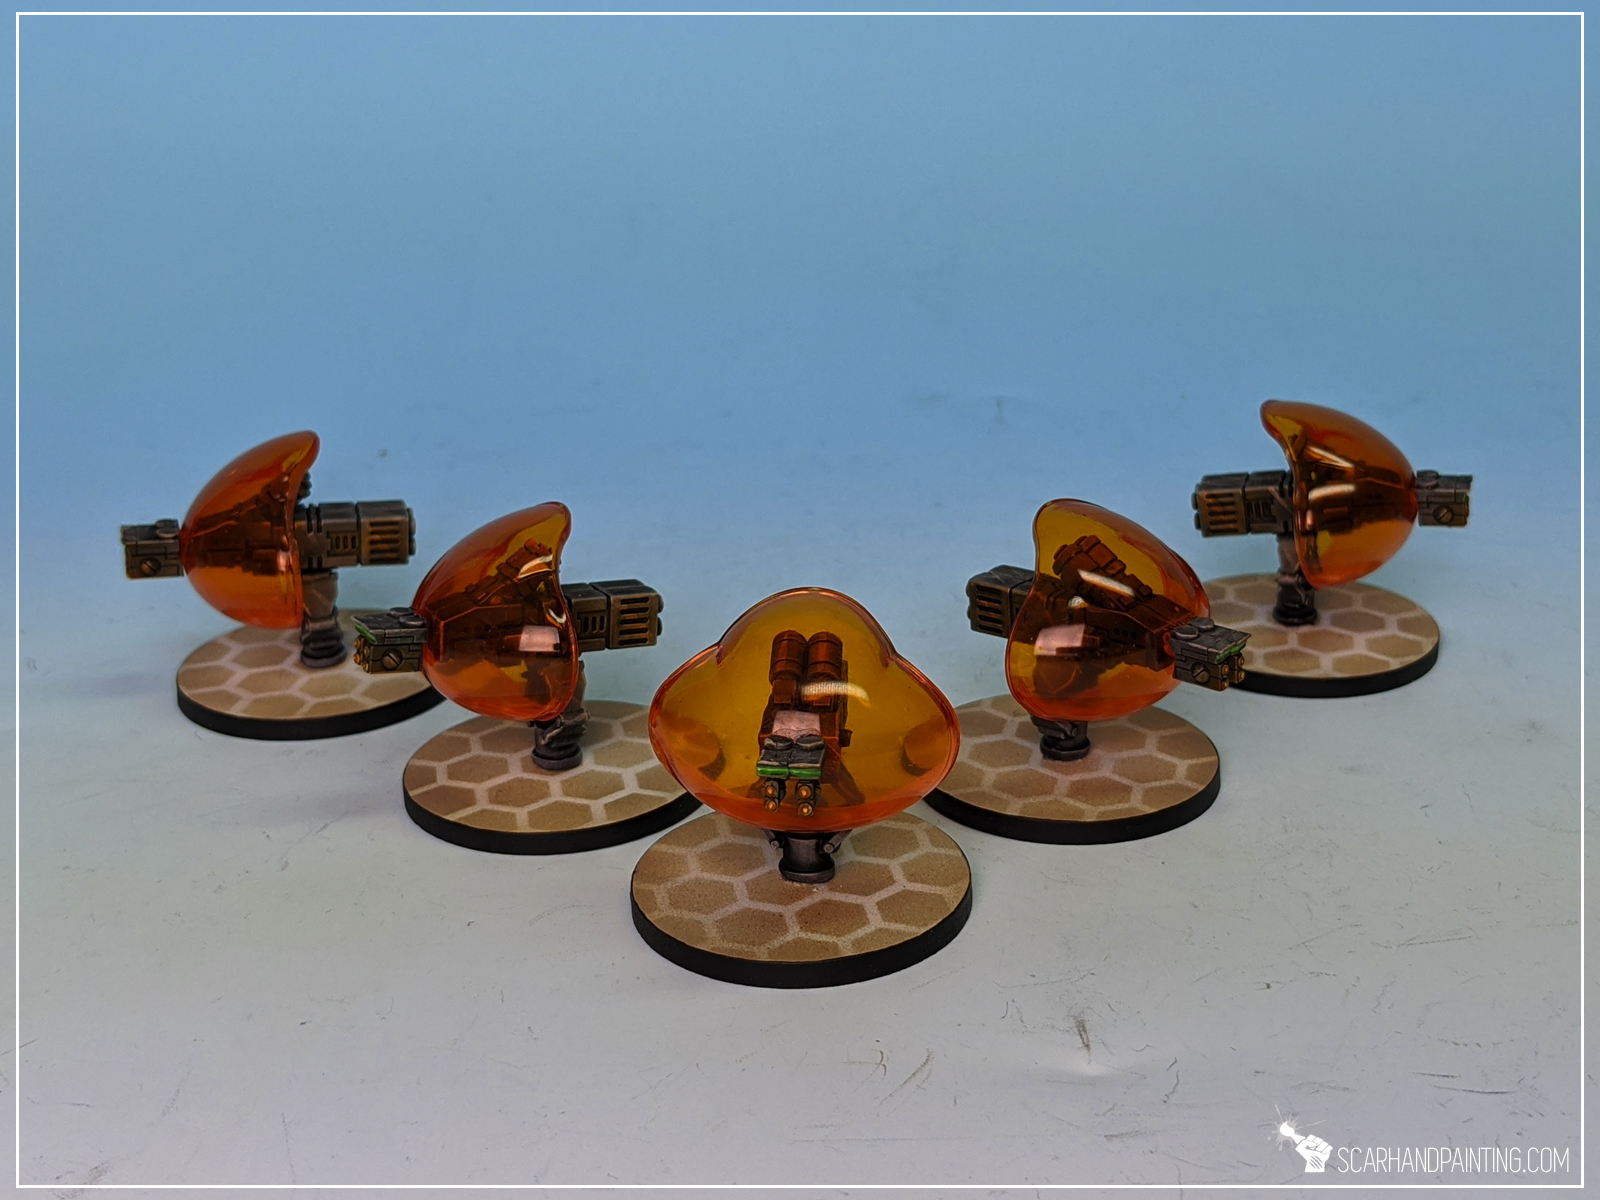
Bonus Pic: (different scenery piece)
I hope you like the article. If it ever inspires you to make your own Fa Shower Gel consoles, be sure to tag me at Facebook @scarhandpainting or Instagram _scarhandpainting so I can enjoy your work. Cheers!