- contact@scarhandpainting.com


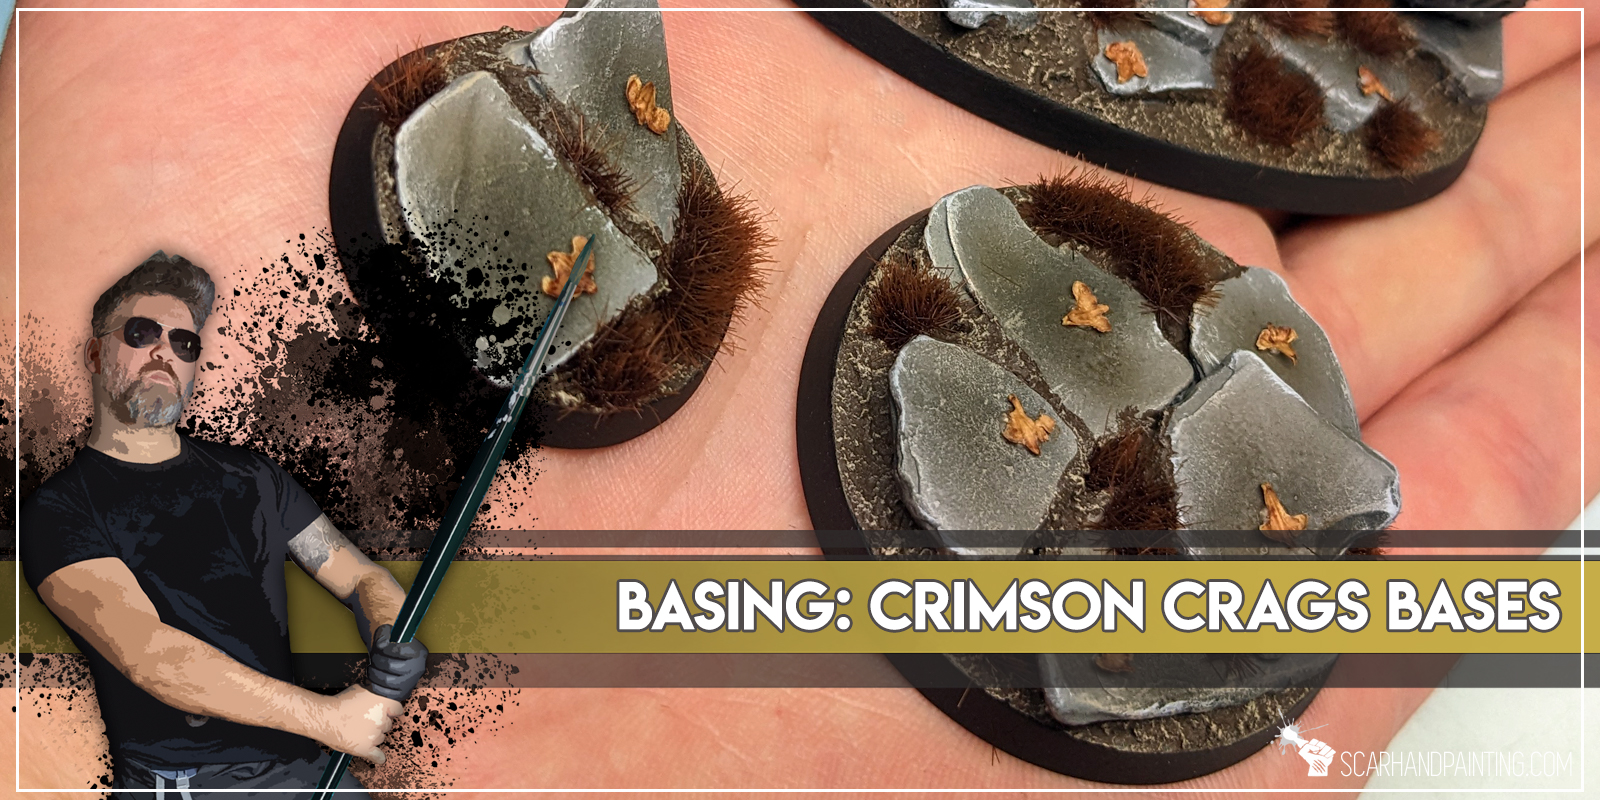
Welcome to Crimson Crags Bases tutorial. Here I will take you on a Step-by-step trip through the process of creating Crimson Crags themed Bases the same way as seen at: Gallery: Warhammer 40,000 Crimson Fists.
Before we start, some notes:
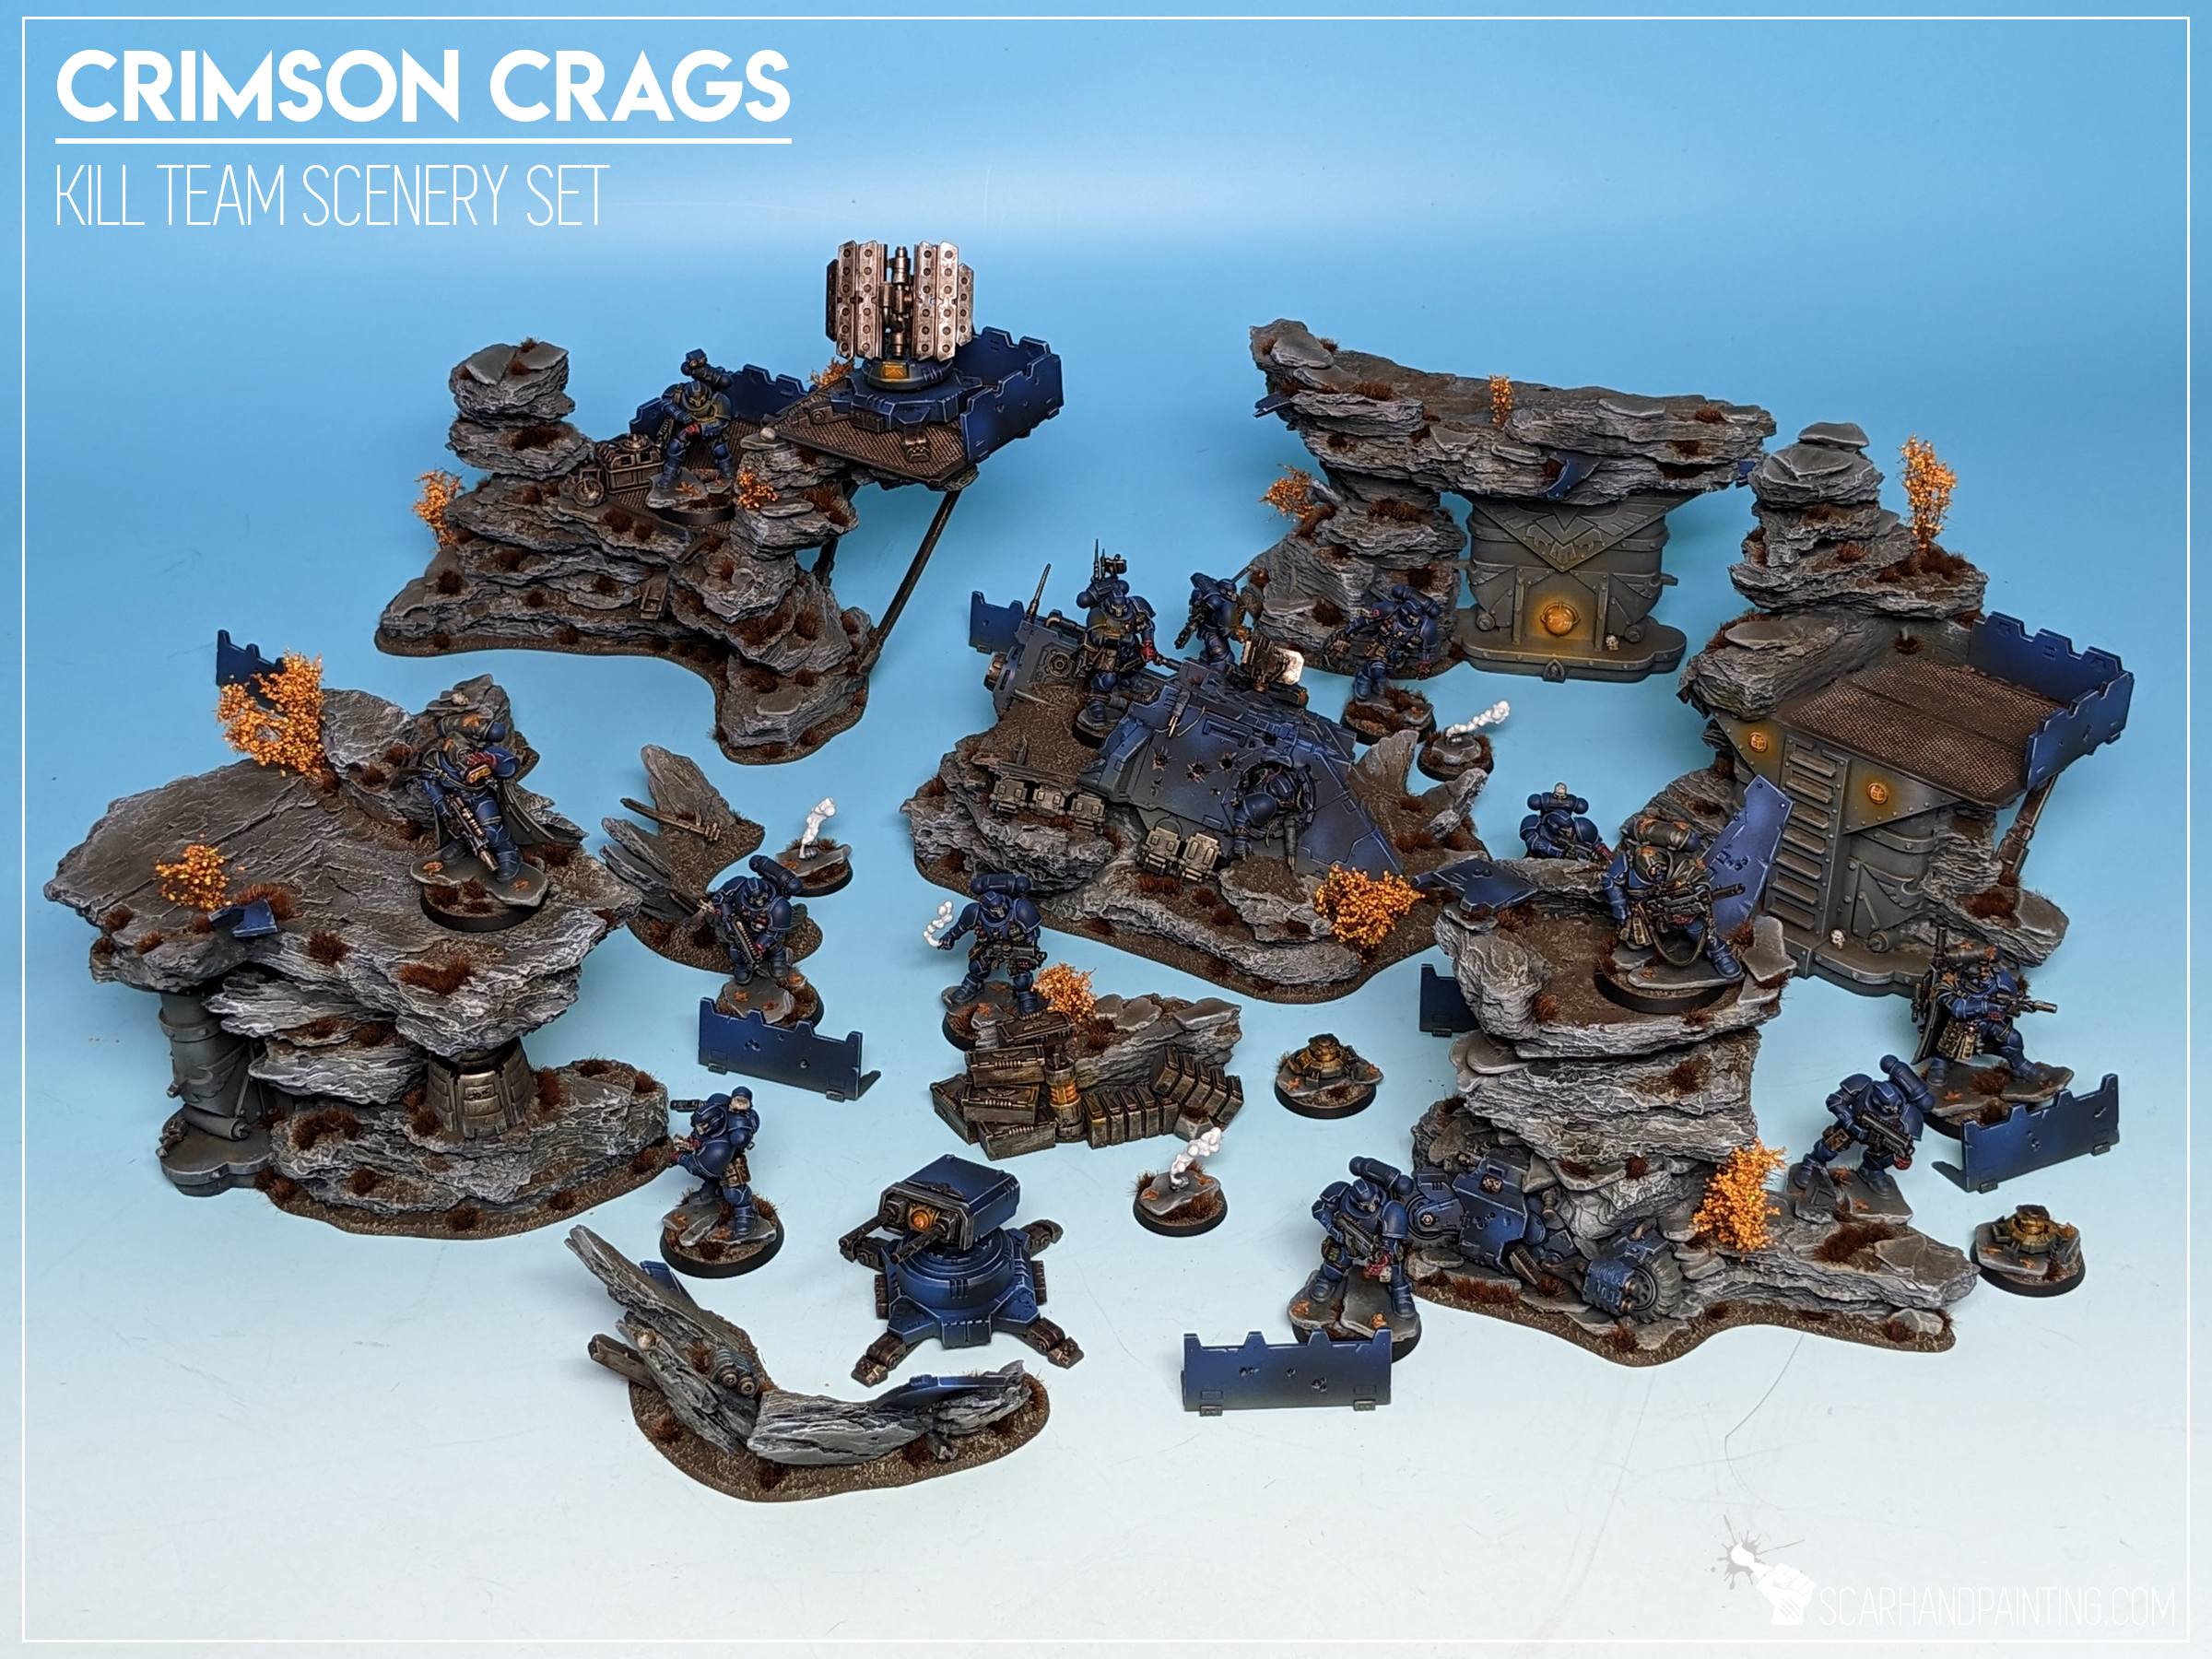
The “Crimson Crags” is a name of a self designed Warhammer 40,000/Kill Team scenery setting themed around my Crimson Fists Astartes collection. The idea behind the setting is reinforced rocky ravines ravaged by war. You can see more examples of the scenery and basing in the Killzone Crimson Crags gallery. I have already covered painting Crimson Fists and modeling the scenery in previous hobby articles. Now is time to present to you the basing.
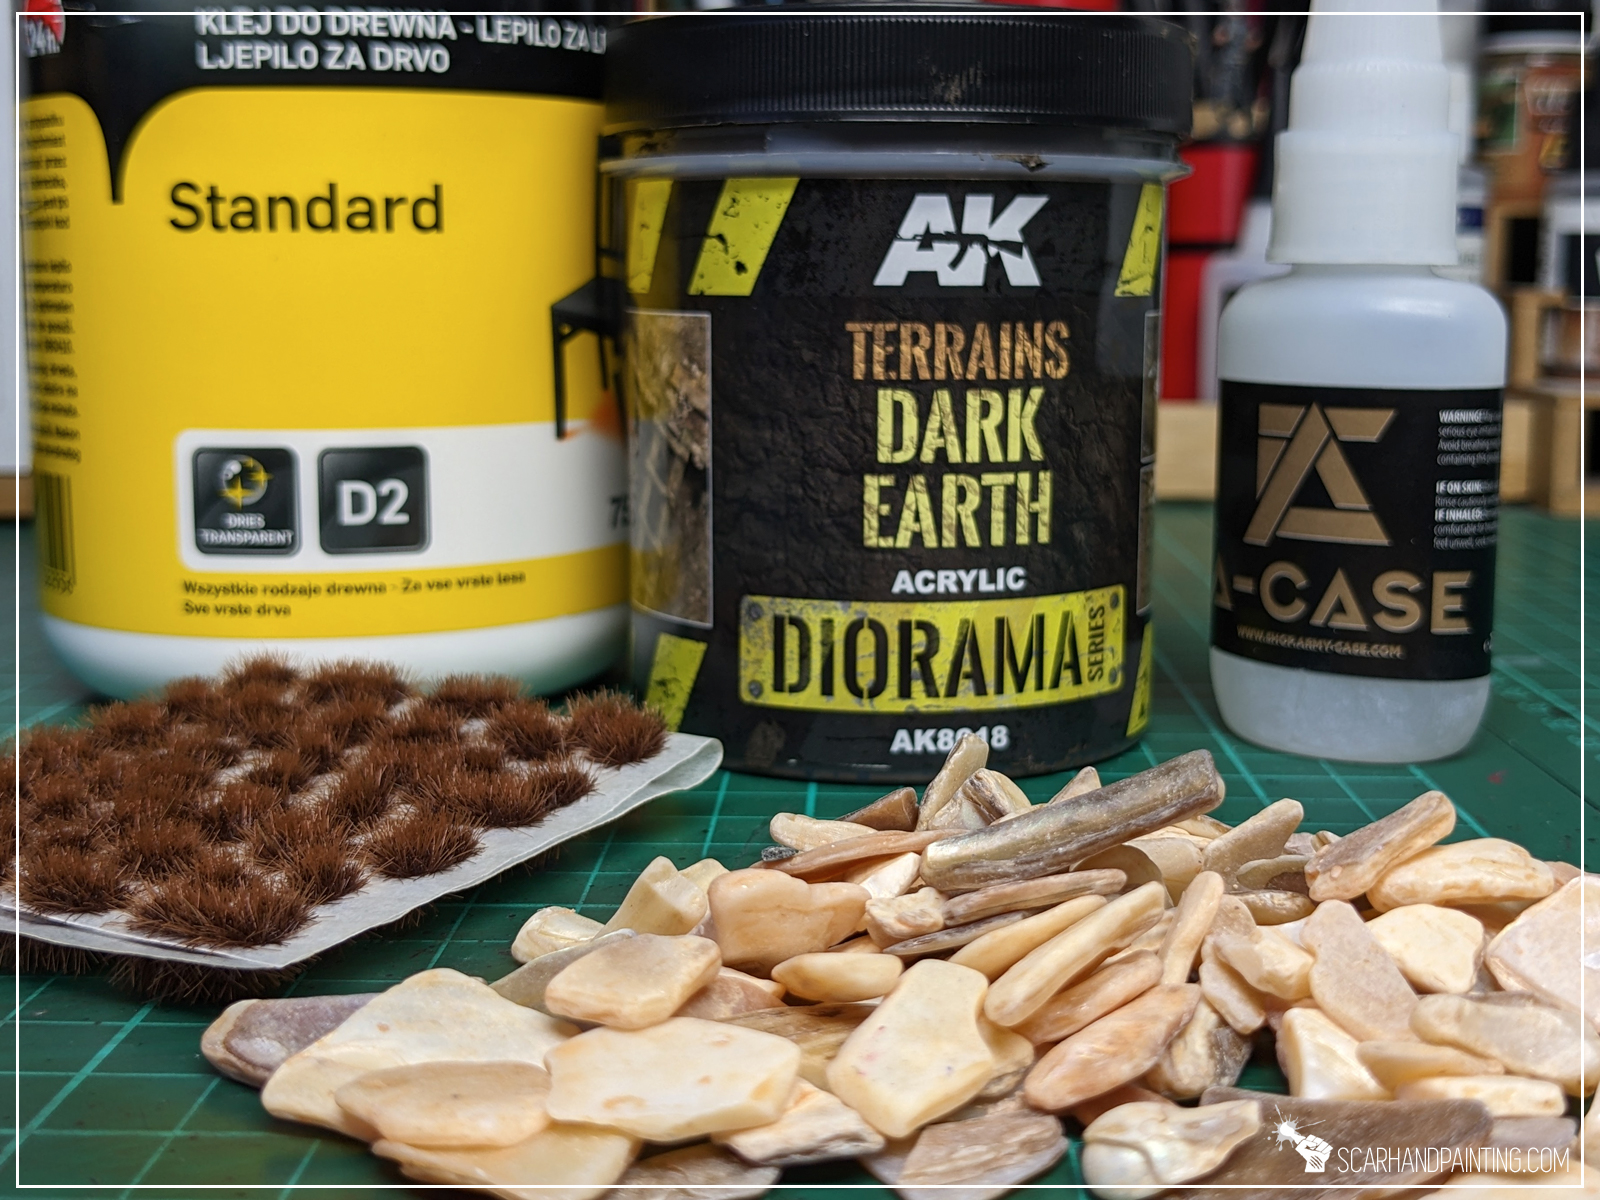
For this tutorial I will be using:
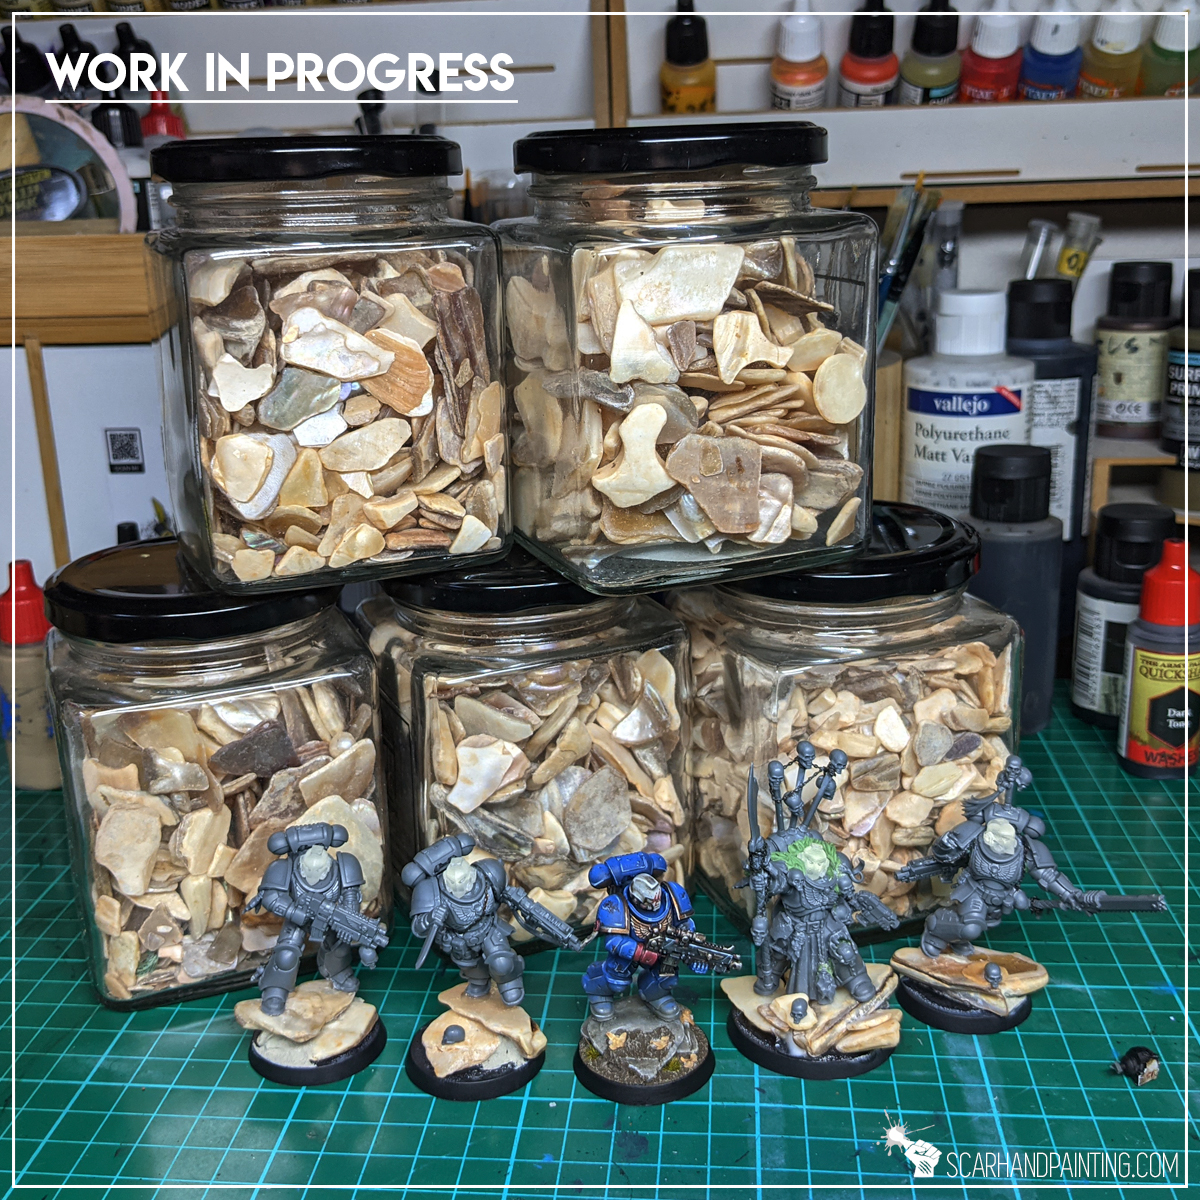
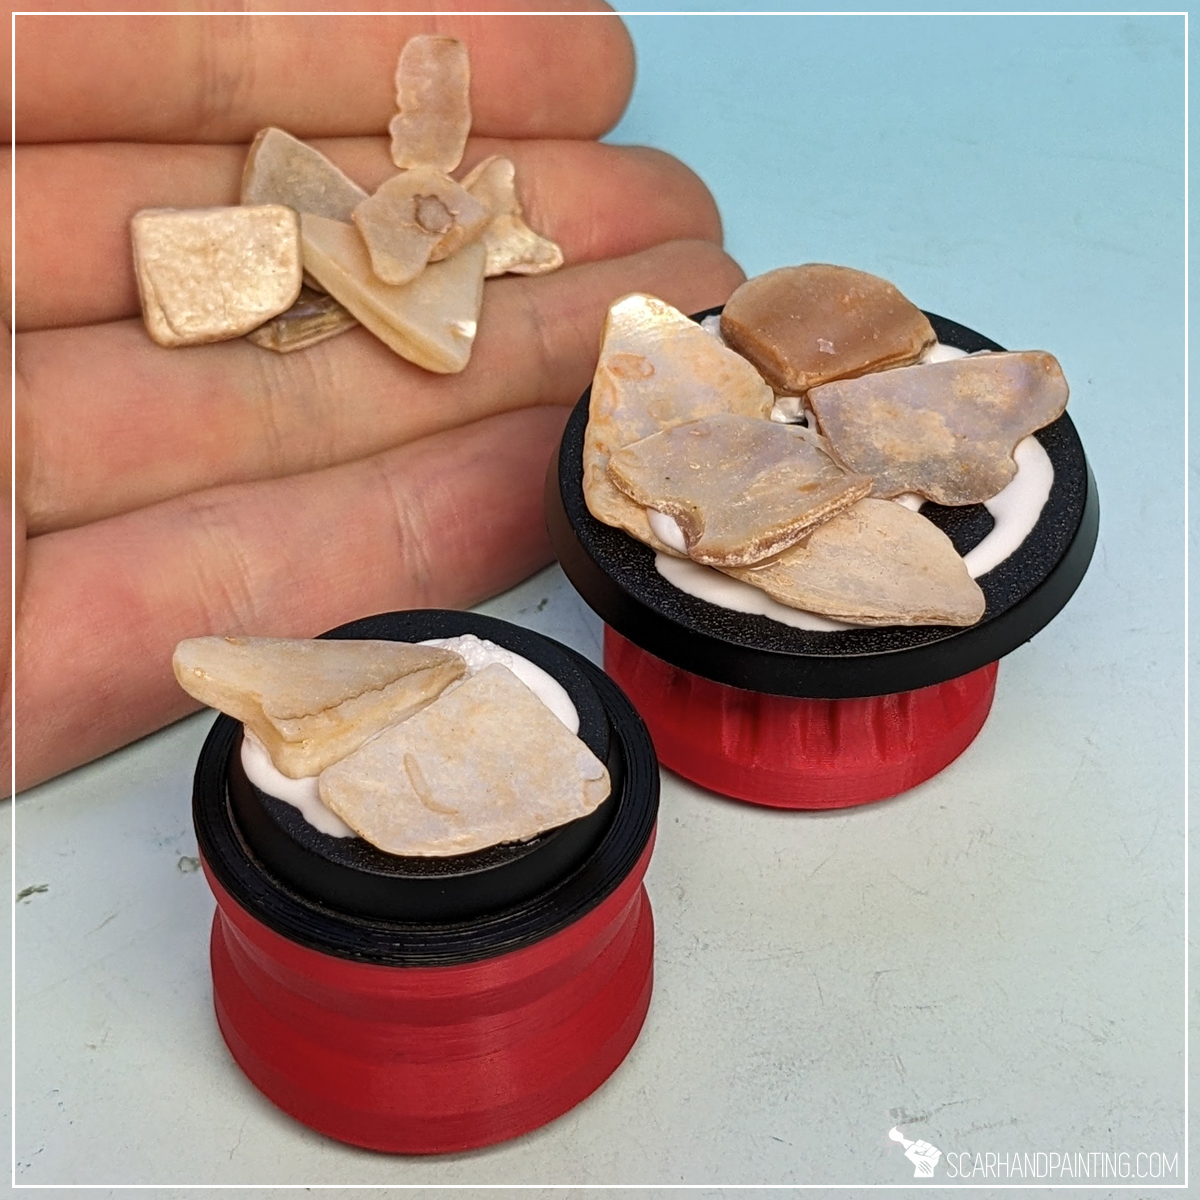
Let’s get it out of the way – yes, I am using natural stones. I like to have my miniatures heavy and stable on the board, plus trying to imitate the effect with self made elements would be rather time consuming. These particular stones are something I’m being asked about a lot, so here’s what I can tell you about them. The stones I’m using are regular decoration gravel from construction/home/garden stores. They are sold in small packages for about 1-2€. Unfortunately I do not know the professional name for this kind of stone, but am sure you will find similar stuff in either Ikea, or other home/garden stores. Below an old pic for reference.
Rocks out of the way, let’s rock! (You see what I did there?).
The modeling process is pretty straightforward, starting with base rock formation, after which the miniatures are mounted on top, everything gets undercoated then painted. Lastly the second part of modeling kicks in with textures and finishing touches.

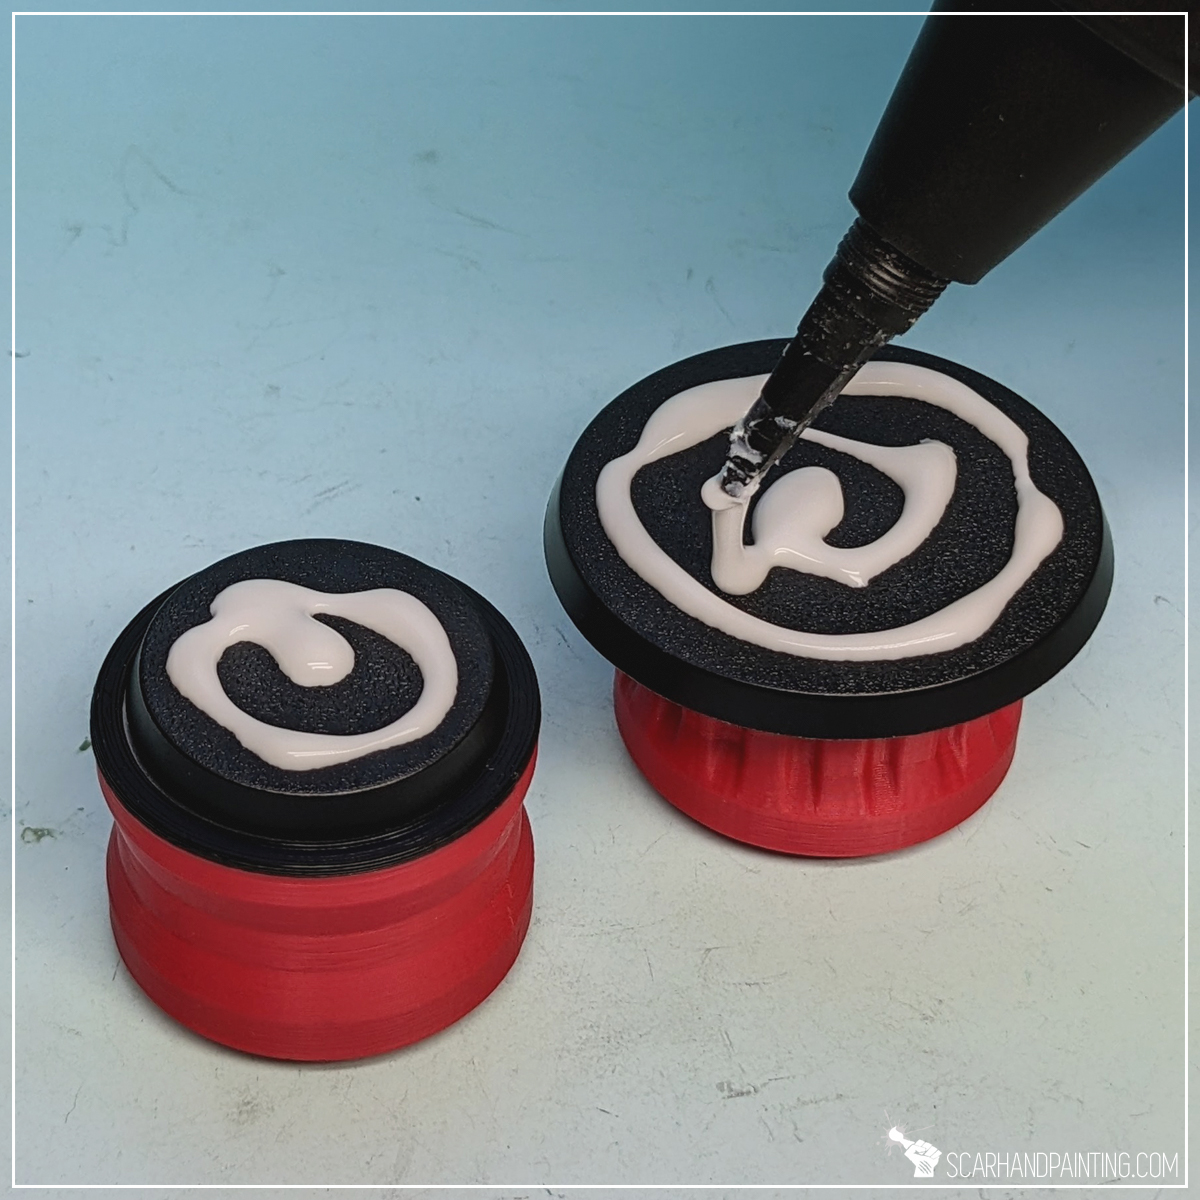
Step one: Rock formation
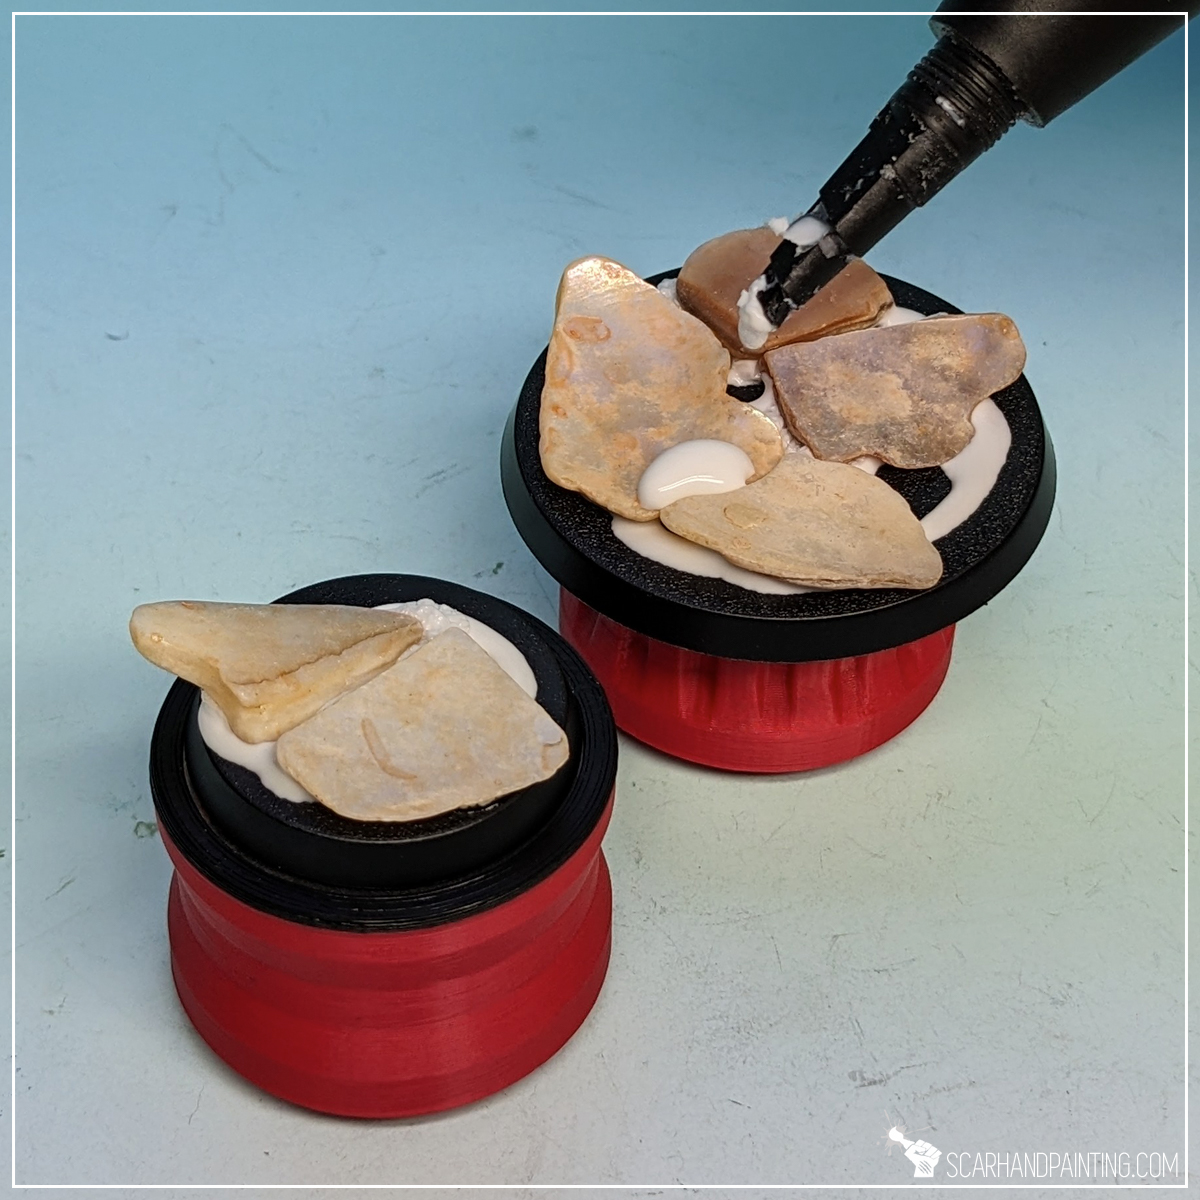
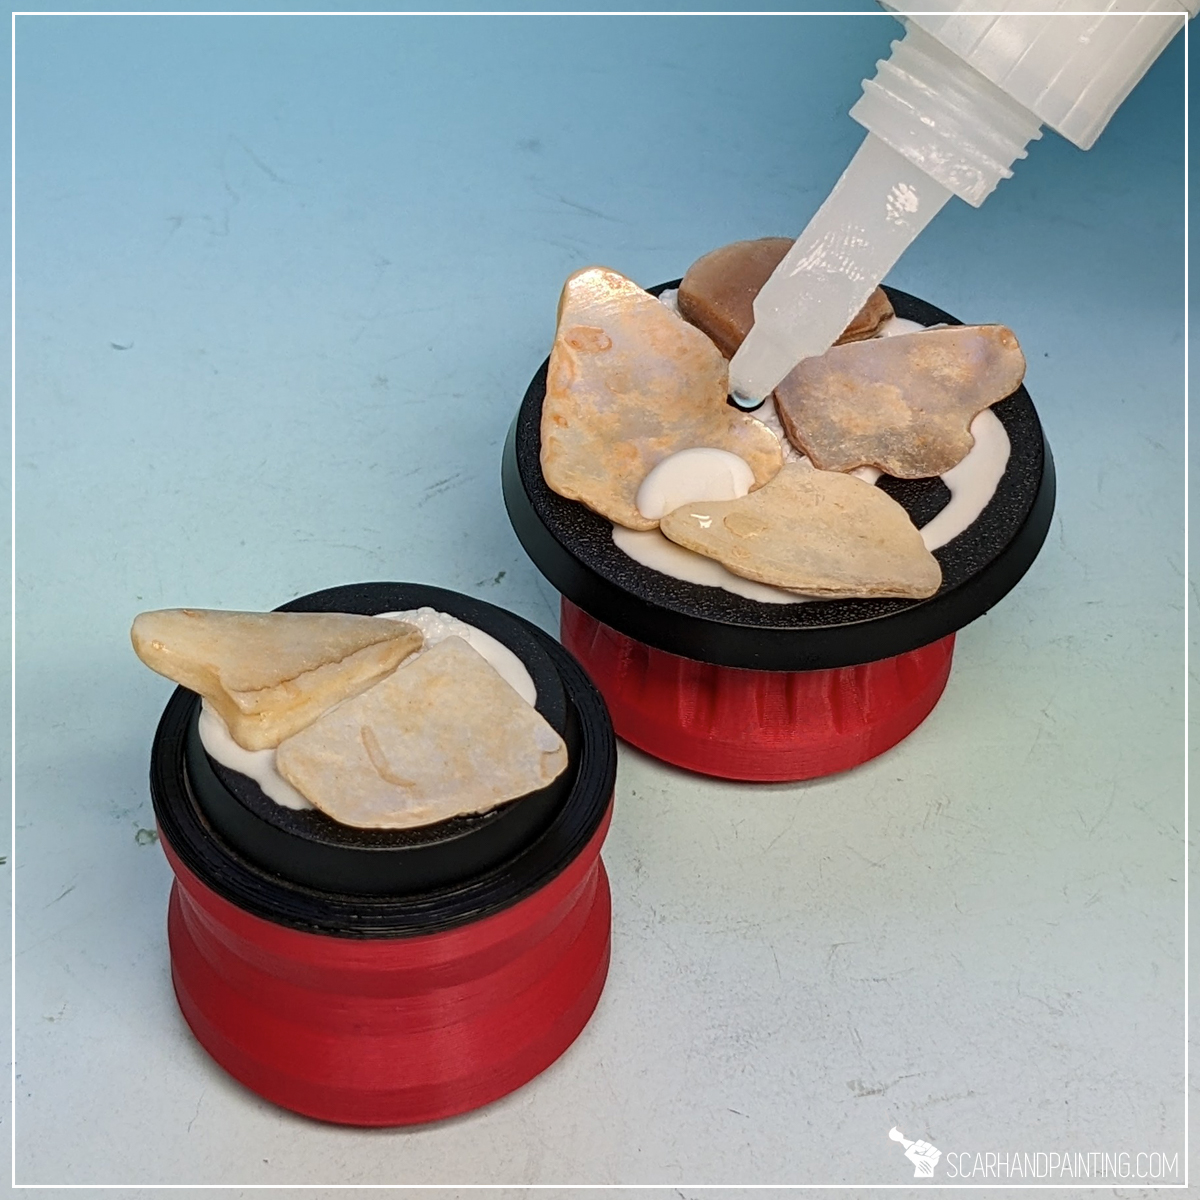
I started by applying PVA glue on top of the base. There’s no need to keep this one smooth – a clumsy random layer will suffice. Next I applied few drops of super glue on top. Finally I put few flat stones on top. Both glues mixed under preassure, filling most gaps between the stones and keeping them in place.
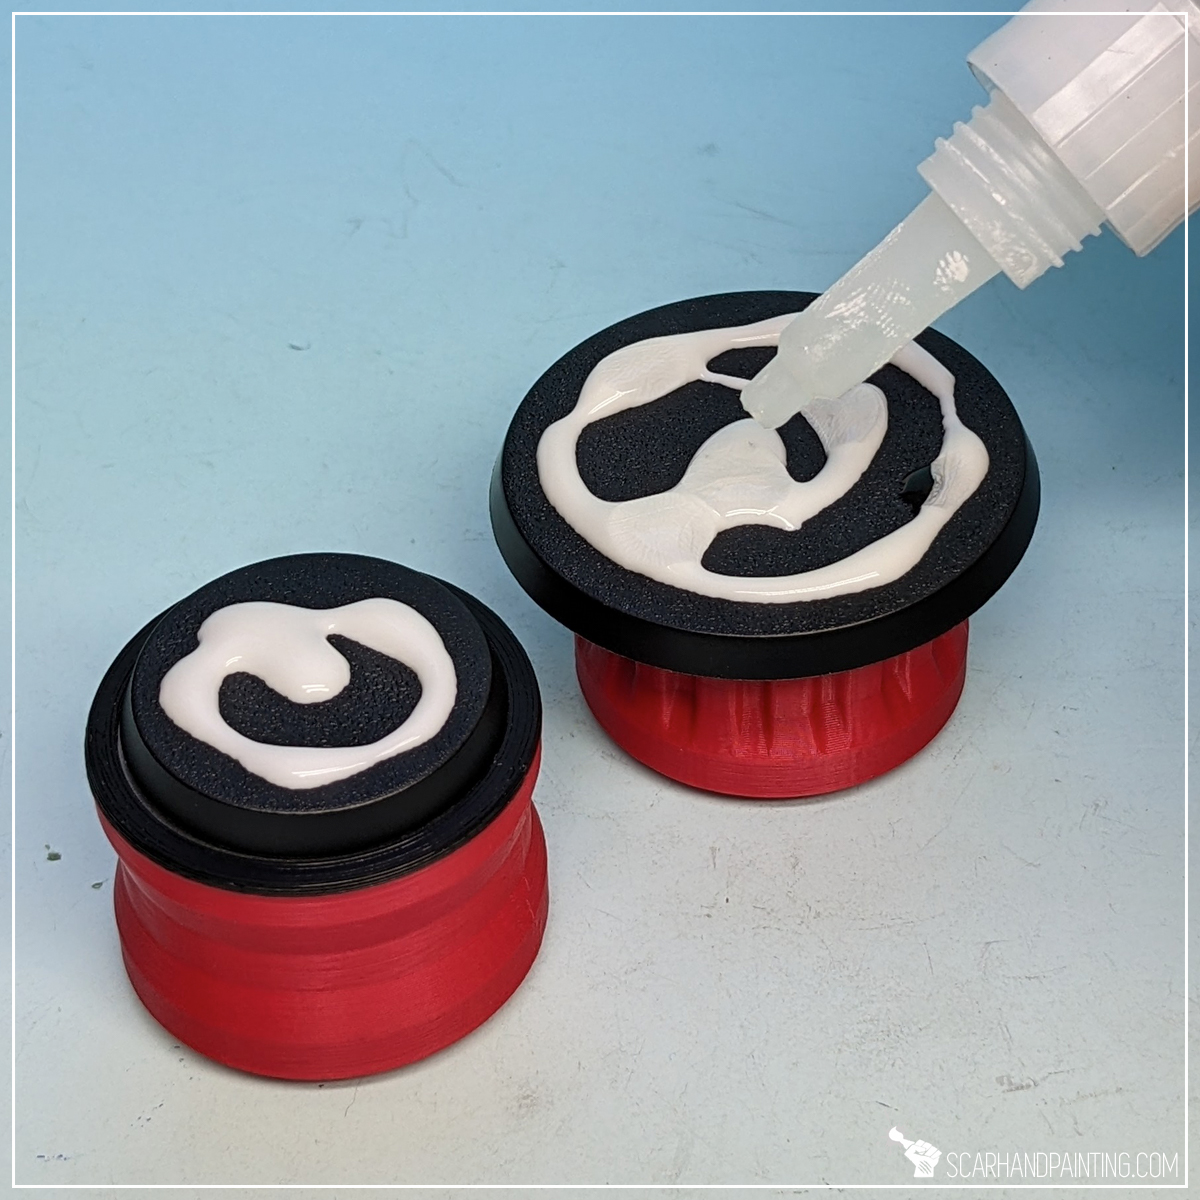

Step two: Increased Volume
Depending on the size and future assignment of the base I sometimes add volume to the rock formation. Some miniatures have one leg slightly raised, or I just want to get a more dynamic posing for my Astartes characters. Having that in mind I applied a drop of PVA glue followed by a drop of super glue and added another stone on top.
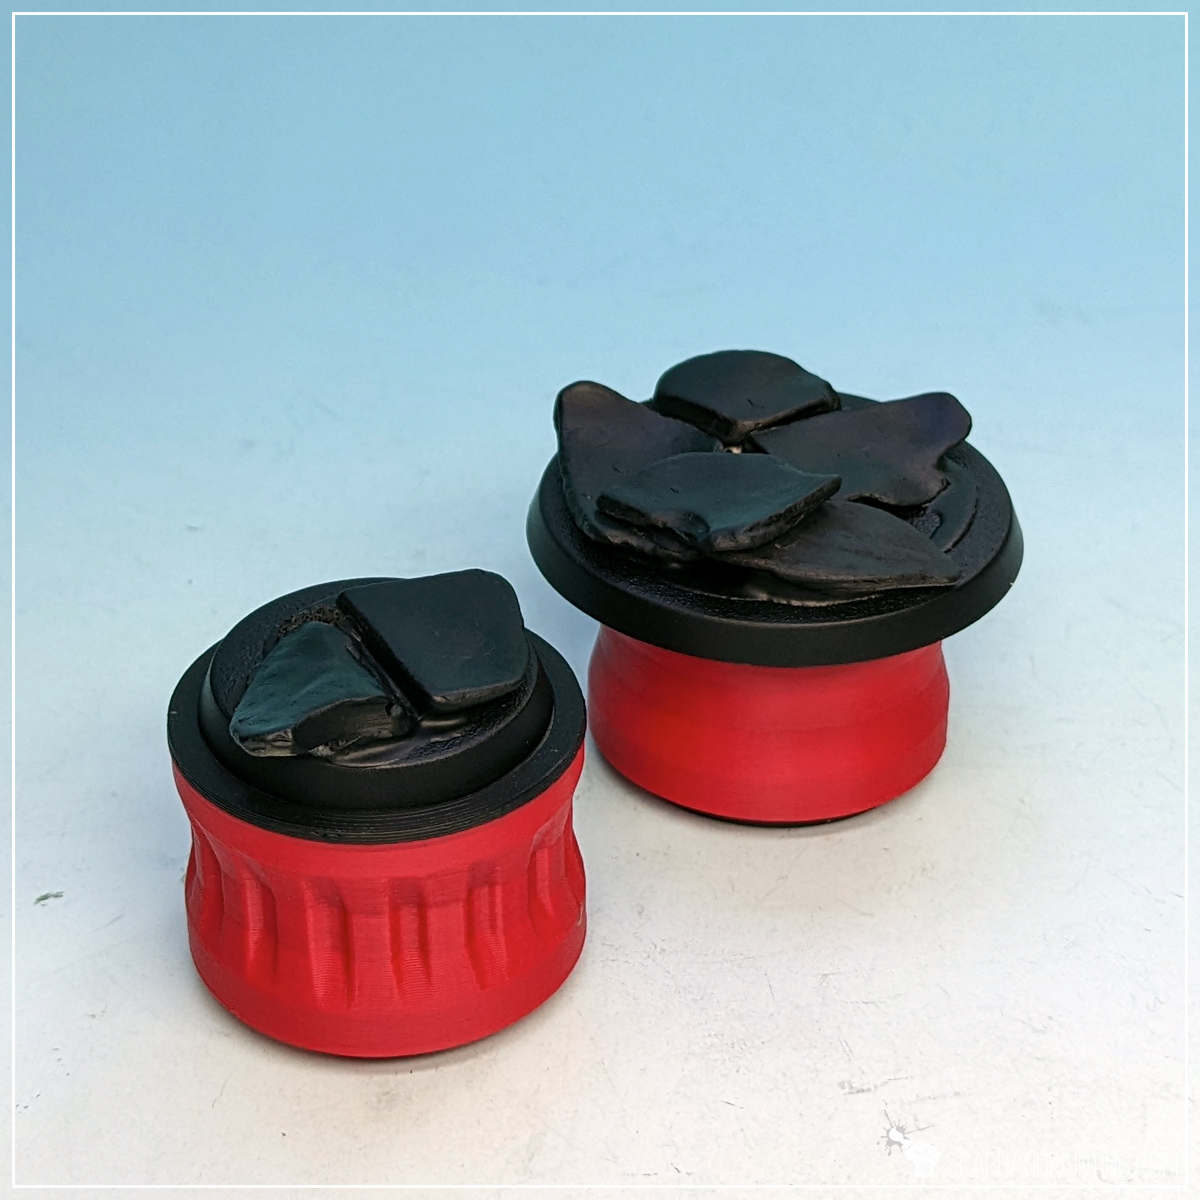
Step three: Undercoat
Once the mix of glue dried up nicely I moved to undercoating. This was done with a smooth layer of Citadel Chaos Black spray primer.
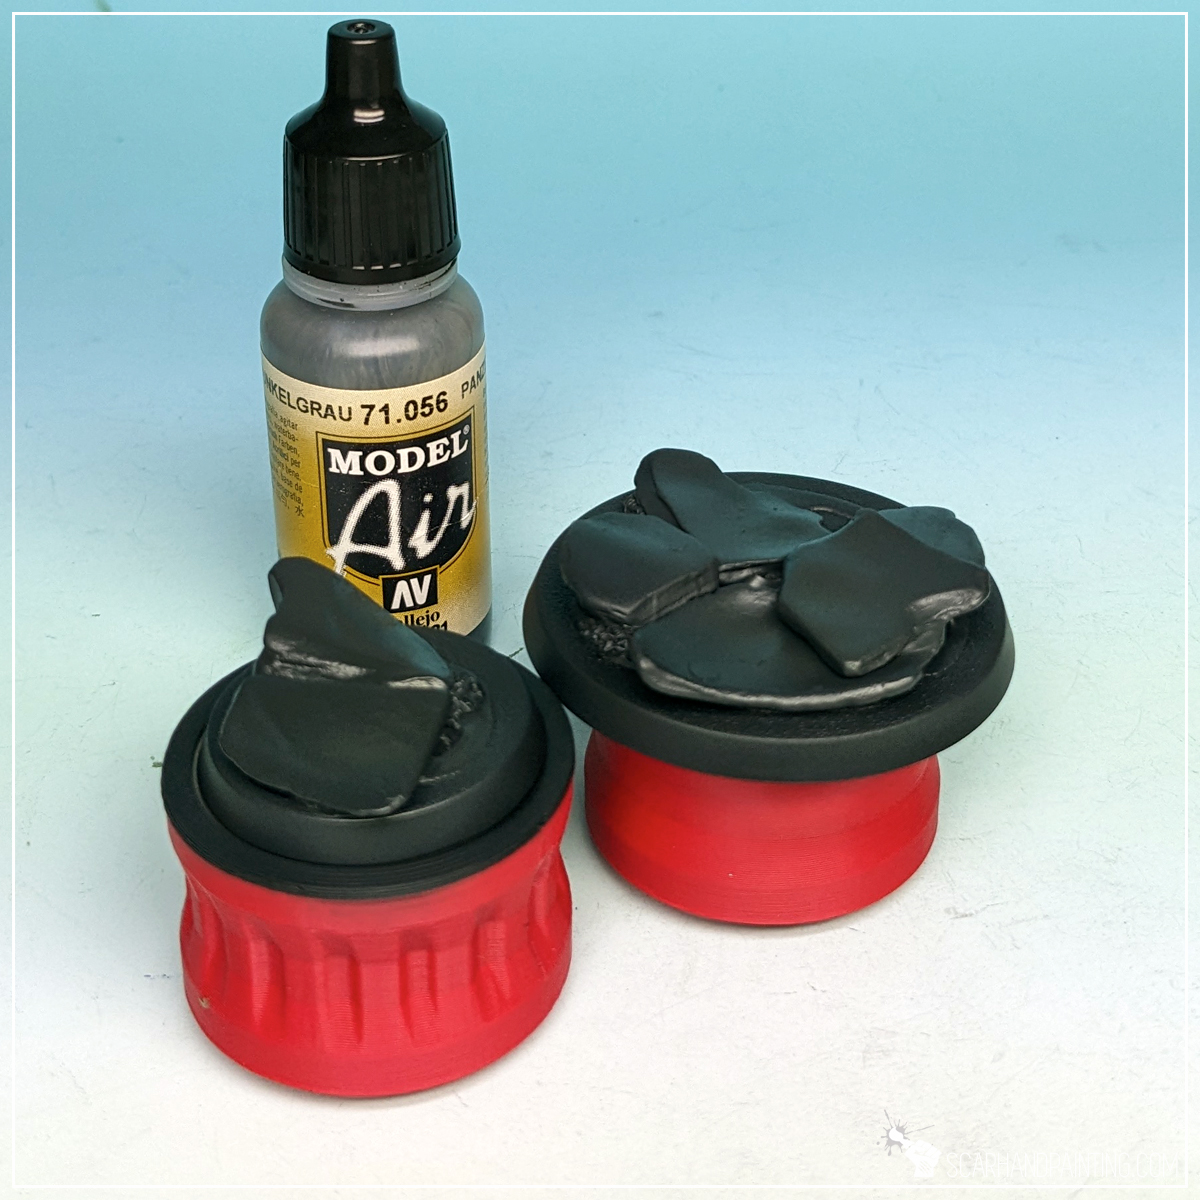
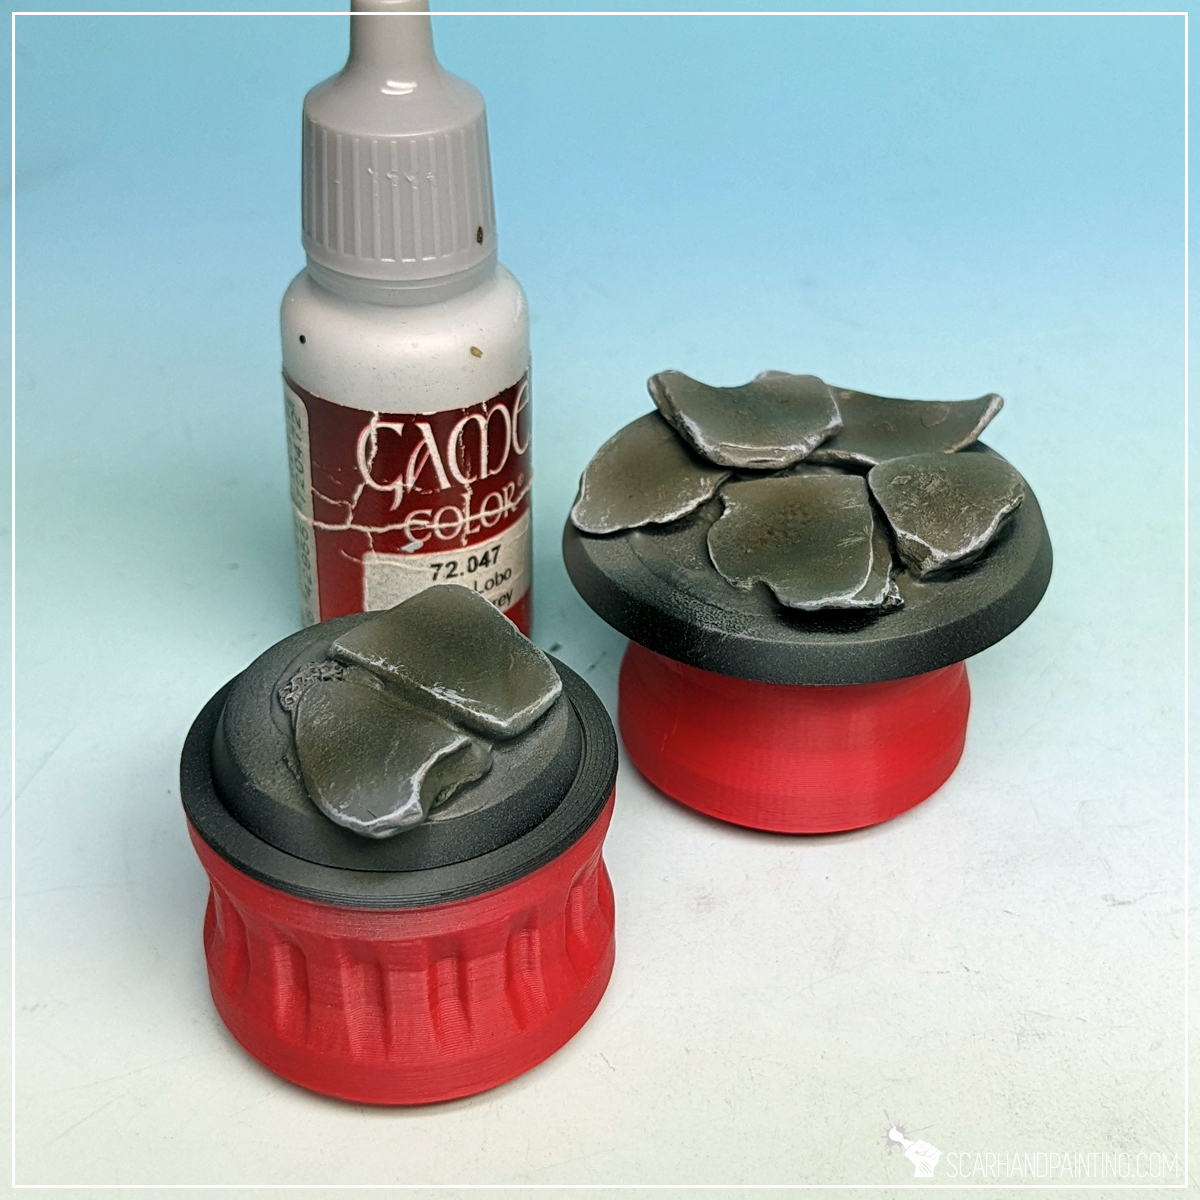
Step four: Base Color
I started painting by airbrushing a strong layer of Vallejo Panzer Dark Grey (air), straight from the pot. I then applied a slightly thinned Vallejo Light Grey Green (air), followed by Vallejo Cold Grey (air). In both cases I tried to reduce the area of paint to add color differentiation.
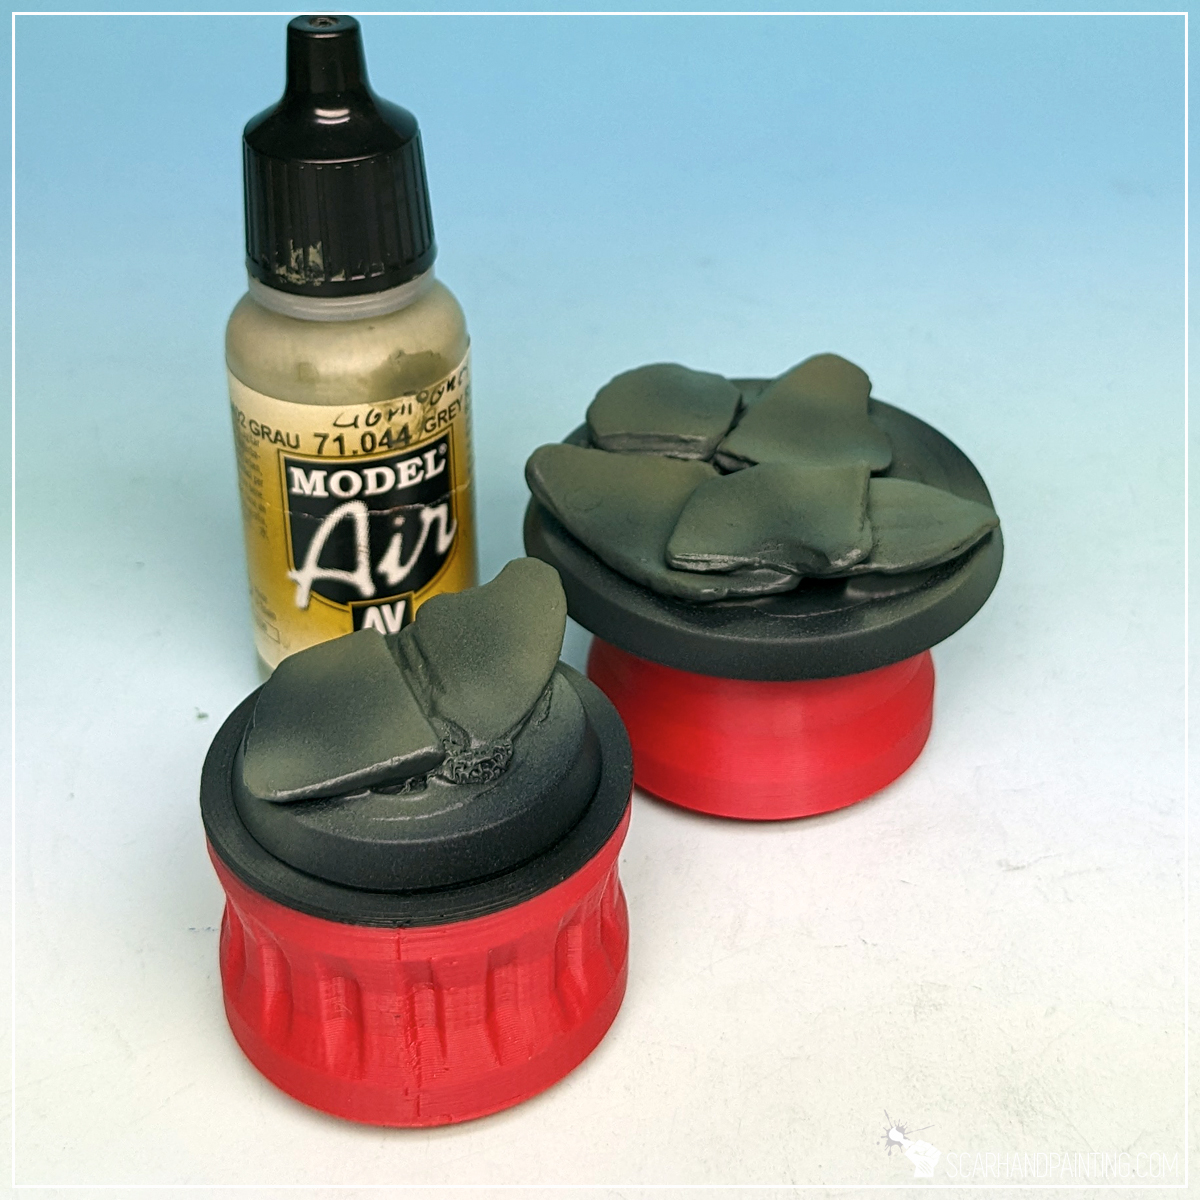

Step five: Highlights
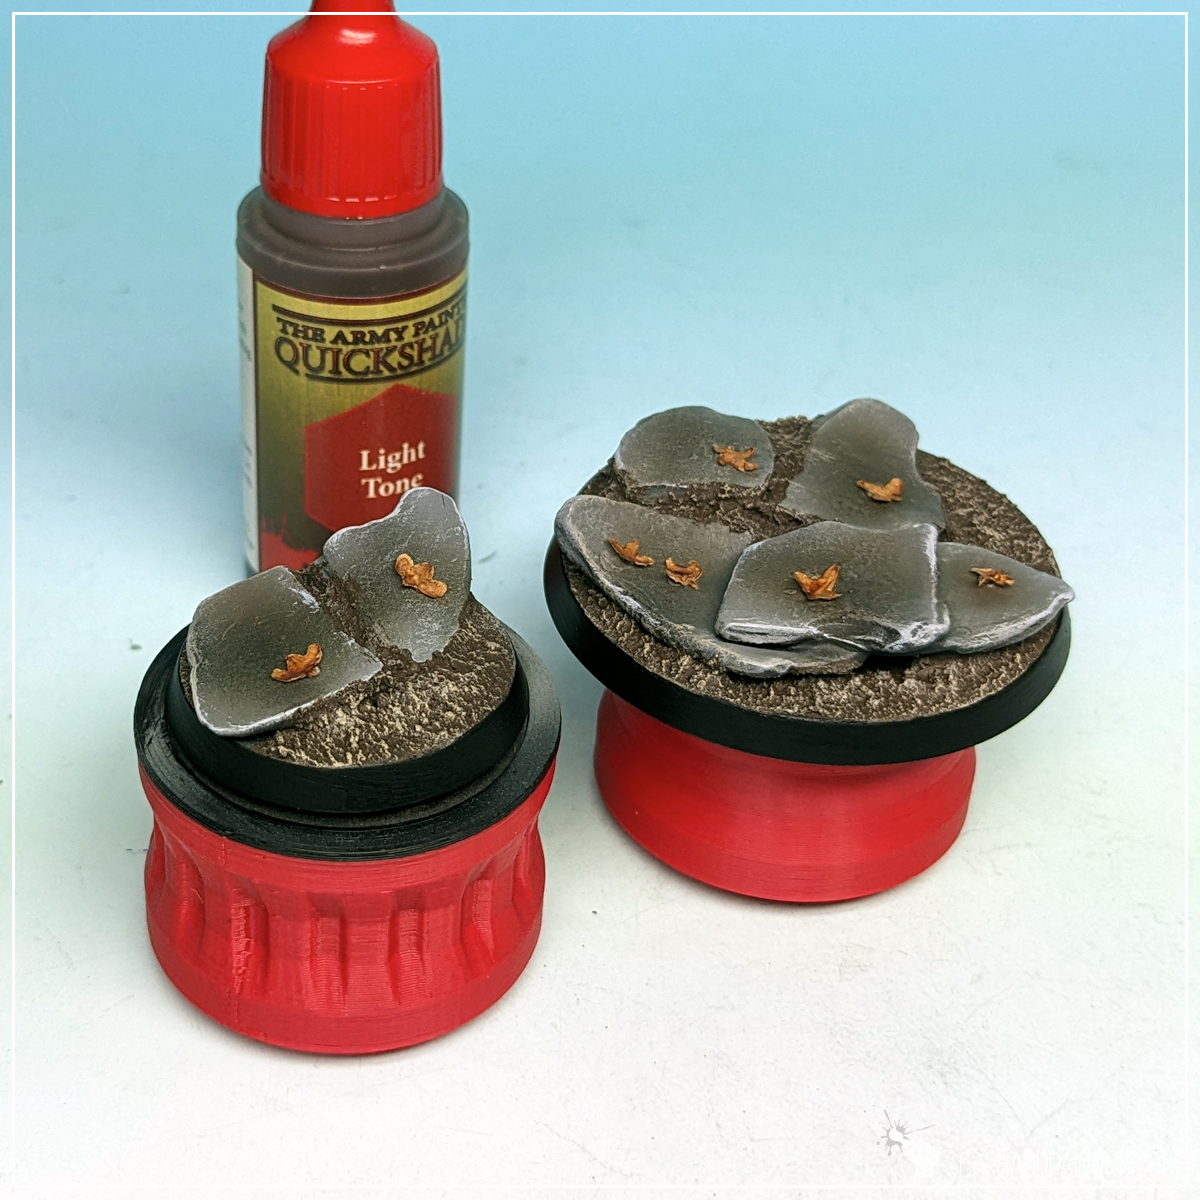
Next I applied a drybrush of Vallejo Medium Sea Grey all over the bases, followed by edge drybrush of Vallejo Wolf Grey. Finally I softly airbrushed Army Painted Strong Tone Quickshade onto the middle points of each individual stone on the base, and slightly around. All of this to add more visual volume.


Step six: Final Highlighs
I then stippled a bit of Vallejo Wolf Grey on the edges of each individual stone, to make them stand out a bit more.
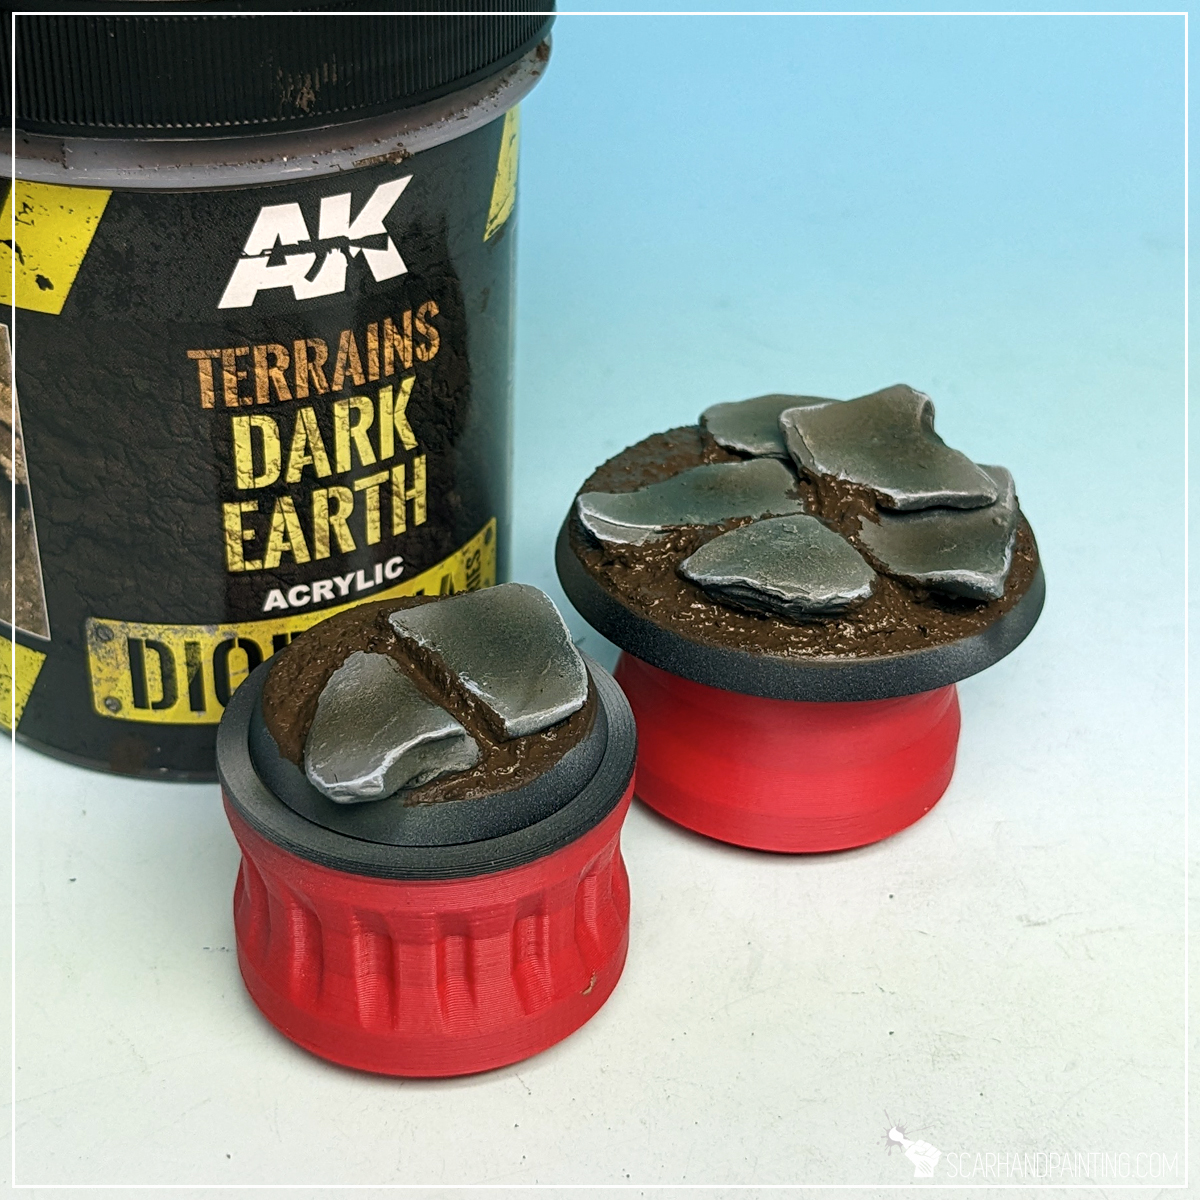
Step seven: Ground Texture
Next I moved to my favorite texture of all time – AK Interactive Dark Earth diorama series that you can learn more about here. I applied a thick layer of the texture, let it dry than drybrushed Citaled Karak Stone on top.

Step eight: Leaves
Then I applied few small drops of super glue and put a Birch tree seed on top of each. Once dry, leaves got painted with Army Painter Soft Tone Quickshade, to add color depth and just some durability.

Step nine: Final Touches
Finally I repainted base’s edges black and airbrushed a strong layer of Vallejo Polyurethane Matt Varnish all over. Job done.
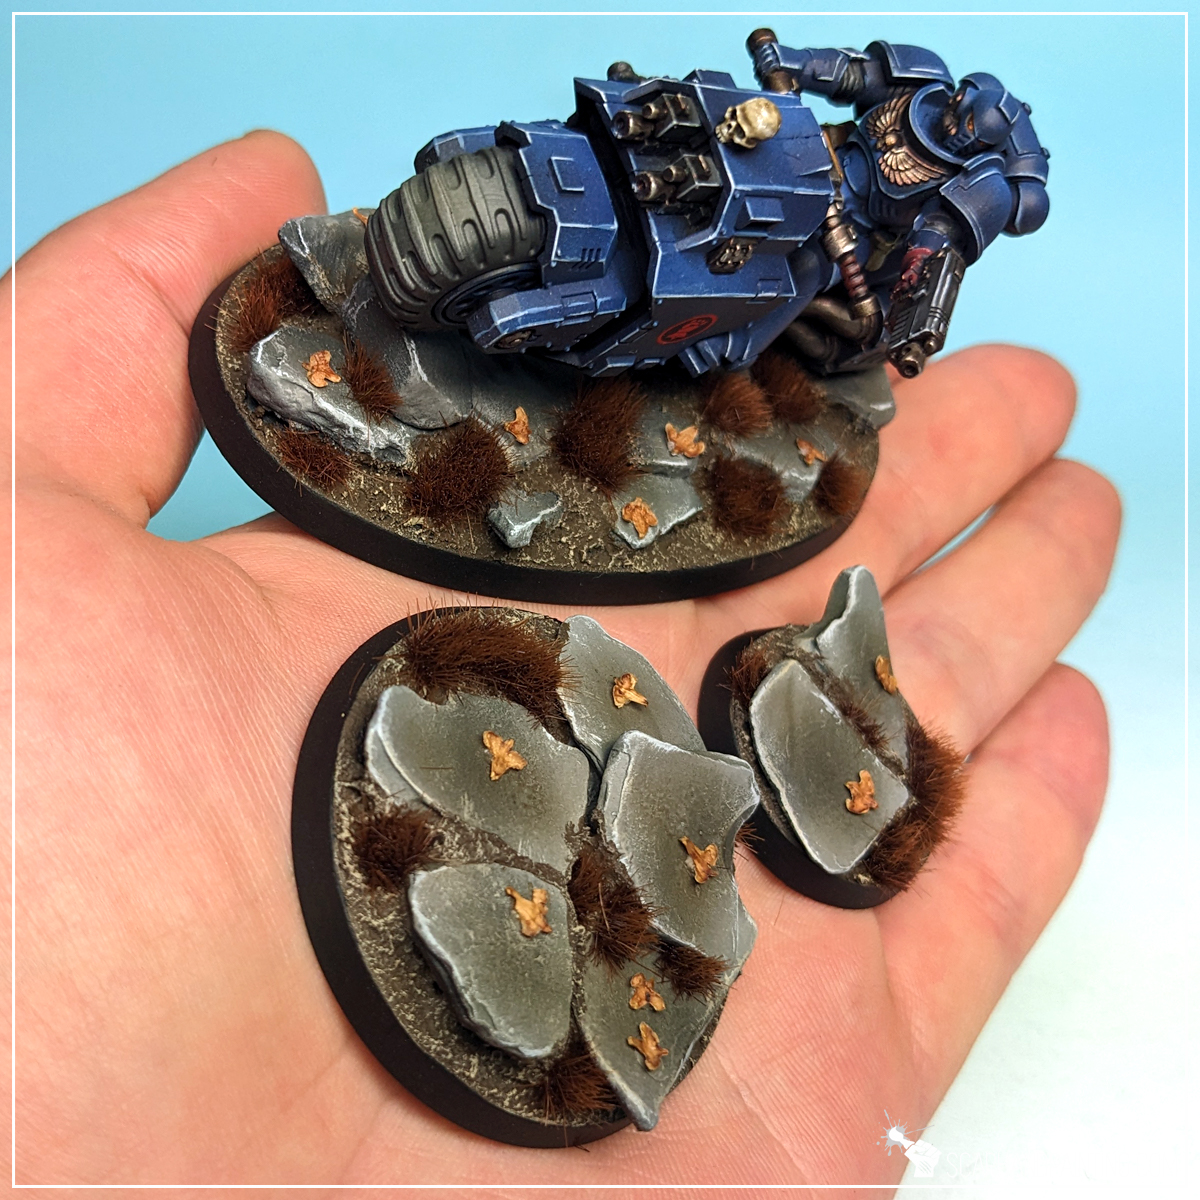
I hope you find this tutorial interesting. Be sure to let me know your thoughts in the comments below, or at Facebook or Instagram. I would also appreciate it if you considered sharing this content with your friends, who might find it useful. Finally if you are looking for a professional miniatures painting service, be sure to contact me with this contact form. I always reply within 24 hours, after which please check out your spam folder.

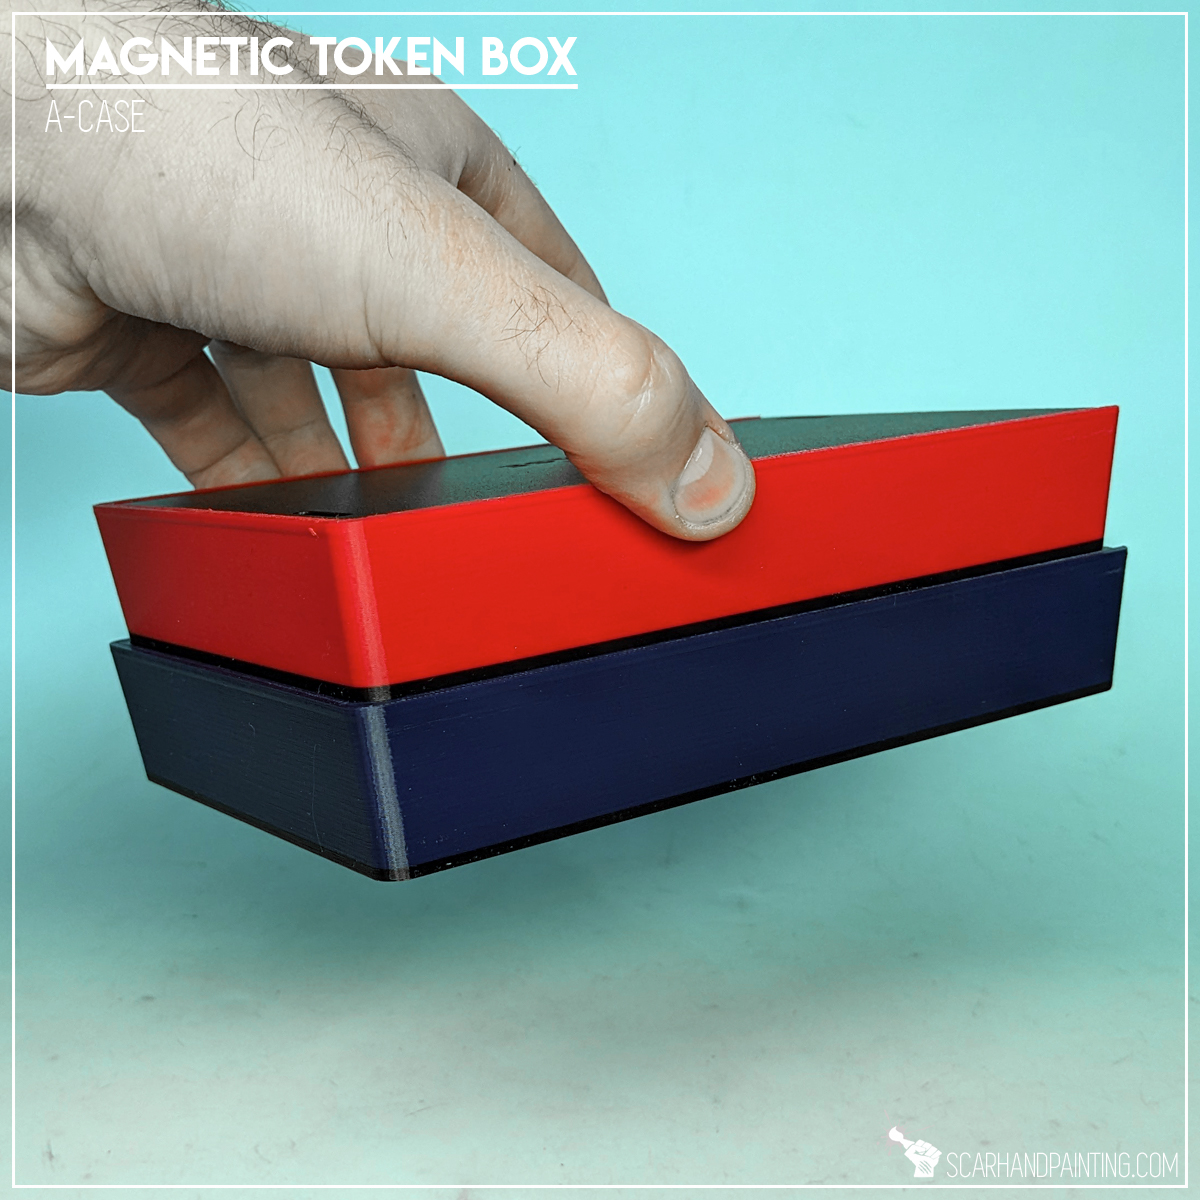
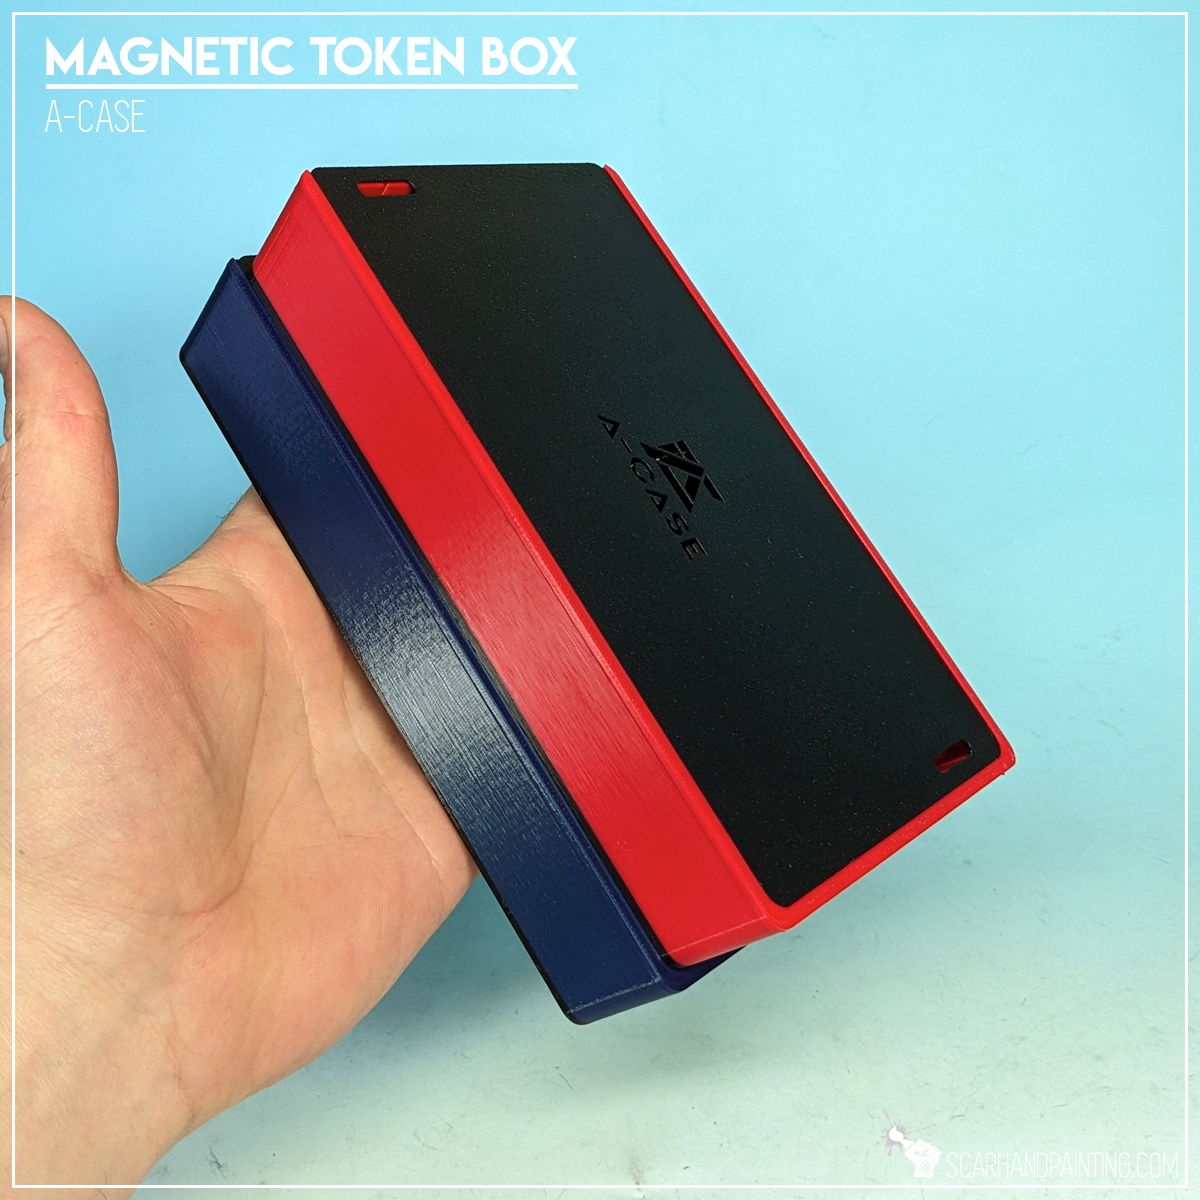
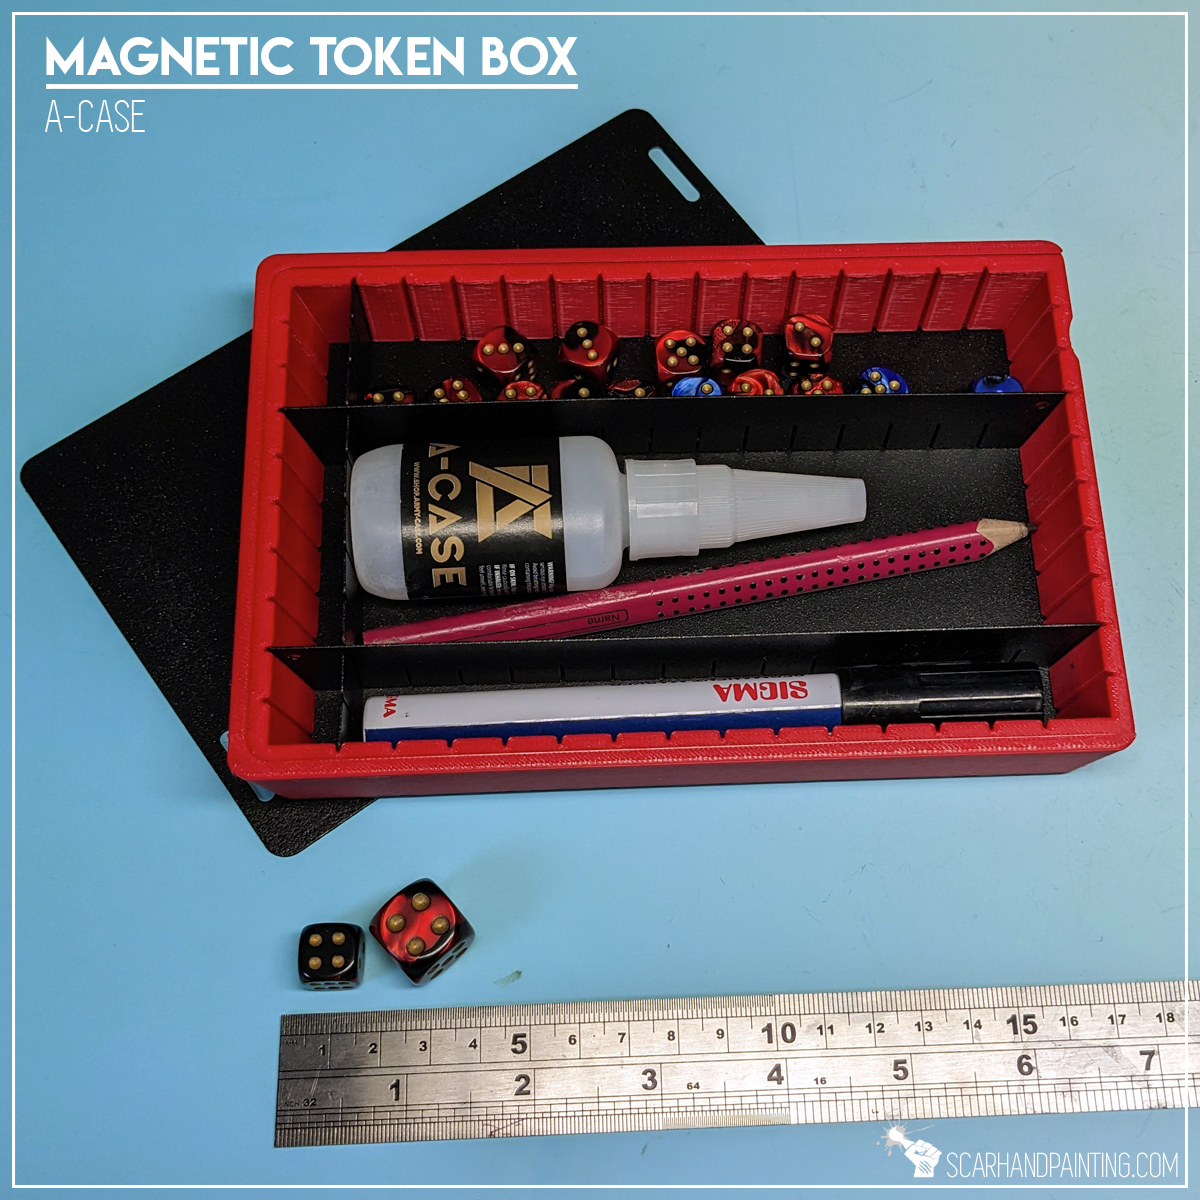
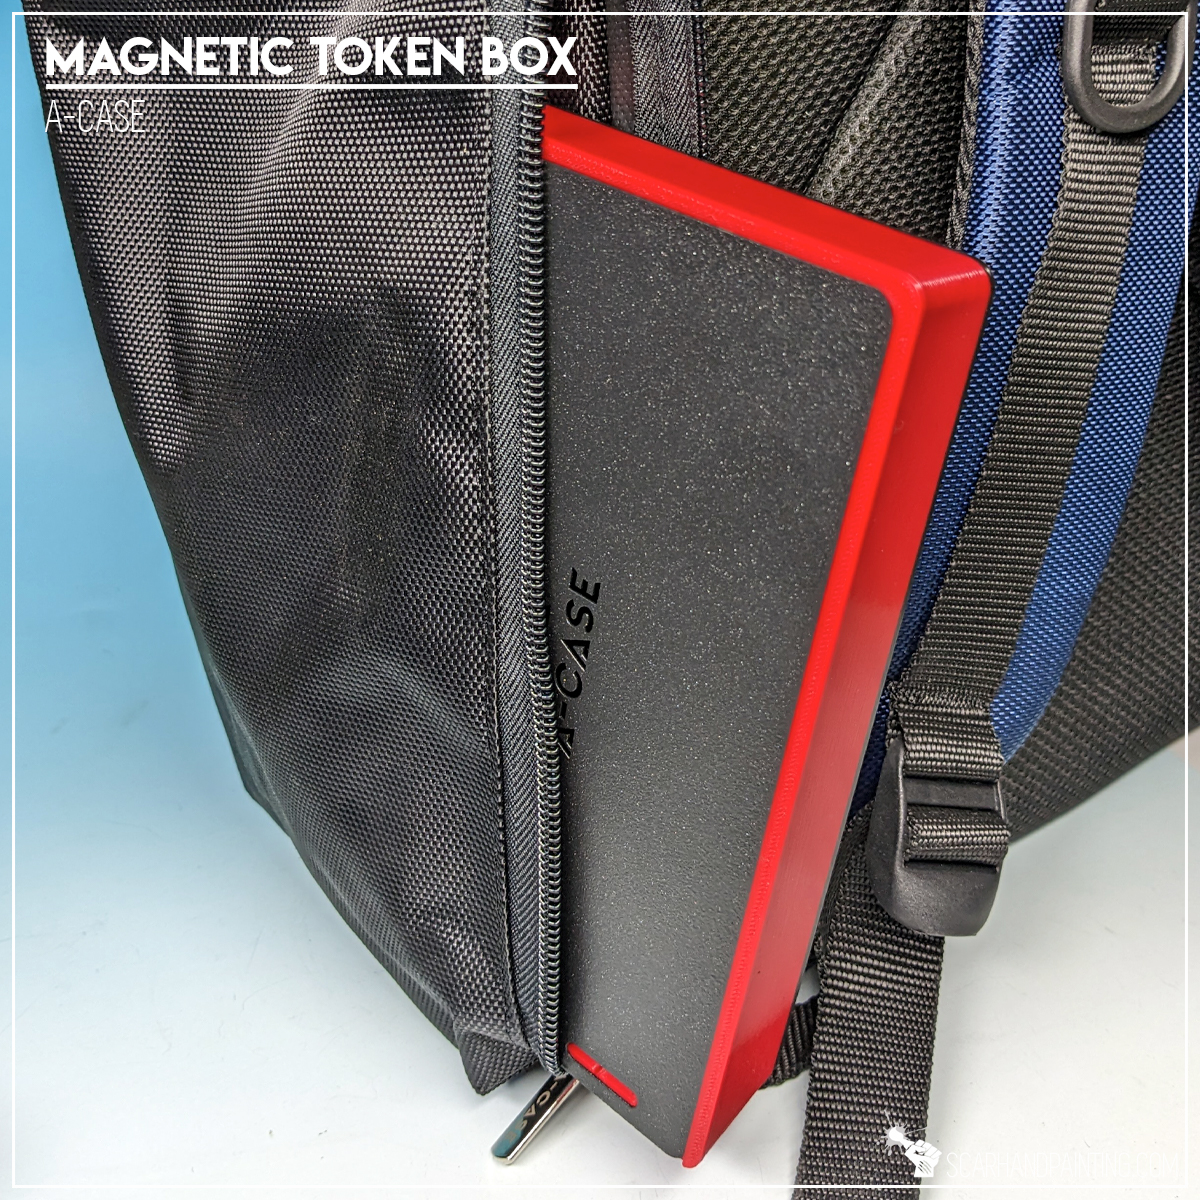
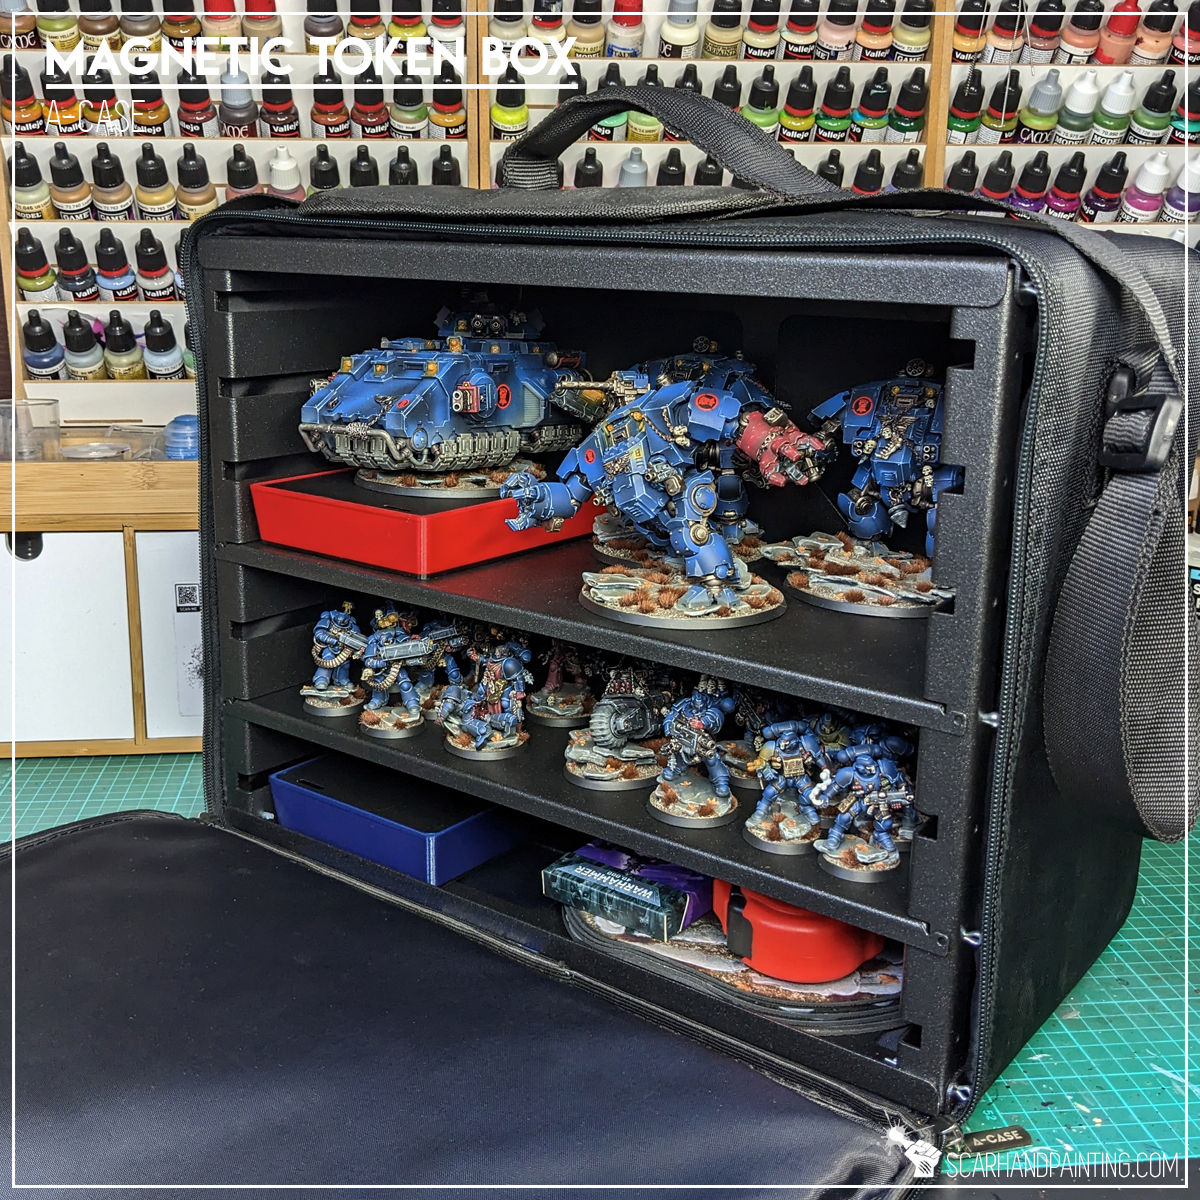
Transporting your miniatures should be smooth and easy. No company seems to embody this philosophy better than A-Case. A relatively small company from Poland, dedicated to producing the very top miniatures transporters. Their entire shtick revolves around magnetism and believe me – Once you go magnetic there’s no going back!
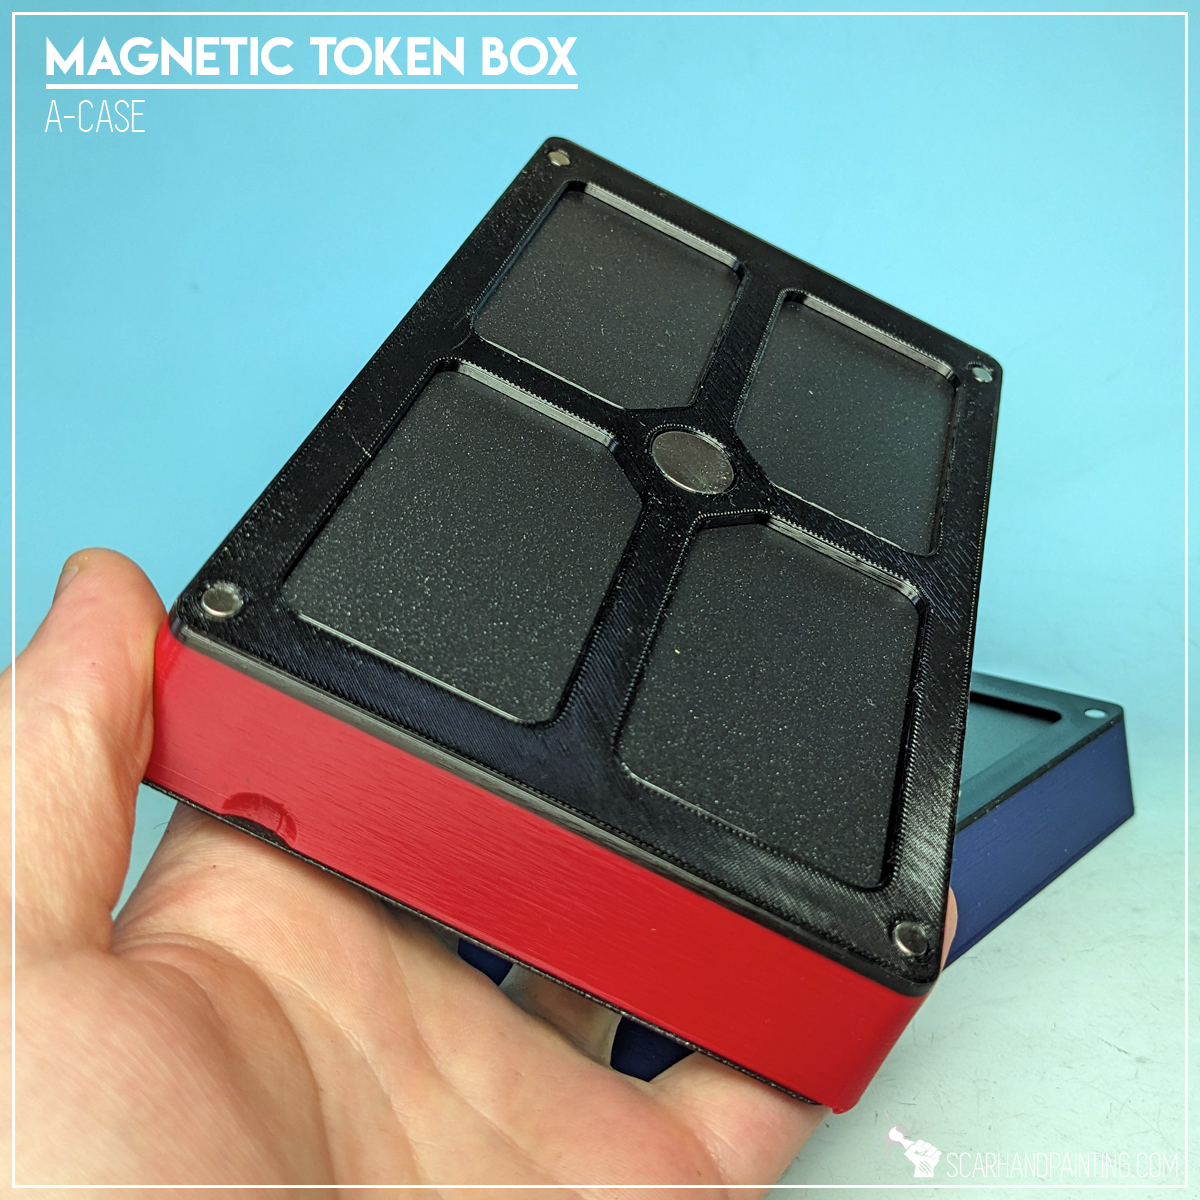
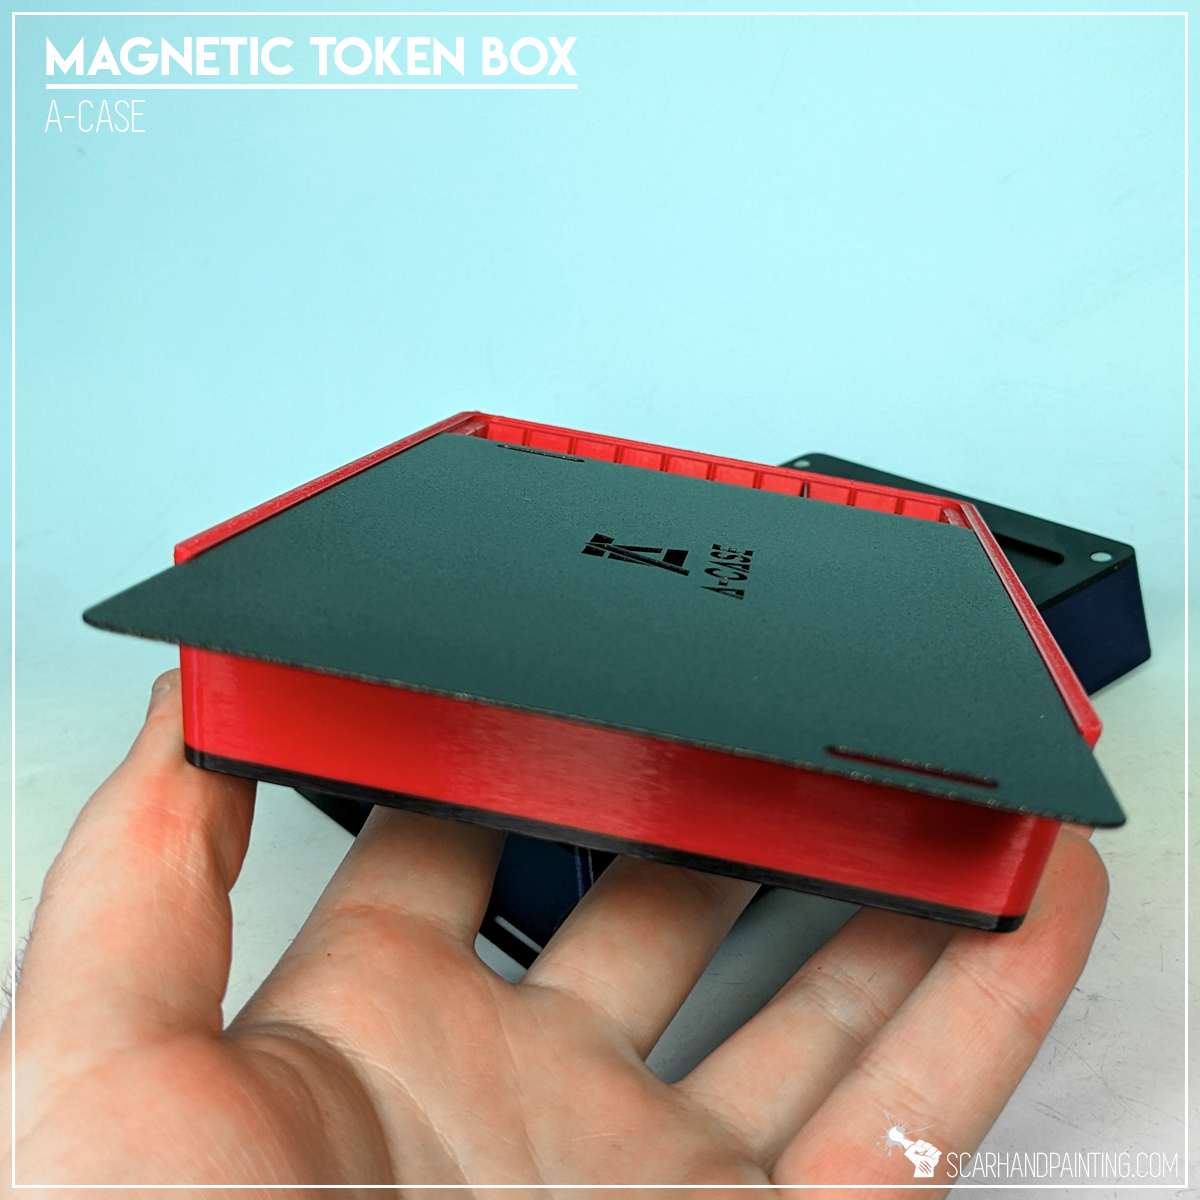
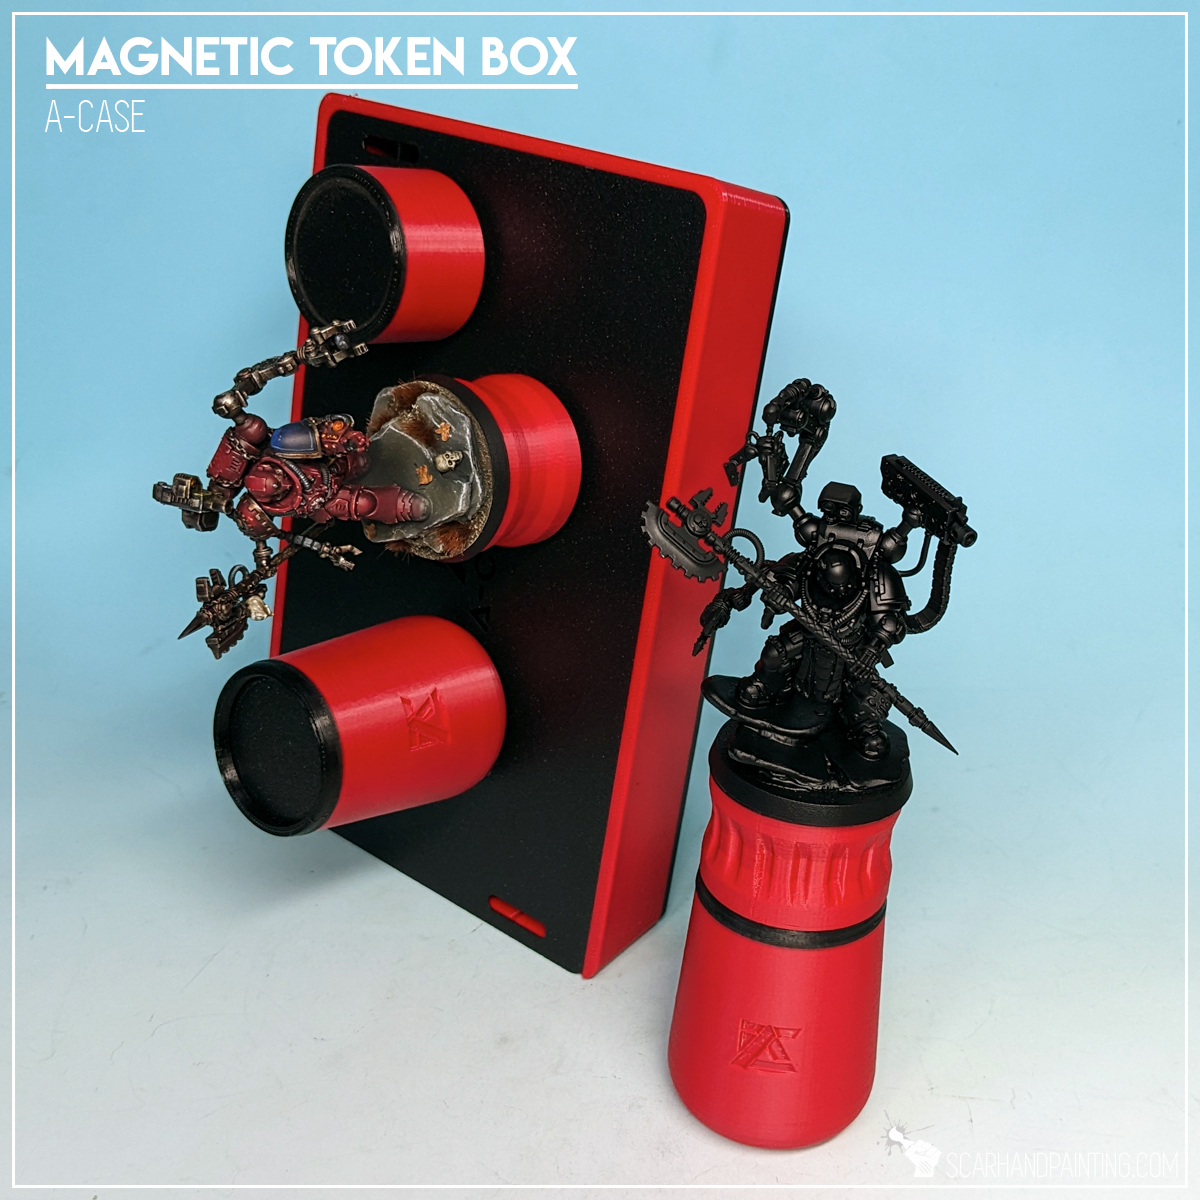
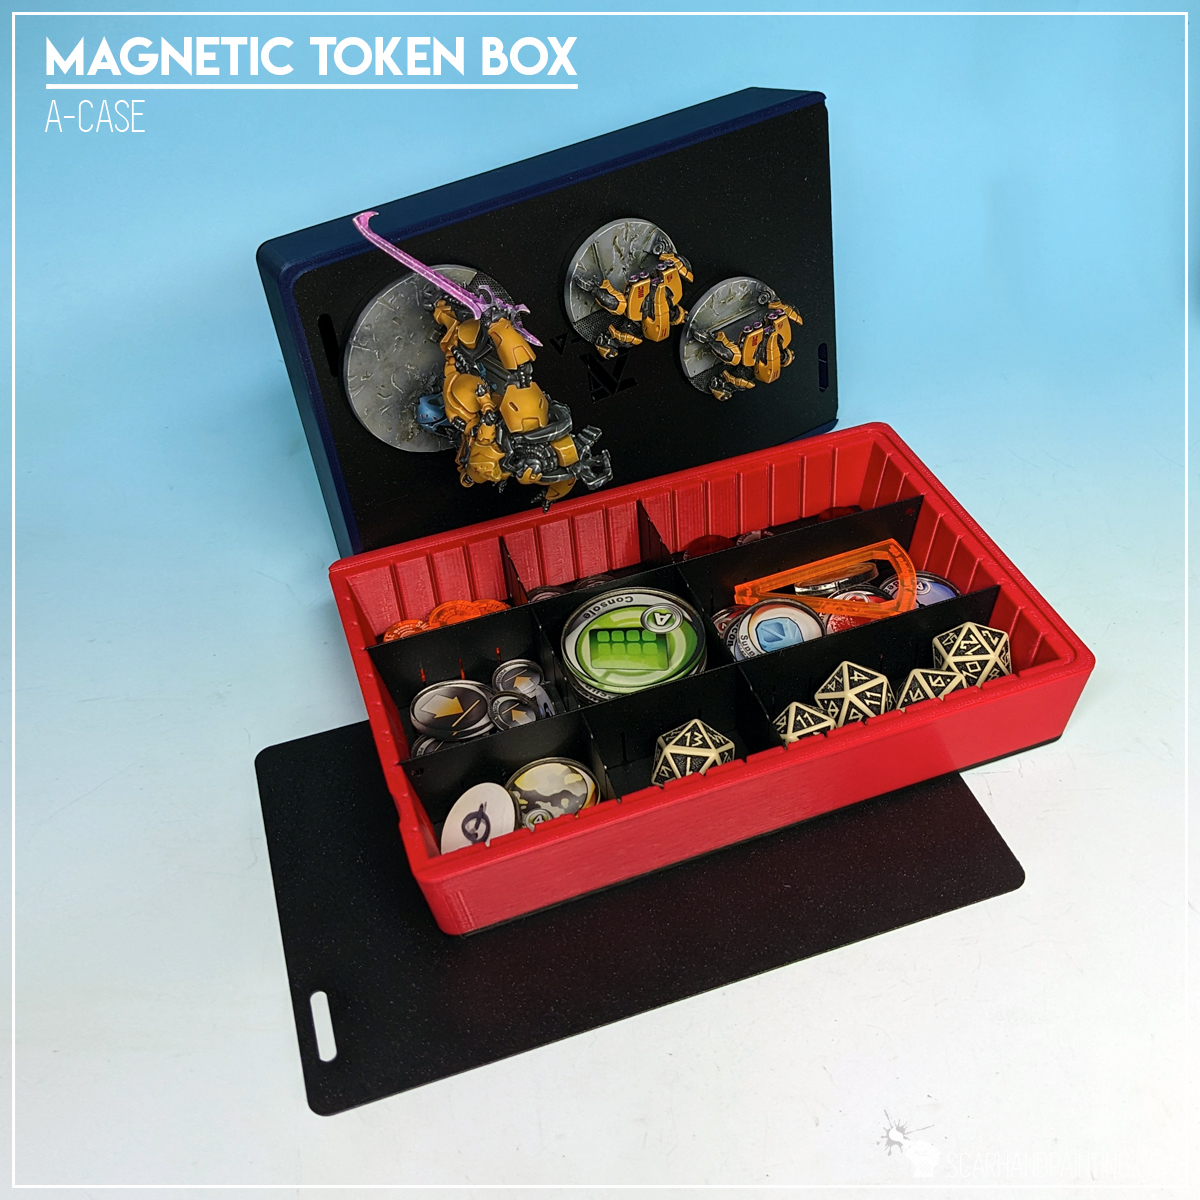
A-Case is best known for their Hybrid series magnetic cases, coming in four different types (and sizes), but there’s more to the line than meets the eye. Lately the company released a Magnetic Token Box, a peripheral accessory fully compatible with their cases. The item is a huge step in improving the comfort of miniatures transportation. Today I will focus on this awesome gadget and present to you its many advantages.


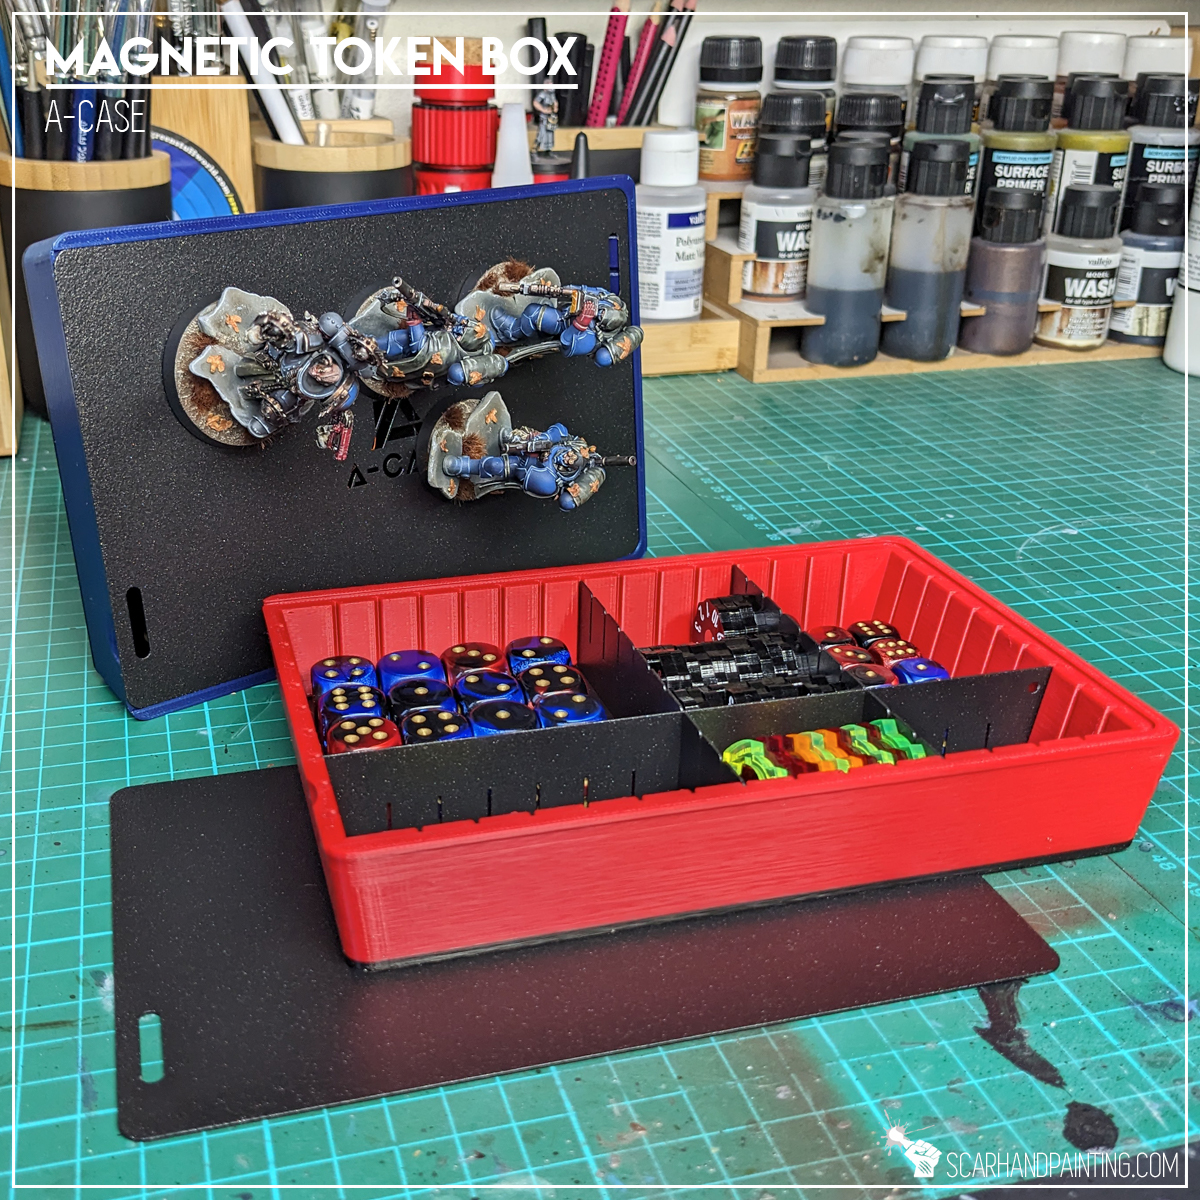
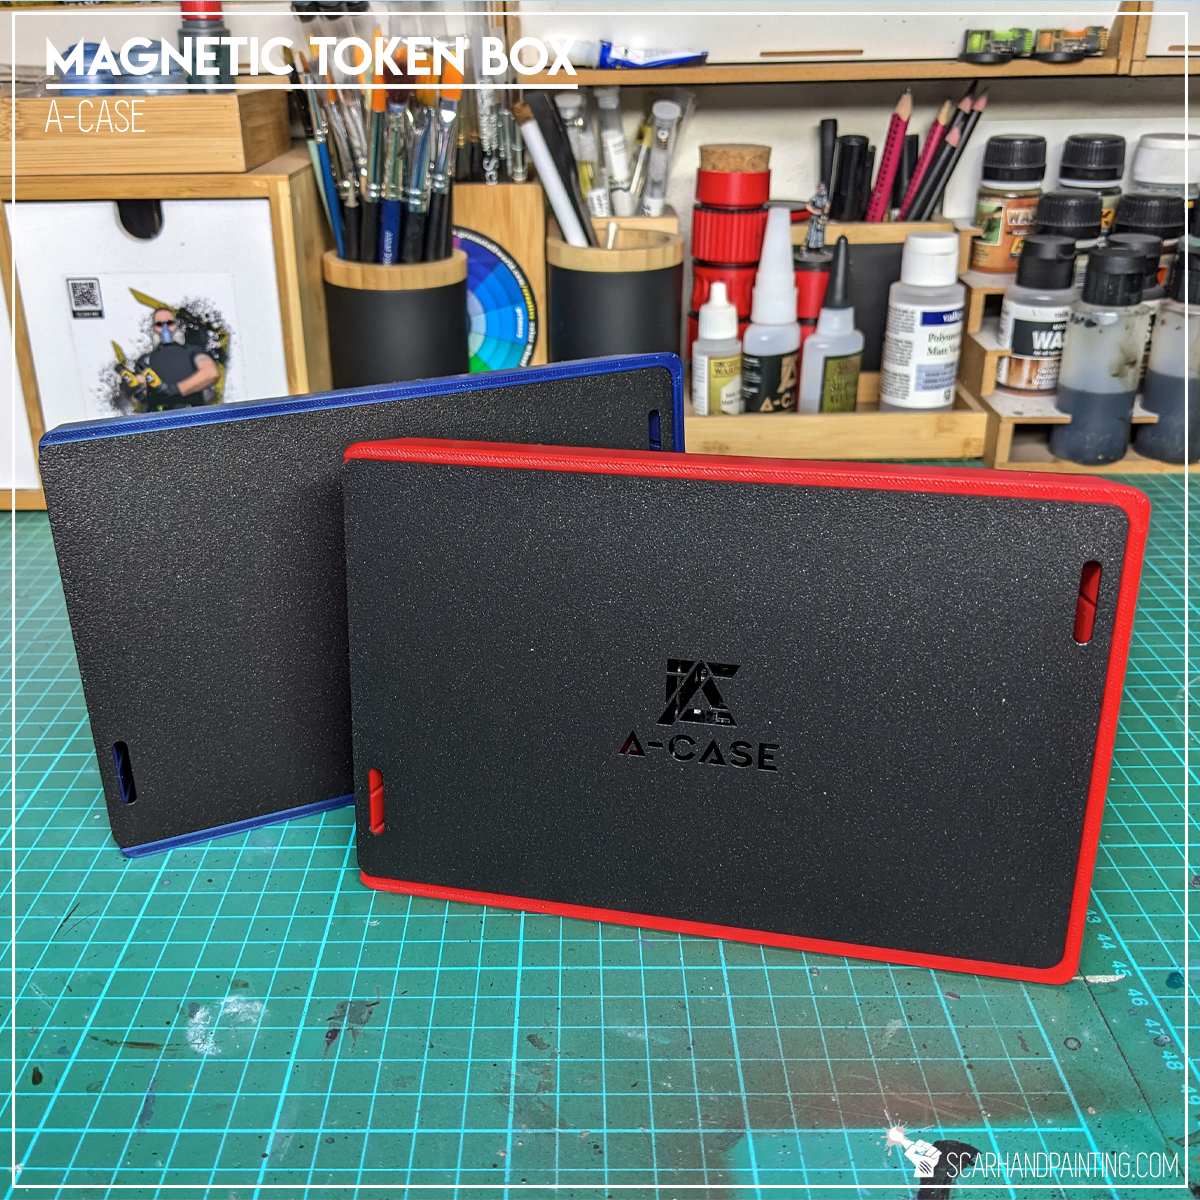
The Magnetic Token Box is an accessory dedicated to transporting a variety of wargaming peripherals, be it dice, laser pointers, gaming tokens and more. Each box is 3d printed with an integrated powder coated metal lid. There are five strong magnets mounted in the underside to immobilize the box inside an A-Case transporter or on top of one another. Boxes come in four colors (Red, Blue, Black and Grey), each 18cm long, 12cm wide and 3cm high (about 7x5x1″). Within you will find adjustable compartments consisting of five powder coated metal walls.
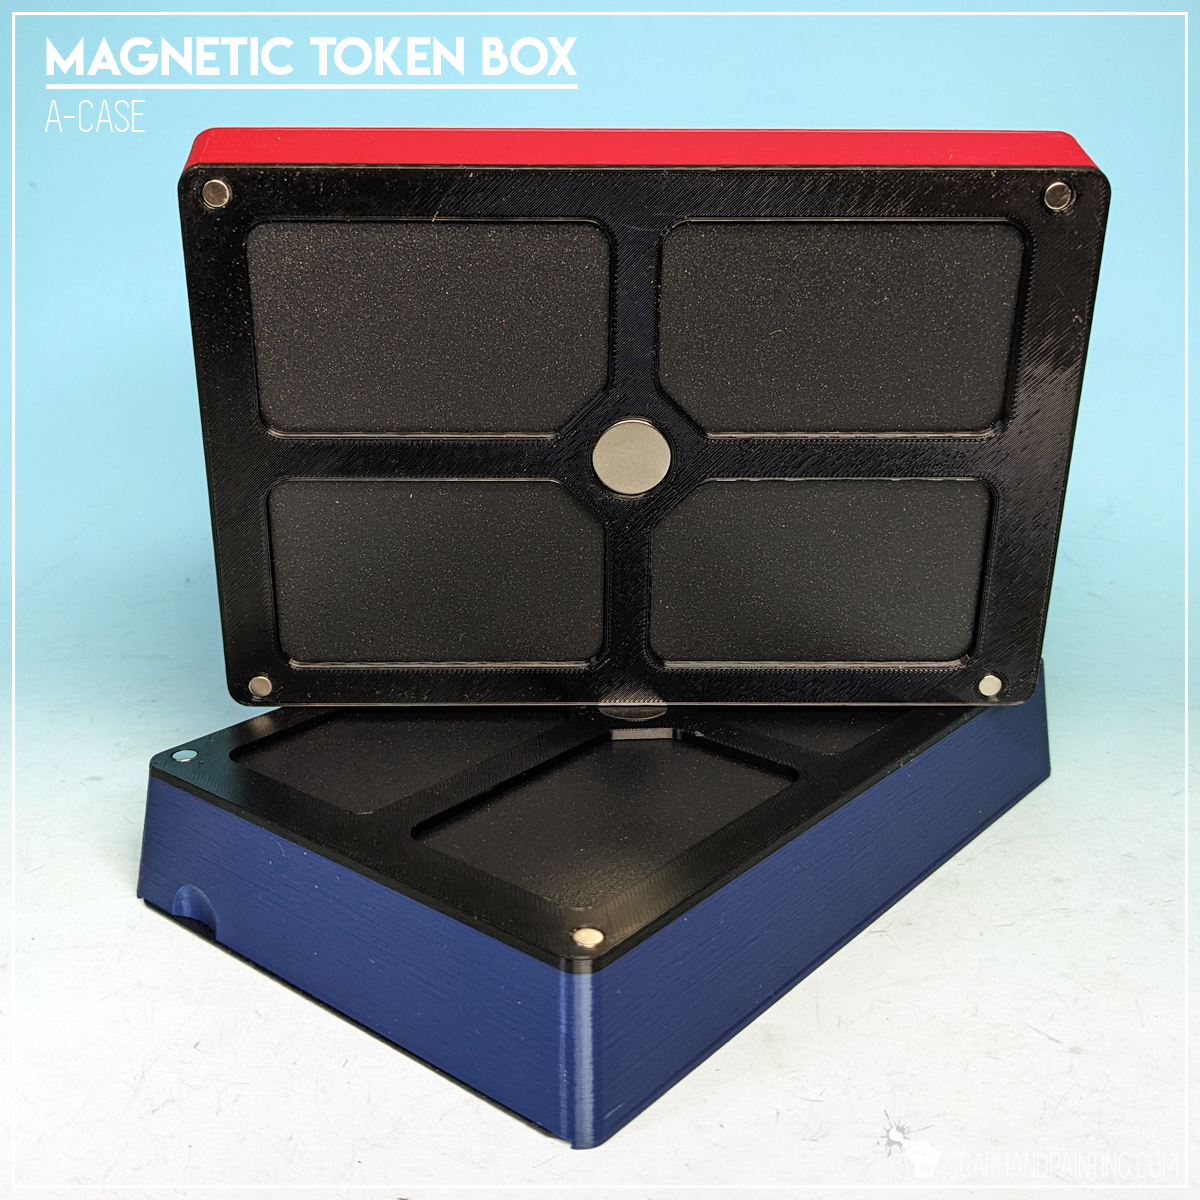
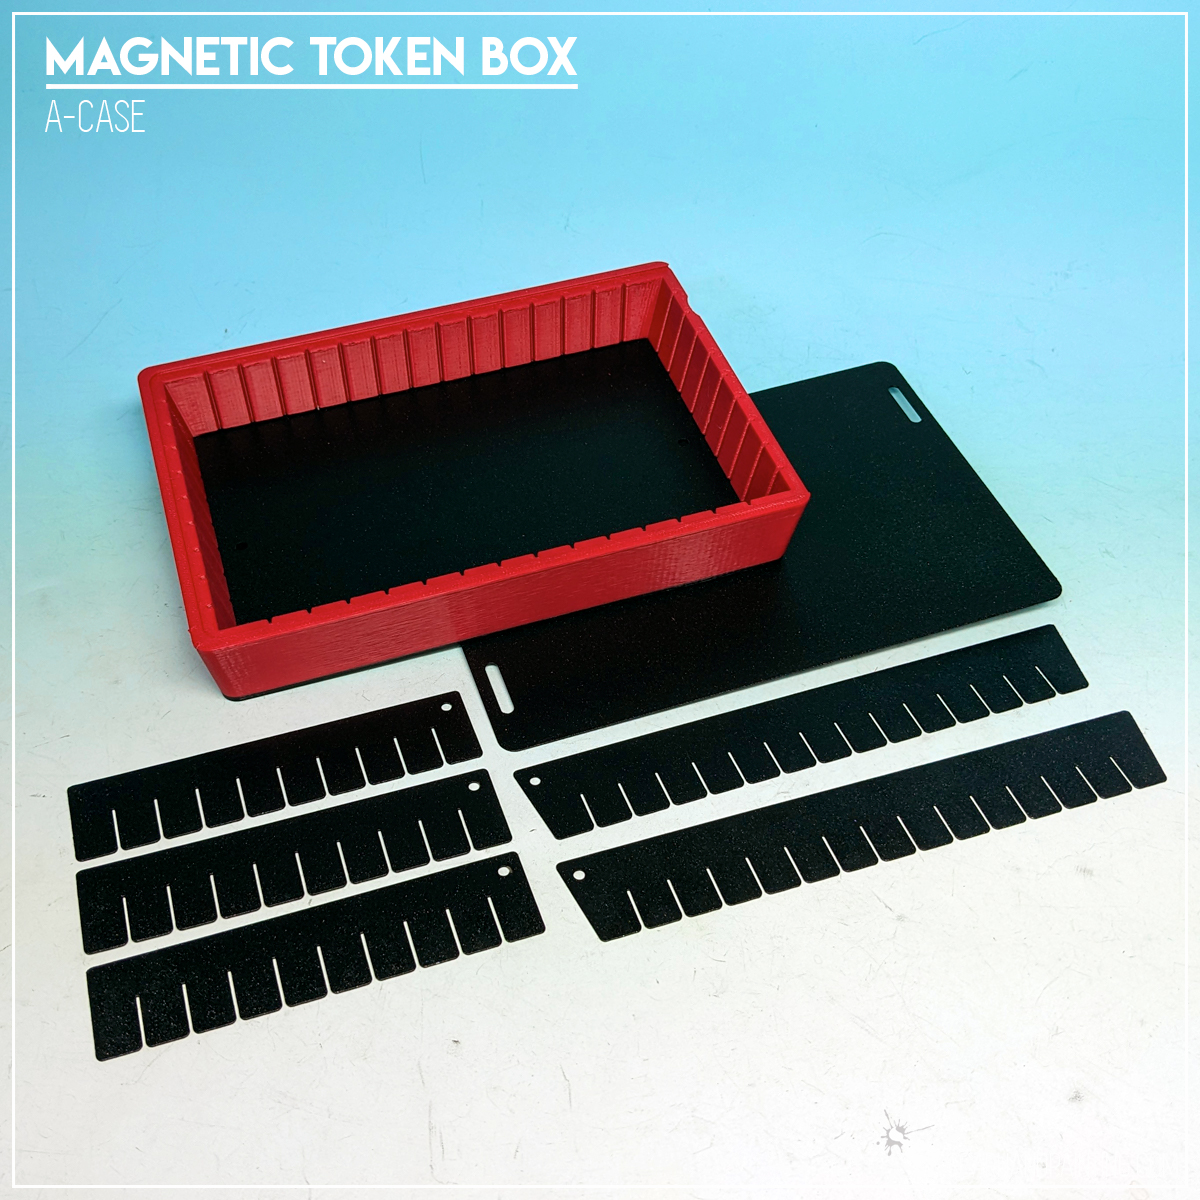
Magnetic Token Box is more than just your typical dice/token holder. It has a wide range of features. The most interesting of, are compatible with the magnetic theme of the A-Case products.
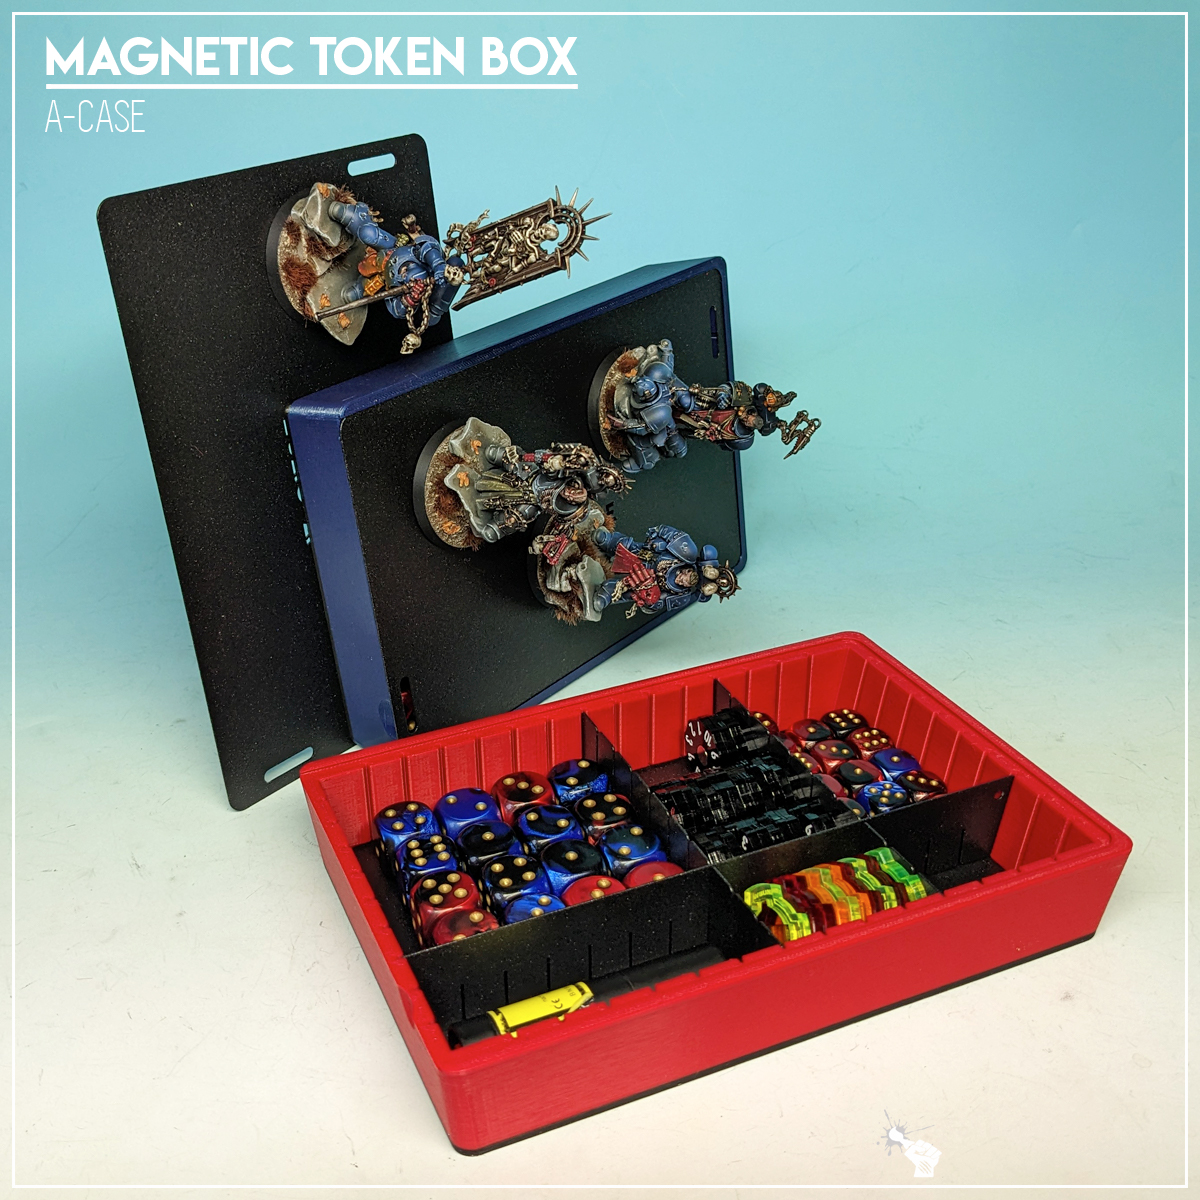

Although I have purchased both boxes used in this review fairly recently, I have been using the beta version of the Magnetic Token Box since last year. I have provided feedback, then watched as the design evolved through multiple iterations, new features being added, size adjusted. I can only say that the actual product got optimized to a point where I consider it perfect for wargaming related needs. The quality is great and the long list of features and possible uses is just mind blowing. It is also pretty well priced for what it offers. Magnetic Token Box is LEGO level of brilliant. I wholeheartedly invite you to try the product out.


I hope you find this review interesting. Be sure to let me know your thoughts in the comments below, or at Facebook or Instagram. I would also appreciate it if you considered sharing this content with your friends, who might find it useful. Finally if you are looking for a professional miniatures painting service, be sure to contact me with this contact form. I always reply within 24 hours, after which please check out your spam folder.

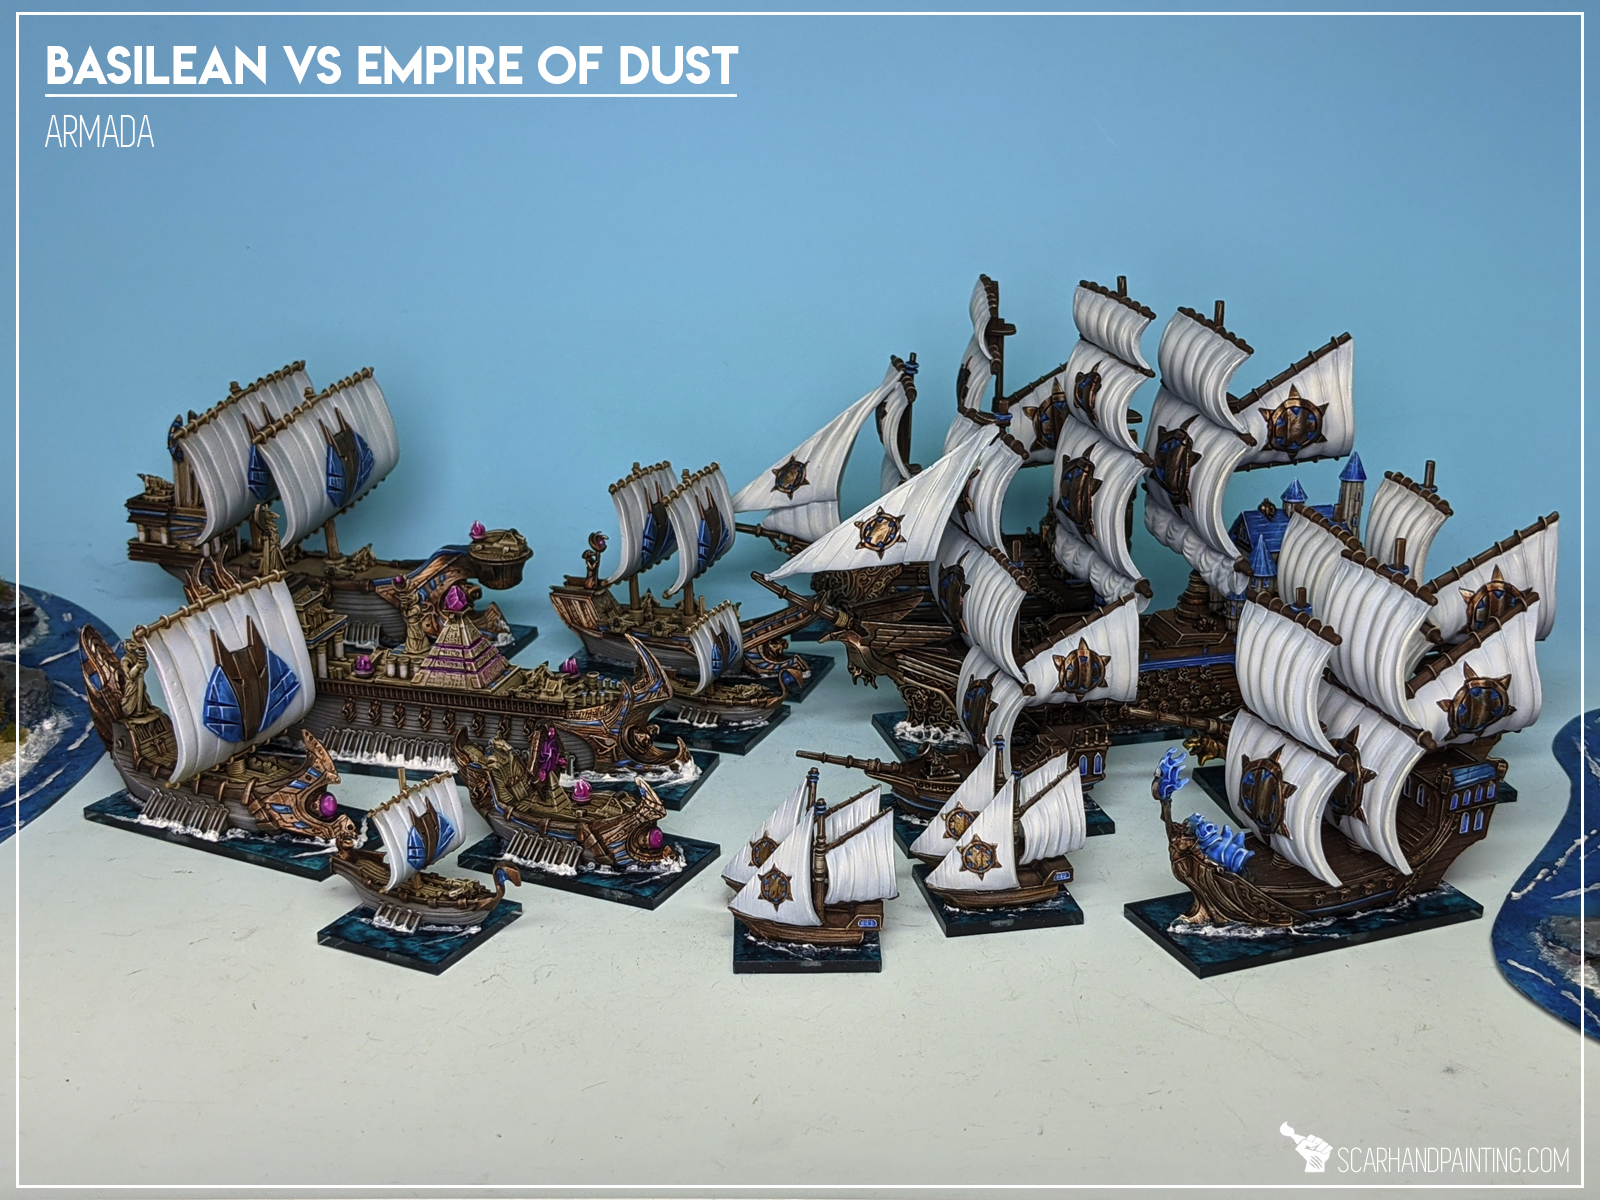
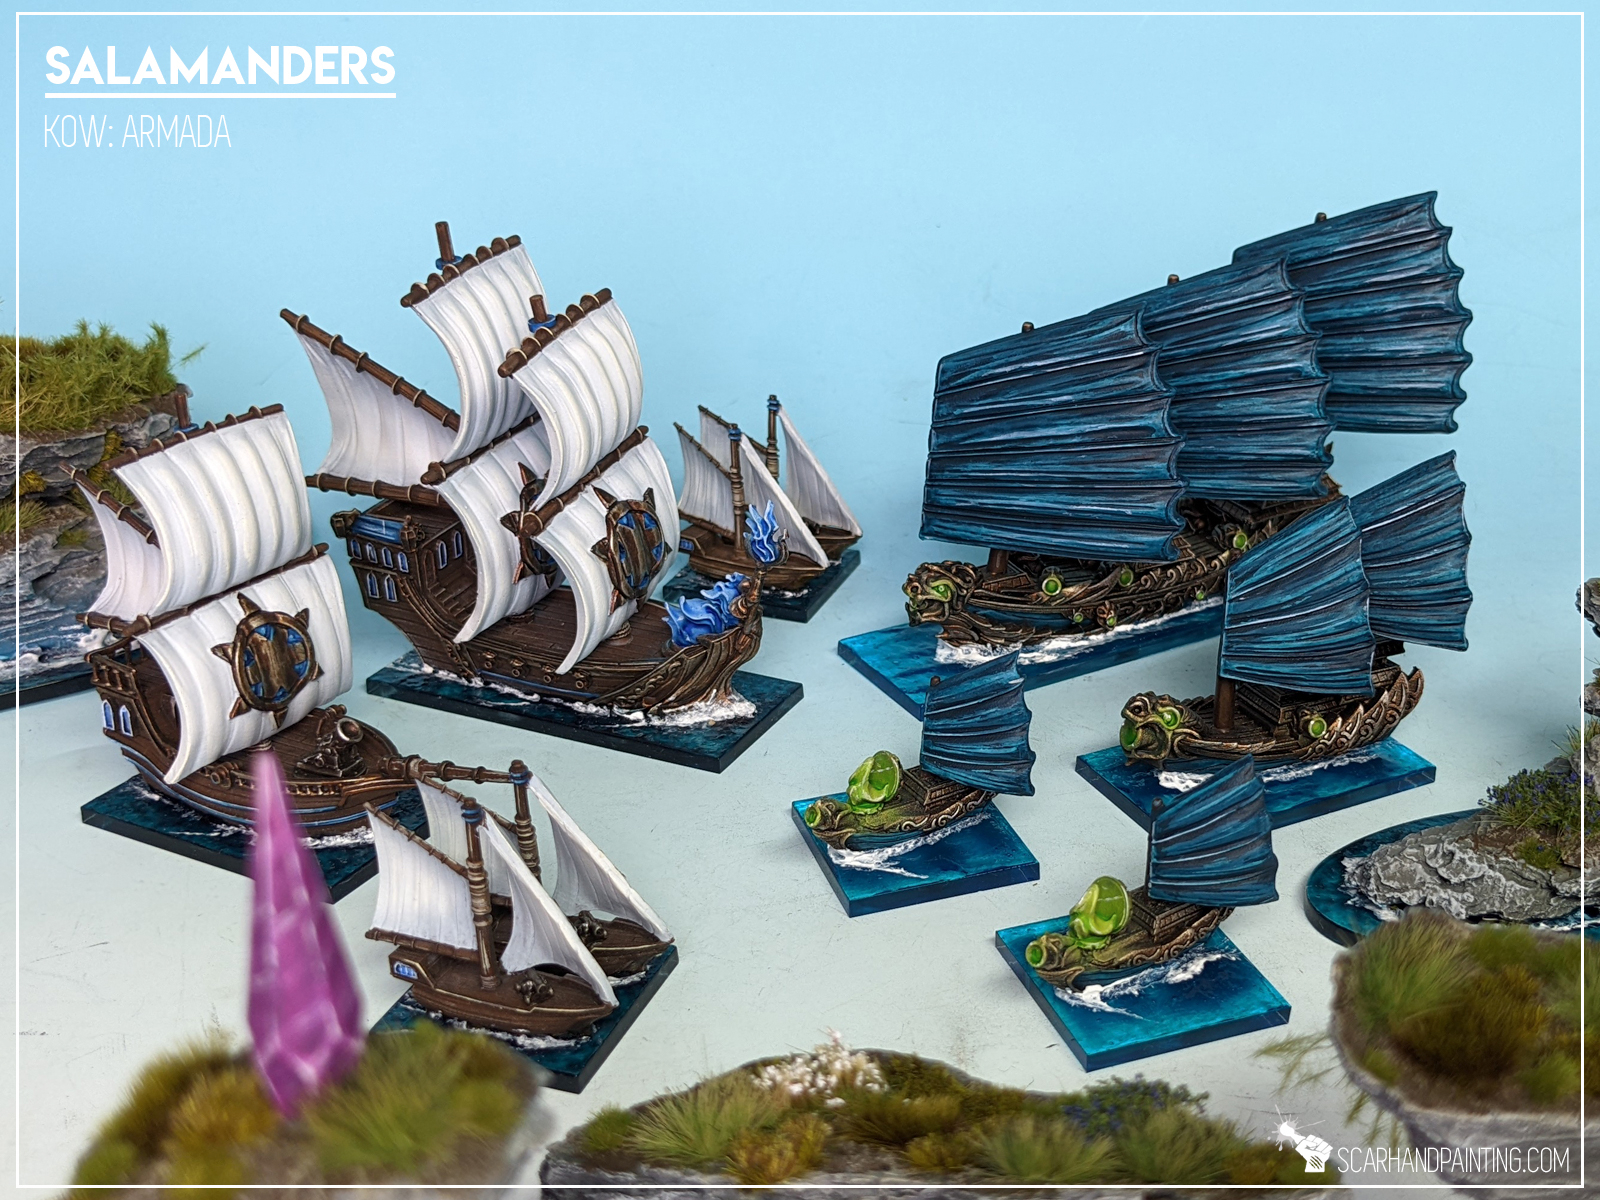
Ahoy Sailors! As you know I am most and foremost a passionate hobbyist. That being said I am also a pirate, a scoundrel and a fanatical enthusiast of Mantic Games Kings of War: Armada – a naval strategy game set in a rich world of Pannithor, pitting multiple wonderfully crafted and strongly themed factions against one another. Today I’m here to share some of my maritime experience.
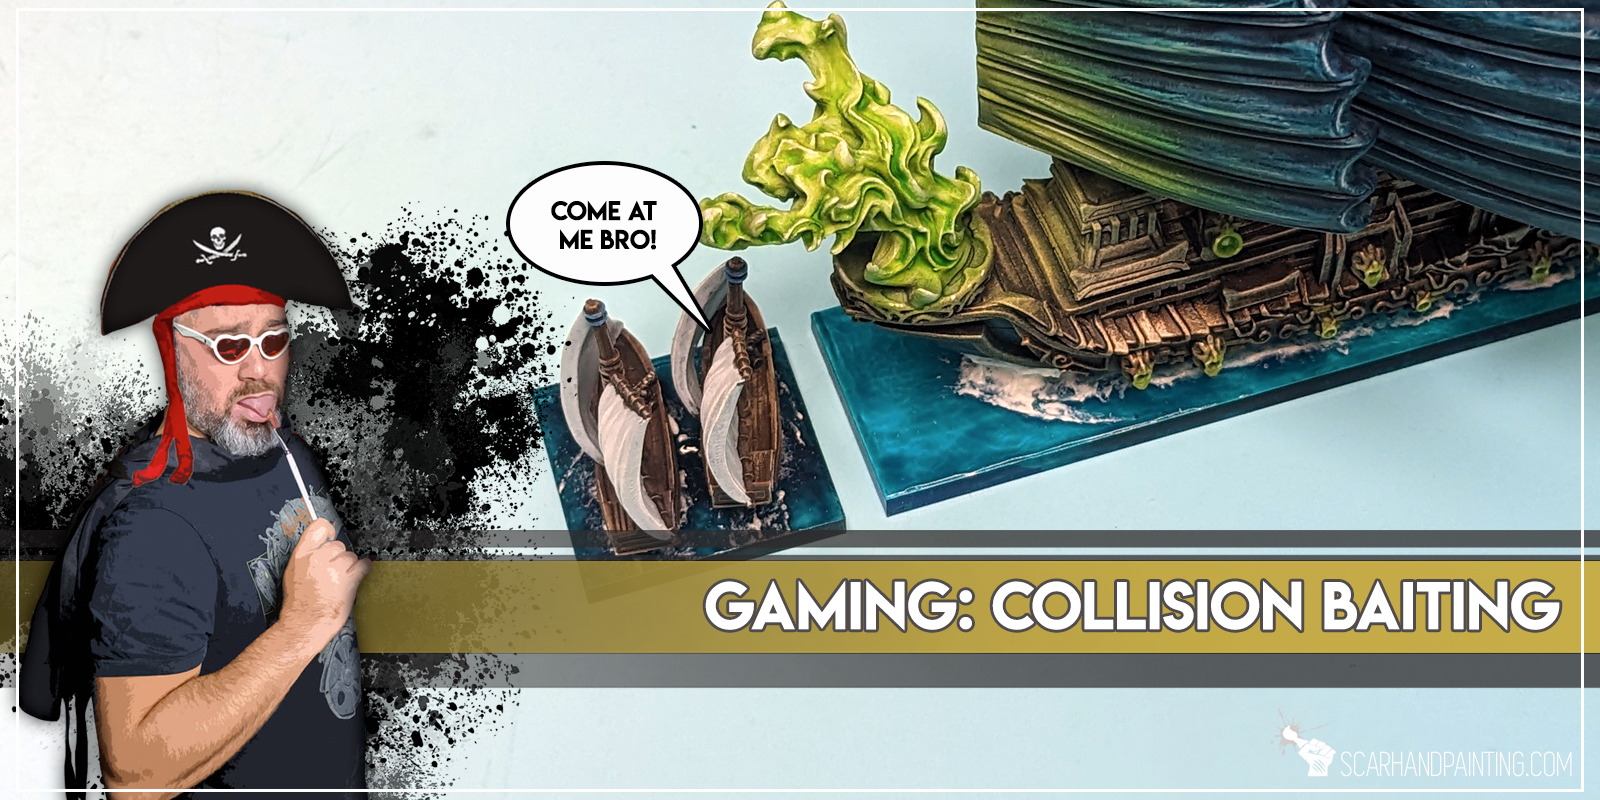
Brutal naval warfare of Armada is pure chaos. Ships colliding with one another is a common sight on the gaming board. Even though the rules forbid colliding on purpose* there are ways to exploit collisions for an advantage. This strategy is known as Collision Baiting and I will show you how to execute it, as well as what is and is not permitted by the rules.
*Unless special rules allow it like RAM (x) etc.
Avoid Collisions While Moving, Rulebook p.16
“If it is not the last Move Step in a ship’s activation, ensure its forward movement in the next Move Step will not result in a potential collision (with terrain or another ship). If this would result in a potential collision, alter the ship’s turn to avoid this as much as legally permitted.
Sometimes however, due to forward momentum, lack of turn angle, poor planning or just bad luck, collisions will be unavoidable (see page 20).“
Collisions Rulebook, p.20
“Players must avoid deliberately ramming or colliding with other ships and terrain, unless a rule says otherwise. Orcs for example, delight in the carnage caused by ramming their ships into the enemy!
However, on occasion, a newly Activated ship may have no option but to collide (perhaps due to poor planning!).
Only consider the bases of the ships (or terrain features) involved when checking for collisions.
If faced with more than one accidental collision target, the player using the Activating ship can choose which one to hit.”

Rules out of the way: During ship’s activation and when moving a ship, a player is not allowed to set a collision course for the NEXT MOVE STEP on purpose, unless there is no other choice or the ship has a special rule that would otherwise allow it. This does not affect the last Move step.
Some basic examples below.

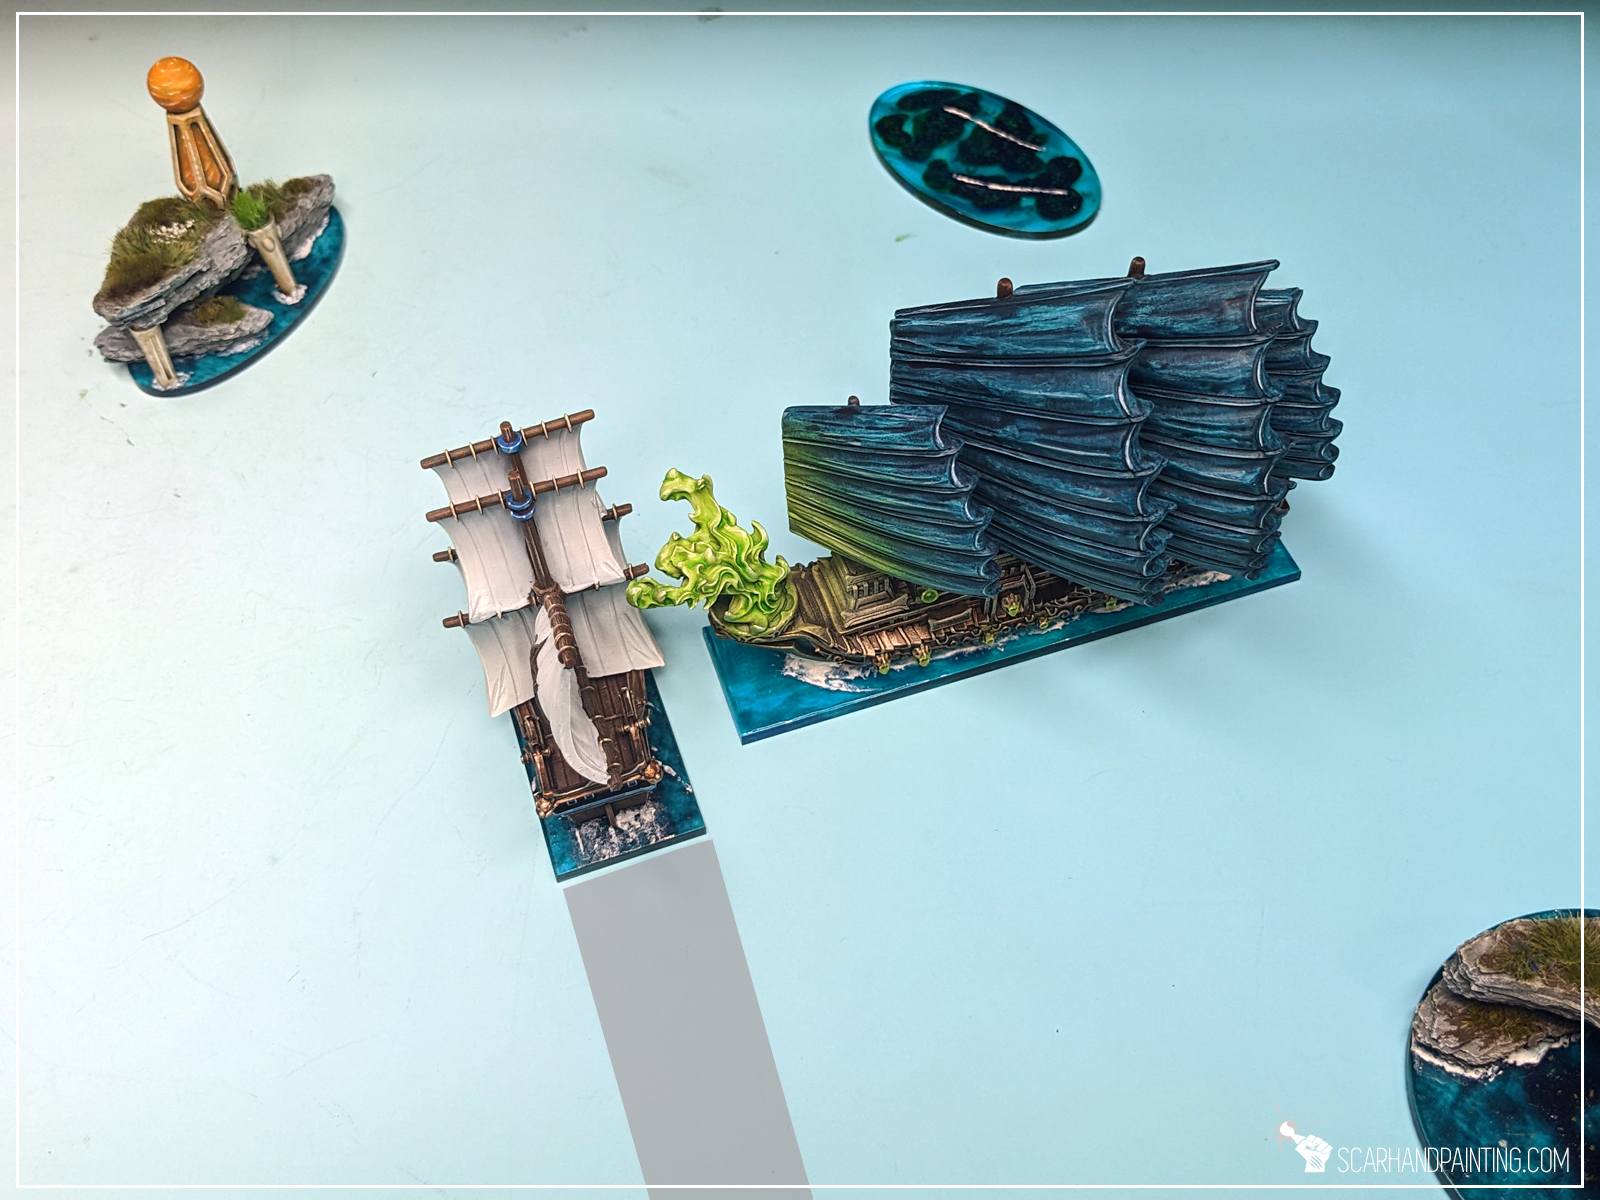
The Gur Panther, moving at Battle Speed, just moved it’s first Move step. With a 30* turn the Gur Panther is capable, and so it must set a course to avoid a collision before it’s second Move.
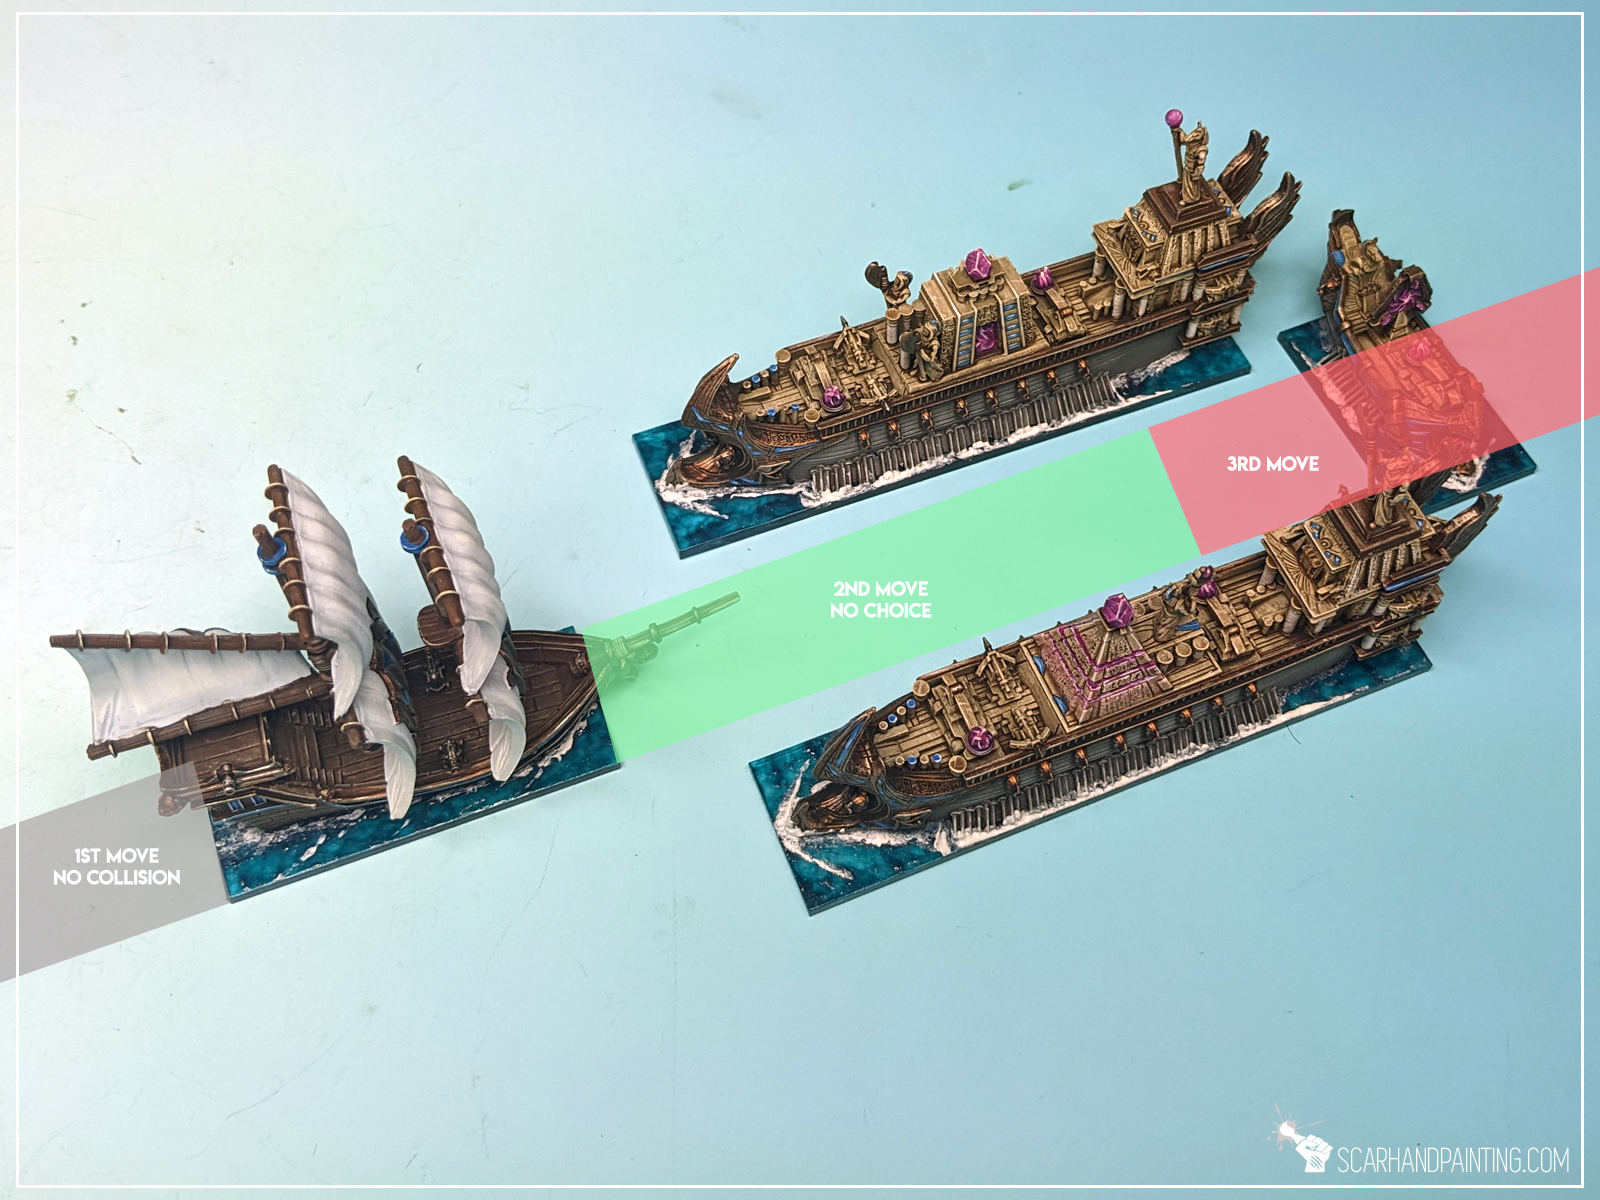
The Gur Panther moving at Full Speed, that had just made it’s first Move. There is no immediate collision threat for the next Move, thus the Gur Panther does not have to turn and is allowed to maintain it’s course. It is legal to stay on course, even though, due to lack of other options, the ship will be forced to collide during third Move step.
After second Move the Gur Panther find’s itself in a position where it cannot avoid a collision. It is forced to stay on course and suffer the consequences.

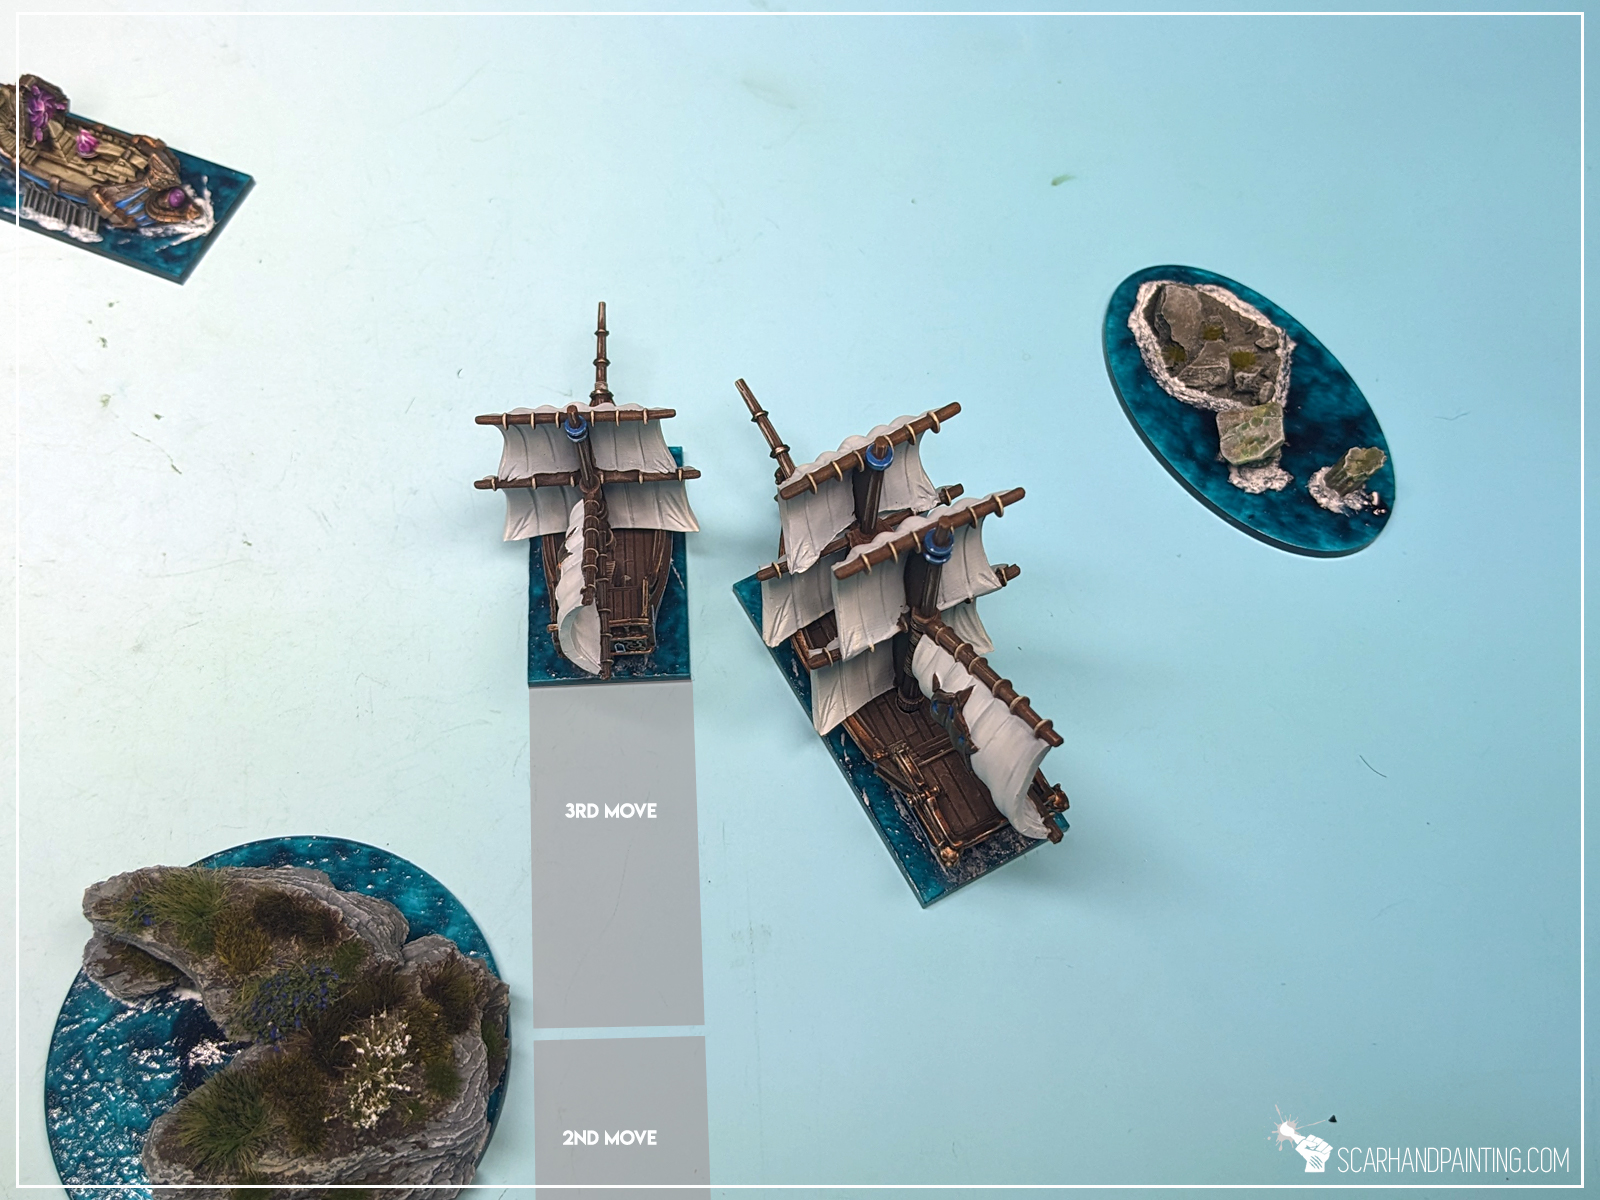
The Monolith made a final Move of it’s activation. During final Move the ship is not forced to avoid potential collisions and can instead ‘prime itself’ for one. With favorable winds and failed Evasion tests the Monolith will crash into the Gur Panther on it’s next activation.
This example shows an “honest mistake” referred to by the rules. Let’s say the wind blew from the North. Gunbrig moved Full Speed to set itself between the Soulhunter and the Gur Panther. Being a small (priority) target makes it more difficult to hit by the Soul Hunter and with wind blowing from the North the plan is to activate right after and move out of the Gur Panther’s way. But oh no! The wind changes direction to North/East. This means the Gur Panther is to activate first and the Gunbrig is in it’s way. A potential collision is imminent.
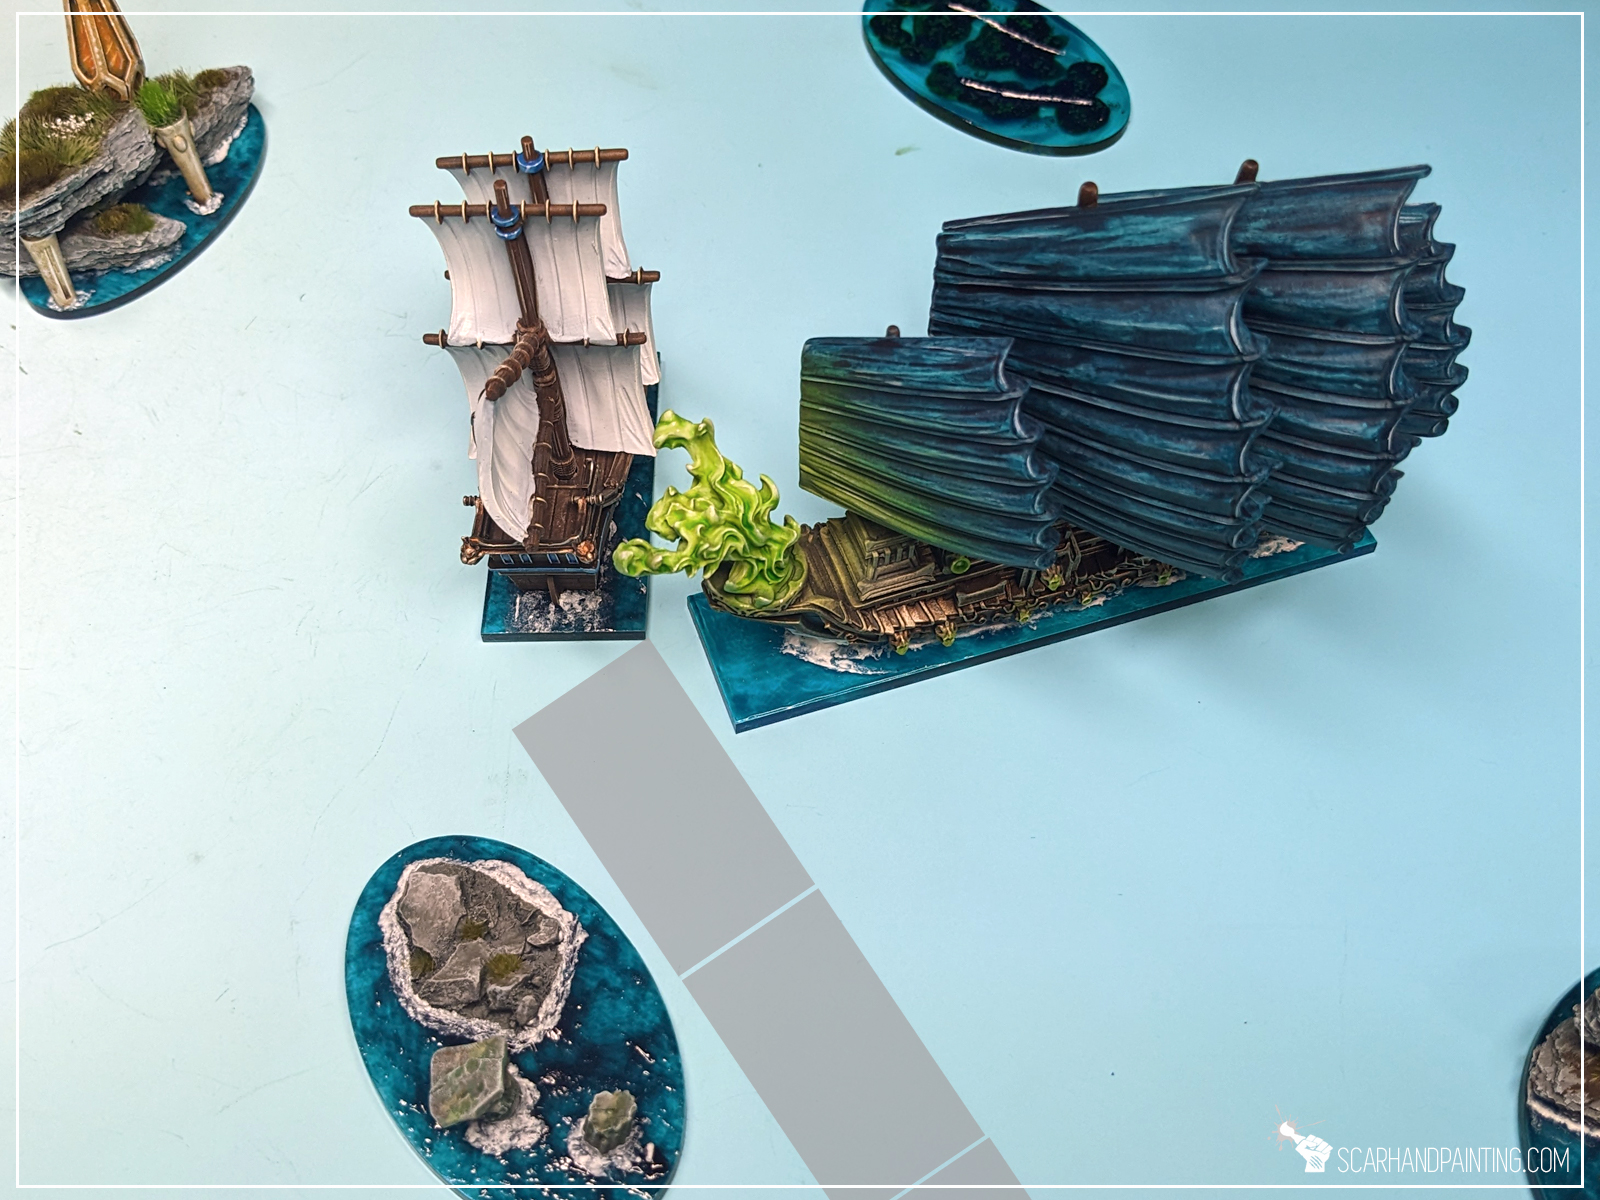
We now know that under normal circumstances a ship is not allowed to deliberately move to collide during it’s activation. Still this leaves the doors open for a little exploitation. Players are allowed to set up their ships in the way of incoming enemy. This strategy is called Collision Baiting and apart from potential damage and negative mods dealt to enemy ship, it can also prematurely end it’s activation!
The basics is simple: End your ship’s Move upfront and close to enemy ship in a way that will force an Evasion test. If both ships fail their tests – CRASH!
This can be used to deal damage to enemy ships, but also disrupt (end) their next activation. More so, even a passed skill test to Evade will stack a negative -1 To-Hit mod on the enemy ship and can result in course alteration, forcing it to head out for another potential collision! Furthermore a ship cannot shoot throughout the Move step when it Evades.
Few examples below.
The Gur Panther finished it’s Move in front of Drake. Drake activates next and is forced to Evade and risk a collision. The Drake will suffer a -1 To-Hit for all it’s shooting and potentially suffer damage wasting it’s entire activation.
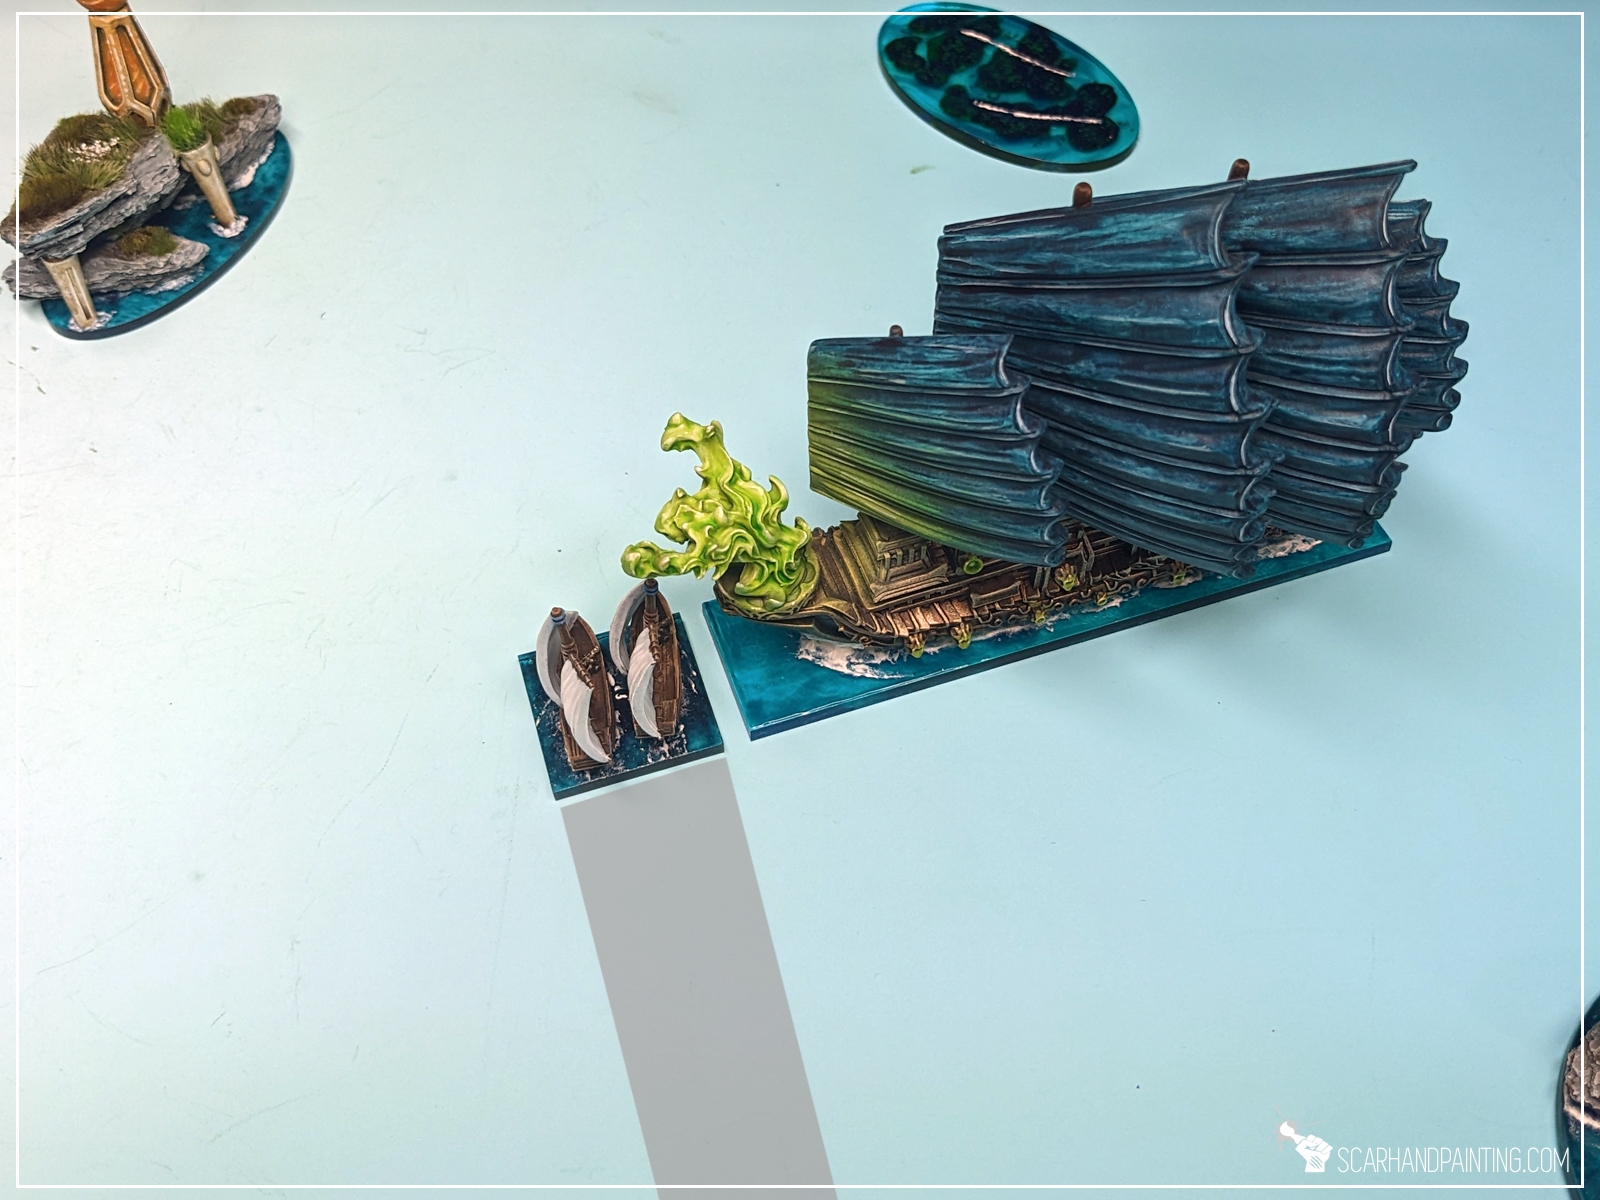
A Sloop Squadron finished it’s Move in front of Drake. Drake activates next and because Sloop Squadron is a Squadron, the Drake can elect to auto fail it’s Evasion test. If the Sloop Squadron fails as well, the resulting collision will not end Drake’s activation, but will still deal some damage and a -1 To-Hit mod.
Collisions with Squadrons do not force enemy ships to alter course, deal only half the damage and do not end ship’s activation. Still the -1 To-Hit mod can make a difference and the enemy ship will not be able to shoot during this Move step.
The Gur Panther decides to implement some nasty tactics. It ends it’s final Move step in front of Drake and in a way that will force the Extra Large ship to Evade. If any of the two succeeds Evasion Skill Test, the Drake will turn the minimum distance to clear the Panther – and as a result head straight for the Rocks. Rocks cannot be Evaded and apart from dealing damage and ending Drakes Activation, they will also ground the ship for good. Just brutal!
Now you know the variety of Collision Baiting tricks. Set sail and make enemy ships suffer. Just make sure not to set up in front of enemy ships with RAM (x), as the result might surprise you… in a bad way.

I hope you find this article interesting. Be sure to let me know your thoughts in the comments below or via Facebook or Instagram. I would also appreciate if you considered sharing this content with your friends, who might find it useful. Finally if you are looking for a professional Warhammer miniatures painting service, be sure to contact me with this contact form. I always reply within 24 hours, after which please check out your spam folder.

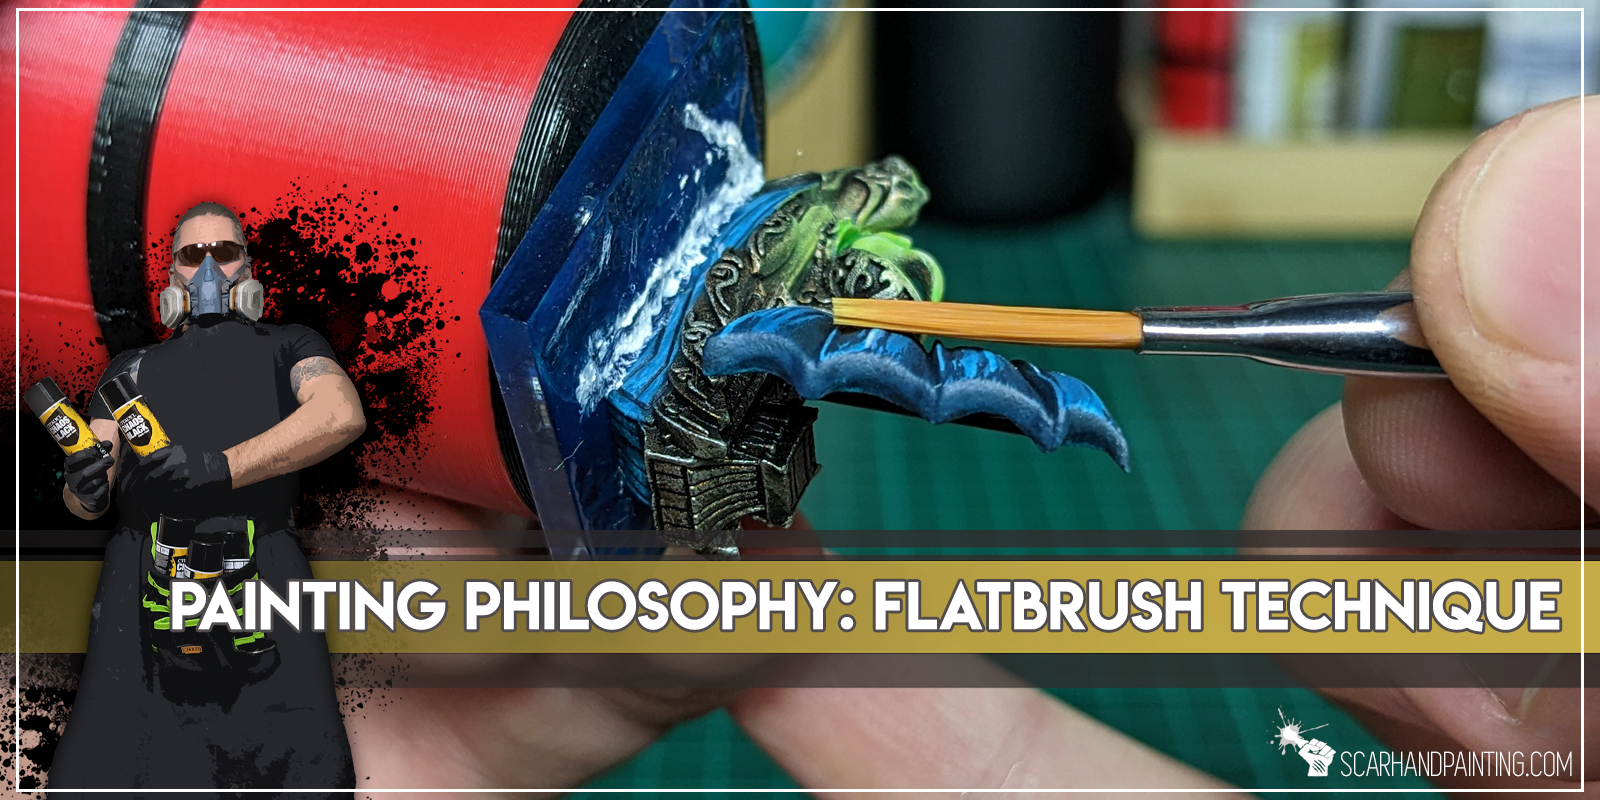
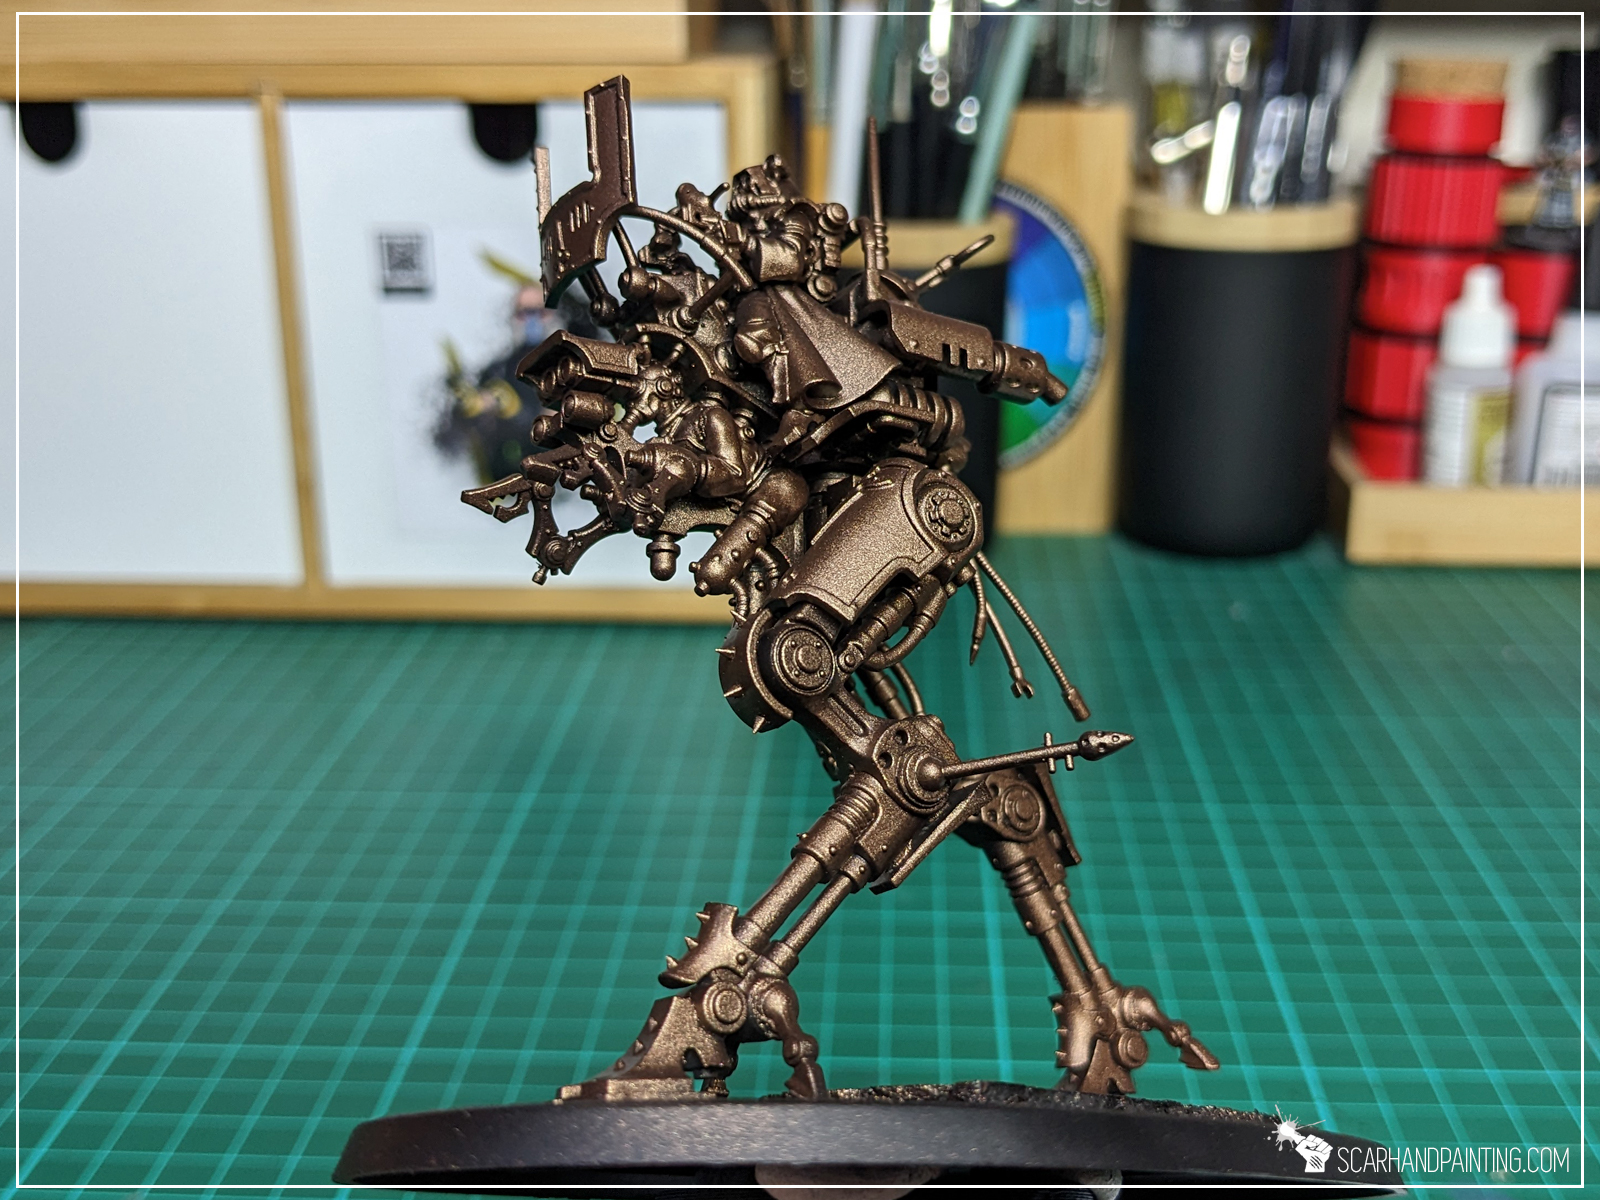
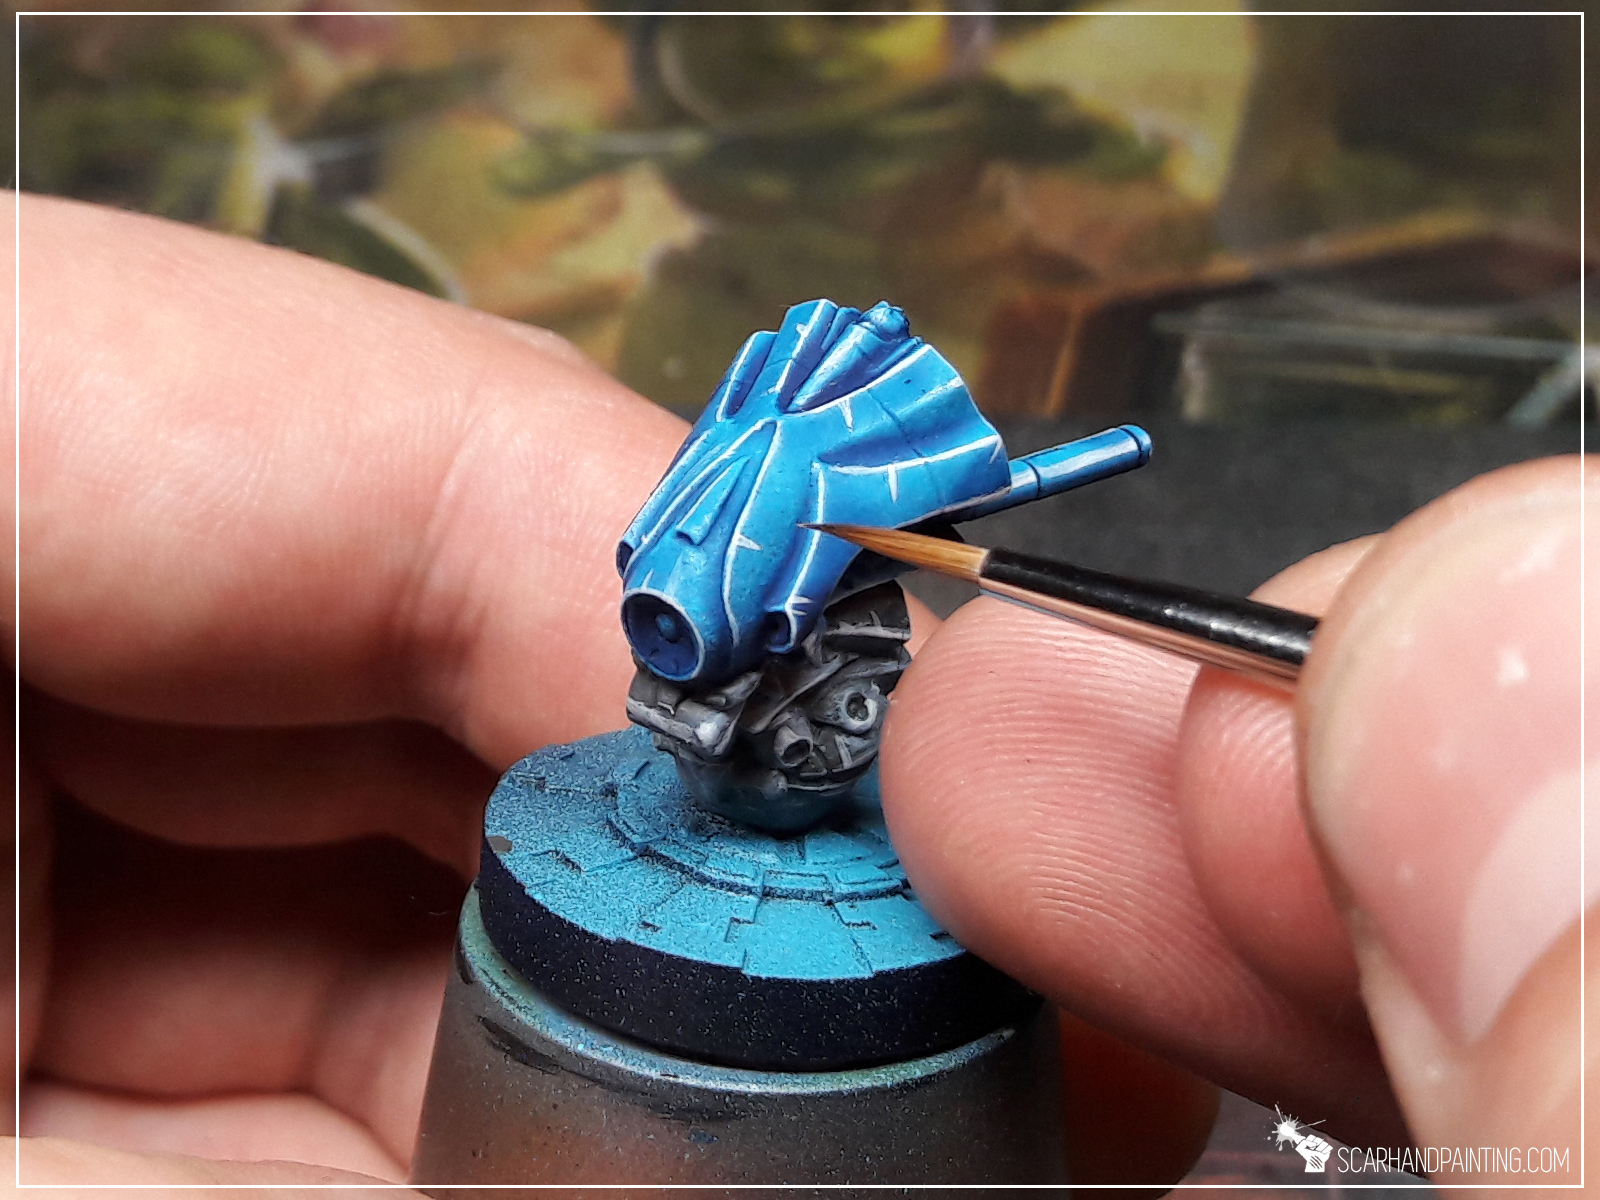
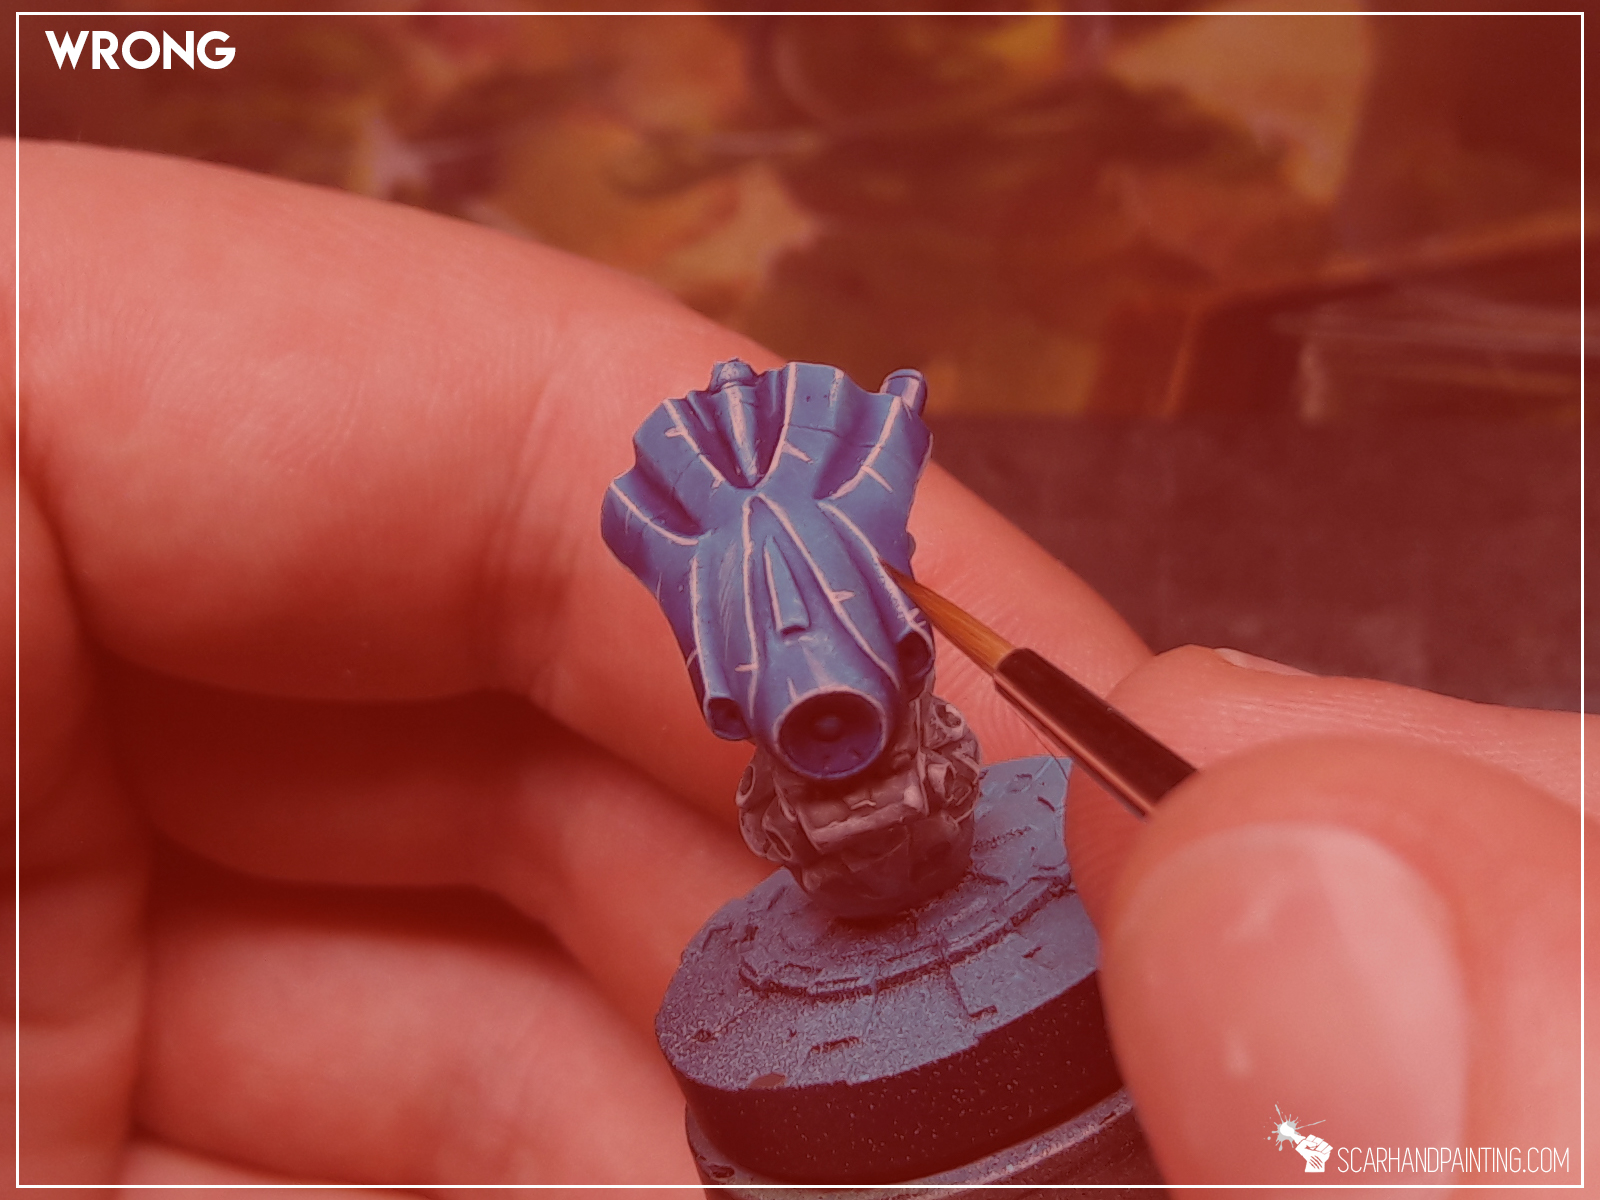
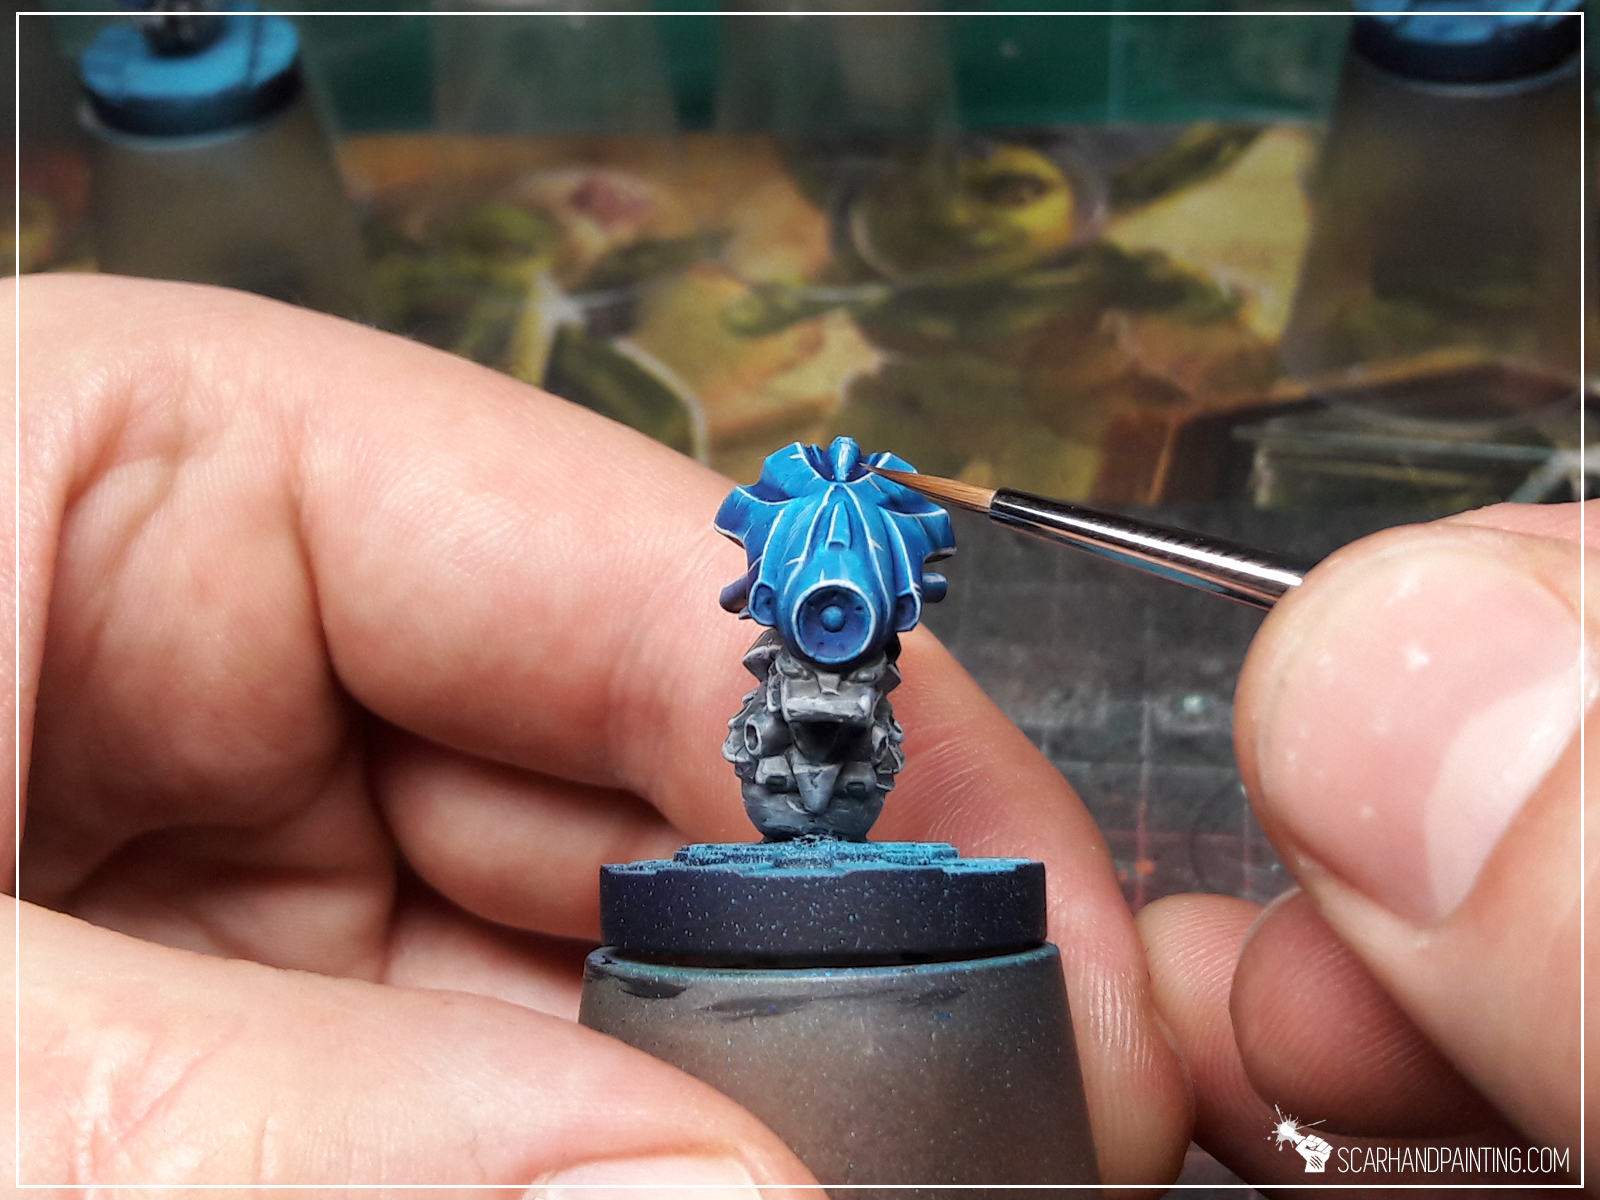
Welcome to another entry in the ‘Painting Philosophy’ series, where I let you in on ‘how’ and especially ‘why’ I do some things in a certain way. In my opinion a proper approach to painting is crucial to maintain a healthy, rewarding experience and to produce satisfactory results. Today I will focus on a technique that, for lack of a better term, I refer to as “Flatbrush “.
Contrary to what the nickname suggests the flatbrush technique does not require an actual flat brush. The technique, as I see it, revolves around applying a highlight with multiple single direction movements using the belly of the brush. In a way it is similar to drybrushing, except the paint is usually semi-moist and bristles are held highly inclined towards the painted surface, rather than perpendicular. As a result a smooth, solid layer of paint is applied to any exposed areas, leaving any perpendicularly positioned recesses unpainted.
The flatbrush technique works best with well pigmented, standard density paints, such as Citadel metallic, layer, base colors, regular and metallic Army Painter, Vallejo Game Color and Model Color including metalic range, regular and metallic P3… the list goes on. Due to low or high density any washes, inks, air series, most special effects etc. will not work well with flatbrush. Some high density paints such as Citadel Dry, or just your standard but a bit old partially dried paints, can still be used while thinned slightly.
The key is to get just enough paint on the brush to be able to apply a semi-moist, smooth layer on the miniature, rather than overflowing the detail and recesses. For that purpose, in order to control the volume of paint on the brush, I very much recommend a dry palette. This does not to be anything special. An old CD, or a lacquered piece of paper will do.

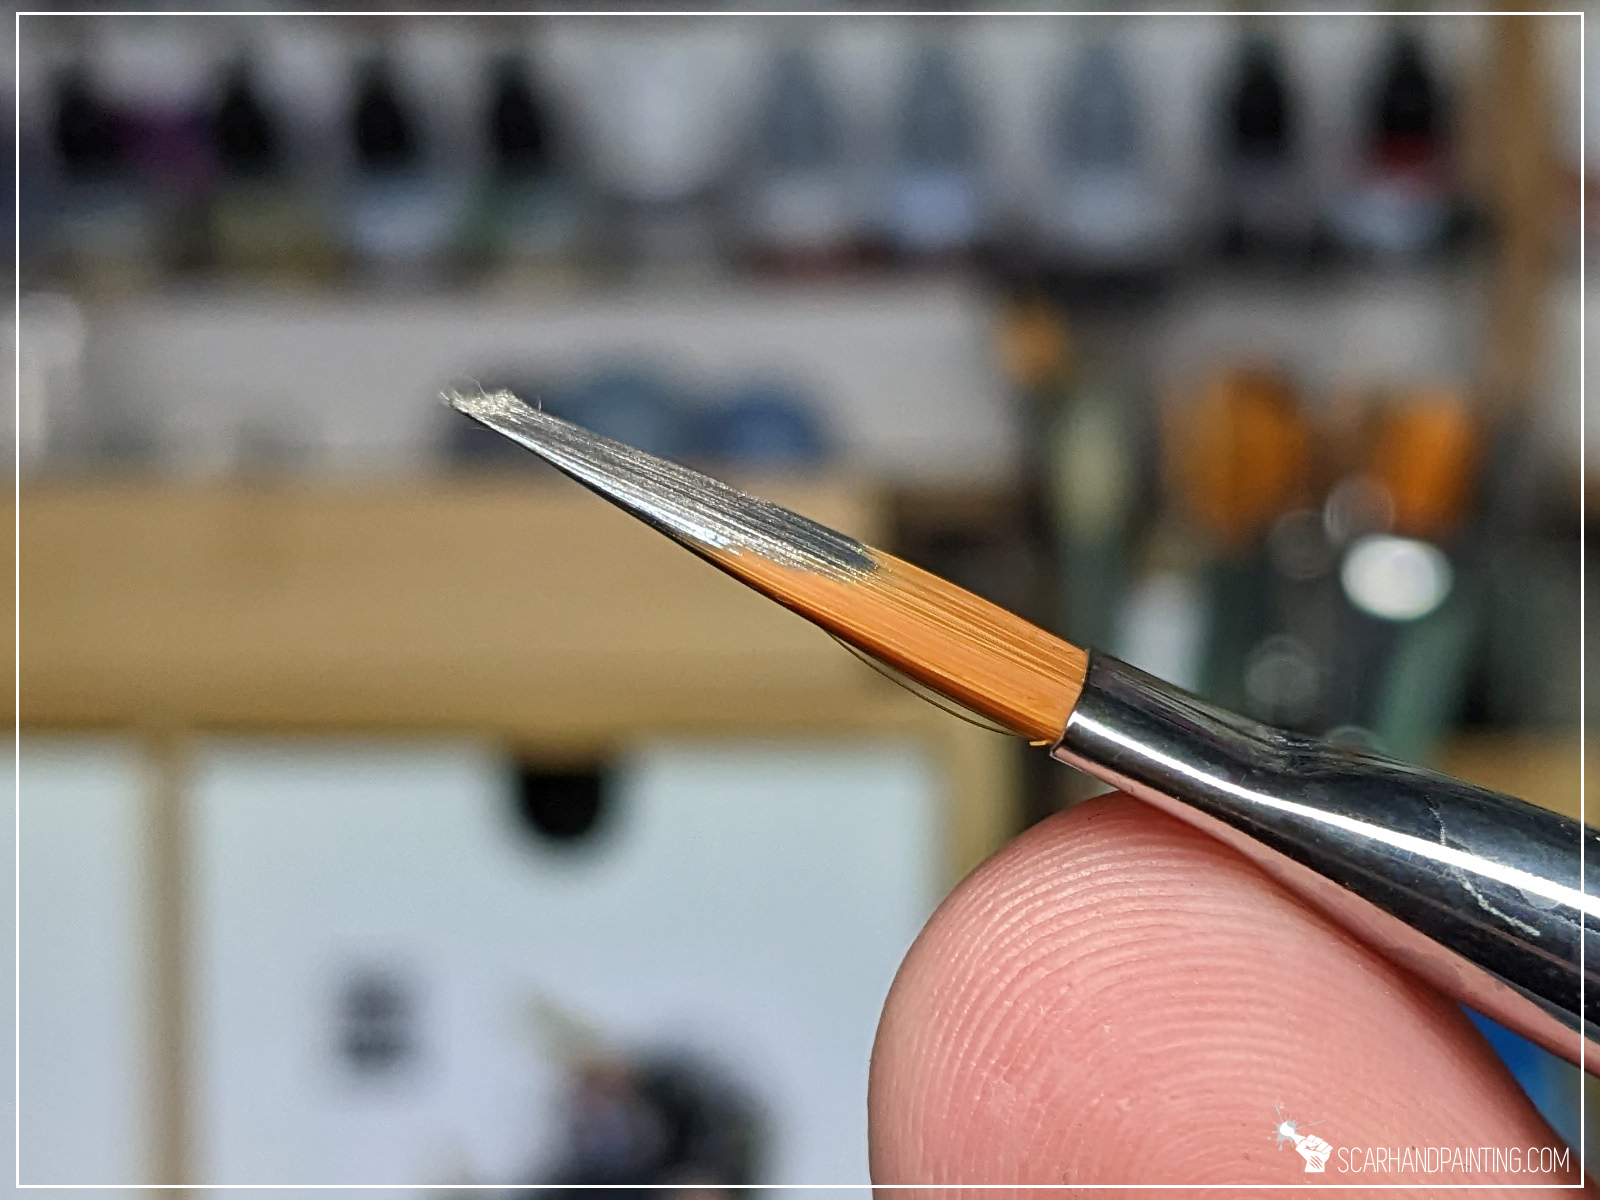

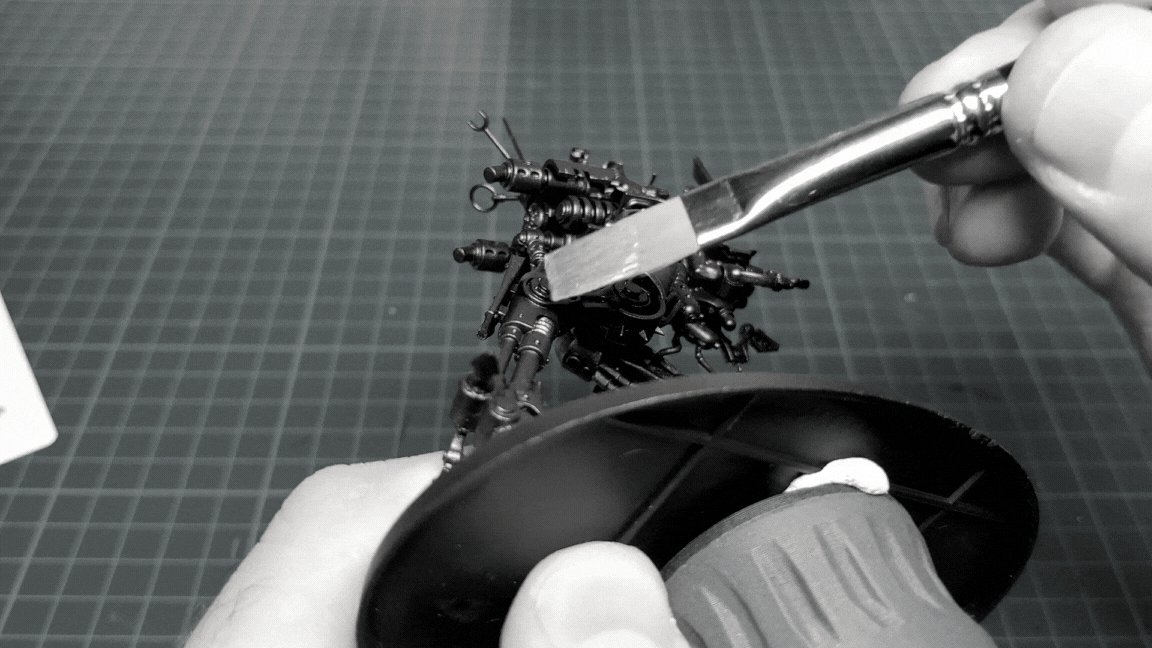
The process itself is very simple. Once there’s just enough paint on the brush (no longer flows) I use multiple, soft, one direction moves to highlight particular parts of a miniature. I try to paint with the belly of the brush and in order to avoid the tip being too aggressive with recesses, I keep the belly of the brush inclined towards the painted surface.

Extra Tip: In order to stabilize my hands during painting, I usually keep both of my wrists supported on the edge of a painting desk. However flatbrush does not necessarily require much precision. On some occasions, depending on particular surface being painted, the movement of the brush comes from the entirety of the hand, rather than wrist and fingers. (Learn more about hands stabilization in The Way of the Brush article here.)

I’ve been painting miniatures for over two decades now. Sometime along the way the flatbrush technique developed itself as a tool to apply initial highlights in timely fashion. It is a simple, fast and very rewarding technique, that produces nice effect. Maybe it comes at a different name. Maybe it is widely implemented or even just a part of another painting technique. I don’t know as I failed to find much about it. Either way I’m sharing my take on flatbrush, because I refer to it a lot in Scarhandpainting articles. At least now you know what I mean by that.


I hope you find this tutorial interesting. Be sure to let me know your thoughts in the comments below or via Facebook or Instagram. I would also appreciate if you considered sharing this content with your friends, who might find it useful. Finally if you are looking for a professional Warhammer miniatures painting service, be sure to contact me with this contact form. I always reply within 24 hours, after which please check out your spam folder.

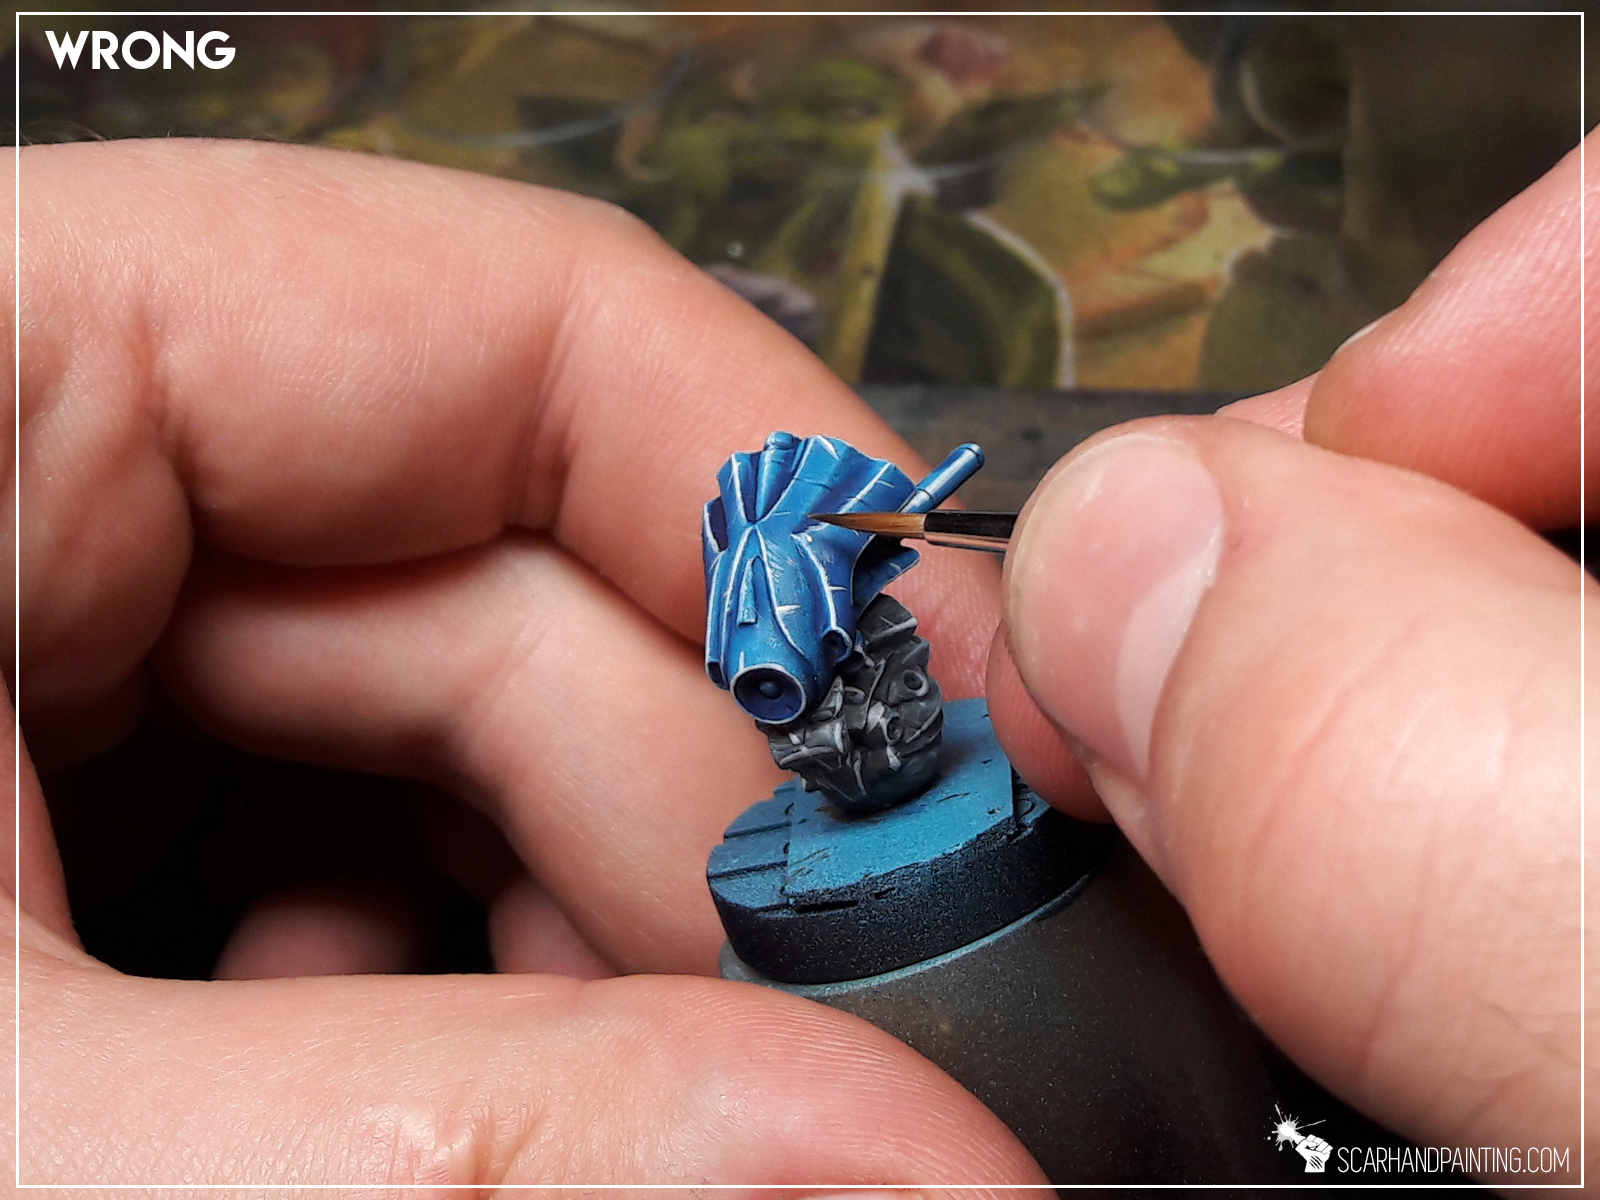
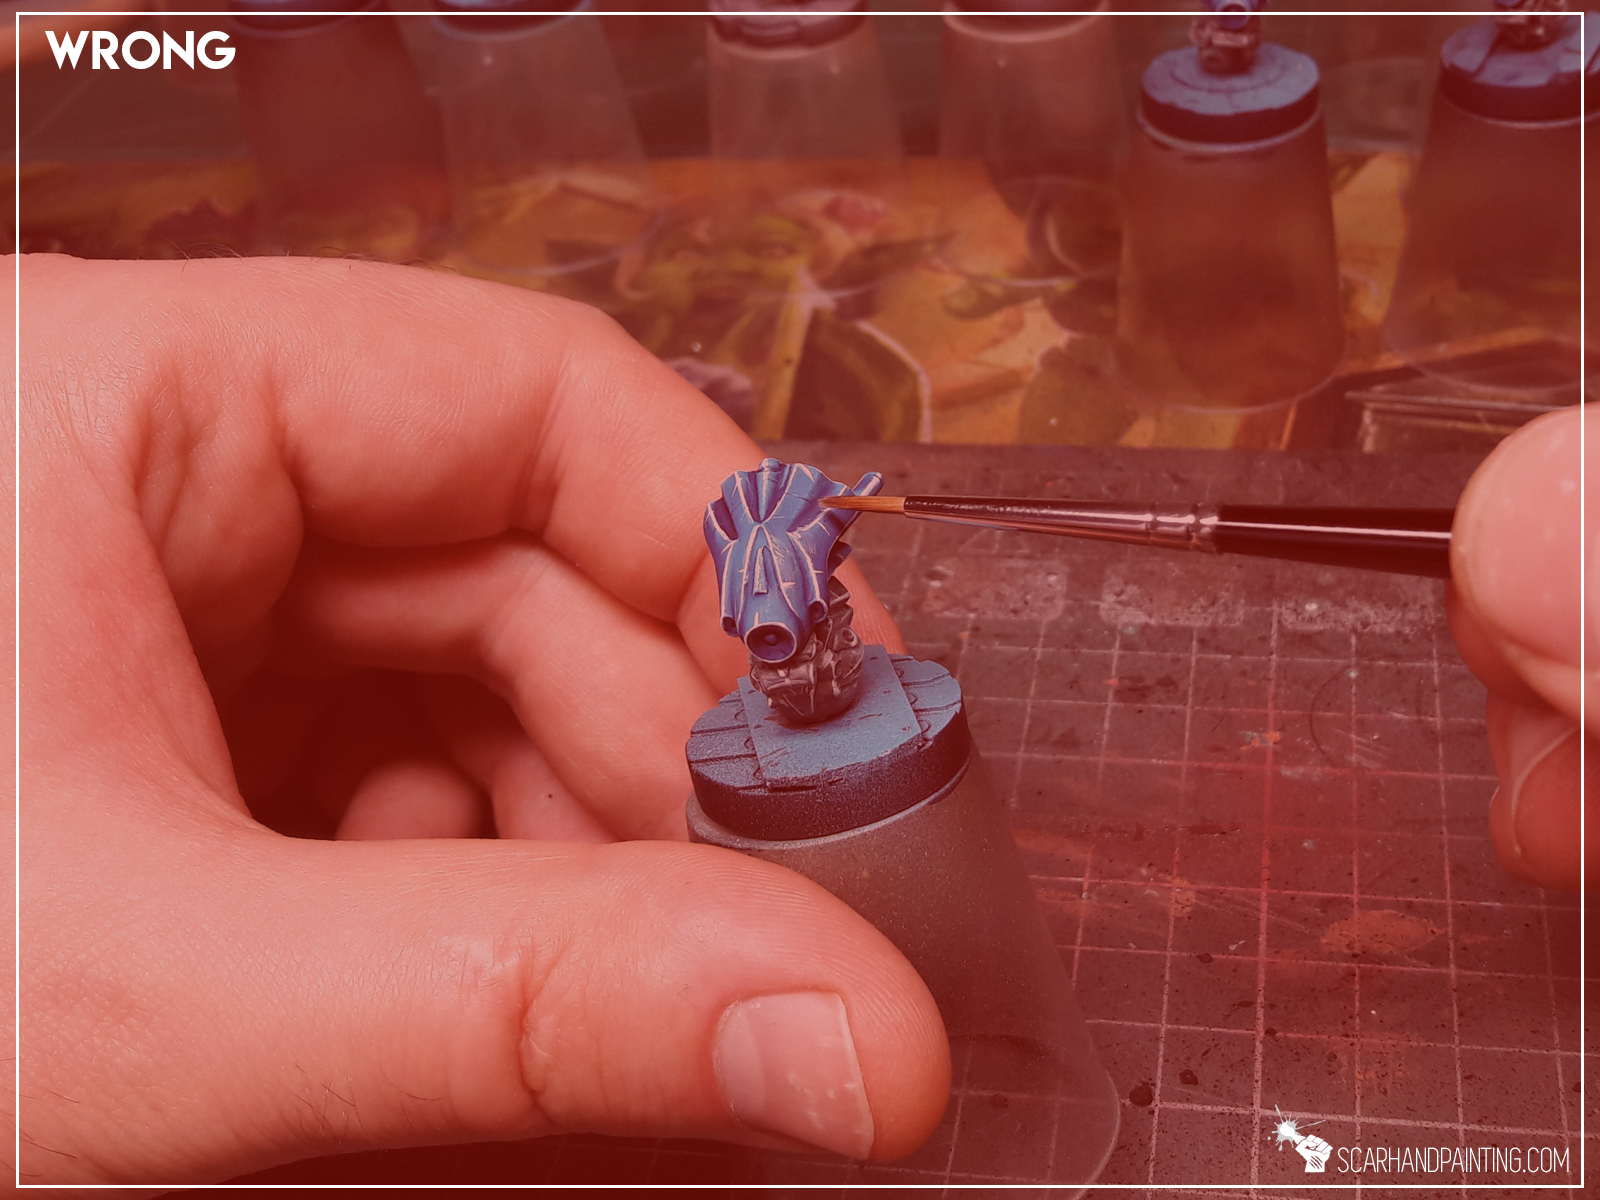
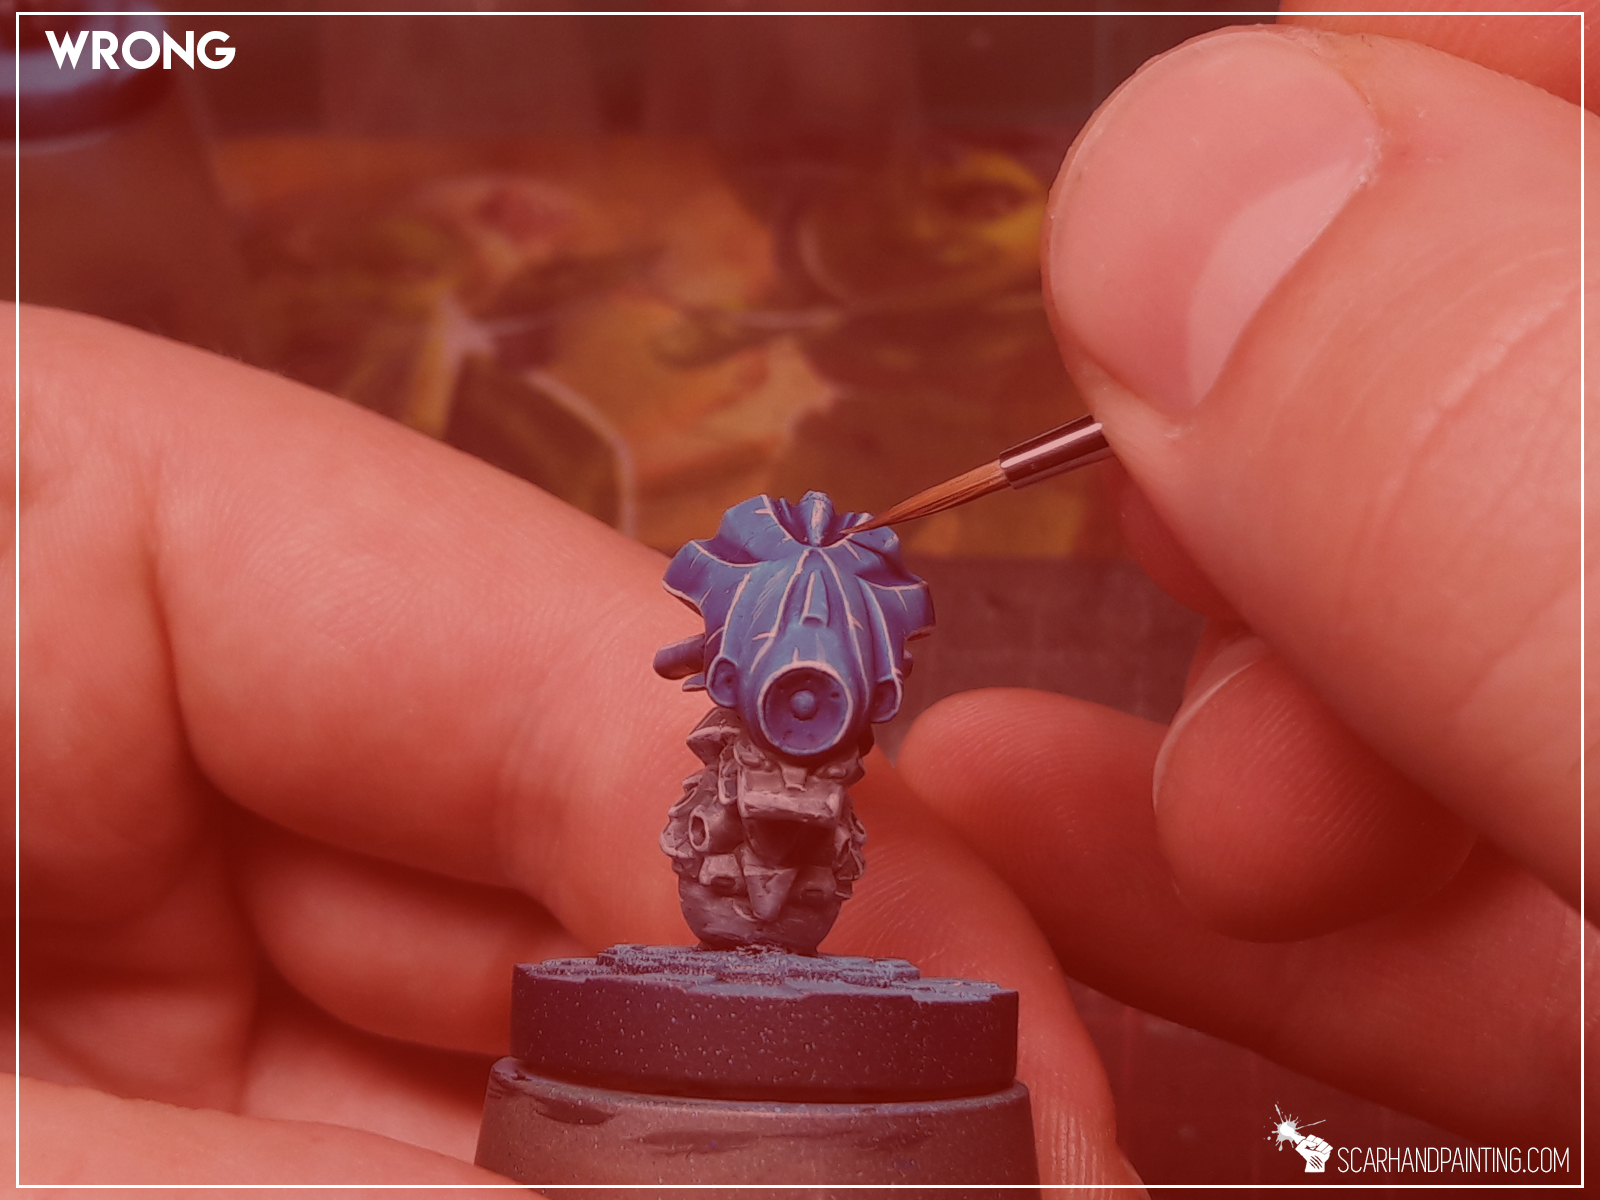
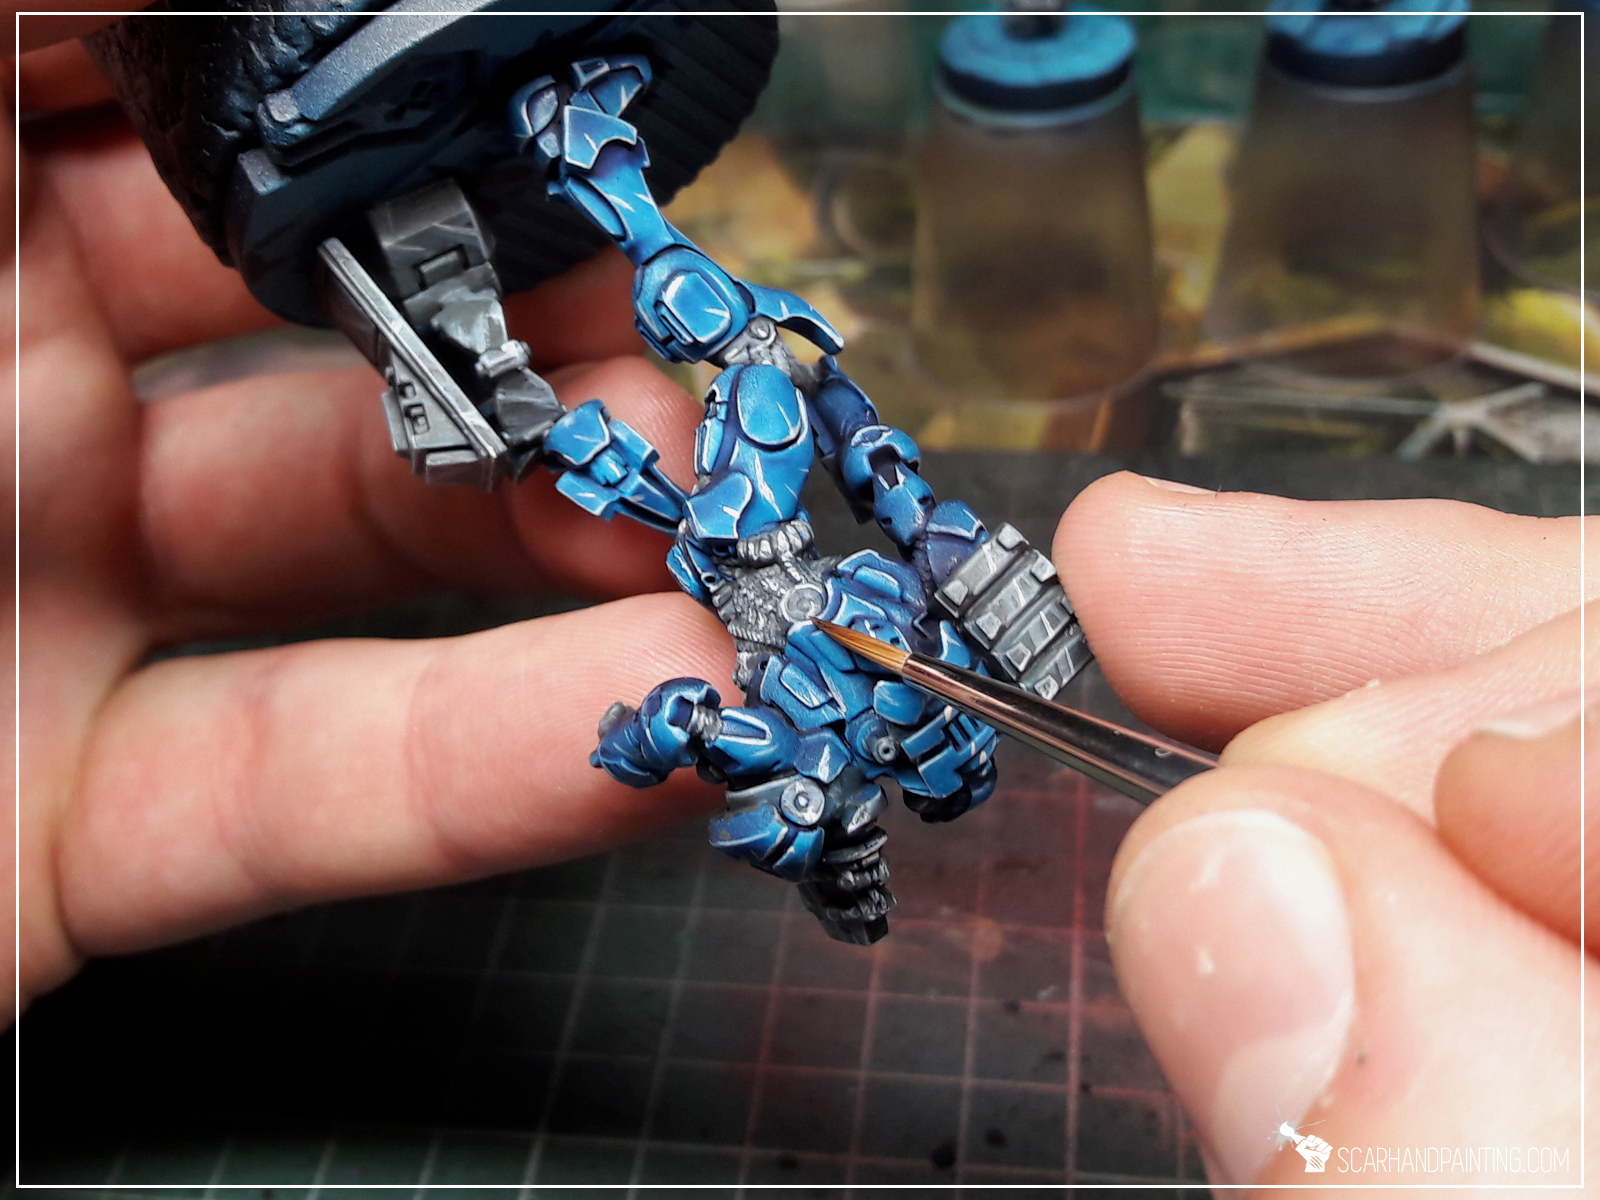
Welcome to another entry in the ‘Painting Philosophy’ series, where I let you in on ‘how’ and especially ‘why’ I do some things in a certain way. In my opinion a proper approach to painting is crucial to maintain a healthy, rewarding experience and to produce satisfactory results. Today I will focus on brush handling and hand support during painting.
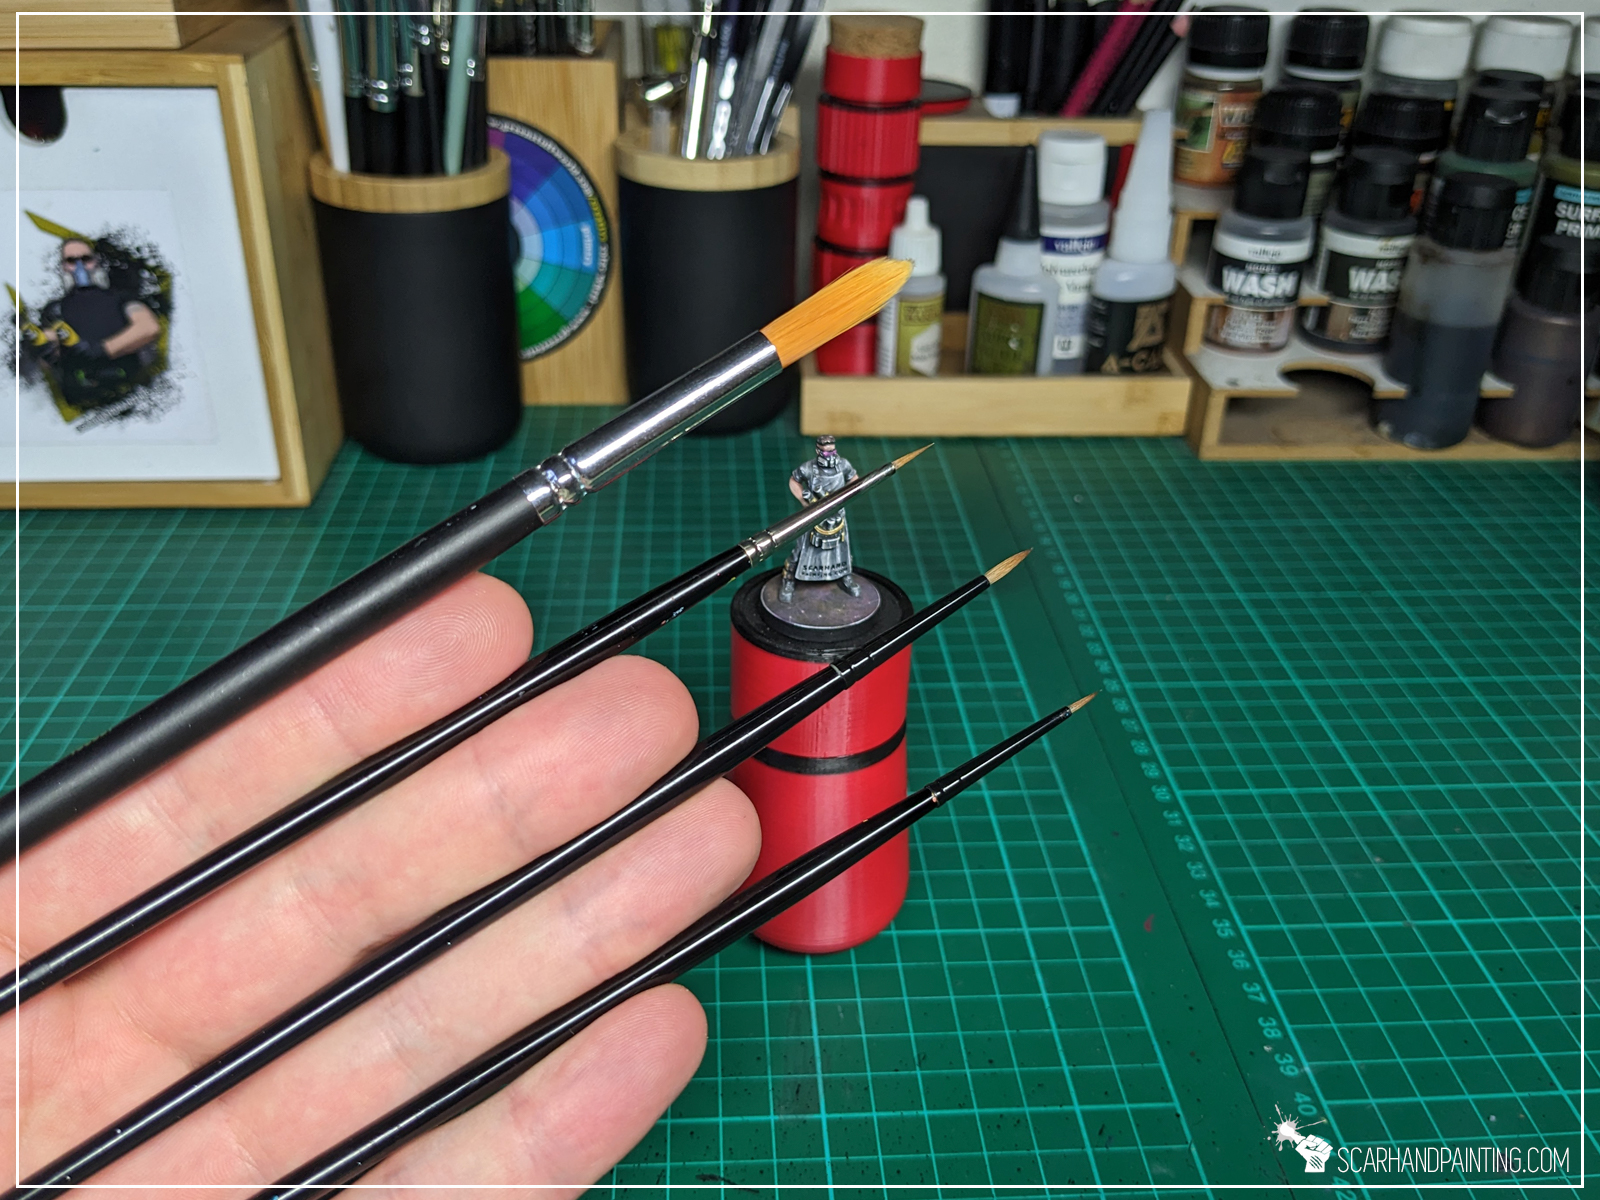
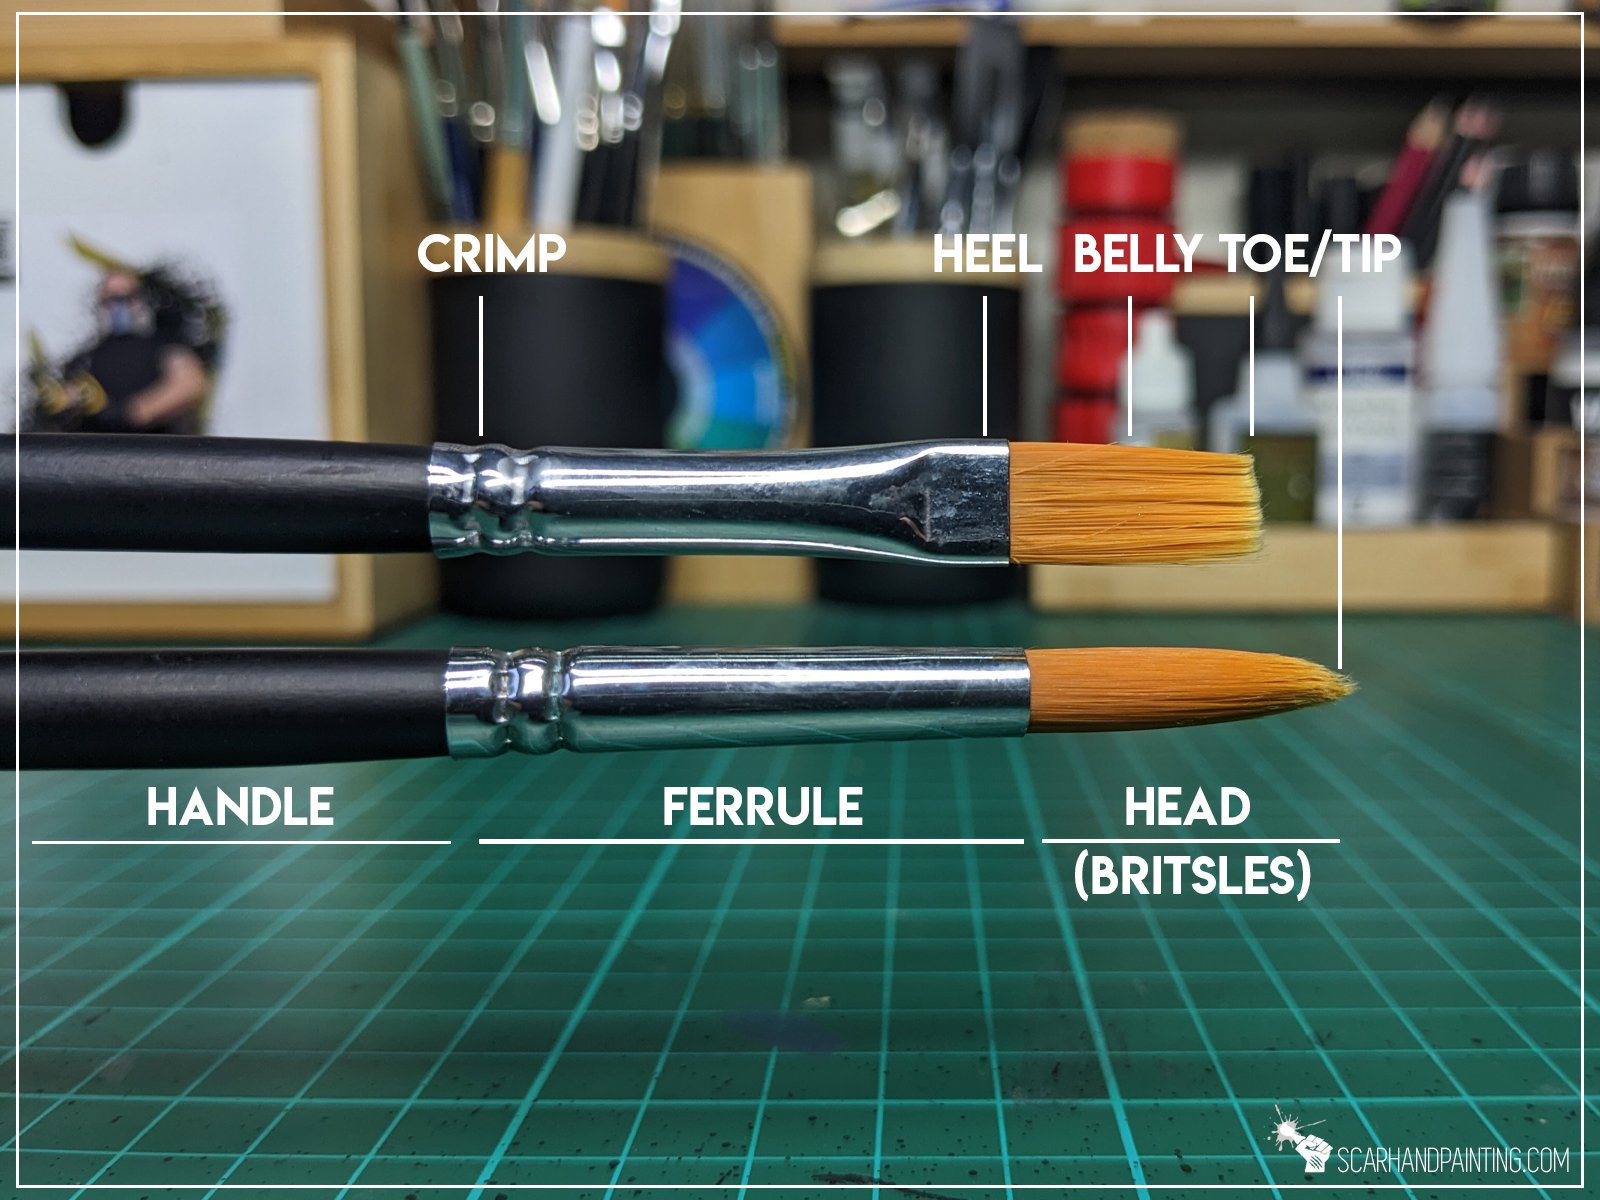
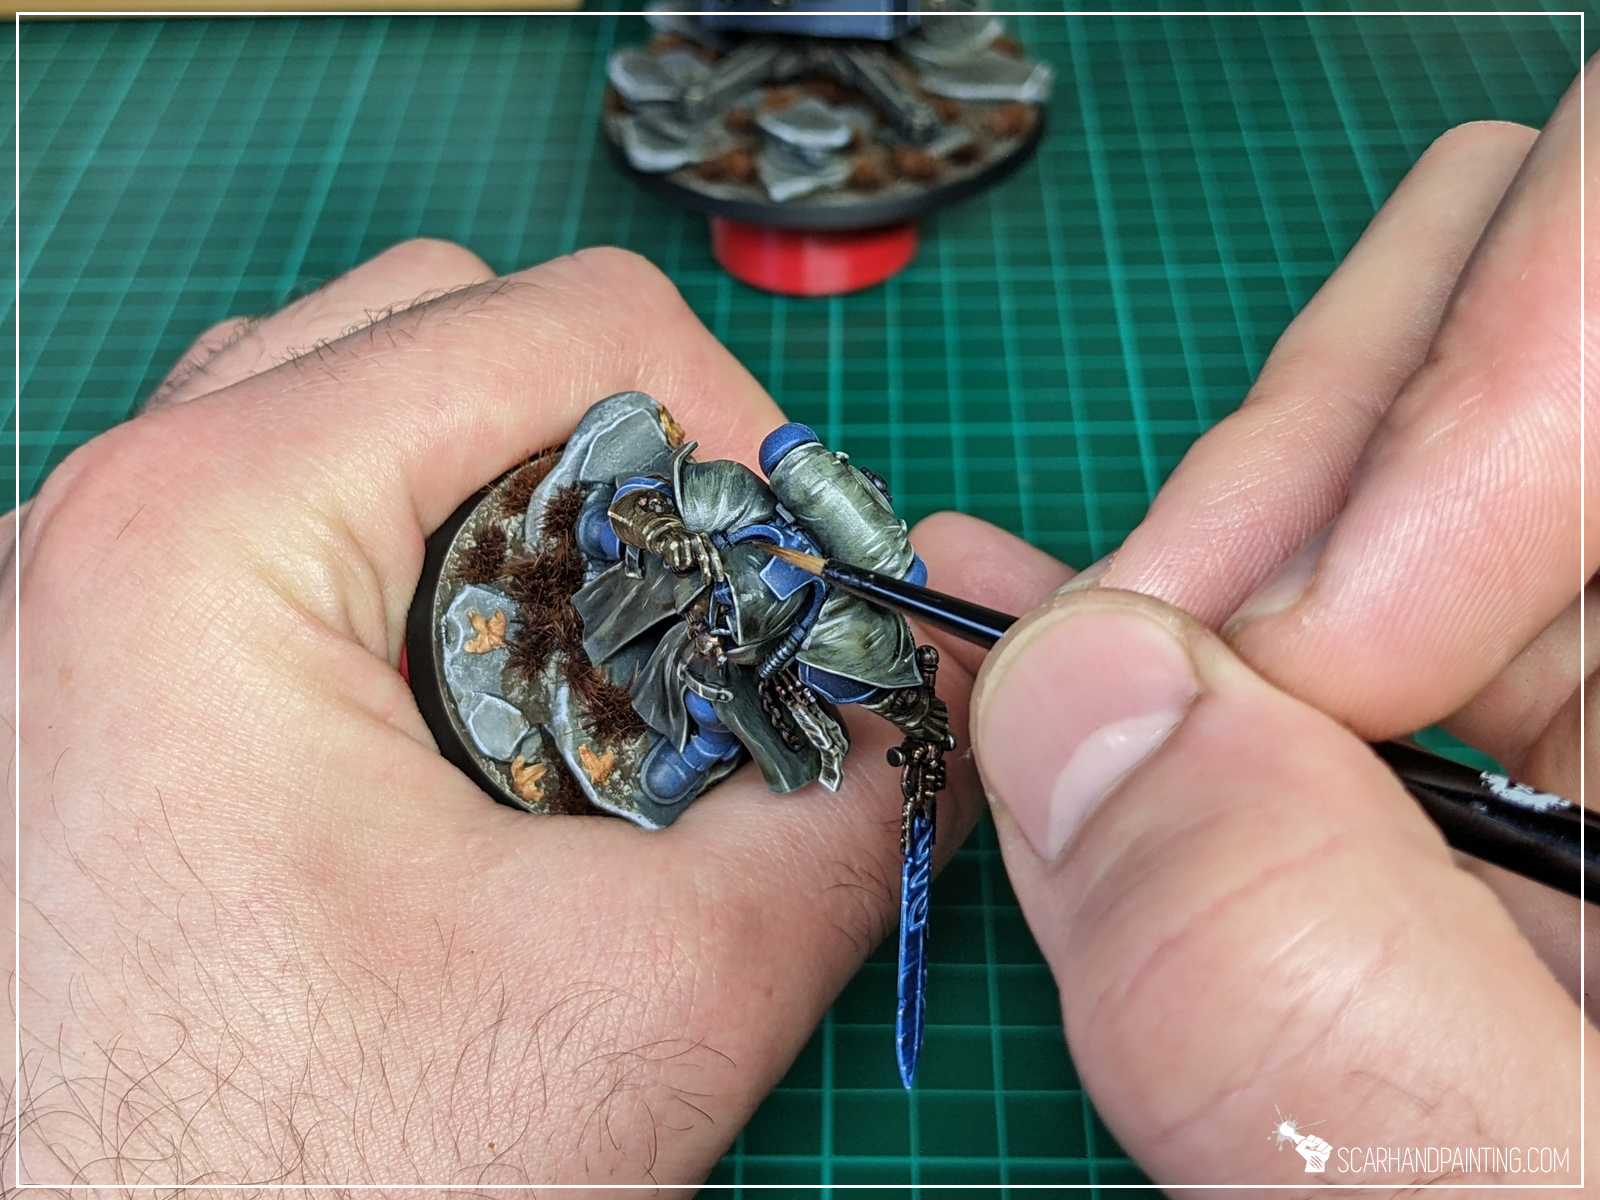
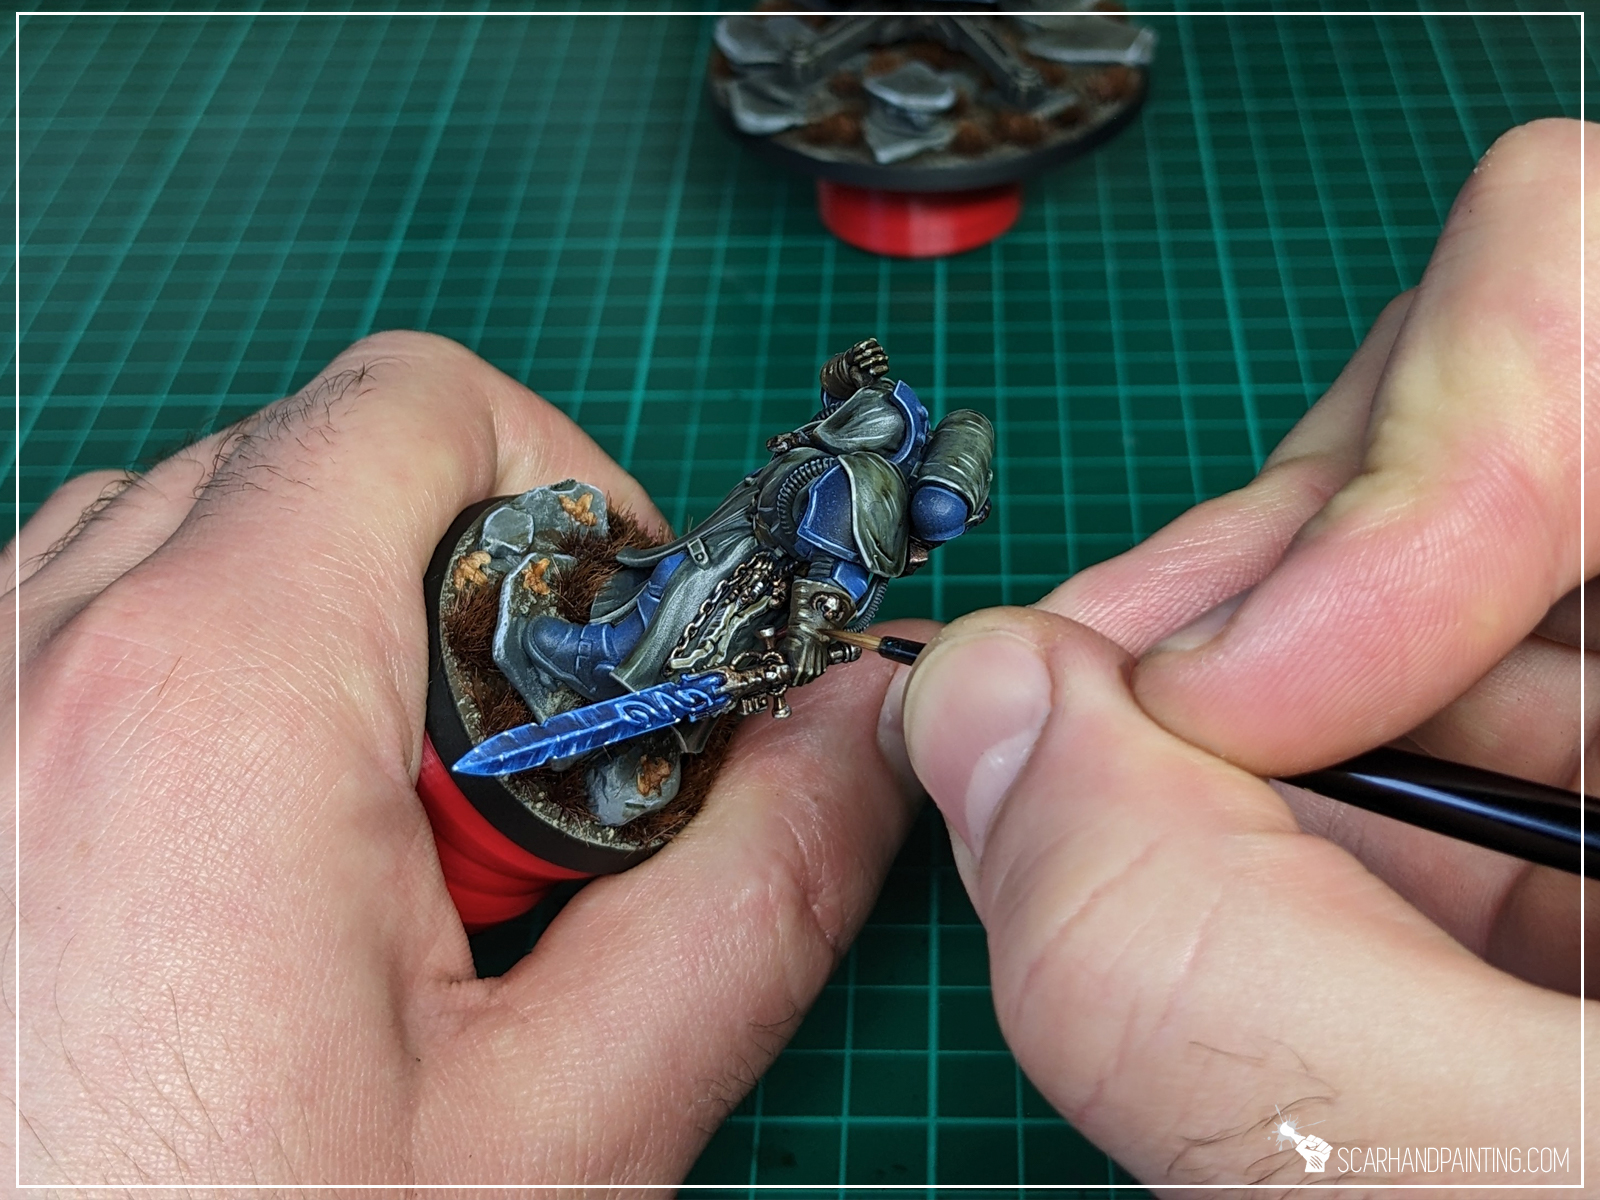
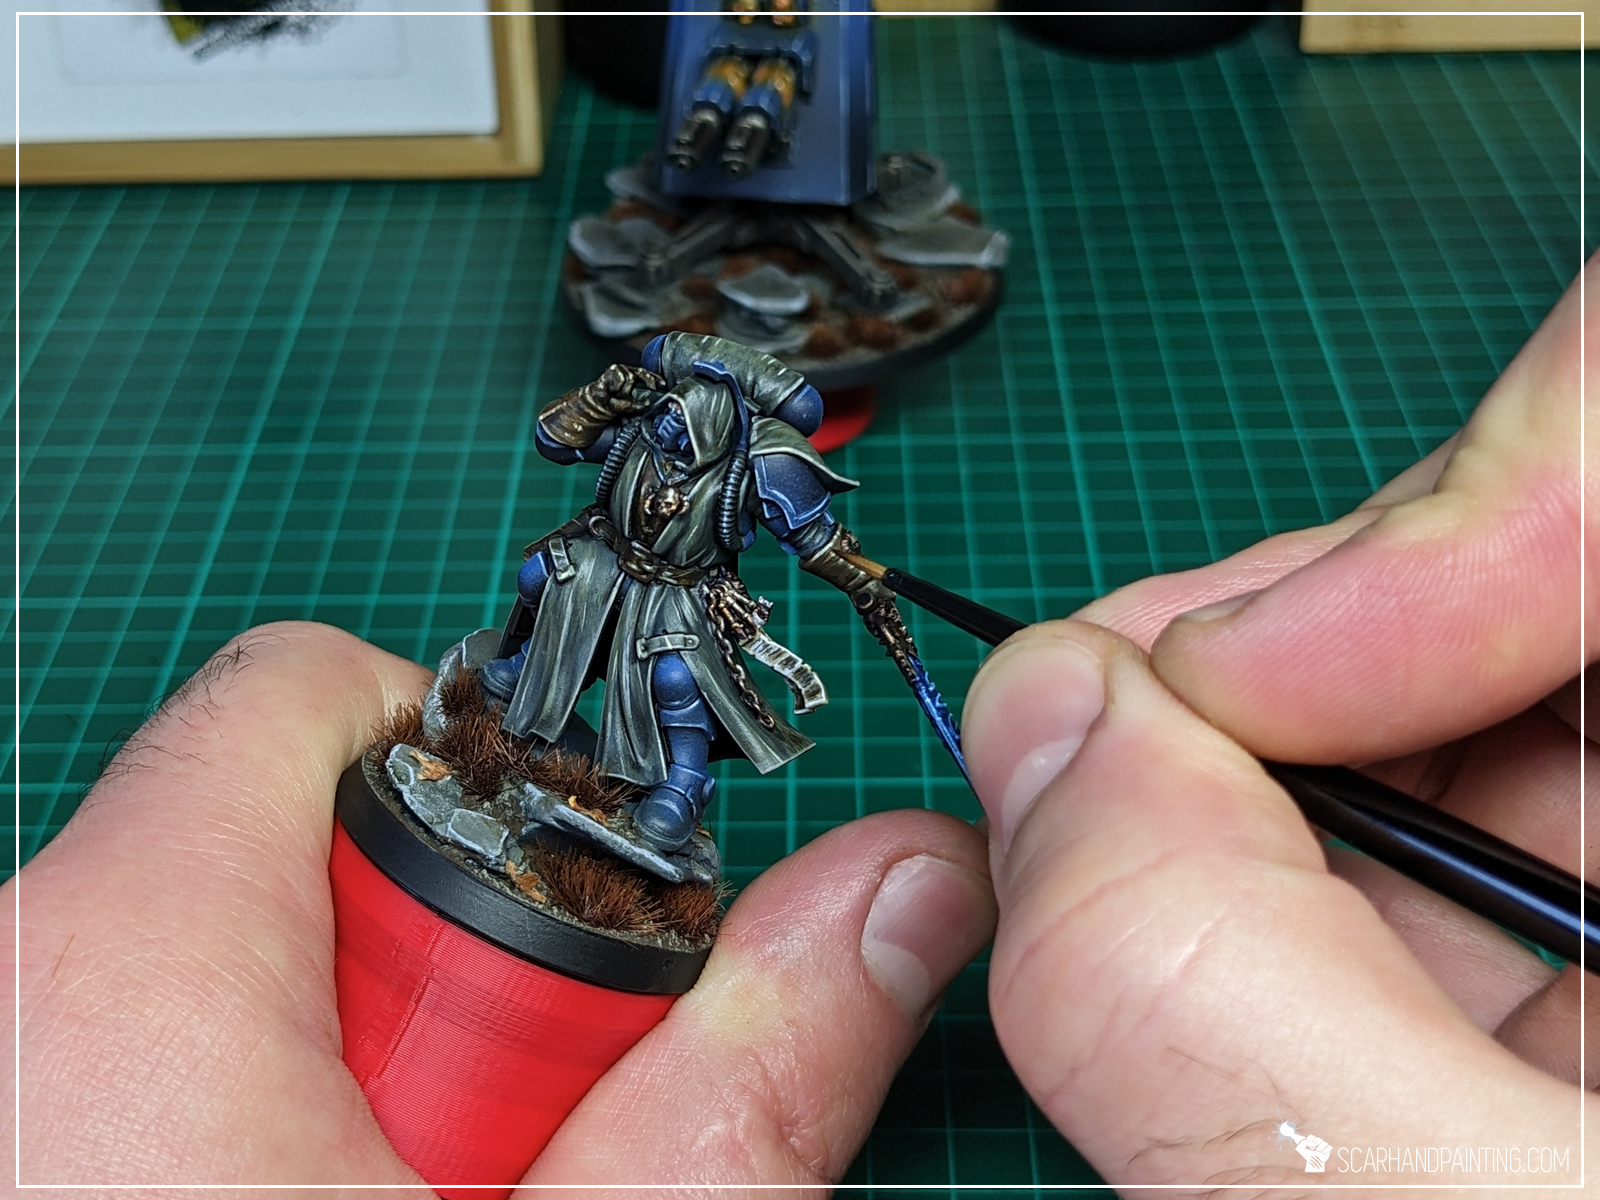
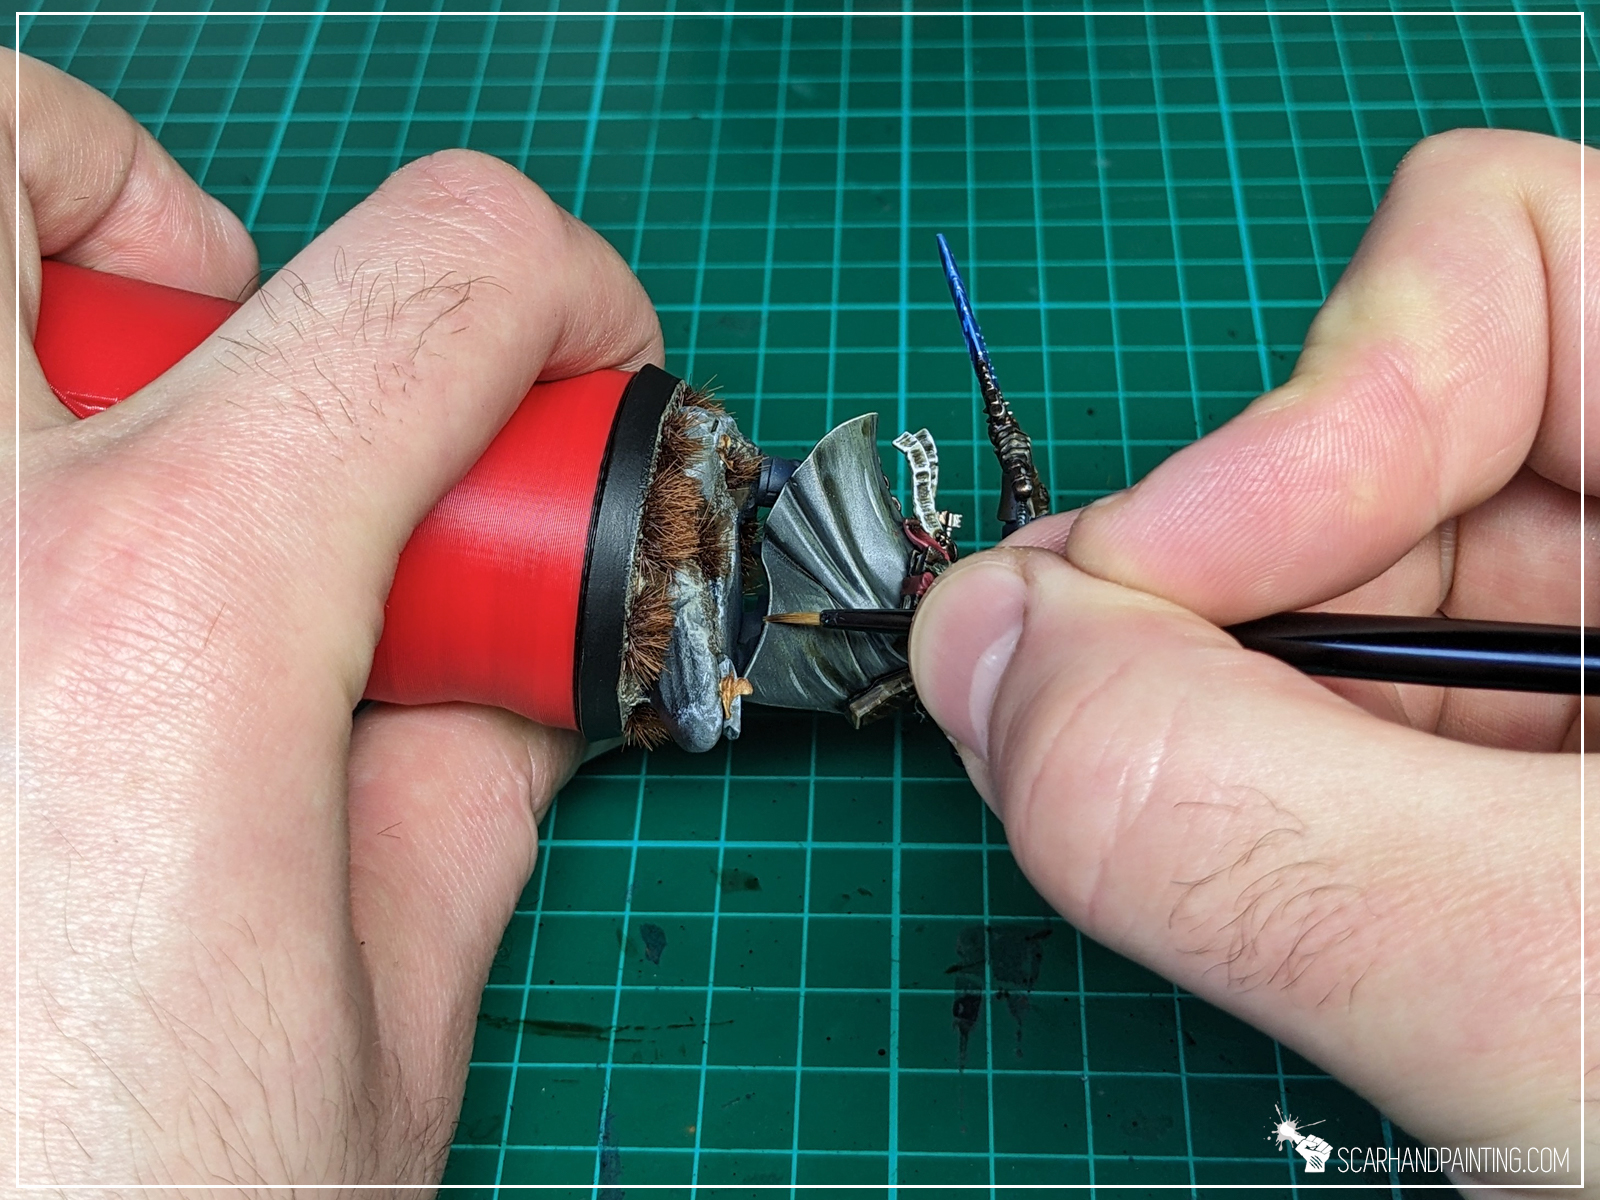
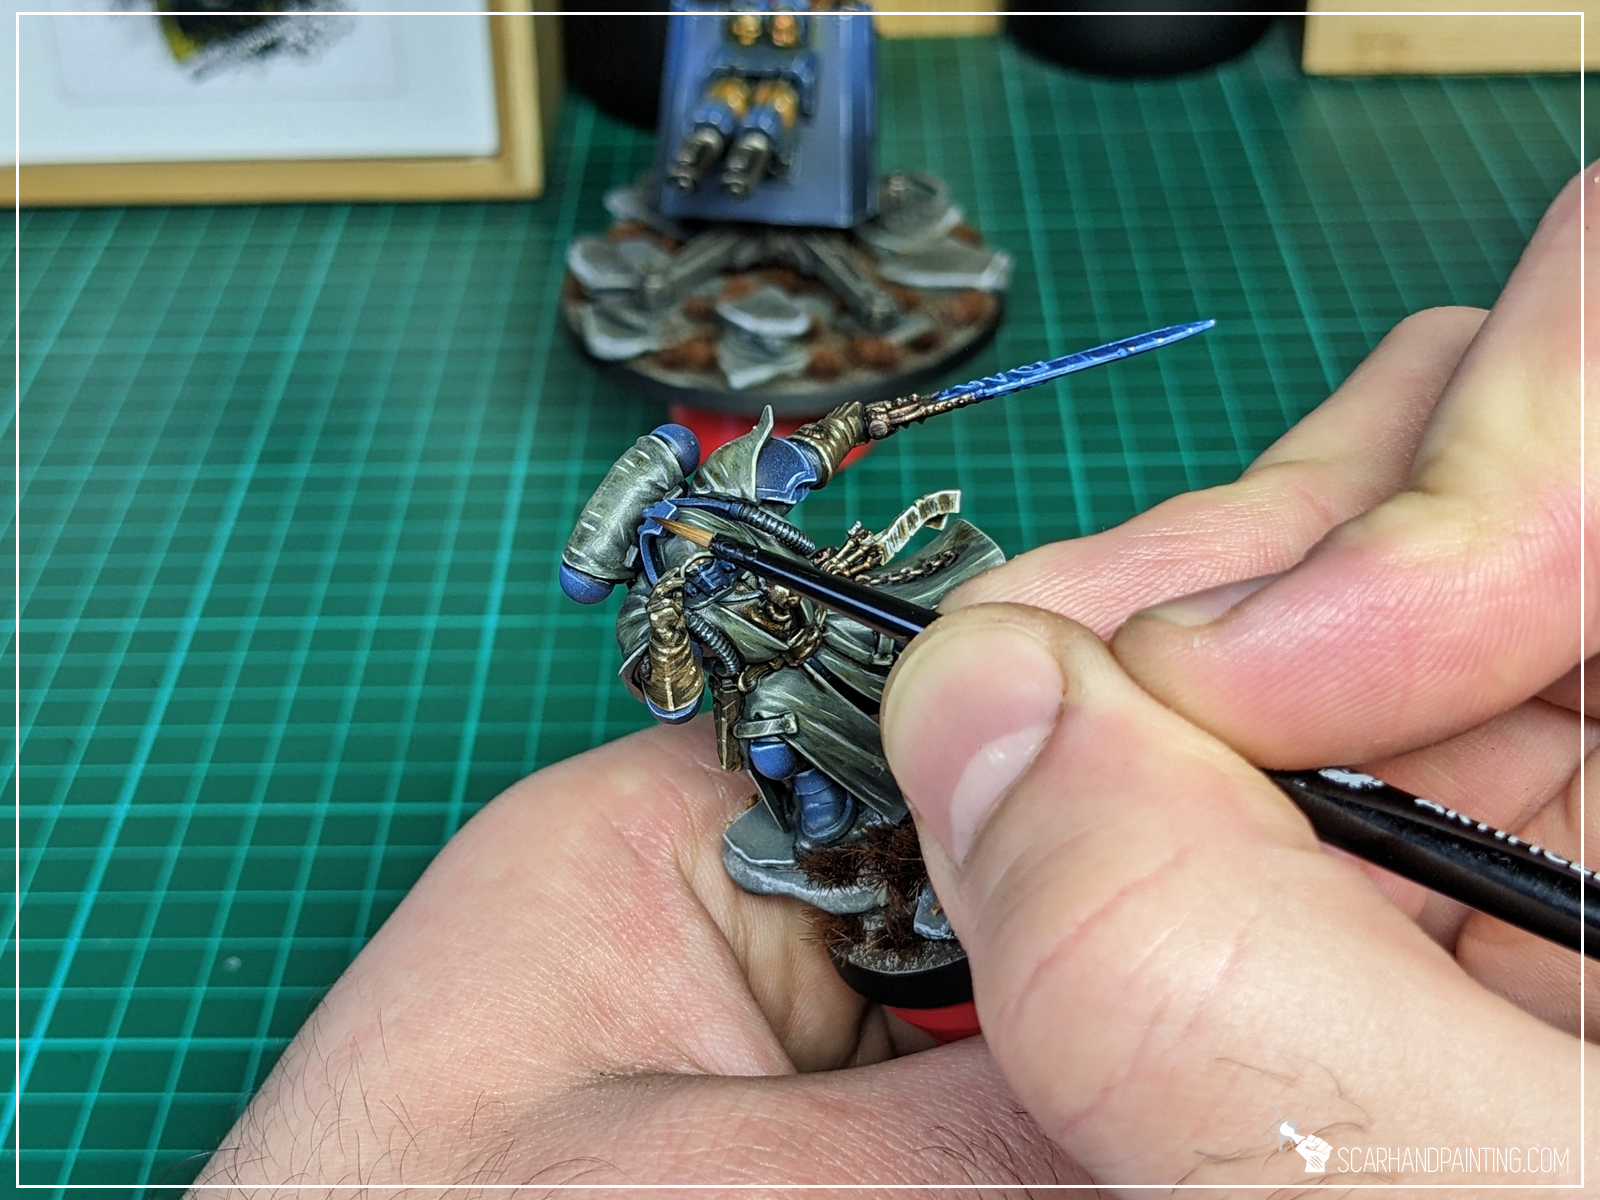
Handling a brush is a personal thing. It depends mostly on your experience, preferences and muscle memory. It would be inappropriate for me as a painter to tell you how to handle your brush, but I can definitely share some of my own habits. For starters, brush control and hand support, both heavily impact precision of the painting process. I found these skills worth practicing early on.

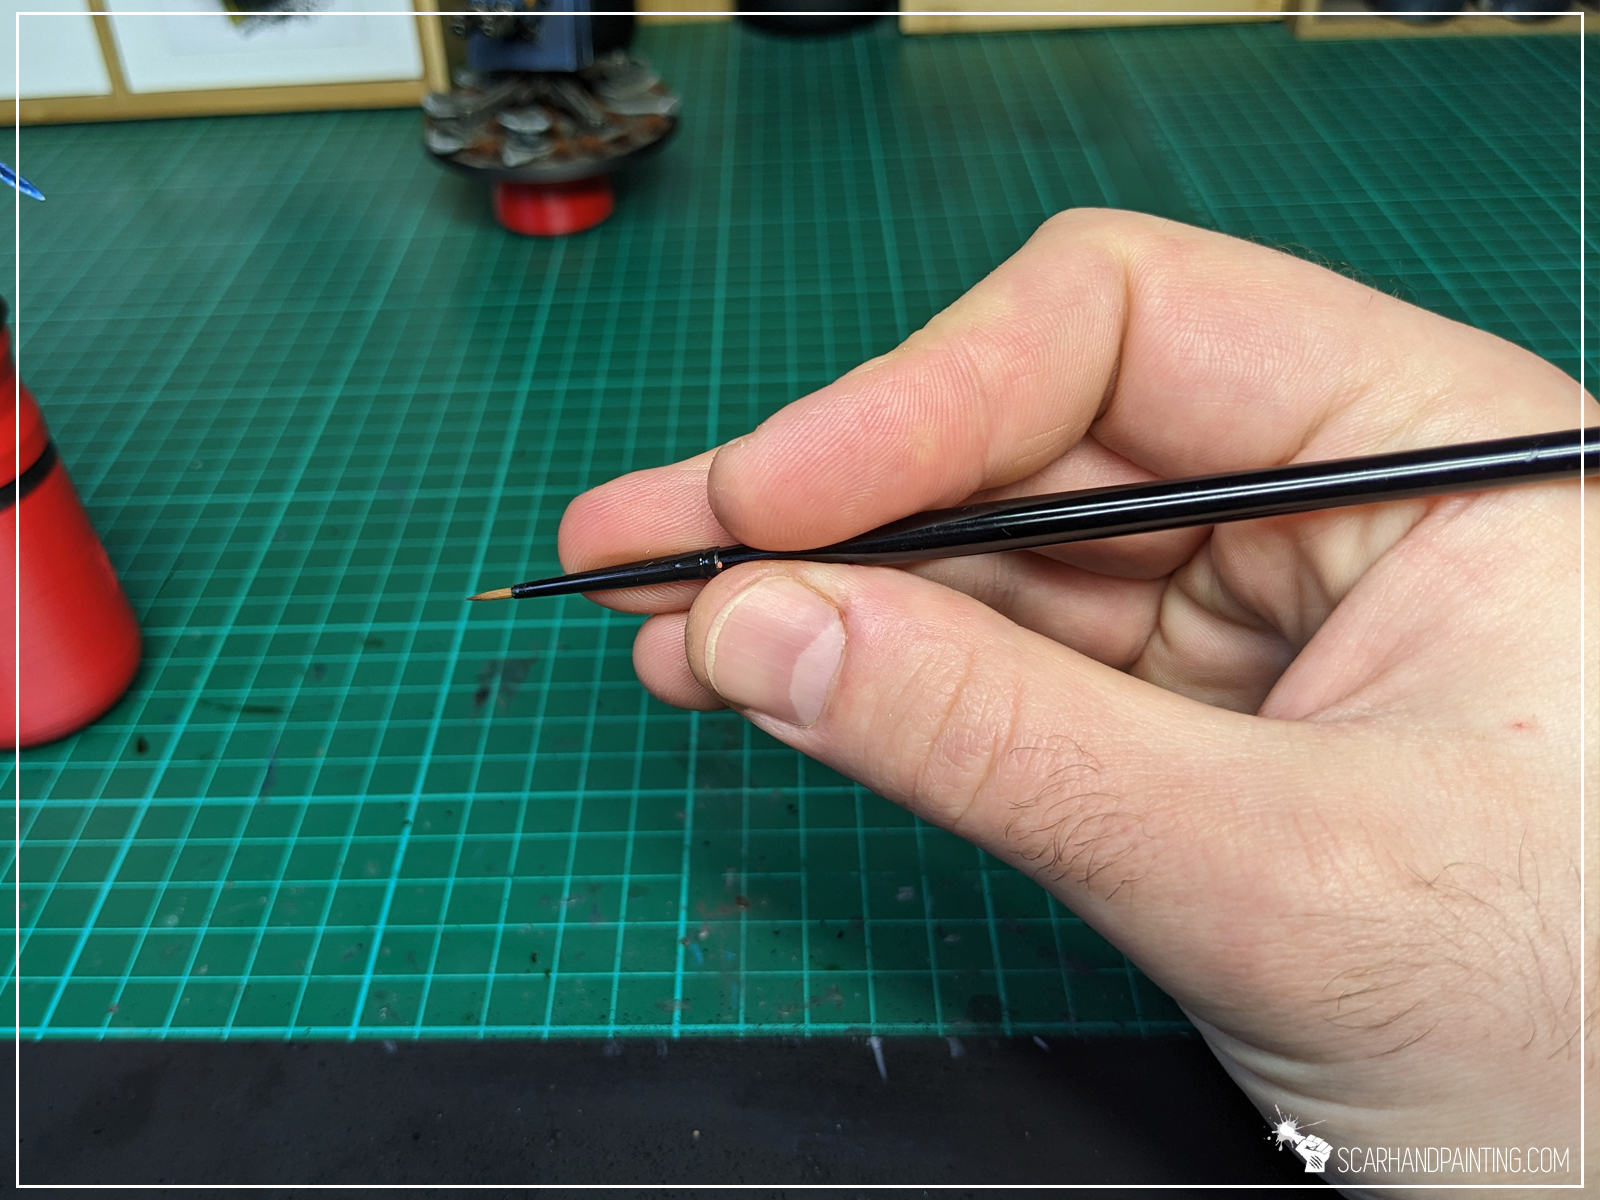

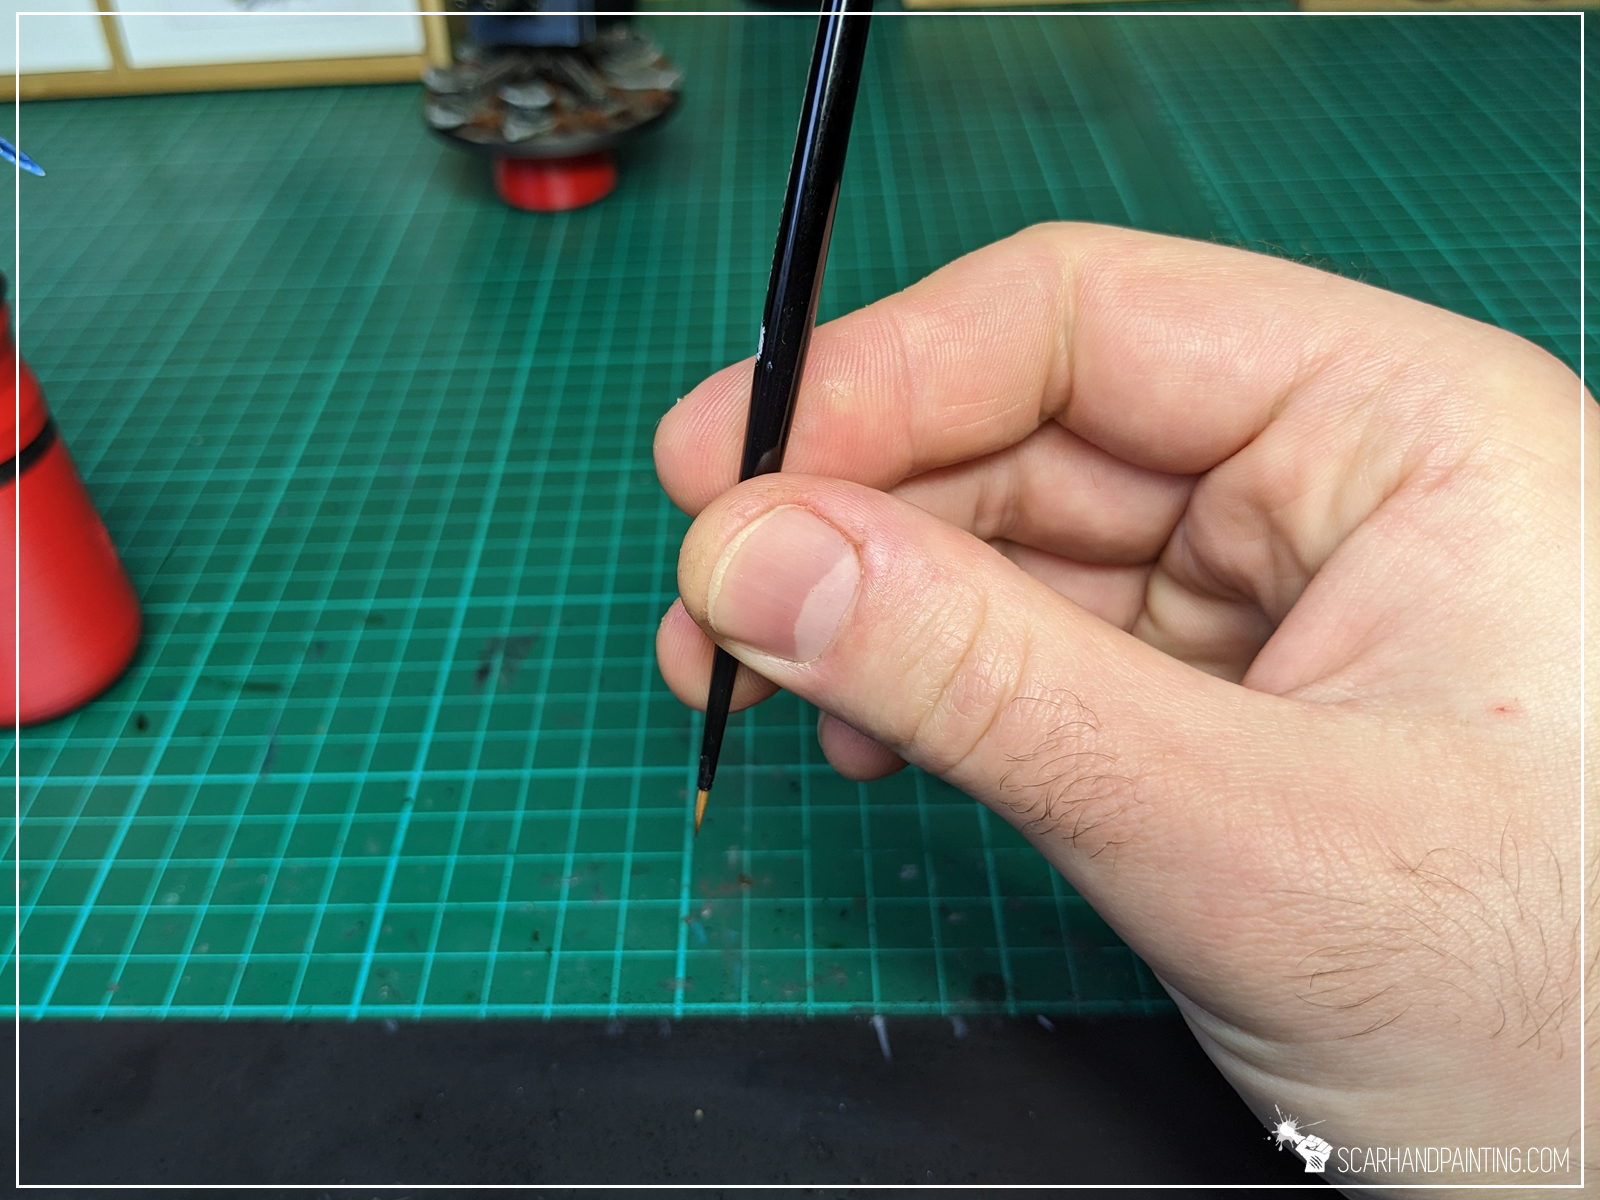
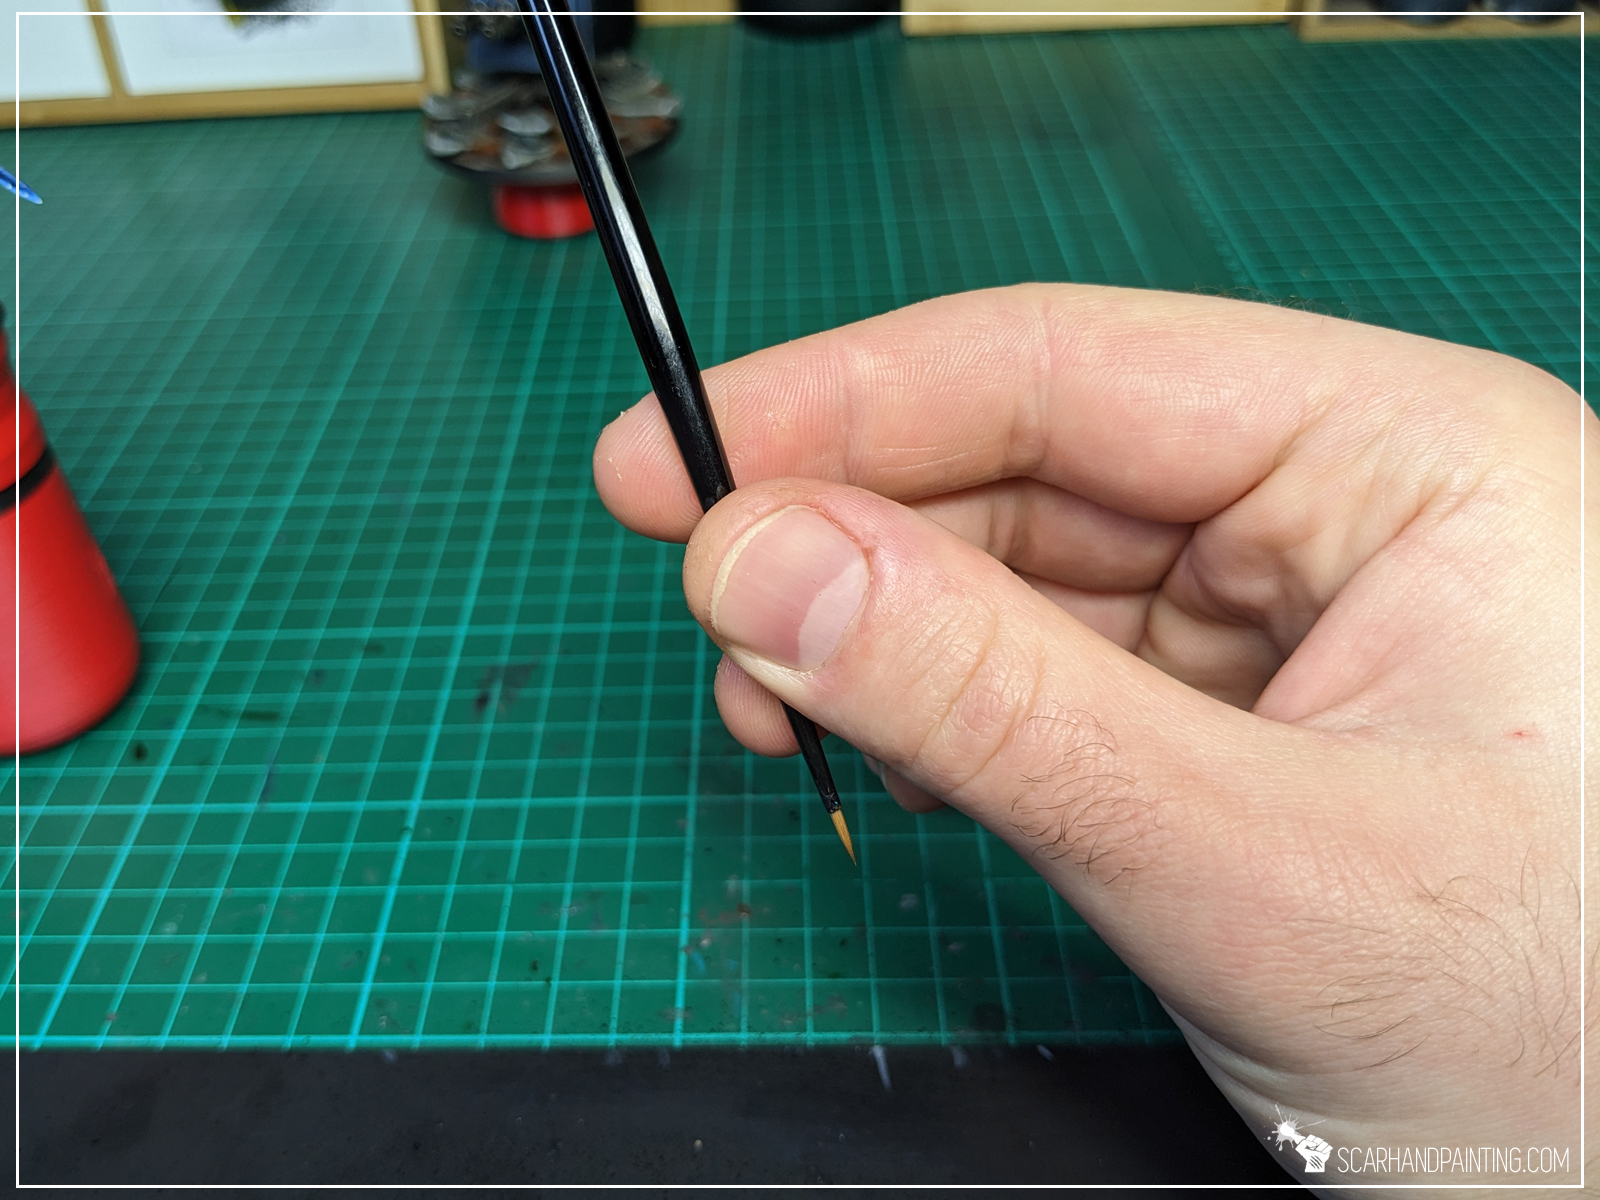
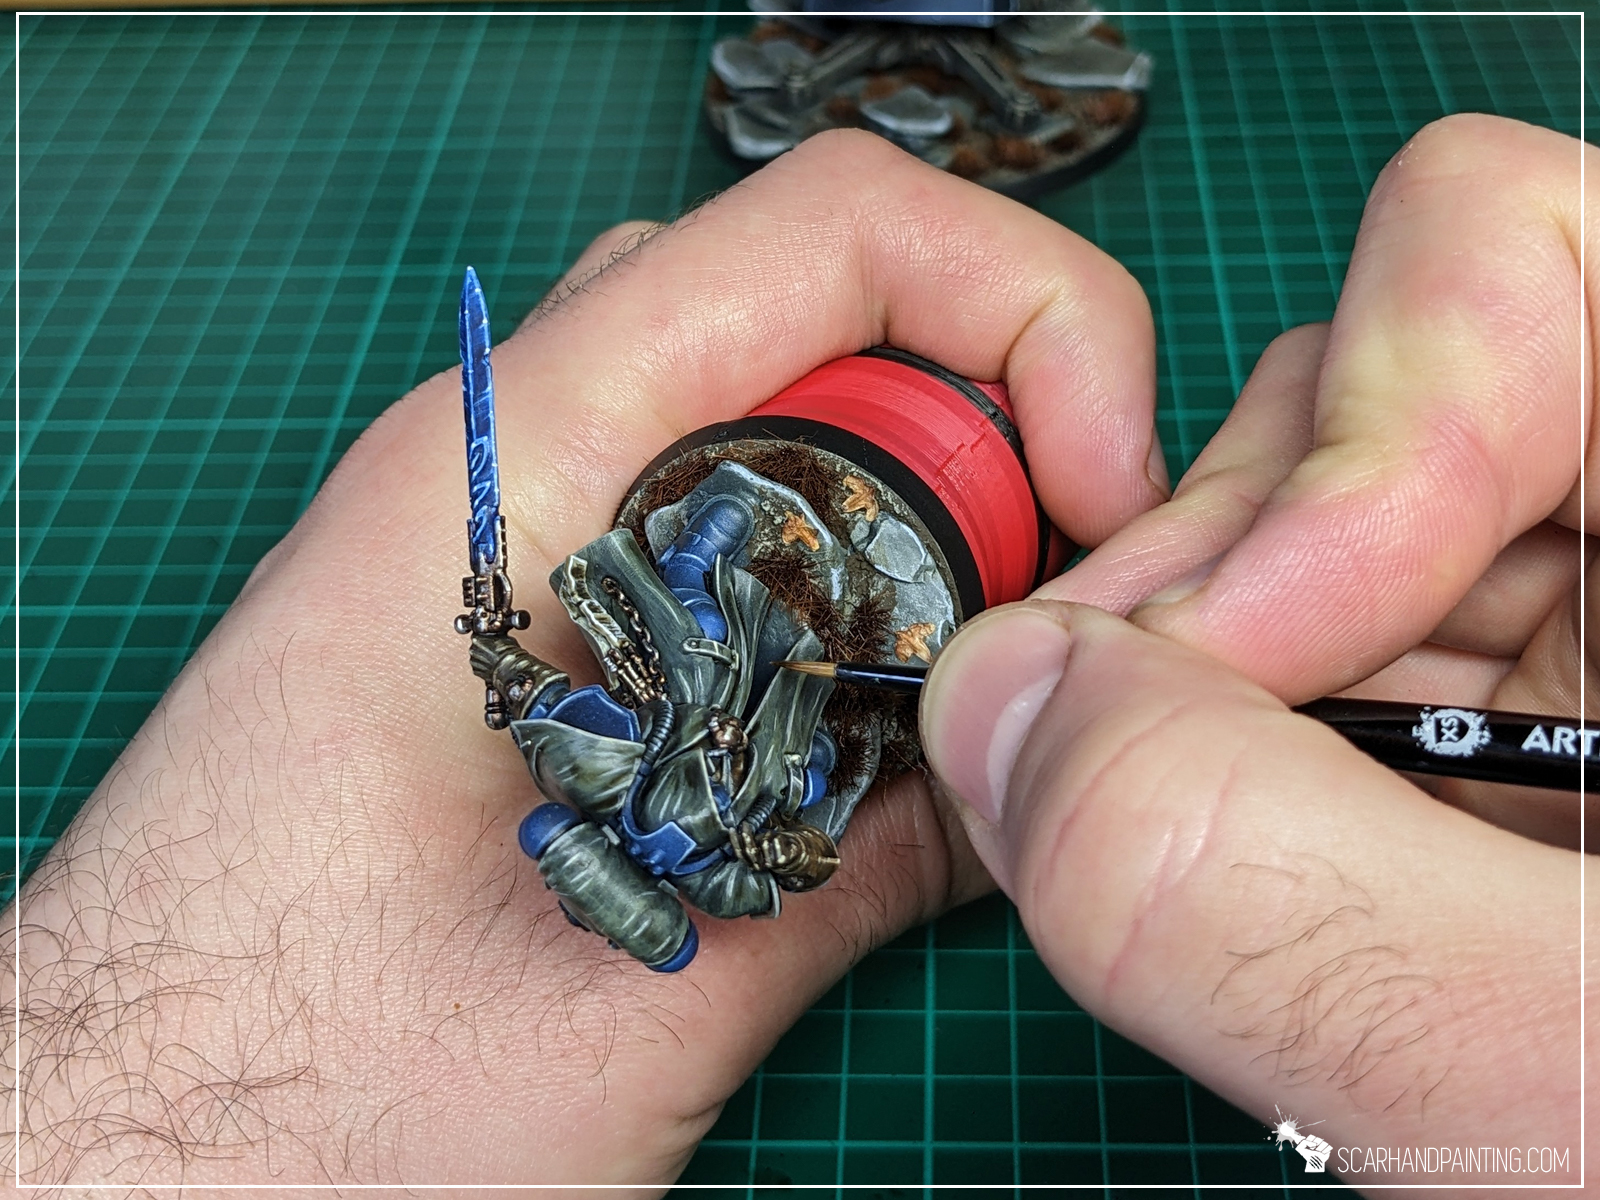
When painting, I usually hold a brush with three fingers (see pics) and control it with small movements of my fingers and wrist. This is where most of the brush movement originates from, regardless of inclination. I tend to hold brushes close to the “crimp” on the ferrule, which gives me better control over the tip. Most of the time I loosely support the handle of the brush on my hand, between the pointing finger and thumb. This decreases brush vibrations and makes it follow the movement of the hand much smoother. On occasion, in the midst of painting, I might raise the handle off of my hand to gain access to a spot that is otherwise difficult to reach (such as painting obscured eyes), but most of the time it stays in the resting position. All of this combined allows for a wide range of smooth, precise movements with which to work with.
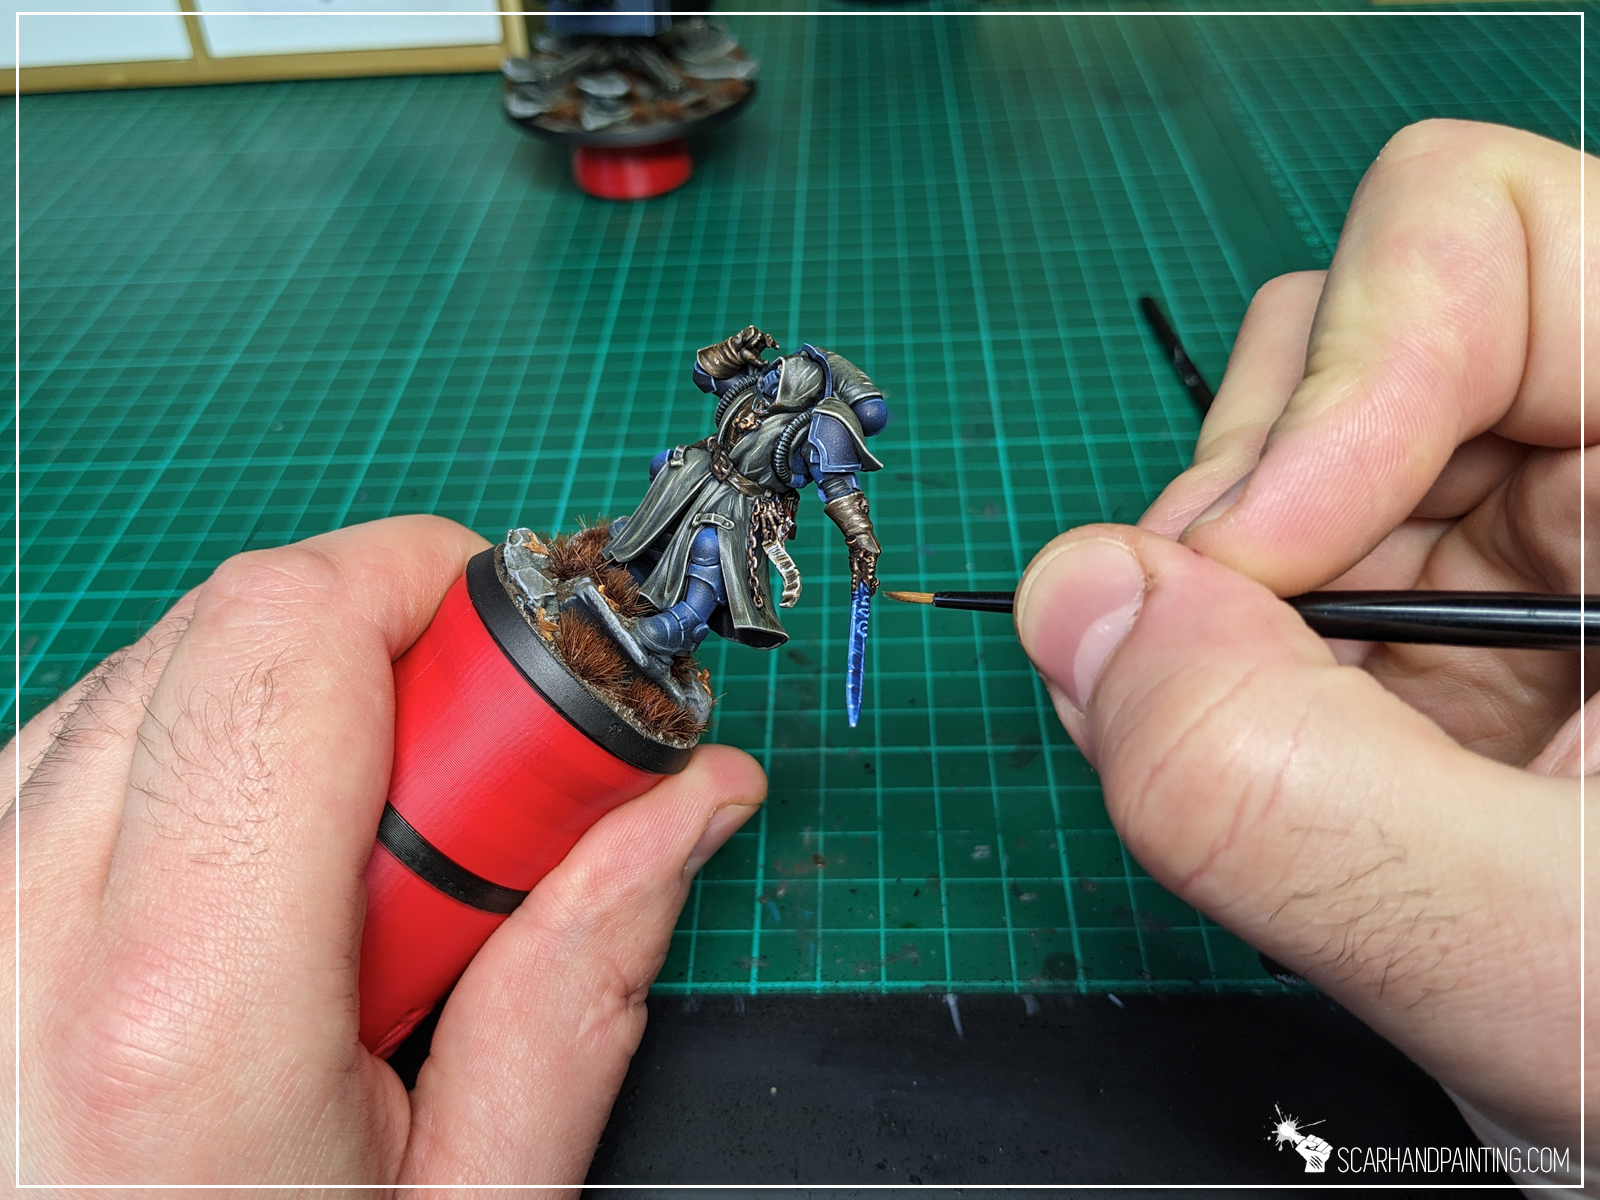
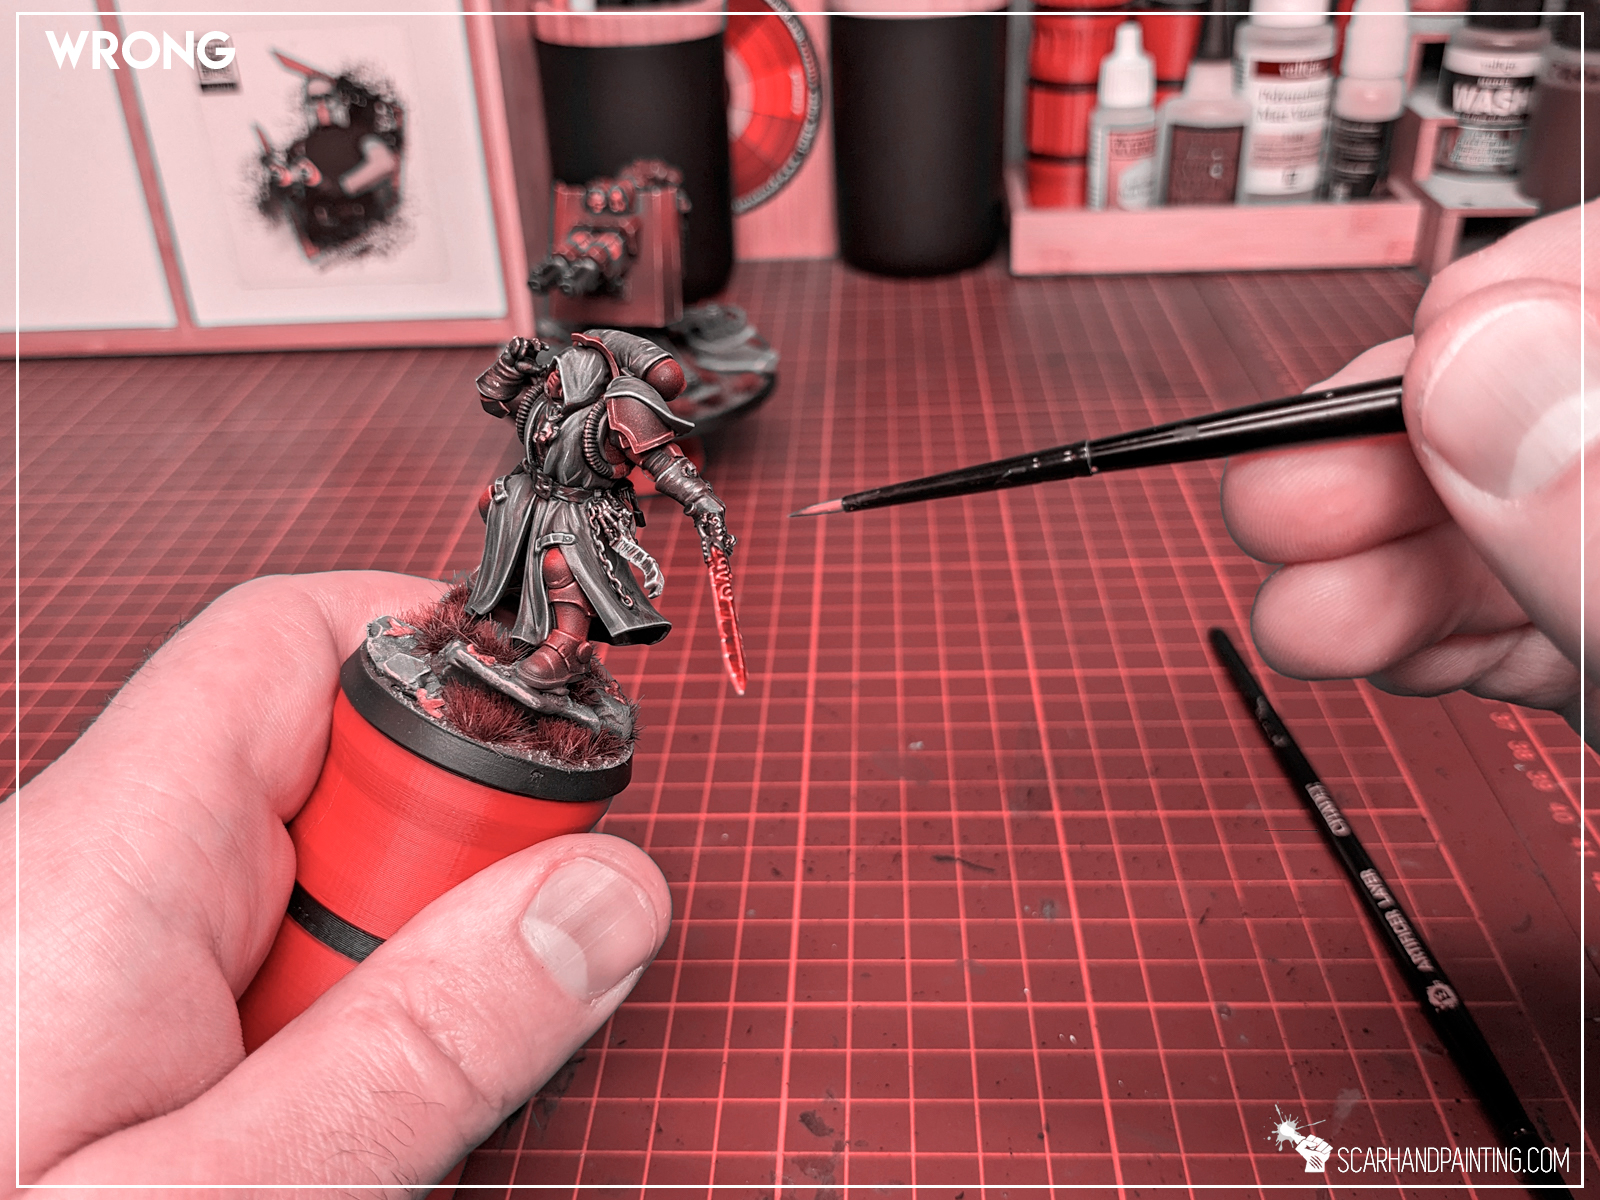

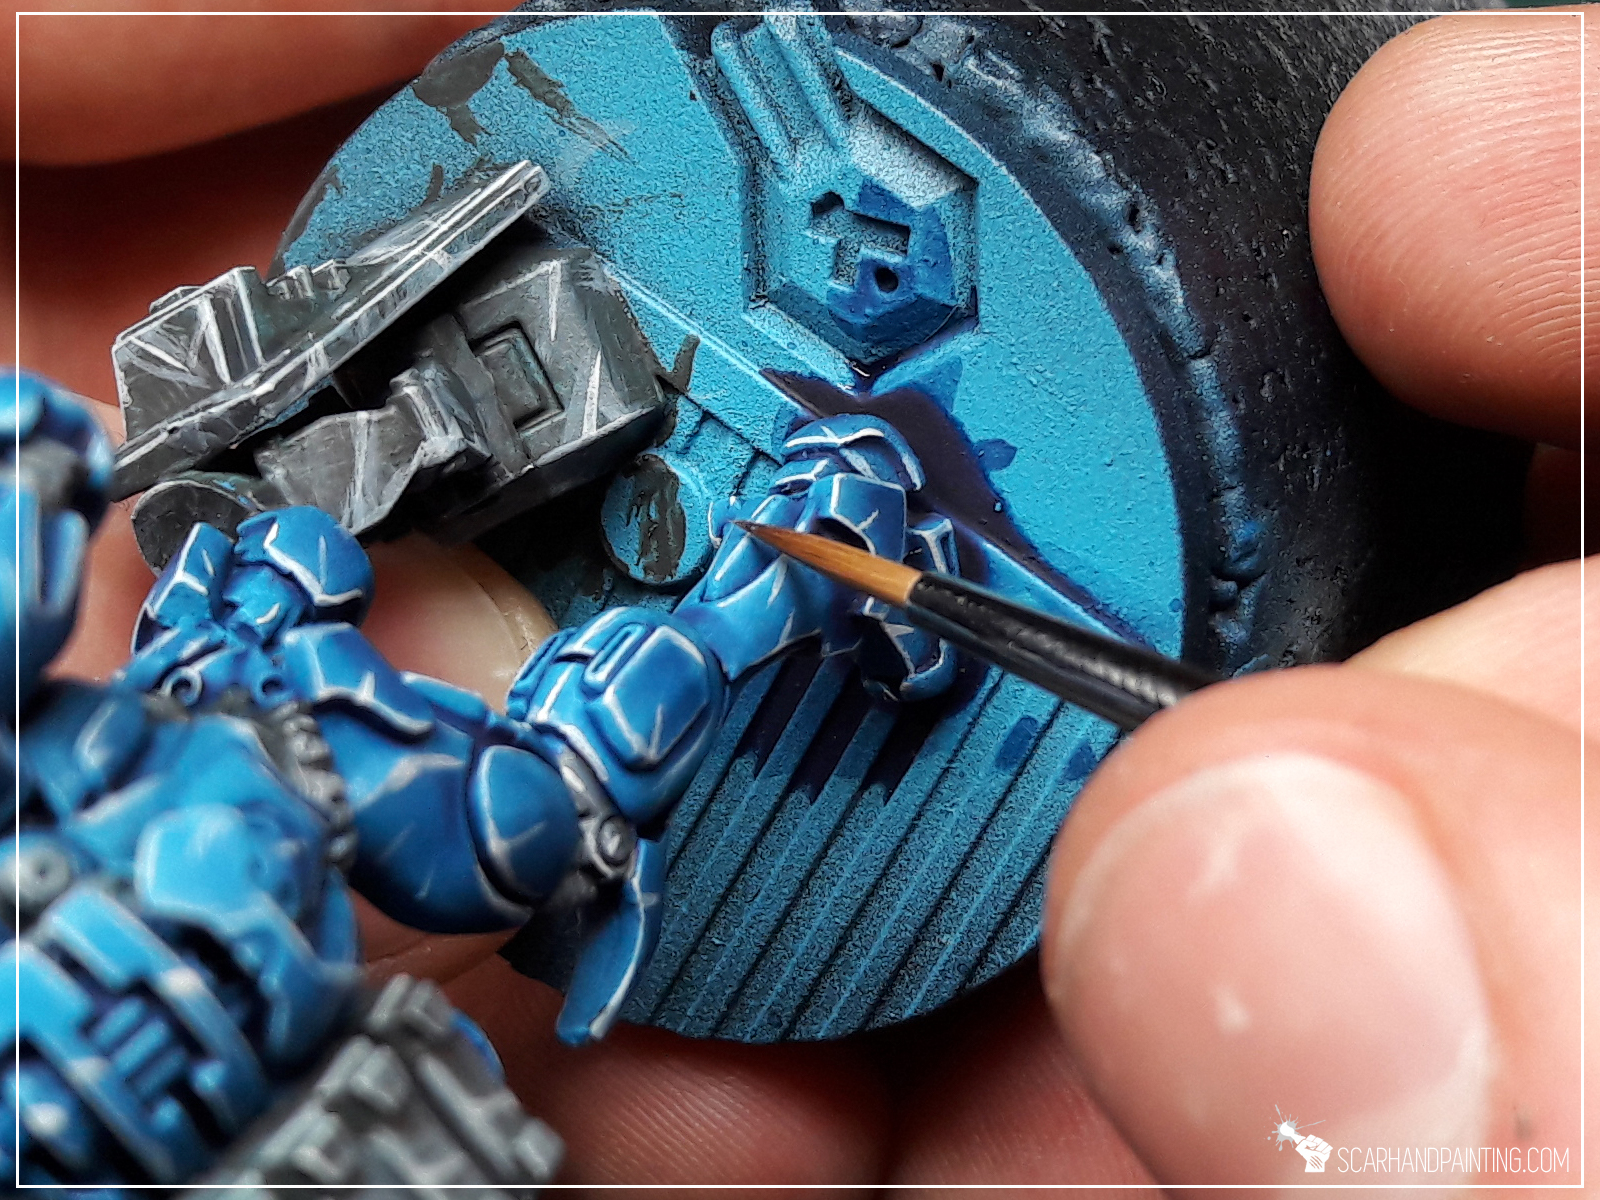
Shaky hands or just unnecessary movement might render even the most professional brush handling ineffective. I always keep my wrists supported on the edge of a painting desk. This is to properly immobilize the miniature but also reduce any macro movement (breathing, elbows etc.) translating onto the brush. To make this a bit less uncomfortable for my wrists I use smooth edge covers for furniture permanently glued onto a working desk (you can learn more about this life hack here).
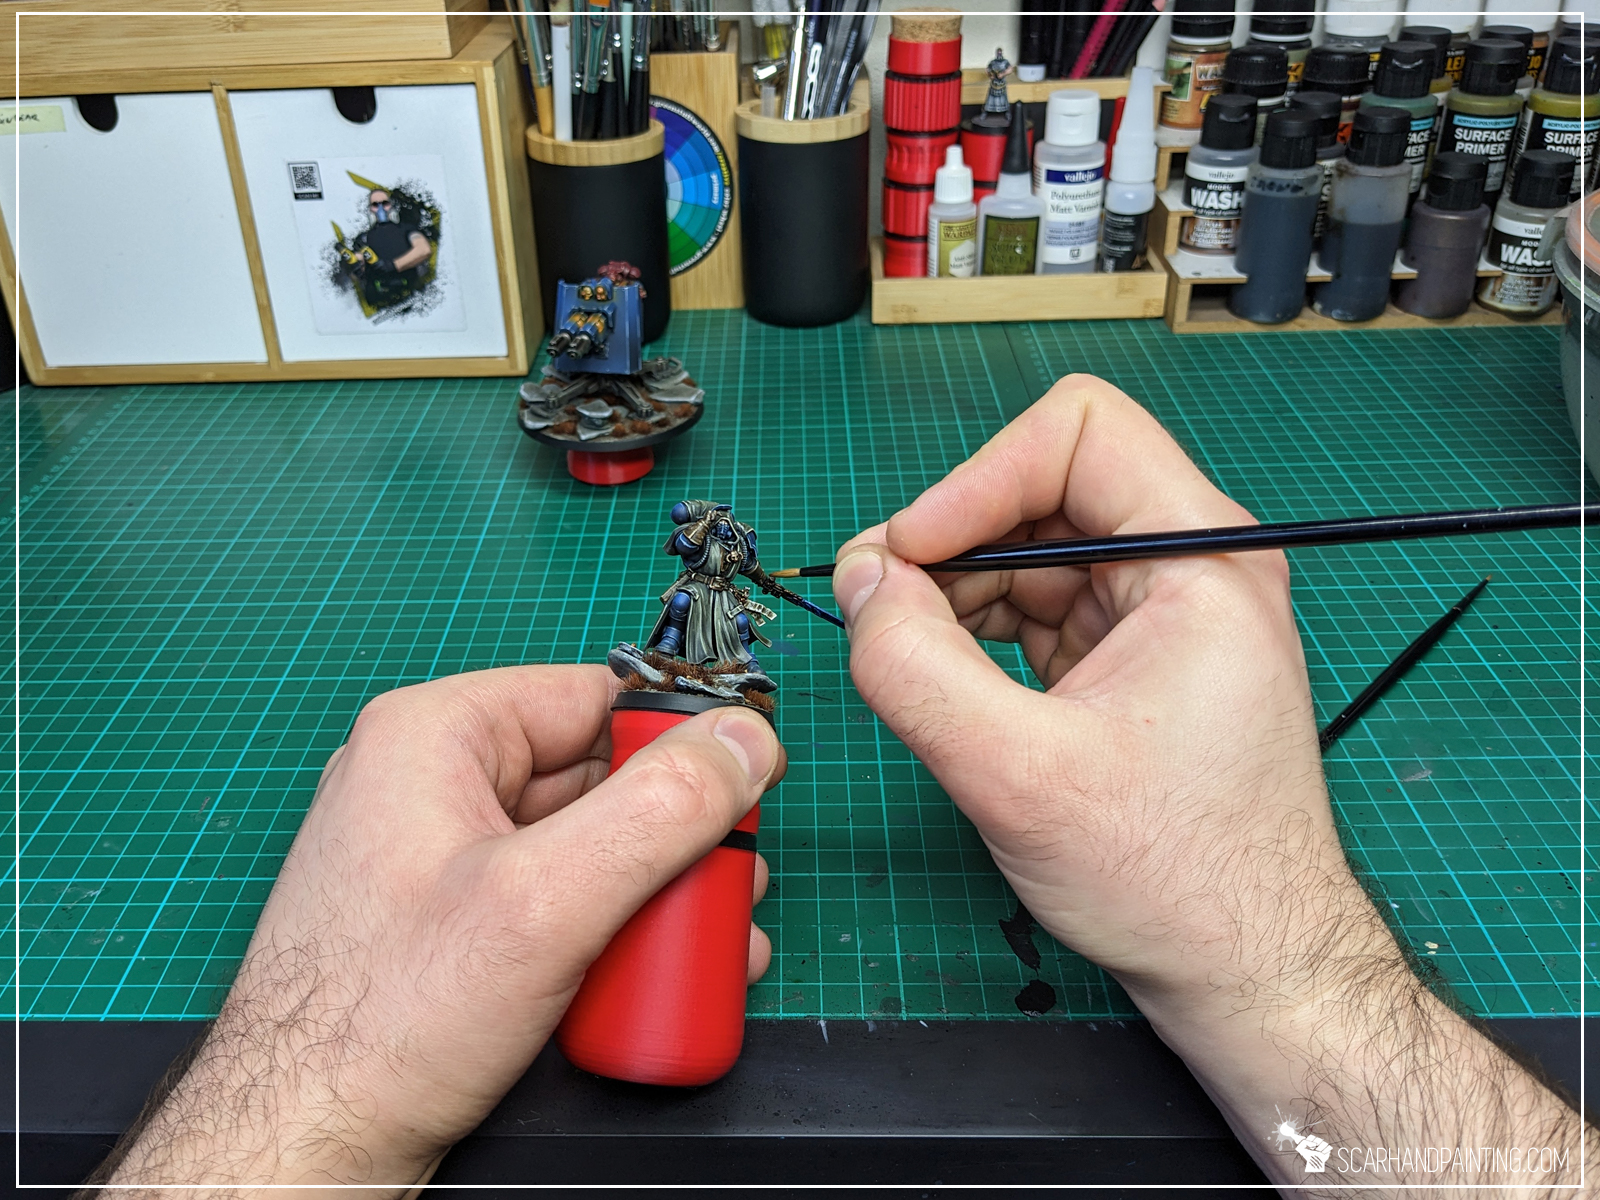
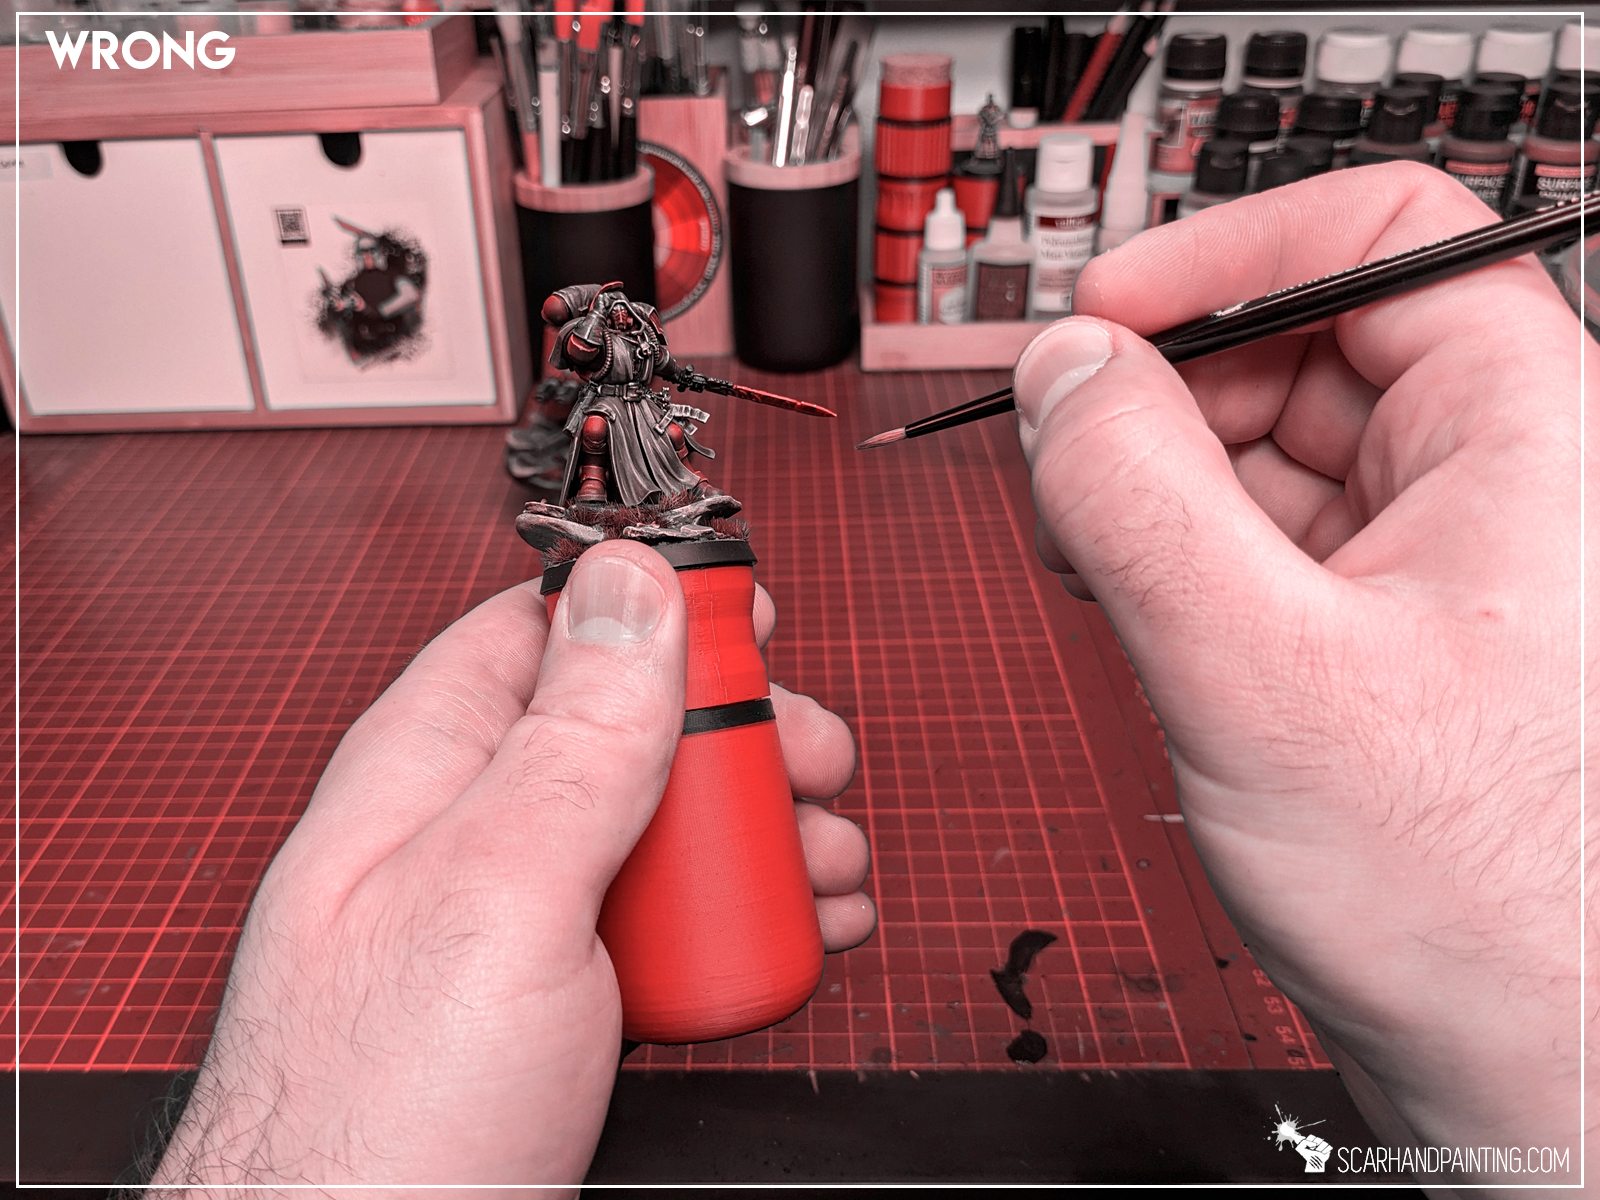

When in need of increasing precision even further, I like to ‘link’ my hands, supporting brush hands pinky on the hand that I hold the miniature with. Both hands micro movements synchronize and I get more control over the tip as a result.

Frankly speaking, the aforementioned methodology does not work the same for every painting technique. Depending on the size and type of the miniature I sometimes deviate from the norm. Some techniques, such as drybrushing or washing, might not require much precision, whereas detail heavy techniques will definitely benefit from proper brush handling and hand support.
I hope you found this tutorial interesting. Be sure to let me know your thoughts in the comments below or via Facebook or Instagram. I would also appreciate if you’d consider sharing my content with your friends, who might find it useful. Finally, if you are looking for a professional Warhammer miniatures painting service, be sure to contact me via this contact form. I always reply within 24 hours. If you don’t see anything from me by then, please check your spam folder.
Third time’s a charm thus welcome to the third ‘Painting Philosophy’ article, where I let you in on ‘how’ and especially ‘why’ I do some things in a certain way. In my opinion a proper approach to painting is crucial to maintain healthy and rewarding experience. Final result depends on it in the same way as on techniques, know-how and tools being used. Nowadays internet is full of painting tutorials yet it takes some inner understanding of our own capabilities to find what suits us best and fully benefit from all acquired knowledge. That being said – In this series I will reveal what works best for me as a painter. I hope you will find some wisdom in it…
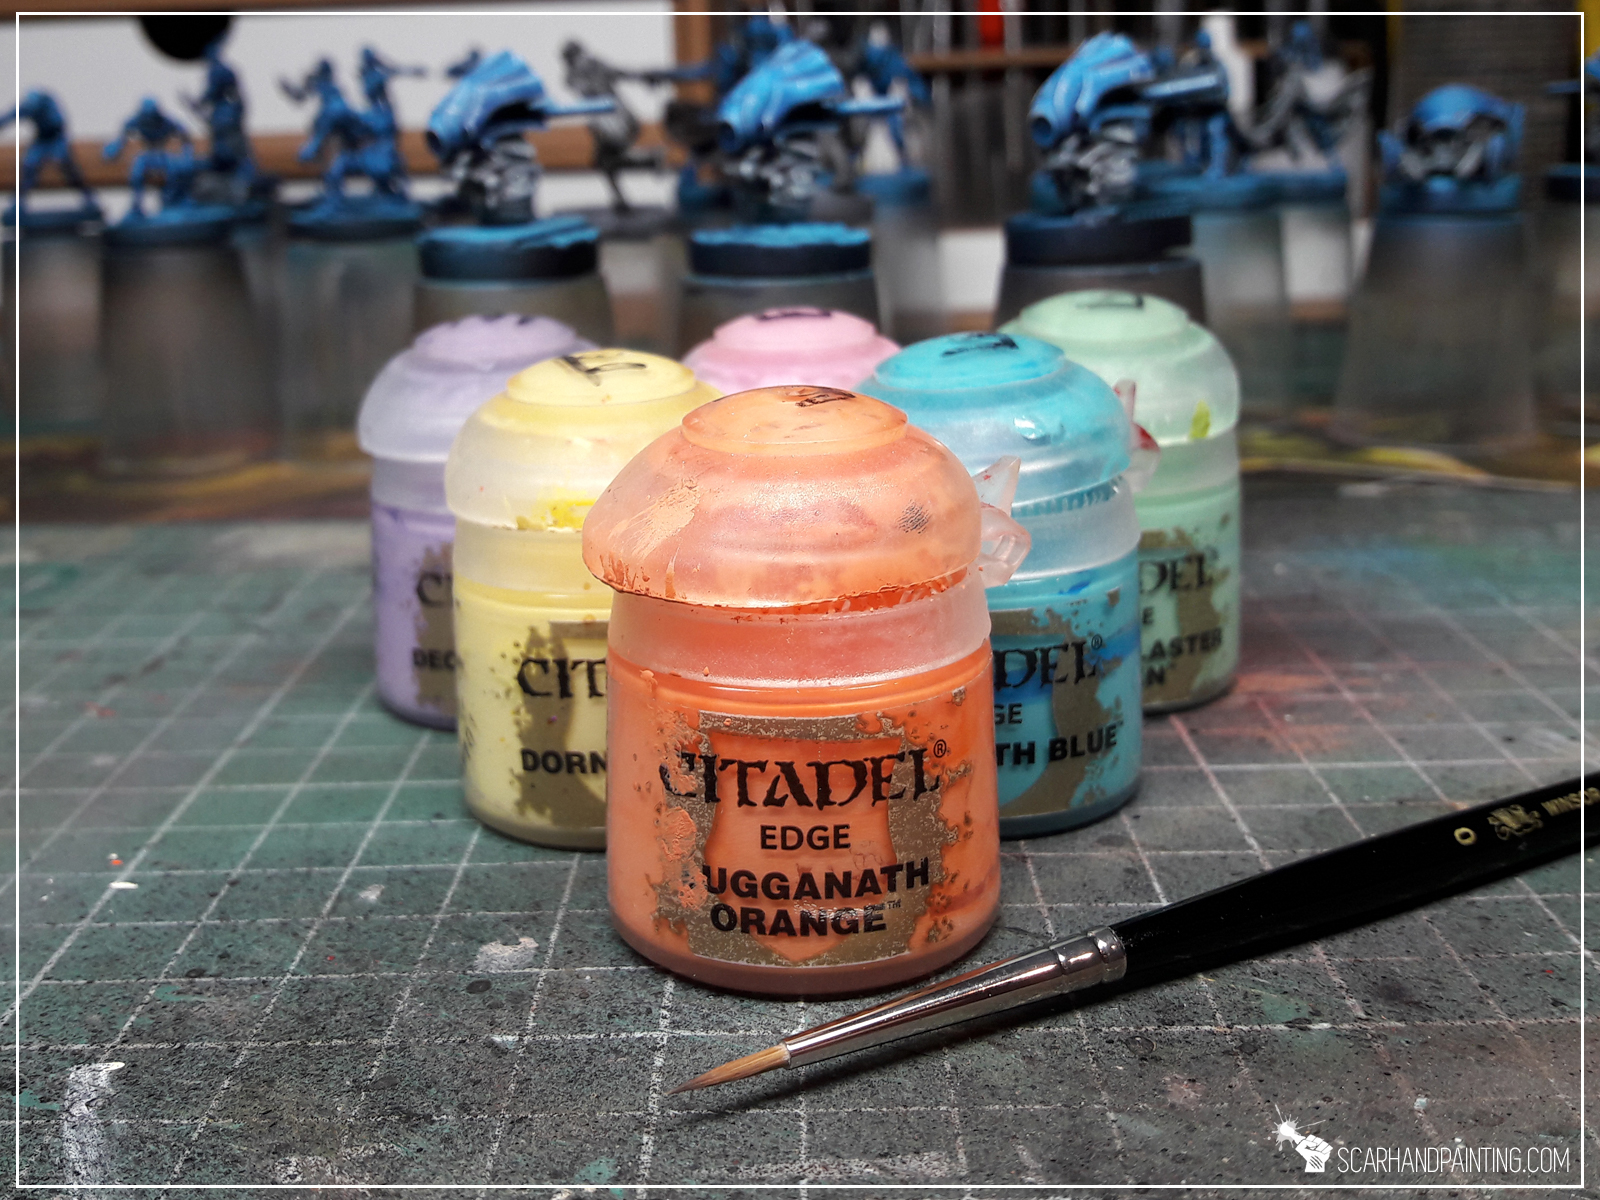
In last article I wrote a lot about the edge of a base and what it represents. Do not let yourself be fooled by a similar title, as today we’re talking a completely different topic. I introduce to you the ‘Edge highlight technique’. Something that I used to avoid, but at some point got lured by Games Workshop to try out. Before that I struggled to keep colors juicy and interesting, preferred dark, murky color schemes and avoided any type of lining, including edges. I was a bit disappointed with my own work as a result – so a not very healthy relationship with paints and miniatures. It all changed once I got my hands on GW’s Edge paints, which was the first step to realize how important strong edges, combined with proper lining, are.
Edge highlights is a technique of applying paint to the natural edges of a surface, resulting in strong contrast and nice surface outlining. I find edge highlighting, combined with lining, to be a great way to make a color pop and literally change how an eye can perceive it. It works especially well with multi-layered surfaces of detailed miniatures but should work for you regardless of what miniatures you paint. Here’s an example of edge highlights in action – two sets of miniatures painted the same, except one set was then edge highlighted (with barely few extras):
I’m not a guy that looks at miniatures through magnifying glass. Being a commission painter I paint projects related to gaming and this kind of miniatures should be able to catch an eye while being used on the gaming board. I like my miniatures to pop, to be sharp and ‘edgy’, to have personality and coherent color scheme. For me edge highlights provide all that and more.
First of all, like with most painting methods, I avoid overloading my brush with too much paint. This is very important as too much paint would run down and ruin a crisp, sharp edge. Other than that I try to:


Now you know how I approach edge highlighting and with that I would like to close third the Painting Philosophy article. Please take note that what works for me, might not necessarily work for you – still there are many ways to accomplish certain things – mine is just one of them. I encourage you to try and experiment with this technique. As usual I put a lot of effort into preparing this article, but if it helps at least one painter out there – I consider it a time well spent.
I hope you found this tutorial interesting. Be sure to let me know your thoughts in the comments below or via Facebook or Instagram. I would also appreciate if you’d consider sharing my content with your friends, who might find it useful. Finally, if you are looking for a professional Warhammer miniatures painting service, be sure to contact me via this contact form. I always reply within 24 hours. If you don’t see anything from me by then, please check your spam folder.

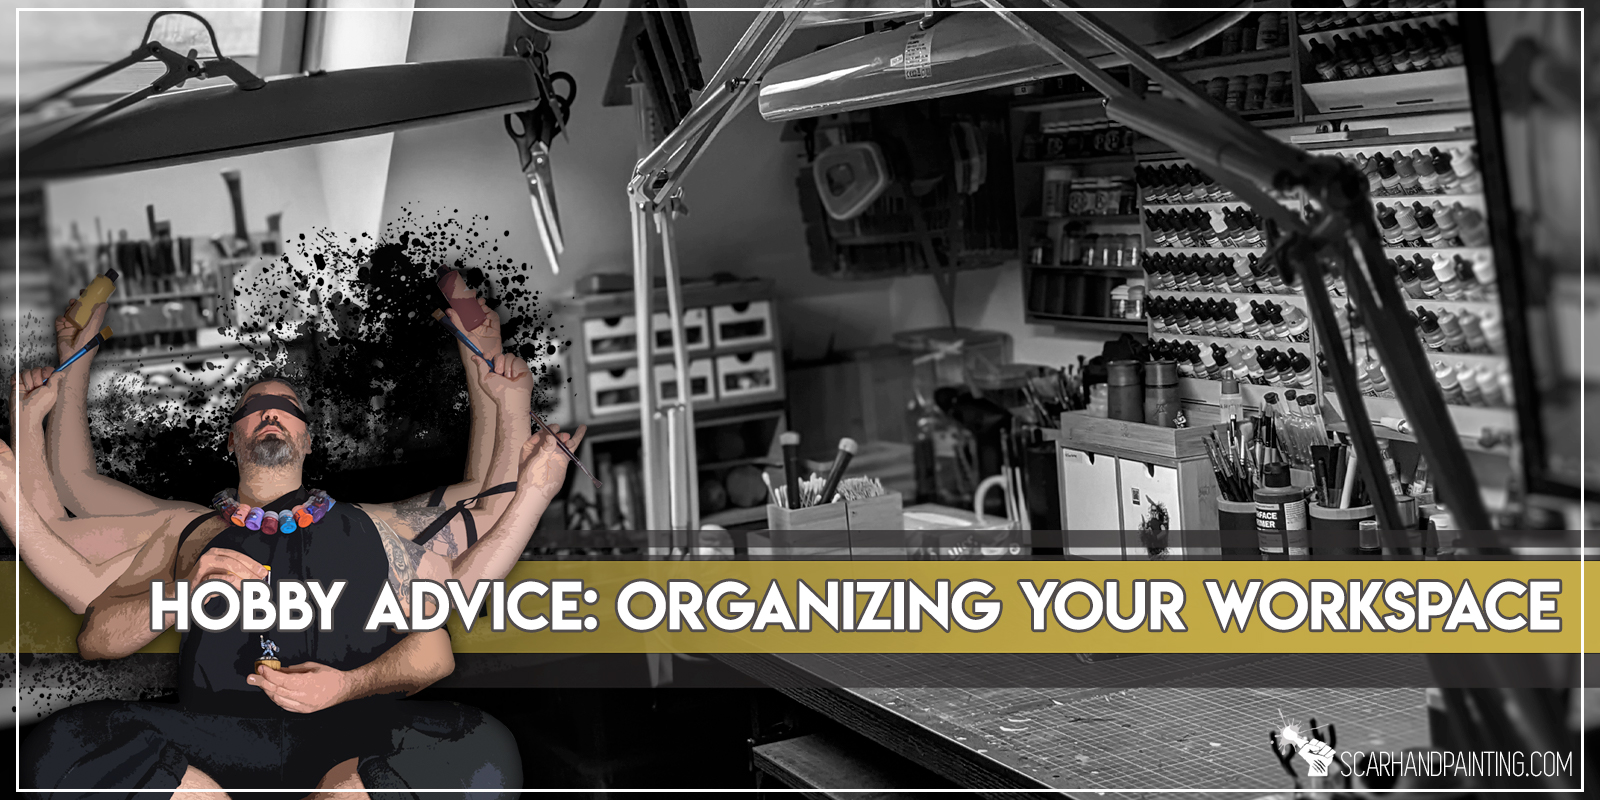
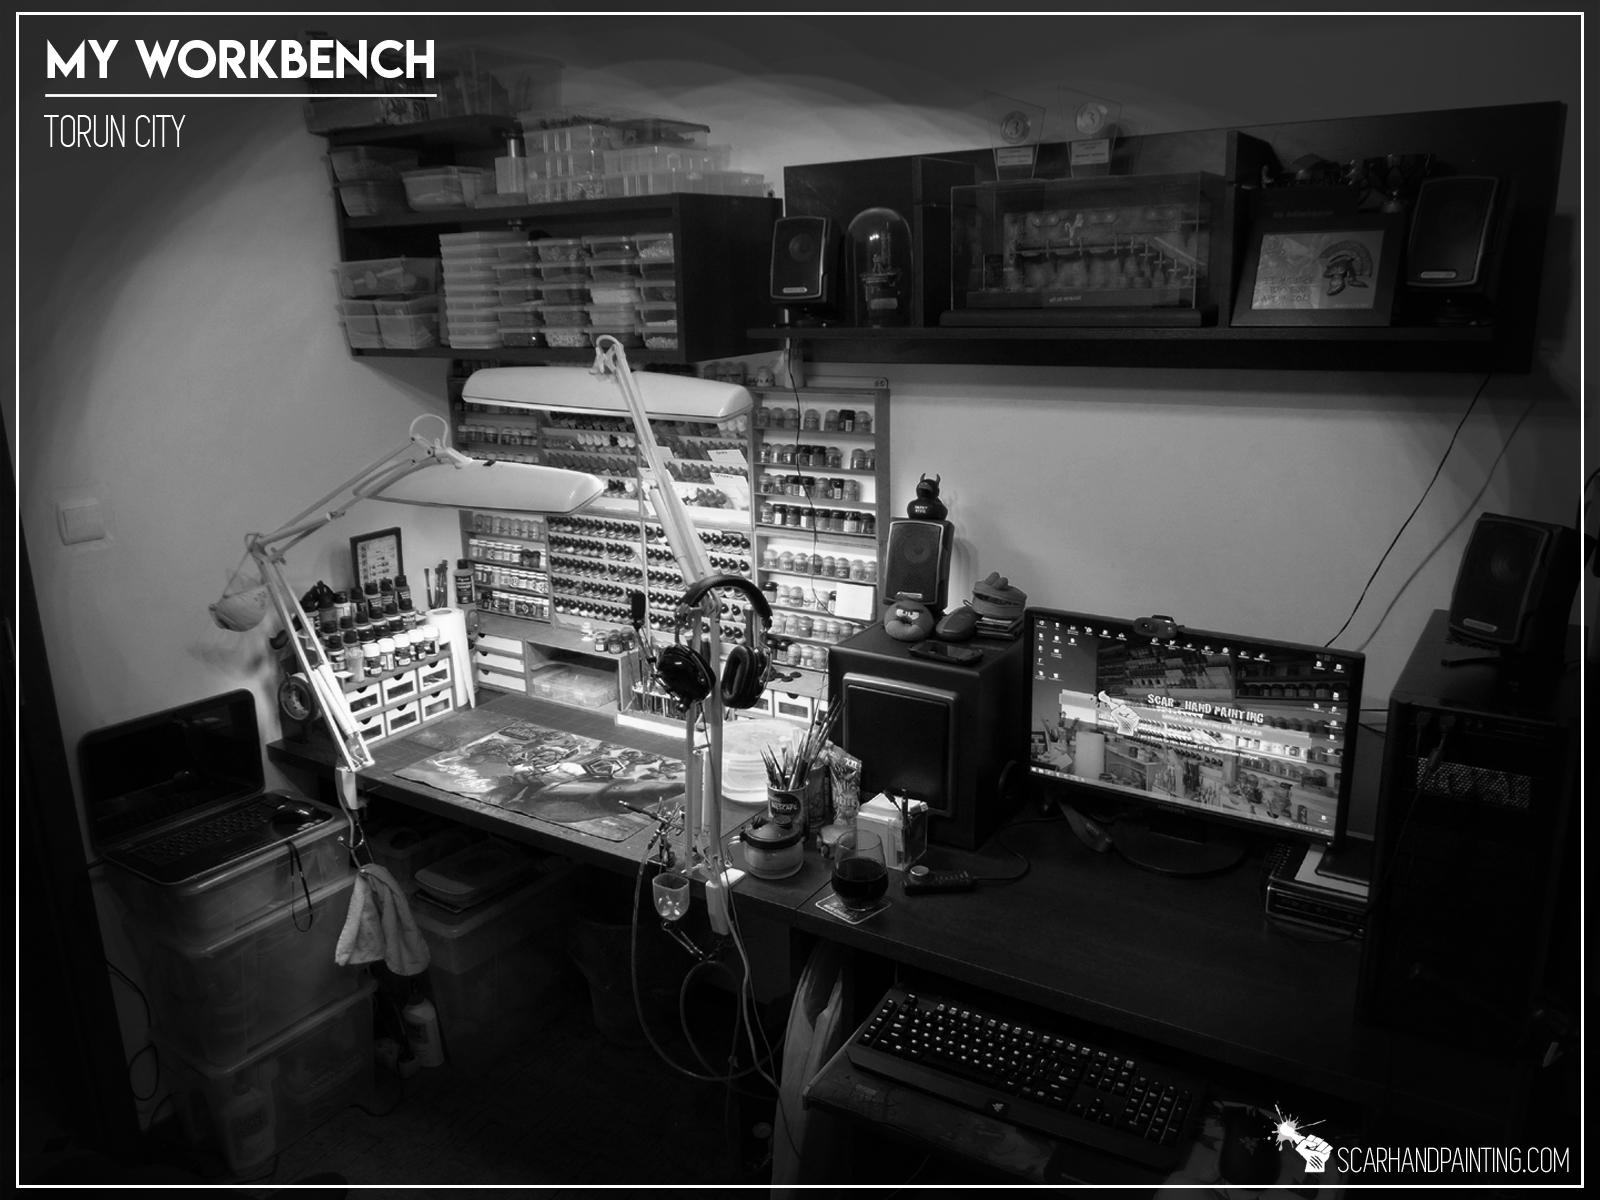
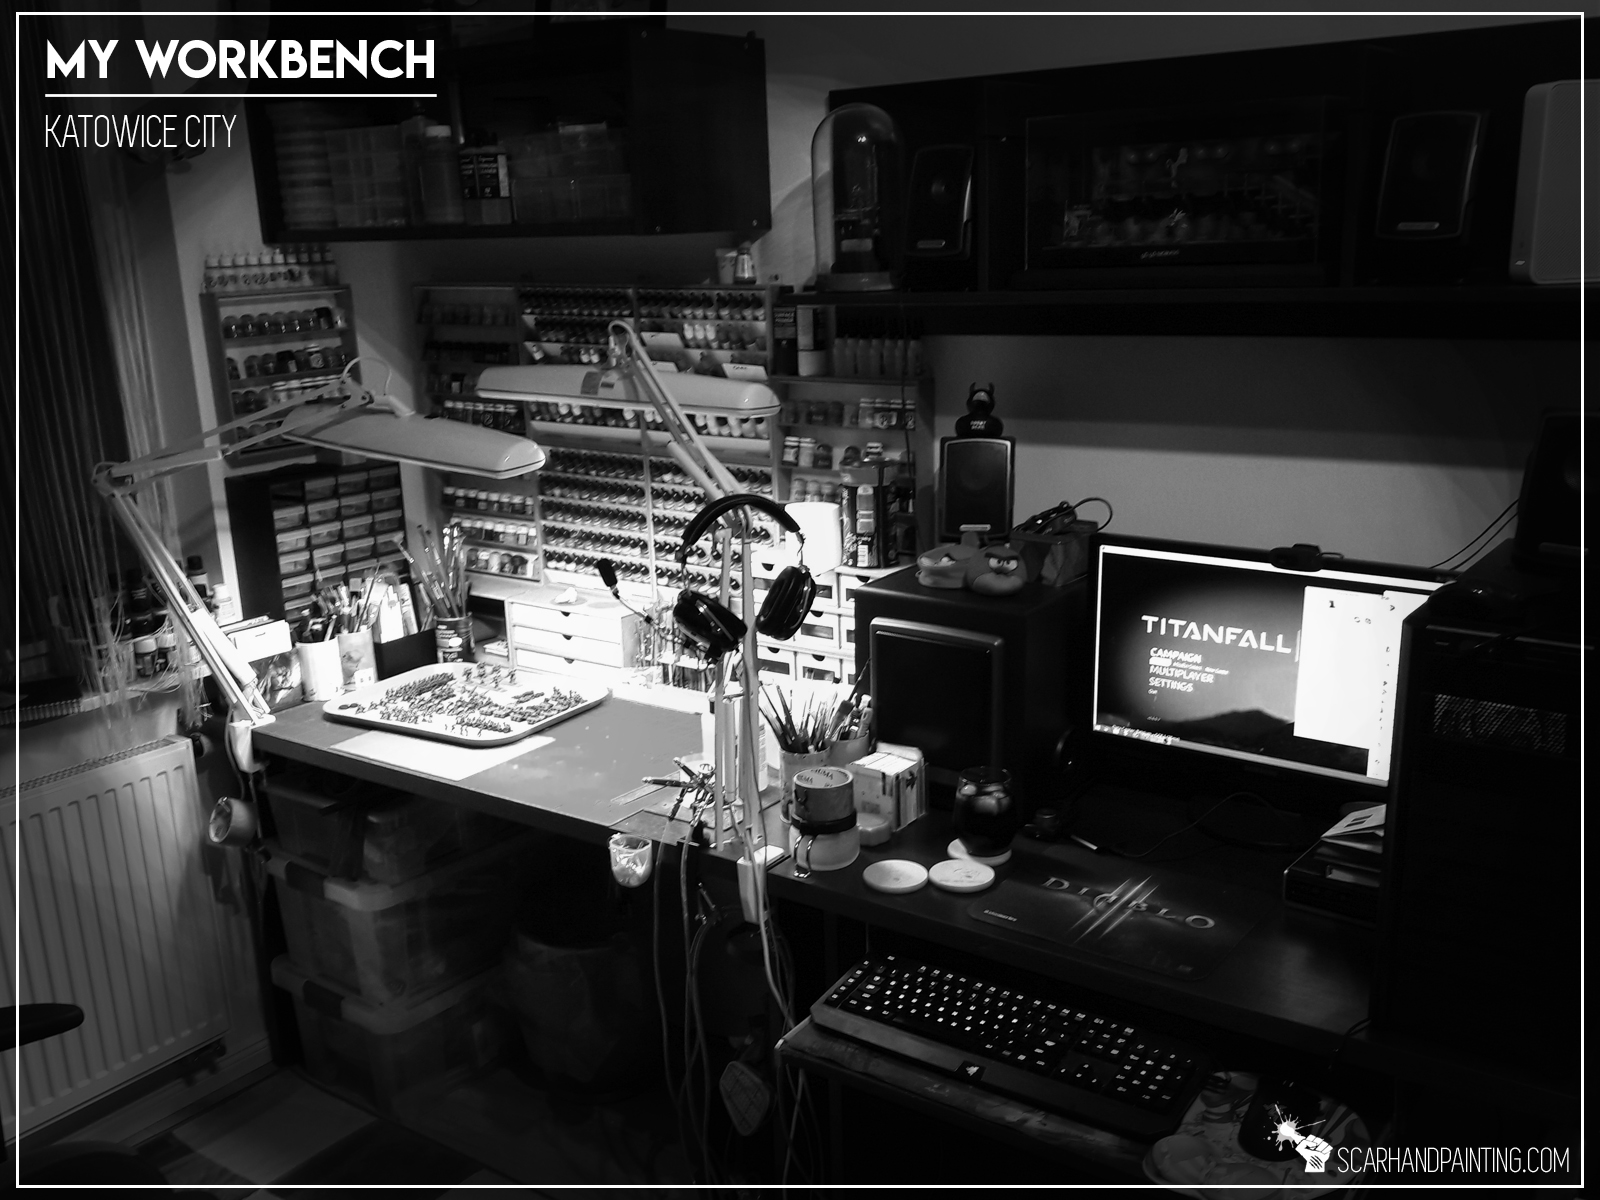
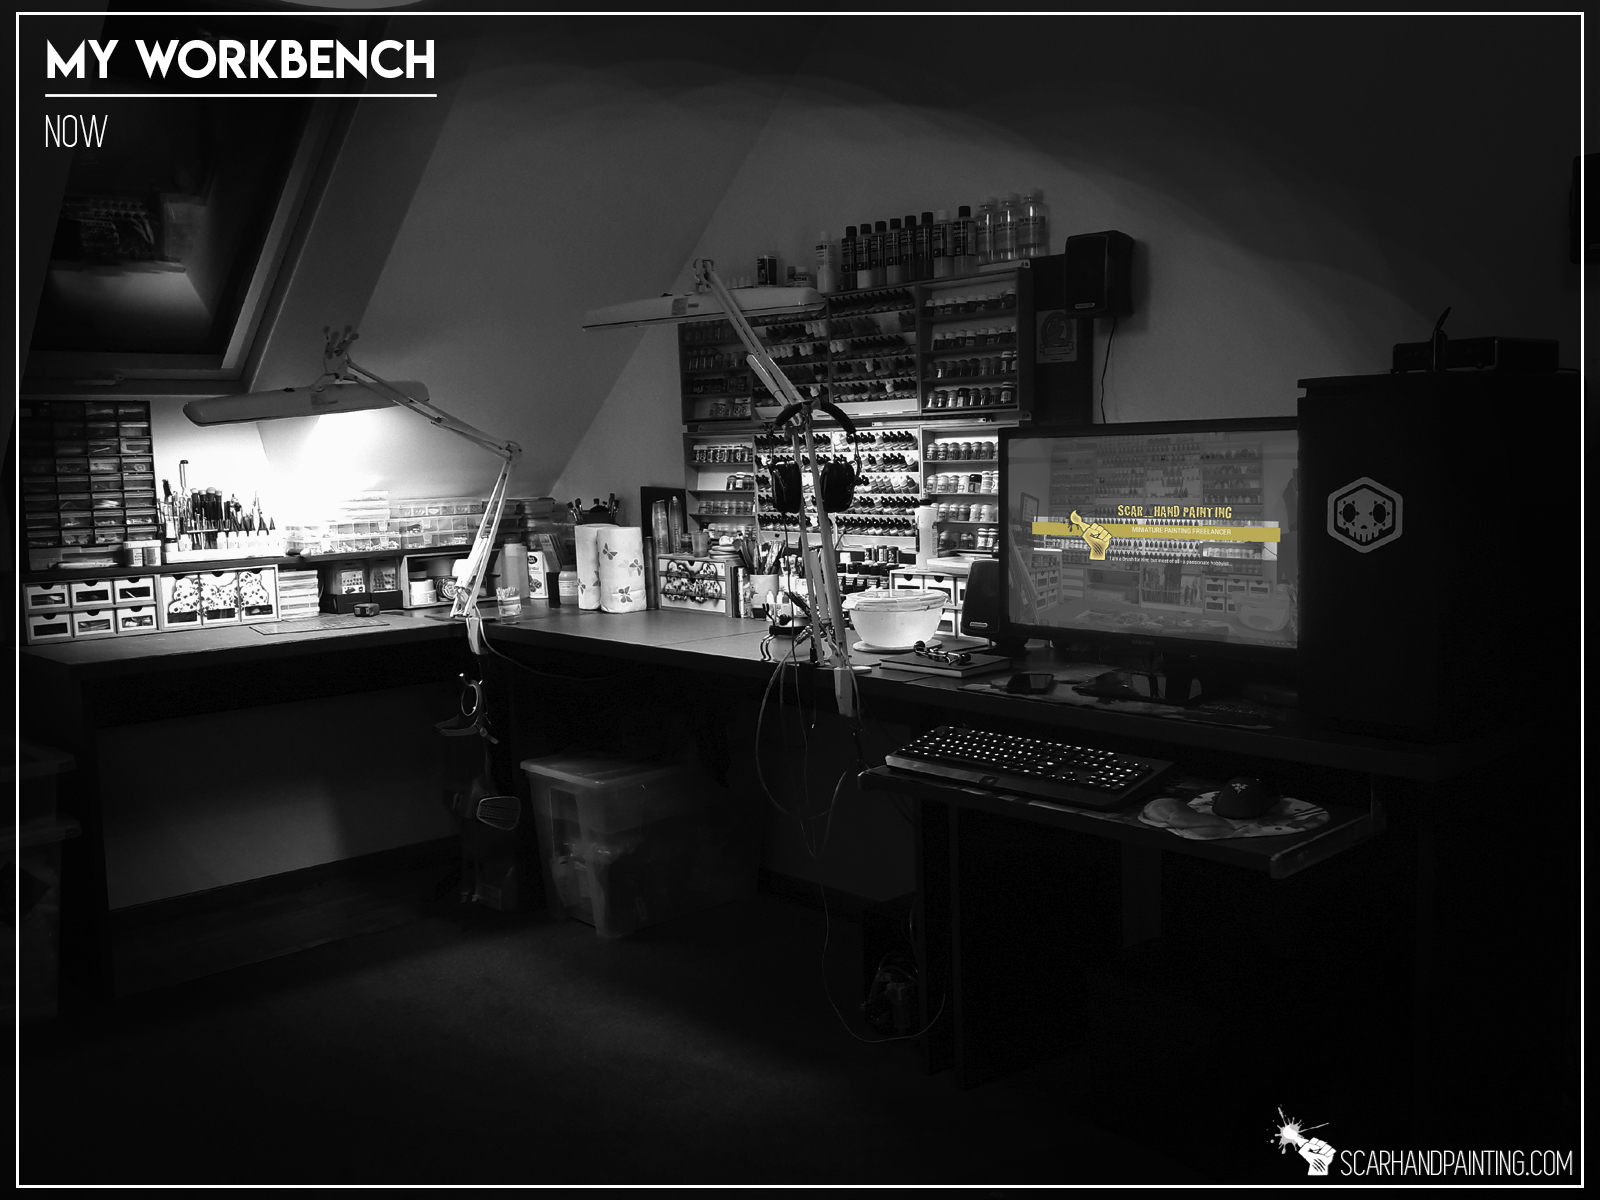
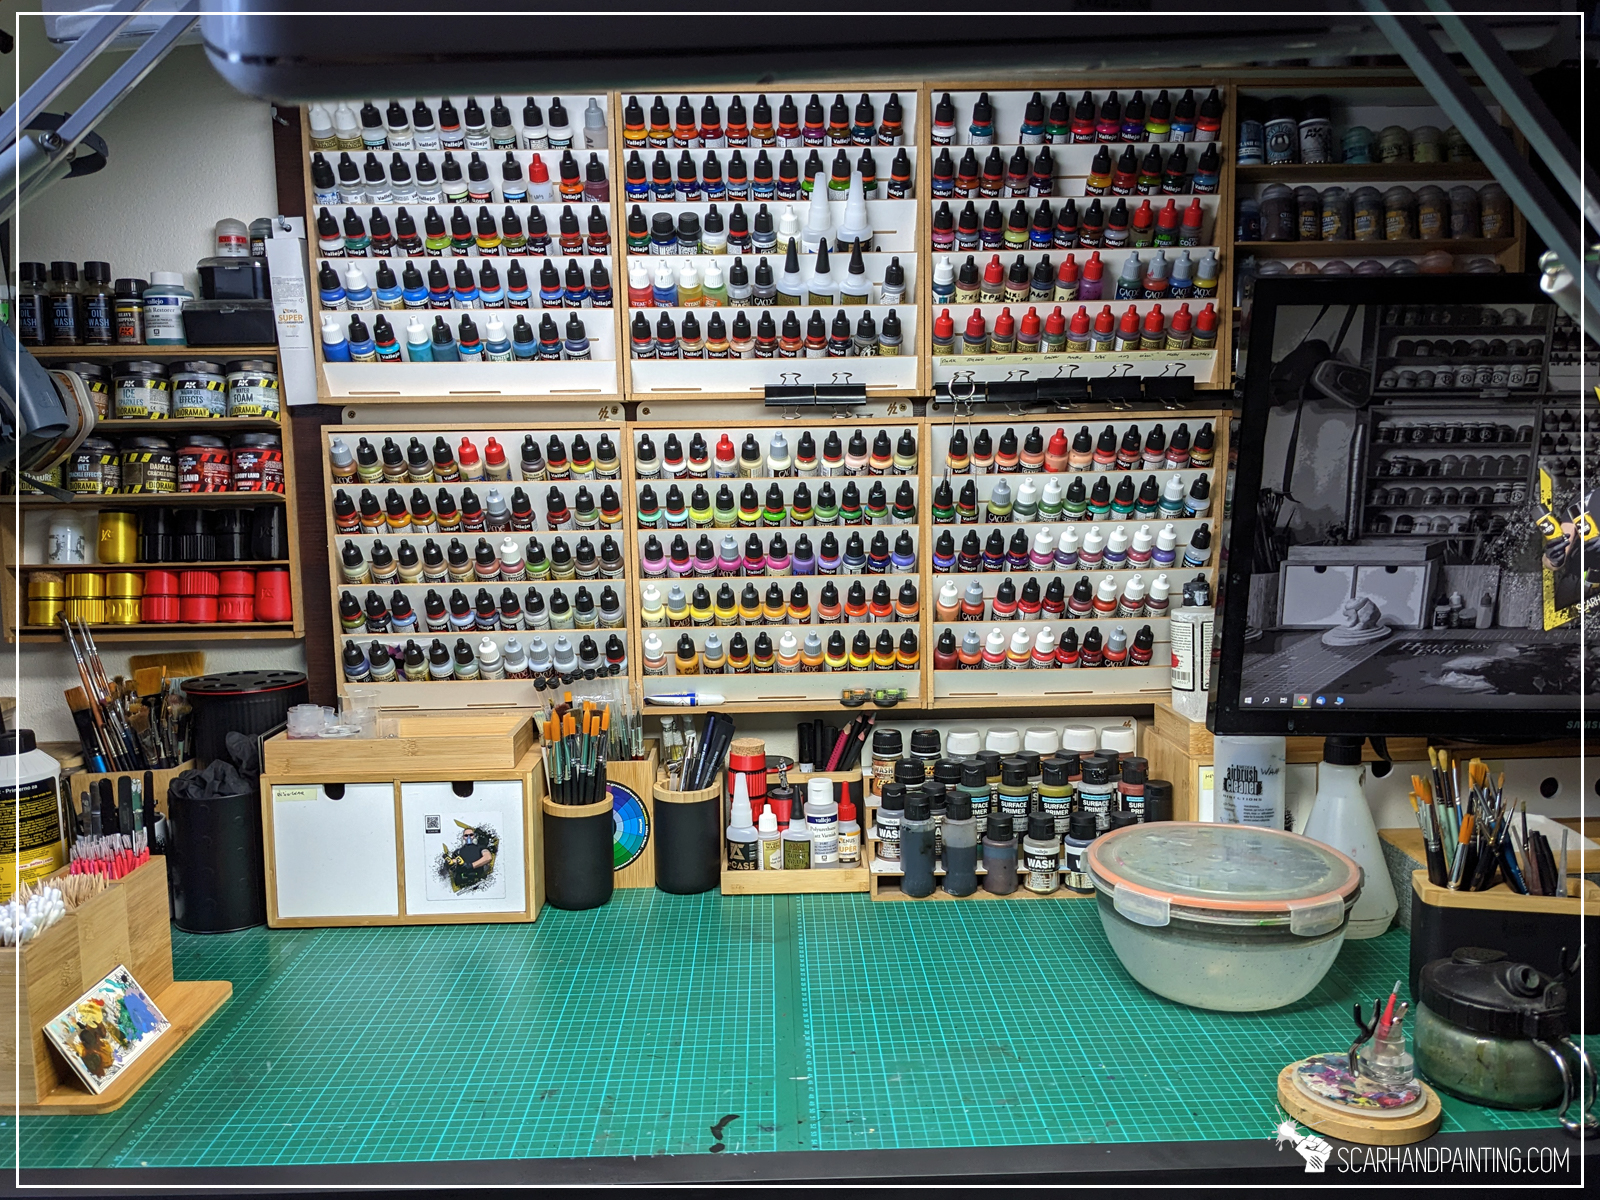
Keeping a clean and tidy workspace might seem like a chore, but it does not have to be so. In this article I will share with you some tips on organizing your hobby workspace, based on my own experience. I will also let you in on what benefits are there from working in a well organized environment.


Before we start, it is worth noting that I am a full time, professional commission painter. For years now I have been testing different solutions to try and improve my personal workspace. Moving from town to town required me to build my workbench from the ground up multiple times and provided a lot of insight into what to aim for. You might not necessarily have space, funds or need to achieve a similar setup, but if my adventure has taught me anything, it’s that there is always the space for improvement. Here’s the best proof of that – some previous iterations of my trusty workspace:

Regardless of you being a weekend hobbyist or a professional, a workspace’s main purpose is to provide comfort of your painting process. This includes the ease with which you access tools, manage projects and even how you feel when painting miniatures. A tidy, clean workspace translates directly into your work and motivation. It is far easier to take on a new project when you don’t have to take care of the mess first. Less time spent in search of tools or bitz means more time spent on the actual thing you want to do. Most importantly keeping things in established spaces allows to train muscle memory, thus increasing productivity.
For the purpose of this article I have narrowed down the list of useful advice to a few tips that greatly improve the quality of life while not being too hard or expensive to implement. Without further ado, let’s get into it!

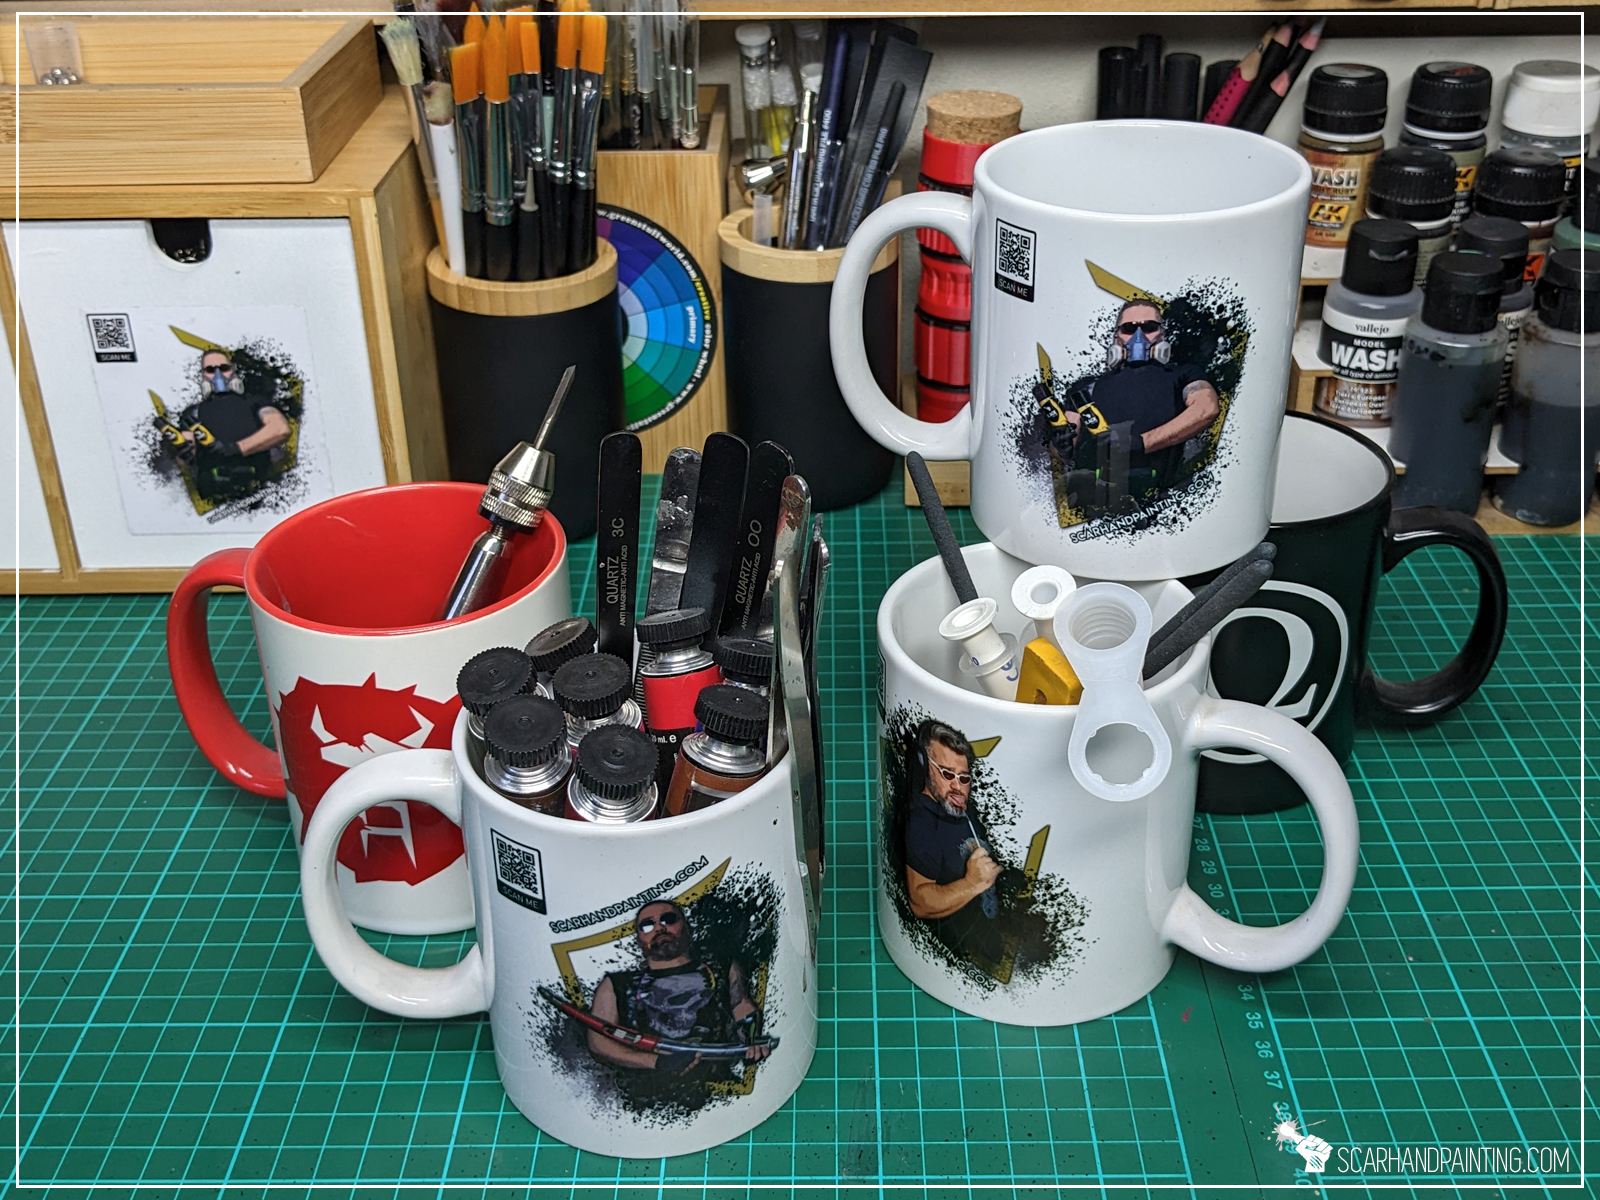
With how popular the hobby has become, a variety of innovative brush storage utensils are being introduced to the market every year. Still when it comes to it, there’s nothing better than a good old mug. Well… not entirely. Toothbrush cups come in a variety of shapes and styles, bringing all the best that mugs have to offer, but without cons. Bathroom cups are usually plain, without handles, occupying less space and being easier to store around the workspace. Plus, depending on your tastes, they might up the visual style of your hobby area.


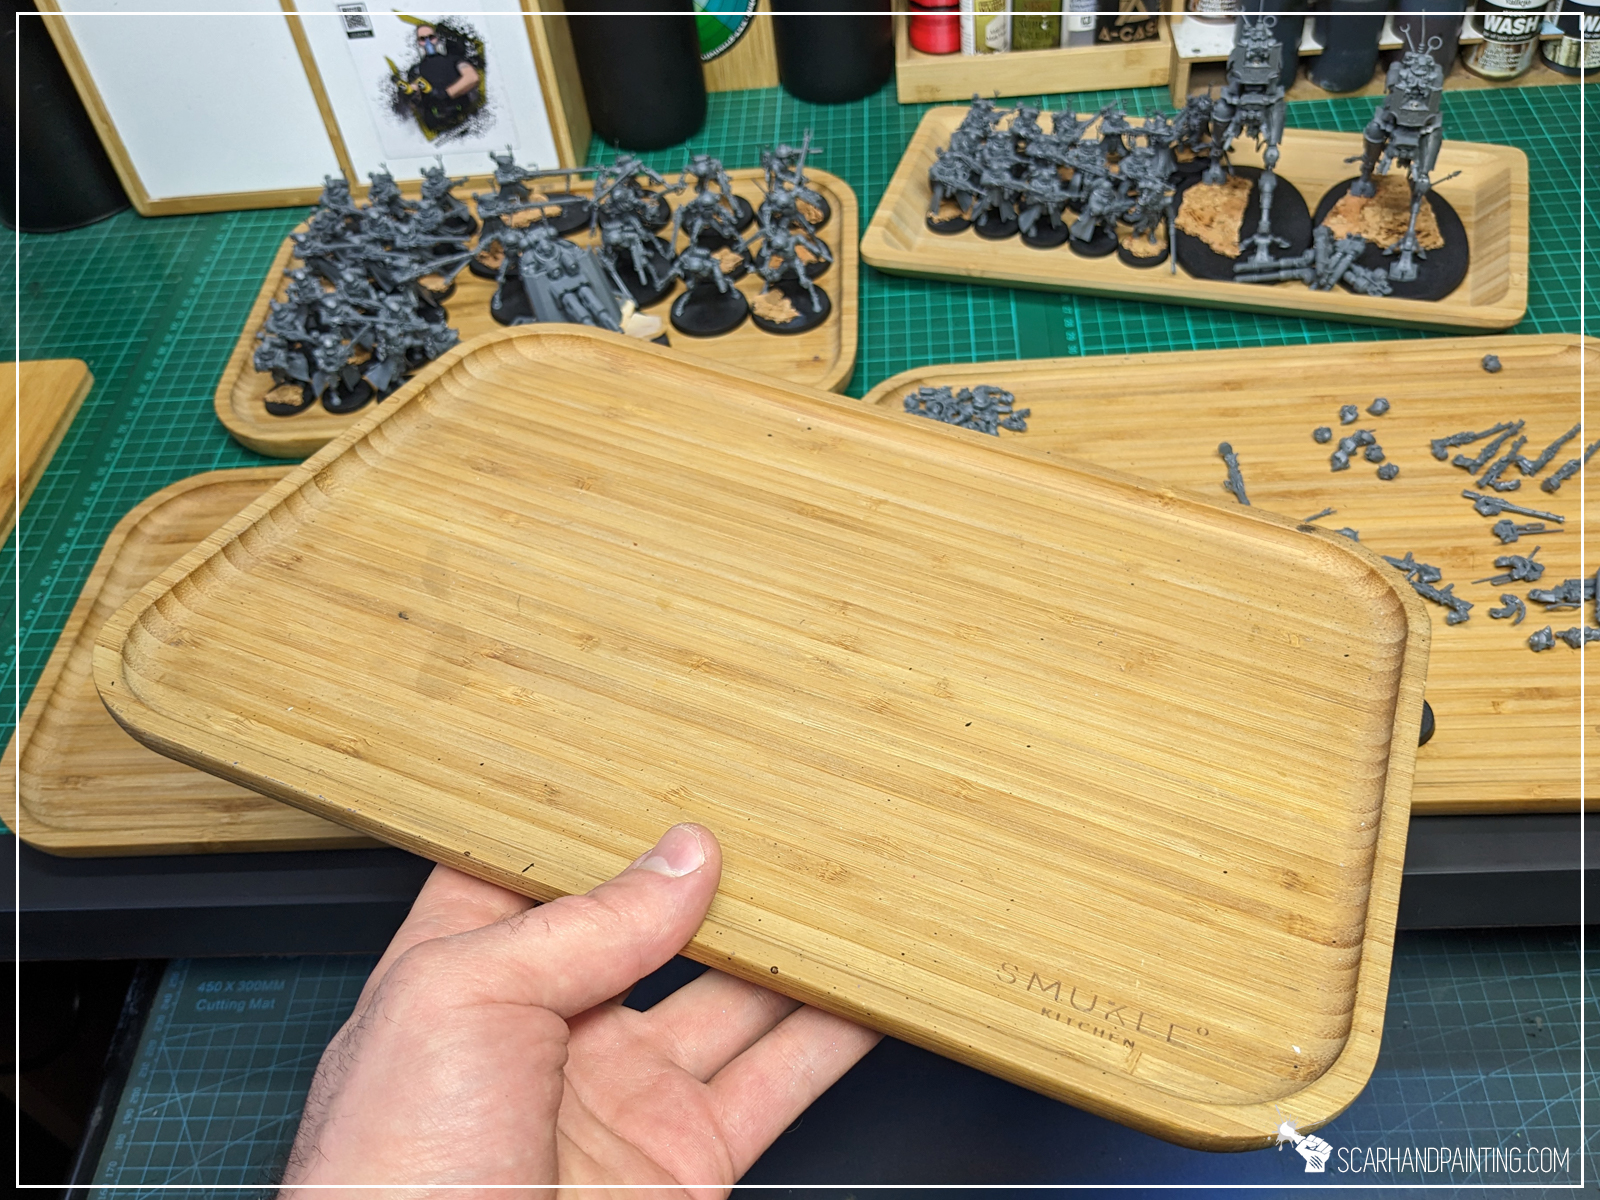
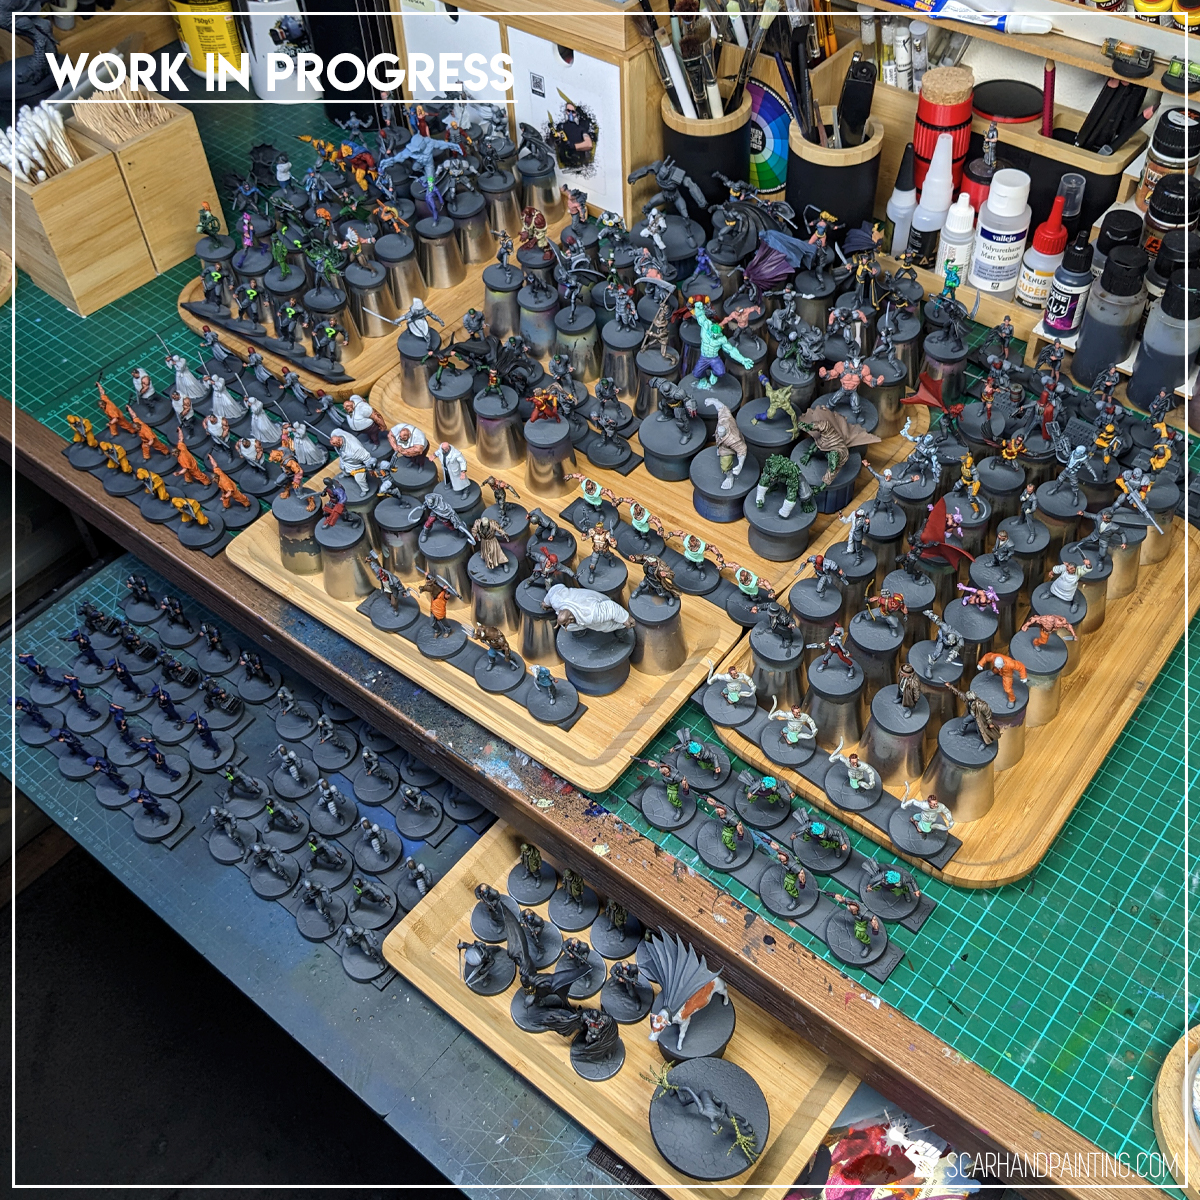
Trays ain’t on a list of your typical miniatures painter must-haves, but they definitely should! One of the things that used to frustrate me the most was having to switch projects or move stuff around in order to dig for a tool. It became a none-issue once I introduced trays into my hobby. Nowadays groups of hobby tools, paints and even entire projects can be moved around freely, saving me a lot of time. More so, on top of clean and friendly work conditions, setting up ongoing projects on trays defines particular stages of the work, helps me to define goals and keep the motivation up.


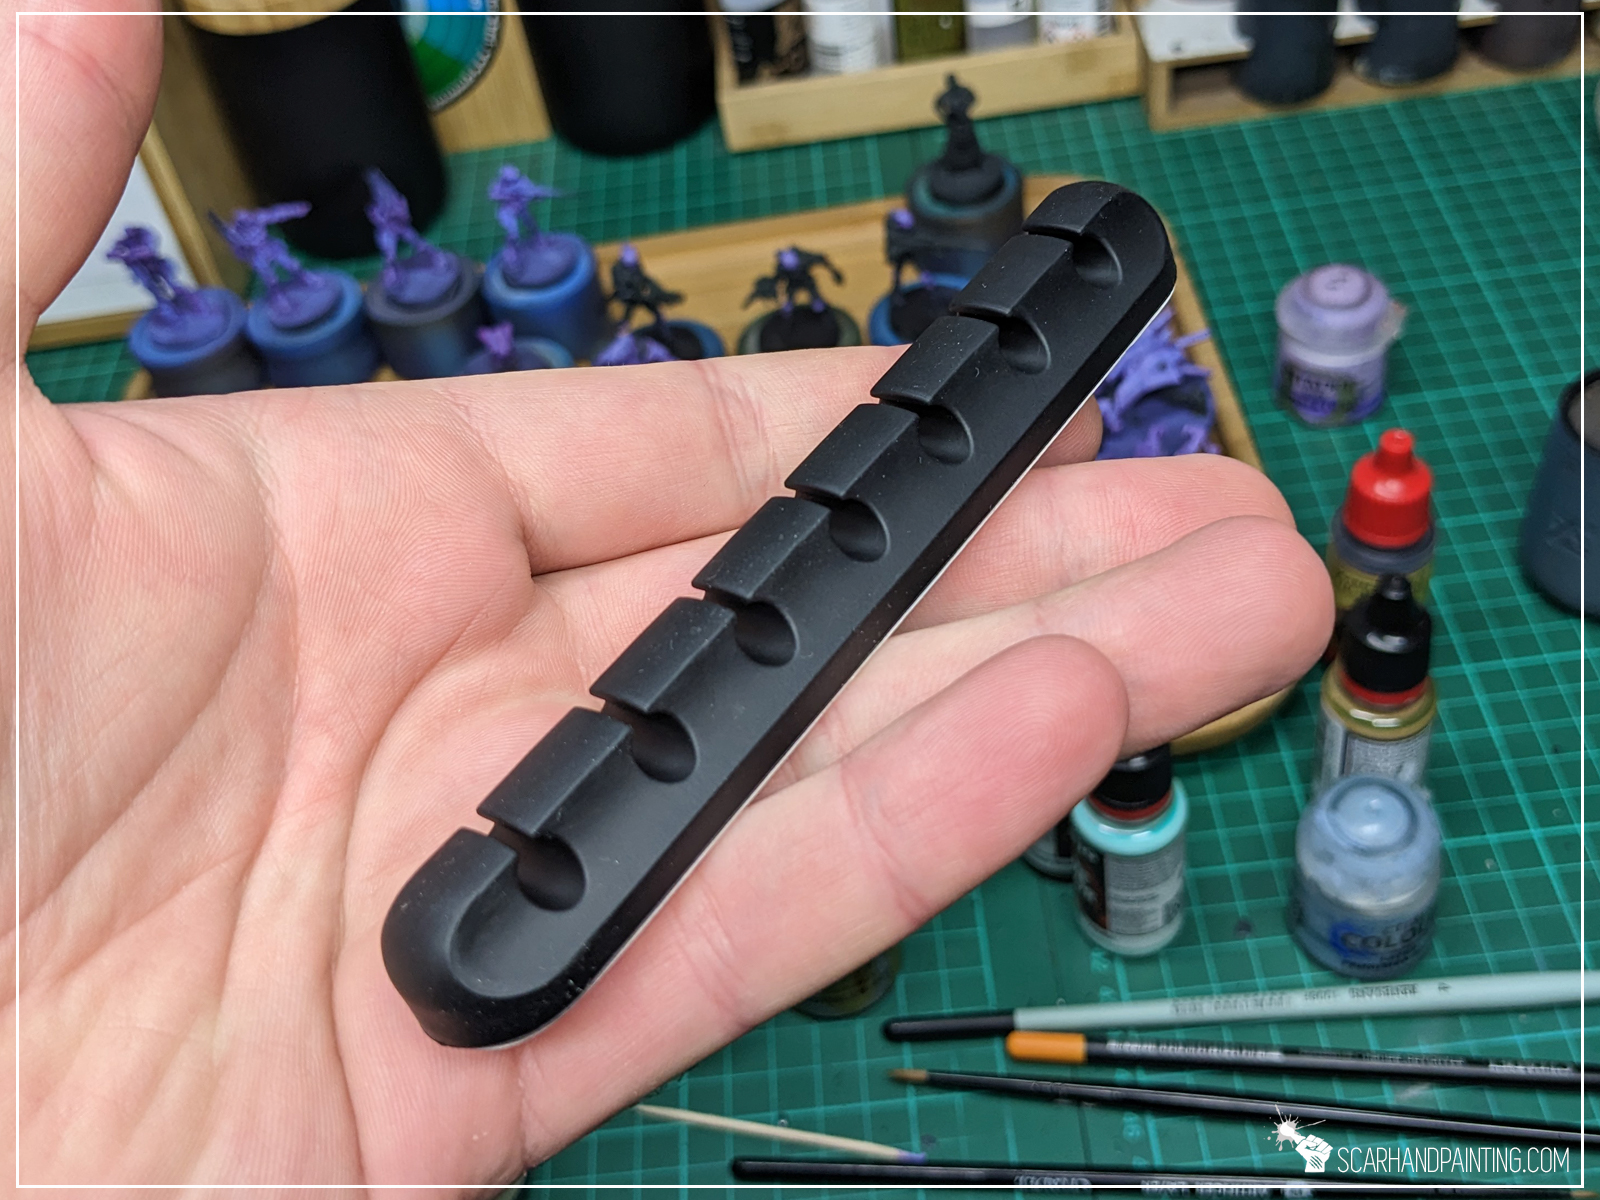
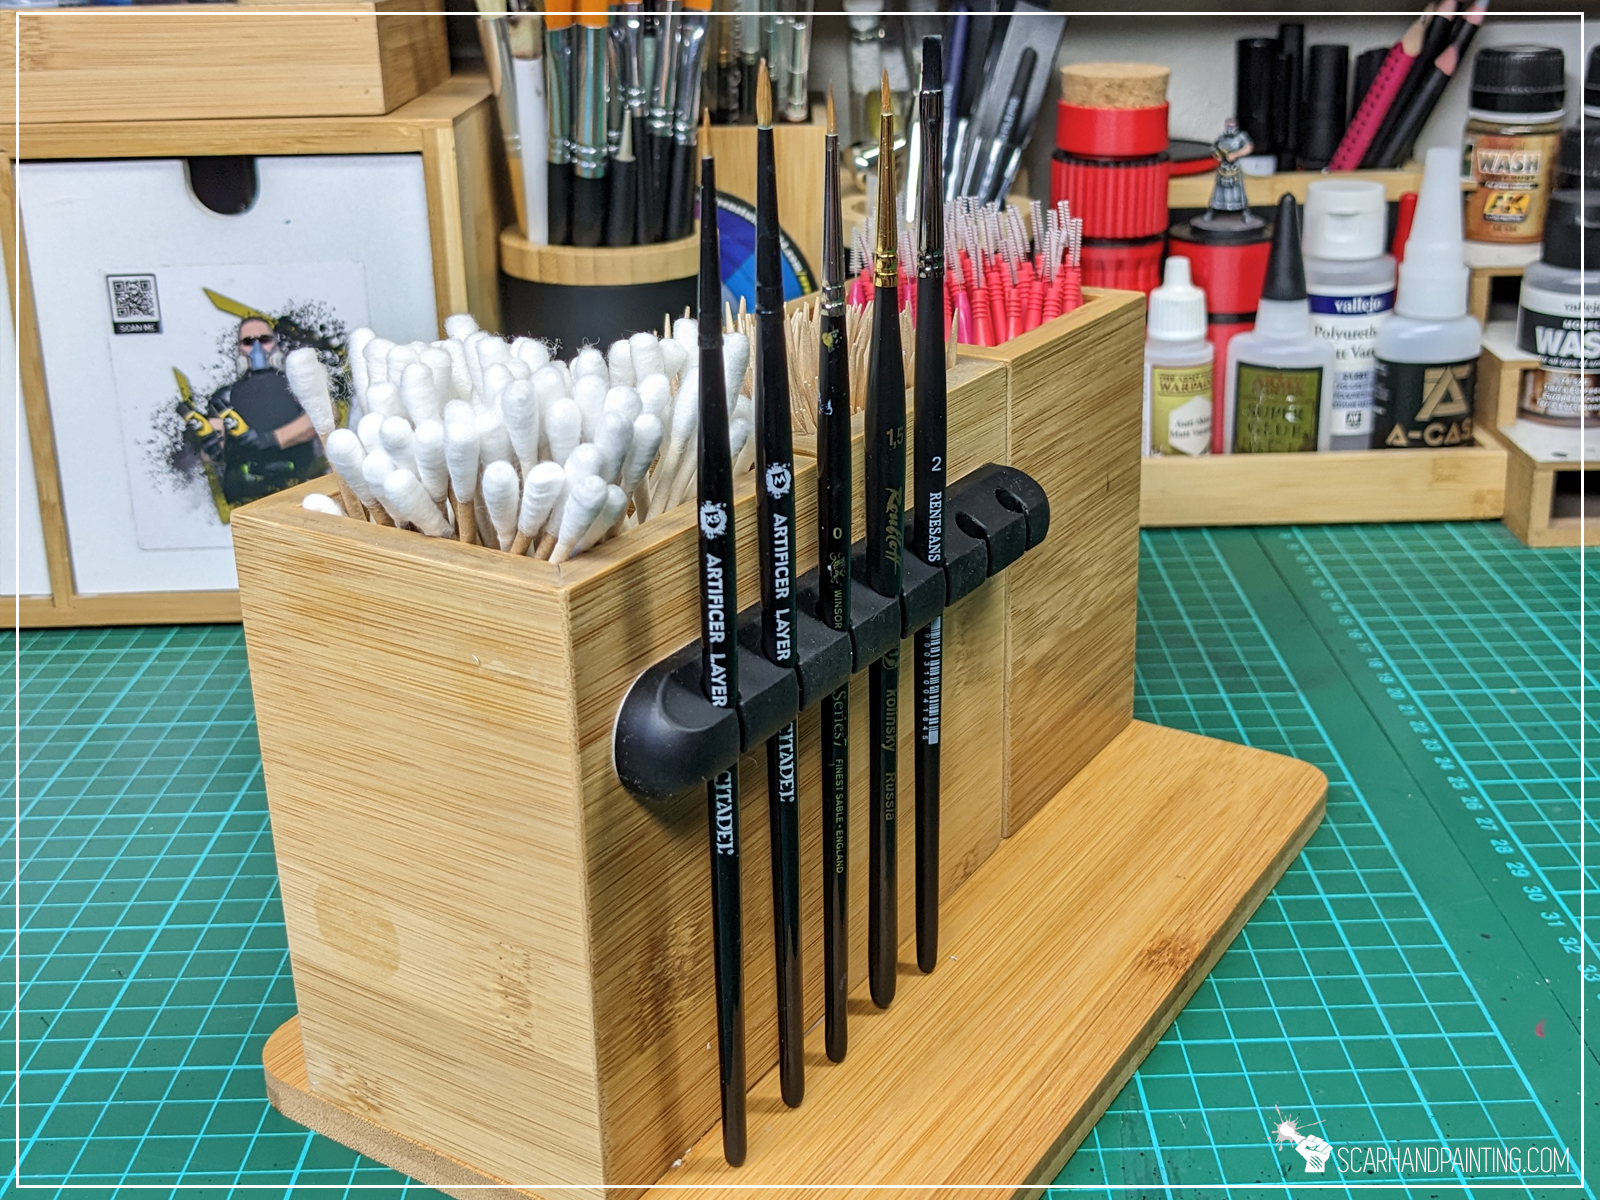
Self adhesive, rubber cable organizers are a useful tool to help keep all those nasty air hoses and cables in check. More so, with a bit of a lifehack’ish mindset, they can be used as a fantastic mid-work brush holders.

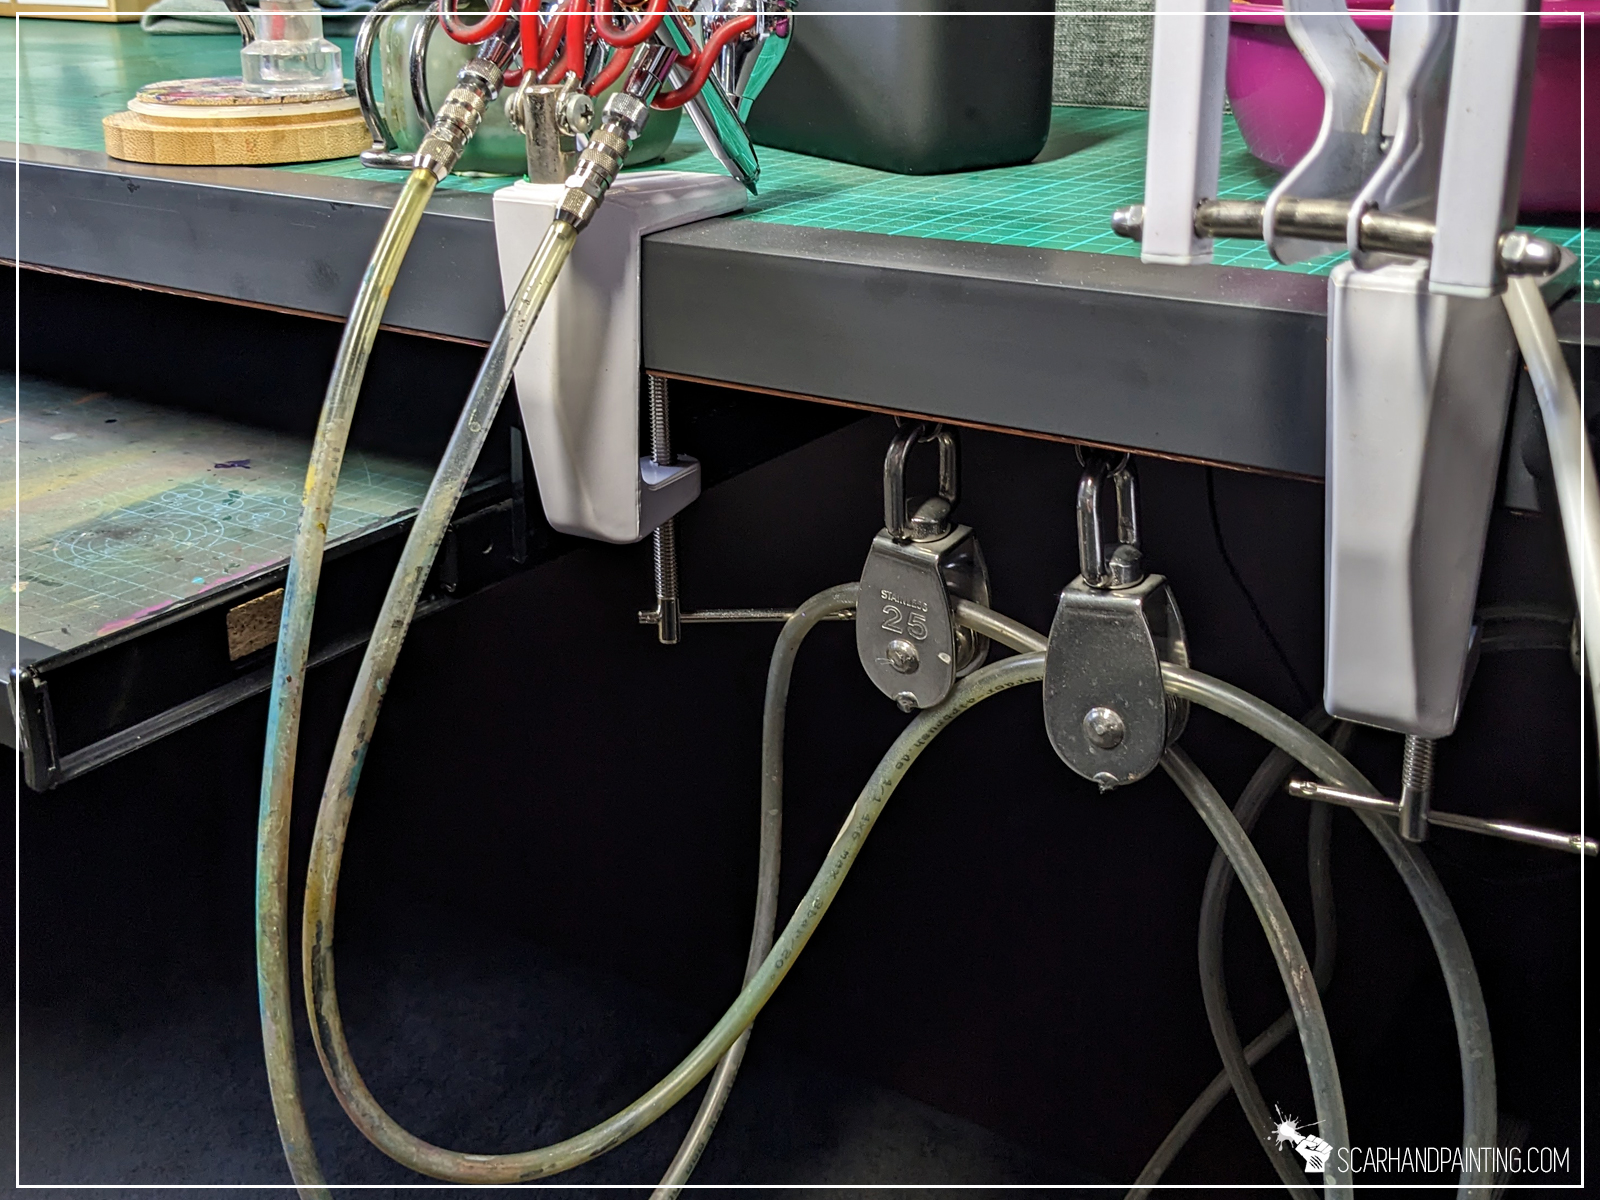
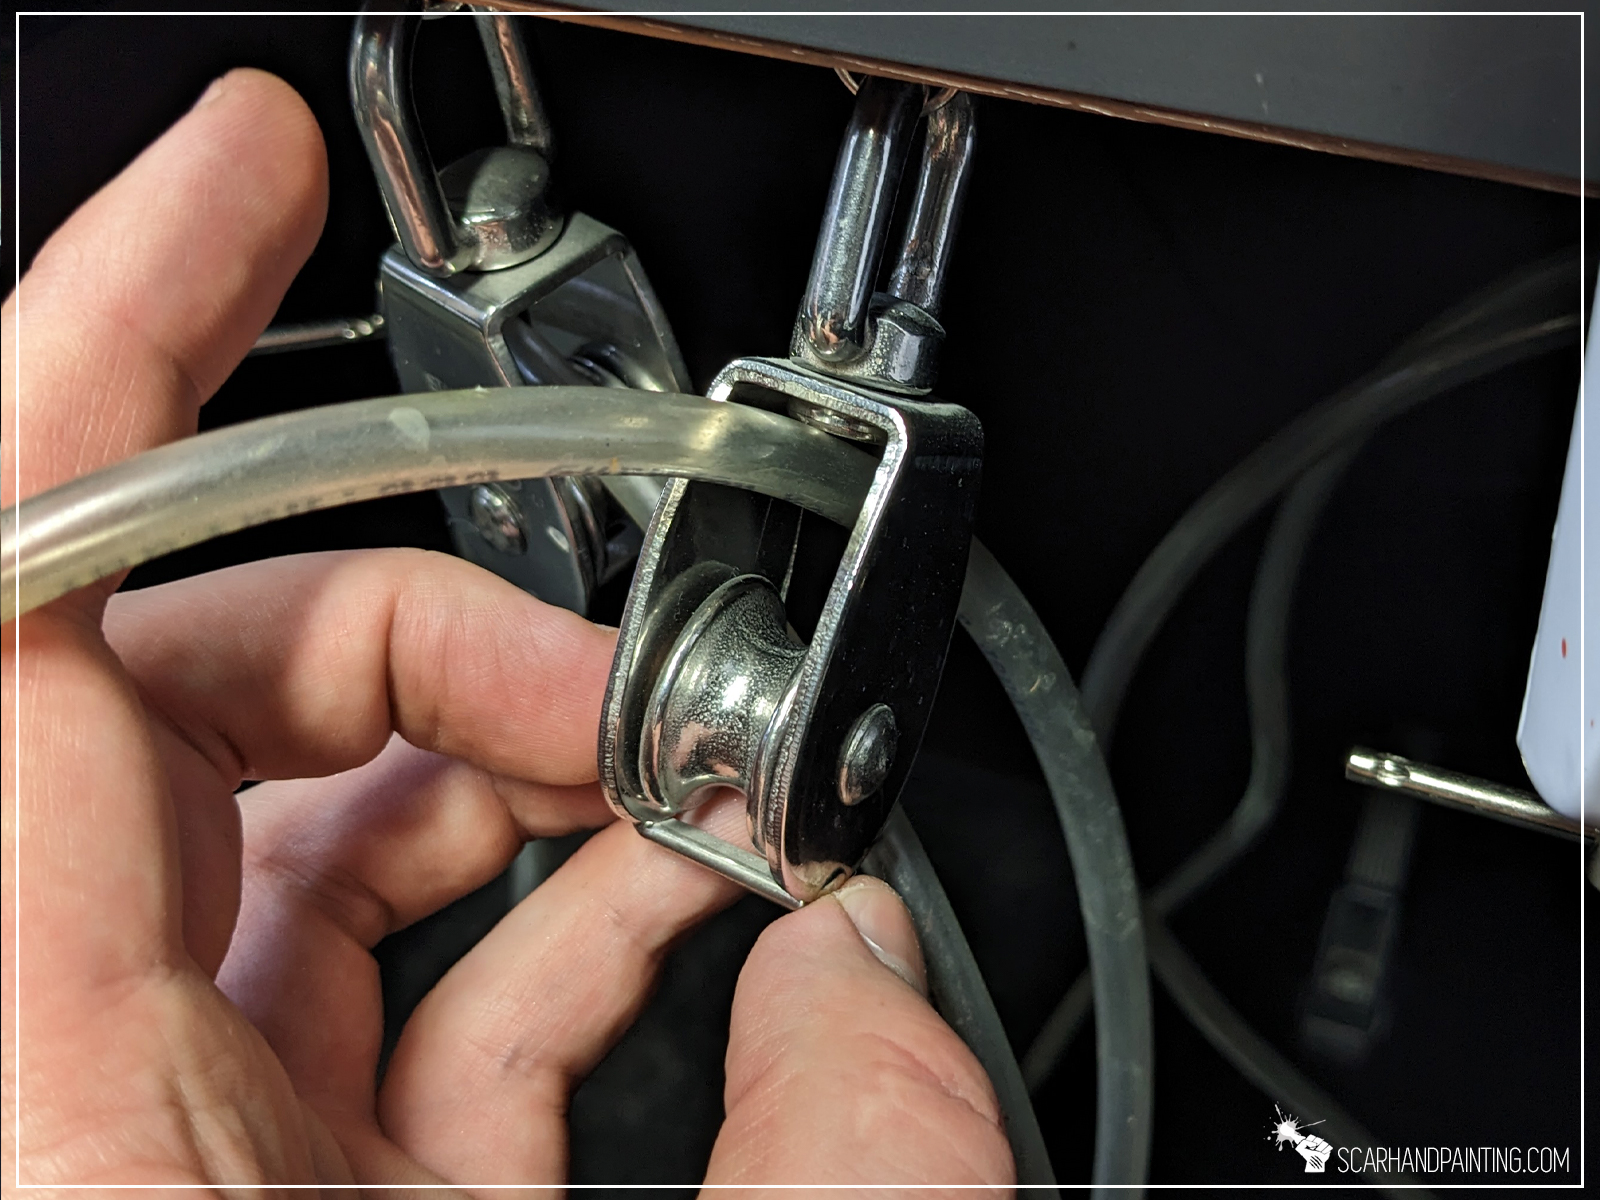
And while we’re at it, airbrush air hoses are usually very difficult to tame. They’re rather stiff and tend to curl. Fortunately, it’s nothing that a sailing block can’t handle! These puppies will keep the air hose where you want it and allow for rapid airbrush deployment when the time comes!
It is easier to switch a cover than an entire desk. Respect your desk and it will serve you longer, plus there’s probably nothing worse than dusted, grainy, irregular, dried paint surface irritating your skin when painting. Don’t even get me started on a sharp desk edge cutting a side of a wrist (shivers internally). Personally I use a thick cutting mat and a self adhesive PVC corner cover, but anything will do as long as it’s water resistant, easy to clean and stiff enough.
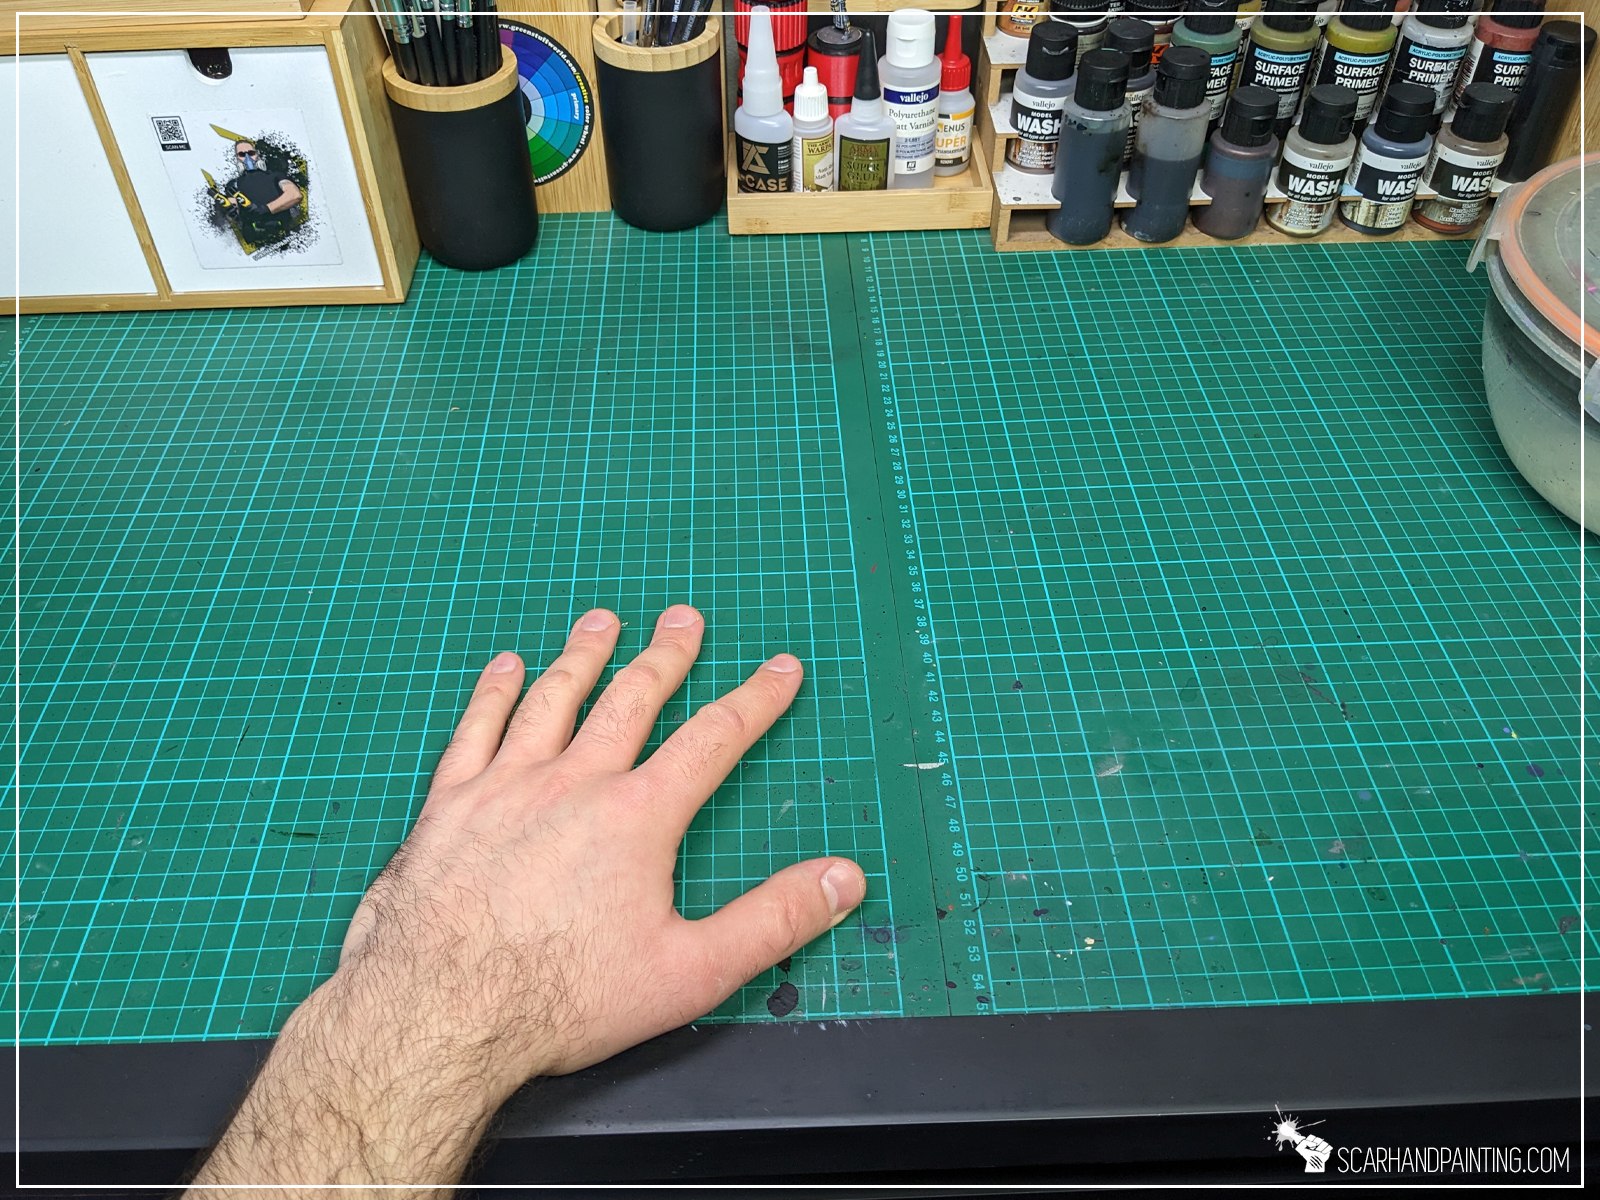

‘Enlarge your p’ …ainting space with a single pull. This simple solution expands your working area when needed, but does not take up much space when not being used. I sometimes find my desk overwhelmed with miniatures and instead of transferring a part of work to secondary space, I just extend a shelf from underneath and continue working. It’s especially useful when I have something messy to do, like applying static grass or pouring resin, but don’t want to risk the entire project getting dirty.
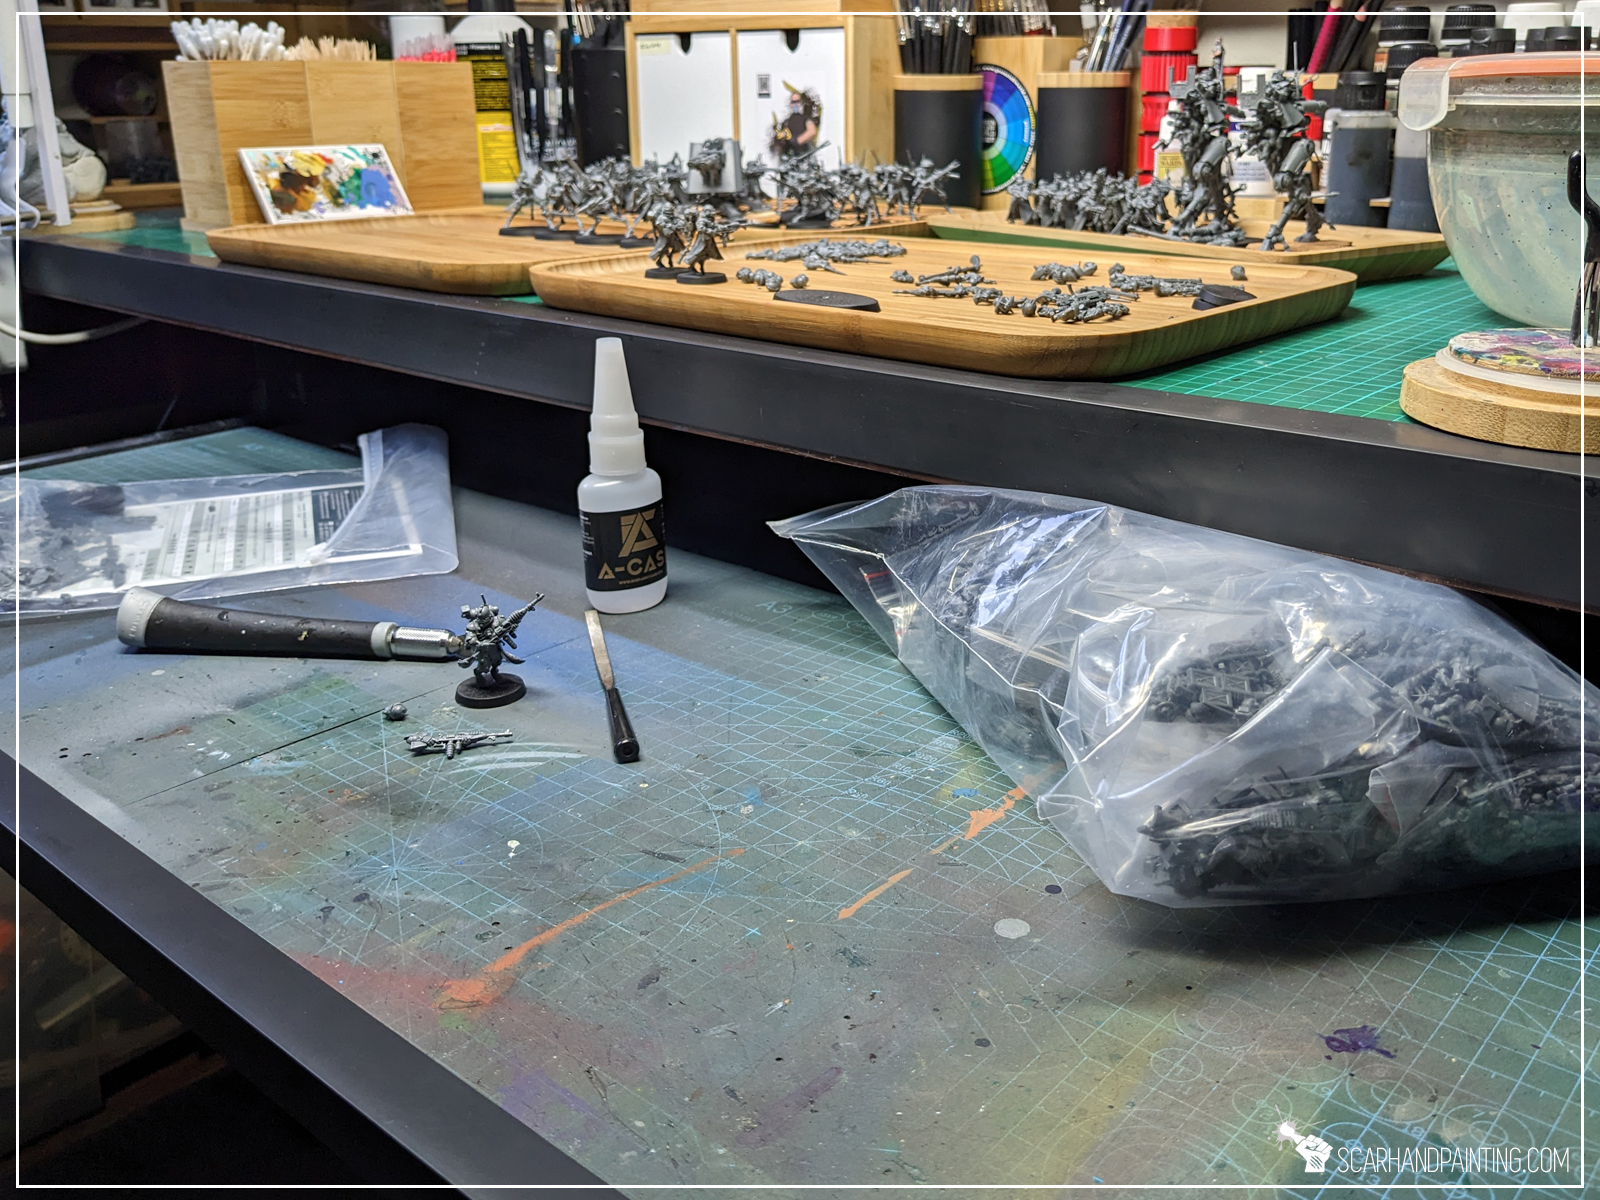

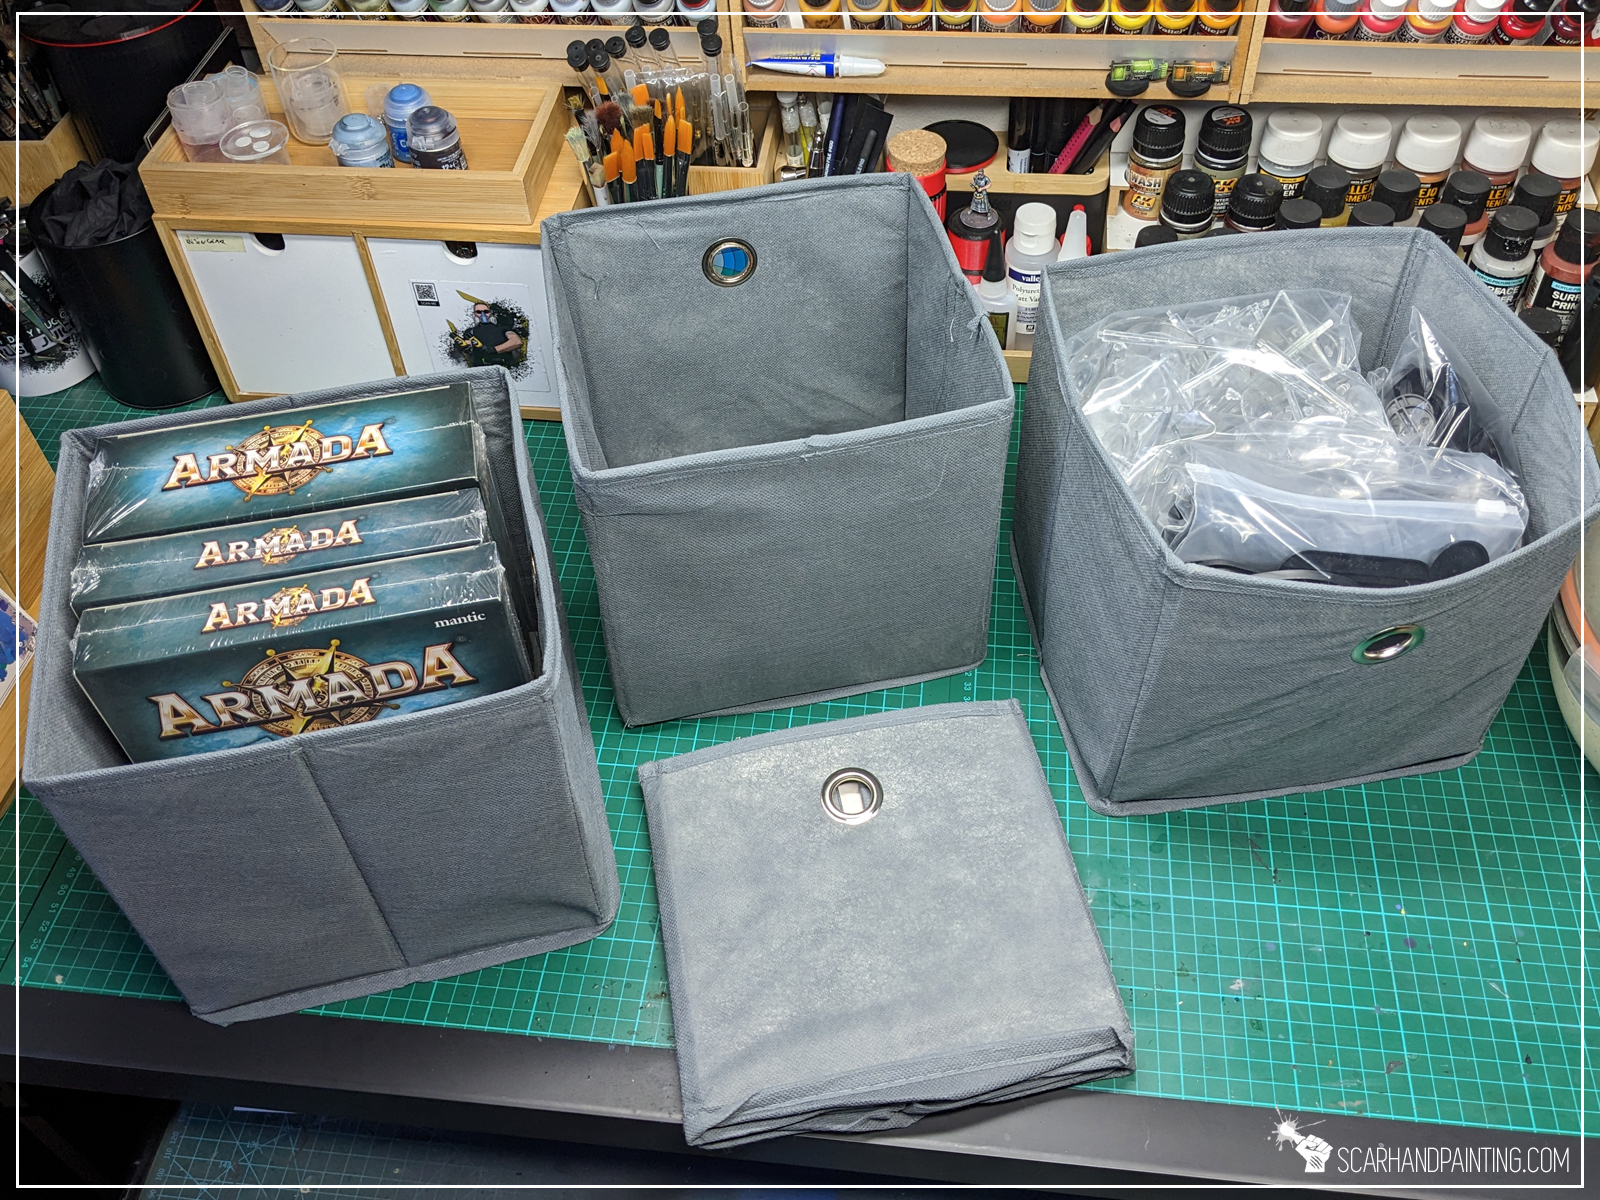
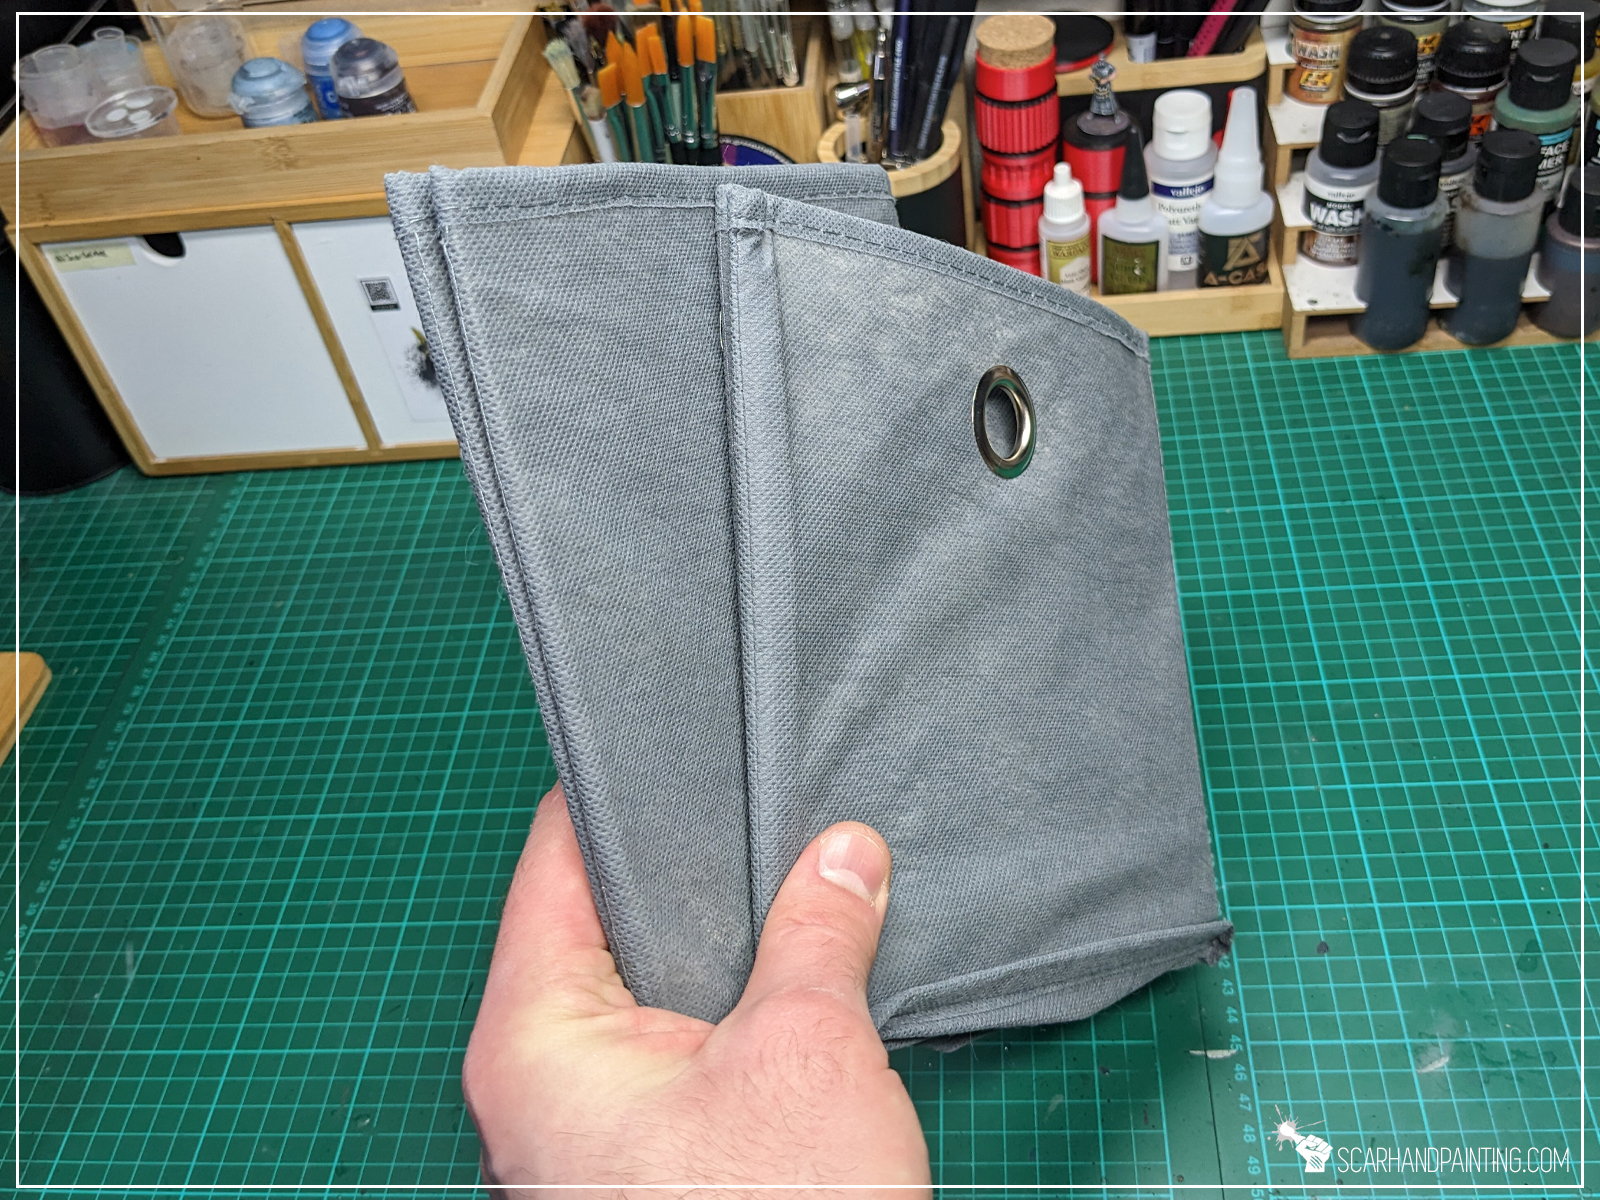
These can be found in almost every house & decor store. Plastic baskets, food containers, tool organizers, clothes storage boxes. Instead of keeping all the boxes, packaged miniatures, spare paints and other stuff stacked on shelves and one another – why not keep it more accessible? Pulling a box from a shelf is much faster and more comfortable than ‘excavation’.

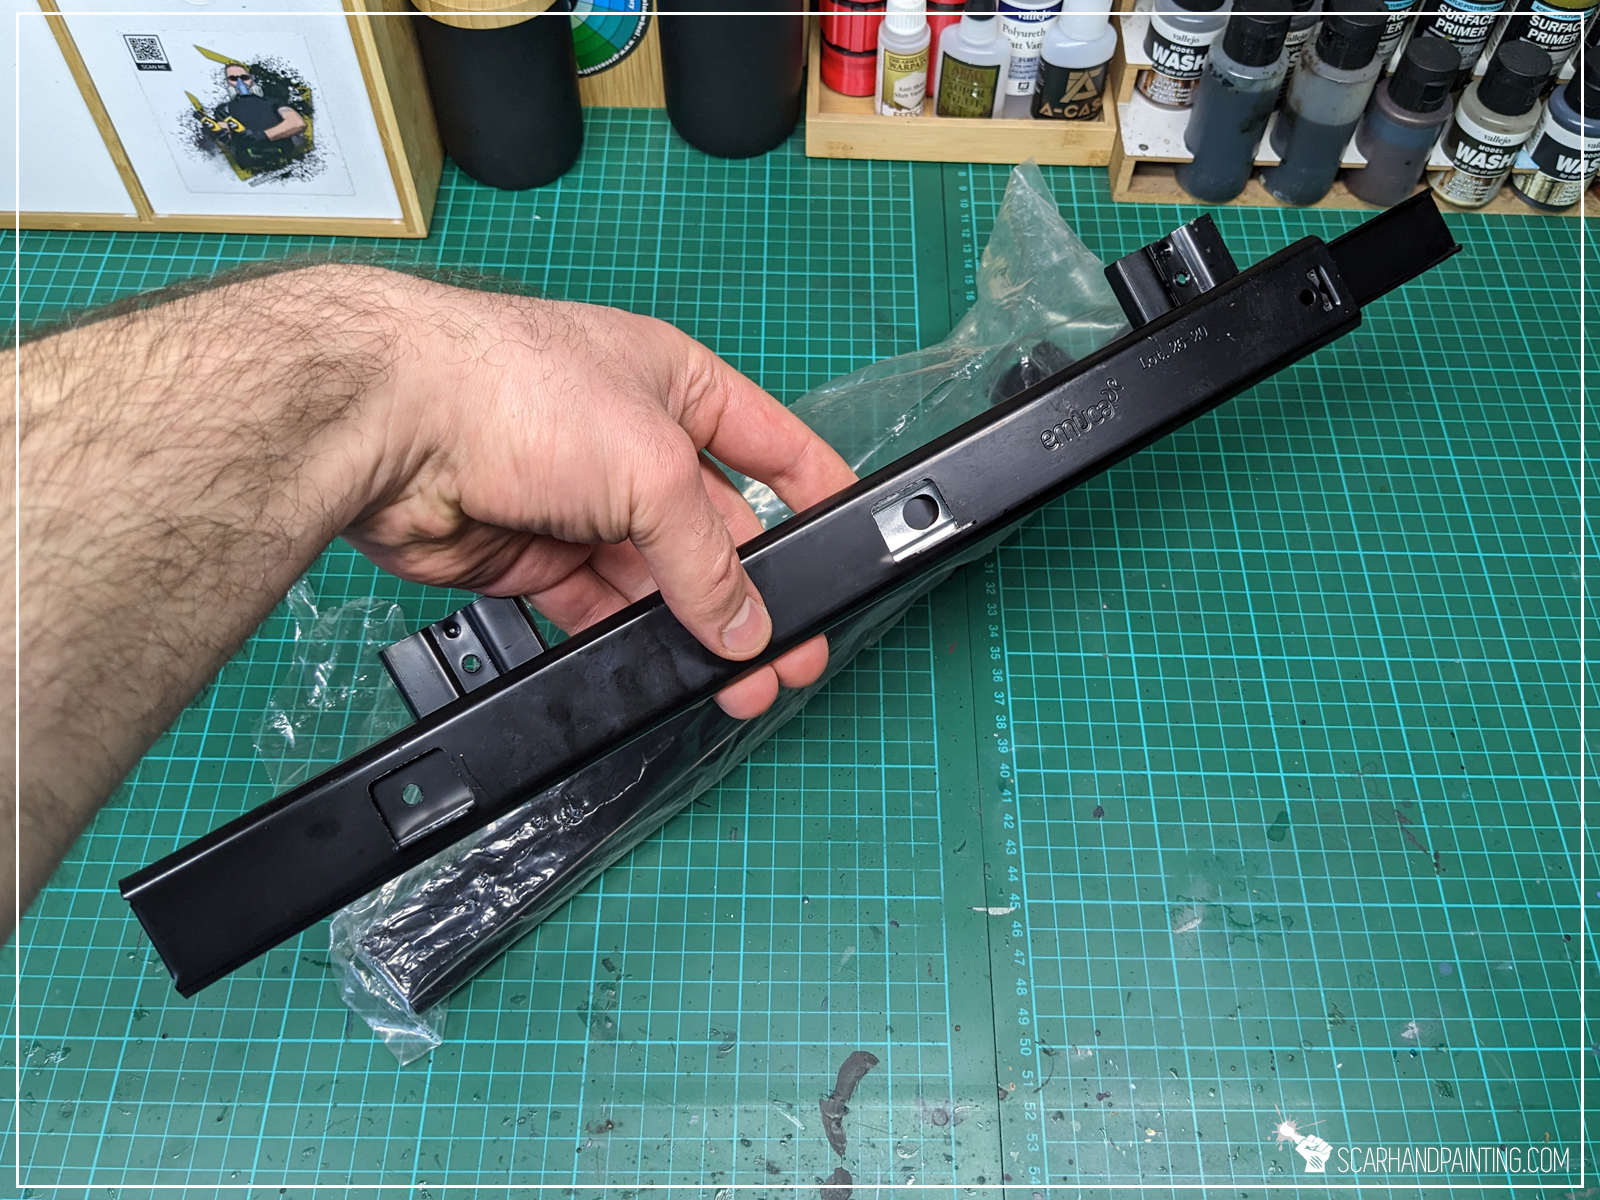
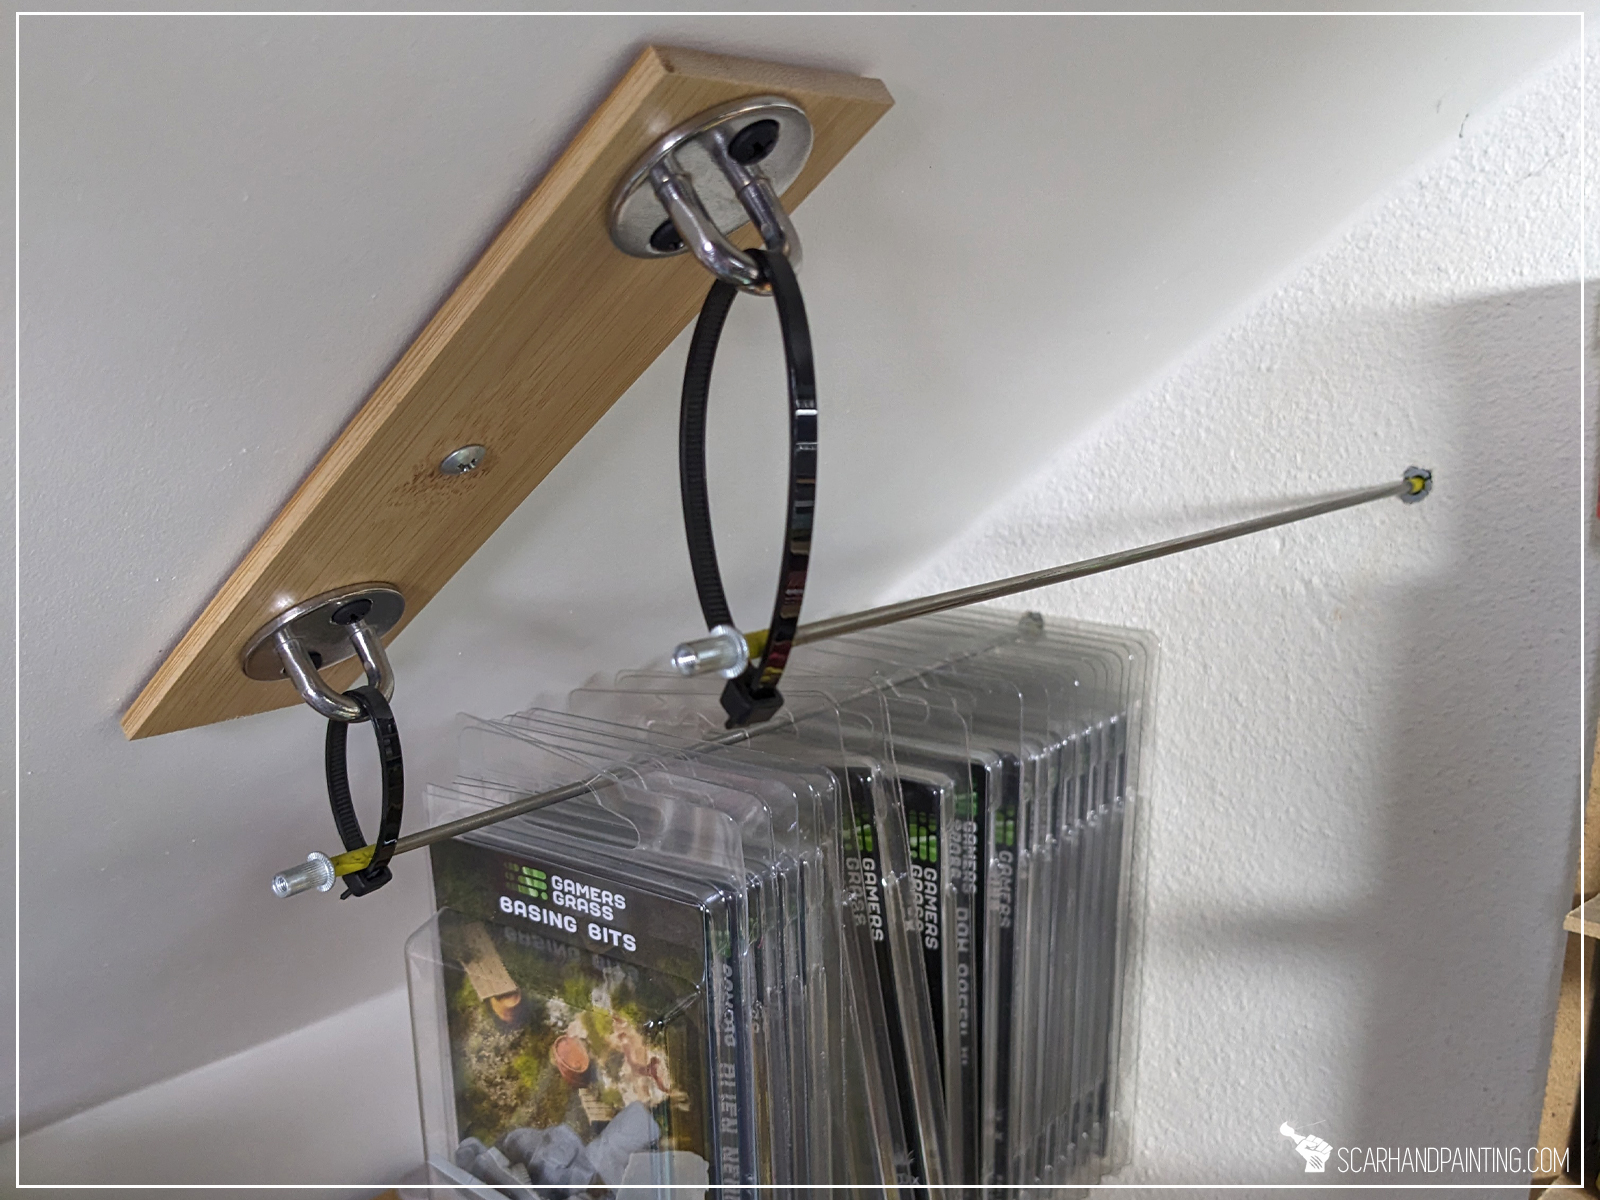
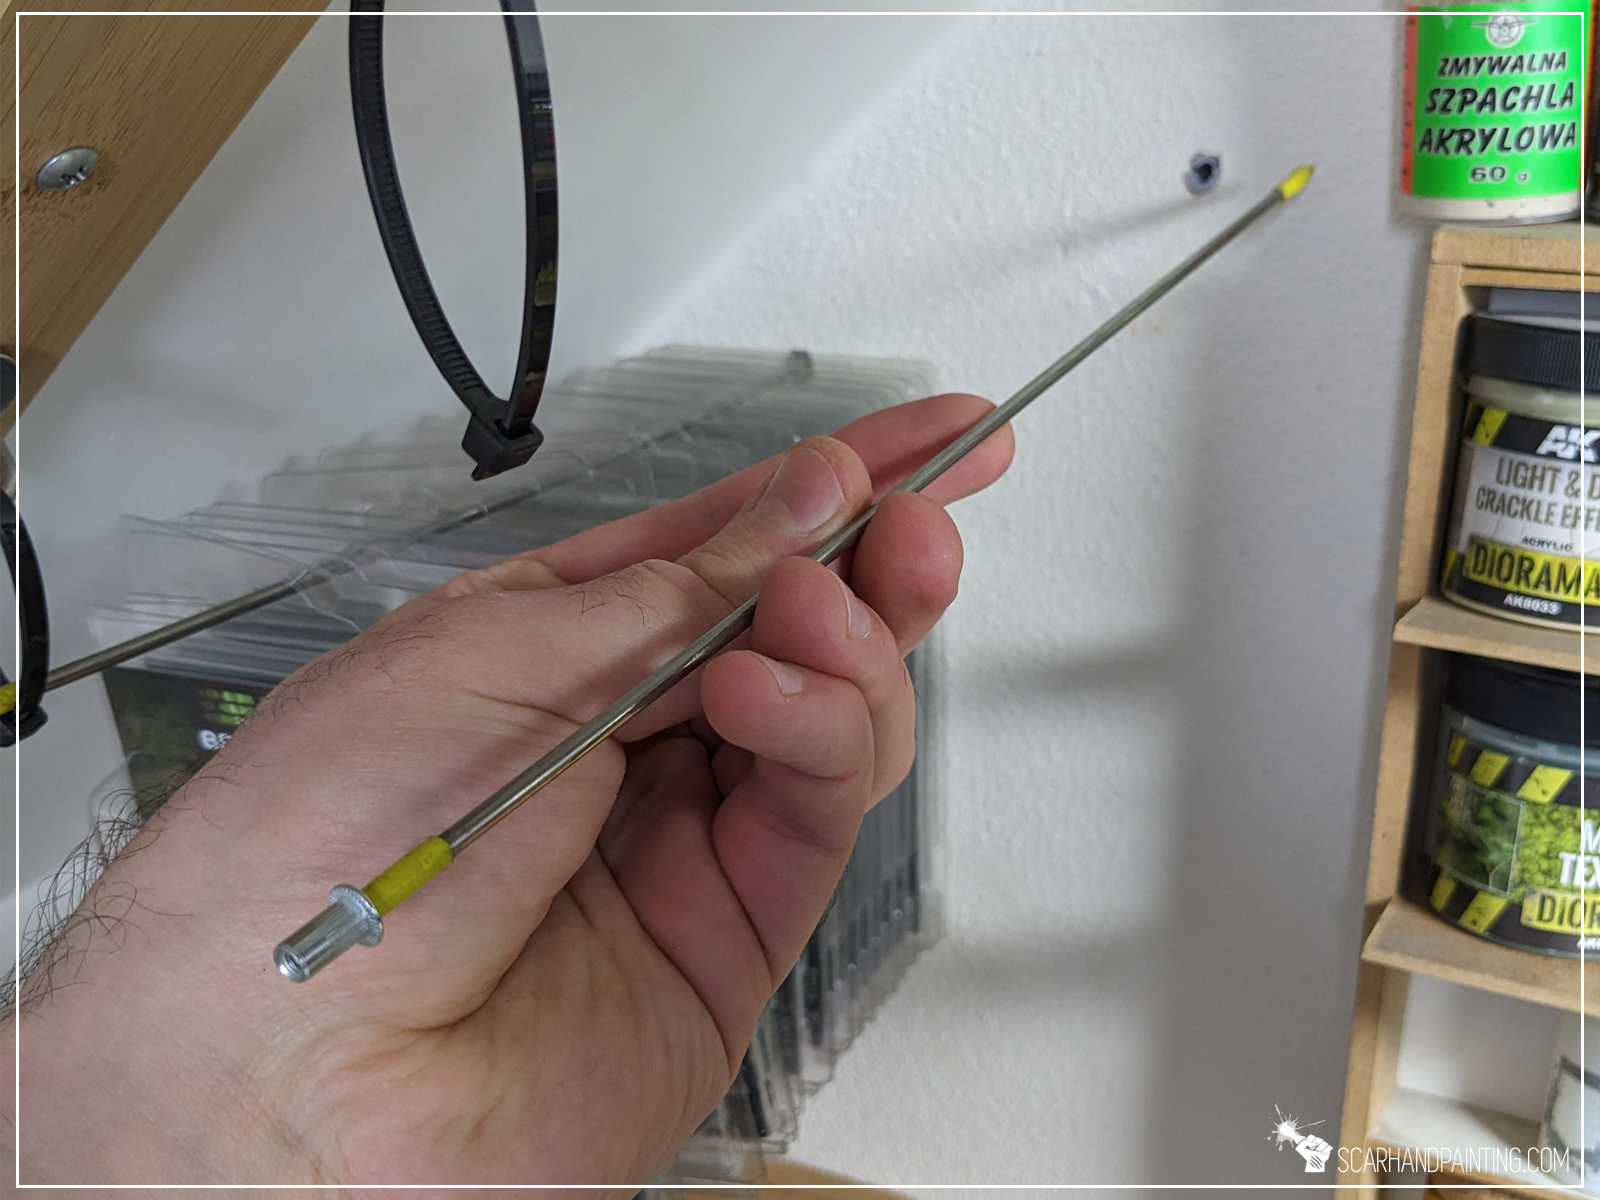
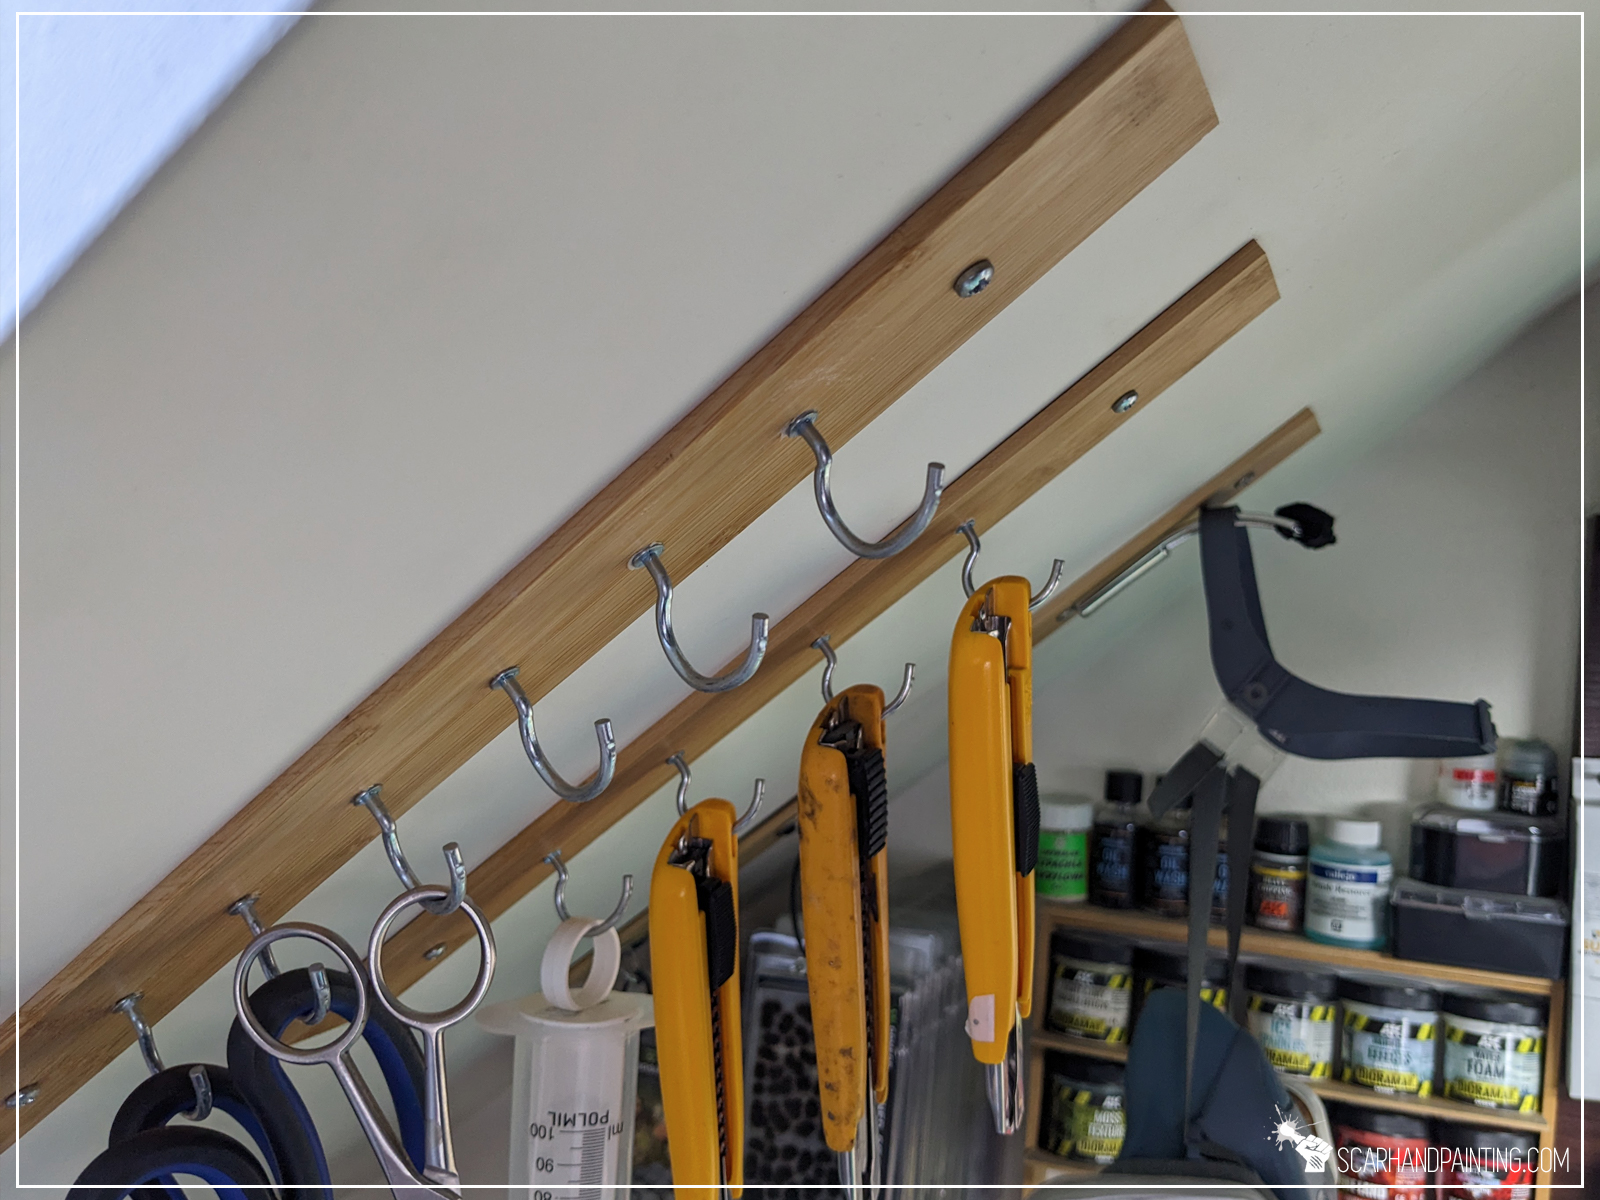
Some stuff is not very comfortable to stack around the workspace. This is especially true for large tools and packages of hobby tufts. There are of course some workarounds. Here’s a pretty simple way to store these items. These self-made tool racks are thin bamboo planks with small hooks and handles, screwed to the ceiling. For tufts I used a metal rod mounted on a piece of plastic on one side and inserted into a hole in a wall at the other. Tuft packages have then been cut on one side, as seen in the picture below, to allow them to be taken off and put back on the rack individually. This made an otherwise unused space into a nice storage area.


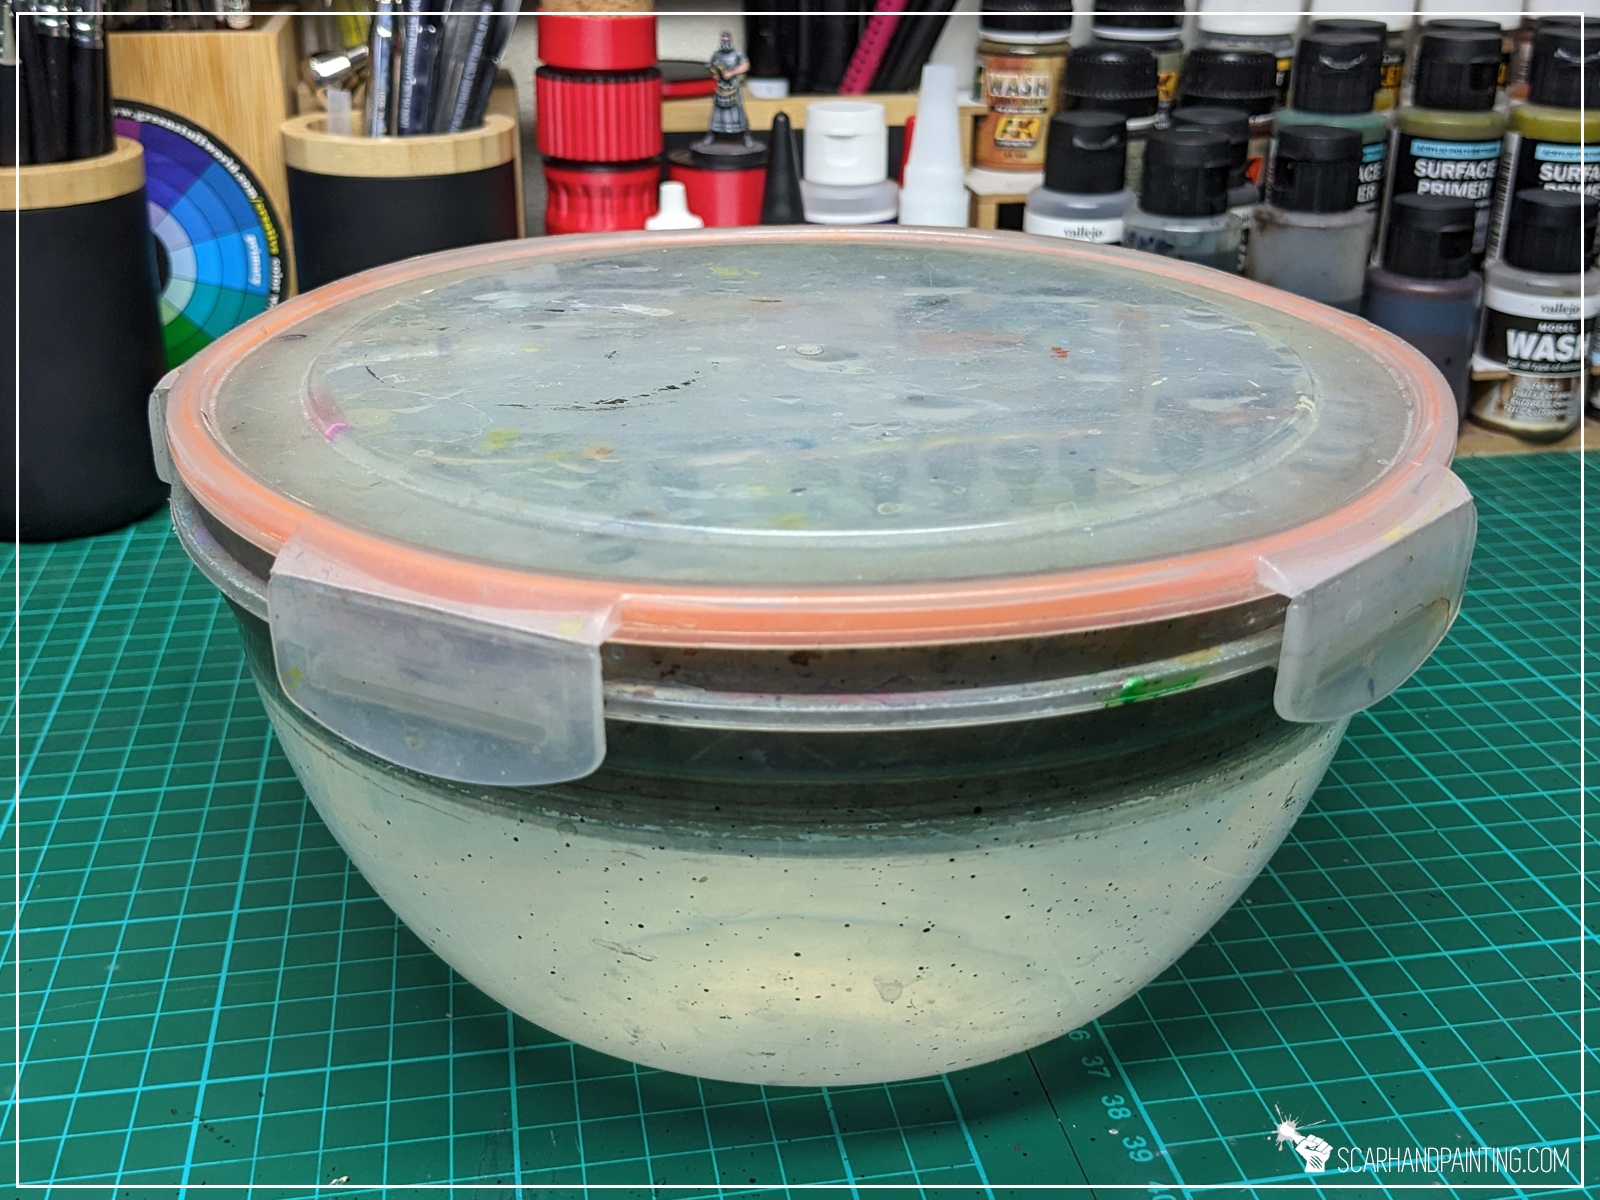
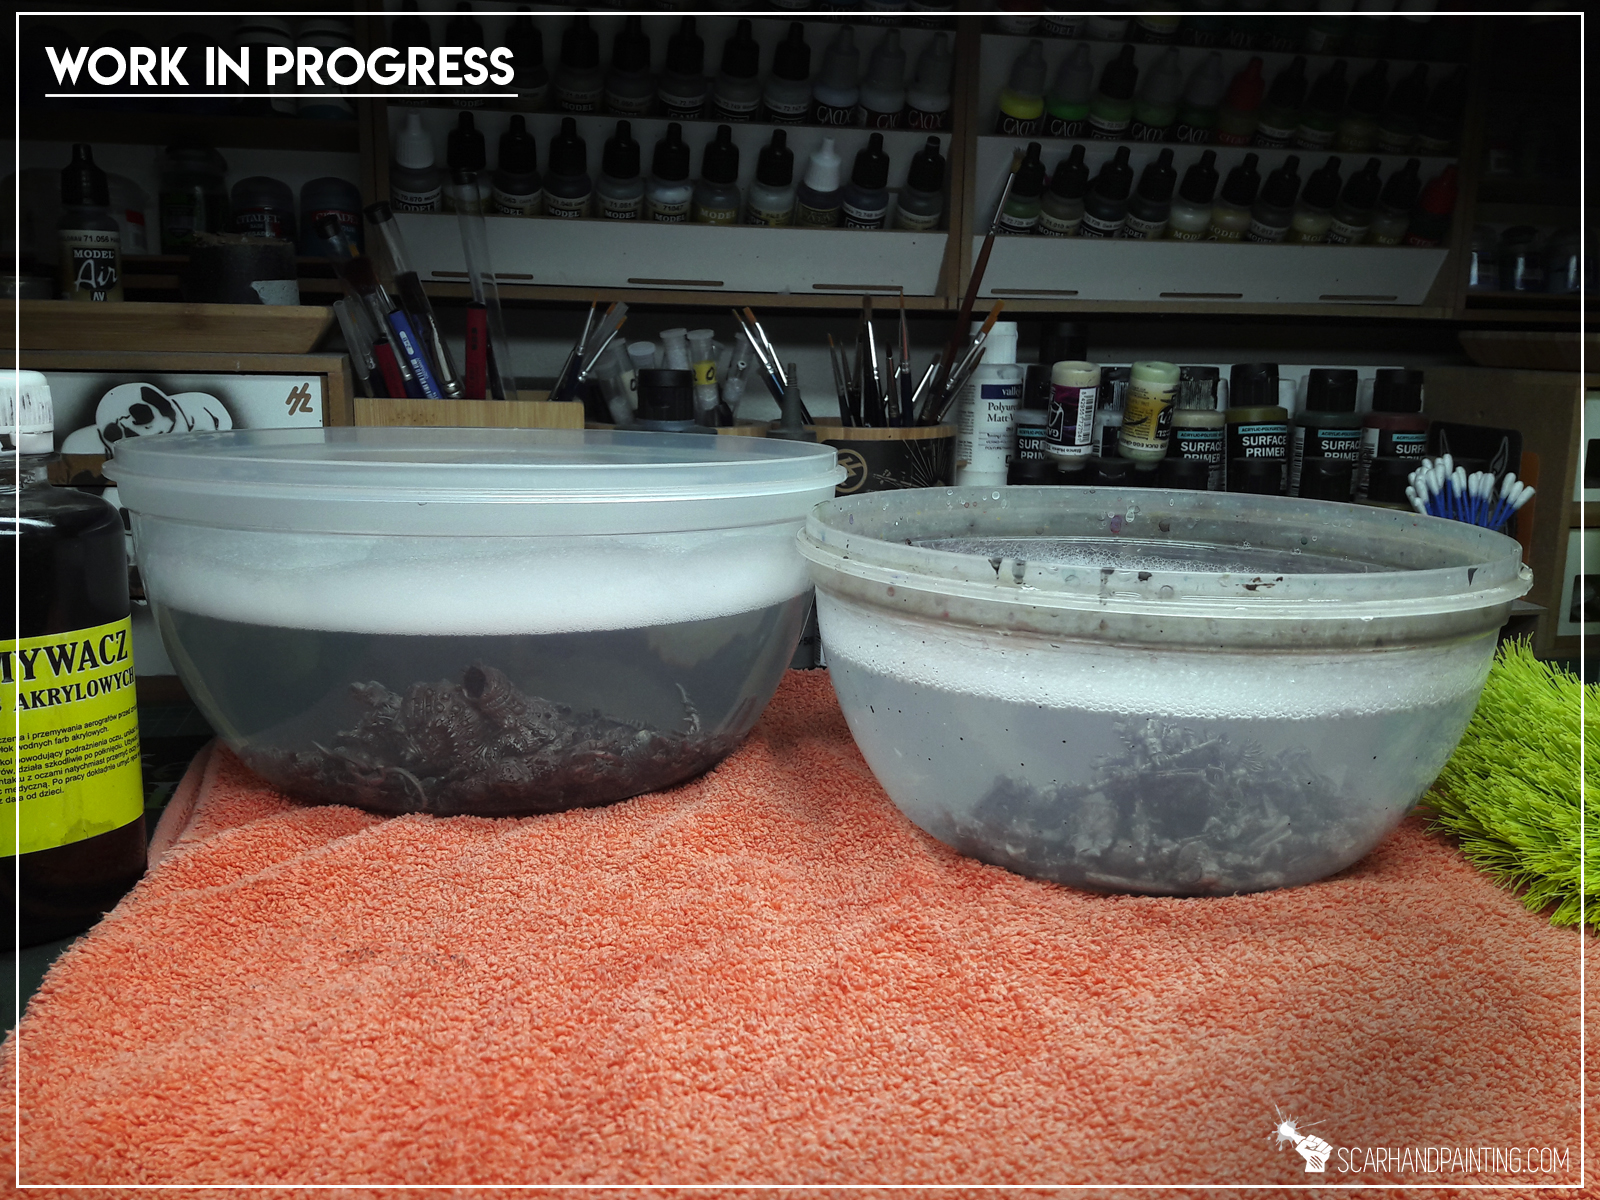
I think I should dedicate an entire article to the water bowl and how superior it is compared to a cup. Maybe even a book! But in all seriousness, the more water there is, the longer it will last. It is easier to clean an airbrush, or a regular brush in a larger area of water. Cups and mugs are prompt to topple and need to be cleaned and refilled more often. Plus there’s the lid. This magnificent contraption protects your desk from water when put on, allows for safe transportation to and from the sink and allows to use the space otherwise occupied by the bowl. Just epic!

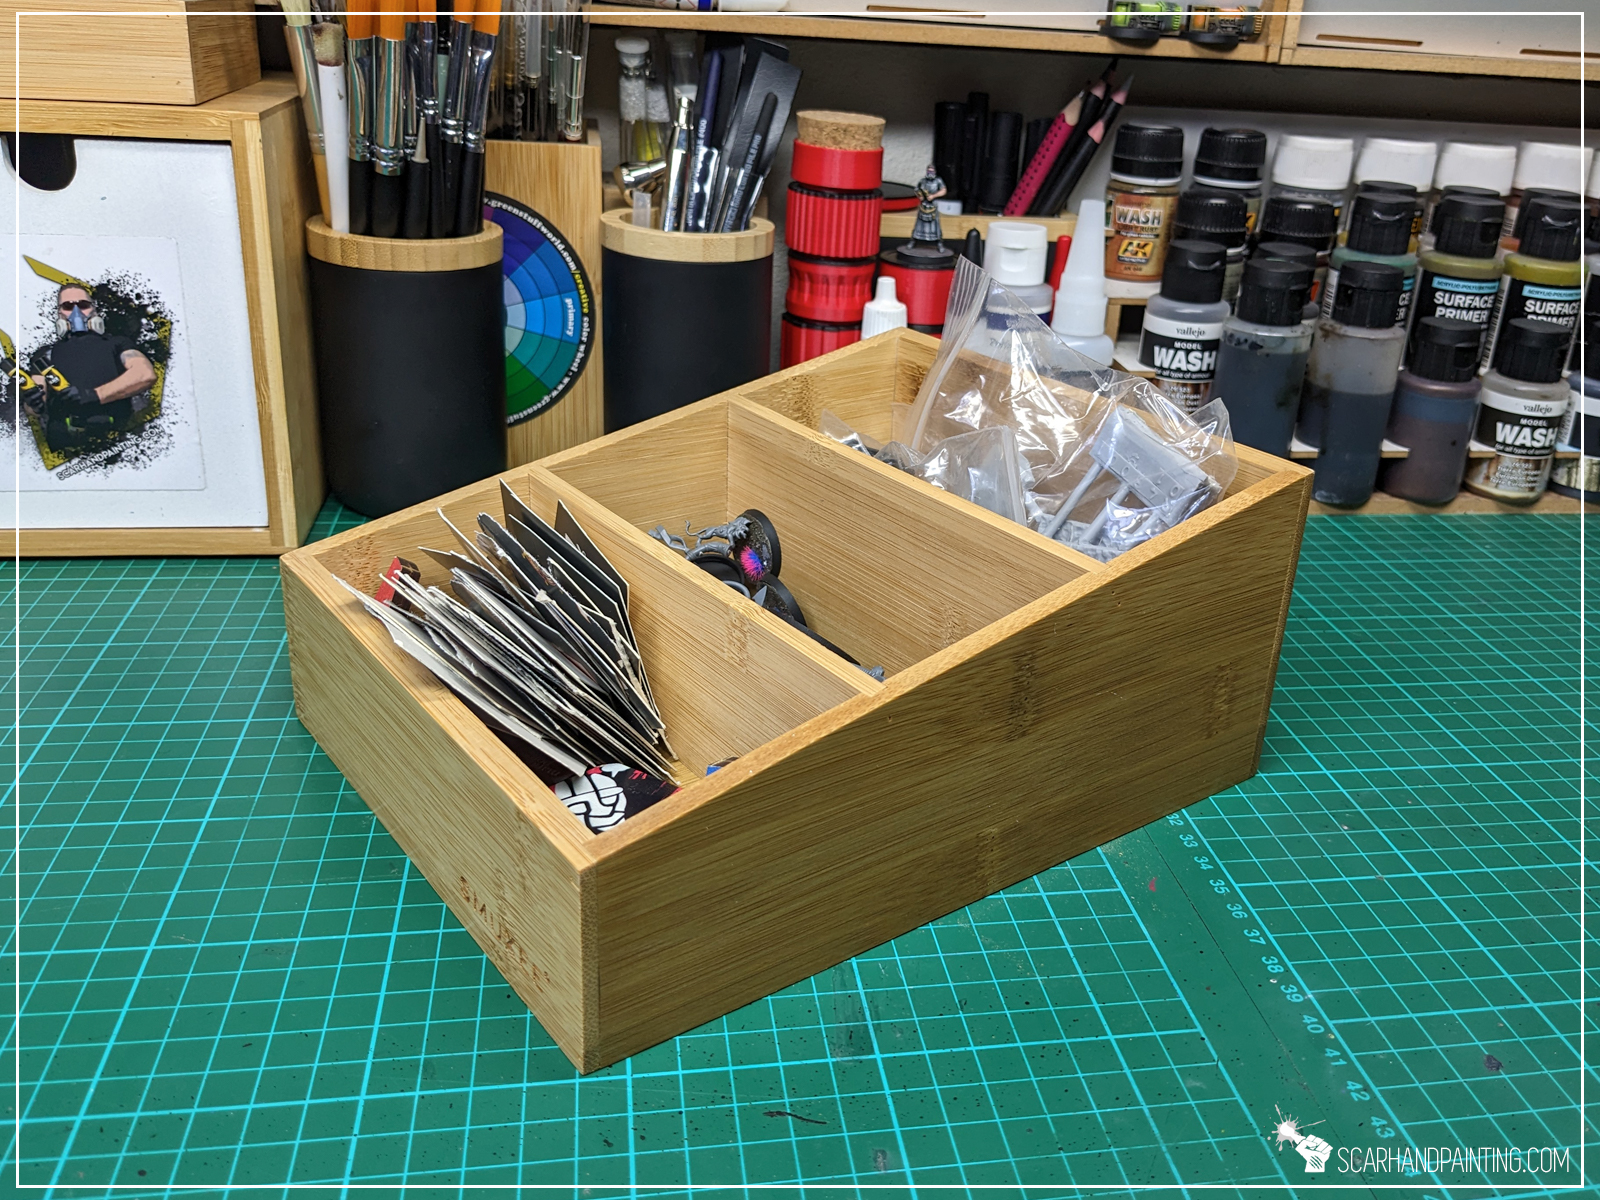
When it comes to bitz, they tend to take up a lot of space. A good way of dealing with that is cutting all the separate parts from the sprues and zipping them in a thematic zip bag. These can then be stored in translucent plastic boxes to allow faster bag identification. Bitz of particular type in a single bag and a tray should let you fish out any bitz you need much faster, than searching through a room full of mixed, half emptied sprues.


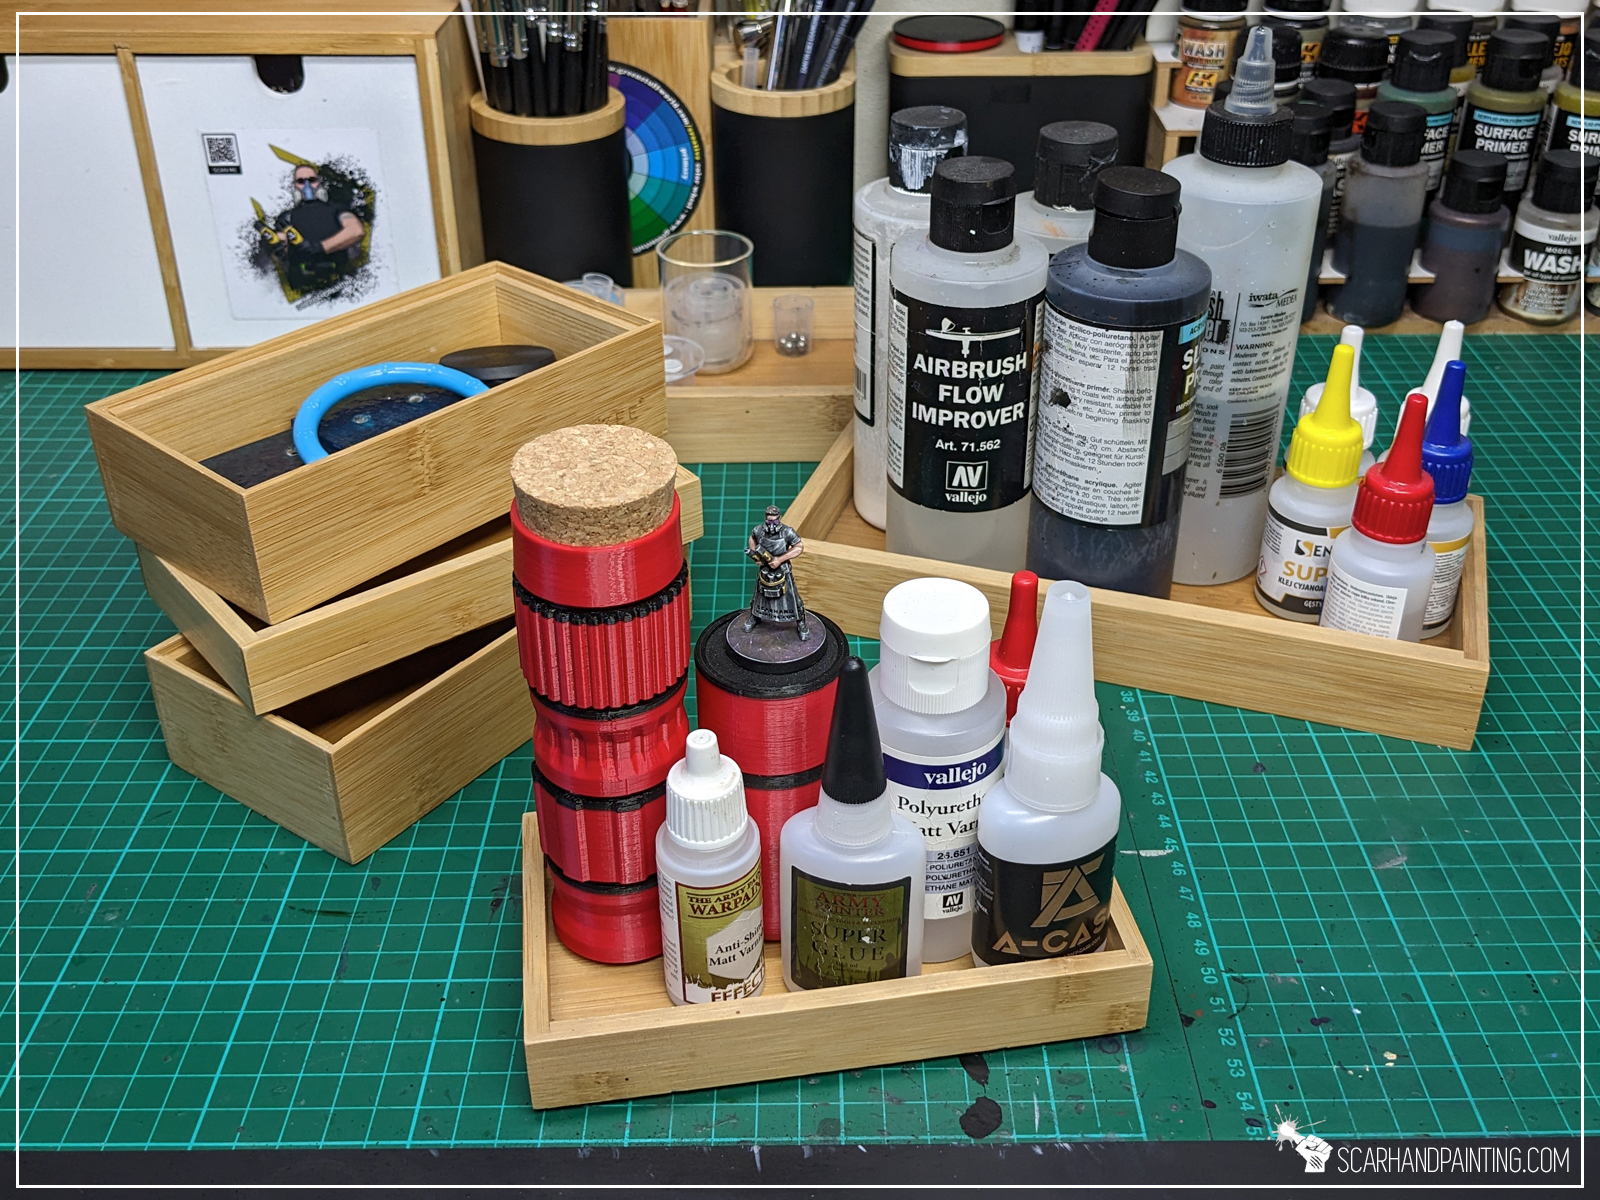
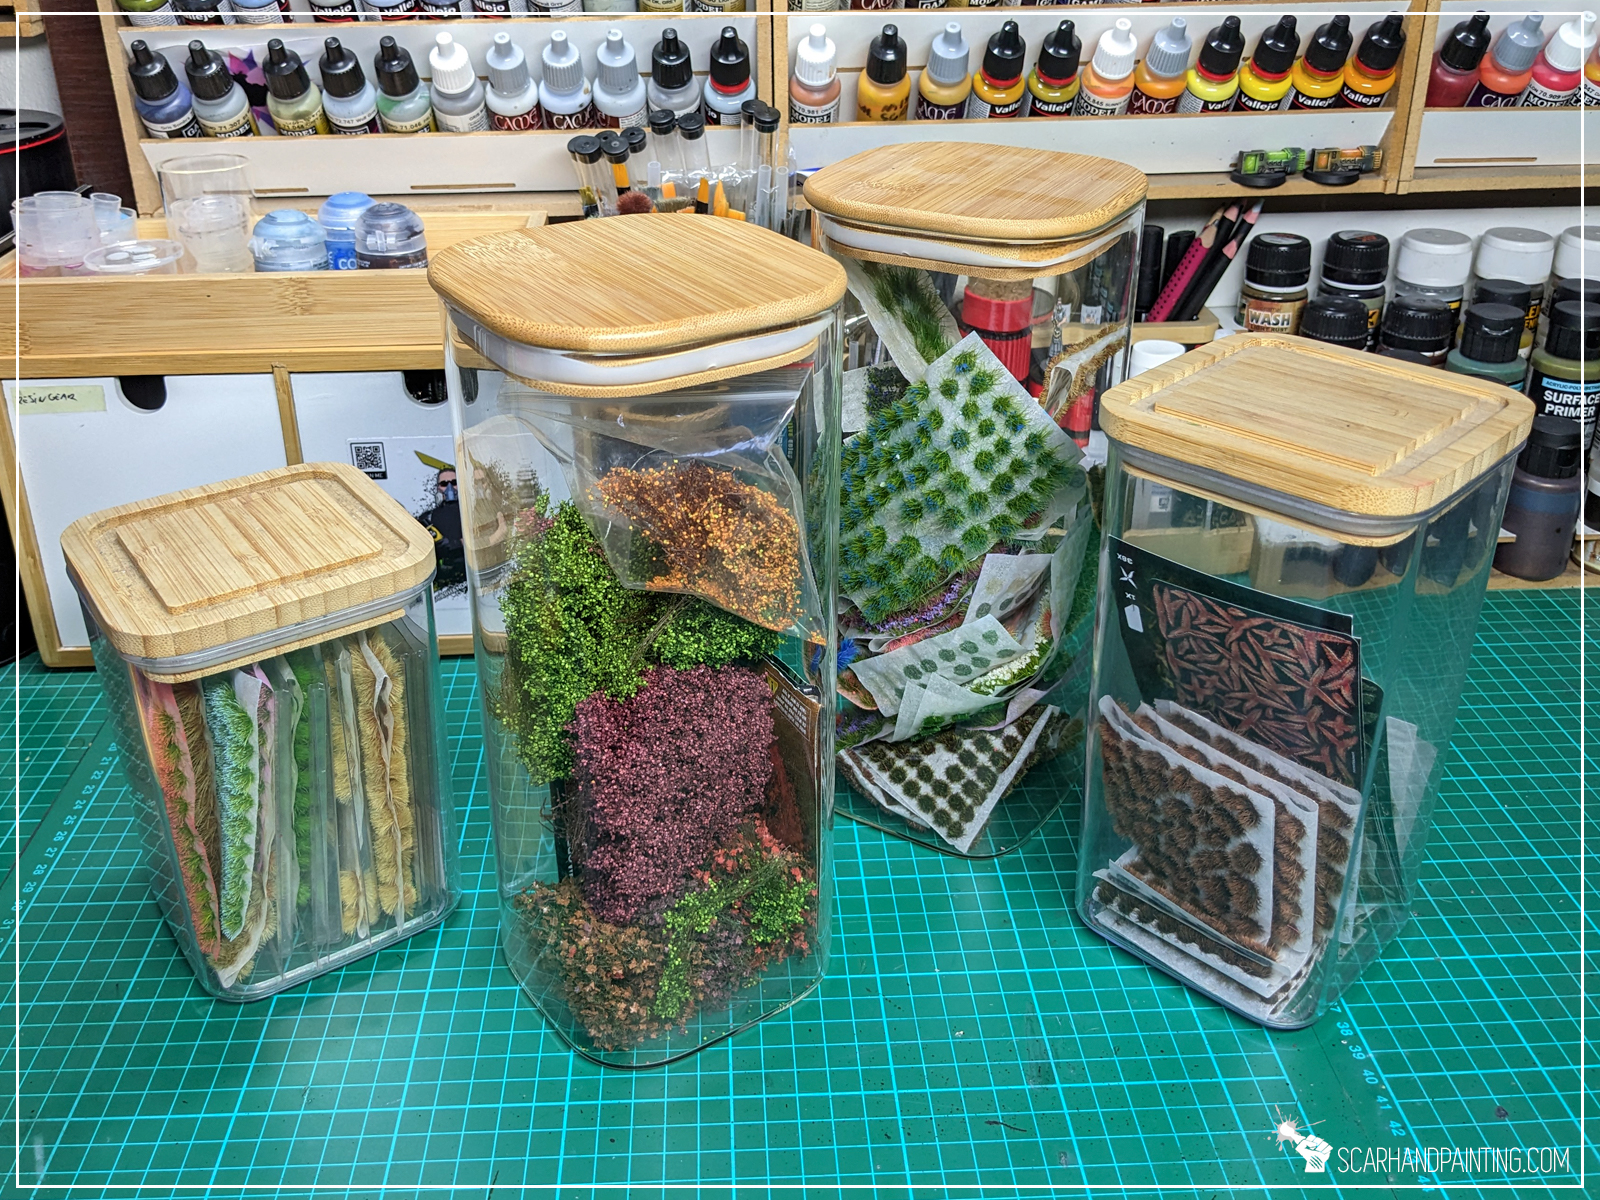
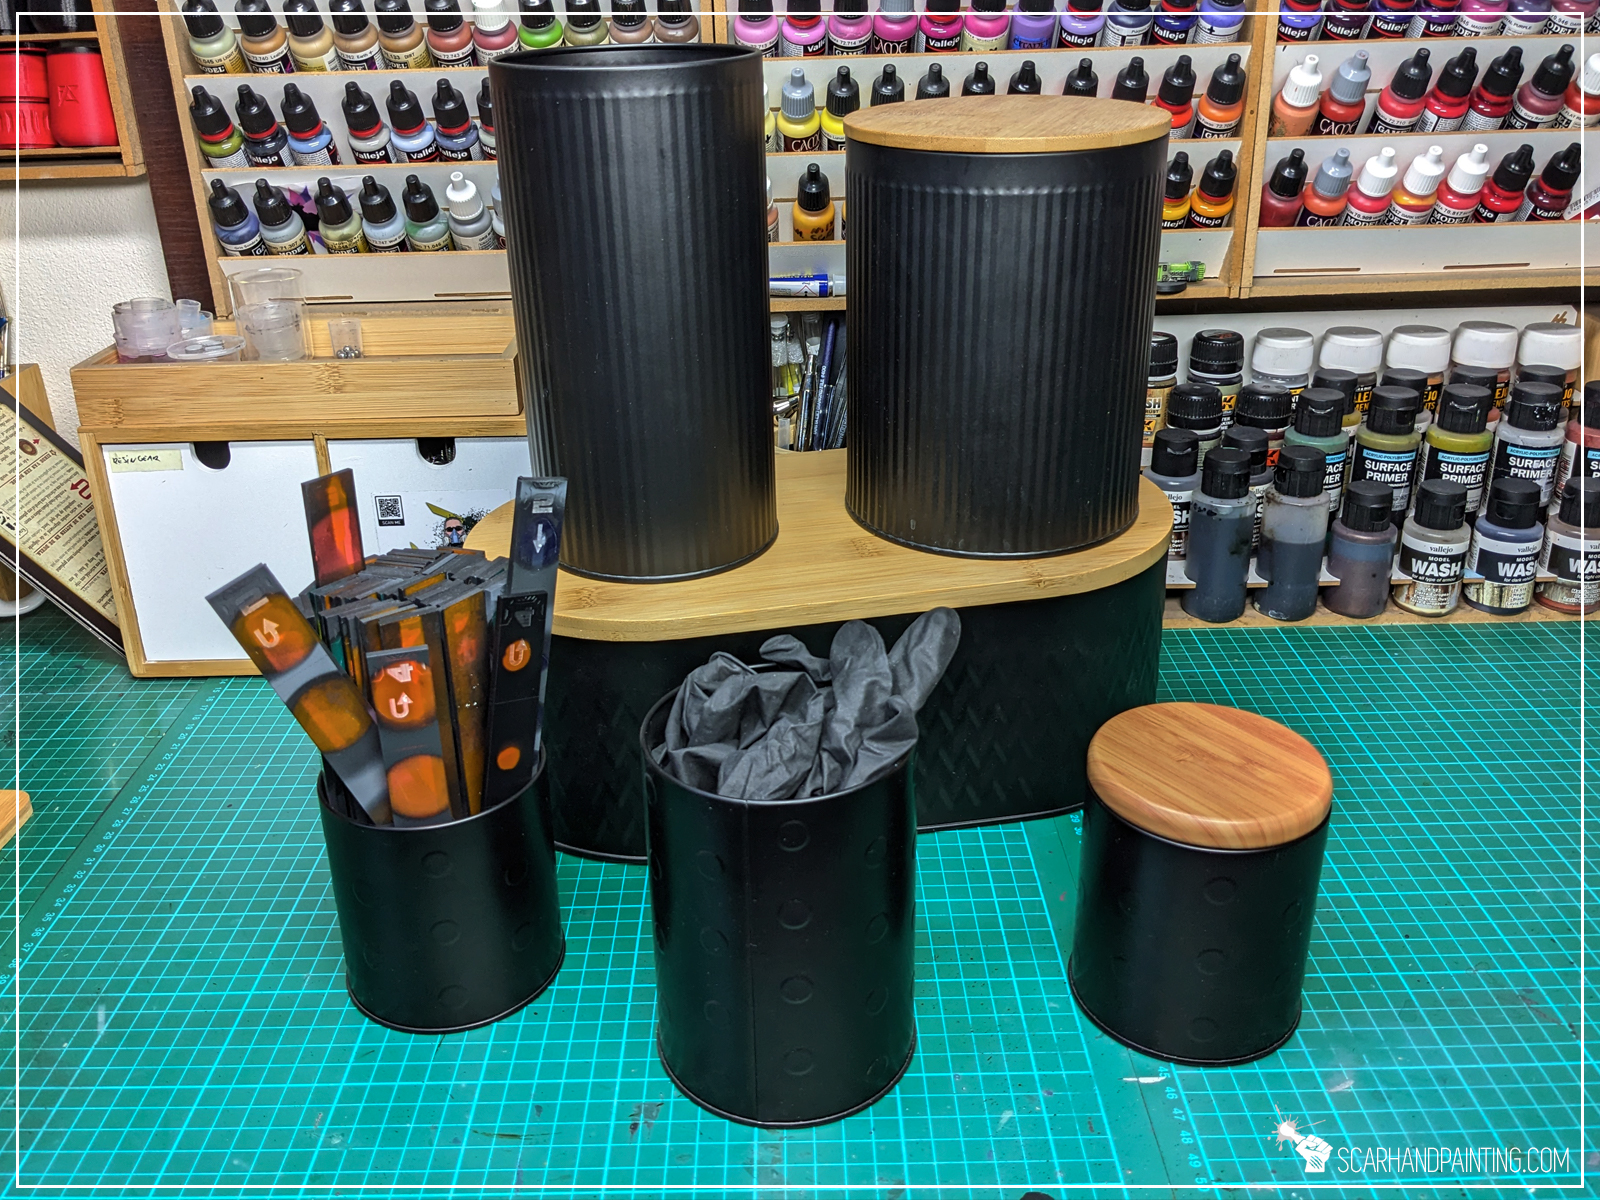
At this point you might see a certain pattern so there’s no need for me to hide it anymore. I admit I might have a little fetish. I tend to bring home a fancy looking food container, a bamboo tray, or some sort of other cool looking stuff whenever I go shopping. If only you saw my kitchen… Anyhow, stylish food containers combine fine looks and functionality. They can be stacked on top of one another and tend to take up less space than standard, flatter boxes. They come in a variety of shapes and sizes, made of either wood, plastic, metal or glass. There’s something to fit any workspace and they have a wide range of storage uses.
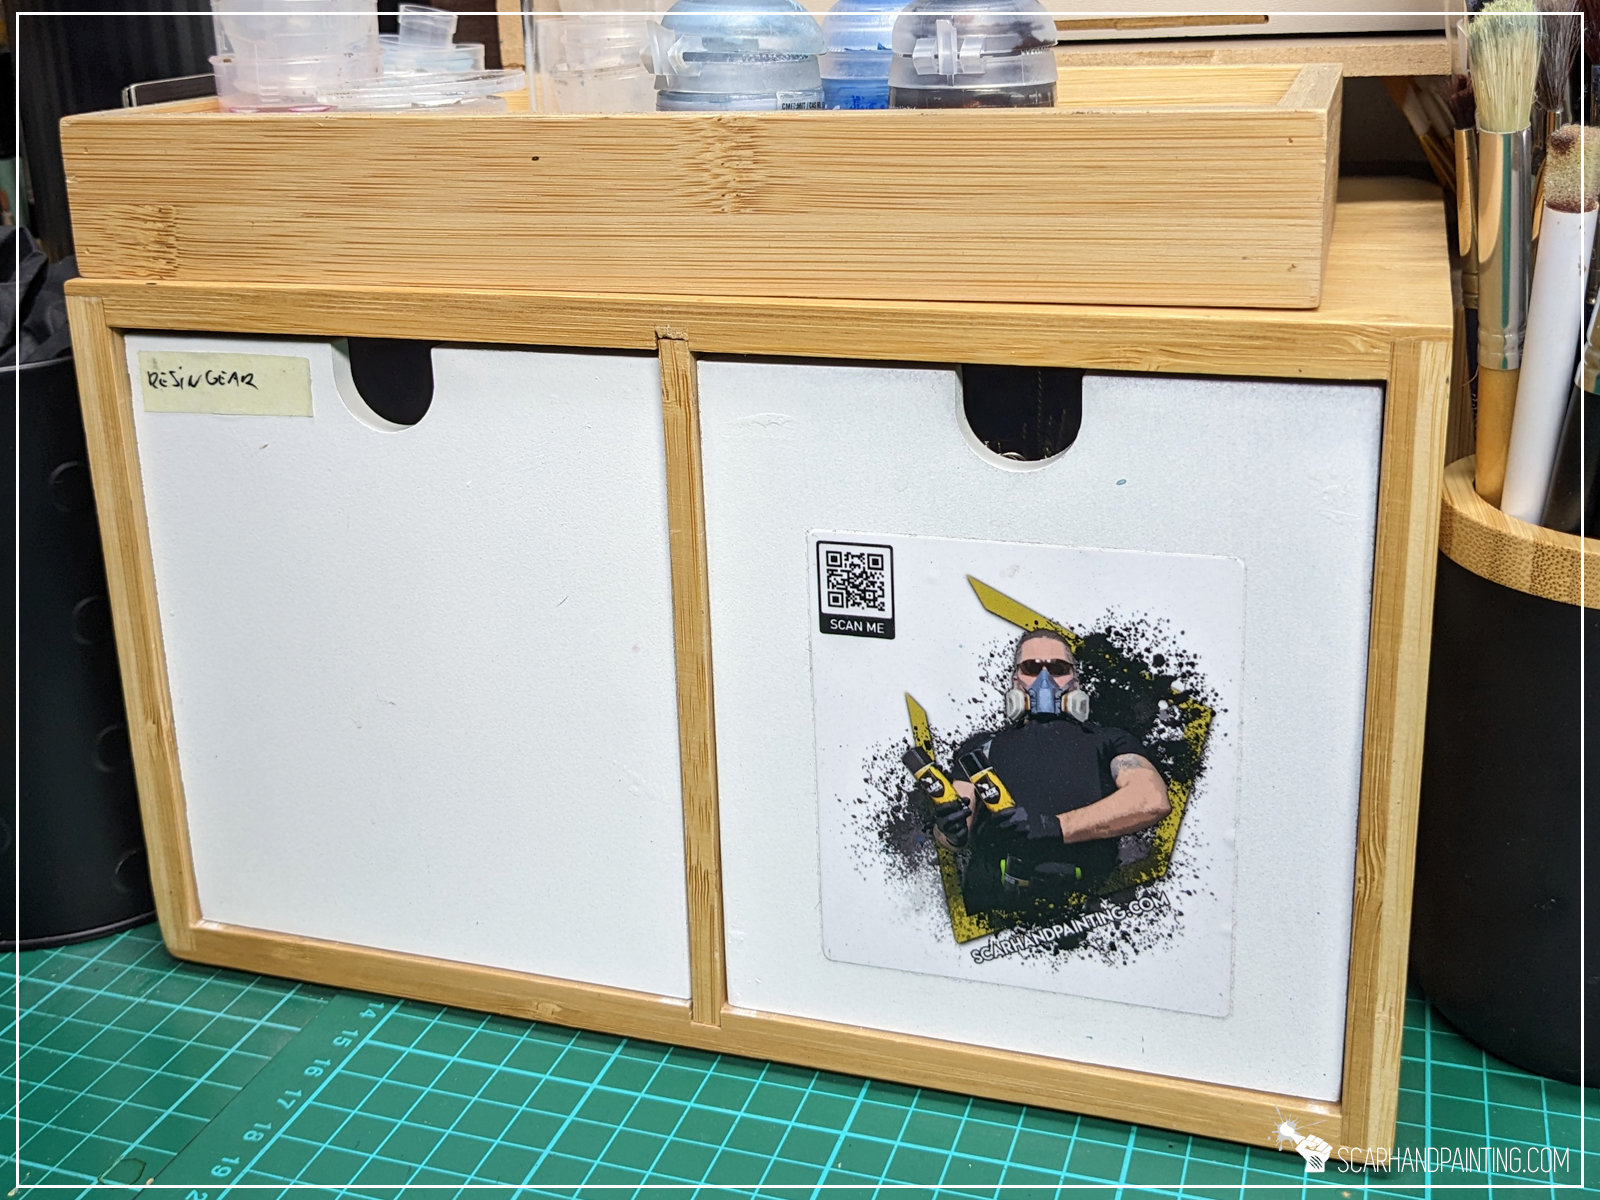
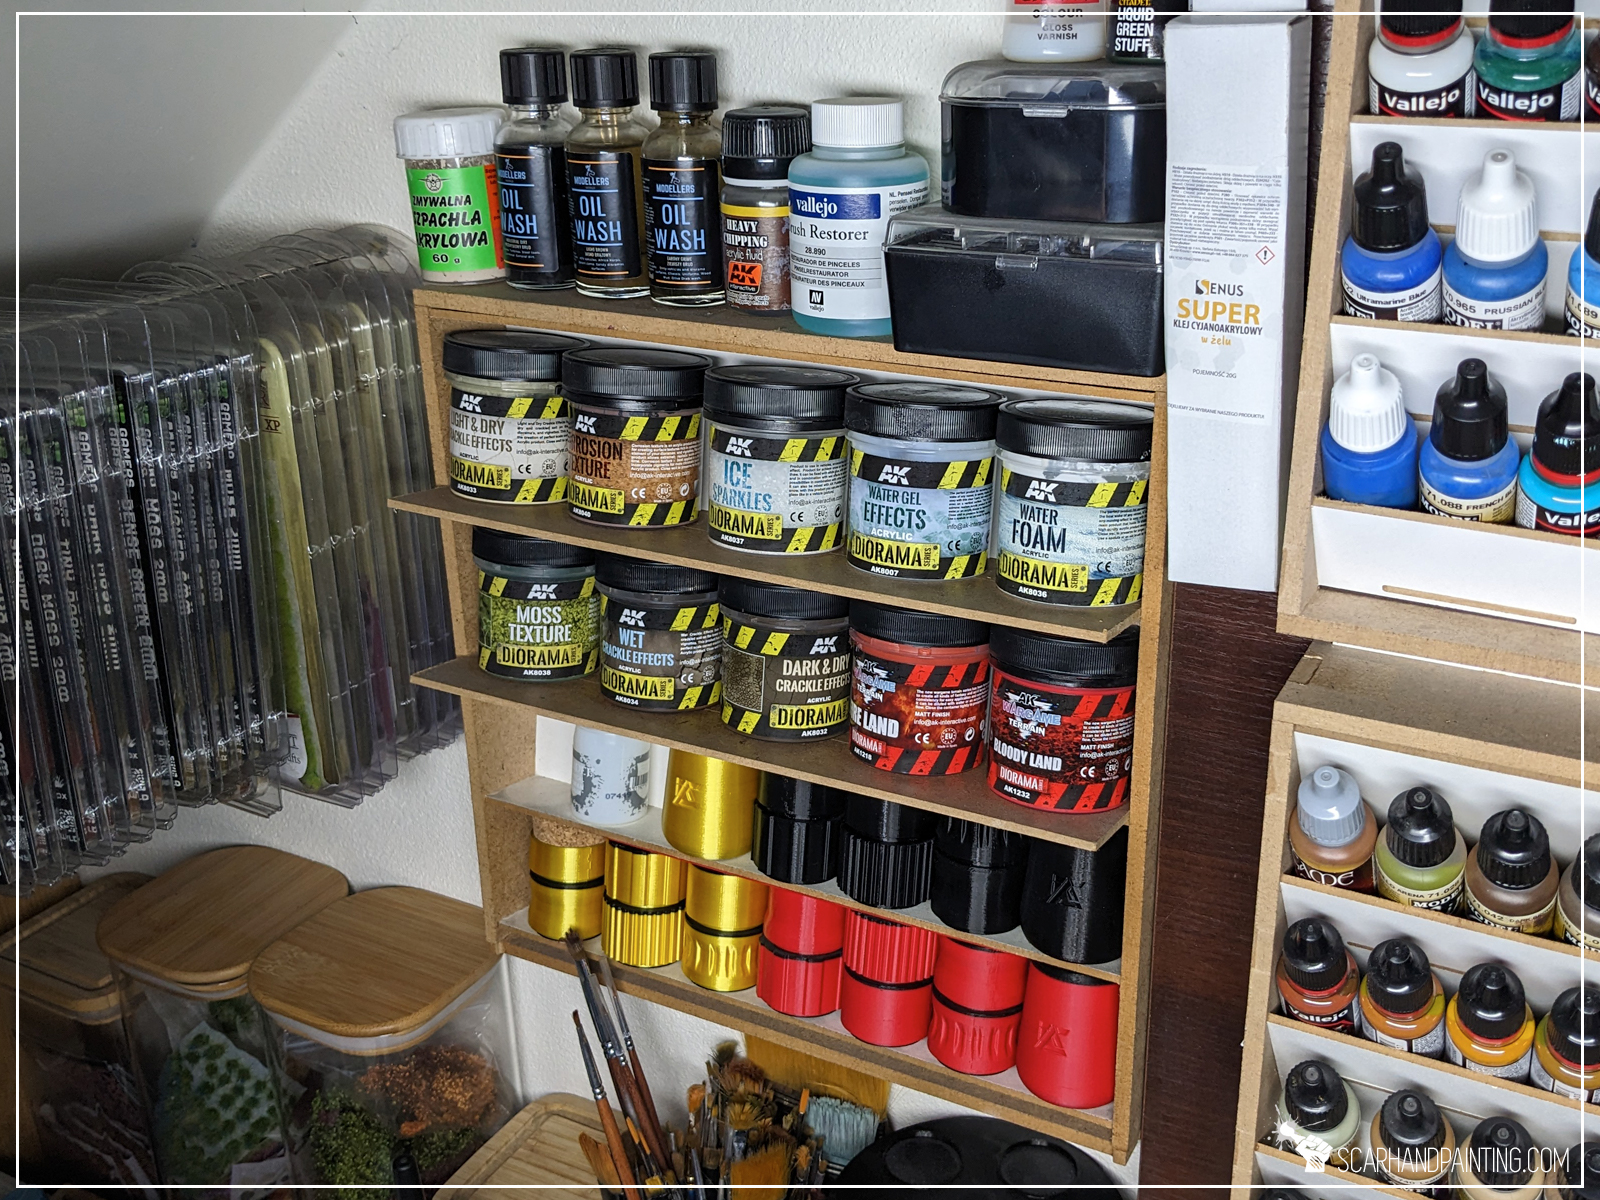
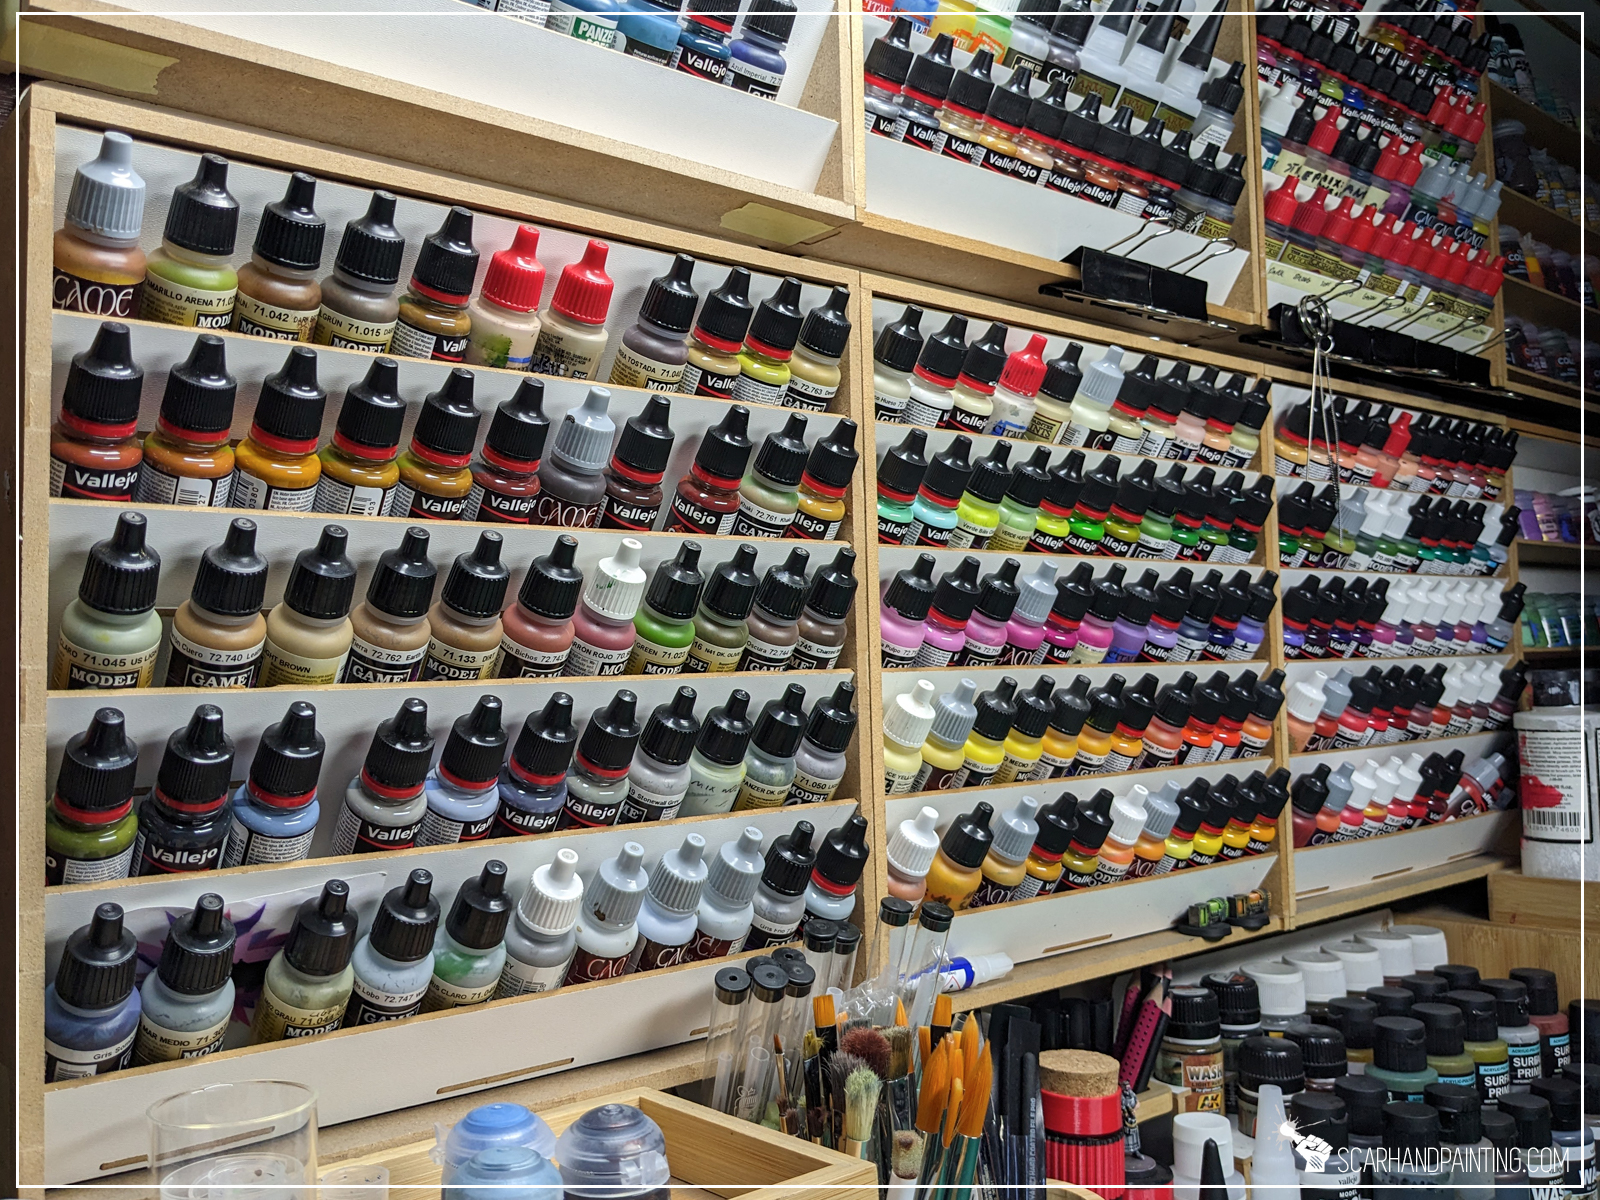
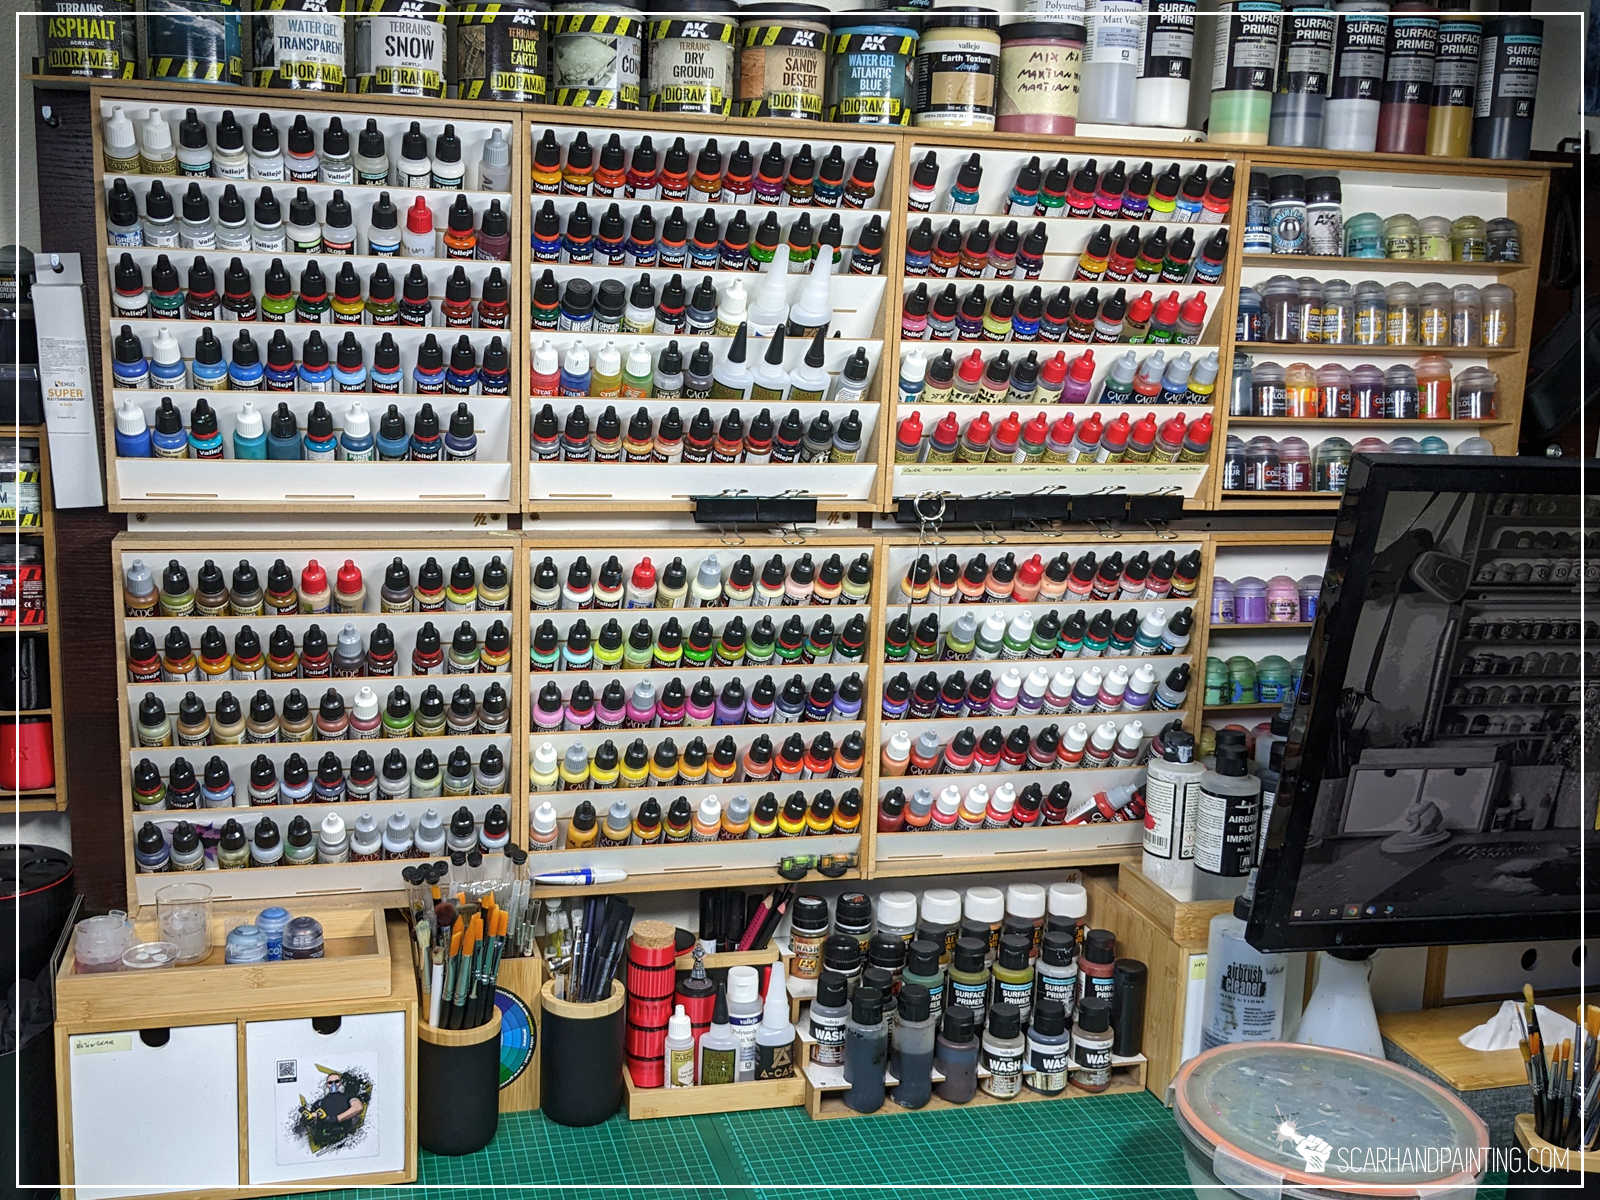
This is a well known classic, so I decided to throw it in. There is a variety of paint racks, tiny drawers and even entire Modular Workshop Systems in the market, such as the popular HobbyZone. Although dedicated painting racks can only be obtained through hobby related companies, tiny drawers and wooden organizers can be found at house & decor stores. In my experience these are similarly priced so there’s not much difference, other than looks, style and in compatibility with other Modular Workshop System.

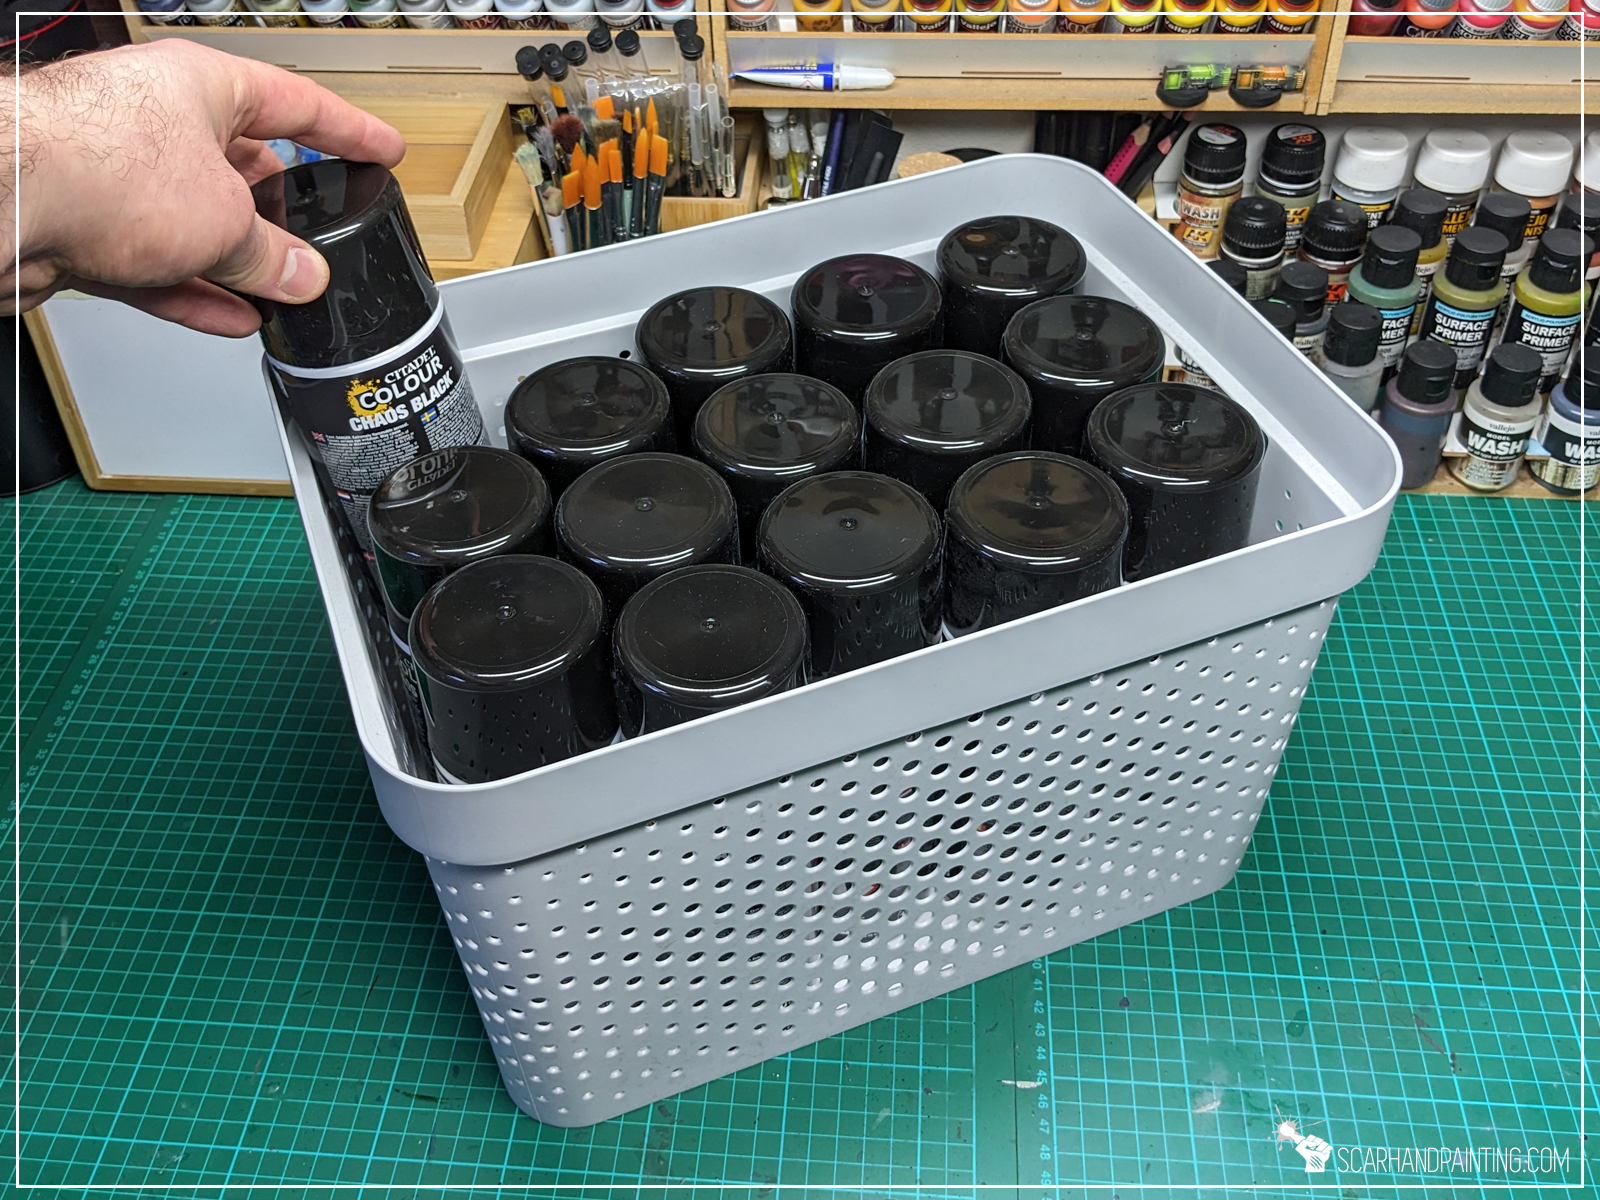
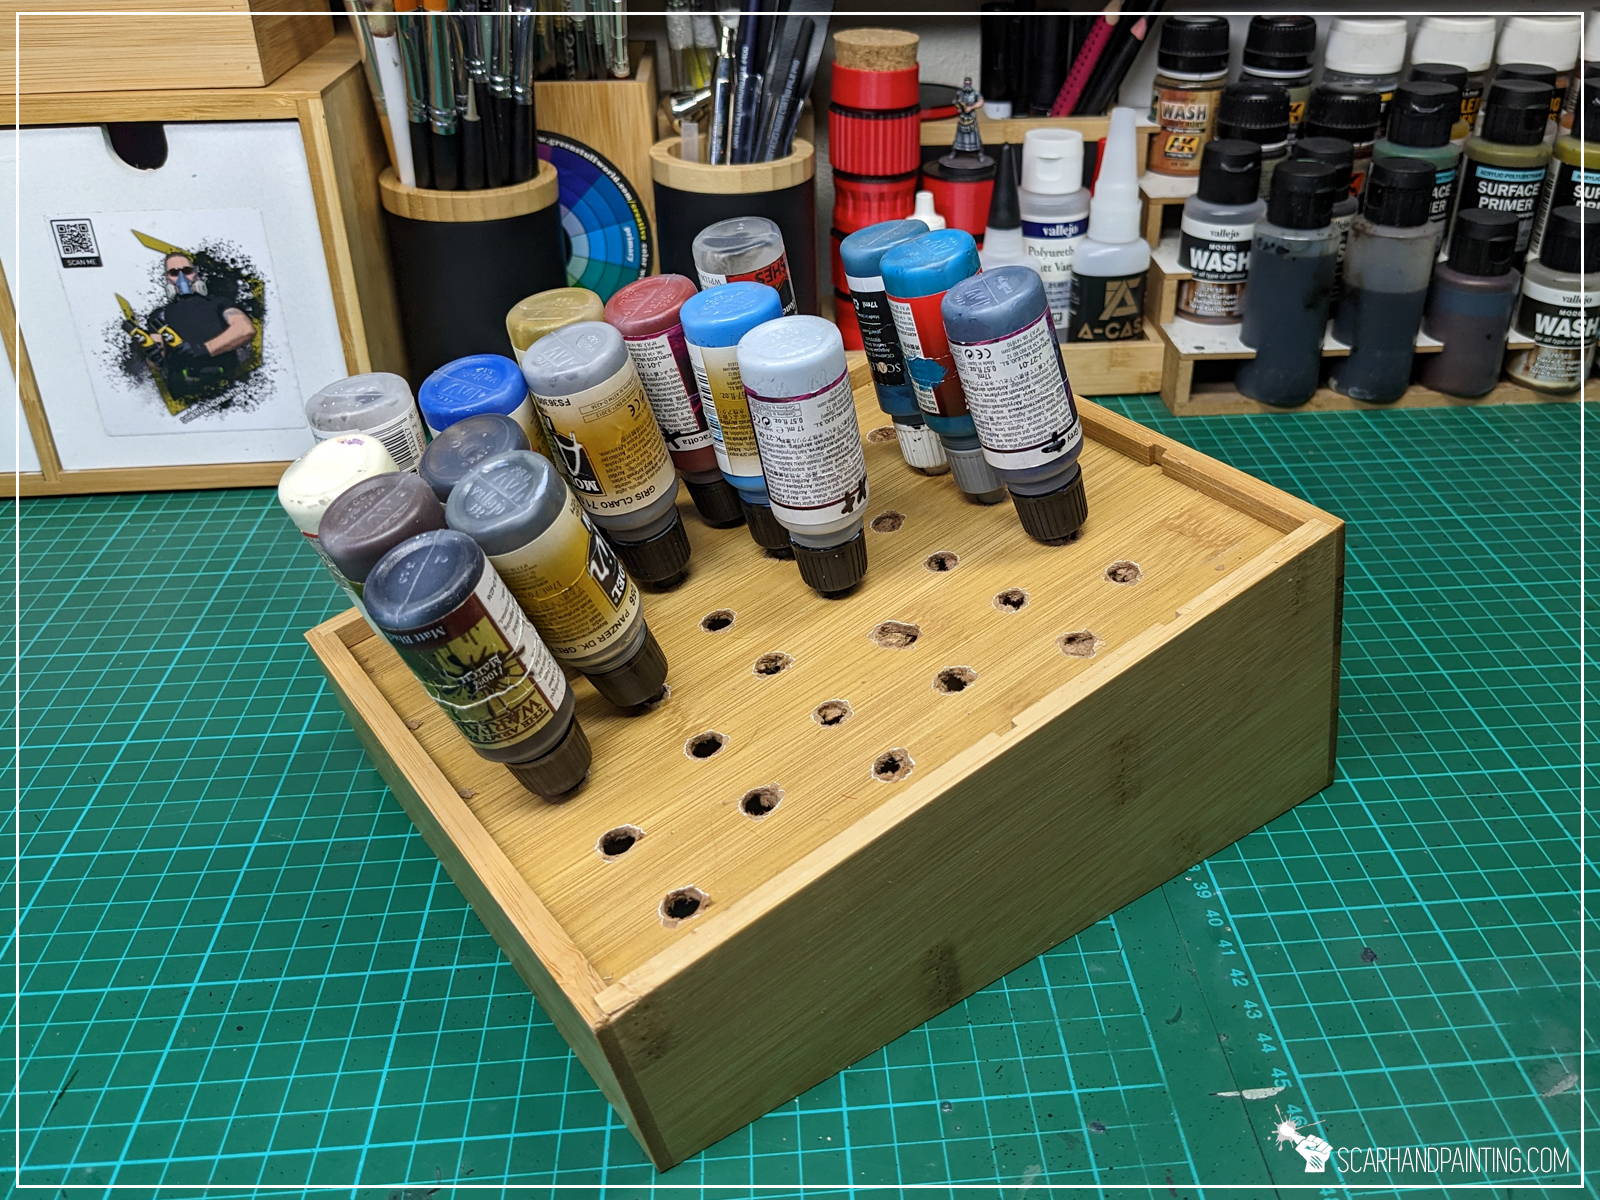
Have you ever found yourself reluctant to throw out an almost empty drop bottle paint, because ‘there is still some left!’ ? Personally I dislike keeping two paints of the same type on a hanger rack, but am also not keen on wasting paint. To avoid diving into backup paint box mid-work, I ‘retire’ old paints to a special self made rack (a box with a few holes drilled in the underside). I keep them close, ready to use at all times. Took a while to make a habit of prioritizing old paints over the new ones on the hanging rack, but once it kicked in I started to save a lot of time.
I’ve been using the above solutions for some time now. They’ve been my allies in a fight against workspace entropy. Now it’s your turn to put them to a test. Let me know if any of these spiked your interest. Are any of the above completely new to you? Which, if any, do you plan to implement in the nearby future? I am eager to read your feedback in the comments below. I’m also available at Facebook and Instagram if you’d rather prefer reach me there. Finally I would appreciate if you shared this article with your hobby buddies.
If you are looking for a professional Warhammer miniatures painting service, be sure to contact me via this contact form. I always reply within 24 hours. If you don’t see anything from me by then, please check your spam folder.

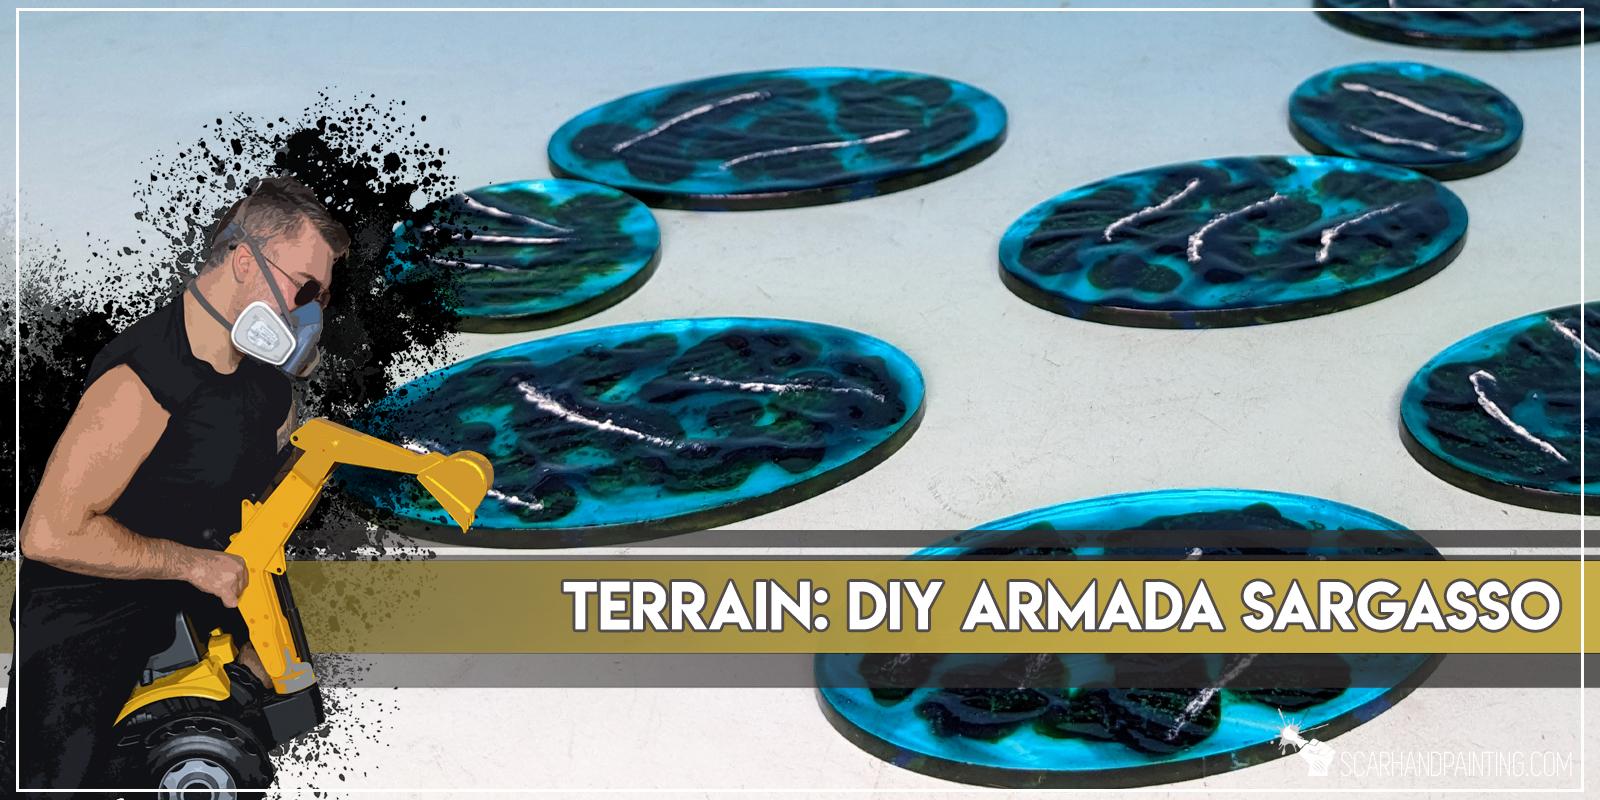
When it comes to spicing up your miniatures naval games, there’s nothing better than nice looking scenery. This is especially true for games full of finely detailed miniatures, such as Kings of War: Armada. Today I would like to take you on a Step-by-step trip through the process of creating and painting an alternative scenery for Armada – the Sargasso. These can be used as either Sandbanks proxy, or as something completely new, as you see fit.
Some notes:

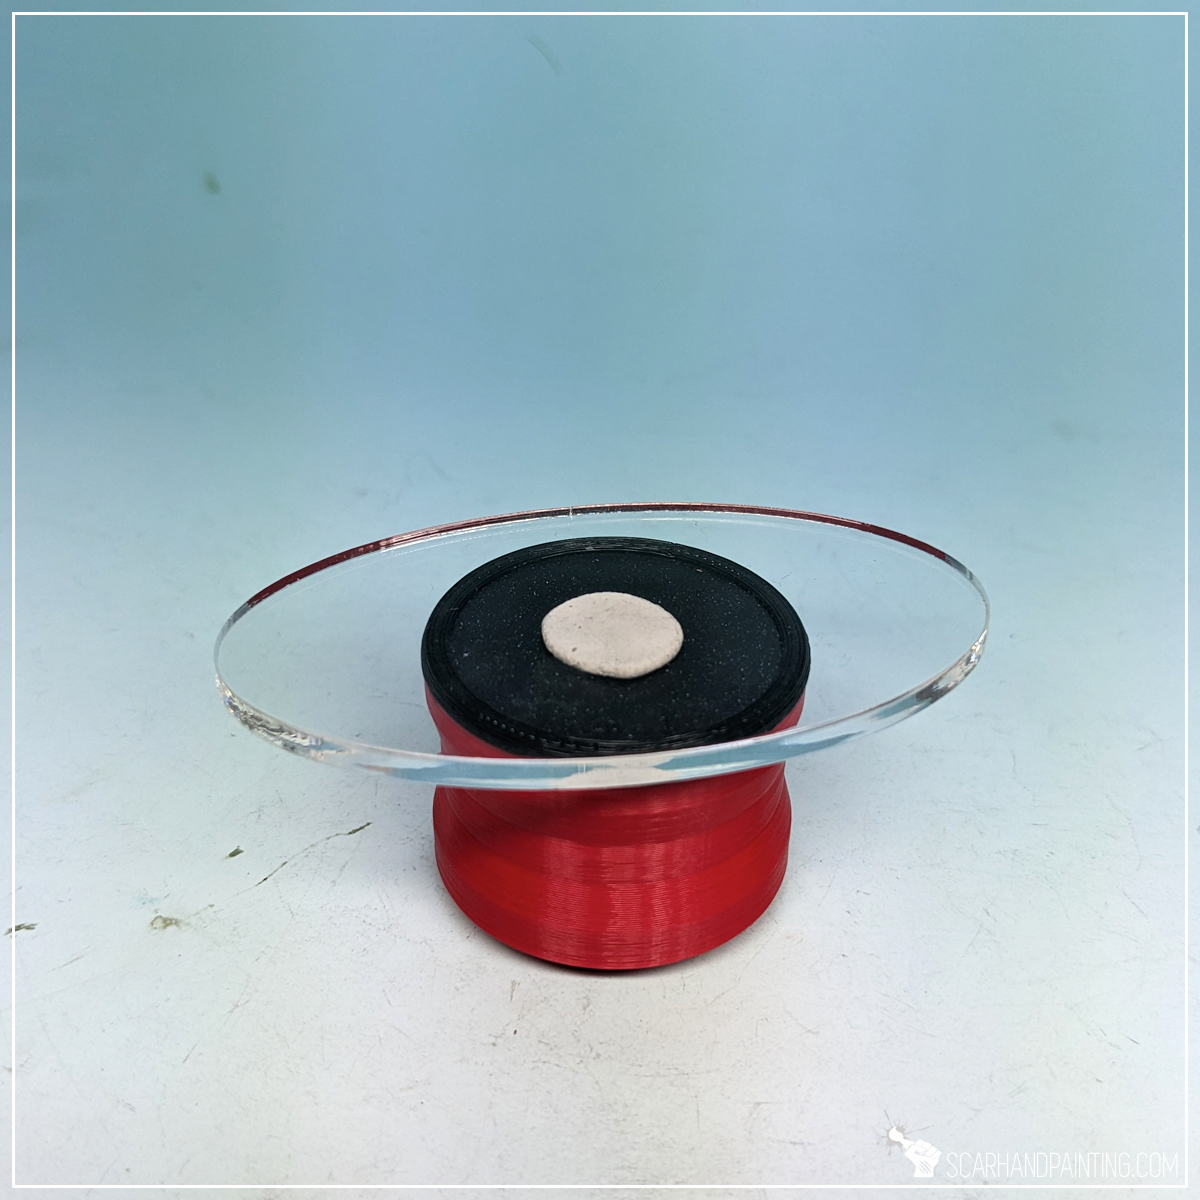
High end materials right from the get go. I do prefer my scenery to be durable and high quality, thus I went with laser cut translucent acrylics. That being said, there’s nothing preventing you from using a cheaper and more accessible material, such as clear plastic – maybe food packaging leftovers, or miniatures blister package? As long as it’s clear and sturdy enough you should be fine with any substitutes.
I started by applying some Citadel Militarum Green Contrast in a random pattern all over the base. I used a large, soft brush and applied few large drops of the paint, then added some more to link them.
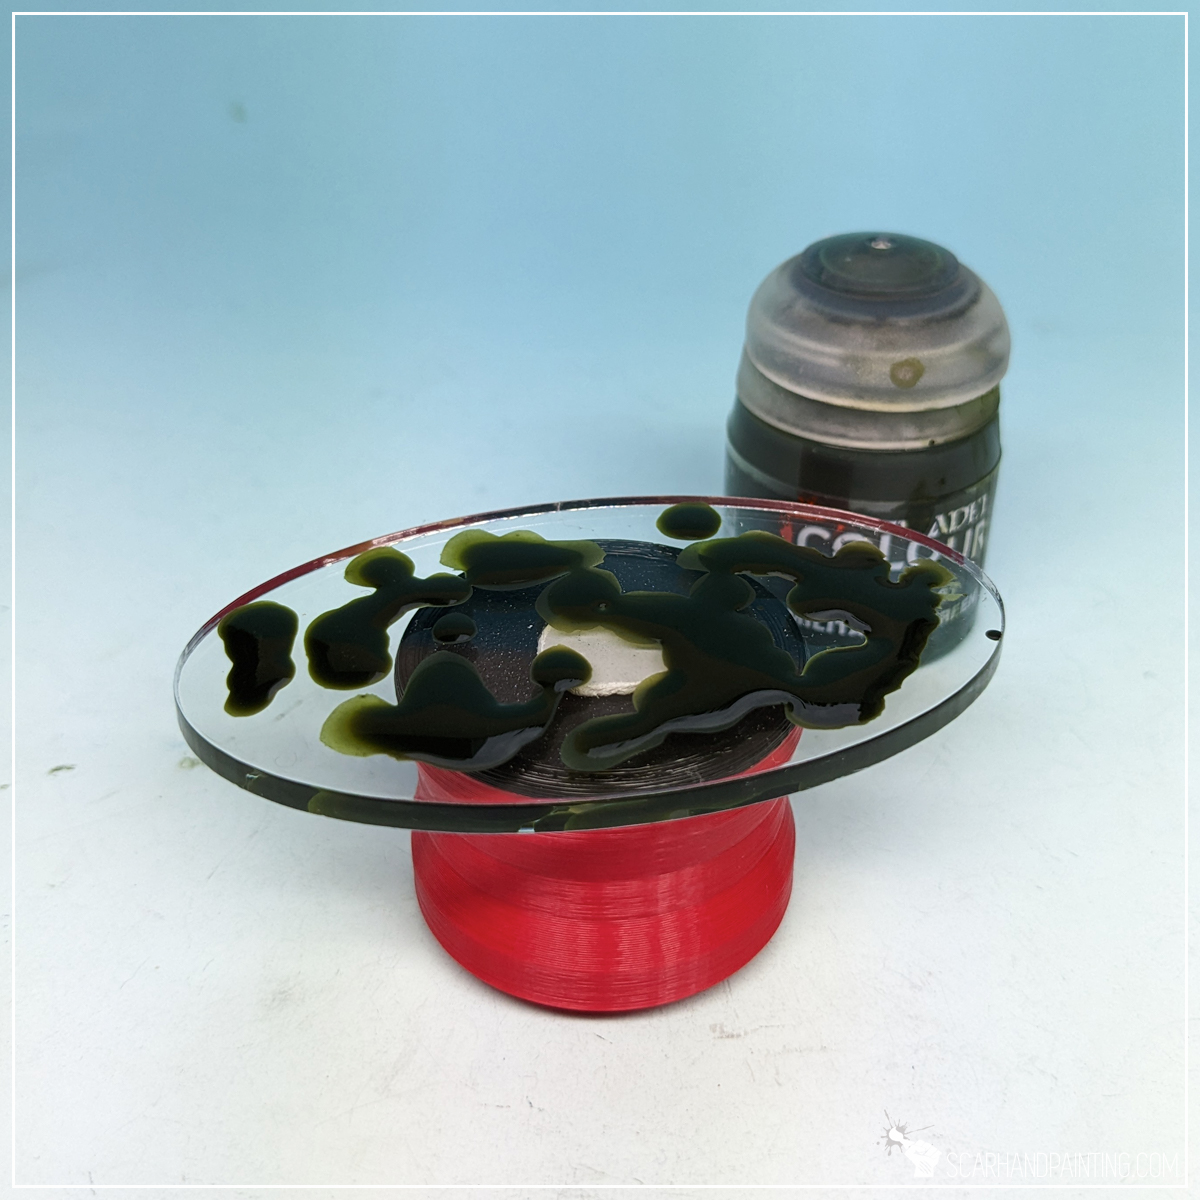
Next I used a large, round brush to stipple Citadel Nurgle’s Rot paint on top of still wet Militarum Green. This was a bit tricky and I used a paper towel to clean the brush very often. The idea is to apply Nurgle’s Rot from the top by touching the previous layer, bot not smear nor mix the two paints too much.
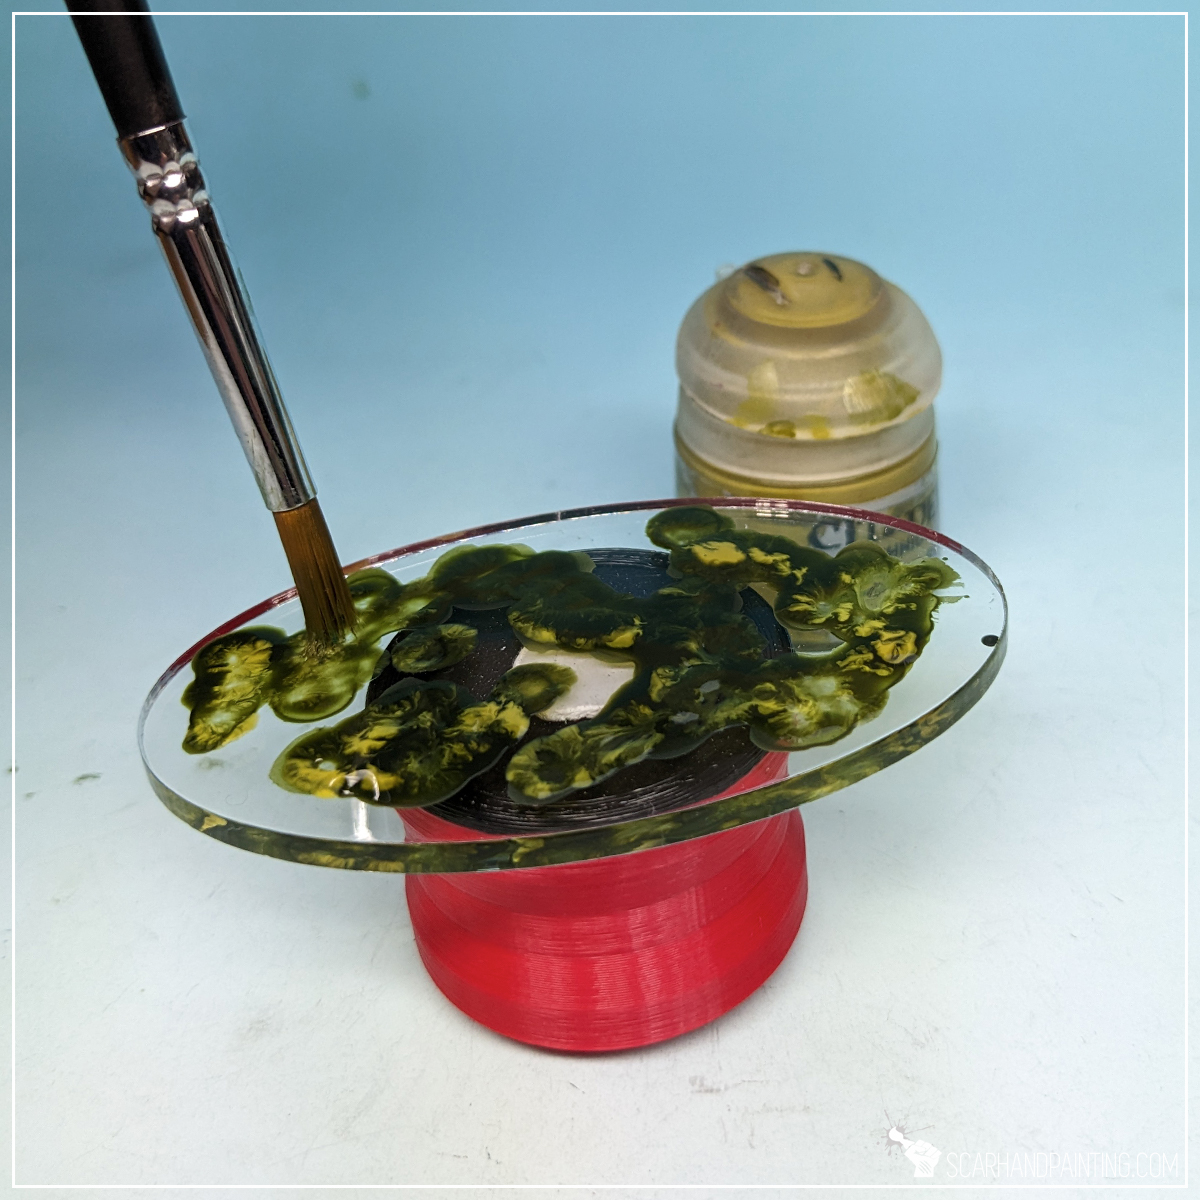

Once the paint dried I decided to add more live to the mix. Using a large, round synthetic brush with a flat tip I stippled wet Vallejo Heavy Khaki paint all over the previous layer.

Next I applied a thick layer of AK Interactive Pacific Blue. I usually go with Atlantic Blue instead, but this time I aimed at a brighter, more translucent effect.

Finally I applied few lines of AK Interactive Water Foam texture. I then used a clean synthetic, flat tip brush to reduce volume and shape thin waves.


And that is basically all. Sargasso, Seaweed, alternative Sandbanks or some sort of awesome new Armada scenery is now complete.
I hope you find this tutorial interesting. Be sure to let me know your thoughts in the comments below or via Facebook or Instagram. I would also appreciate if you considered sharing this content with your friends, who might find it useful. Finally if you are looking for a professional miniatures painting service, be sure to contact me with this contact form. I always reply within 24 hours, after which please check out your spam folder.

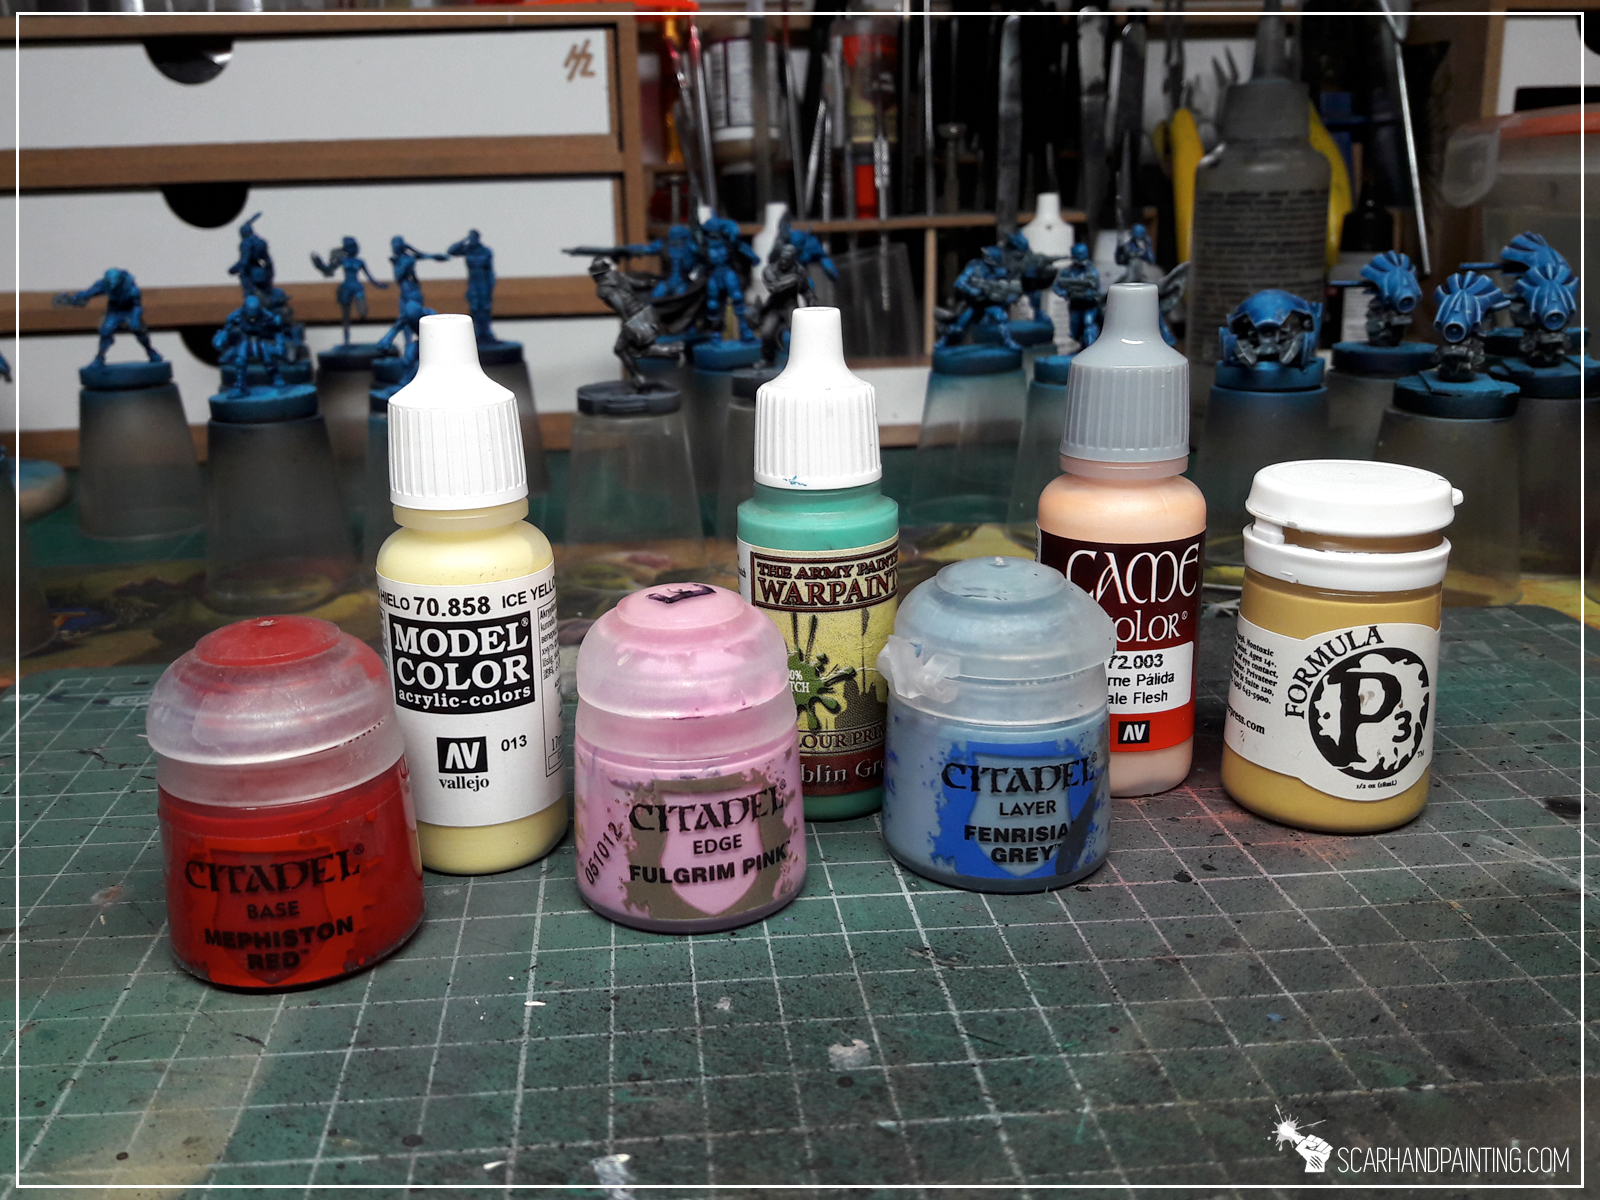
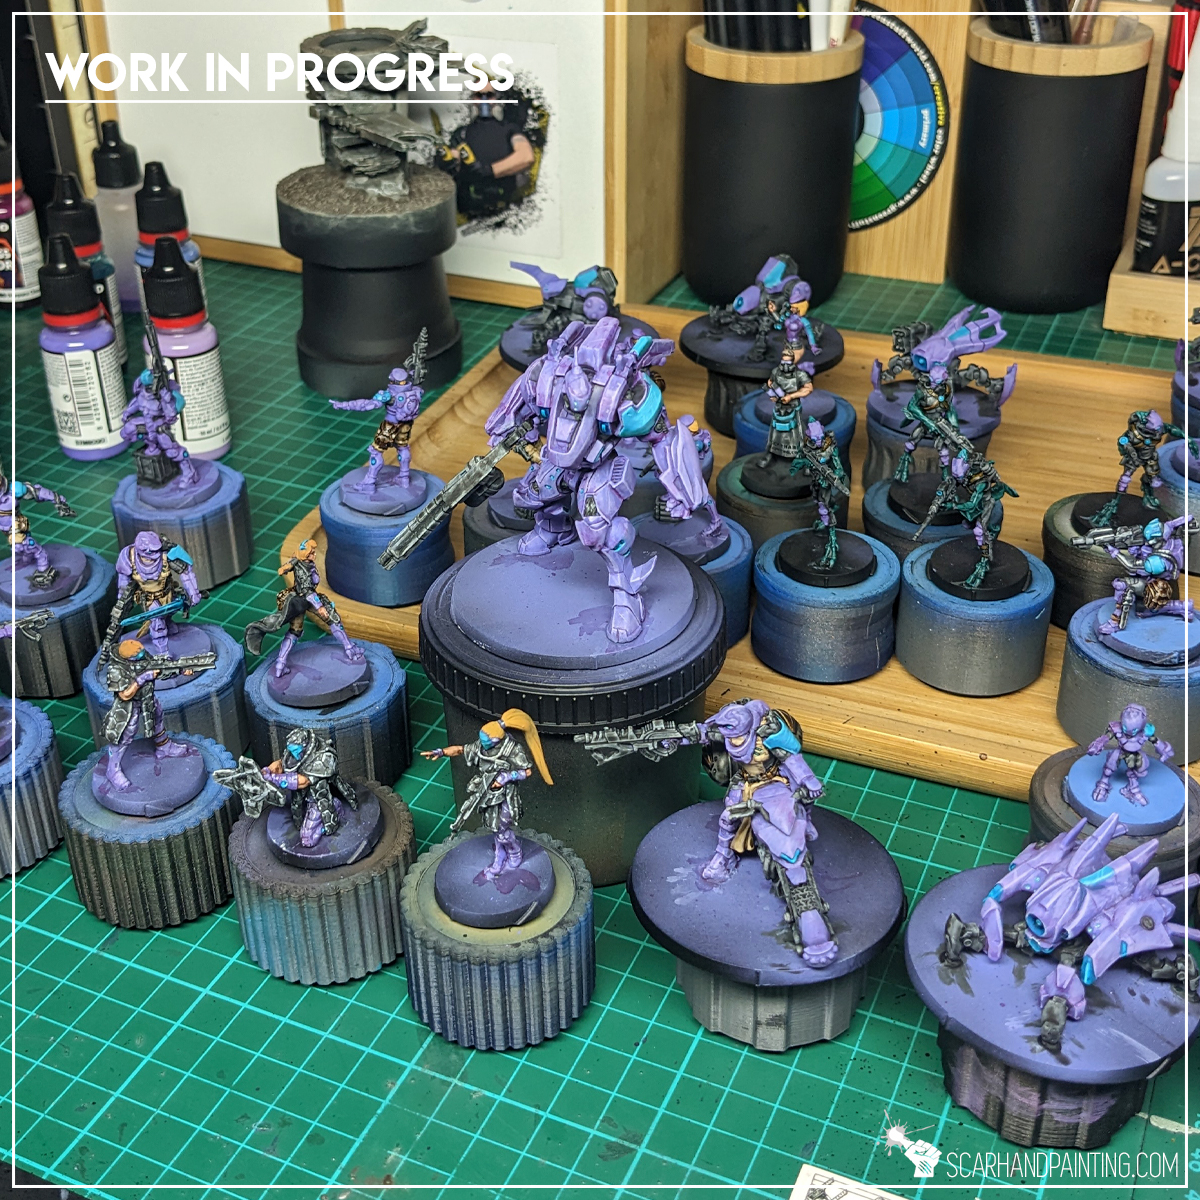
Here are some Color Recipes for Infinity Varuna. Please take note that this is a simple color scheme, not covering multiple overlapping layers and blends in between, that lead to the final product. It is supposed to be used as guideline not a step-by-step.

Purple Armor:
Mix Alien Purple (val) 1:1 Water, *
Lustful Purple (val), flbr
Mix Deep Purple (val xp) 3:1-1:1 Water, wash
Lustful Purple (val), l&p
Mix Lustful Purple (val) 1:1 Warm Grey (val), l&p
Turquoise Armor:
Hydra Turquoise (ap),
Aquamarine (val), flbr
Mix Snake Green (val xp) 1:3 Water, wash
Verdigris (val), l
Verdigris (val), p
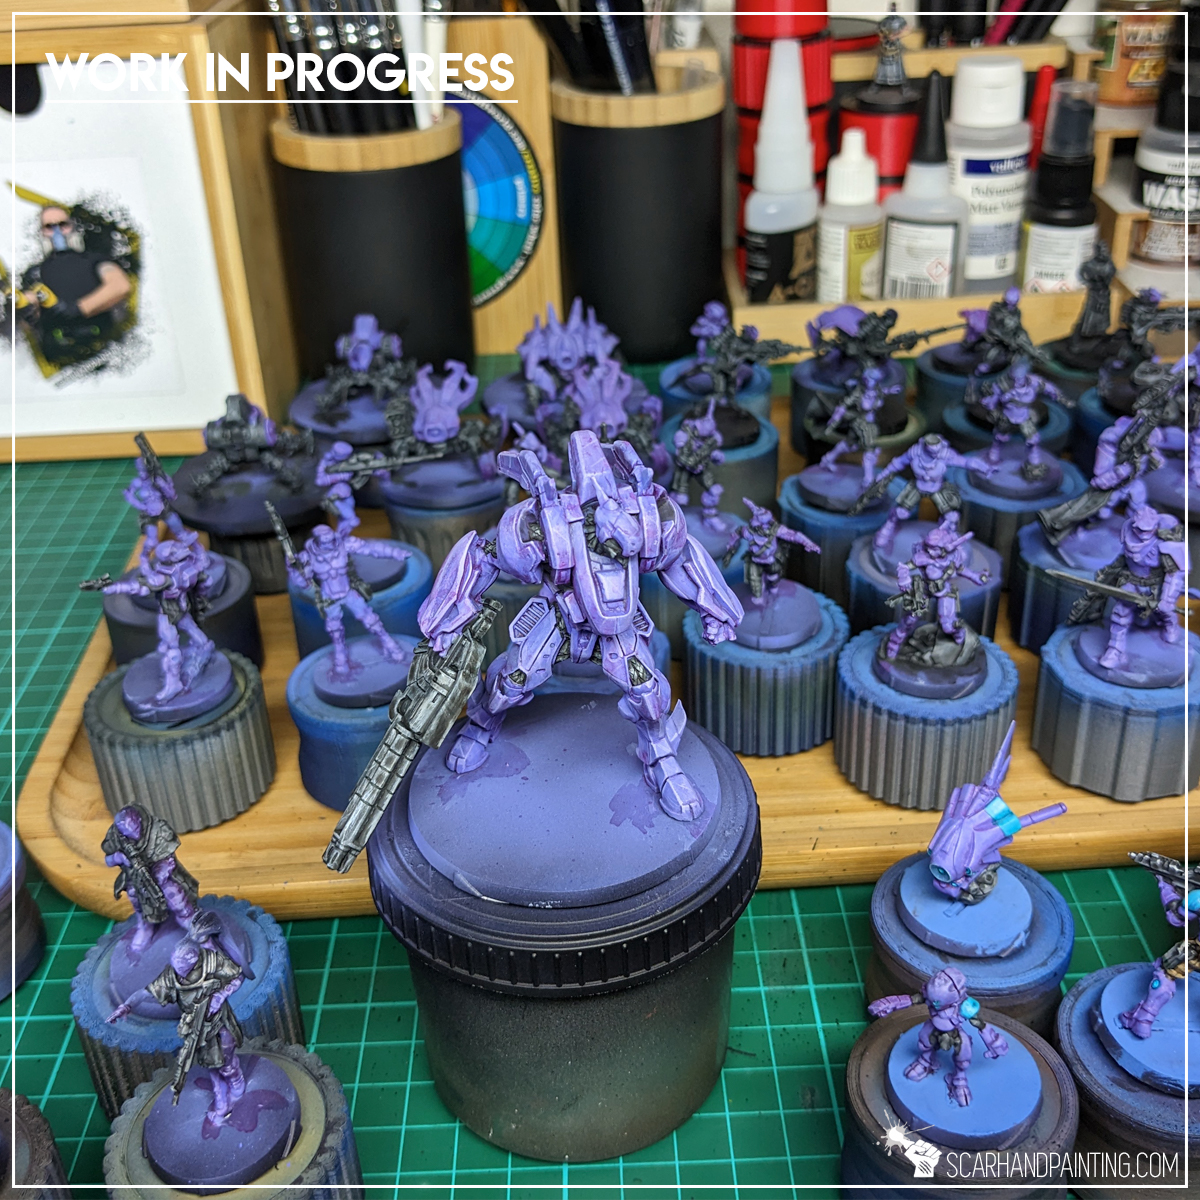
Black Armor:
Panzer Dark Grey (val a),
Fenrisian Grey (gw), flbr
Pallid Wych Flesh (gw), flbr
Dark Tone Ink (ap), wash
Pallid Wych Flesh (gw), l&p
Off White (val), l&p
Skin:
Tan (val),
Mix 1:1 Tan (val), Dwarf Flesh (val a), flbr
Strong Tone Ink (ap), wash
Dwarf Flesh (val a), l&p
Brown:
Gorgon Brown (val),
Khaki (val), flbr
Copper Brown (val xp), wash
Strong Tone Ink (ap), wash
Strong Tone Ink (ap), wash
Lights:
Aquamarine (val),
Verdigris (val), p
Dark Turquoise (val ink), wash
Verdigris (val), p

l&p – lines and points,
l – lines, edge highlights,
p – points,
dl – deep lining,
bl – blend,
gl – glaze,
drbr – drybrush,
flbr – flatbrush,
lobr – loaded brush,
stpl – stippling,
*Airbrushed (with multiple layers and mixes)
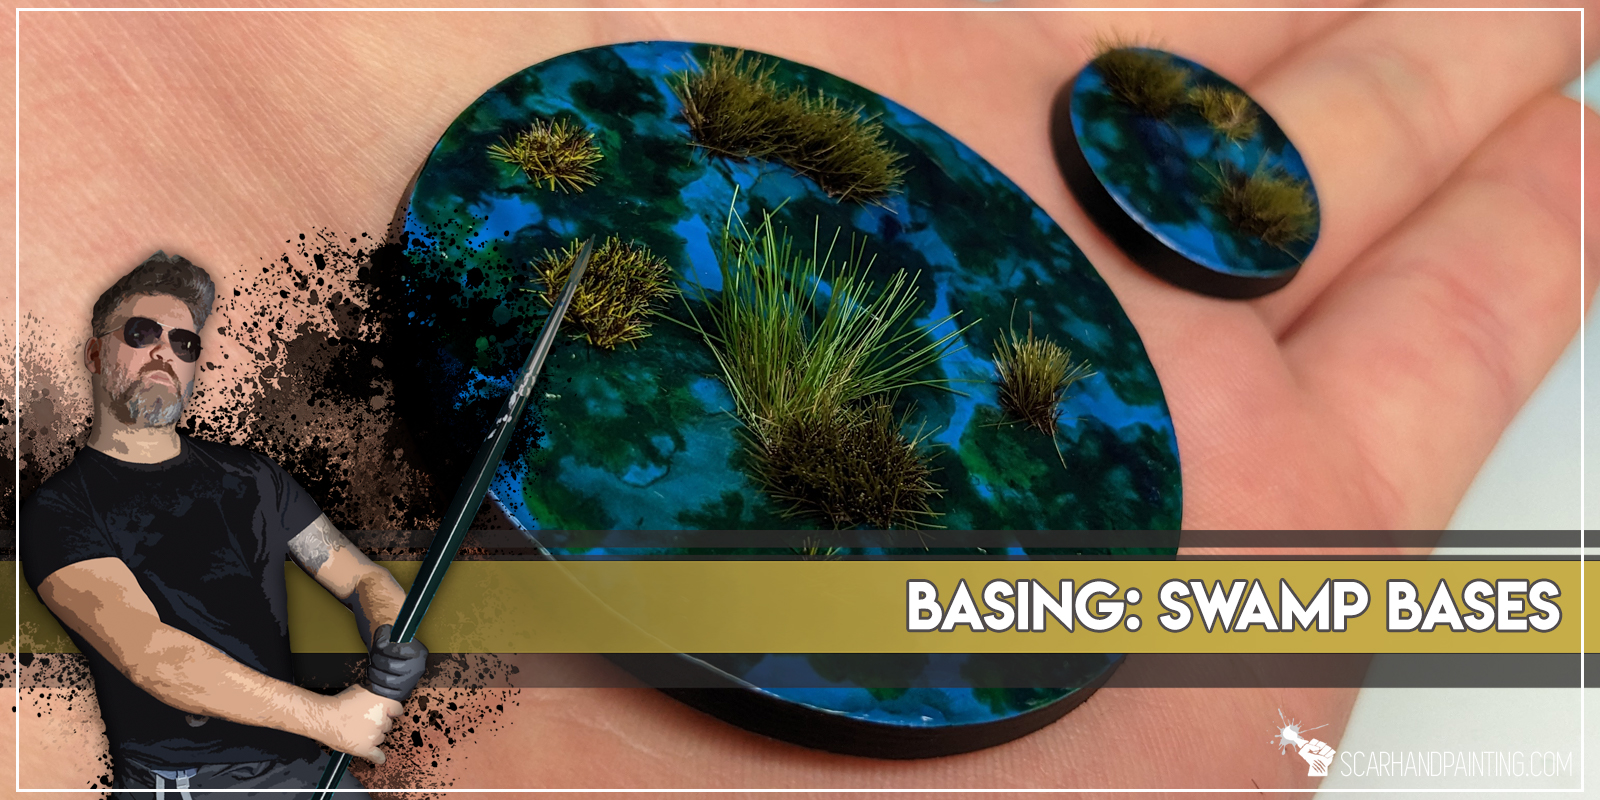
Welcome to Painting Swamp Bases tutorial. Here I will take you on a Step-by-step trip through the process of creating Swamp Bases the same way as seen at: Gallery: Infinity Varuna.
Before we start, some notes:

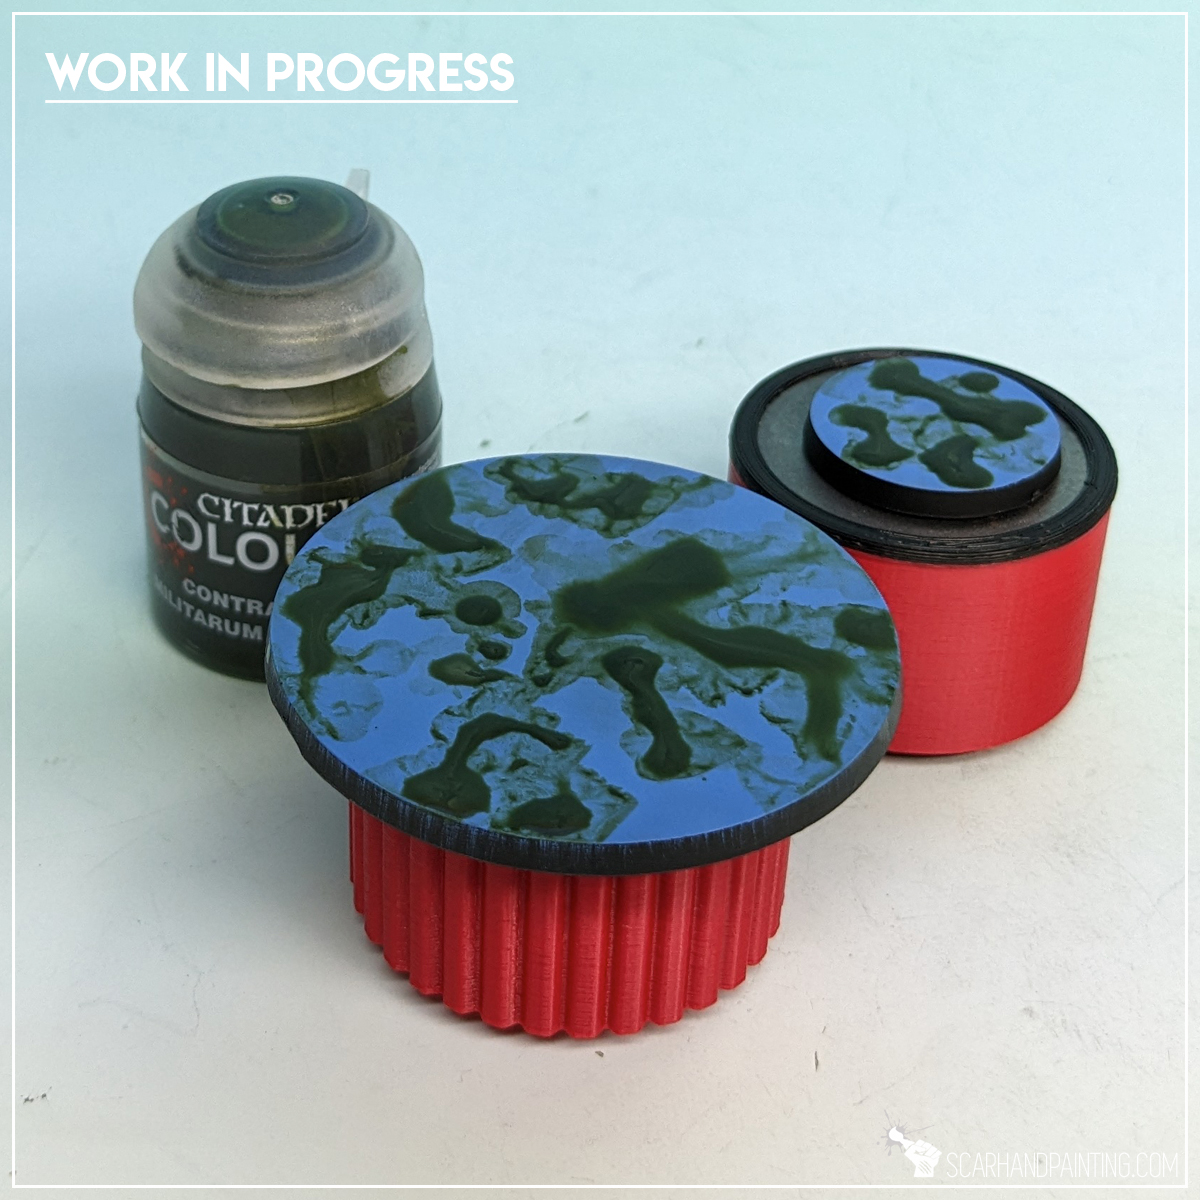
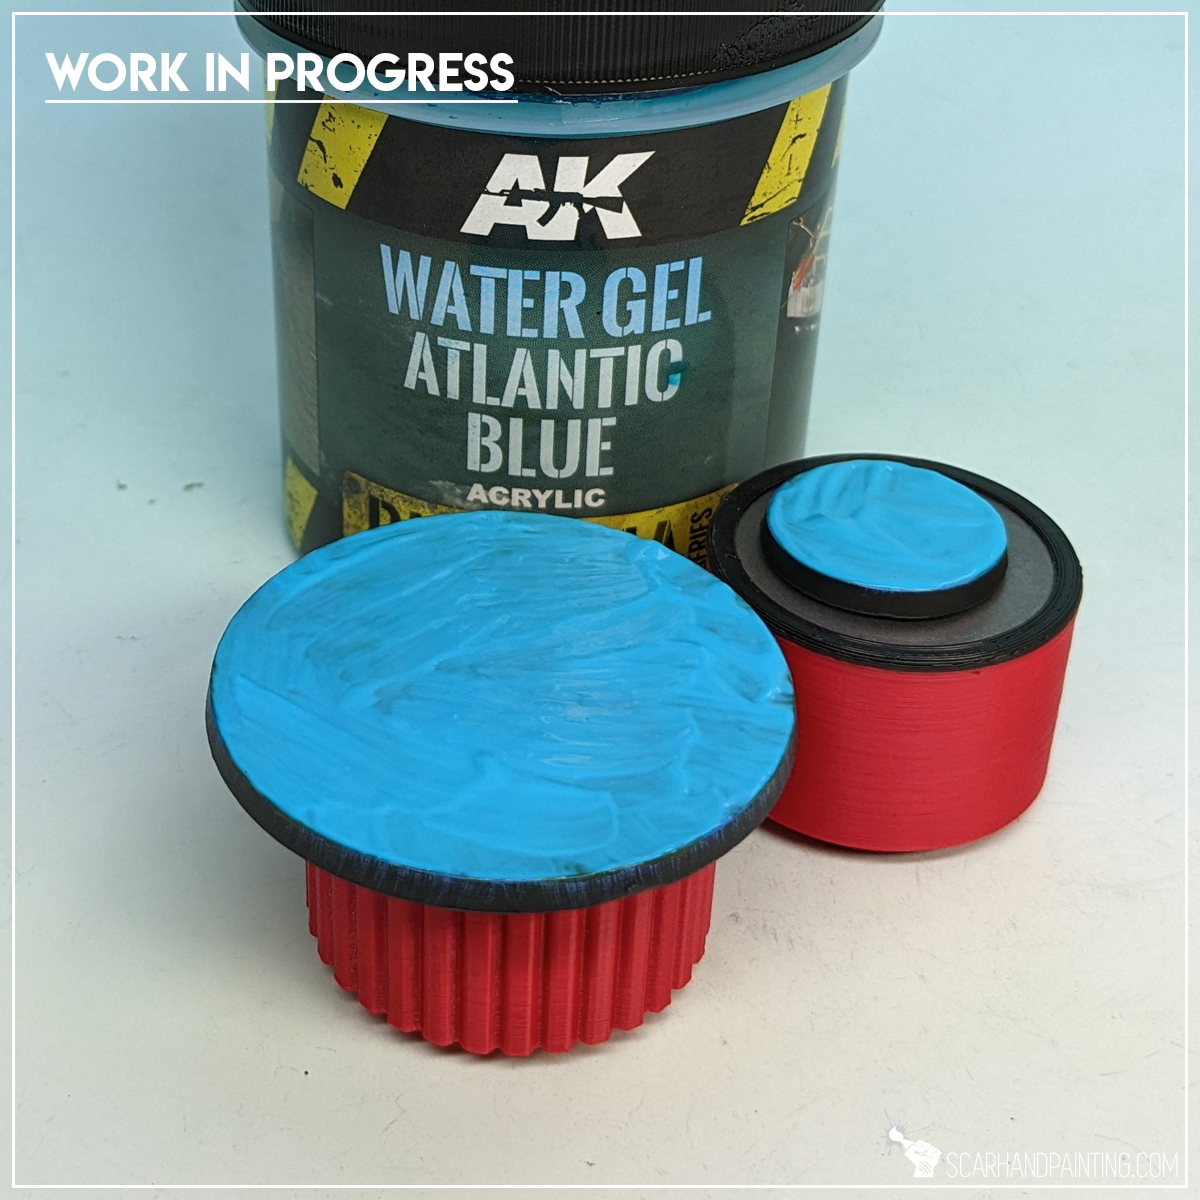
Step one: Undercoat
I started with a relatively smooth layer of Vallejo Elfic Blue. Any similar color would fit and I encourage you to experiment.
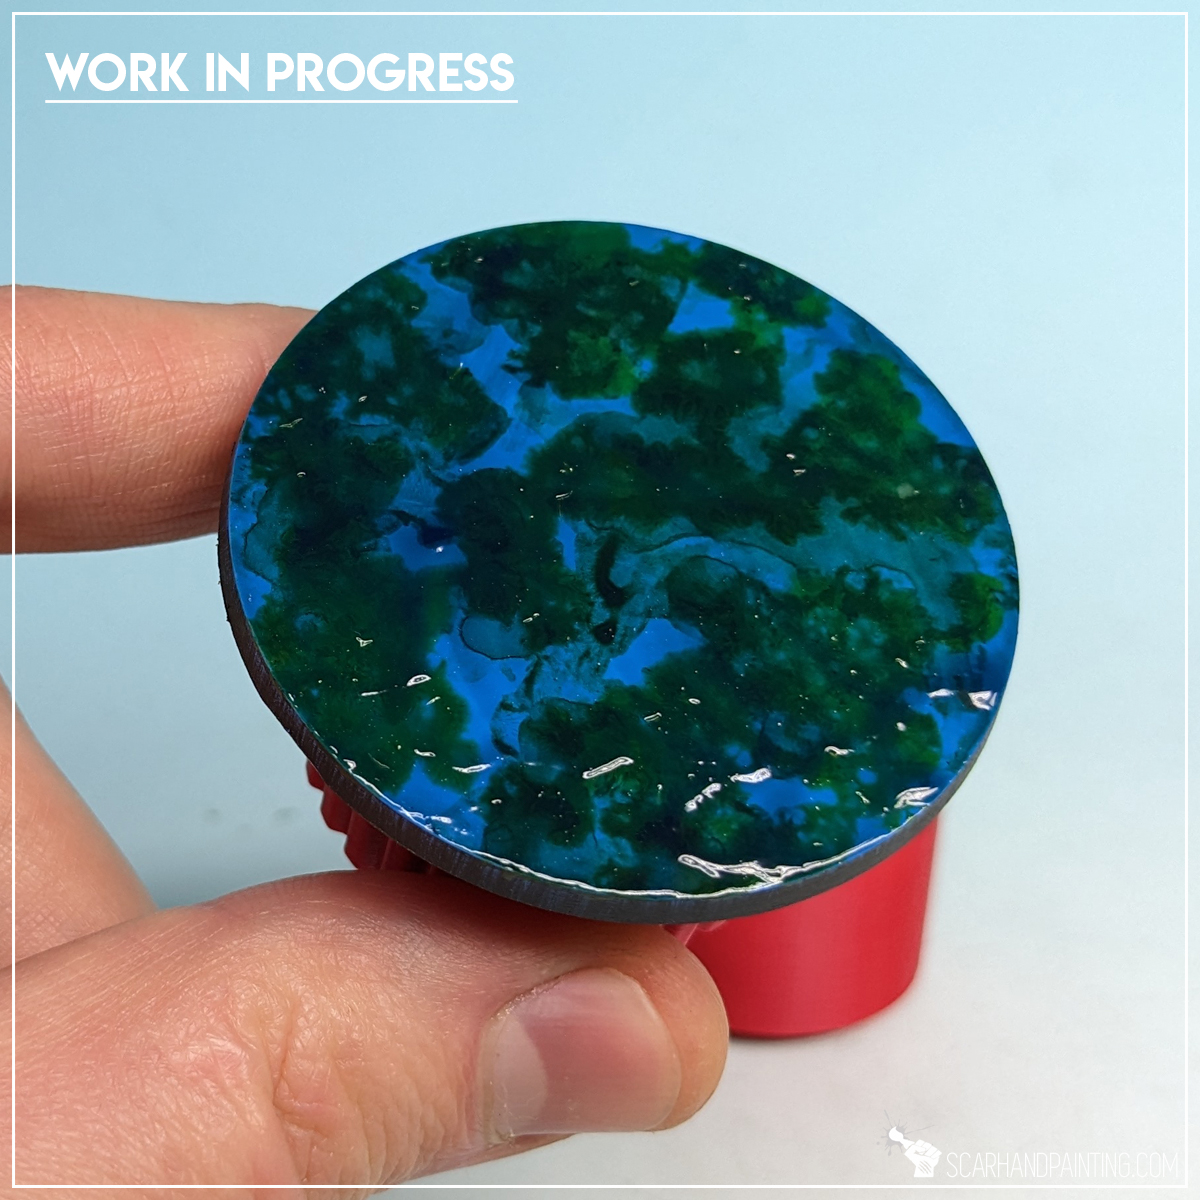
Step two: Underwater Plants
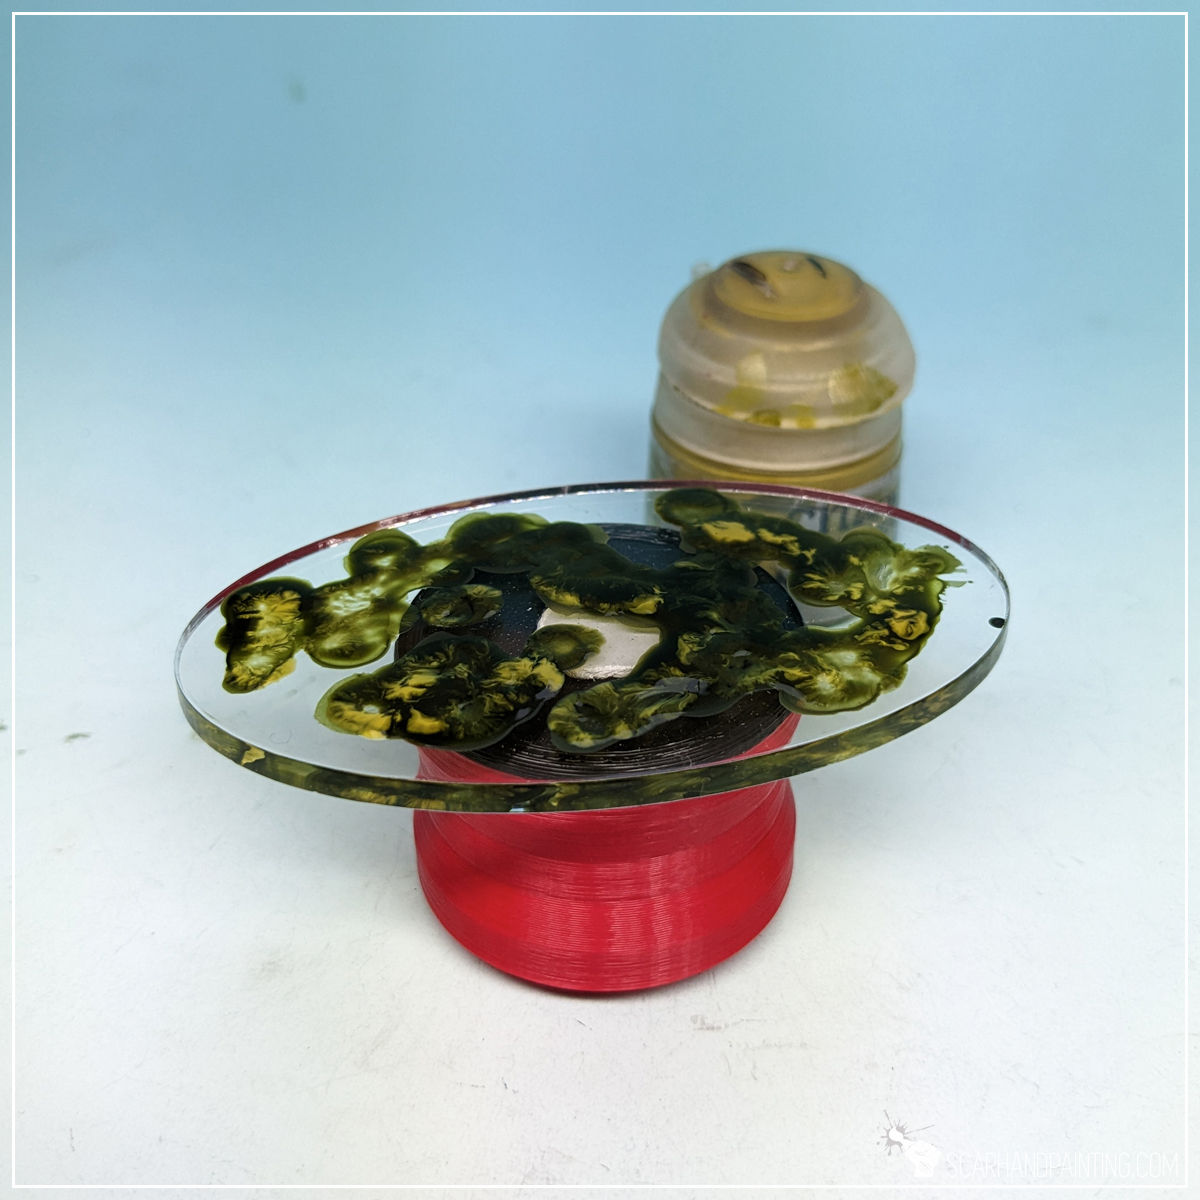
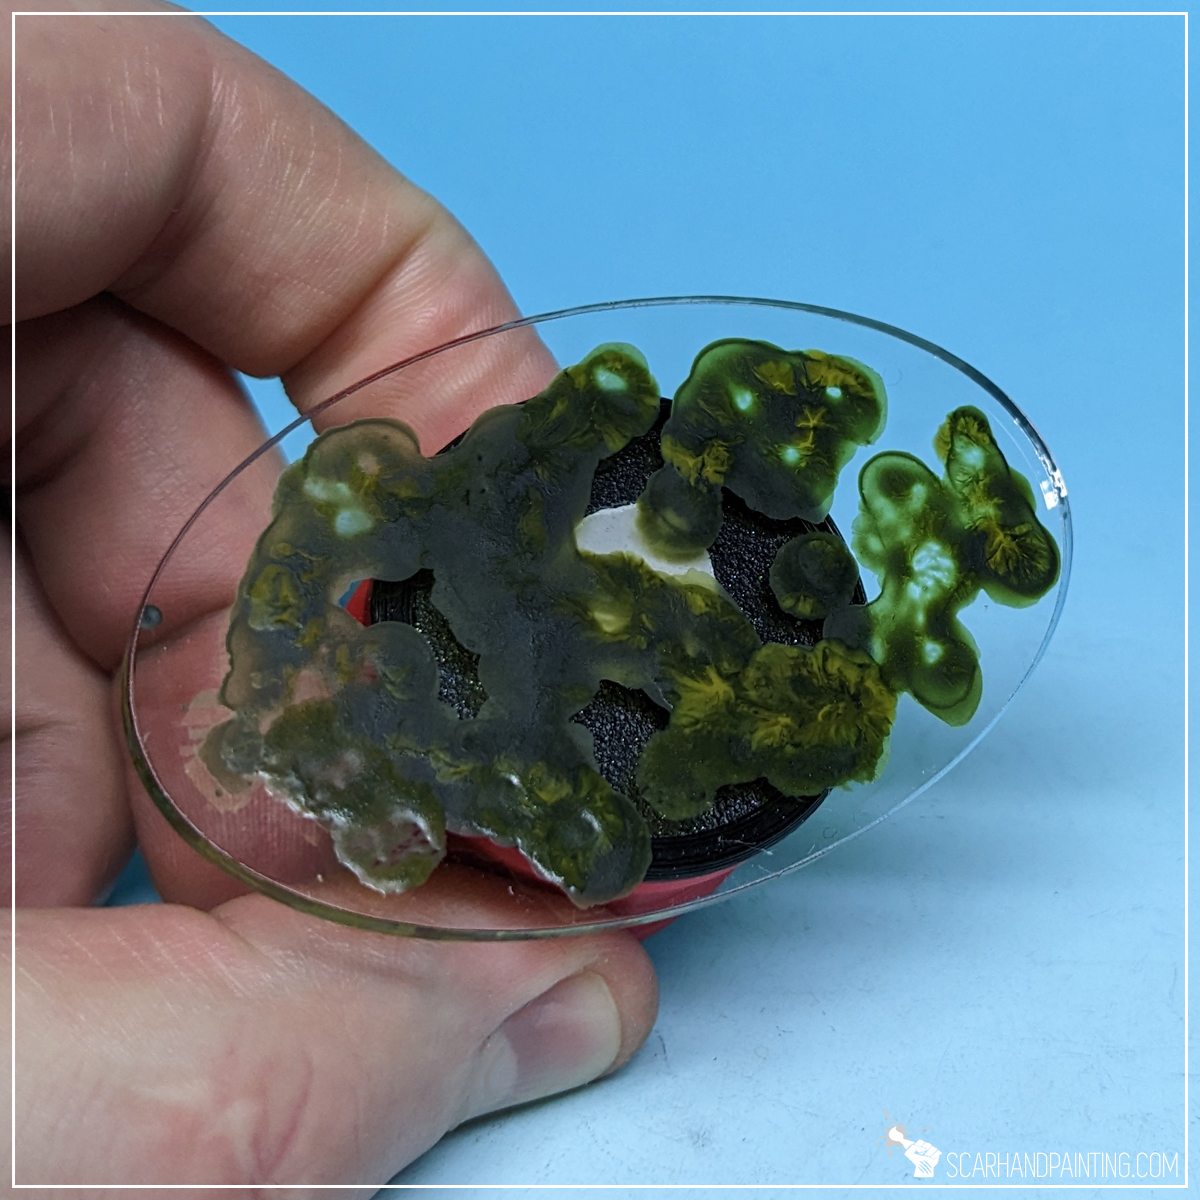
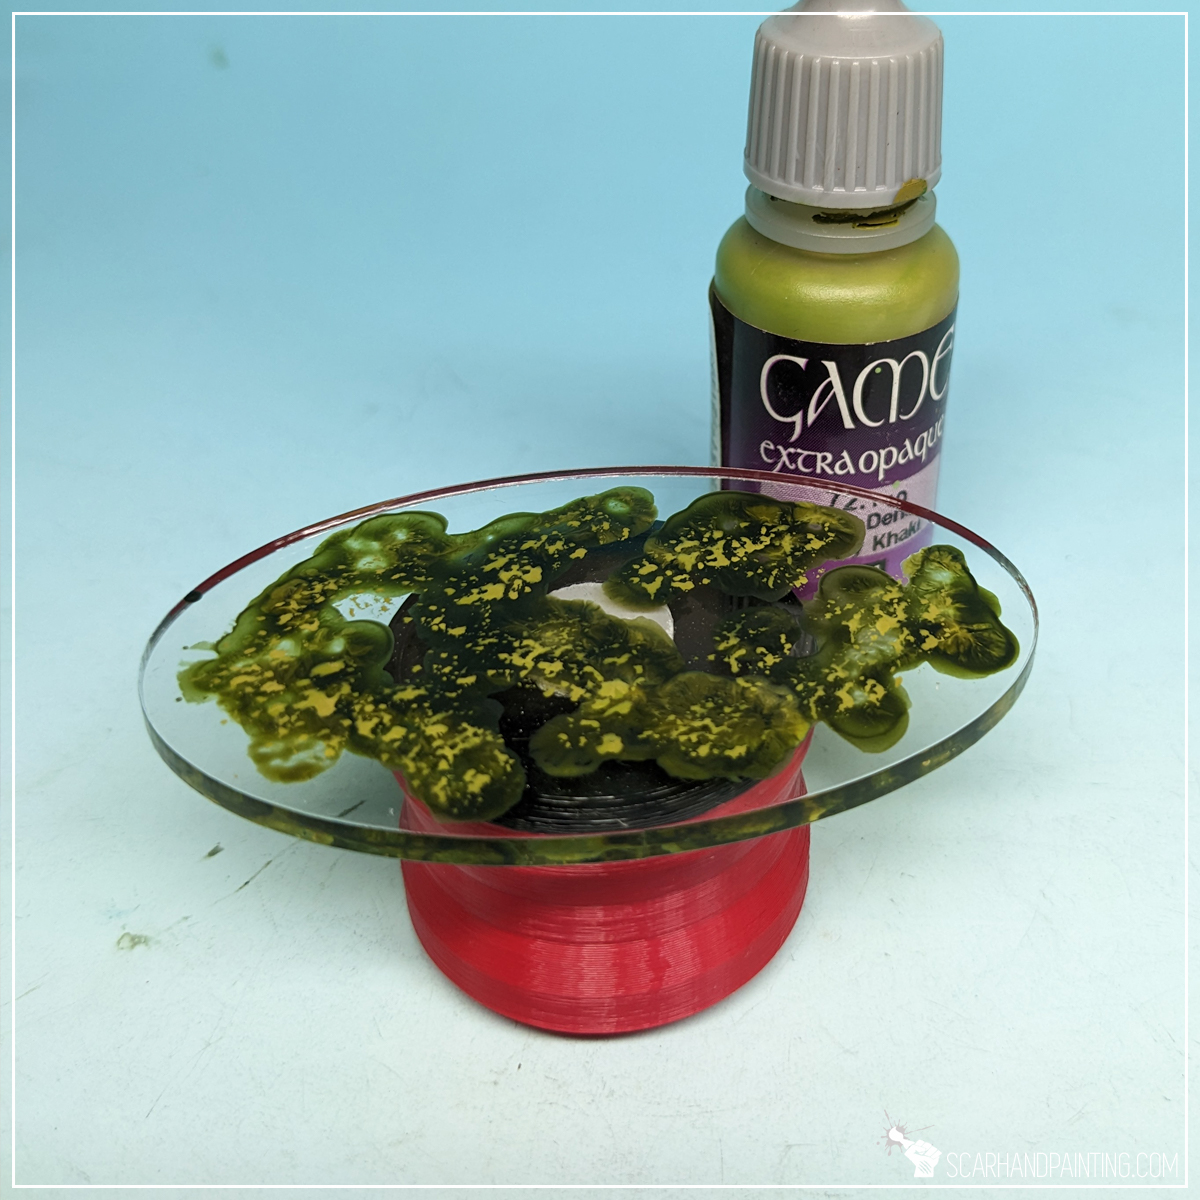
Next I applied spots of Games Workshop Militarum Green Contrast mixed with a bit of water, followed short by Games Workshop Nurgle’s Rot on top. I used relatively large, soft brush to ‘stipple’ Nurgle’s Rot on top of still wet Militarum Green. These paints do not mix well, precipitating and creating interesting patterns in result.
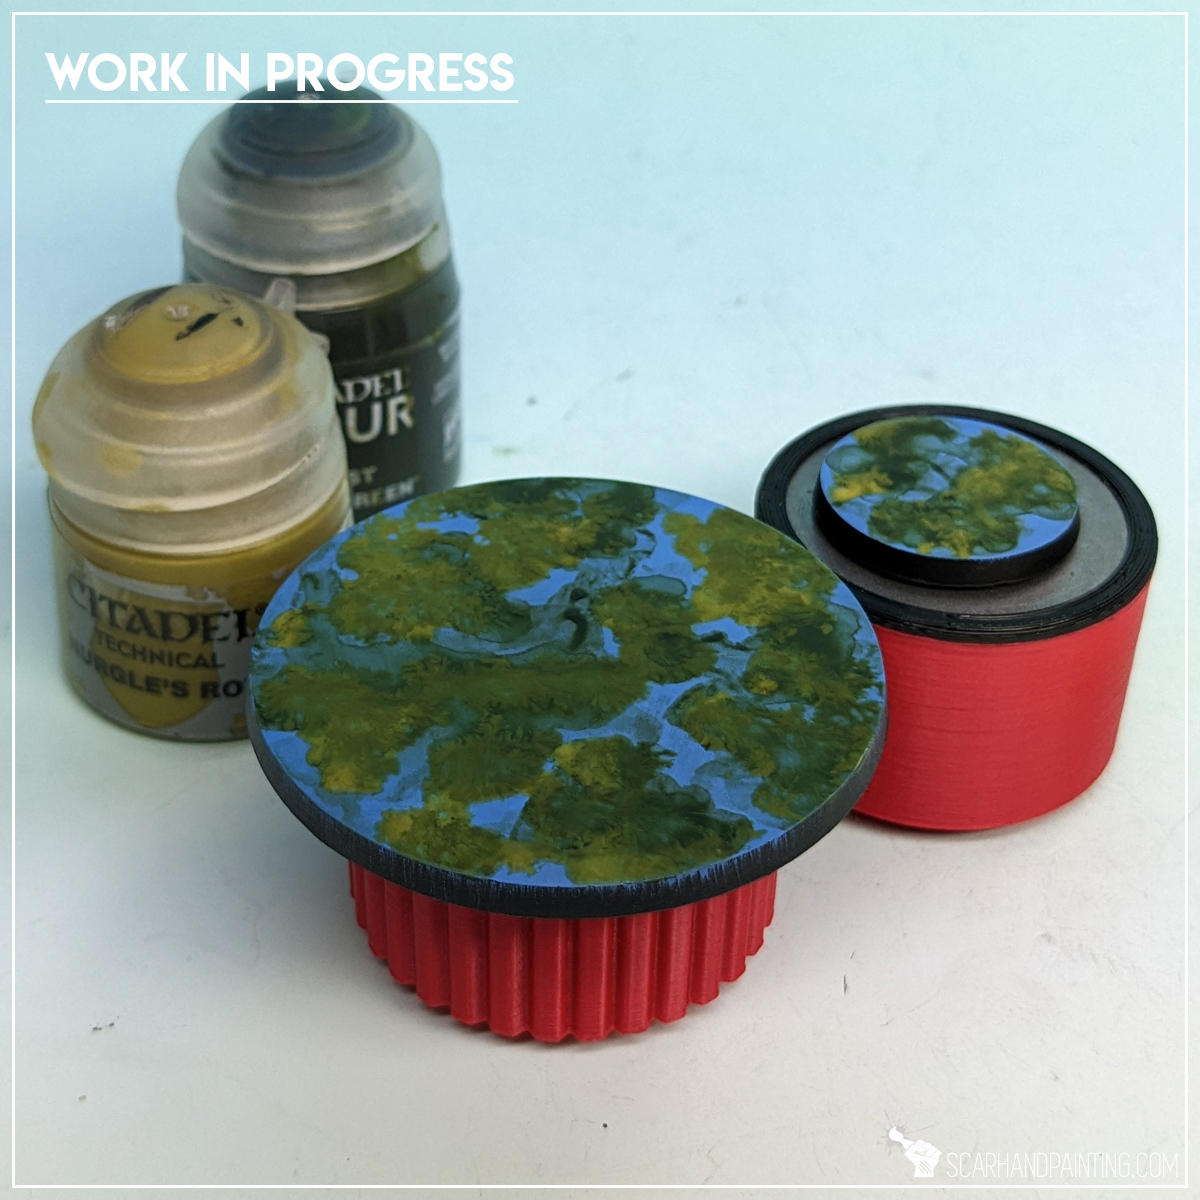
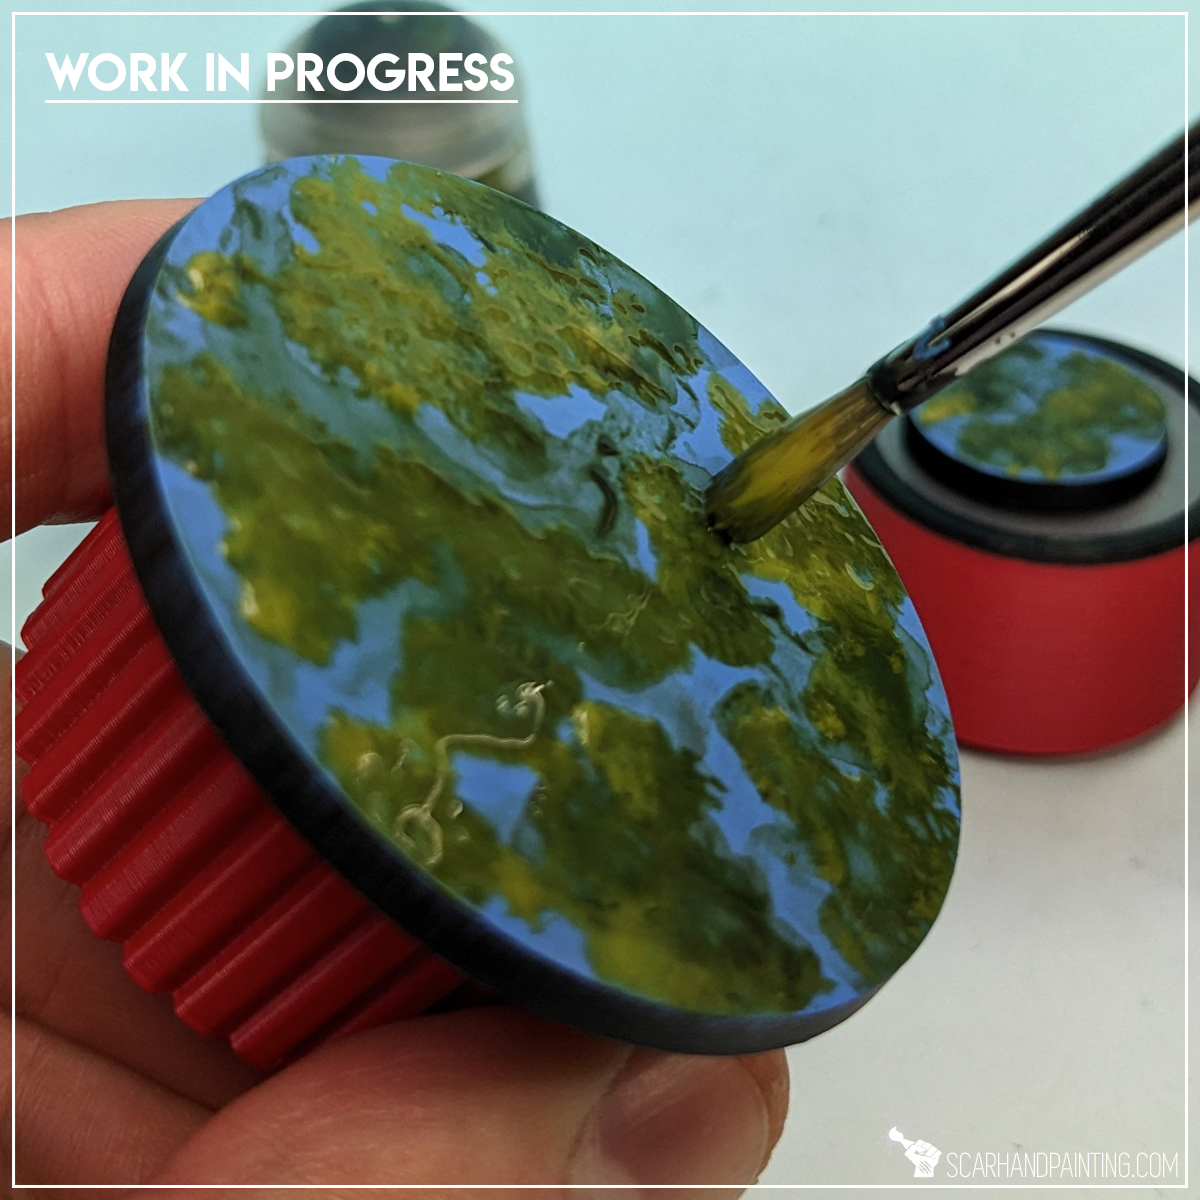
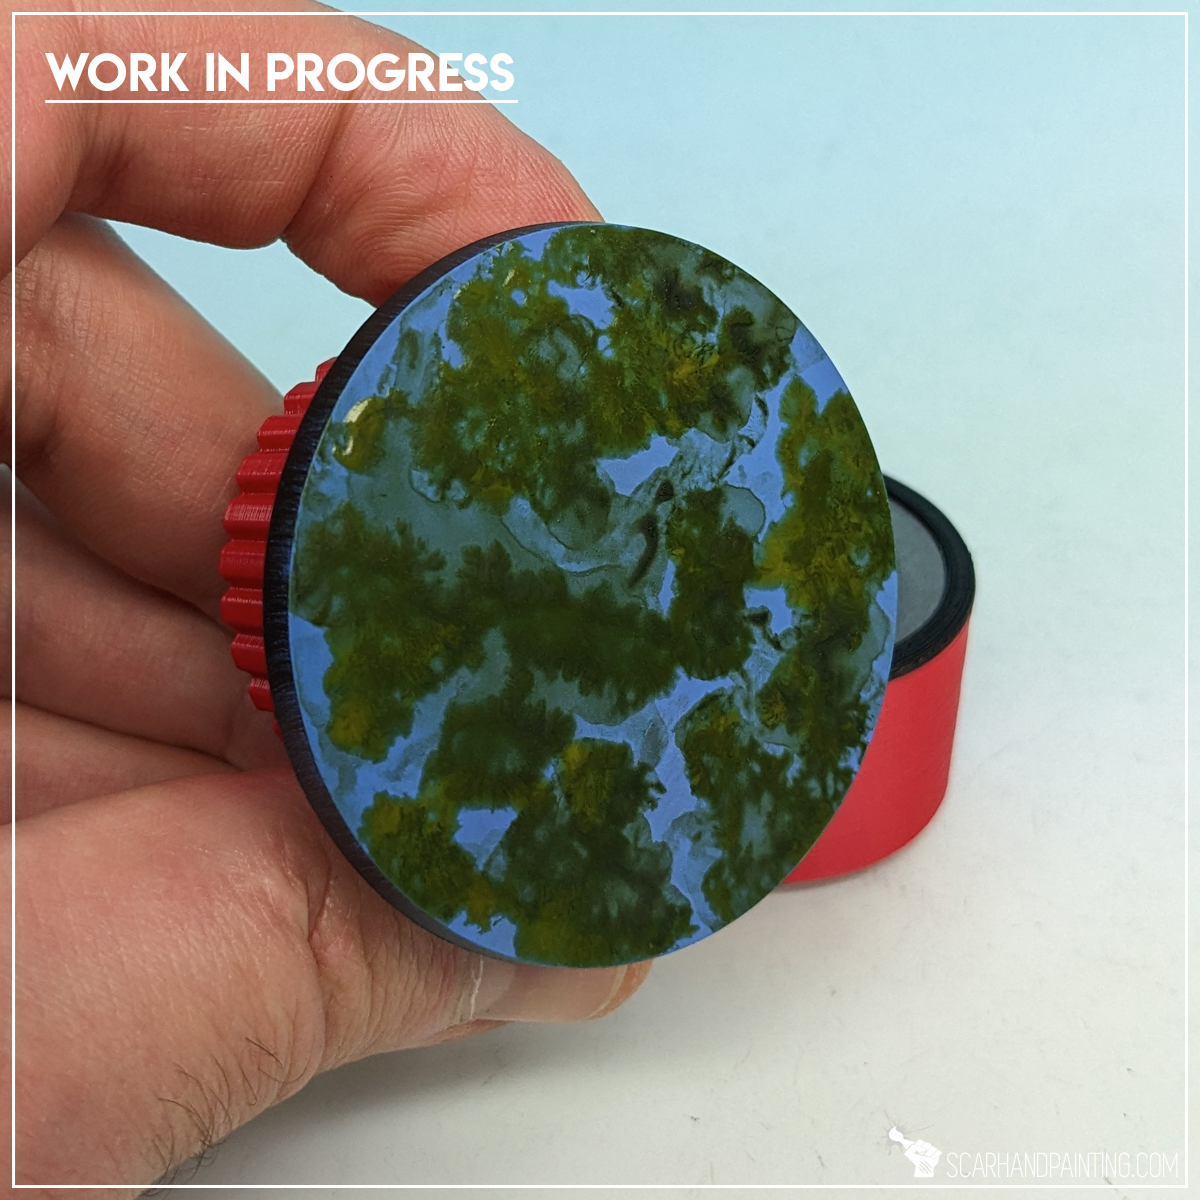
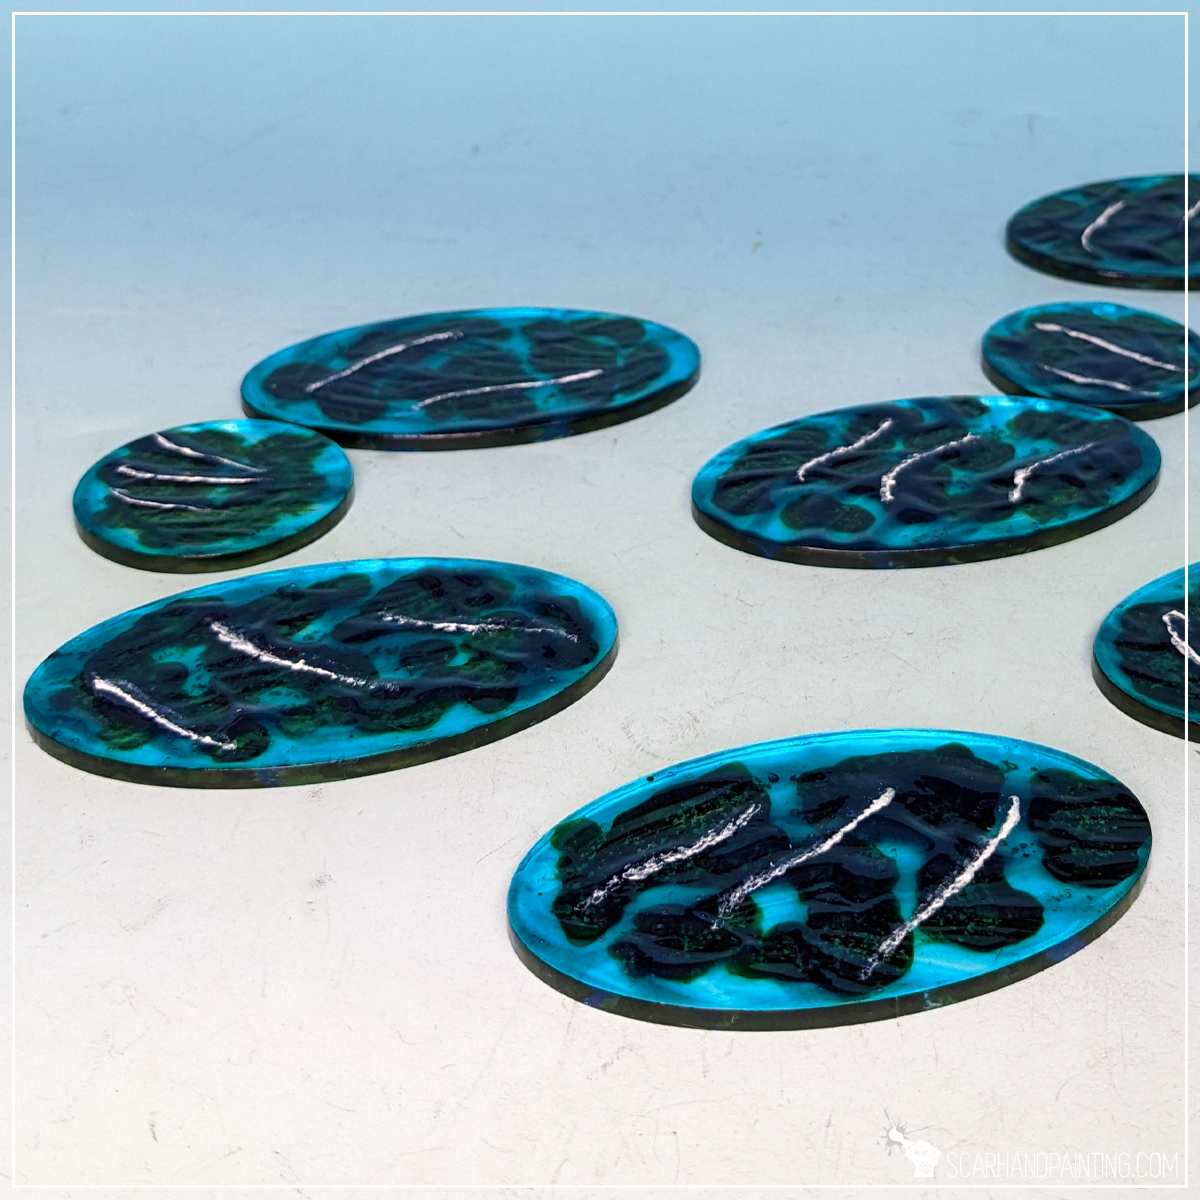
Step three: Water Effect
Once the previous layer dried, I covered entire base with a thick layer of AK Interactive Atlantic Blue texture and left it for half an hour to dry well.
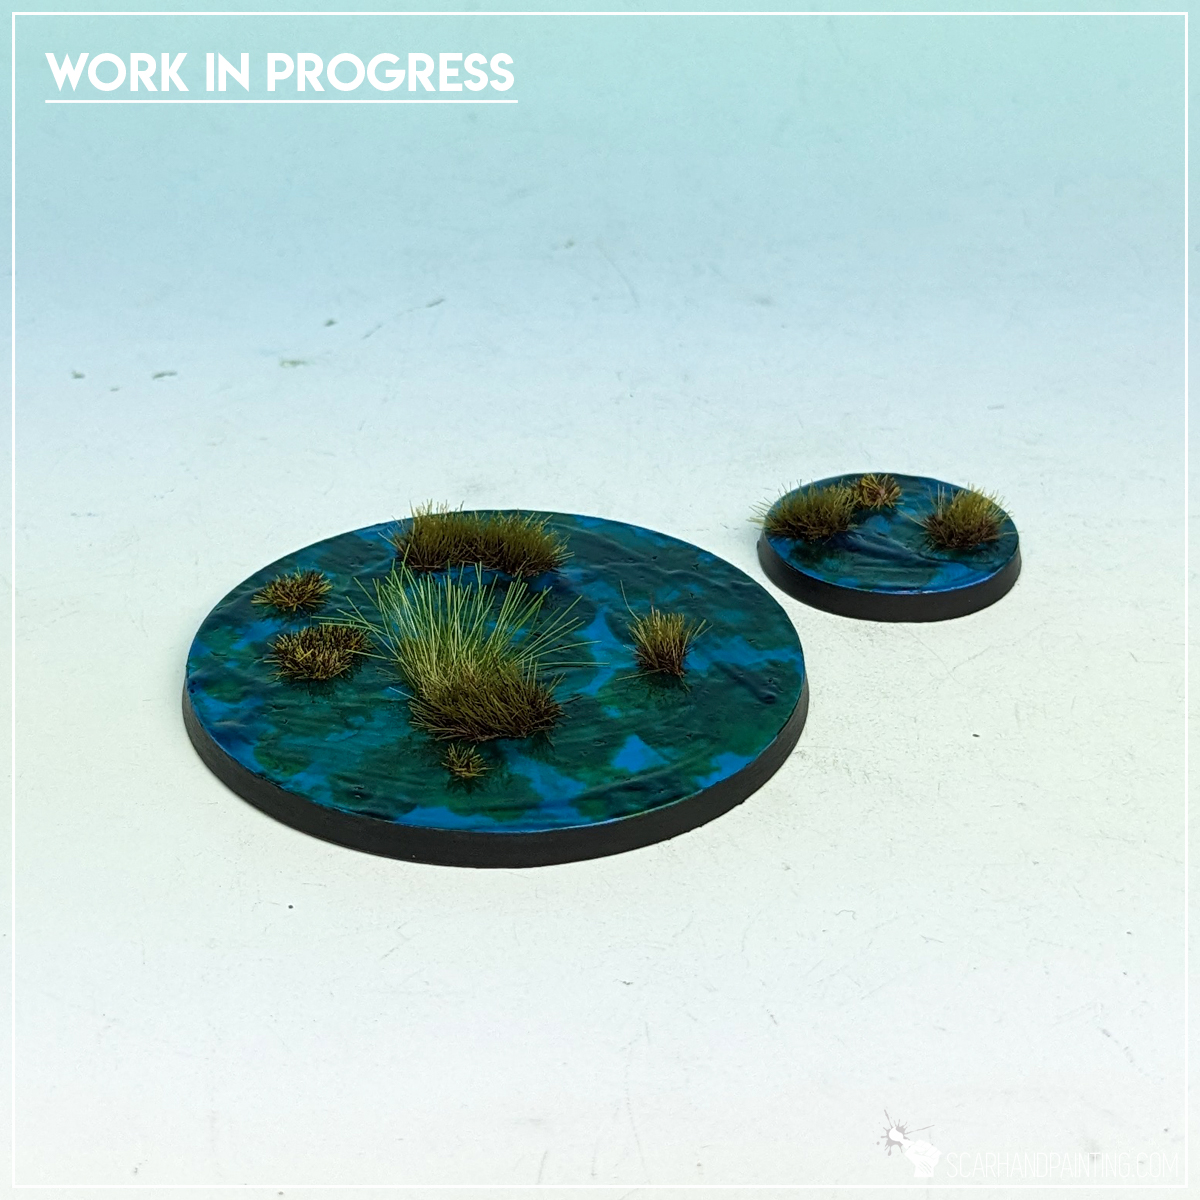
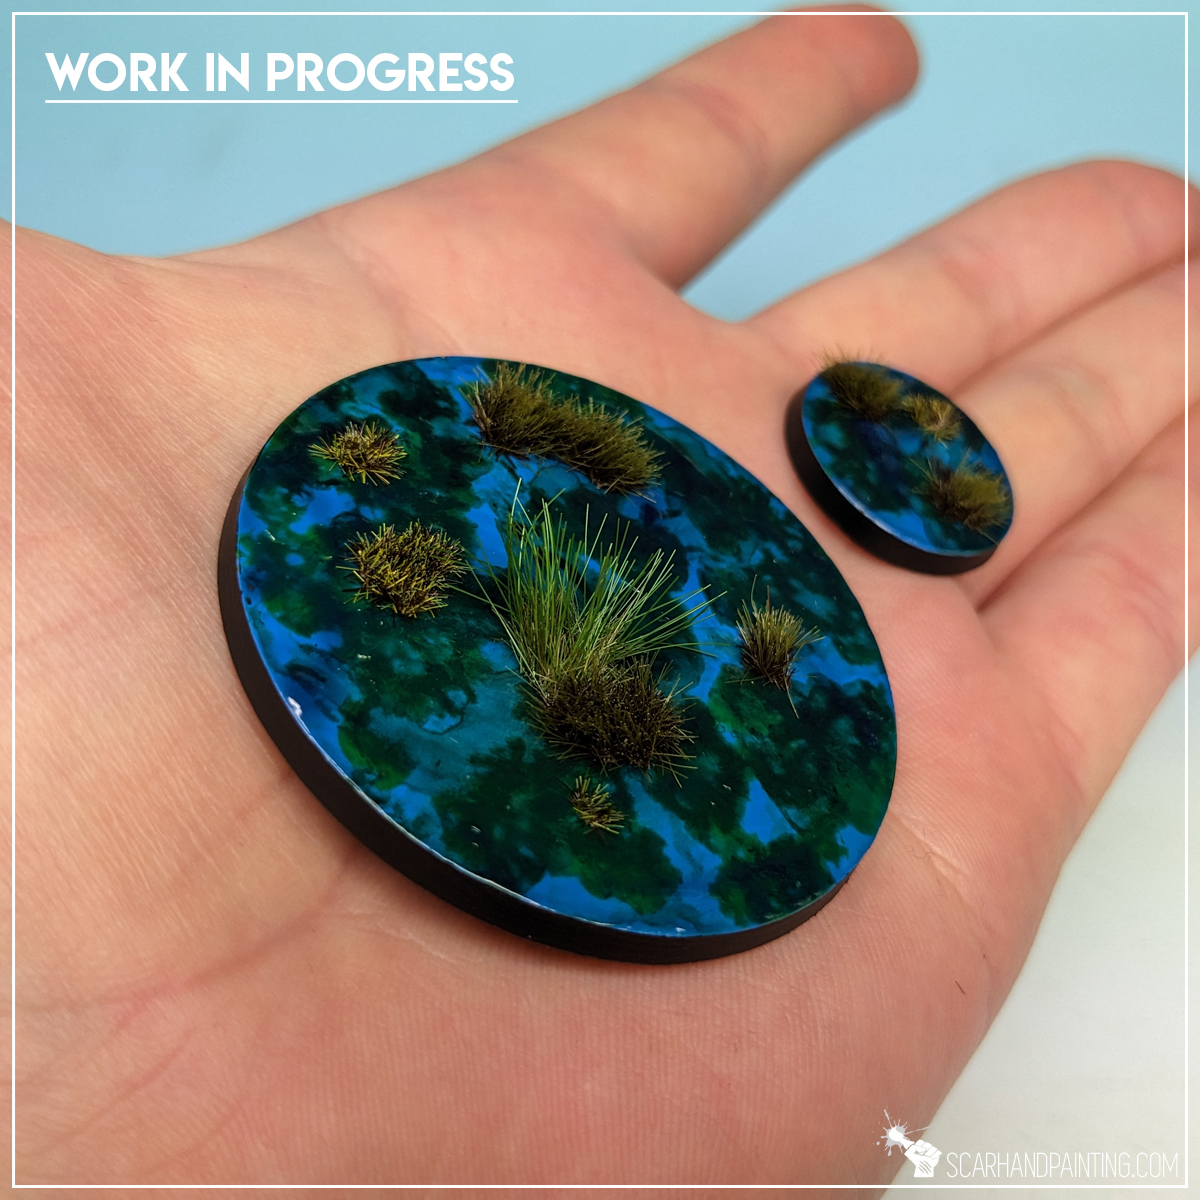
Step four: Tufts
Finally, (after some black edge ninja painting) I applied some tufts. I used a mix of Gamers Grass Swamp and Dark Moss tufts to add volume to the base.

As you can see the process is super easy but provides an interesting, eye catching final result. I strongly suggest you take the process further and experiment with different colors and overall volume. I believe there is a lot of potential in this method.
I hope you find this tutorial interesting. Be sure to let me know your thoughts in the comments below or via Facebook or Instagram. I would also appreciate if you considered sharing this content with your friends, who might find it useful. Finally if you are looking for a professional warhammer 40k miniatures painting service, be sure to contact me with this contact form. I always reply within 24 hours, after which please check out your spam folder.