- contact@scarhandpainting.com


Today I’m going to reveal one of my dearest secrets: how Super Glue and Basing Glue can be used to make some fantastic, crazy, awesome stuff! I have invented it by accident when I was a kid, used it since and love it for both simplicity and awesome texture effect. In this easy, step-by-step tutorial I will show you how to produce your own Overgrown Bases!

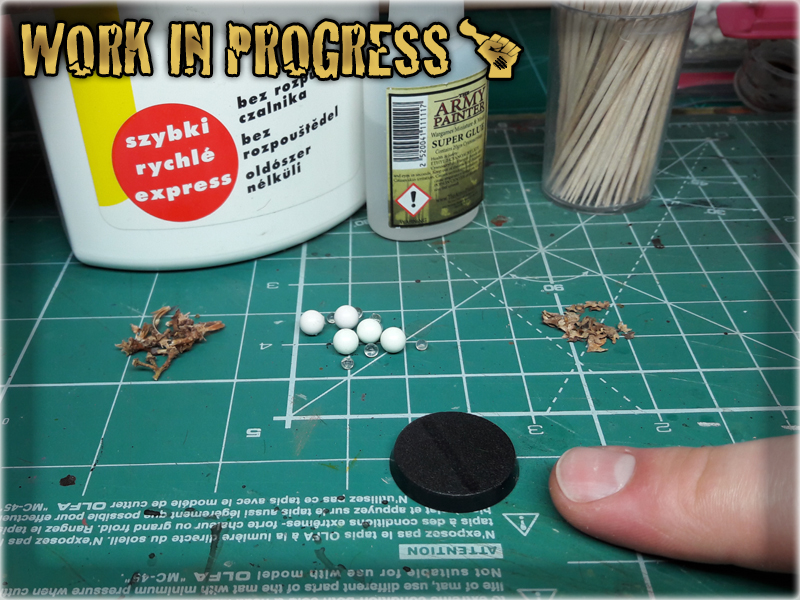
*I purchased a huge pack of these for approximately 1€,
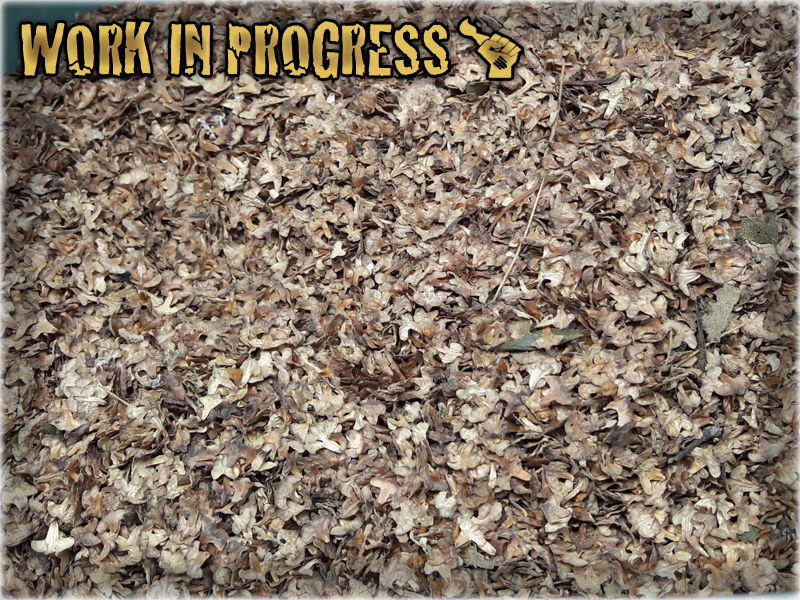
**Once you eat up all the goodie goodie grapes, you have like a bunch of wooden leftovers. Once dried out these are awesome bor basing miniatures.
***I use either Air Soft Gun ammuniton, or for smaller calliber moist absorber balls obtainable with every new pair of shoes. Just ask your gf to dig out one of her shoeboxes, there should be a small paper bag filled with tiny, translucent balls in it.
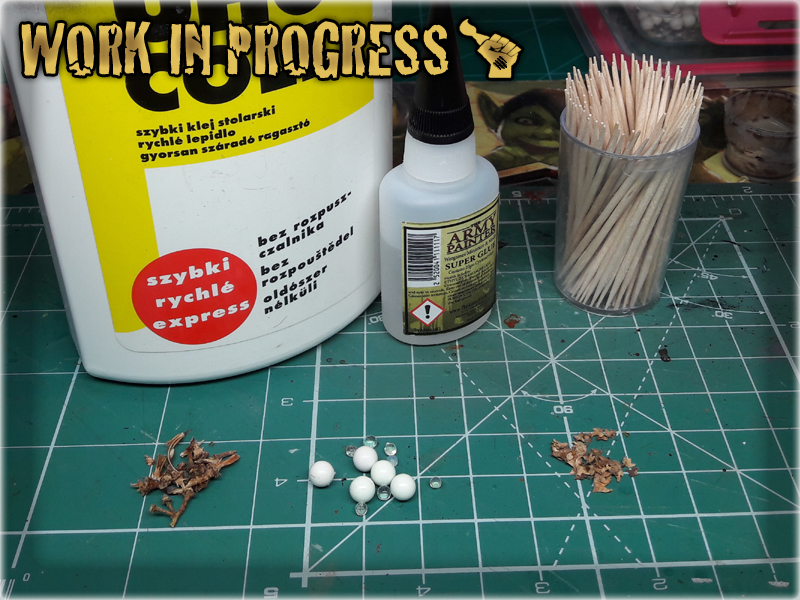
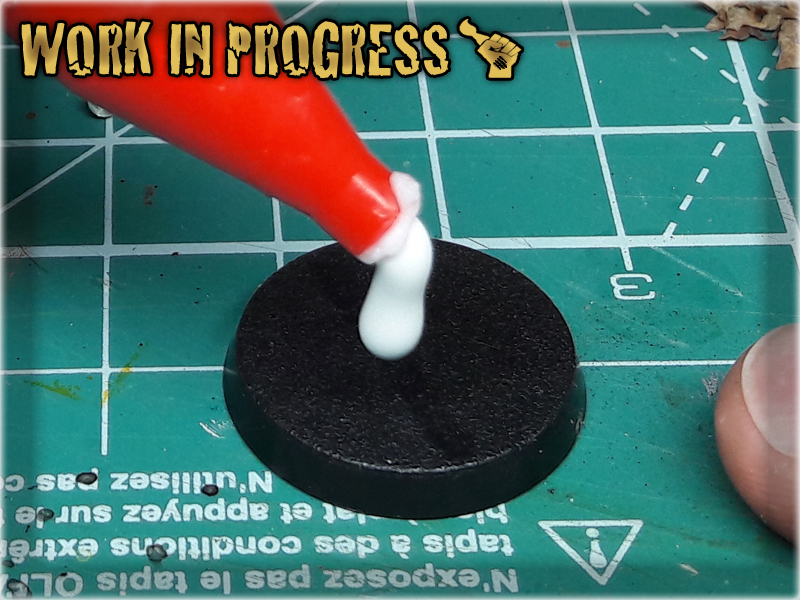
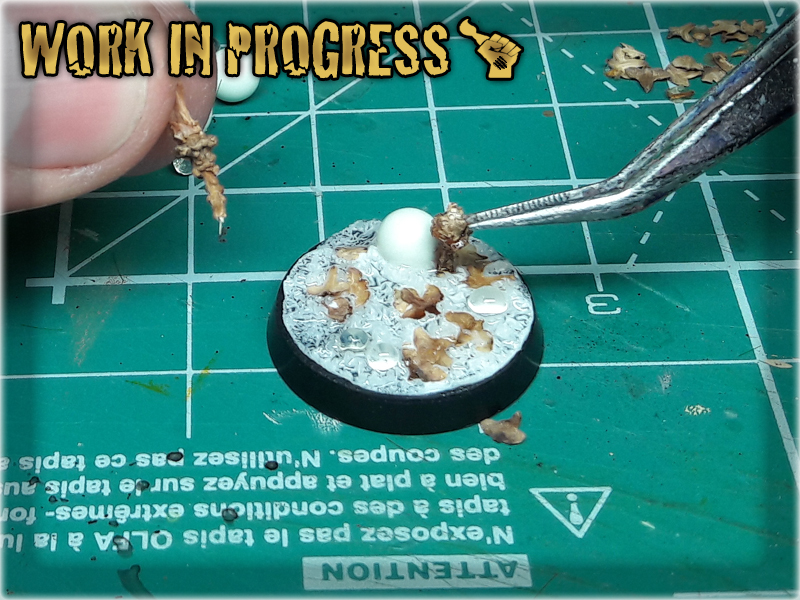
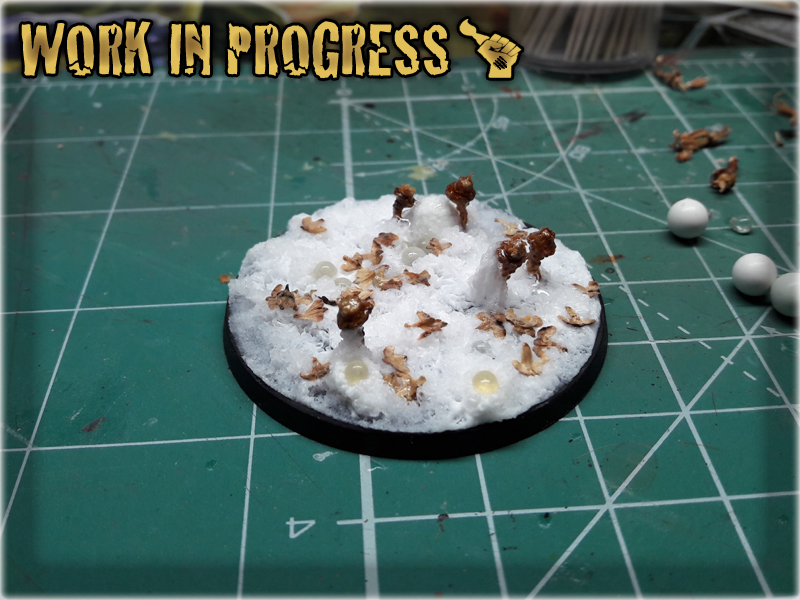
1 I started by applying basing glue all over the base. No need to make it smooth, just enough not to leave any empty spaces.

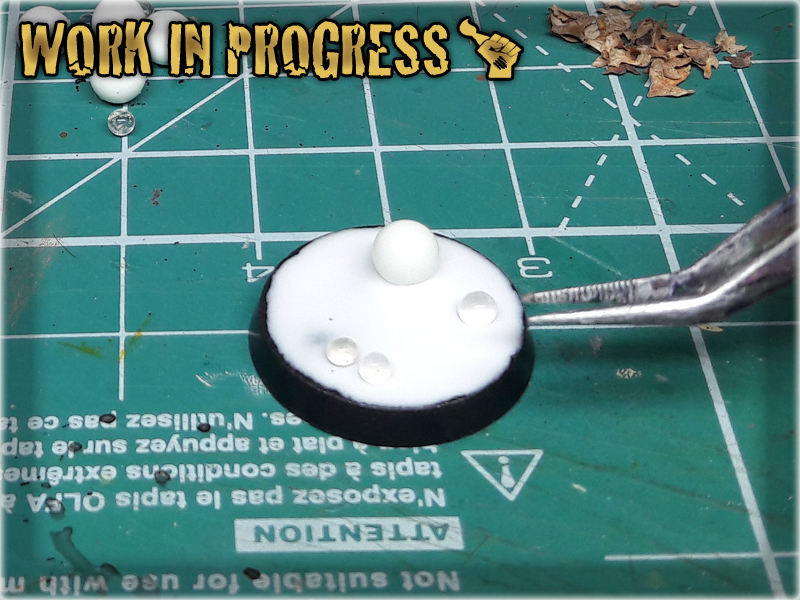
2 I then dropped some of the tiny balls and Birch-tree seeds over the wet glue.
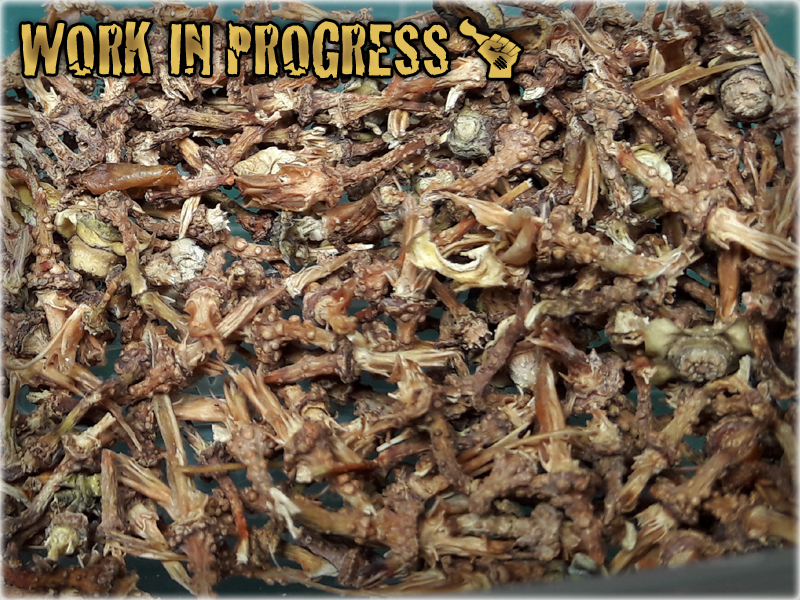
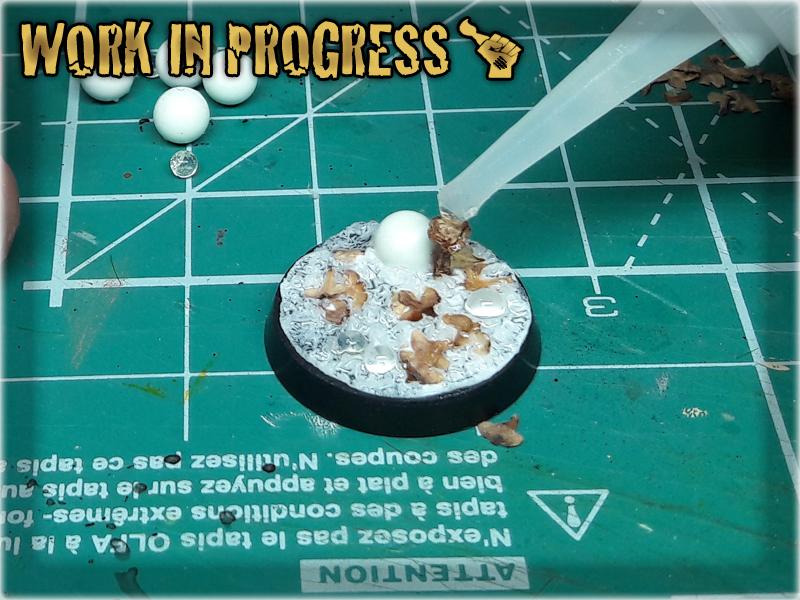
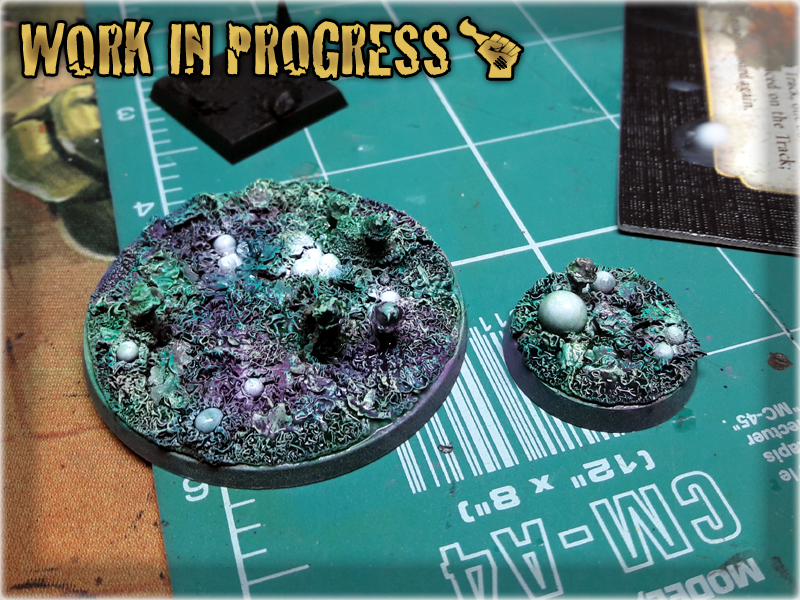
3 Here's where MAGIC begun. I covered entire base with Super Glue and watched as it was warped before my eyes in a matter of merely seconds.


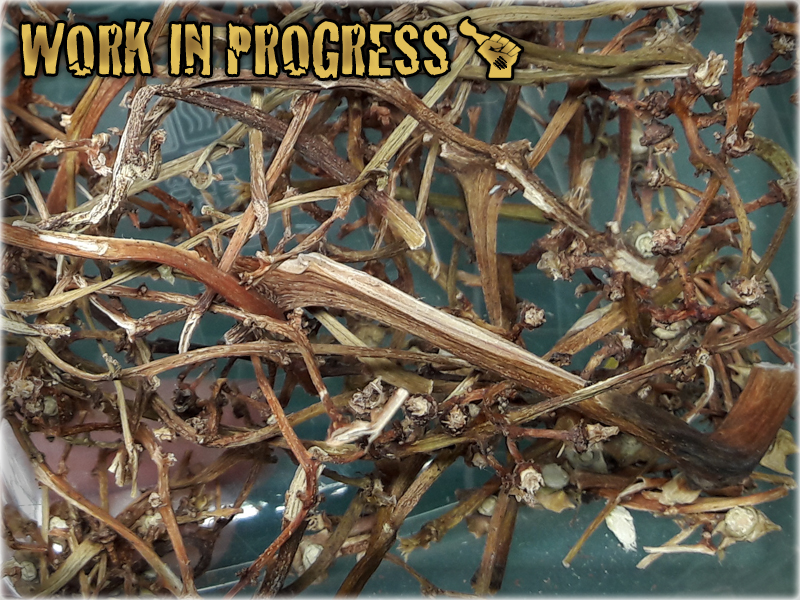
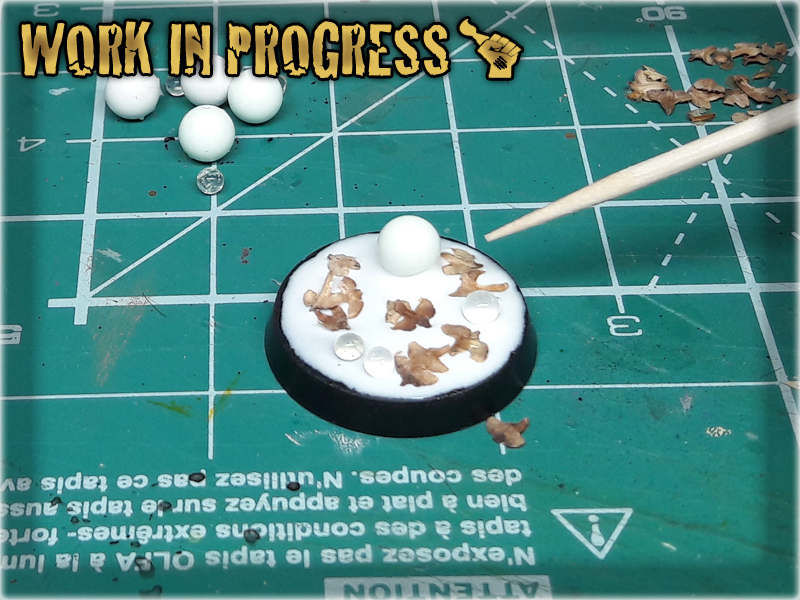
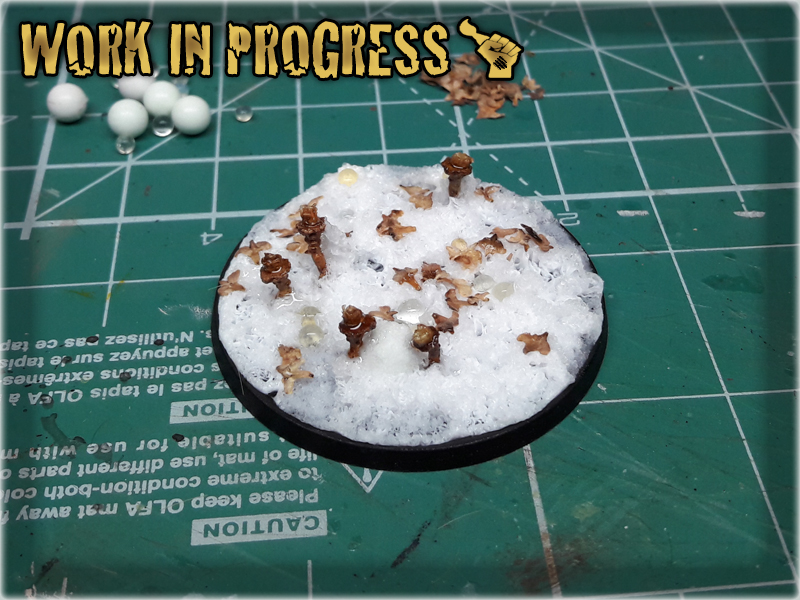
4 Before it dried out I added some pieces of dry grape vines to make it look like some strange, alien mushrooms, or plants. I then covered additional stuff with more Super Glue to harden it.
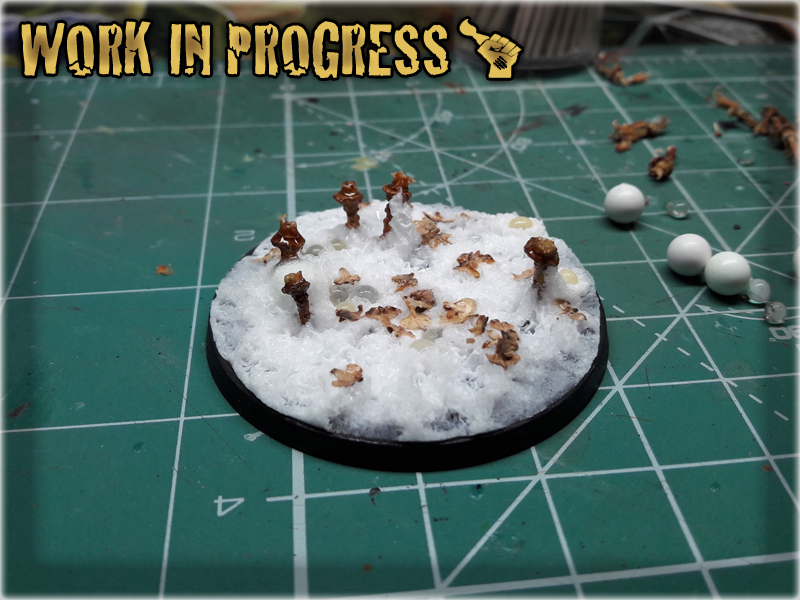
5 Last step was to leave entire thing to dry out. Usually it takes around five minutes for a base to get dry, but it might take a bit longer, depending on how much basing glue is used.

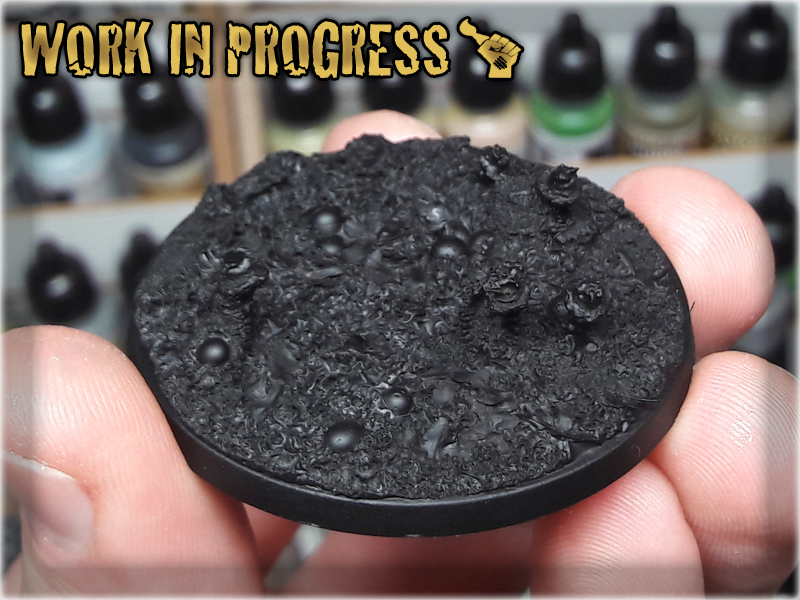
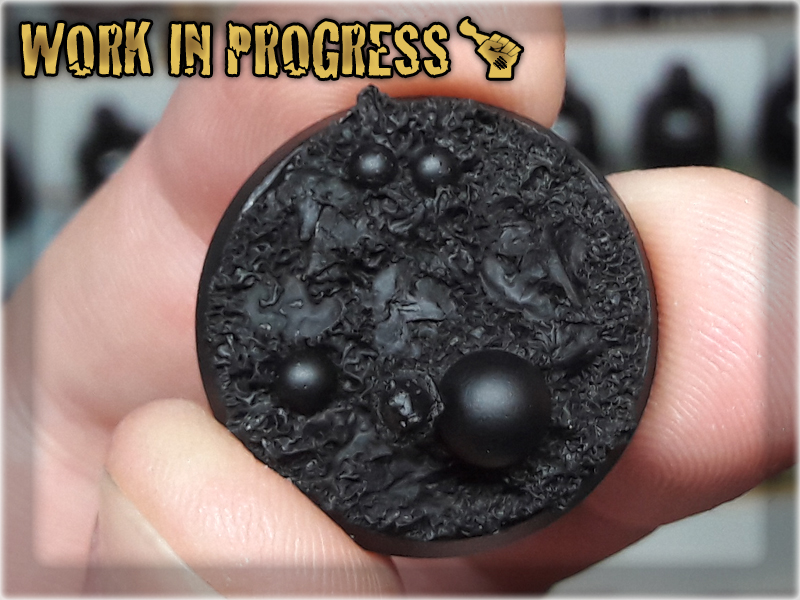
6 The final step was to undercoat dried out base with Chaos Black spray... then do a quick paint job with random colours.
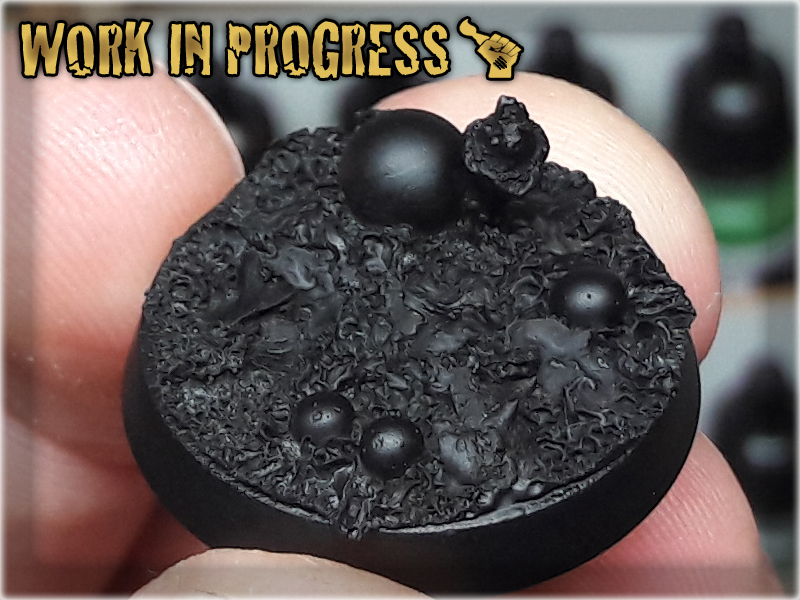
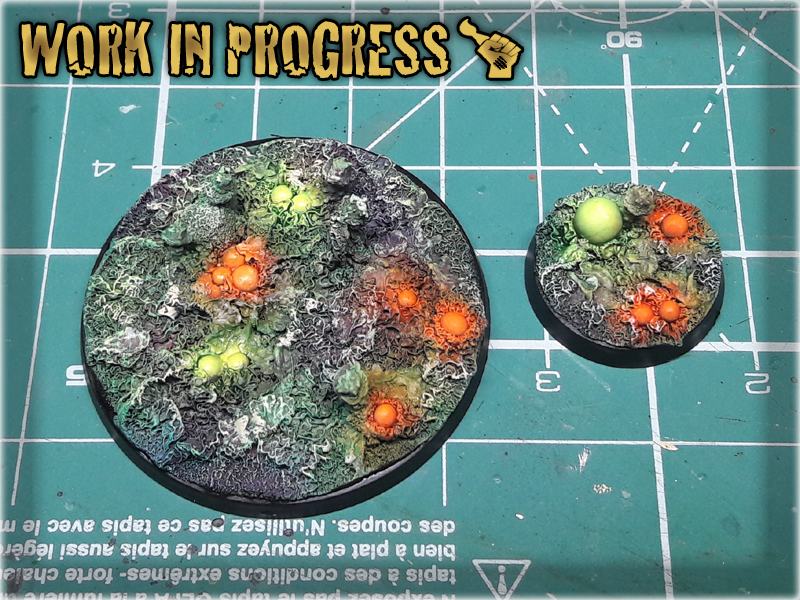
Now seriously – tell my that’s not an awesome texture effect XD This is like ultra-fast, mega-cool way of using two glues to create utter chaos on any surface. Chaos mutations, warped stuff, Zerg creep, alien planet foliage, jungle floor, faerie glade, name it – then glue+glue it 😉

Do not hesitate to let me know and send some pictures via FACEBOOK if you ever use the tutorial. I will be happy to see how it turned out 😉
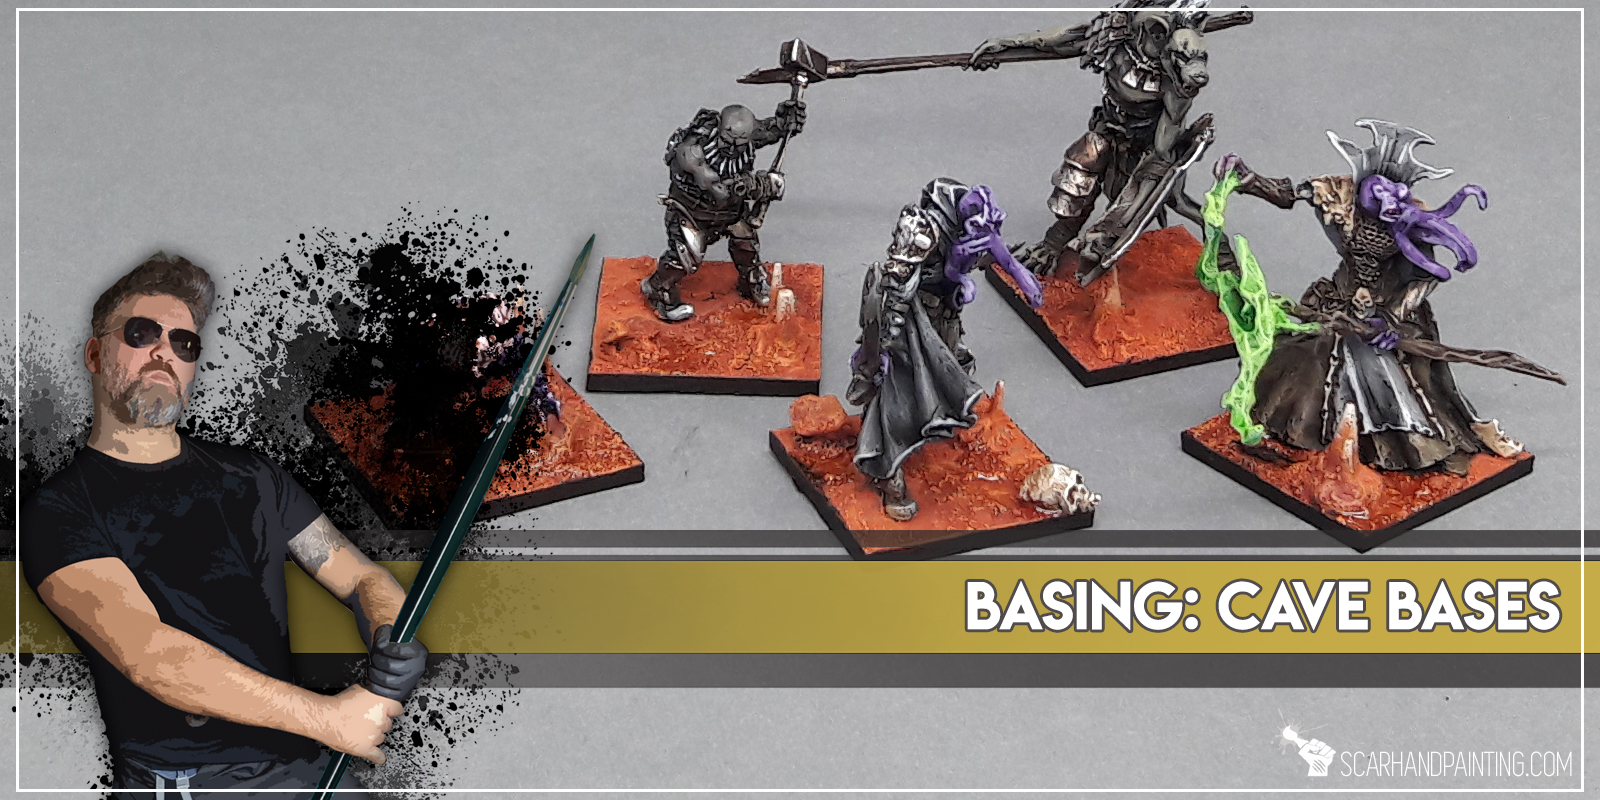
In this easy, step-by-step tutorial I’m going to show you how to create a Cave Base.

*Ask your GF if you don’t know where to obtain the latter.
**Search in IKEA or any home/garden store. A lifetime stockpile of these is less than 5€.
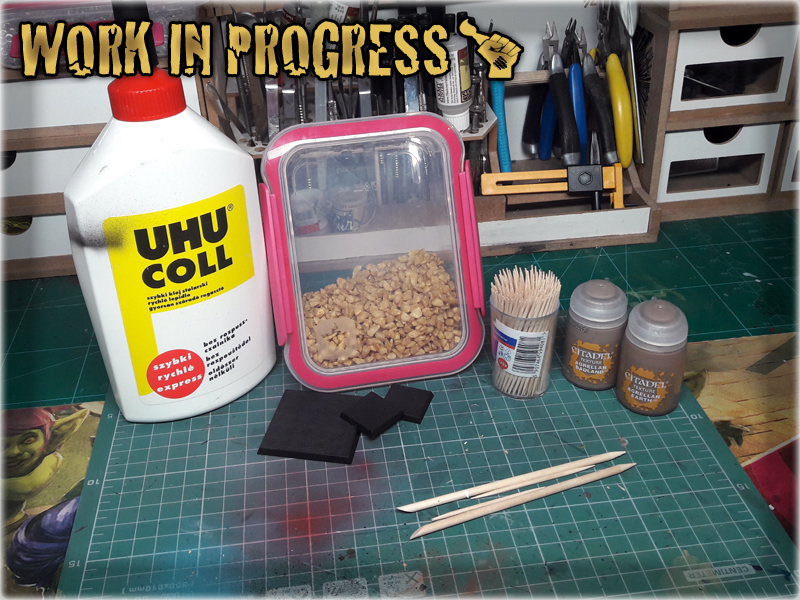
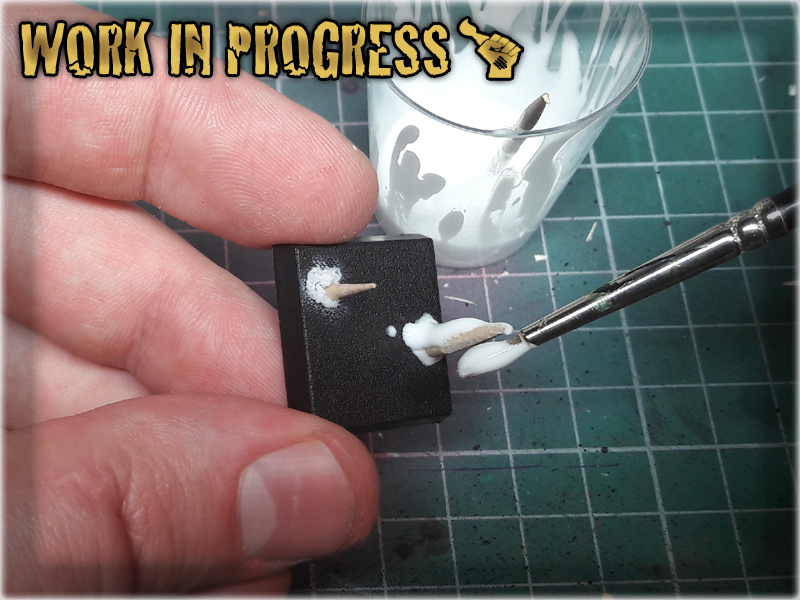
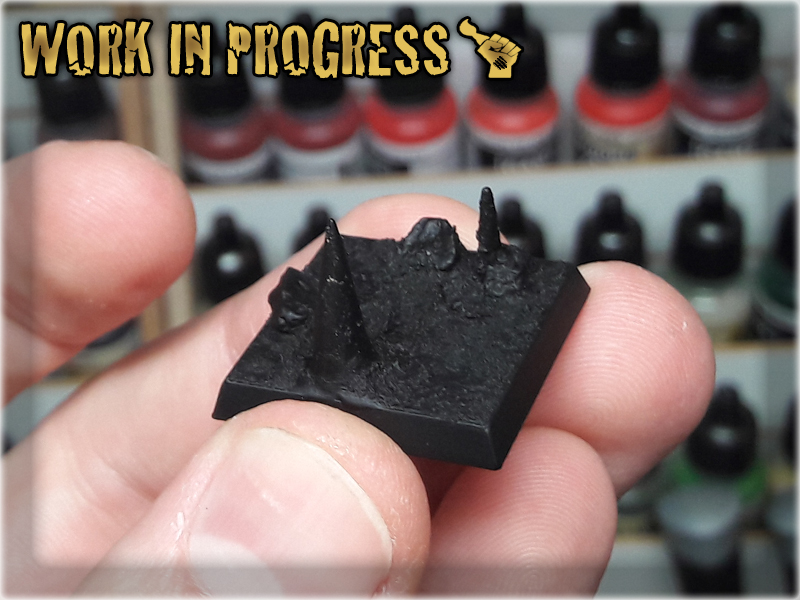
1 I started by cutting off the tips of both toothpicks and nail sticks. These would do for fine stalagmites later on.
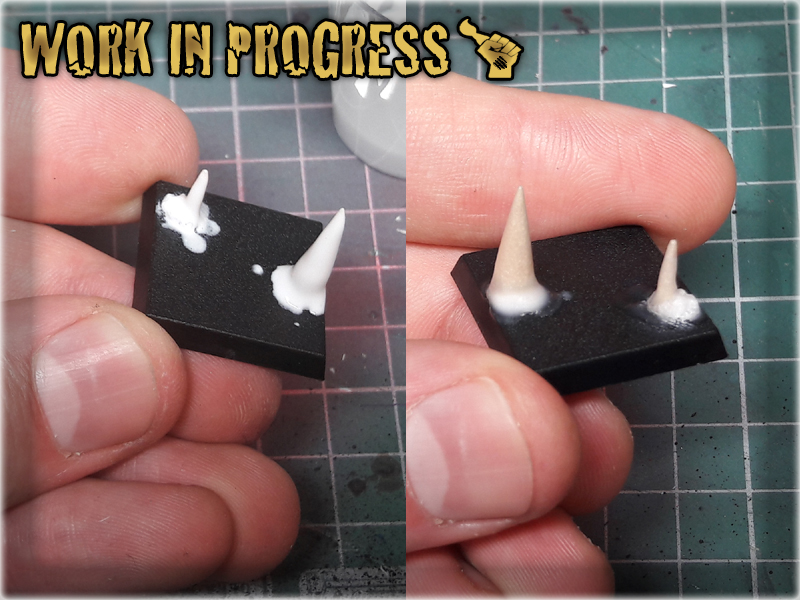
2 I then applied couple of drops of basing glue onto the base. Before it dried out I applied Super Glue on it and mounted stalagmites, tip upwards, on the mix.

3 Next I covered entire stalagmites with basing glue and left it to dry. The excess glue, moved by the power of gravity, was drawn downwards, where it rested around the base of the stalagmites, making them look smooth and natural.
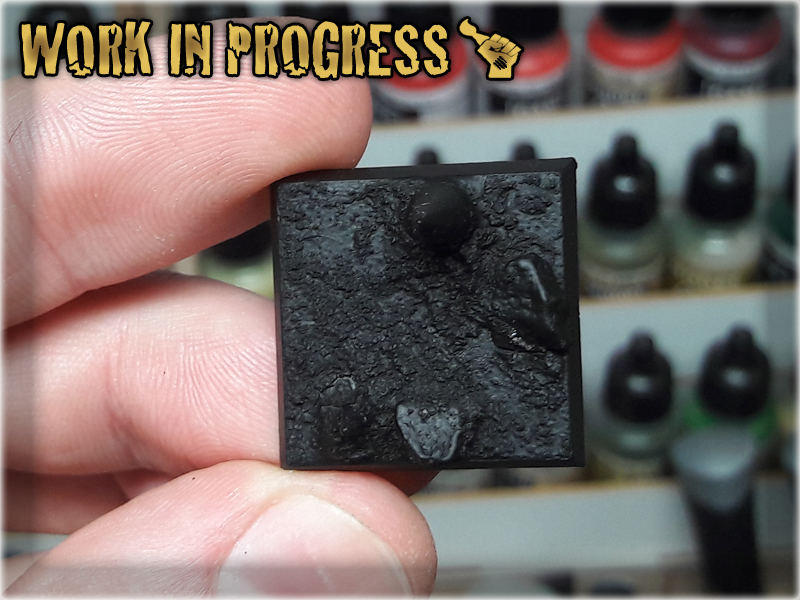
4 Using the previous technique I applied some basing glue in few spots and then Super Glue'ed some gravel over it. You can actually glue any type of stuff with this - like skulls, some pieces of armour etc.
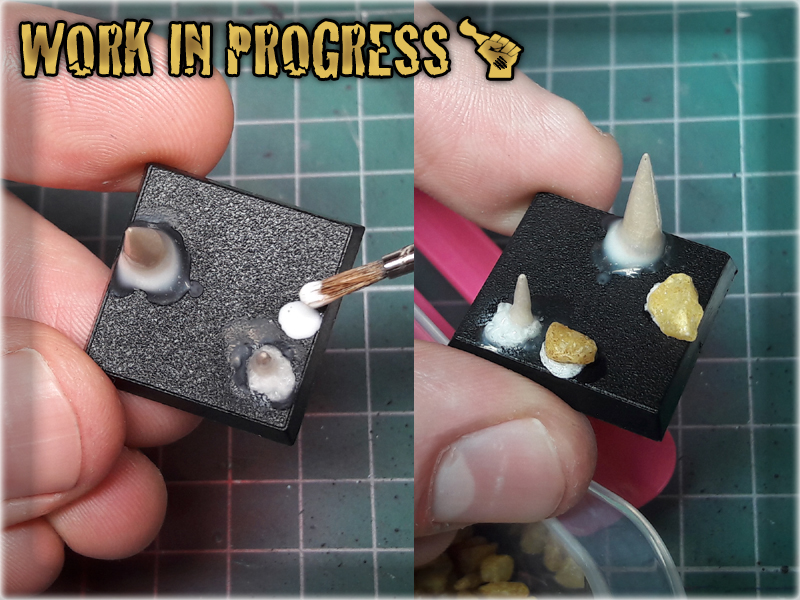
5 I then covered antire surface, except for any fillers, with Games Workshop's texture paints. I used a mix of Agrellan Earth and Agrellan Badland for this tutorial, but actually any of the range will do - as long as you would like to undercoat the base afterwards.


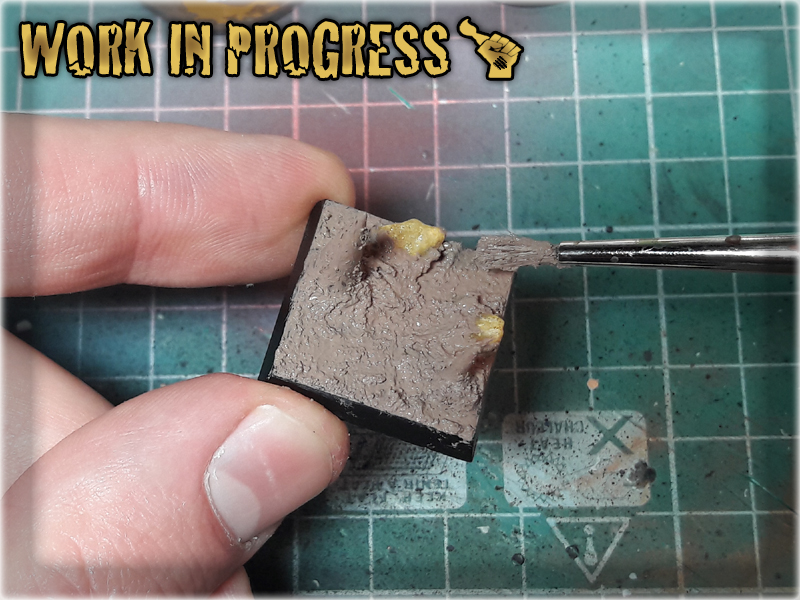
6 The final step was to undercoat dried out base with Chaos Black spray...


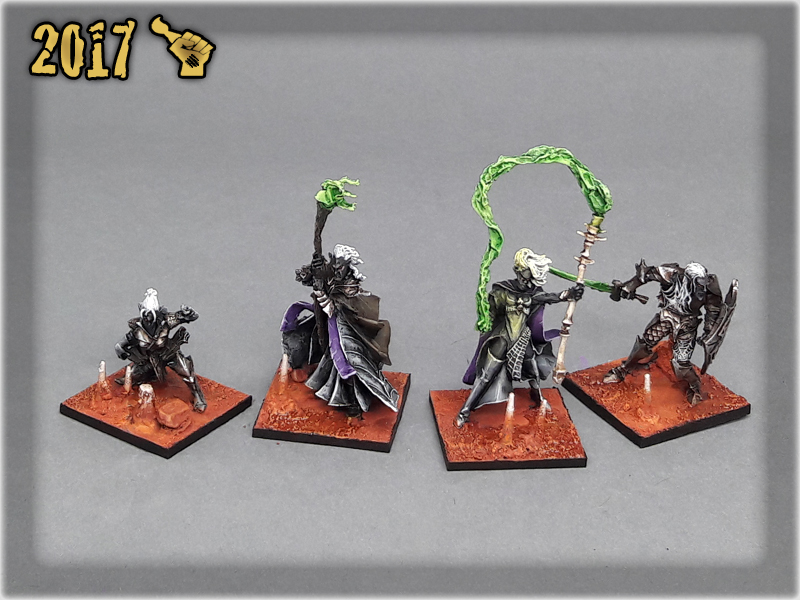
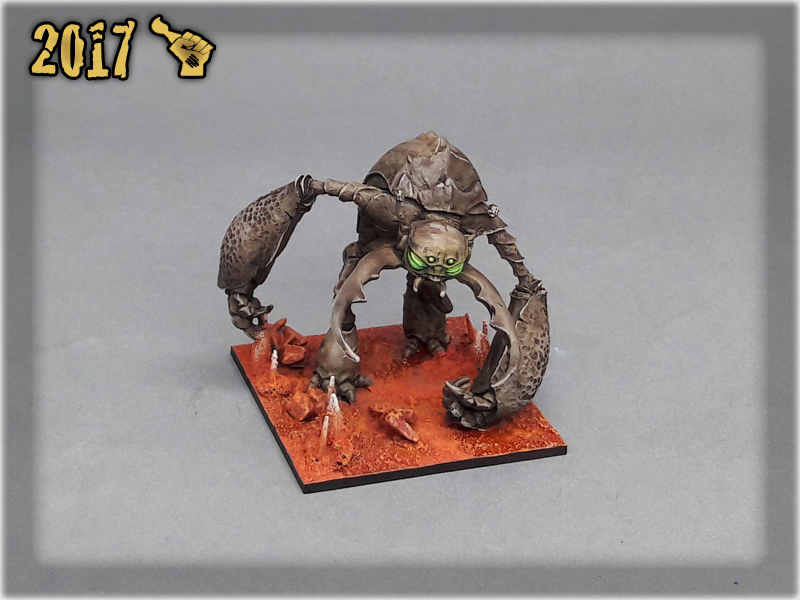
Now, what’s left is just to paint the bases with your preferable colour scheme. I chose to go red/copper style similar to ‘the Wave’ and watered some spots with clear resin, but the number of potential colour schemes is unlimited.
If you ever use the tutorial – be sure to let me know and send some pictures via FACEBOOK. I will be happy to see how it turned out 😉

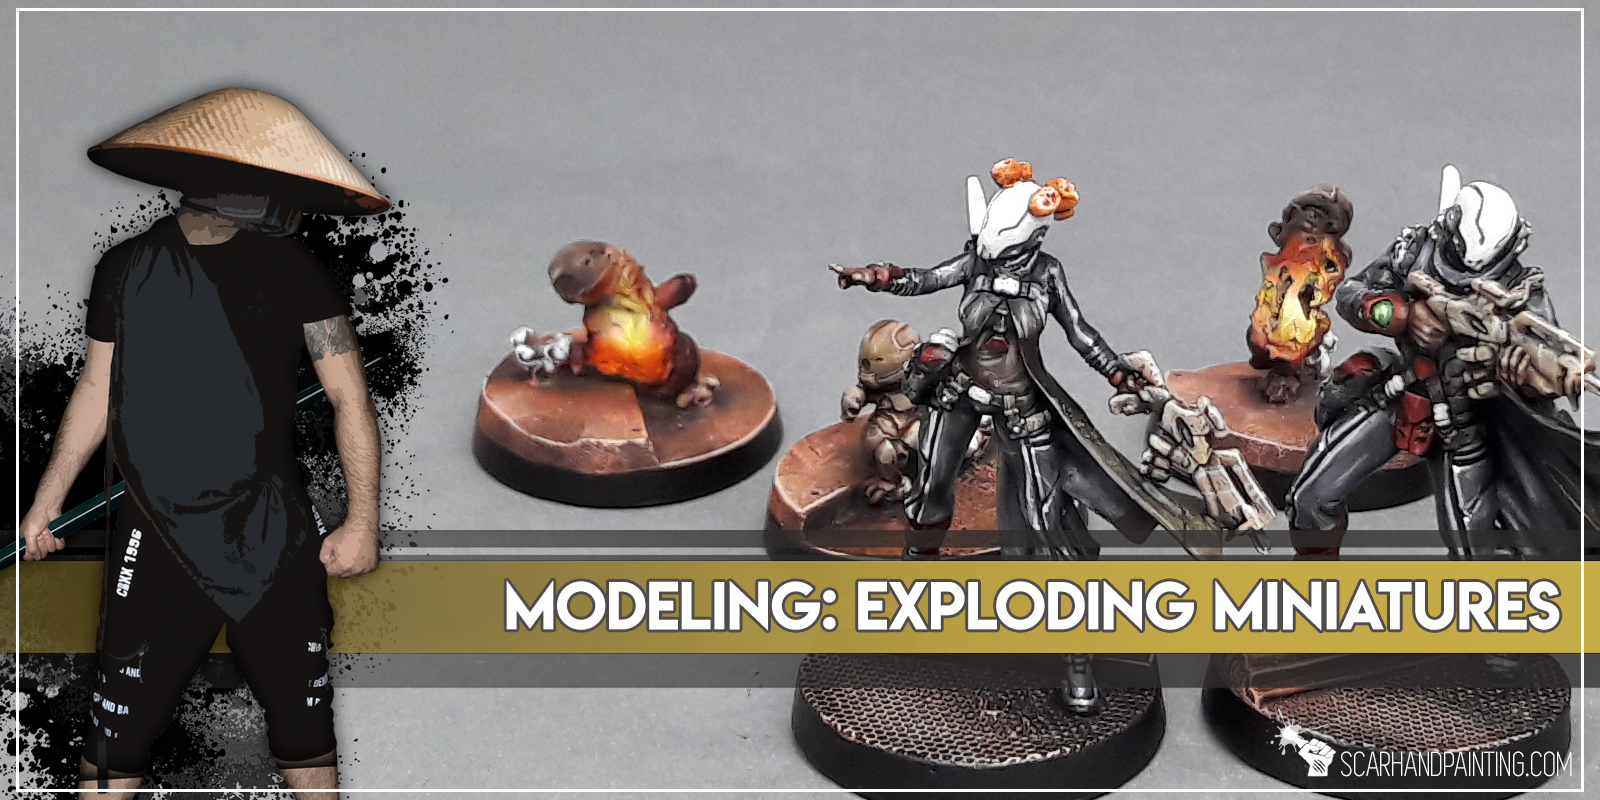
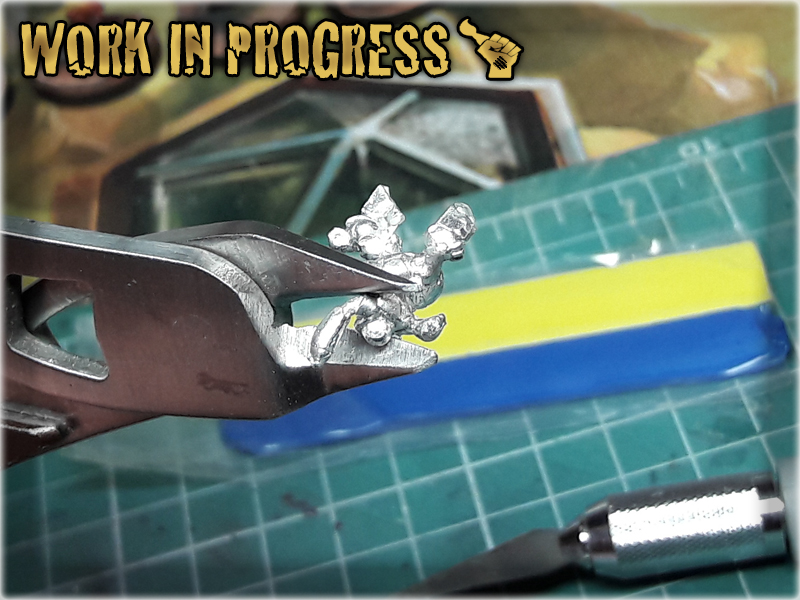
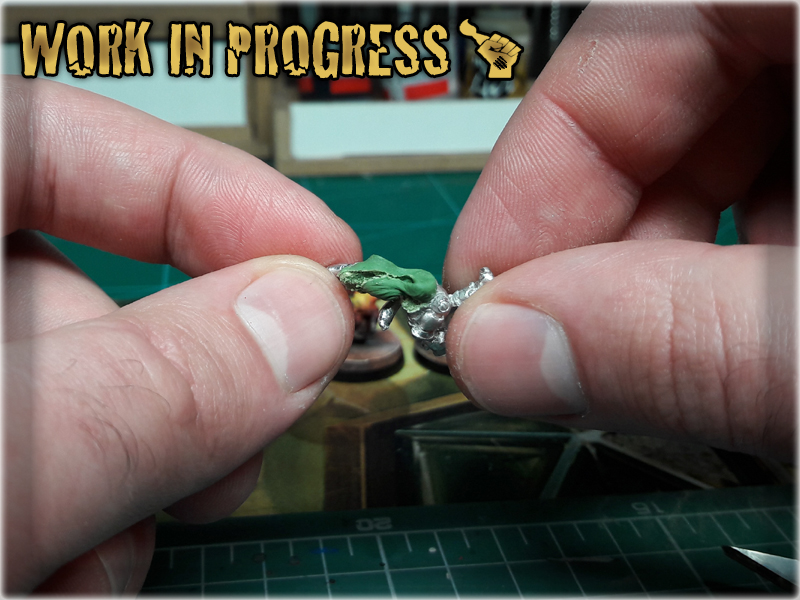
In this easy, step-by-step tutorial I’m going to show you how to create an ‘explosion from inside’ effect on the miniatures. Personally I use this method to create exploding mines or in this case Crazy Koalas from Infinity the game, but the number of potential uses is limited only by your imagination. That being said, buckle up and have a nice ride.
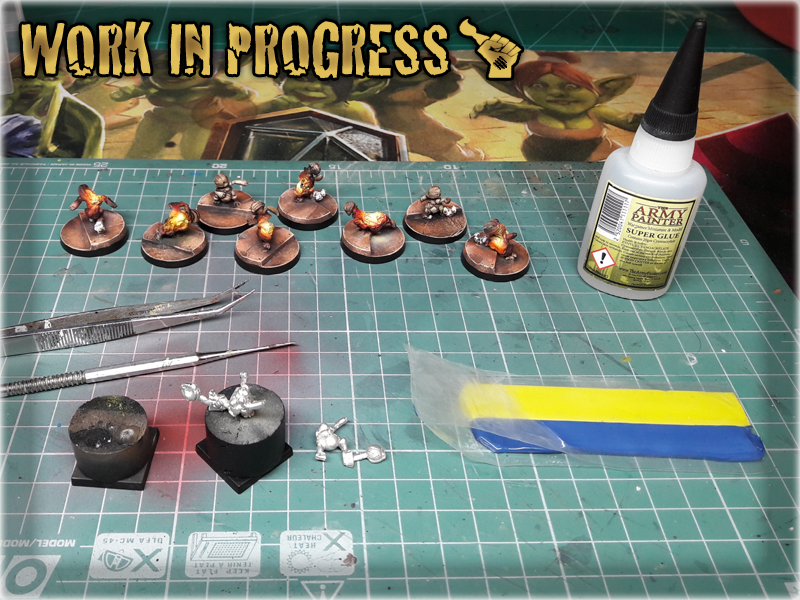
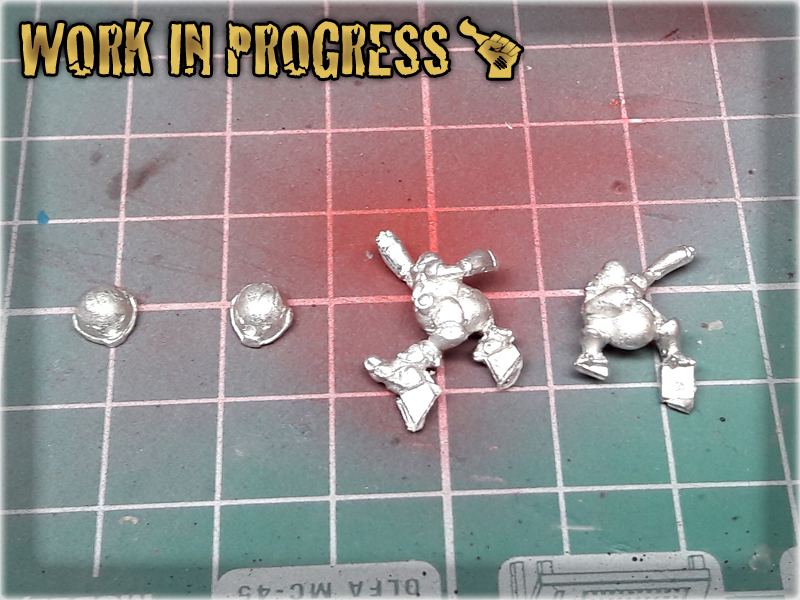
1 I started with cutting the miniature diagonally in two. I didn't thought too much about where to cut, just about the waist, leaving one hand attached to the lower part of the body.

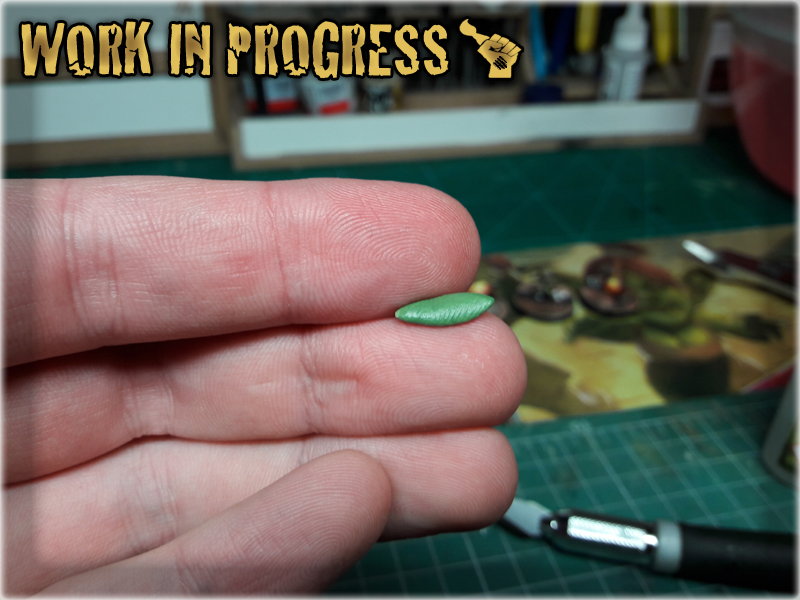
2 I then rolled some Green Stuff and glued it onto the lower body part.
3 Next I applied a small drop of Super Glue onto the Green Stuff and attached the upper body part to it.

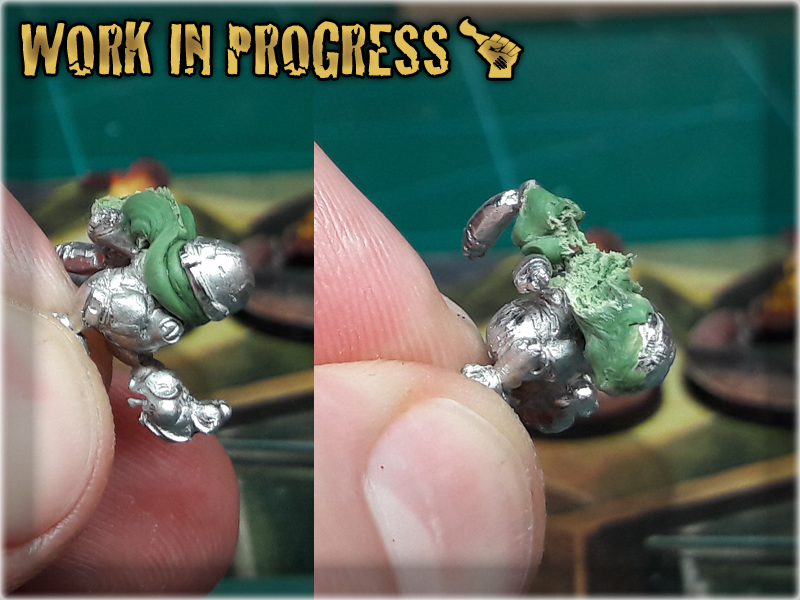
4 Then I squeezed both part, forcing the Green Stuff out.
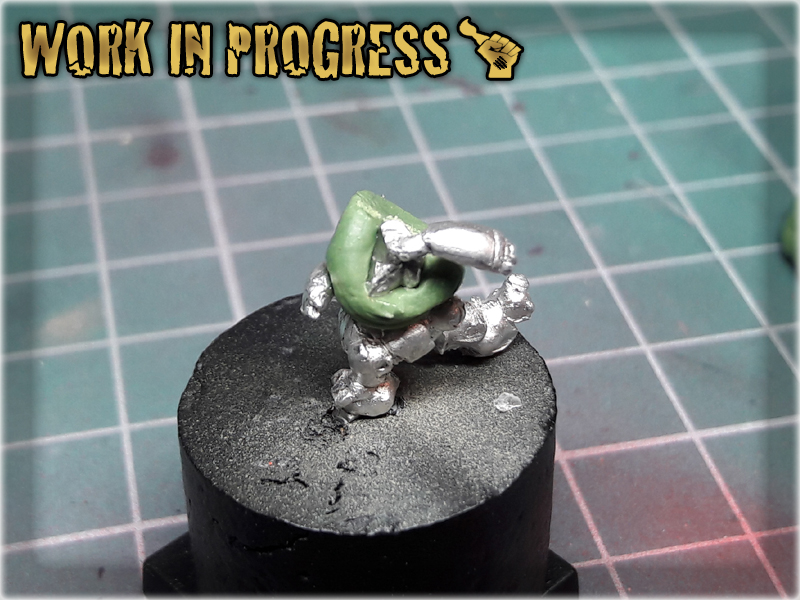
5 Next I gently pulled both body parts away, creating a gap with rended Green Stuff inbetween the parts.
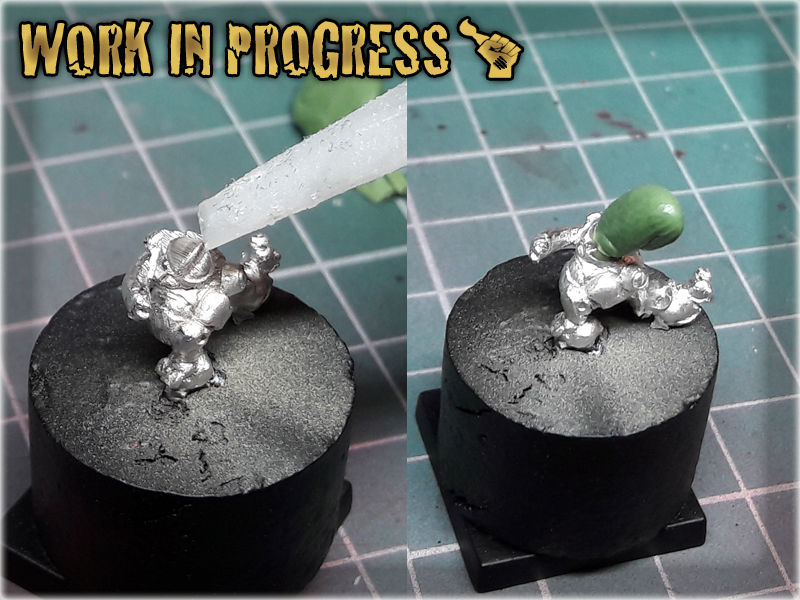
6 Next I rolled another piece of Green Stuff and repeated the technique, adding head to the miniature.

7 After pulling the head away I used a modelling tool to stretch the excess Green Stuff to the sides.
8 I also applied Super Glue onto the Green Stuff to fasten it's hardening.
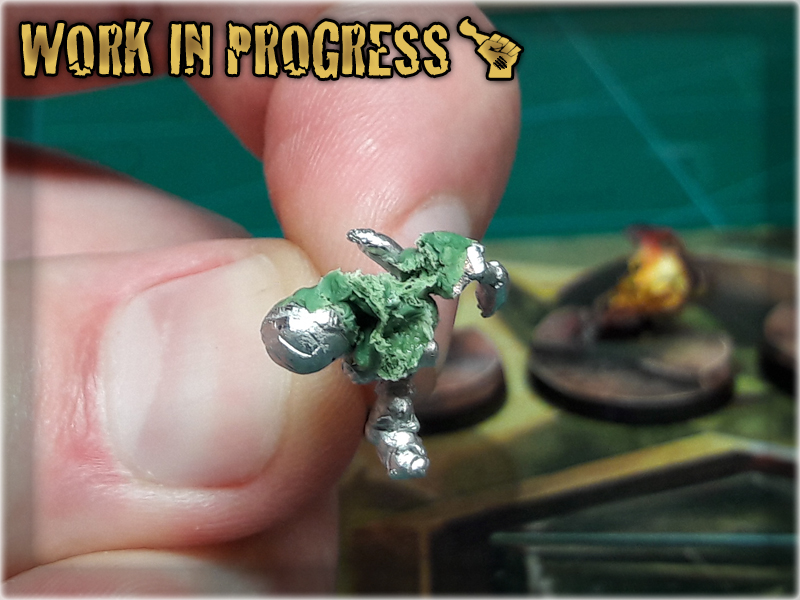
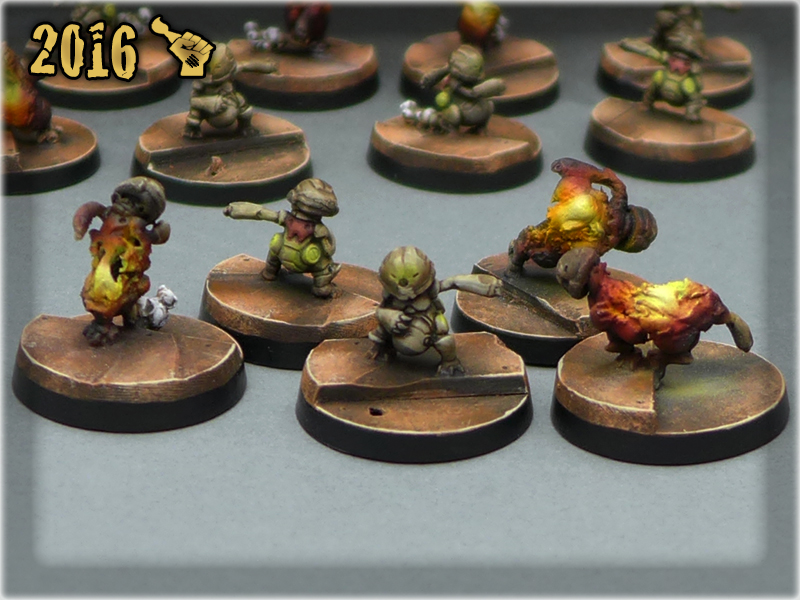
The end result is below:


“It is a Dark Time.
The might of the Empire is dust, their crown is lost to them and their glory forgotten.
The promise of an age of peace and prosperity is drowned in blood.
This is your time. For the ruins of Mordheim hold prize beyond imagination: stones of power which can grant all your wishes.
But beware of your enemies.
Fear the Possessed, the Beasts of the Pit which roam the night.
Watch for the thieves of the Rat men, the Skaven of the Underworld.
Dread the corpses who walk like the living: the foul Vampires and their rotting minions.
This is Mordheim, the city of the Damned. This is the home of all your hopes. Be wary or it will be your grave as well.”
Mordheim rb.s.124
It all started with a single idea that came to me one day. I installed “Mordheim: City of the Damned” on a PC and played for the first time. It took me back on a memory trip through all the campaigns played throughout the years and further – as for the first time I saw Mordheim in it’s dark glory! It looked so effective. I figured to make myself a gaming board based on this…
You see – terrain making is similar to PC map building. You take base shapes, you texturize them and then color them. If you happen to plan it beforehand, you will have just that: base shapes, texture pieces and paints – to work with. So , the idea was totally within my reach. Not a priority – just ‘an idea’. One to haunt me throughout my everyday life from then on. Sometimes it stayed dormant for couple of weeks just to emerge from the depth of imagination without any warning. Many times I was on the verge of realizing it into existence, then just hid it deeper within me like “meh, takes up too much time, I don’t need it right now”. But the right moment finally came. I was gaming in a local hobby store, where I saw an inspiring collection of Mordheim scenery. This was too much – I couldn’t resist. There was just too much inspiration to walk by. I broke that invisible mental barrier – took this like a man – a day later I went to construction store, purchased all necessary materials and started working on this project…

I already had a Mordheim Gaming Board along with all the terrain that might come in handy throughout a vast campaign. The old scenery set was rather solid but lacked some key features in terms of theme and most importantly – texture. Back in the days I praised short construction time and playability over looks and strong theme. I produced terrain pieces really fast, but at a cost of visuals. This time around I set off for looks and theme as the highest priority with playability a bit lower, followed by durability and other usual stuff. Due to current Nomad’ish way of life I also wanted for this gaming board to be transportation friendly and rather light. To achieve that I had to fulfill these assumptions:
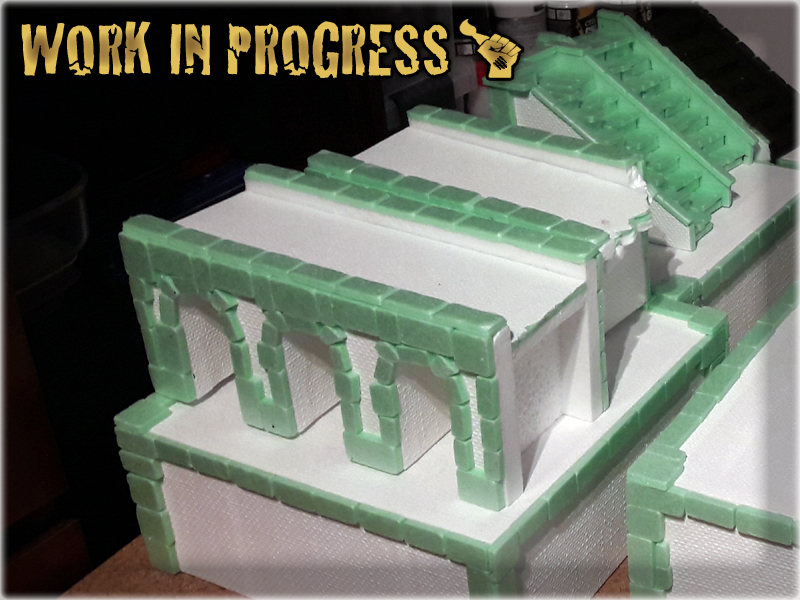
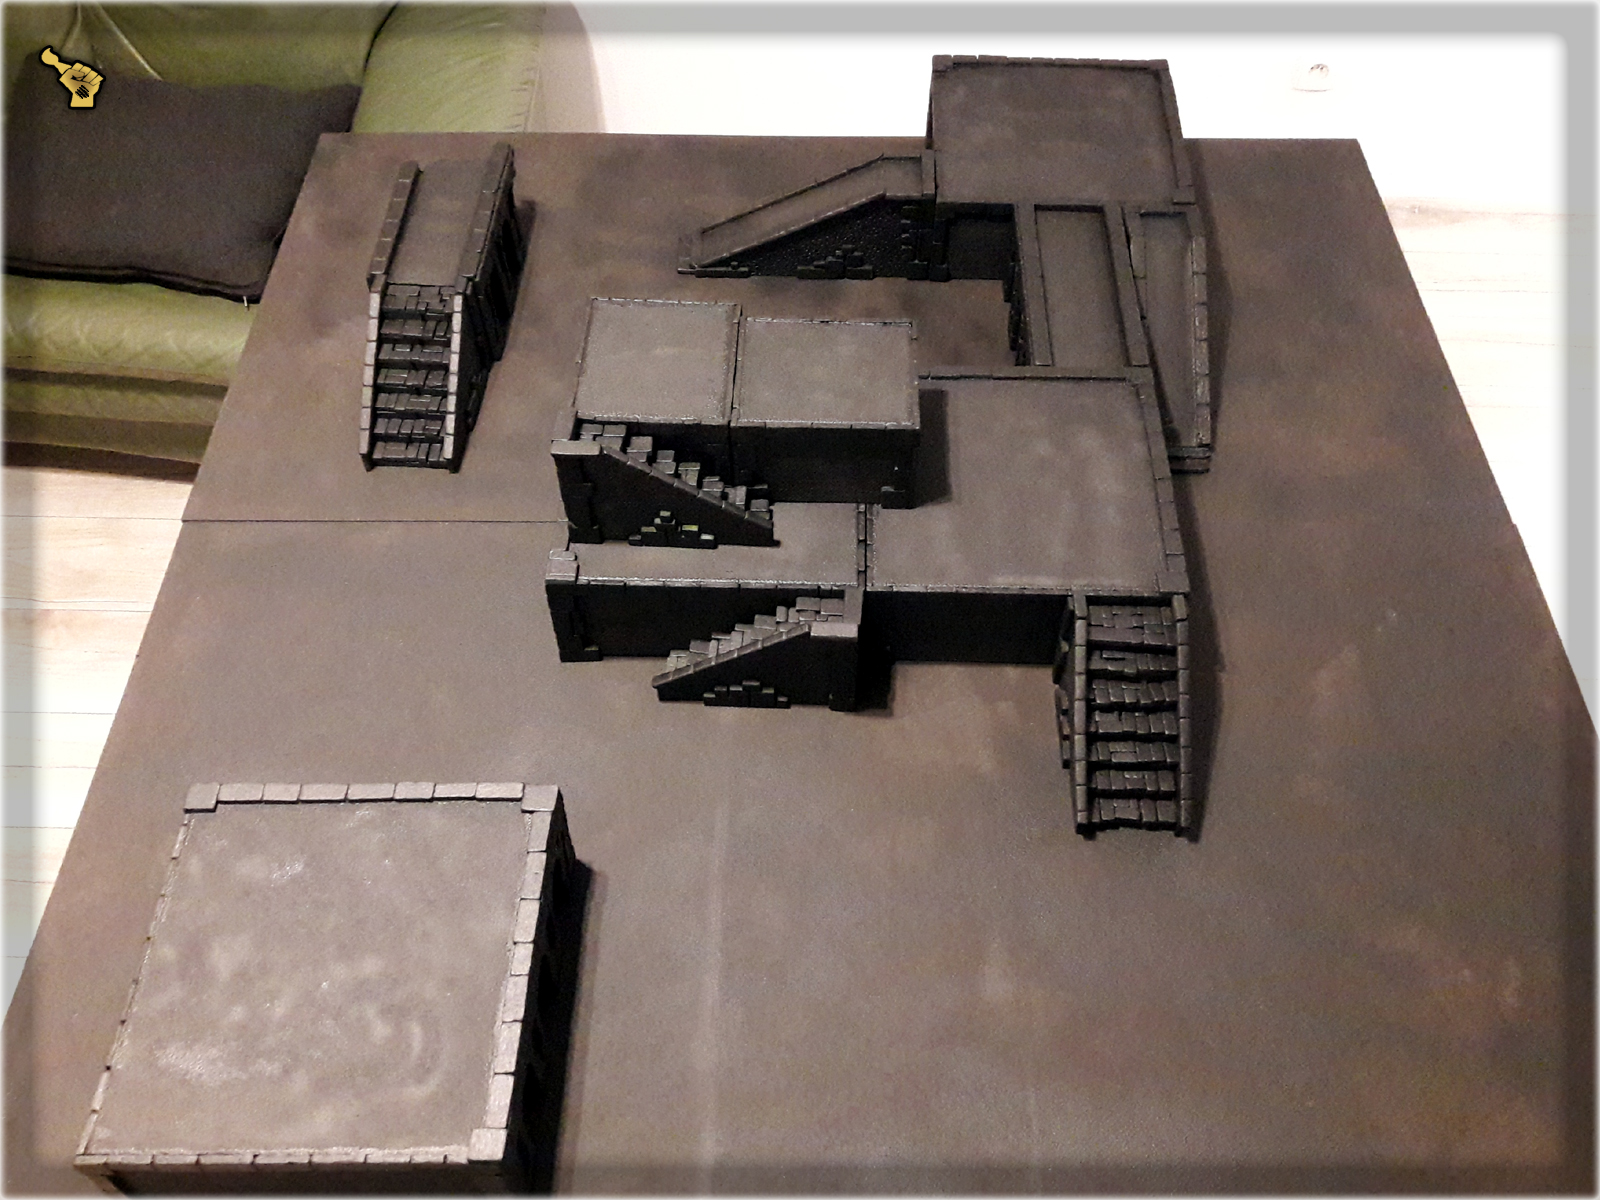
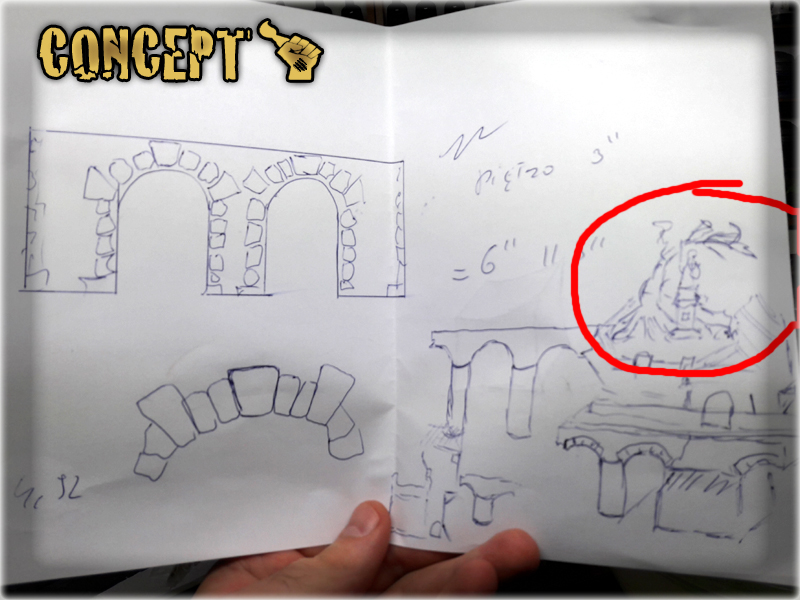
As with most terrain projects, I started by preparing a simple visualisation of how much space the foundations will take up on the gaming board. By ‘the foundations’ I mean simple terrain pieces that will take up most space, creating different levels on the gaming board. In case of “The Colony” gaming board these would be buildings, but this time I’ve decided to use urban hills for the job. This was just a formality, but as usual I wanted to be prepared for what’s to come…
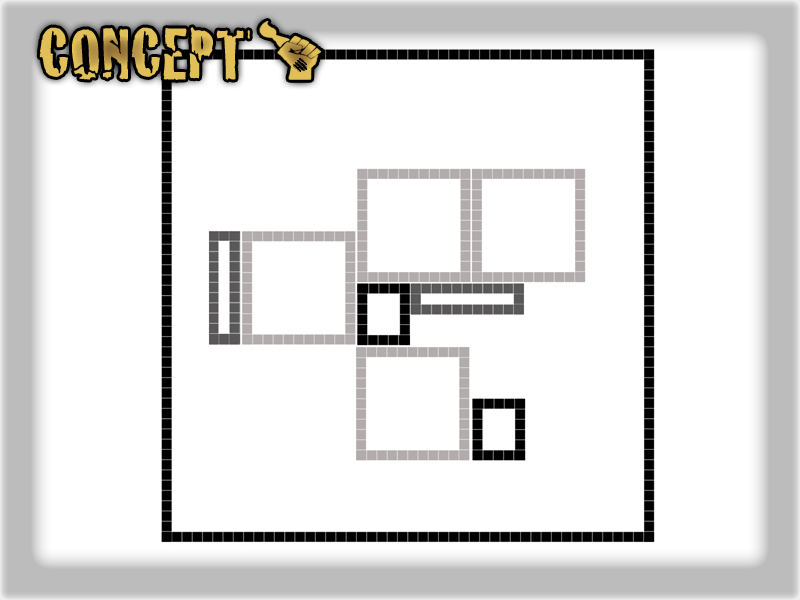
The base concept was to create four urban hills, that might be combined in many different ways to create a large elevated space, or set up individually. Along with these, two small urban hills and two platforms were to be made. While small hills might be used for shape diversity and to link the bigger ones, platforms were to provide easy access to elevated positions on the map…
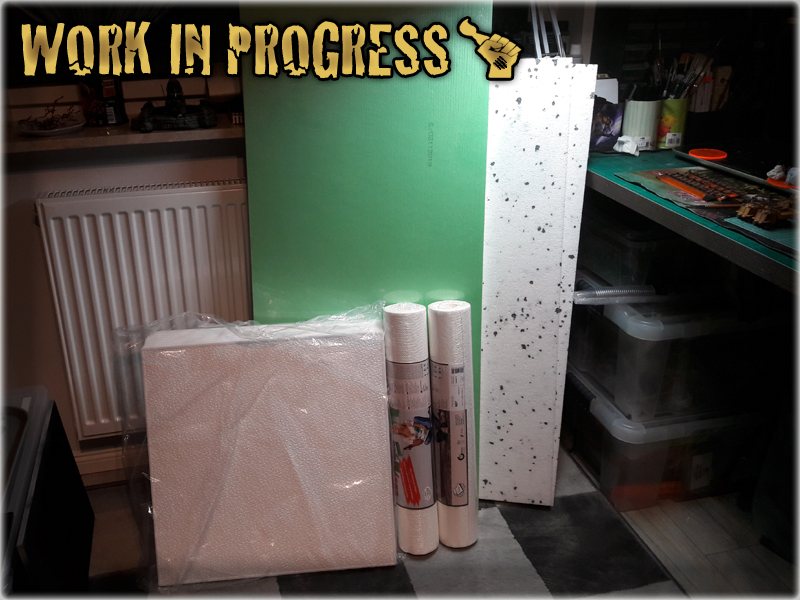
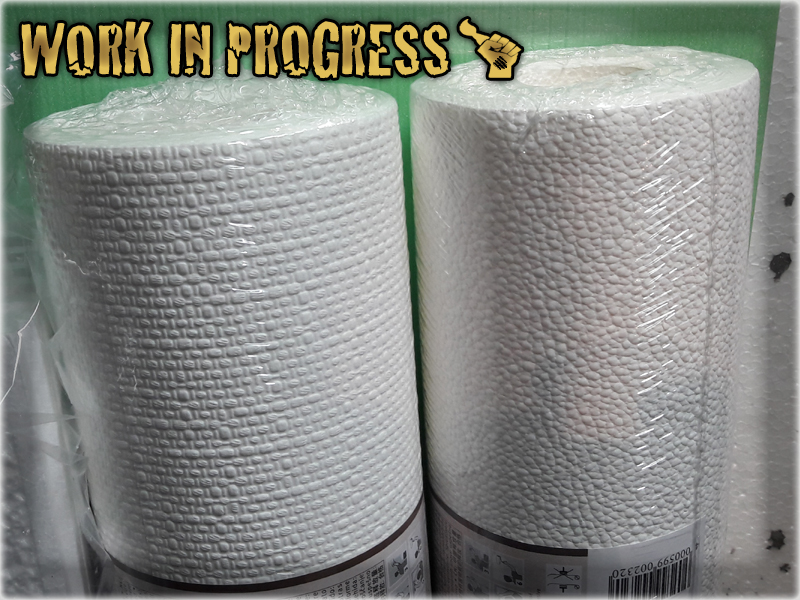
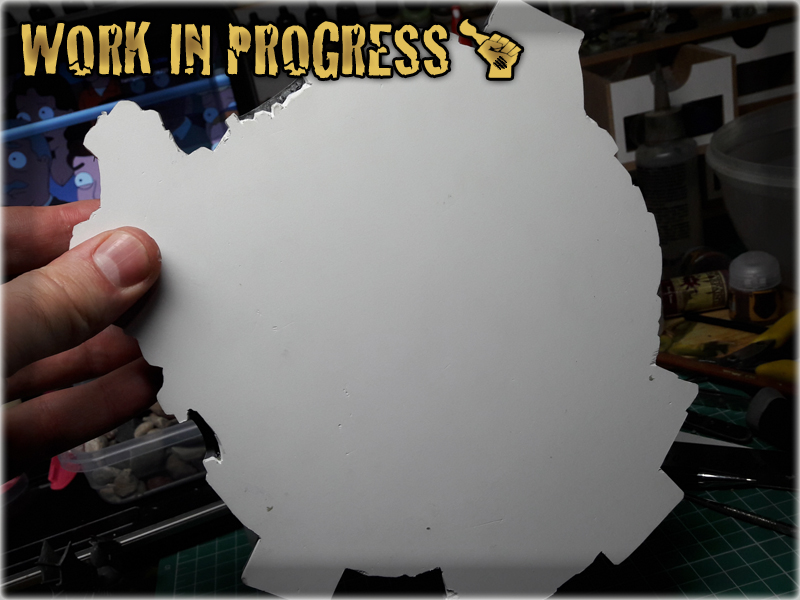
One of the most important things in terrain building is choosing the right materials. Let’s say that I wanted to provide a lot of texture and detail, keeping gaming board/scenery durable, easy to setup and easy to transport (Not to mention – wallet friendly), at the same time. Plaster was obviously a bad choice as it’s heavy and tends to get damaged all the time. Personally I try to avoid it. Any type of Resin or Hardfoam might do but these are extremely expensive and in case of a project on such a scale, they would require professional equipment to be fully implemented. So I decided to go for styrofoam for base shapes and wallpaper for texture. I personally hate light terrain pieces, that tend to fly all over the table, but in this case – solid buildings could keep the rest pinned to the table, thus following all the assumptions of my initial idea at the same time.
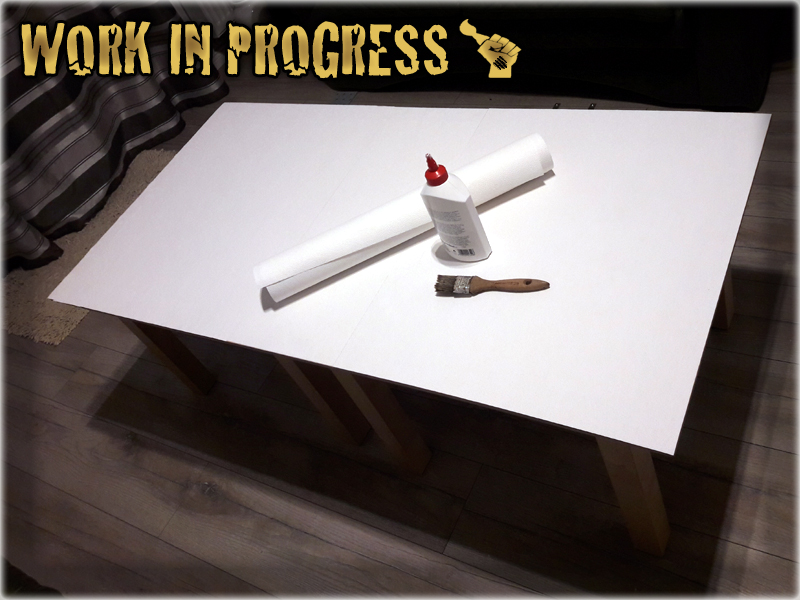
I had all the materials needed along with the concept. The only thing left was to start working on the project. I started with the most simple task – preparing a ‘cobblestone’ gameboard. It took like half an hour with me just applying a lot of basing glue onto the board and then cutting large pieces of wallpaper to be gluedon top of the board. The picture looks nothing special, but once painted – small cobblestone could be seen all over the game board…
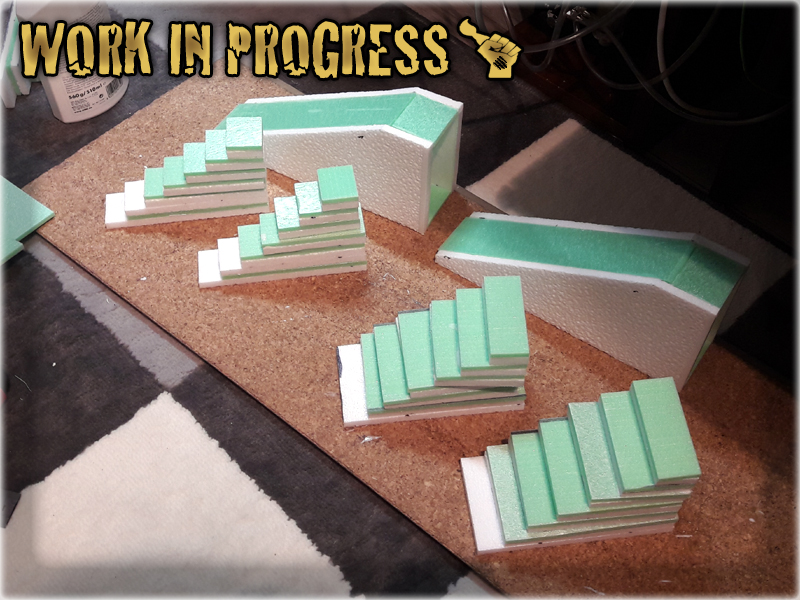
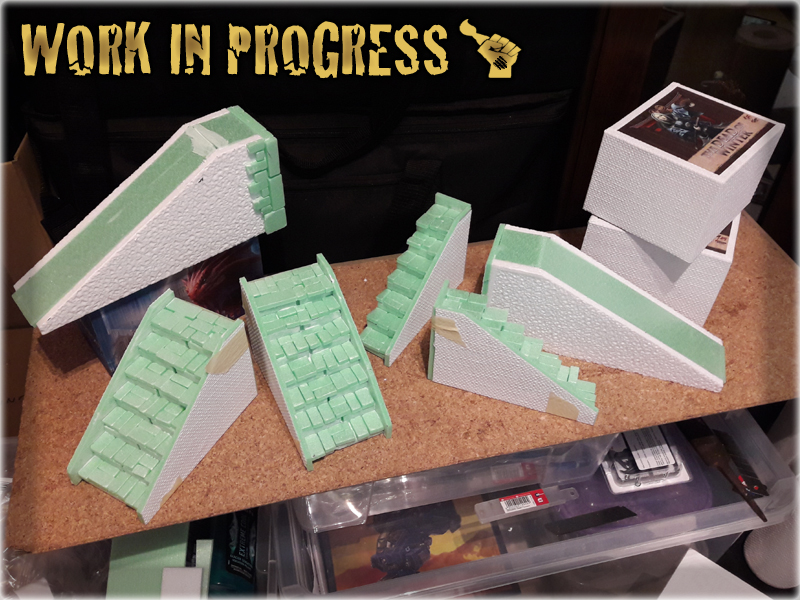
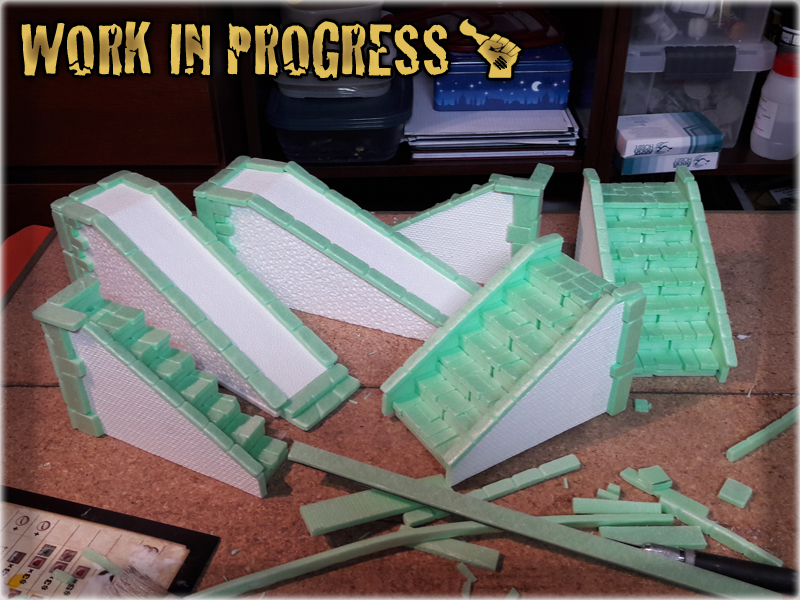
As soon as I took on the platforms, an idea of additional items appeared. Having in mind that the upper level should be rather accessible for all the miniatures I added four sets of stairs to the fold. Started with base shape cut out of rough pieces of styrofoam, then added texture on the sides to finally cover certain places with handmade stones. The stones (or just ‘huge bricks’) were made by cutting the base rectangular shape out of styrofoam and then rolling droves of these in my hands so that all the hard angles became nicely rounded.

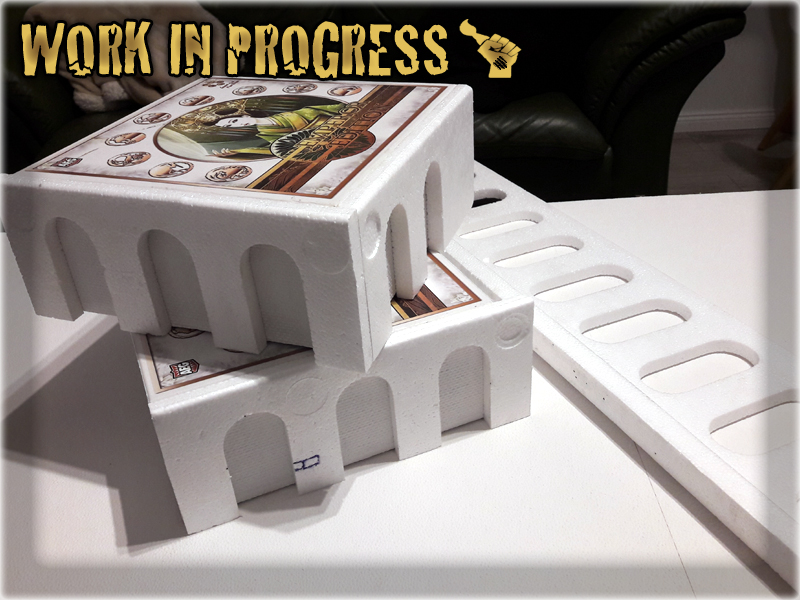
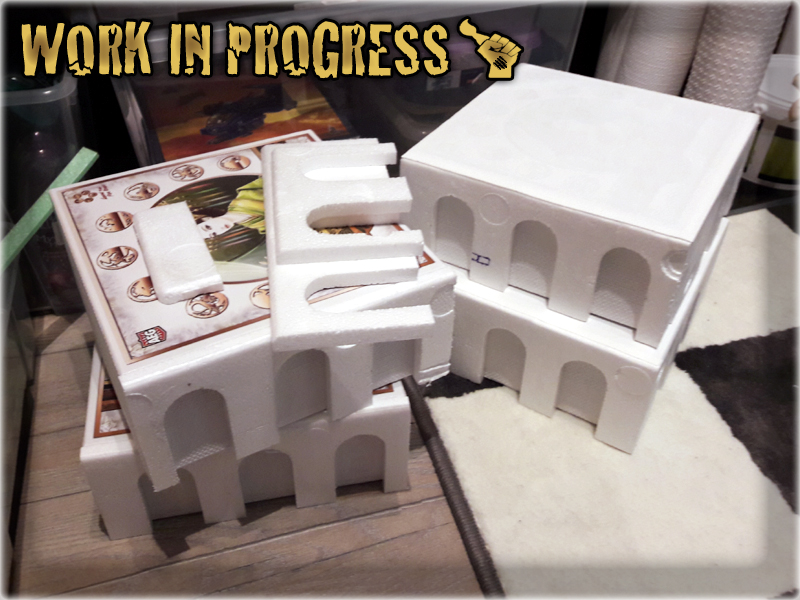
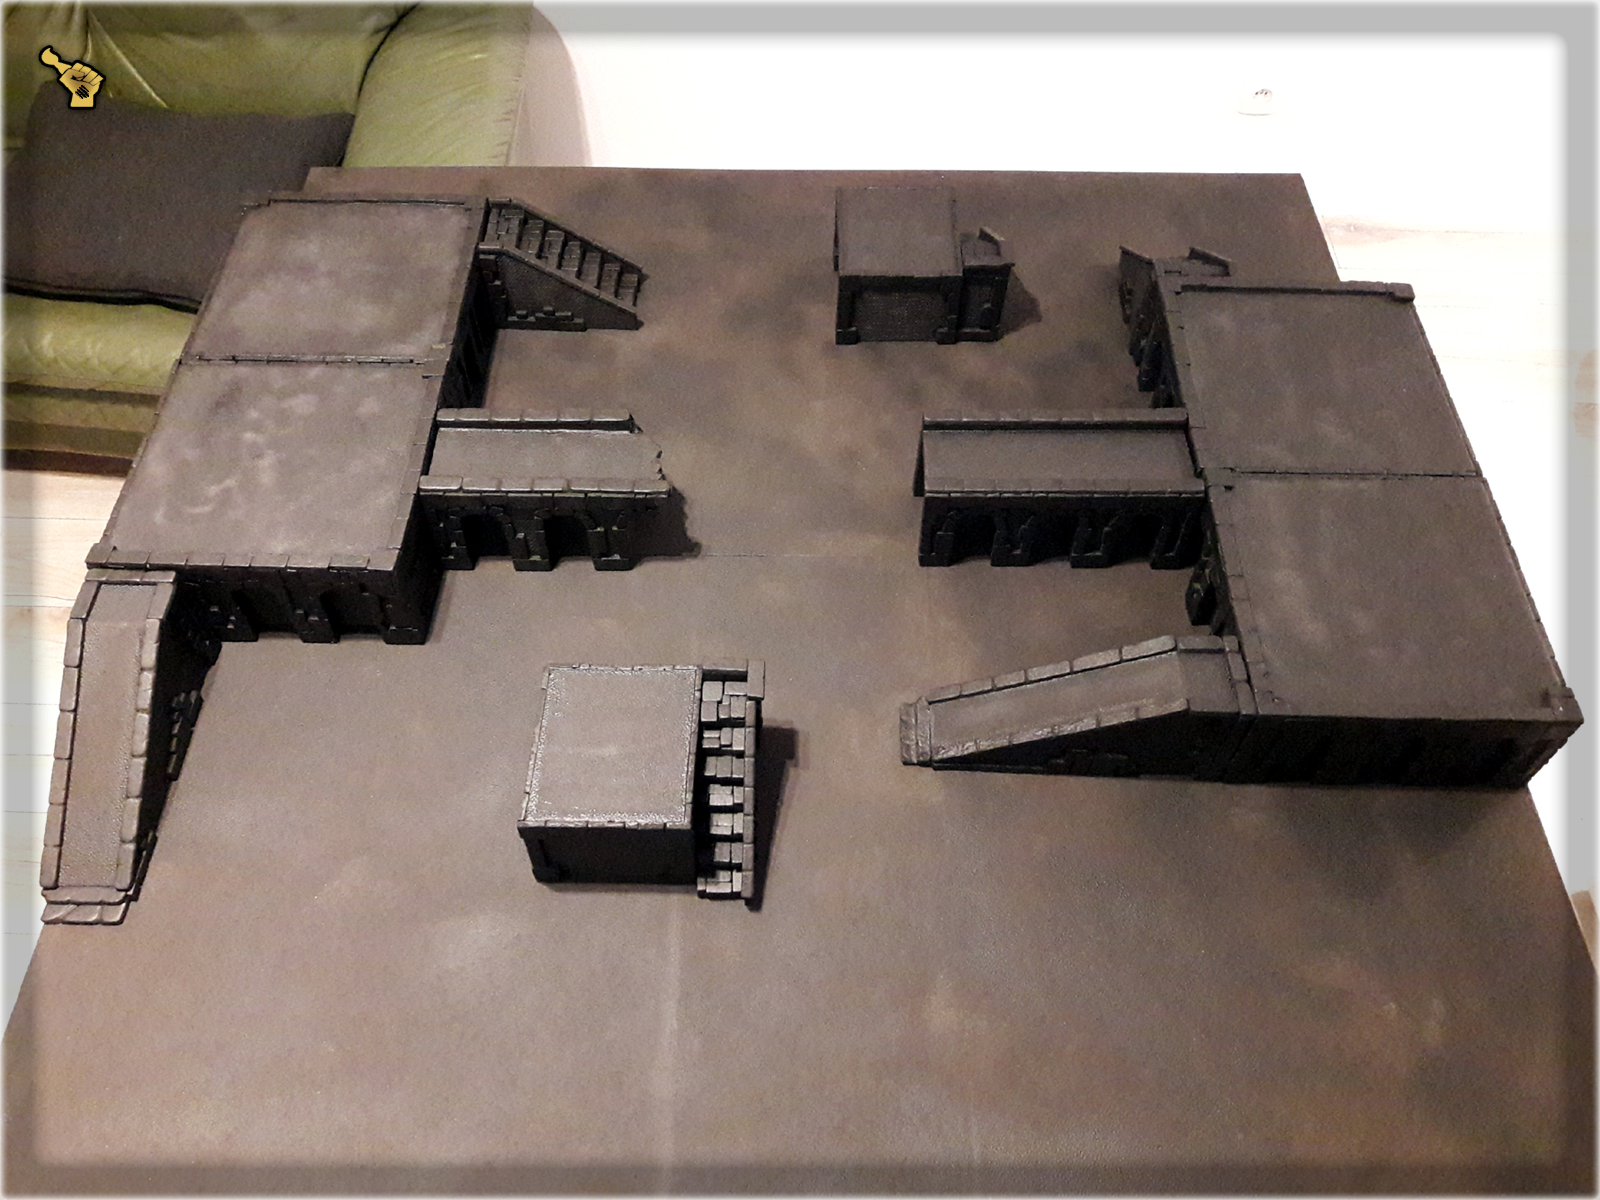
Along with all the platforms and stairways I also prepared a set of urban hills. I used ‘Legend of the five rings ccg’ boxes to gain access to base shapes of a similar height. The best method to texturise them was to cover entirety of them with glue and then use wallpaper all over it. Once glue dried out I added styrofoam pieces cut out of the fridge protecting casing ( I like to keep such stuff in case it’ll come in handy – and guess what – it did…). Just like with stairs and platforms, I texturized urban hills with styrofoam bricks/blocks of stone.
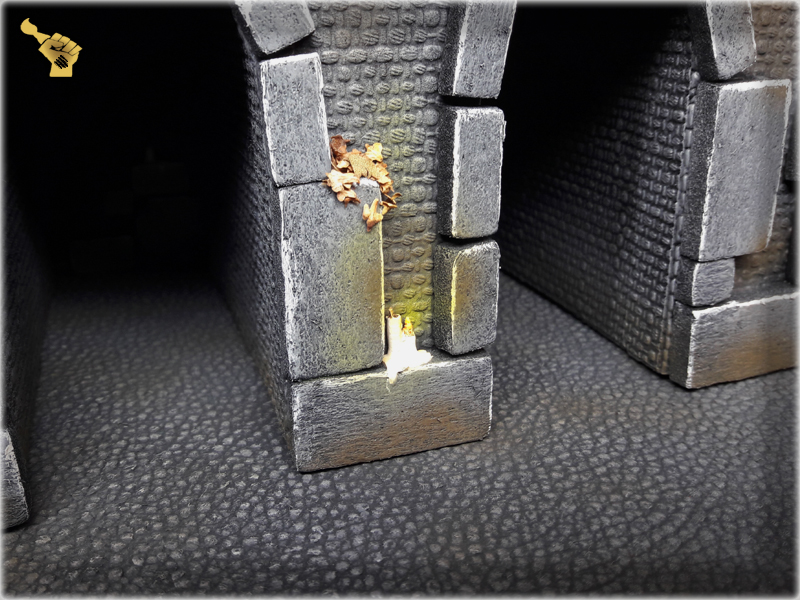
Usually at this point I would have spent a lot of time correcting small imperfections, but I’ve figured out to cover them with a finishing touch of fake autumn leaves, once the paint job is done. This way I wanted to strengthen the mood of the entire table while having all the small holes and defects covered.


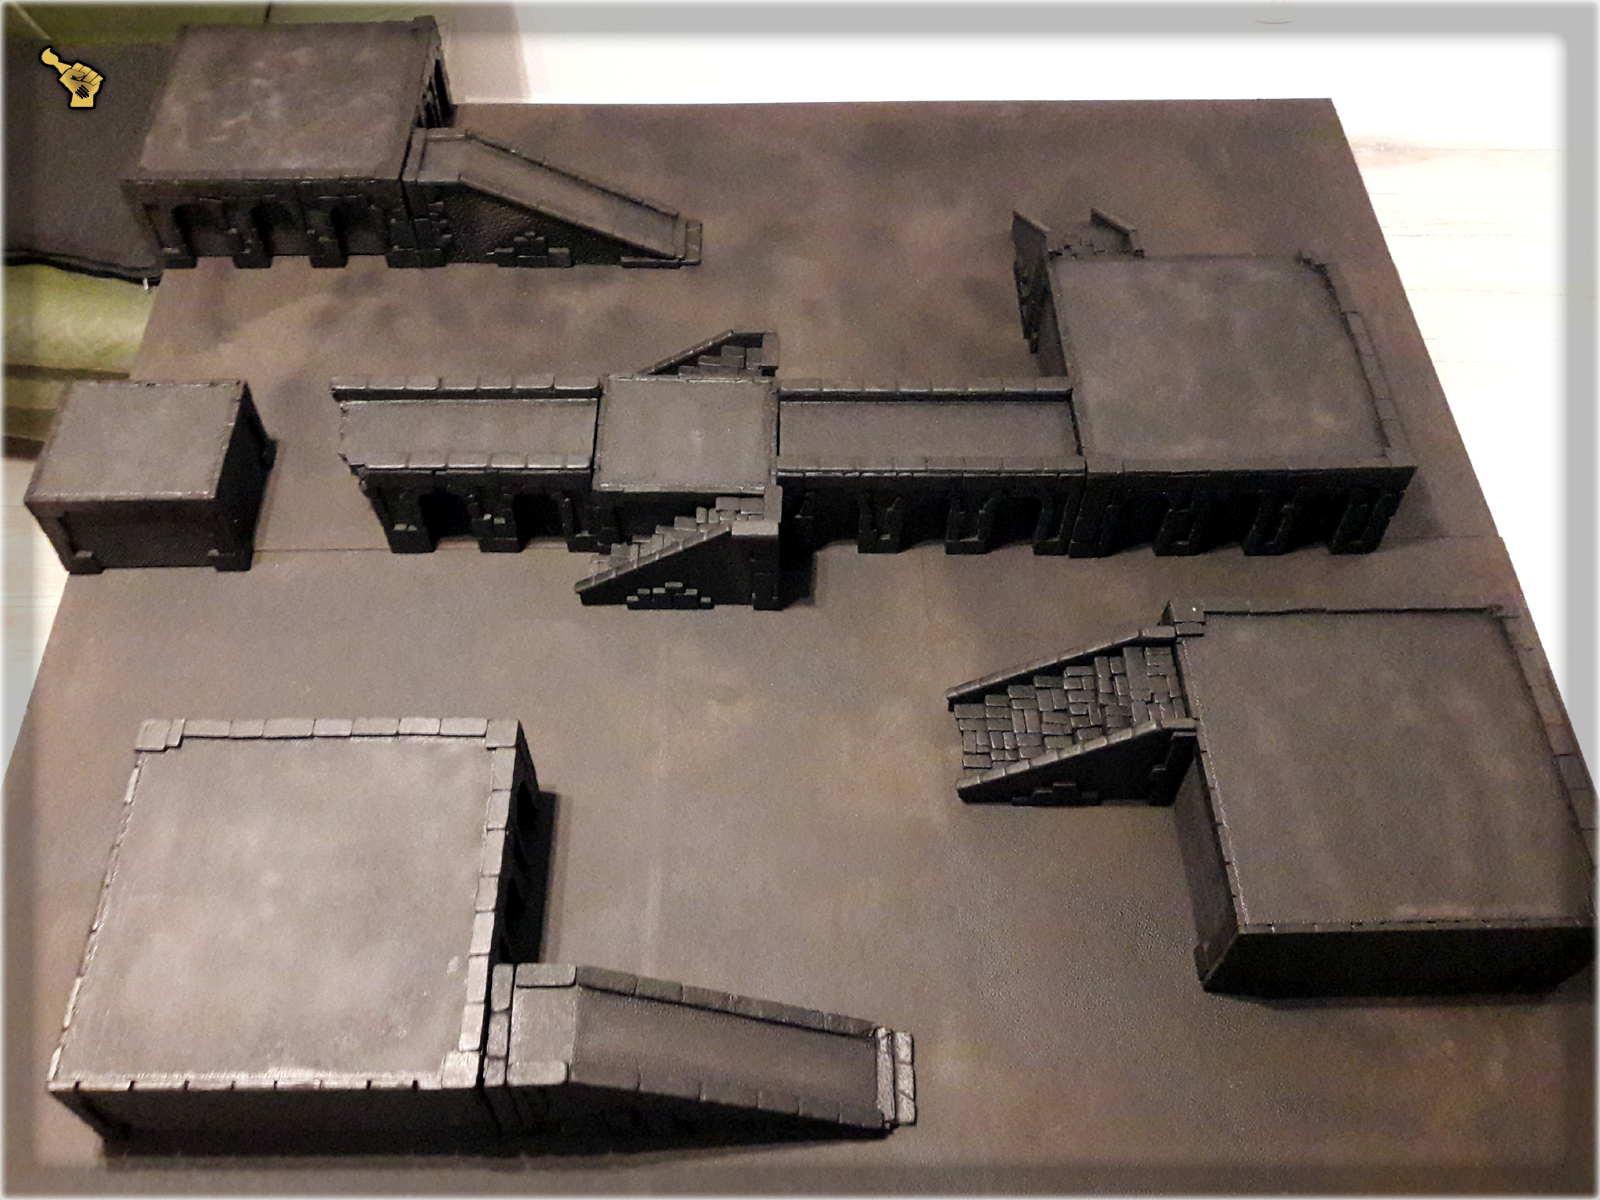
One of the things I usually mess up aree bridges. Up to now I can’t recall any of these that would actually turn out to look good. Having excess materials I decided to give it a try, this time though I used the same concept as in case of urban hills. I tweaked the design a little to better suit the gaming board and added two short bridges to the set.
Once undercoated I set up couple of different battlefields to take proper pictures. I was able to confront the idea of a modular table with what I’ve created. Checked out different layouts but also made mental notes of what and how many buildings I would require in the future…
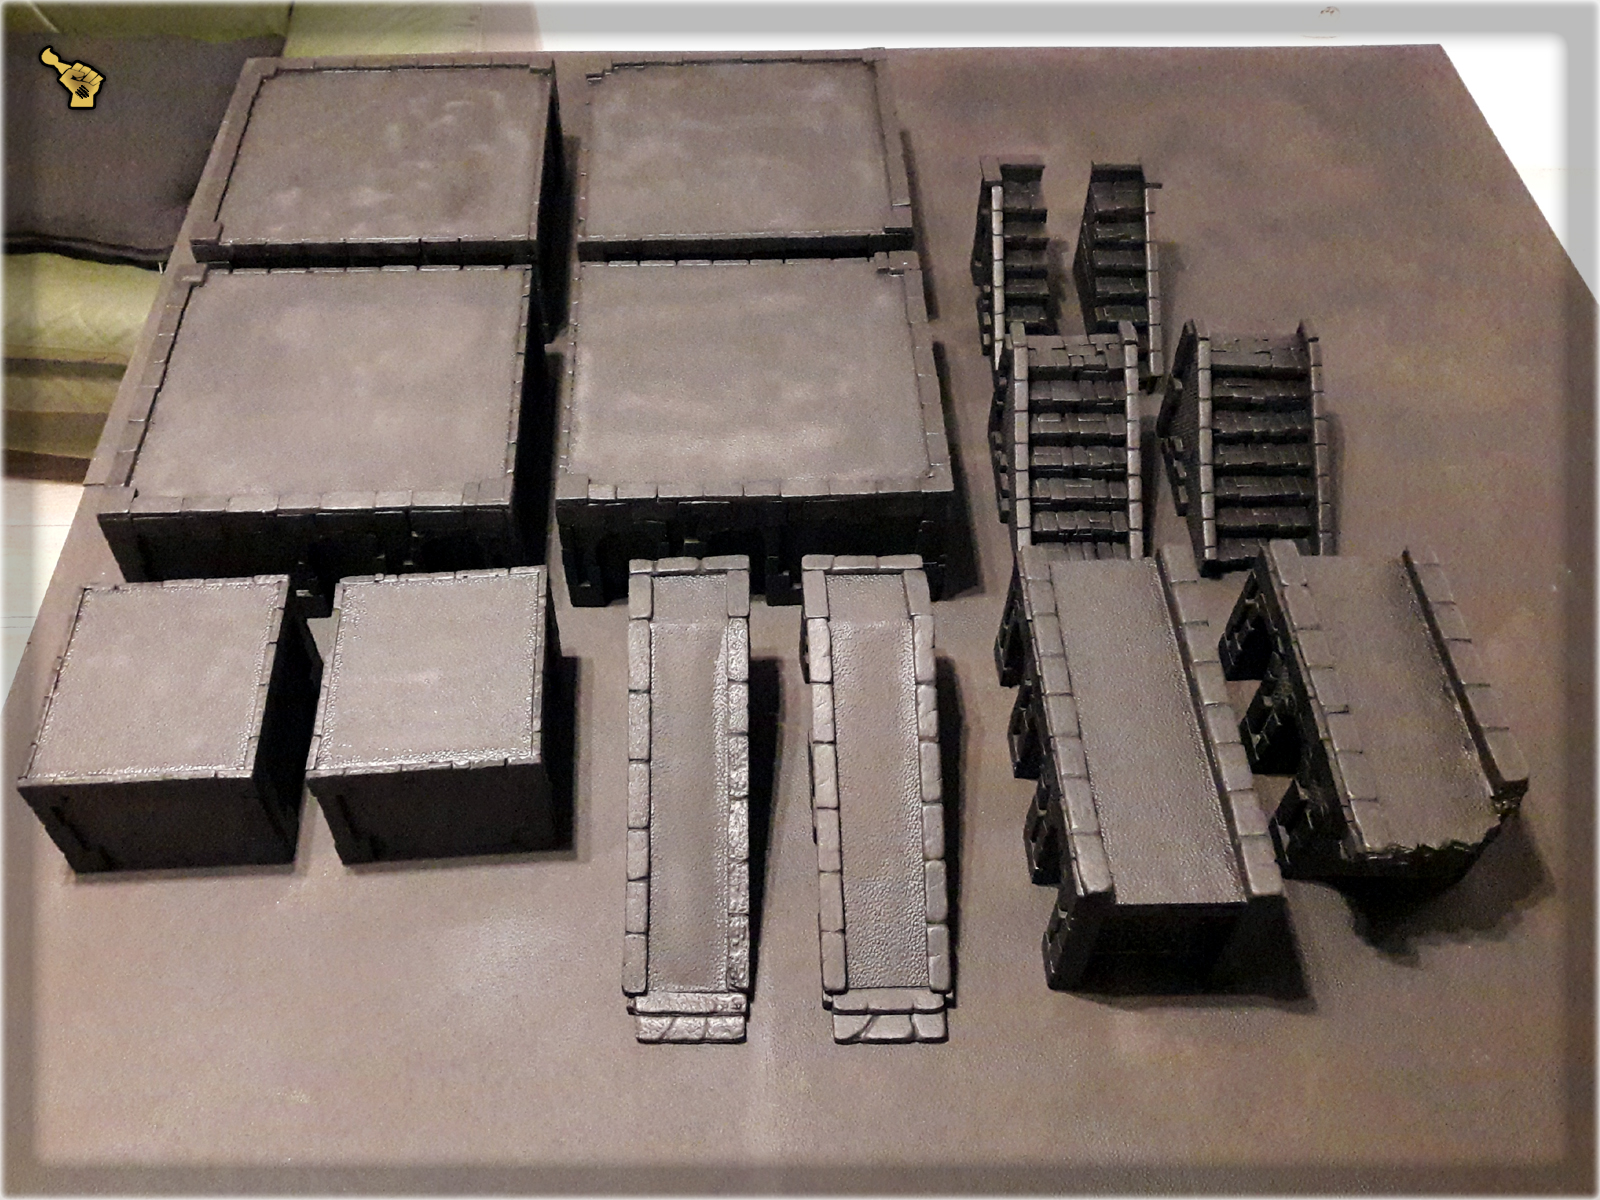
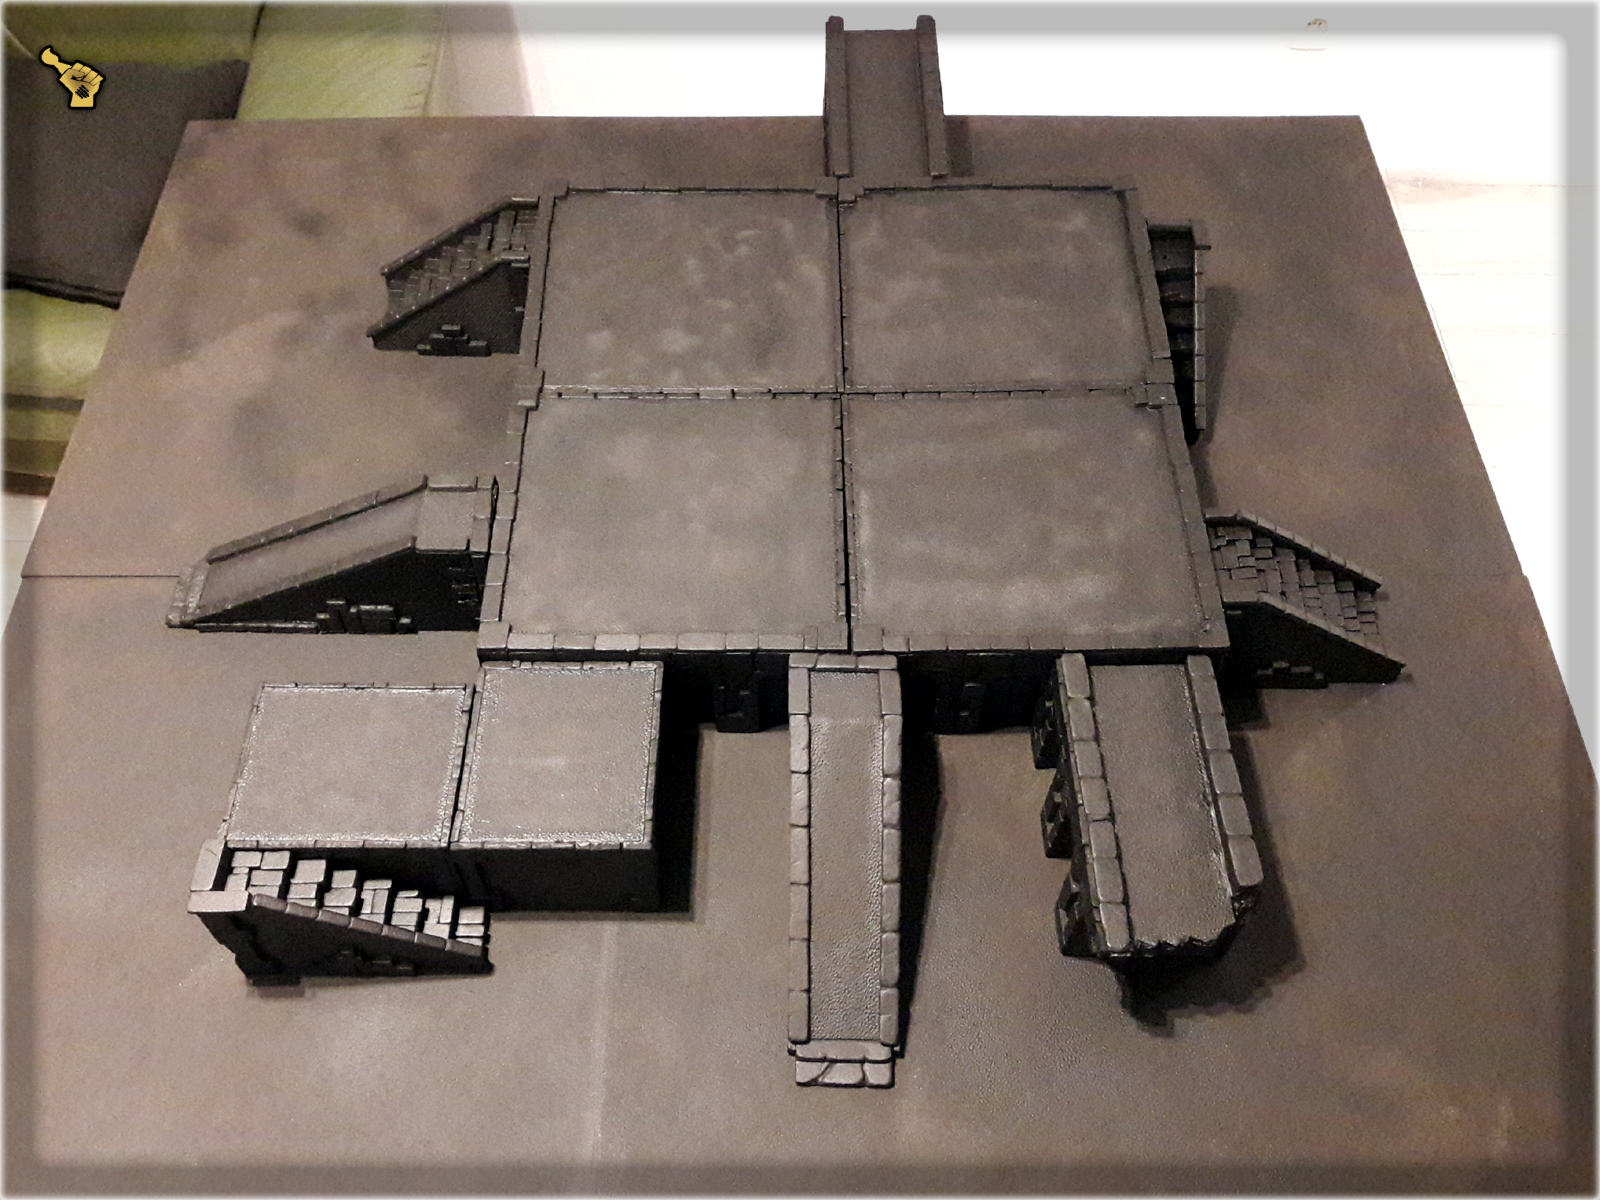
Paint job followed soon after. I used entire 200ml of Vallejo Black Surface Primer mixedwith gray and white to provide different layers of both wet paint job and drybrush. After that I also edged all corner stones with GW’s Pale Wych Flesh and added some extras in form of broken skulls, torches and Wyrdstone Shards. I also covered some spots with Autumn Leaves made out of Birch-tree seeds. This set a strong, dark mood to the scenery and comboed nicely with already painted ‘Toad Fountain’ and ‘Dead Tree’ pieces…
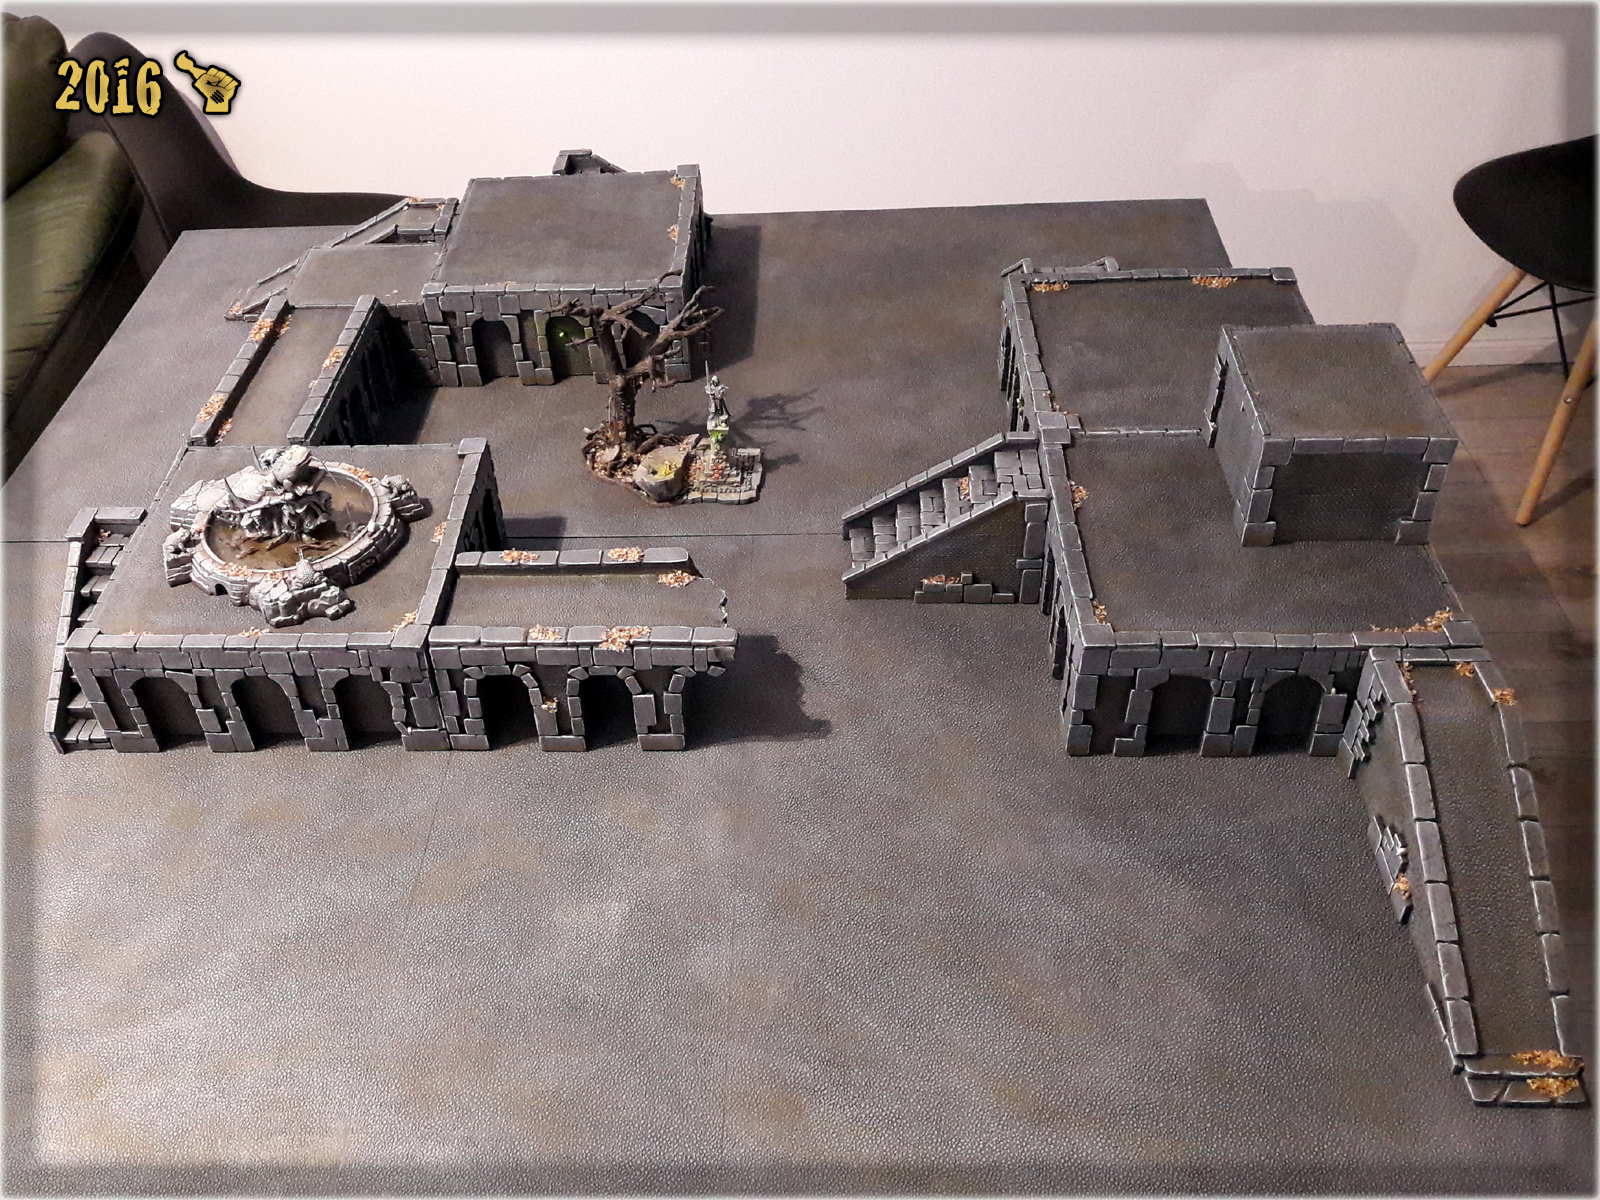
More than happy with the visual results I put the project on hold until end of the year in hope to get back to it with some cool looking buildings later on. We’ll see how it goes once 2017th hits the callendar…
Last weeks I’ve been diverting more and more attention to Mordheim. Maybe that’s because I’ve been playing PC version lately. Either way, every couple of years I get that ‘Mordheim fever’ and delve deep into my imagination, staying up whole nights, making something cool for my own Mordheim collection. Right now I work on a brand new Mordheim gaming board thus I figured out to revive an old Tutorial from Mordheim Treasure Hunters blog and add it to the collection here at Scarhandpainting. More articles are already prepared, but I somehow felt like this one will be a nice way to close the 2016th.
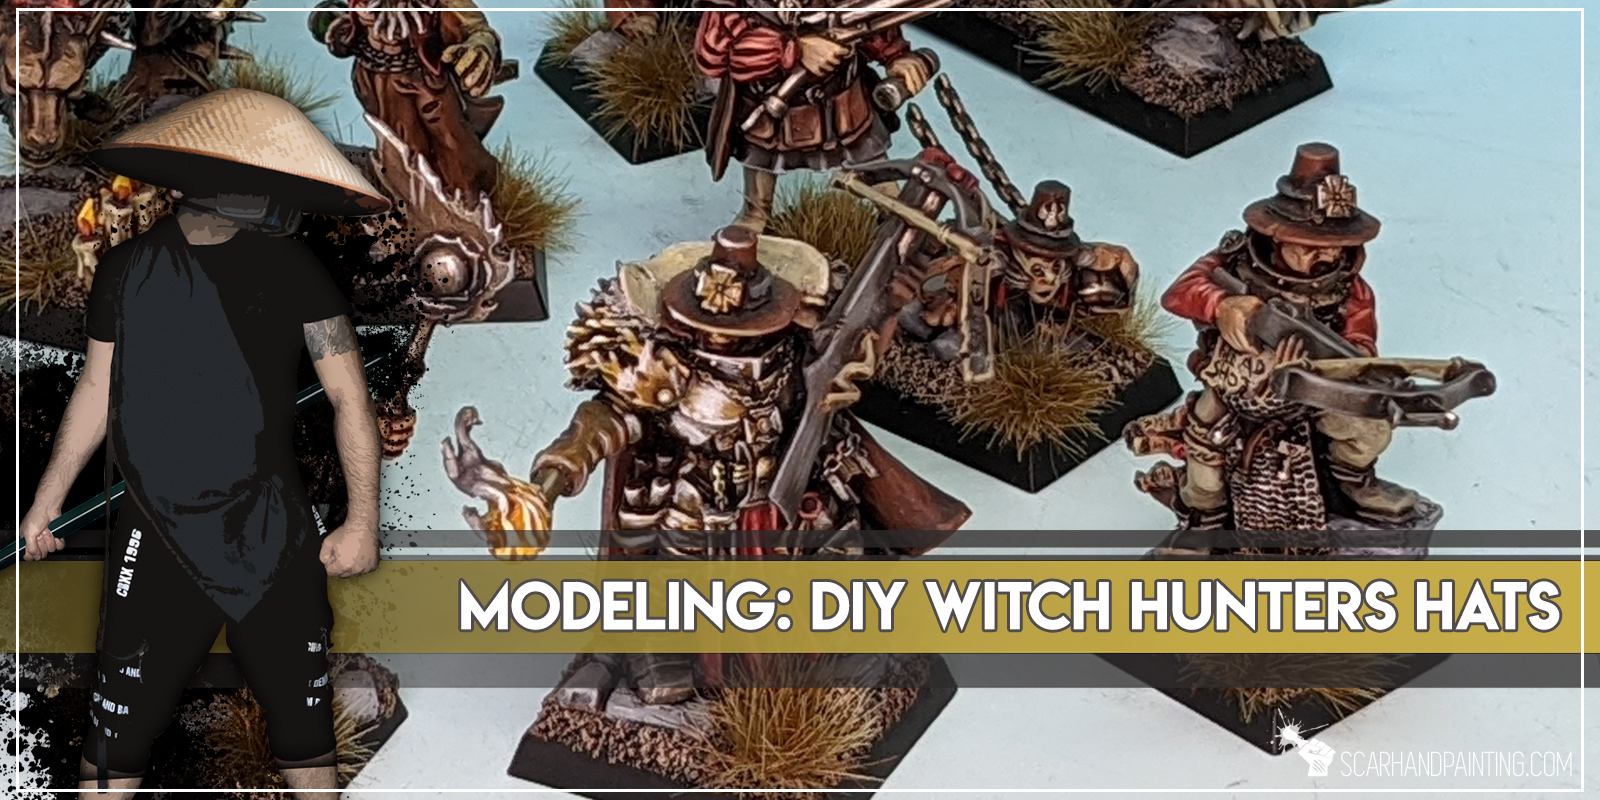
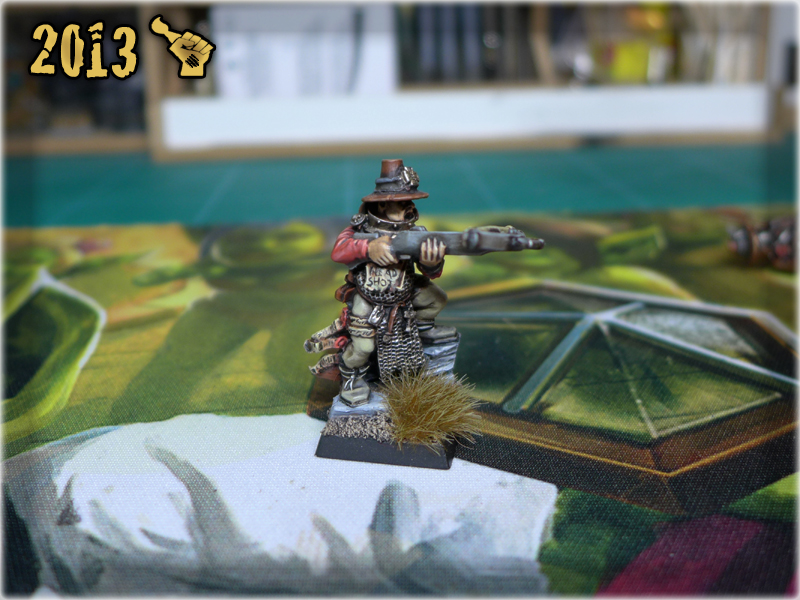
Below I will show you a quick way of making a Witch Hunter’s Hat with basic tools, some green stuff and some plastic leftovers. The thing about Witch Hunter’s Hats is that they are extremely rare and yet they look just awesome. A lot of miniatures can be reborn as proper Witch Hunters just by adding this small detail. So, here’s how I do it:
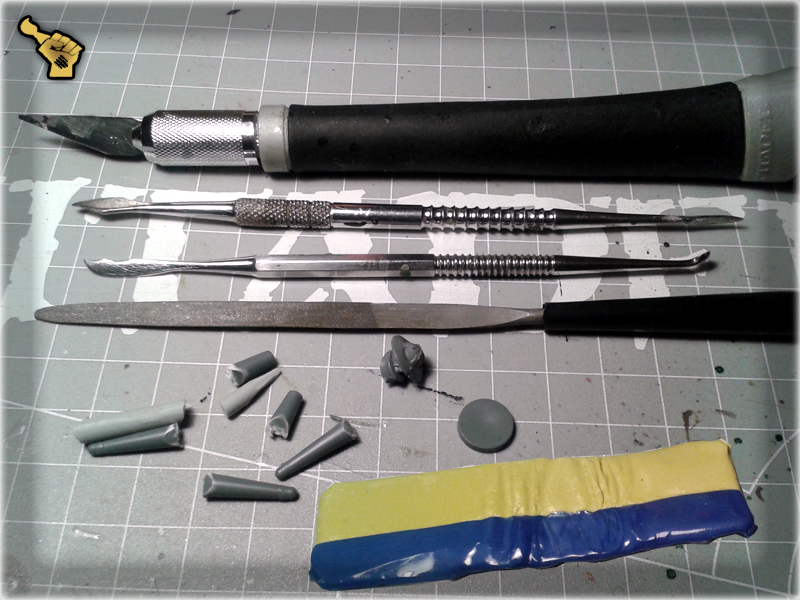
* Modelling Knife,
* Sculpting Tools,
* Modellin File,
* Green Stuff,
* Super Glue,
* Some round and flat plastic bitz (heads in helmets will do too),
* Some tubular sprue plastic bitz (easy to get as they’re in almost every sprue),
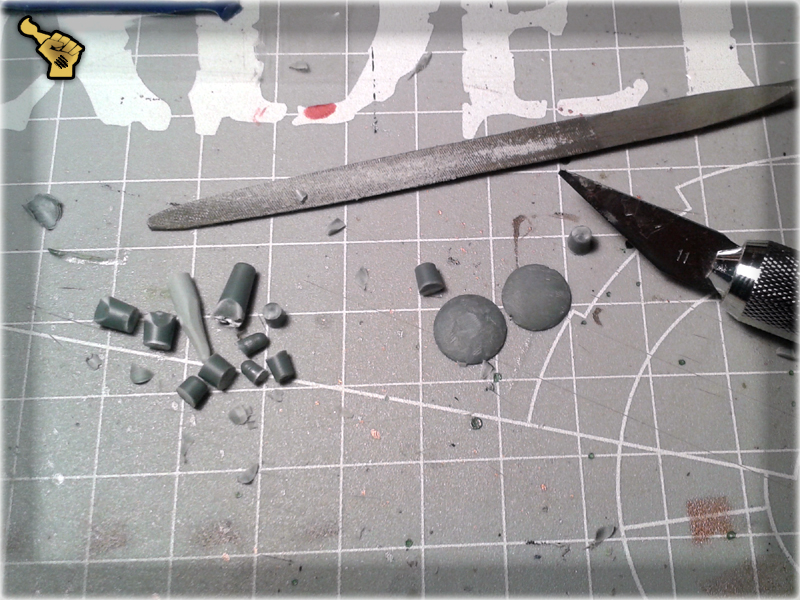
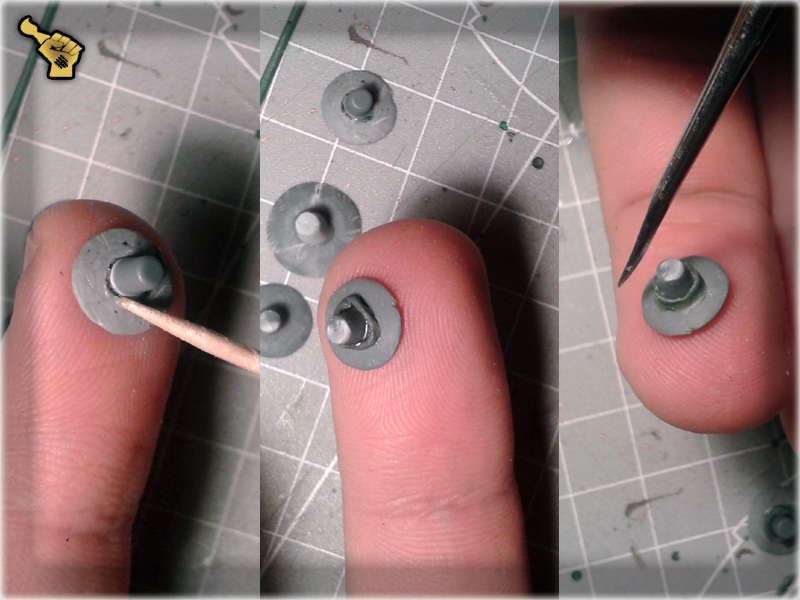
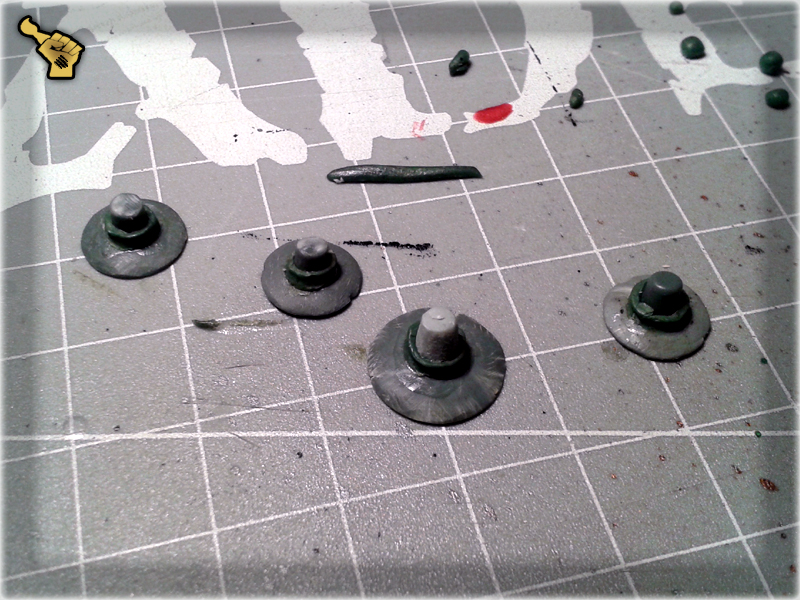
1 I started with preparation of hat parts. For this purpose I used round shaped plastic bitz, cutting off the excess of plastic with Modelling Knife first, then flattening the top area with a Modelling File. Next I used a Modelling Knife to cut tubular sprue bitz into nice hat top pieces. This is how it should look like when done:
2 I then glued the pieces together, prepared a piece of Green Stuff and rolled it into a thin line. I also cut small pieces of Green Stuff loose and rolled them into small balls.
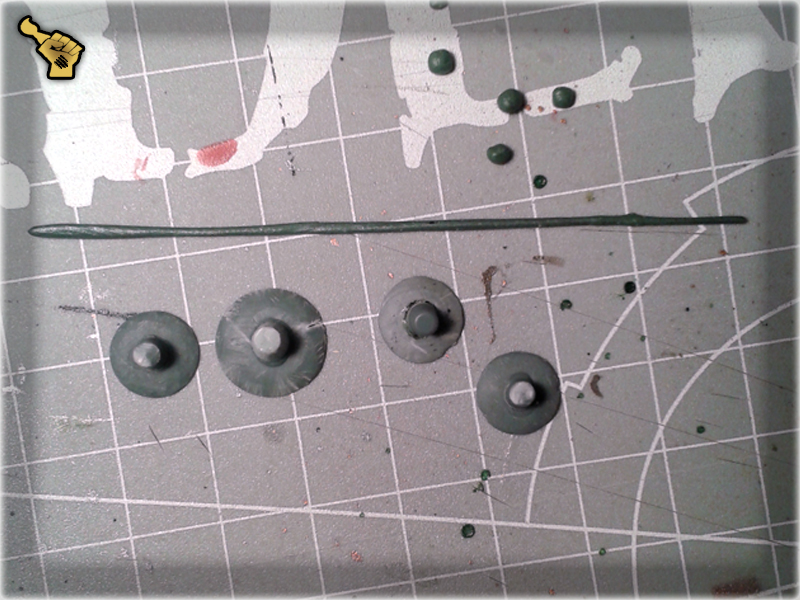
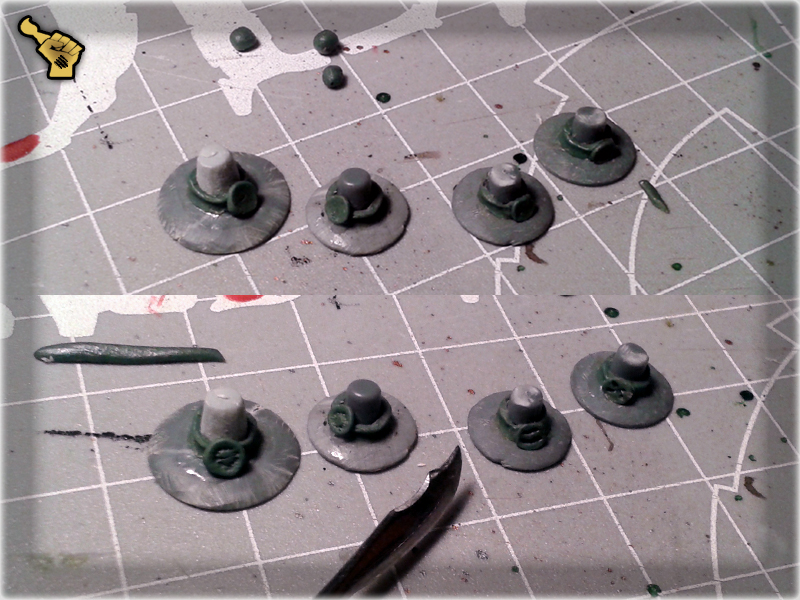
3 I applied some Super Glue around the connection between hat's top and brim. I then applied a Green Stuff rolled piece onto the glue and flattened it with a Sculpting Tool modelling it into a strap. For this purpose I used a rounded part just behind the tip of a Sculpting Tool.
4 I smoothed the texture of starps using a Sculpting Tool dipped in water. I then left the hats to dry.
5 Once the Green Stuff dried out I applied Super Glue onto a piece of plastic, sticked a Green Stuff ball onto the tip of a Sculpting Tool, gently dipped it in the glue and applied it to a hat's strip. I also flattened the ball with the other (rounded) end of a Sculpting Tool thus creating a clasp.
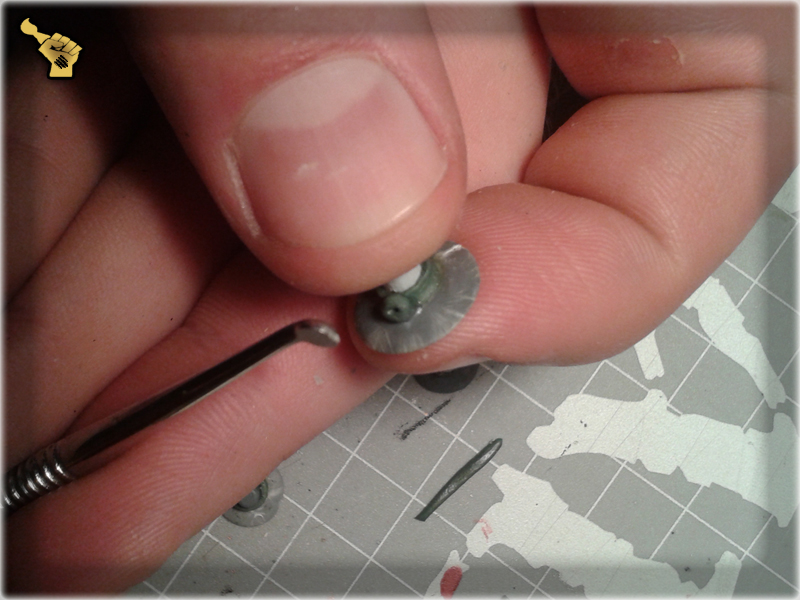
6 In the end I modelled a pattern on each clasp with the sharp tip of a Sculpting Tool. Once it was done I let the Green Stuff to dry out. Instead of modelling a clasp yourself, you can use any well sized bitz or even a piece of plastic. Actually anything fitting the hat's strap will do.
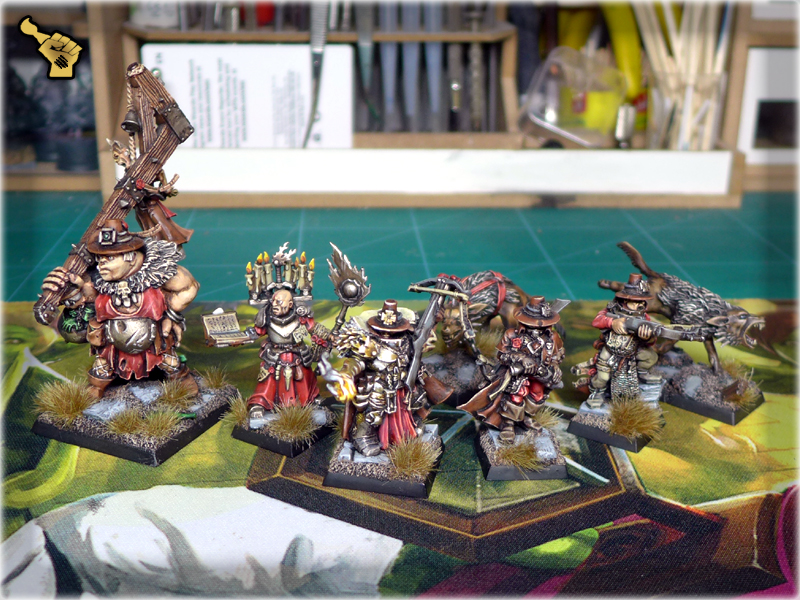
The final effect may not be outstanding but it will do the job of transforming your Imperial Mercenary, or any other miniature into a badass Witch Hunter. See for yourself in the Warband: ‘Scourge of the Witches’ gallery. Here’s a preview pic:
I hope you like the tutorial. It is an old piece but I really wanted to have it here at Scarhandpainting.
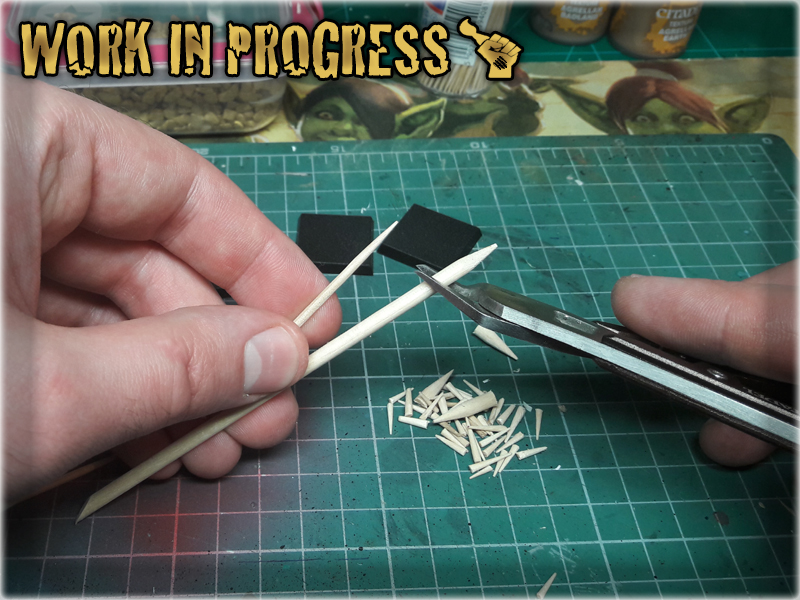
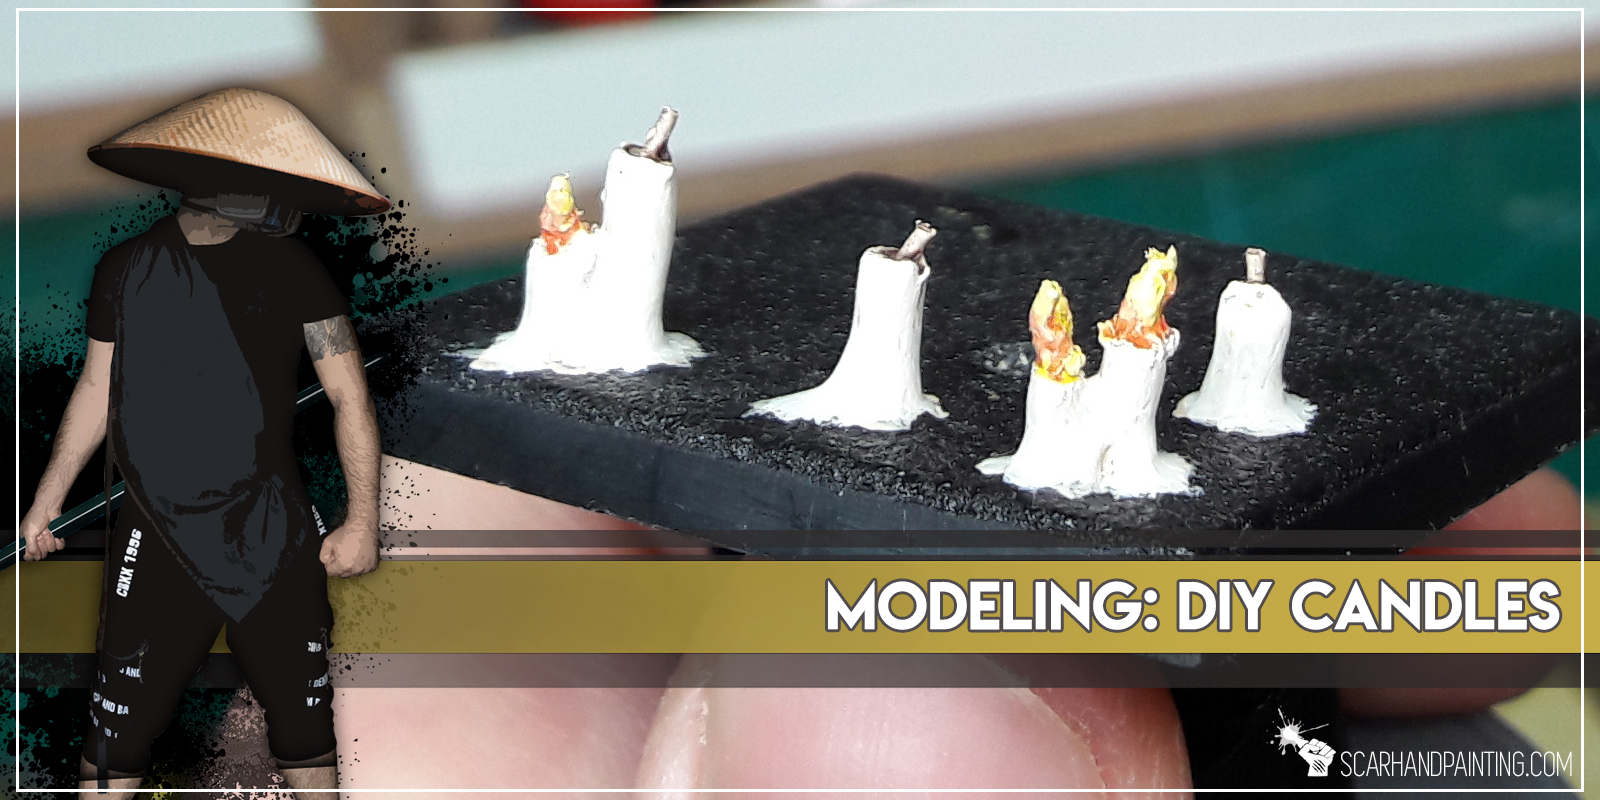
Winter is already here thus I thought about warming the theme a bit by introducing a tutorial of how to make candles for 28-30mm scale. Why produce such things? In miniatures hobby candles are rare bitz among what you get in the sets designed by main miniature producers. Even if a set contains some, their number is scarce. Why not make your own and adorn bases, miniatures and even scenery with them? Be it Age of Sigmar, Mordheim, Warhammer 40,000 or just a fantasy dungeon – candles will provide mood to both miniatures and scenery. Below is a quick and easy step-by-step of how to produce your own 28-30mm scale candles. Enjoy…

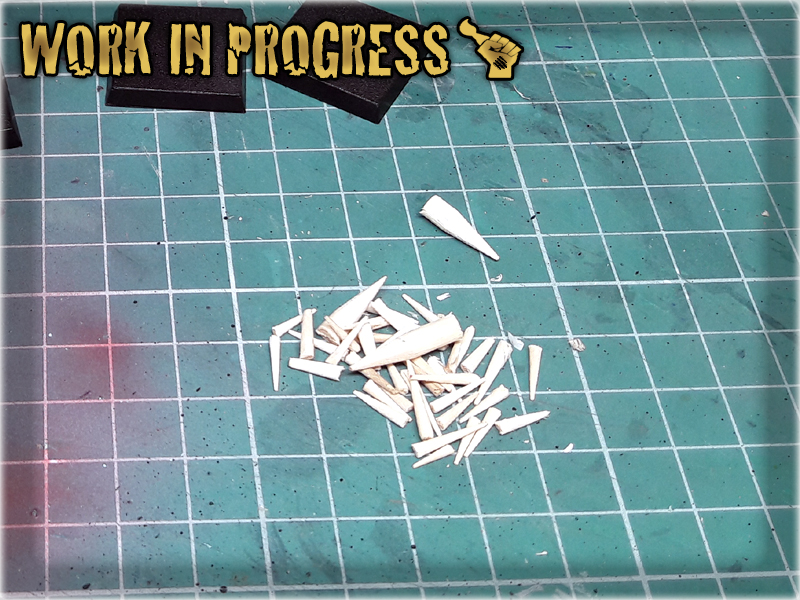
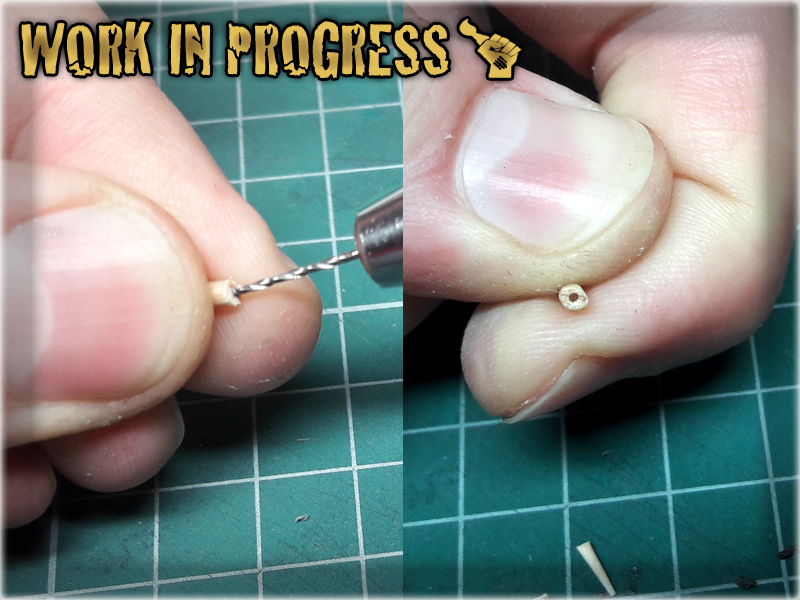
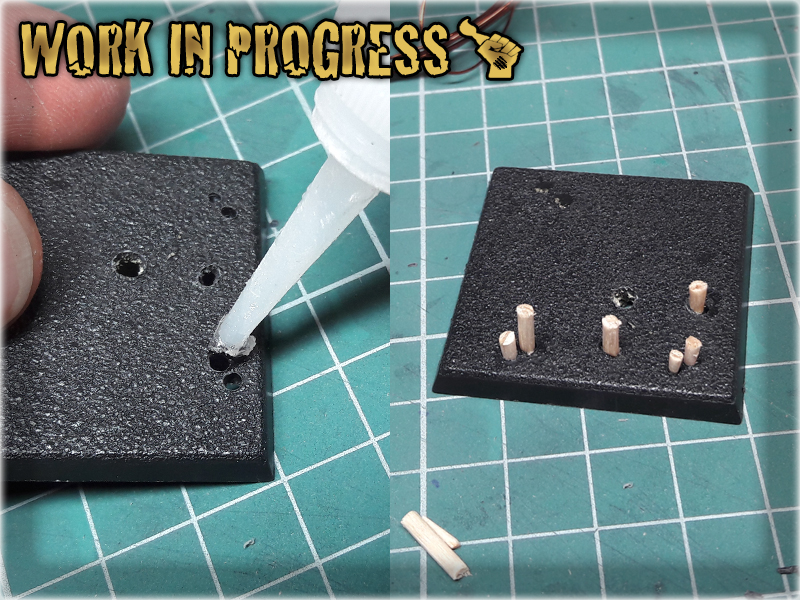
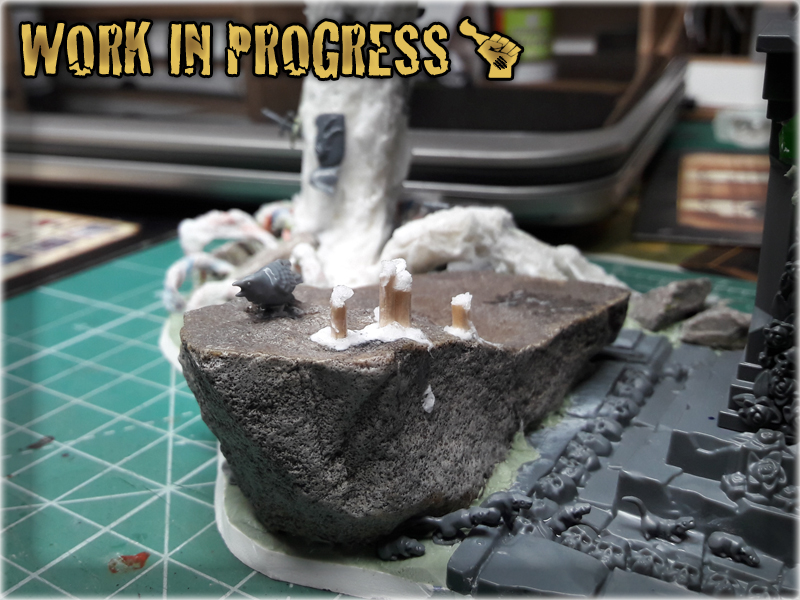
1 I started with preparation of candles-to-be by cutting toothpicks into small pieces. I tried to keep all of them between 5-10mm long, to better fit into the 28-30mm fantasy scale. Once I had couple pieces done I choose some of them and drilled small holes from one side. These will be used later to hold candlewicks.

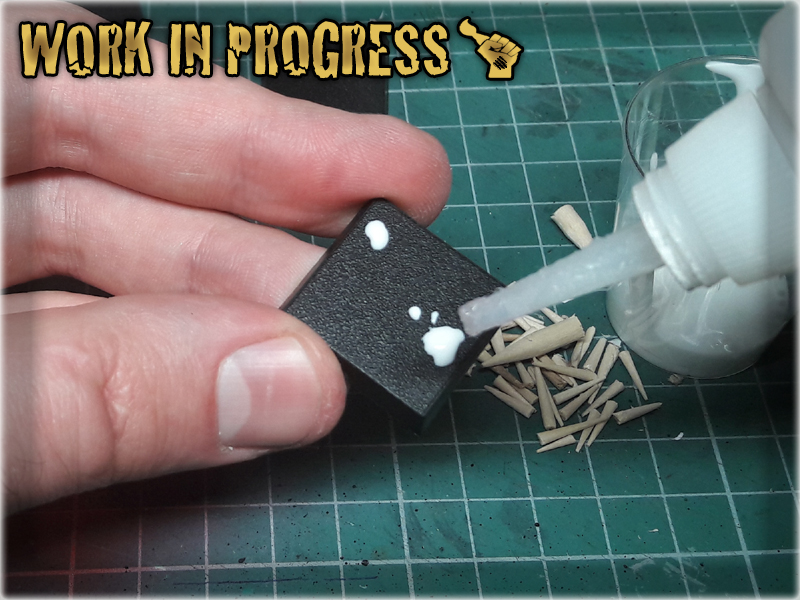
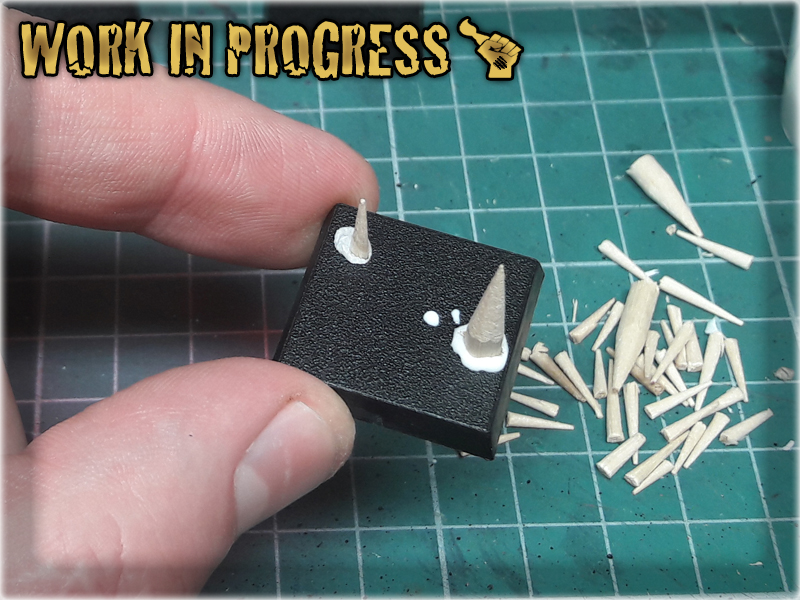
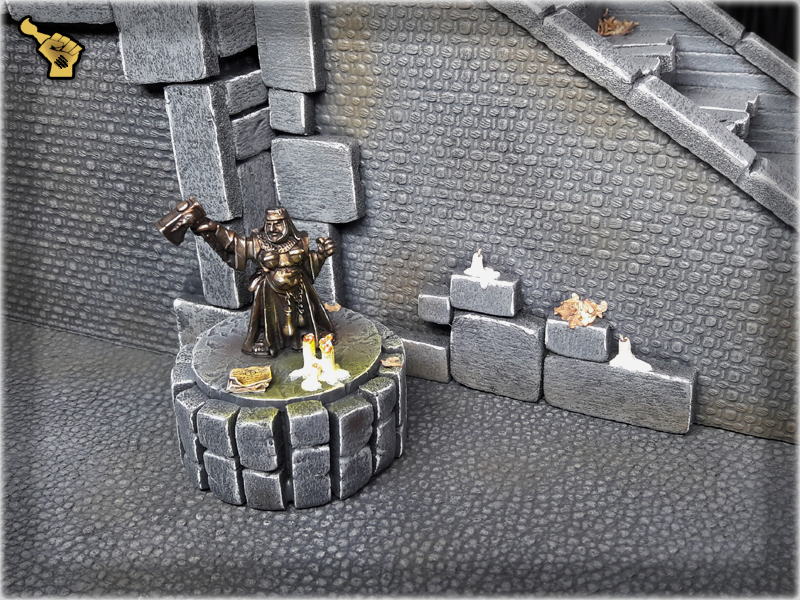
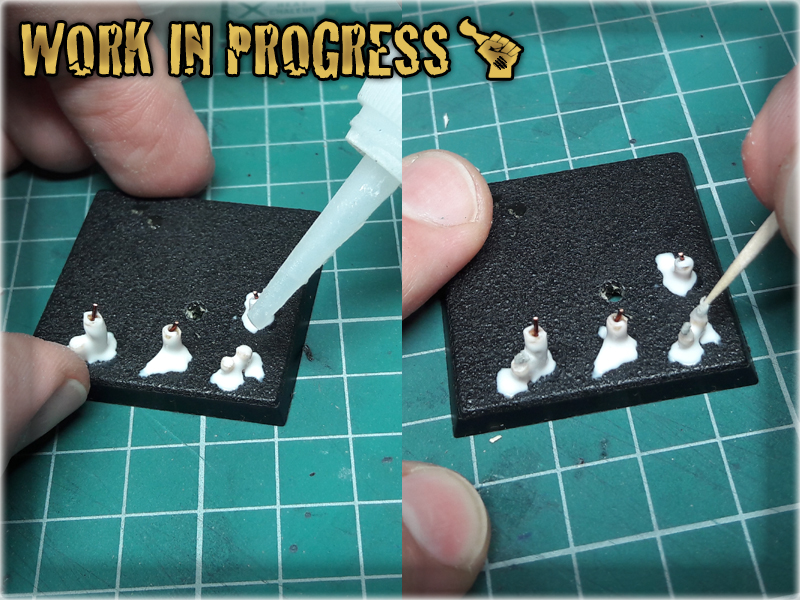
2 Next I glued the candles onto the base. In case of scenery I usually drill small holes to hold the candles in place or just glue them as it is if I'm sure the scenery won't require enchanced durability. For the purpose of this tutorial I drilled some holes in an old square Warhammer base.
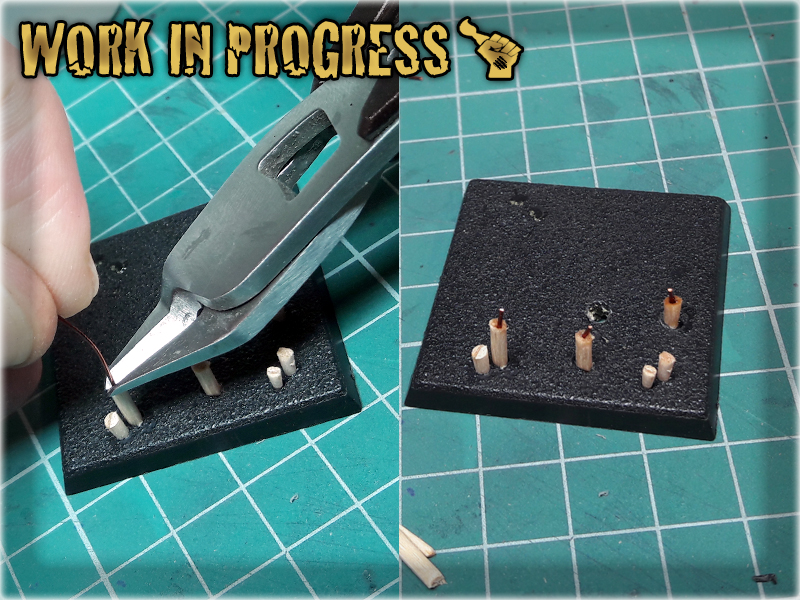
3 I then glued small pieces of wire into the holes, to look like candlewicks.
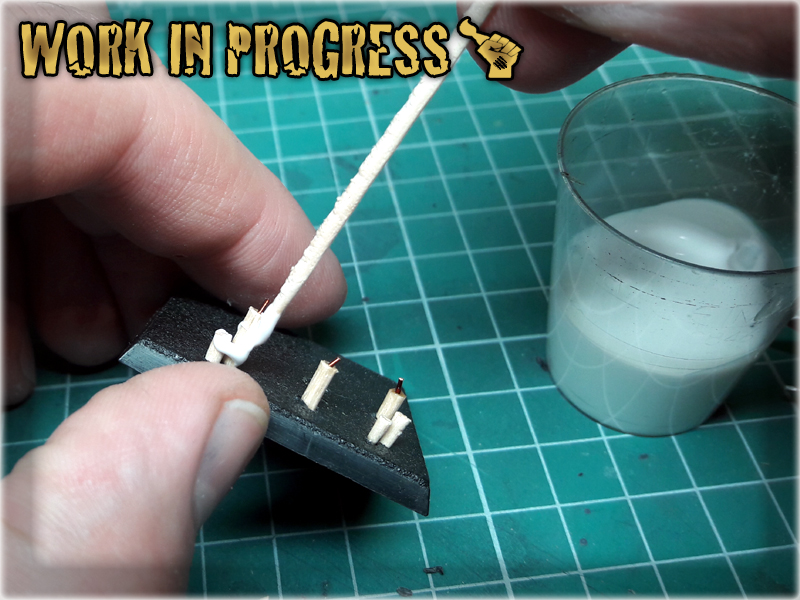
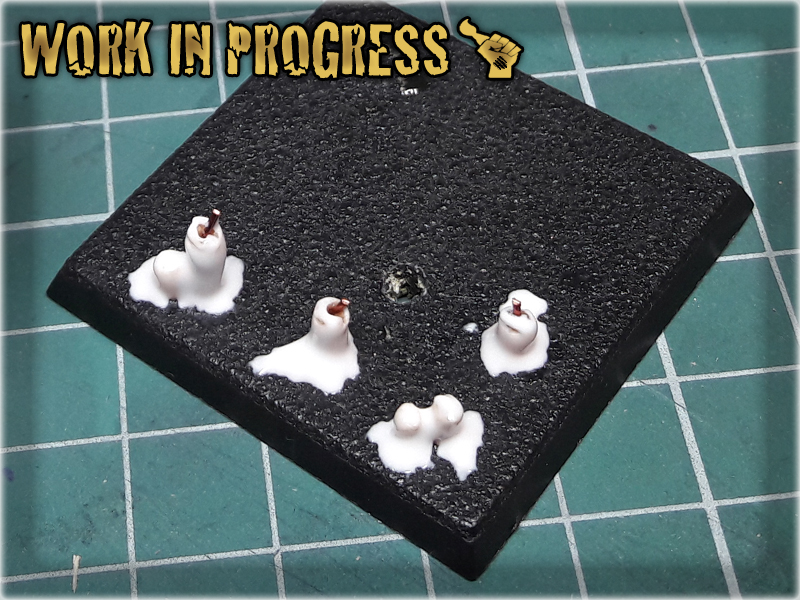
4 Then came the time to cover the candles with a basing glue, applying additional glue around the base of each candle to create an effect of spilled wax.
5 Next step was to prepare couple of small flames, using a wet paper tissue. I just rolled, then cut it into small pieces, which I then rolled once again.
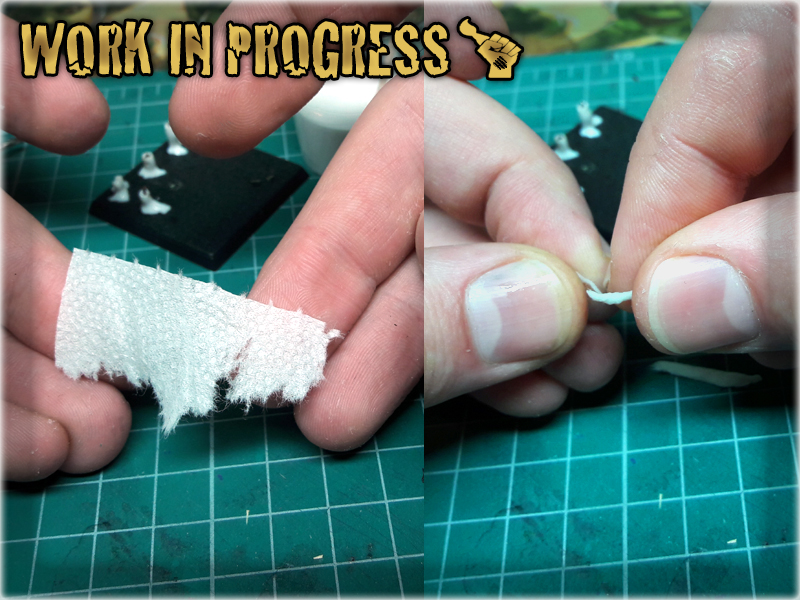

6 The flames where then glued to the candles with super glue and once in place - covered with glue to harden entirely.

7 I left the stuff to dry, then painted it with mix of creme and white, washed the candlewicks and flames with some washes.

The end result will look more or less like this:
“It is a Dark Time.
The might of the Empire is dust, their crown is lost to them and their glory forgotten.
The promise of an age of peace and prosperity is drowned in blood.
This is your time. For the ruins of Mordheim hold prize beyond imagination: stones of power which can grant all your wishes.
But beware of your enemies.
Fear the Possessed, the Beasts of the Pit which roam the night.
Watch for the thieves of the Rat men, the Skaven of the Underworld.
Dread the corpses who walk like the living: the foul Vampires and their rotting minions.
This is Mordheim, the city of the Damned. This is the home of all your hopes. Be wary or it will be your grave as well.”
Mordheim rb.s.124
Following the previous Mordheim article I would like to present the “Toad Fountain” – another addition to my Mordheim scenery collection. The same night I started to work on “Dead Tree” I encountered difficulties with falling asleep. My imagination bombarded me with countless visions of cool Mordheim scenery pieces, ruined bridges, fallen temples and overturned carts. Among many otheres was a diamond in for of a big, eye catching fountain…
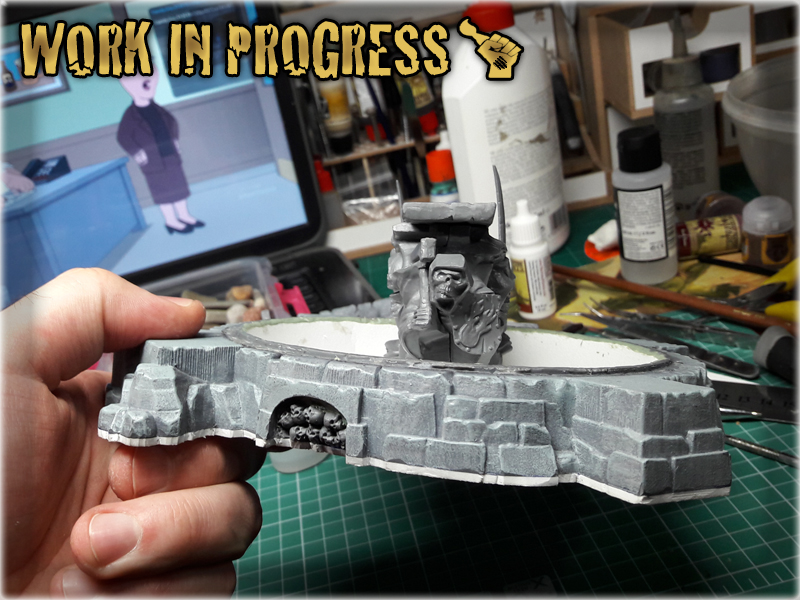
At first I approached this project from many different angles. Wasn’t entirely sure how to handle the main body of the fountain and even what to actually put on top of it. I only knew how I would like it to look in the end. I considered building entire fountain out of MDF pieces or even plasticard. In the end I decided to use a GW’s Tower of Sorcery bottom piece to base the construction at. With that behind me I could have predicted the size and role this scenery piece would fill in my newly developed gaming board. Be it a plaza filler or top piece of an urban hill – I was sure this one will bring a lot of dark and strange mood to my City of the Damned.
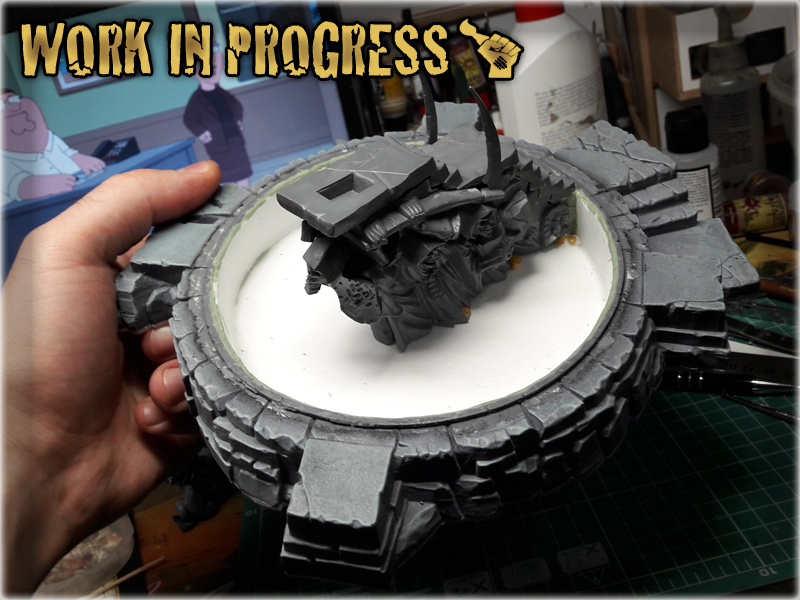
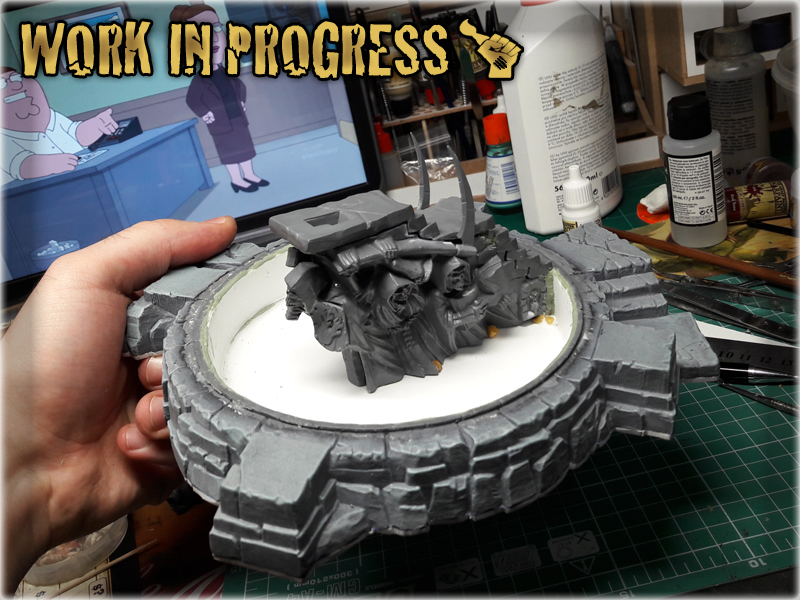
I started the project with cutting out the entire inner surface of the Tower of Sorcery’s base. I had to use a heated knife to do this, cause the plastic was really thick. Once done I cut a huge chunk of plasticard, mounted the construction on it and cut it to match the base of the fountain. I filled two canals in the base with skulls and bricks picked from scratch, then used modelling putty to fill any remaining holes. Having a firm floor in place I then used strips of plasticard to form the inner wall of the fountain. Smoothed the edges with modelling putty and mounted the inner feature, made out of GW’s scenery piece…
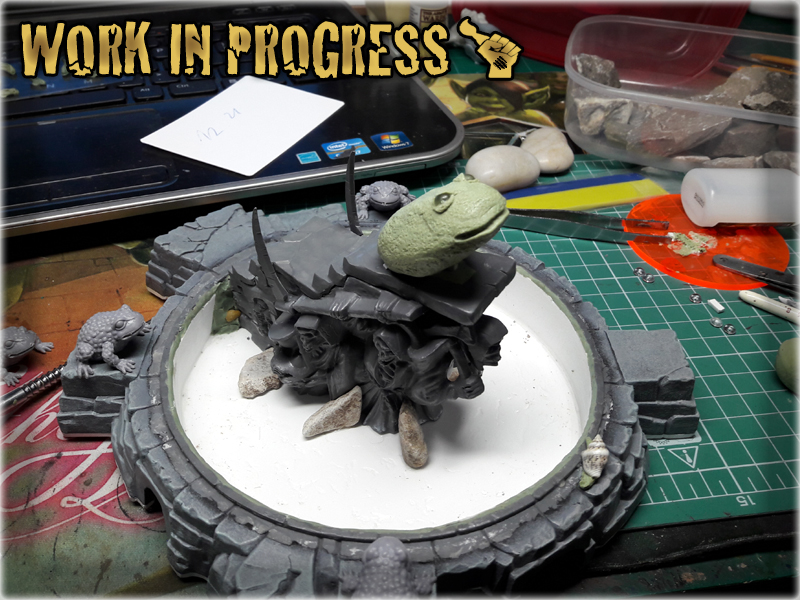
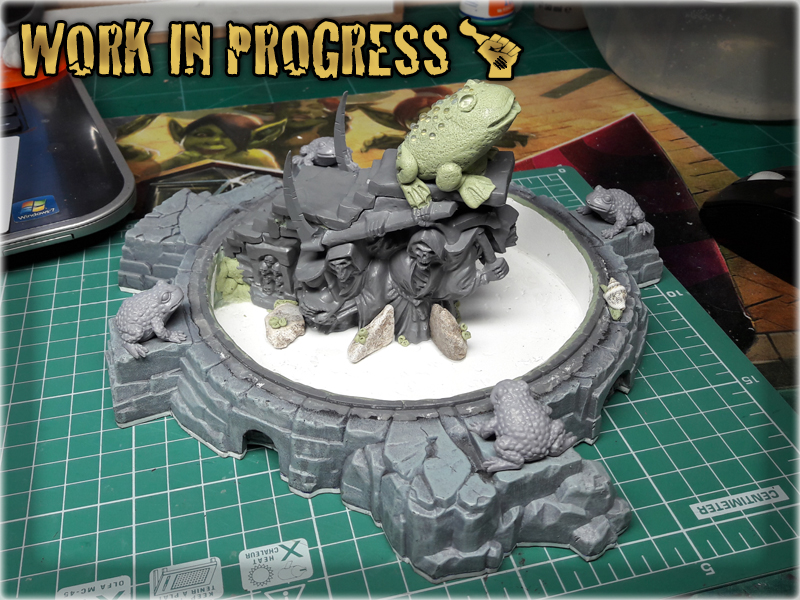
I then started to figure out which miniatures to put around the pool and on the main plinth. Had real problems with that, due to not enough statue looking miniatures. I had some old Sisters of Sigmar, but each one was a different piece. Any other stuff except Stormcast Ethereals was too diverse to be even considered, and the Space Marine like guys looked just ridiculous, and uber epic’ish to be mounted. Totally out of place which you can see below…
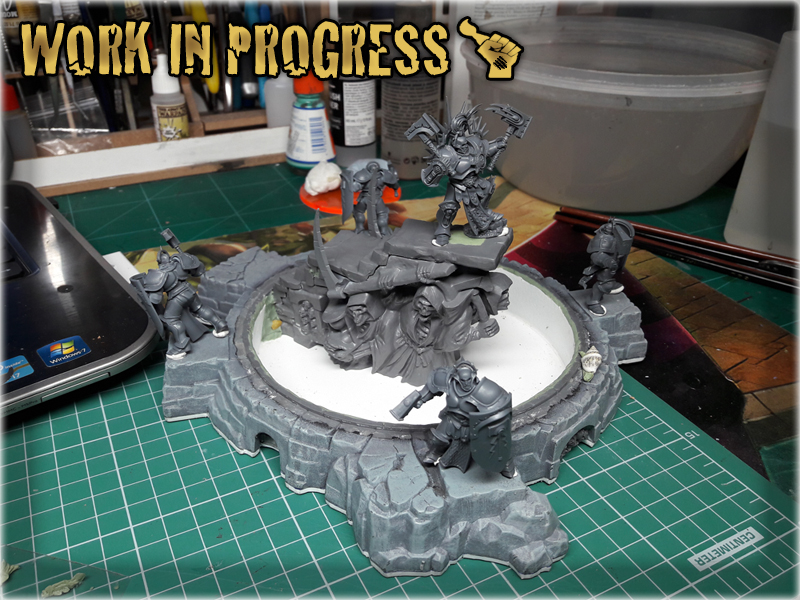
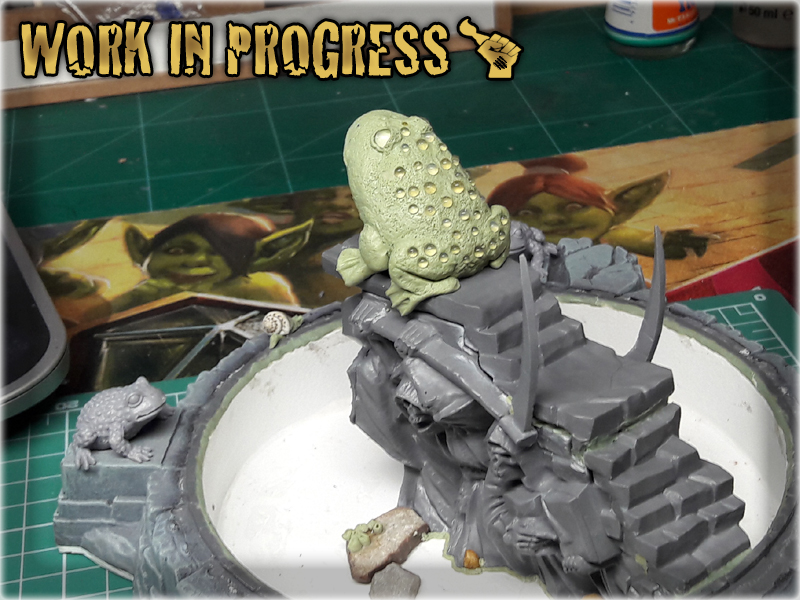
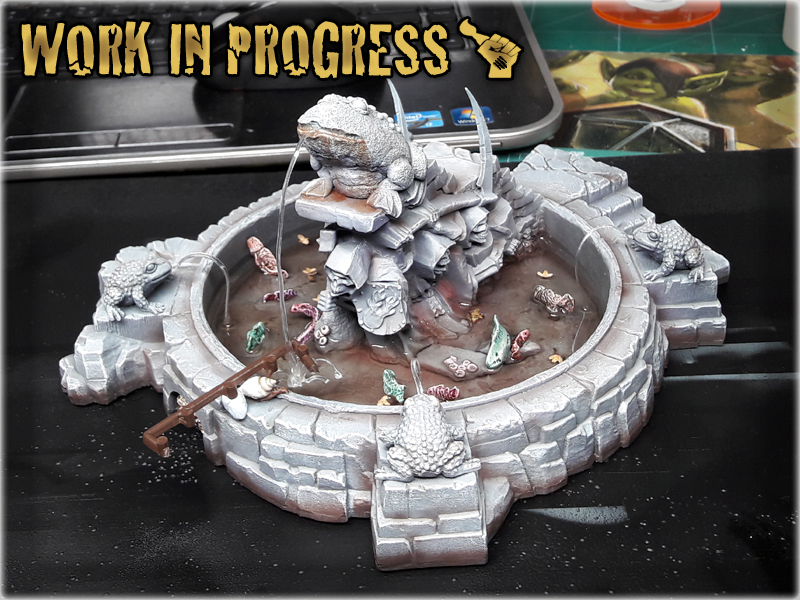
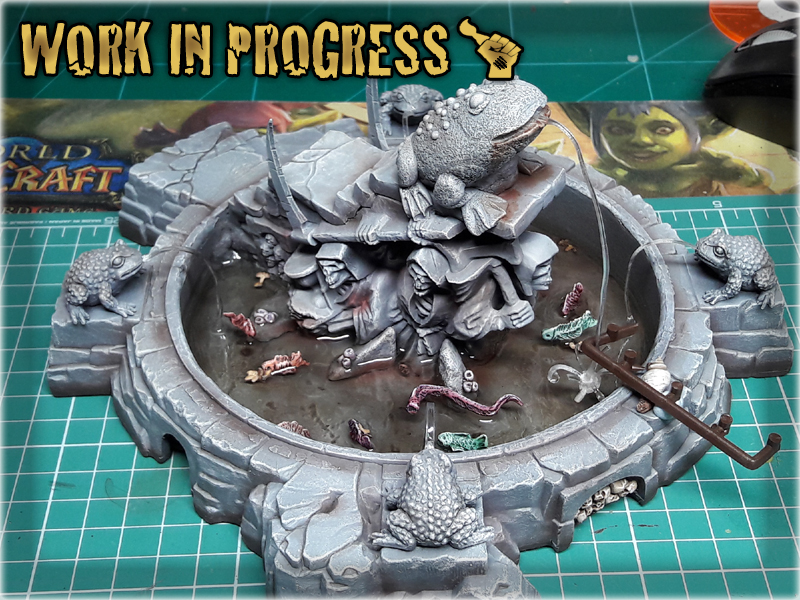
Salvation came in form of Talisman the board game, where four awesome looking frogs can be found. Frogs totally fit into Mordheim’s unhealthy, dark mood – so I decided to ultimately break down the Talisman set and use these four creatures as statues. But what to do with a center piece? I considered leaving it empty or building an altar on top of it. Nothing seemed fitting the space so in the end I decided to take a risk and try to sculpt my own Toad. To do so I picked a smooth, flat egg-like rock and used it as main body. Then I just built the texture around it, mounted it on the plinth and added arms, leggs and facial features. I used small crystal balls on the back of the main Toad so that it fit to the rest of the herd…

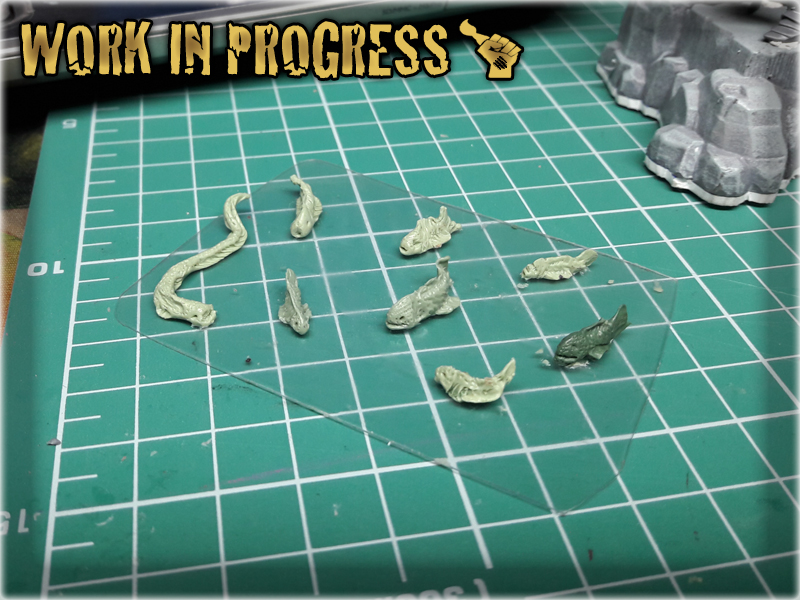
I was really happy with the result of my sculpting, especially while I am not at all that good of a sculptor. Usually I just use random stuff instead of making it myself. Still – this turned out pretty cool so a win for me. I even used the excess of the modelling putty to make more fish and creatures, mixed them with the ones created during the “Dead Tree” Special Project and mounted all on a piece of plasticard to be easily painted outside of the fountain. The scenery piece was ready for another step…
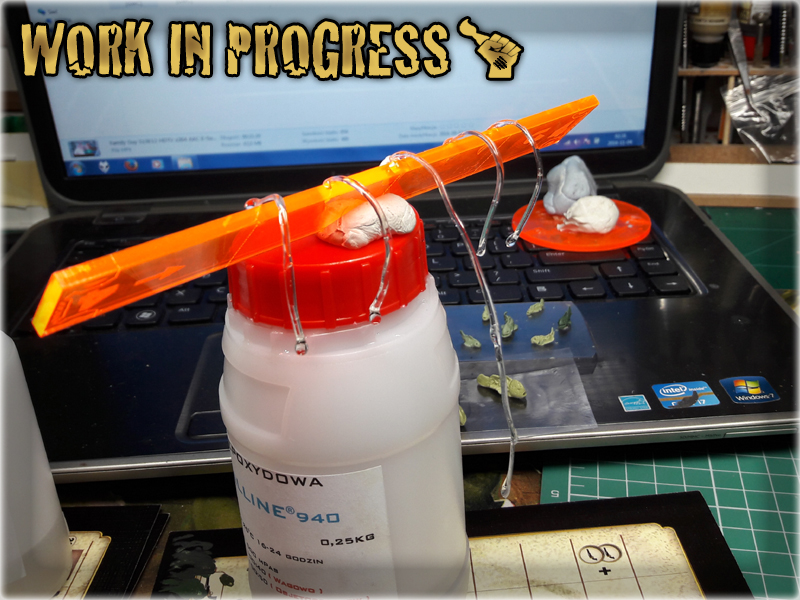
This one was painted side by side with the previous Special Project. I had a strong Mordheim fever back then and was so deep in trance as not to take any mid-paint pictures except for one. Real shame, but what’s done is done. What’s worth saying is that I airbrushed a lot, covering entire Fountain with Dark Sea Green from Vallejo and then moving up with Light Grey Green and other colours. Purple and brown points were added to the fray before entire fountain was drybrushed softly with Pale Wych Flesh. I then washed the interior of the pool with some of Vallejo washes and mounted all the newly painted fish on top of tiny translucent pieces of plastic cut out of a coca-cola bottle. After the paint and glue dried I just filled the basin with Crystalline 940 resin halfway up and let it rest for a day. I also cut thin lines of translucent plastic and modelled them to look like falling water using heat. Added them to the construction the next day and had to pack entire thing for transportation to a new home, along with all my stuff…
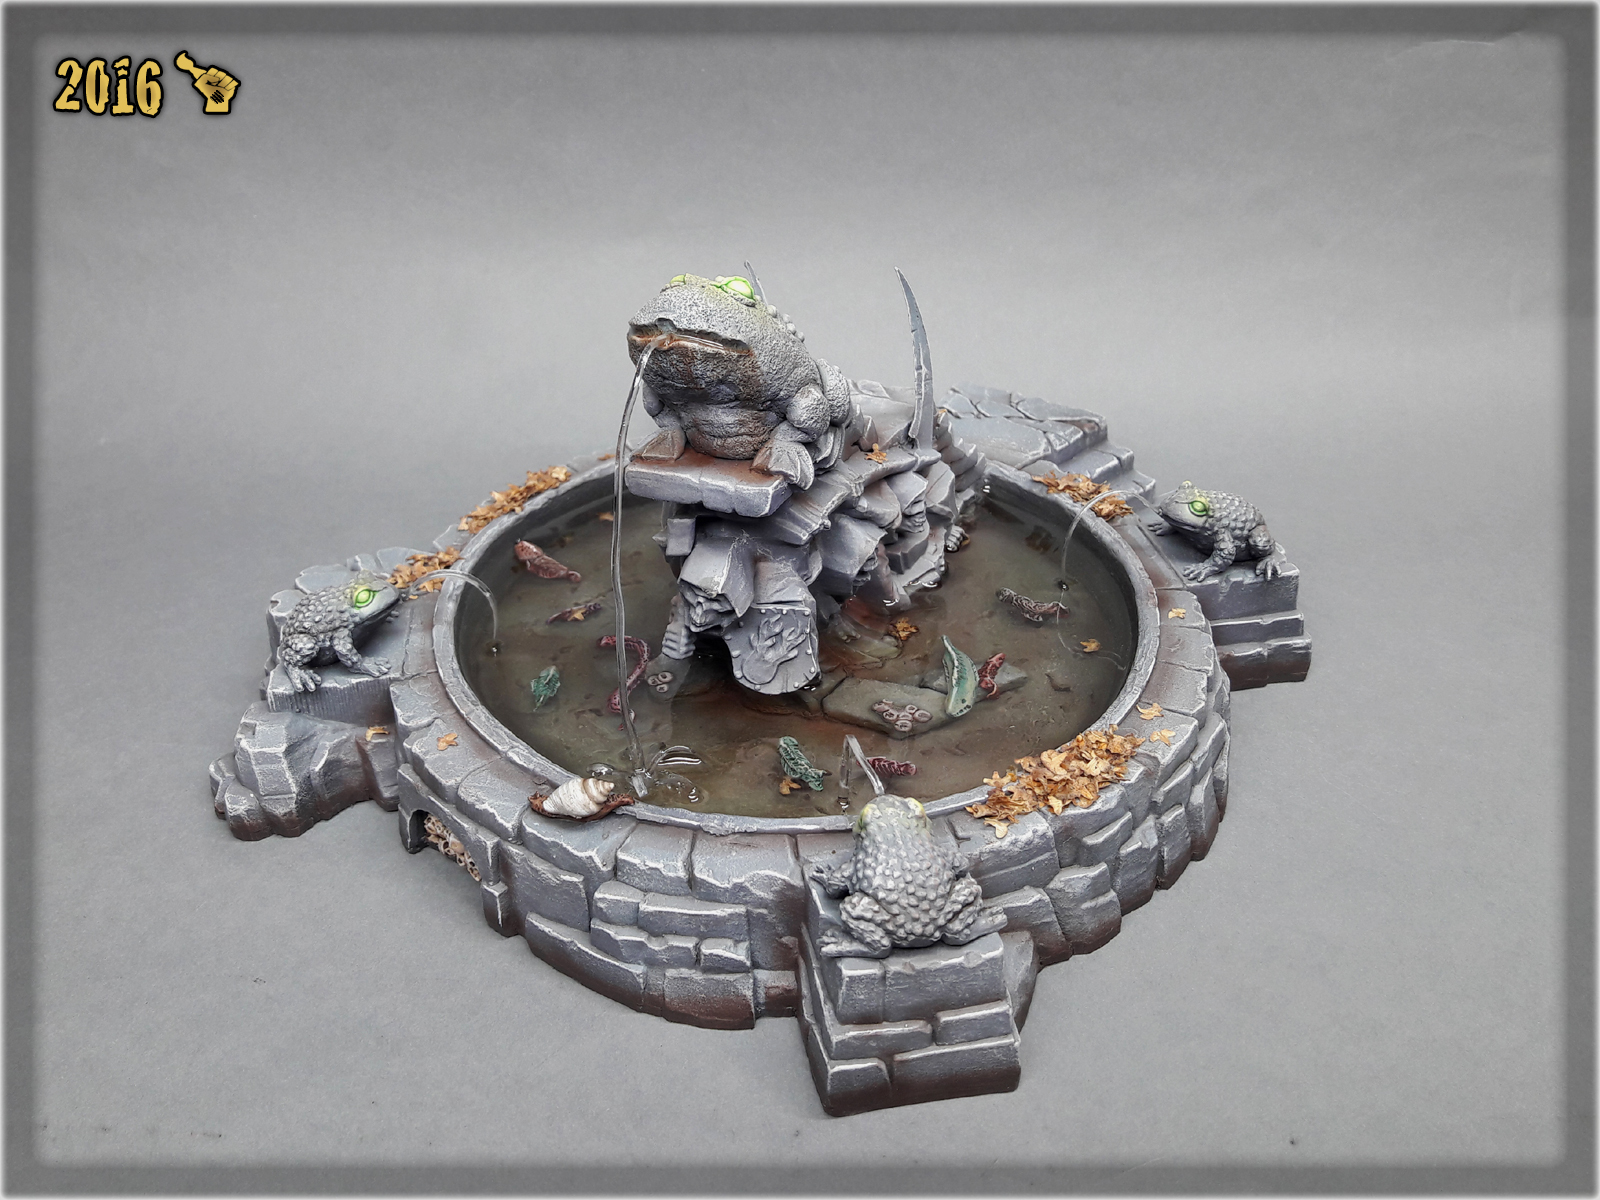
Something around two weeks later I finally got to work on the “Toad Fountain” once more. I added some streaks and soft glow to the frogs, filled the basin with resin up to the brim and added some leaves inside. I also applied leaves all around the fountain to keep it visually coherent with the rest of the terrain I’m planning to make.


You can see the finished piece below, while more pictures can be found in the “MORDHEIM TOAD FOUNTAIN” Special Project gallery…
This piece can also be found at CoolMiniOrNot, where you can vote for it.
I hope you like this piece. I have big plans for Mordheim, wish to bring even more Mordheim scenery pieces to life in the future. Right now I’m working on a complete redesign of my previous Mordheim gaming board. Have a lot of ideas, but due to lack of free time I plan to take small steps. If you want to see more of the upcomming Mordheim related articles, just stick around and they will certainly pop up from time to time.
“It is a Dark Time.
The might of the Empire is dust, their crown is lost to them and their glory forgotten.
The promise of an age of peace and prosperity is drowned in blood.
This is your time. For the ruins of Mordheim hold prize beyond imagination: stones of power which can grant all your wishes.
But beware of your enemies.
Fear the Possessed, the Beasts of the Pit which roam the night.
Watch for the thieves of the Rat men, the Skaven of the Underworld.
Dread the corpses who walk like the living: the foul Vampires and their rotting minions.
This is Mordheim, the city of the Damned. This is the home of all your hopes. Be wary or it will be your grave as well.”
Mordheim rb.s.124
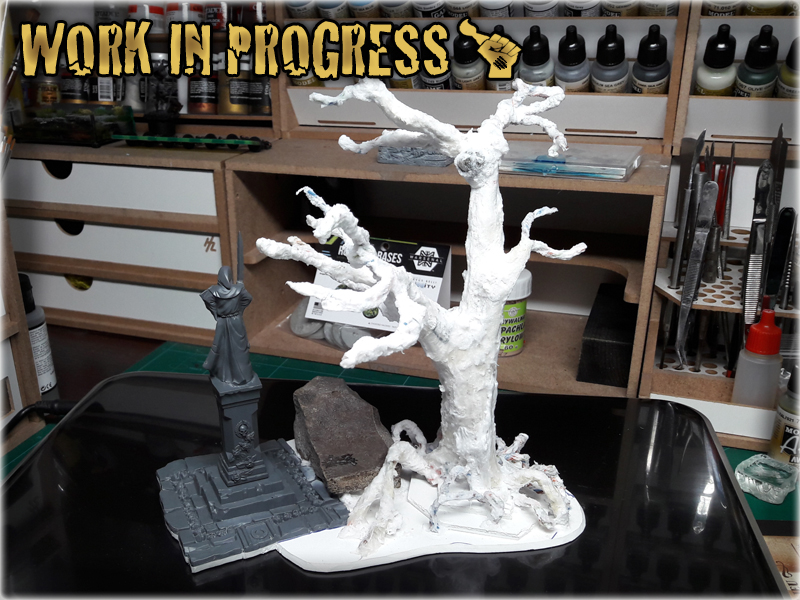
Working with some awesome Tabbletop World terrain bringed back memories of Mordheim and how I used to create fantasy scenery for my own gaming table. The idea to revitalize entire gameboard surfaced in my mind on more than one occasion but such a feat was somehow beyond my reach. To satisfy the muse and pacify my deepest Mordheim desires I decided to go one small step at a time. My attention focused on a piece I wanted to create since the earliest days of Mordheim – a creepy, dead tree. I already made an attempt to bring life to this piece couple of years ago, but the overall effect was rather poor and I ditched the project. This time I was much more experienced and much more hyped, but most of all I have acquired a lot of new skills and got to know new techniques during these last few years. I was ready to take on this Special Project head-on.
The idea was to make a sickly looking tree, hung some stuff on it then compose the surroundings so that the entire piece of scenery would create a nice visual effect. It was supposed to be a cool looking, mood providing centerpiece. The most important features were to be looks and being totally impassable so that the terrain piece won’t cause any placement problems during the game. Along with the tree there supposed to be some sort of eye-candies in form of small detail like a hidden treasure, bones, animals etc. Also I wanted to include either a small crypt or a monument somewhere on the base to provide a stronger mood to the piece.
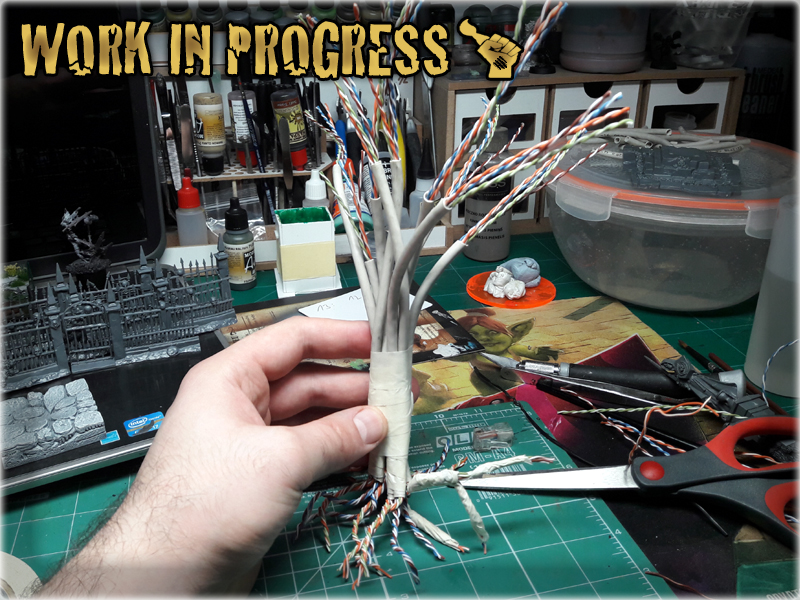
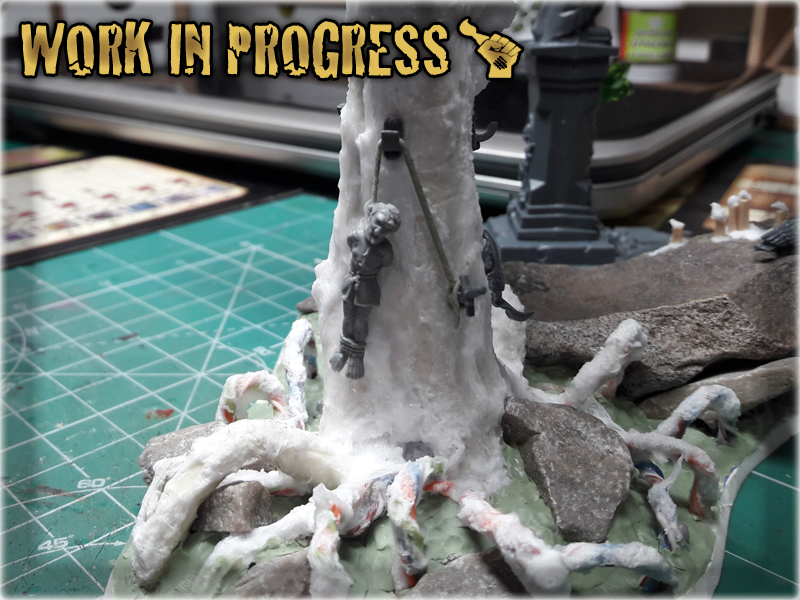
After selecting most of the initial materials and bitz for the project I started with the tree. I thought long and hard about where to get a long wire to base the tree upon, but in the end was able to get my hands on an old Ethernet cable. At that point I knew that I will have to strenghten the entire construction, but for the time being I concentrated on the base shape. I cut the cable into pieces, removed the excess of the outer layer and reshaped the inner wires into branches/roots on both ends of each piece. Then I grouped the pieces in twos and threes, taping them around the main trunk with a paper-tape. In the next step I composed the tree out of the newly created pieces and taped them together…
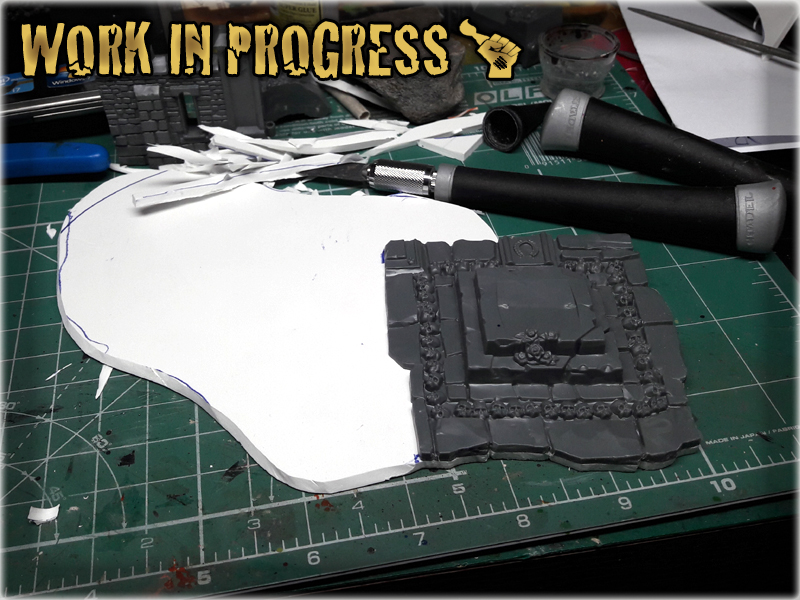
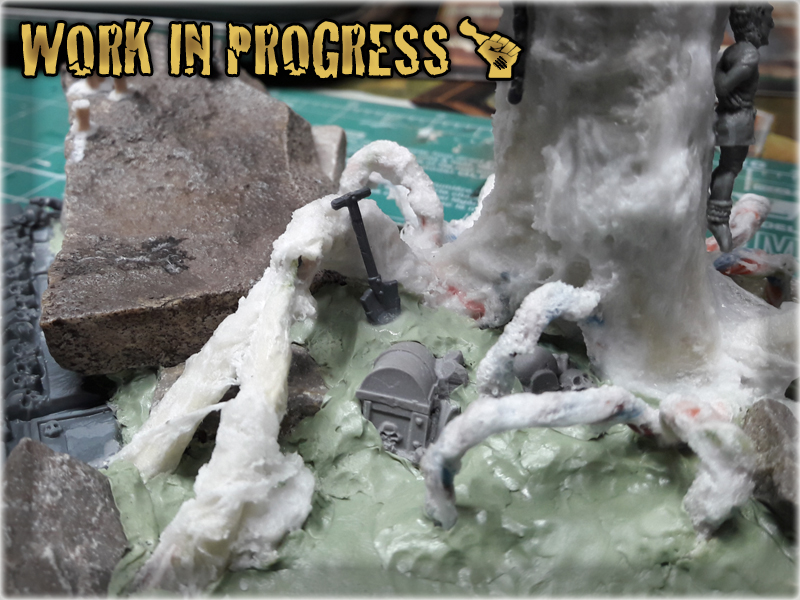
Having a tree I concentrated on basing it. Used a piece of PCV to cut the basic shape and glued a bottom piece of the statue I was going to add to the composition. I then cut the excess of PCV and modelled it a bit around the newly aded piece. I based the tree and added a huge natural rock to the base to serve as a sort of a sacrificial altar or something related to occultism (And to add weight to a base that was supposed to hold a big tree). I then used a basing glue on the entire trunk of the tree and taped it around with pieces of moisted paper towel. Left the entire thing to dry out for the night…
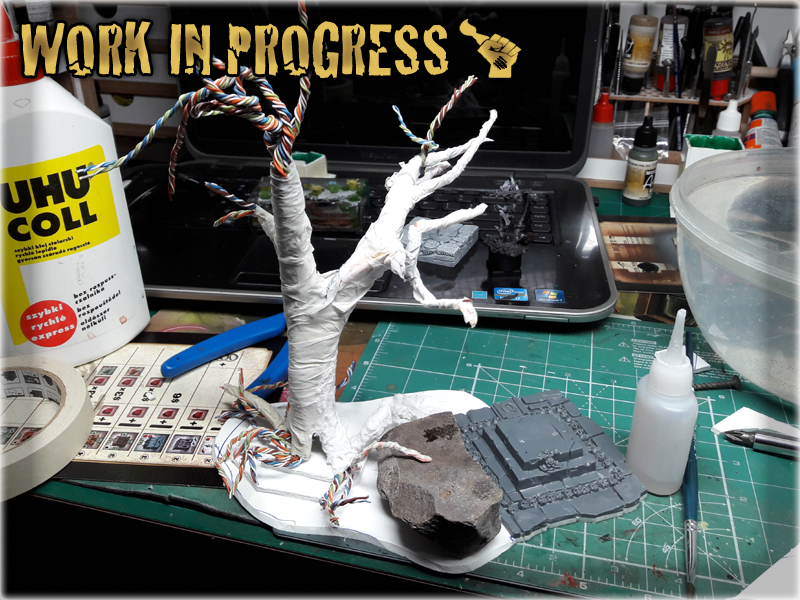
Upon waking up I started to add texture to the tree. There were two possible ways to achieve a durable and good looking effect. The first one was to use Green Stuff along with other sculpting putties to provide a nice texture. This one would take up a lot of time and cash so I ditched it in favor of the more simple and quicker way. Once again I used basing glue, but this time I covered entire tree. Once it was hard enough I added another layer and used a dryer to help it harden. I also applied a lot of Mourn Mountain Snow – texture paint from GW. Modelled a bit and then finished with a lot of Super Glue to harden the entire surface and strenghten the construction. This way I ended up with a nice looking, durable and highly textured tree…
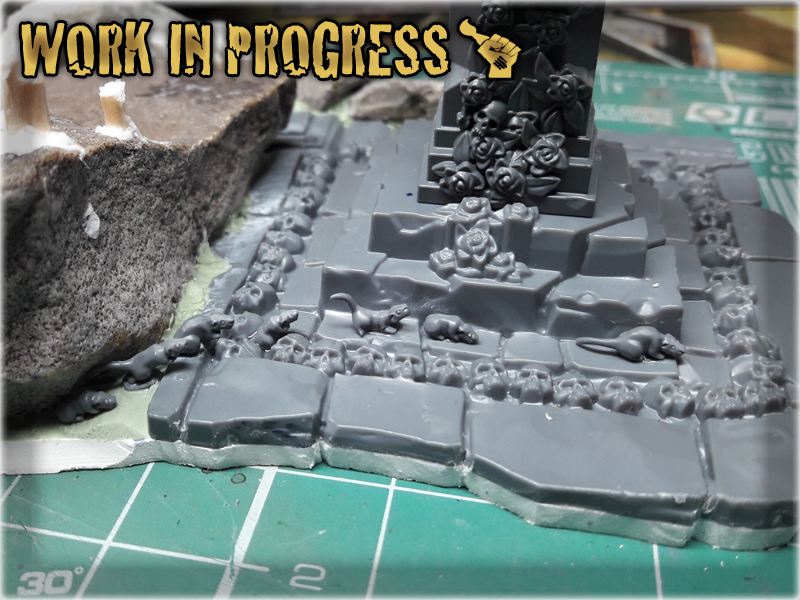
Next step was to add more stones onto the base and provide a more natural shape to it. I used Green Stuff and some other modelling putties to create the base shape. It was a bit expensive, but I hadn’t had plaster around and wanted to progress without any delays. I even used up excess of the putty to quick-sculpt some fish and mutated creatures for another Special Project going on beside this one. Somewhere on the way I also started to add bitz to the tree so that it looked more Mordheim-like with hooks, nails, a dead body hunging by the neck etc…
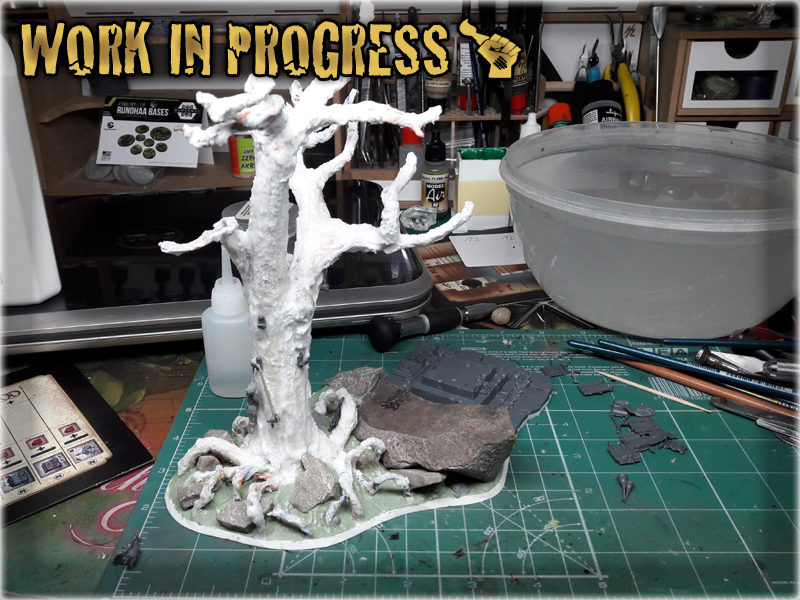
Detailing took some time as I wanted to bring life to the piece. A short line of running rats here, A bird interrested with the candles there and a half burried treasure chest somewhere else. The work moved steadily forward and with each new feature the ‘Dead Tree’ look much more alive.
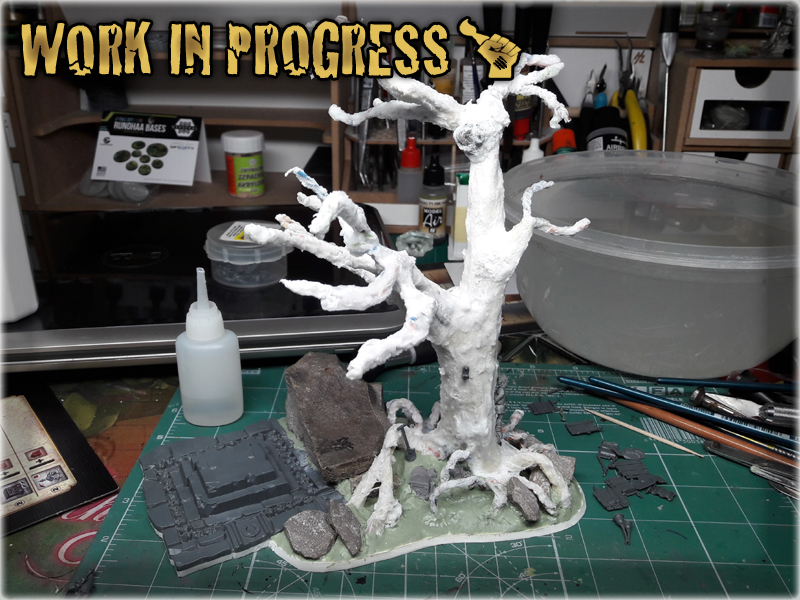
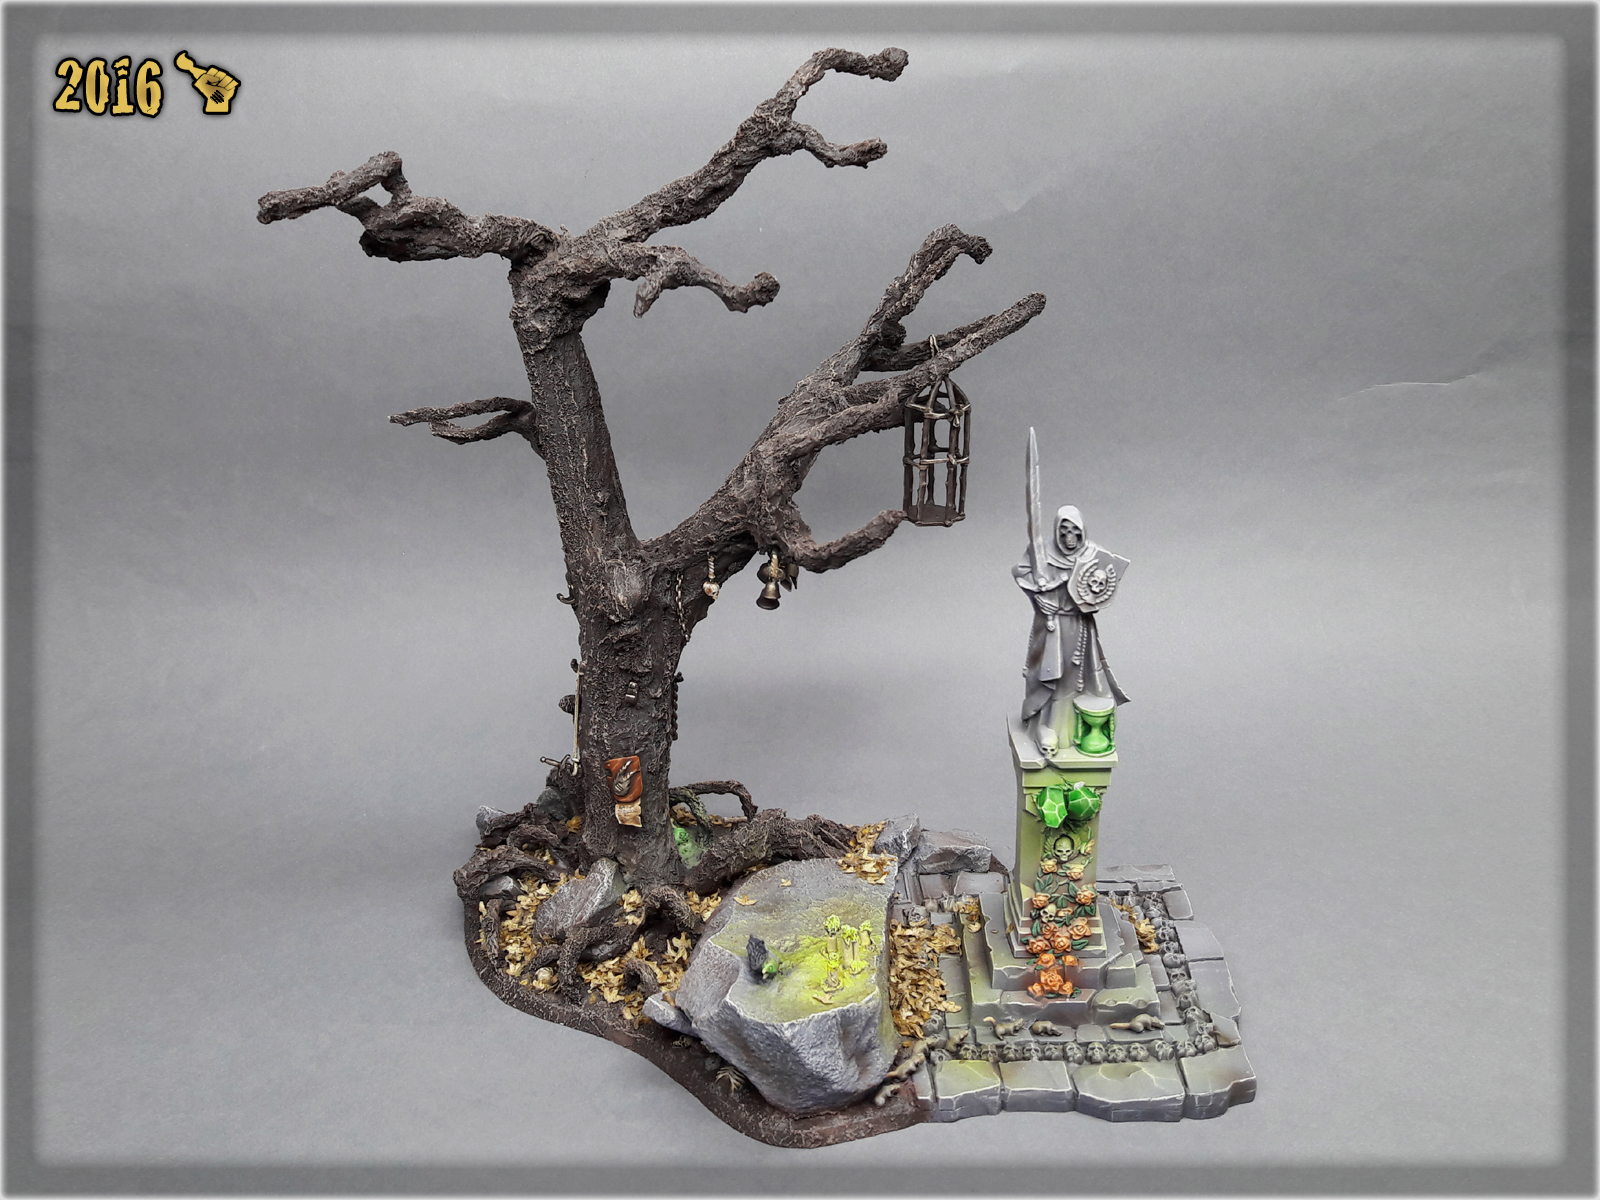
Once everything was in place I covered the entirety of the base with Stirland Mud – tecxture paint from GW. Usually I just use basing glue and sand, but this time I wanted to create something more detailed. ‘No shortcuts’ I told myself when applying the texture. Ended up with a complete piece looking like this:

What can I say – I was totally in the mood. Once I sat to paint this thing I couldn’t take a break even if only to take a work in progress picture. Just couldn’t stop. Took couple of hours to complete with me testing new recipes – wanting this one to look superior to all my previous Mordheim scenery. It turned out to be a concept foundation on which I intend to build my new Mordheim gaming board terrain series.

One thing that I can say about the paint job is that most of it is made using Vallejo Air paints and actually airbrushed. Some surfaces were drybrushed just to be lined with Flayed One Flesh. What is unusual for me is that I almost used no washes, which usually are the main source of highlights in my works. This time tho I decided to go in the direction of a proper airbrushing, rather than risk unpredictability of a wash. Either way – I finished the project by applying Birch-tree seeds to imitate leaves all around the base and in particular small spots over the altar and monumet. This complimented the entire colour scheme and deepened the mood of the scenery piece.
Here is a picture of the finished piece, but theres a lot more in the “MORDHEIM DEAD TREE” Special Project gallery…
Some pictures can be also found at CoolMiniOrNot, where you can leave your votes for this one if you like.
“Dead Tree” is not my last word when it comes to Mordheim Terrain. Even now I’m working on a brand new pieces, not to mention the ‘Toad Fountain” which was completed in the same time as this one. Hope you like this piece and will enjoy the entire series. I encourage you to leave feedback, especially in case of any questions related to the project.
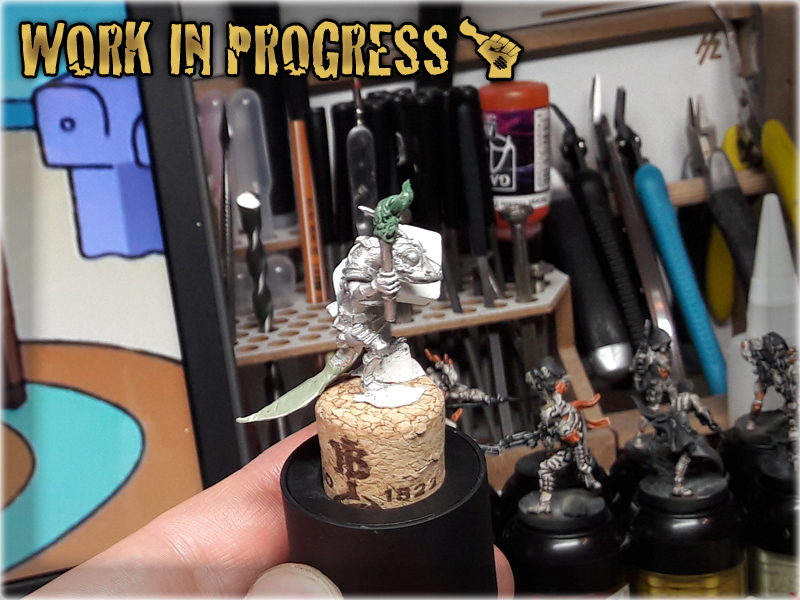
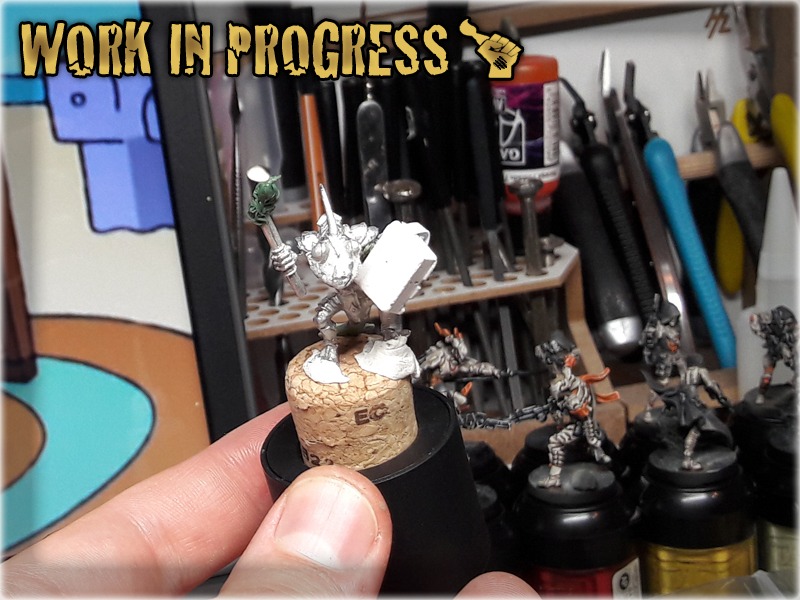
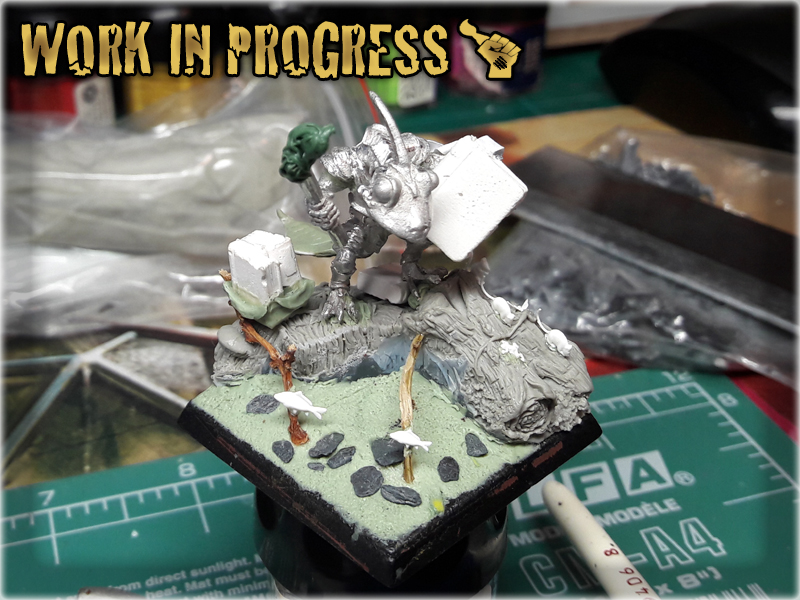
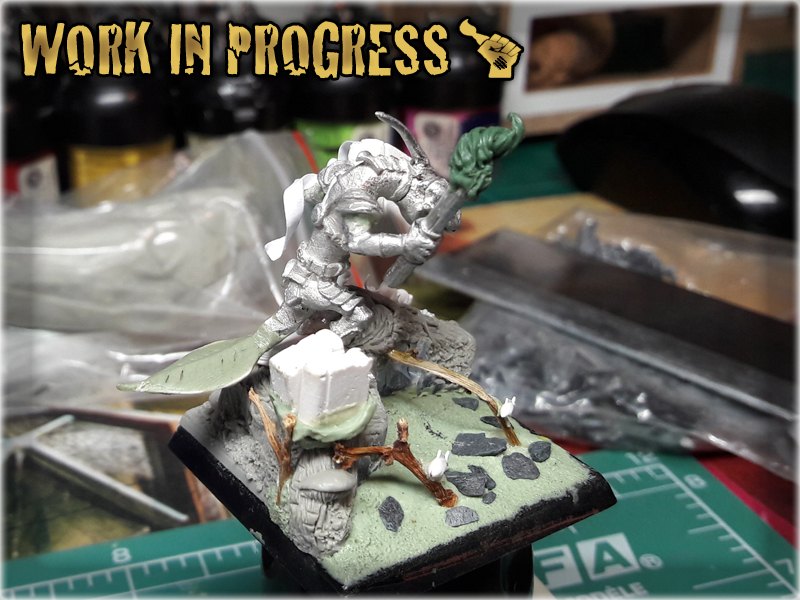
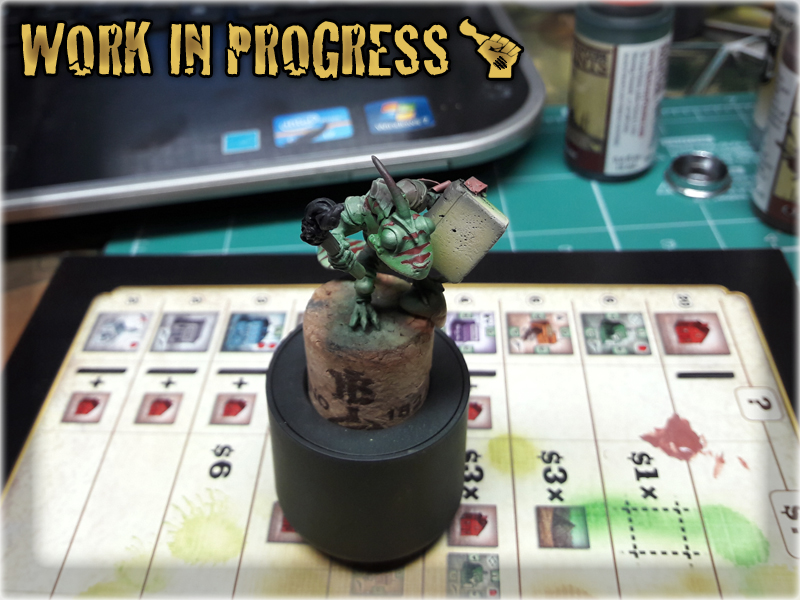
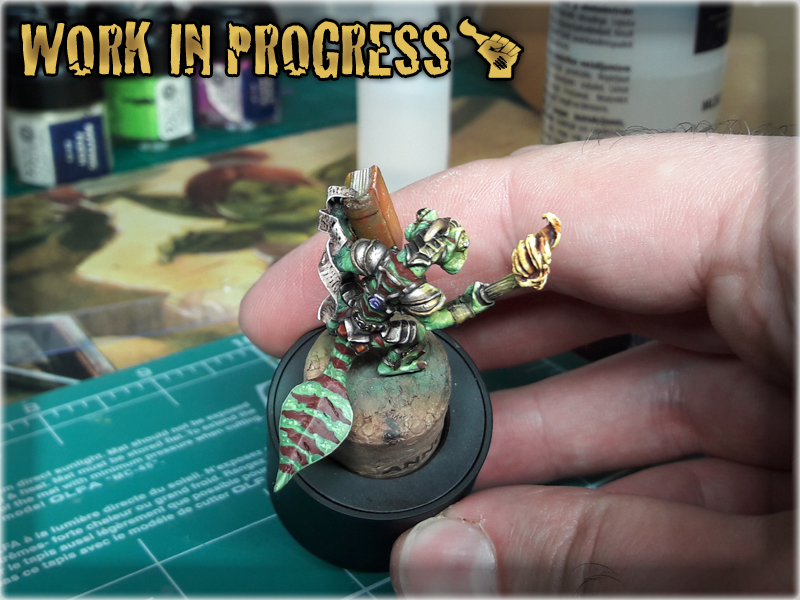
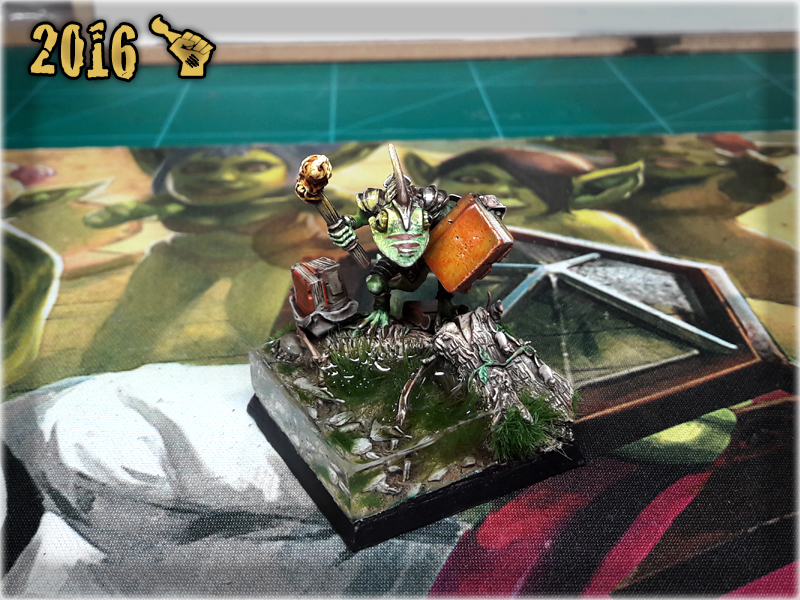
Every once in a while I encounter a visionary customer ending up head to toe in a ‘Special Project’ of someone else’s design. Such event occured just recently when I met Thomas, who is both a miniatures collector of grand magnitude and a great fan of Geckos. So, Thomas had an interresting idea of converting a Newt Warrior from Dark Sword Miniatures into a ‘Gecko Mage’. He was very specific about all the details for this particular project. He even drawn some concept arts to point out his expectations which is a rare thing. I was pretty much consumed by the idea and started to think about how I would proceed with it…
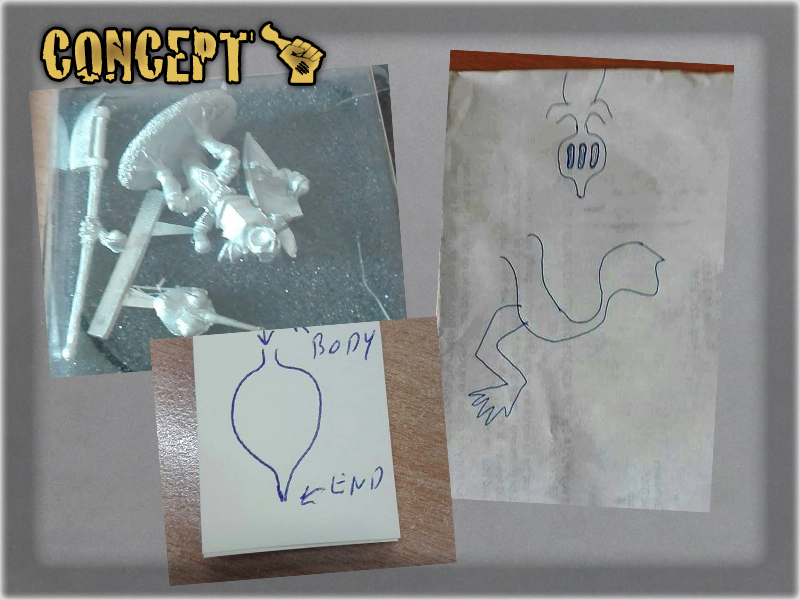
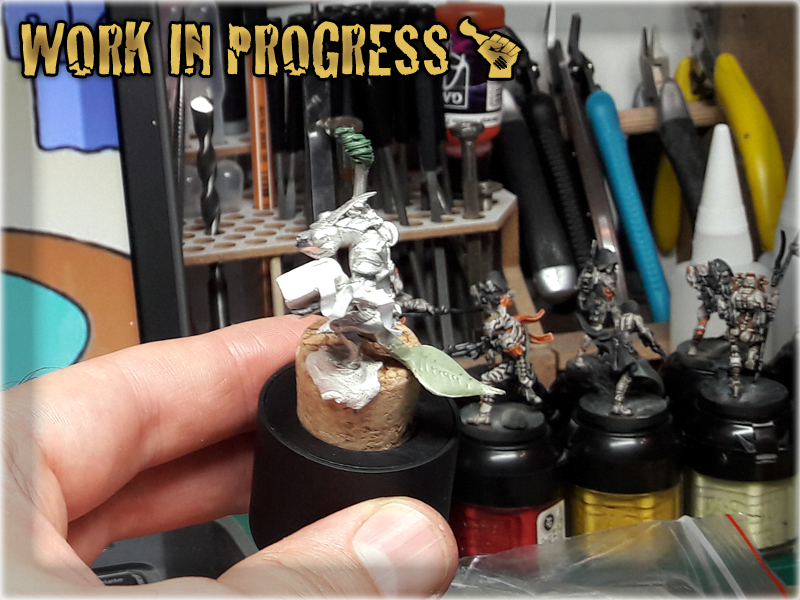
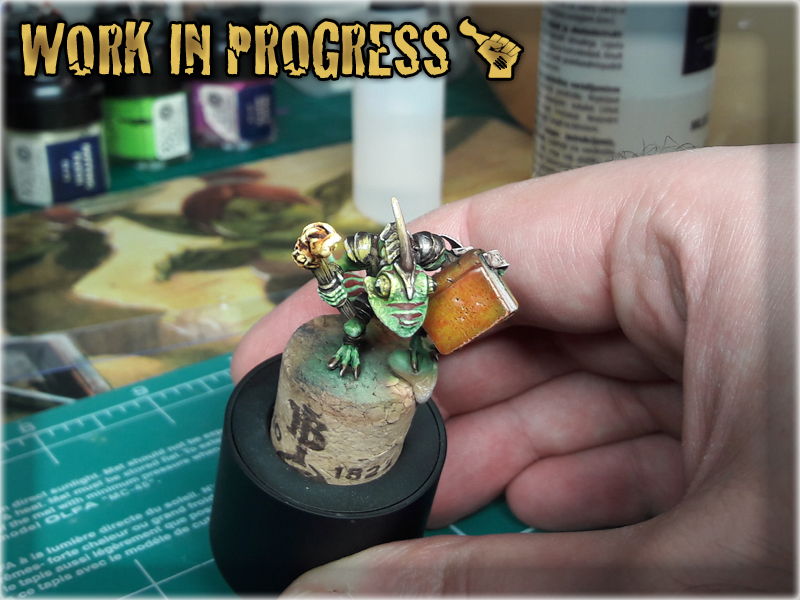
Alongside typical Gecko tail I was asked to create a torch and a book for the miniature to stand out as a ‘gecko mage’. Torch and tail were a matter of some time spent with green stuff and it went pretty smooth, but the book was a totally different thing. First of all I had to remove the miniature’s left arm, almost entirely covered by a shield. Taking that into consideration I decided not to rebuild this practically ‘obliterated’ limb but rather mask the damage and use a proxy hand to hold the book. Sculpting a new hand was out of question, as this would consume a lot of time and is on a verge of the limit of my skills. I used a Warhammer Ghoul’s hand instead and cut off one of it’s fingers to mark the other hand. Then I used some green stuff to fill the space left after previous ‘operation’ and masked the ‘wound’ using a book on the one side and a scroll-like bookmark on the other.
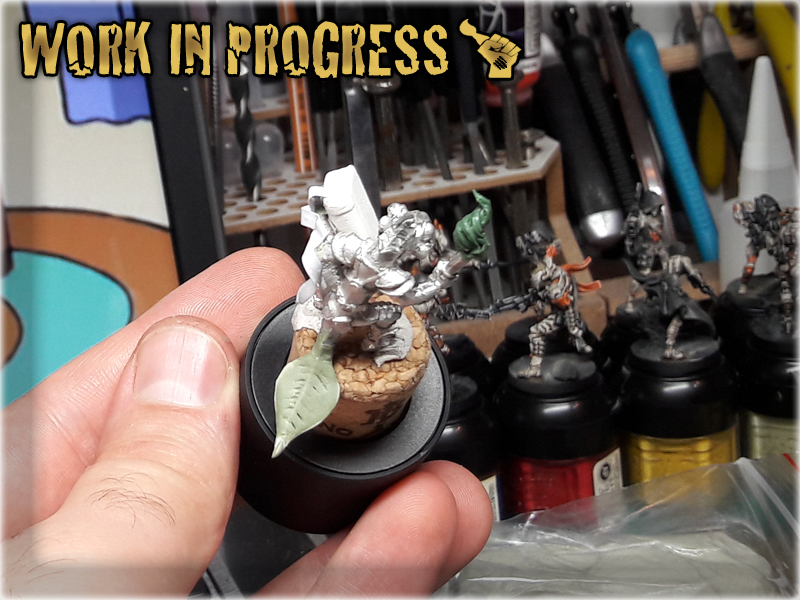
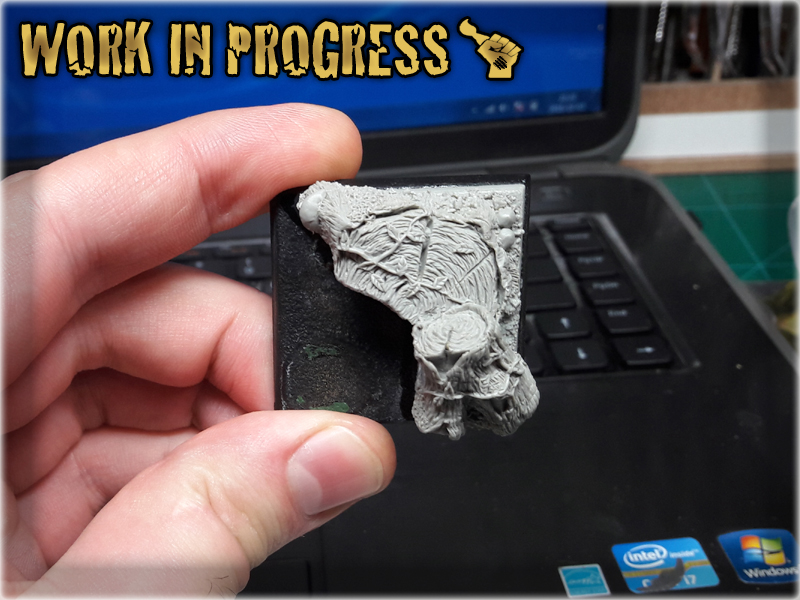
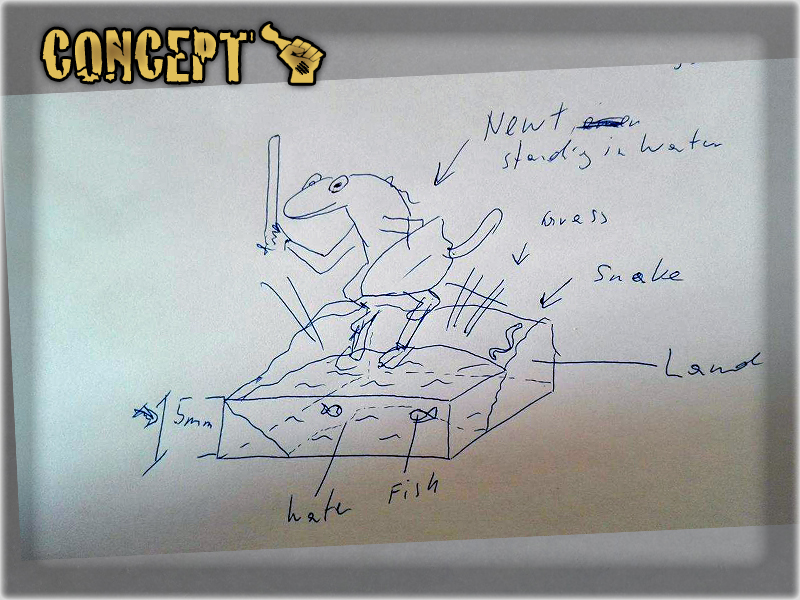
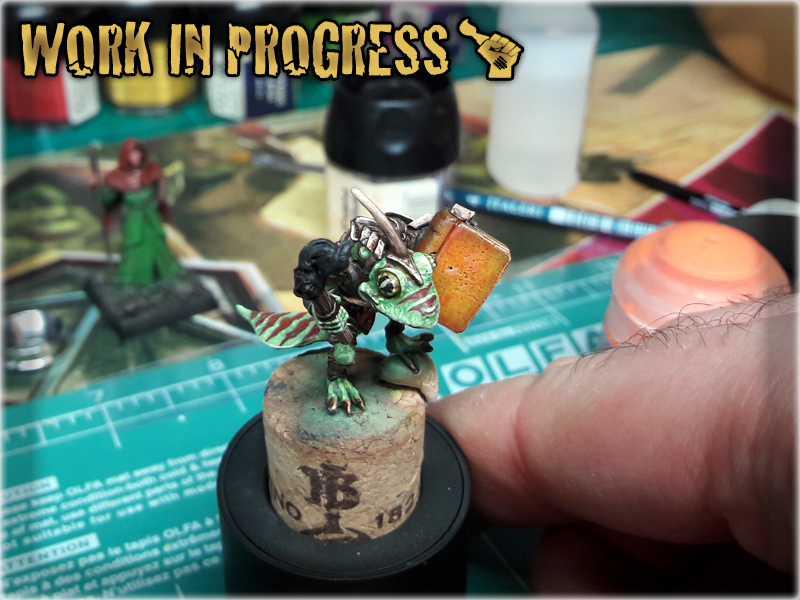
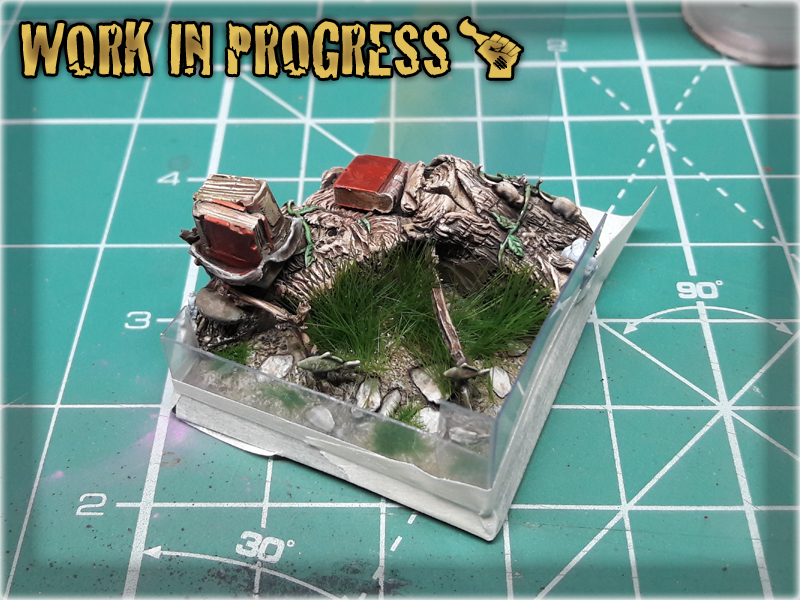
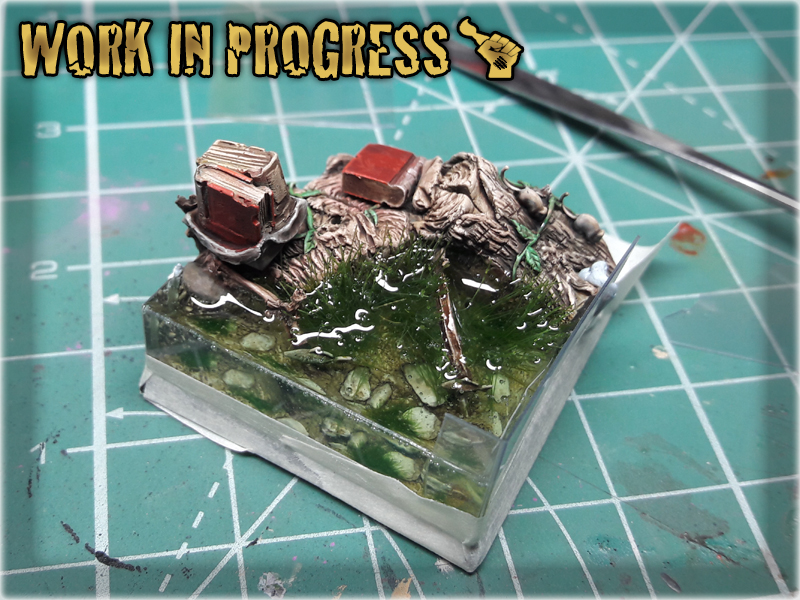
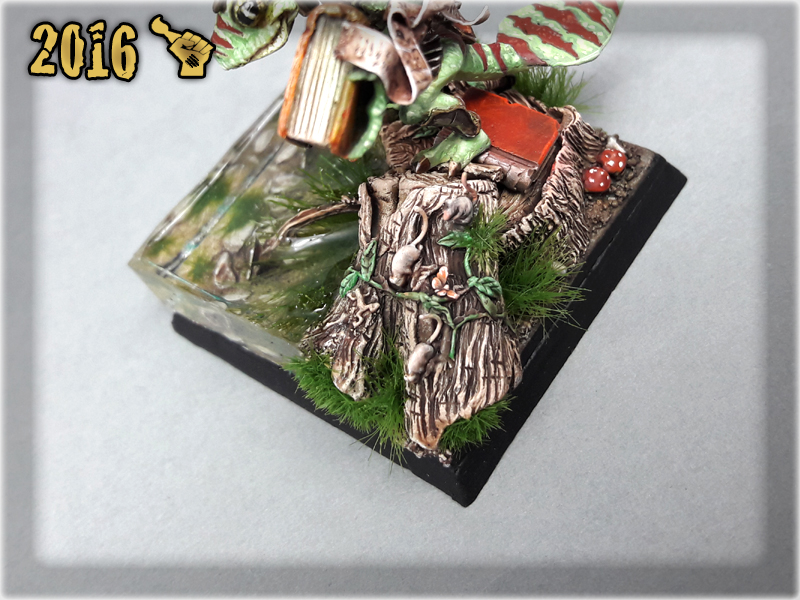
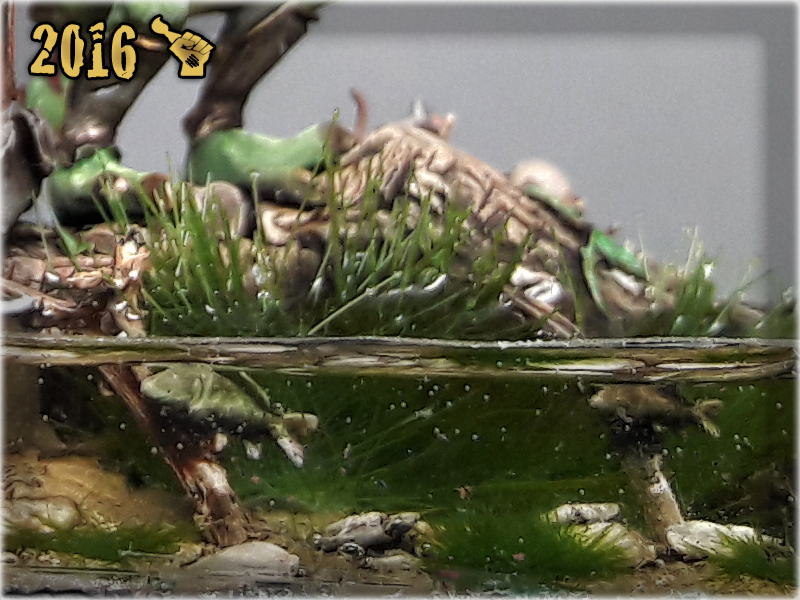
The base was yet another interresting idea. It was meant to be partially submerged with fish, plants and river bank being clearly visible. Alongside the mage, some books were to be added on the coast. Also three rats were to accompany the Gecko, being it’s familiar pets. As it happened, I had an old Micro Art Studio base with a tree trunk all over it. I decided to modify and use it as a major feature of the coast. Once it was prepared and placed on the base, I just added detail all around it and positioned the Gecko miniature in a slightly more dynamic pose. It looked well so I got a green light from Thomas and proceeded to painting…
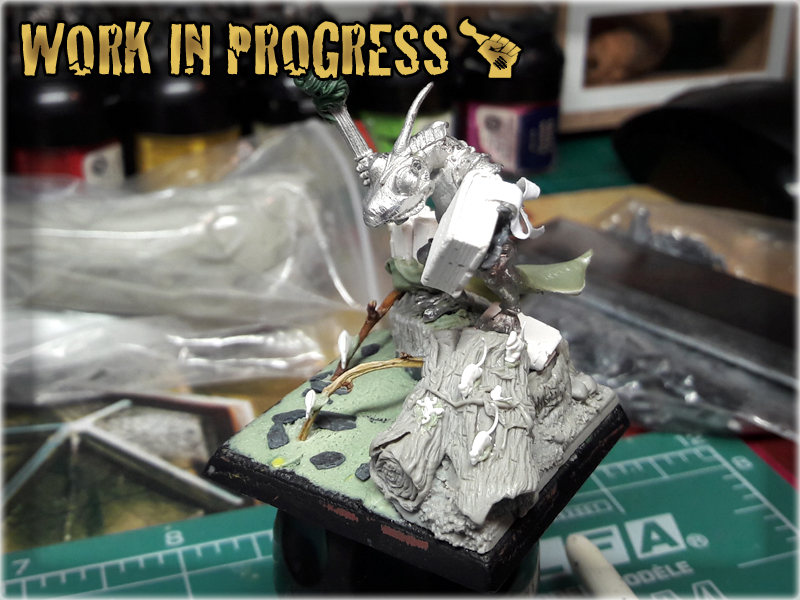

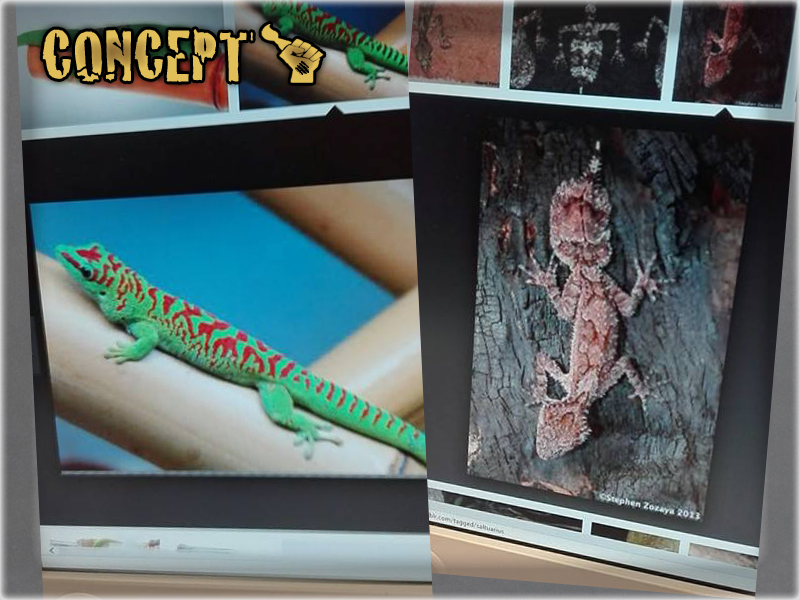
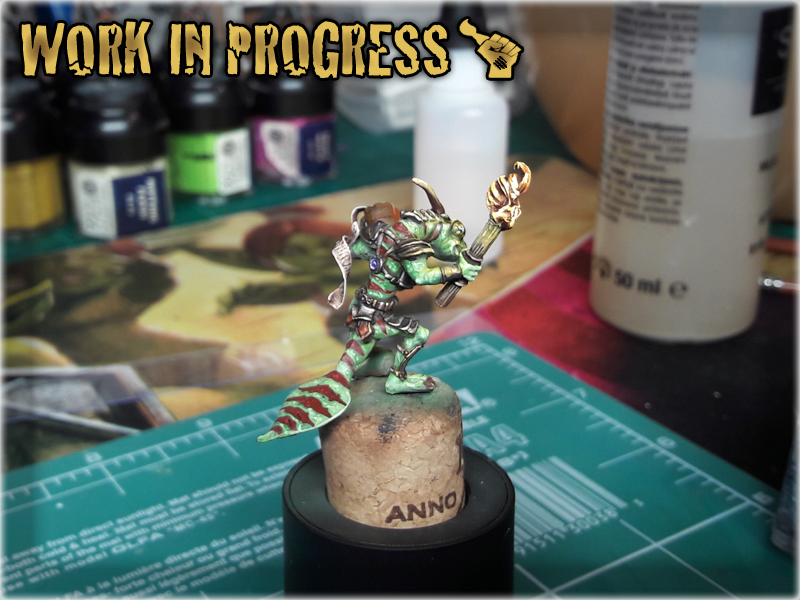
The overall concept for the paint job was to use the original colour scheme of light green with underbelly creme and add a red pattern to the tail and back. I also got some specifics on the eyes and armour. Otherwise I had a free will to choose colours and their depth so I just did my best, providing a nice ‘Heroes Never Die!’ lvl 6 paint job.
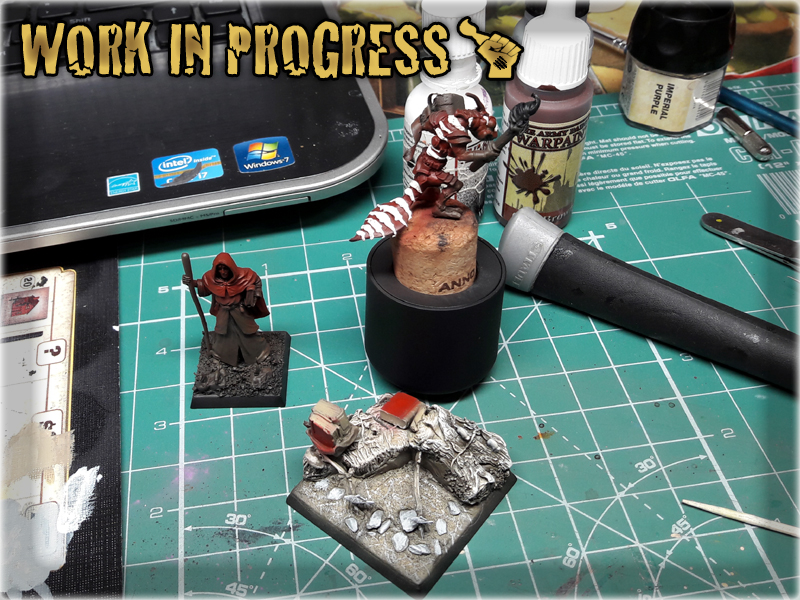

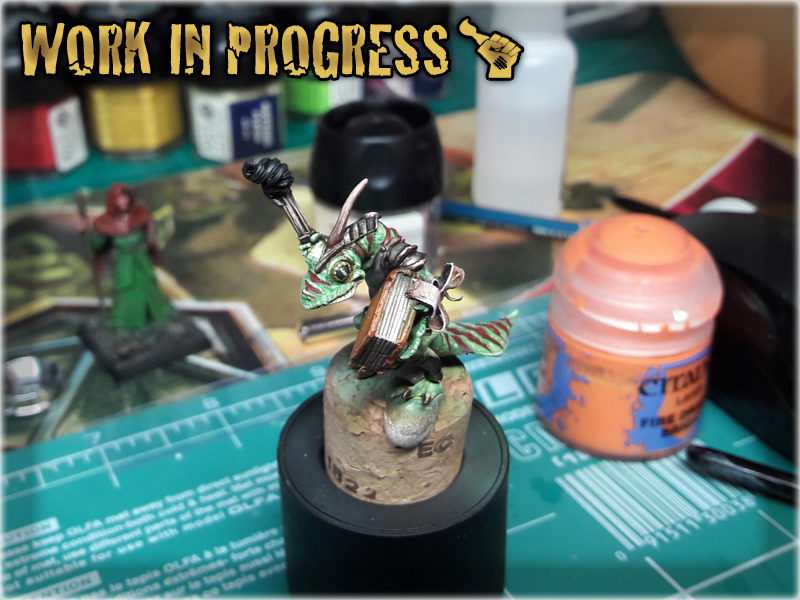


I actually started painting with the base. While the Gecko paint job proceeded, the base was already prepared to get submerged. I used Fantasygames awesome tutorial to prepare the base then poured the resin in. As with all things – mistakes happen, and my first attempt ended up with a mess, resing pouring all over the desk, me trying to block it with blue tac and other stuff… I failed and restarted the process after clearing the base of resin. Second attempt was a success and after 24 hours I was ready to add a finishing touch to the base…
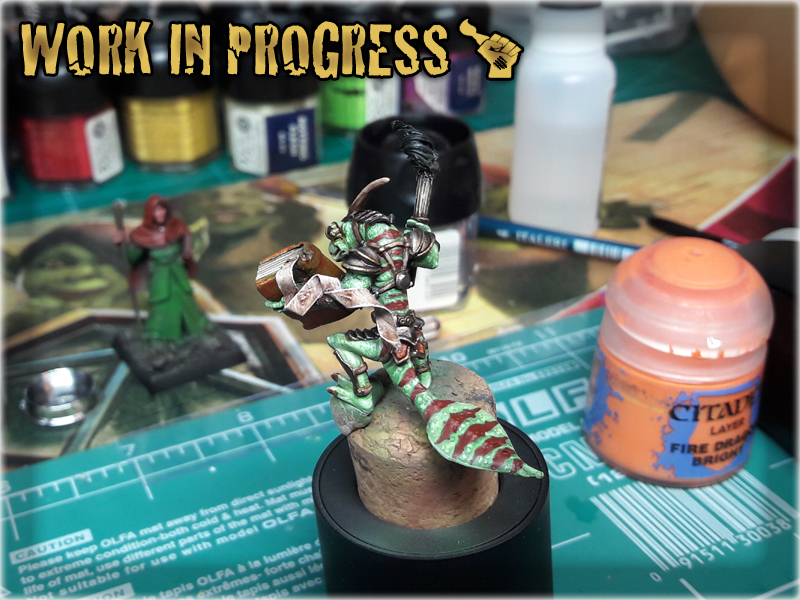
I had a lot of fun with this Special Project, mostly because I would have never had an idea like this on my own. Thomas not only provided the concept but also entrusted me with his vision. He had a great impact on the project and it makes it even sweeter. If only I could produce two identical pieces so that one would adorn my own collection 😛
View complete Gallery… Like/Don’t like? Vote at CoolMiniOrNot…
It’s been almost four months since I have ‘finished’ The Colony Special Project. Such grand endavours are the reason I’m into painting and miniatures wargaming. That wondrous feel of completion once a huge project hits the finish line. It always comes with a great satisfaction but once the dust settles, a void starts to grow inside my heart. I’m happy with results, yet long for the ‘process of creation’. That is why I consider every major project to be alive for at least as long as I am. In case of The Colony – well, a gaming table could always be improoved or use some more scenery. That is the exact way of thinking which led me to writing another part of this article…
That being said I must confess that I wasn’t able to invest much time into The Colony in the last few months. Other artistic projects fell on me from all around the globe and I lived a prosperous life by lending my brush to all those in need of decent painting. Still, once in a while I stumbled upon some cool looking items that just screamed to be unleashed onto my gaming board in form of some sweet looking terrain. Many sources provided me with items of great value, among them my girlfriend (cosmetics), my friend Garran (his personal collection of ‘cool stuff’) and even some of befriended companies like Micro Art Studio, or Ekograf, who (knowing my tastes) sent me some of their leftovers. I sincerly thank all of you, my beloved providers, and proudly announce that I couldn’t resist the temptation and used all the items, you so willingly parted with, to further expand my scenery collection and bring The Colony’s theme beyond the bounds of my early predictions.

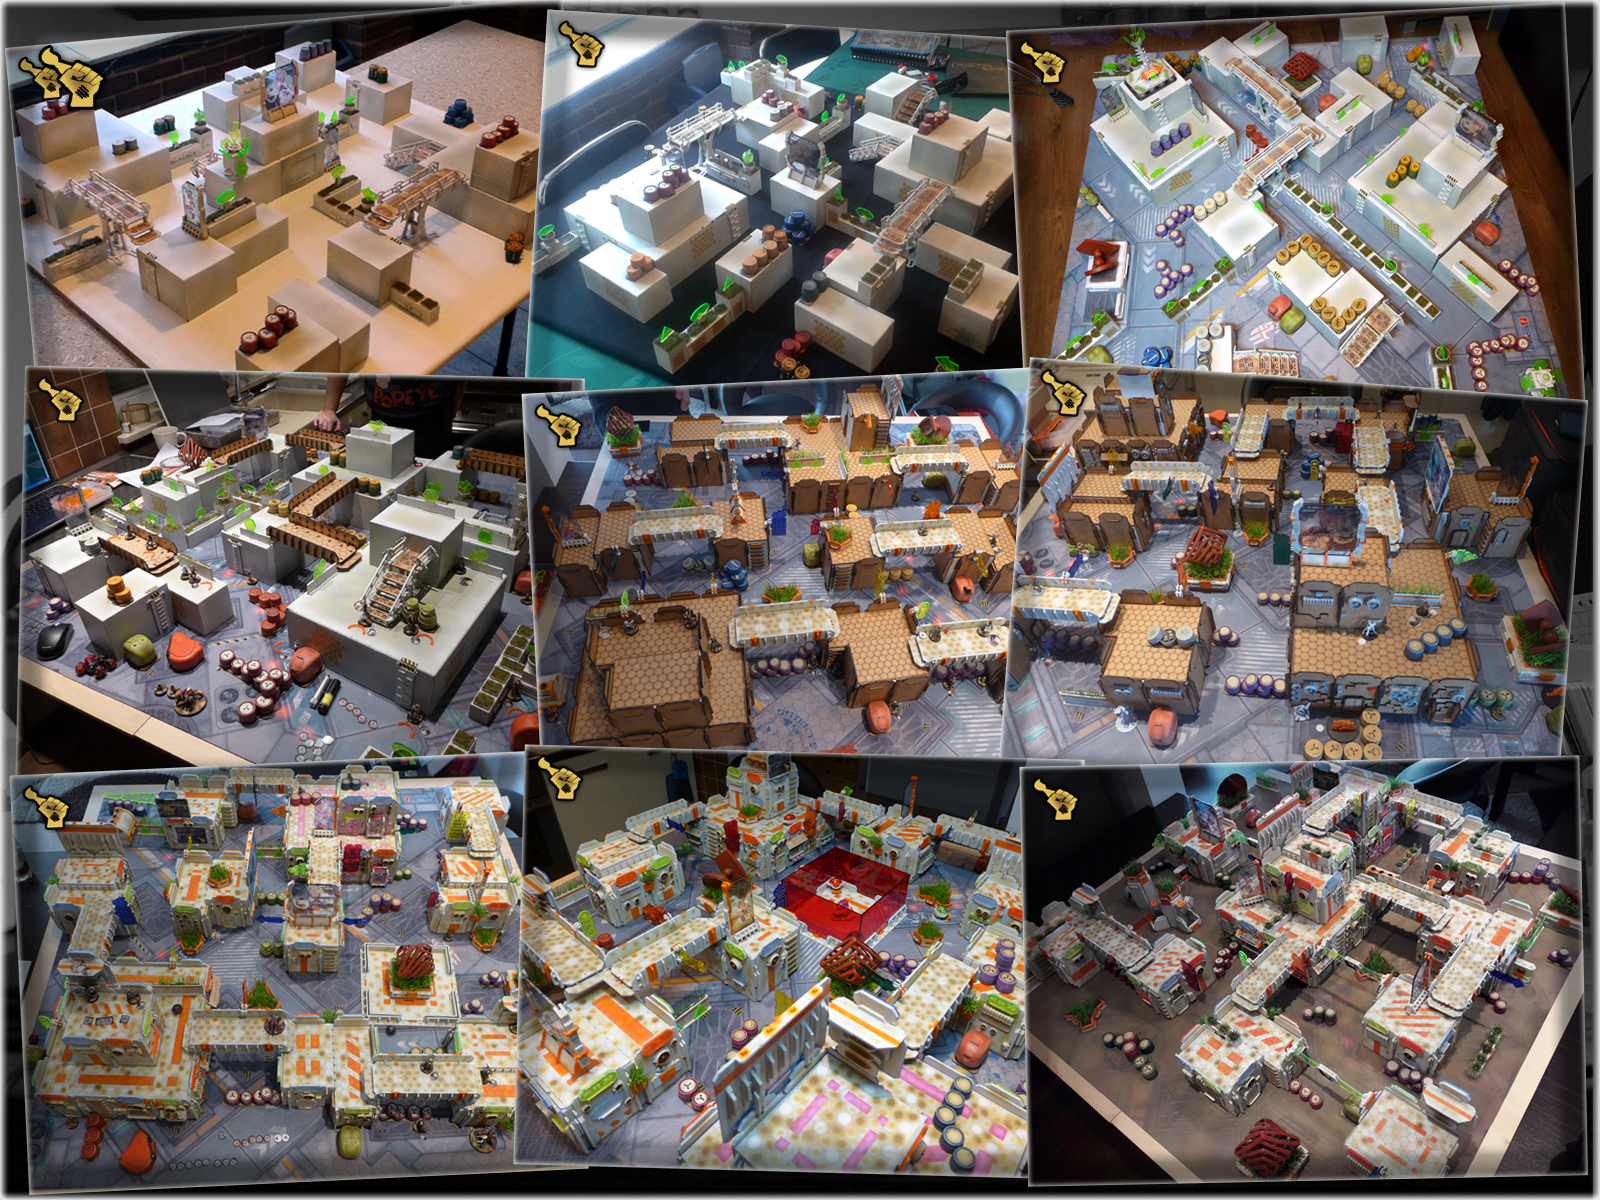
Anyone remembers that picture? It was published at the end of “THE COLONY” SPECIAL PROJECT part six article. Some of this stuff still awaits being used, but more than half of it has already reincarnated in a form of these scenery pieces:
A futuristic sculpture made out of a Maybelline eyelashes mascara. Once I stole this precious item from my GF’s secret stash I had a real wrinkle with how to use it. So many ideas, including an antenna, a column, a laser tube – in the end I couldn’t decide so I got back into a well known territory of futuristic sculpures. It is only fair to use items stolen from my GF as pieces of art, otherwise she might not be swayed to turn a blind eye on my theft 😛
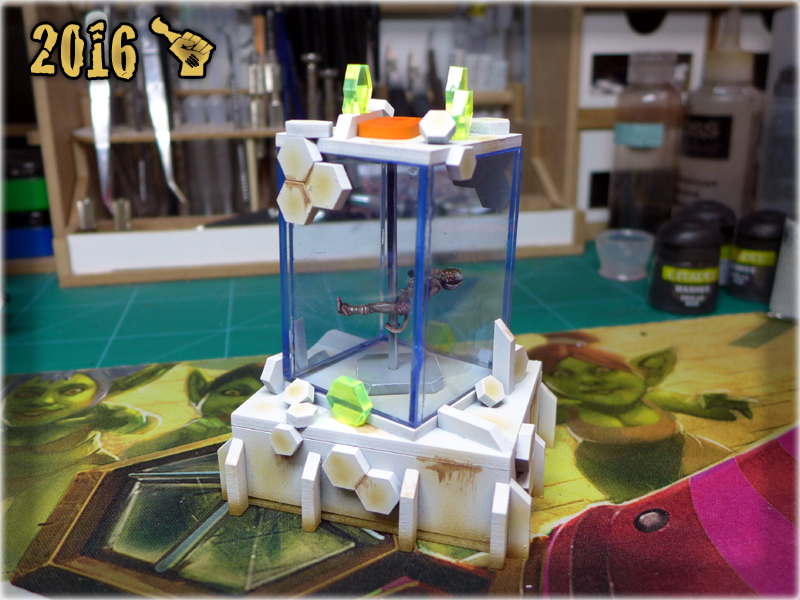
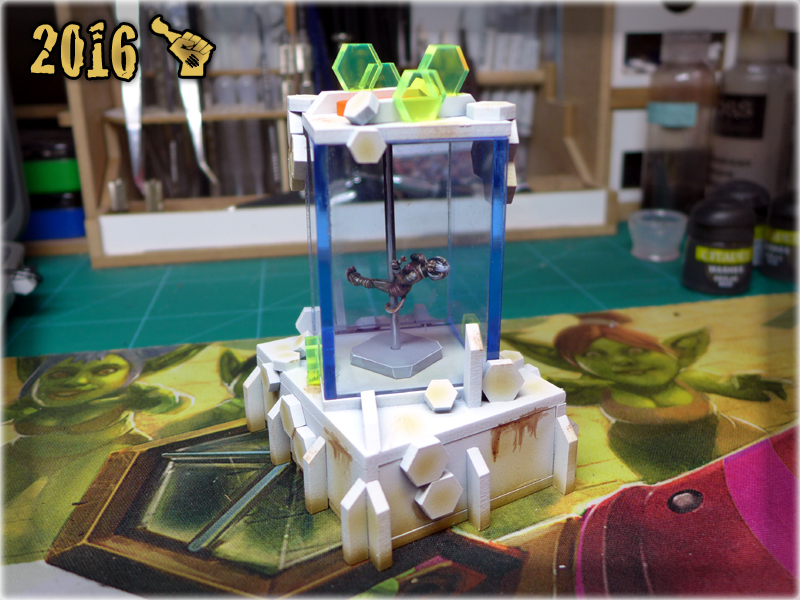


I got that awesome Dactari from my Girlfriend somewhere along two years of gaming. Untill now I hadn’t had use for it, as I was more into Corregidor-like miniatures, but finally I got the idea, made up what MDF pieces I will need to ‘cage’ this chick and ordered them from a friendly company. Once I got the stuff I just build the cage and here’s the result. It makes foir a nice rooftop piece or a great standalone scenery piece.
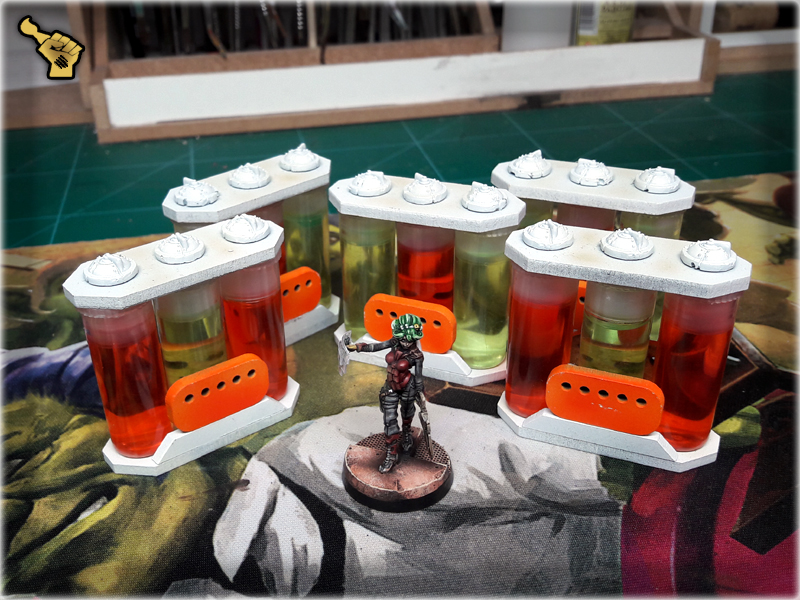
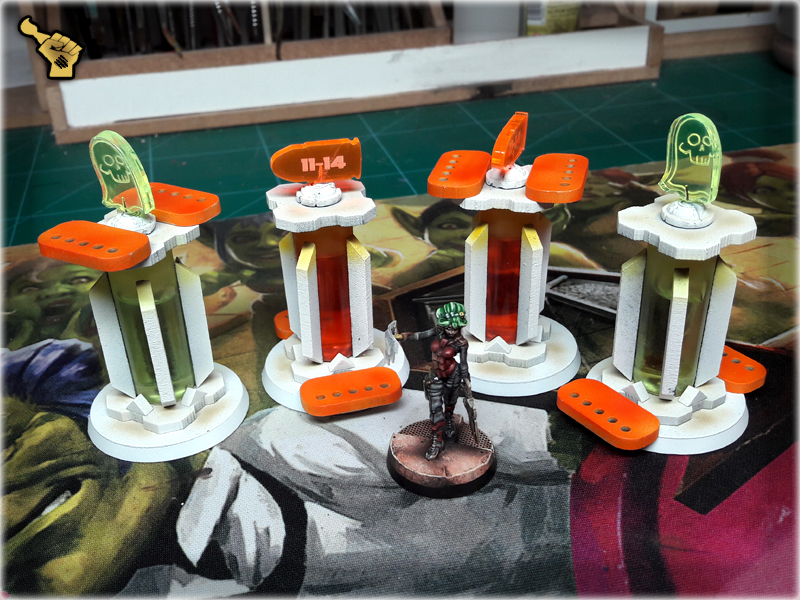
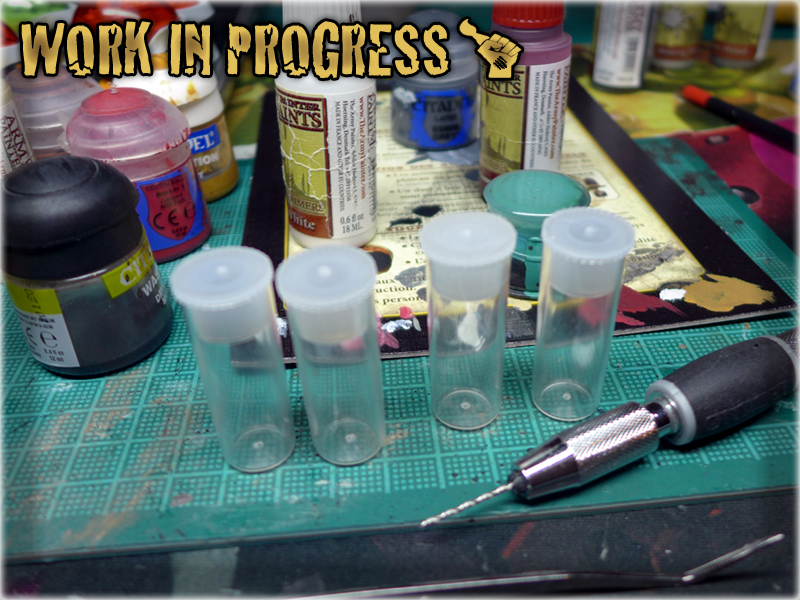
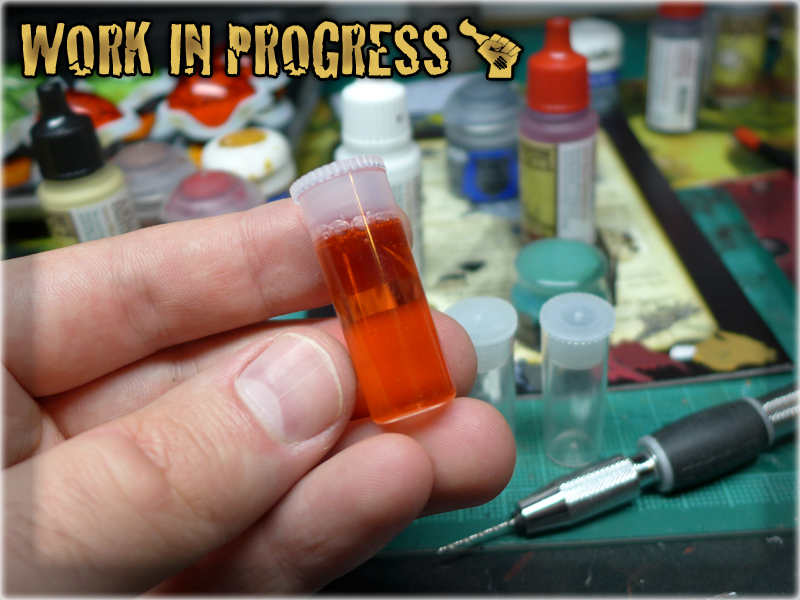
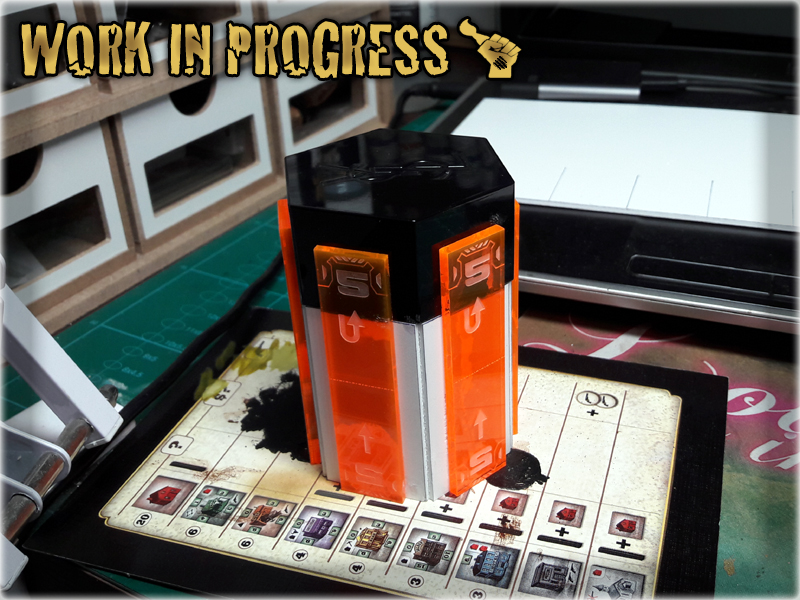
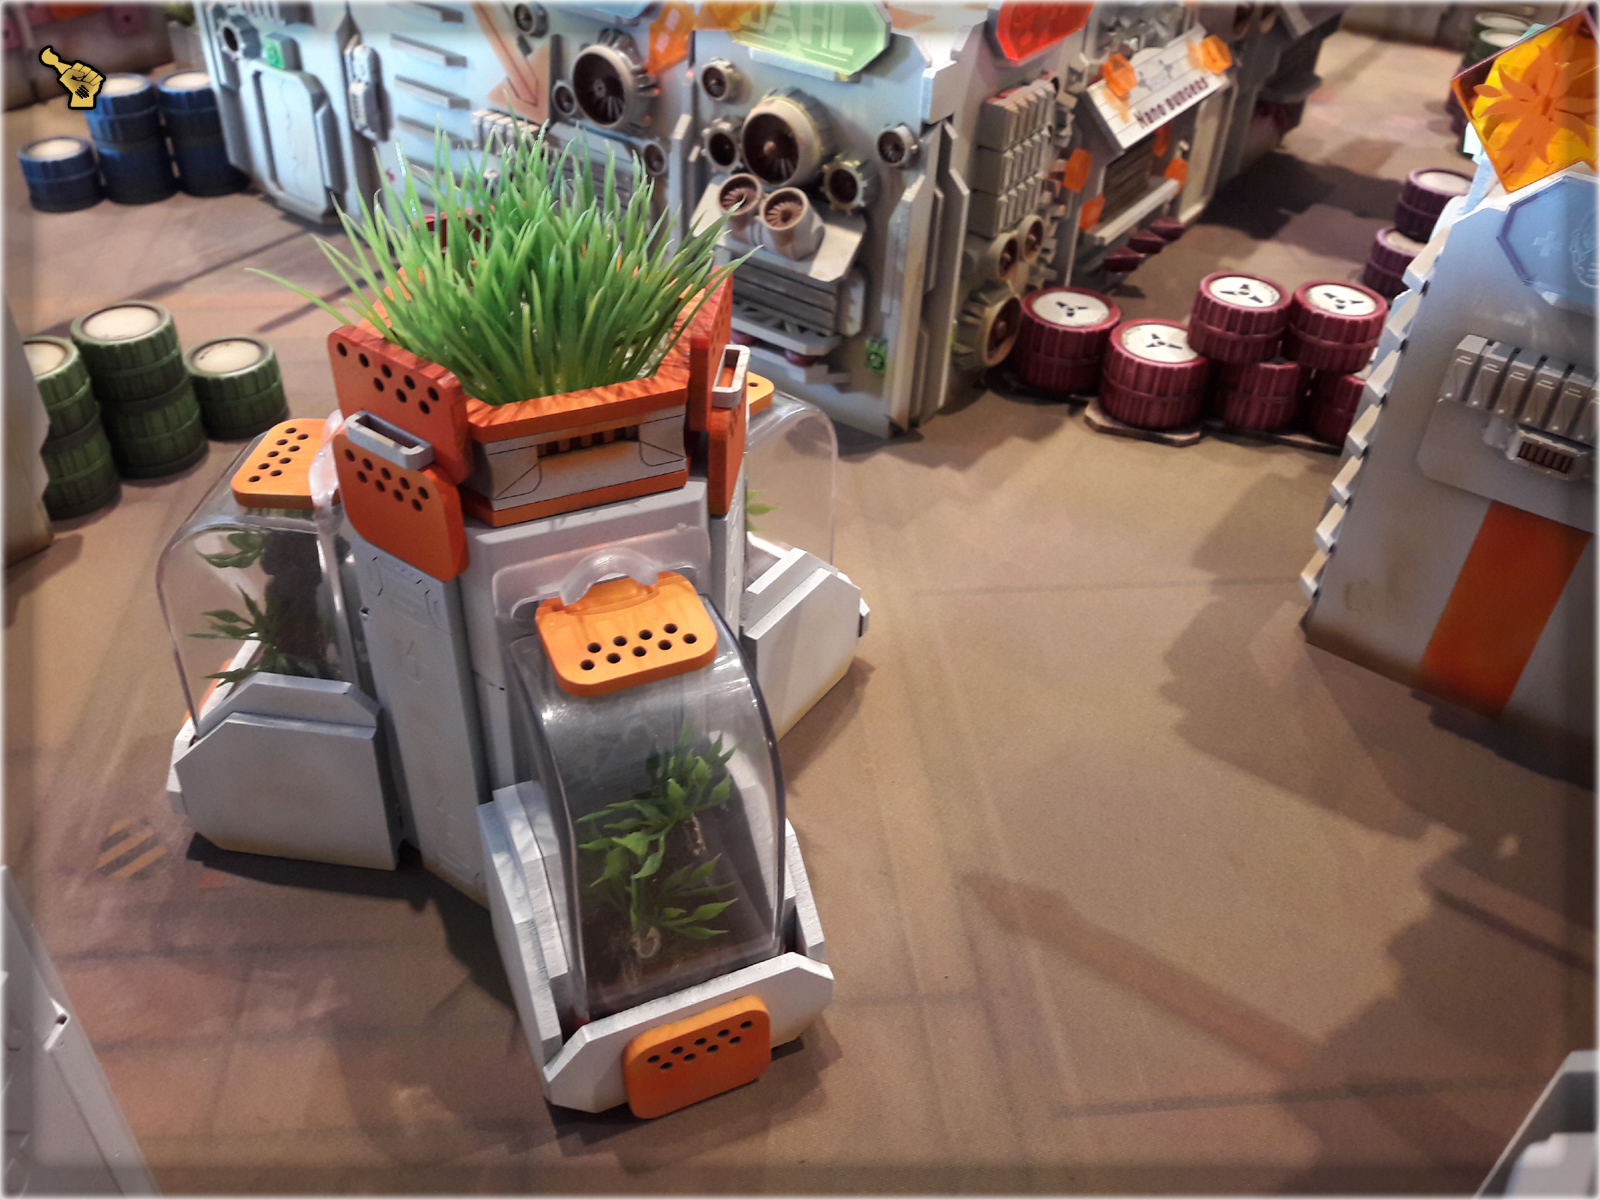
These can be used as objectives or just some random scenery pieces. I made them out of HDF pieces, leftovers and small plastic tubes* filled with shower gell. The tubes were given to me by Garran with which I tend to play Infinity, but also exchange concepts during our long painting/modelling talks. The guy is so nice as to share some of his stuff with me and I try hard not to let this gesture go to waste.
This is another source of endless inspiration. These are some throwbacks from Micro Art Studio’s production. MAS is very serious about their products – each and every one is checked for defects before it proceeds to packing. Once a defect is discovered, all imperfect products are kept as samples to avoid same kind of mistake in the future. In case of large quantities tho – some items may be sent to a friendly modeller to be used for awesome scenery building! One might even say that these can be used in a variety of crazy ways…
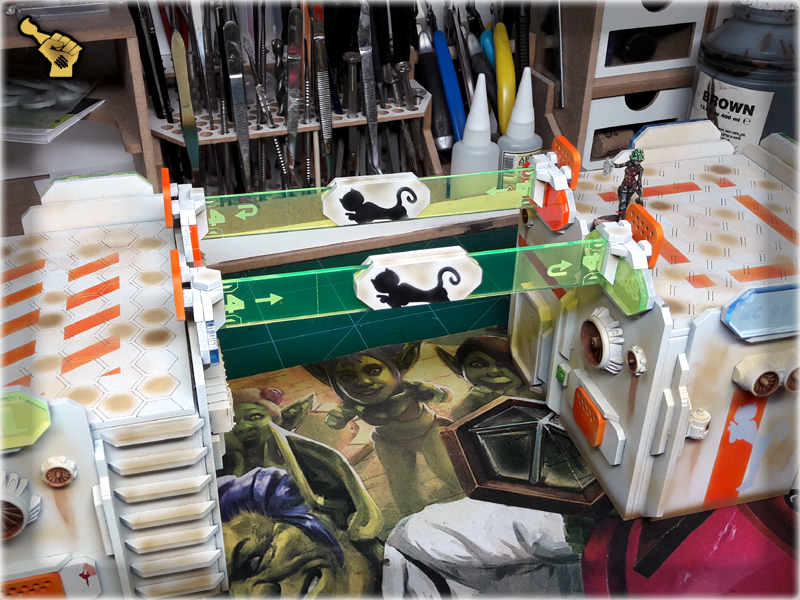
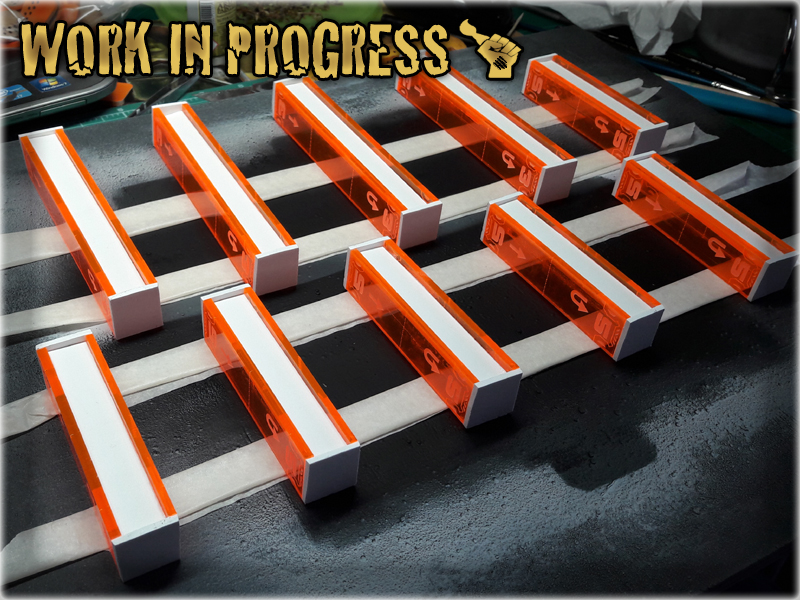
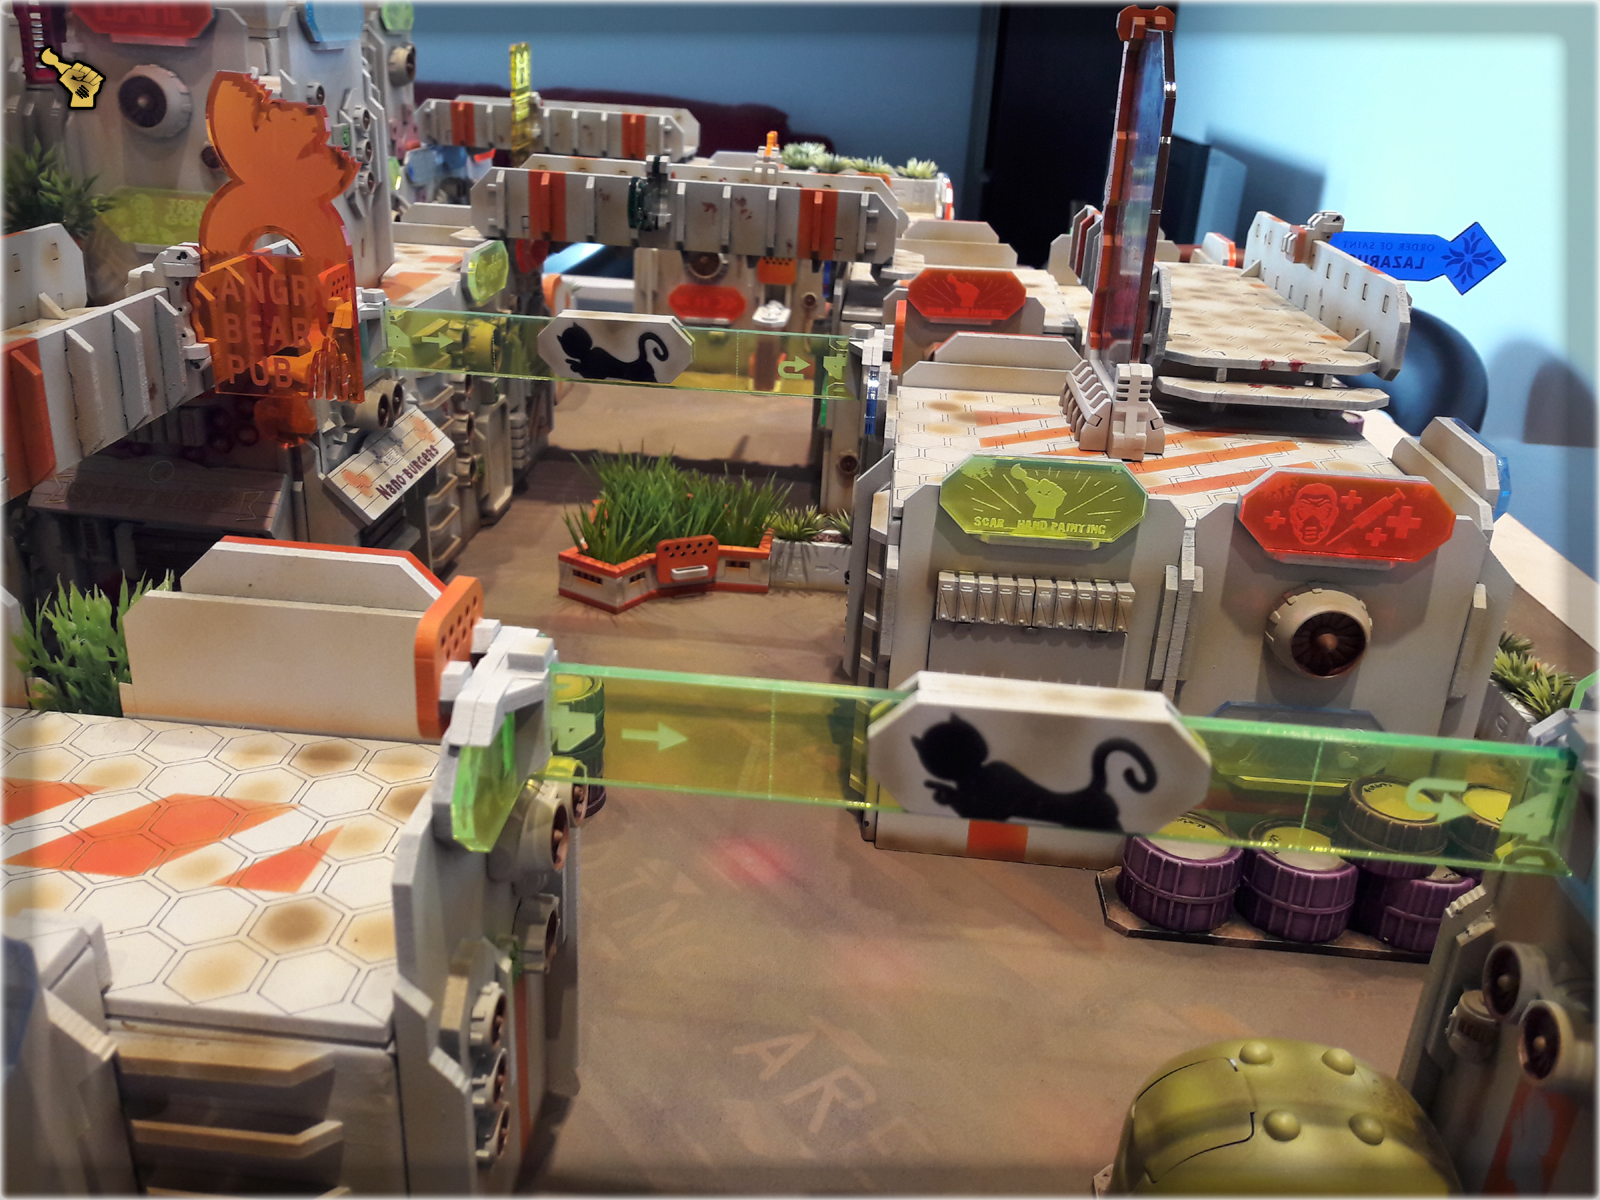
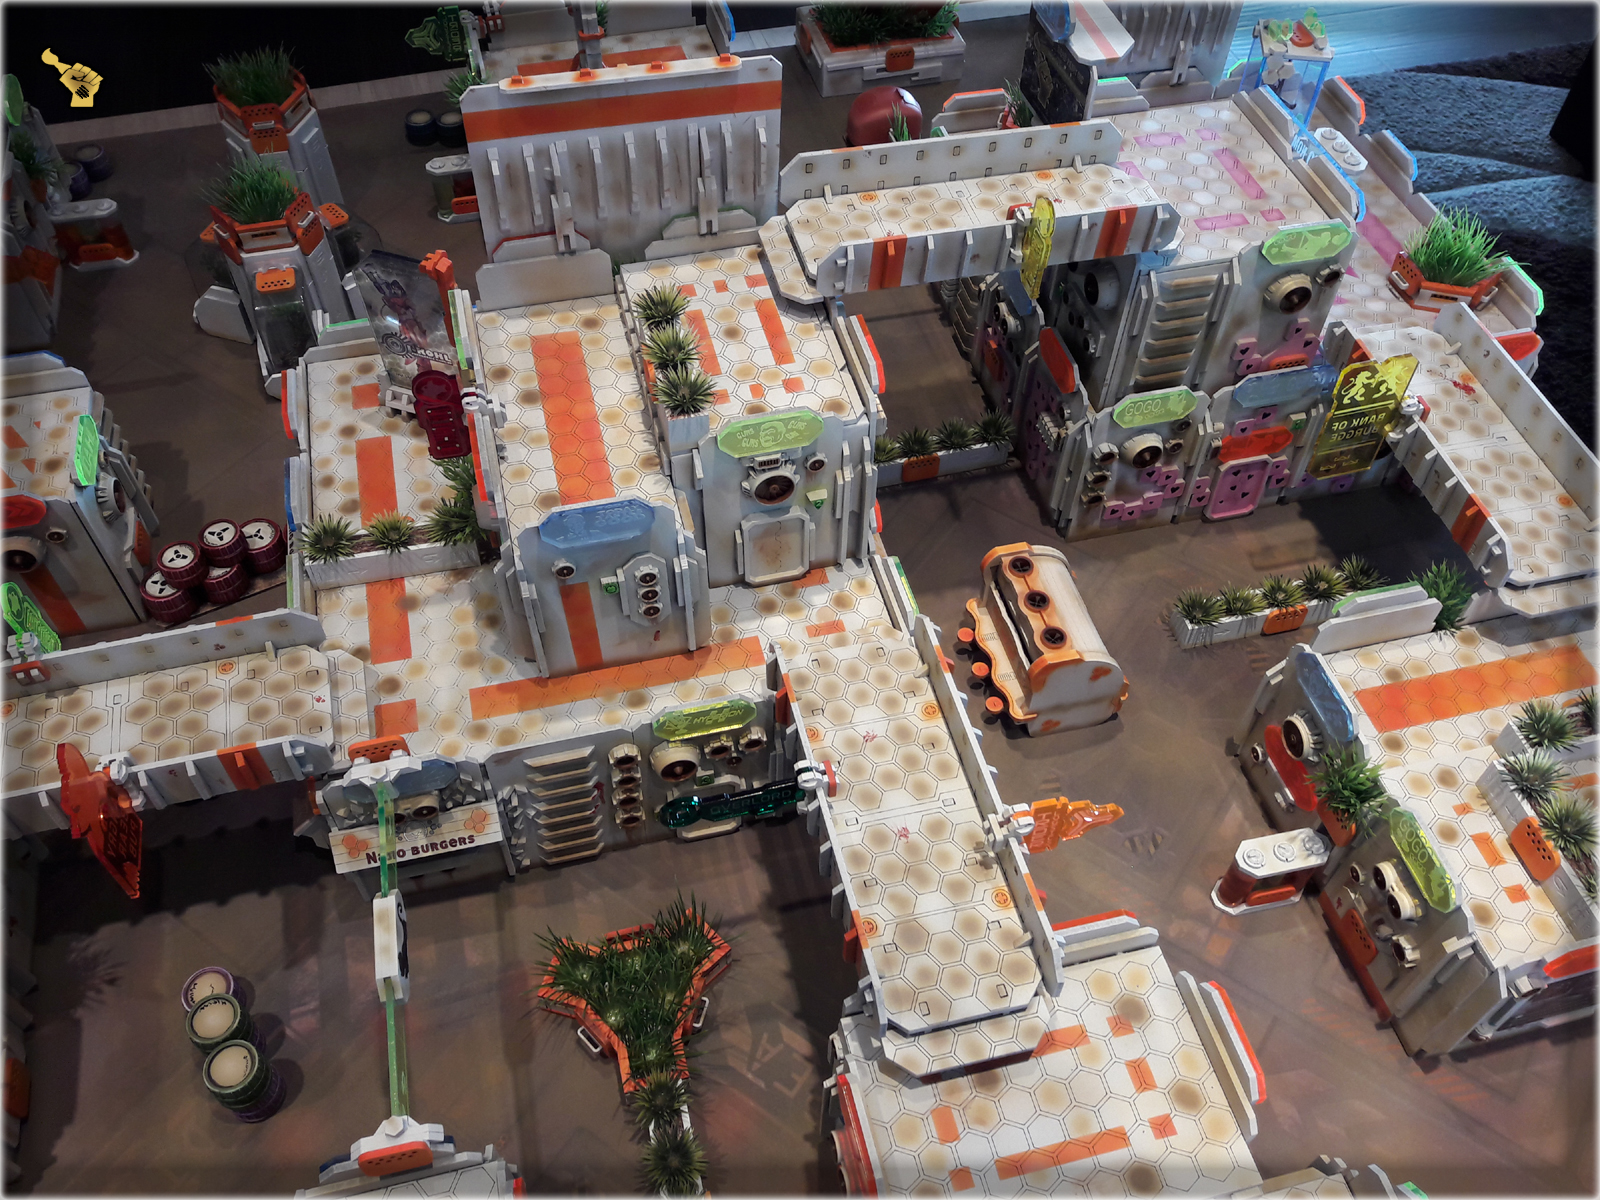
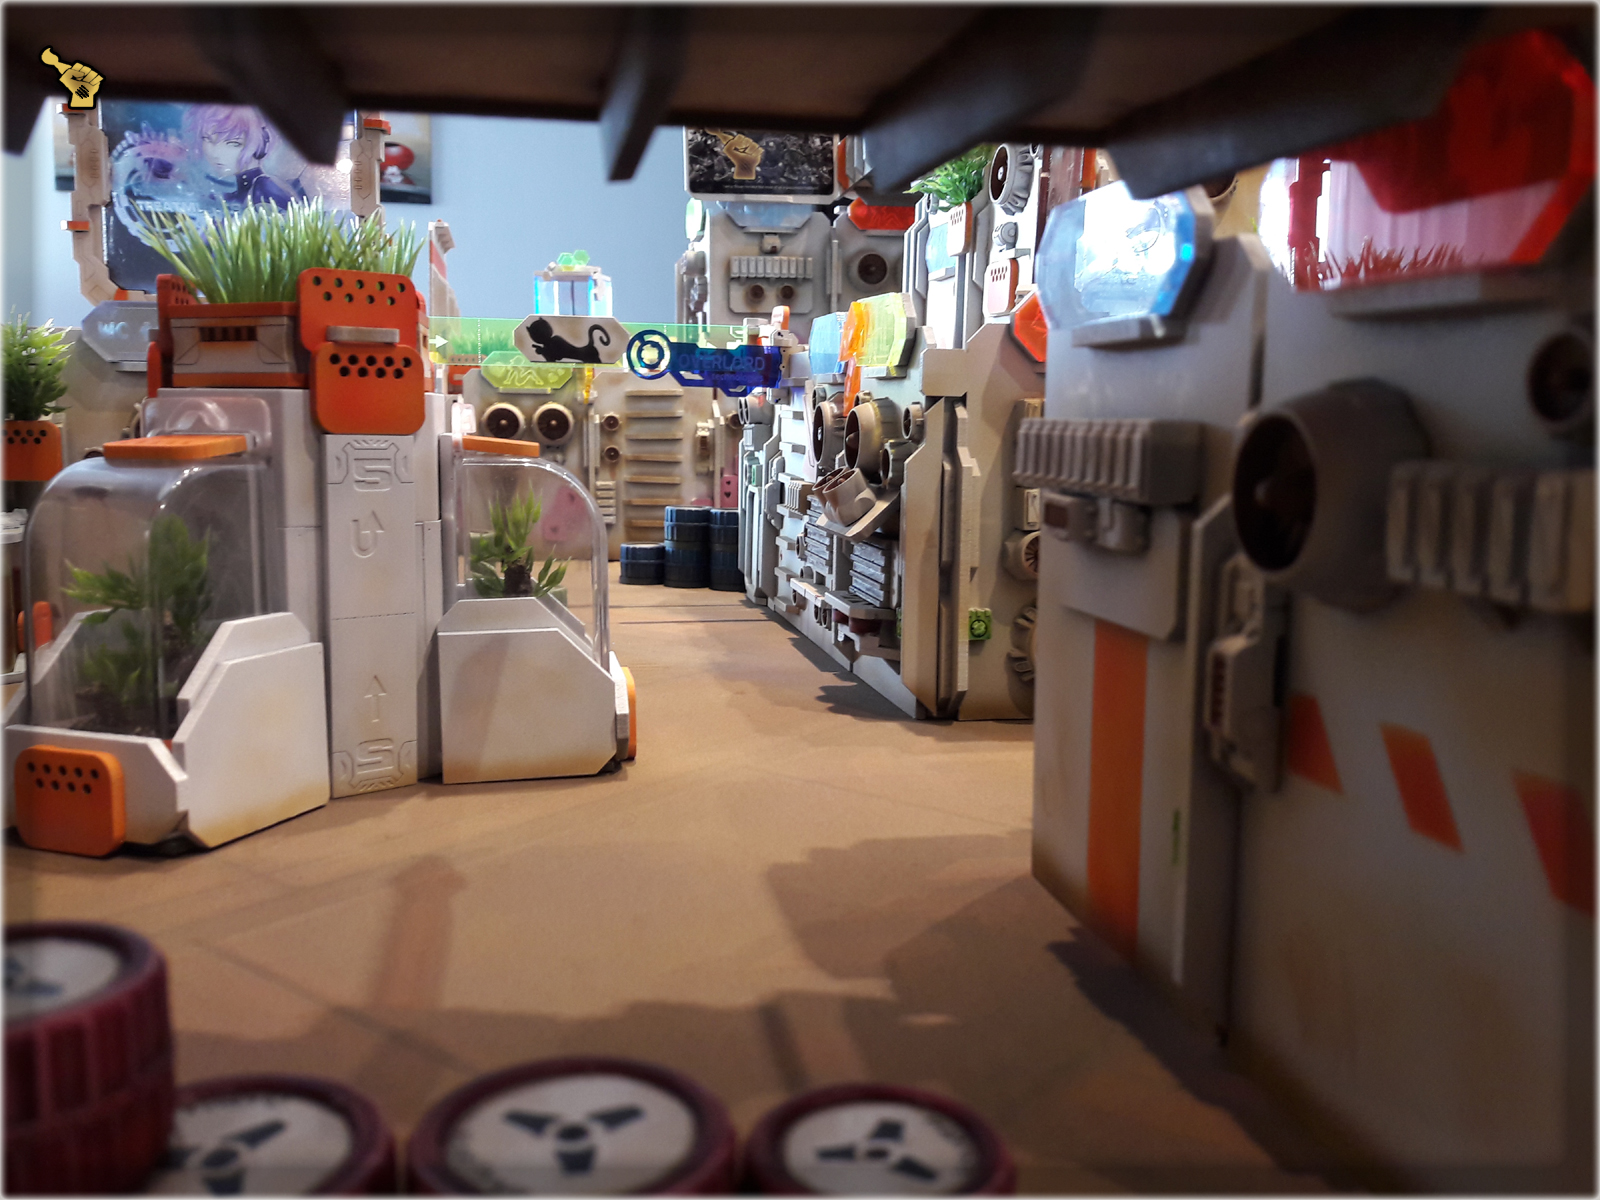
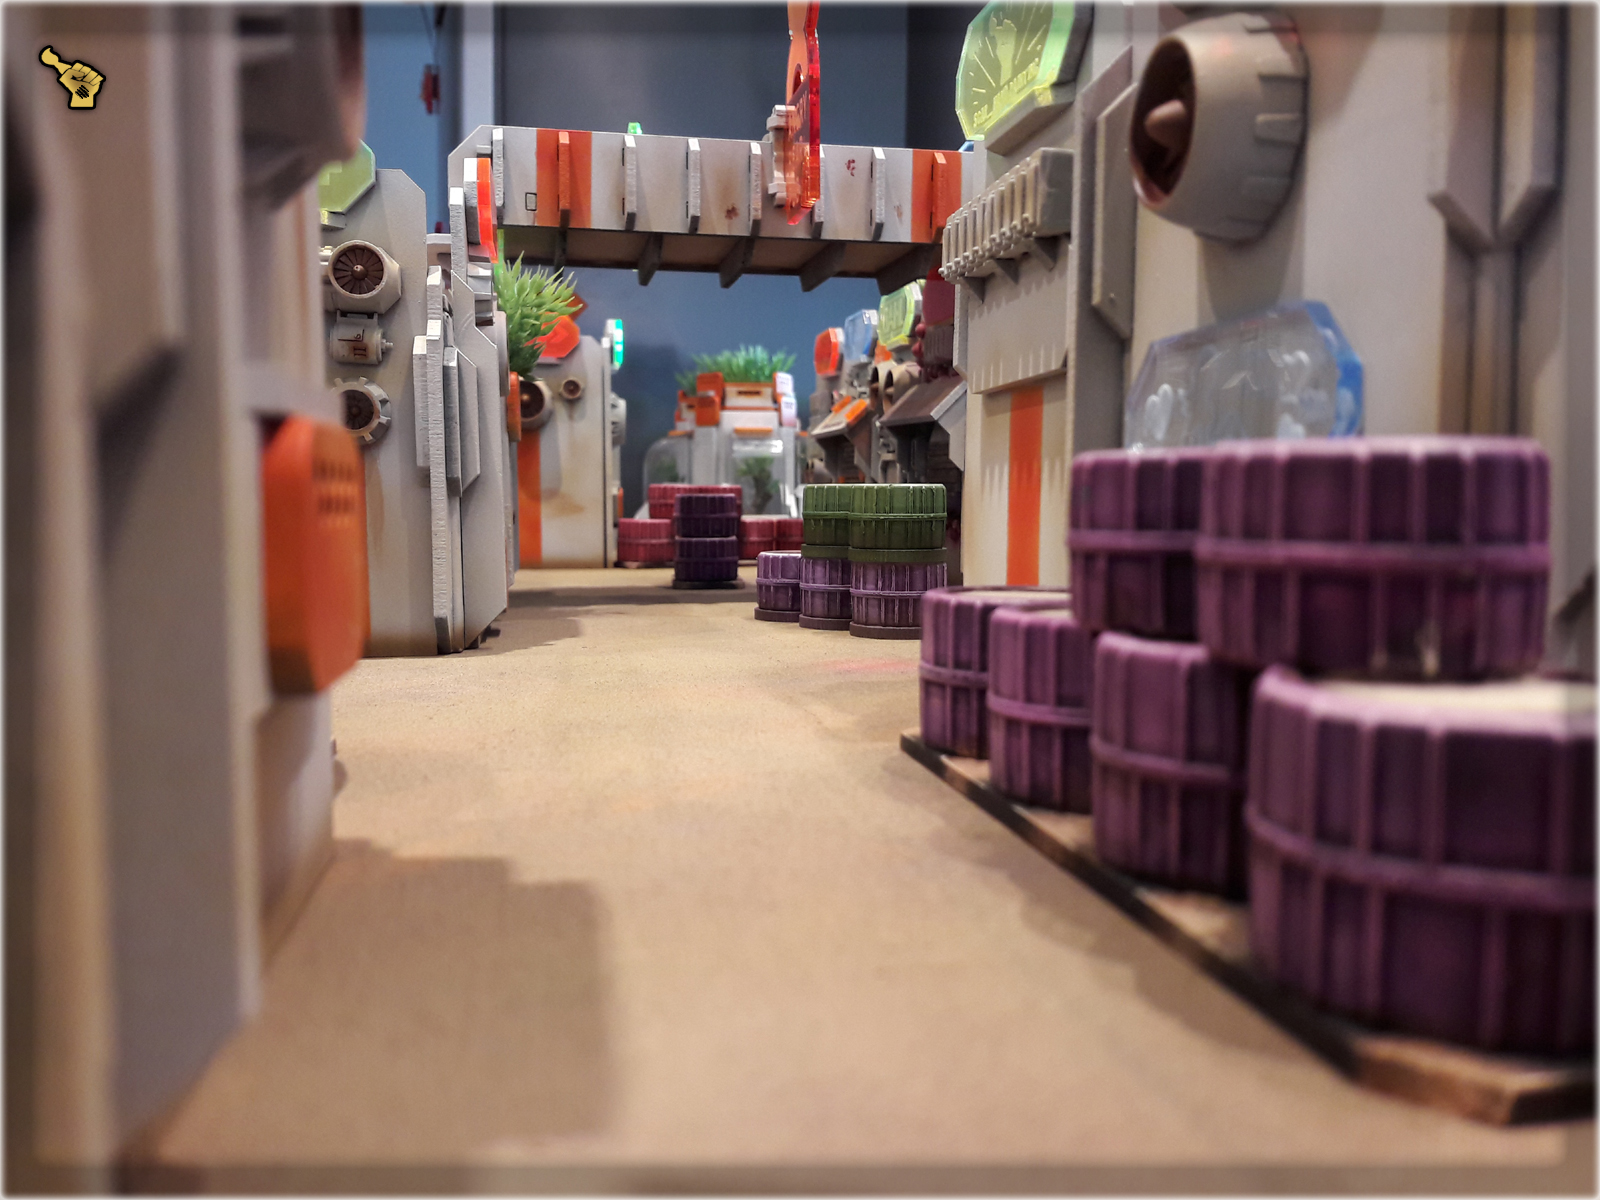
Six bridges are a bit too much on a 48×48″ table so I designed these scenery pieces to help me setup and then keep the gaming board in order. Simple yet effective, adding depth to streets and a nice futuristic note to the overall visual effect.
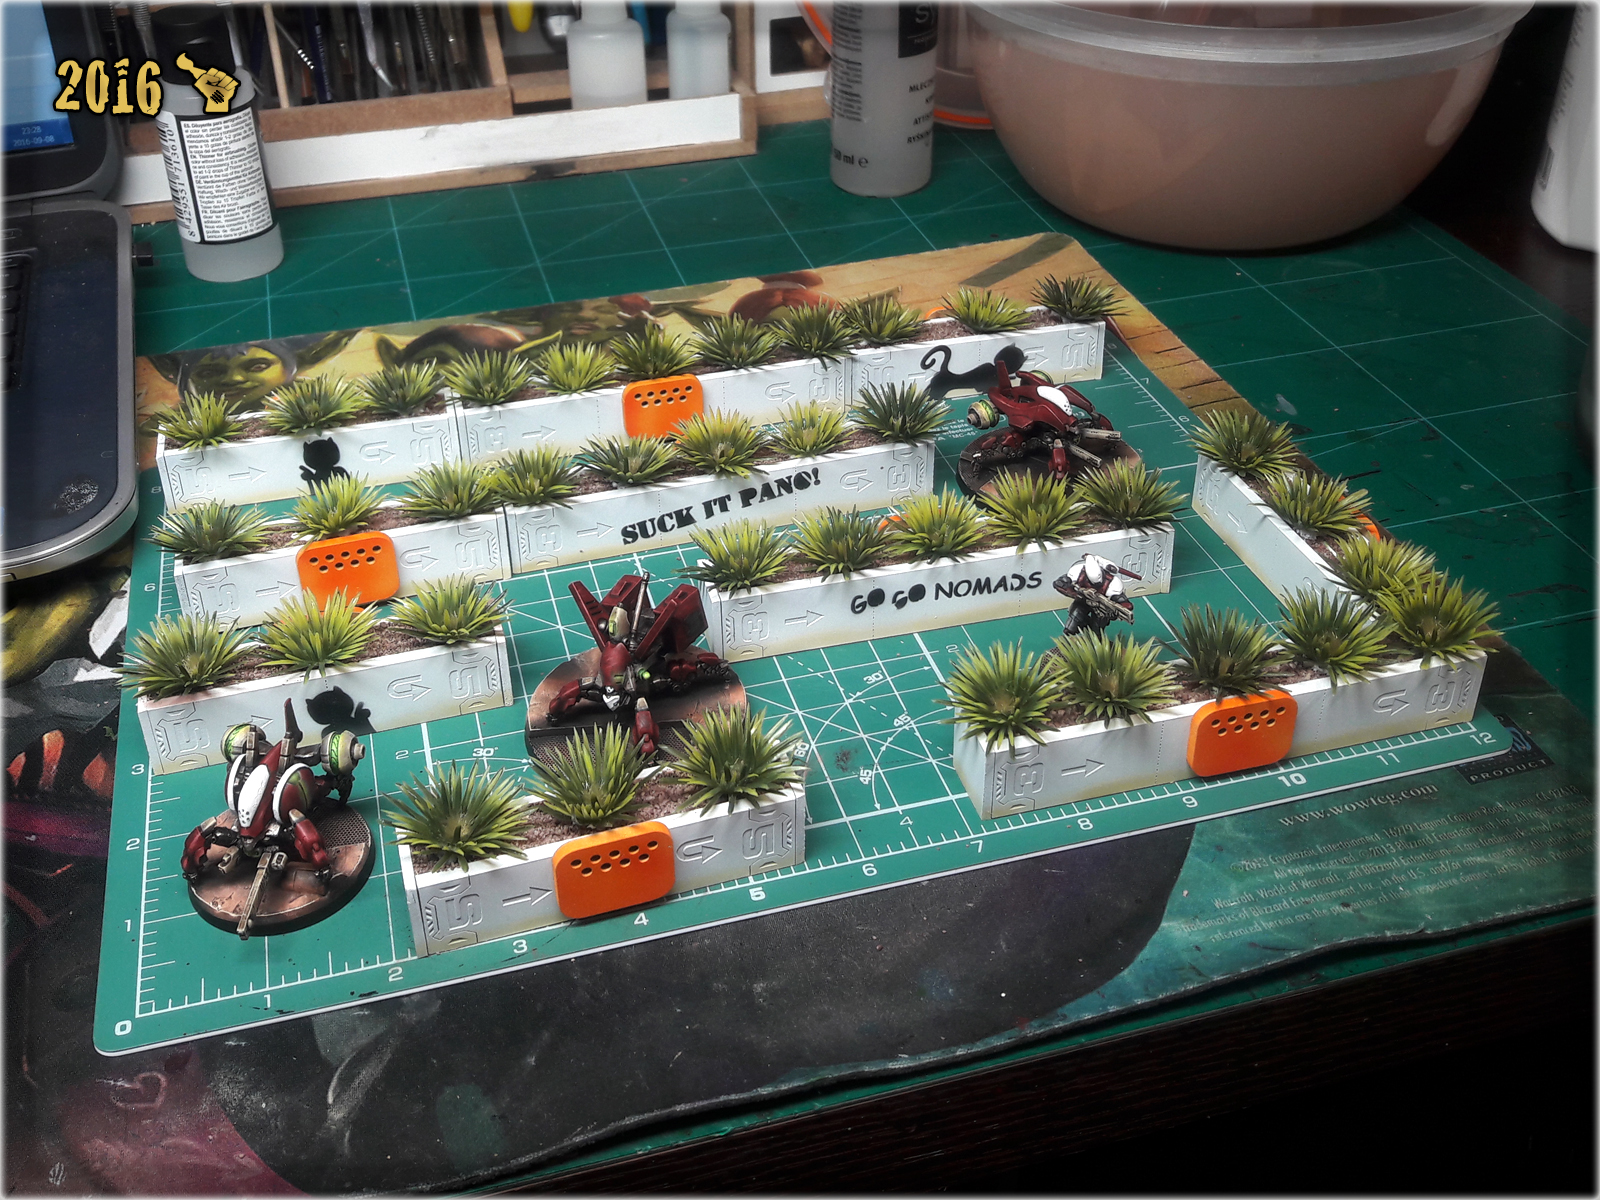
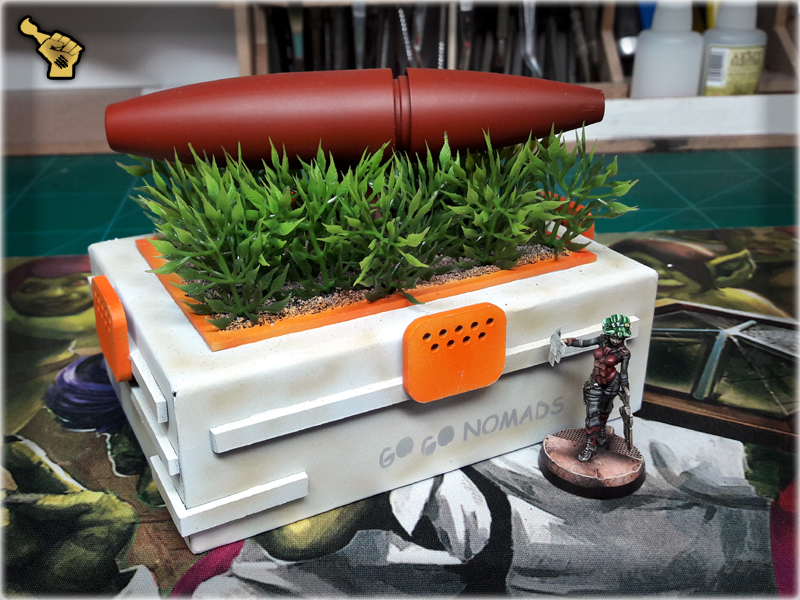
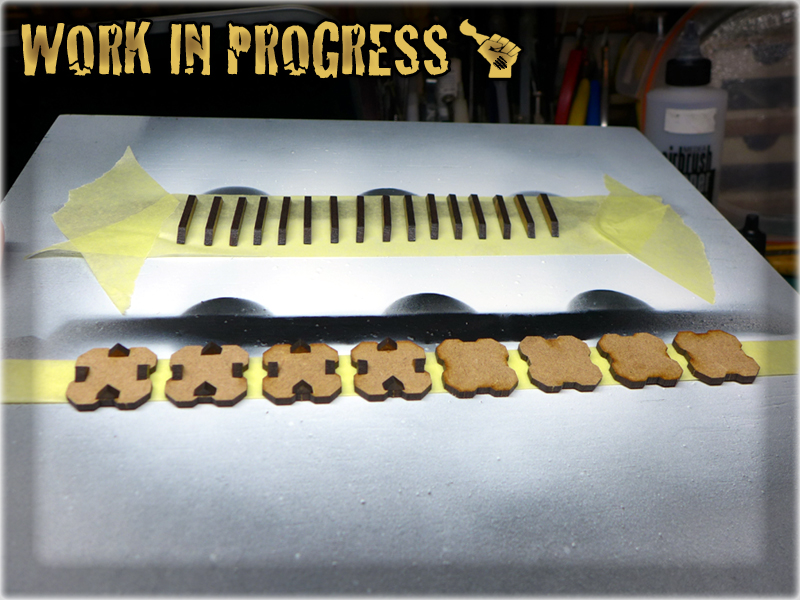
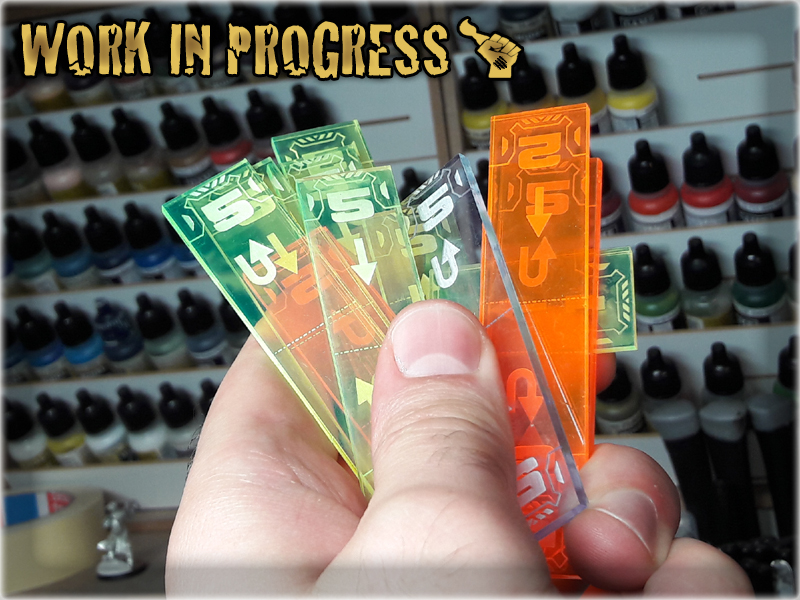
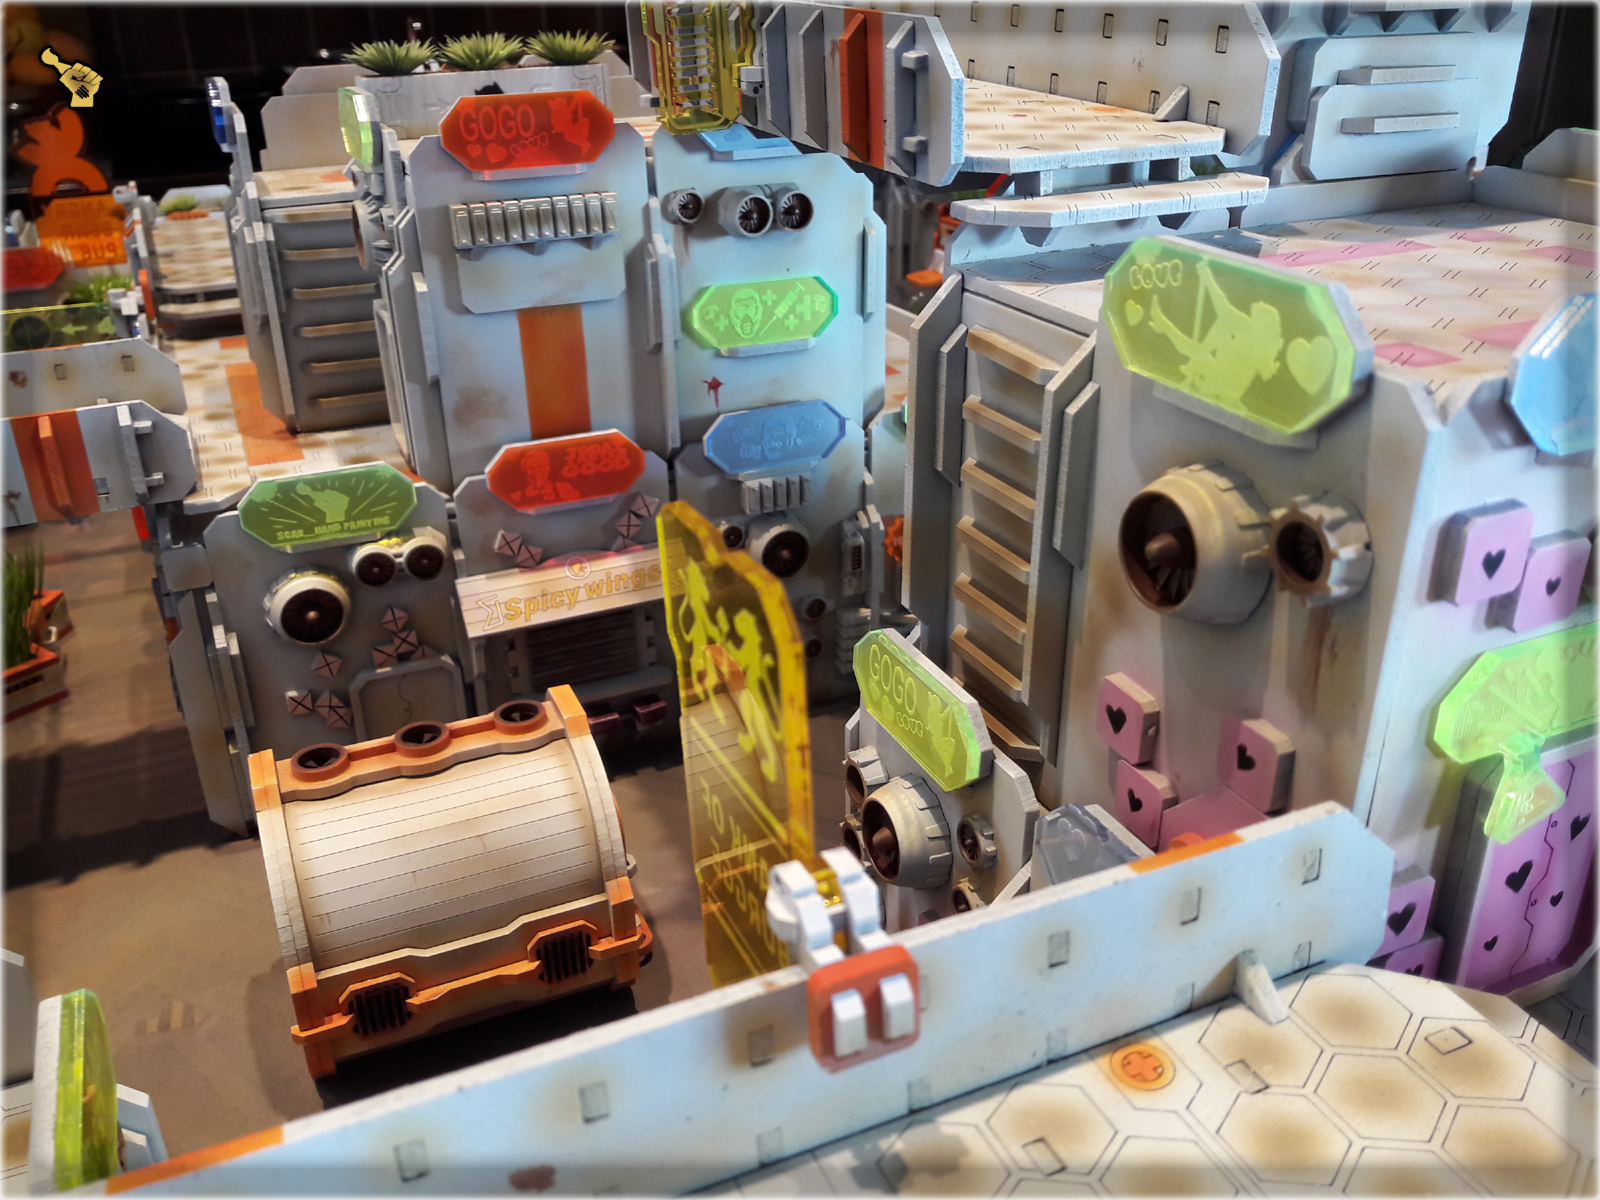
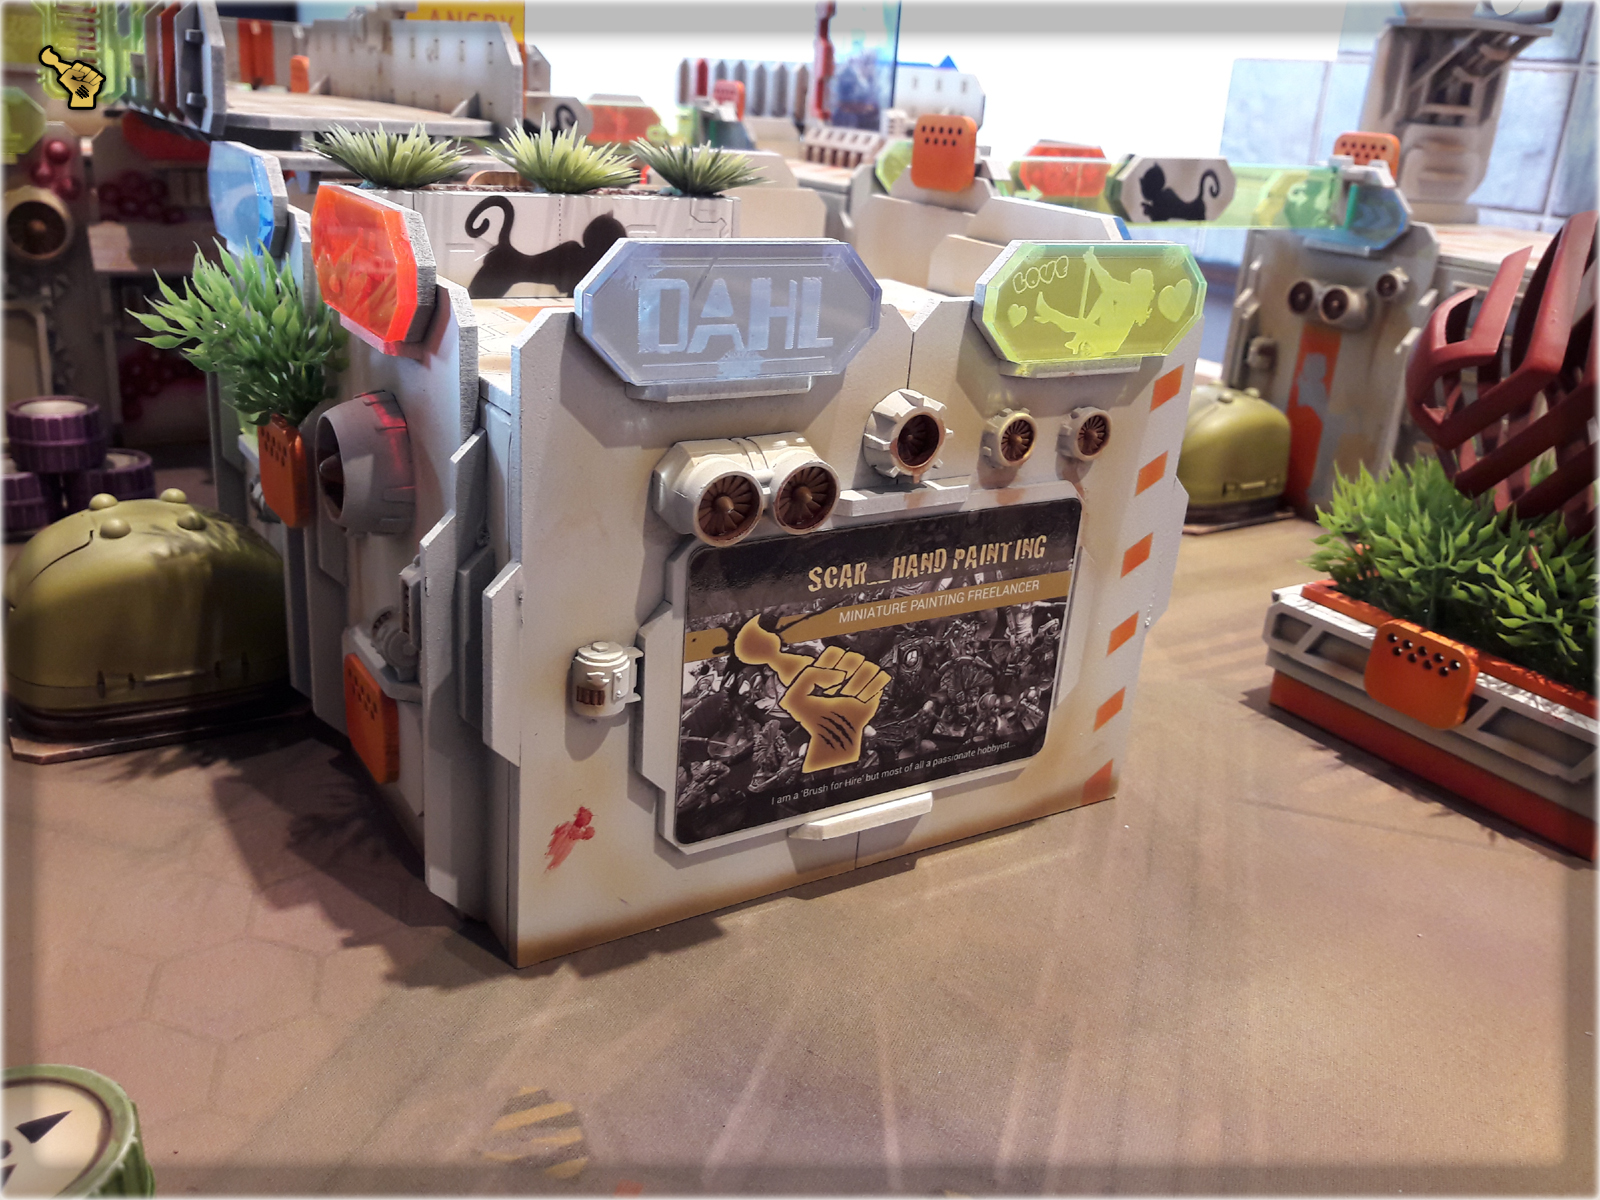
Made with playability in mind, these low planters are perfect to fill my choosen theme of white/orange/green scenery. They fit both at the ground level and in the rooftops. I made these using pleksi rulers to provide detail, while the rest is just plasticard cut to fit the empty spaces. The visuals vere enchanced by plants and HDF ‘orange’ pieces.
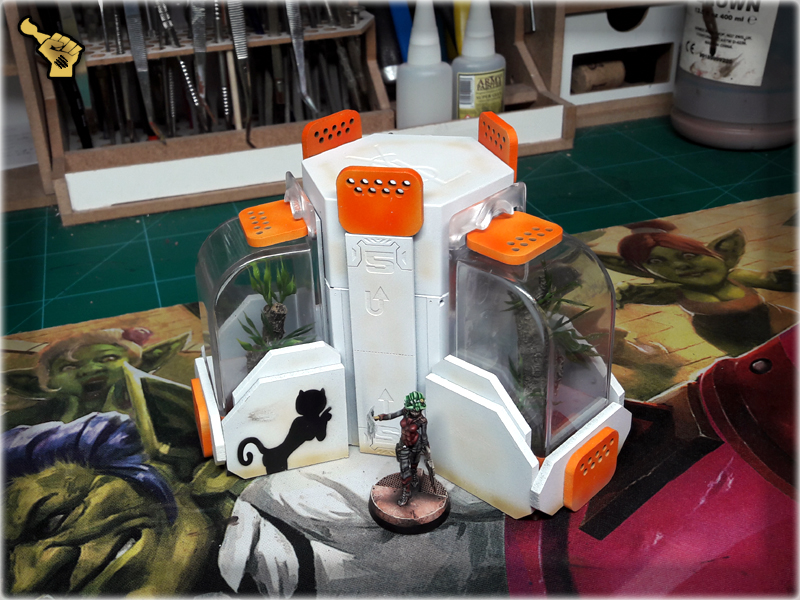
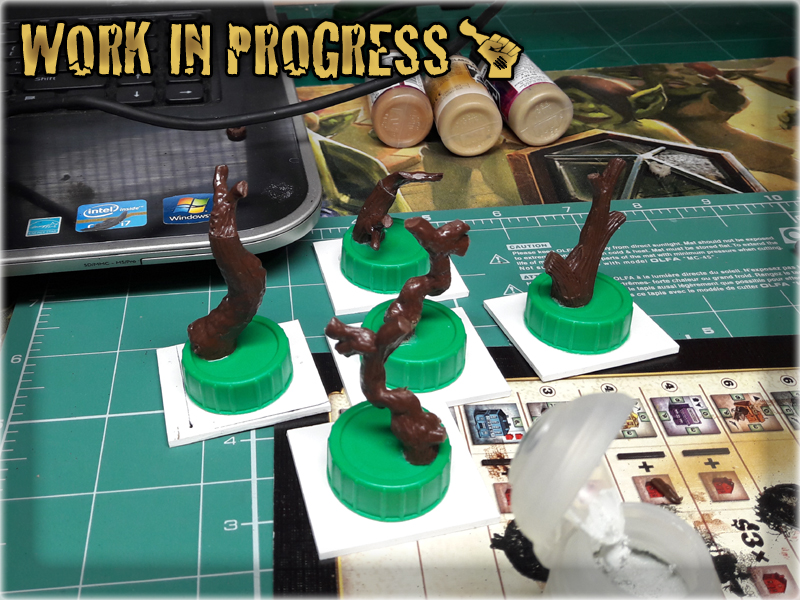
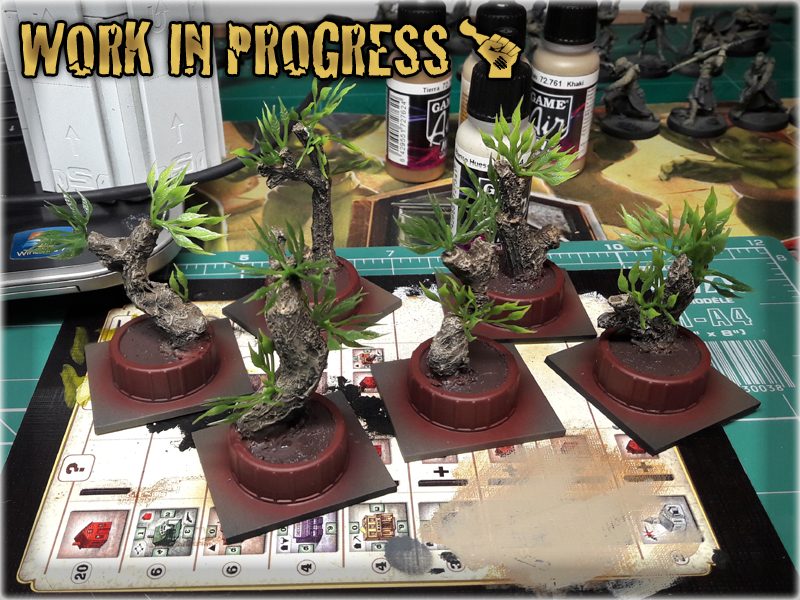
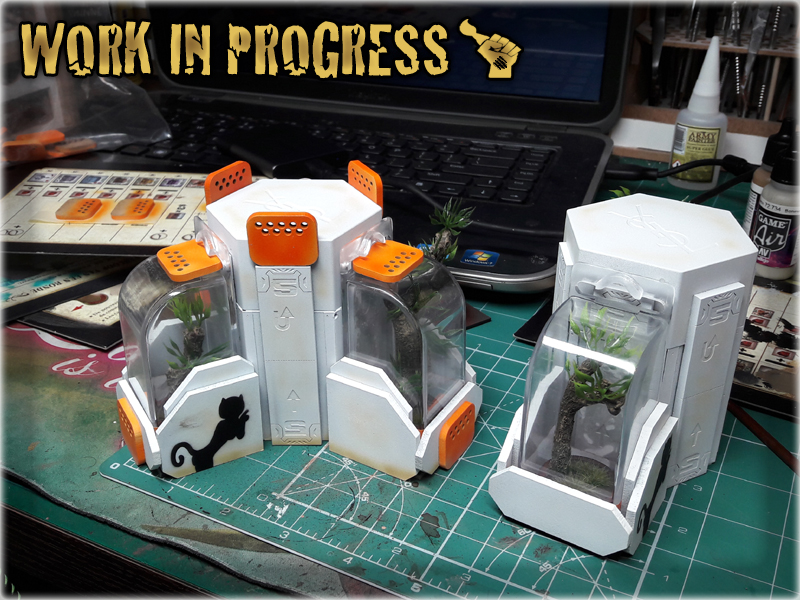
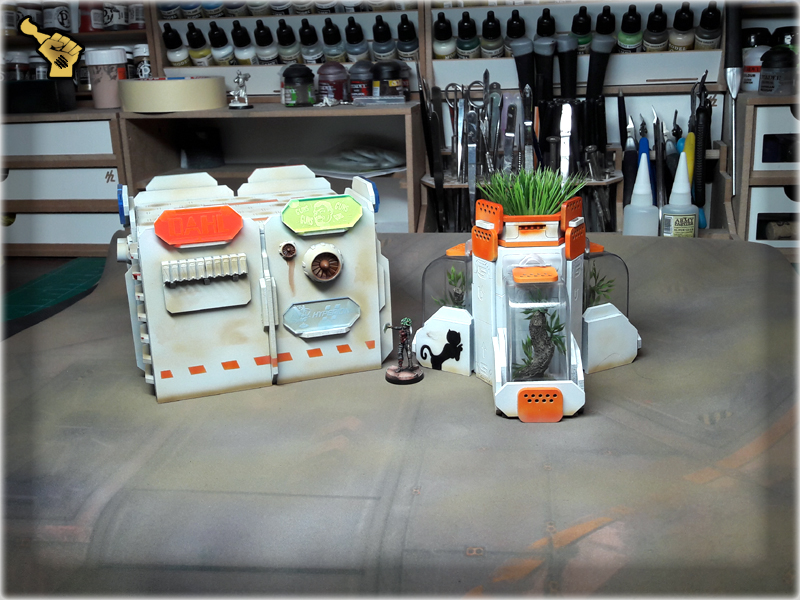
This plant compartment module is a pearl among the scenery pieces I’ve created lately. I’m really happy with how it came out. To think that I struggled for almost a year before I decided how to use two Yves Saint Laurent caps. But let’s get to the way these items (there are actually two identical scenery pieces) came to life. Some time ago I got a set of used up cutter casings from Ekograf to use in my quest of bringing imagination to reality. My friend Garran was the one to dig these out specially with me in mind (Once again thanks mate!). Once I layed my hands on these fine pieces I knew that something wondrous will come out of them. So I started planning and was quickly drawn to still unused Yves Saint Lauren caps. Their hexagonal shape fit perfectly to The Colony’s theme so I based the entire construction on them. After adding couple of PCV pieces to make the construction higher I used plexi rulers to add detail, then used cutter casings and some HDF leftovers to build particular compartments and mounted them around the central column. For the plants I used a fake Bonsai tree made out of gum. It was to fragile to be used as a standalone scenery piece, but inside the compartments it could easily outlive all the other terrain pieces. So I used glue and some tricks of my own to enchance the vicualts of tree stupms, added fake greenery and mounted these fine looking plants inside the compartments. ‘Orange’ elements followed and themed paint job done the rest. Now I have two LOF blocking pieces of scenery, that provide a lot of cover, fill empty spaces between the buildings and go along with the theme.
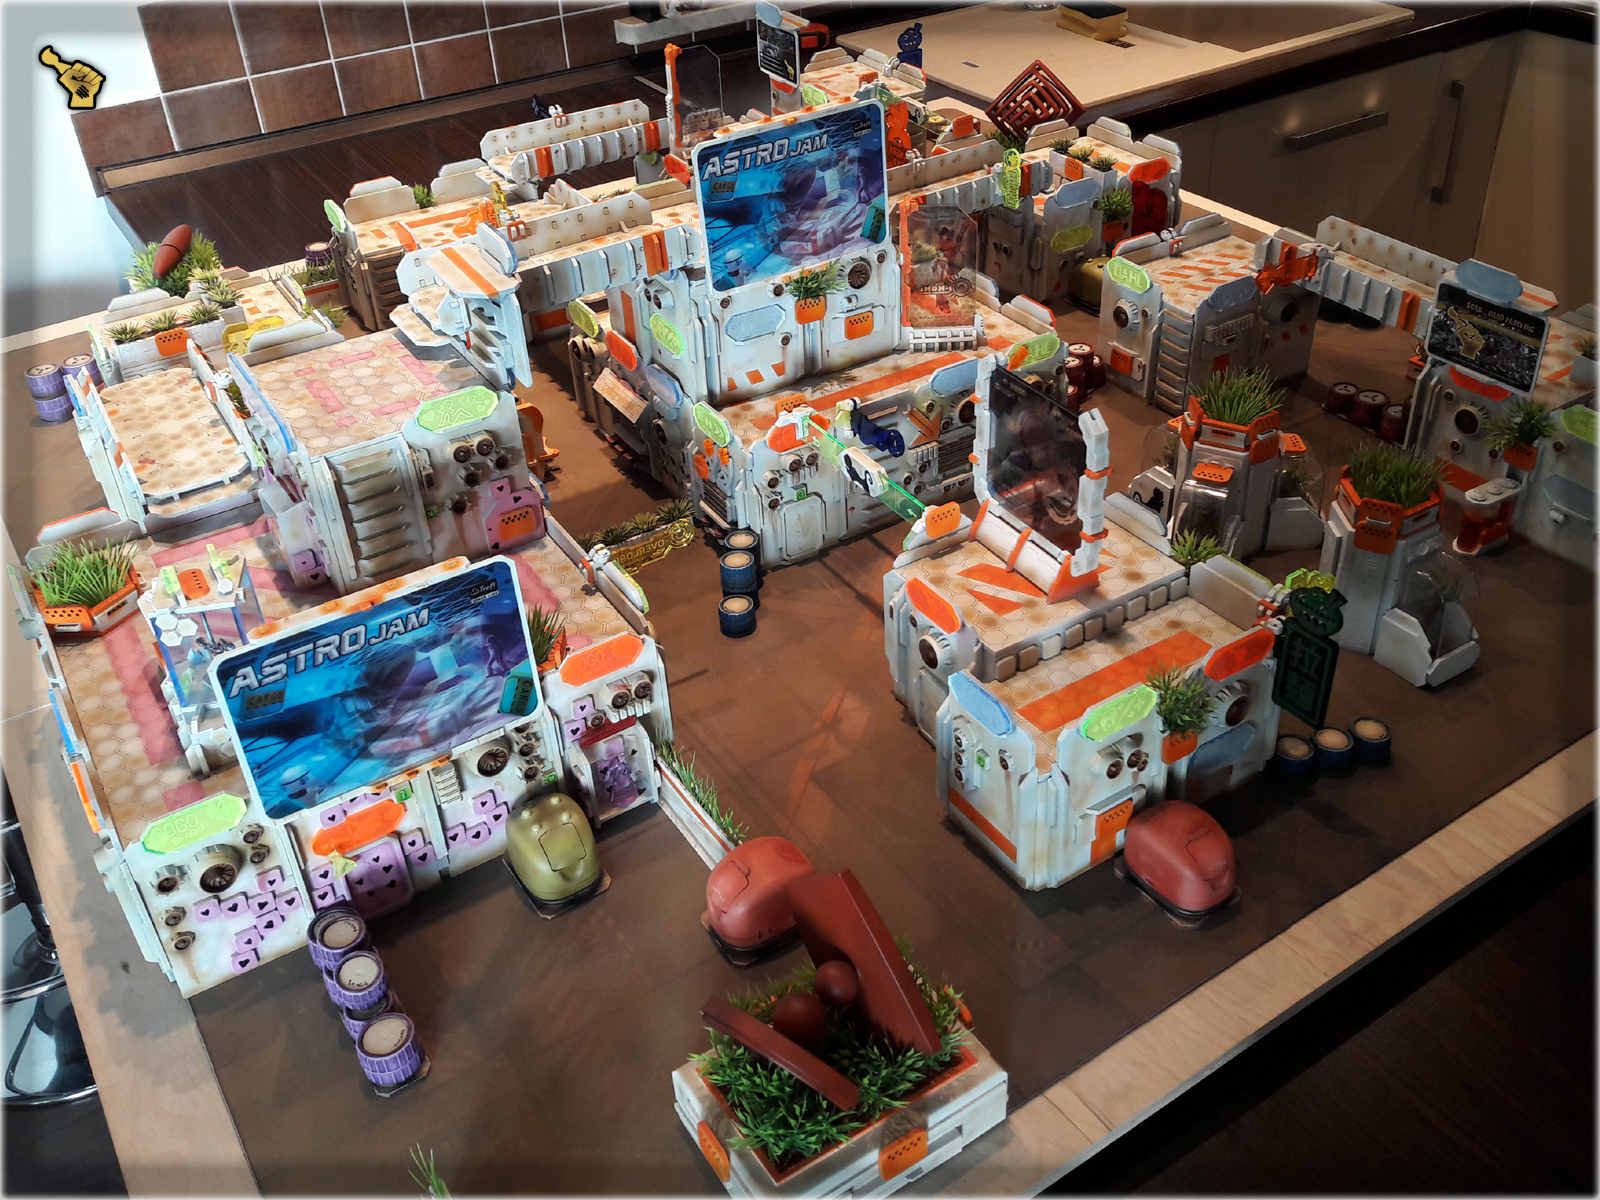
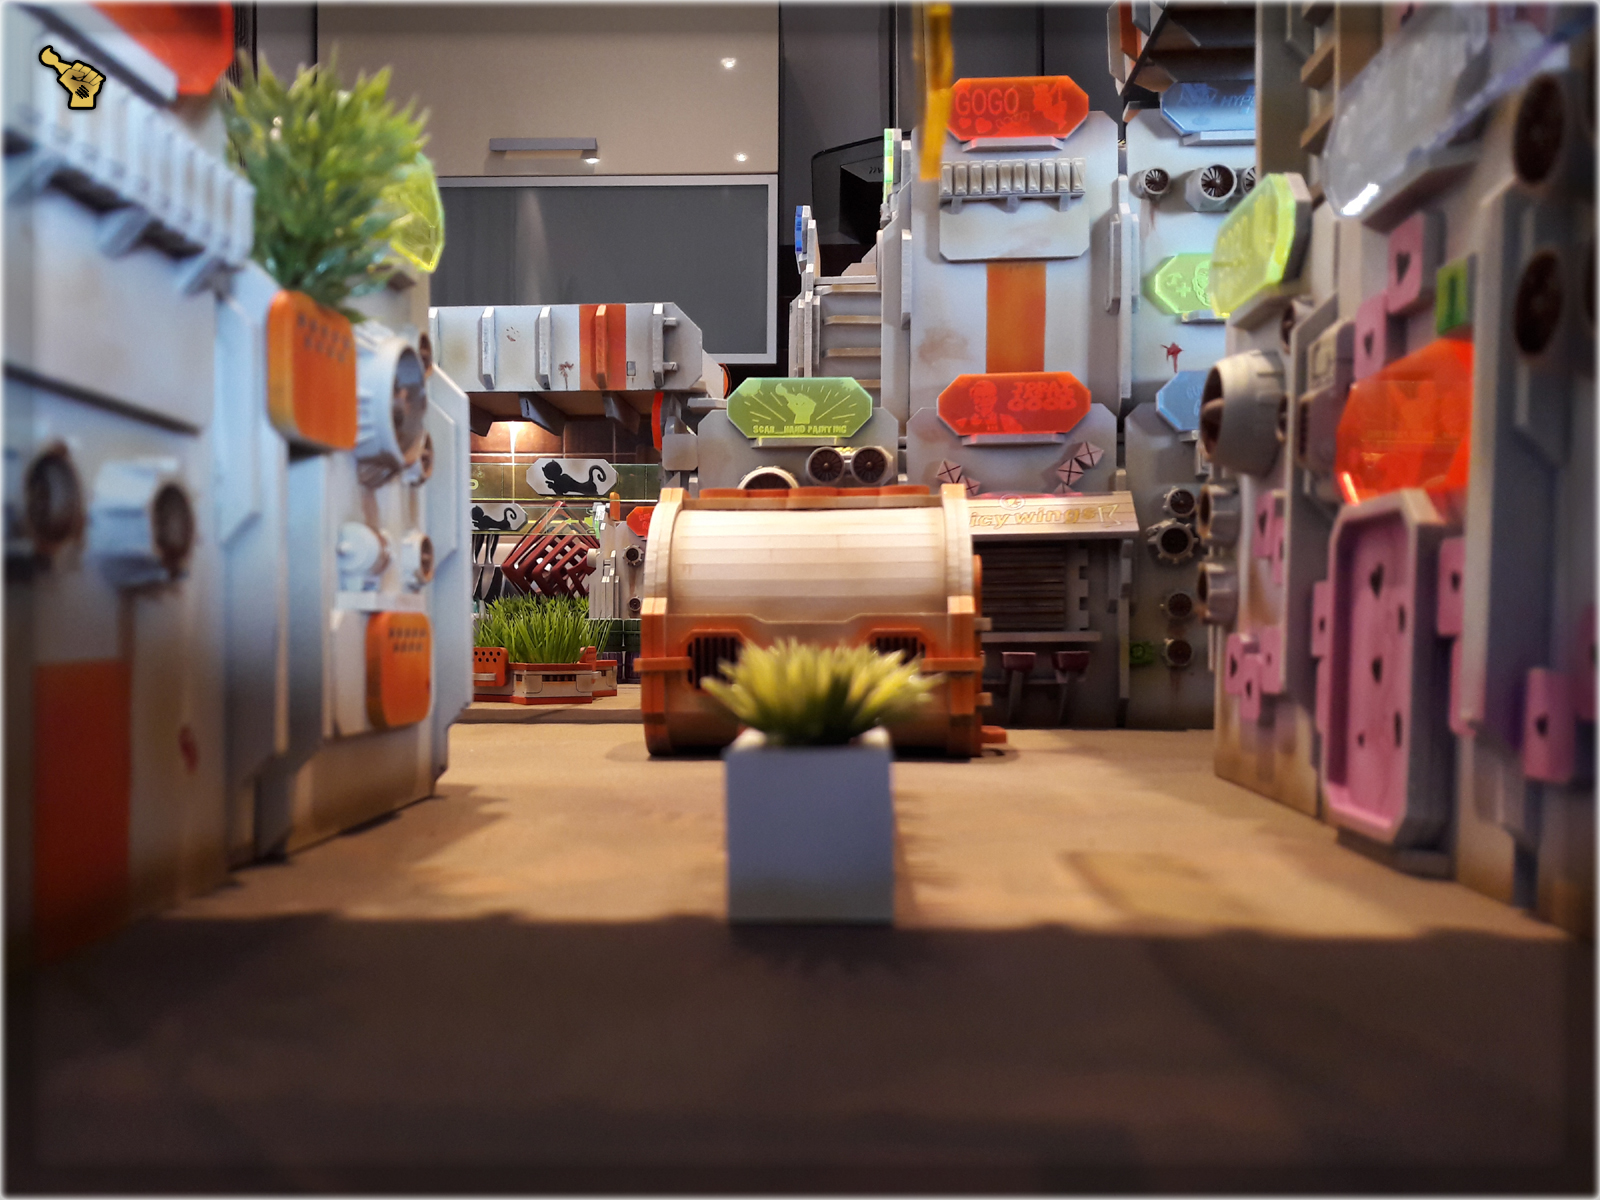
One thing still stood out of The Colony’s theme. The Micro Art Studio’s gaming mat (which I just love and don’t want to ever switch for anything else) was screwing with my colour scheme too much. I’ve figured to try and paint it, using sprays and airbrush. For this purpose I’ve airbrushed the entire mat with Vallejo’s German Red Brown, then used Vallejo’s white primer to lighten some spots and finished with Games Workshop’s Zandri Dust primer spray. Once the last layer was dry I moisted the gaming mat and used a piece of cloth on it to ensure that no paint will leave marks on my terrain, miniatures and accessories. Must say that MAS’s gaming mat holds the paint perfectly, while keeping it’s previous properties. The picture does not entirely cover the hue but rest assured that now the gaming mat fits perfectly to The Colony.

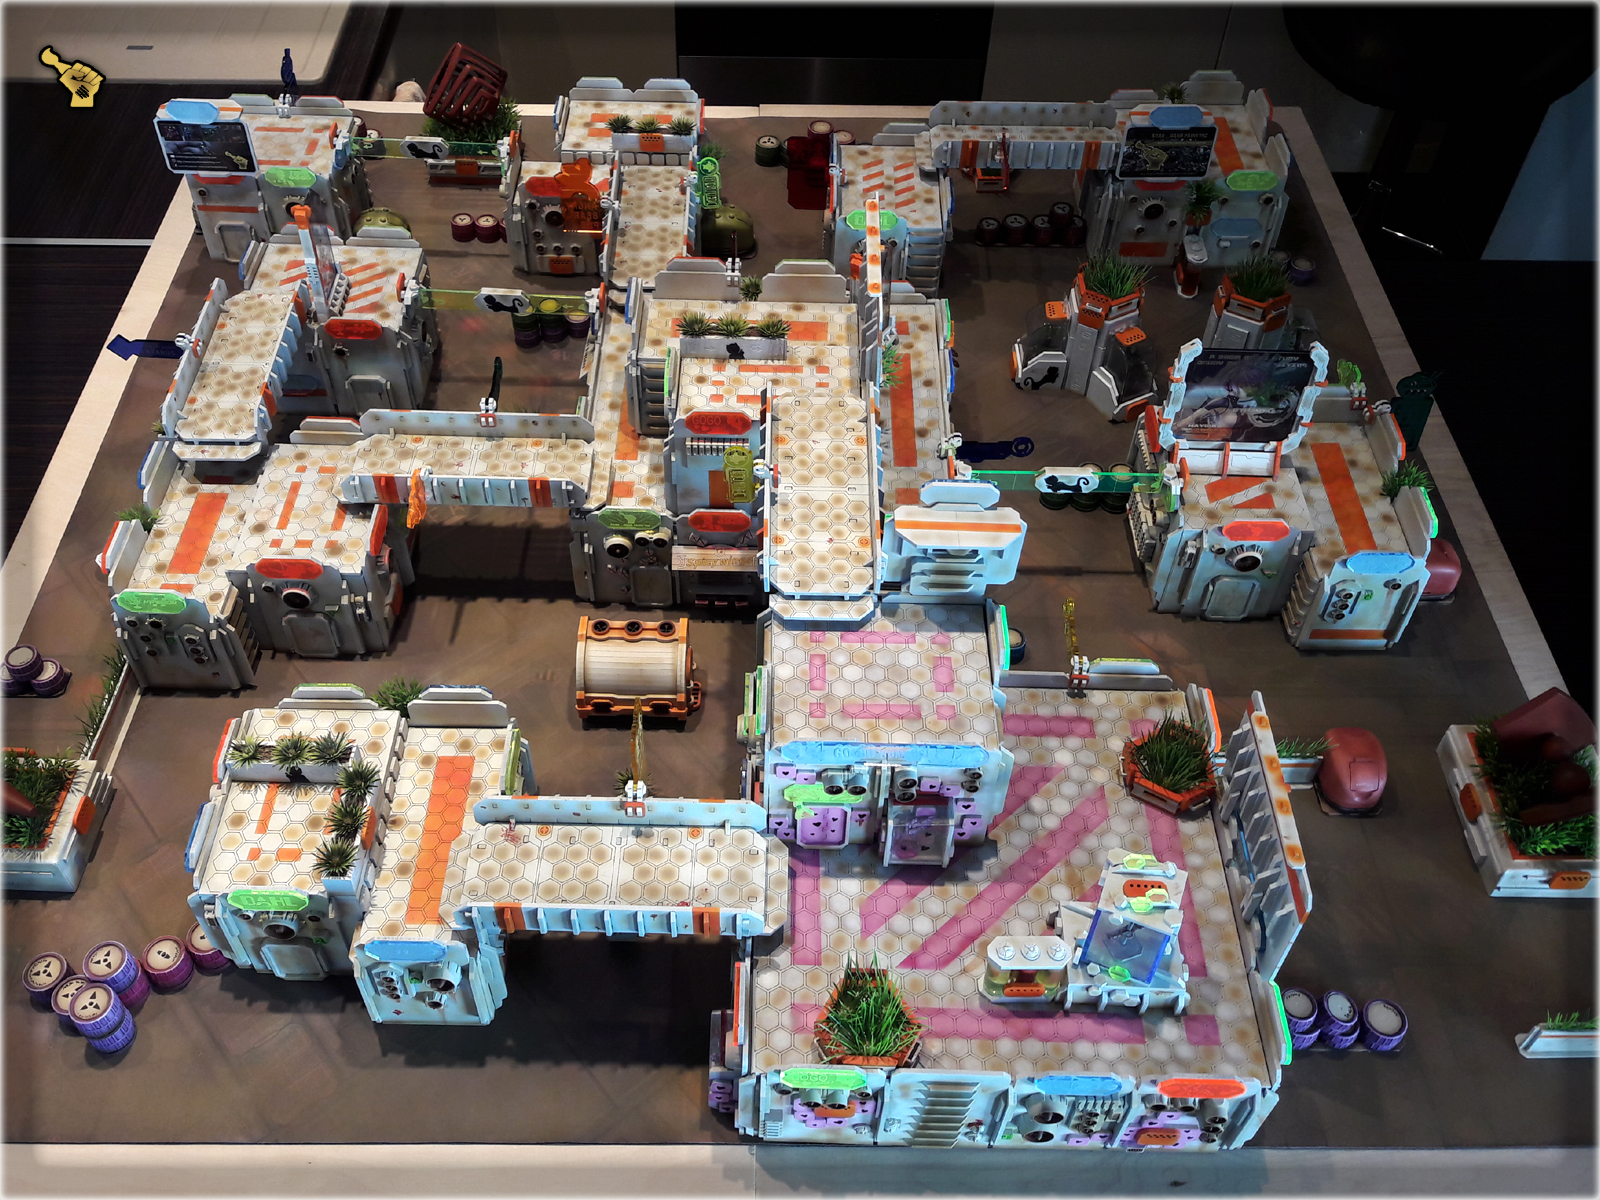
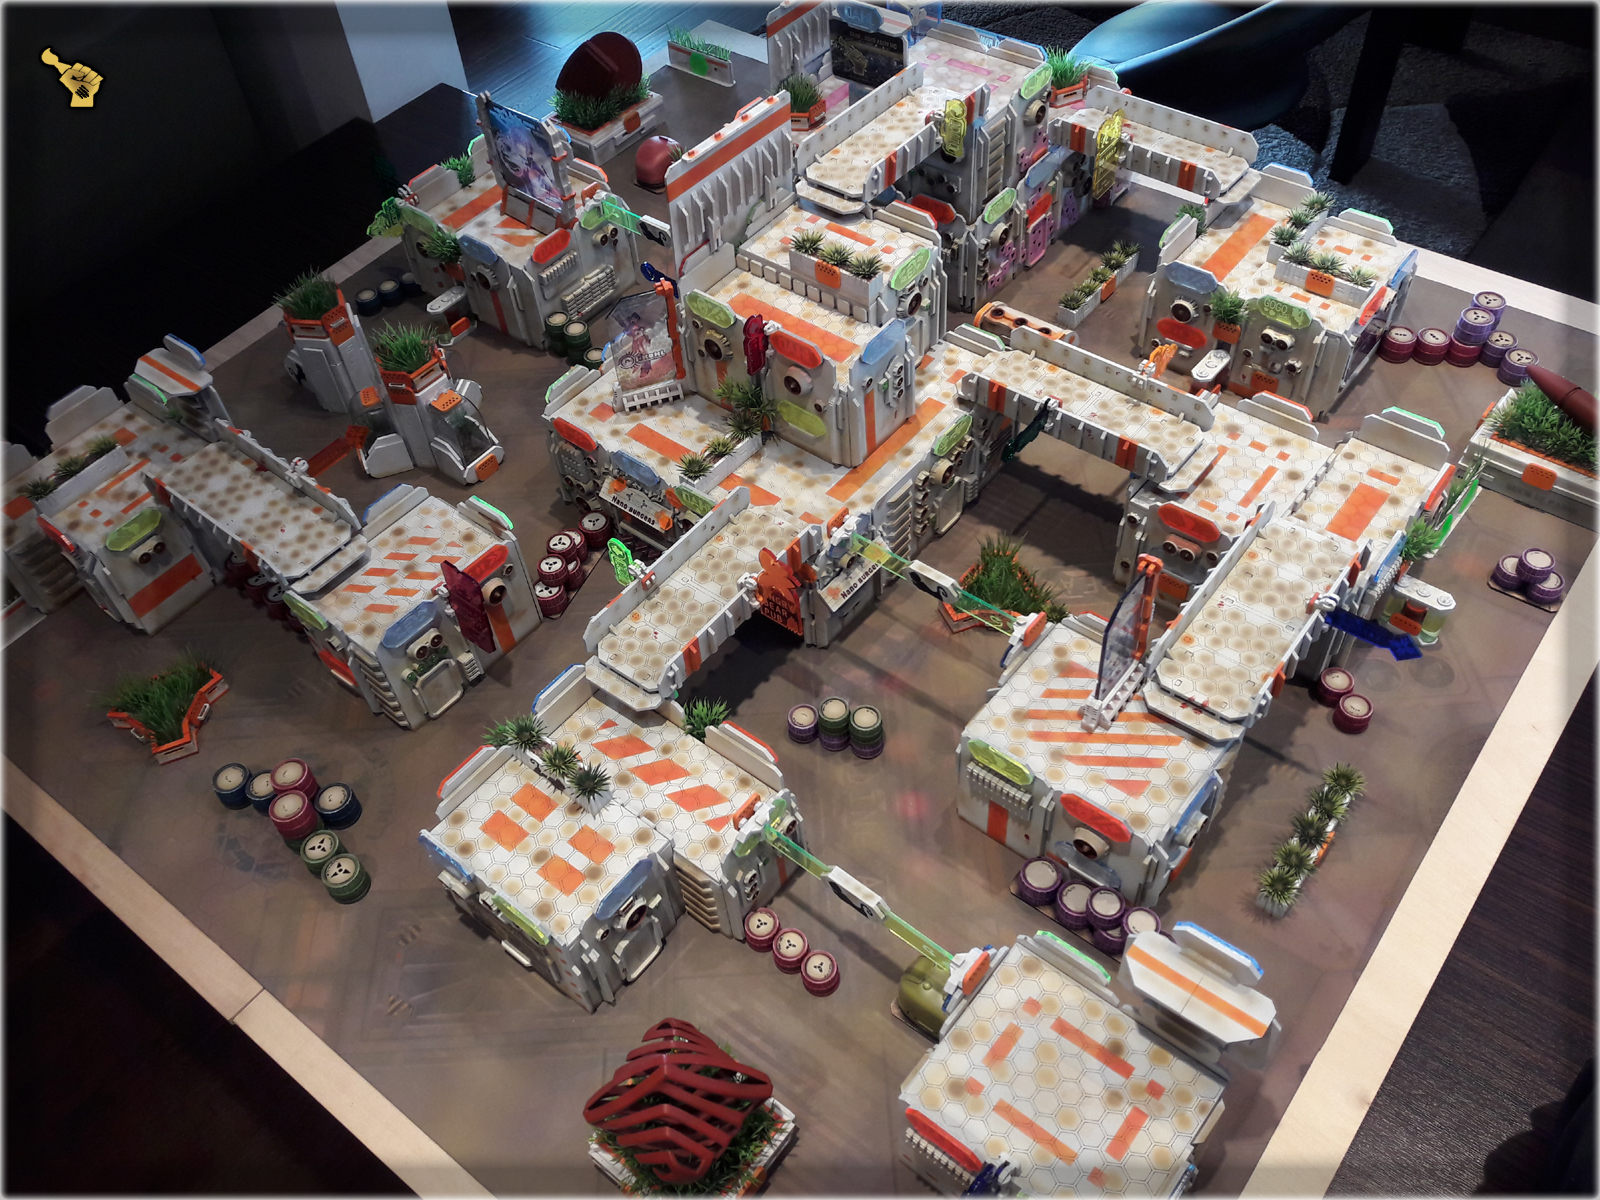
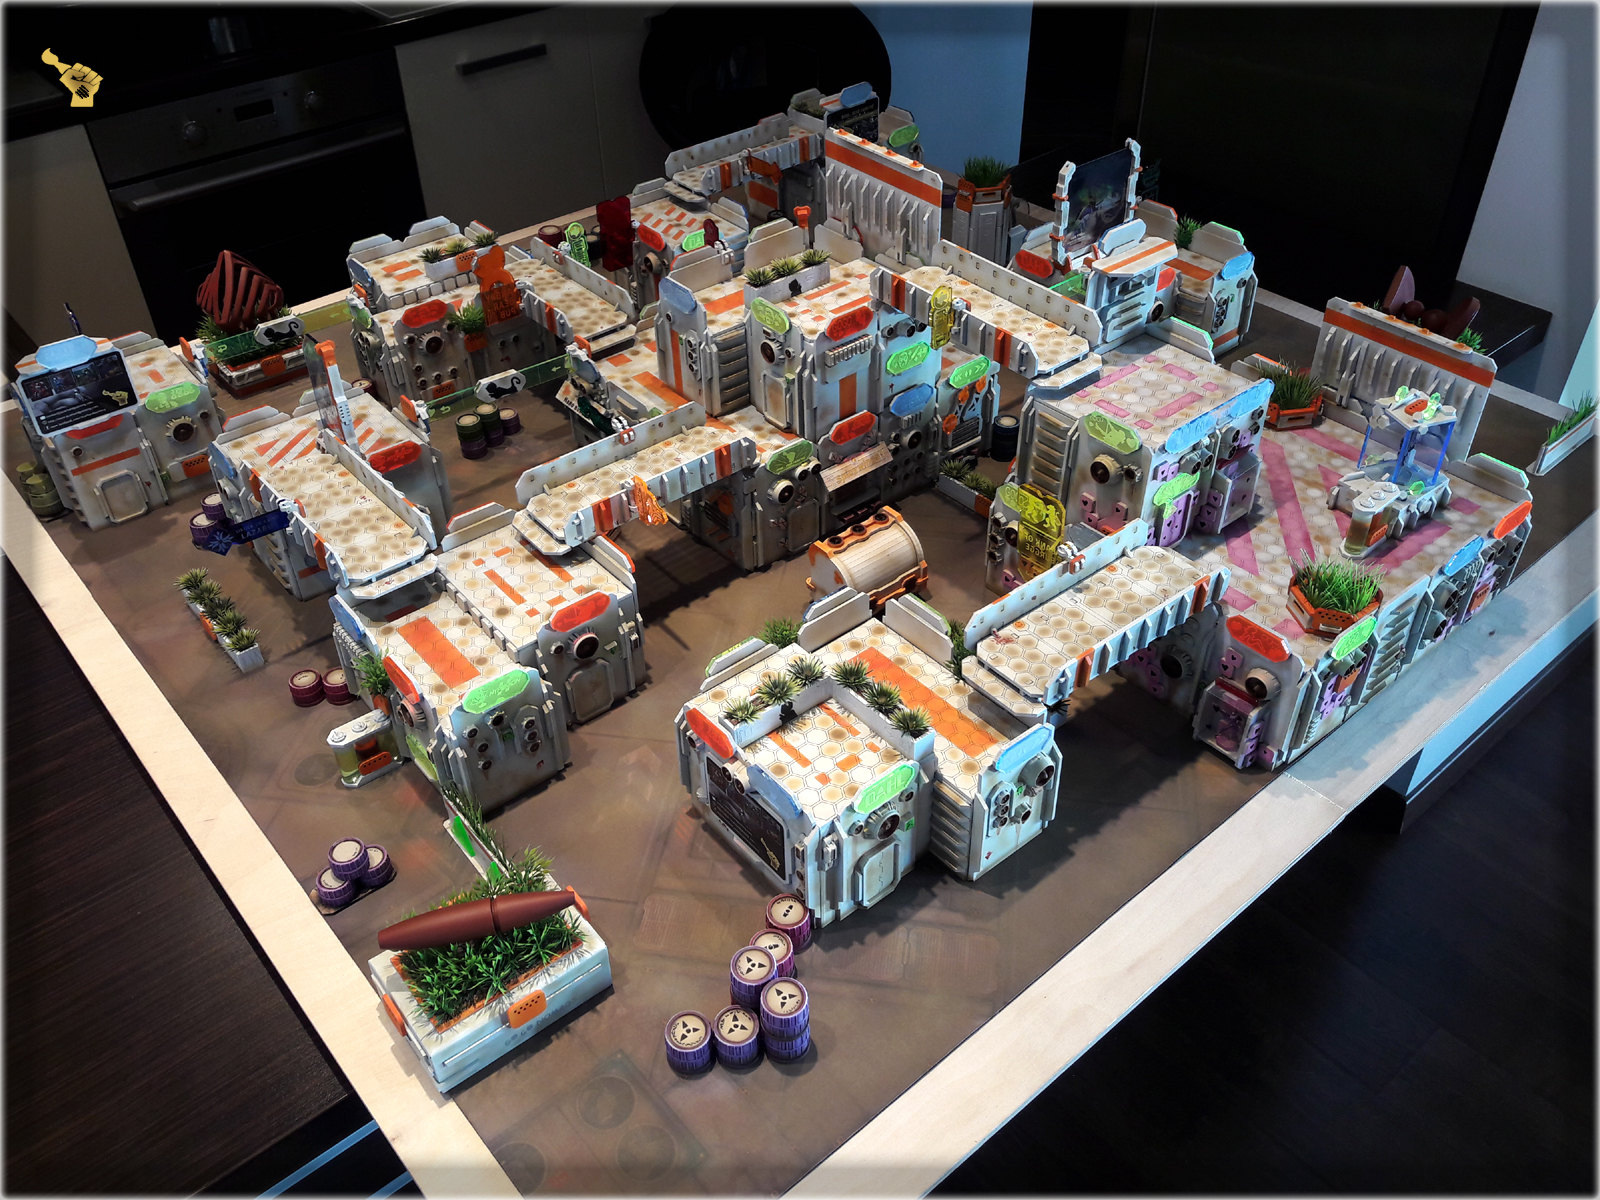
Last four months might not seen me The Colony-centered, still I’ve managed to improove the inicial concept of this gaming table. I’m really glad to be able to transform this:
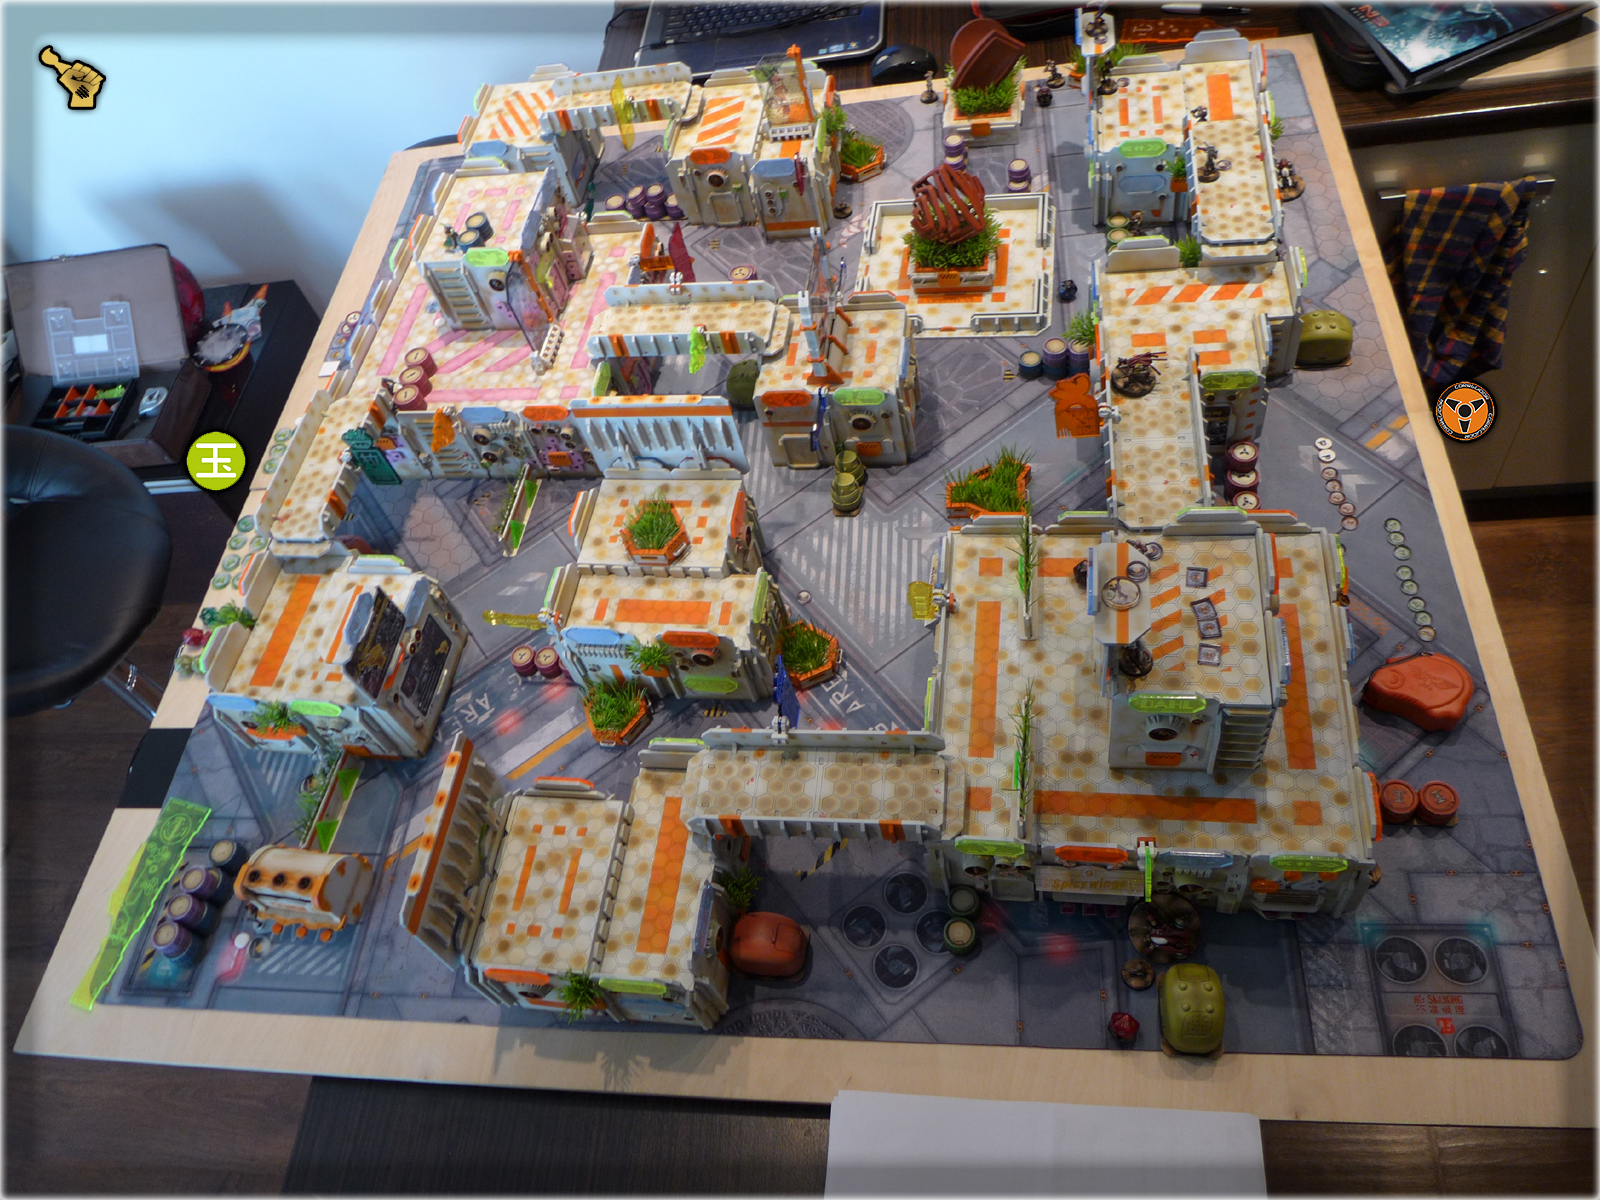
Into this:
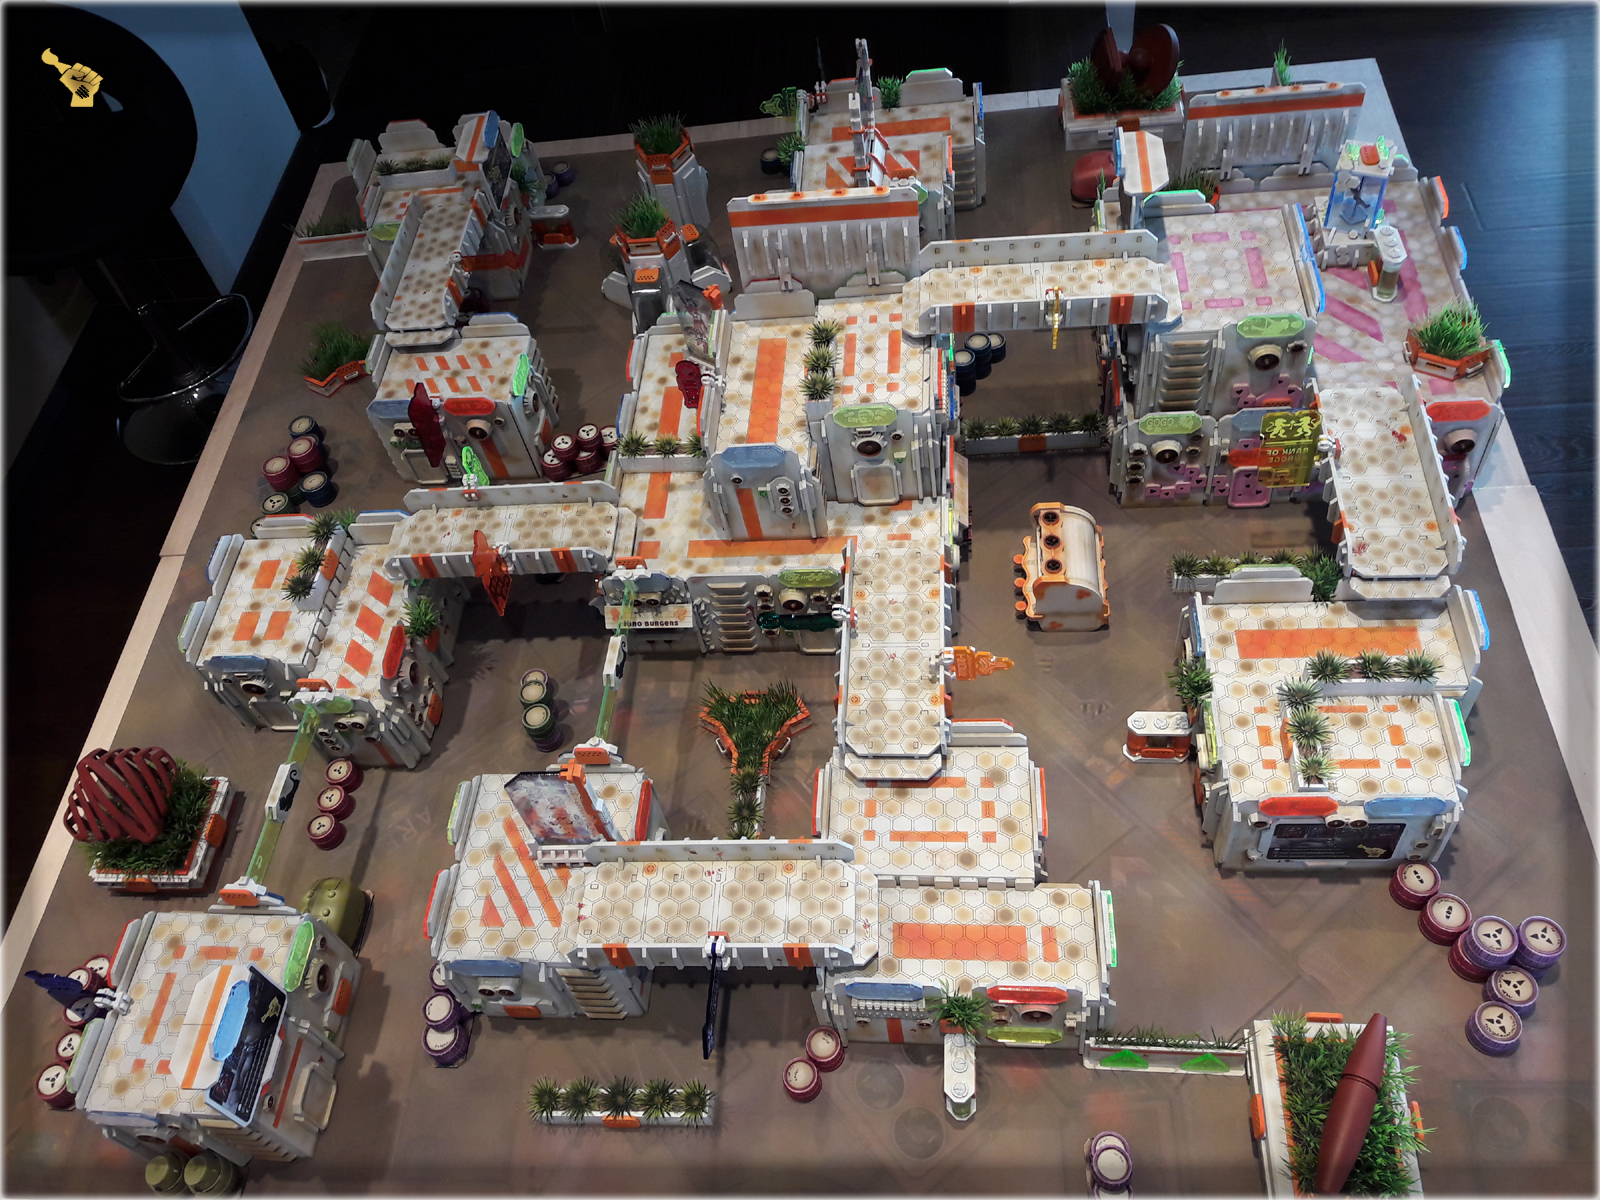
Are more upgrades incomming? As long as I live and am into Infinity – that’s not a matter of if, but when. Stay tuned for more of The Colony.

You want to learn more about The Colony? Check out the entire series using THIS TAG