- contact@scarhandpainting.com


Seems like following the release of Games Workshop’s Contrast Paints, painting miniatures on easy mode became the new hotness. Different companies jumped on top of the hype wagon, releasing their own version of the recipe, with mixed results. The more the merrier, thus the Green Stuff World, a Spanish company well established in the hobby market, dipped their toes in the trend with their line of Dipping Inks paints.
Recently I have received a chunky package filled with Green Stuff World products, to do with them as I please. I took some of them for a spin and decided to share my experience with you. First on the line are the aforementioned Dipping Inks. Please note that this review is not sponsored by Green Stuff World.
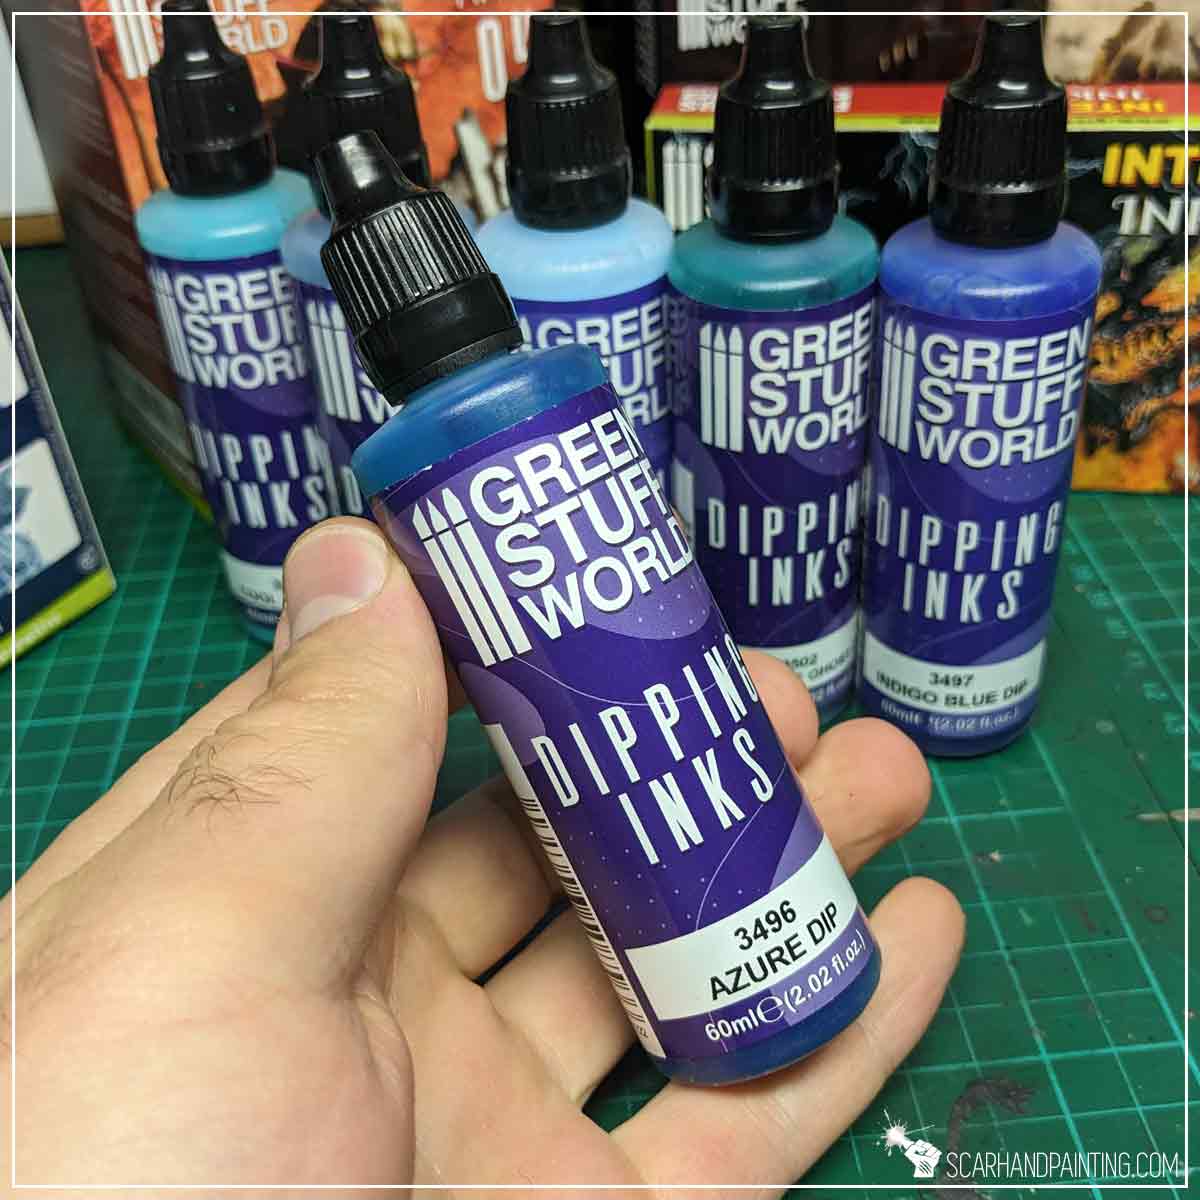
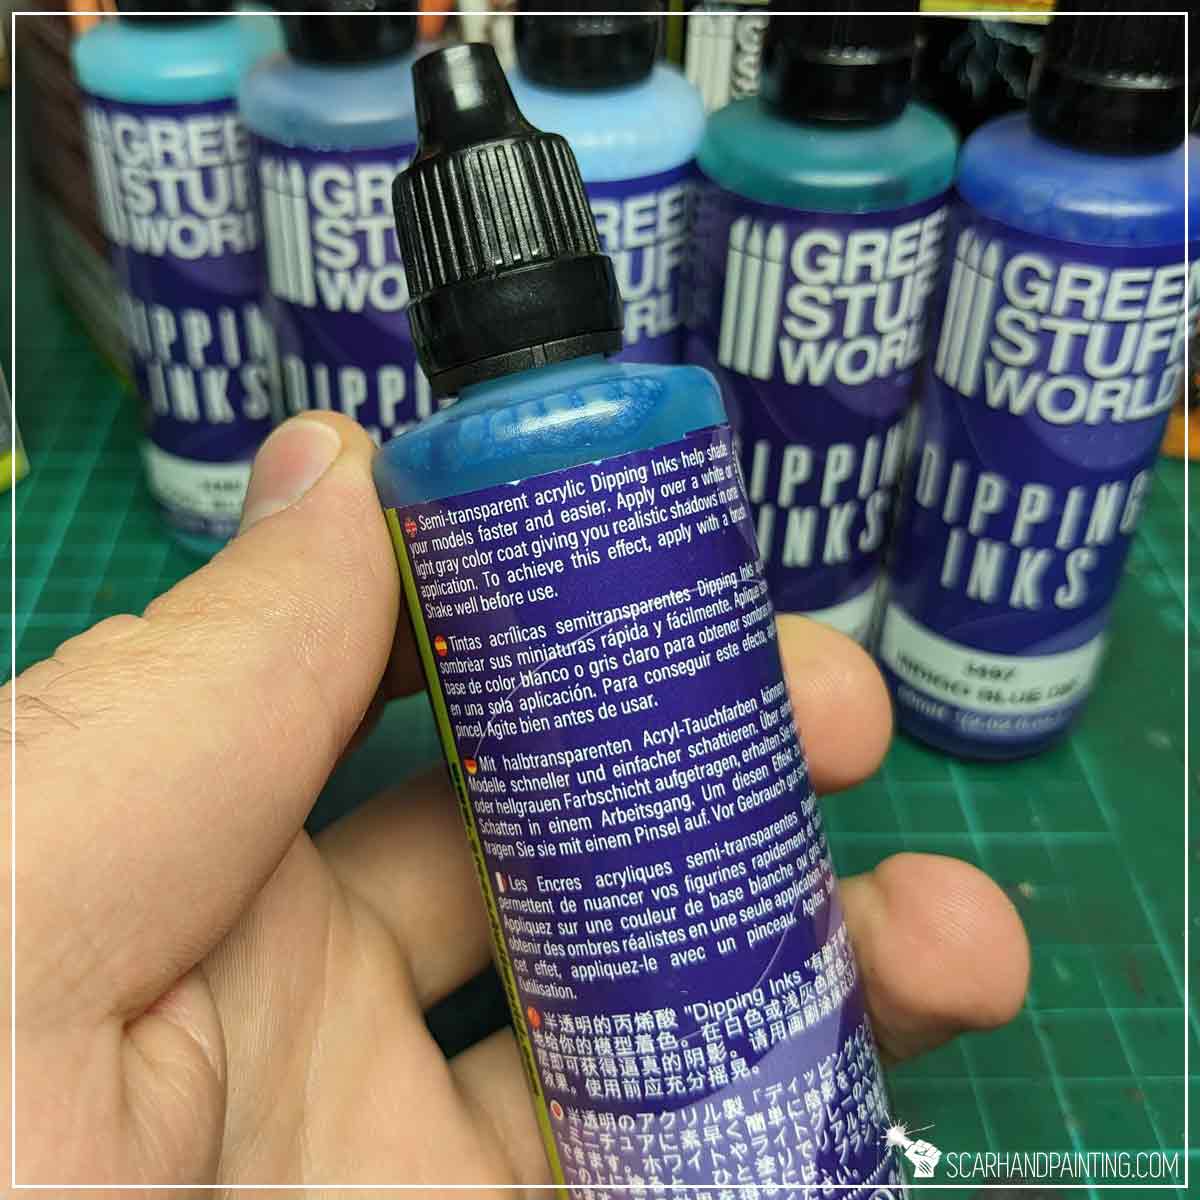
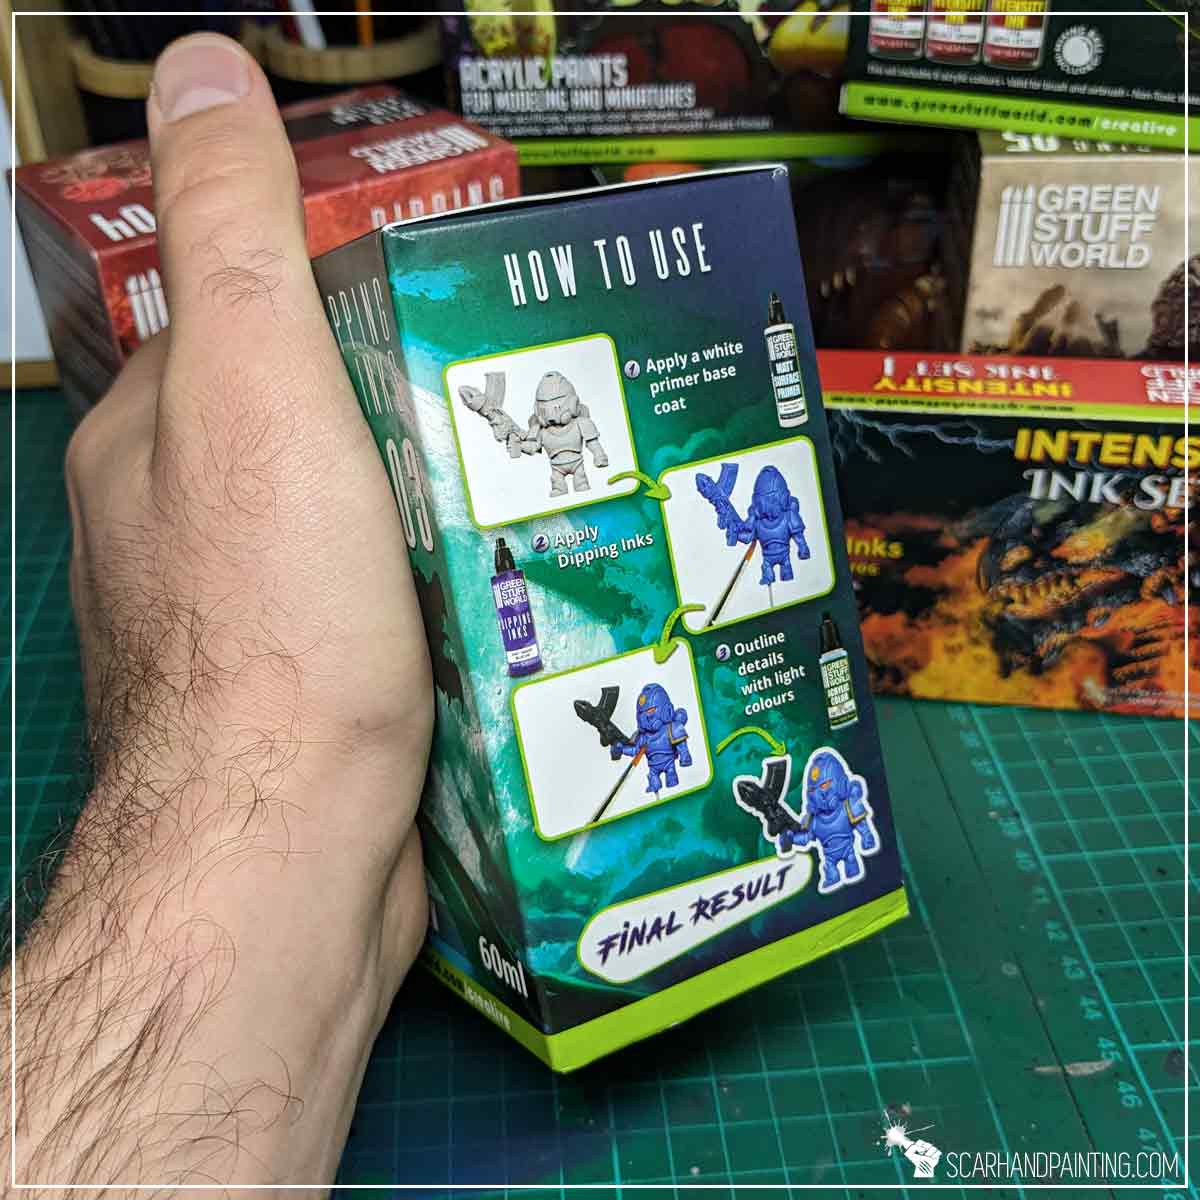
The Dipping Inks is a speed painting system containing paint recipes designed and perfected by Green Stuff World. Thanks to a single coat producing both vibrant highlights and strong shadows, this type of semi-transparent paints is aimed at painting miniatures with ease and speed. It barely takes a bright undercoat such as white, a single coat of speed paint and you can call it done. Alternatively, depending on your skill and expectations, you can build from there by applying more coats, highlights and shadows. Personally I rarely use similar types of paints to start a paint job, but I find them perfect to substitute washes and/or apply blends with, instead.
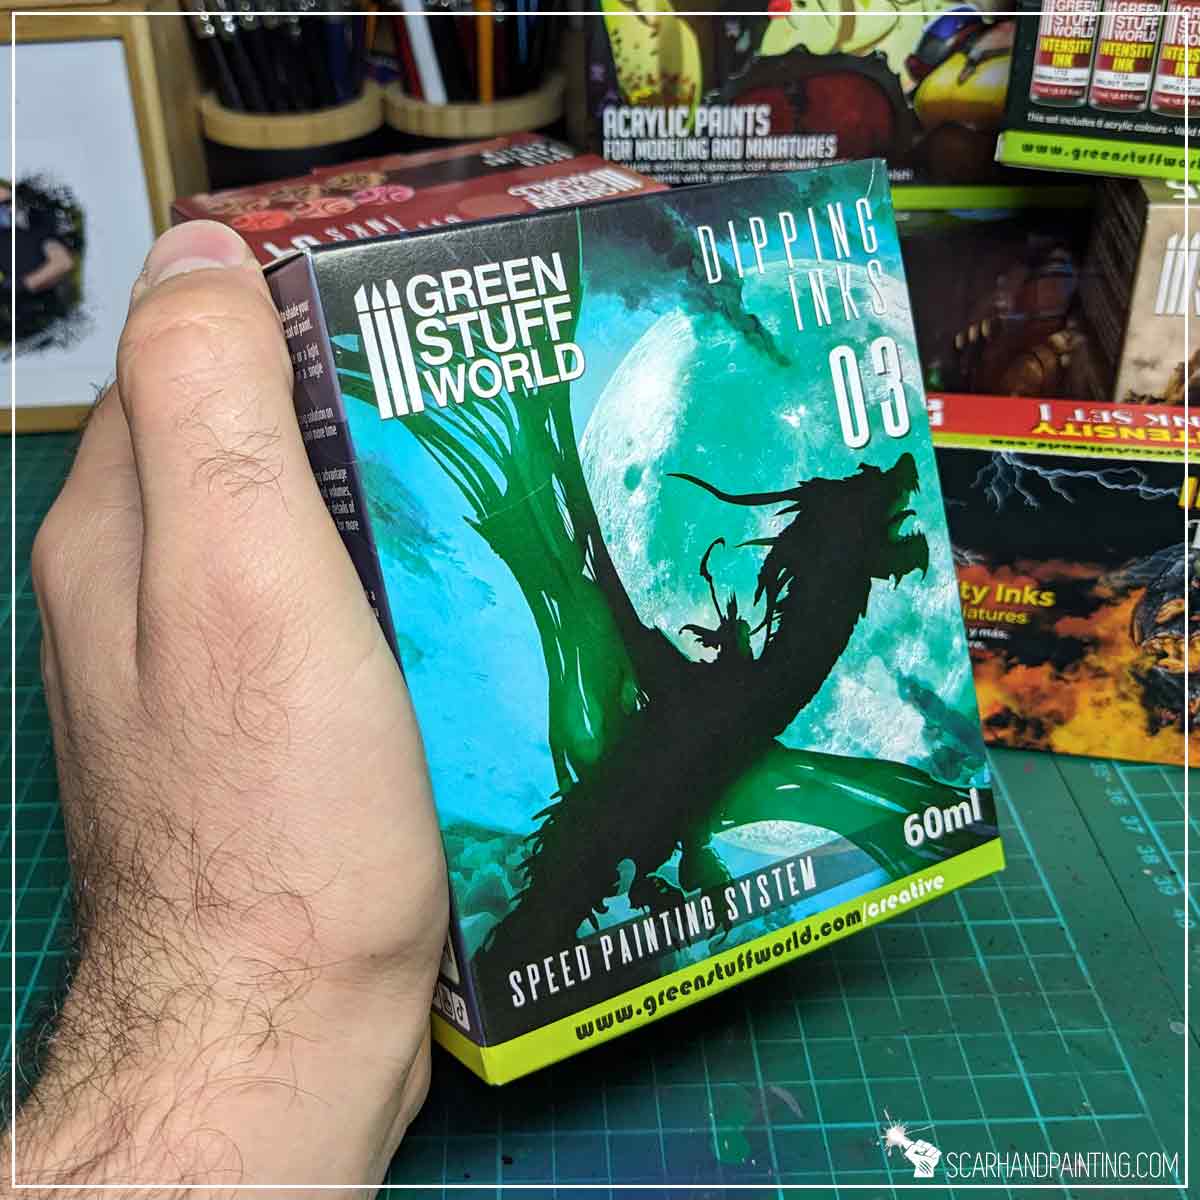
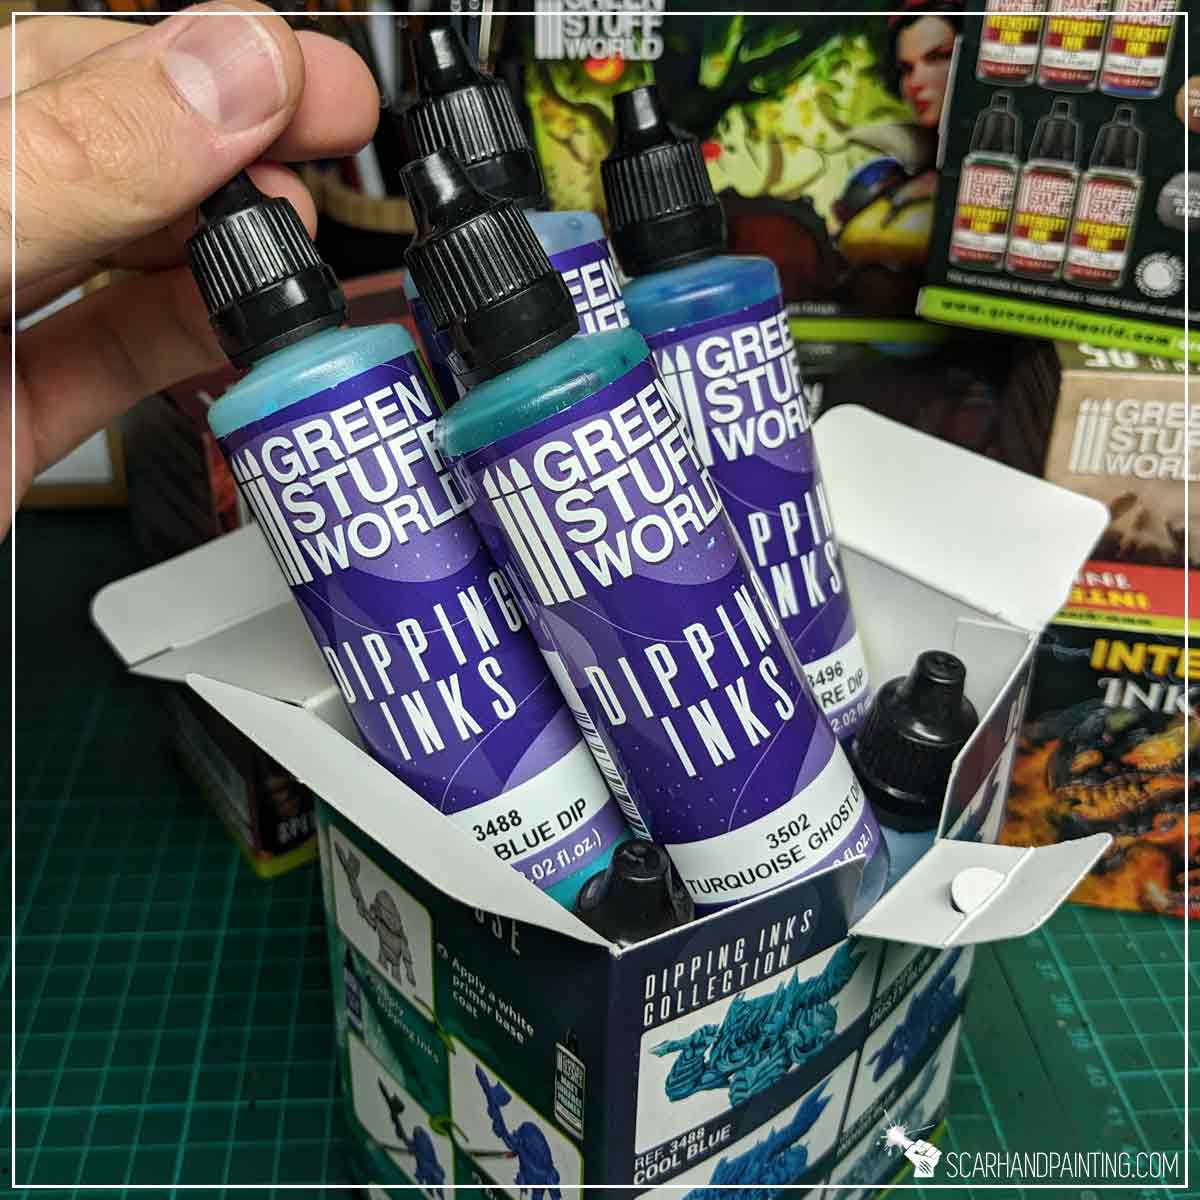
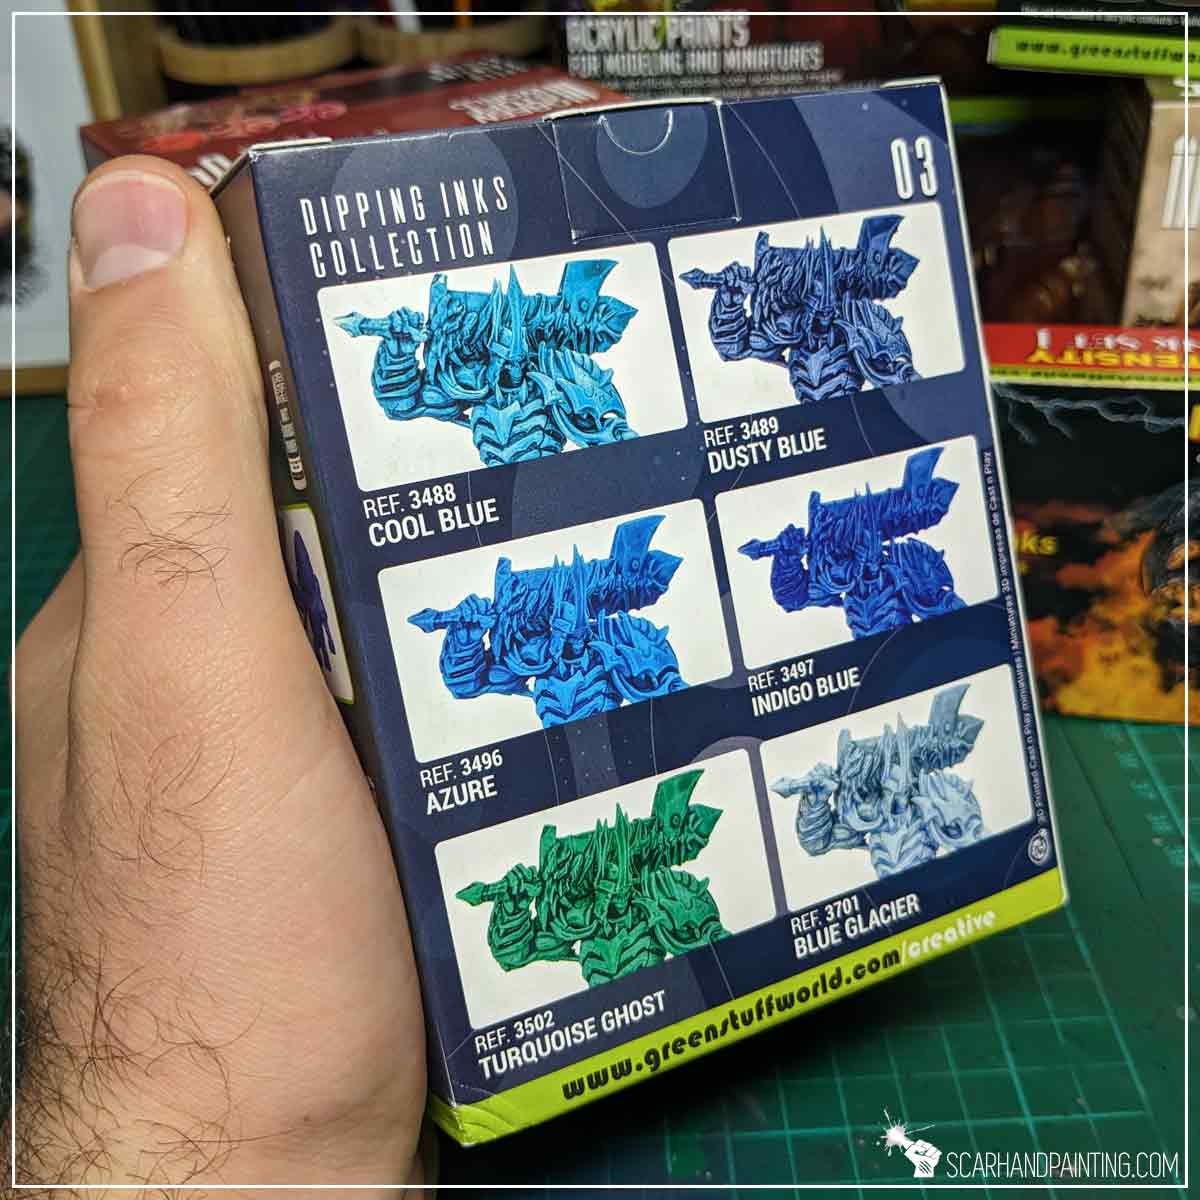
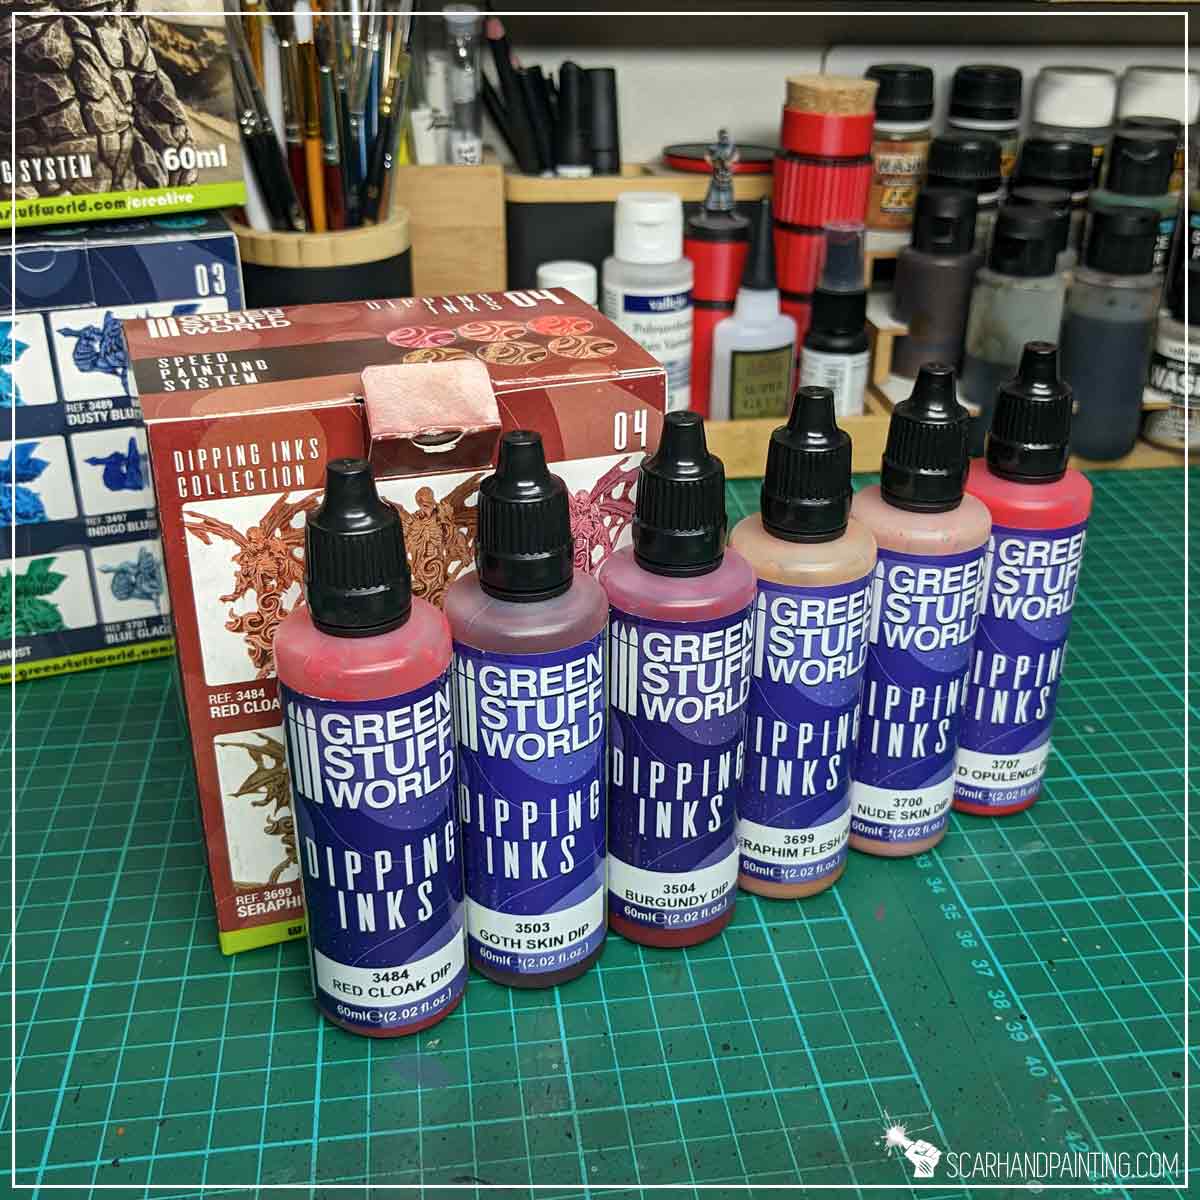
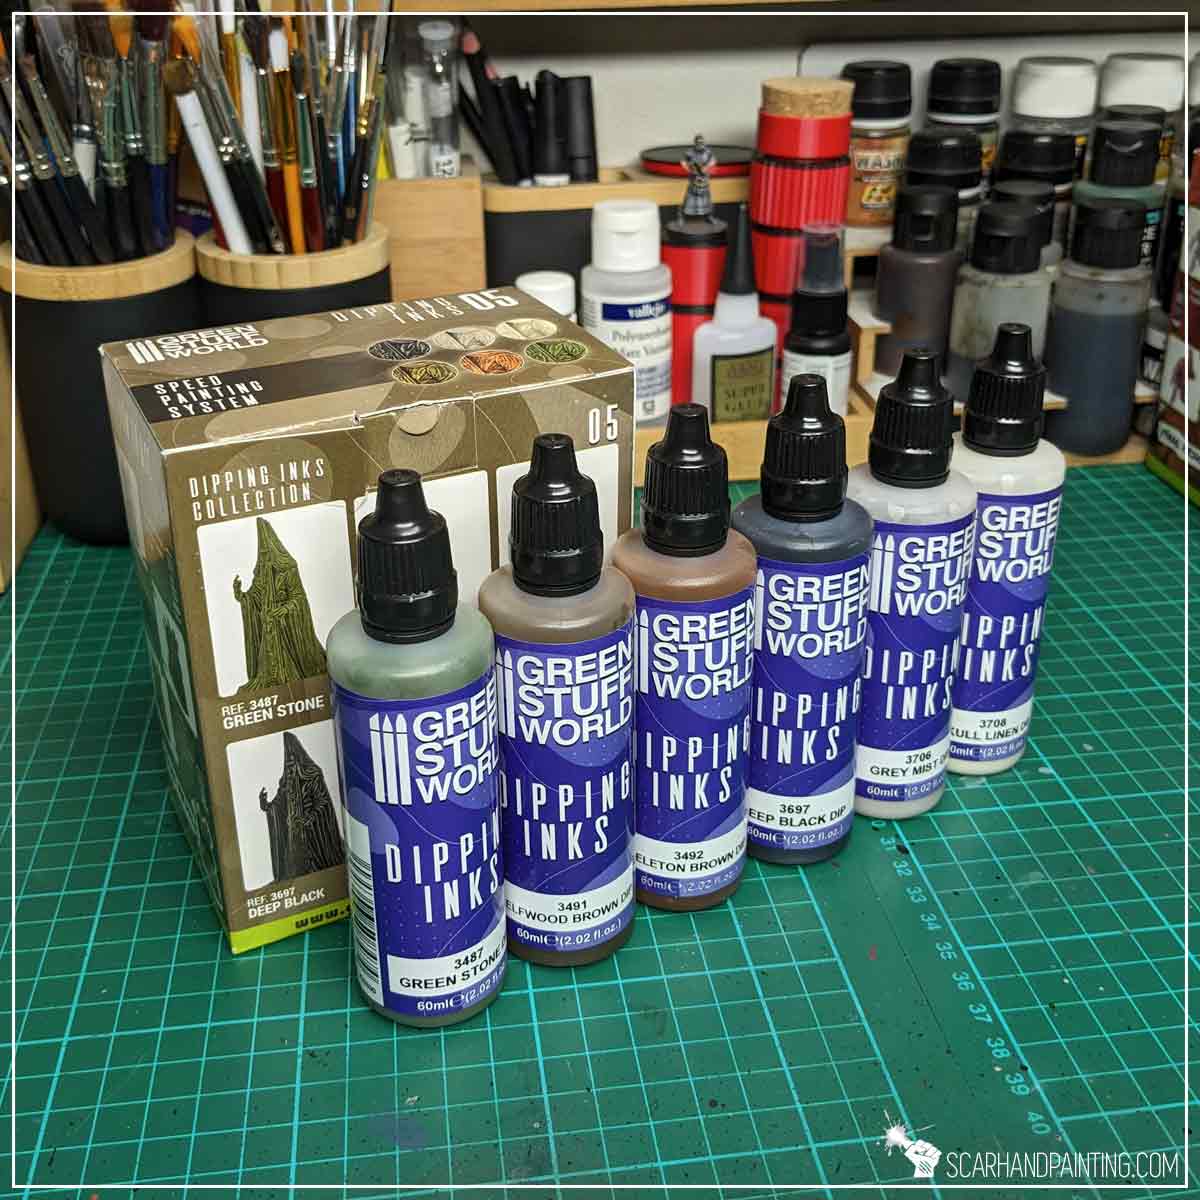
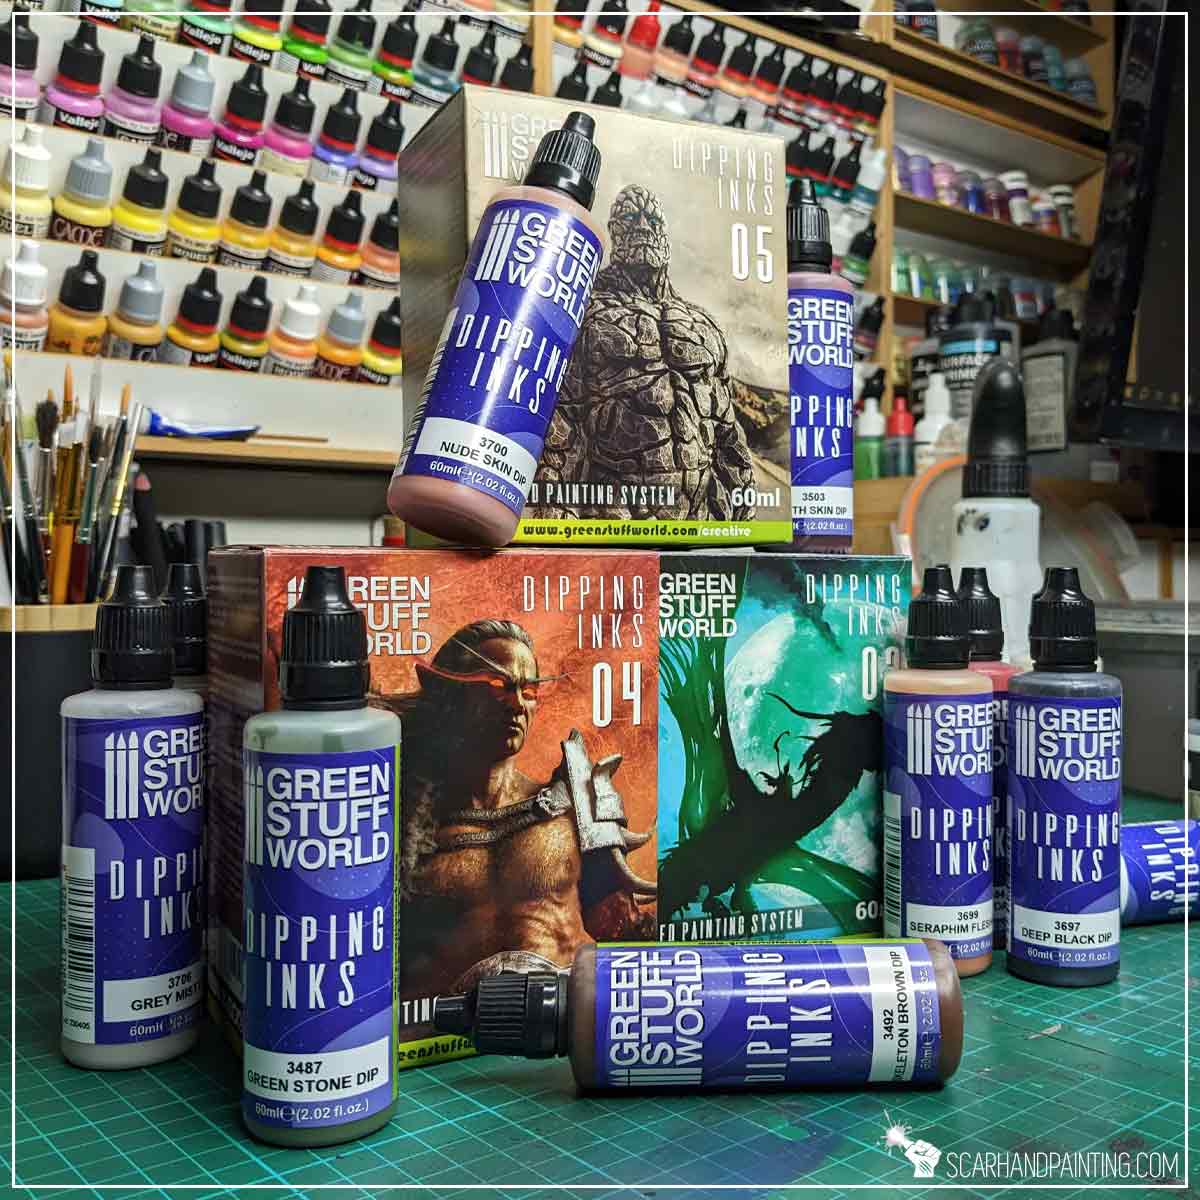
Dipping Washes come either solo, or packaged inside well thought through color themed sets of six. I have received three of such sets: Dipping Inks 03, Dipping Inks 04 and Dipping Inks 05 and put them to a test to compare the end results with box examples.
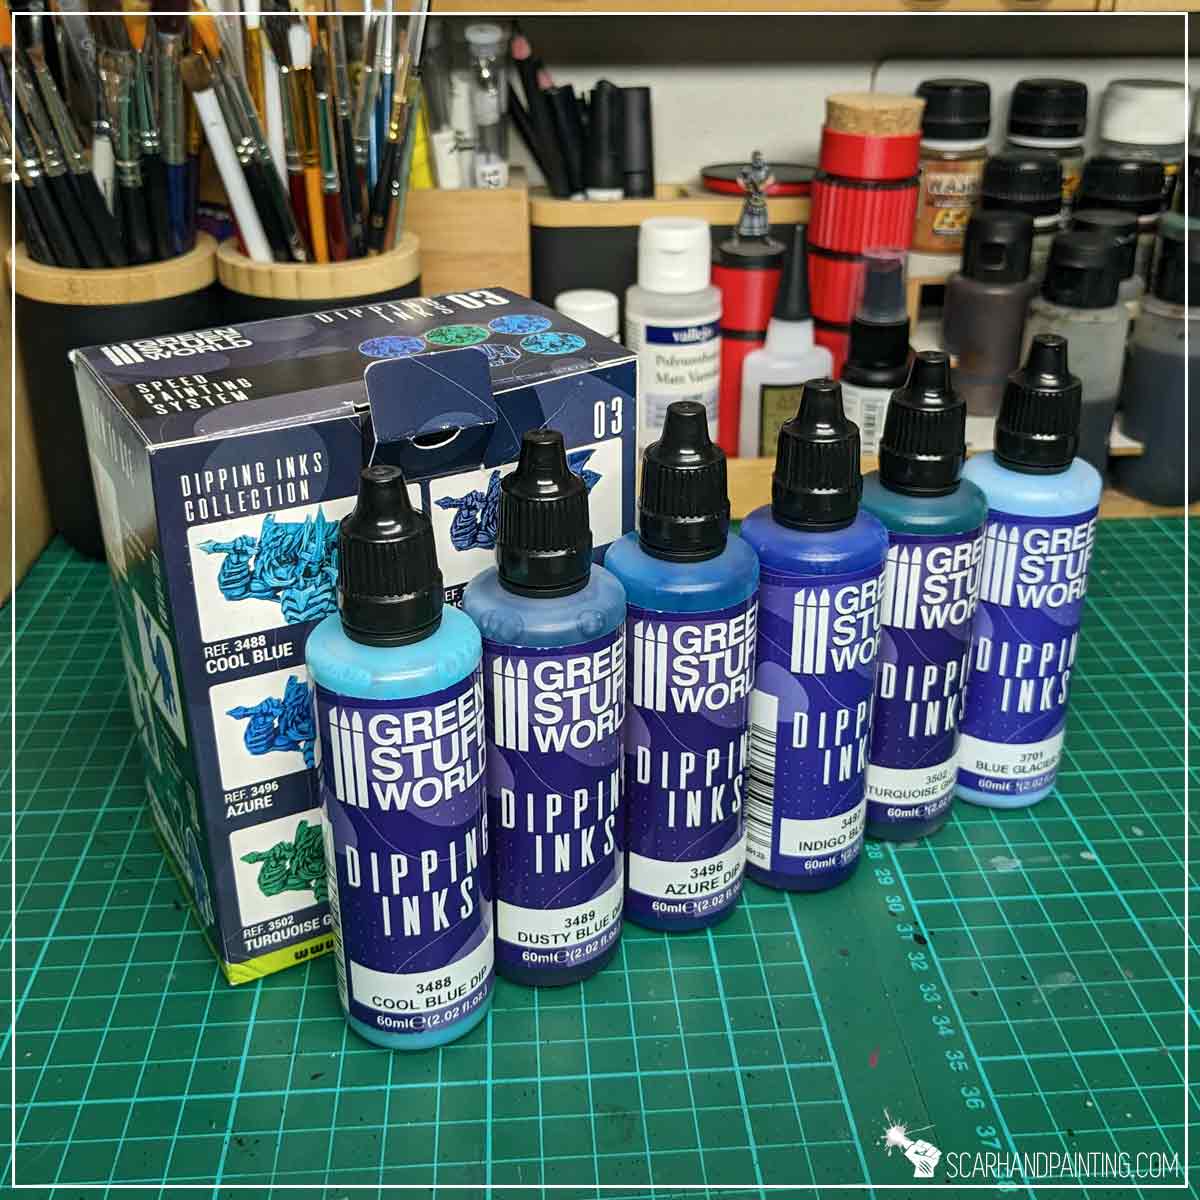
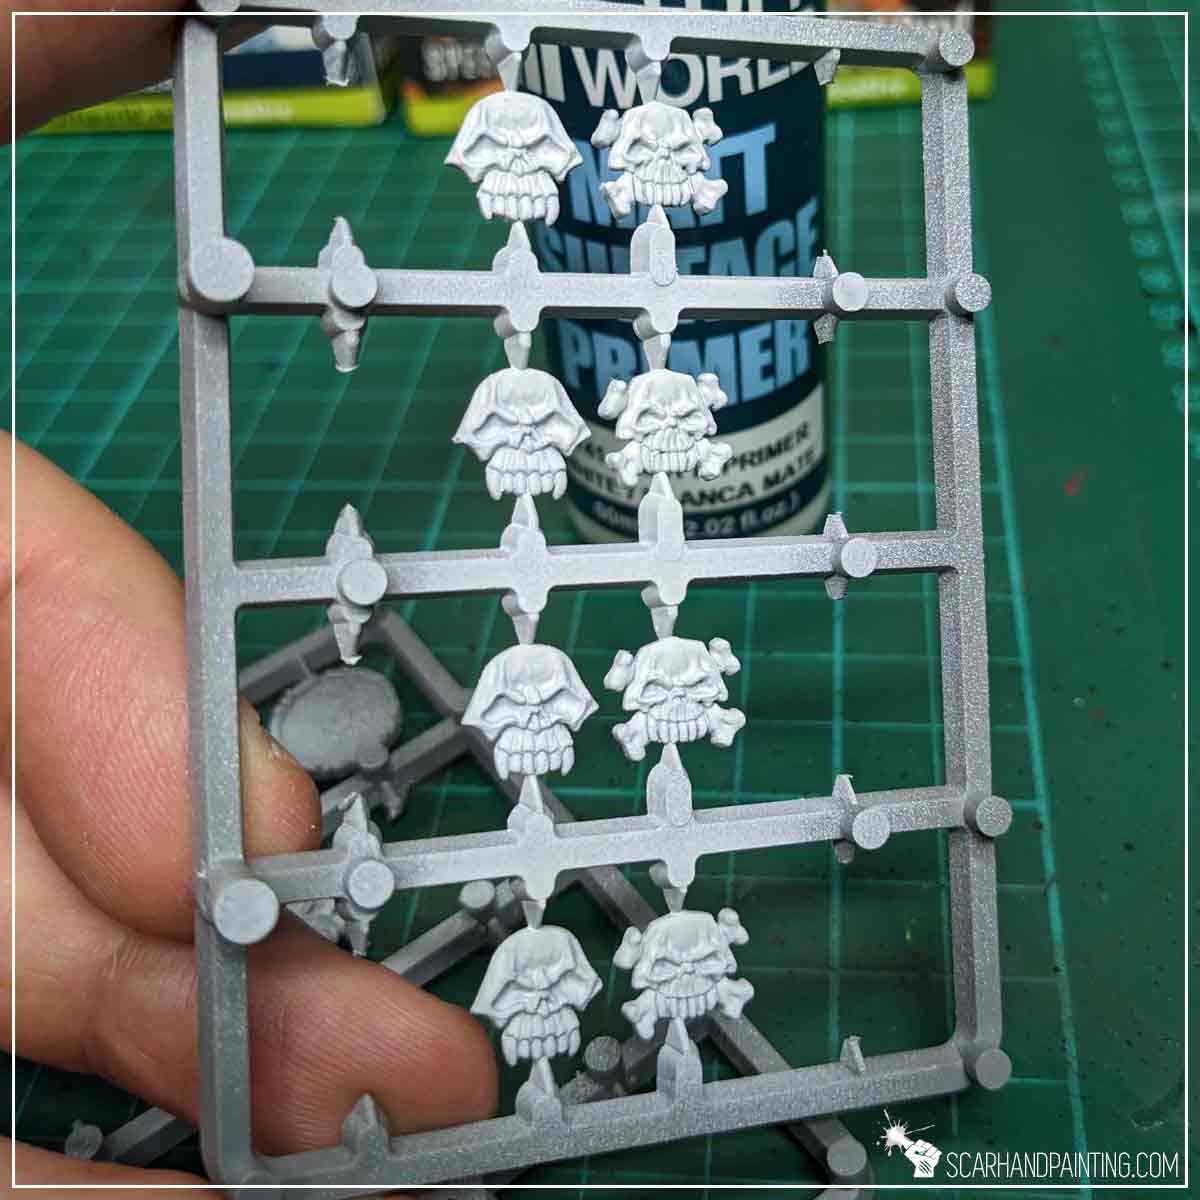
For the purpose of proper testing I have selected a set of old school Undead shield adornments (Warhammer Fantasy Battles), featuring some deep recesses, sharp detail and flat areas. Perfect to display what the Dipping Inks can achieve, depending on the surface.
I have painted each piece with a different Dipping Ink, one layer applied manually (by brush), let them dry and prepared a comparison exposition by gluing each piece beside its corresponding example at the back of the box.
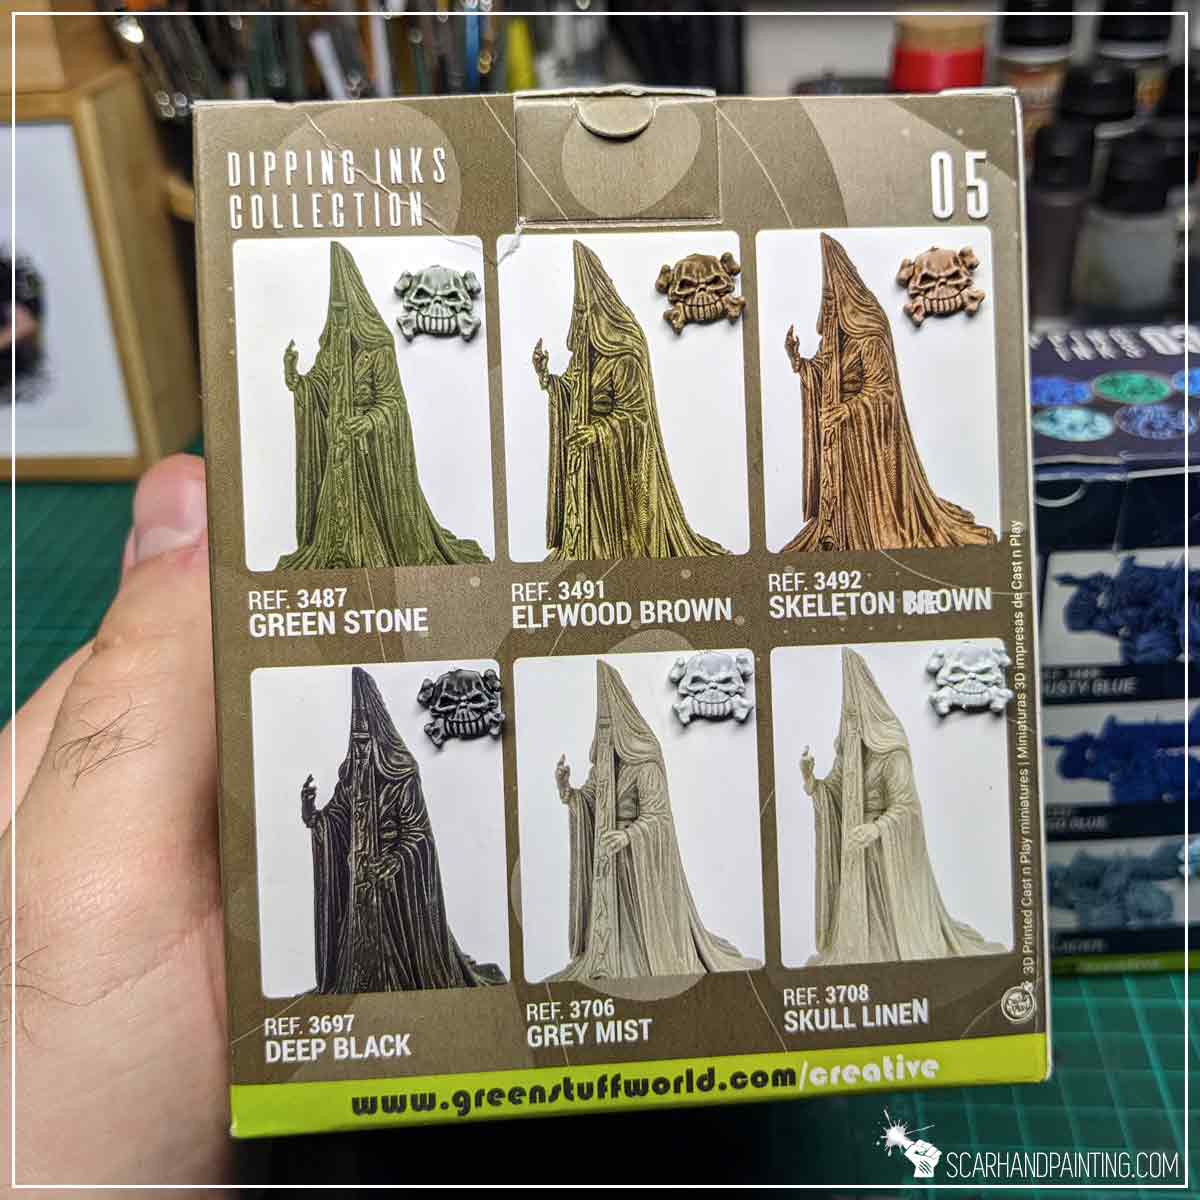
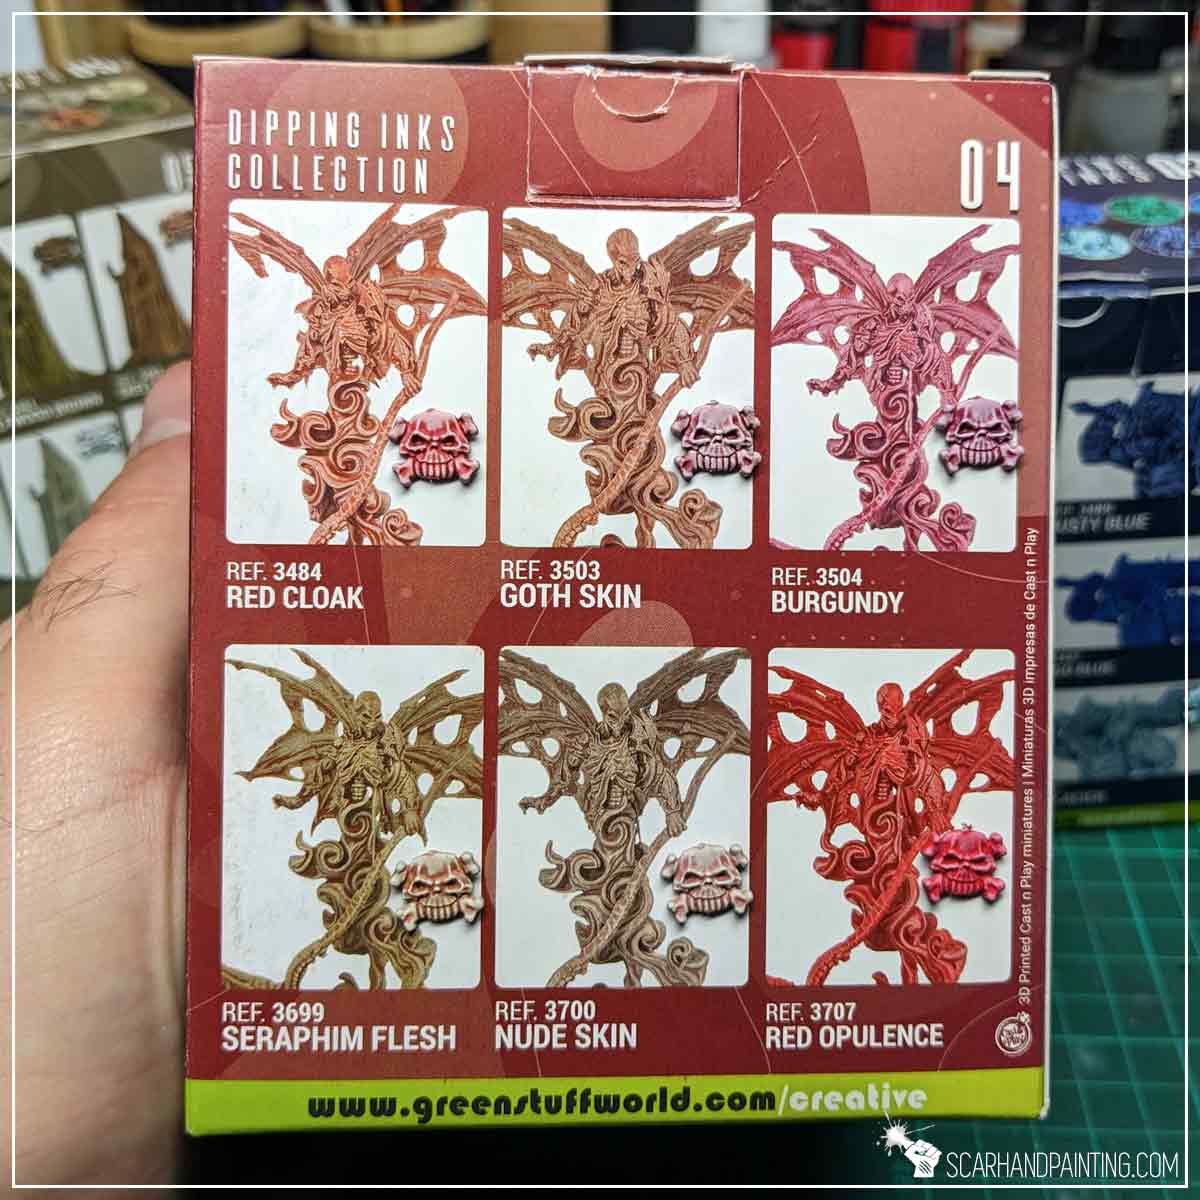
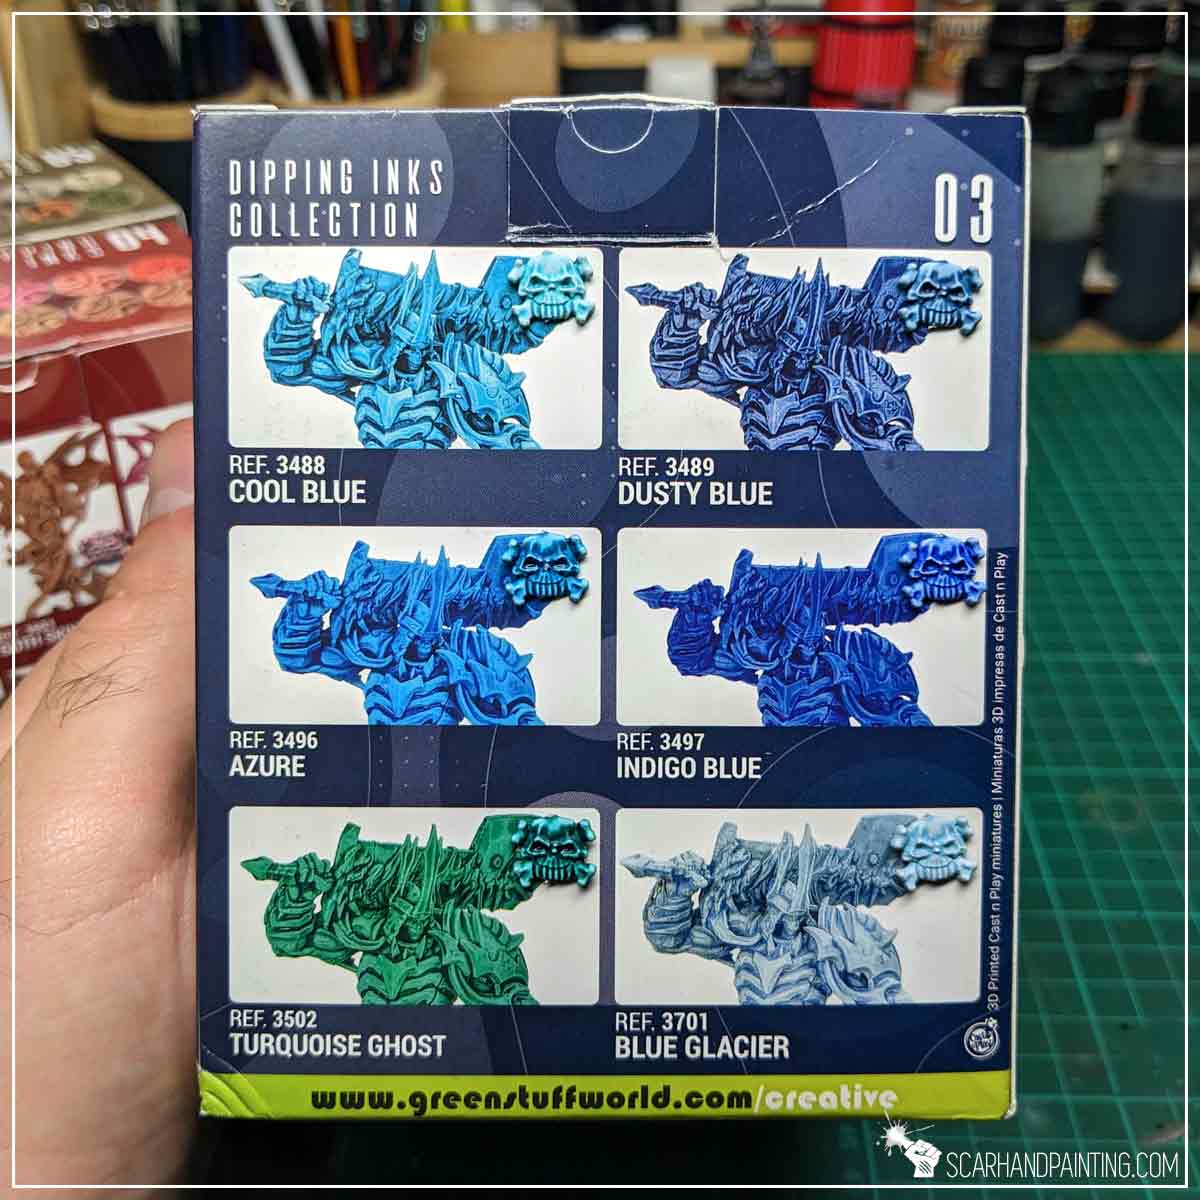
The results are a mixed bag. Most (Deep Black, Elfwood Brown, Skeleton Brown…) really hit the mark, translating very well from the back of the box onto the miniature. Others (such as Green Stone and Skull Linen…) performed rather underwhelmingly, while a few (Turquoise Ghost, Blue Glacier..) produced interesting results that exceeded my expectations. Thorough shaking and more tests produced consistent results which is good news for the entire line, not so much for a selected few Dipping Inks that underperformed.
Dark colors definitely steal the spotlight, producing deep shadows and contrasts, whereas in my opinion the lighter tones might use some more juice to make the highlights pop. That being, due to personal preferences and the way I paint I am probably biased. I sincerely believe I will find a use for every single one of them at some point.
Key features:
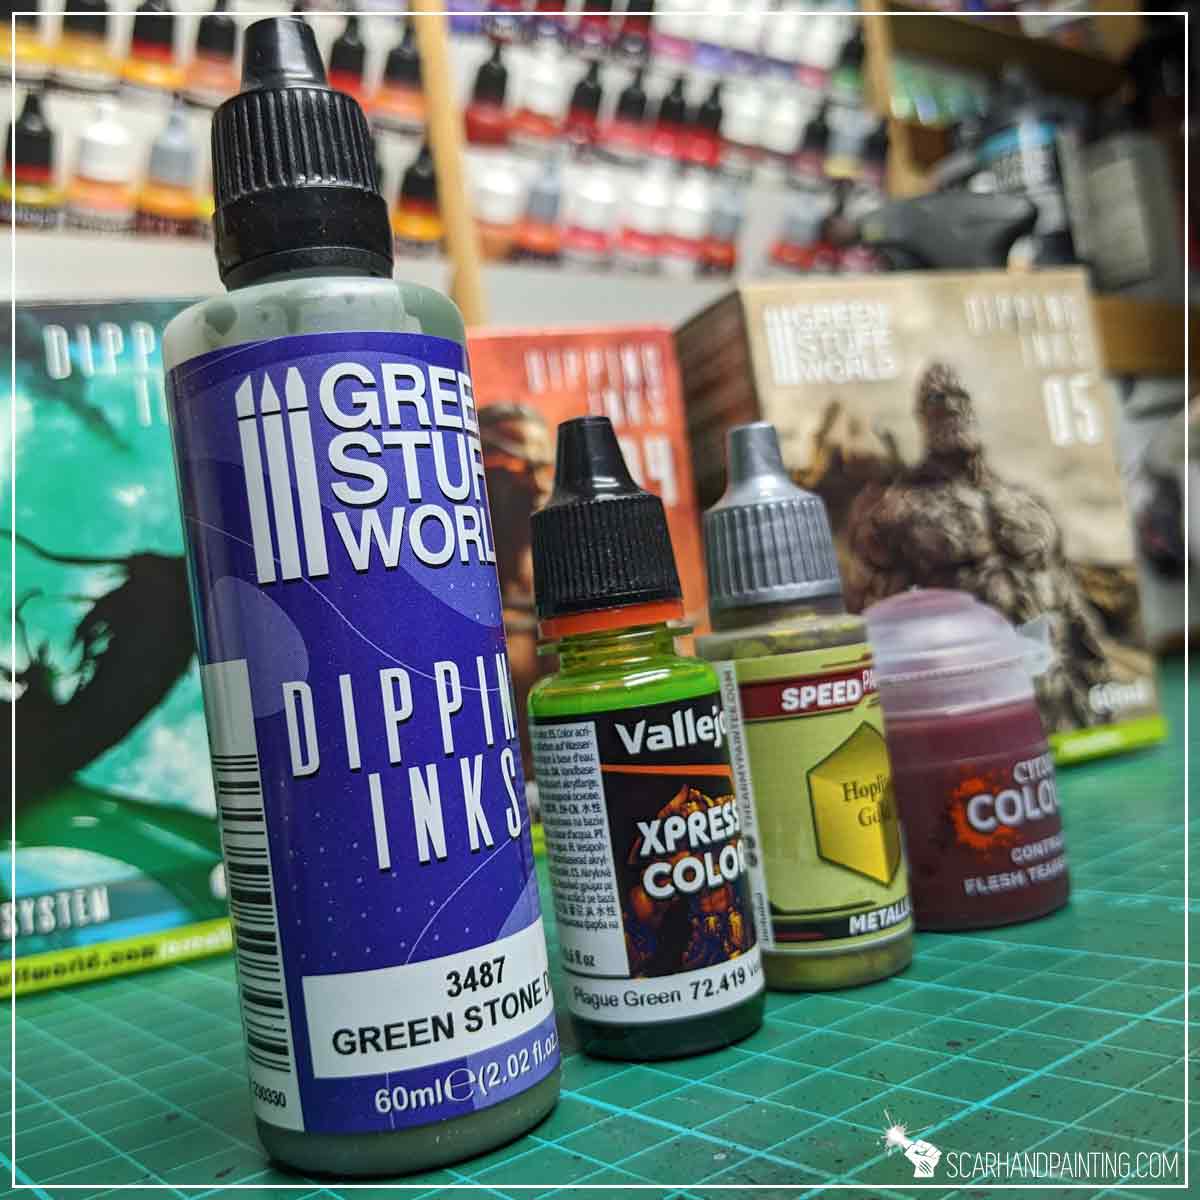
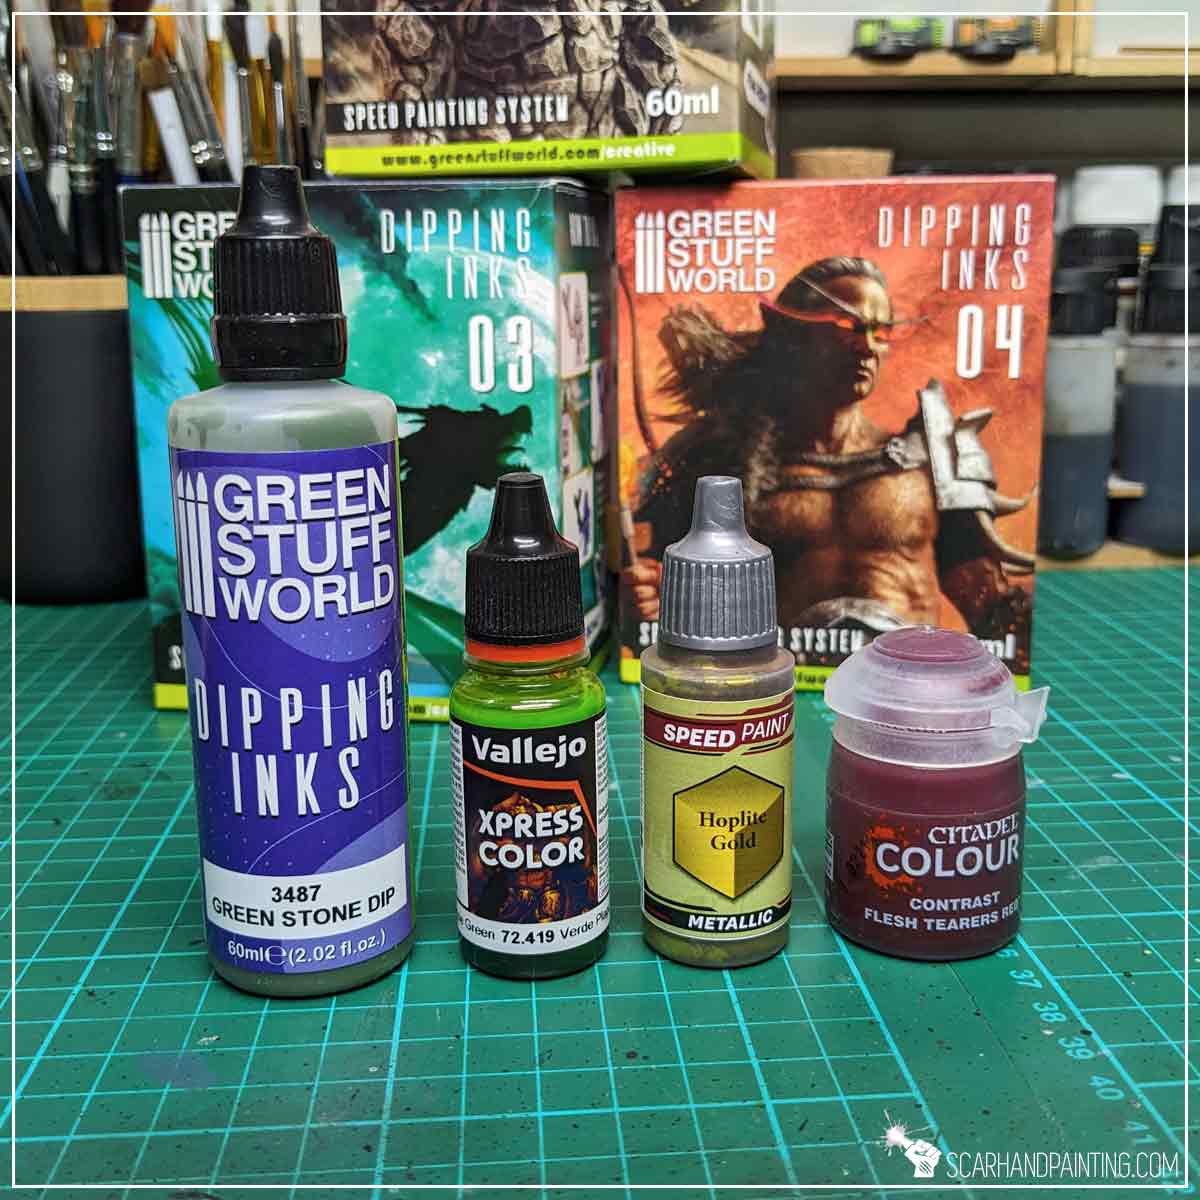
Here’s where Green Stuff World Dipping Inks really shake the meta. Pricing is just out of this world. We are used to single 18ml pains coming at a price of between 4€ to 7€. Dipping Inks come in a 60ml bottle for a market bending price of 5.75€ (currently 4.31€ on Green Stuff World page!). It drops down to 4€/bottle if purchased as a set of 6!
By comparison:
Green Stuff World Dipping Ink 60ml – 5.75€ (currently 4.31€)
Games Workshop Contrast Paint 18ml – 6.30€
The Army Painter Speedpaint 2.0 18ml – 4.25€
Hands down the best volume for the buck.
With how saturated the hobby paints market currently is, breaking through to general awareness is very difficult and requires some exceptional features on top of reliable results. The Green Stuff World Dipping Inks couldn’t avoid the curse that plagues every other line of paints – being a mixed bag varying between outstanding, ok (a few) and underwhelming. Still on top of offering a variety of effects they come in a large, comfortable bottle and at a phenomenally low price. Most importantly they get the job done on par with competition. Personally I will definitely include them in my day to day commission painting as it seems to me, like I have finally found a good solution for blacks and browns. I sincerely recommend the range and incline you to test it personally, because this is the only way to get to know if these paints work for you.
I hope you find this article interesting. In case of any questions, use the comments section below or contact me via Facebook or Instagram. I would also appreciate it if you considered sharing this content with your friends, who you think might find it useful. Stay tuned for more hobby content.

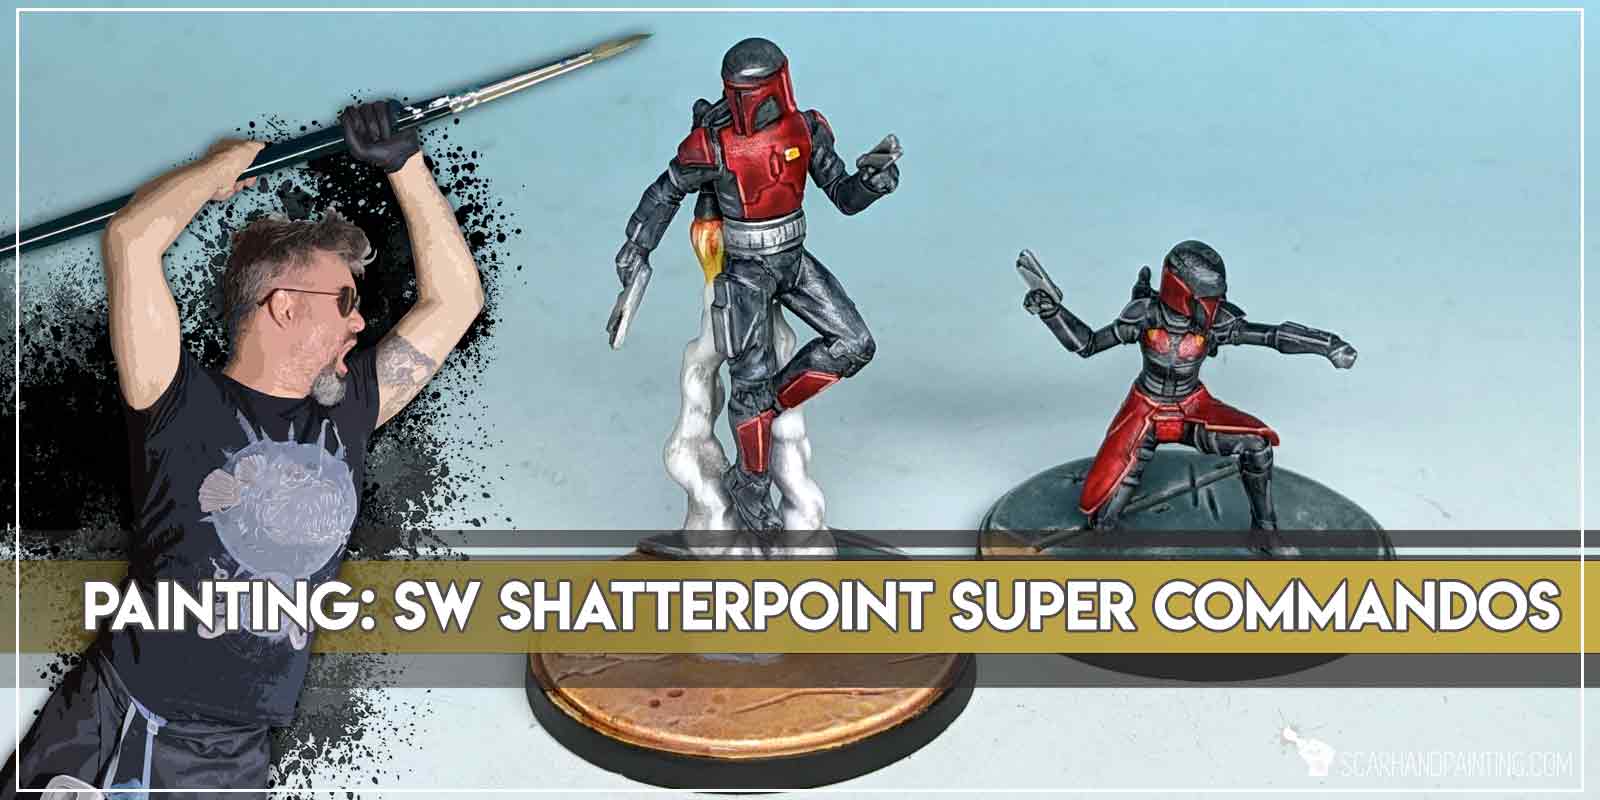
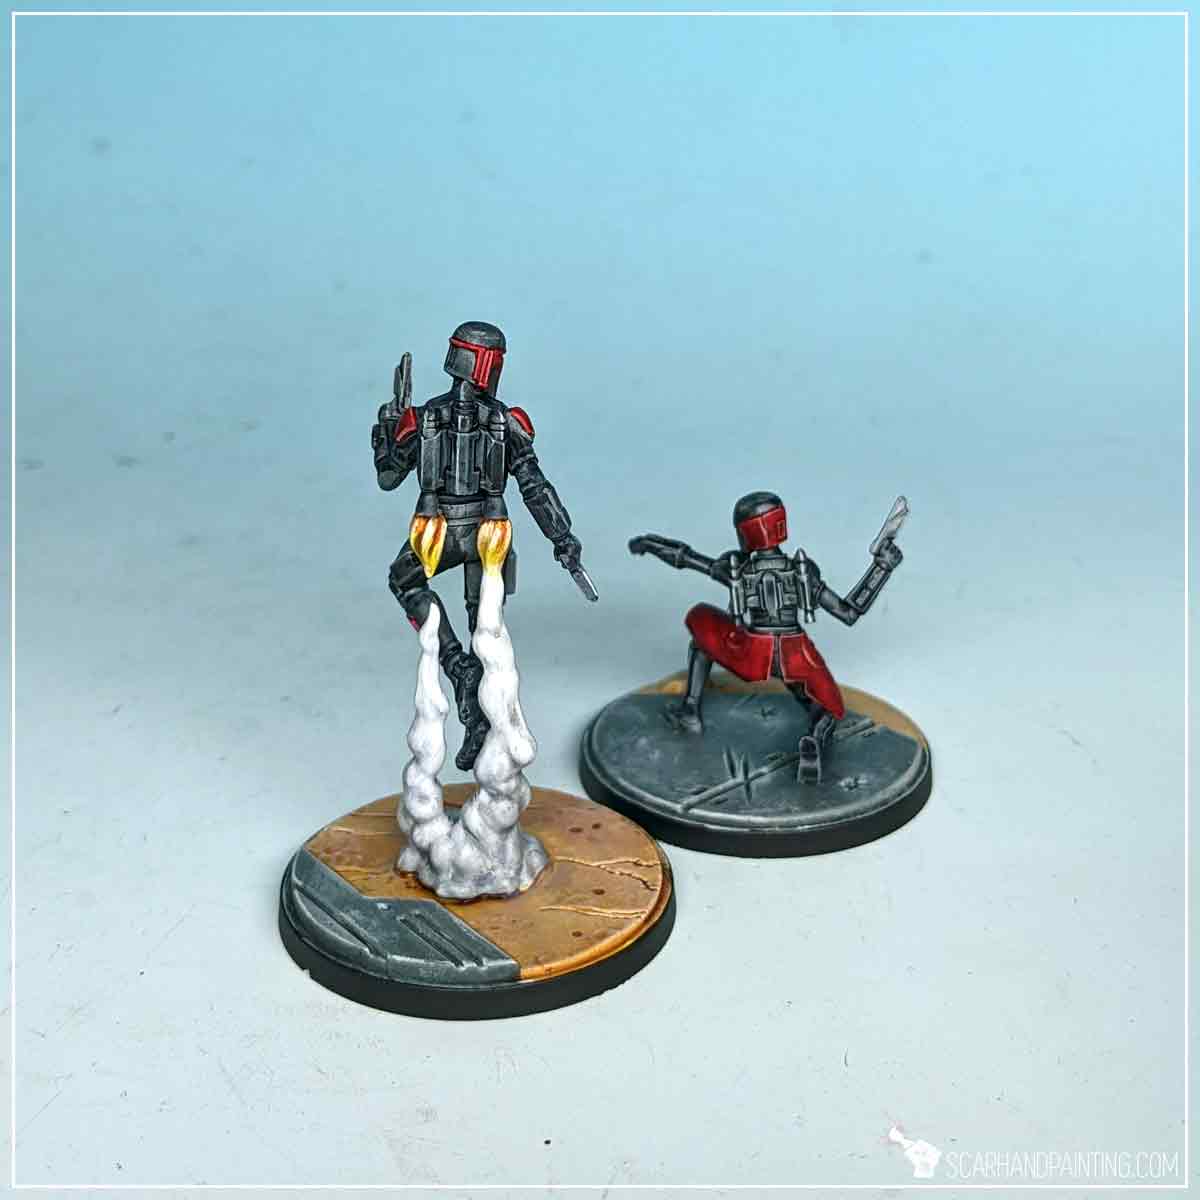
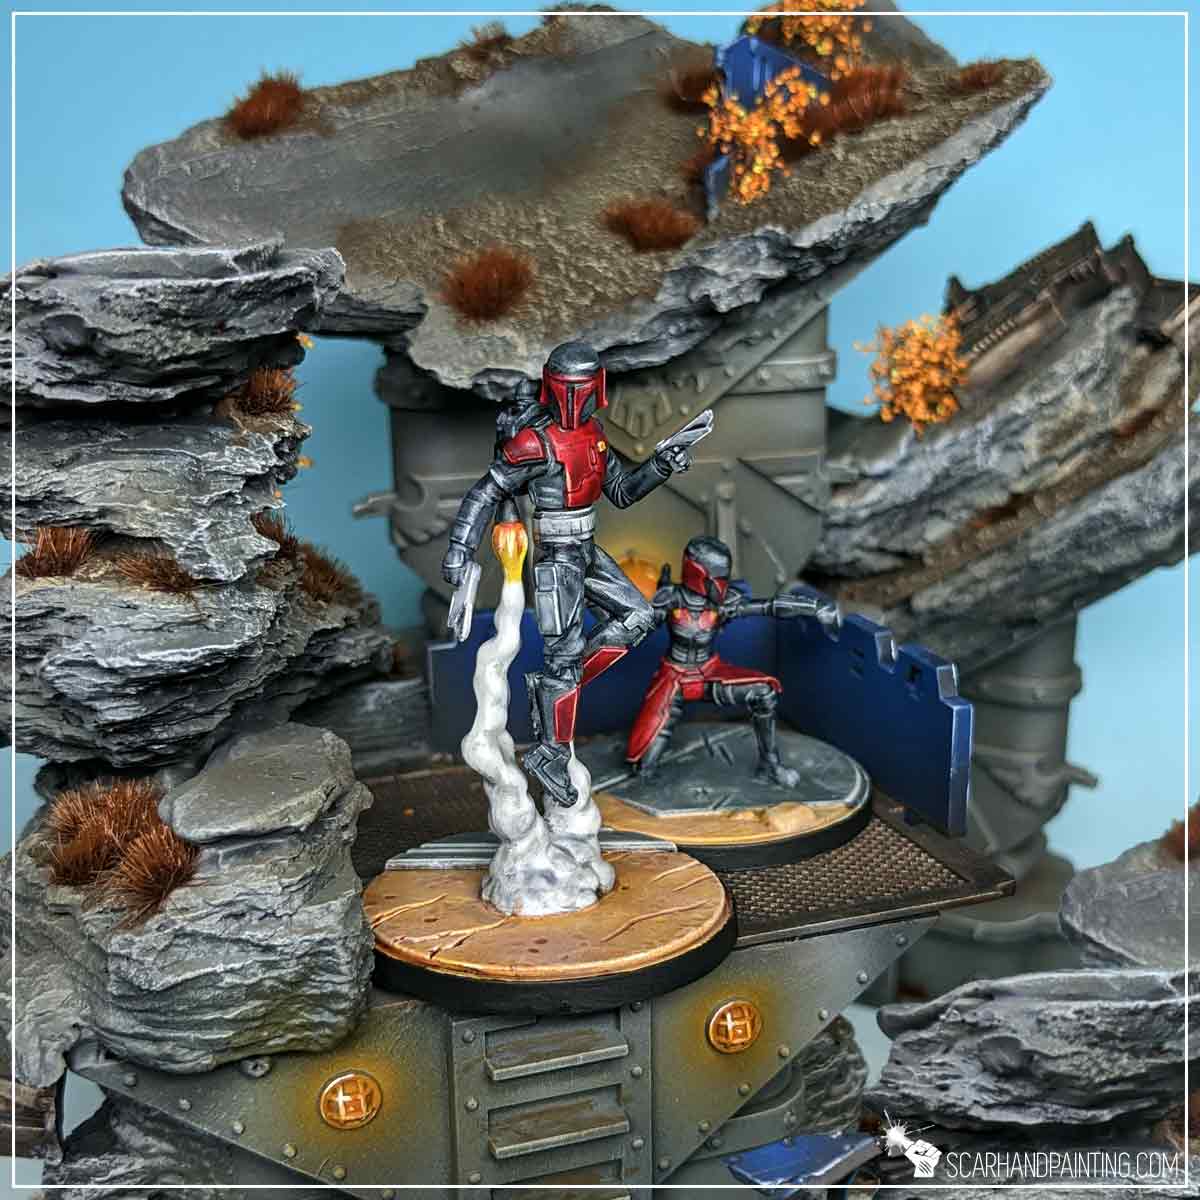
Welcome to Painting Star Wars: Shatterpoint Super Commandos tutorial. Here I will present to you a Step-by-step of a basic painting process for Mandalorian Super Commandos and a few extras.
Before we start, some notes:
Both Mandalorian Super Commandos were prepared in the same way as previous Shatterpoint miniatures. Visit Tutorial: Painting Star Wars Shatterpoint Clone Troopers article for a detailed step-by-step guide.
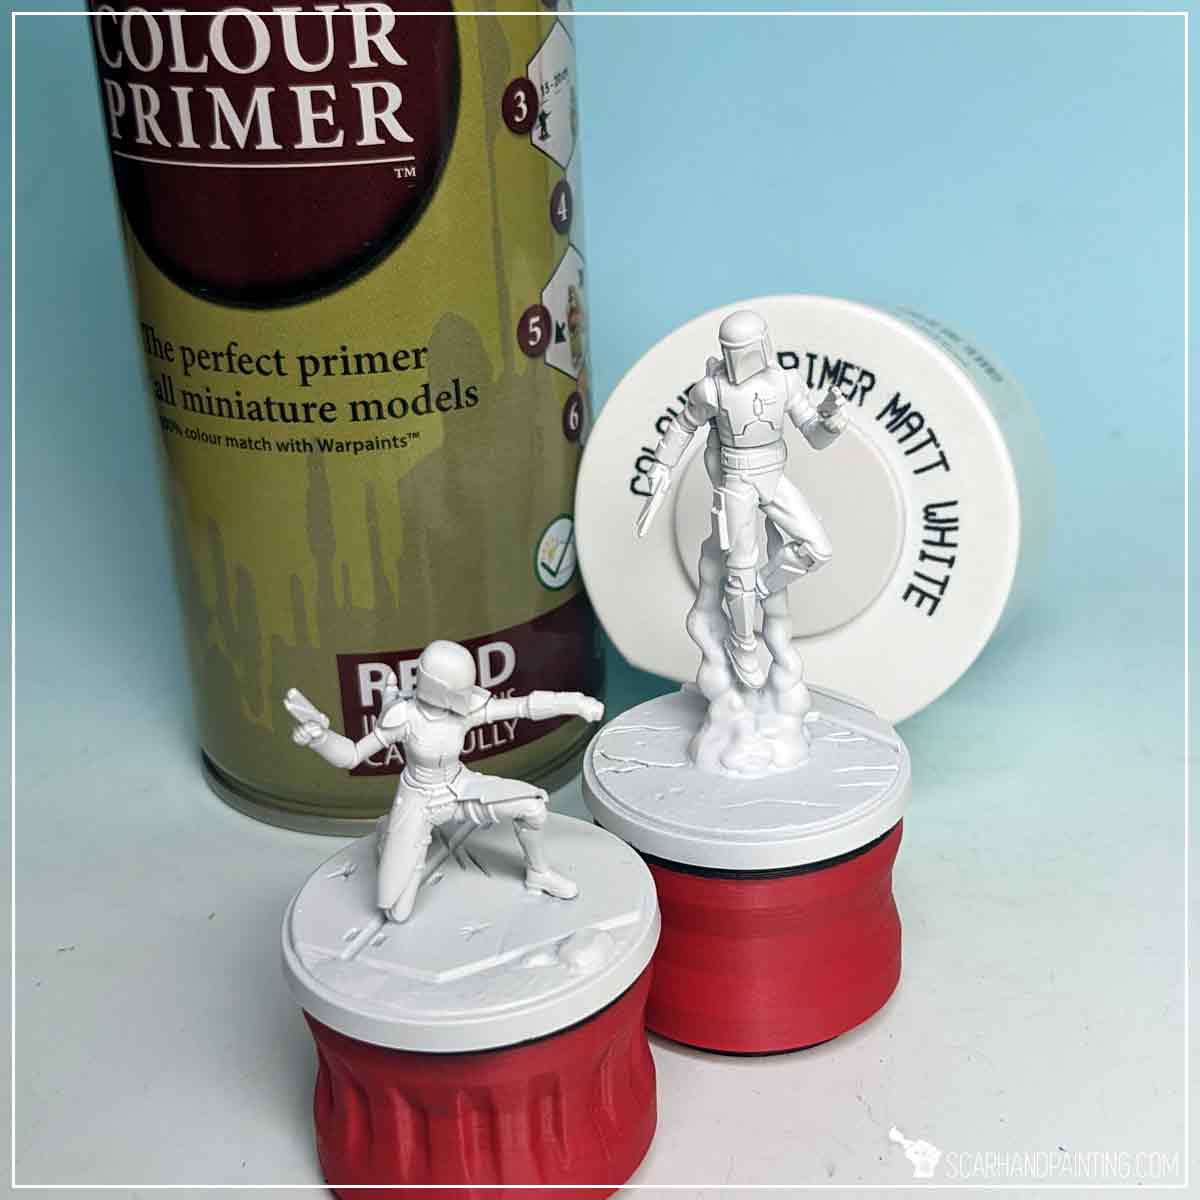
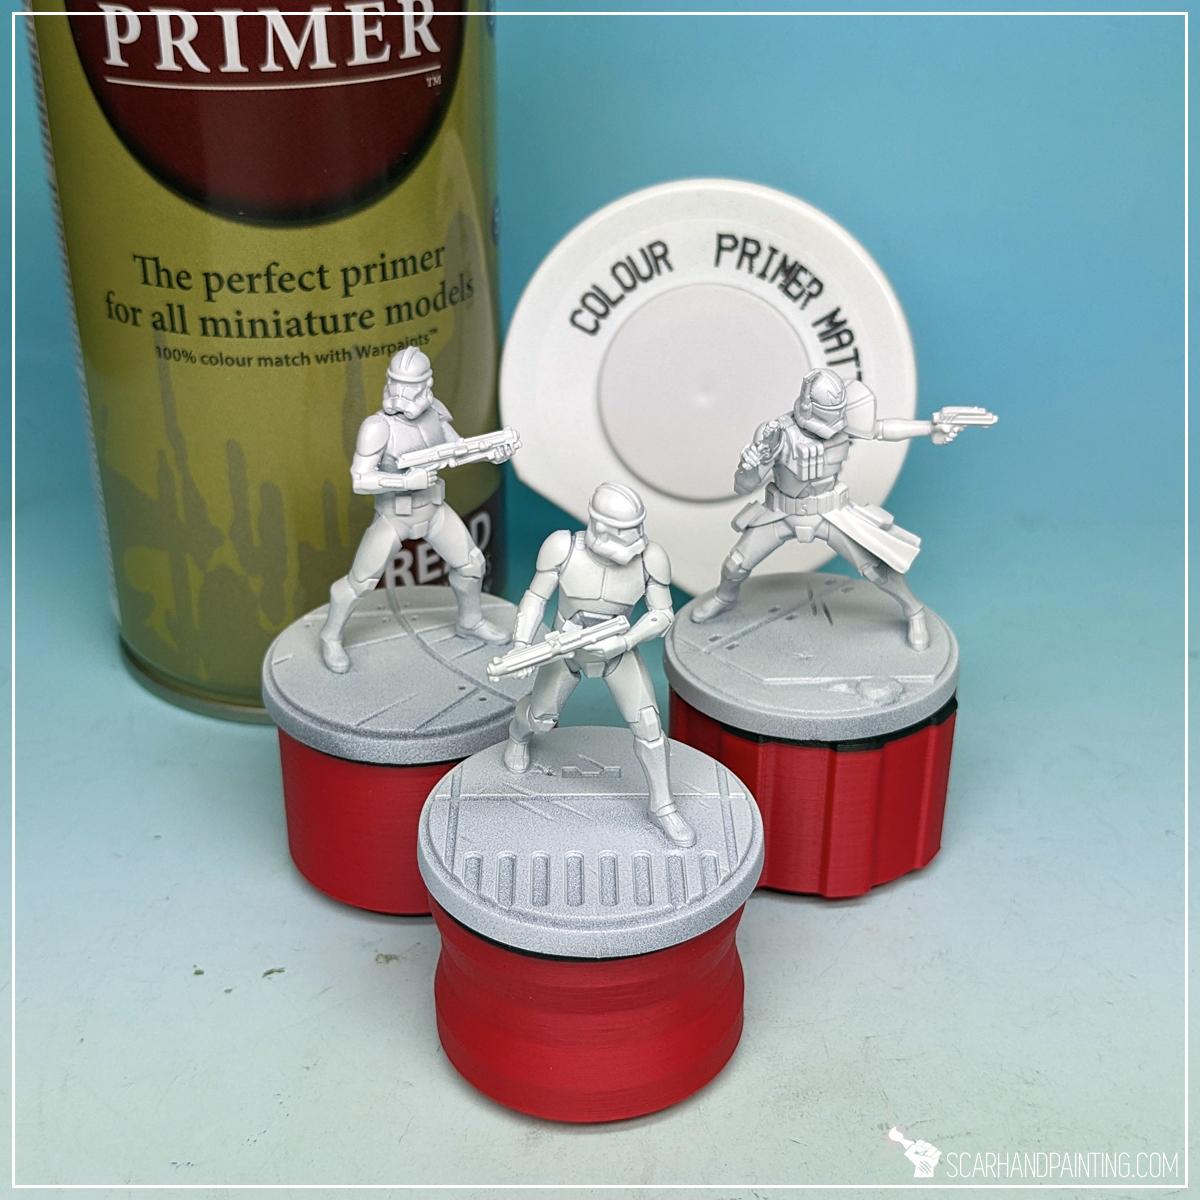
I mounted the miniatures on a stick with a piece of Blu-Tack, then undercoated them with The Army Painter White Matt Primer.
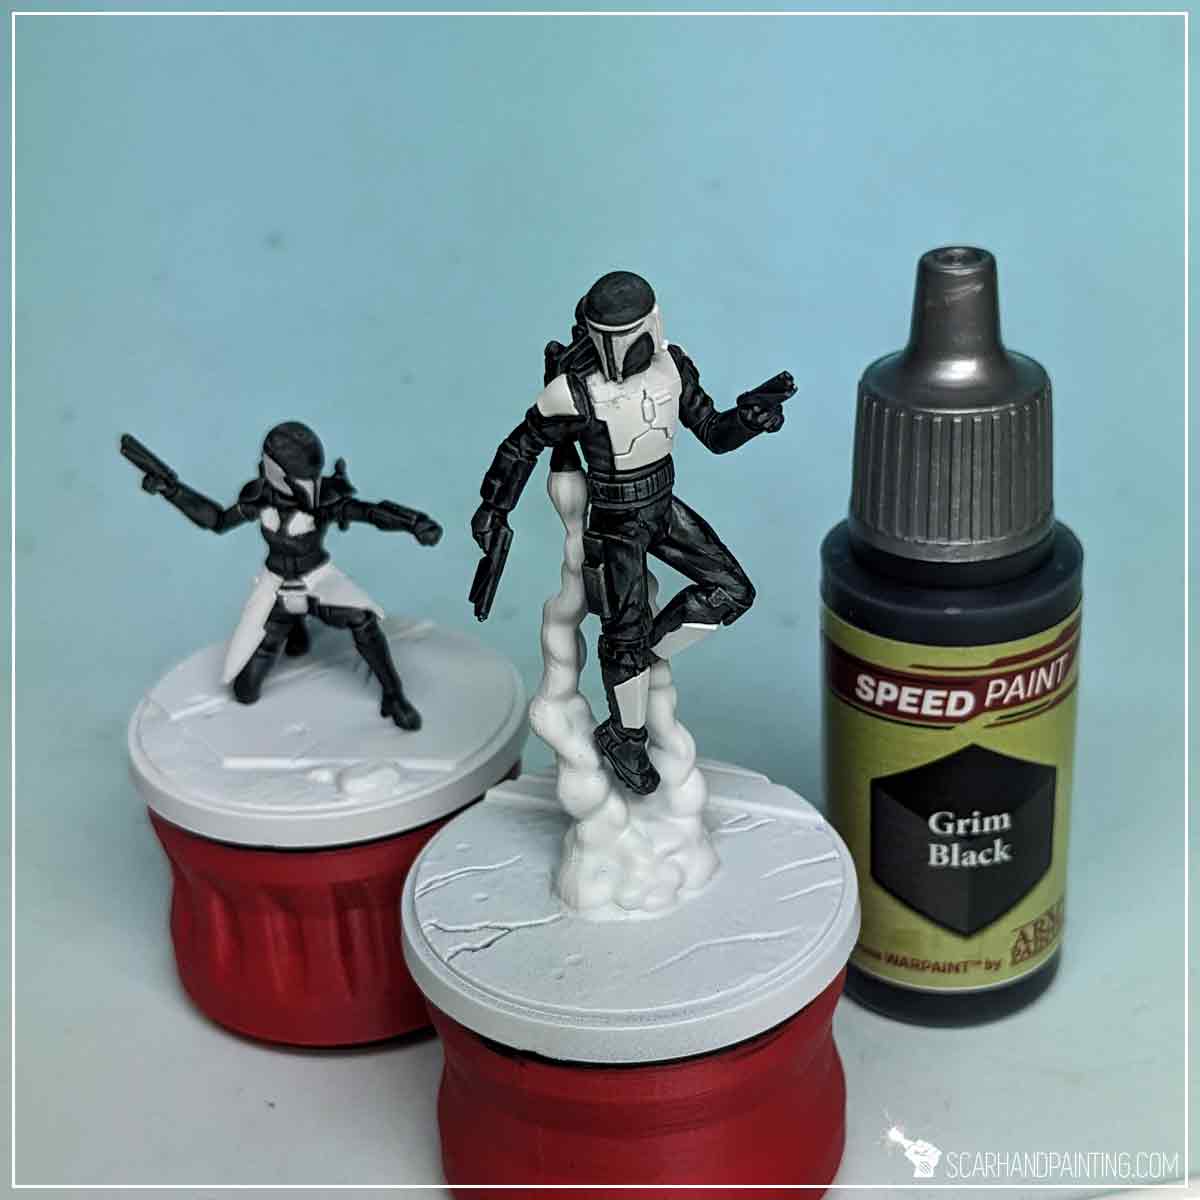
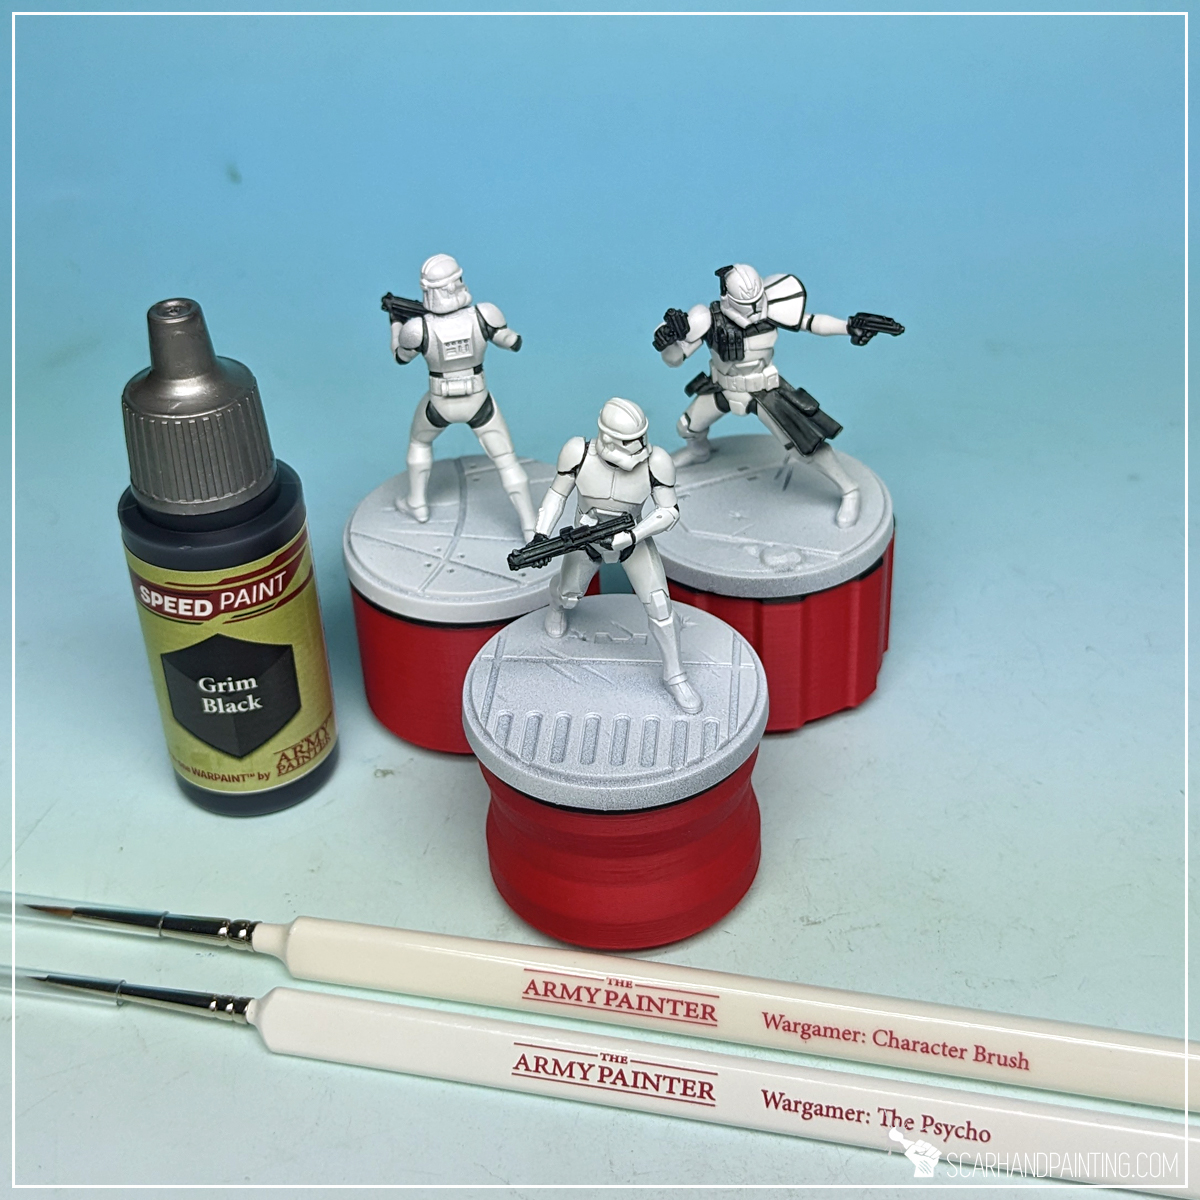
I started by applying Grim Black Speed Paint to most of the miniature, leaving out only a few selected armor elements and backpack exhaust fumes. My brushes of choice were Wargamer: Regiment Brush and Wargamer: Character Brush.
TIP: I then used a tip of a toothpick to softly scratch any mistakes of black paint getting where it wasn’t supposed to.
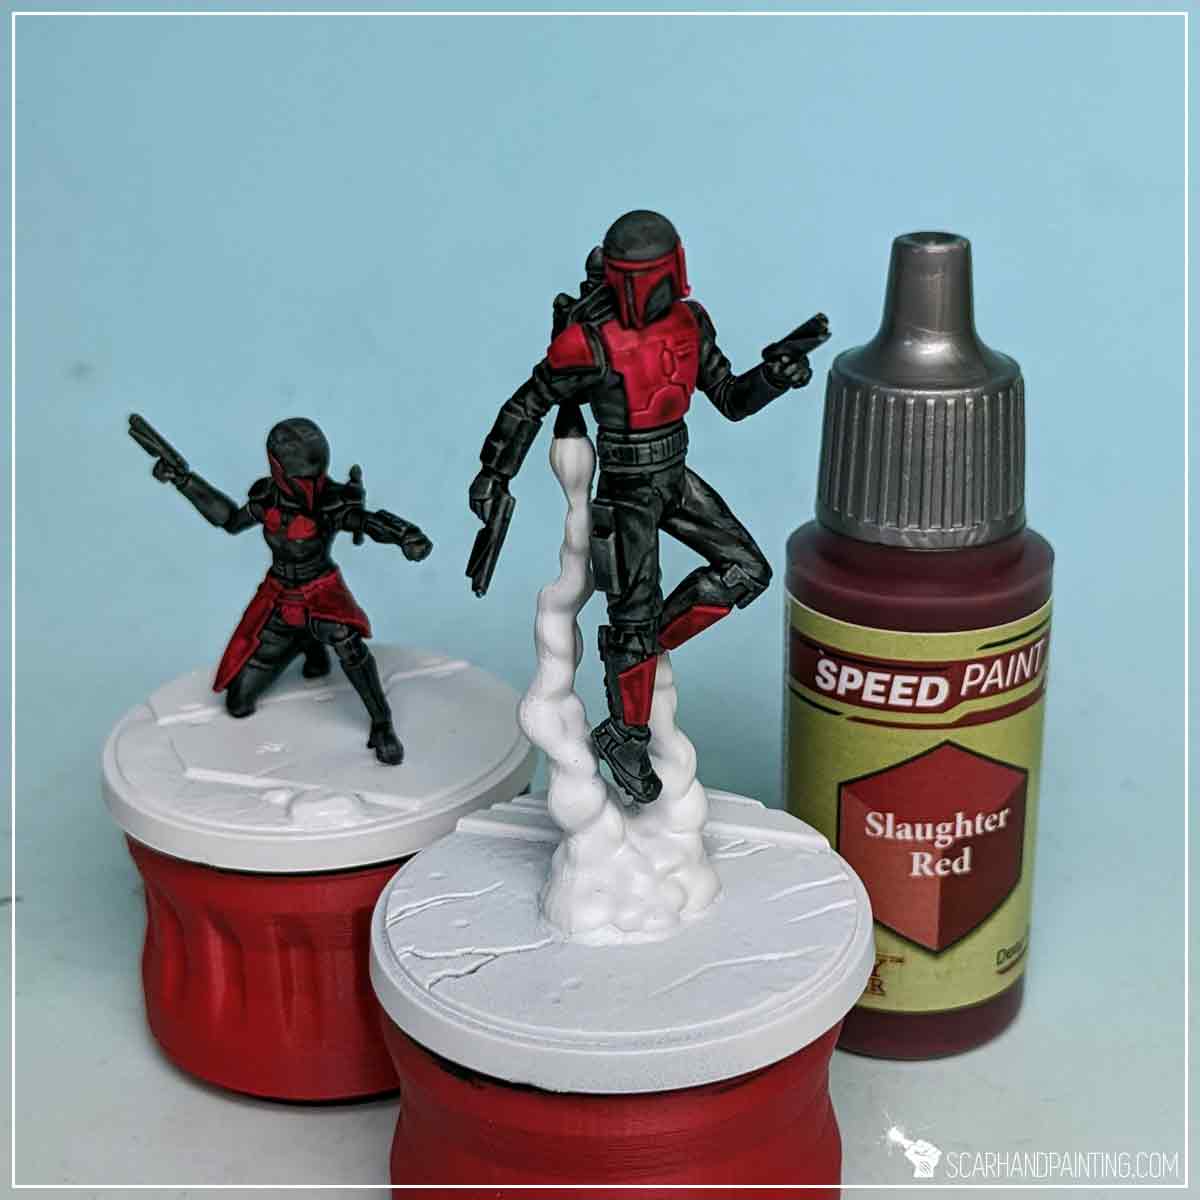
Next, using the same two brushes, I applied Slaughter Red Speed Paint onto white armor plates.
I then repeated the process, adding another layer of Slaughter Red to add warmth and deepen the red color.
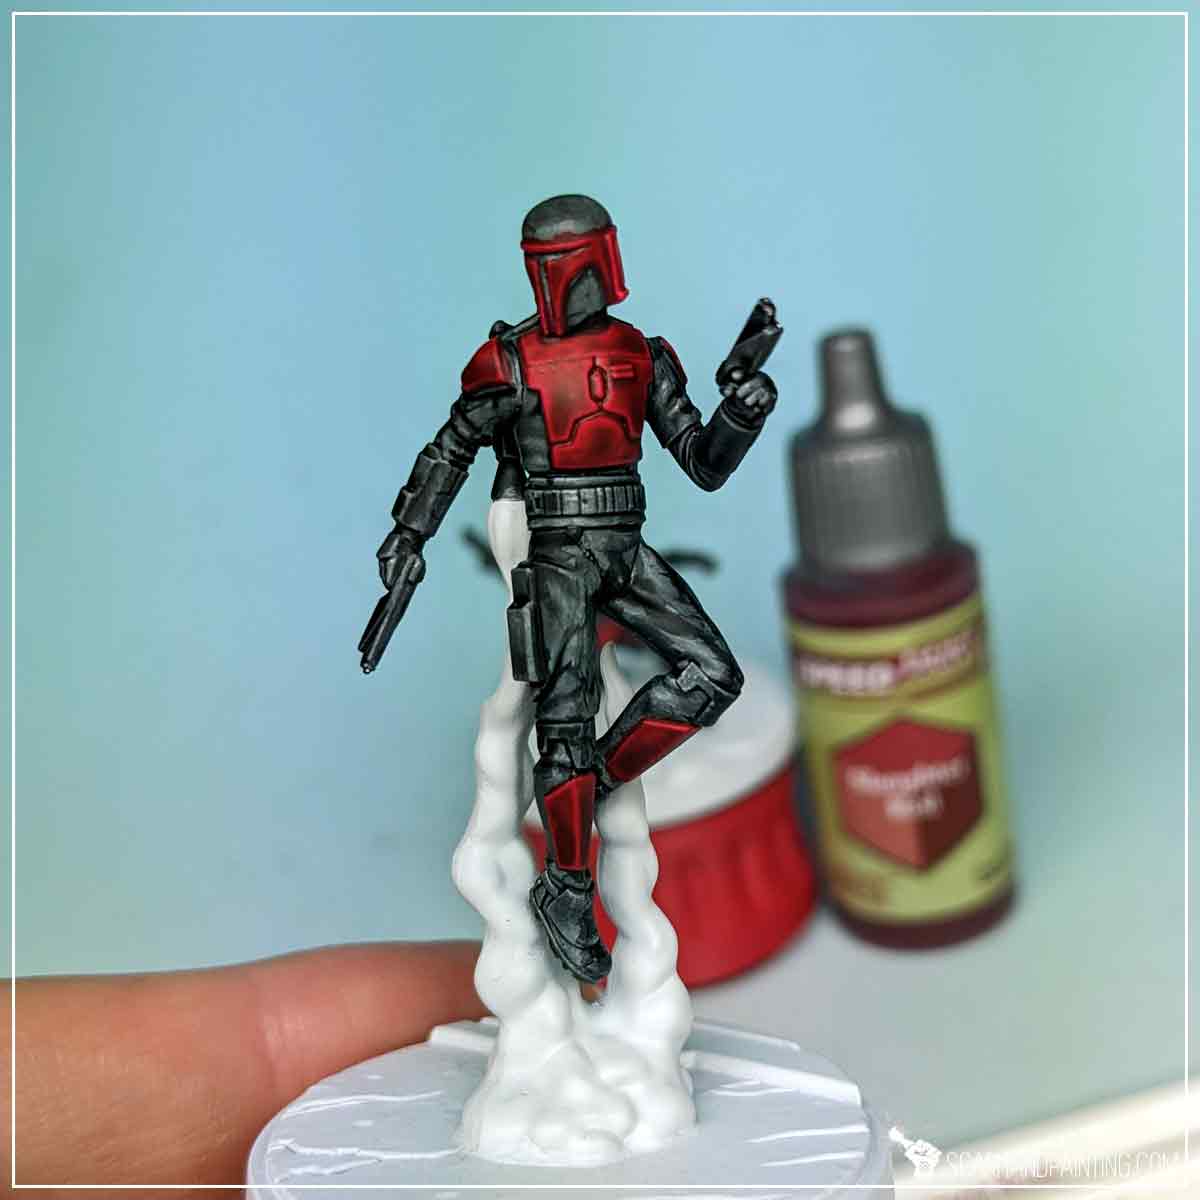
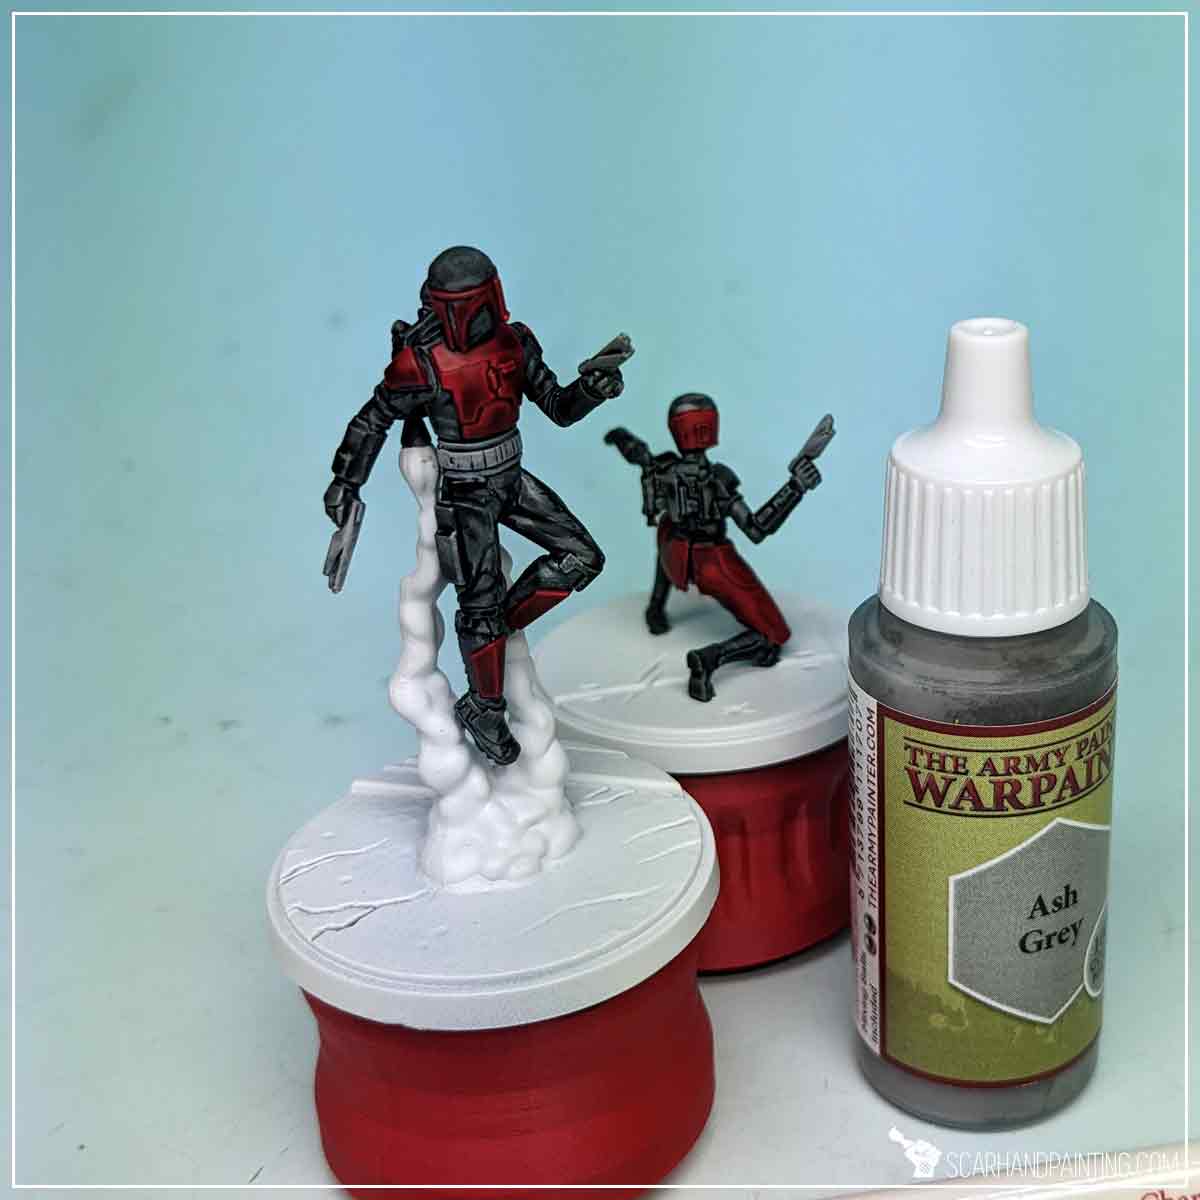
For Belts and Weapons I applied a layer of Ash Grey. I used the Wargamer: Character Brush and the Flatbrush technique to do this.
TIP: Flatbrushing is done by putting the tip of a brush in paint, then brushing the excess paint off onto a piece of paper or other smooth surface material, then brushing the remainder of the paint onto the chosen surface, in one direction and perpendicular to any edges. This technique works best with brushes equipped with a long “head” or synthetic brushes with a long “belly” part. You can learn more about the technique HERE.
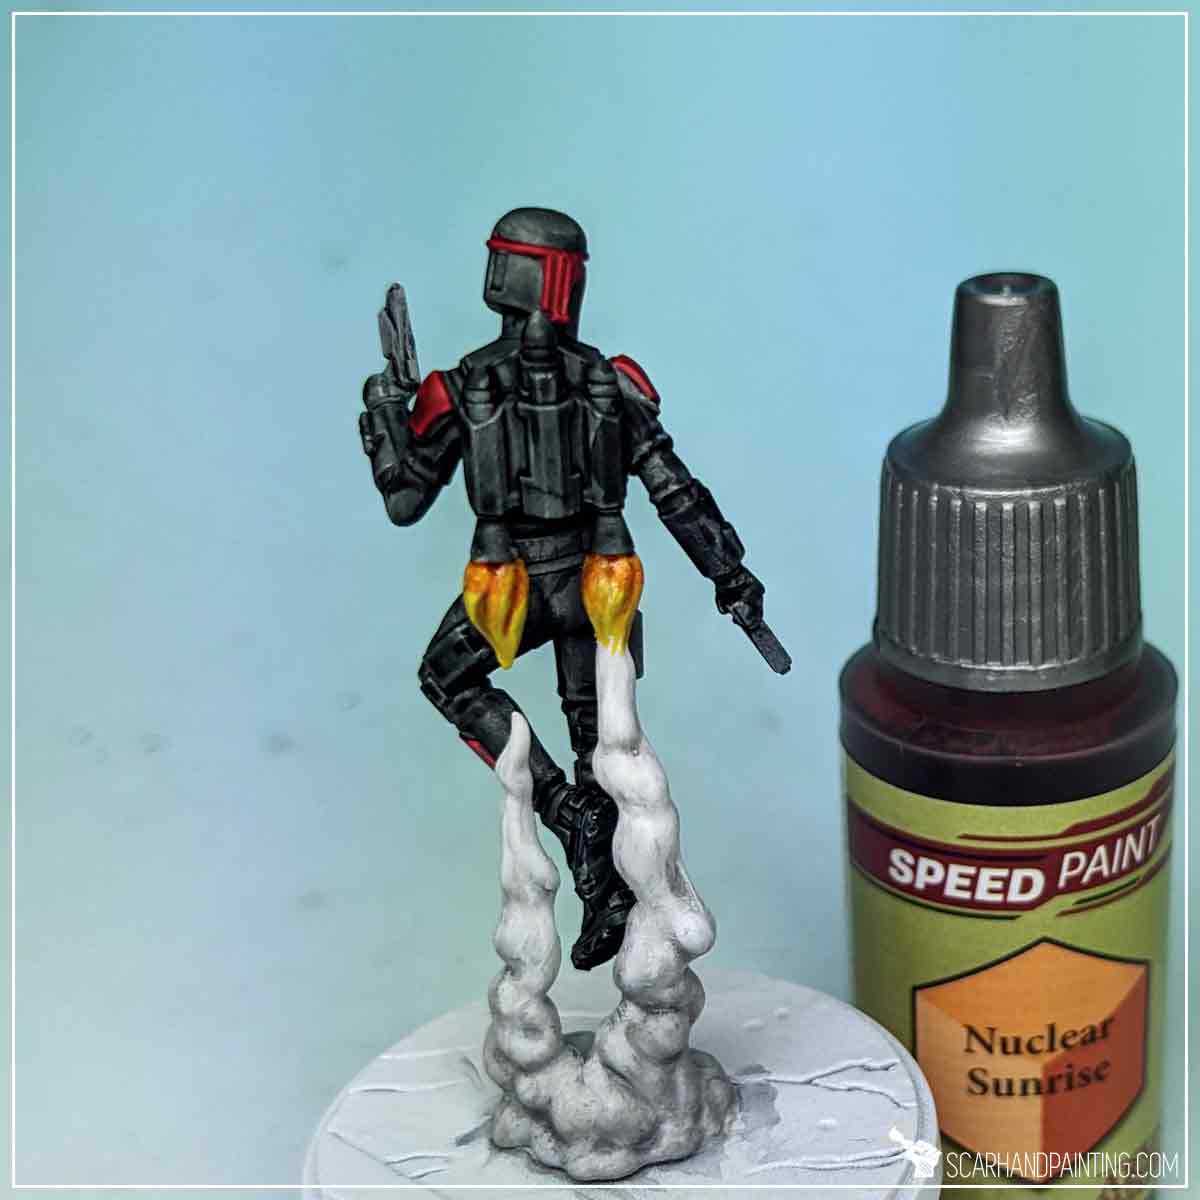
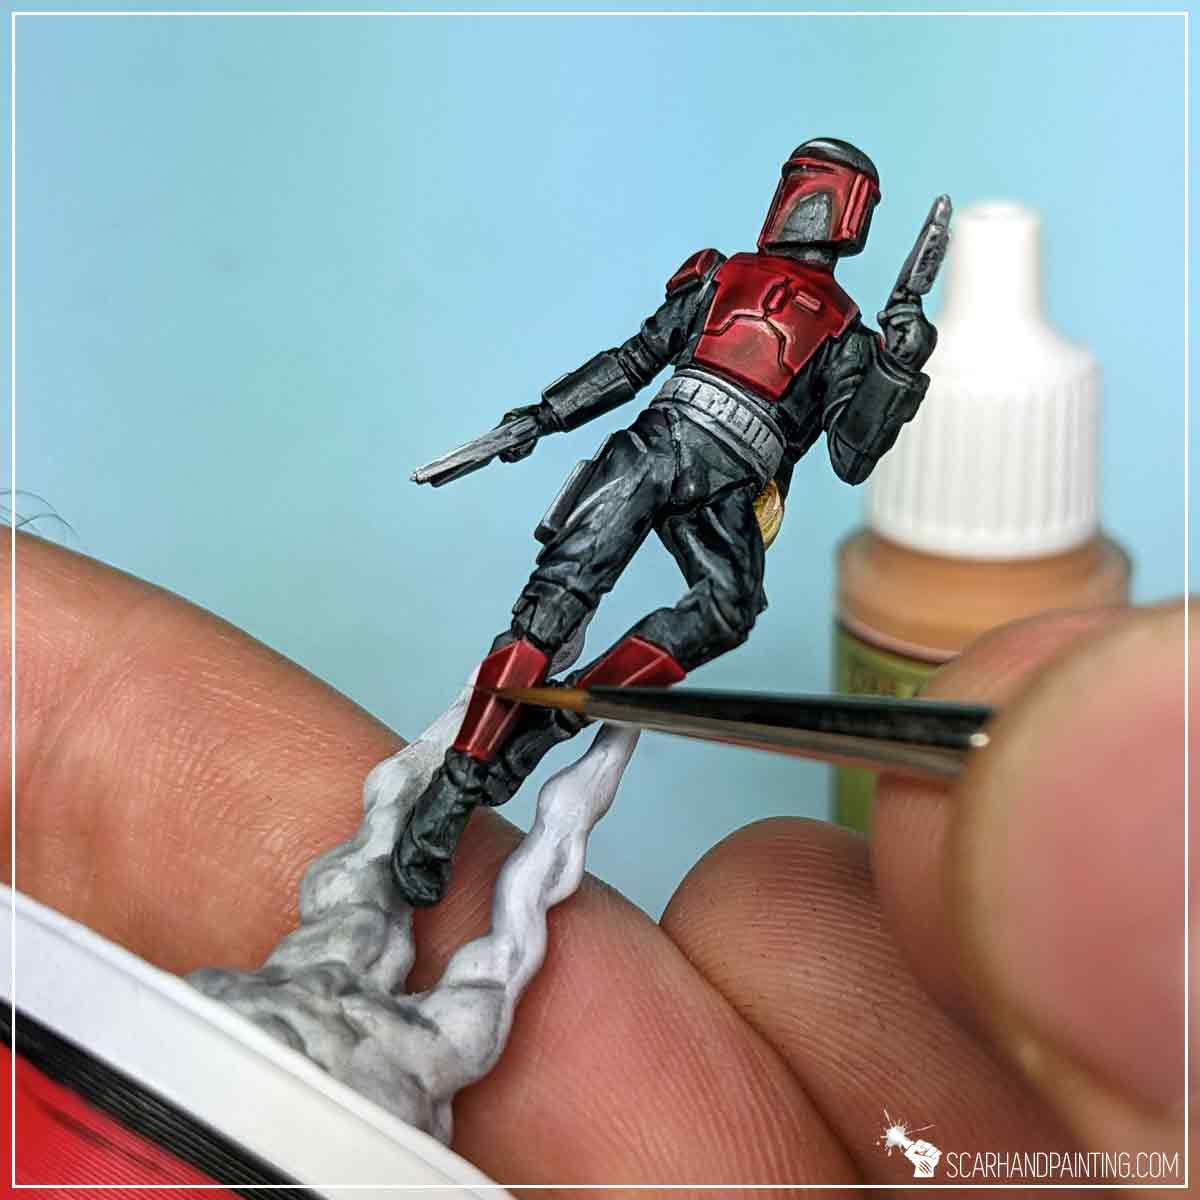
Focusing on easy methodology I built a volume of smoke like color by thinning Ashen Stone Speed Paint with water, and covering the entire surface with the resulting mix.
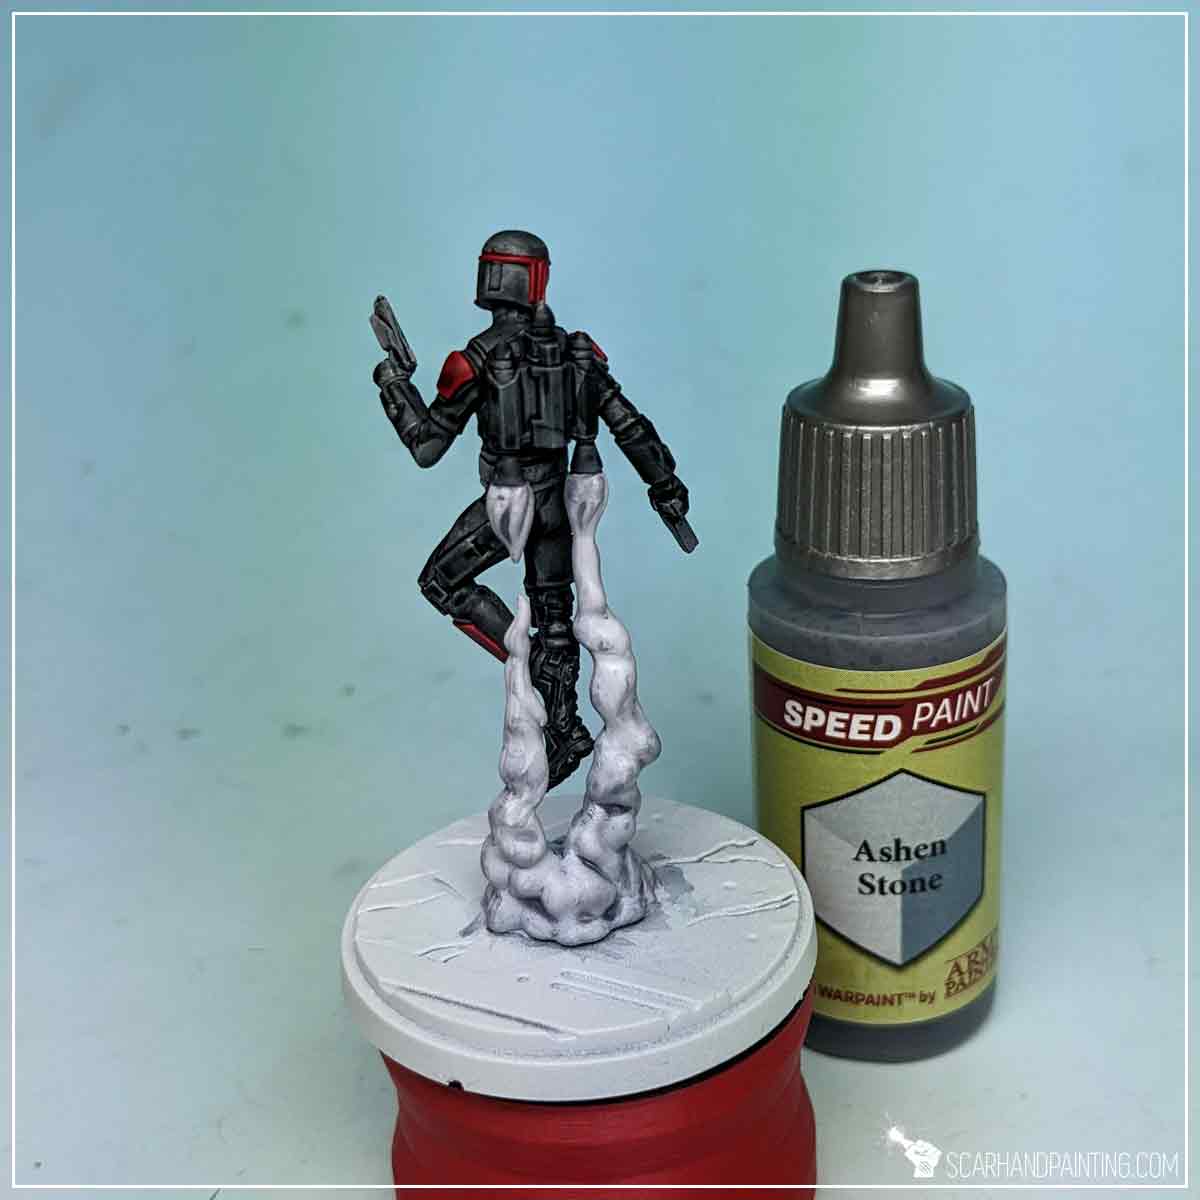
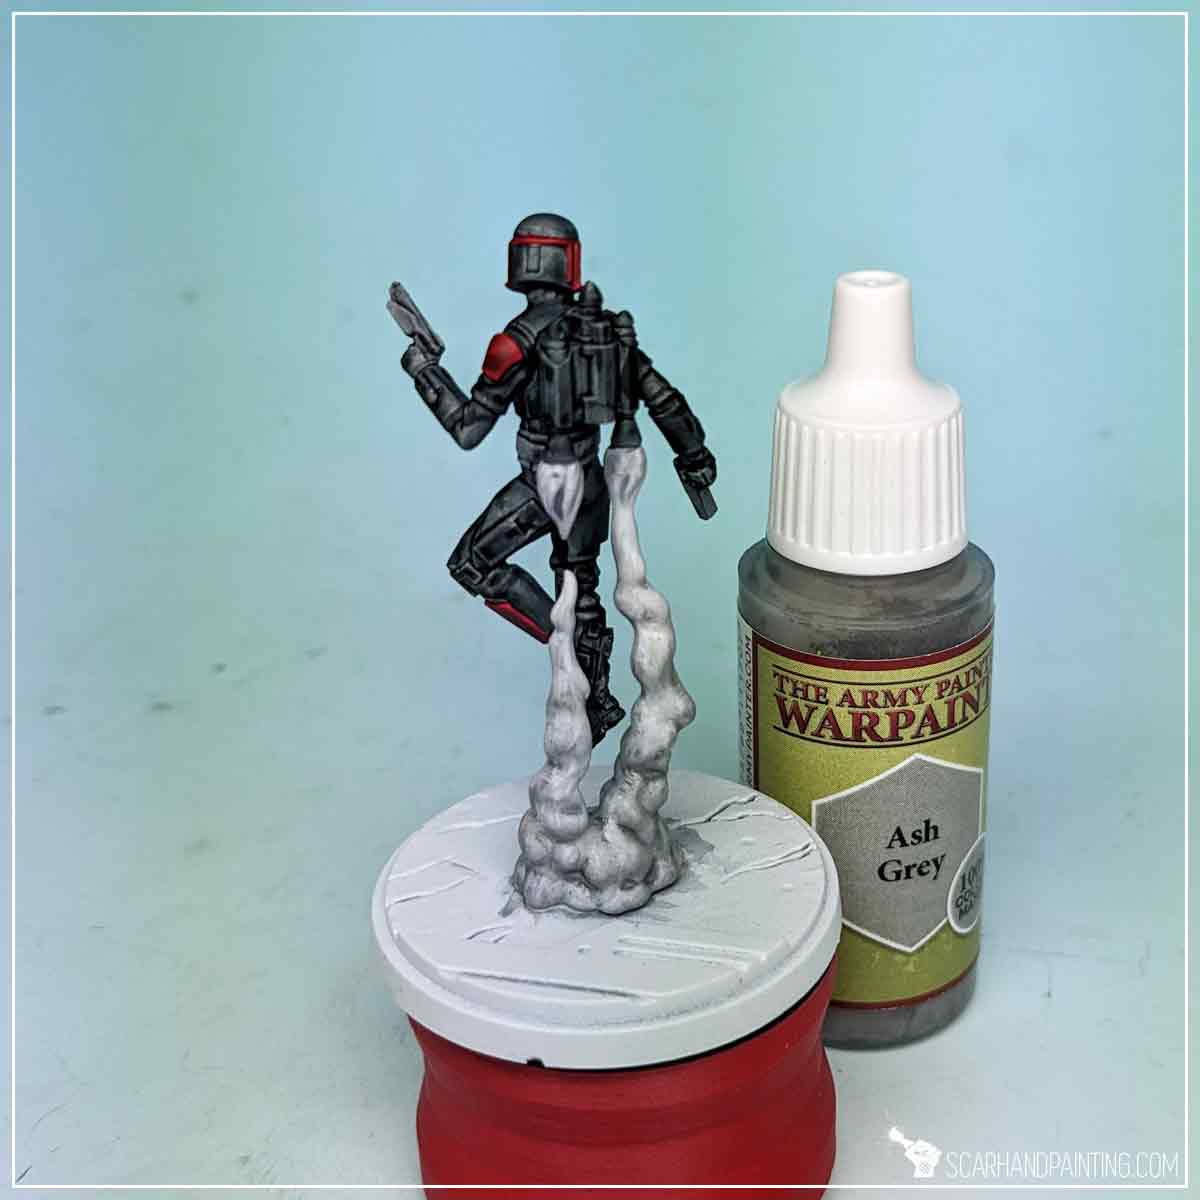
I then applied another mix. This time I used water to thin down Ash Grey in a 1:1 ratio.
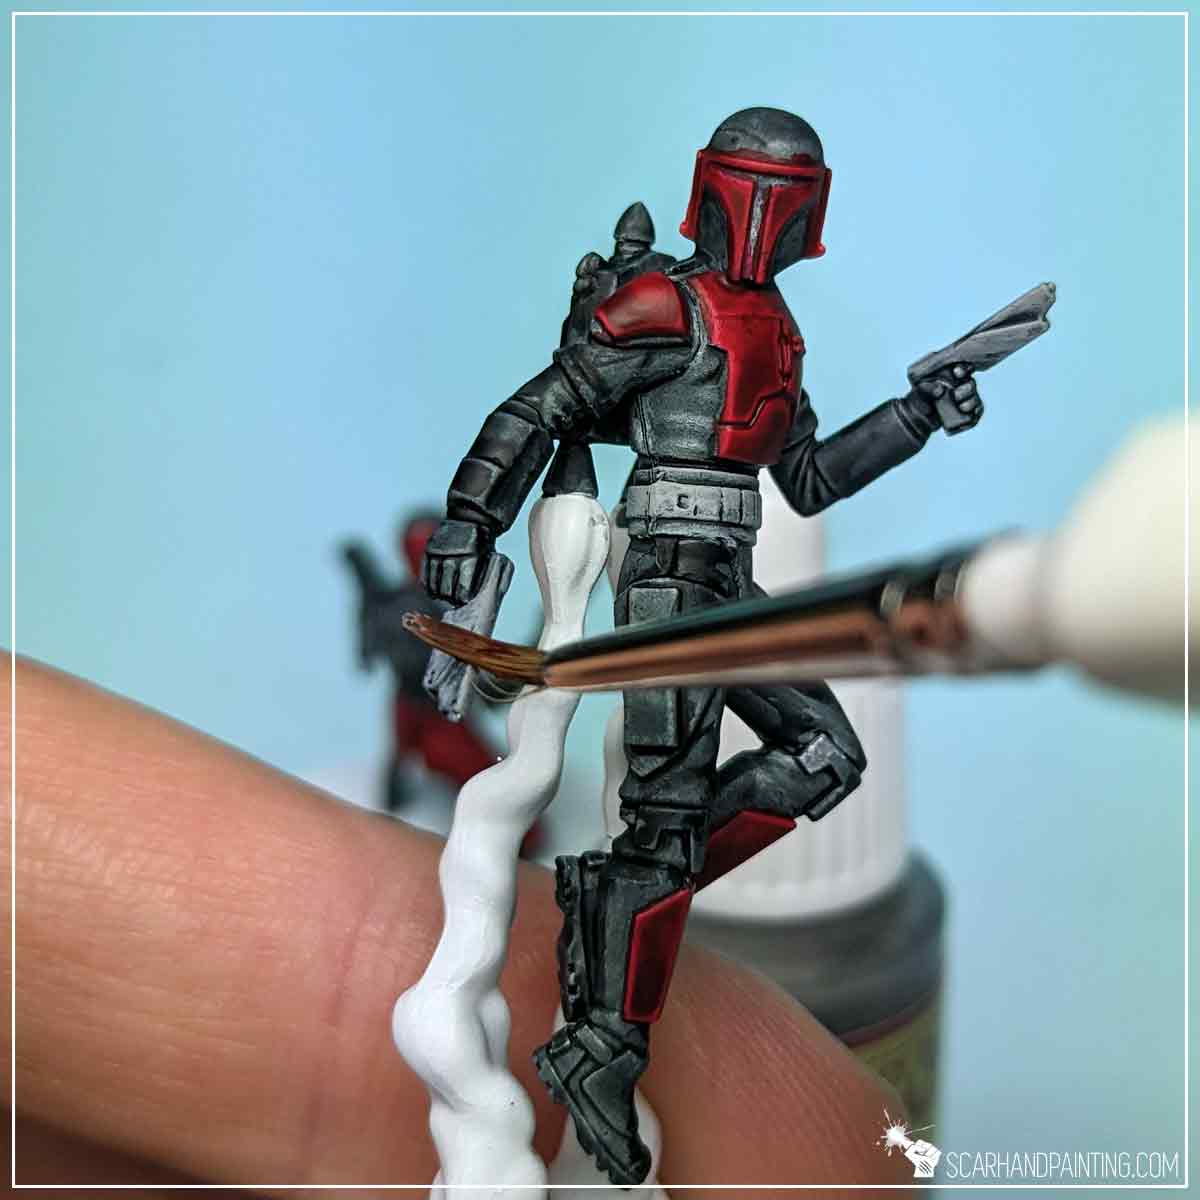
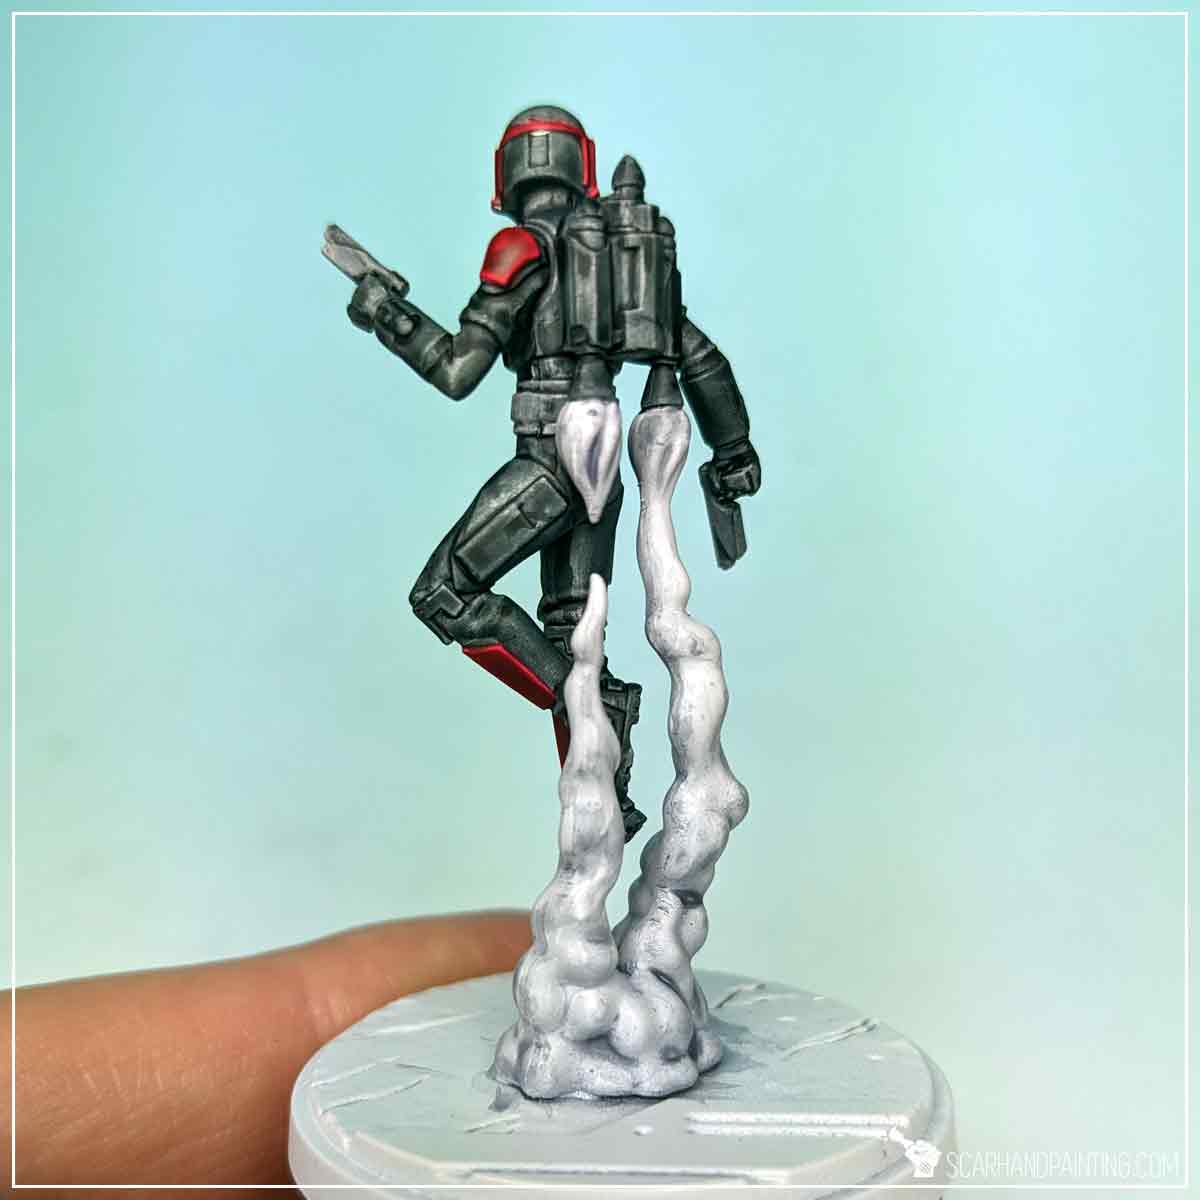
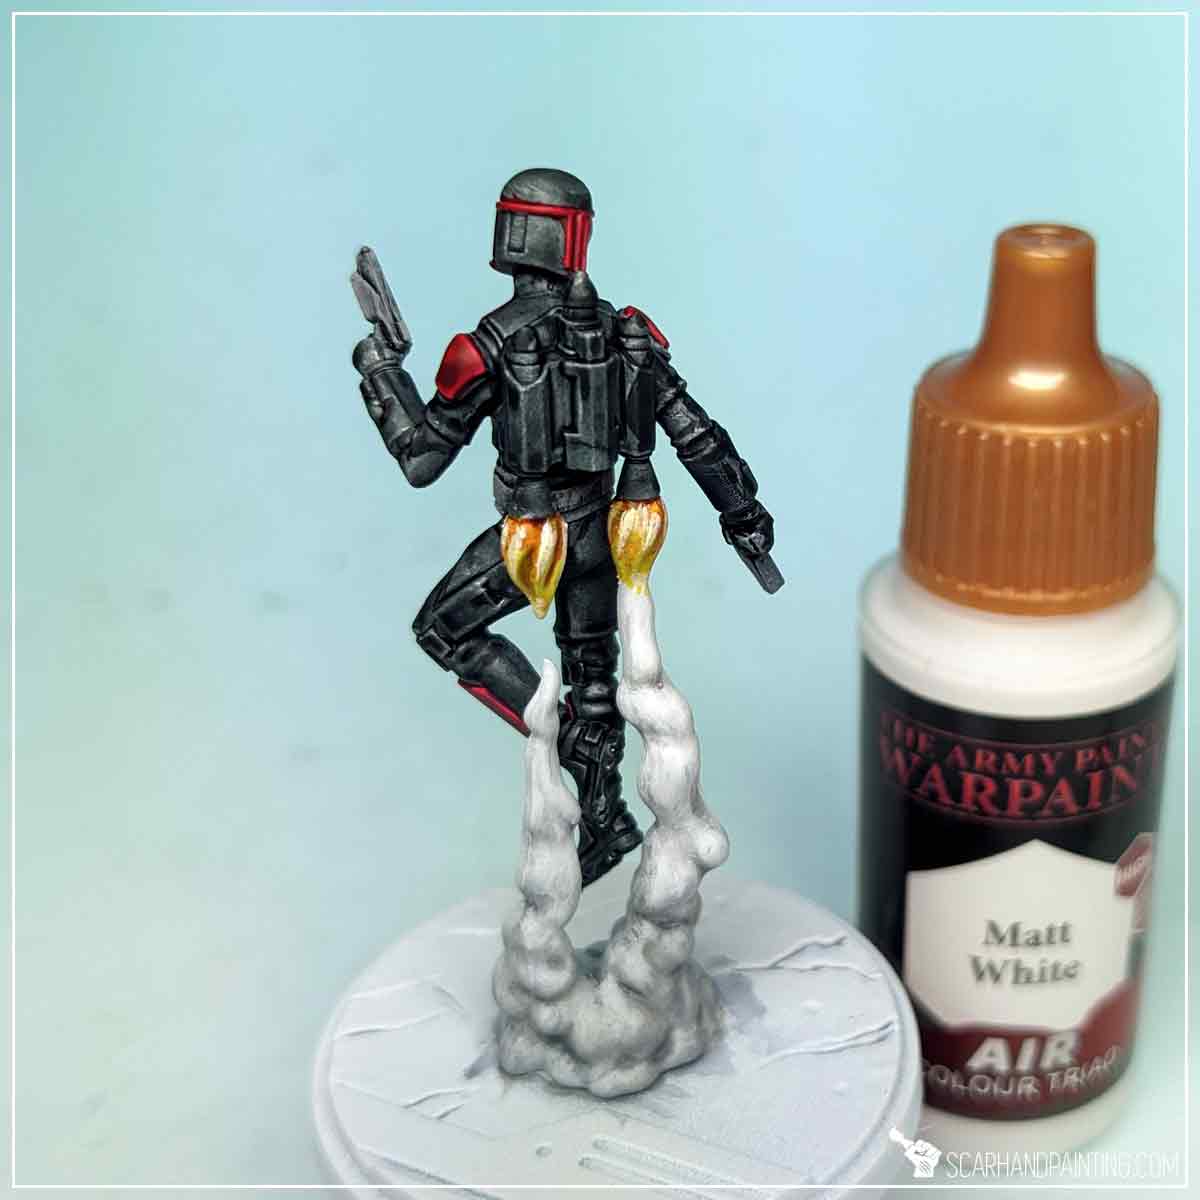
Next I manually applied some Matt White (Air) to the upper, most exposed parts. Air paints are thin by nature, which resulted in a nice color gradation between upper and lower areas of fumes.
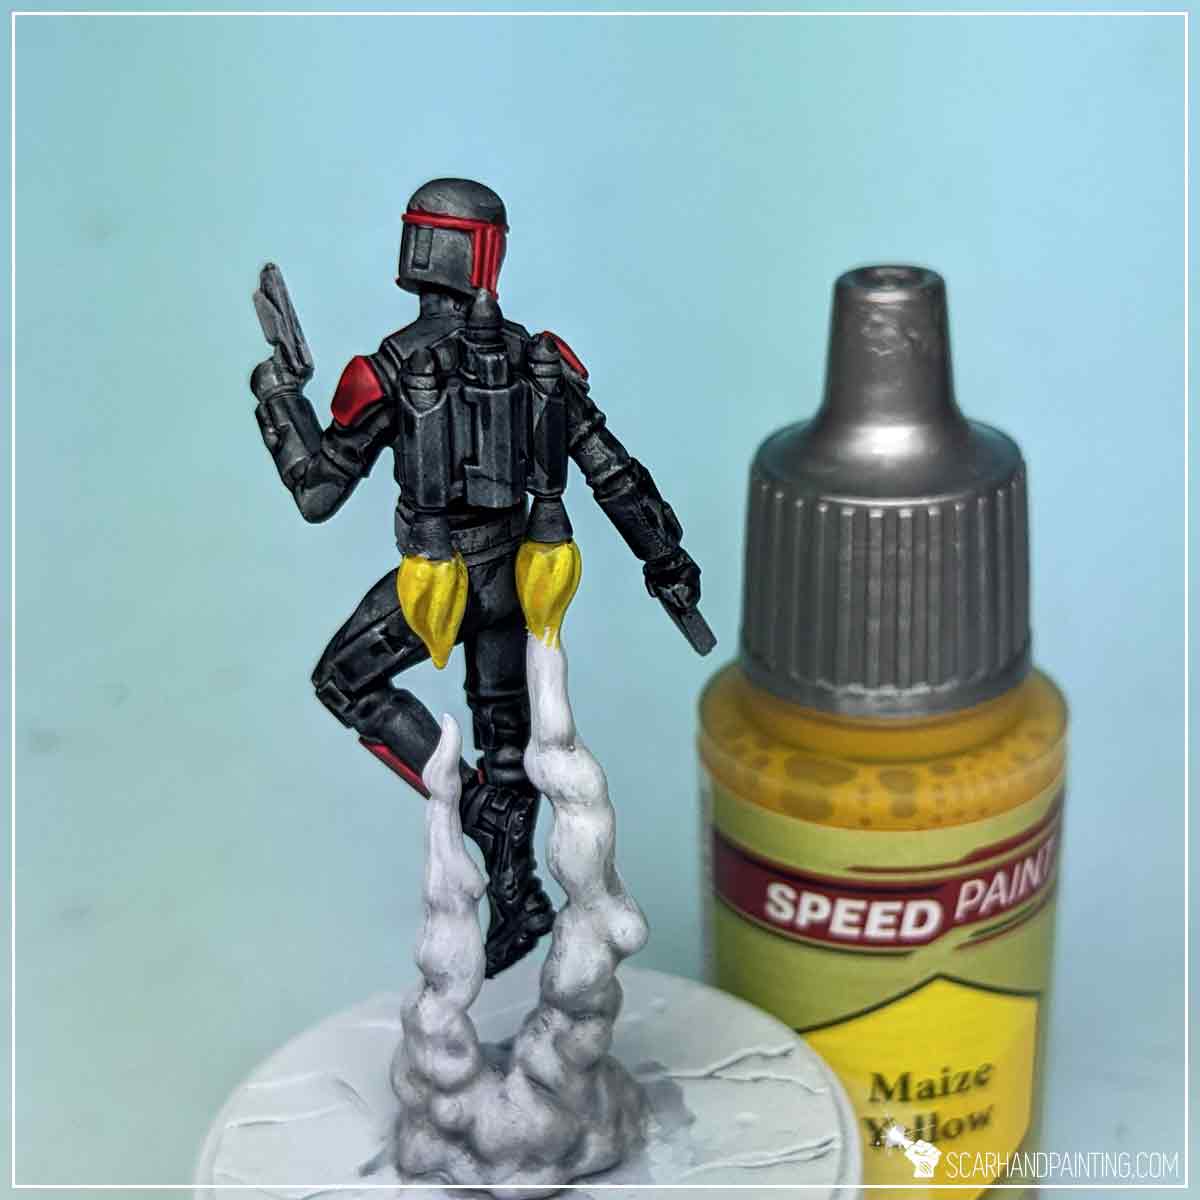
Finally I painted the top of the exhaust fumes with Maize Yellow Speed Paint, followed short by Nuclear Sunset Speed Paint at the very top.
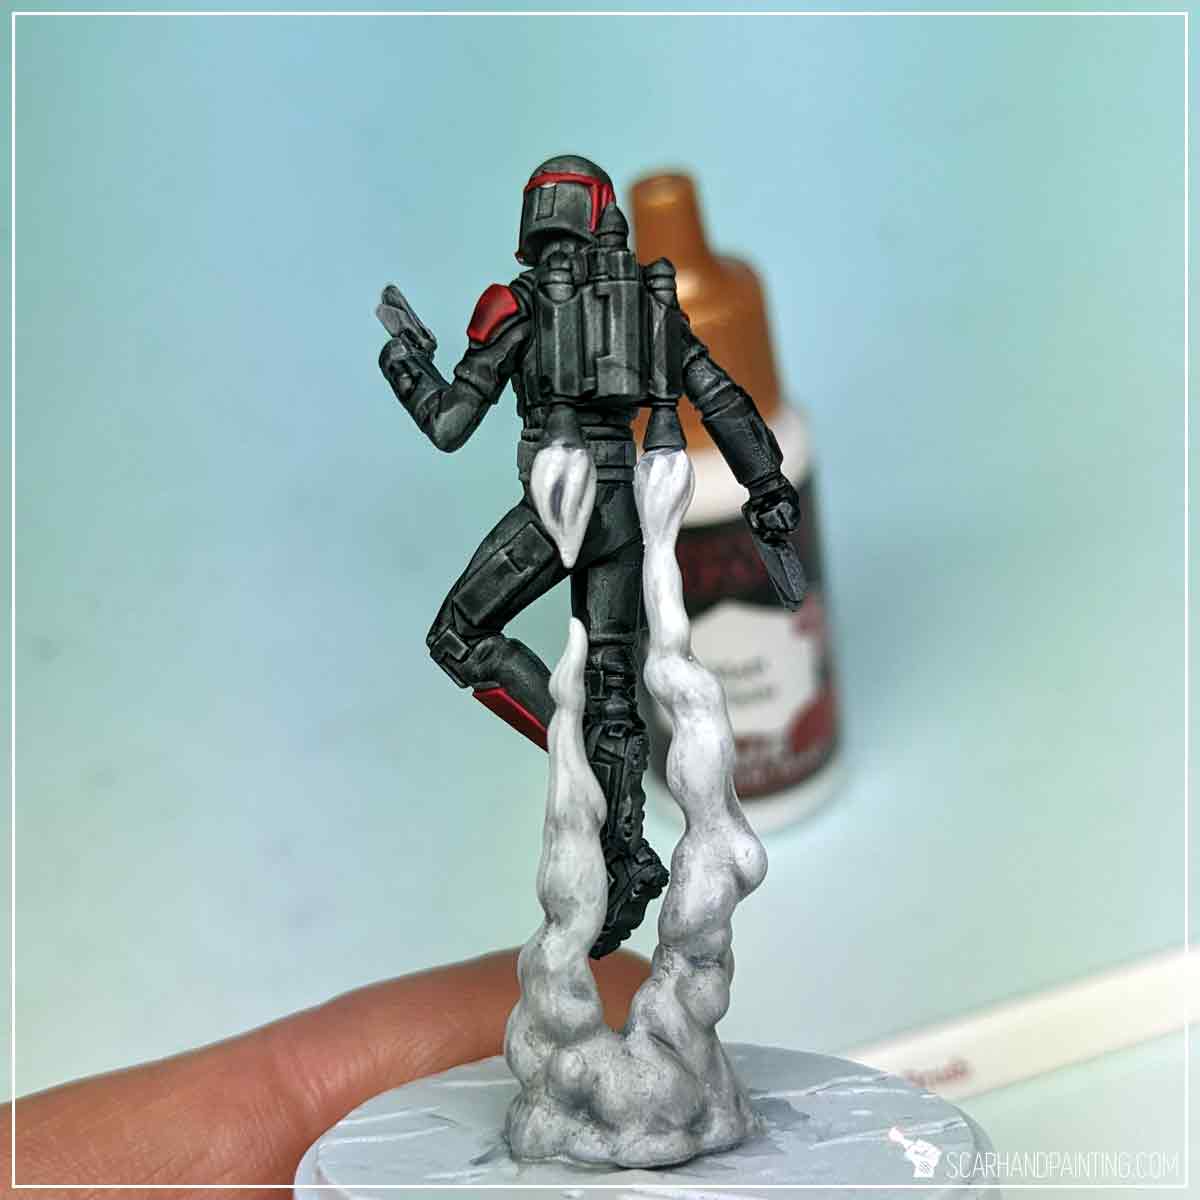
To make the colors pop I drew a few lines of Matt White along the most exposed areas.
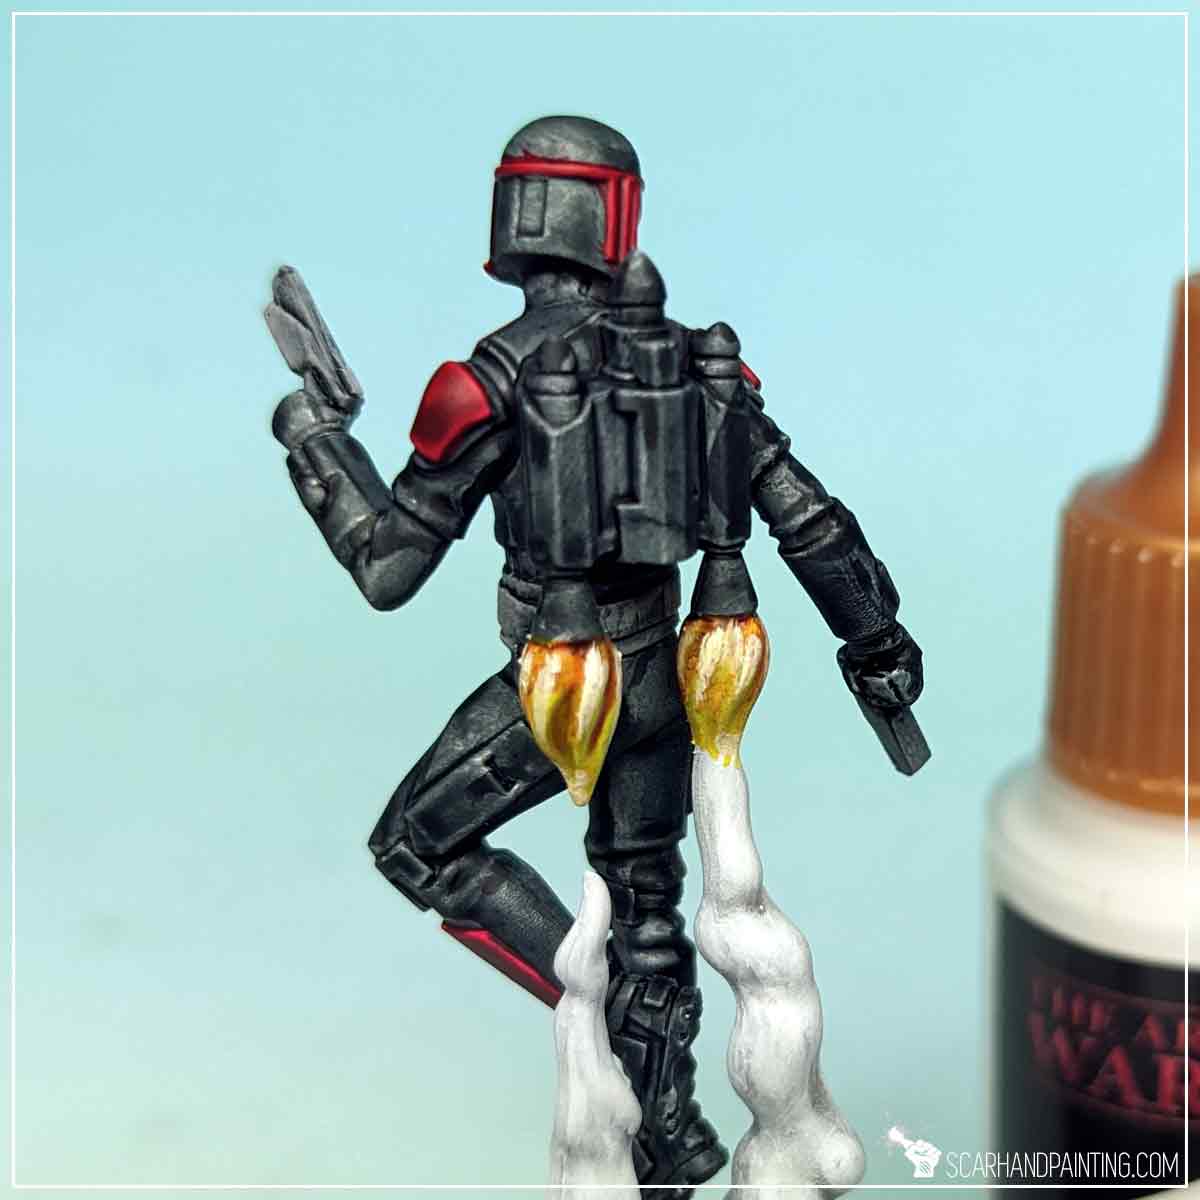
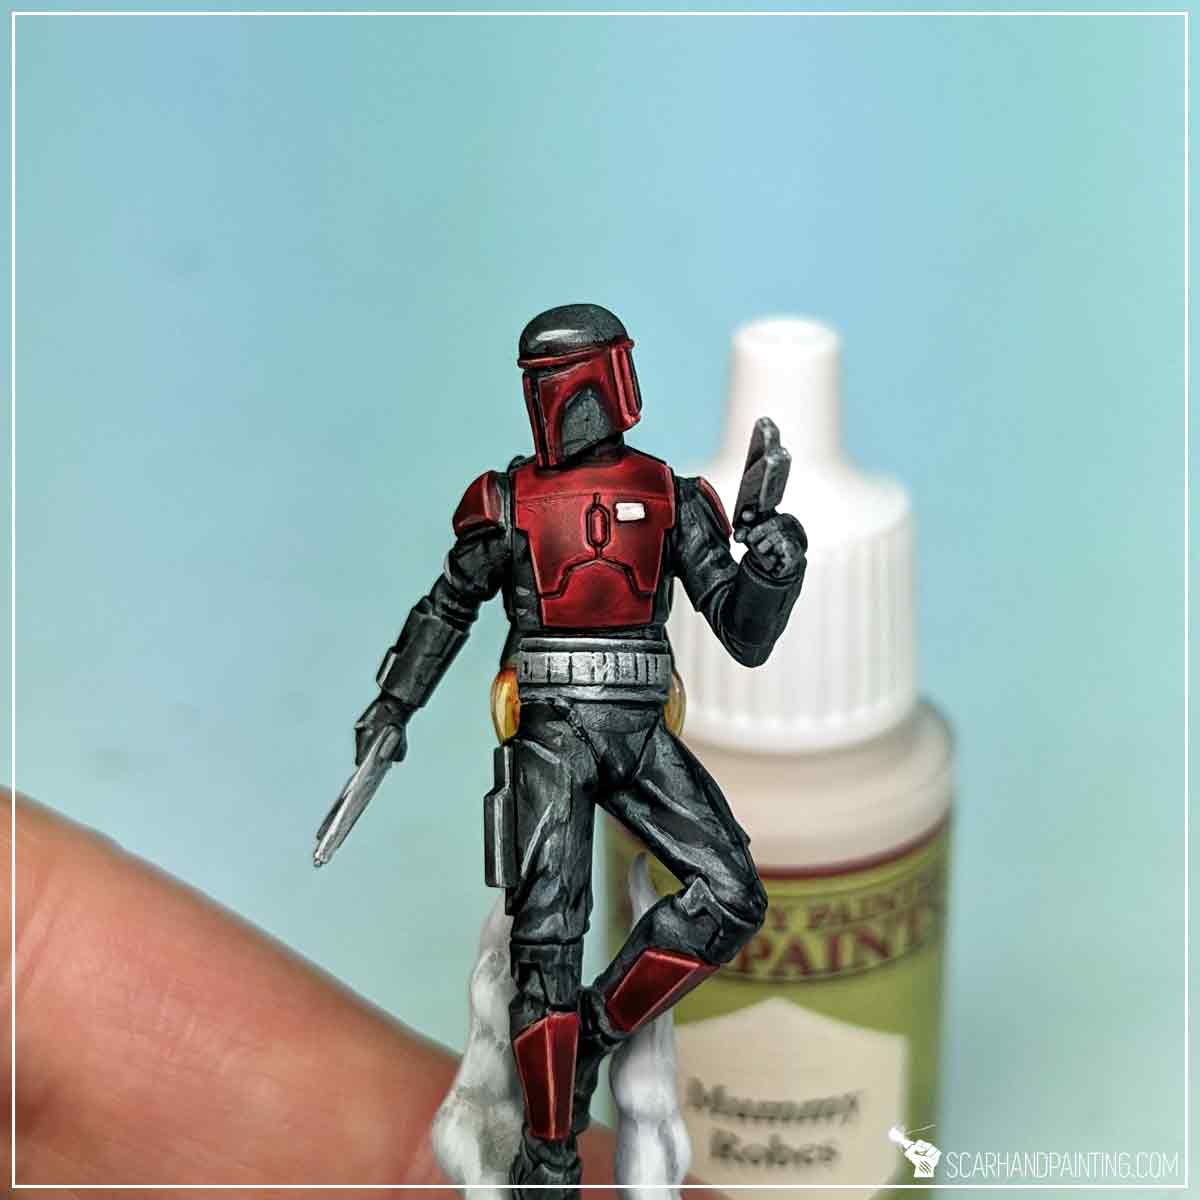
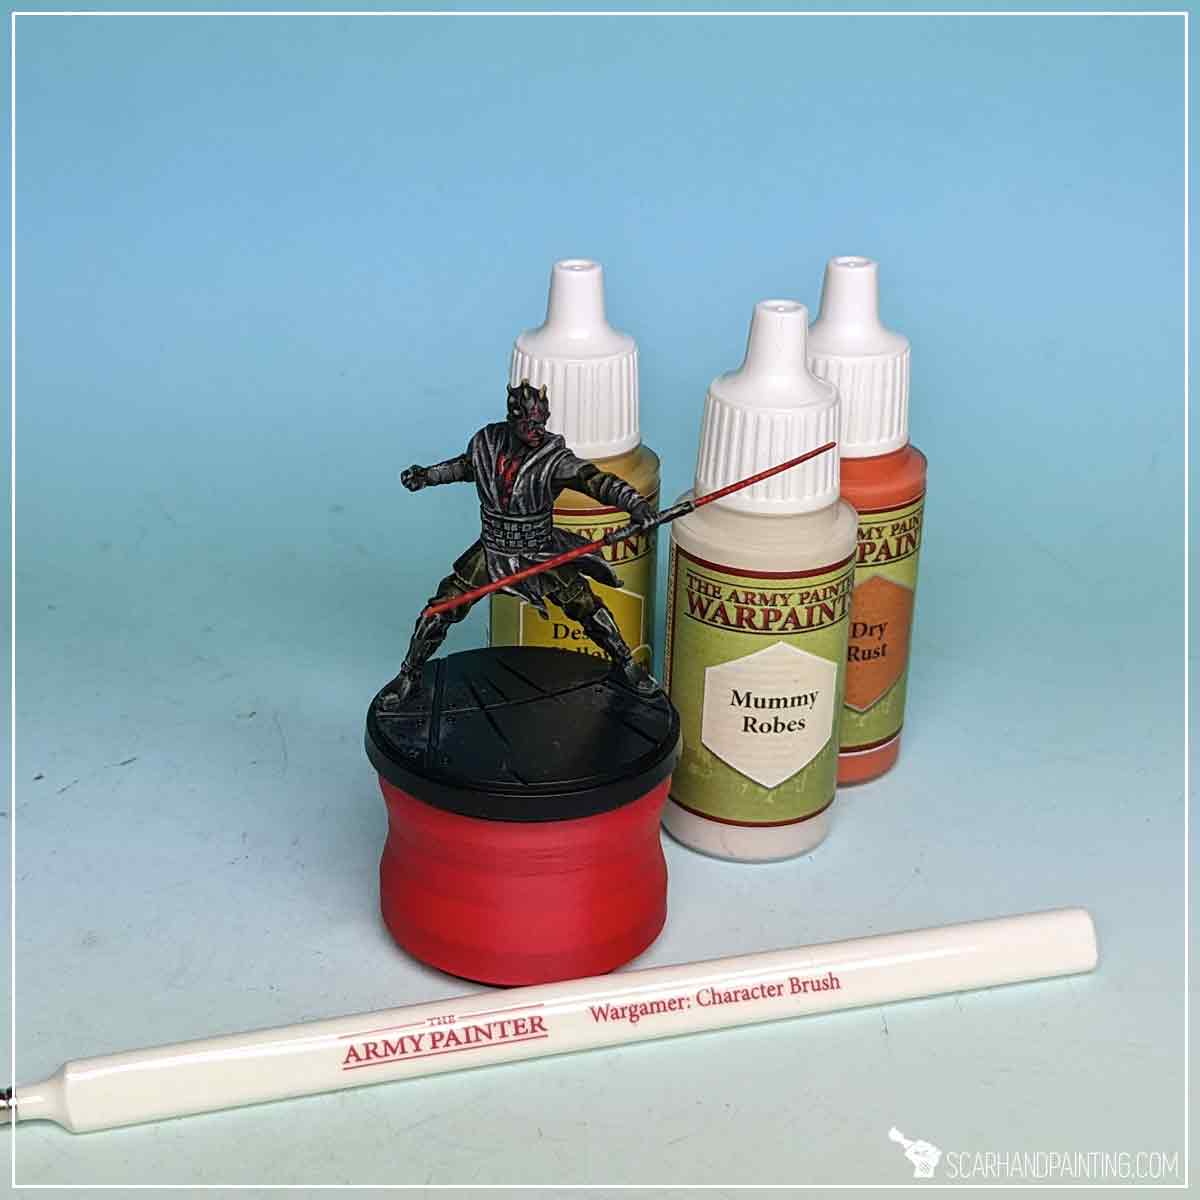
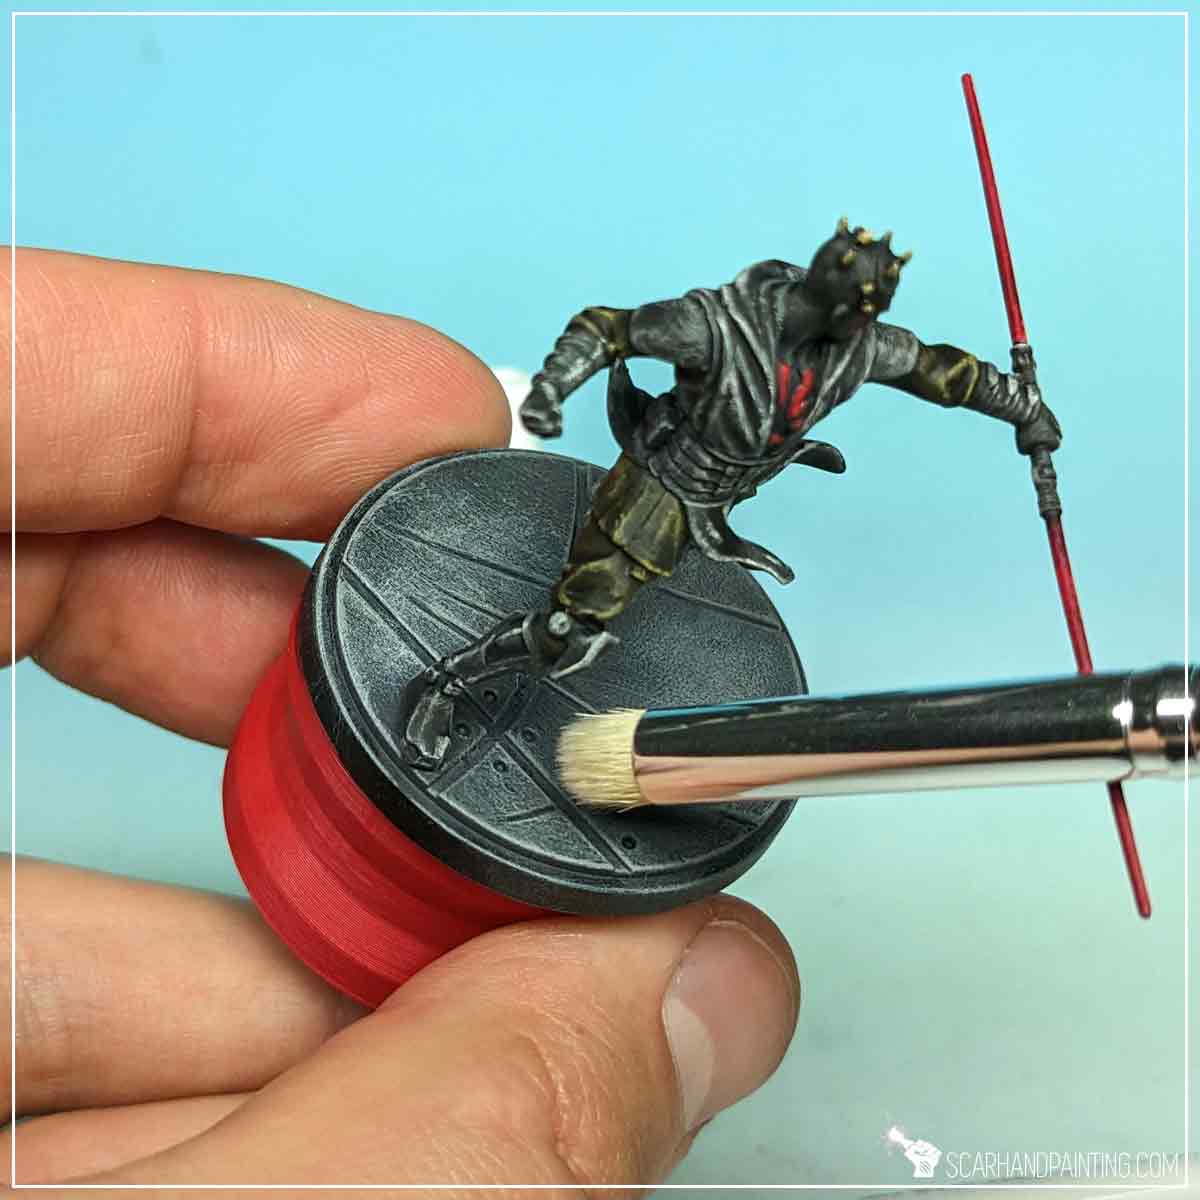
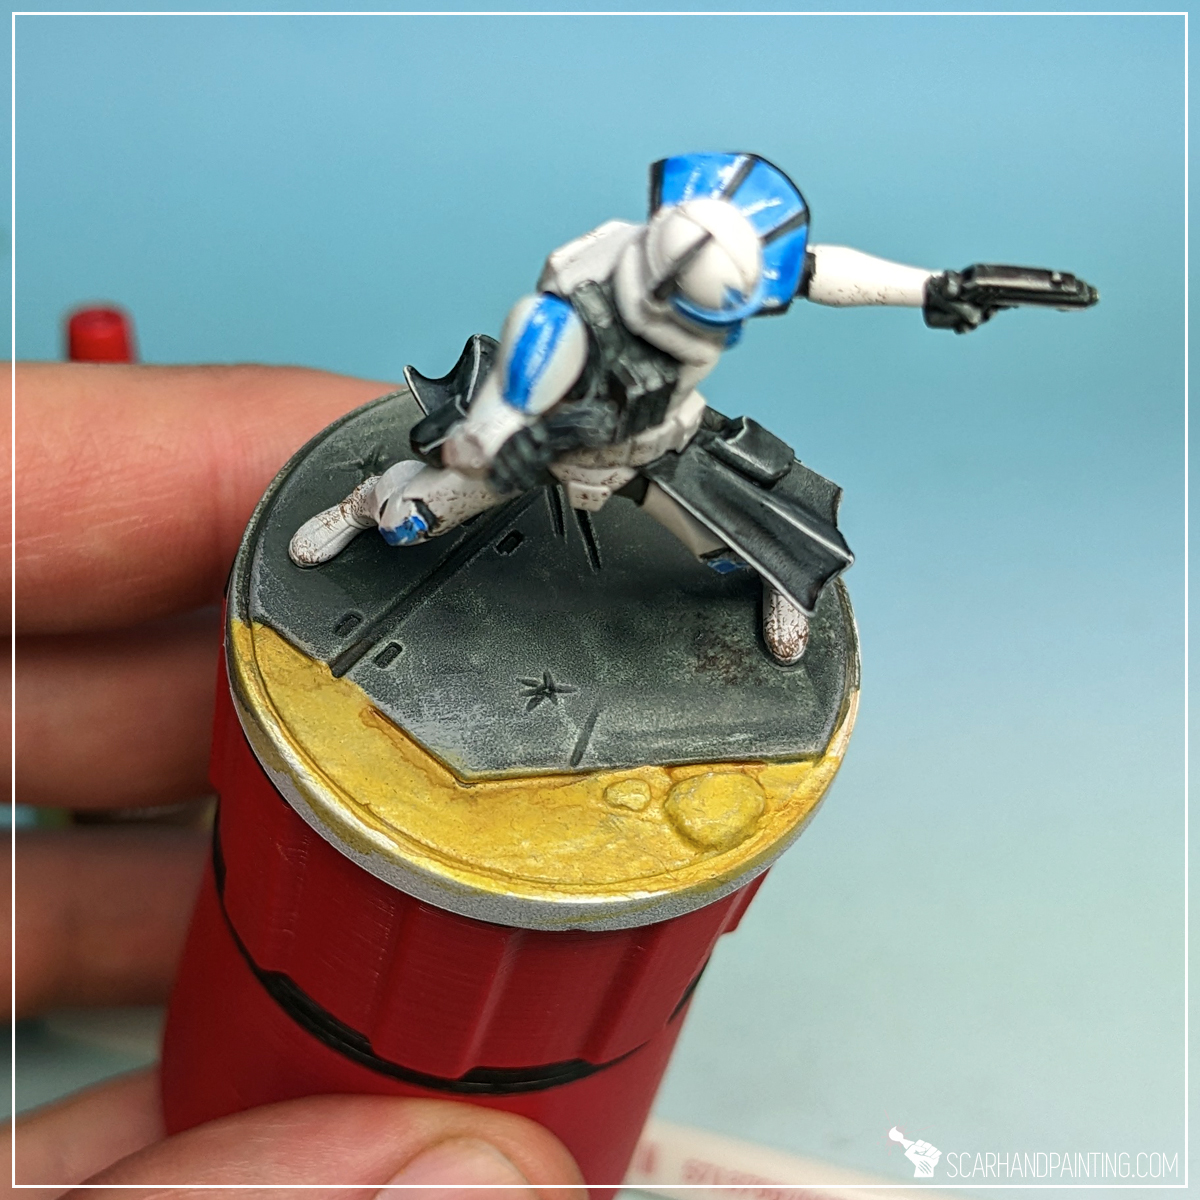
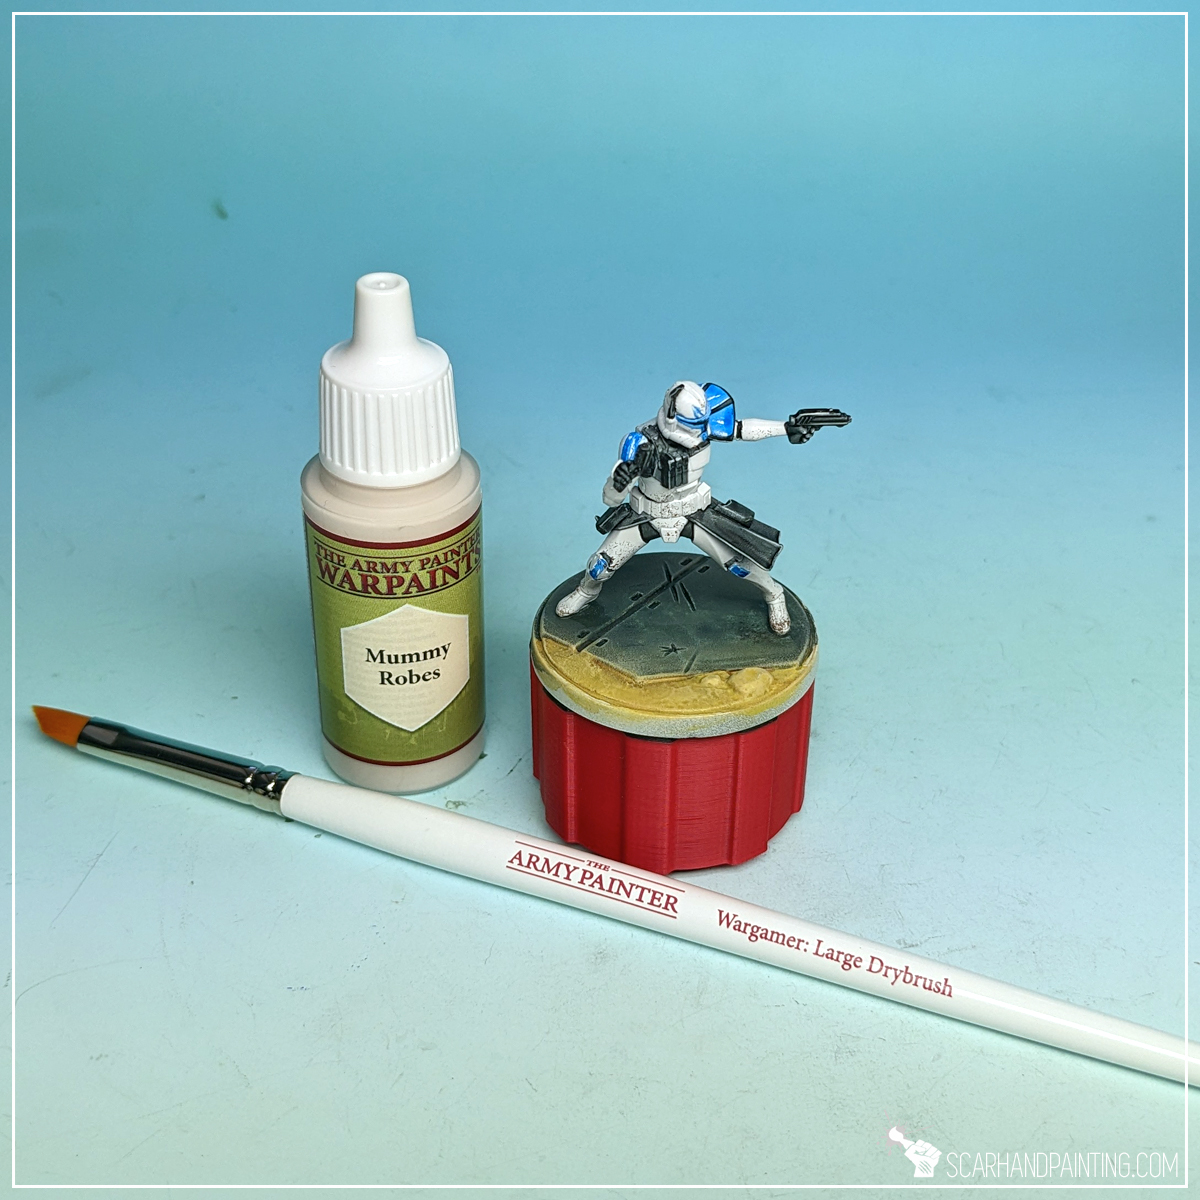
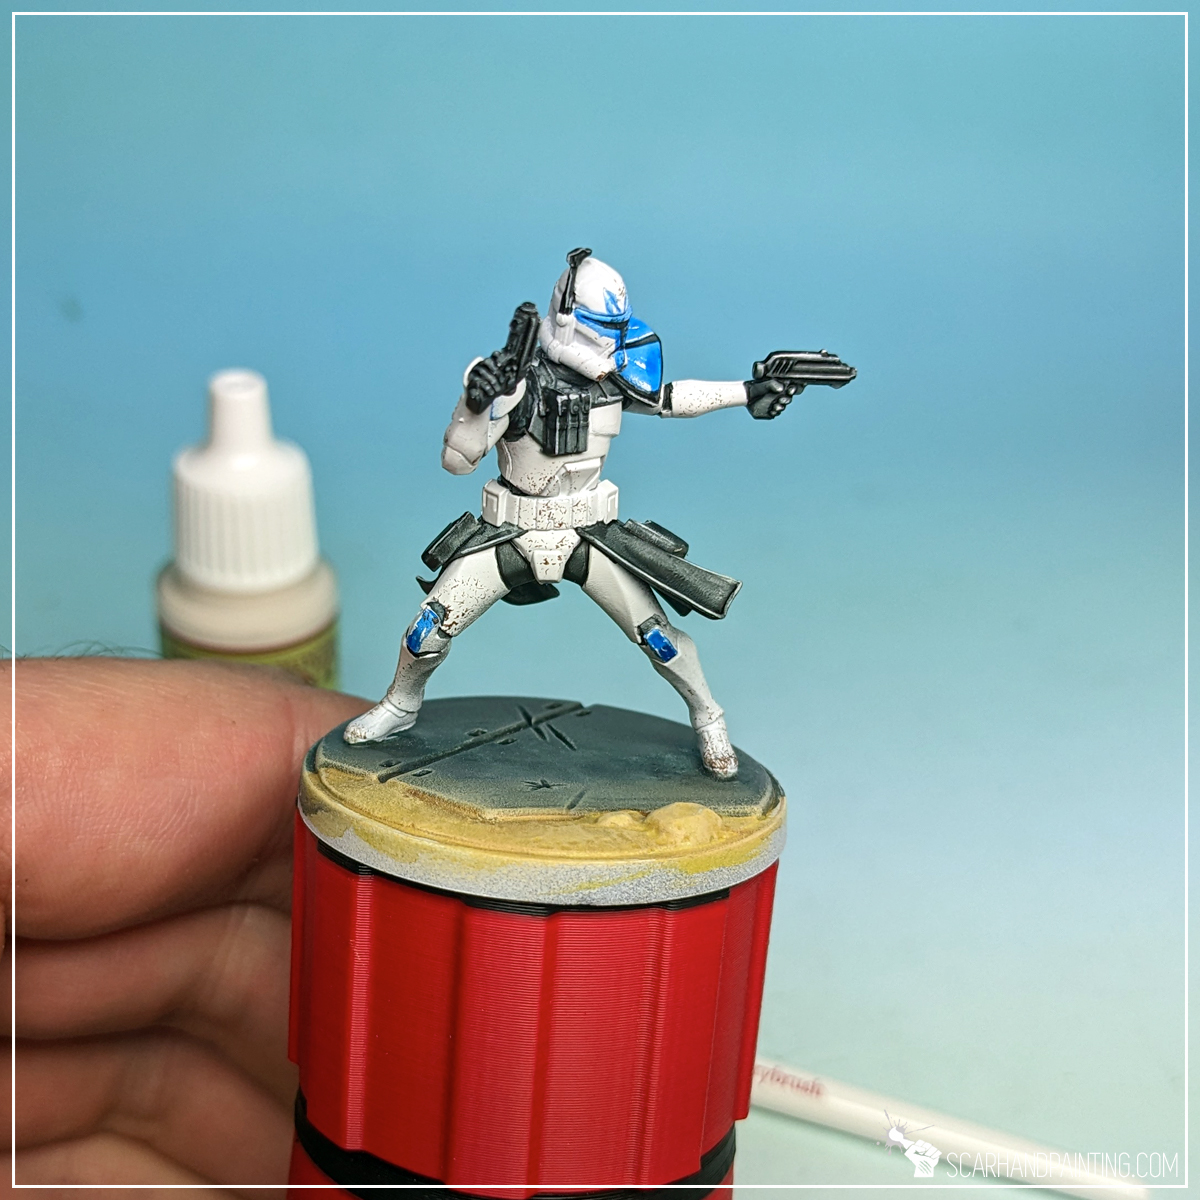
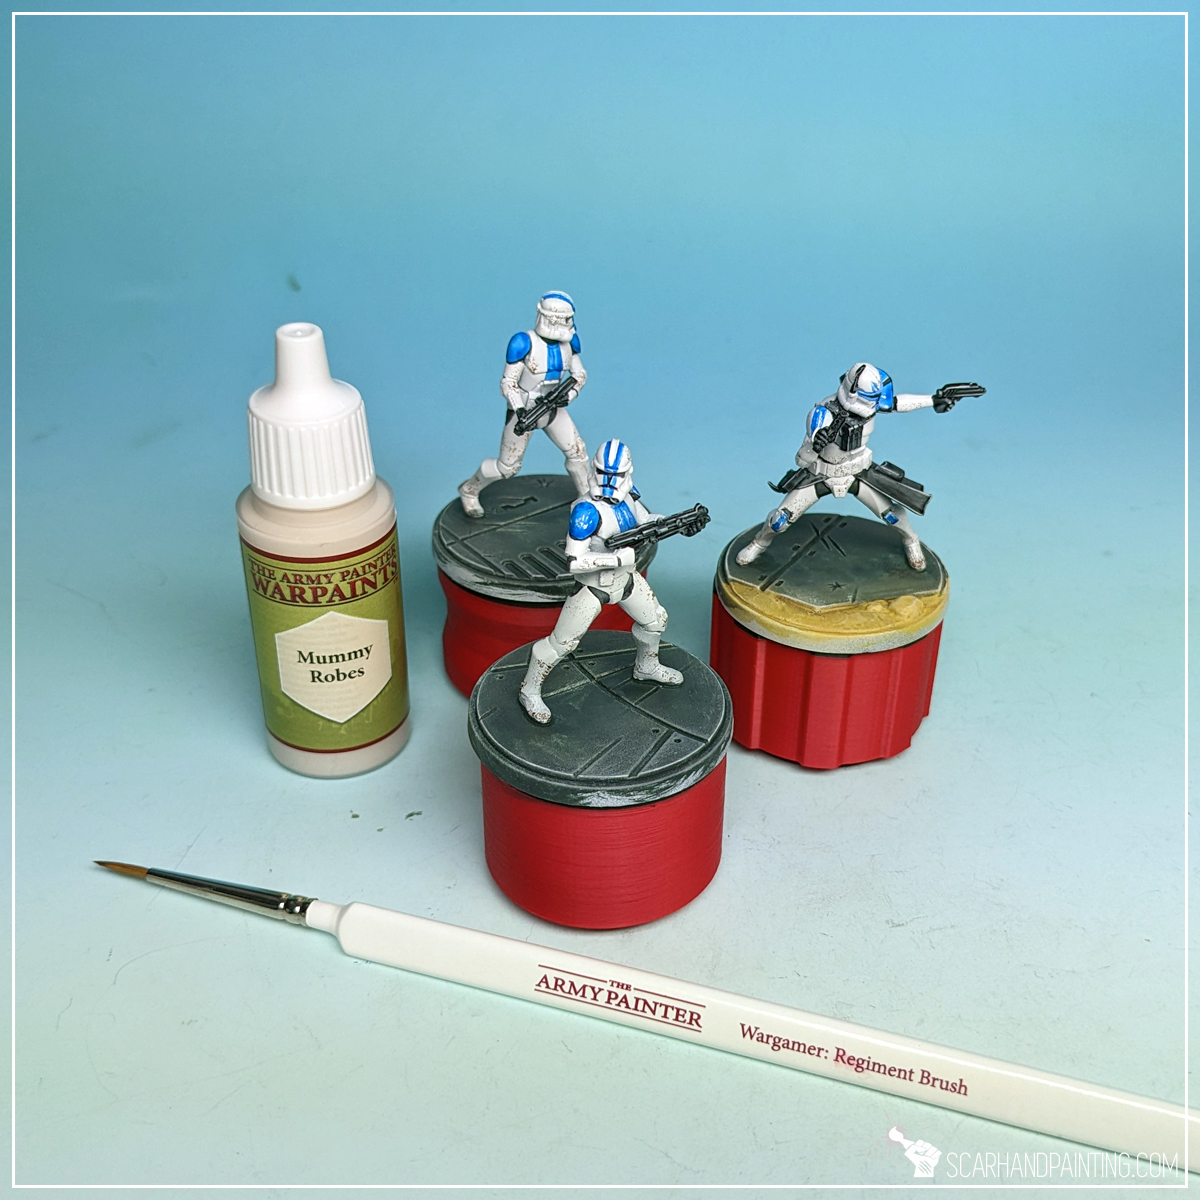
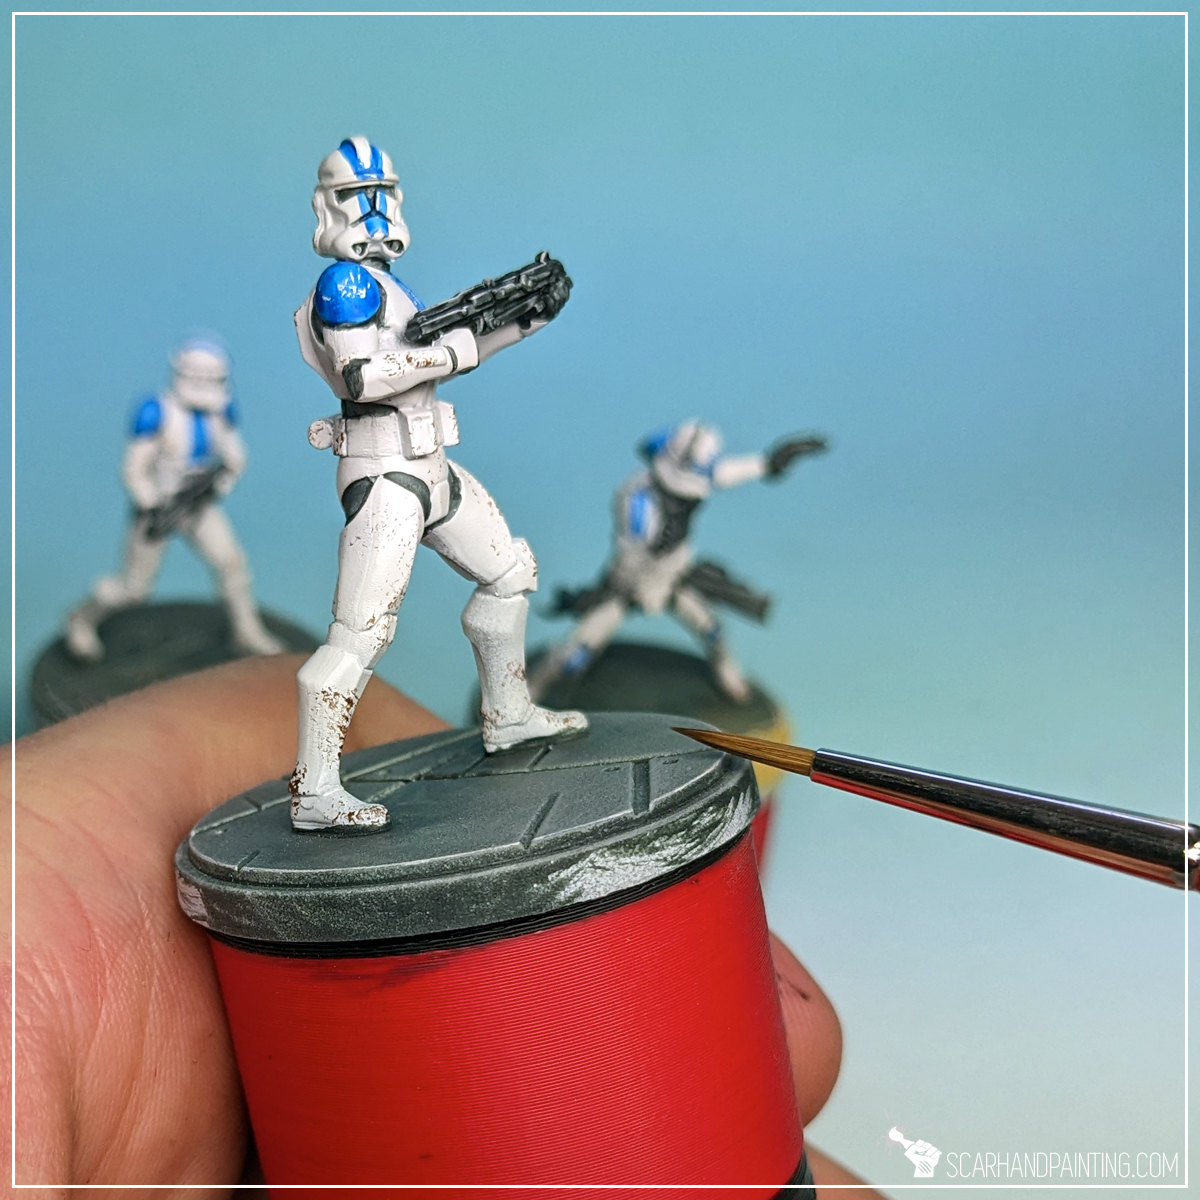
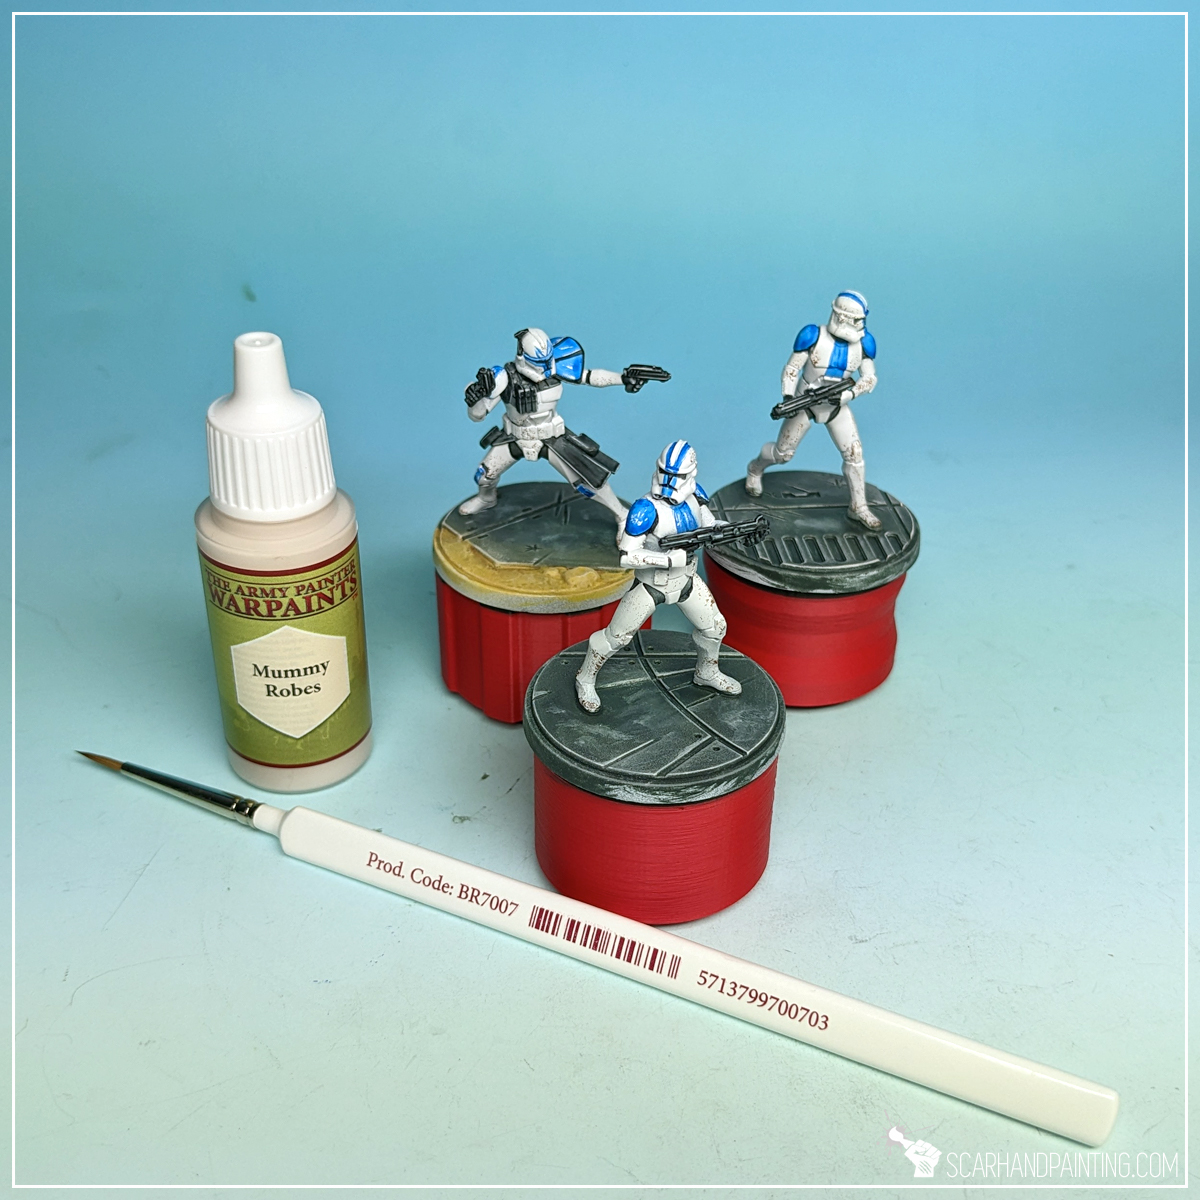
To make dark clothes, armor, belt and weapons pop I applied a simple, selective highlight of Mummy Robes. I focused on the most exposed, easy to access edges, painting thin lines with a side of Wargamer: Detail Brush.
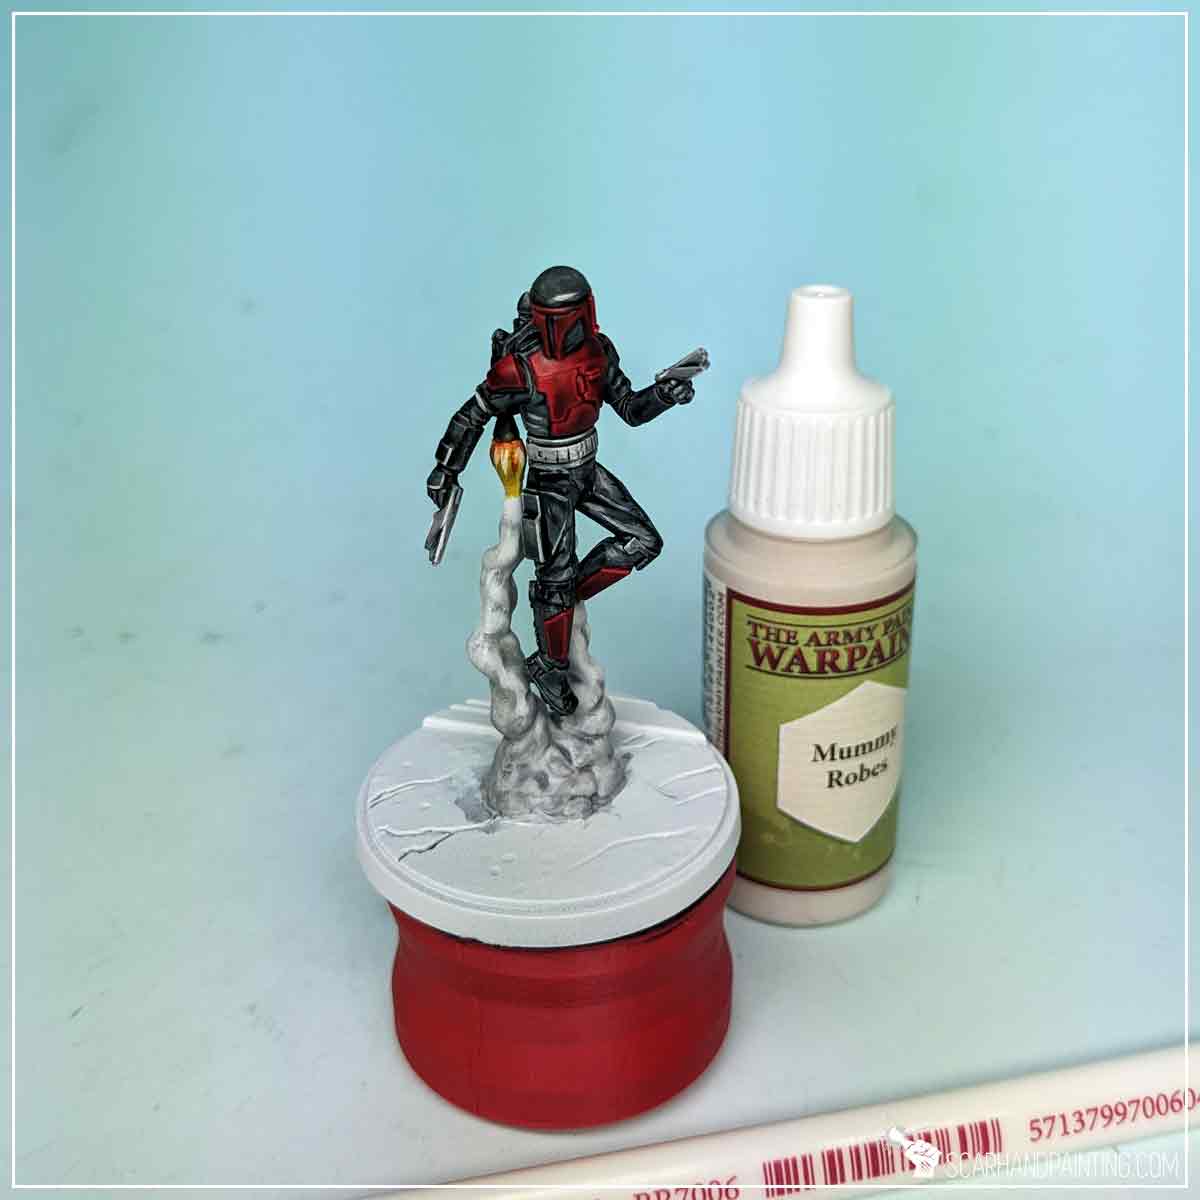
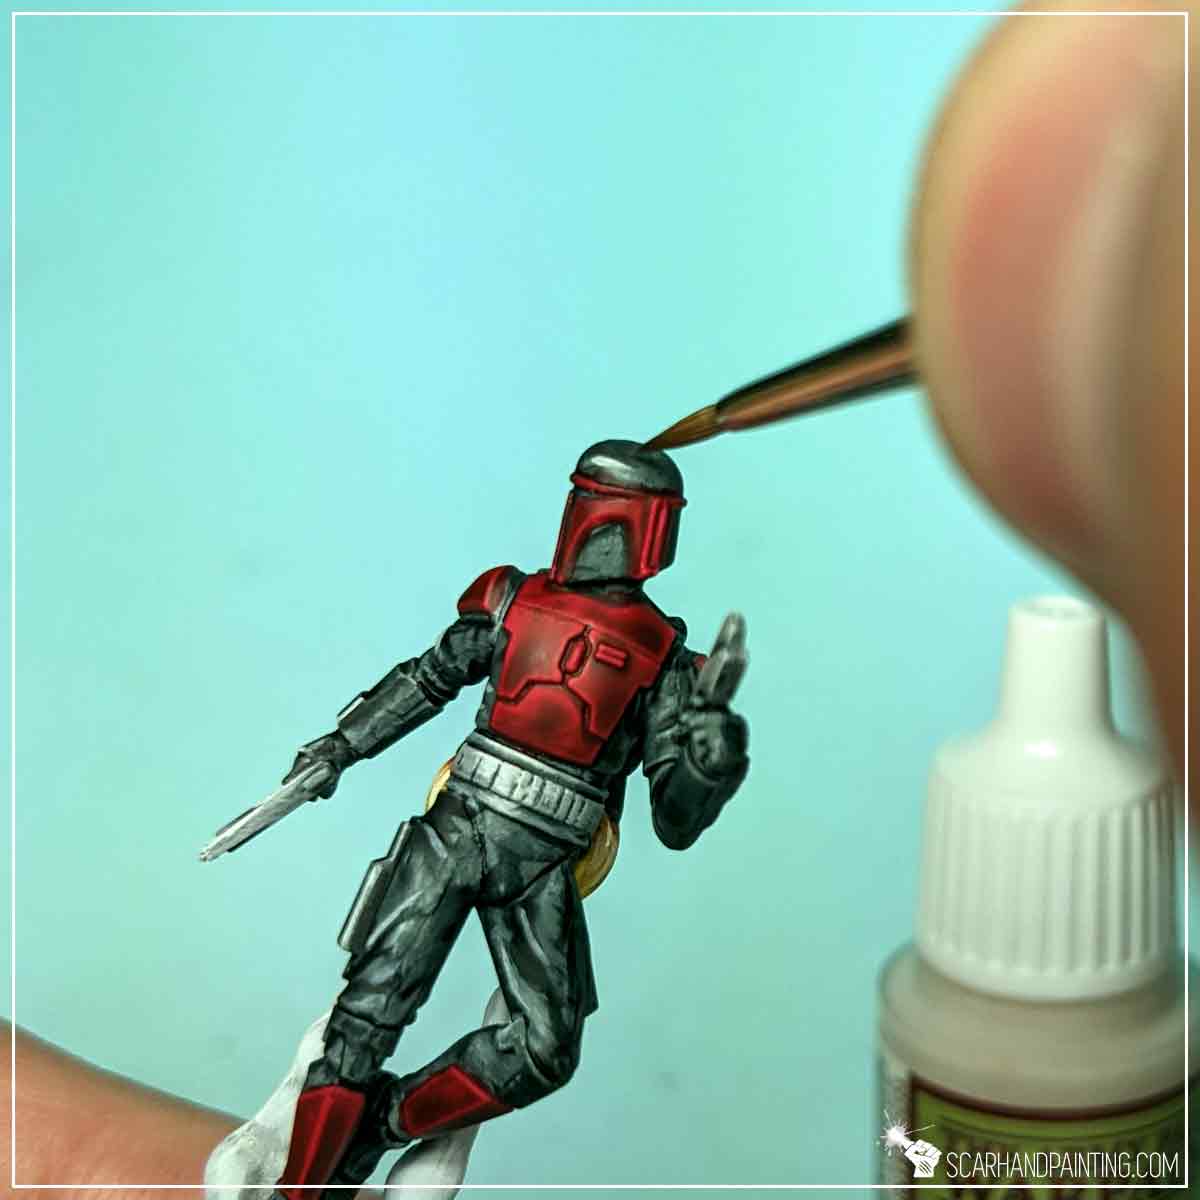
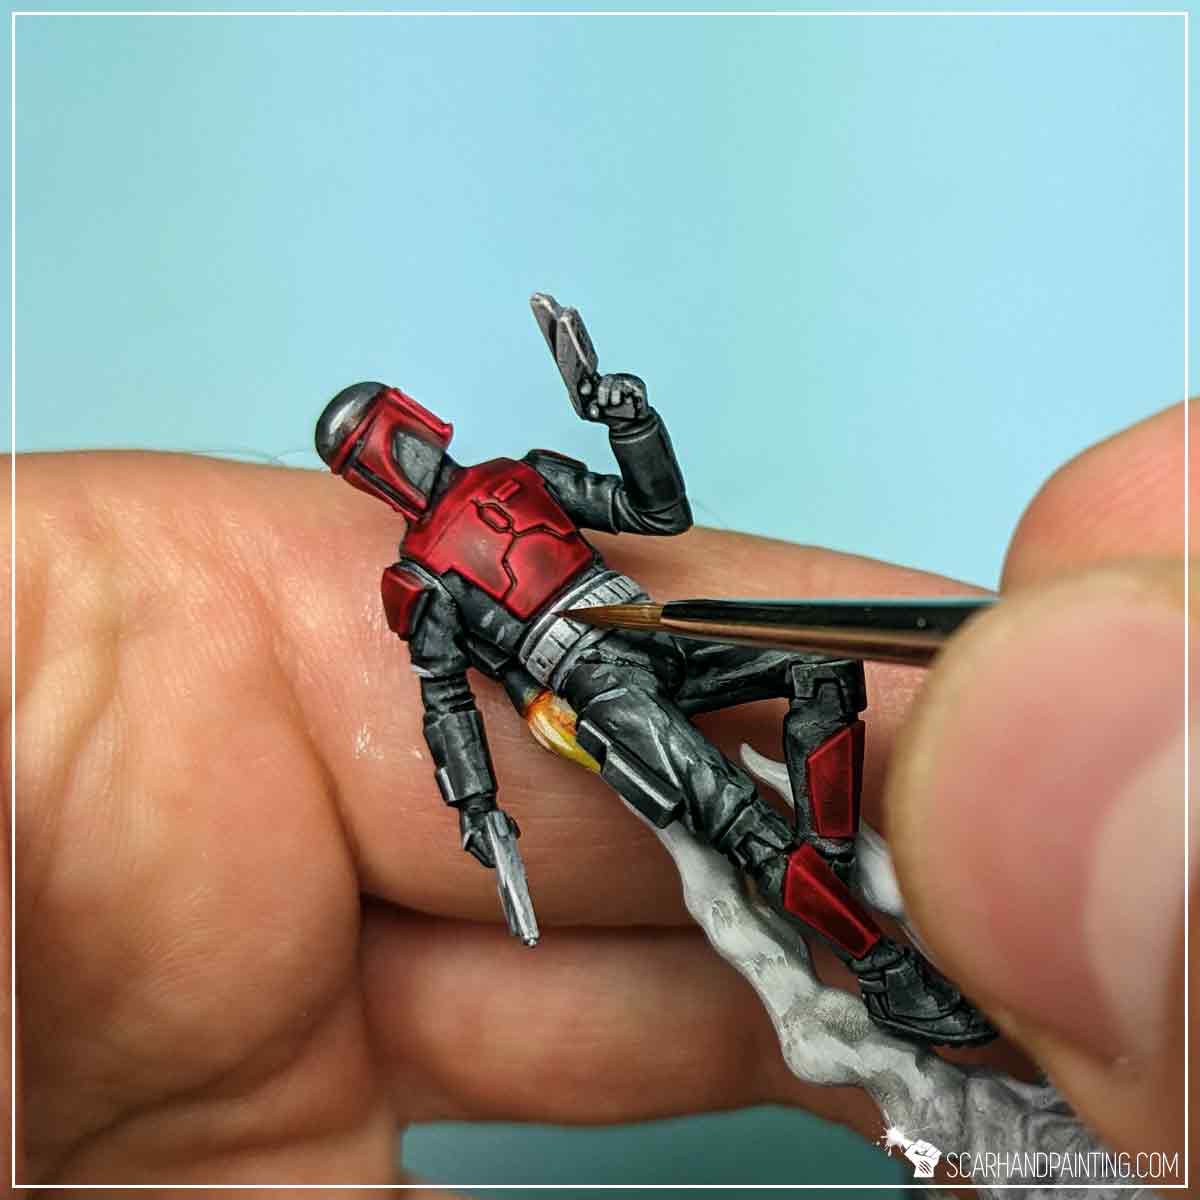
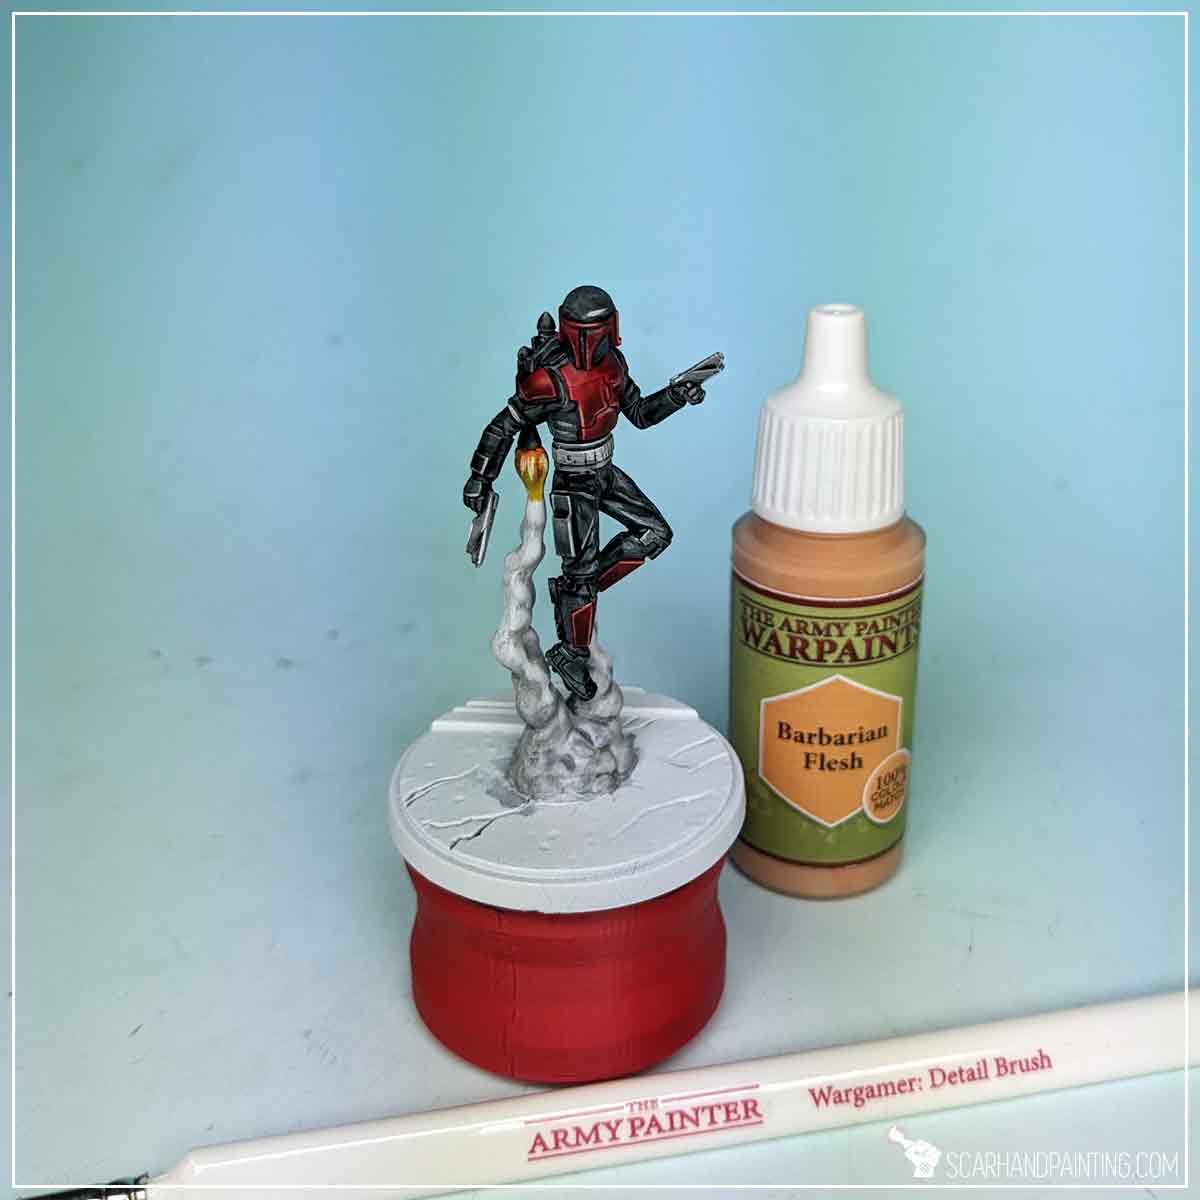
I have switched paint to Barbarian Flesh and repeated the process for Red armor.
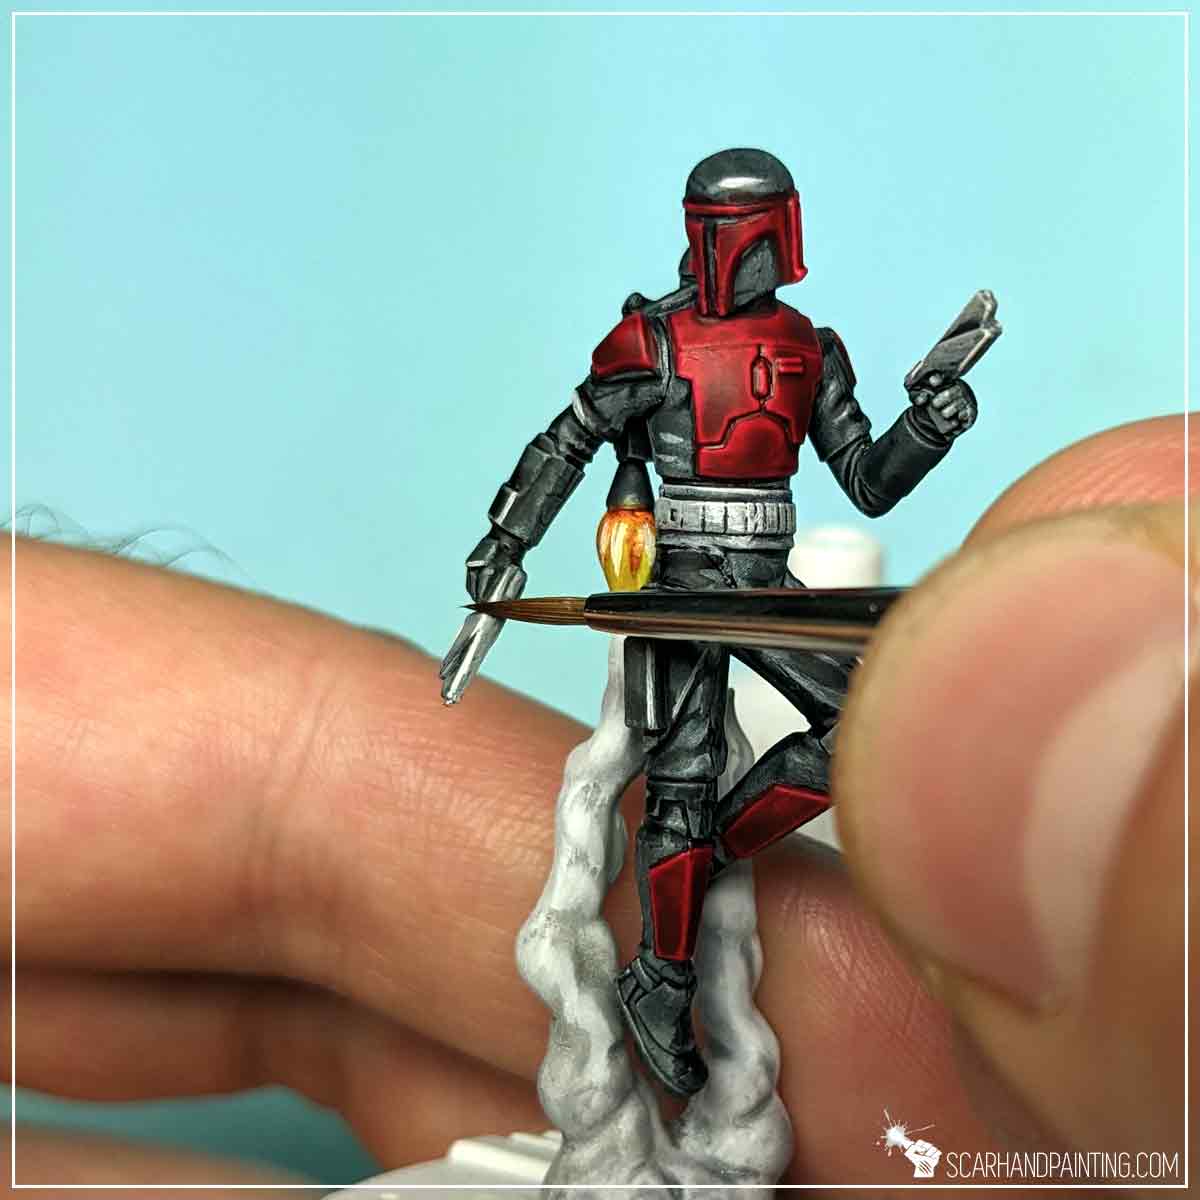
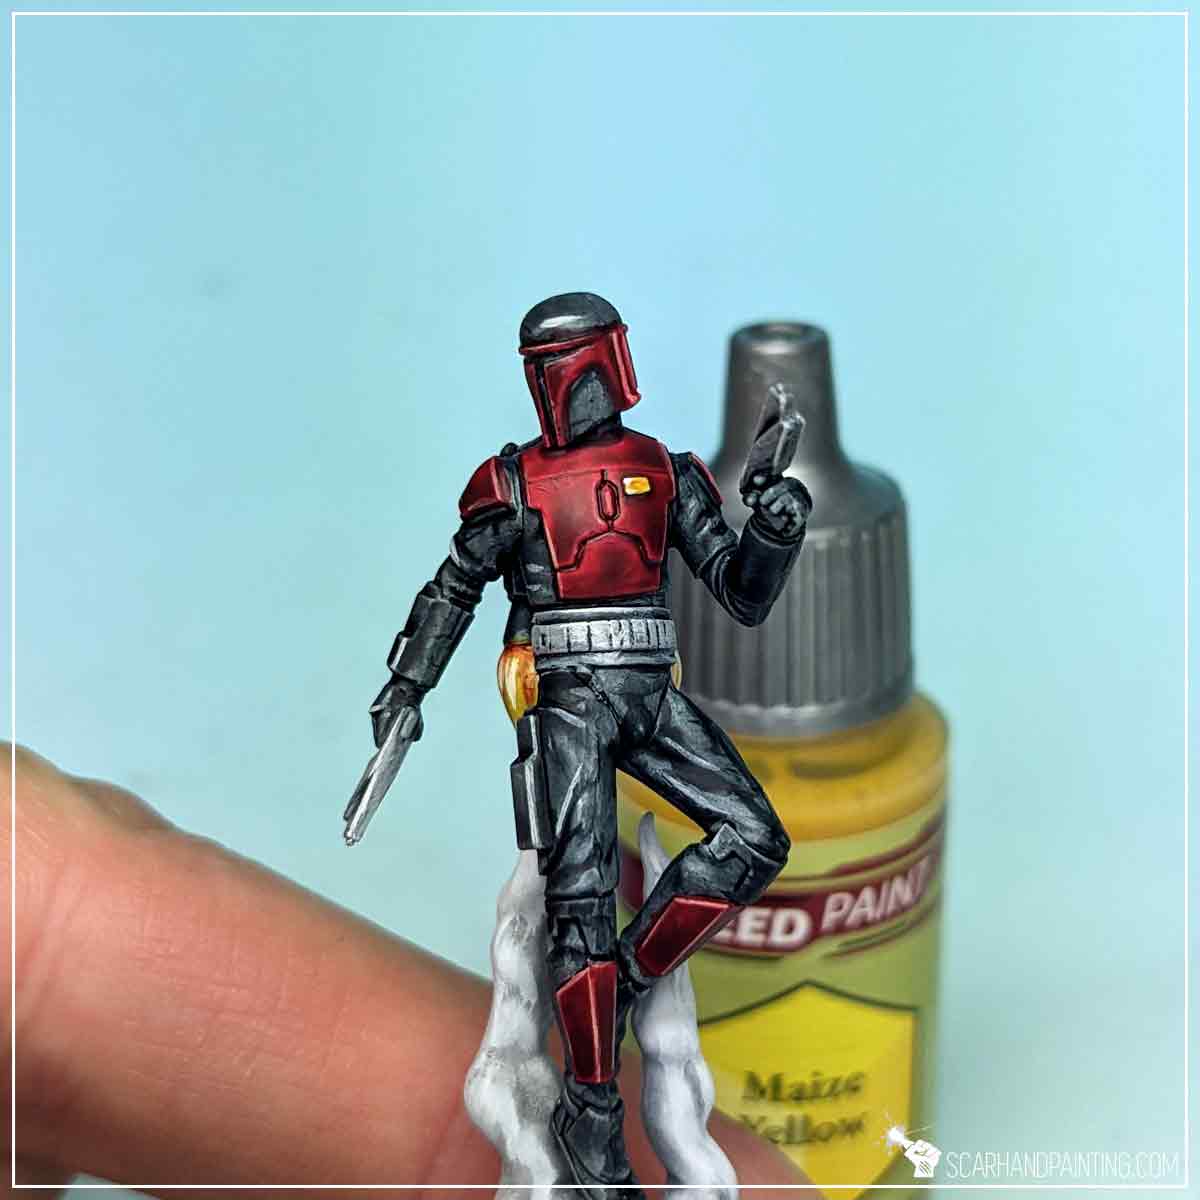
To add a final touch I have painted the chest armor pin Matt White, followed short with Maize Yellow Speed Paint.
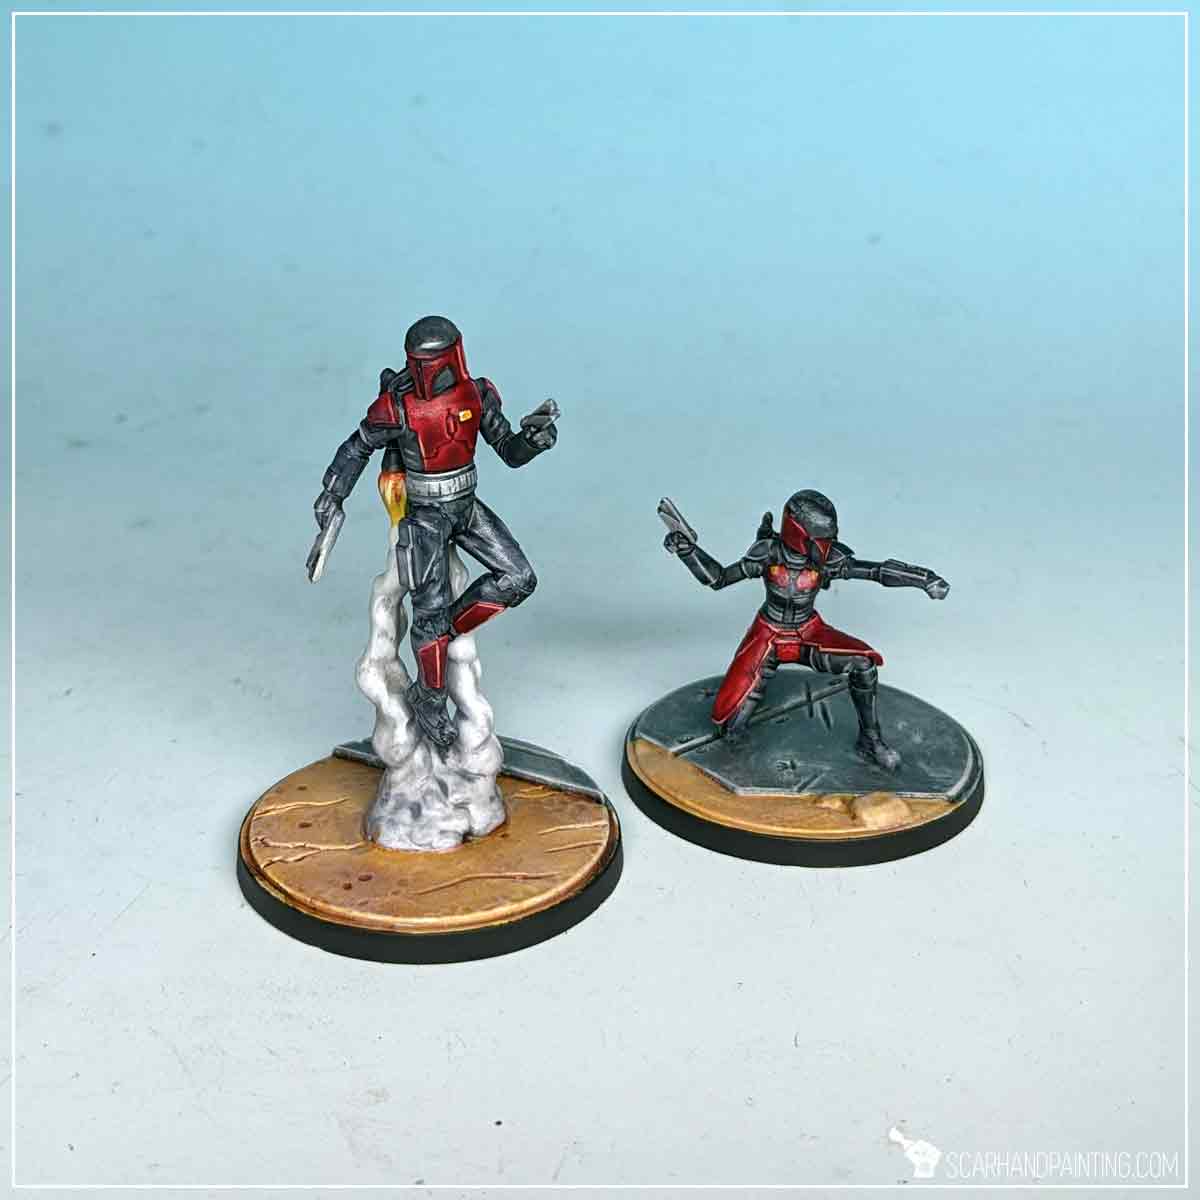
Finally I have painted bases and Varnished both miniatures following steps previously presented in the Tutorial: Painting Star Wars Shatterpoint Clone Troopers article.
I hope you find this tutorial interesting. Be sure to let me know your thoughts in the comments below or via Facebook or Instagram. I would also appreciate it if you considered sharing this content with your friends, who might find it useful. Many thanks to Rebel.pl for sponsoring this content. Stay tuned for more Star Wars: Shatterpoint tutorials.
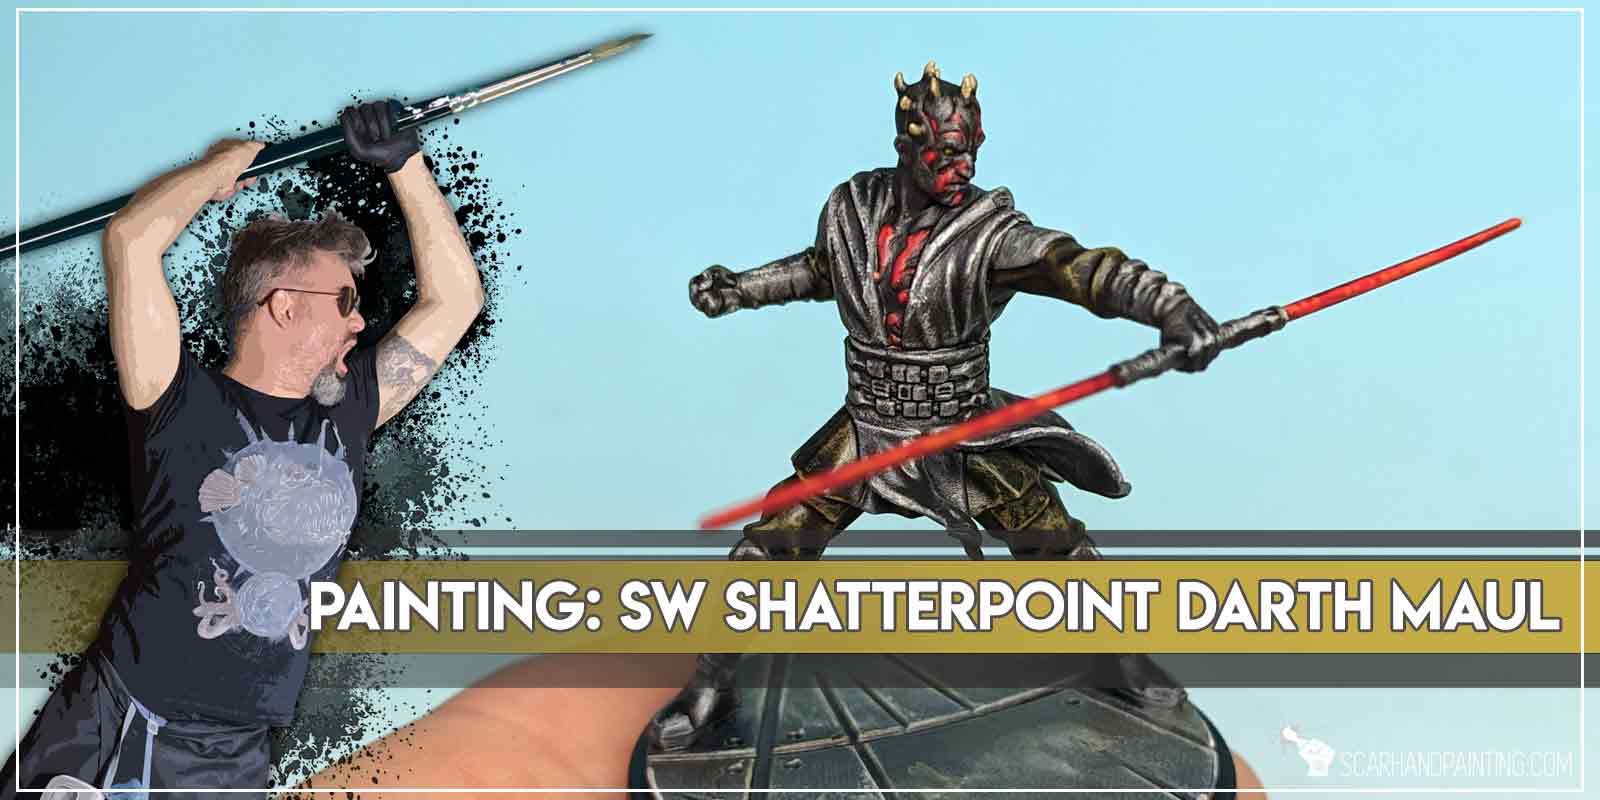
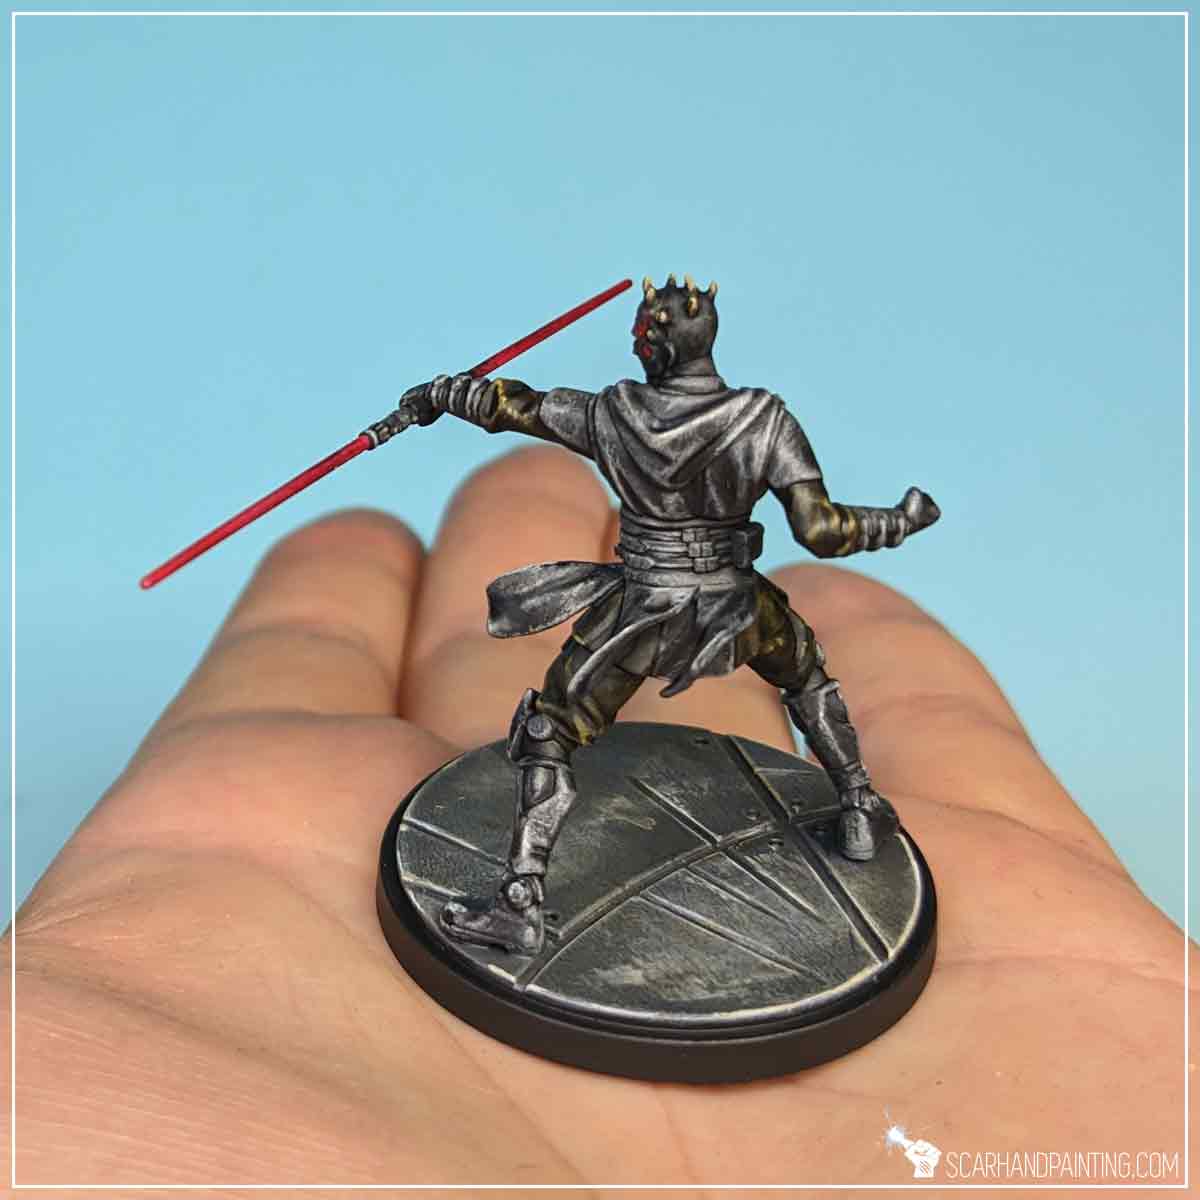
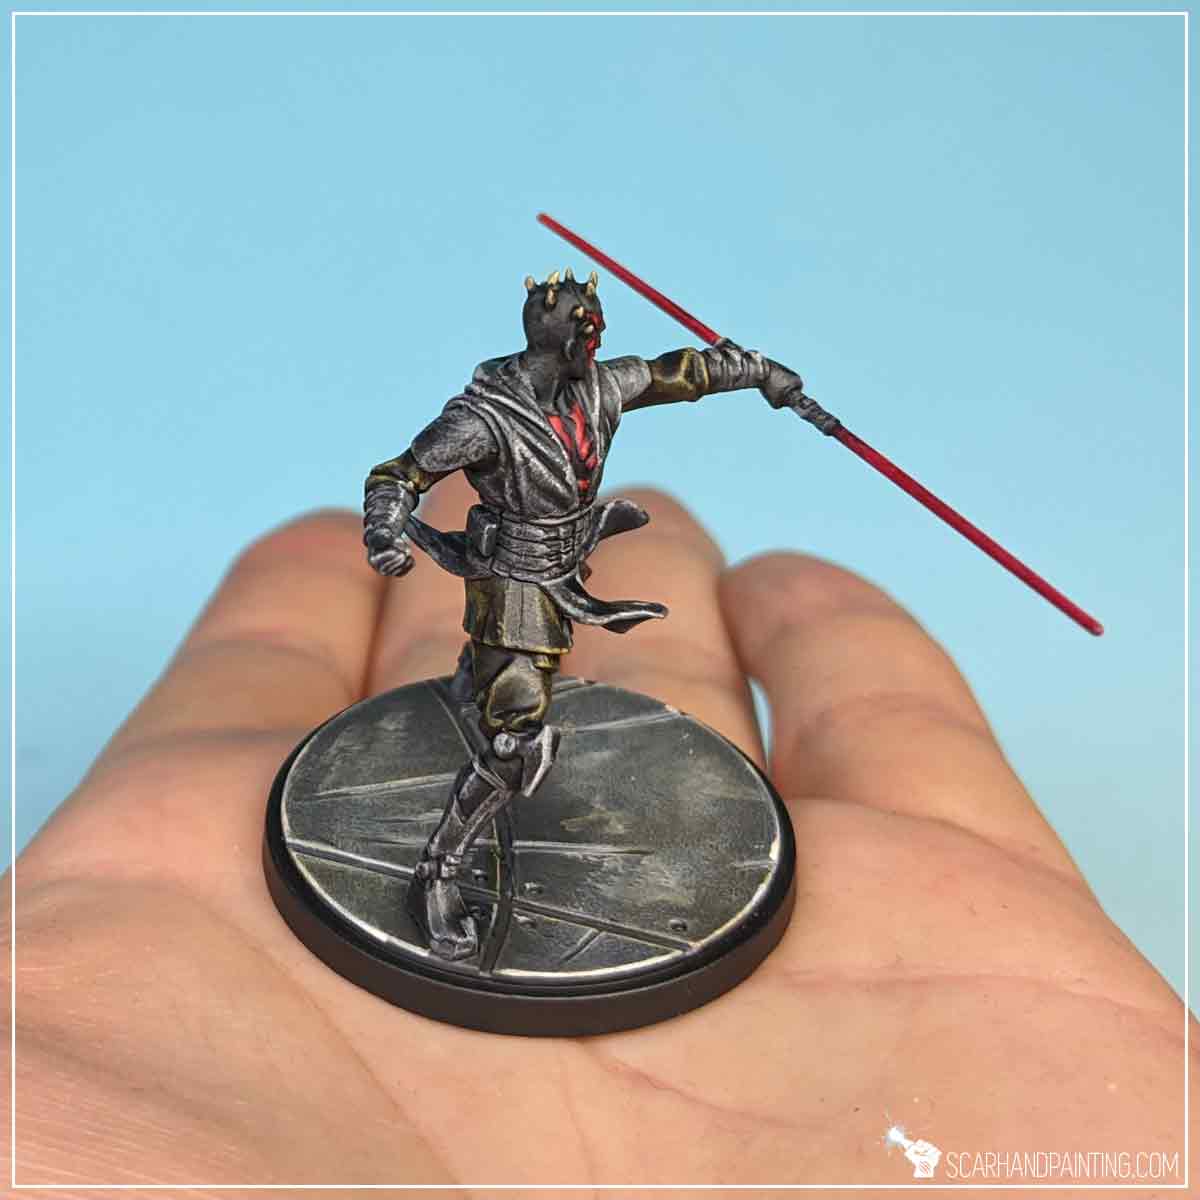
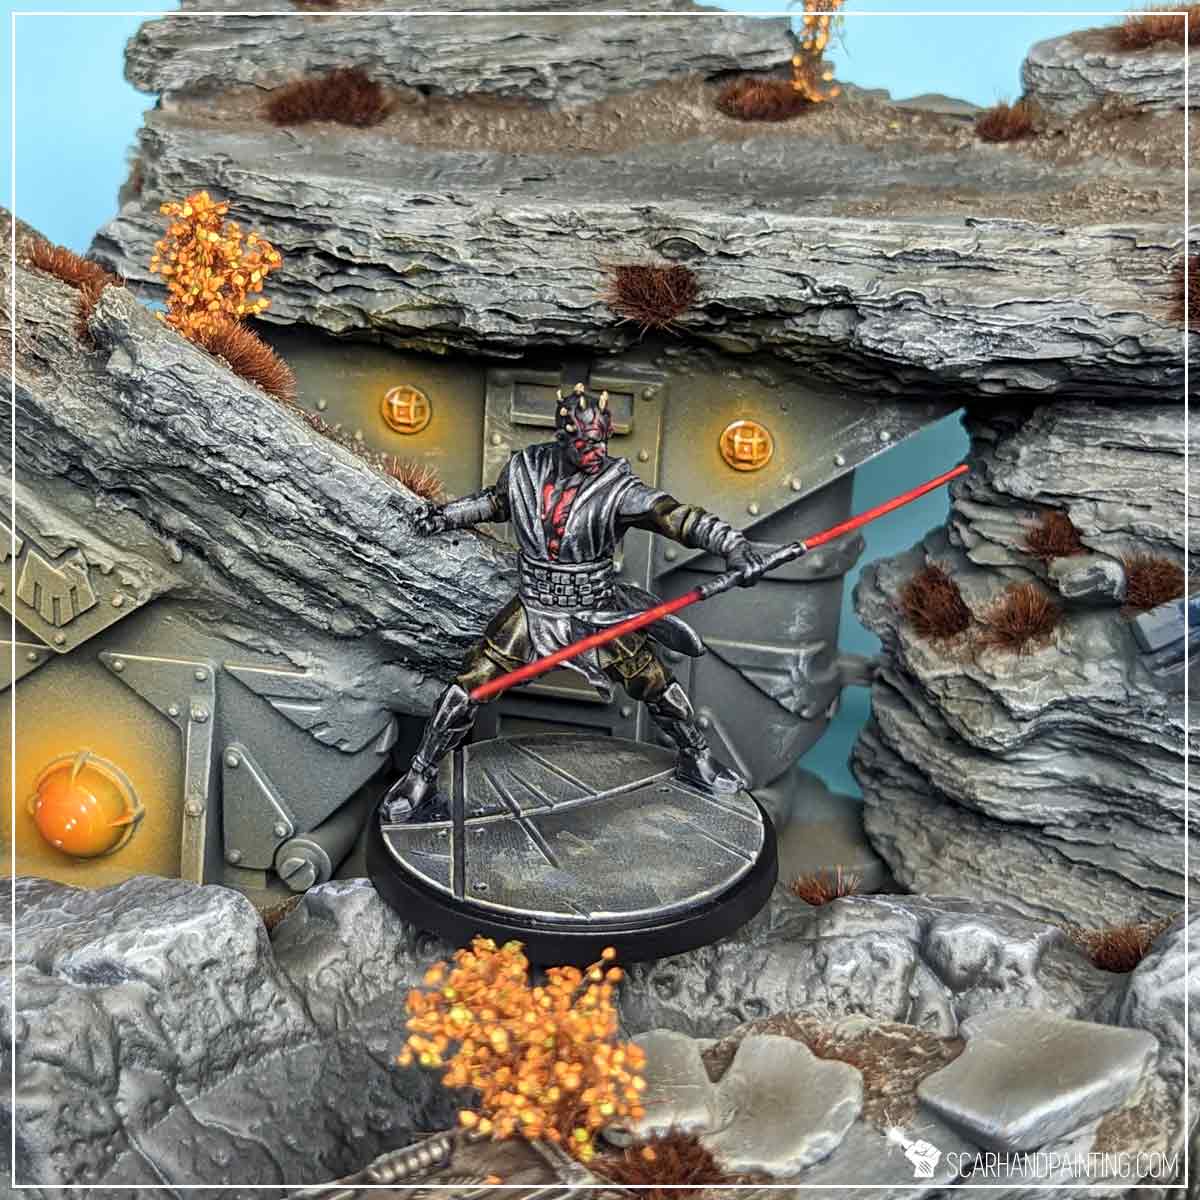
Welcome to Painting Star Wars: Shatterpoint Darth Maul tutorial. Here I will present to you a Step-by-step of a basic painting process for Darth Maul and a few extras to really make the miniature pop.
Before we start, some notes:
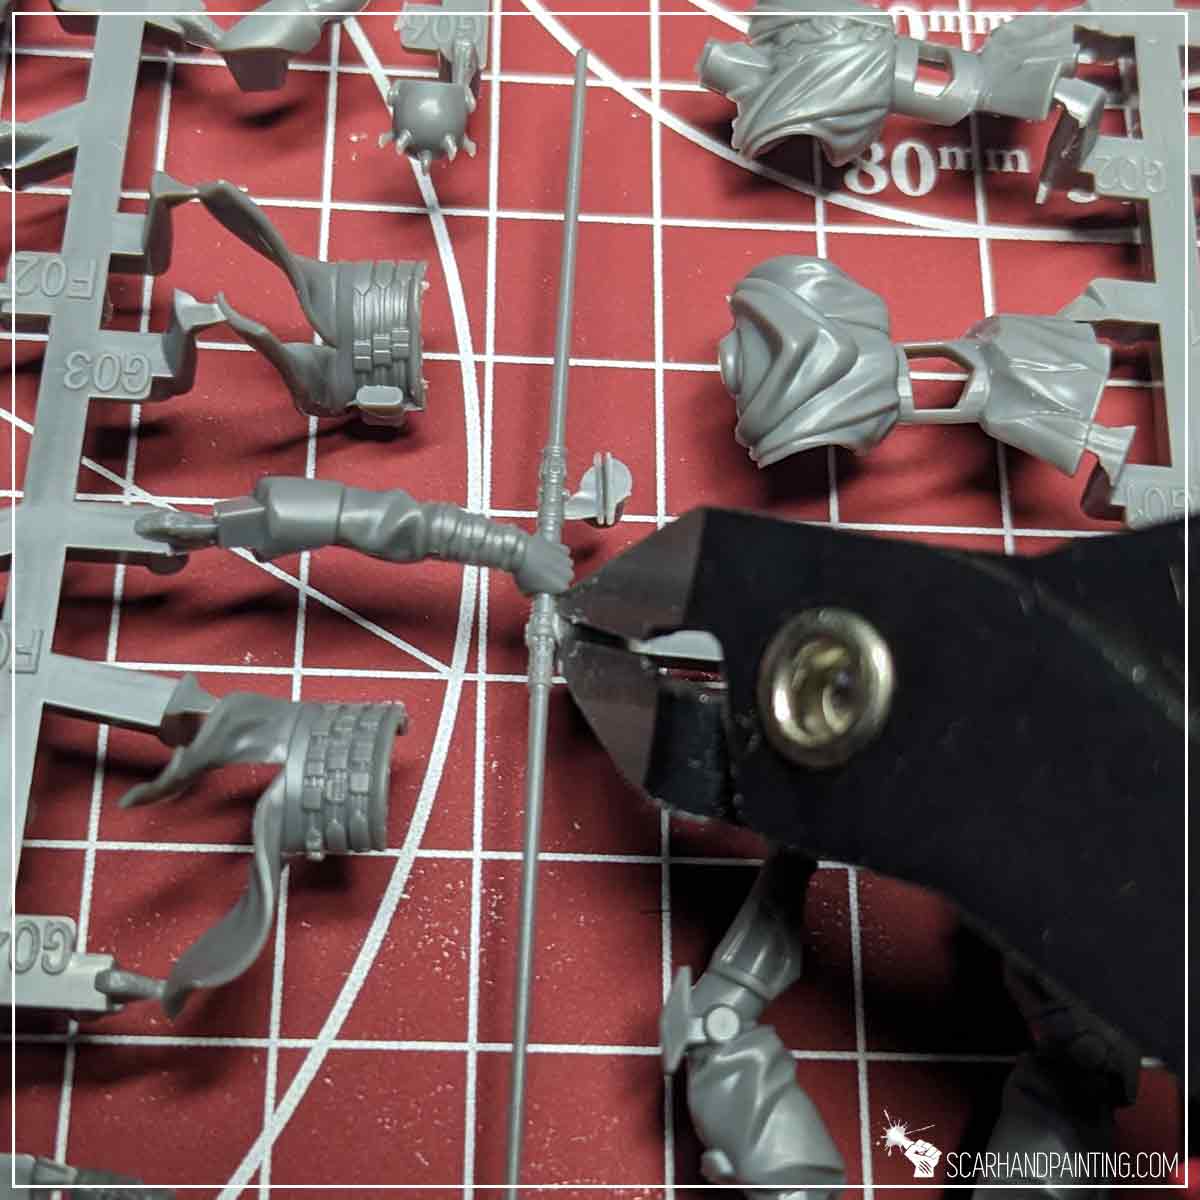
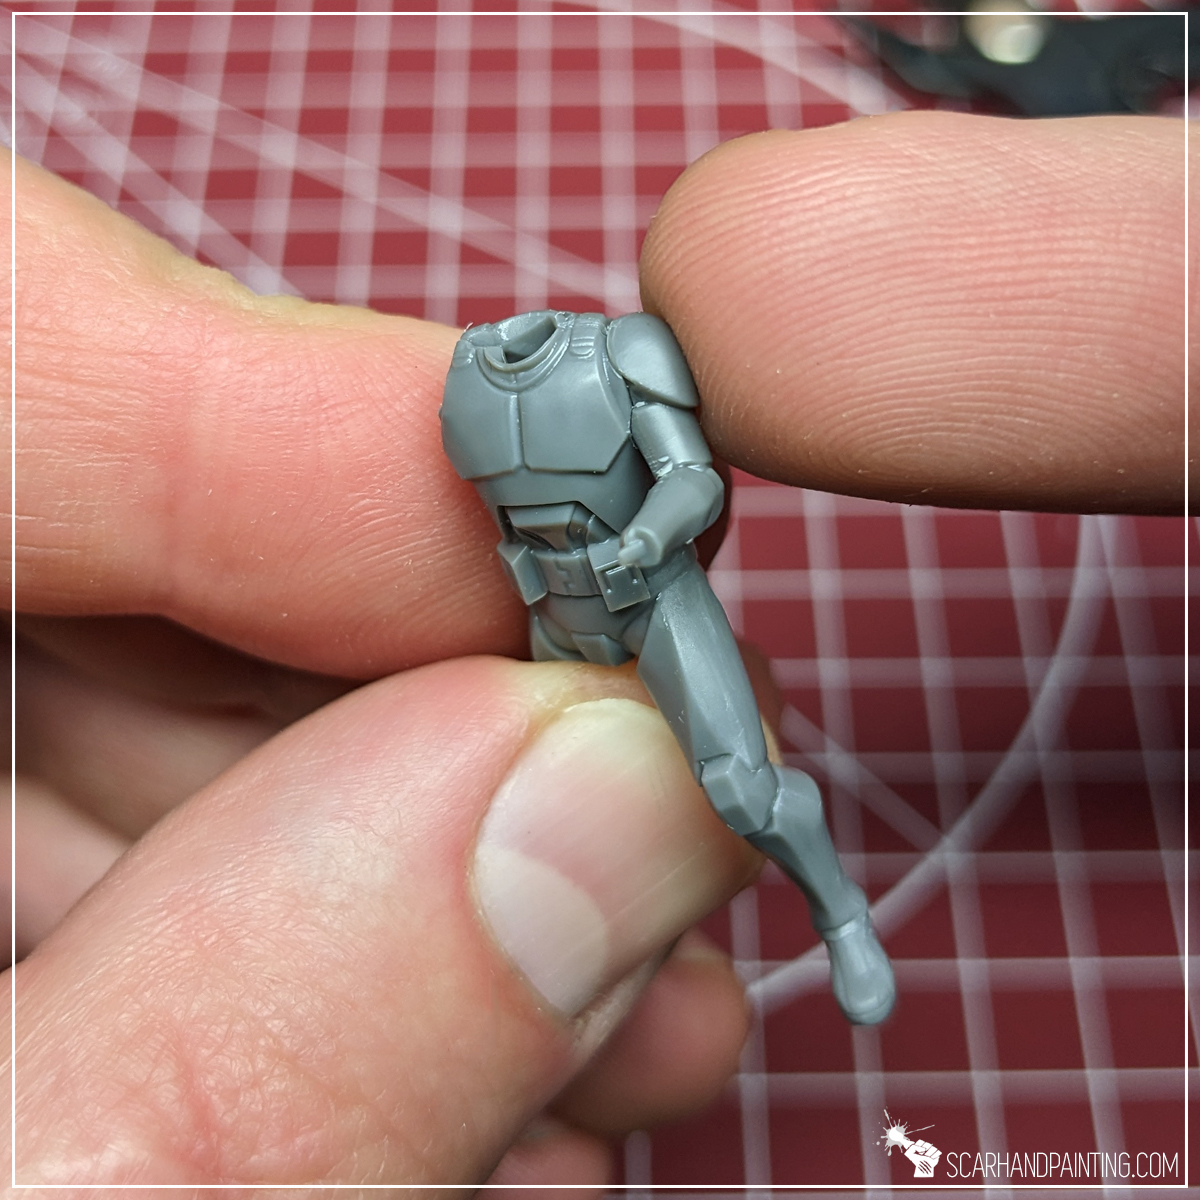
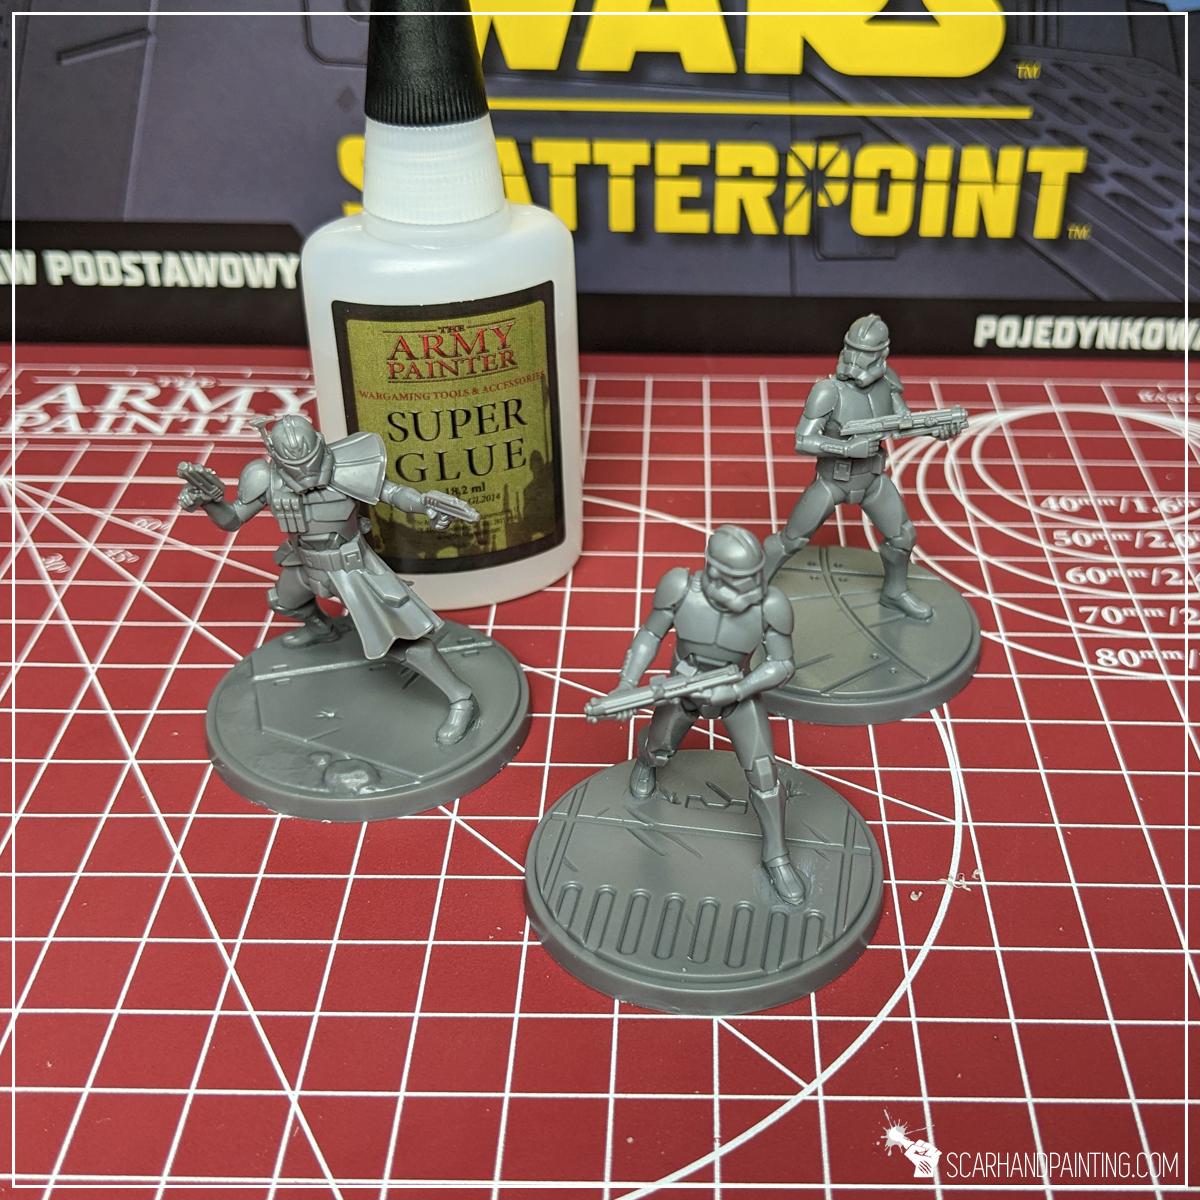
Similar to previous miniatures, I have removed parts of the miniature from the sprues, cleaned them from flash and built using Super Glue. You can visit Tutorial: Painting Star Wars Shatterpoint Clone Troopers article for a detailed tutorial on the topic.
TIP: Lightsabers in Star Wars: Shatterpoint are pretty delicate. To avoid bending or even breaking them, I suggest supporting their length with fingers while scrubbing off the flash line. This way the strength of the blade will be transferred onto the finger underneath the part, rather than influence the fragile part itself.

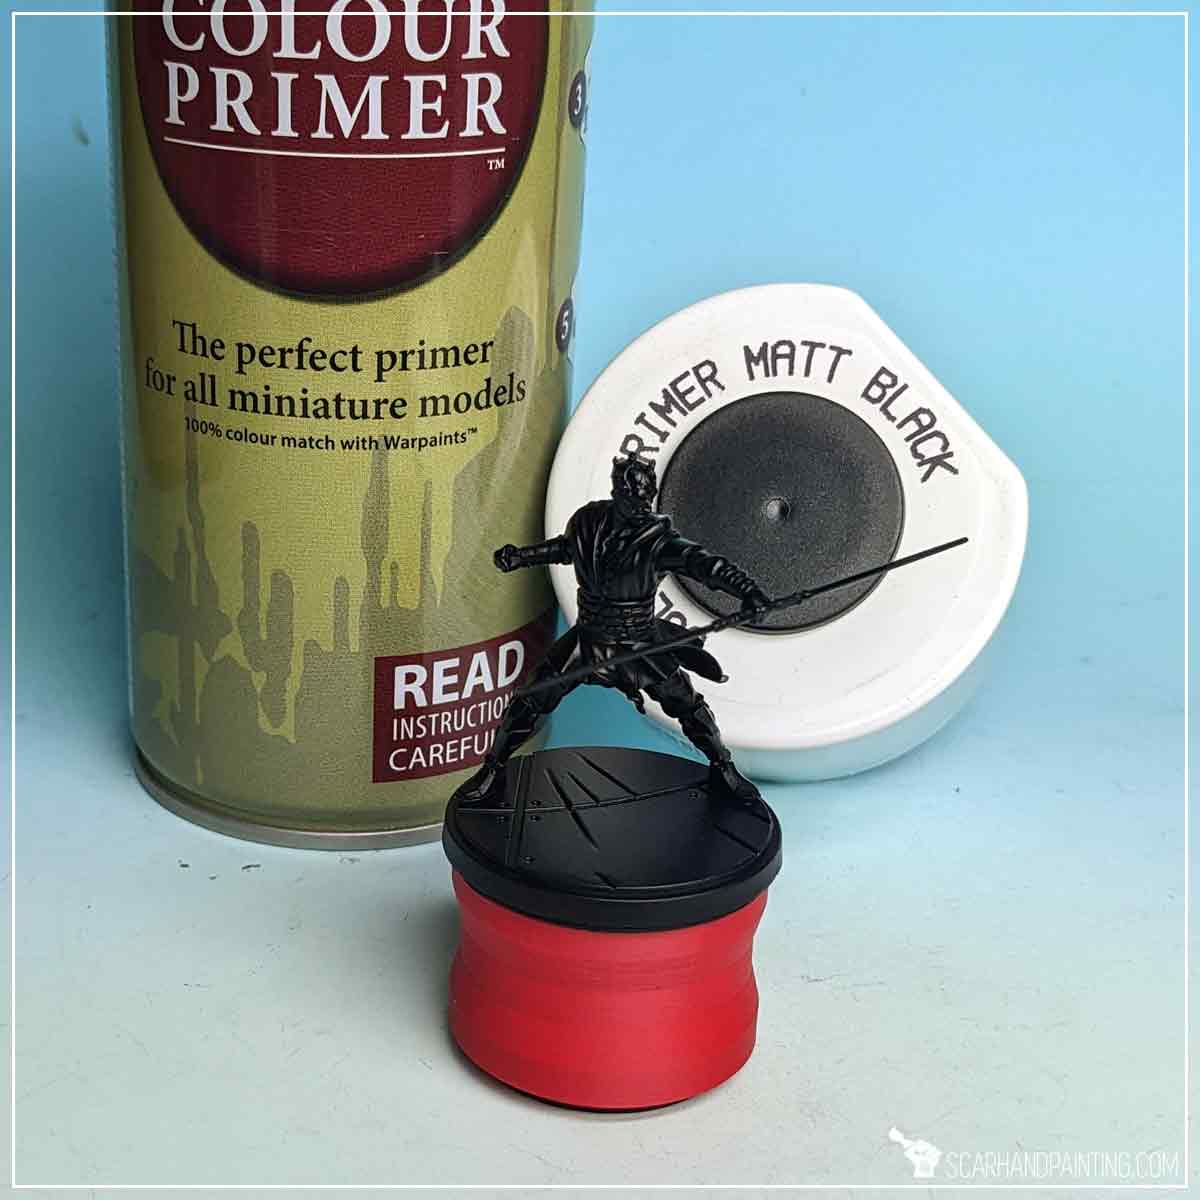
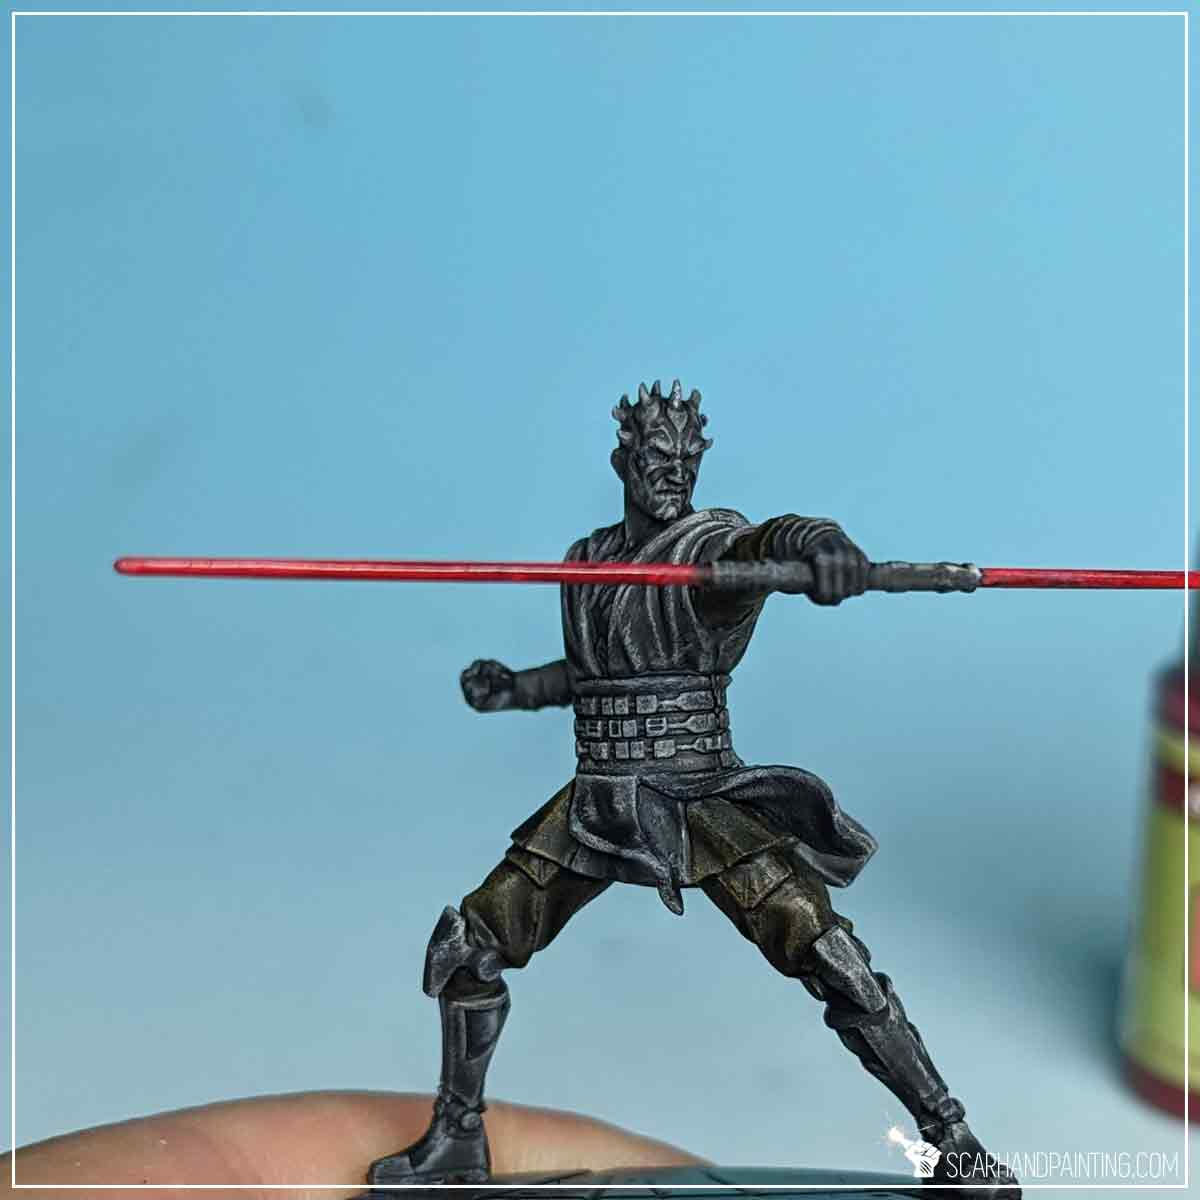
I mounted the miniature on a stick with a piece of Blu-Tack, then undercoated it with The Army Painter Black Matt Primer. This is the first time we will be using black primer in this series of articles and you will see the difference in both the methodology and the behavior of the paints used for this tutorial.
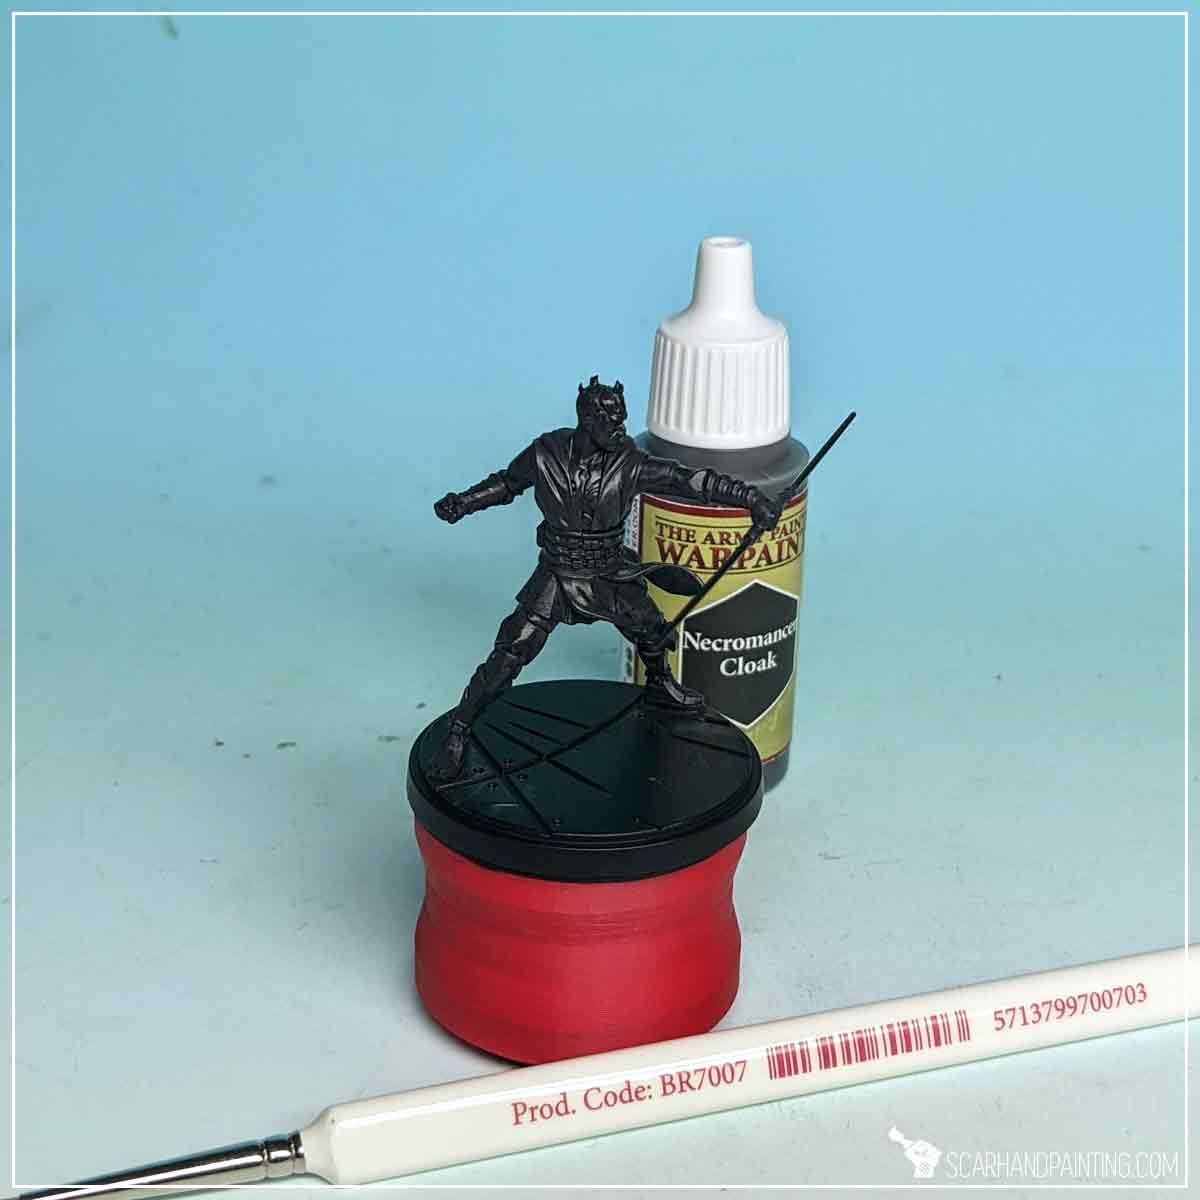
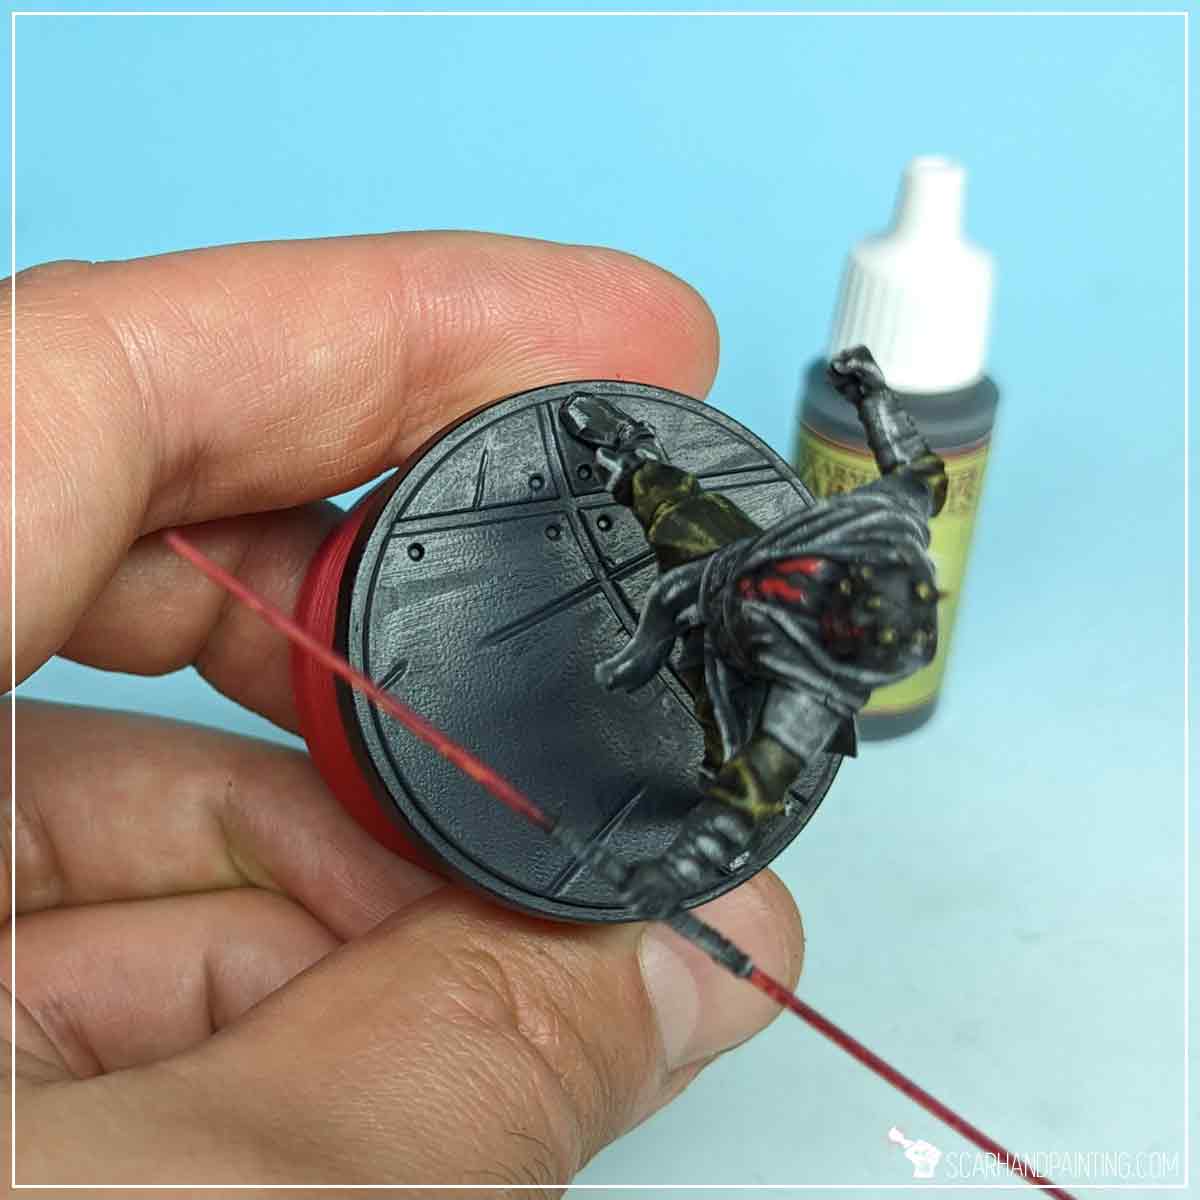
Darth Maul is a character and the miniature has a really menacing feel to it. With that in mind I have decided to go with a limited palette of colors and a technique that will bring out details across the entire miniature. I started by applying a layer of Necromancer Cloak across the entire miniature. I used the Wargamer: Regiment Brush for this and focused on applying the paint evenly. Due to how The Army Painter undercoats work (plastic-like, solid layer) and the pigmentation of Necromancer Cloak, the final effect might not look smooth, but I especially chose a technique that accounts for this kind of behavior.
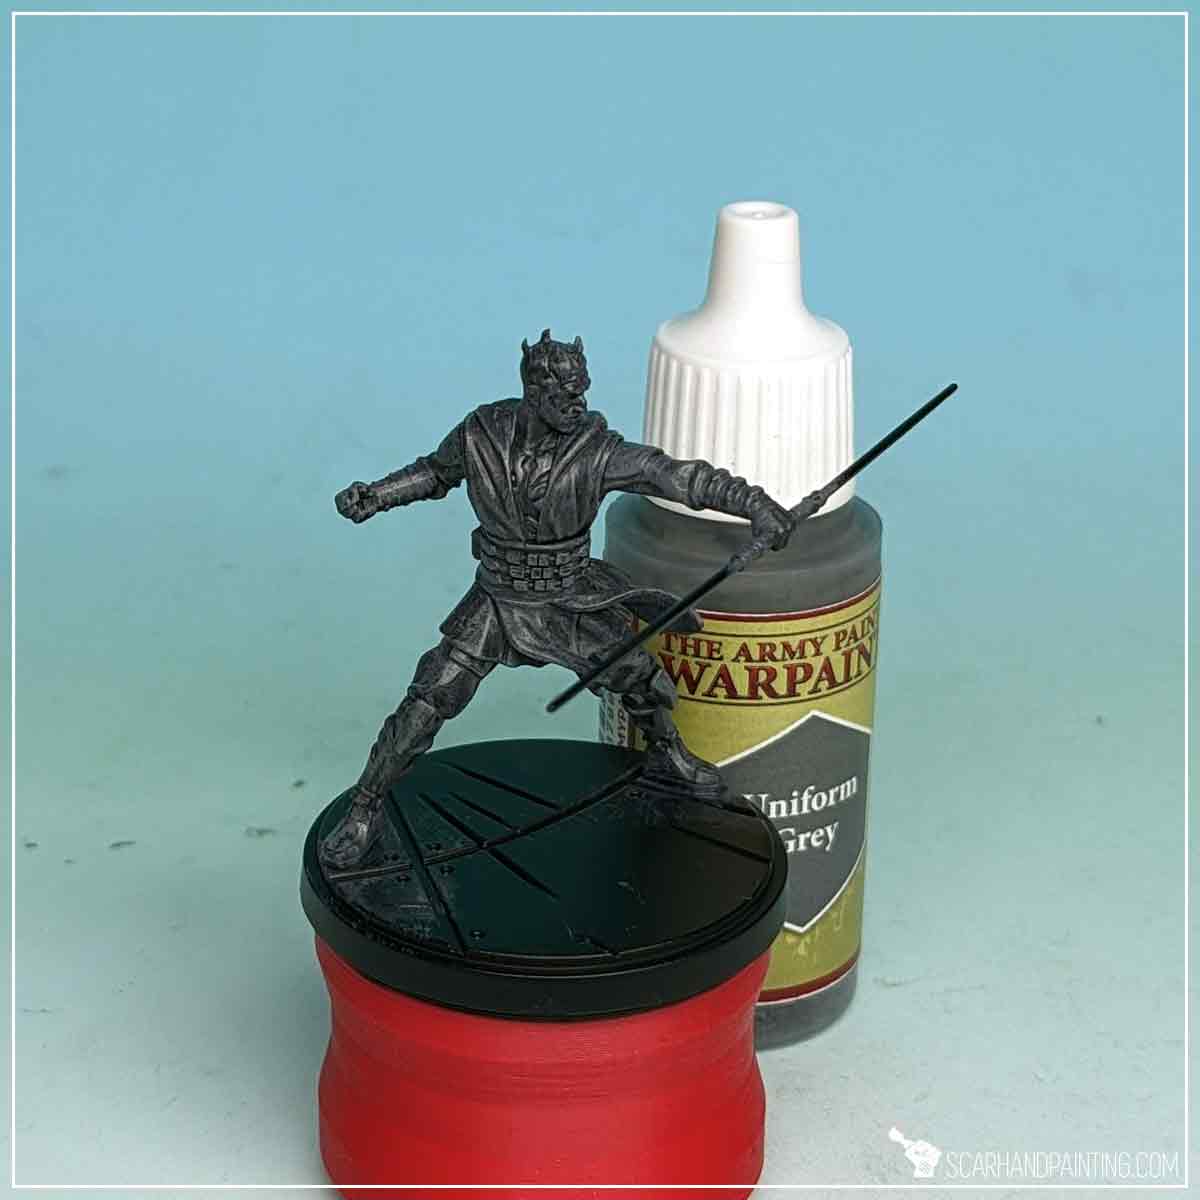
Next, using the same brush, I overbrushed Uniform Grey across the entire miniature.
TIP: Flatbrushing is done by putting the tip of a brush in paint, then brushing the excess paint off onto a piece of paper or other smooth surface material, then brushing the remainder of the paint onto the chosen surface, in one direction and perpendicular to any edges. This technique works best with brushes equipped with a long “head” or synthetic brushes with a long “belly” part. You can learn more about the technique HERE.

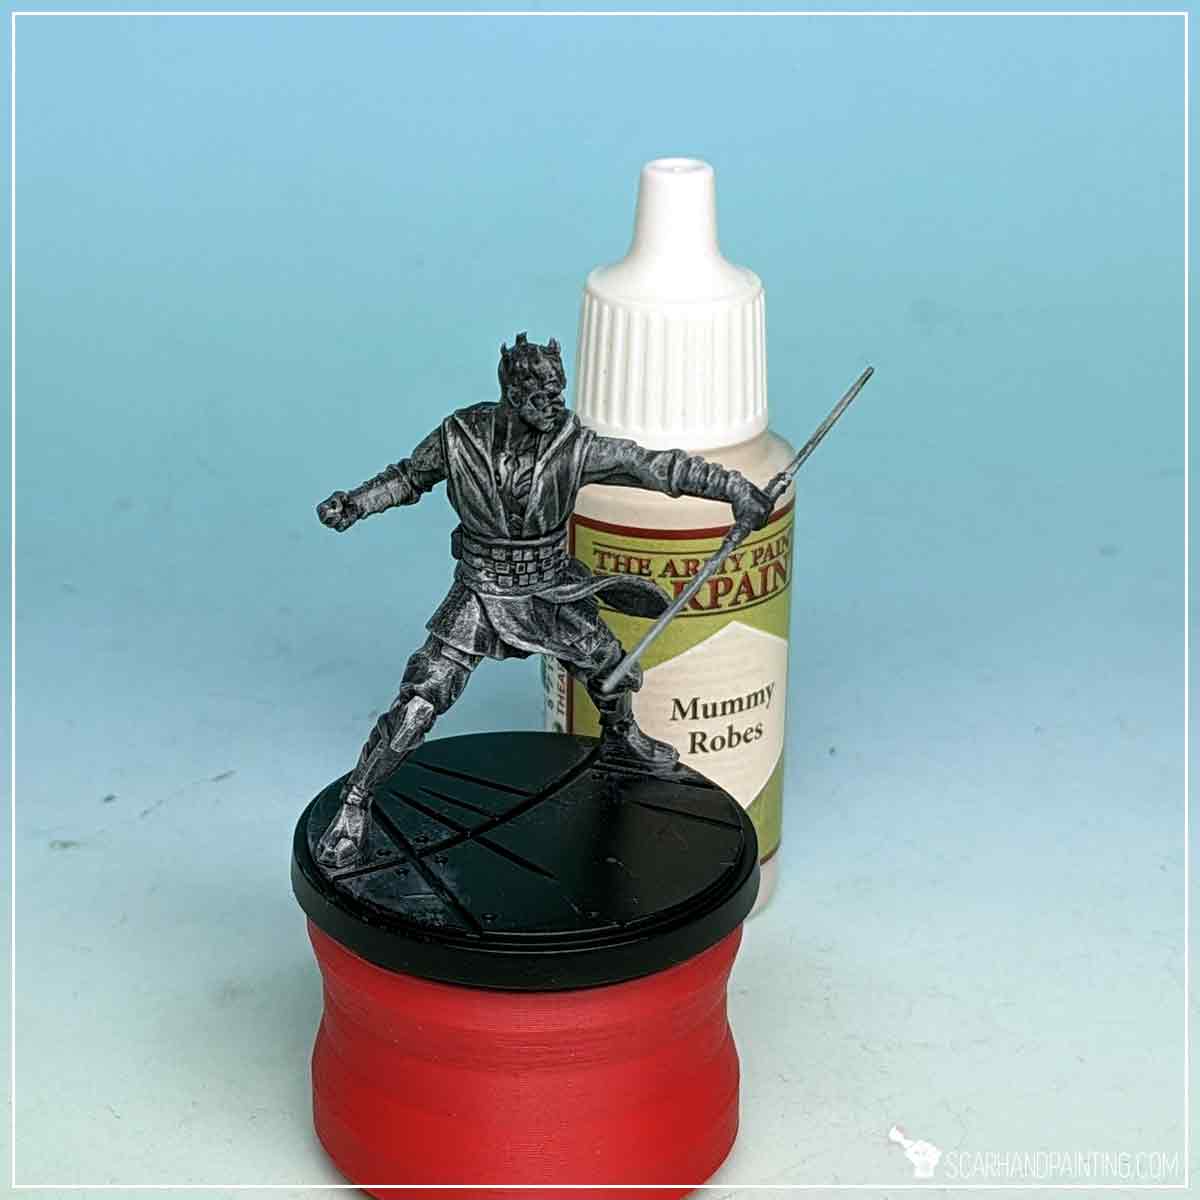
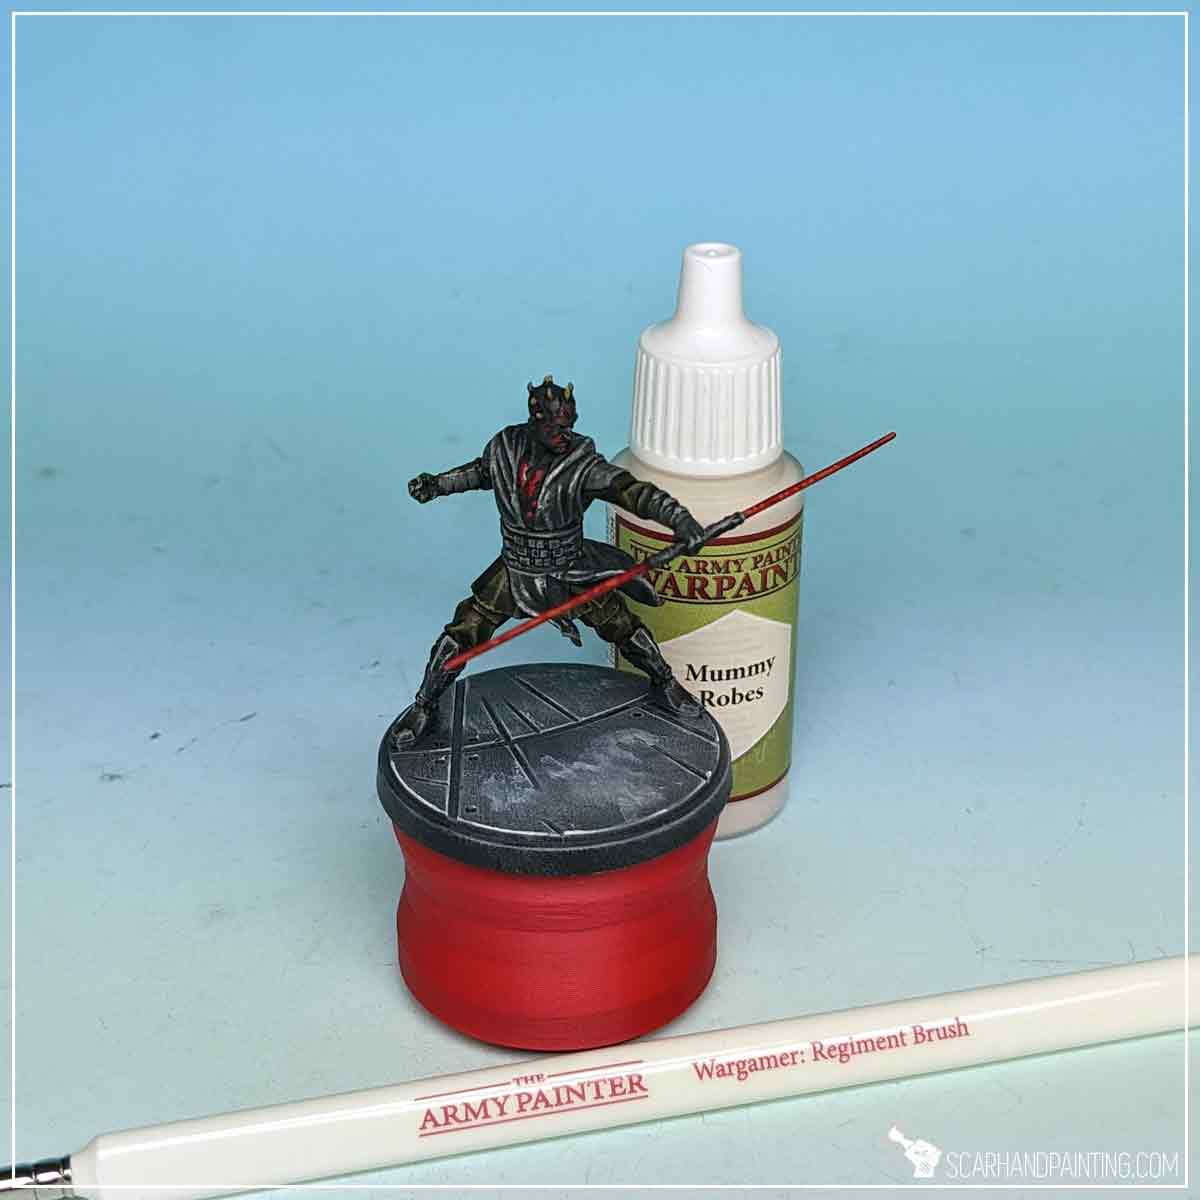
I then applied Mummy Robes with a mix of Flatbrush and regular highlights. This final step provided texture that will benefit the paint job later into the process.
TIP: I recommend painting two strong lines of Mummy Robes across the Lightsaber’s blades. This can be easily done with the edge of the tip of the brush and will create a nice, strong base for future vibrant red.
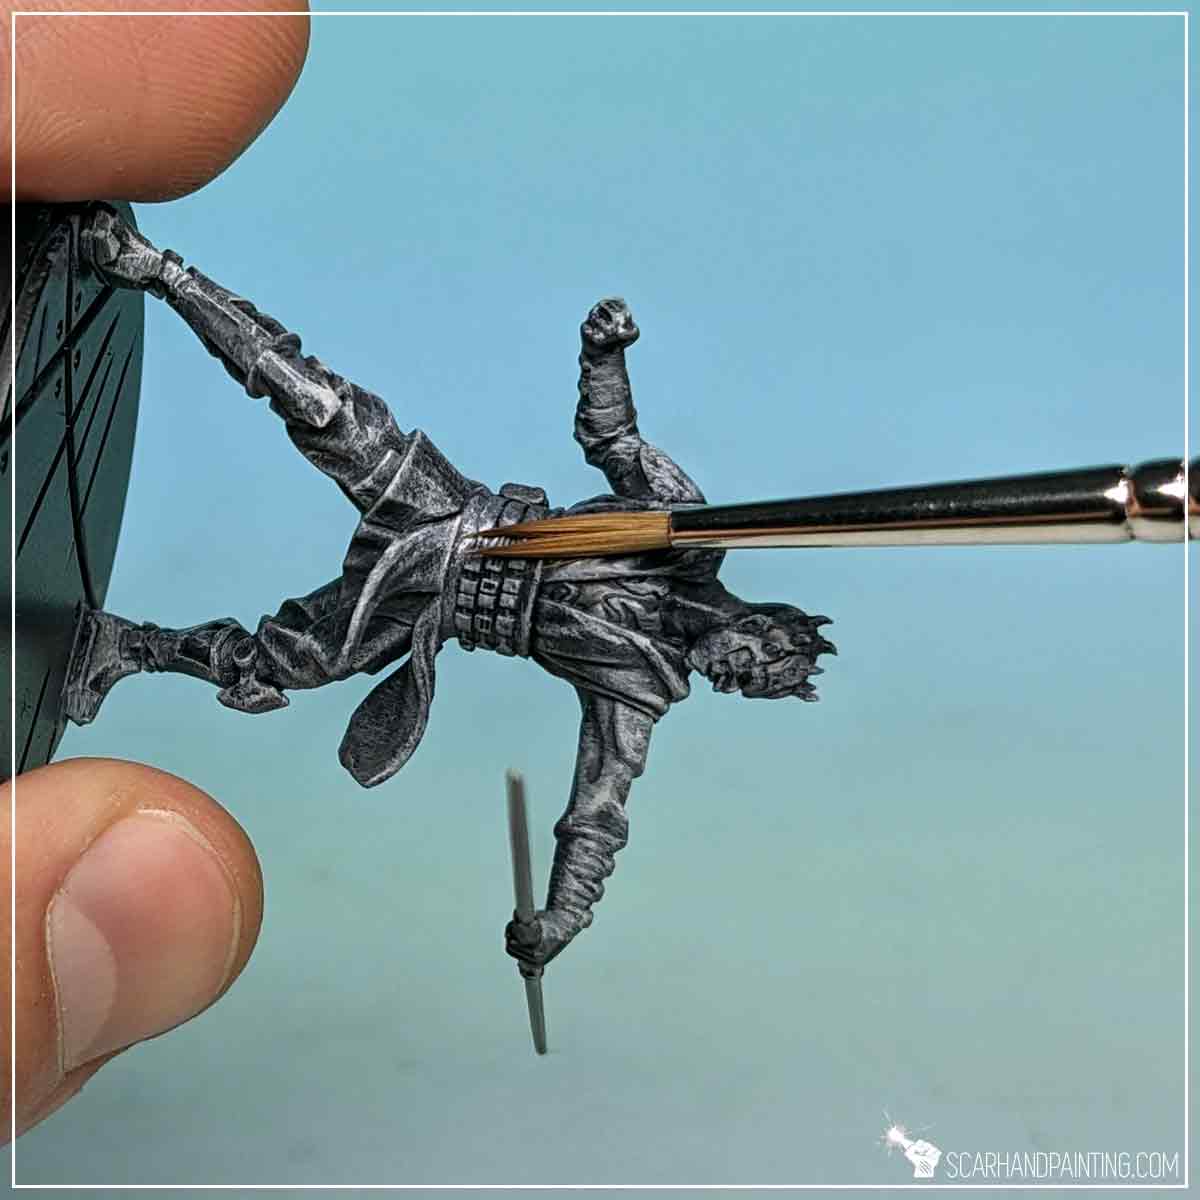
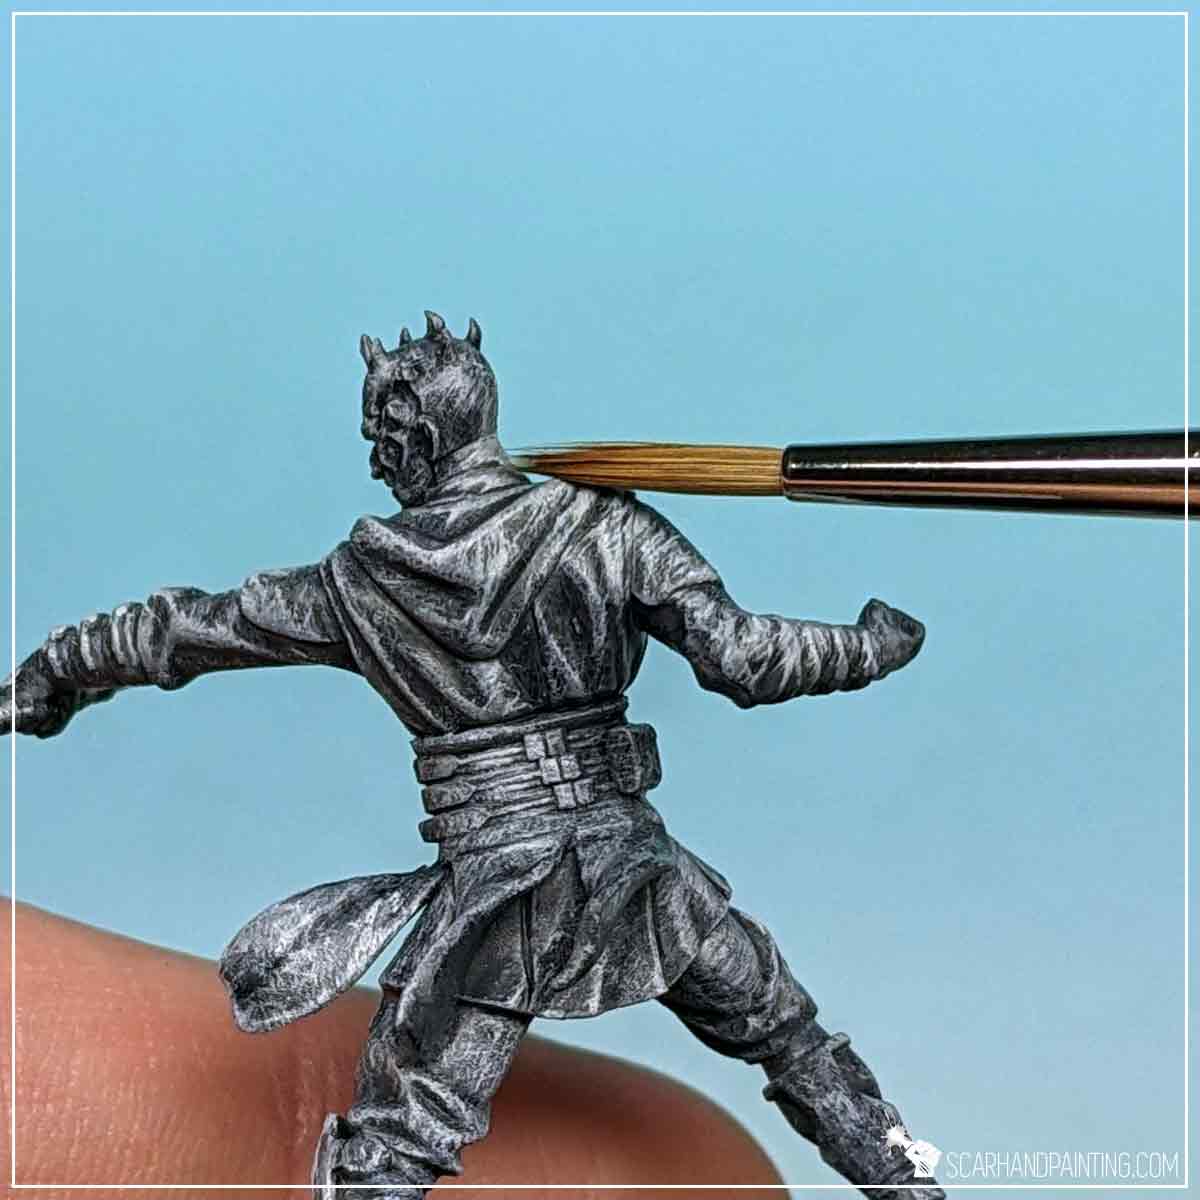

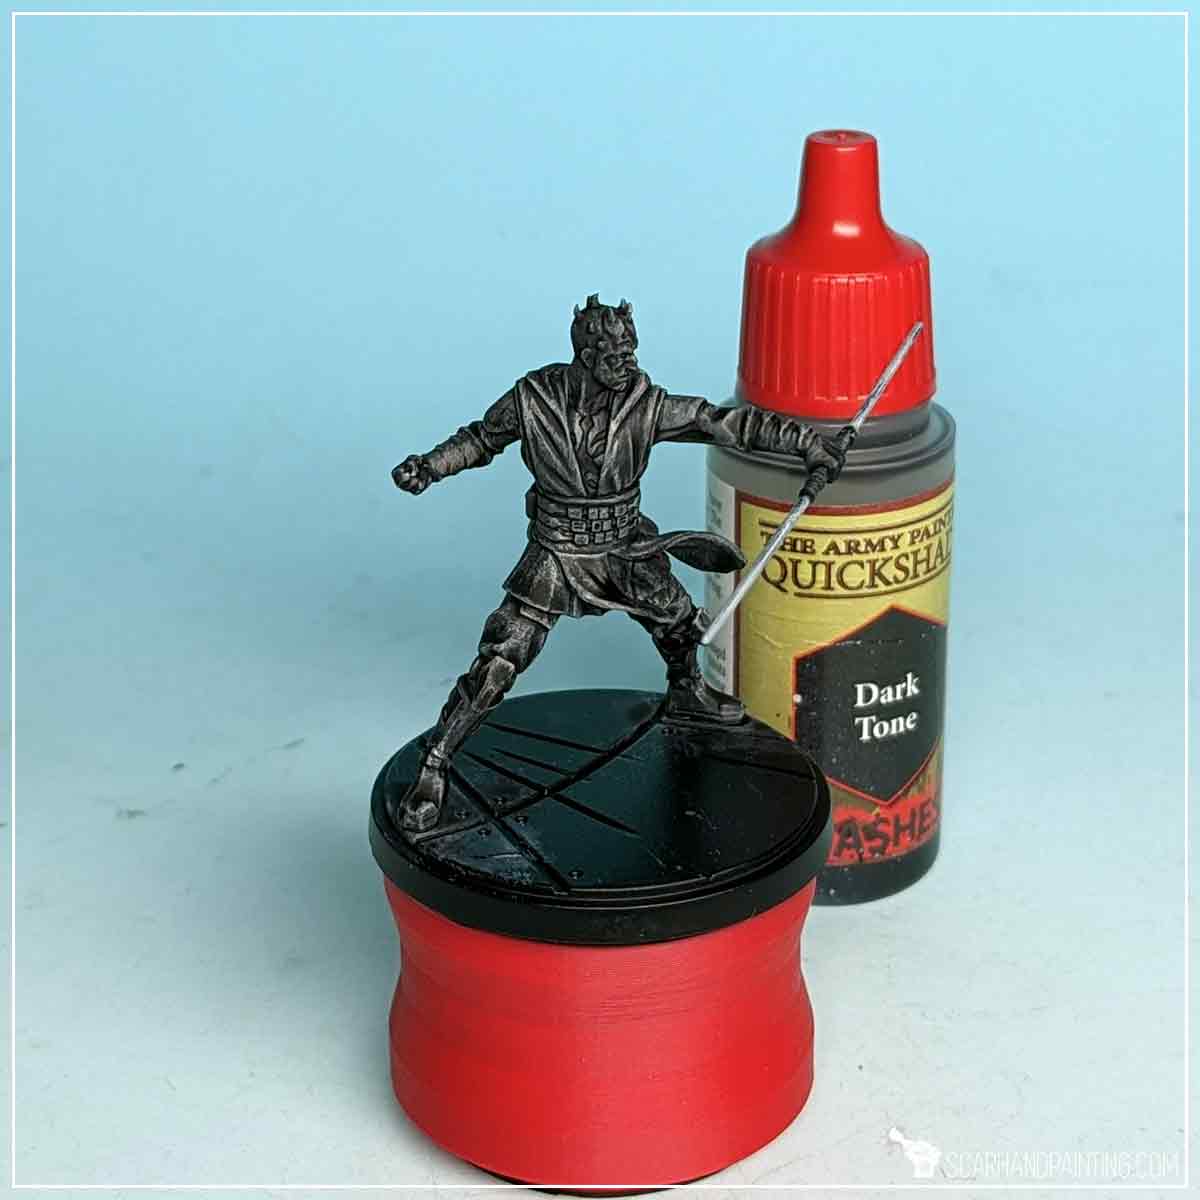
Finally I covered the entire miniature, except Lightsaber’s blades, with a strong layer of Dark Tone wash. Pigmentation from this paint darkened all recesses, but also toned down previous layers.
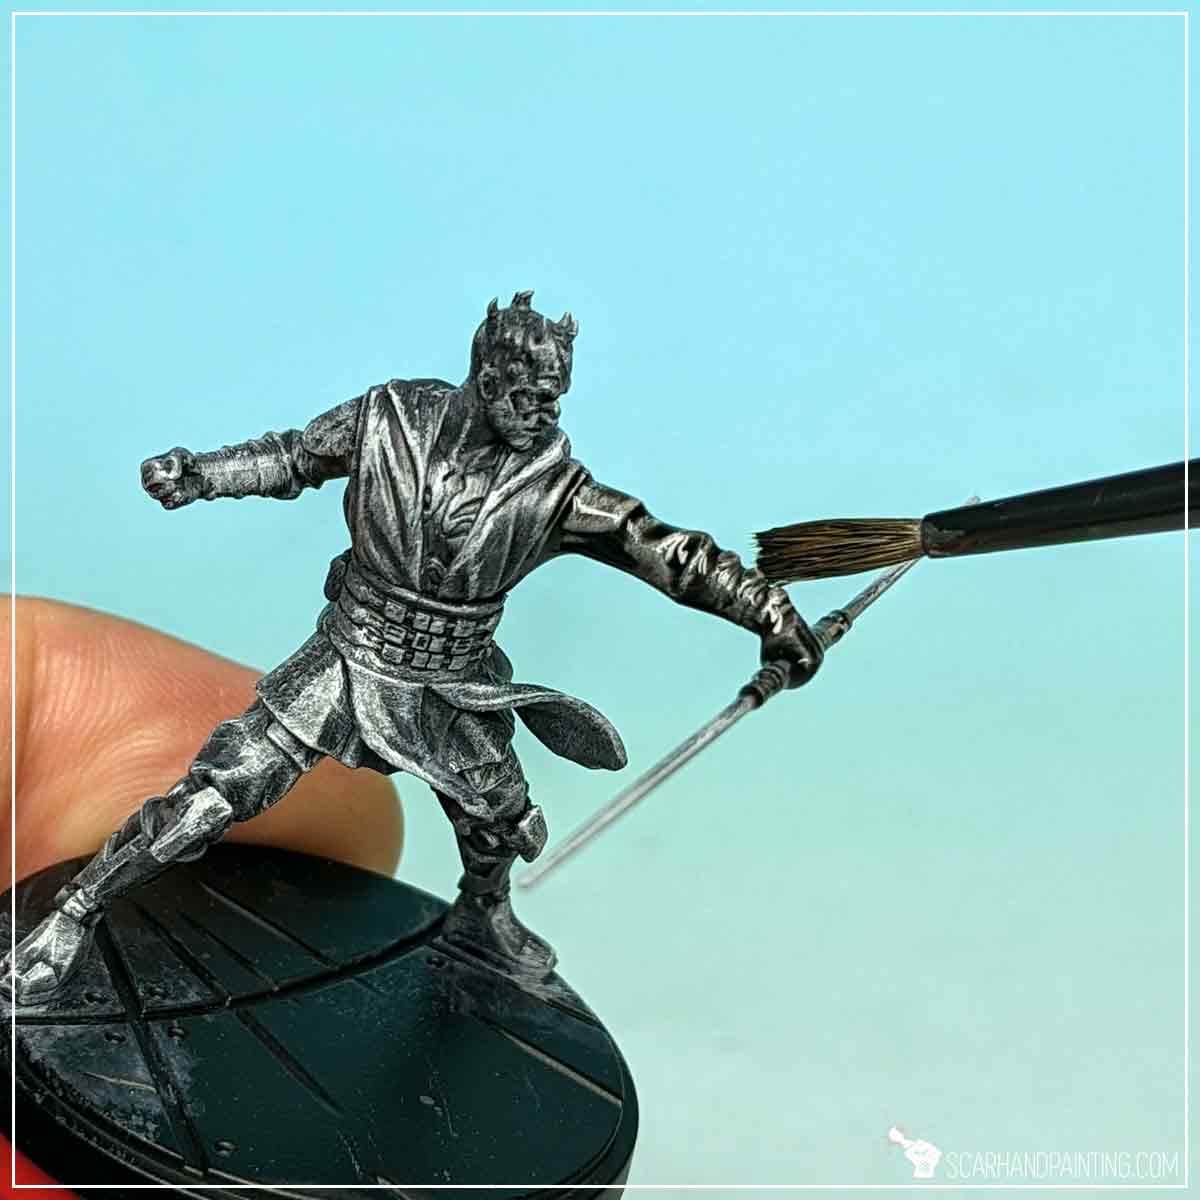
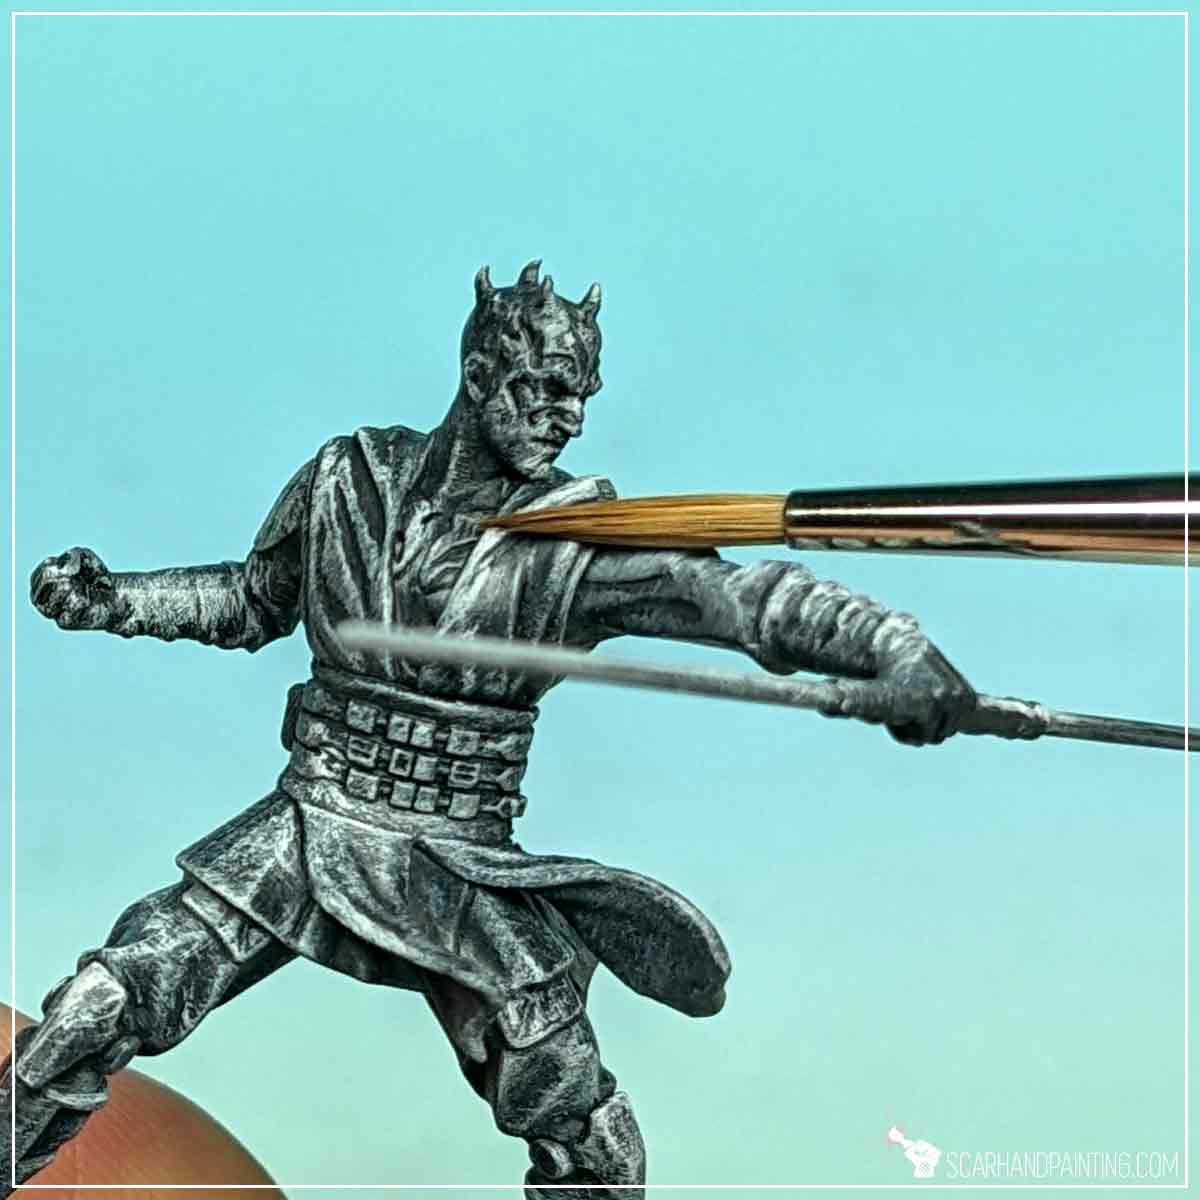
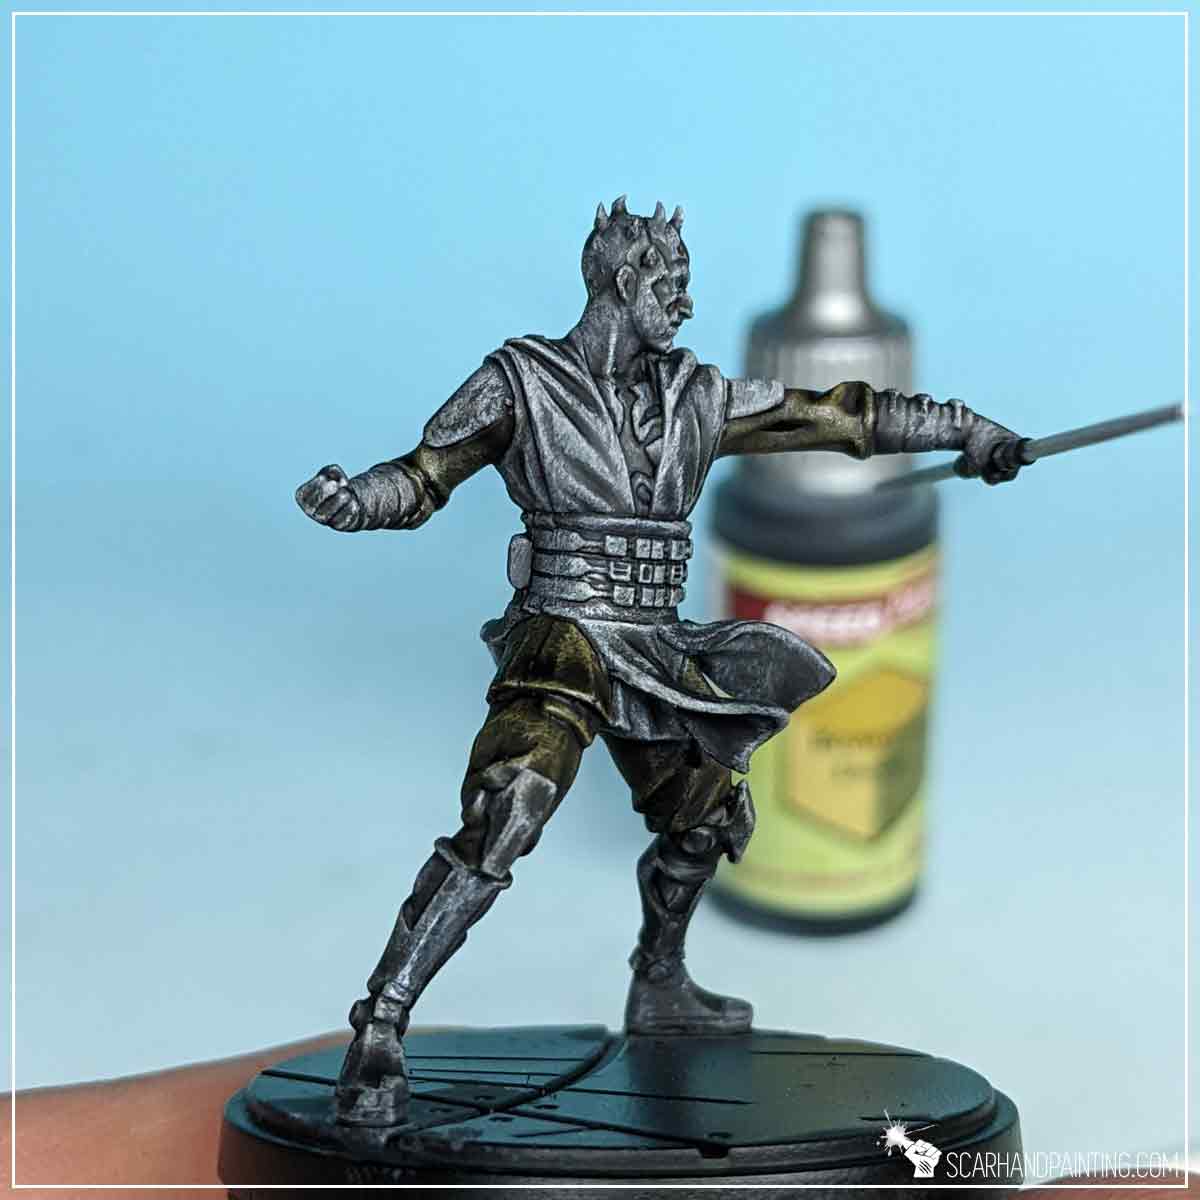
To better distinguish parts of clothing from the rest of the miniature, I applied a layer of slightly thinned Brownish Decay Speed Paint onto pants, sleeves and parts of the tunic. This is where the real beauty of the previous layers buildup really comes into view. Semi-translucent Speed Paint provides color, but leaves all the detail visible underneath.


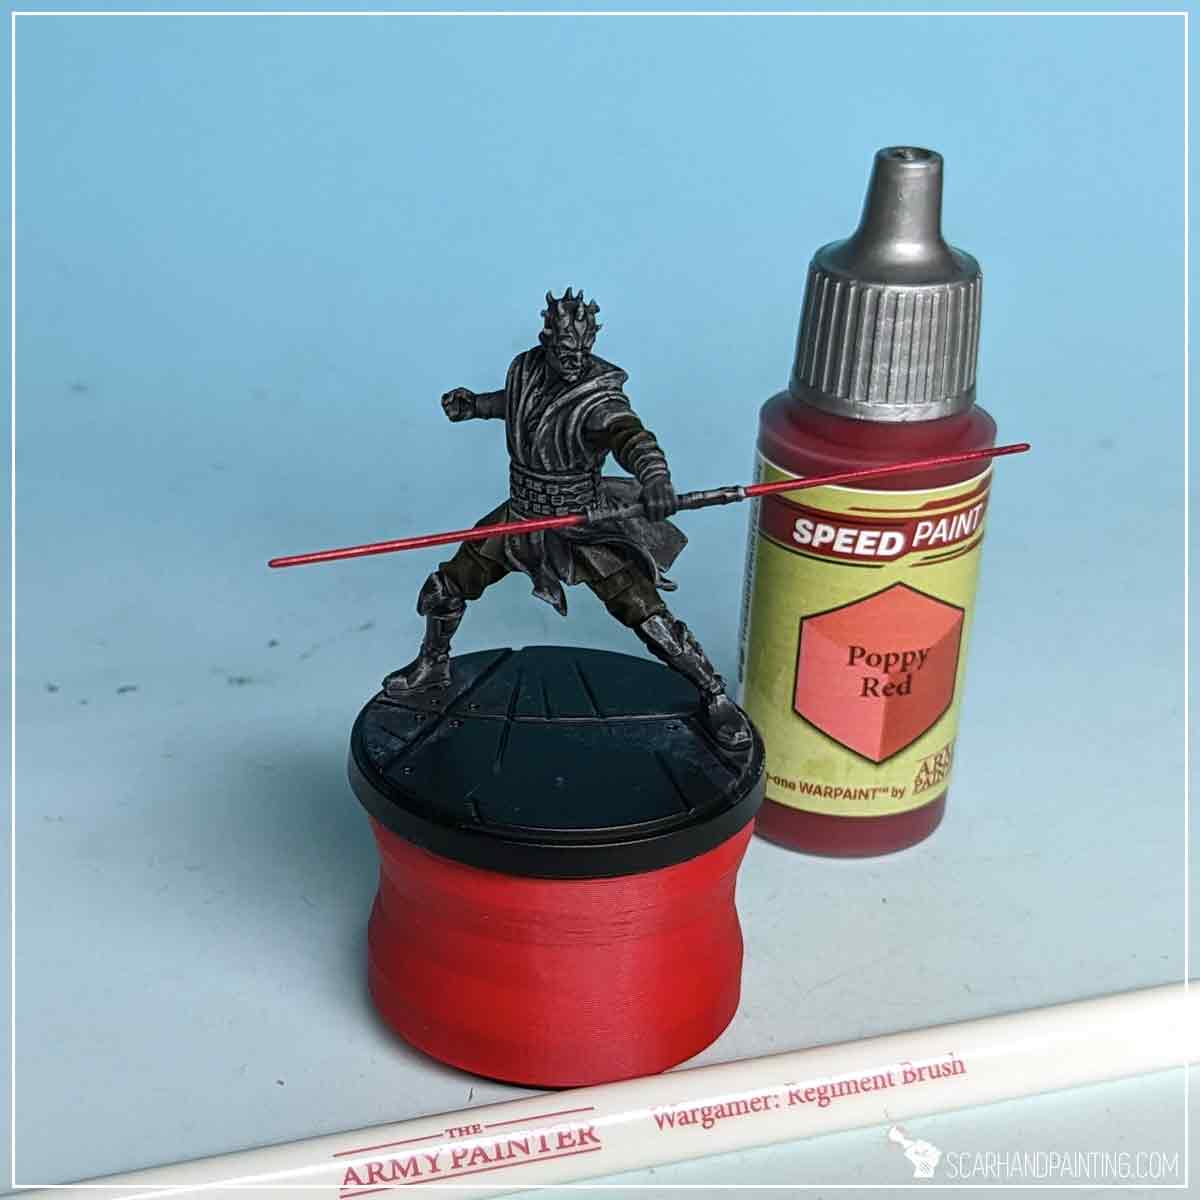
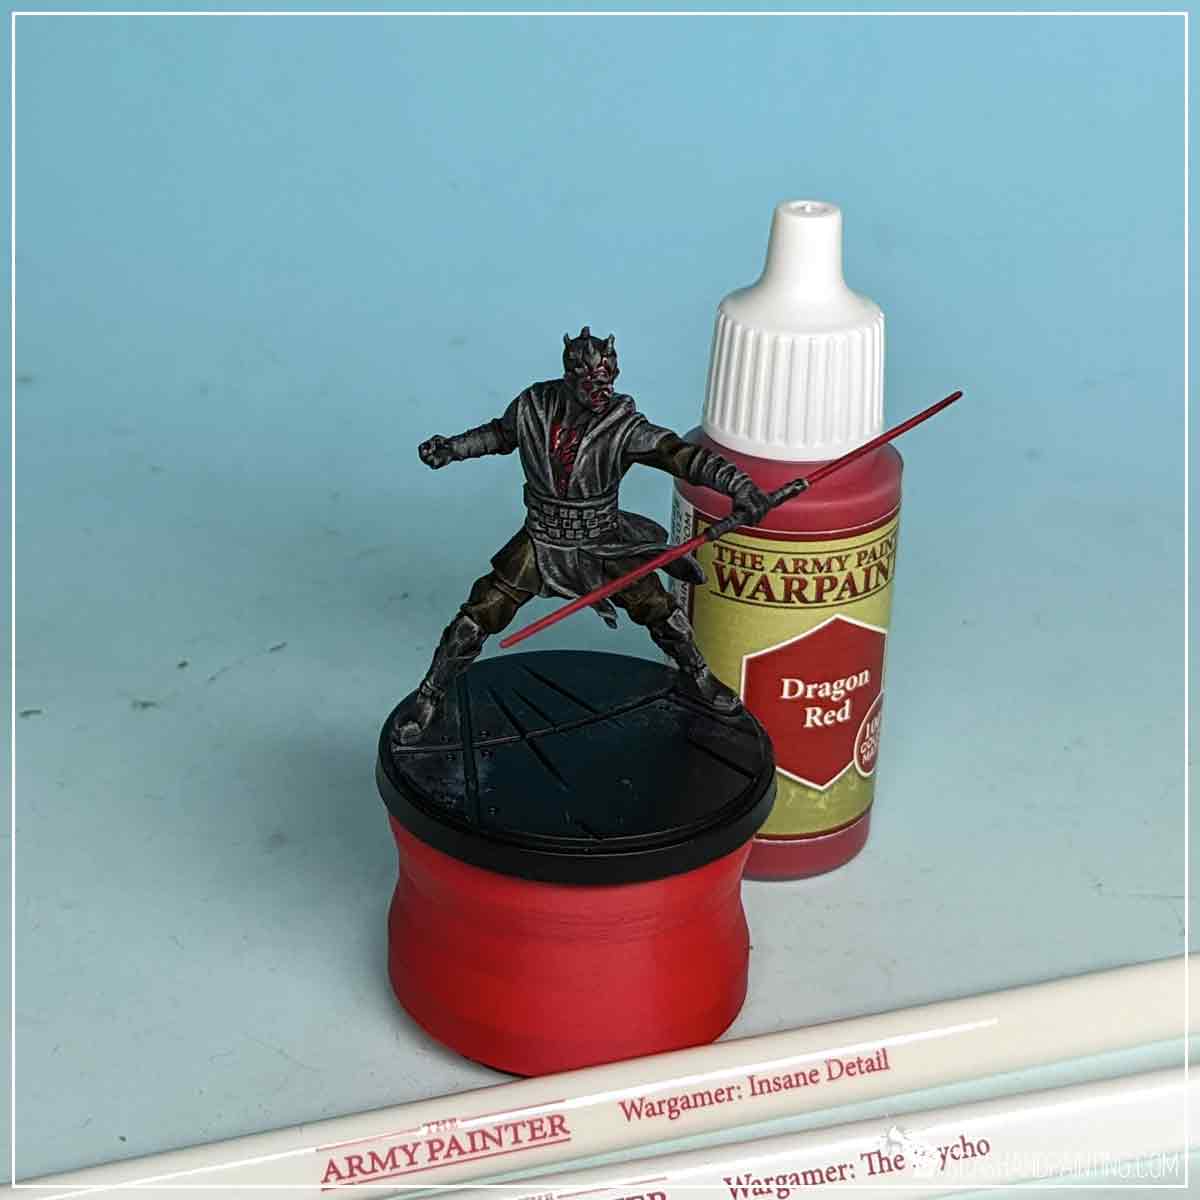
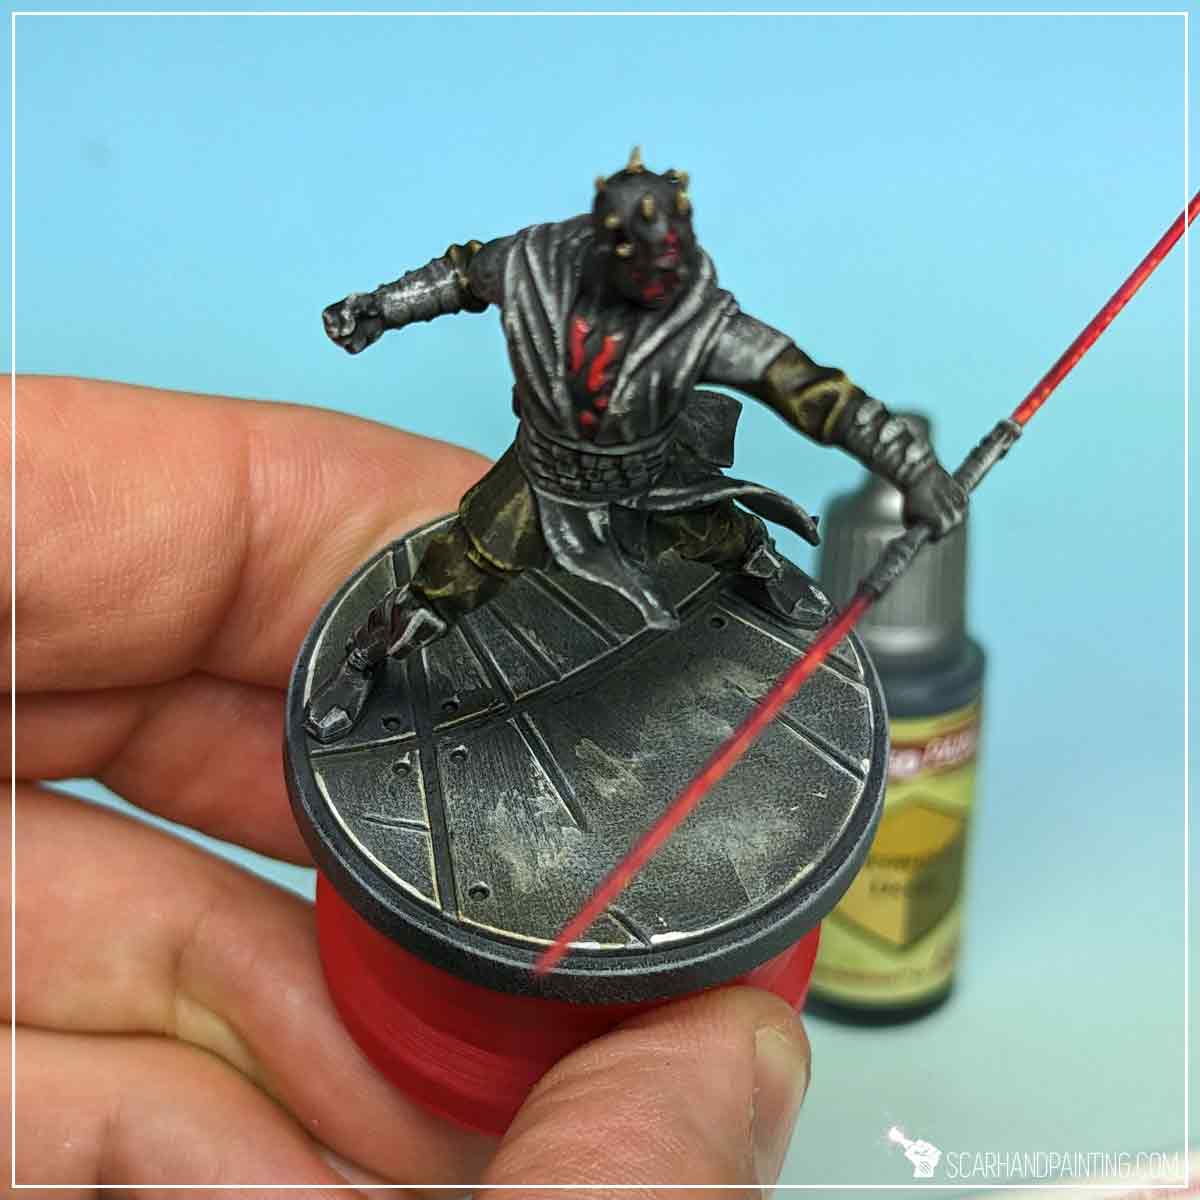
Shifting to reds, I have applied a strong layer of Poppy Red Speed Paint onto the blades. Previous layer of Mummy Robes with slightly darker spots of Uniform Grey, provided a perfect base for this vibrant red color to settle on top of.
Next I have highlighted the front ‘edge’ of the blades with Dragon Red. I then switched to Wargamer: Insane Detail and Wargamer: The Psycho to apply Dragon Red on top of chest markings and in strongly underlined areas on the face of the miniature.
TIP: If you feel uncomfortable painting such details, be sure to check THIS ARTICLE, as it might help you improve your brush handling precision.
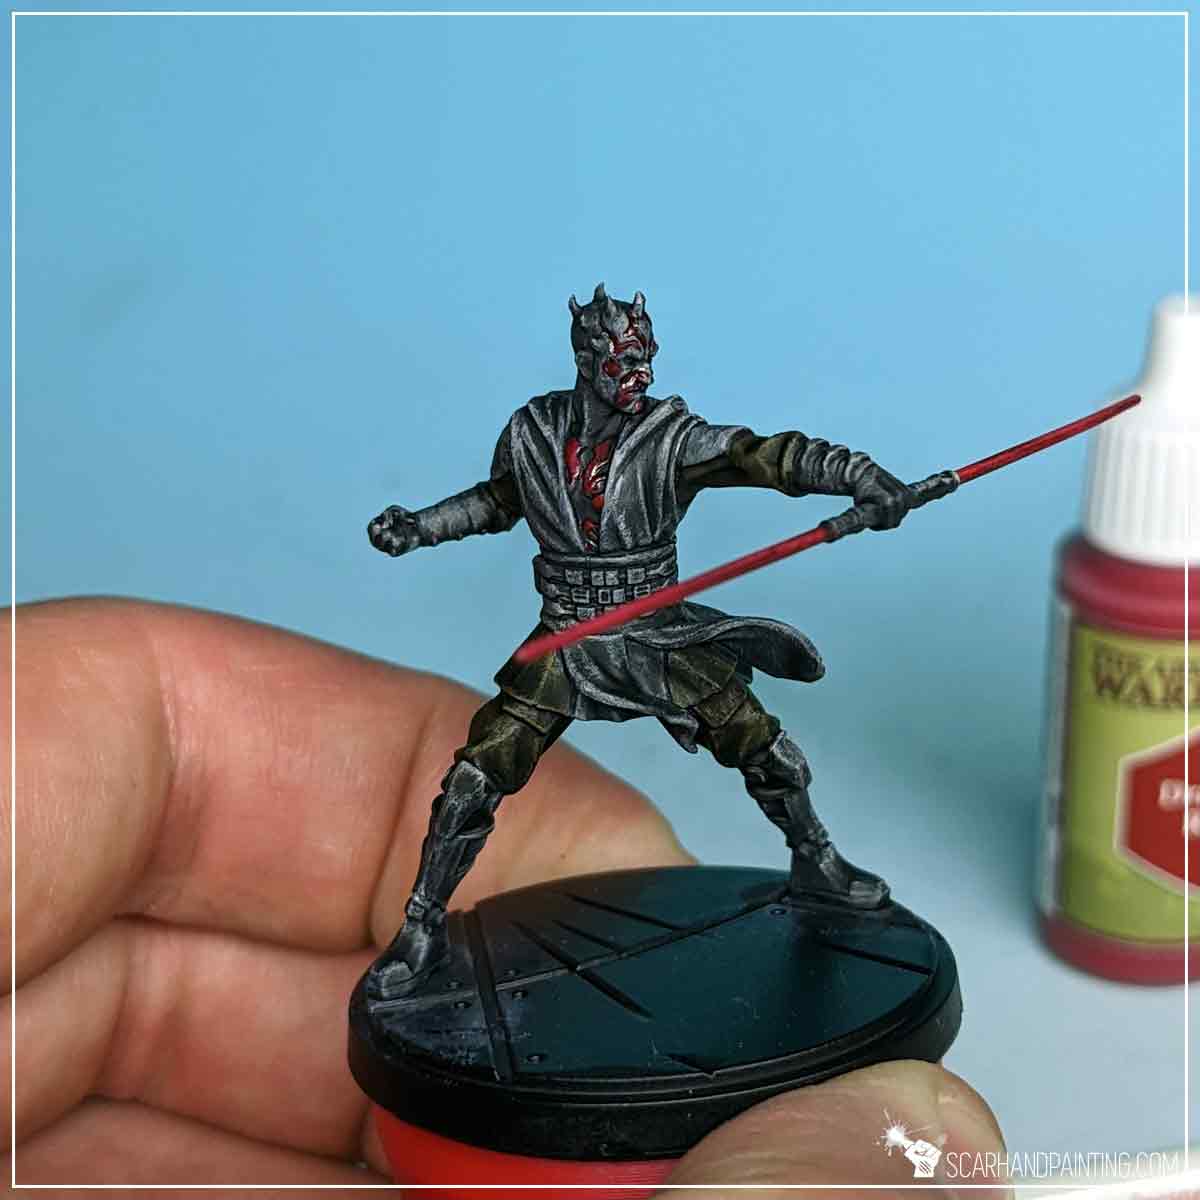
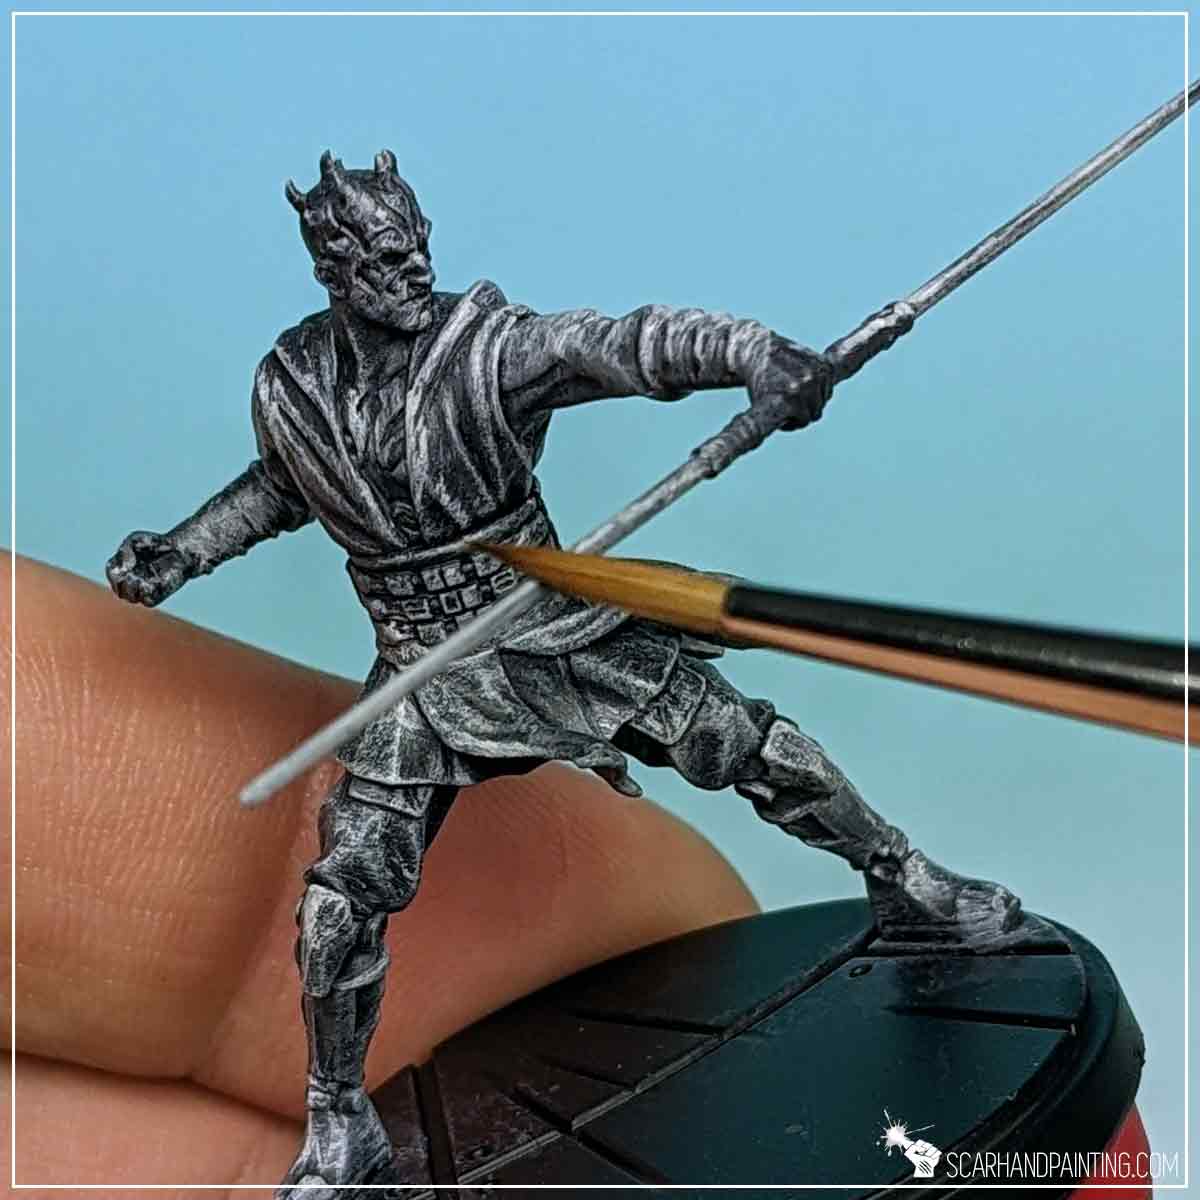
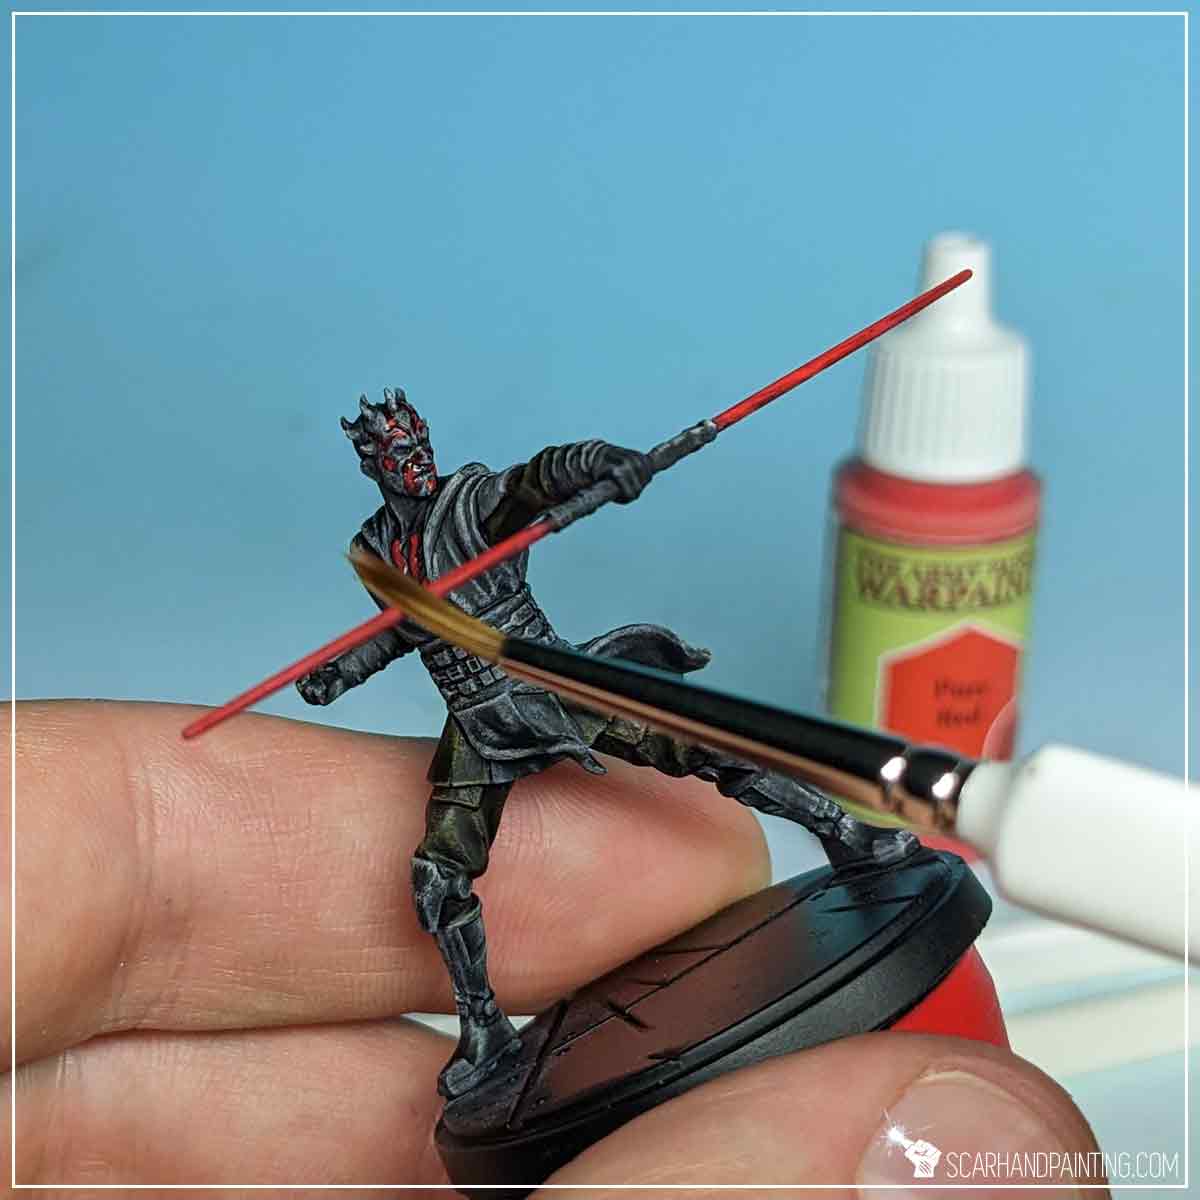
To add vibrancy I have applied small dots of Pure Red onto face markings, then highlighted both the chest markings and the front edge of the Lightsaber.

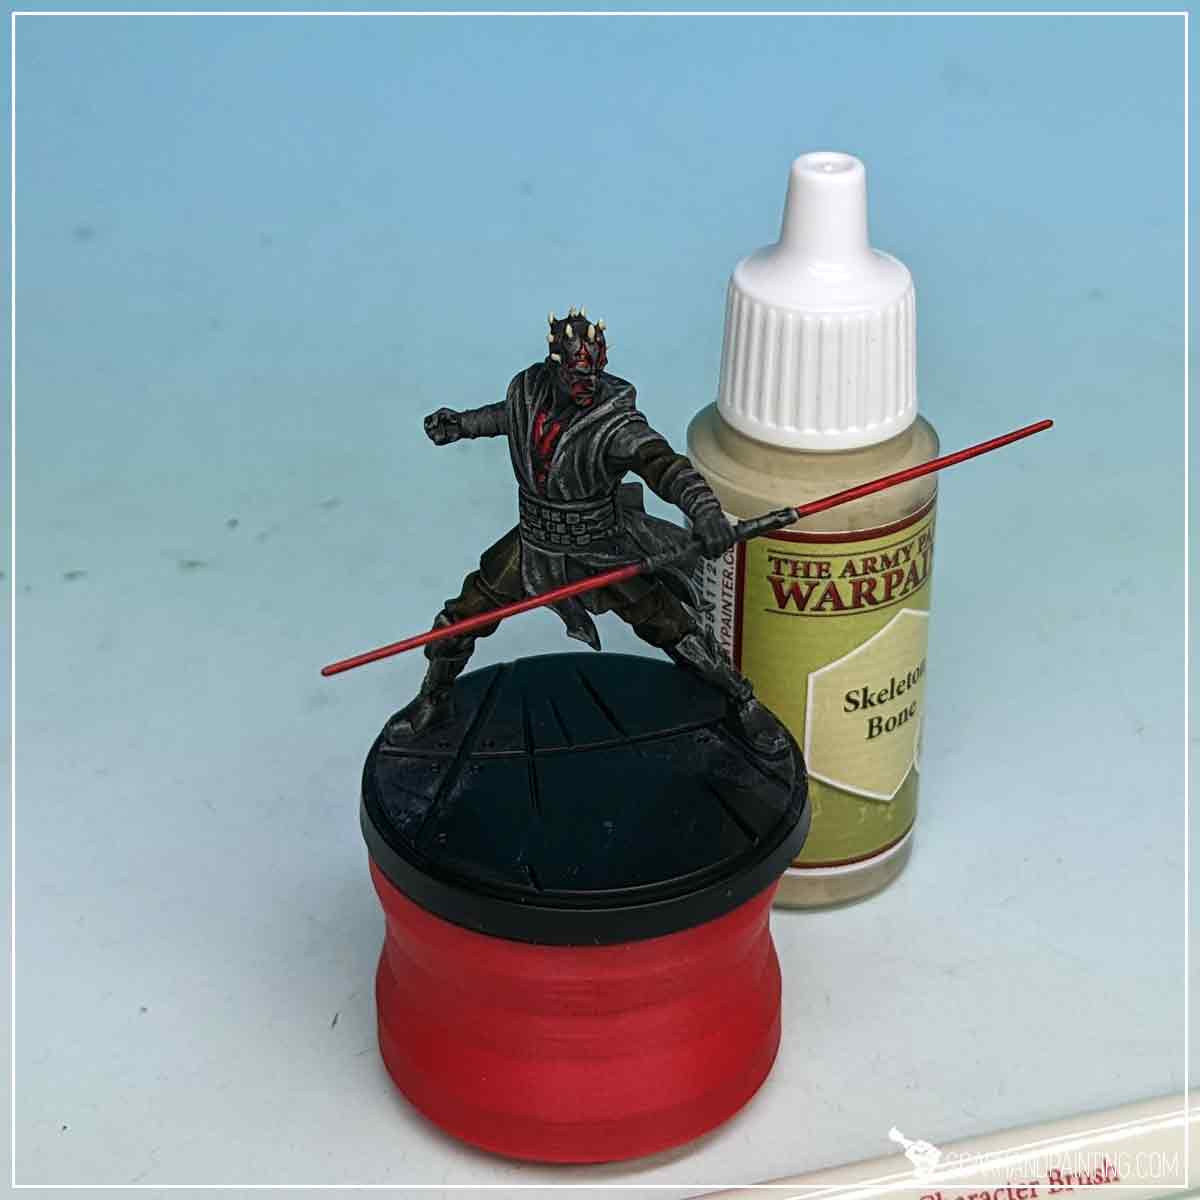
For horns I went with Skeleton Bone and applied it with a tip of the Wargamer: Character Brush.
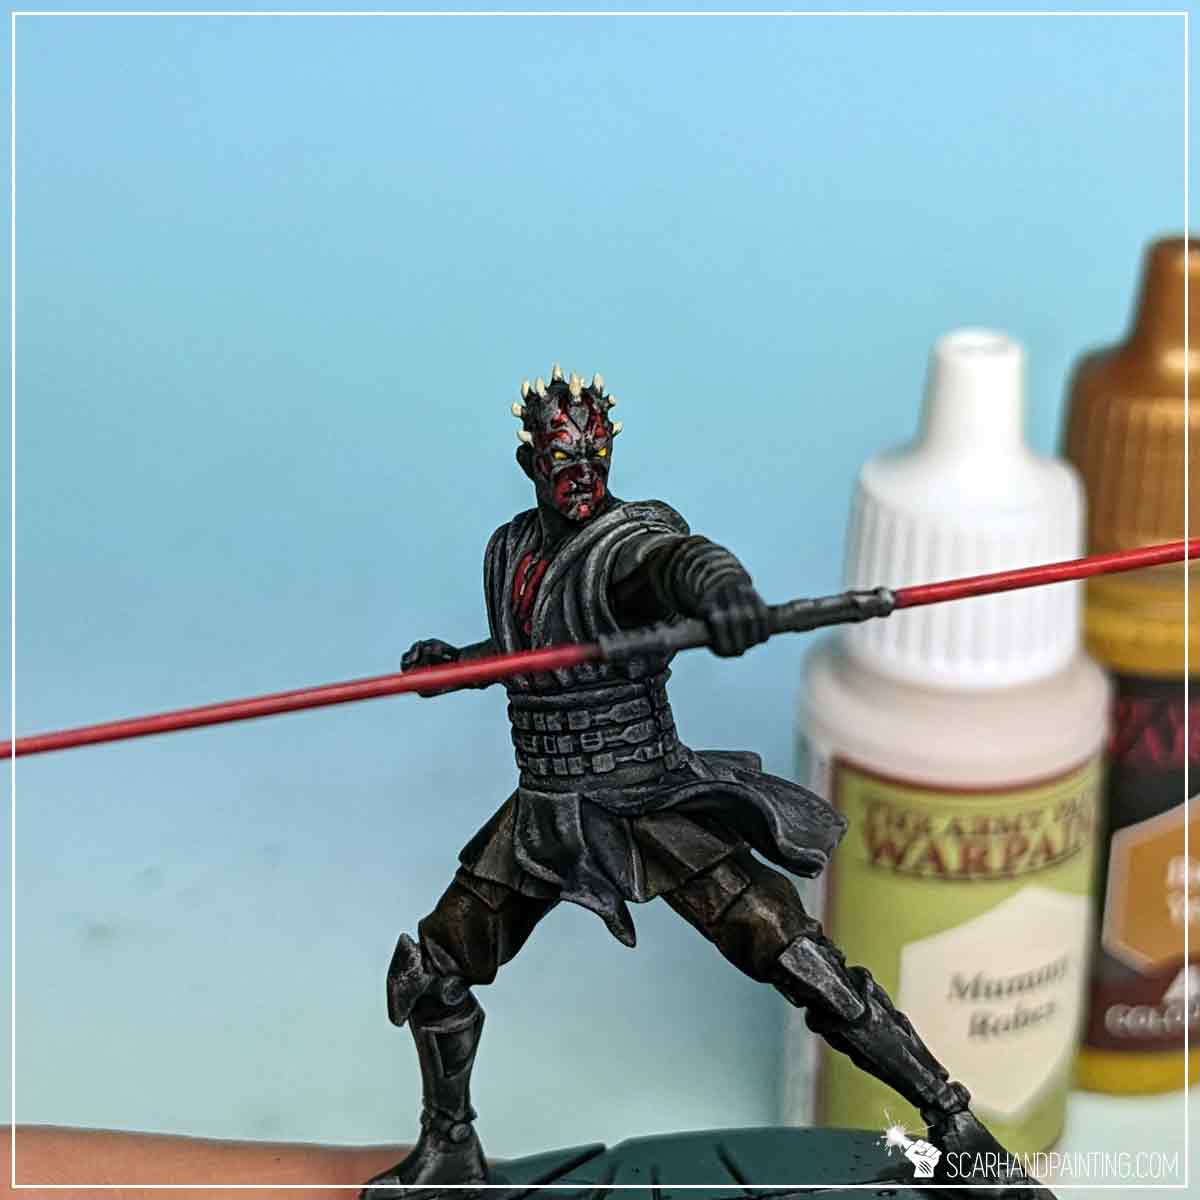
I applied a single dot of Mummy Robes, followed by a touch of Barren Yellow (Air). Used Wargamer: The Psycho.
TIP: This part is a bit tricky and I sincerely recommend you to skip on painting eyes until you test it on other miniatures and feel comfortable painting such detail. On such a scale a pair of painted eyes is not necessary for a miniature to look good on the gaming board, whereas poorly painted eyes can ruin an otherwise solid paint job.
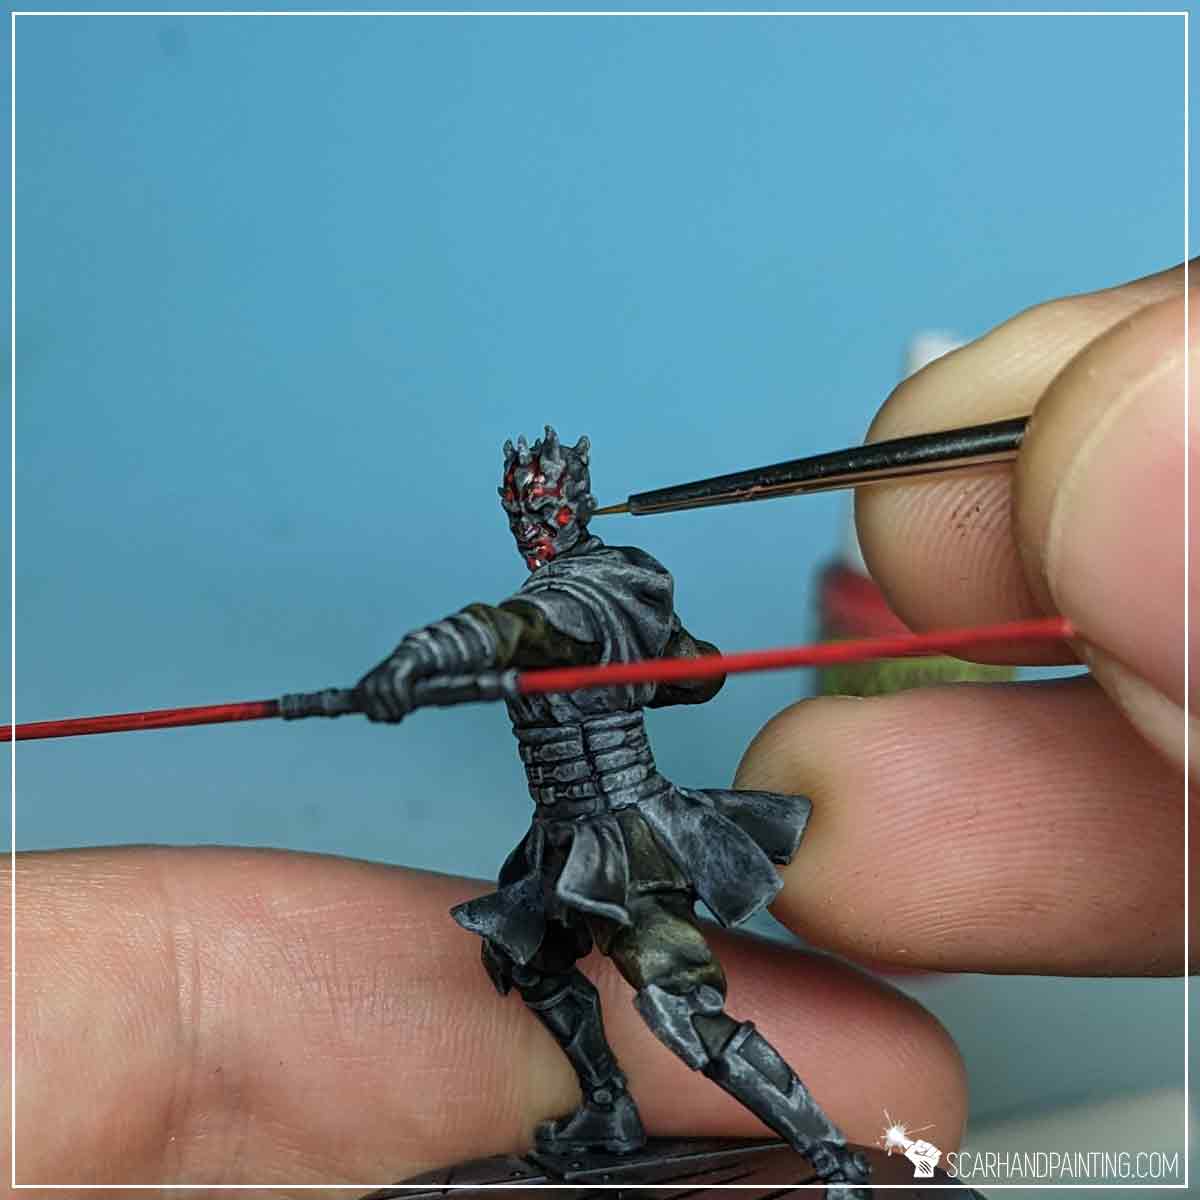
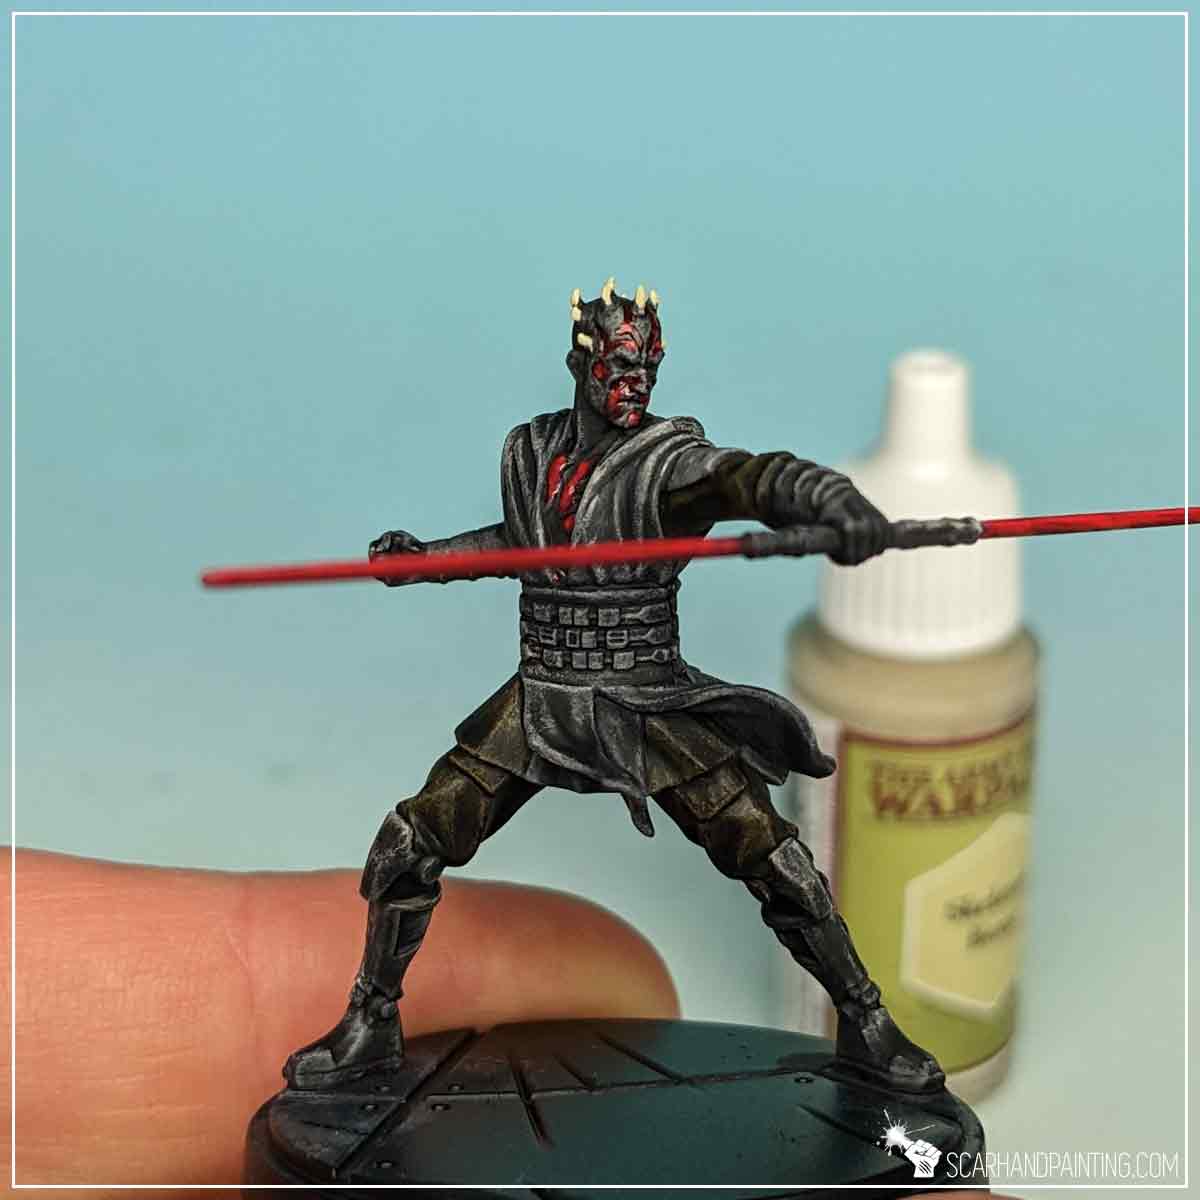
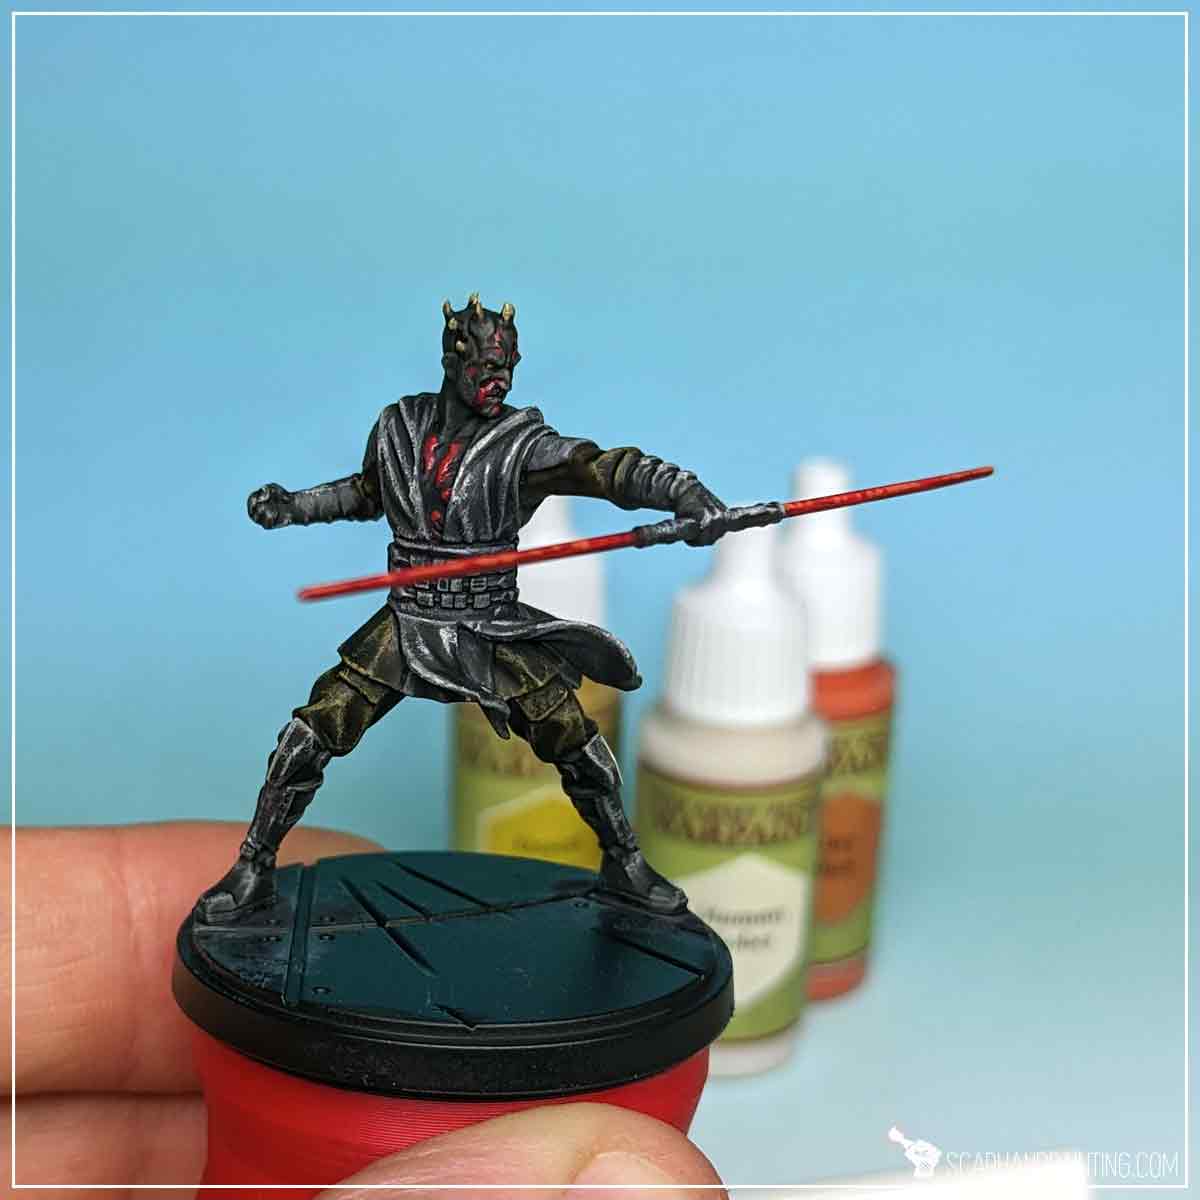
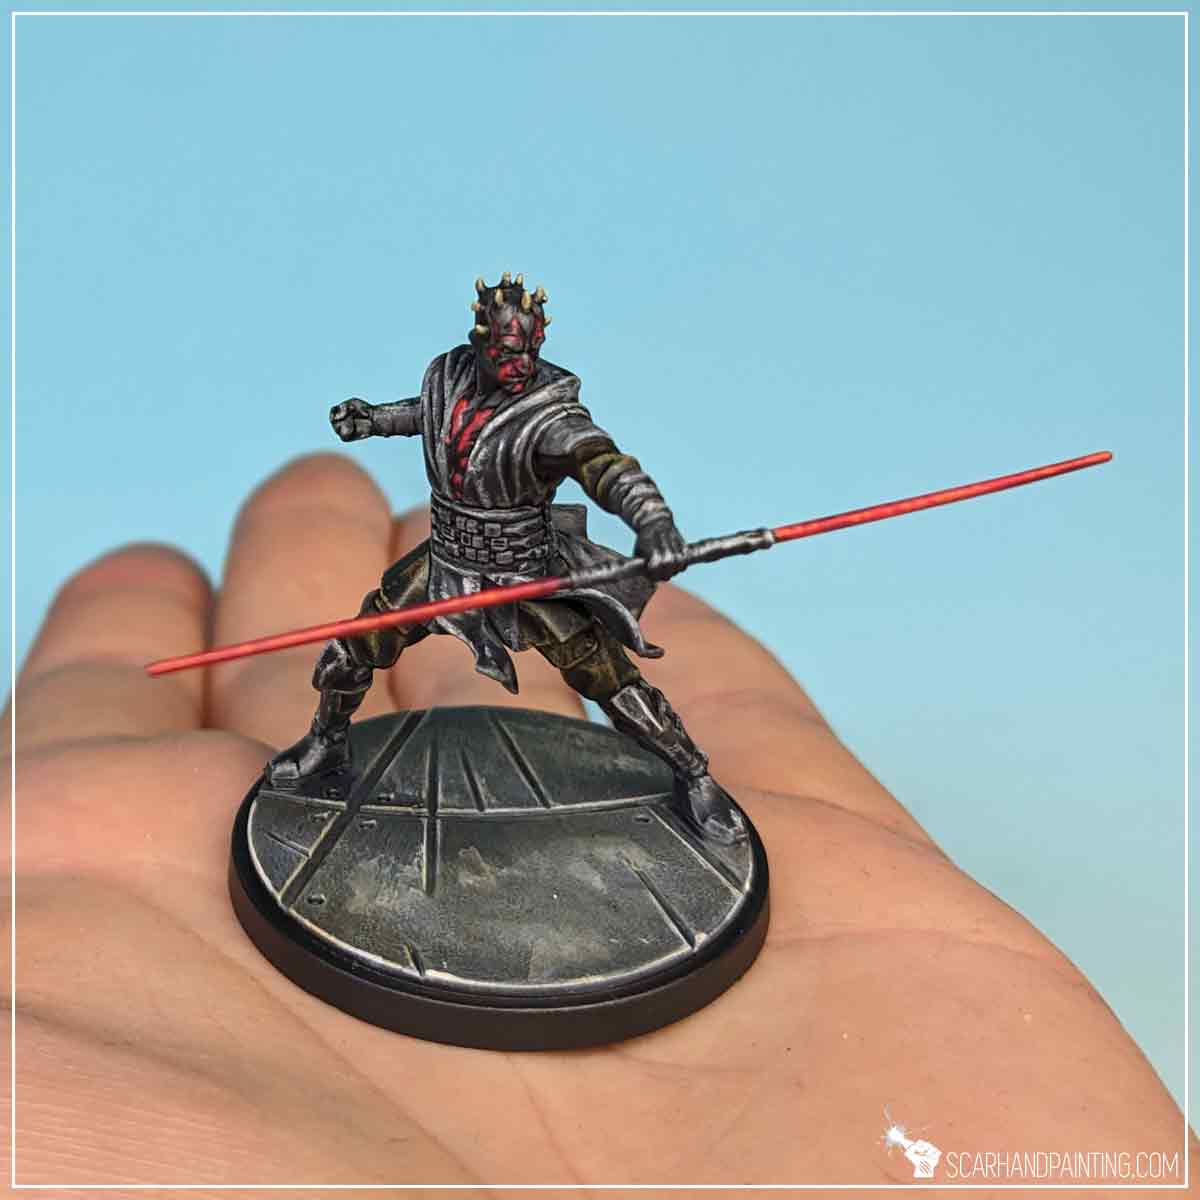
To really make all the colors pop and bring more details out I followed up with a general highlight. I used Wargamer: Character Brush and Stippled Desert Yellow (browns), Dry Rust (reds) and Mummy Robes (blacks) on top of edges of selected surfaces. I have also drawn some edge highlights on the sides of knee pads or well exposed folds of the robes.
TIP: Stippling is a technique of applying paint with multiple delicate touches of the brushe. Usually it is done with flat brushes, using their toe, but in this case I used Character Brushe’s spread out tip and applied paint using its edge, leaving small dots of paint, better presented in pictures below.


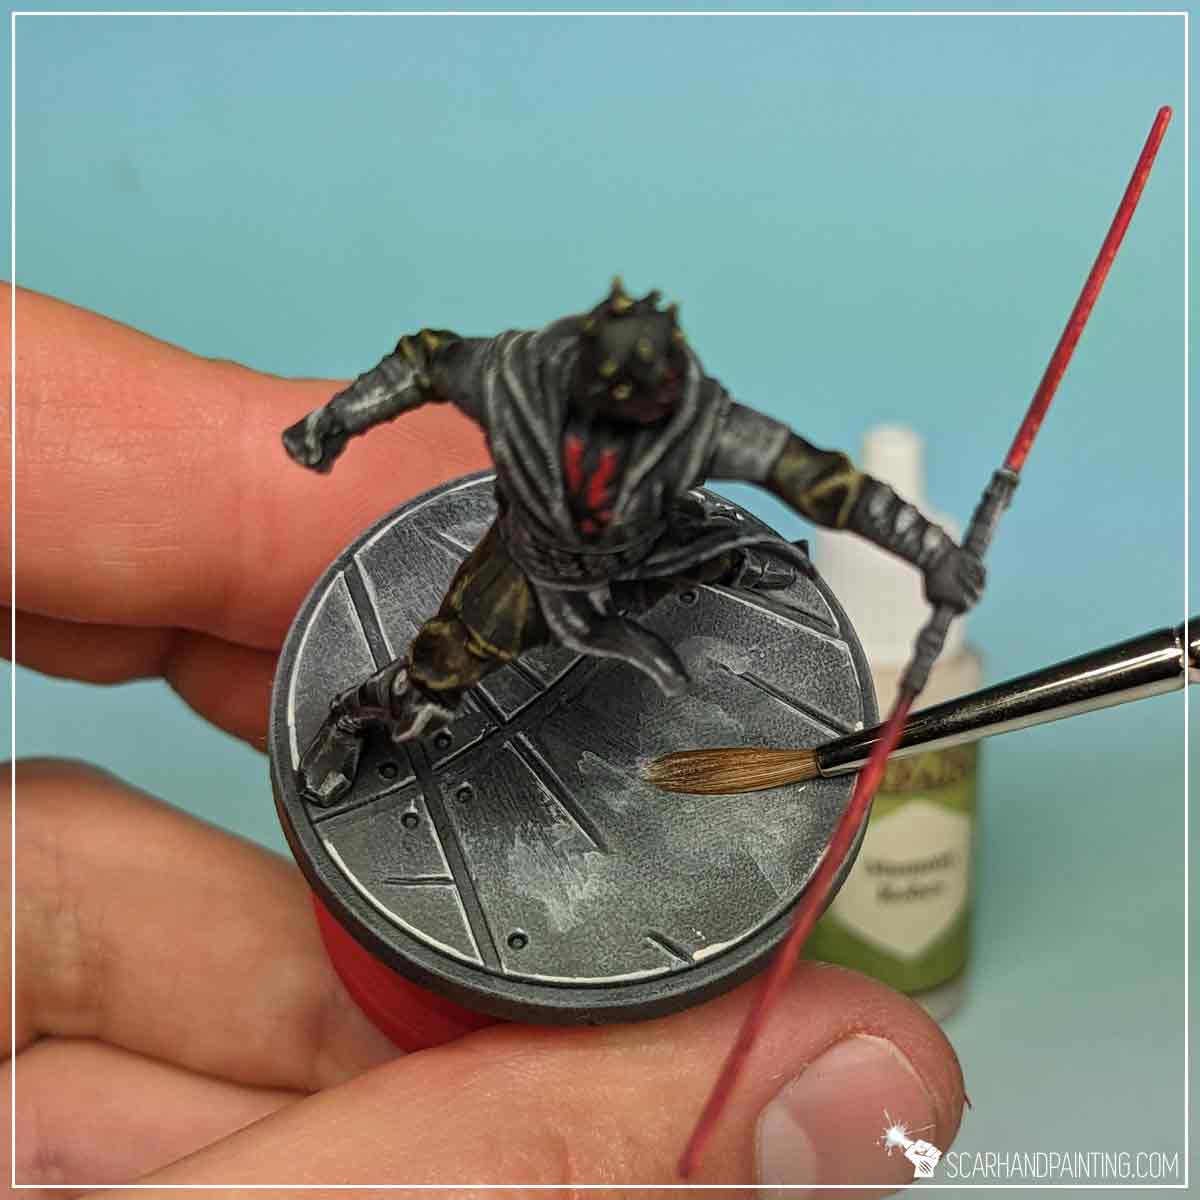
I started the base with a solid layer of Necromancer Cloak. I could have done this when painting the miniature itself, but it would have gotten messy so I left it for after the miniature was done.
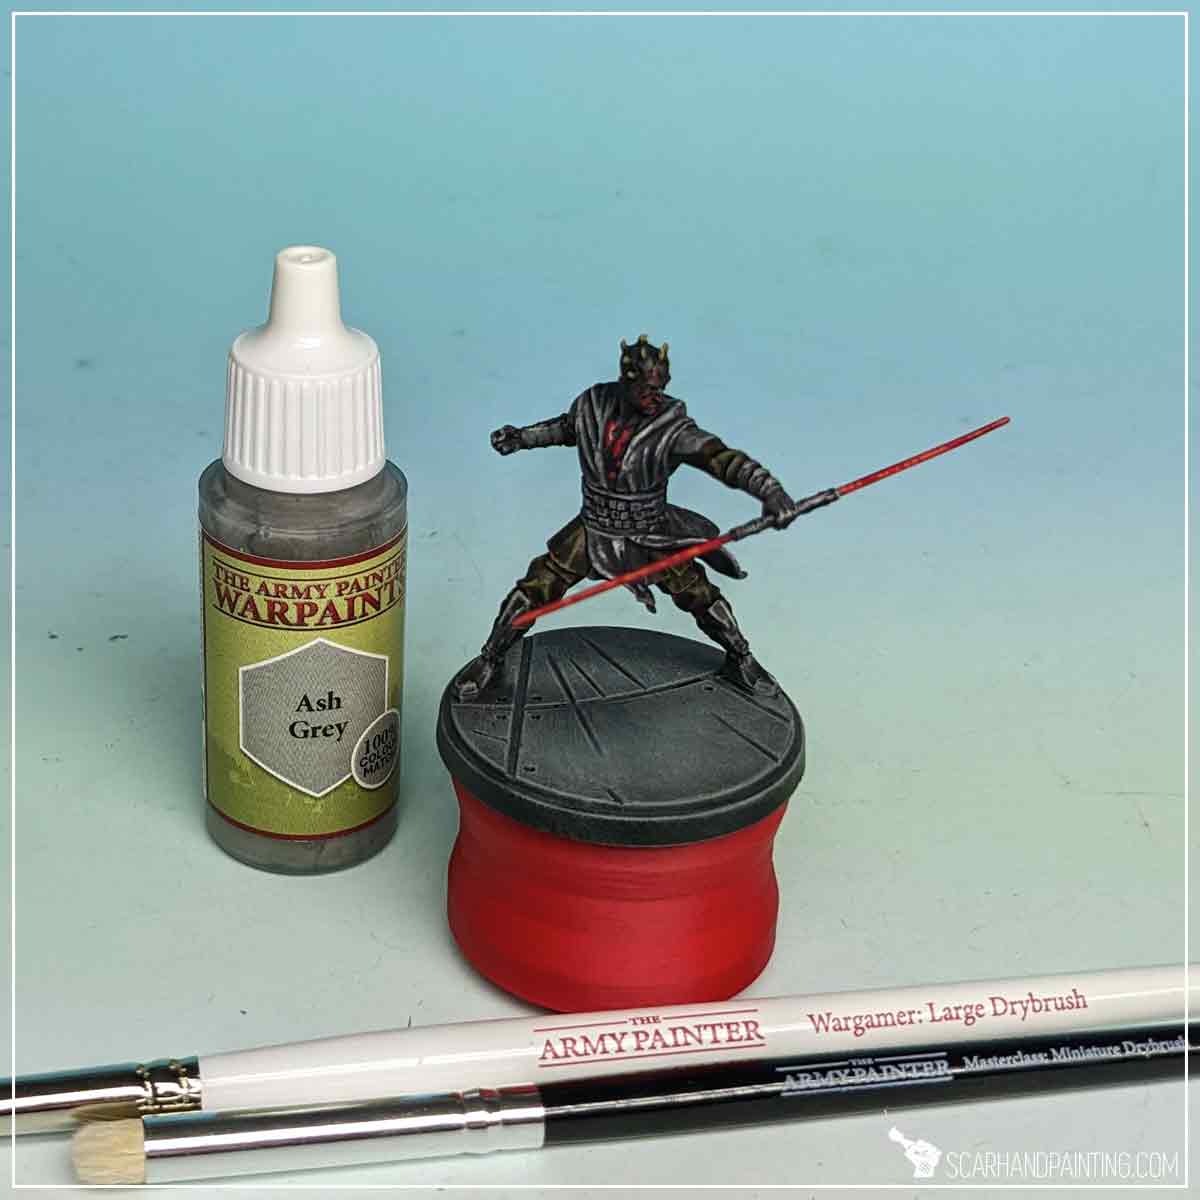
I then applied a strong drybrush of Ash Grey all over the base and around the feet of the miniature.
[Optional] Next I highlighted concrete plates edges with Mummy Robes and smeared thinned Mummy Robes with the tip of the brush in a few random spots.
[Optional] To add a bit of variety and treat Darth Maul with respect worthy of a character, I applied a glaze of Brownish Decay Speed Paint, thinned down with water, all over the base.
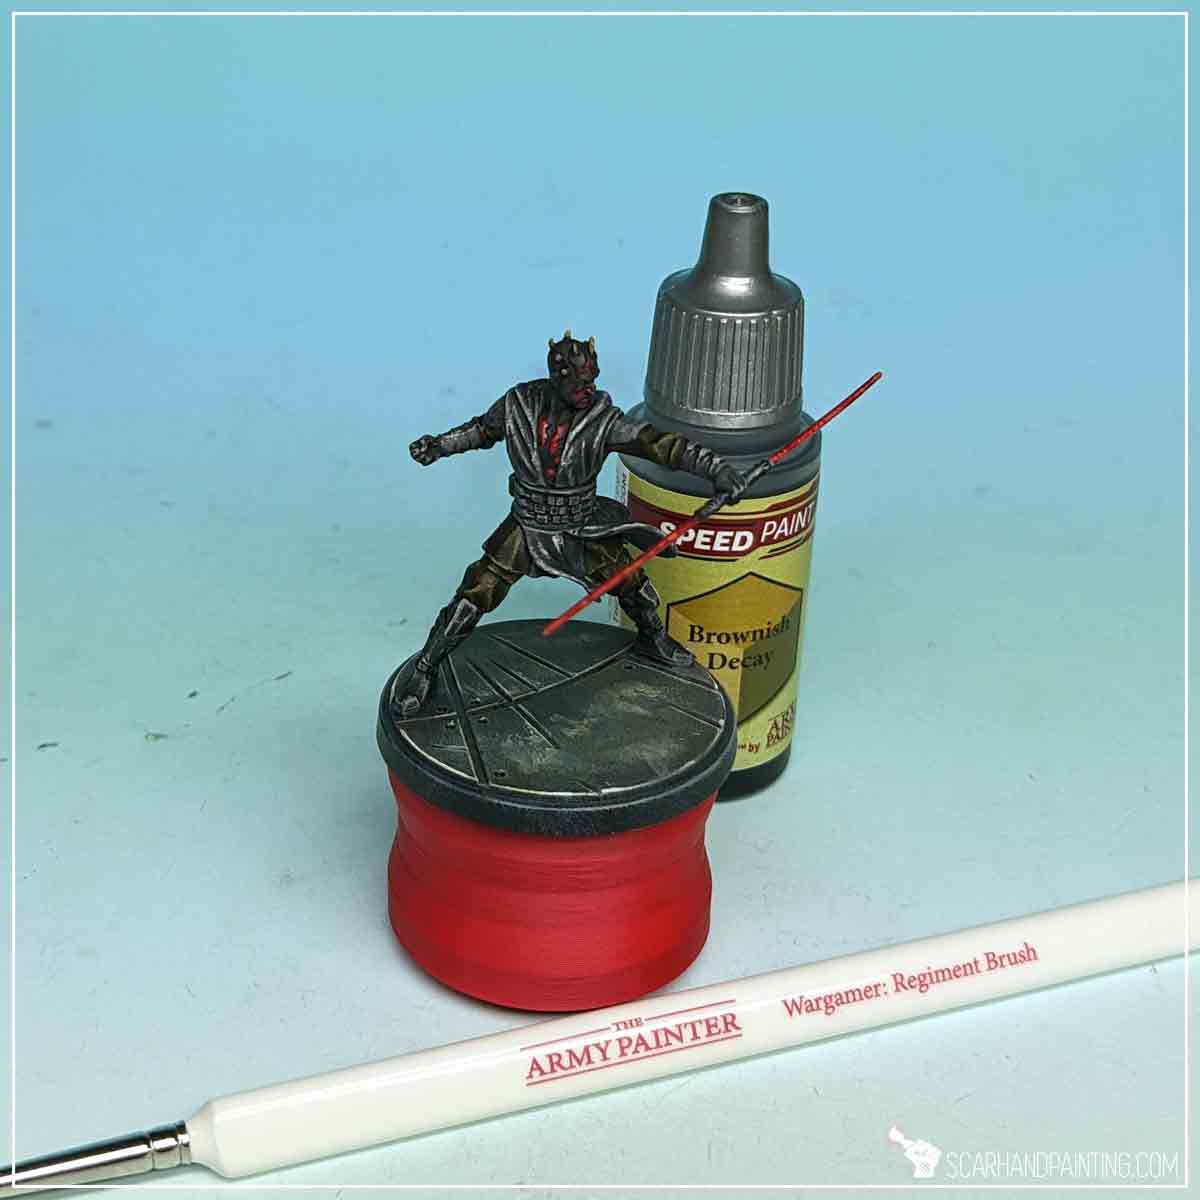
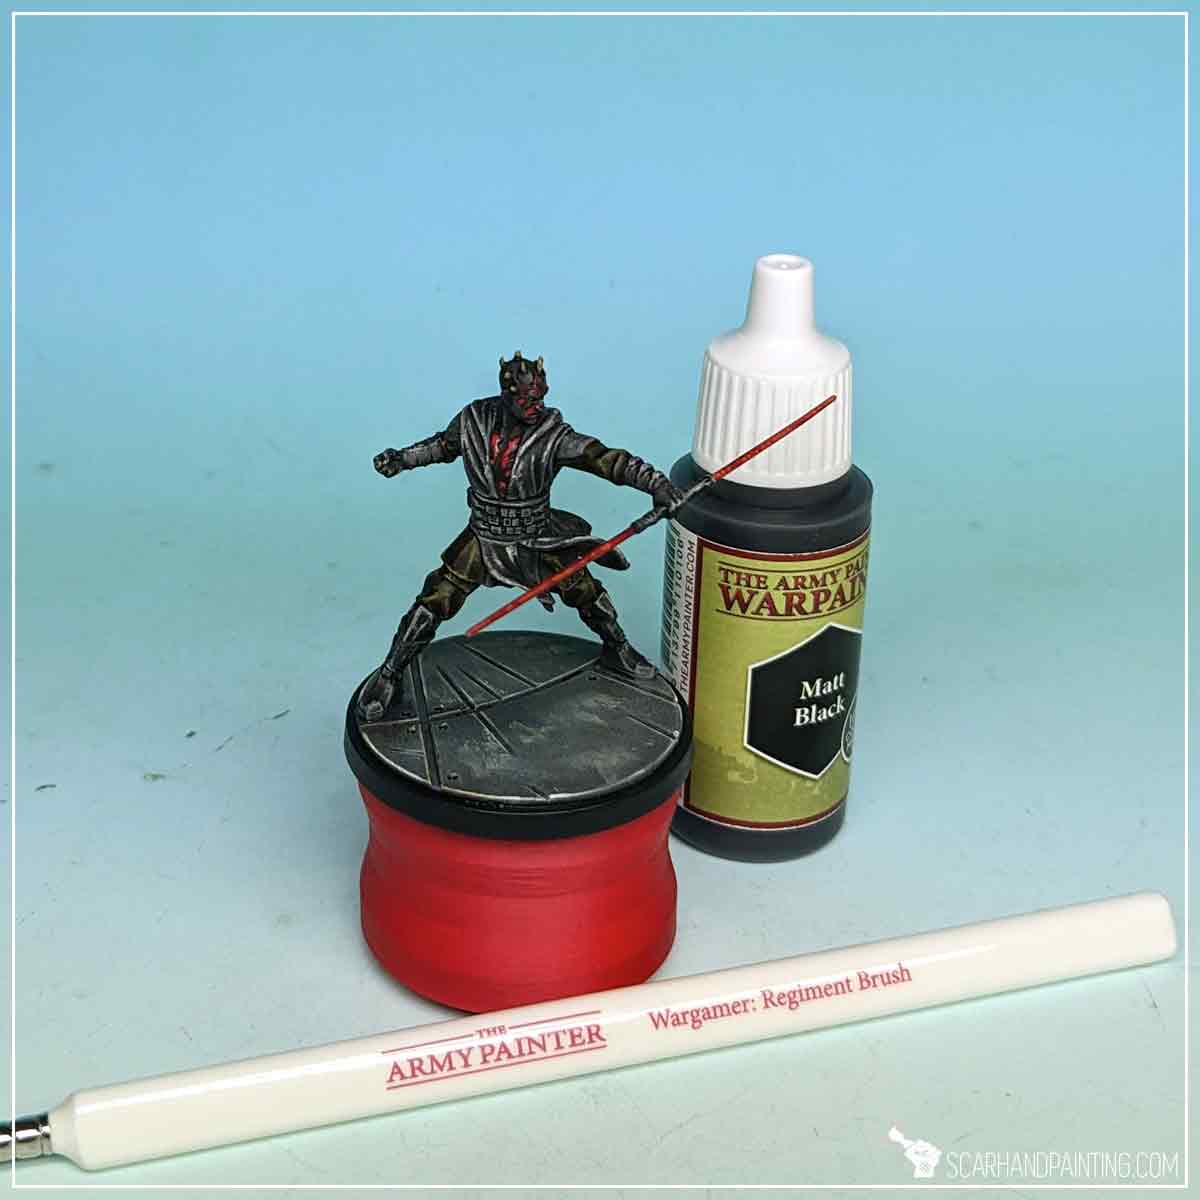
Finally I finished the base with smooth, black edges. One layer of Matt Black, applied with Wargamer: Regiment Brush.
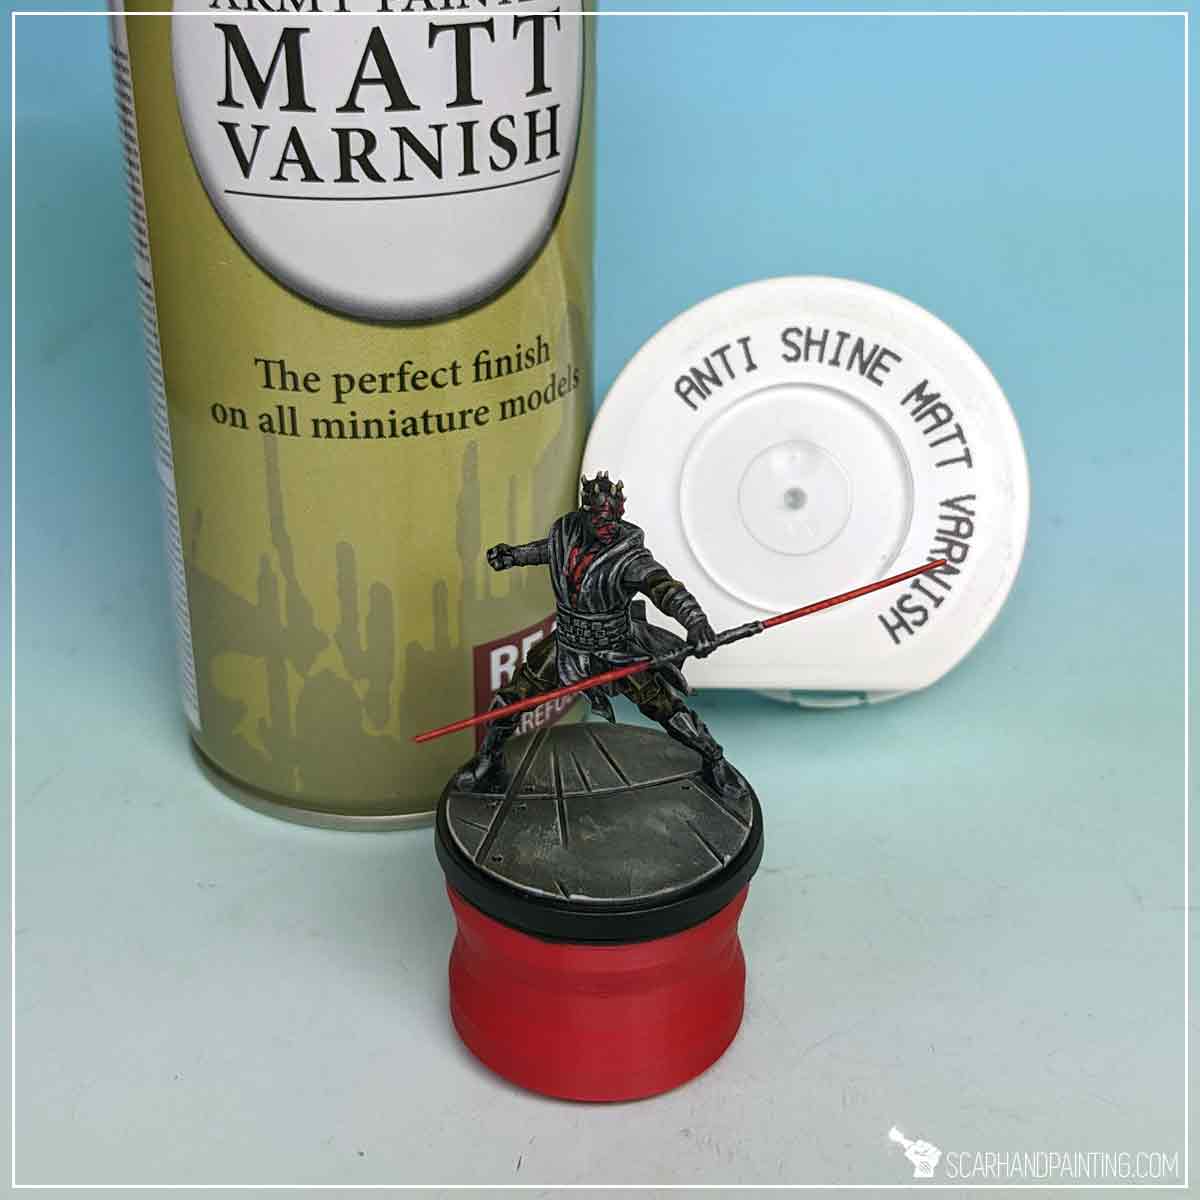
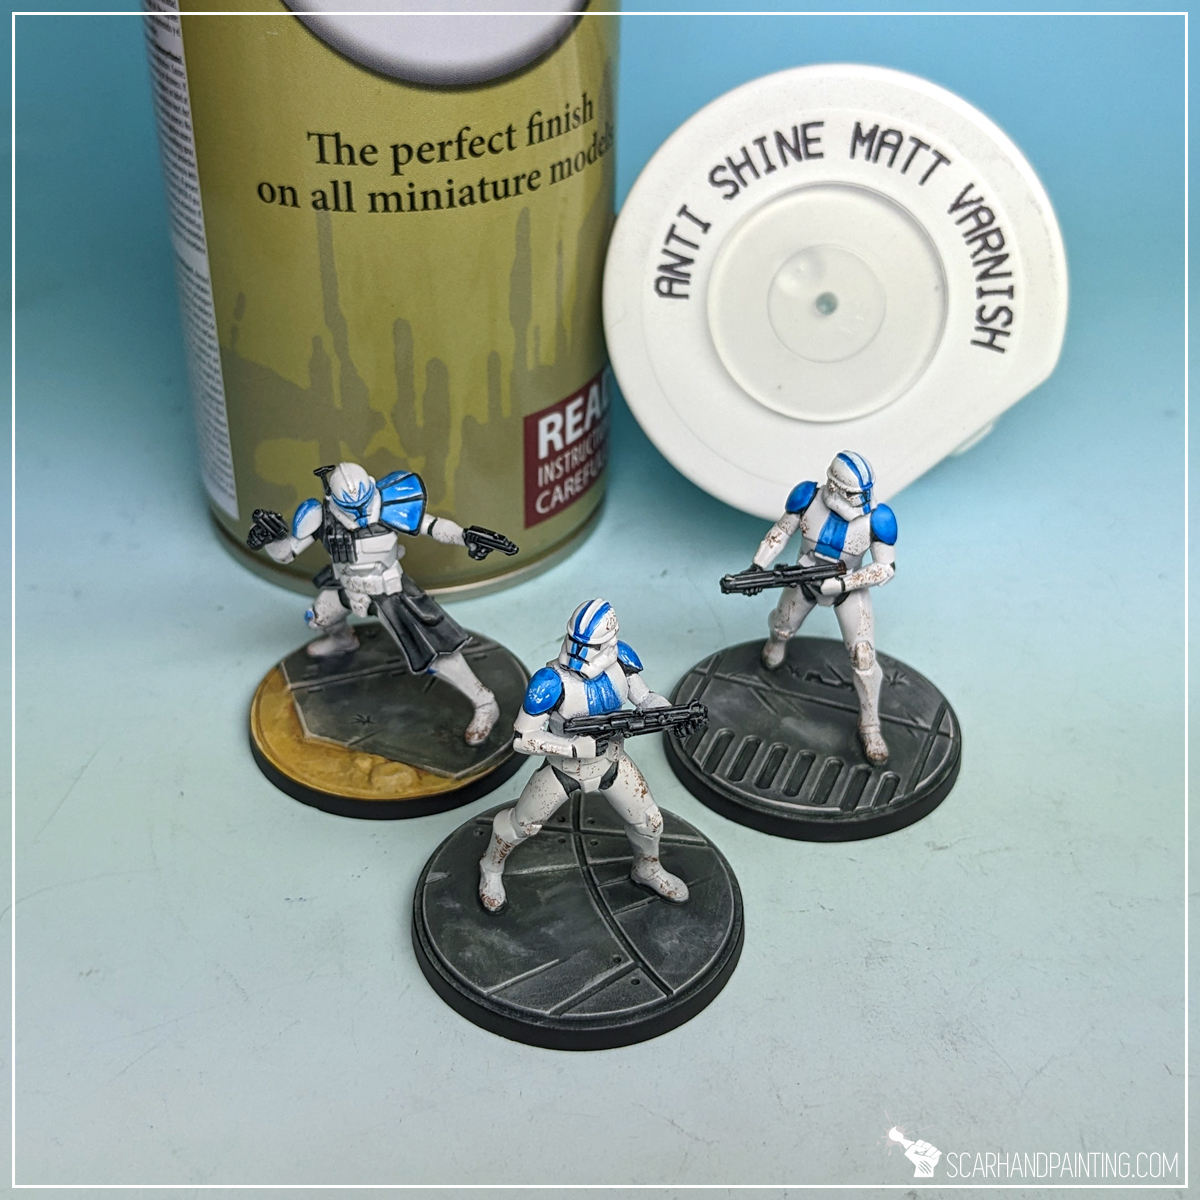
Lastly I sealed the paint job with Anti Shine Matt Varnish.

I hope you find this tutorial interesting. Be sure to let me know your thoughts in the comments below or via Facebook or Instagram. I would also appreciate it if you considered sharing this content with your friends, who might find it useful. Many thanks to Rebel.pl for sponsoring this content. Stay tuned for more Star Wars: Shatterpoint tutorials.
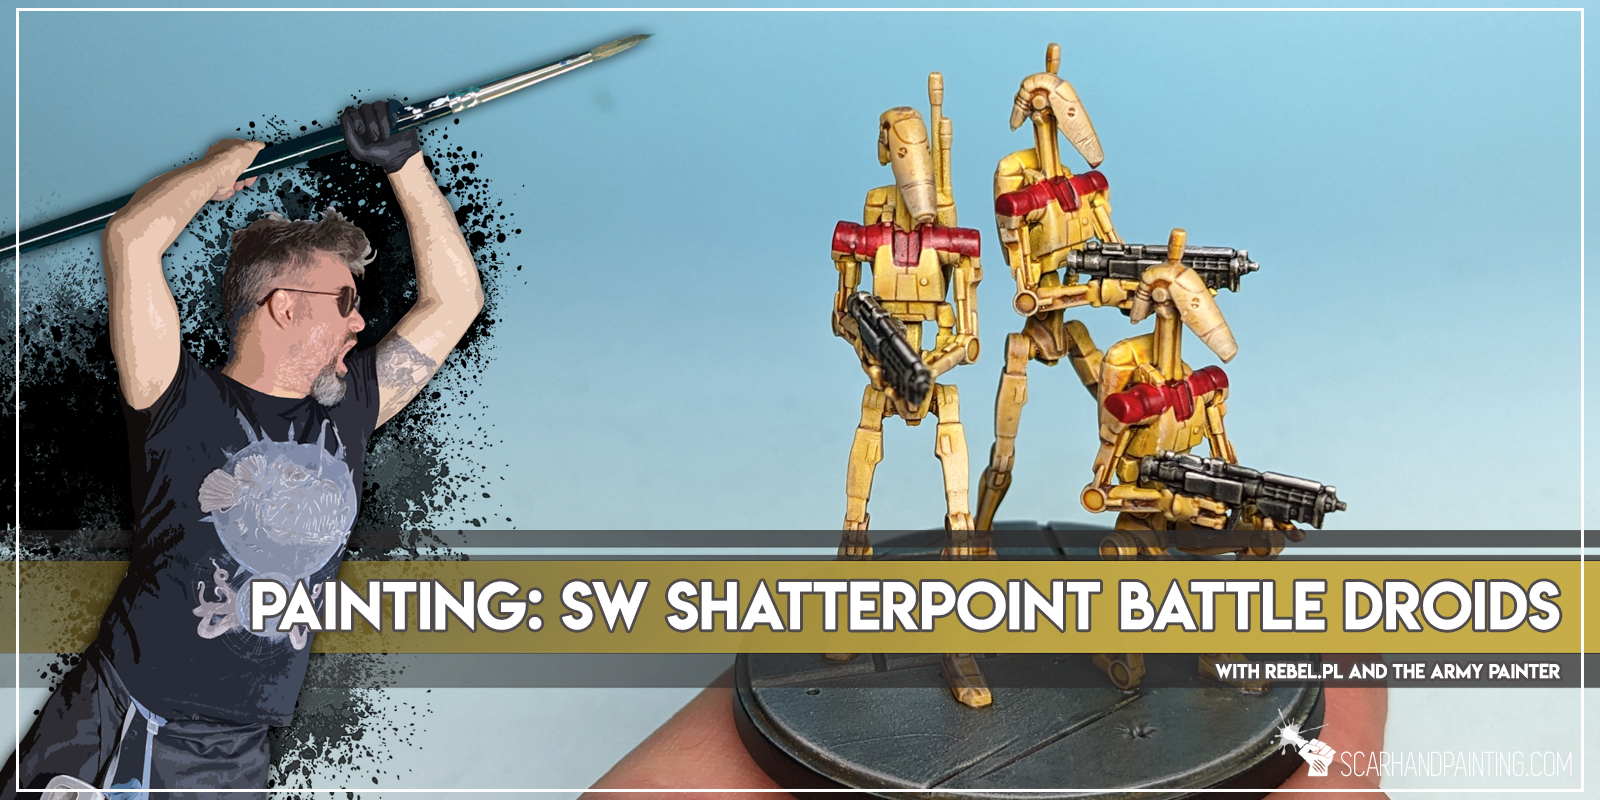
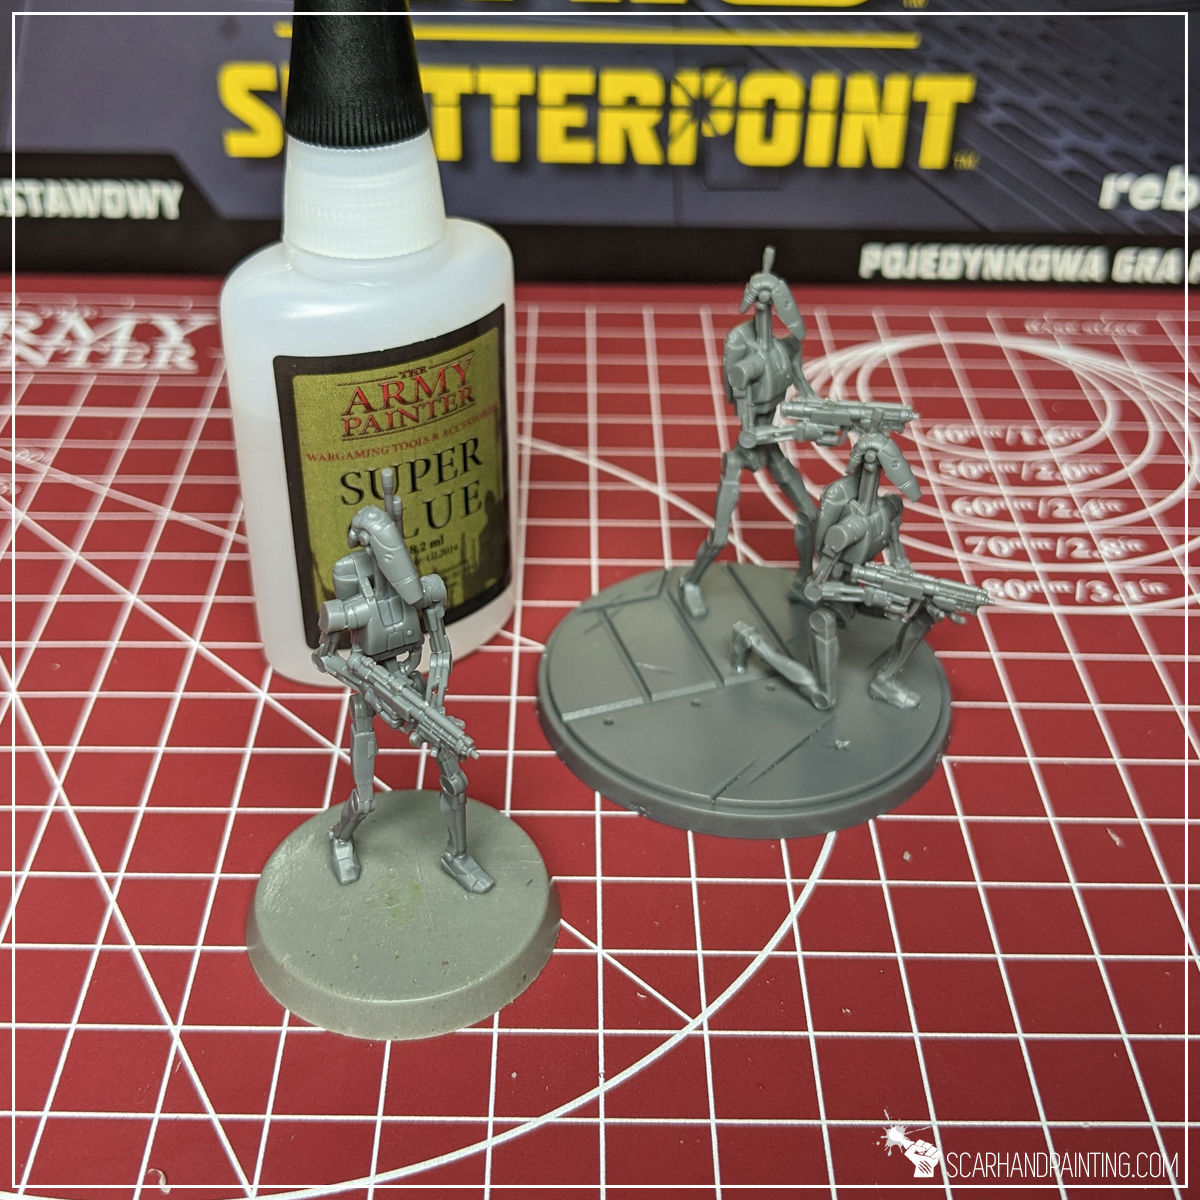
Welcome to Painting Star Wars: Shatterpoint Battle Droids tutorial. Here I will present to you a Step-by-step of a basic painting process for Battle Droids.
Before we start, some notes:
In case you are totally unfamiliar with the hobby, I have prepared a short guide on Shatterpoint miniatures preparation and assembly, including some in-depth notes regarding priming and particular painting techniques. You can find it in the previous article: Tutorial: Painting Star Wars Shatterpoint Clone Troopers.
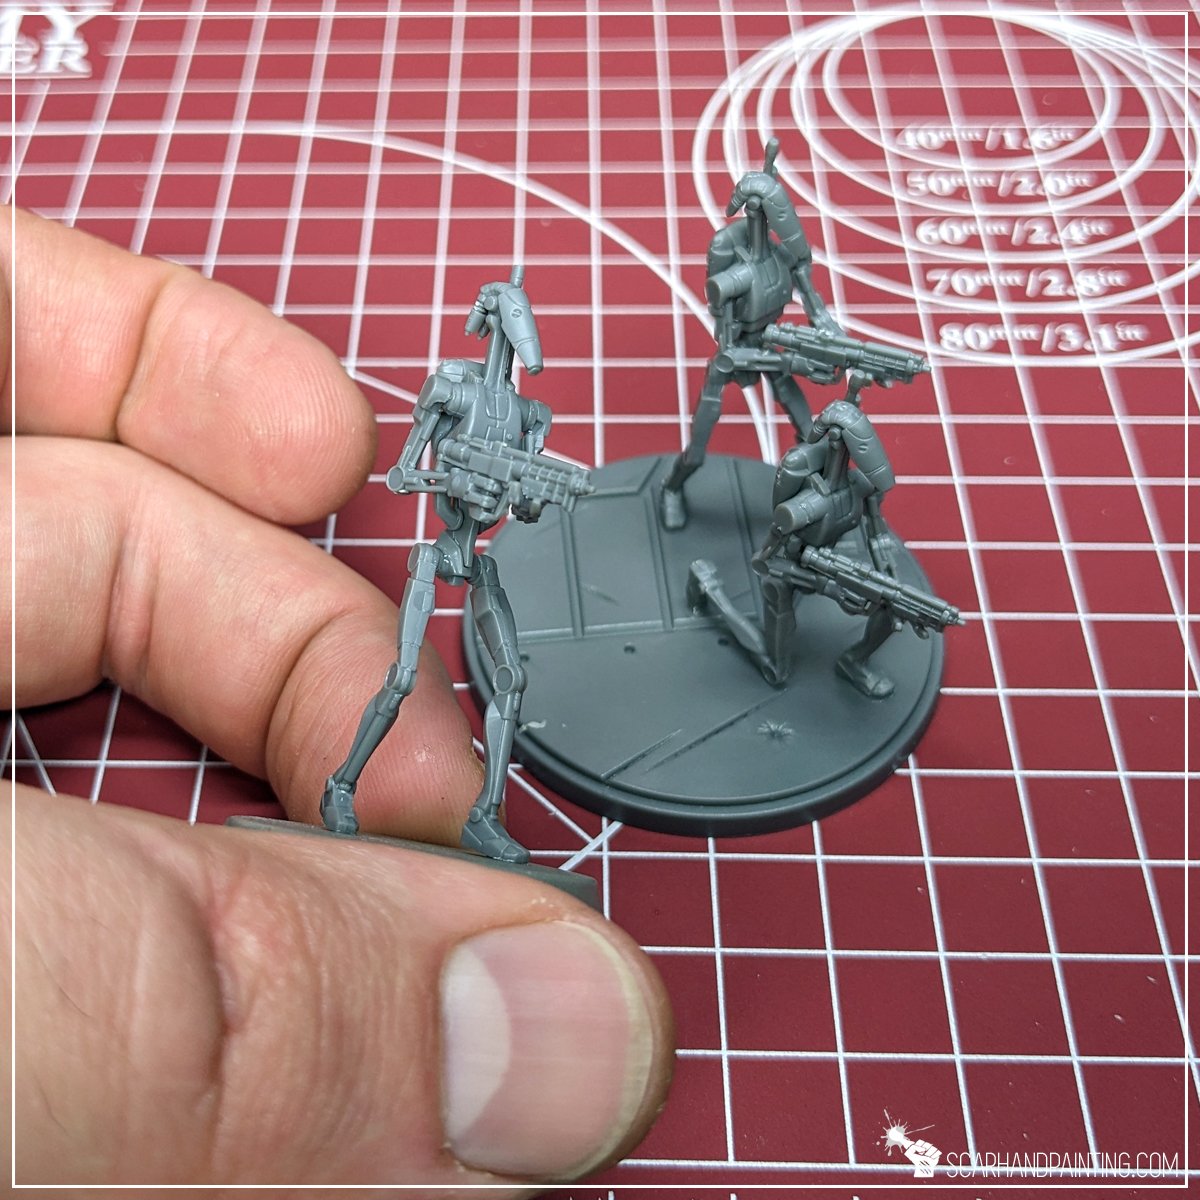
TIP: To better present the painting process I have kept one Droid on a separate base. If you feel it might be difficult to paint multiple miniatures glued to a single base, you can paint them separately, then glue together just before the Varnish step.
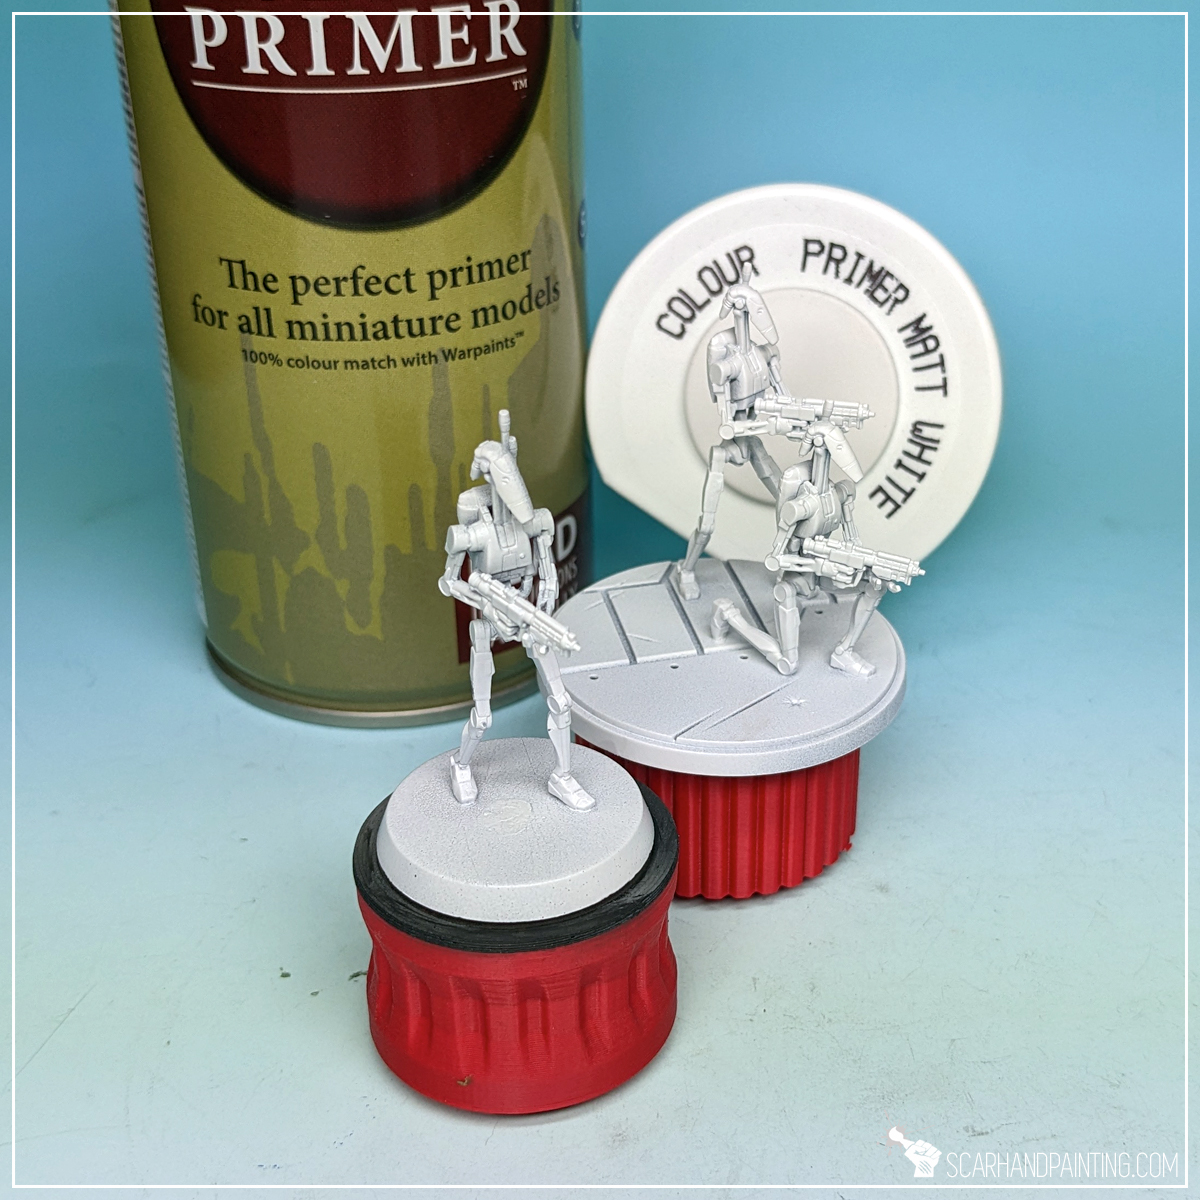
I mounted the miniatures on a stick with a piece of Blu-Tack, then undercoated them with The Army Painter White Matt Primer.

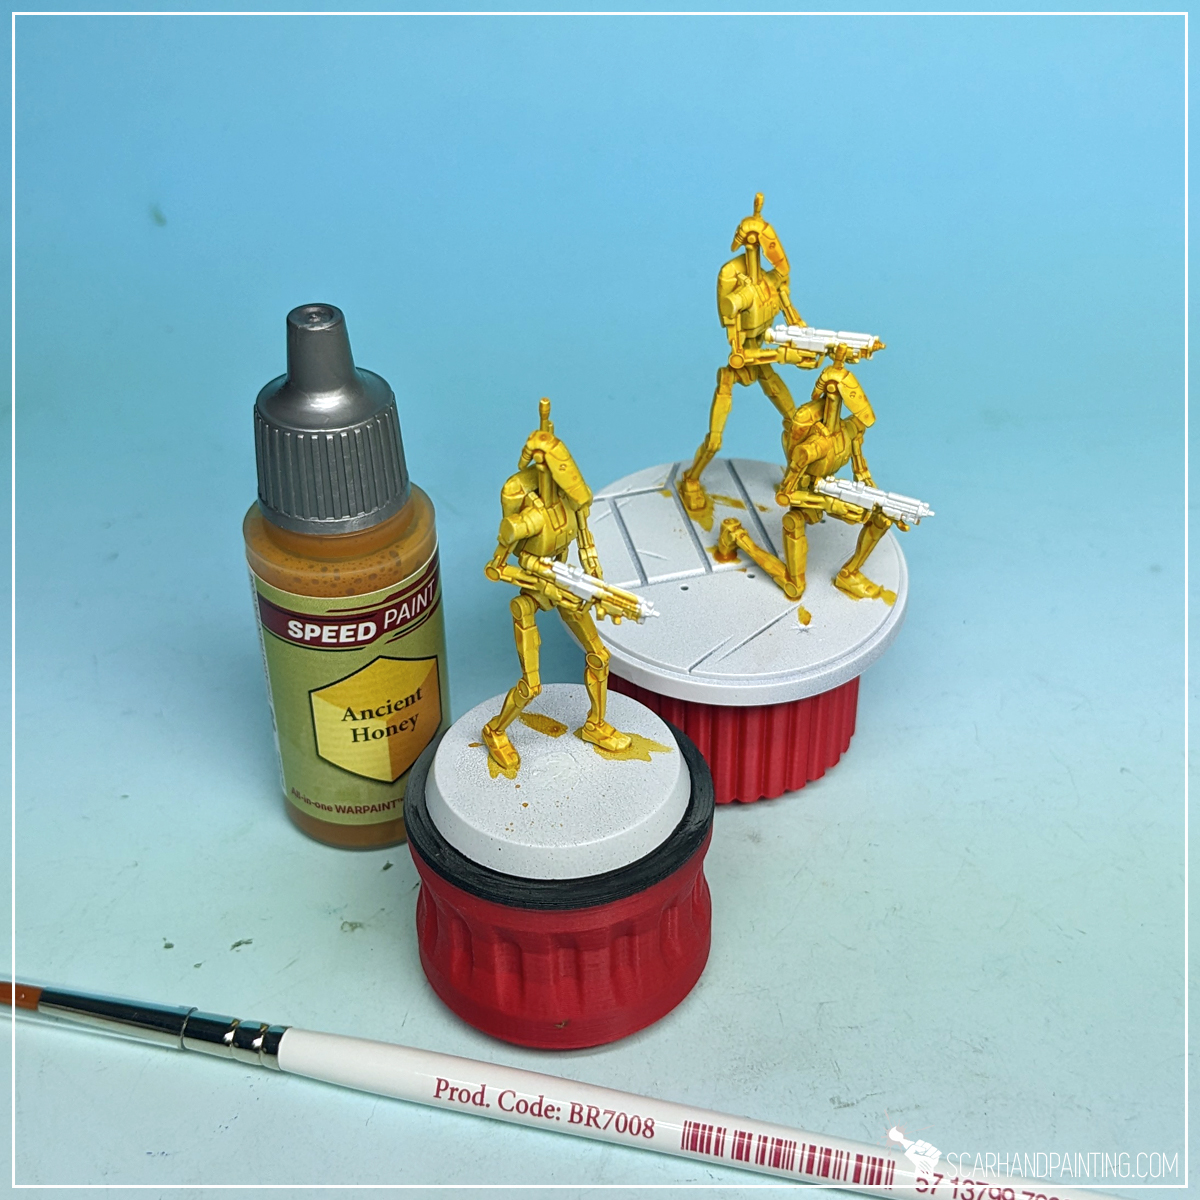
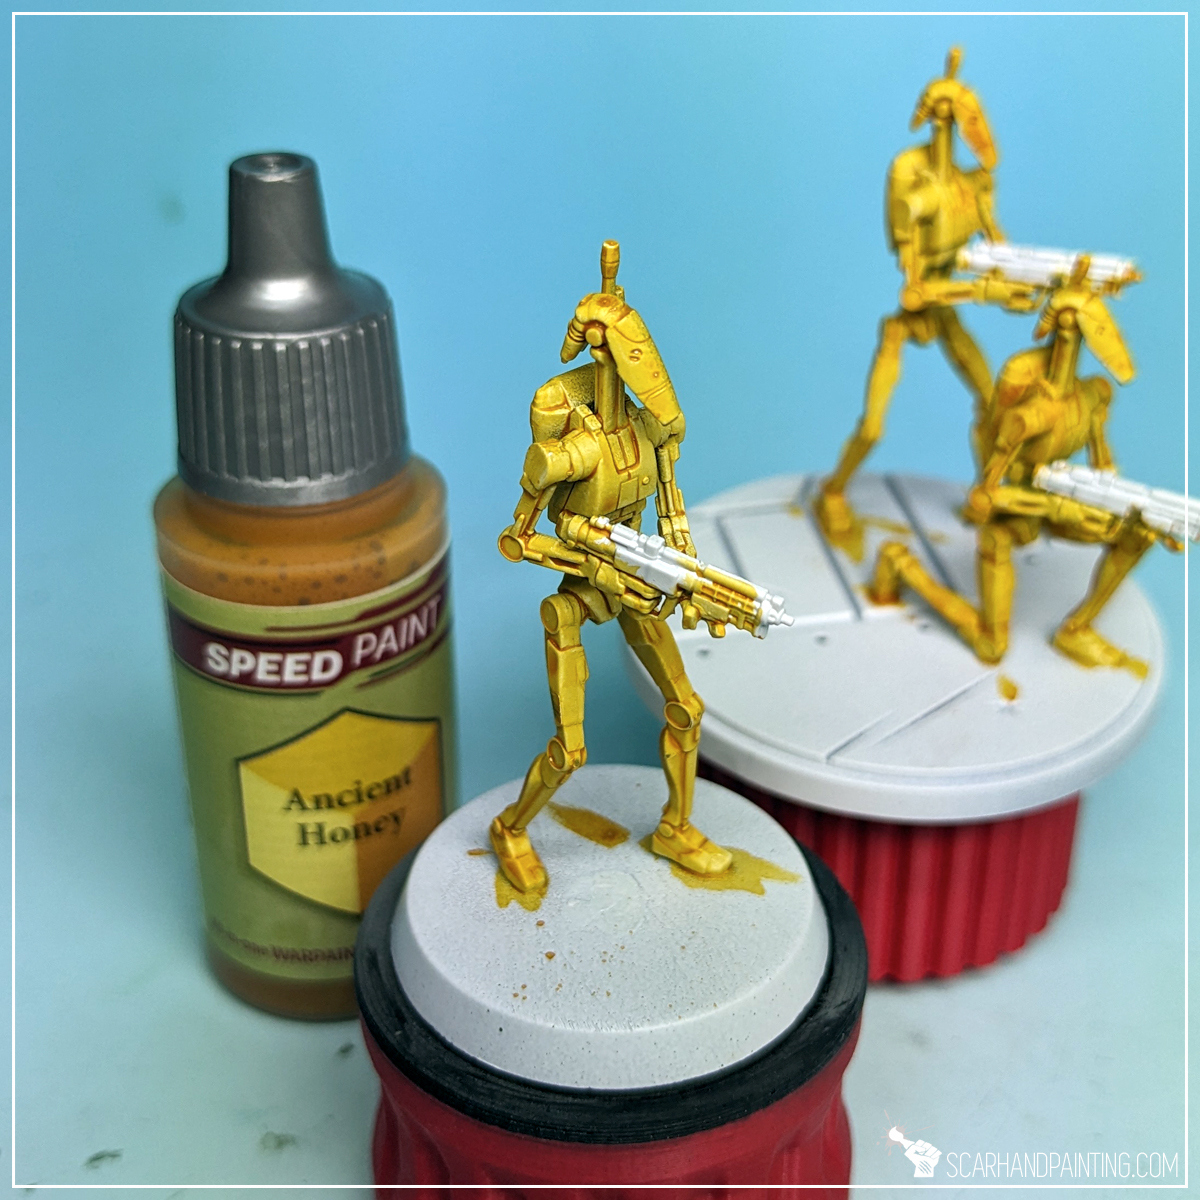
With Wargamer: Monster Brush I have applied a thick layer of Ancient Honey Speed Paint over the miniatures, except for weapons. This created a strong, bright base color.
TIP: No need to worry about the weapons too much. The painting process was designed to cover any mistakes made at this point.
Next, with a softer Wargamer: Regiment Brush, I applied a solid layer of Soft Tone all over the armor. Washes, such as Soft Tone, provide strong pigmentation in all recesses, adding color depth. They also tone down the entire color a bit, which in case of Battle Droids, works to our advantage.

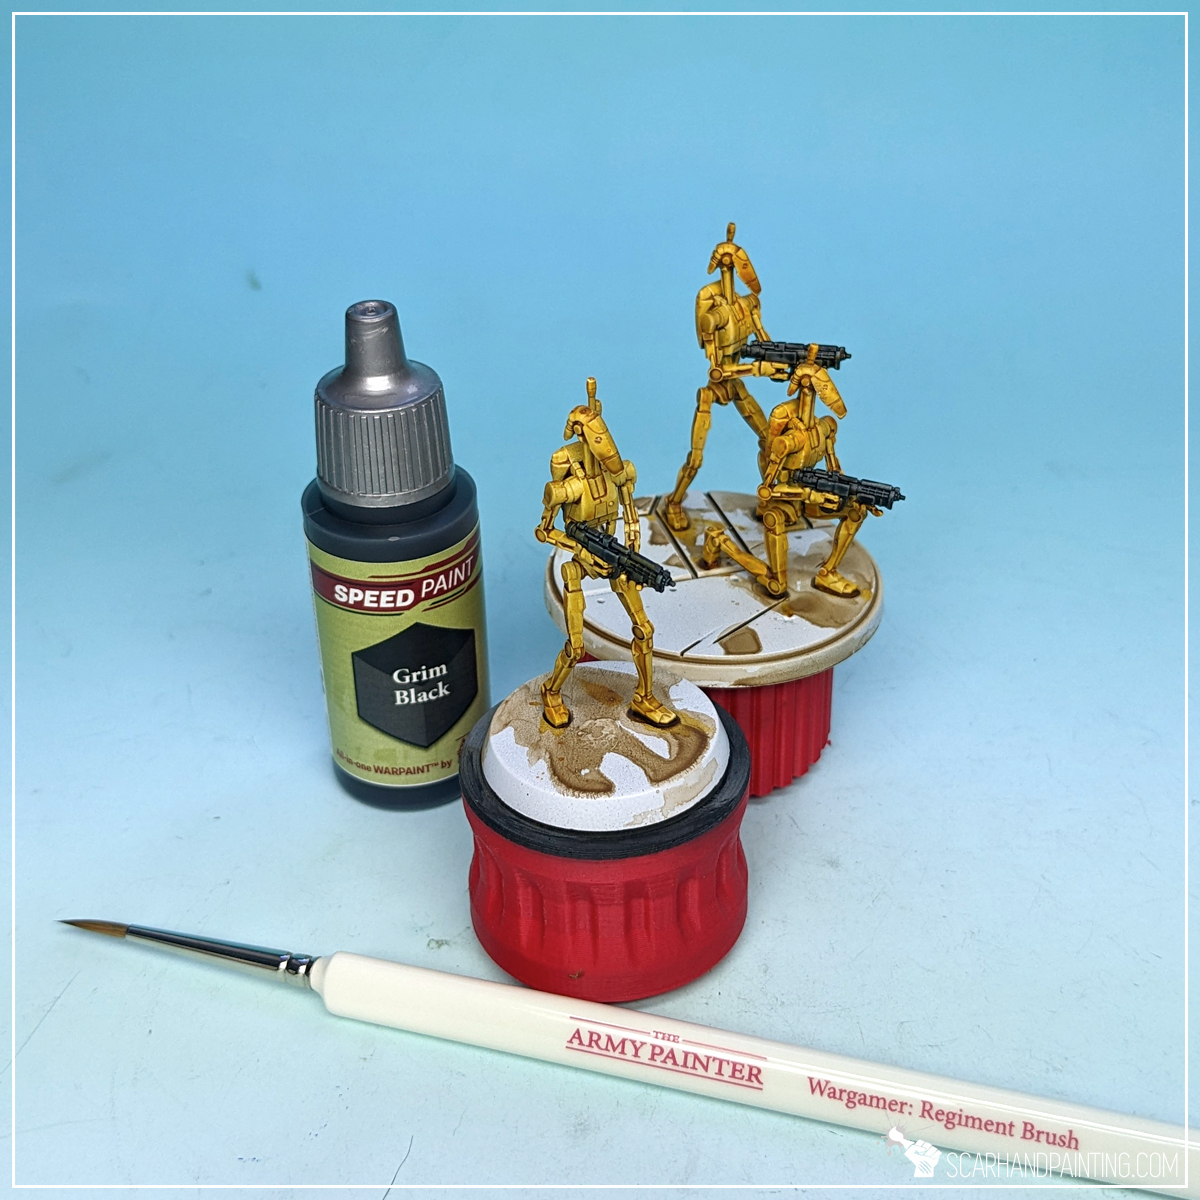
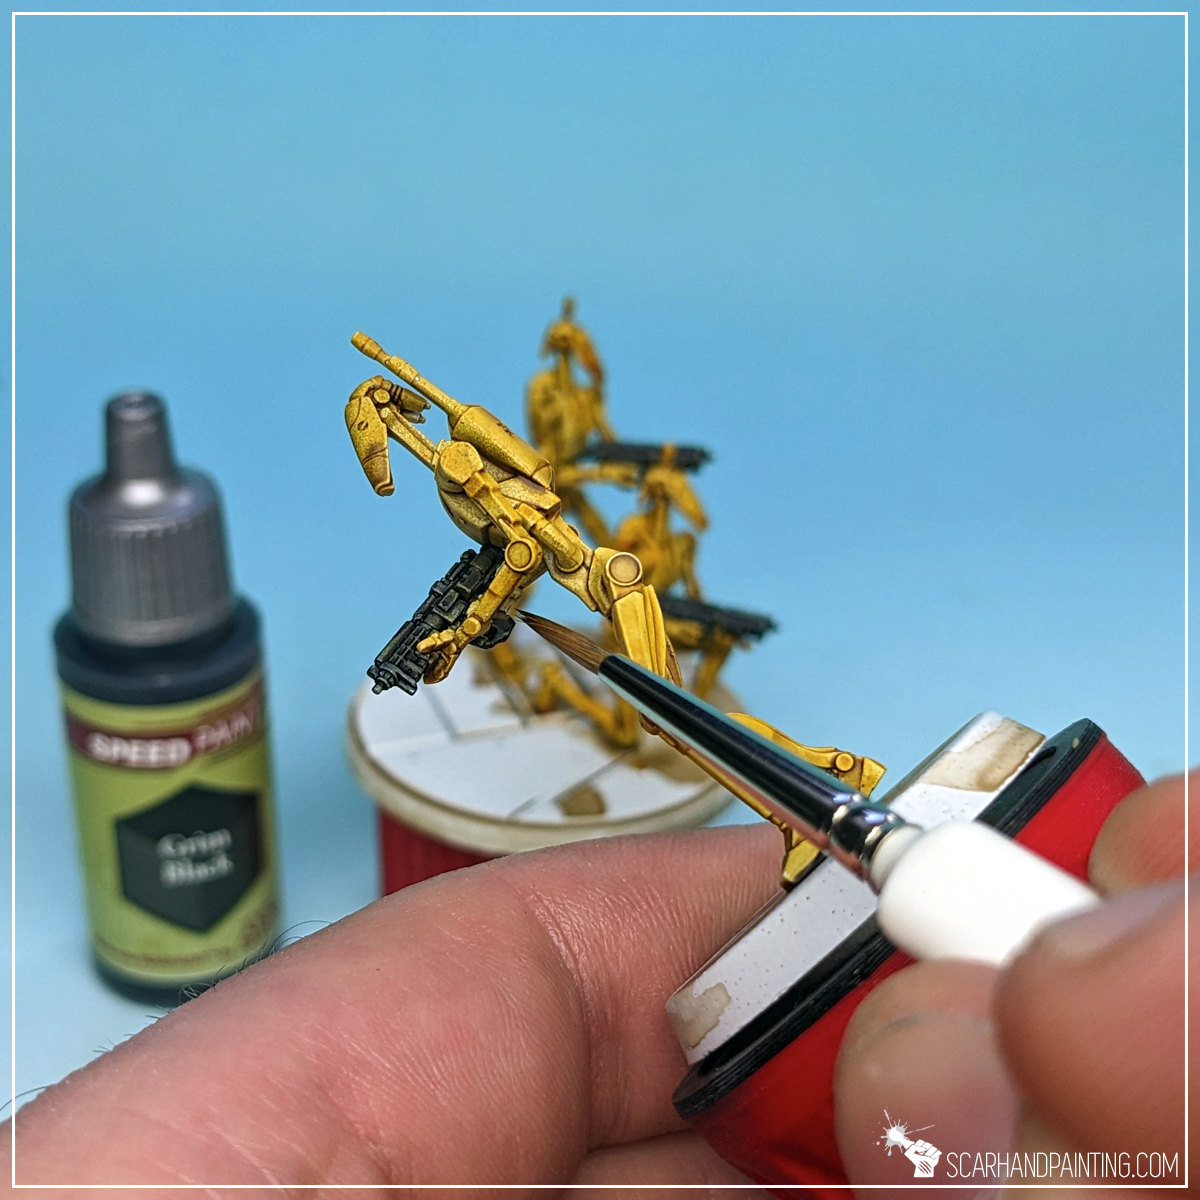
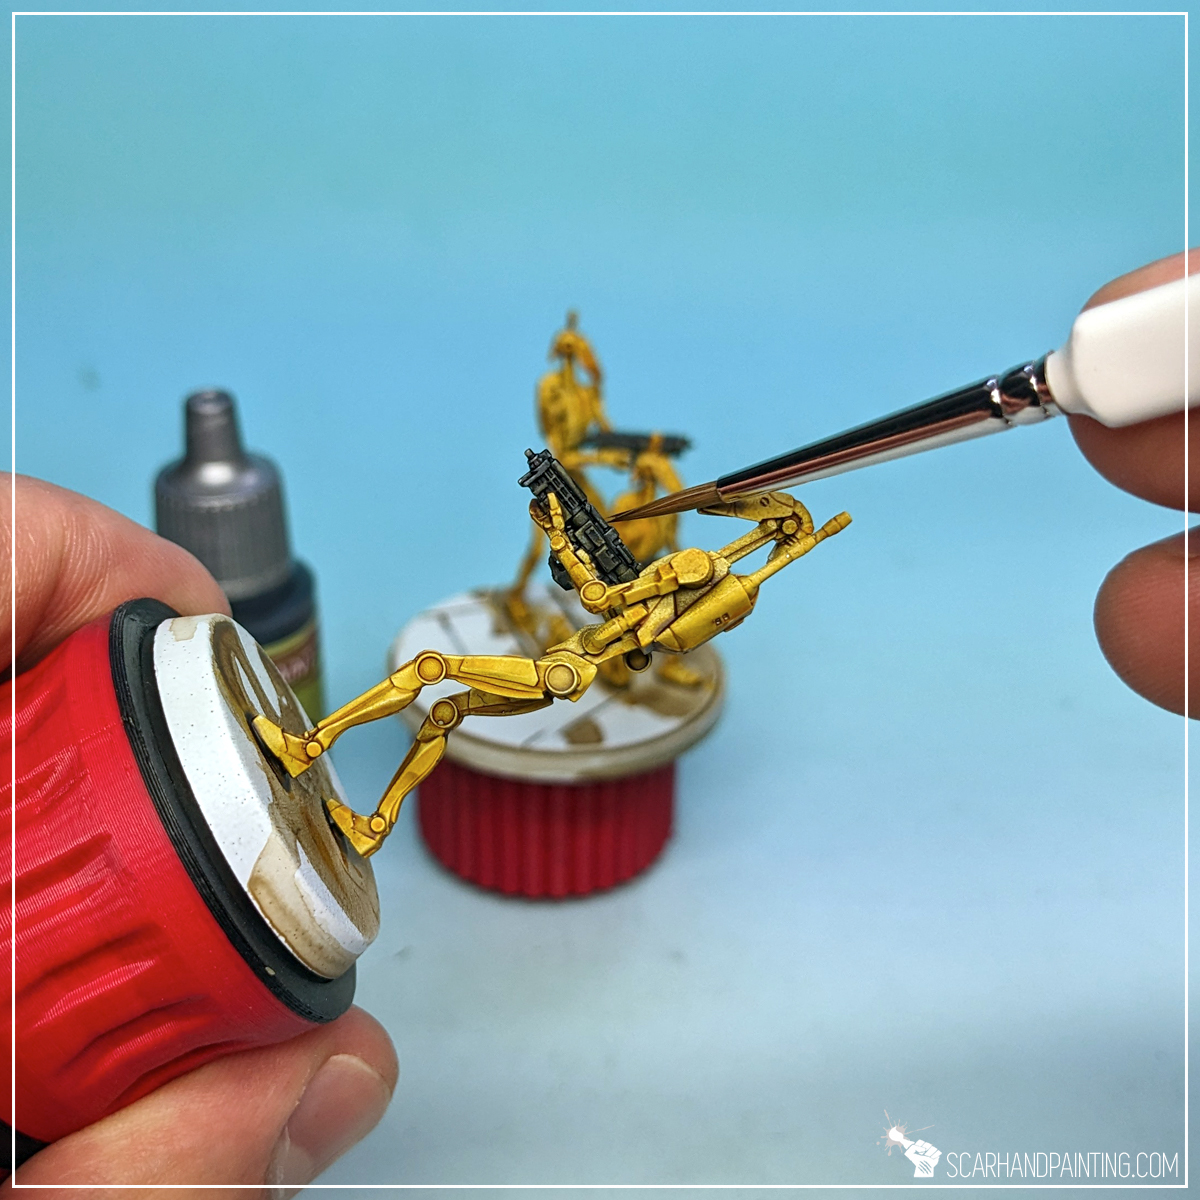
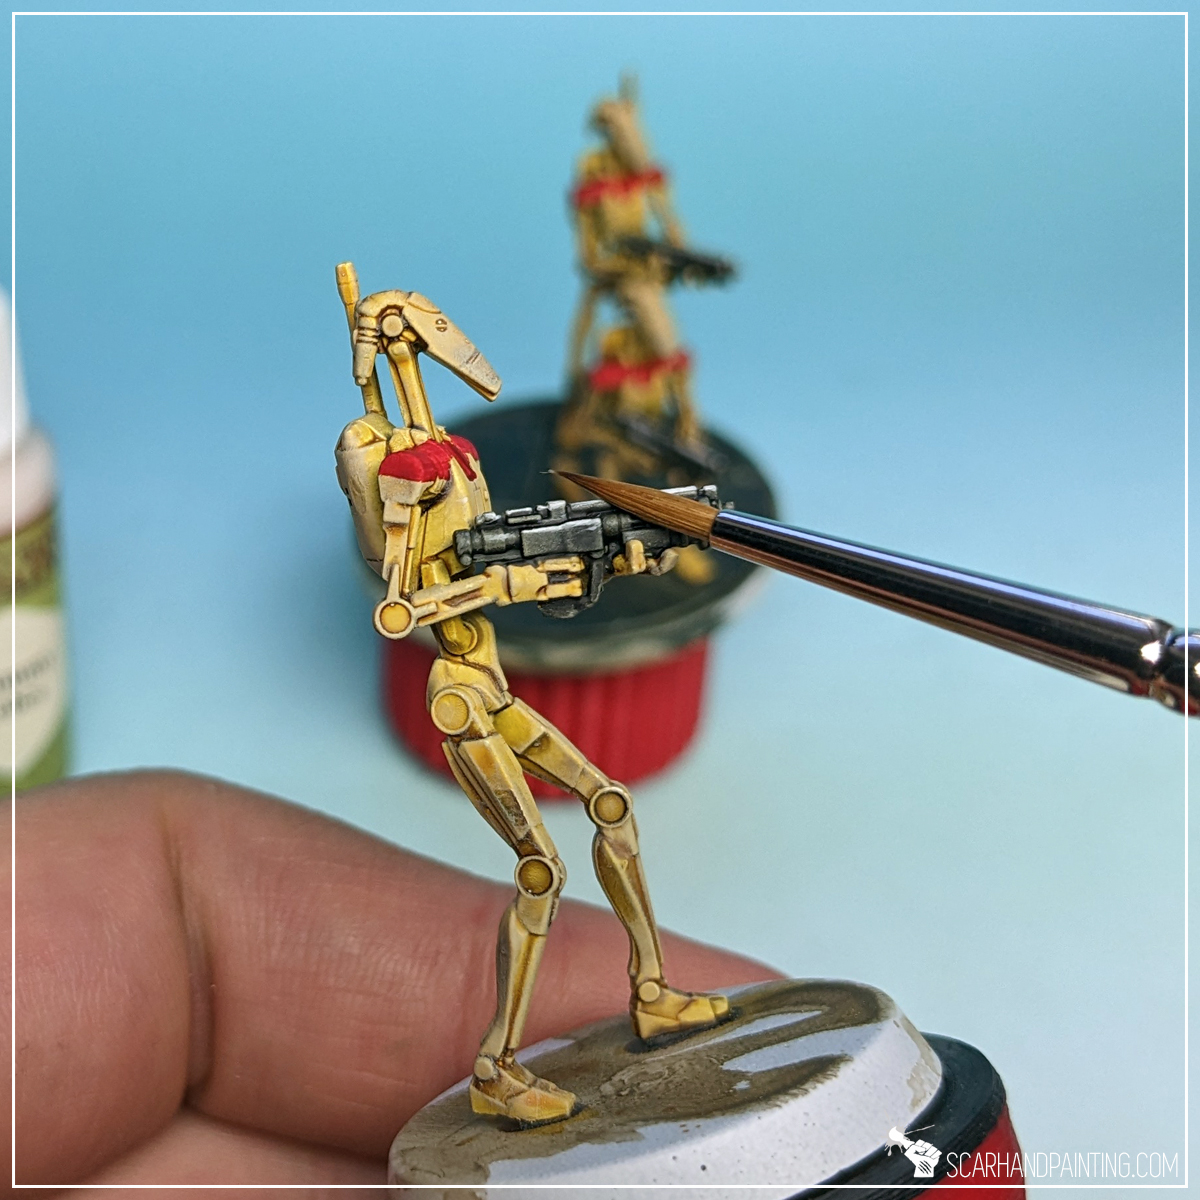
For weapons I went with the Grim Black. This Speed Paint was already tested during the Clone Troopers tutorial, so I knew it would cover any previous mistakes left on the painted areas. I used a Wargamer: Regiment Brush and did my best to avoid messing up the bright Droid armor.
TIP: This might be a difficult step for anyone not familiar with a brush. I recommend switching between different brush sizes and moving the miniature around for easier access. Speed Paints are thin, so you do not have to ‘lead’ the tip of the brush too much. Delicate touches will do.
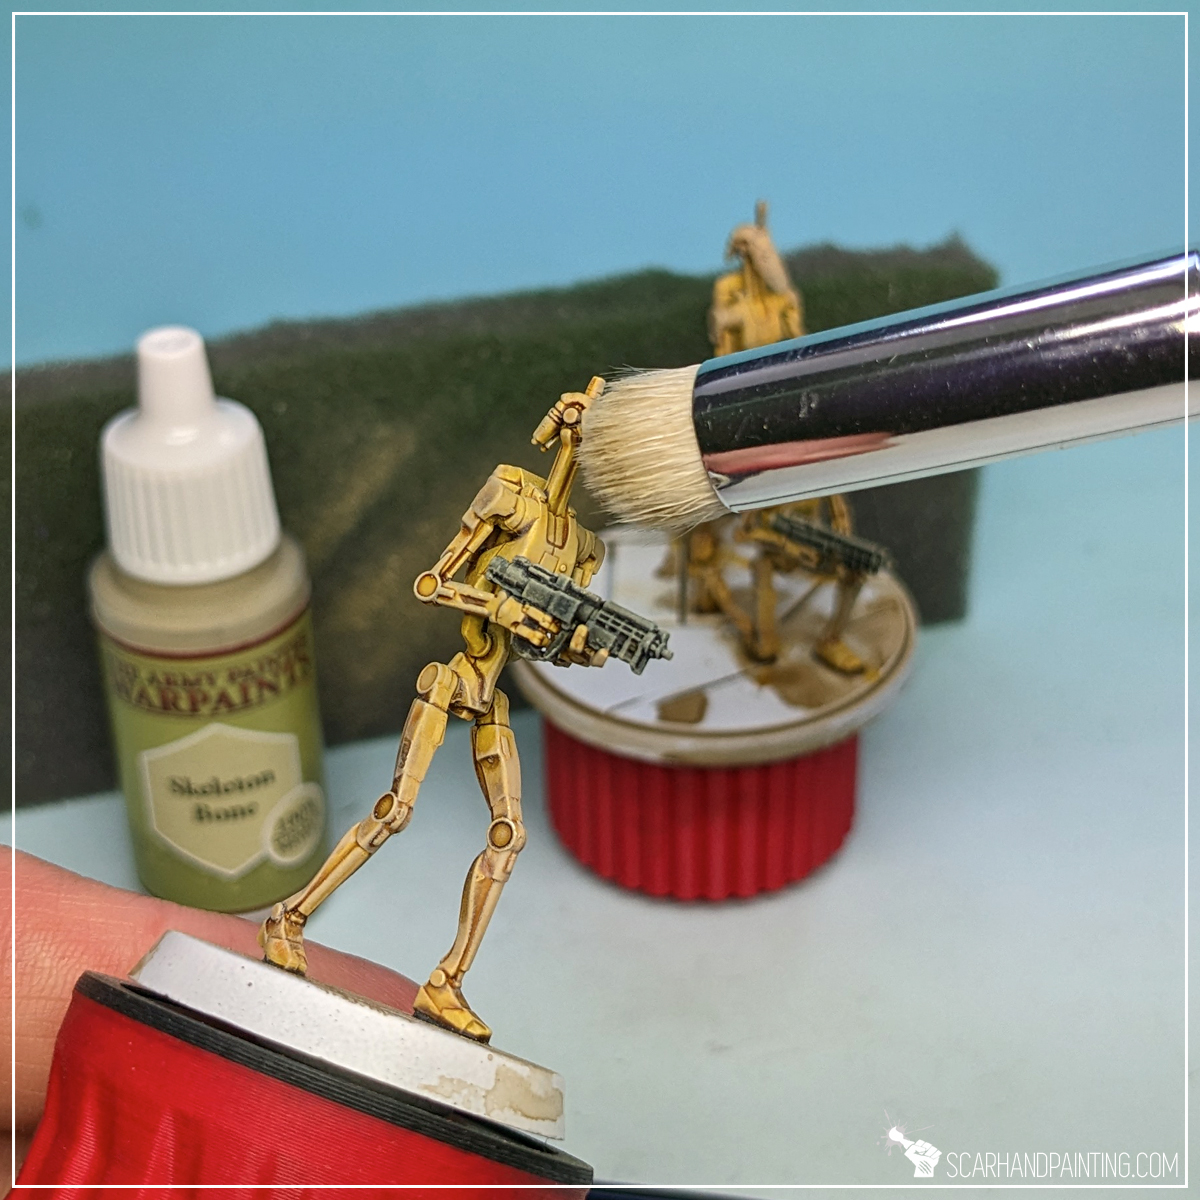
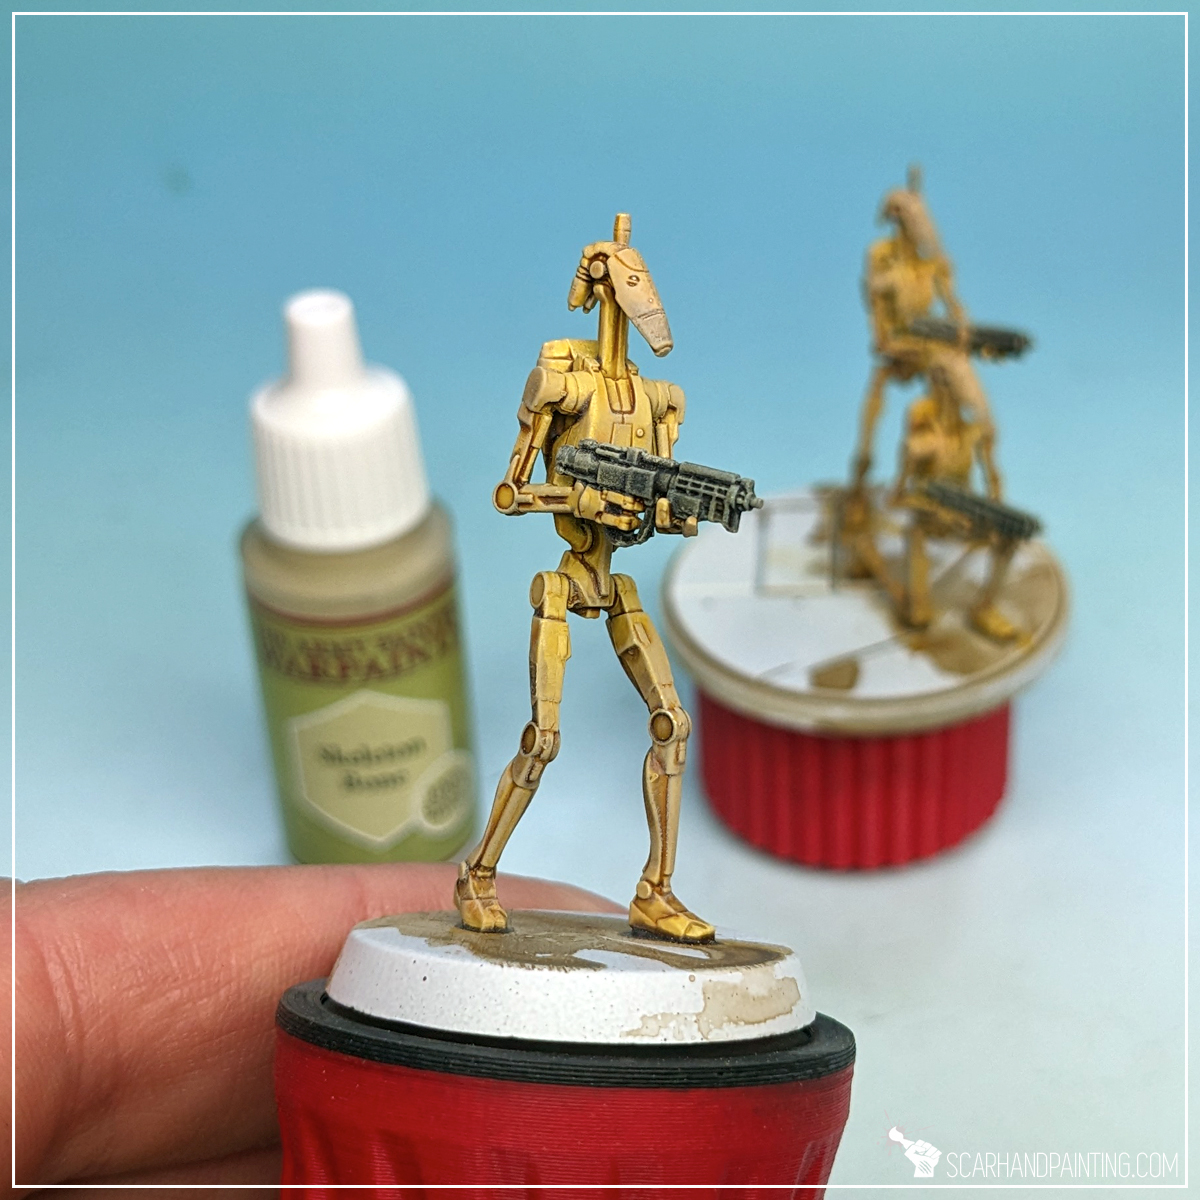
To apply an overall highlight I Drybrushed Skeleton Bone all over the miniature. I used Masterclass Mighty and Moderate Drybrush for this, but it can be done with Wargamer: Large Drybrush as well.
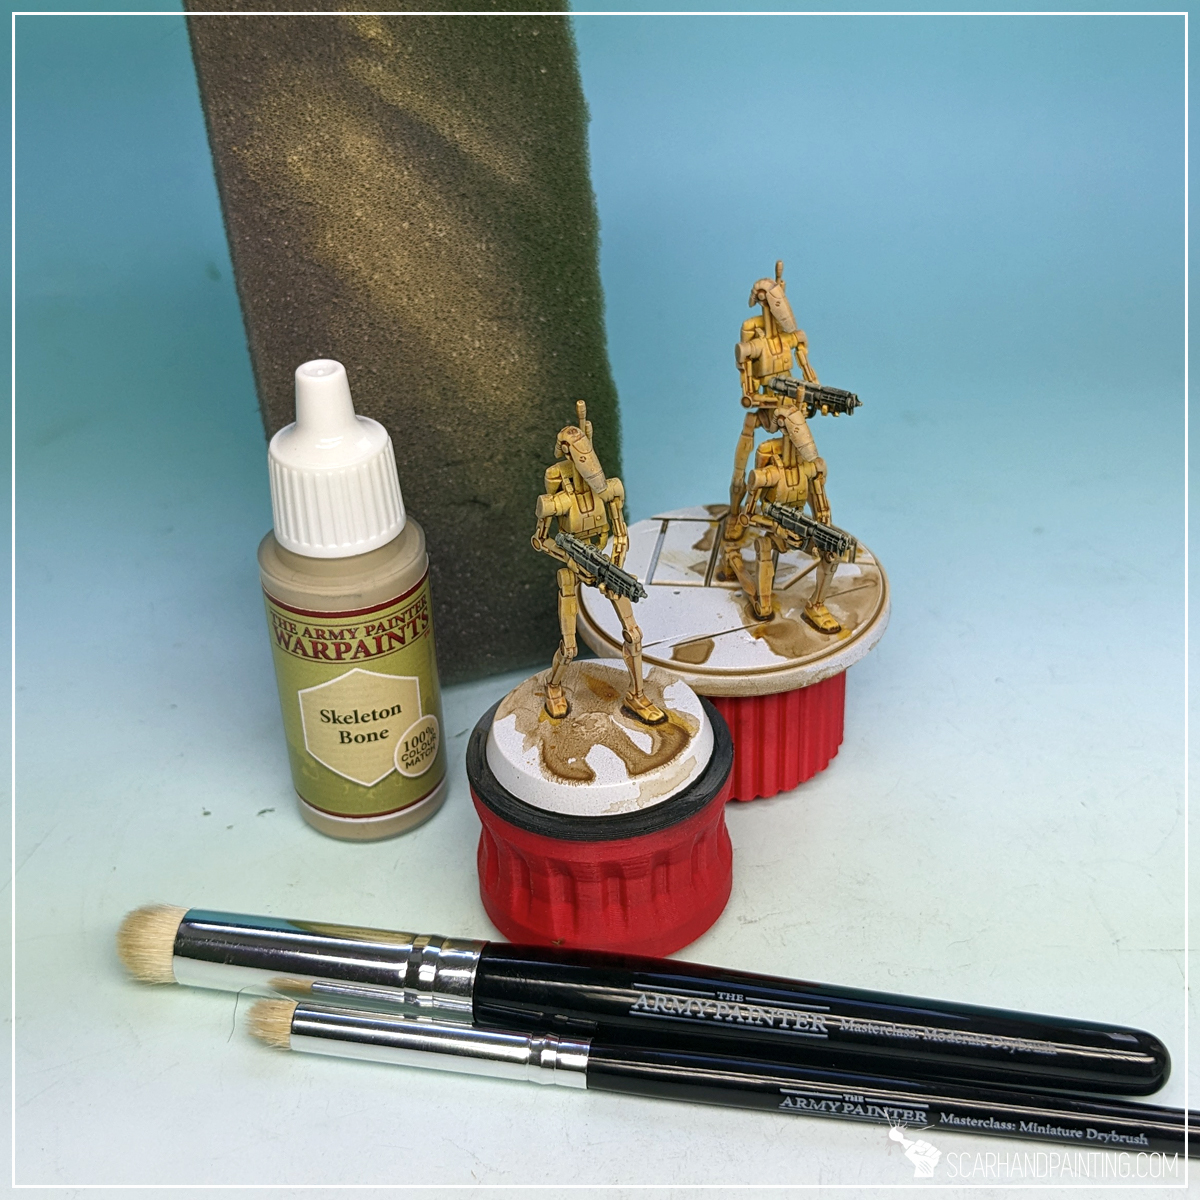
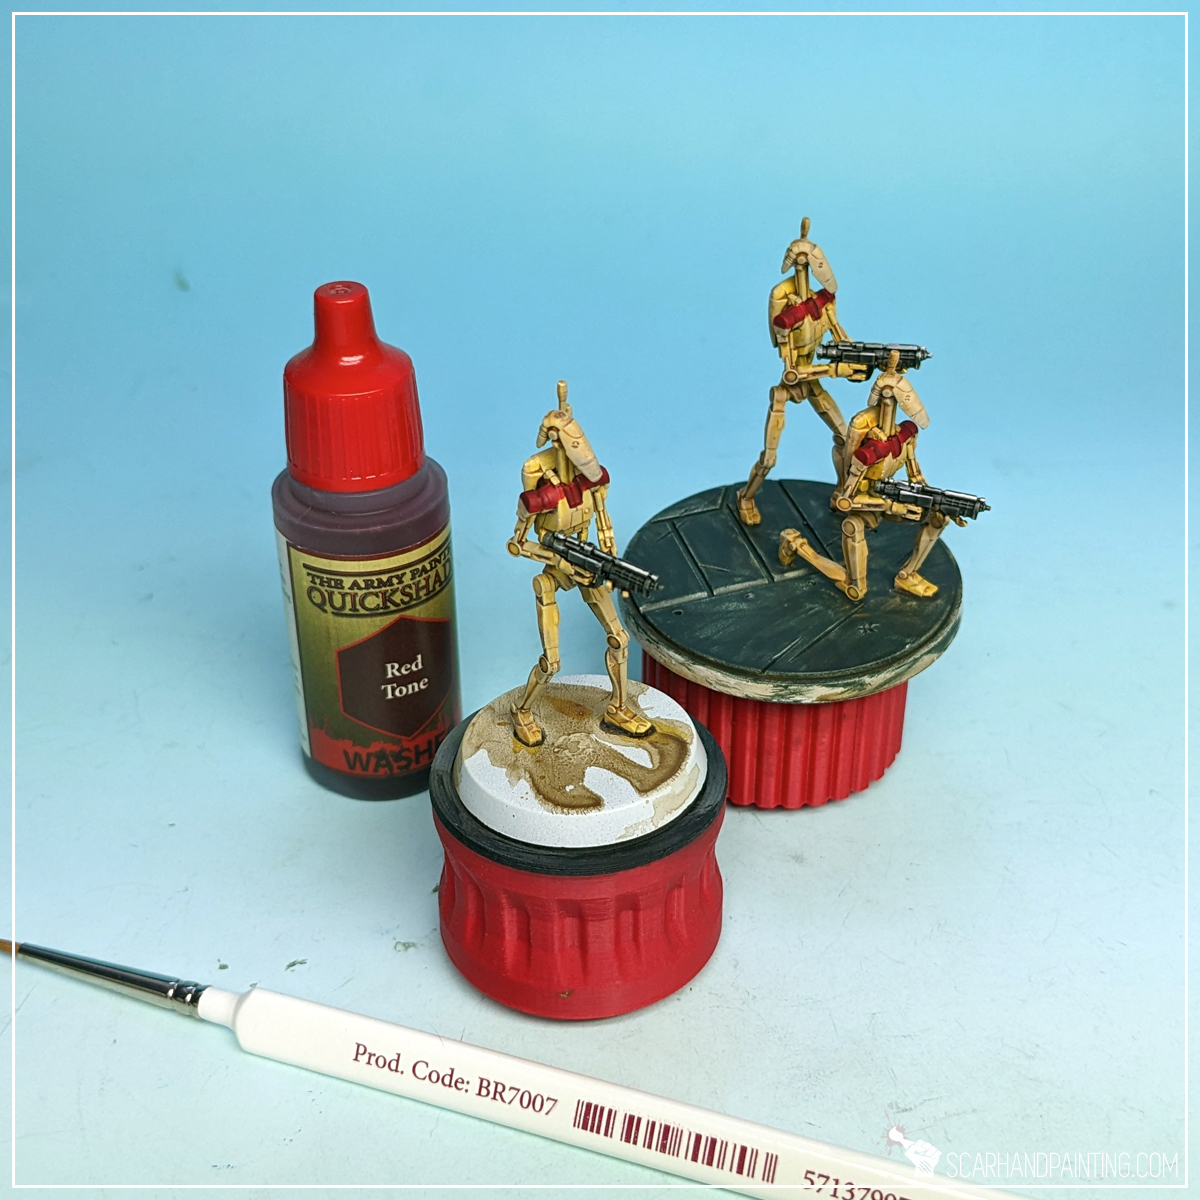
I used Poppy Red Speed Paint and applied it on top of chosen areas with Wargamer: Insane Detail Brush. As a Speed Paint the Poppy Red is perfect to cover bright paints underneath, including edges, previously highlighted with Skeleton Bone.
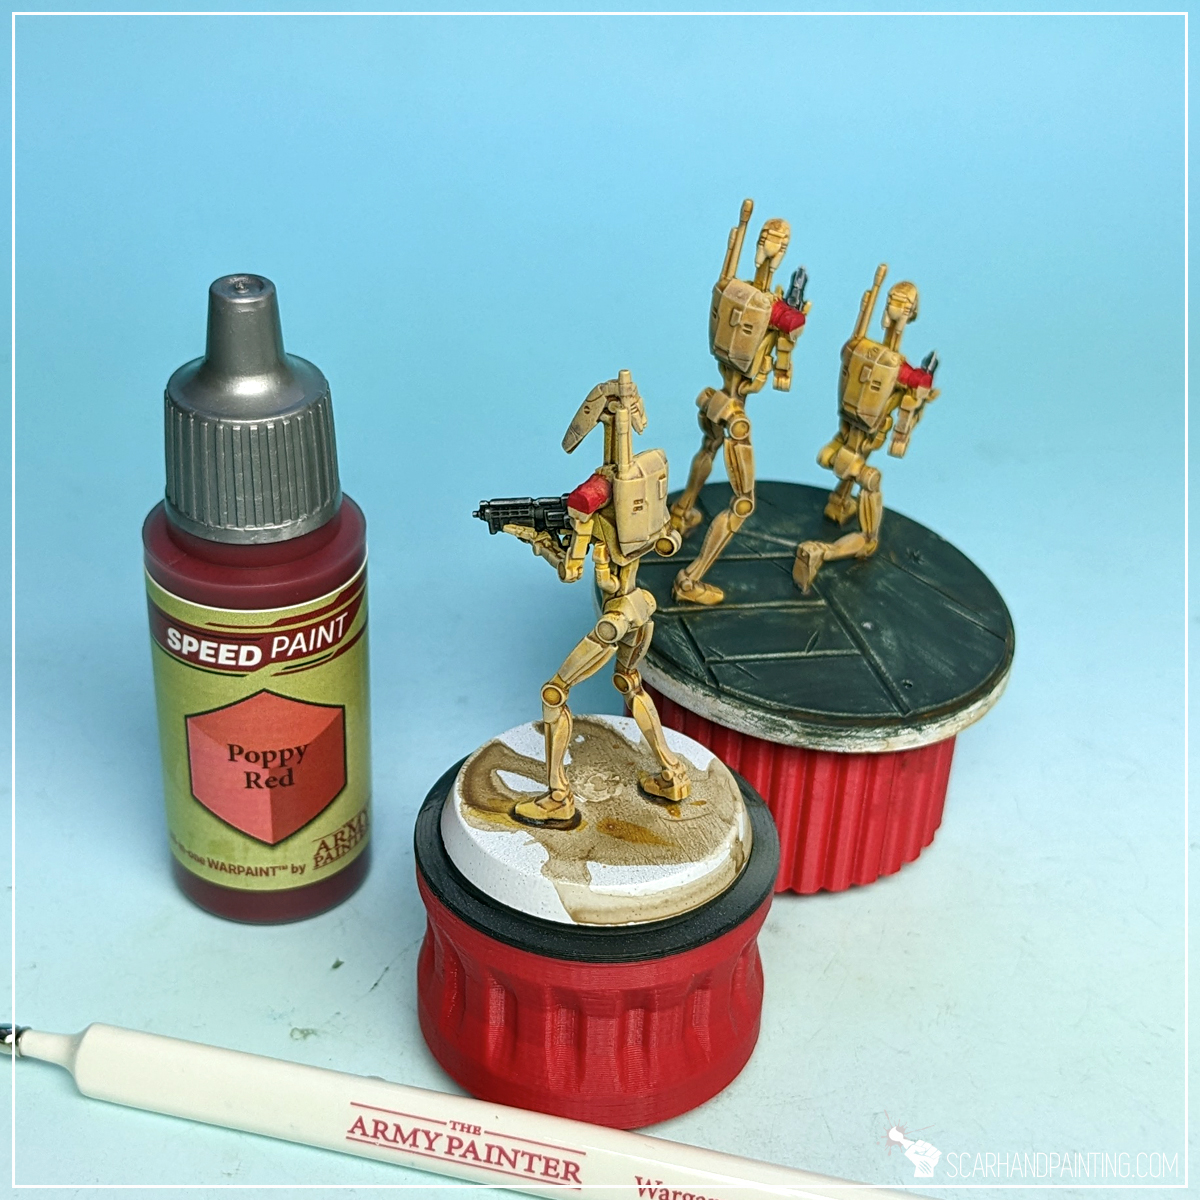

Next I applied a layer of Red Tone wash on top, to add depth and darken the color just a bit.
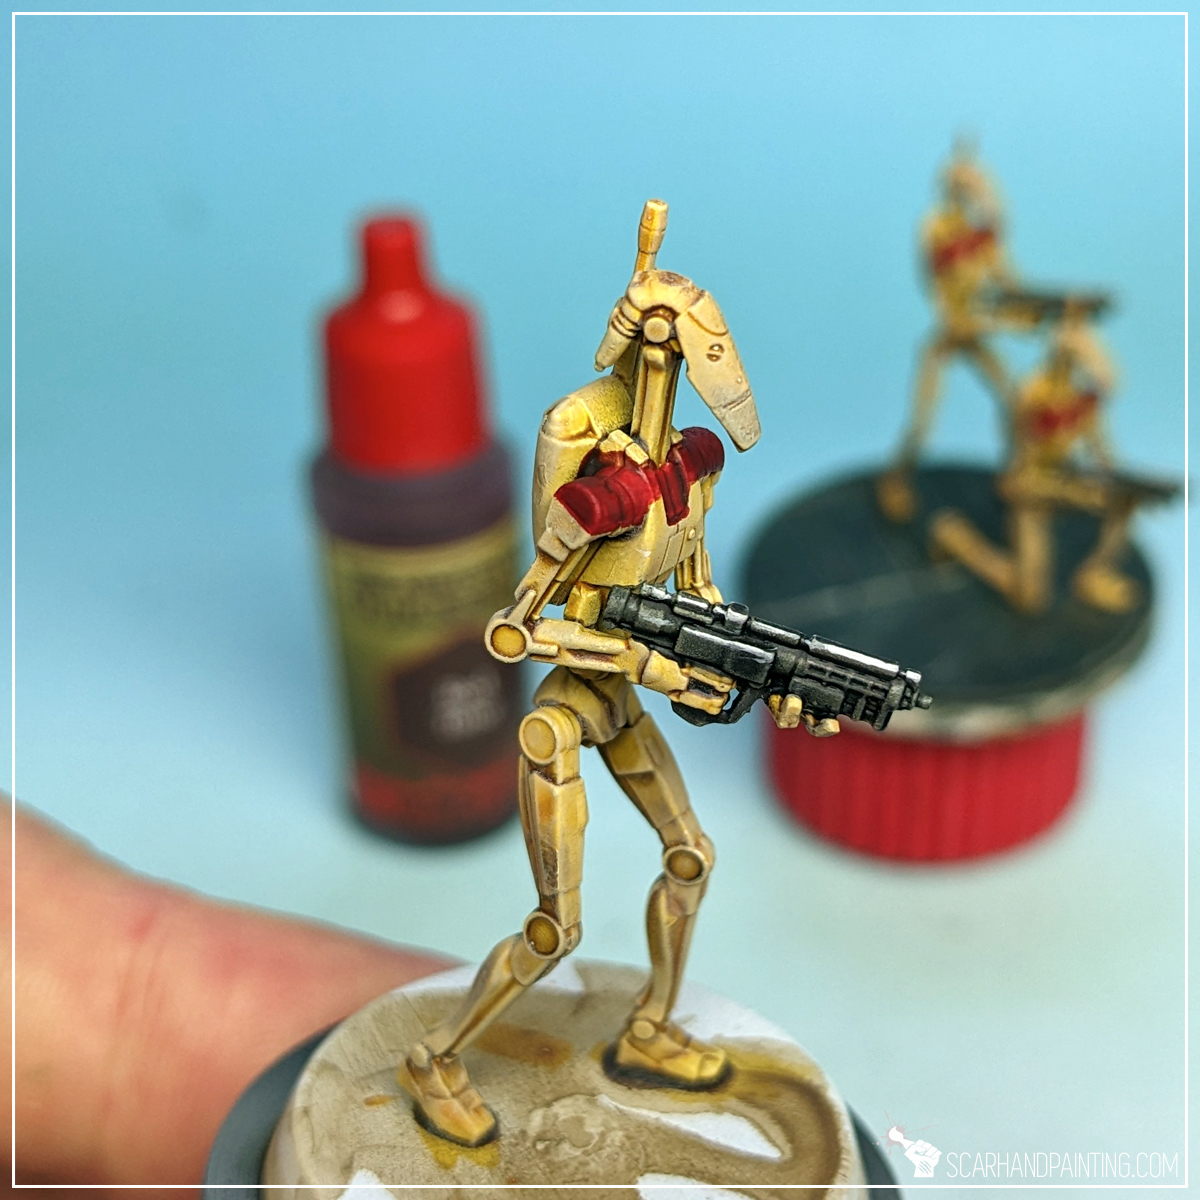
To make weapons pop, I used a Wargamer: Regiment Brush and applied a Dark Tone wash over them.
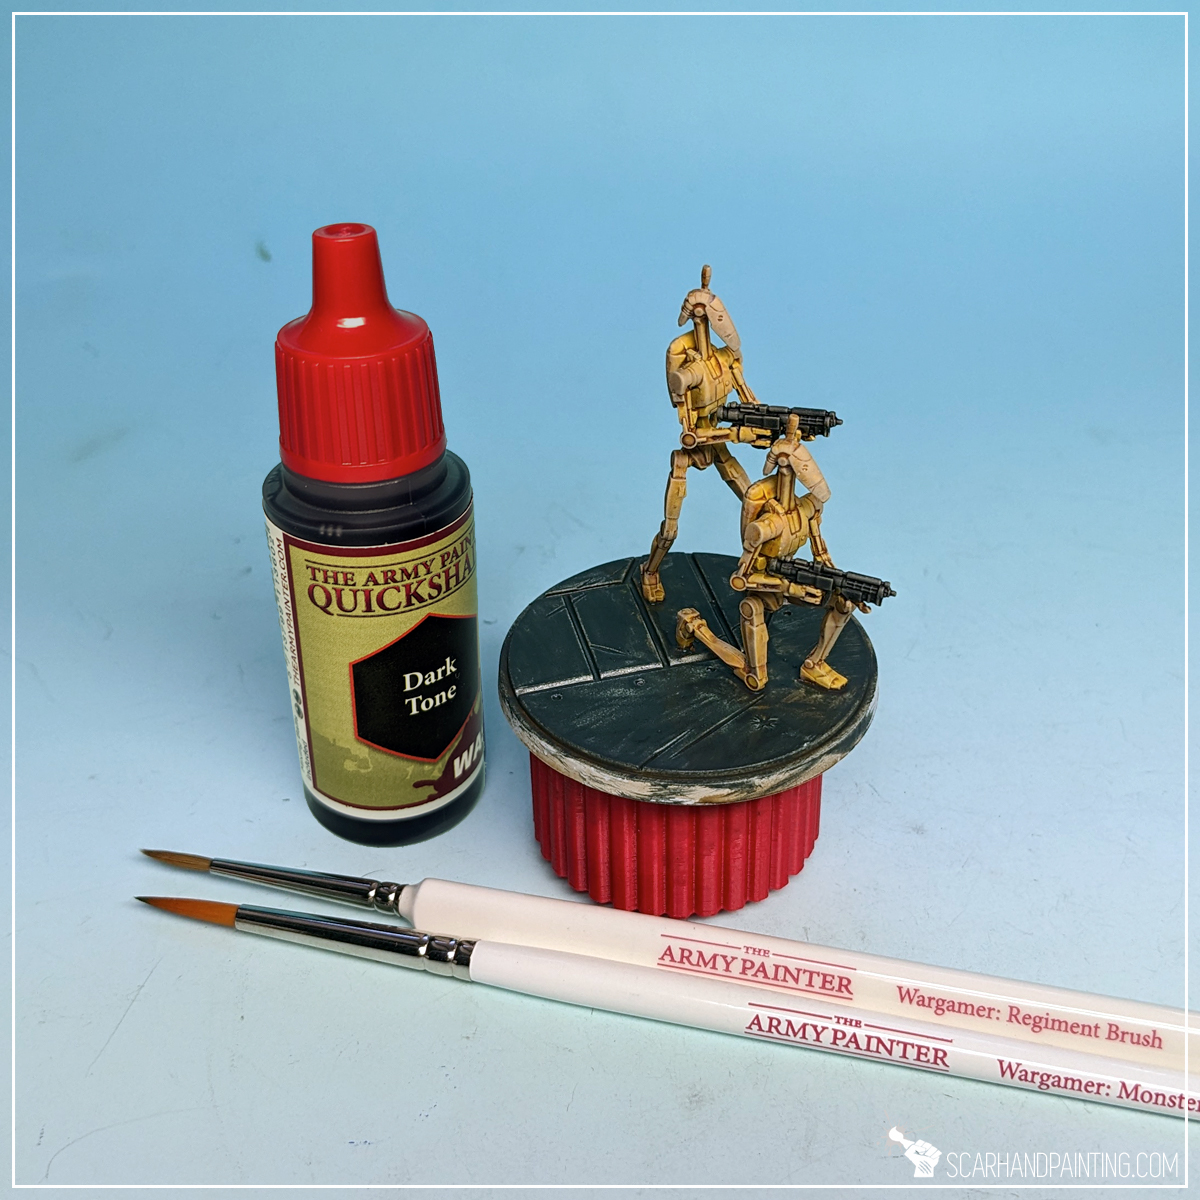
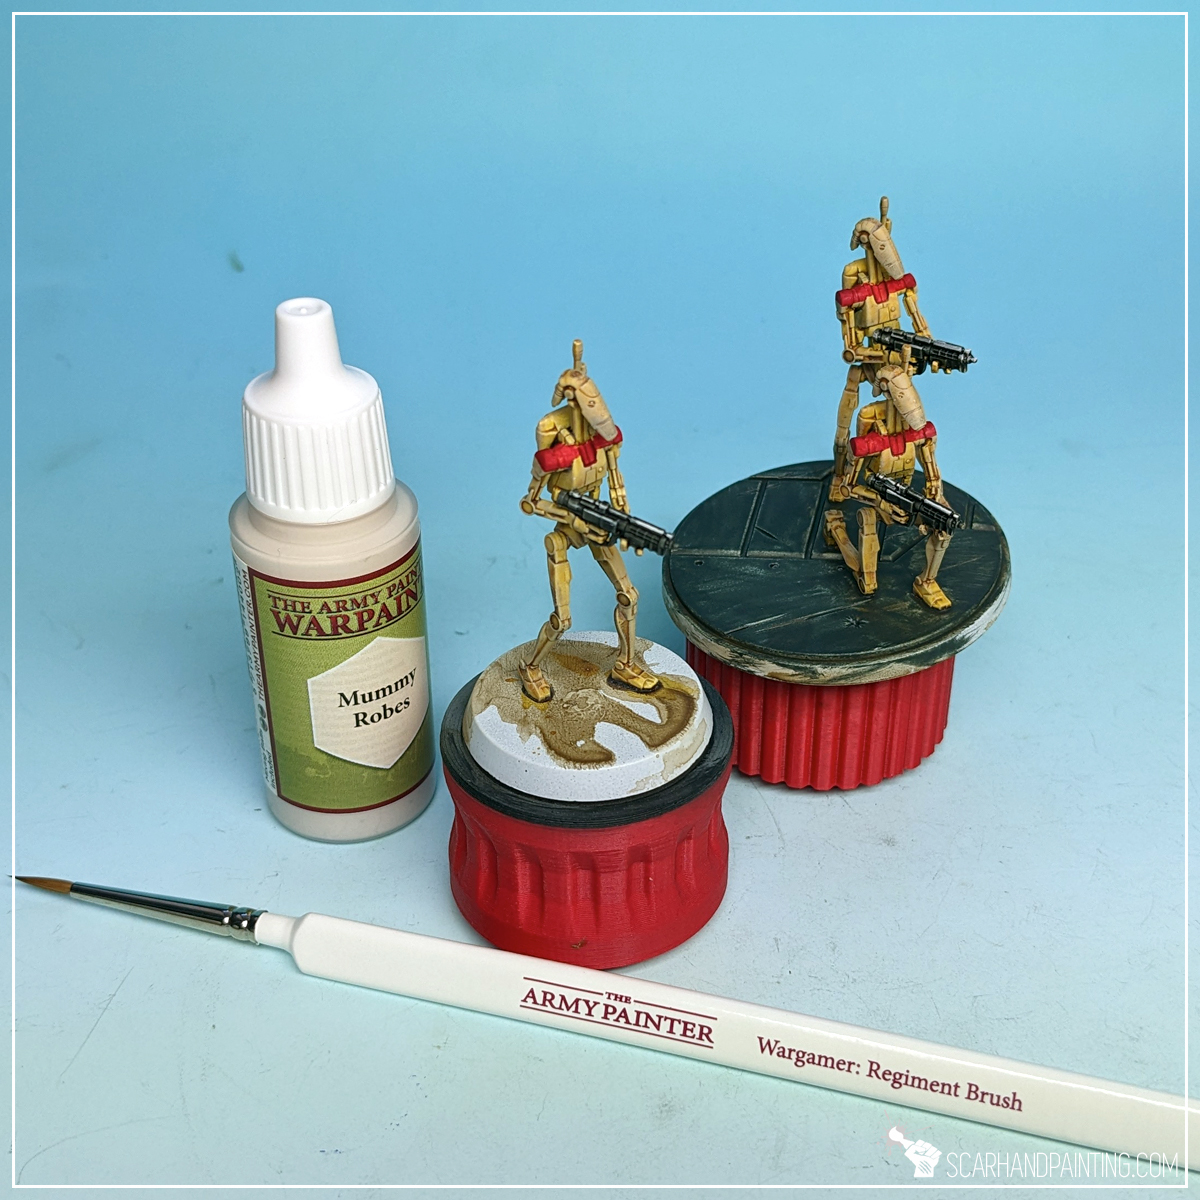
I then highlighted the edges with Mummy Robes, similar to how I did it in the Clone Troopers tutorial.
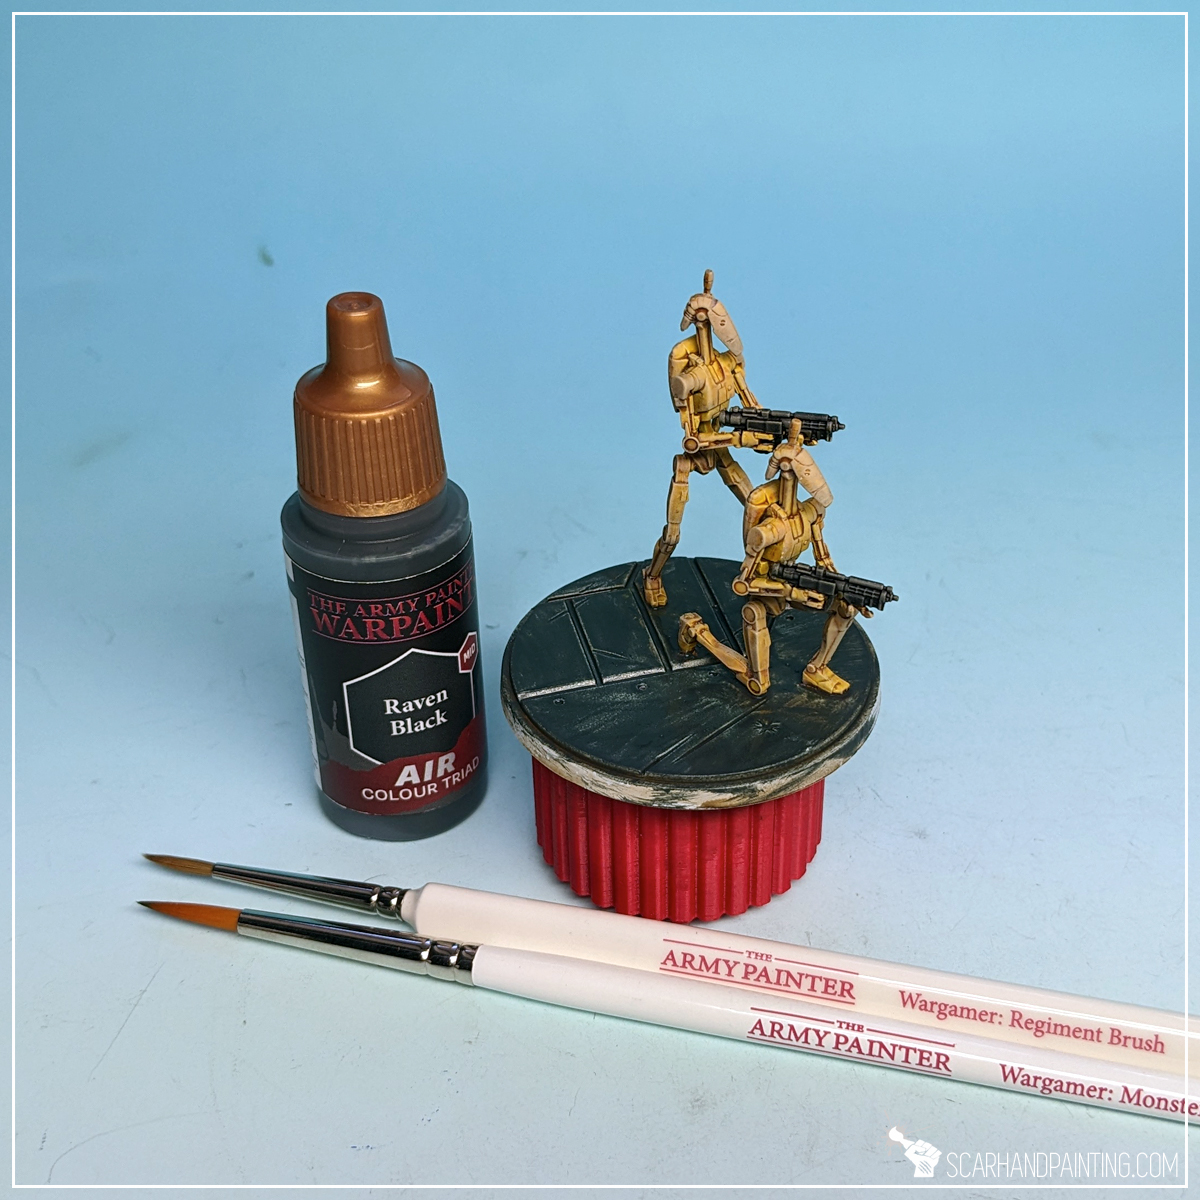
For bases I applied a layer of Raven Black (air) with a Wargamer: Regiment Brush. Just like with Clone Troopers, I deliberately used air series paint for an extra messy end result.
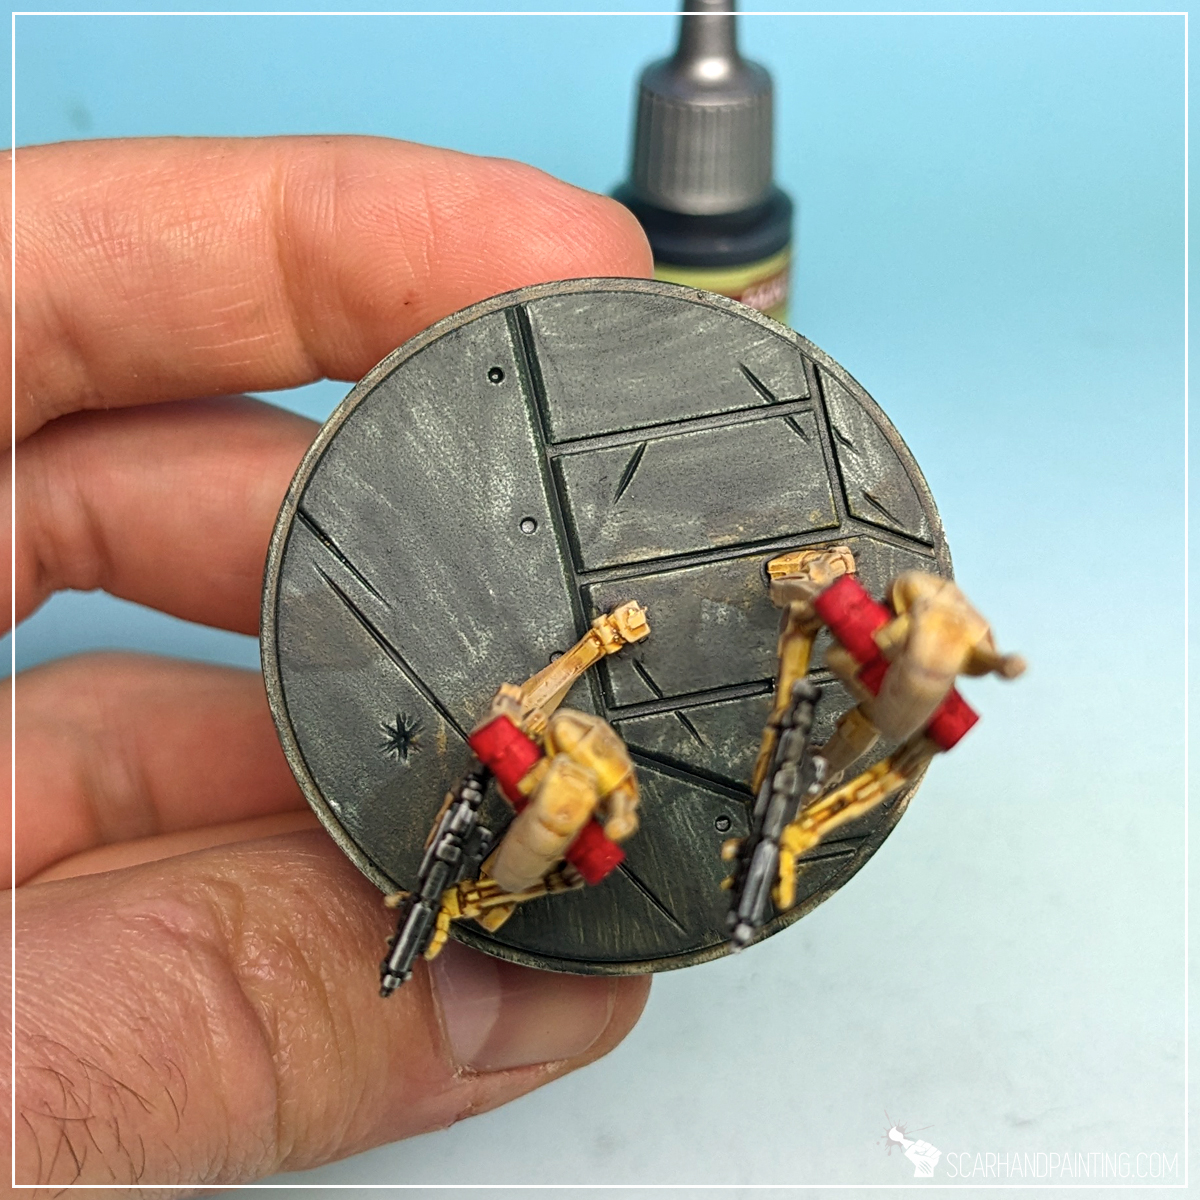
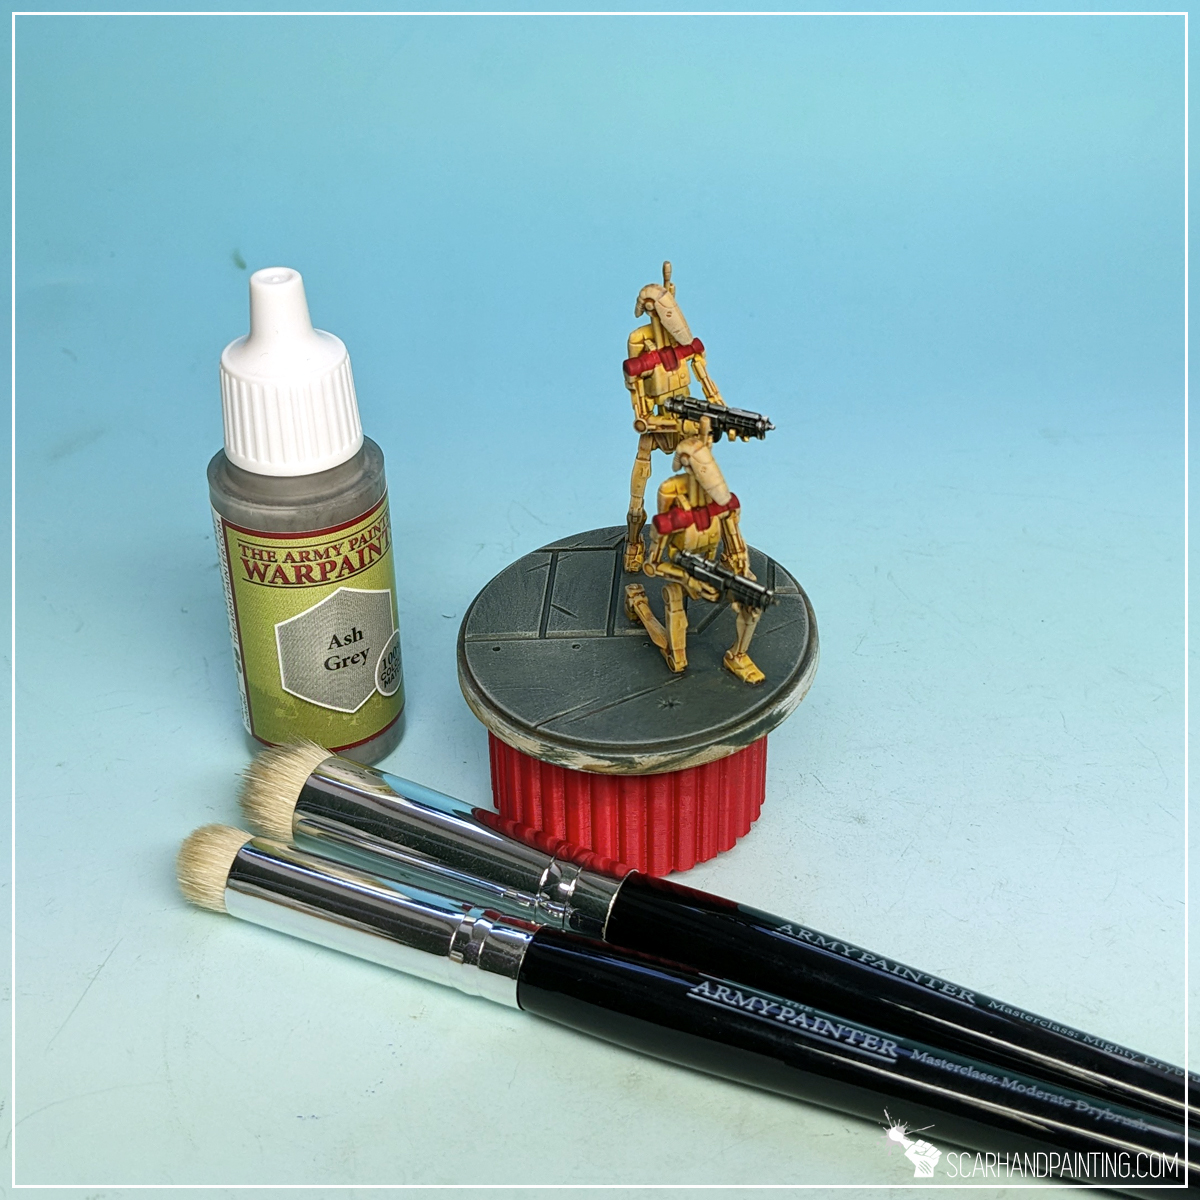
I then applied a strong drybrush of Ash Grey all over the bases and feet of the miniatures.
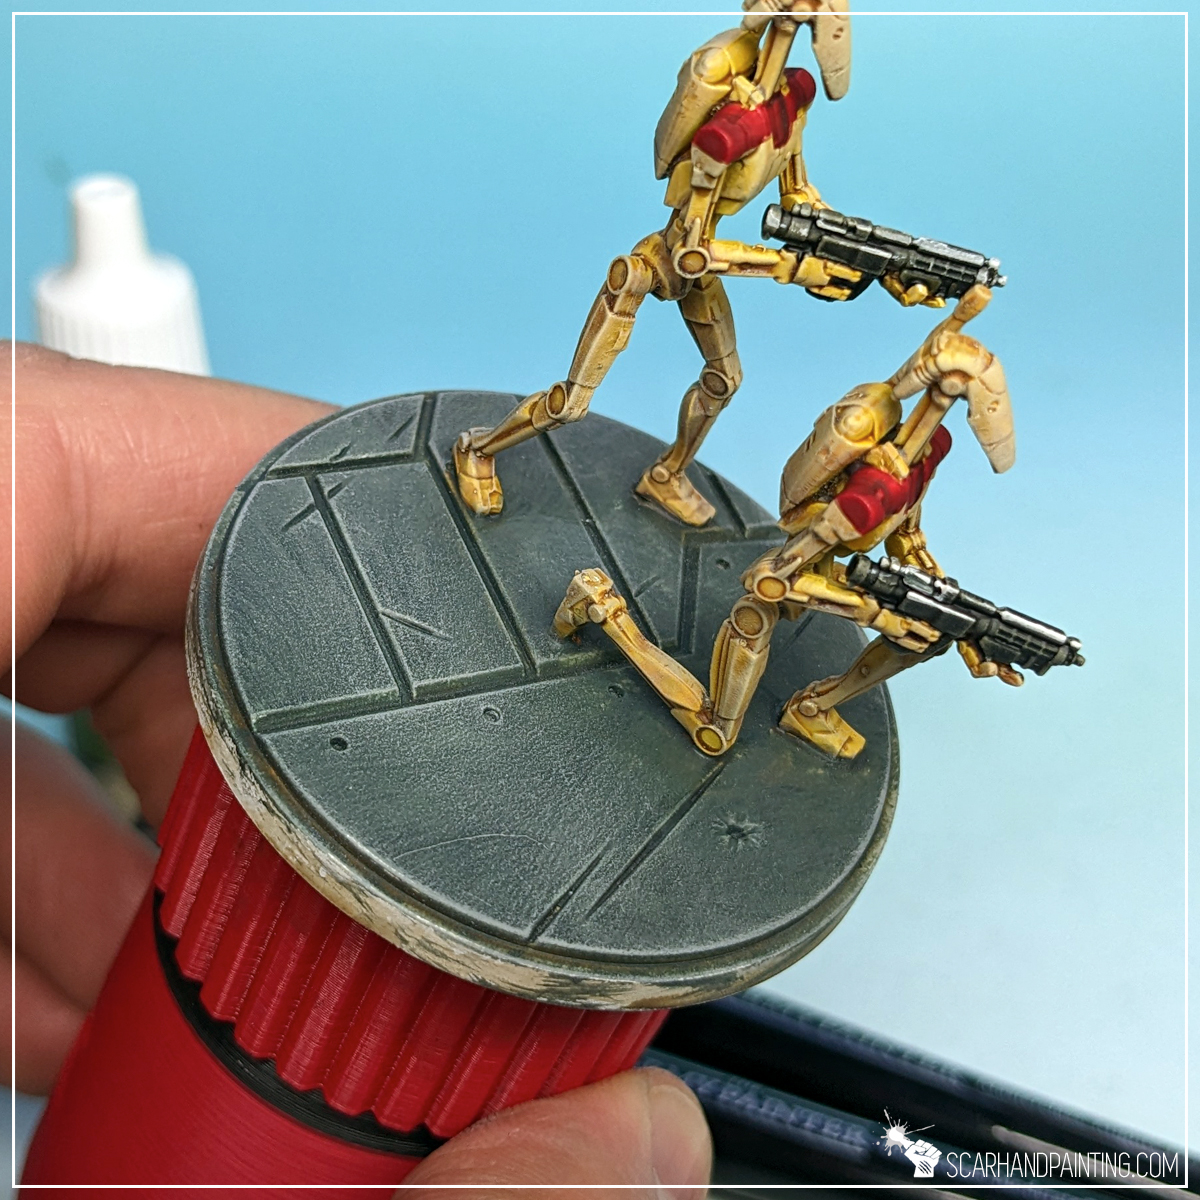
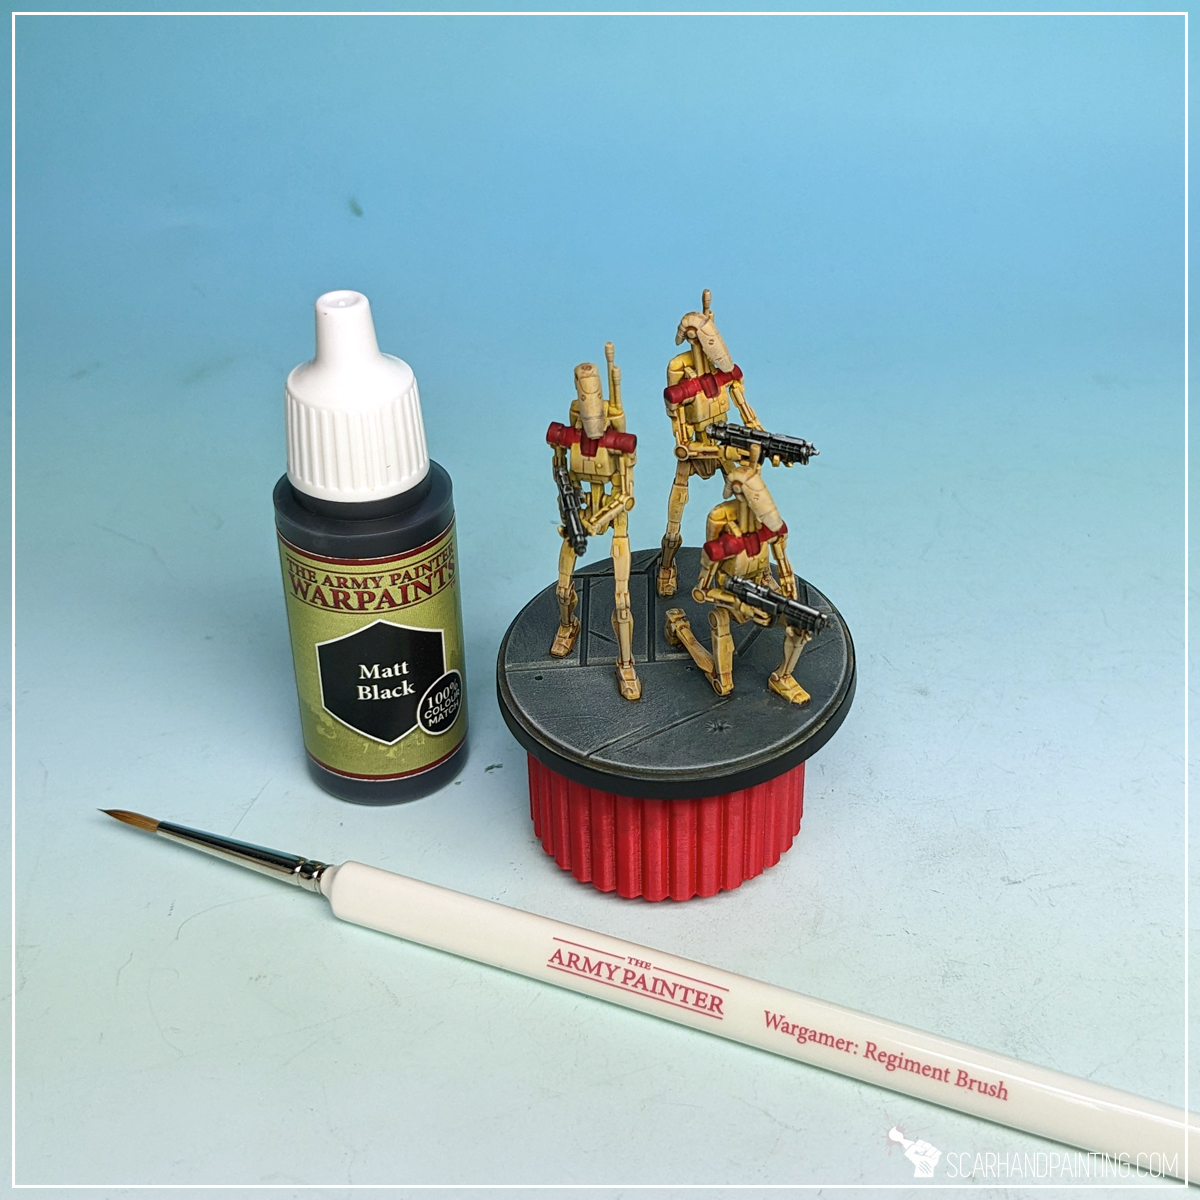
Finally I finished the bases with smooth, black edges. One layer of Matt Black, applied with Wargamer: Regiment Brush.
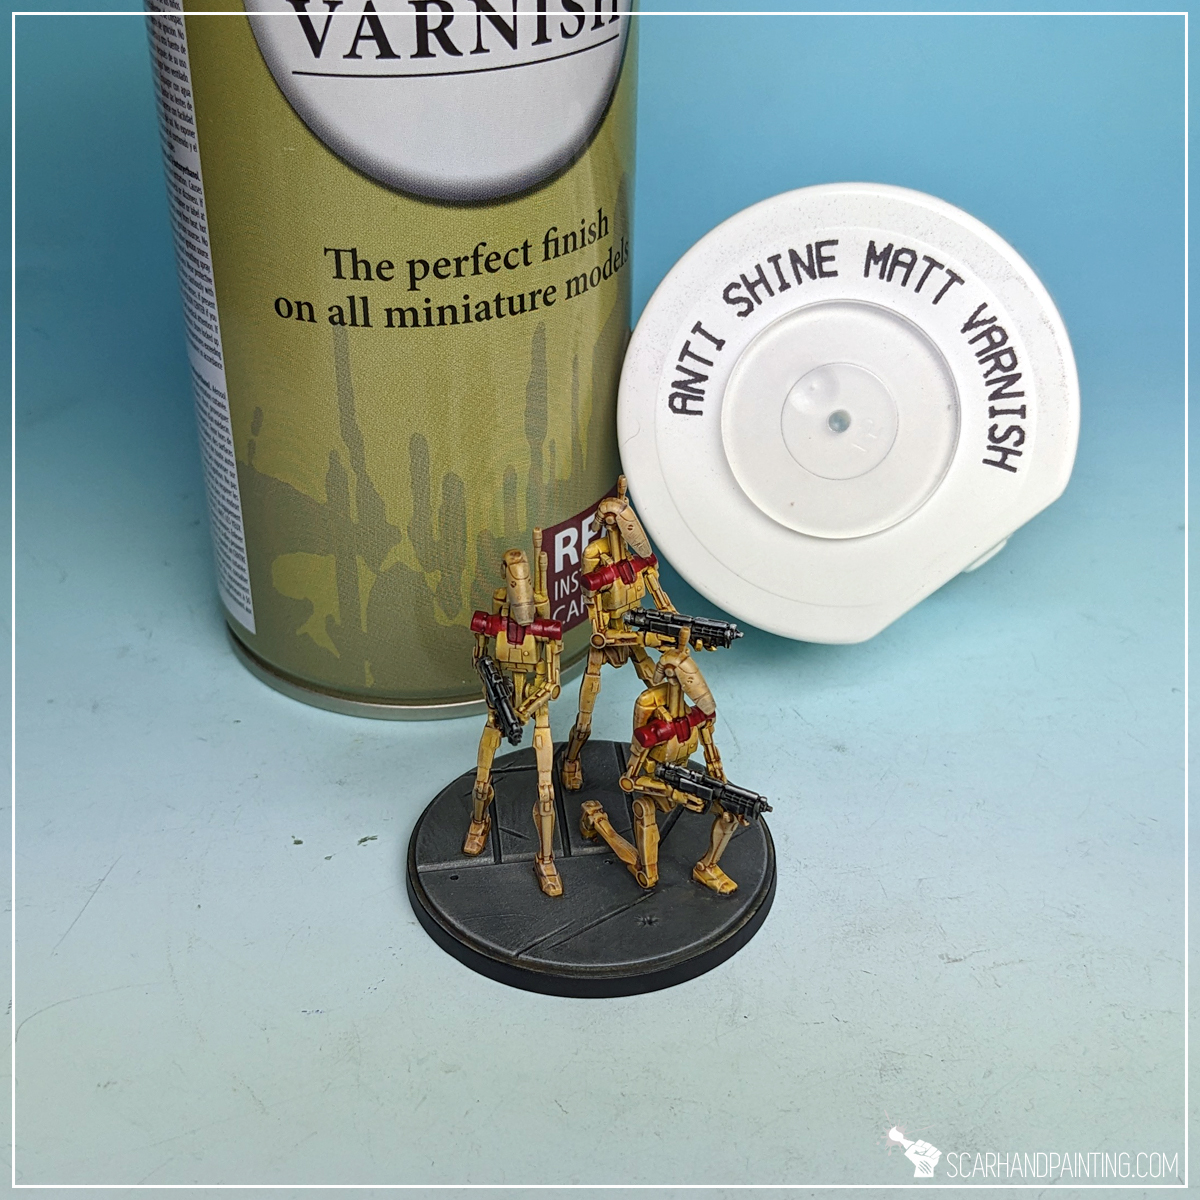
Lastly I sealed the paint job with Anti Shine Matt Varnish.
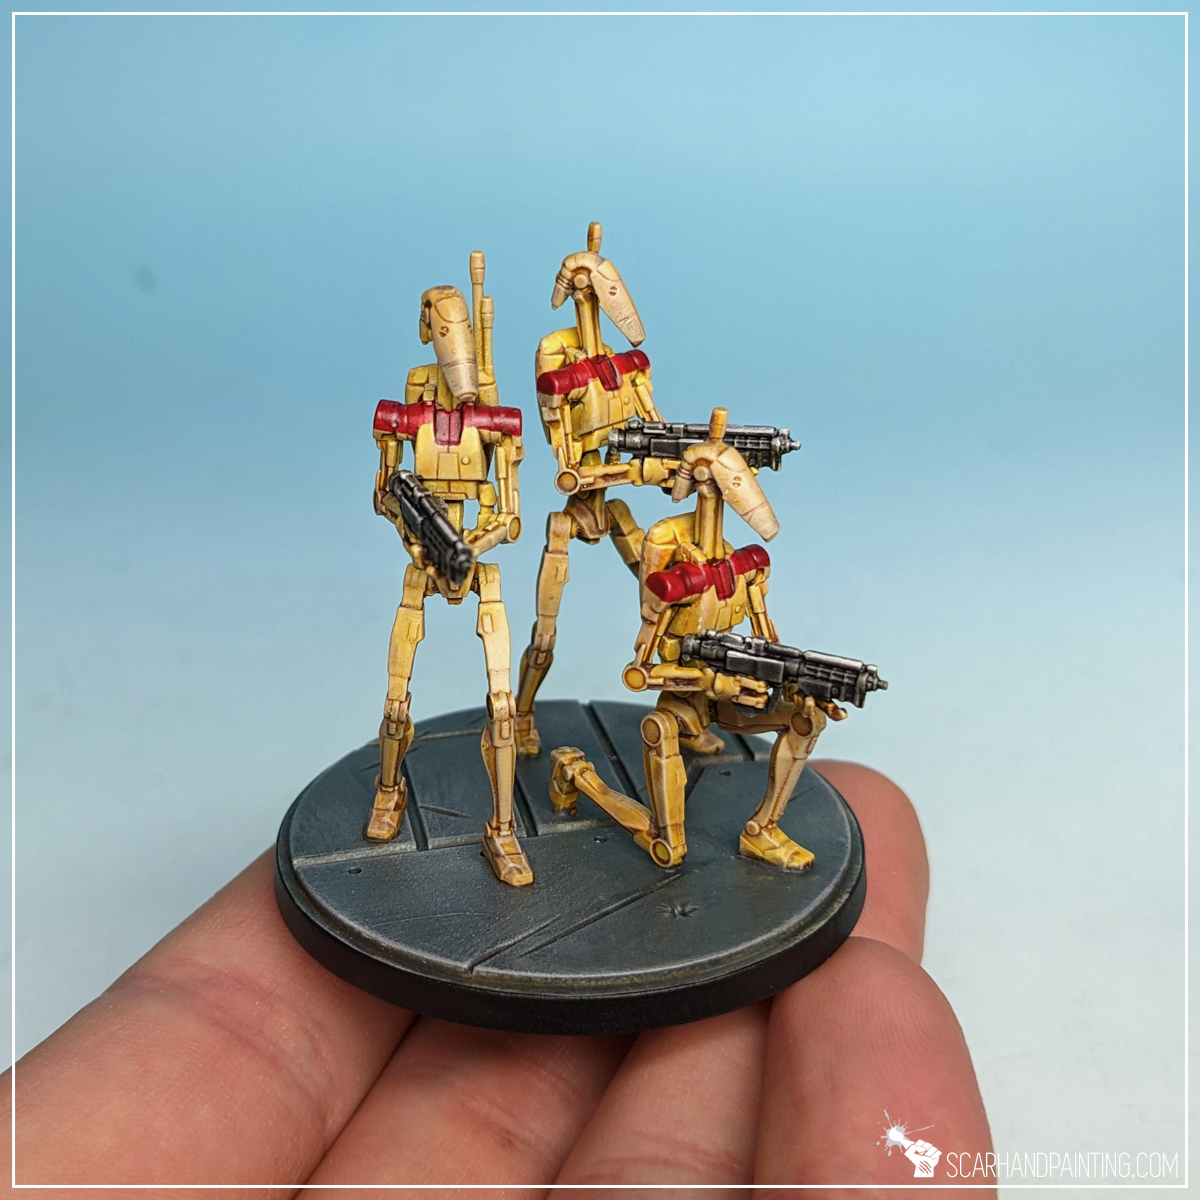

I hope you find this tutorial interesting. Be sure to let me know your thoughts in the comments below or via Facebook or Instagram. I would also appreciate it if you considered sharing this content with your friends, who might find it useful. Many thanks to Rebel.pl for sponsoring this content. Stay tuned for more Star Wars: Shatterpoint tutorials.
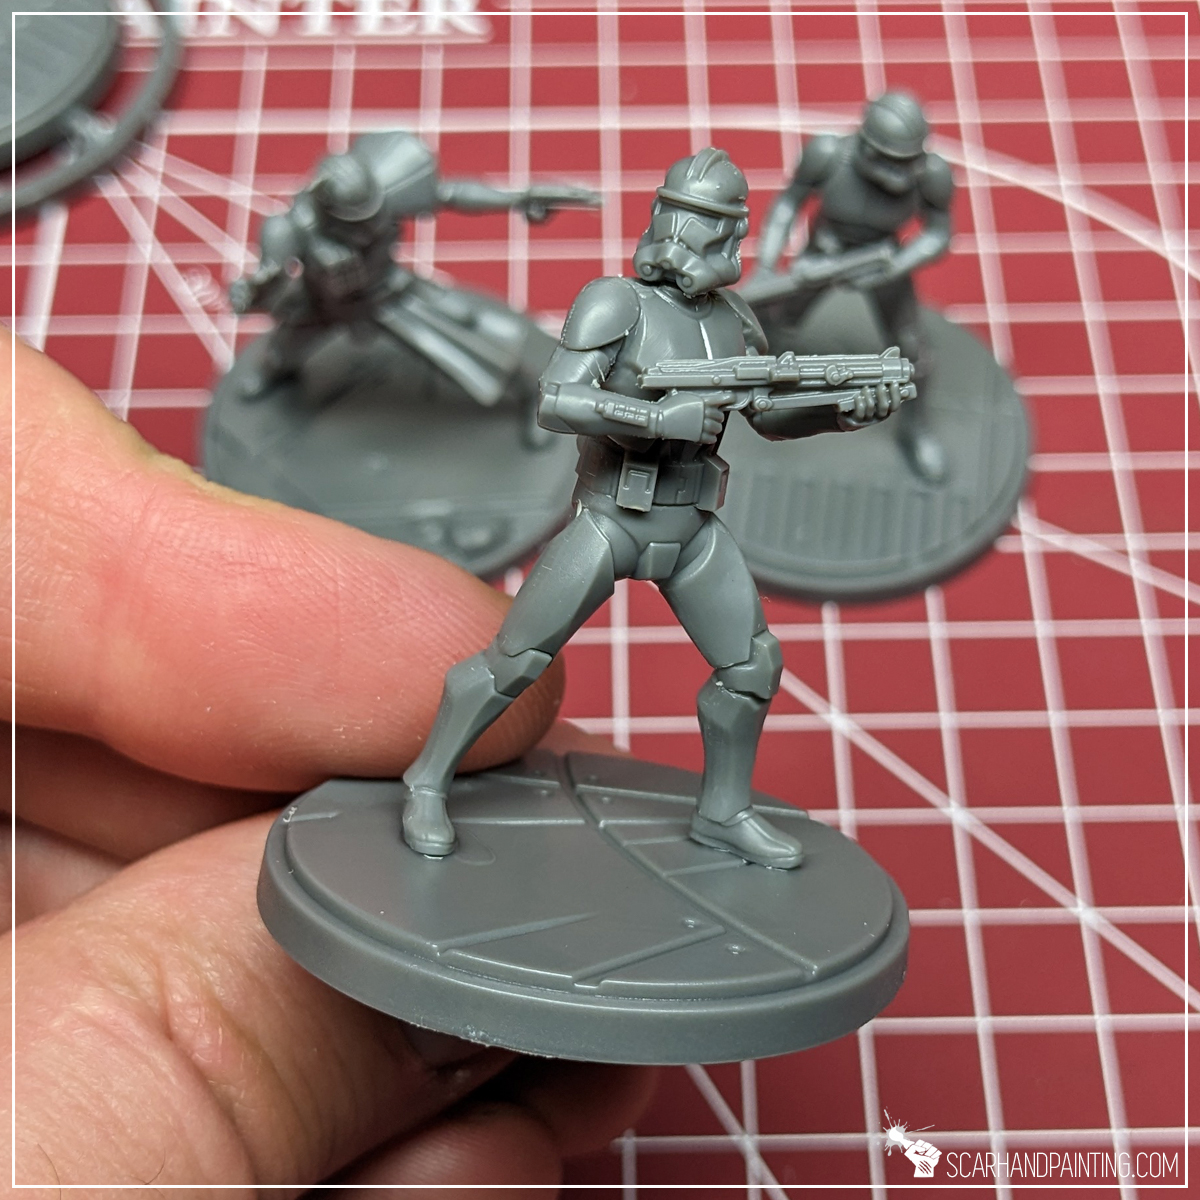
Welcome to Painting Star Wars: Shatterpoint Clone Troopers tutorial. Here I will present to you a Step-by-step of a basic painting process for Clone Troopers, with few optional extras.
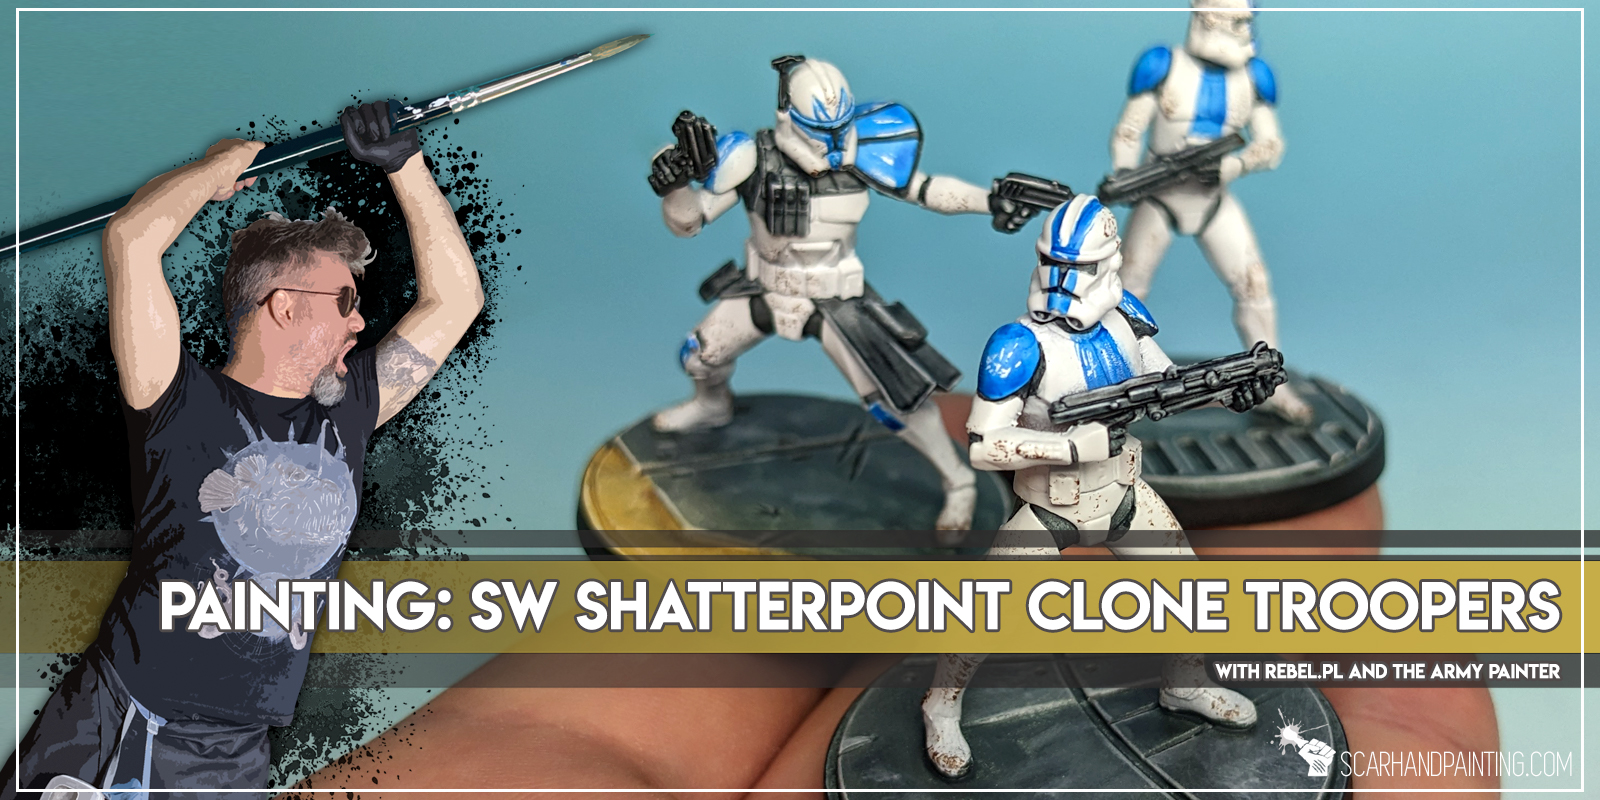
Before we start, some notes:
In case you are totally unfamiliar with the hobby, Star Wars: Shatterpoint being your very first step into the overall Wargaming, below are a few basic steps of miniatures build and preparation.
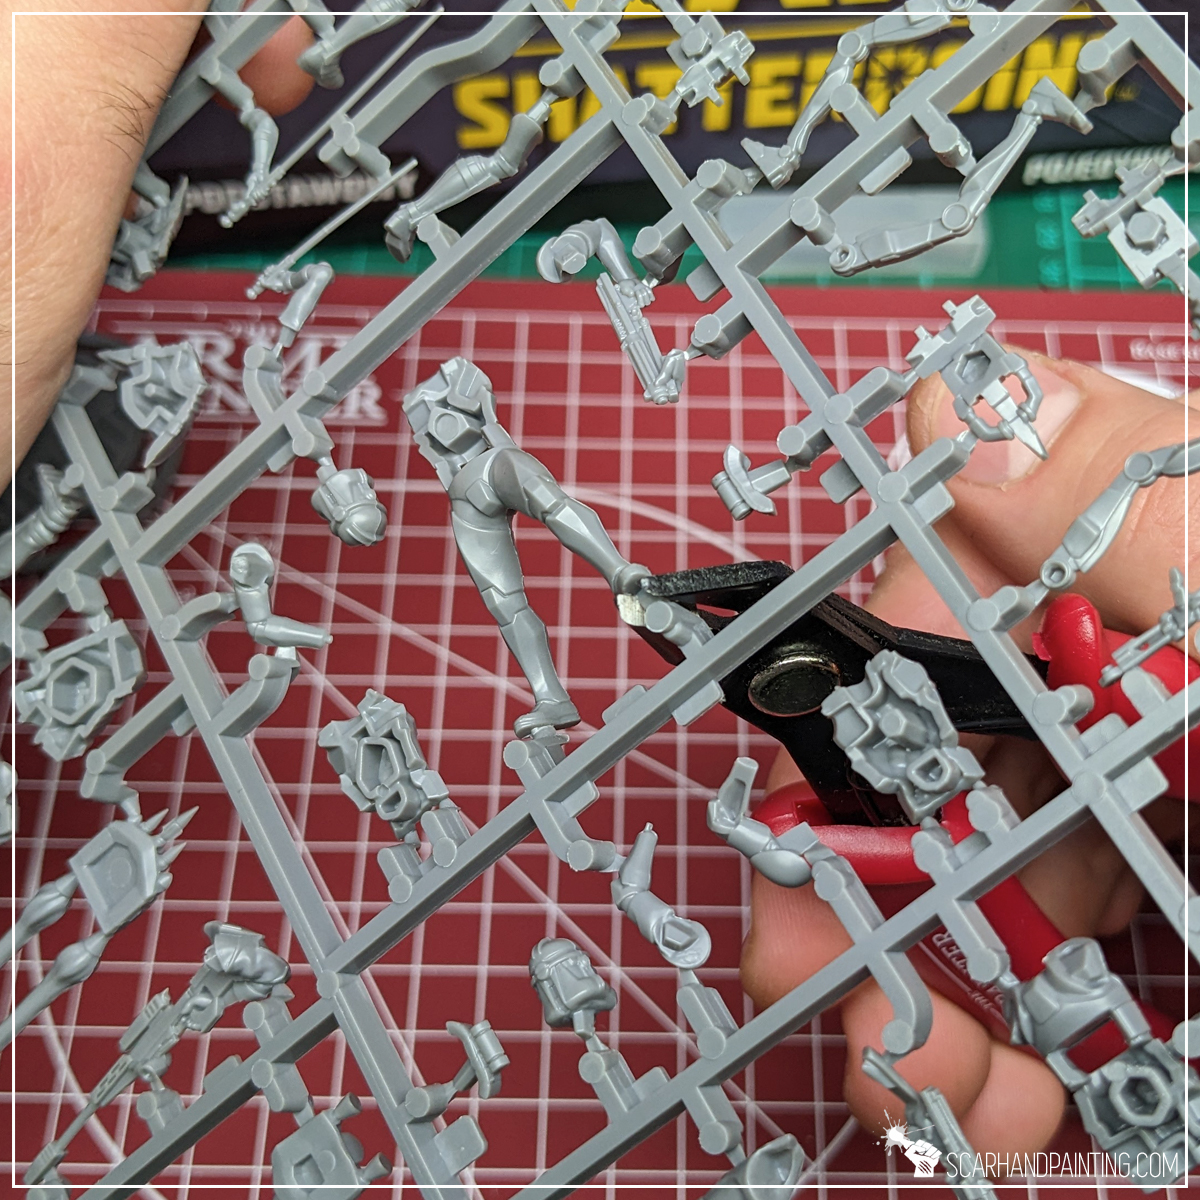
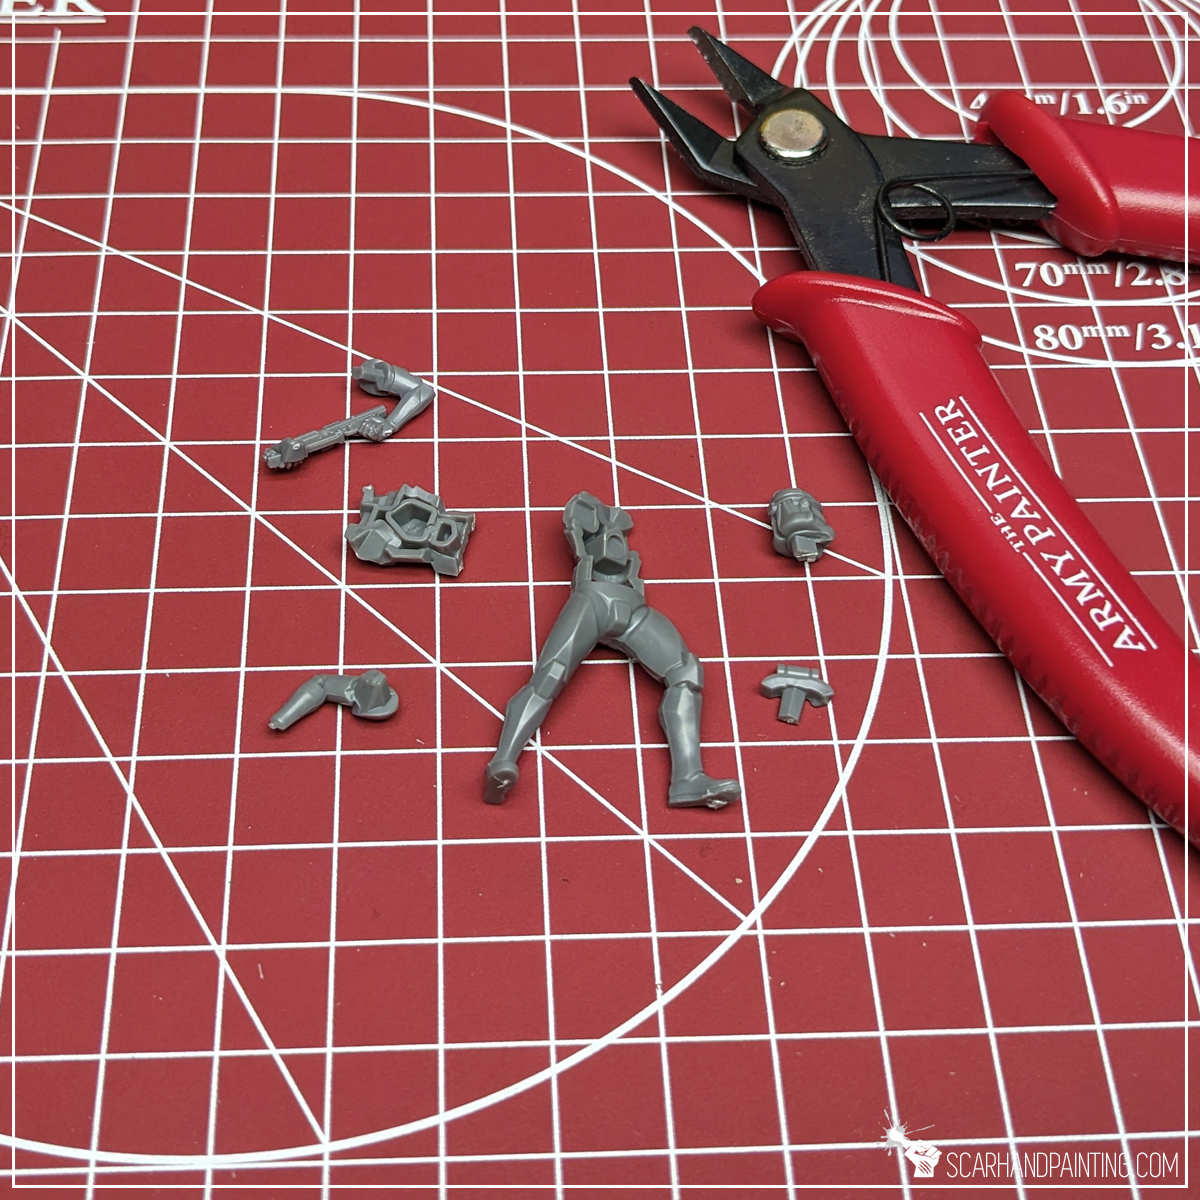

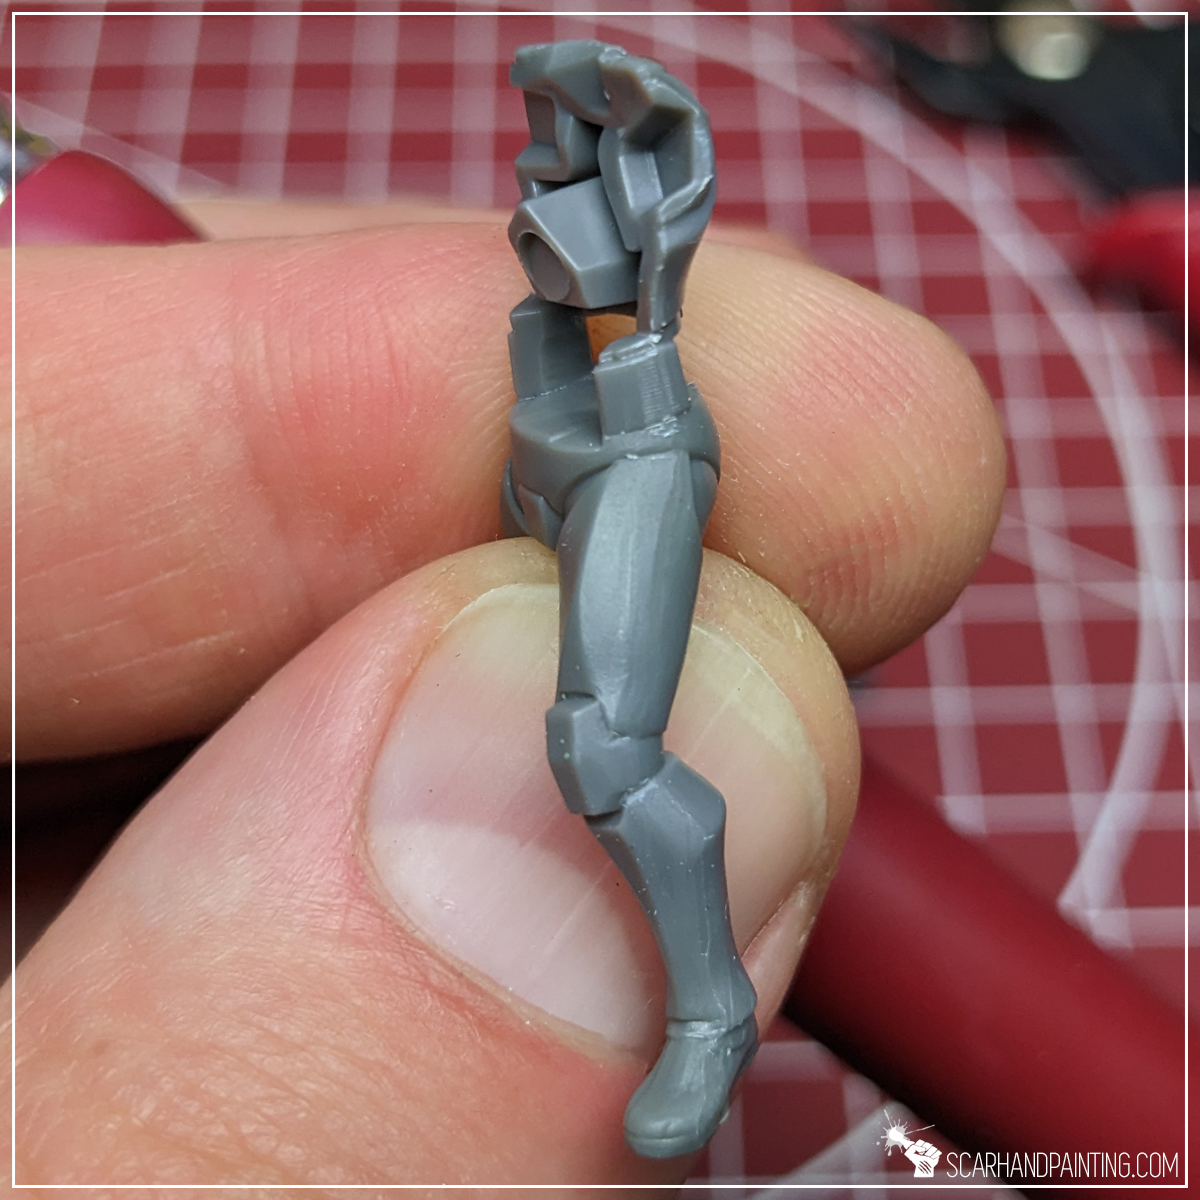


Undercoating miniatures is a topic on its own. Each primer color and technique of application has some advantages. For this tutorial I chose The Army Painter White Matt Primer and sprayed the miniatures around, mounted on a stick with a piece of Blu-Tack. This resulted in a durable, smooth surface, perfect for this kind of paint job. It also allowed me to skip an otherwise difficult first step – white armor.
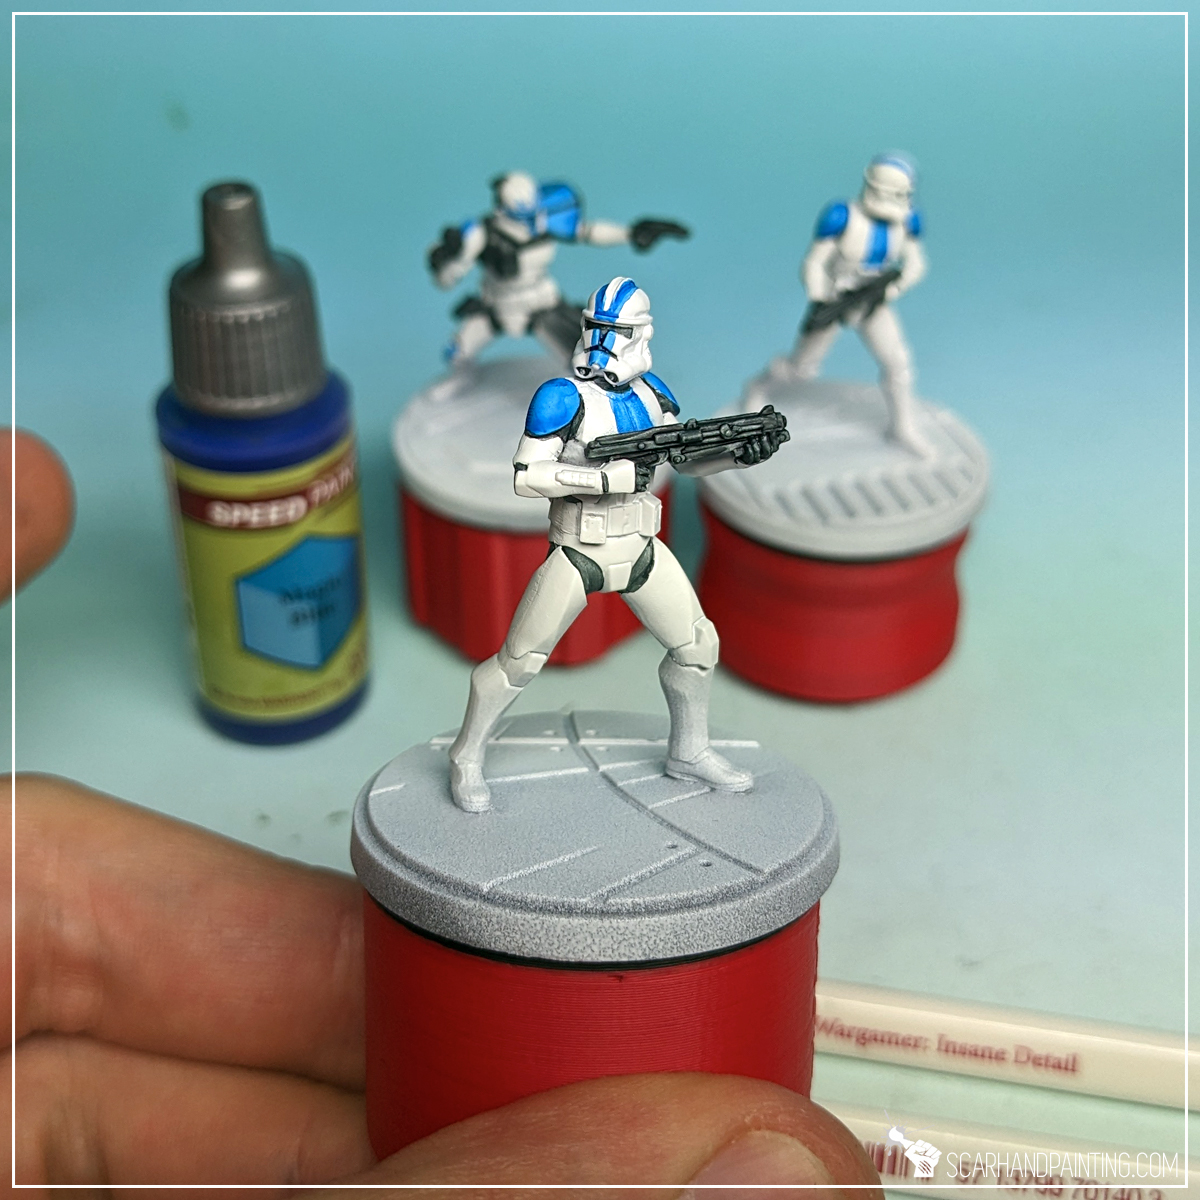
With a Wargamer: Character brush I applied Grim Black Speed Paint over weapons and cloth. I then switched to Wargamer: The Psycho to apply more paint into recesses between armor and onto helmet visors.
TIP: This step is a bit tricky. A lot can go wrong. Fortunately, thanks to spray undercoat’s durability and smoothness, any bloopers can be erased using a toothbrush soaked in water. Simply soak the tip of a toothpick in water, then flatten it with a pair of pliers to make an ultimate bloopers eraser.


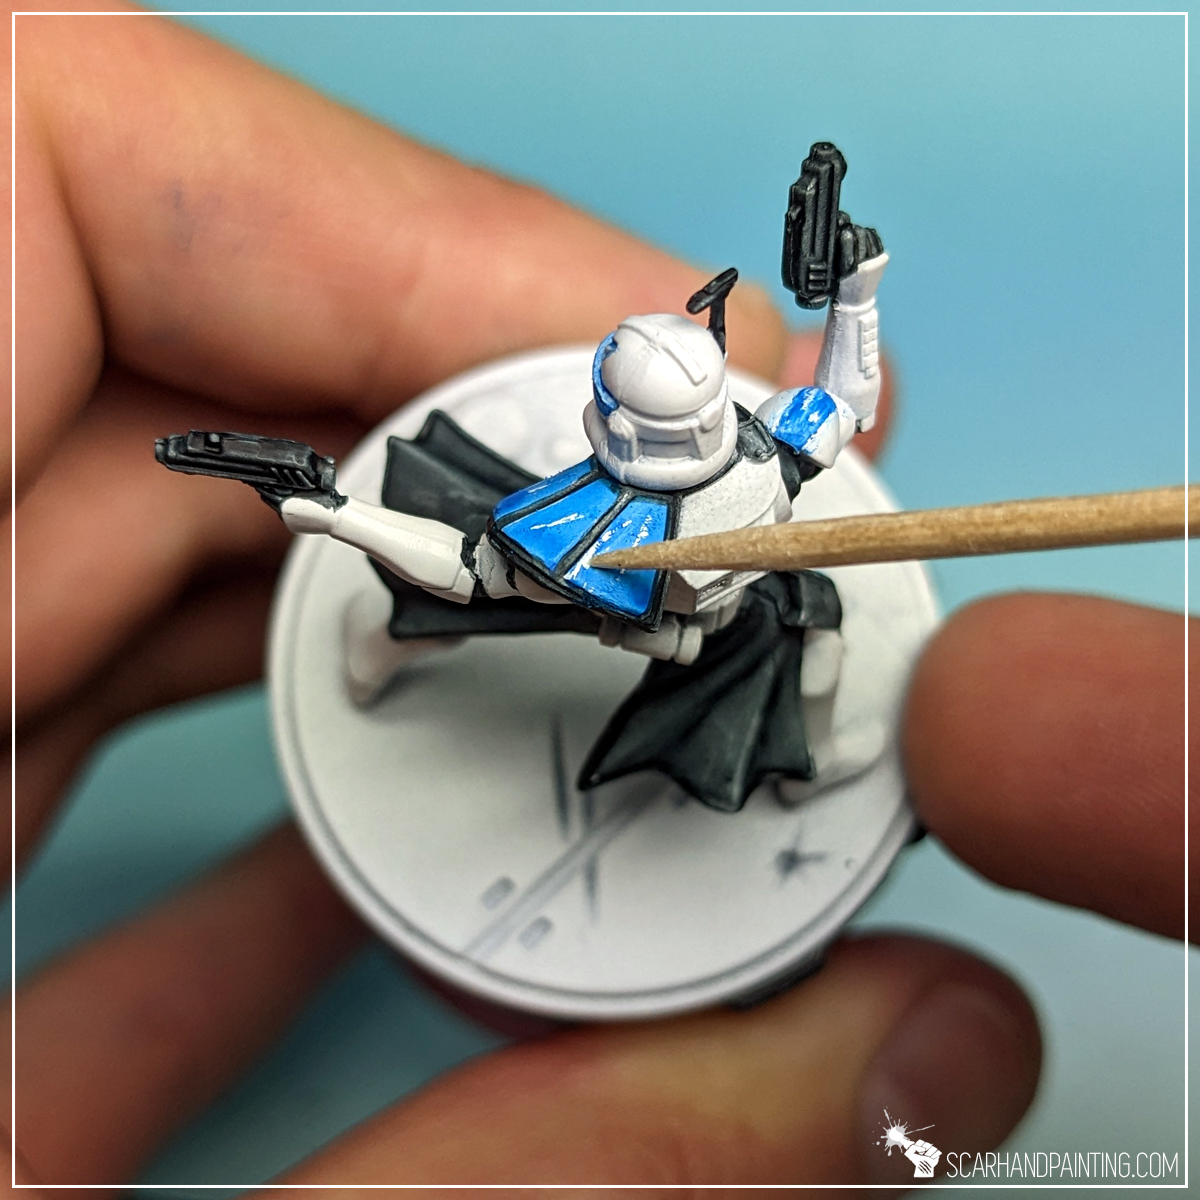
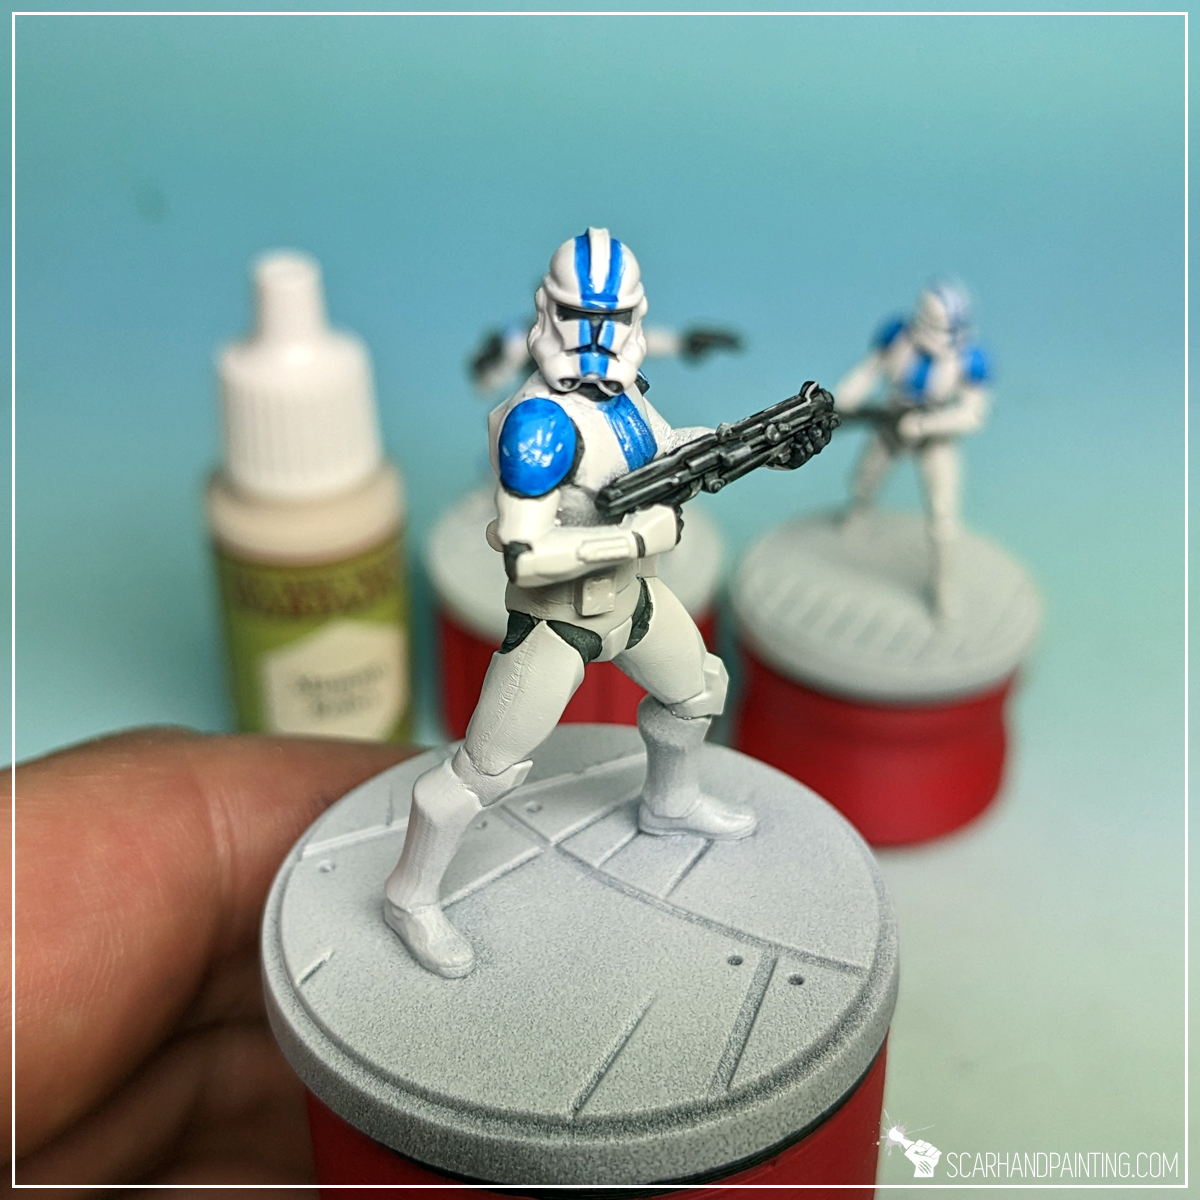
Next I applied Magic Blue Speed Paint onto shoulder guards and in selected areas on helmets and chest plates. I used Wargamer: Insane Detail and Wargamer: The Psycho brushes for this. Usually, when using thin paints such as Speed Paints I go with larger brushes, but here I aimed at precise application.
I then used a tip of a toothpick to scratch blue surface, adding some character with thematic battle damage. This wouldn’t be possible on most undercoats, but The Army Painter primers leave a really strong plastic-like surface.

Using a Wargamer: Regiment Brush I then applied a highlight of Mummy Robes onto the top edges of the guns. Due to wider, more sturdy heads, I find larger brushes better for this kind of job. The key was to keep the paint to a minimum and slide the brush perpendicularly across the top surface of each gun.

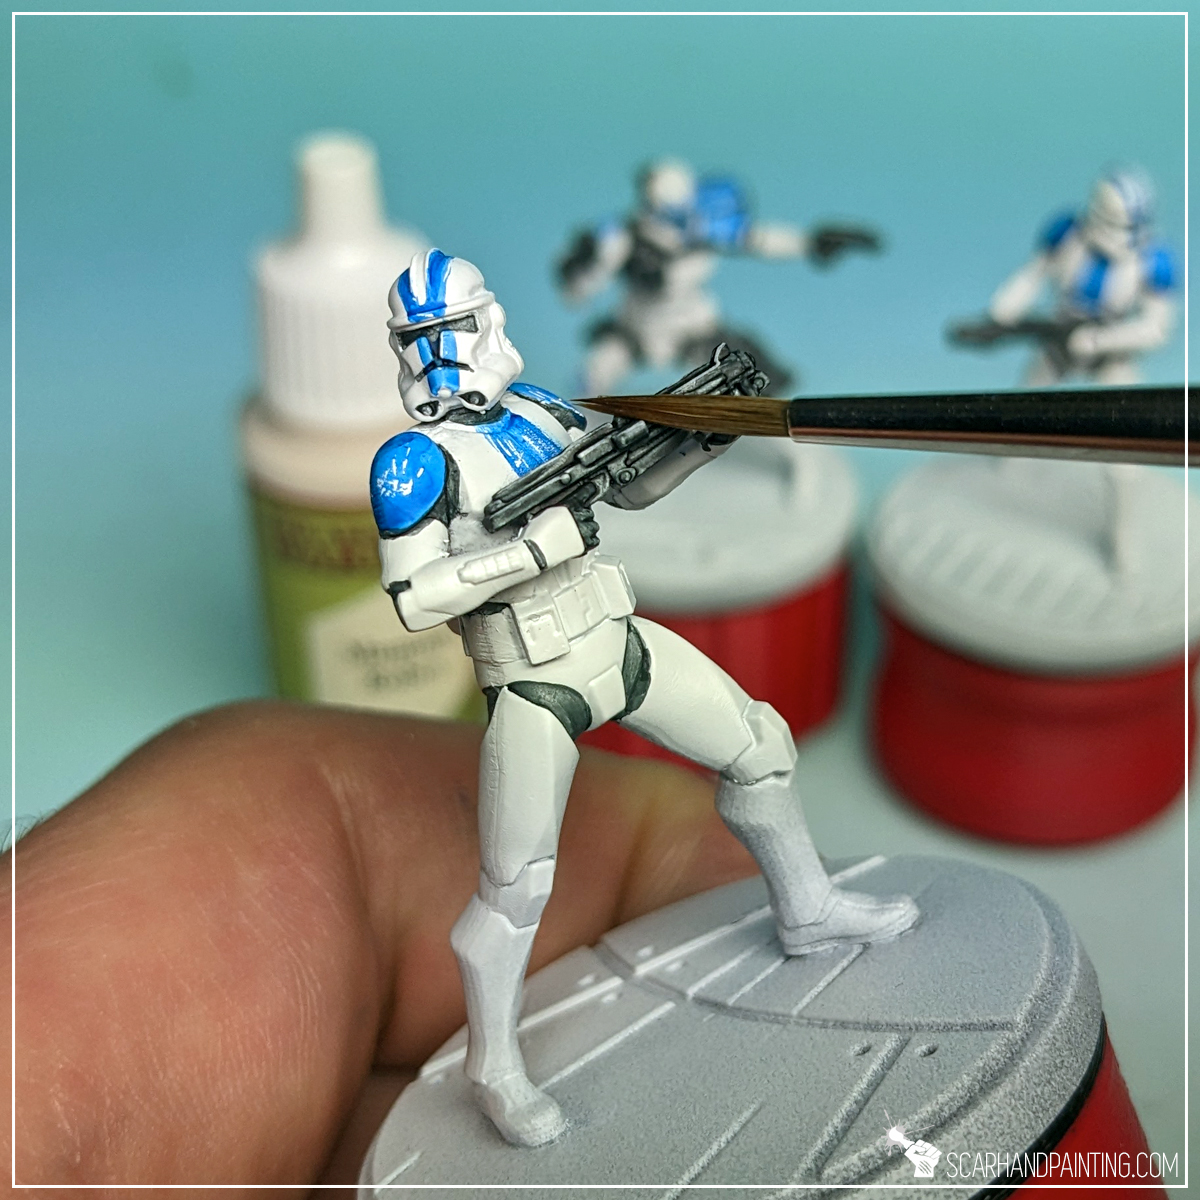
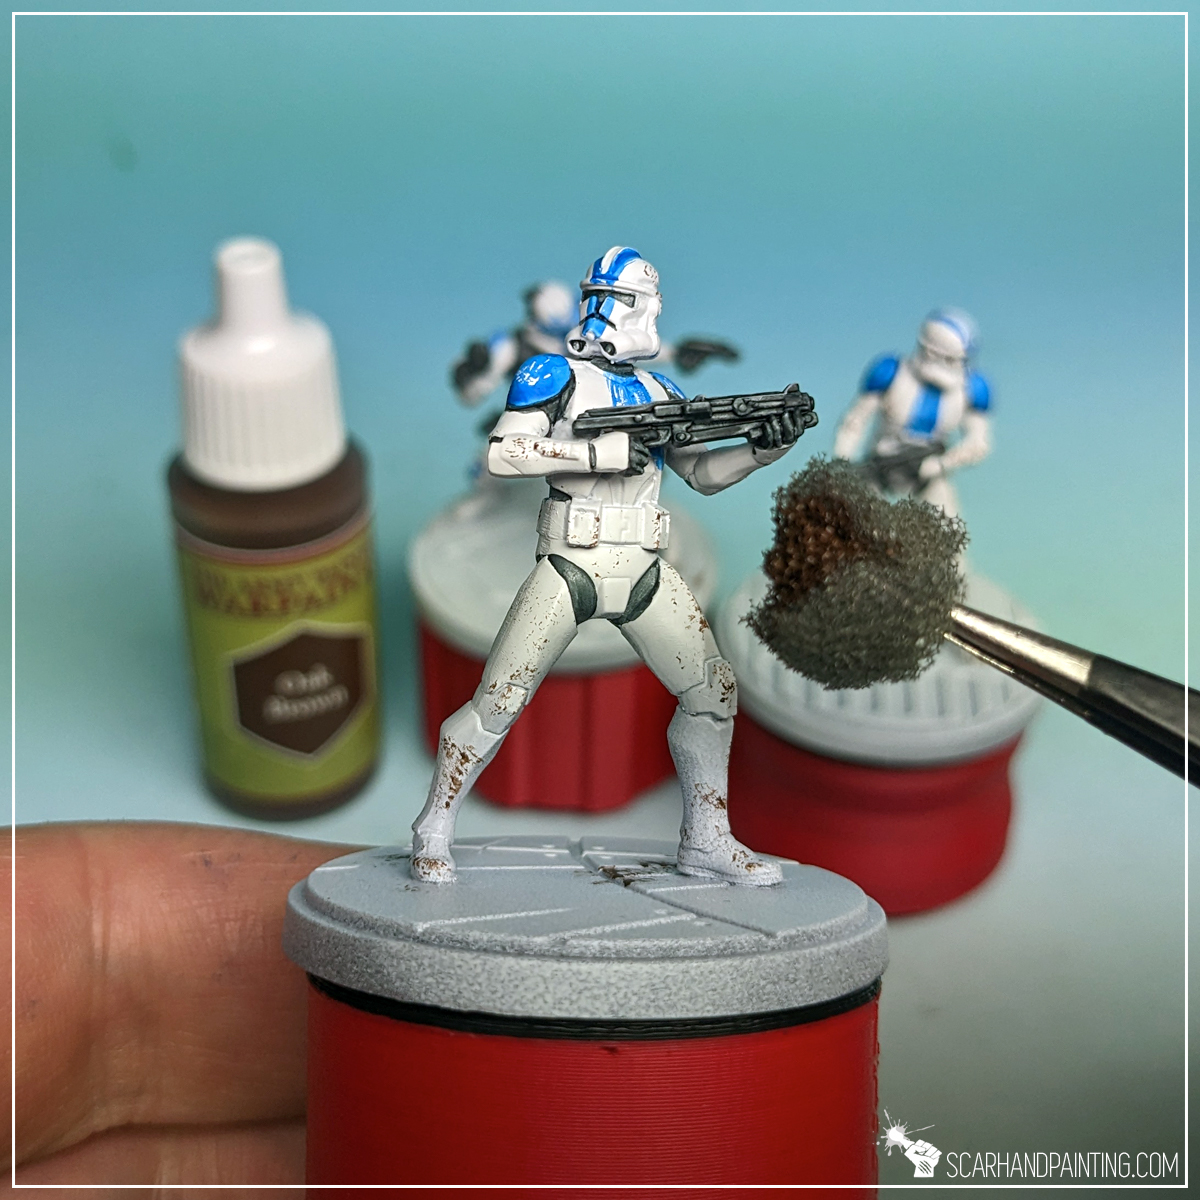
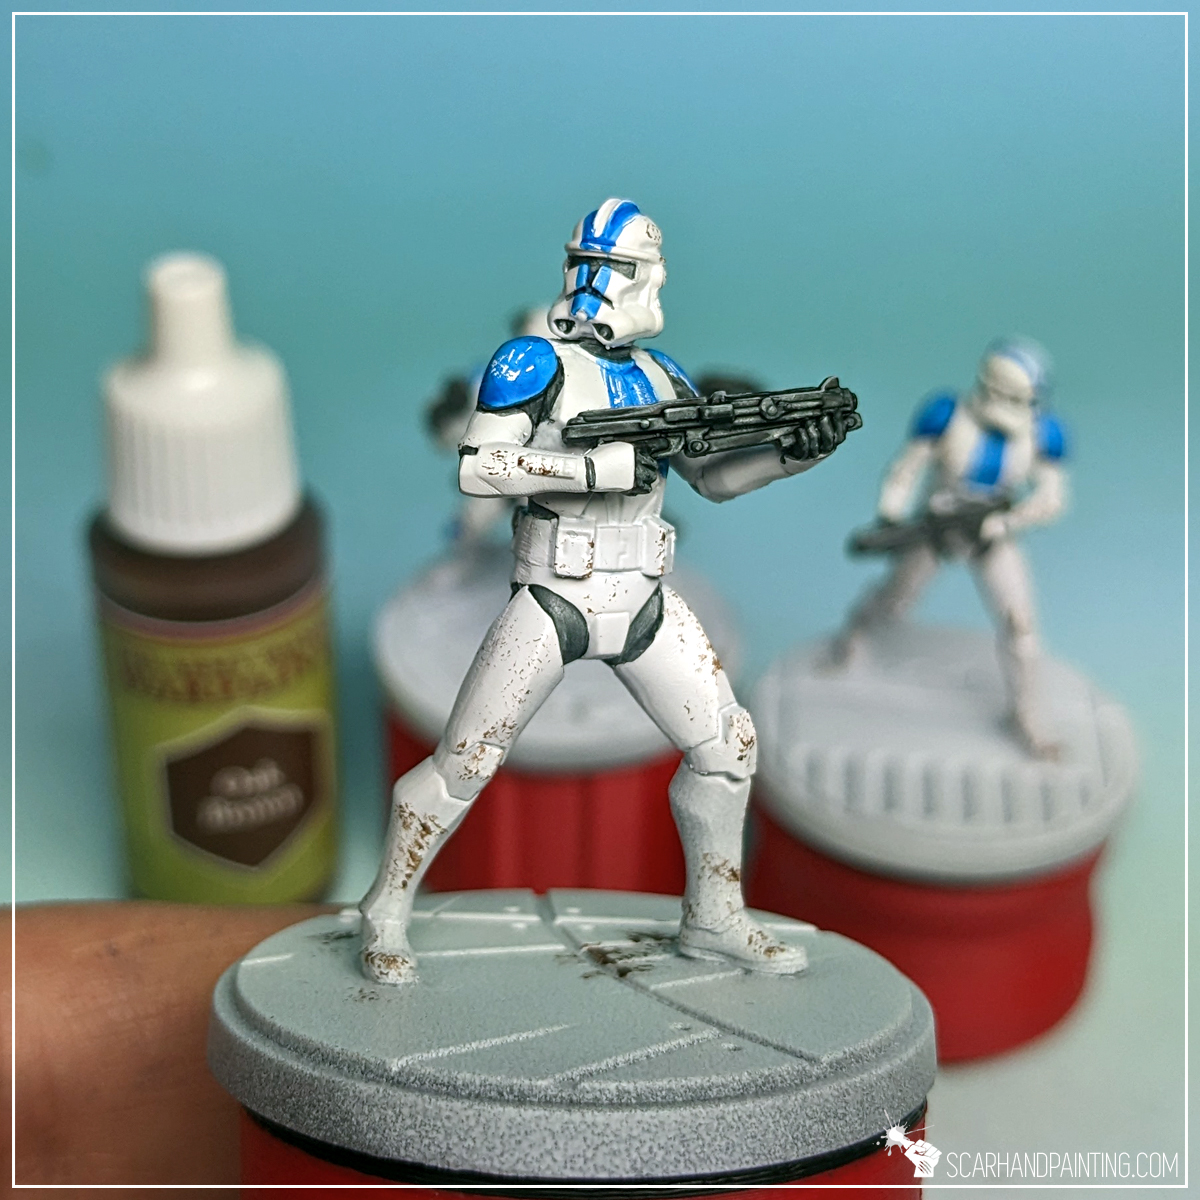
I then used a pair of tweezers and a piece of foam to stipple Oak Brown all over the armor plates. This broke the otherwise flat looking armor and provided additional detail to the miniatures.

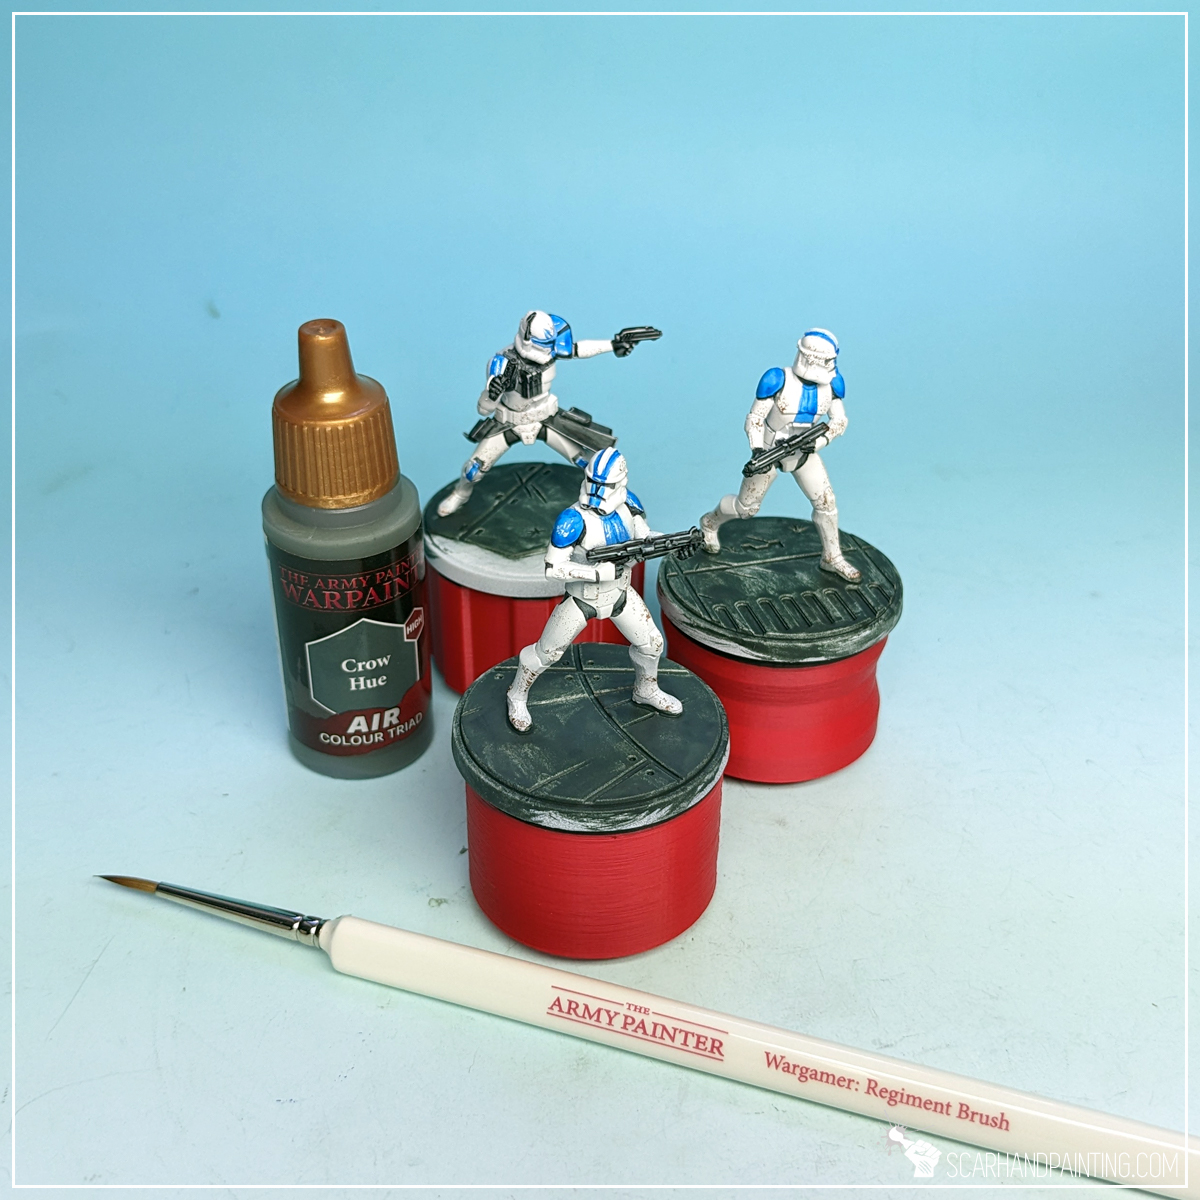
For bases I decided to keep them relatively simple, to make the miniatures stand out. First I applied a layer of Raven Black (air), starting carefully around the miniature’s feet, then expanding outwards. I deliberately used air series paint for an extra messy end result – free details on the painted surface. I used Wargamer: Regiment Brush for this and the next layer.
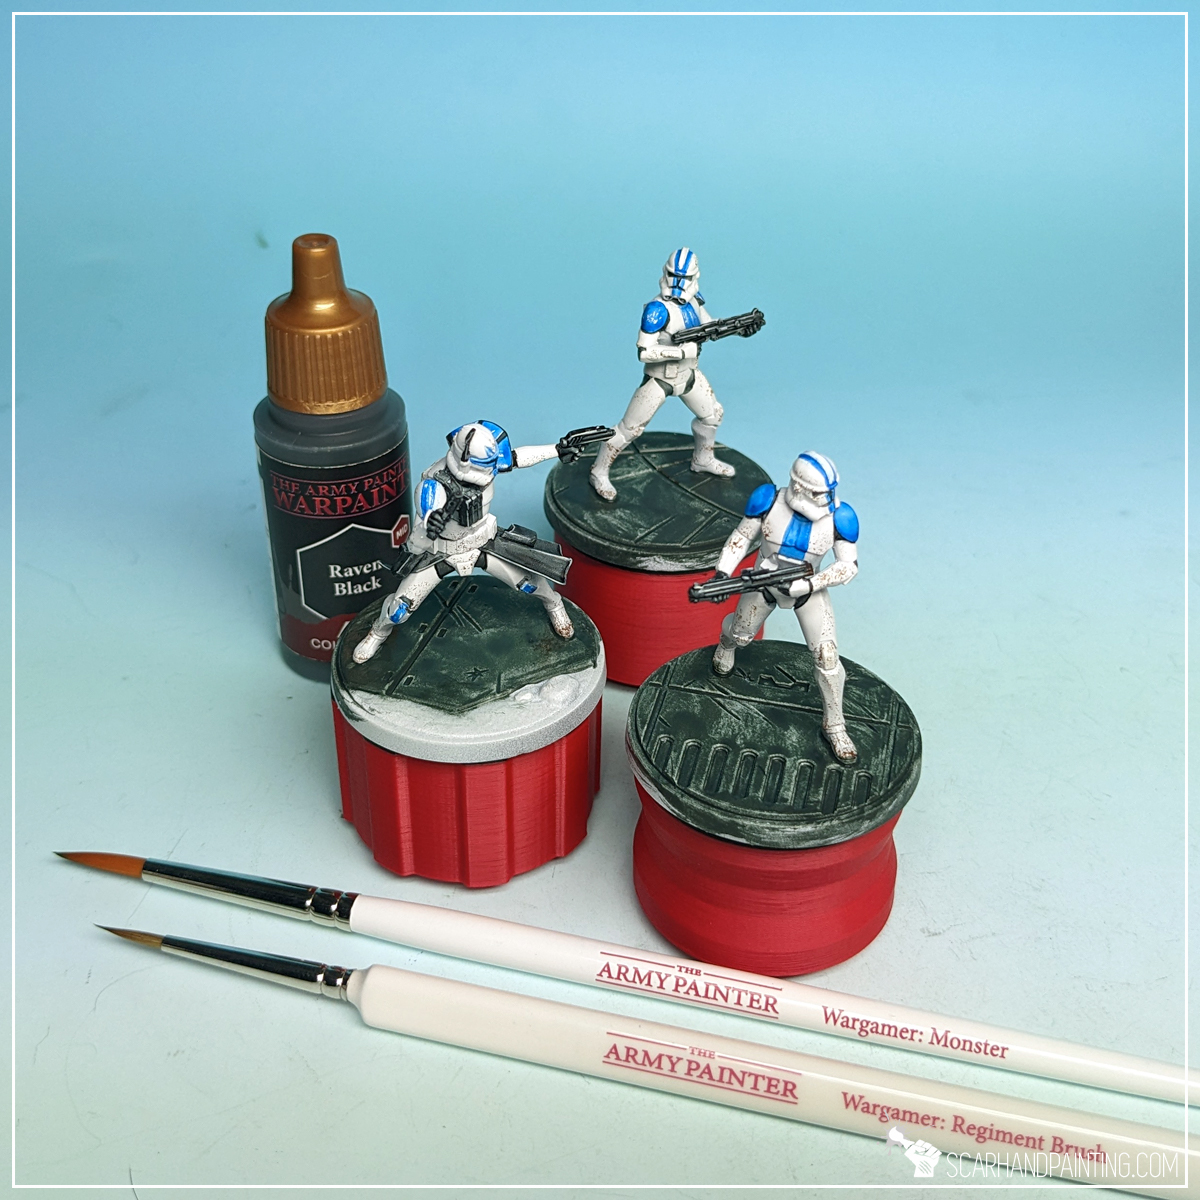


Next, using the same methodology, I followed up with Crow Hue.

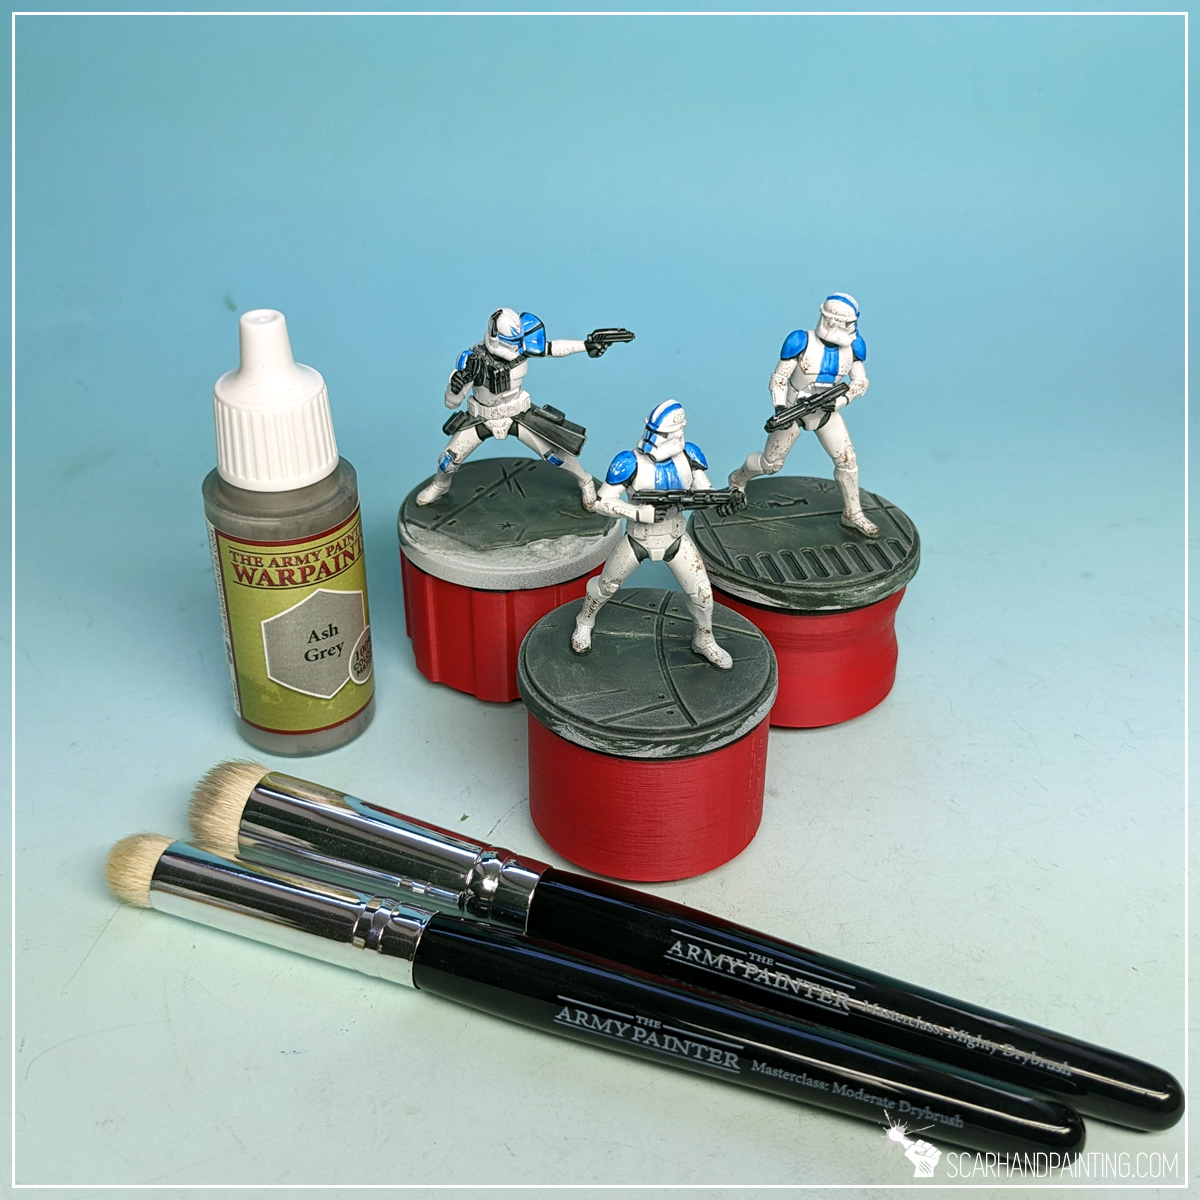
I then drybrushed entire base with Ash Grey.
TIP: Drybrush is done by putting the tip of a brush in paint, then brushing the excess paint off onto a piece of paper, foam or some other material, then brushing the remainder of the paint onto the chosen surface. This can be done with either standard Small/Large Drybrush, or Masterclass for easier, faster application.
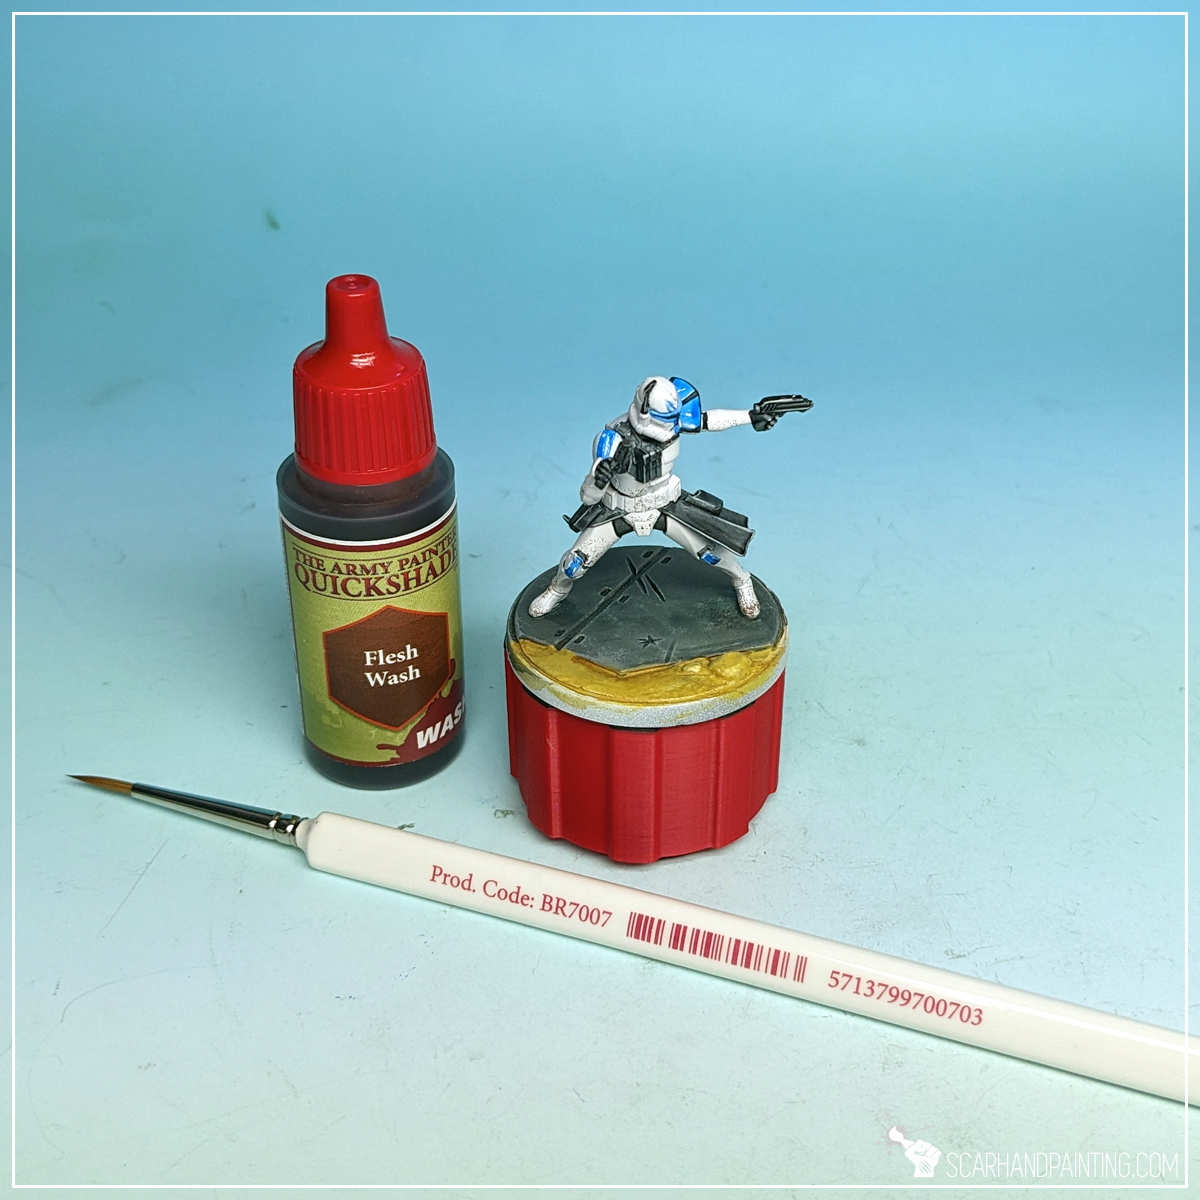
For sand I applied Yellow Dune (air), followed by a wash with Flesh Wash paint.
TIP: Washing is done by applying Washes, or Inks in large quantities and letting them dry. The pigmentation goes into recesses, highlighting any raised areas.

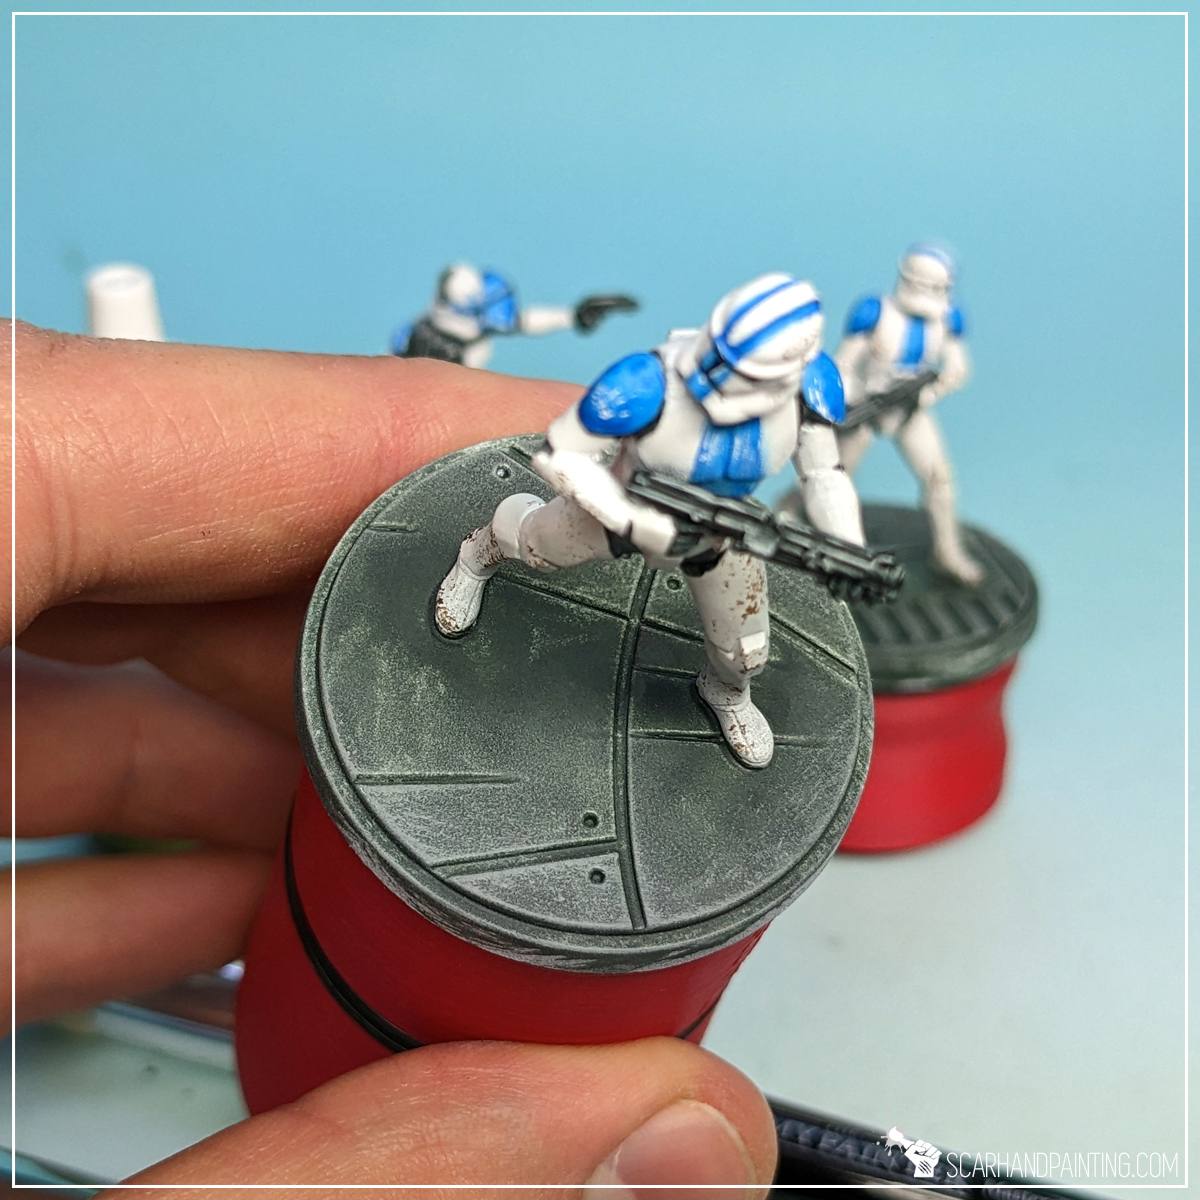
Next I drybrushed sand and surrounding areas with Mummy Robes.

To add depth I highlighted concrete plates edges with Mummy Robes…
… then thinned Mummy Robes with a bit of water and wiped the brush off with a series of semi random movements, onto flat concrete areas. I used Wargamer: Regiment Brush.

To make the miniatures stand out and underline them, I painted bases’ edges with Matt Black. Wargamer: Regiment Brush again.

Finally I sealed the paint job with Anti Shine Matt Varnish. This protective layer will keep my Clone Troopers secure from damage, while I game them into oblivion. With this I have finished the paint job.

I hope you find this tutorial interesting. Be sure to let me know your thoughts in the comments below or via Facebook or Instagram. I would also appreciate it if you considered sharing this content with your friends, who might find it useful. Many thanks to Rebel.pl for sponsoring this content. Stay tuned for more Star Wars: Shatterpoint tutorials.

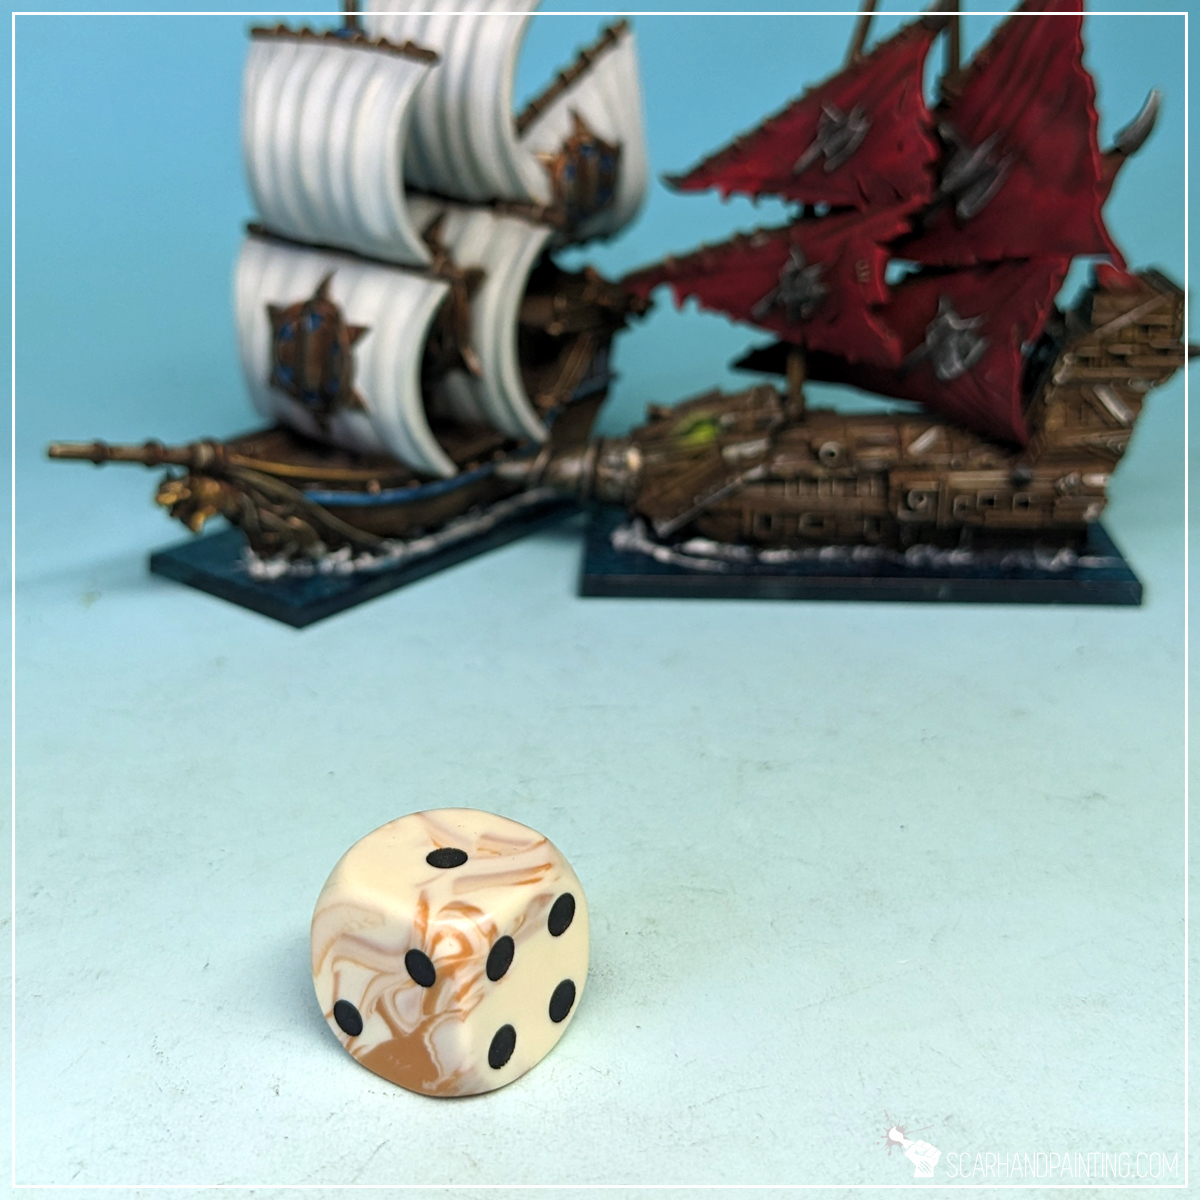
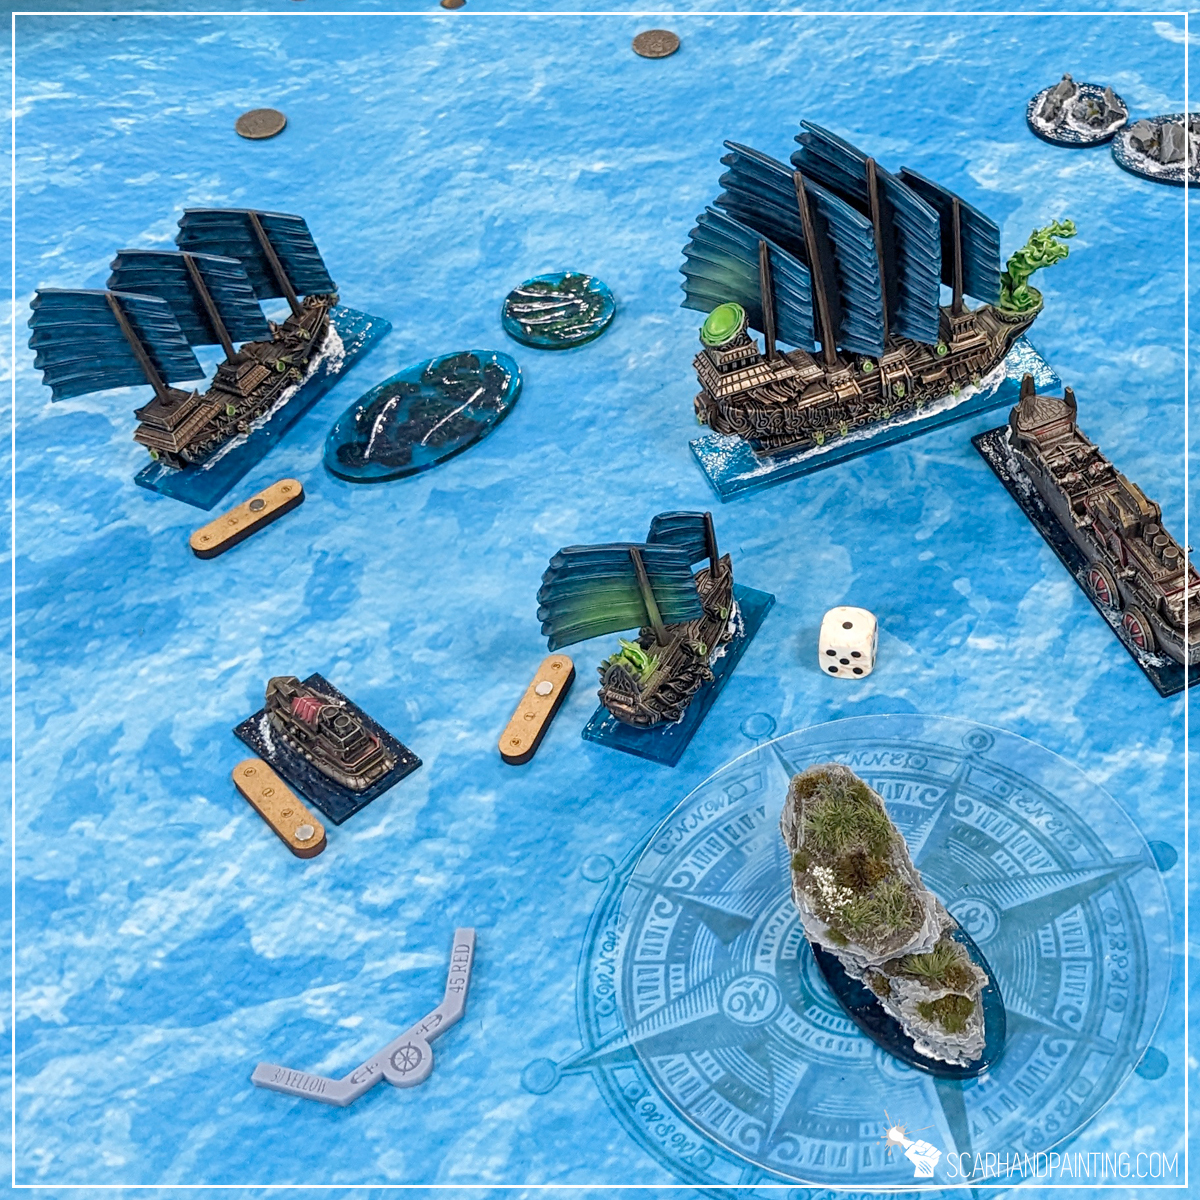
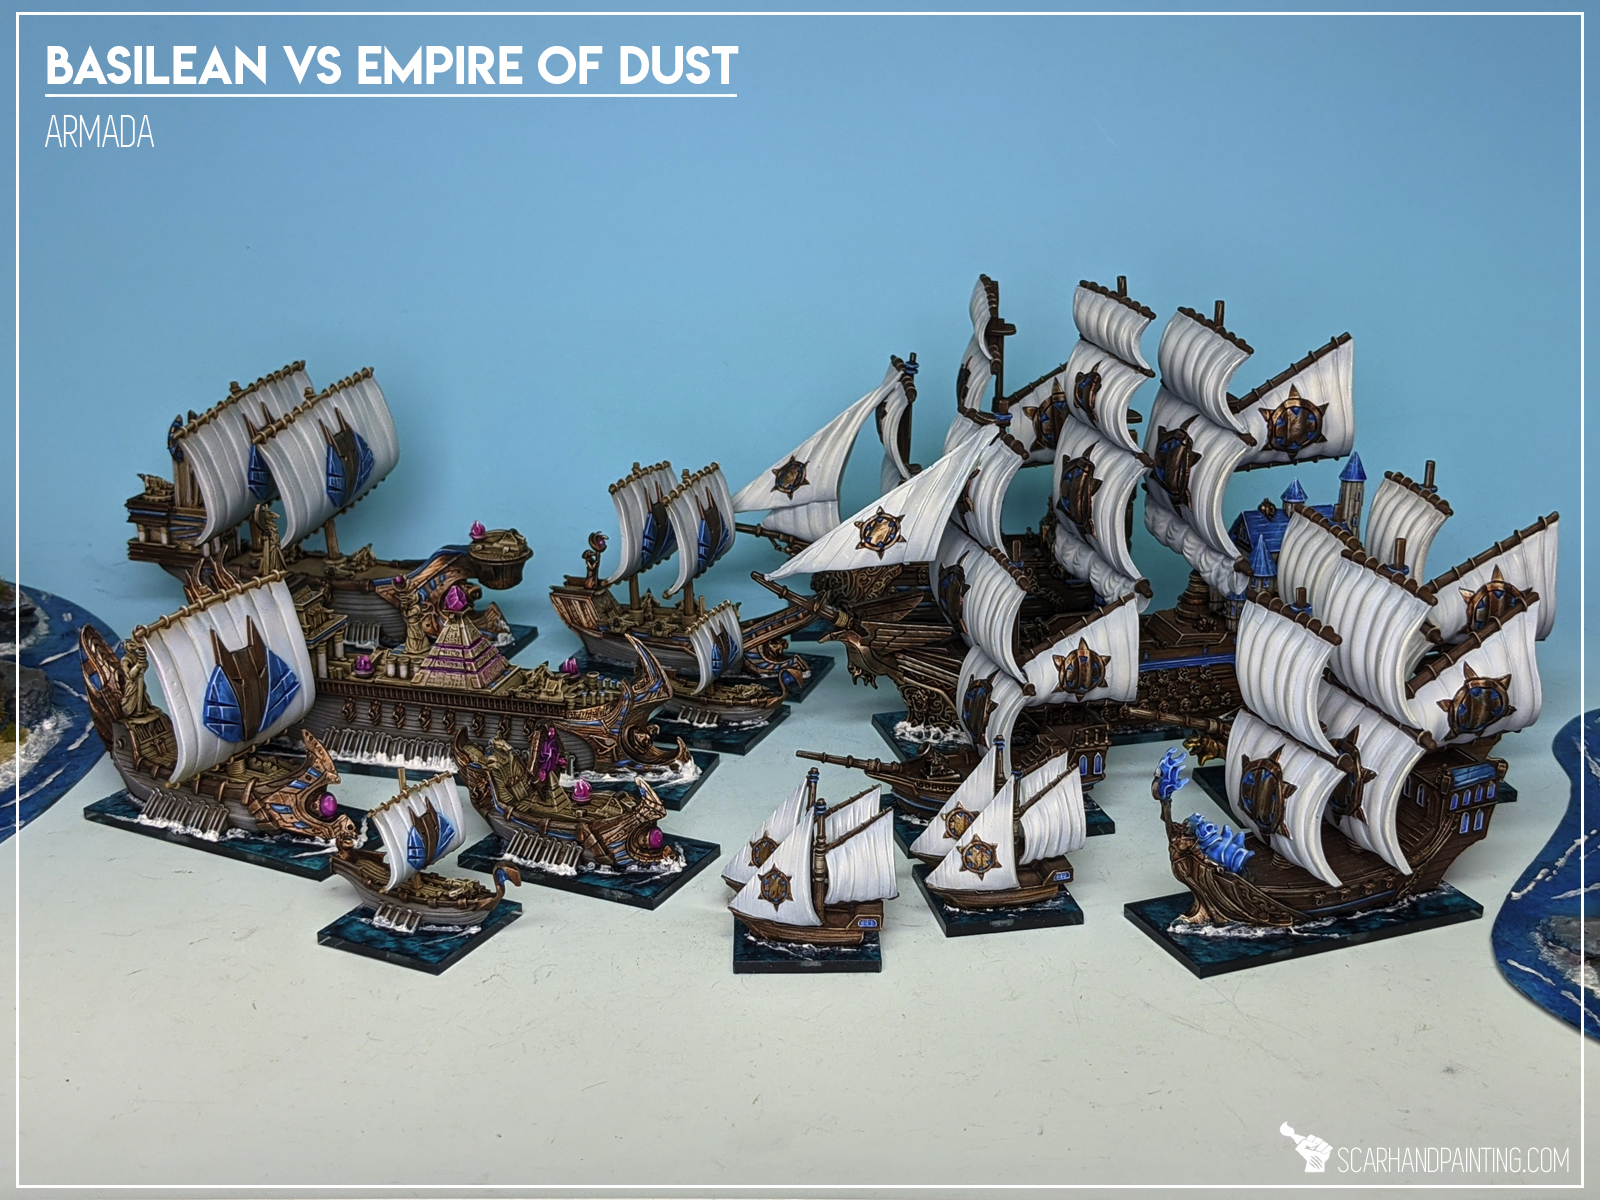
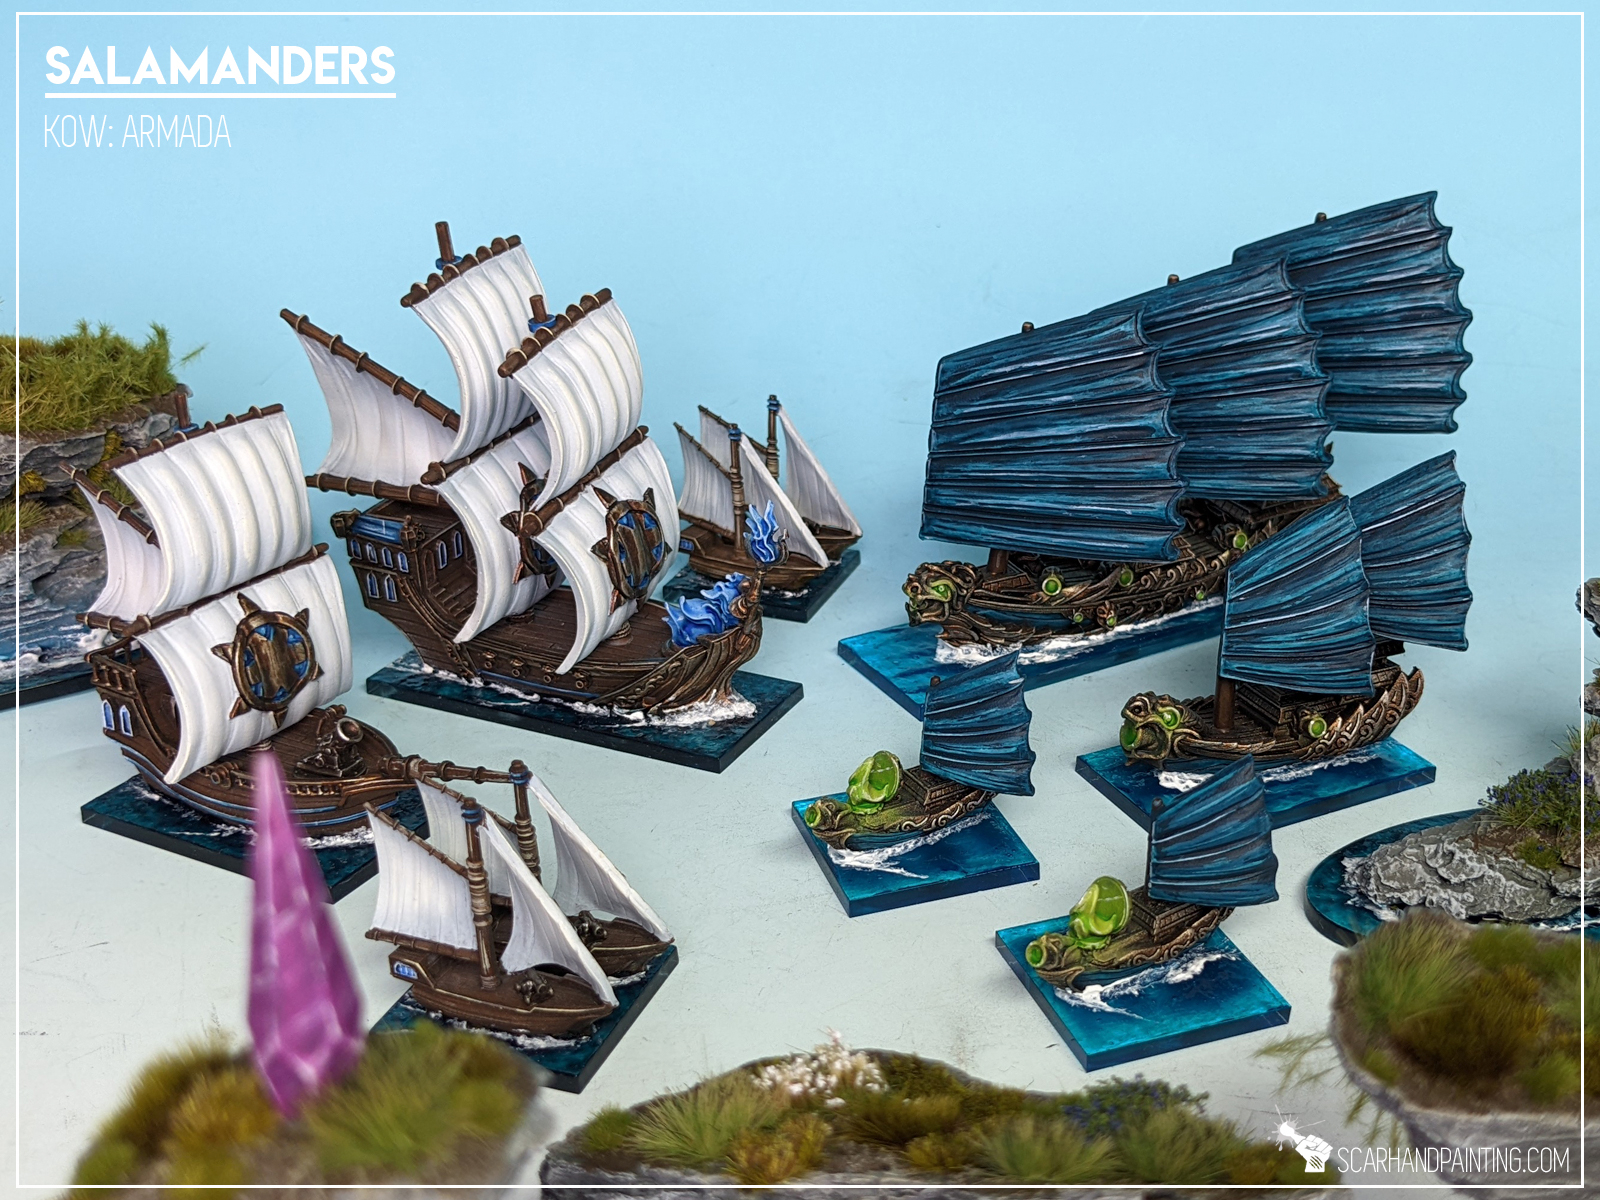
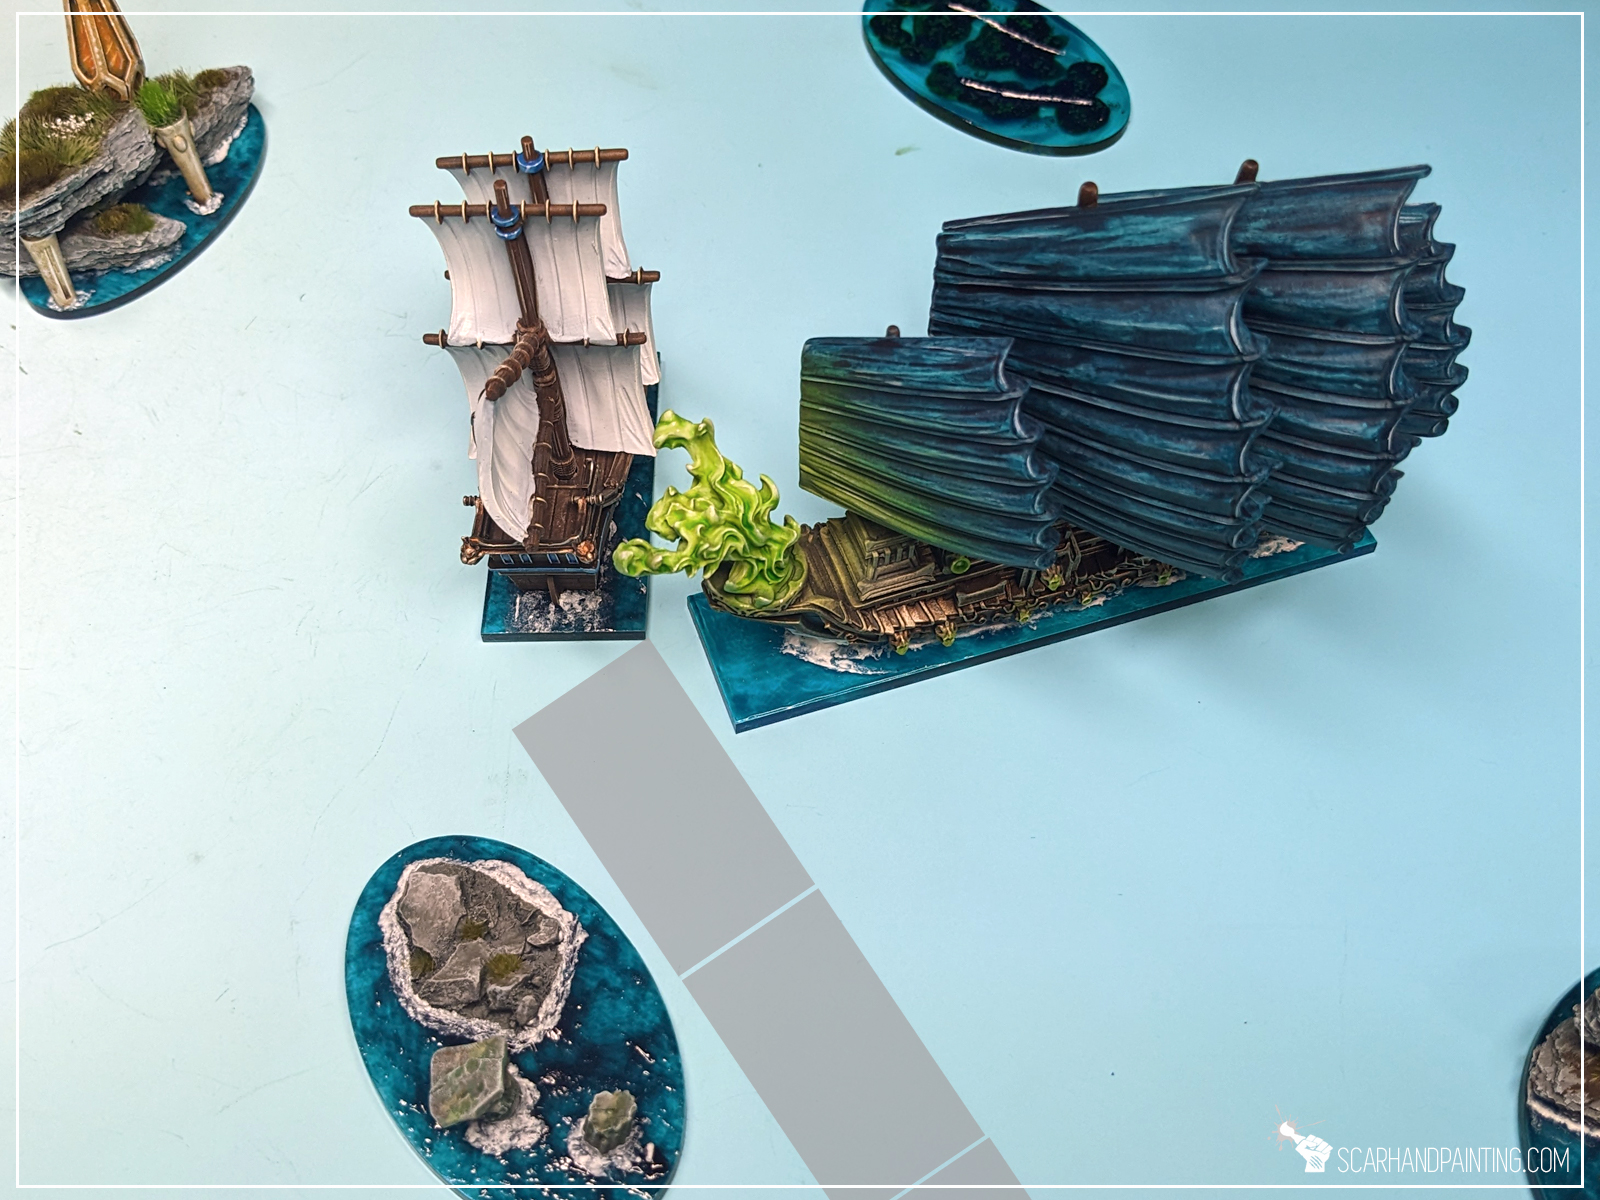
Ahoy Sailors! As you know I am most and foremost a passionate hobbyist. That being said I am also a pirate, a scoundrel and a fanatical enthusiast of Mantic Games Kings of War: Armada – a naval strategy game set in the rich world of Pannithor, pitting multiple wonderfully crafted and strongly themed factions against one another. Today I’m here to share some of my maritime experience.

With new book on the horizon, new fleets on the way, introduction of STL files, easier than ever rules accessibility via Mantic Companion and finally Warhall, the Armada has entered a golden age. I would bet my boat that the number of games played across the globe will increase drastically. This is mainly due to the influx of new players coming into the game on a wave of excitement.
I know for a fact that some games of Armada can sometimes drag a bit, but it does not have to be this way. In order to keep the games fast paced and fun for everyone, especially new players, why not try to speed up your play like a pro?
Below I will present to you a few tips that changed the way I play miniatures wargames, that I then implemented to improve time management during my Armada experience.
Know your fleet
Knowing your fleet and especially rules available in your list is the key to maintaining a smooth thought process when strategizing. Sure, checking stats of particular ships mid-game is a common thing, but fleet-wide rules and important upgrades should be engraved in your memory before the game. This will also help prevent decision paralysis, that is one of the most prominent Player Downtime* factors.
*Player Downtime is when one player is forced to wait for the opponent, with no interaction between the players.
Skip on Ship Cards
Ship cards look cool, but result in a messy, difficult to manage lists with all the counters, upgrades and stuff just mixing around. Instead I recommend using either printed lists or the Mantic Companion Play (beta) app. Not only will all upgrades be in place, but also stats will get adjusted automatically (Sturdy Construction, Ogre Mercenaries), plus you will be able to skip on most gaming tokens. Printed lists are very pencil friendly (damage, fired, blaze, surrendered), whereas MC Play allows to track everything in-app. No need to search and adjust tokens means less wasted time.


Keeping Stuff Organized
Keeping tokens, turning arcs, templates and dice well organized is key to avoid searching for particular game aid mid-play. This can be done before the game, but I also advise putting an extra effort to move things back to their designated area after using them. This way they will be there next time you need them.

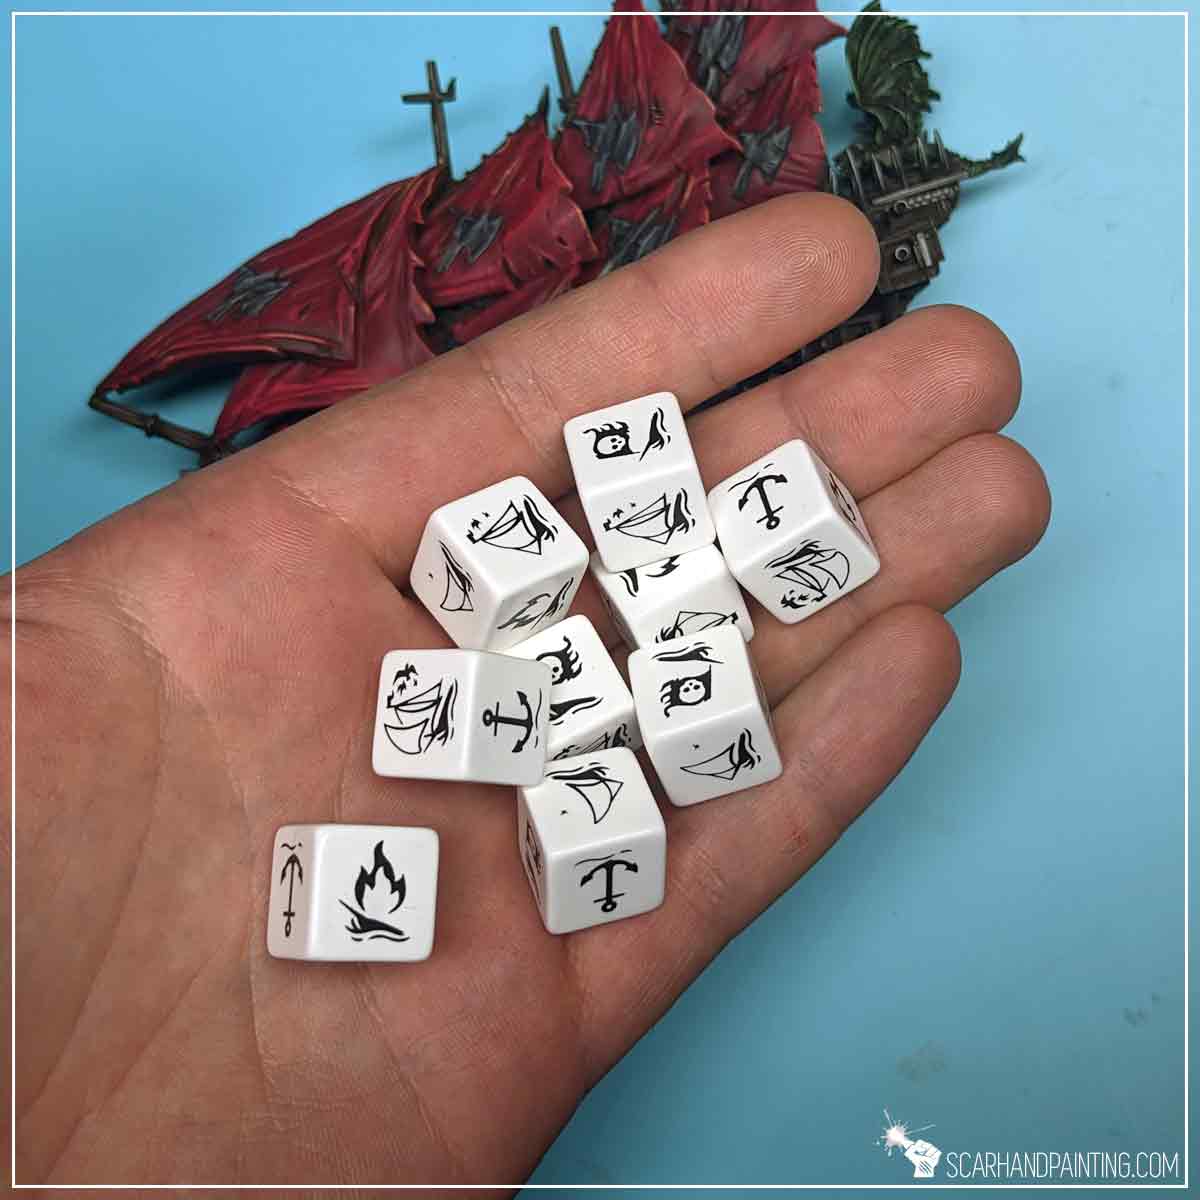
Single shot Dice selection
There’s really no need to pick a particular colored dice for a single shot. Same goes for multiple shots of one weapon type (like 4H broadside). Grab any D10 and roll!
It might also be applied to two weapon types rolls of uneven number of shots. Like if you fire two H and one C, two dice of color A plus one dice of color B will leave things obvious without the need to waste time searching for appropriately colored dice. A heads-up in line with “Blue is L” when rolling will clear things out even further.

Single Dice Rolls and Mods
While on the topic of dice rolls, skip on counting Mods for single dice rolls before the roll. More often than not the result will be obvious, like if you try to hit with Indirect Weapon against a faraway, fast moving, partially visible target and roll 5 or lover you don’t even need to to count the Mods and waste your time. Same goes for Nerve Checks, Evade Rolls and other Skill Tests of either “1” or “6”. These two results alone transfer to 33% chance of saving time counting Mods if you roll the Dice first.

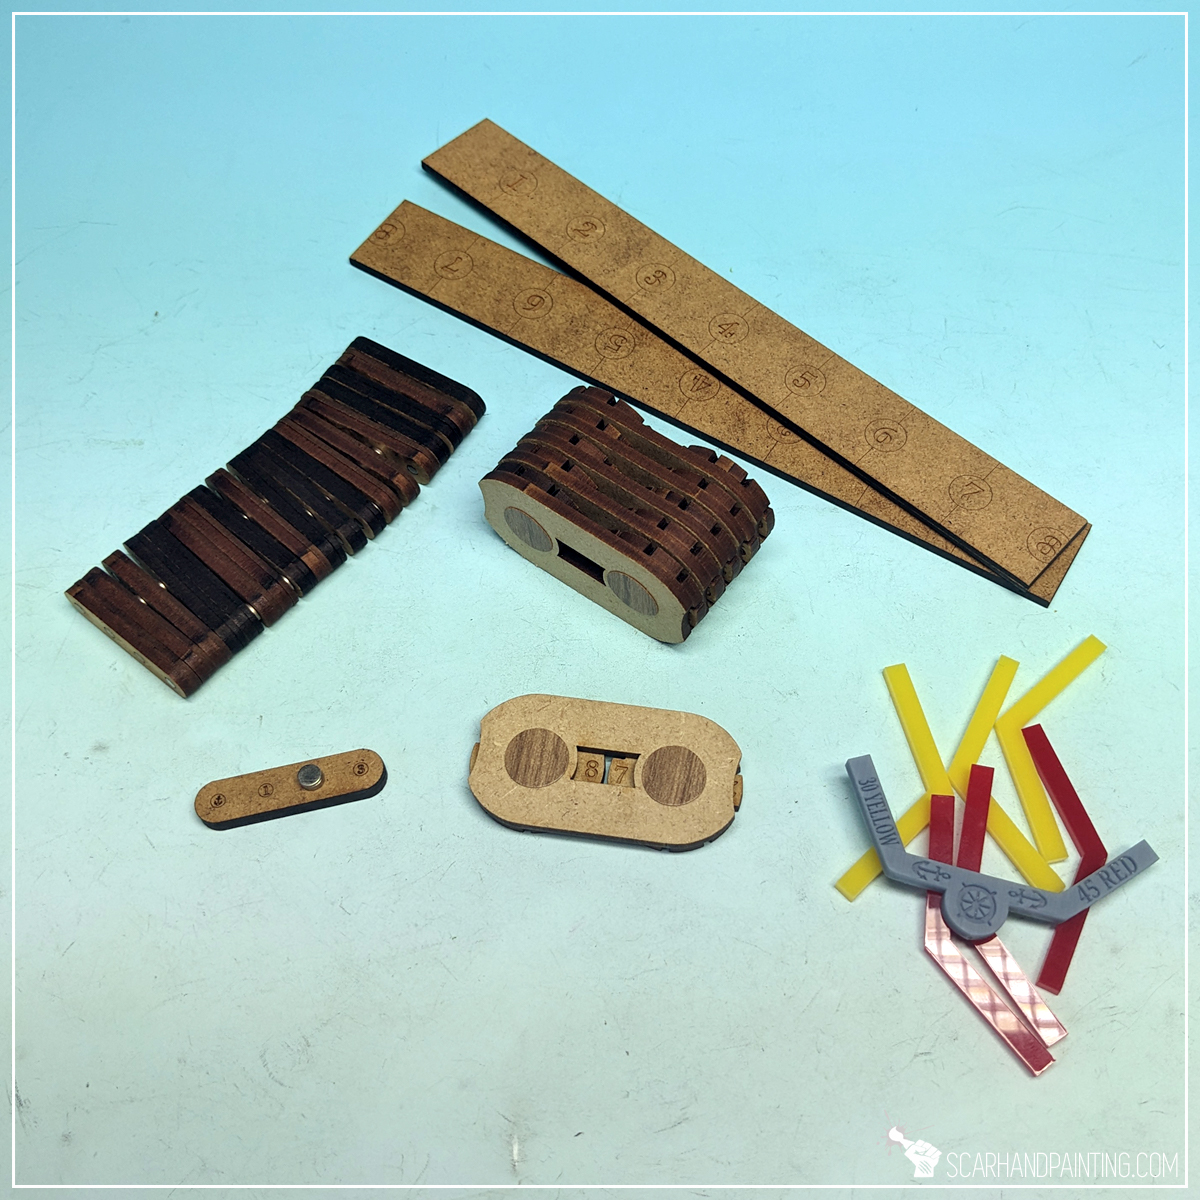
Speed and Damage counters
If there’s one thing that really slows things down in Armada, that would be speed and damage tokens management. The solution would be to use either multi faceted dice, or special counters. There’s plenty of these available on Etsy. Alternatively a sheet of adhesive tape and erasable pen will make your life so much easier.


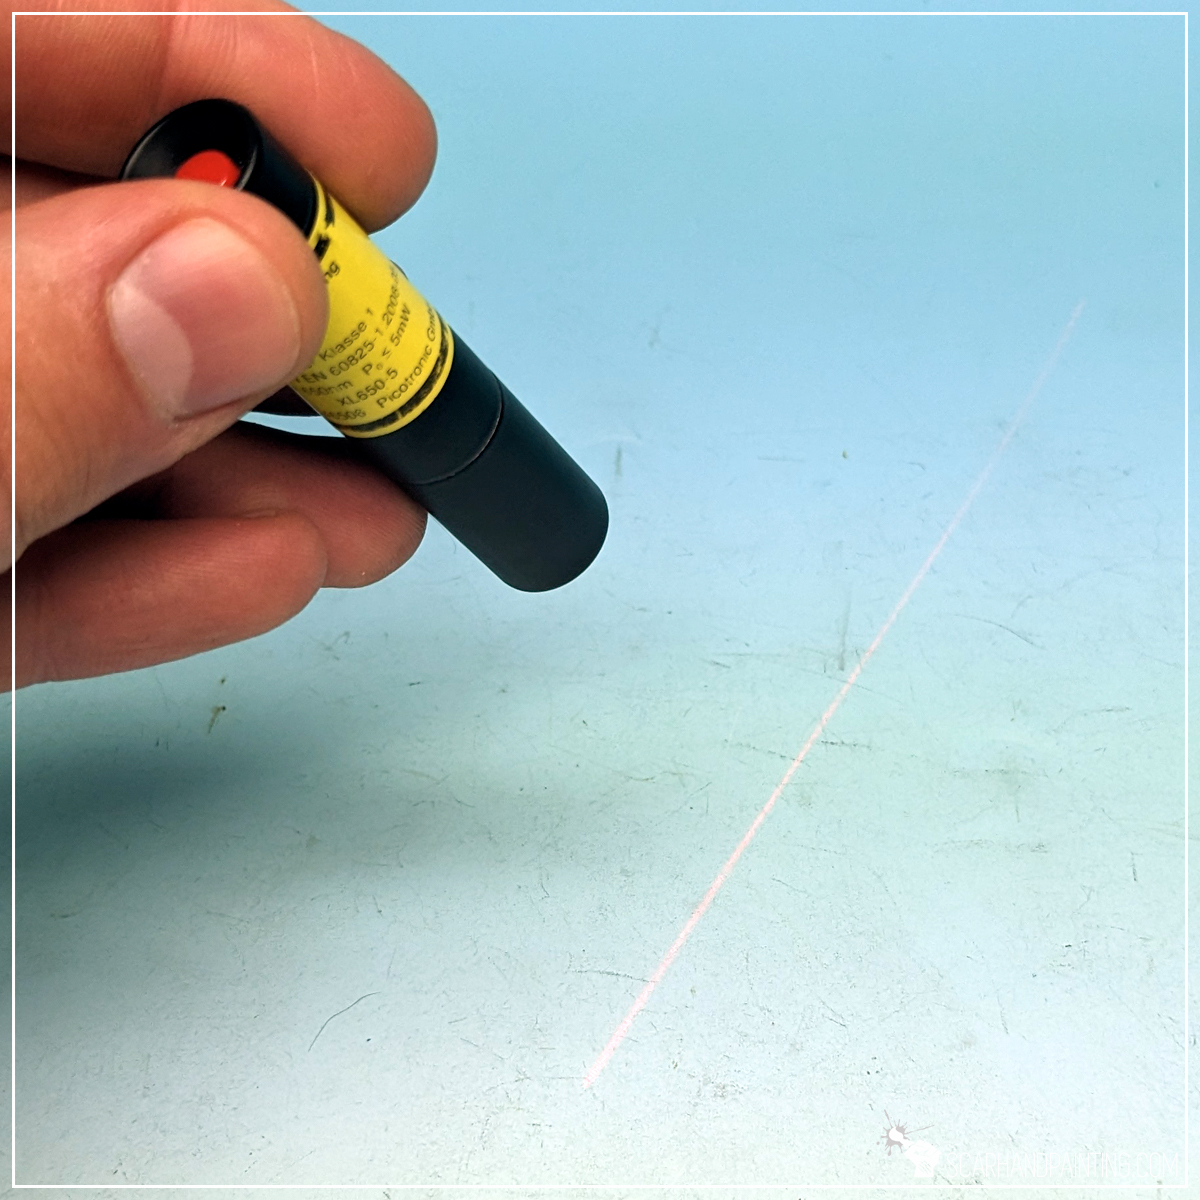
Laser Pointer
Flat line laser pointer is a precision tool, perfect to manage activation order and firing arcs. With this puppy you will save time otherwise spent on moving around the table with a tape measure, or eyeballing and arguing over activation lines. You can grab one from The Army Painter, or google search for alternatives.
Chess Clock
No, I ain’t suggesting you play with a chess clock, switching time with your opponent. Chess clock is just a fine tool to have standing and running beside the board in order to better manage remaining time. I find the sole presence of timer ticking down to be good for motivation and decision making.

Reference Sheets
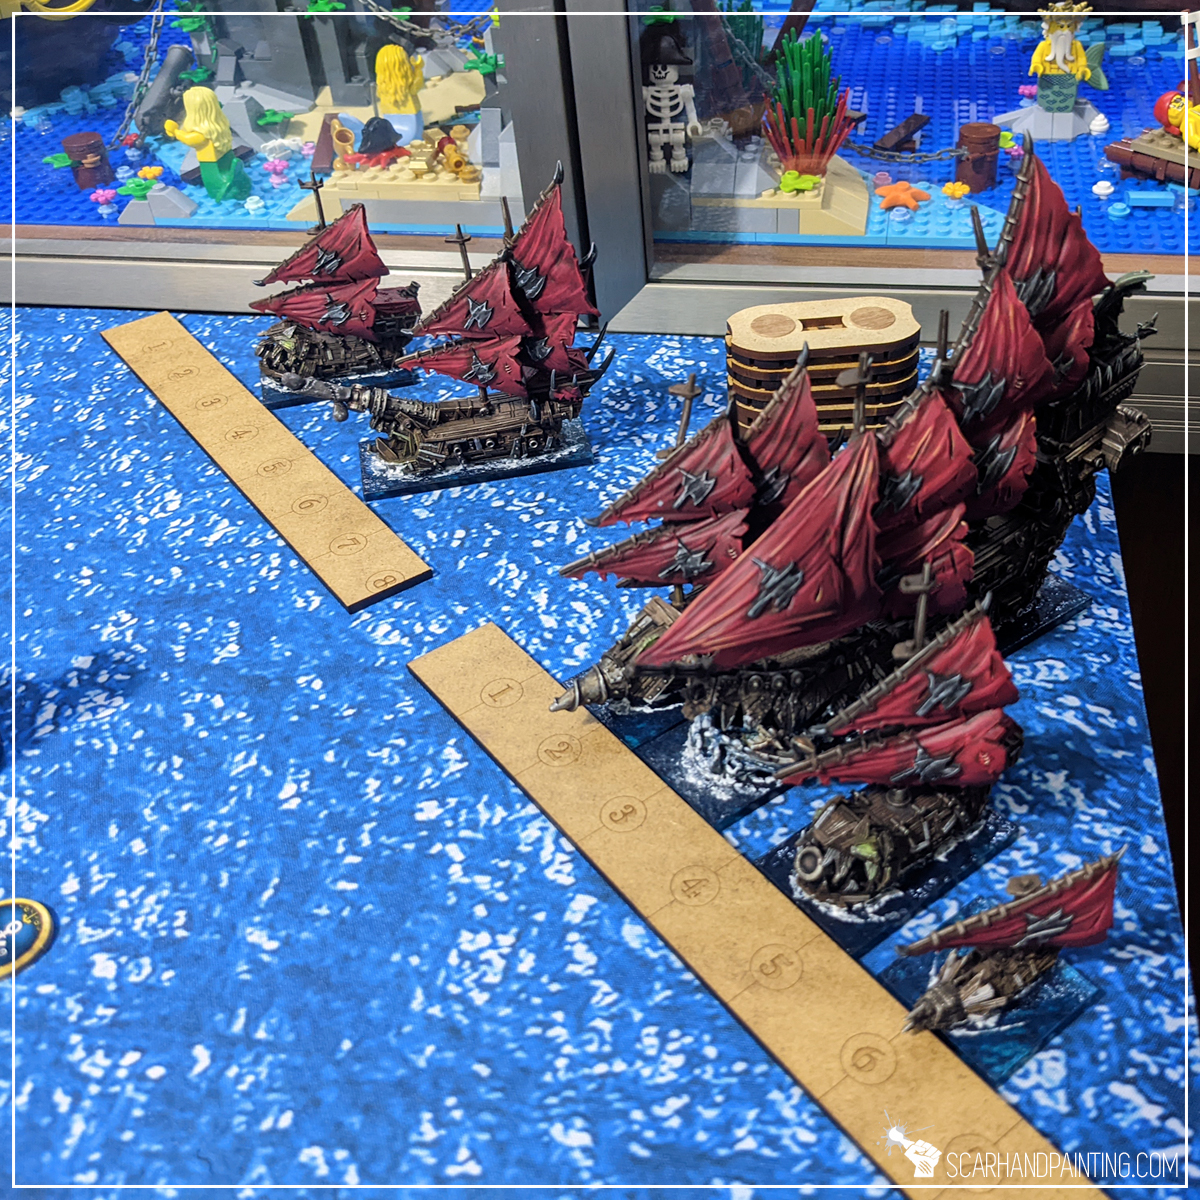
It’s always good to have a copy of the Rulebook at hand, just in case. Still, when it comes to consulting the reference sheets the main book might be a bit unwieldy. This is why I recommend printing a copy of Reference Sheets. Can be done in horizontal two on one pages setup to save space around the gaming board. Checking Wind roll, Critical Hits, Boarding Actions and Weapon ranges will become as easy as glancing sideways.


Marking Deployment
To ease the decision process for deployment it is good to mark the entire Deployment Zone beforehand. This way you will outright see all the available space to deploy your ships to.
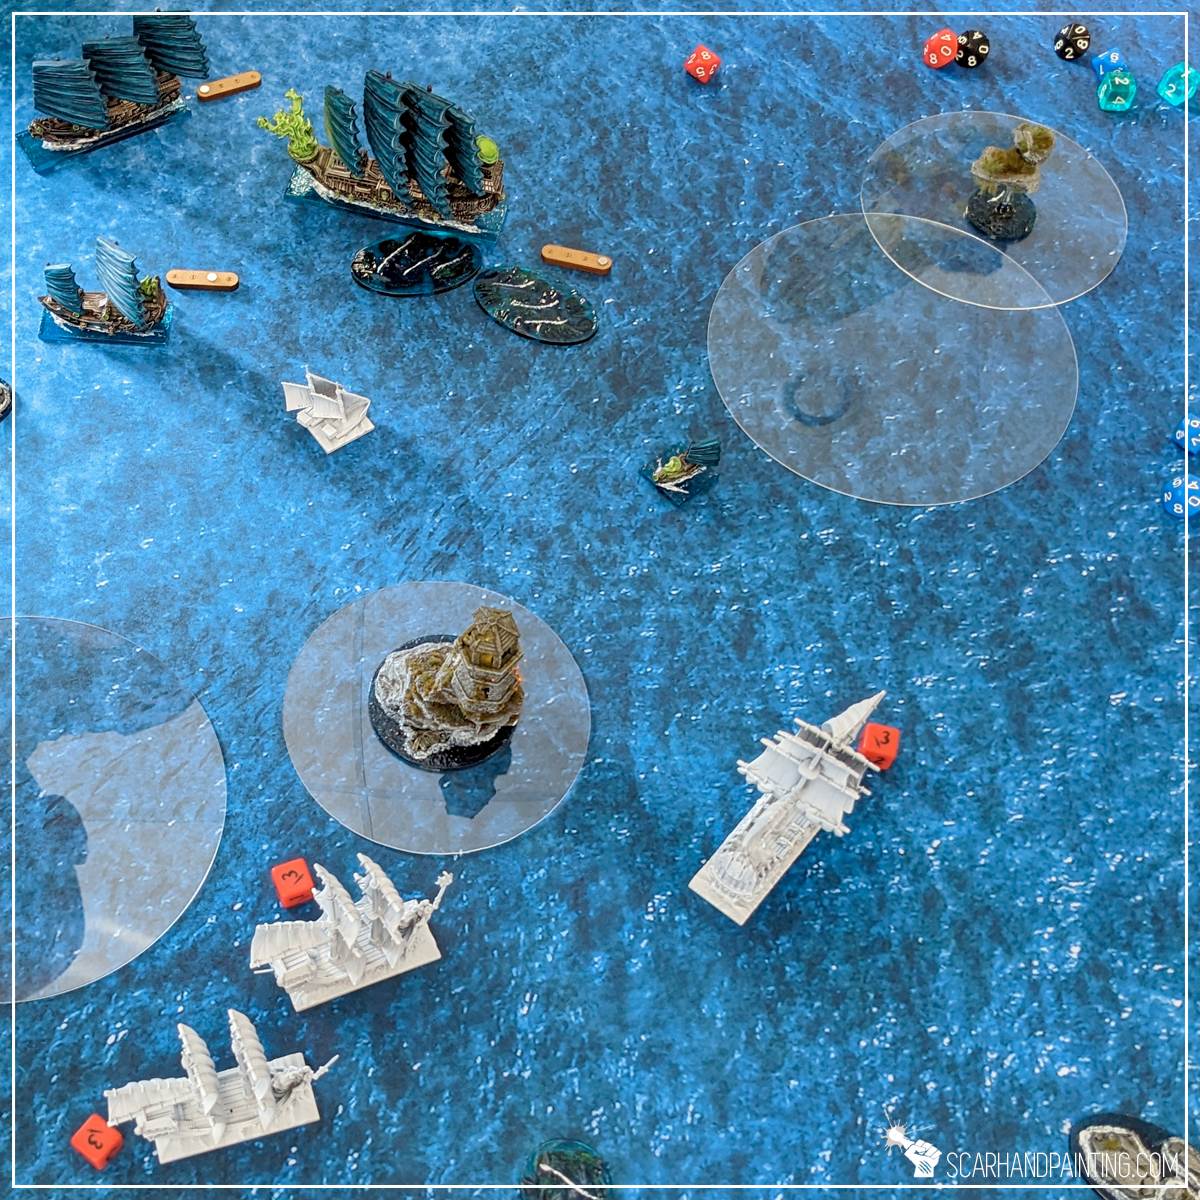
Shoreline markers
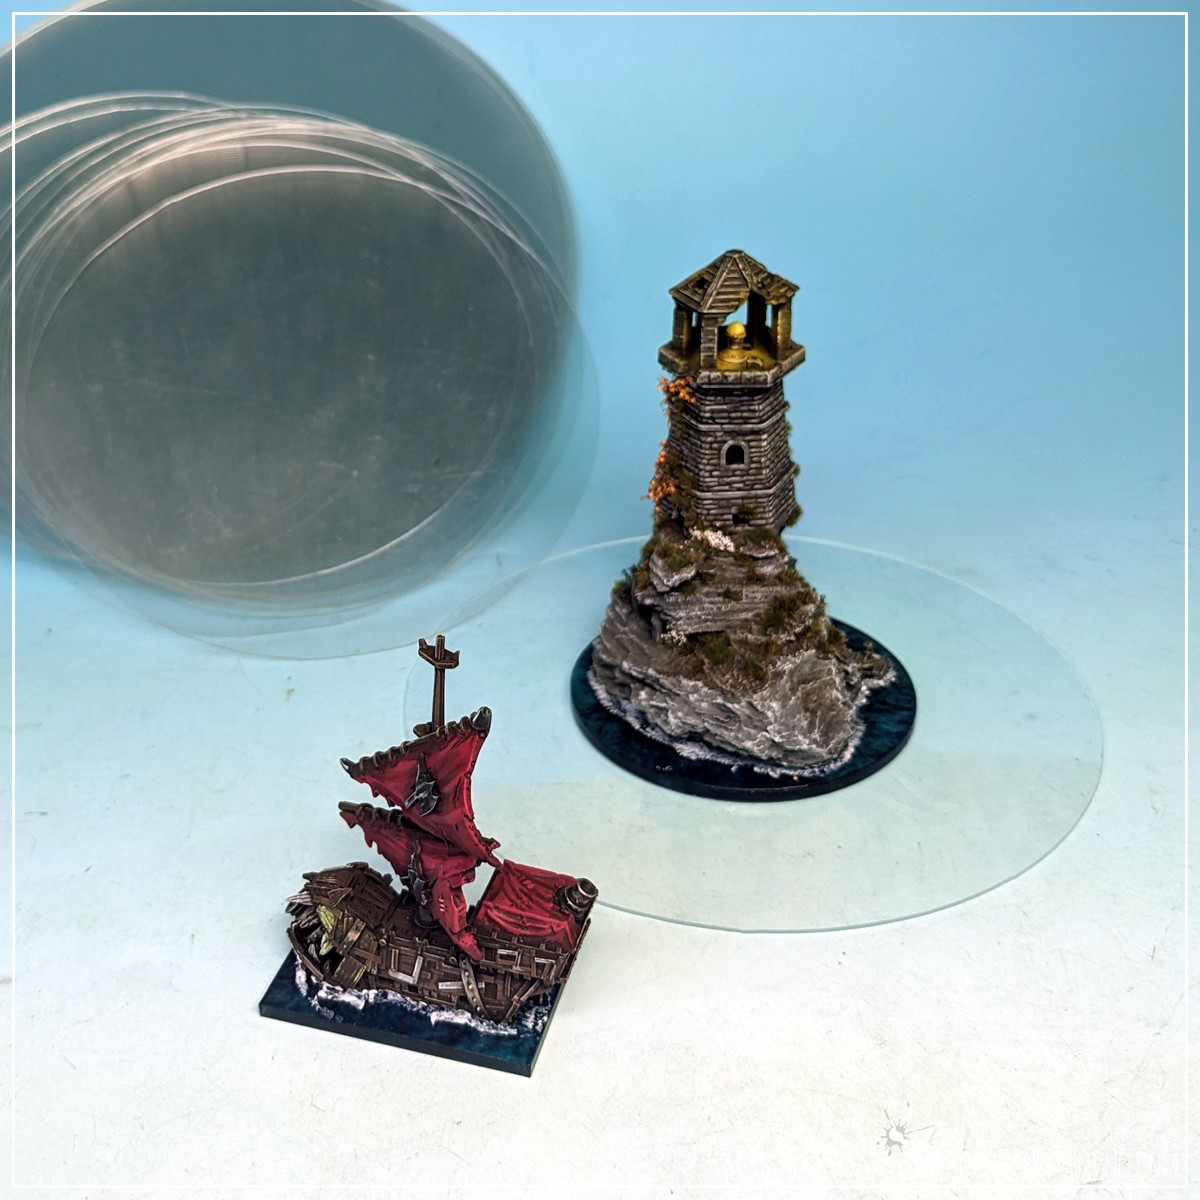
Marking Shorelines ahead of time can be a great help. Skipping on all the measuring will definitely ease the decision making and speed up the game. Shoreline markers can be made with thin translucent plastic, acrylics or just sheets of paper and they do not have to be precise. In my opinion WYSIWYG* Shorelines are fine, even if not precisely 2″ wide around the island, as long as both players agree on it before the game. Personally I use ”Round Acrylic Disc F” from Amazon. These are 1mm thin round acrylics and they have met with fantastic reception at the latest local Armada event and in-house games.
*What you see is what you get.
Rapid Deployment / Let’s Move Out!
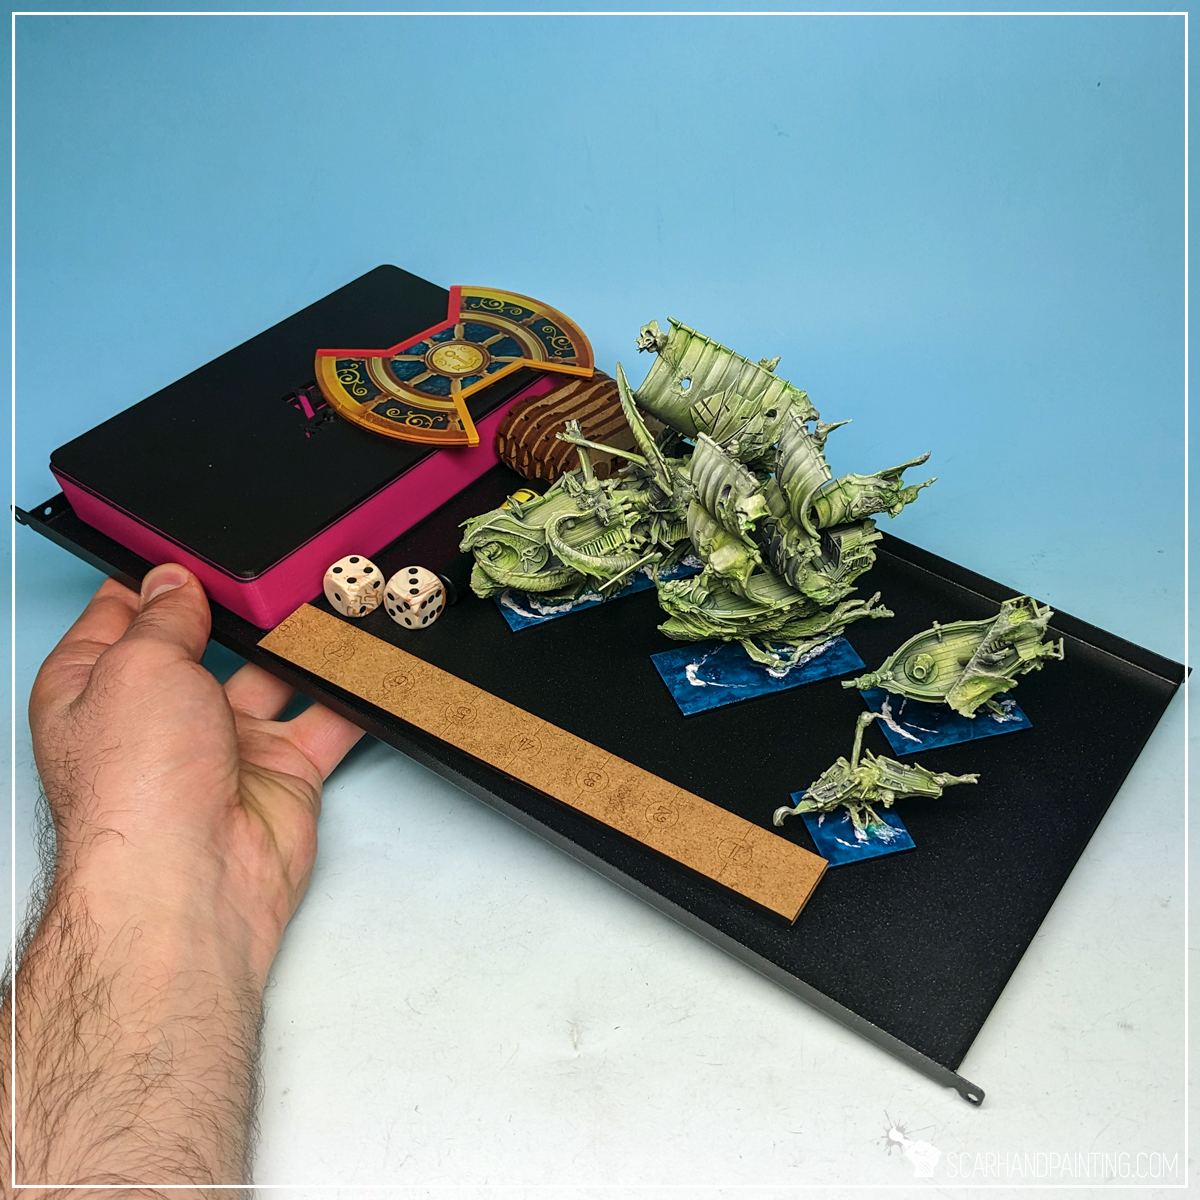
While on events, be sure to carry your miniatures in a way that allows for fast deployment. It can be anything from a simple flat pad, up to a professional miniature carrying case. Anything that does not require you to wrap/unwrap your miniatures every time you start a game is a win.
On that note, remember to grab all your stuff and put it in one place right after the game. Once the next round of pairings is out, everyone will start to move around, searching for their appointed tables. Nothing worse than arriving at the game table only to wait for someone else to come back from a smoke break and start packing their things.

Try Not to Overthink It
Armada is meant to be fun, for both players. Try not to overthink your play and just go with the flow. The more games you play the better you will become at managing your ships. Being human means learning by making mistakes. You need to make some in order to grow as a player. It is an integral part of evolving, adapting, and overcoming.
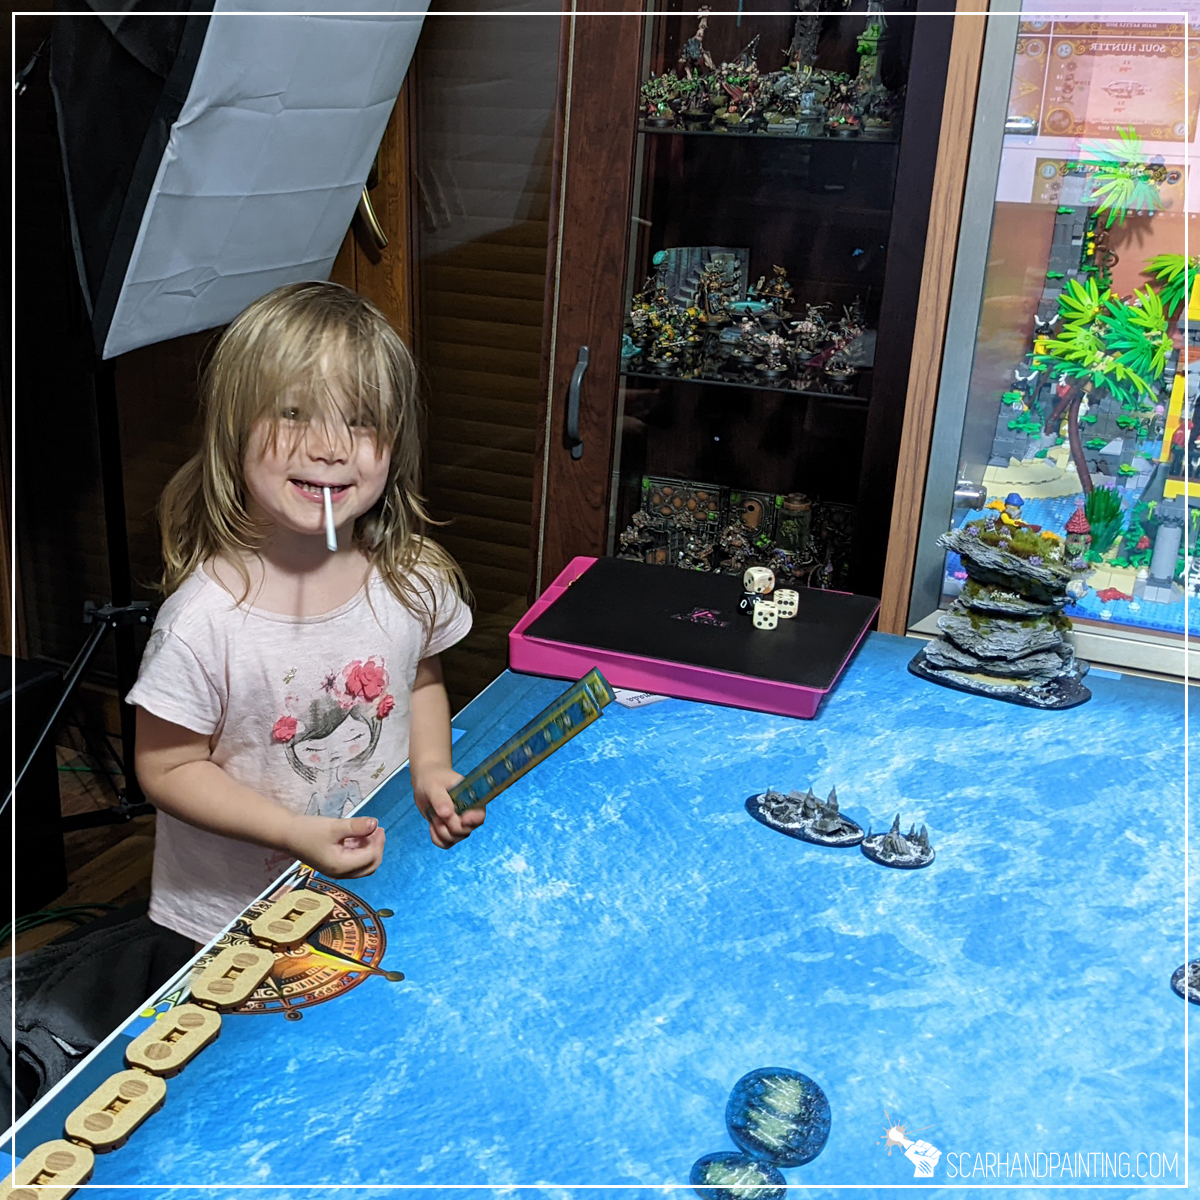
Now you have the tools to Speed Up Your Game. Let me know if there’s anything I missed. I would also love to know if any particular advice is new to you. Until then – have a great Armada gaming!
I hope you find this article interesting. Be sure to let me know your thoughts in the comments below or via Facebook or Instagram. I would also appreciate it if you considered sharing this content with your friends, who might find it useful. Finally if you are looking for a professional Warhammer miniatures painting service, be sure to contact me with this contact form. I always reply within 24 hours, after which please check out your spam folder.

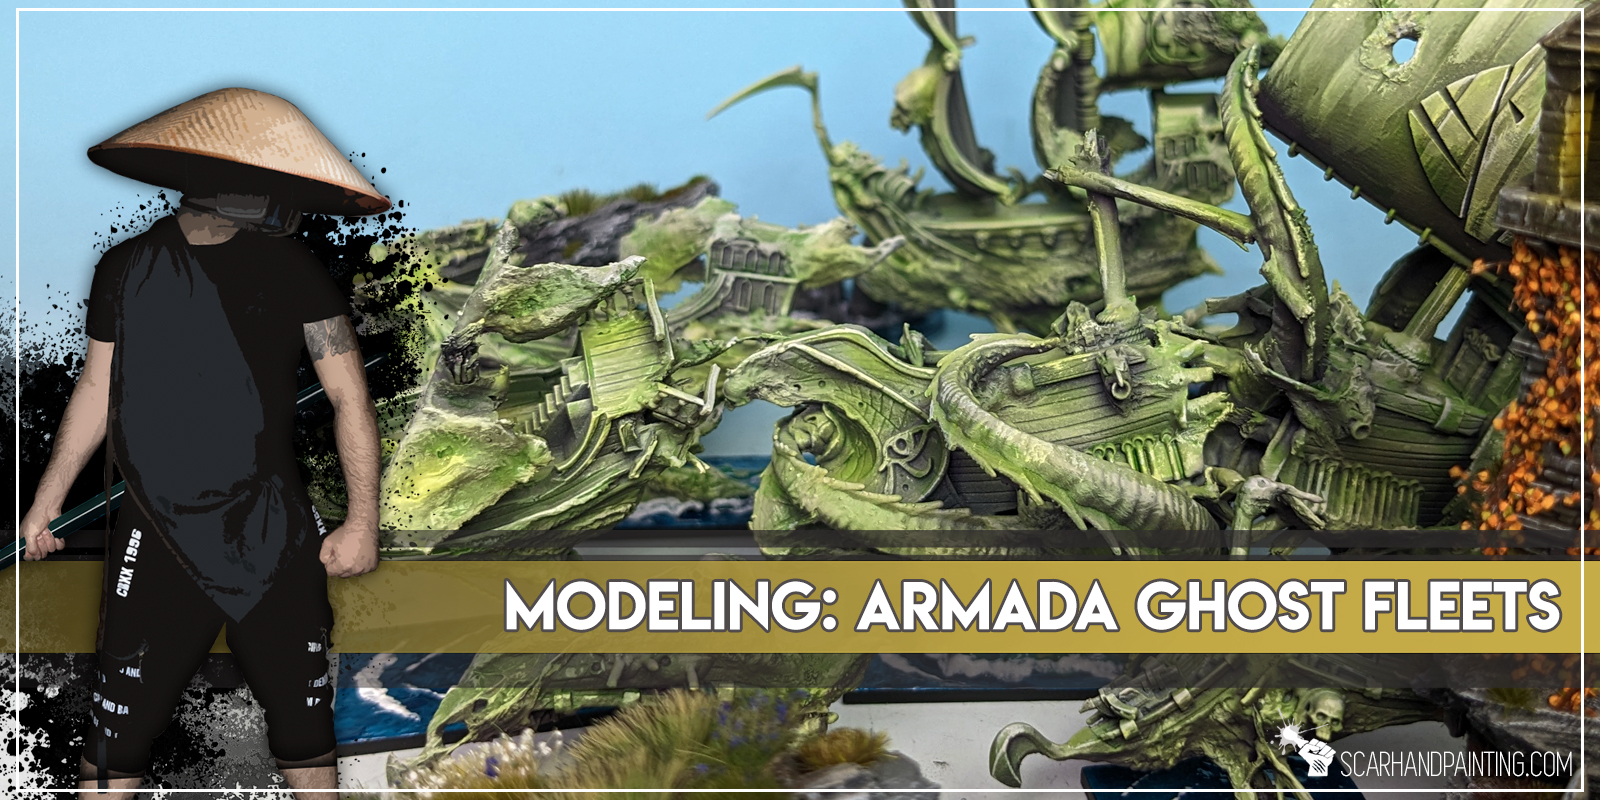
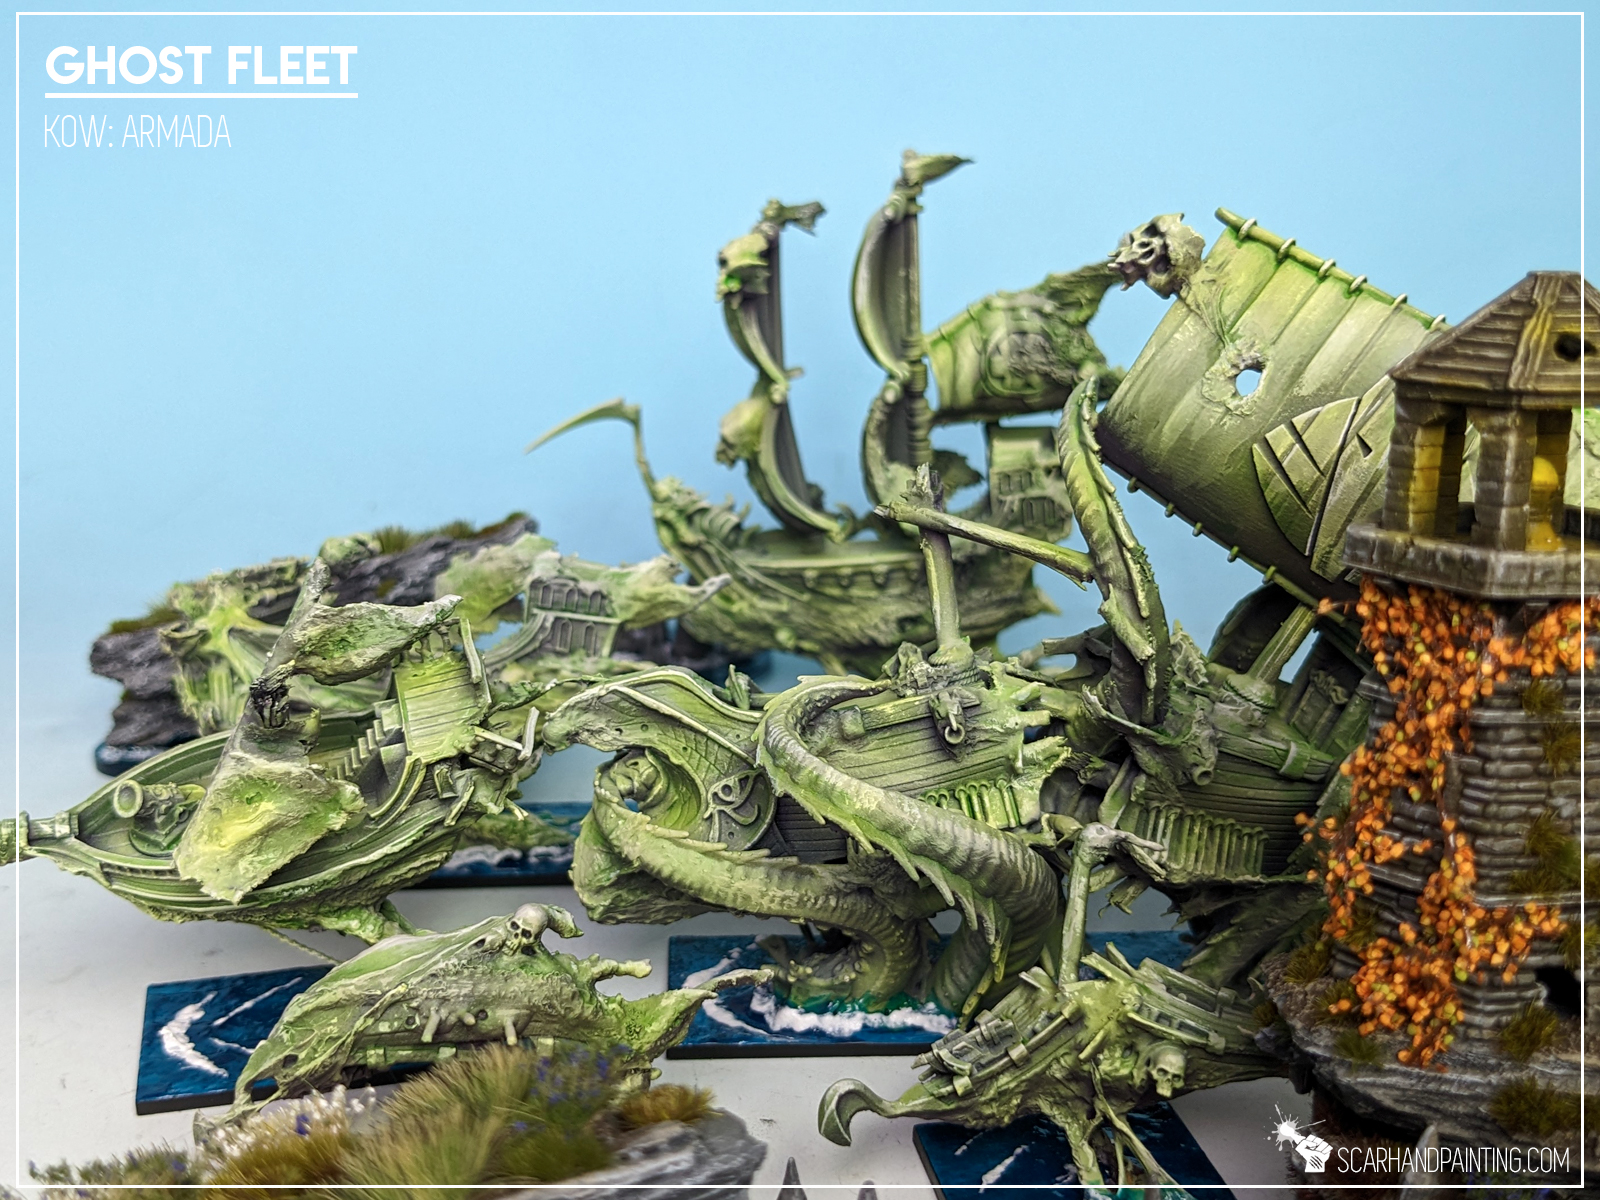
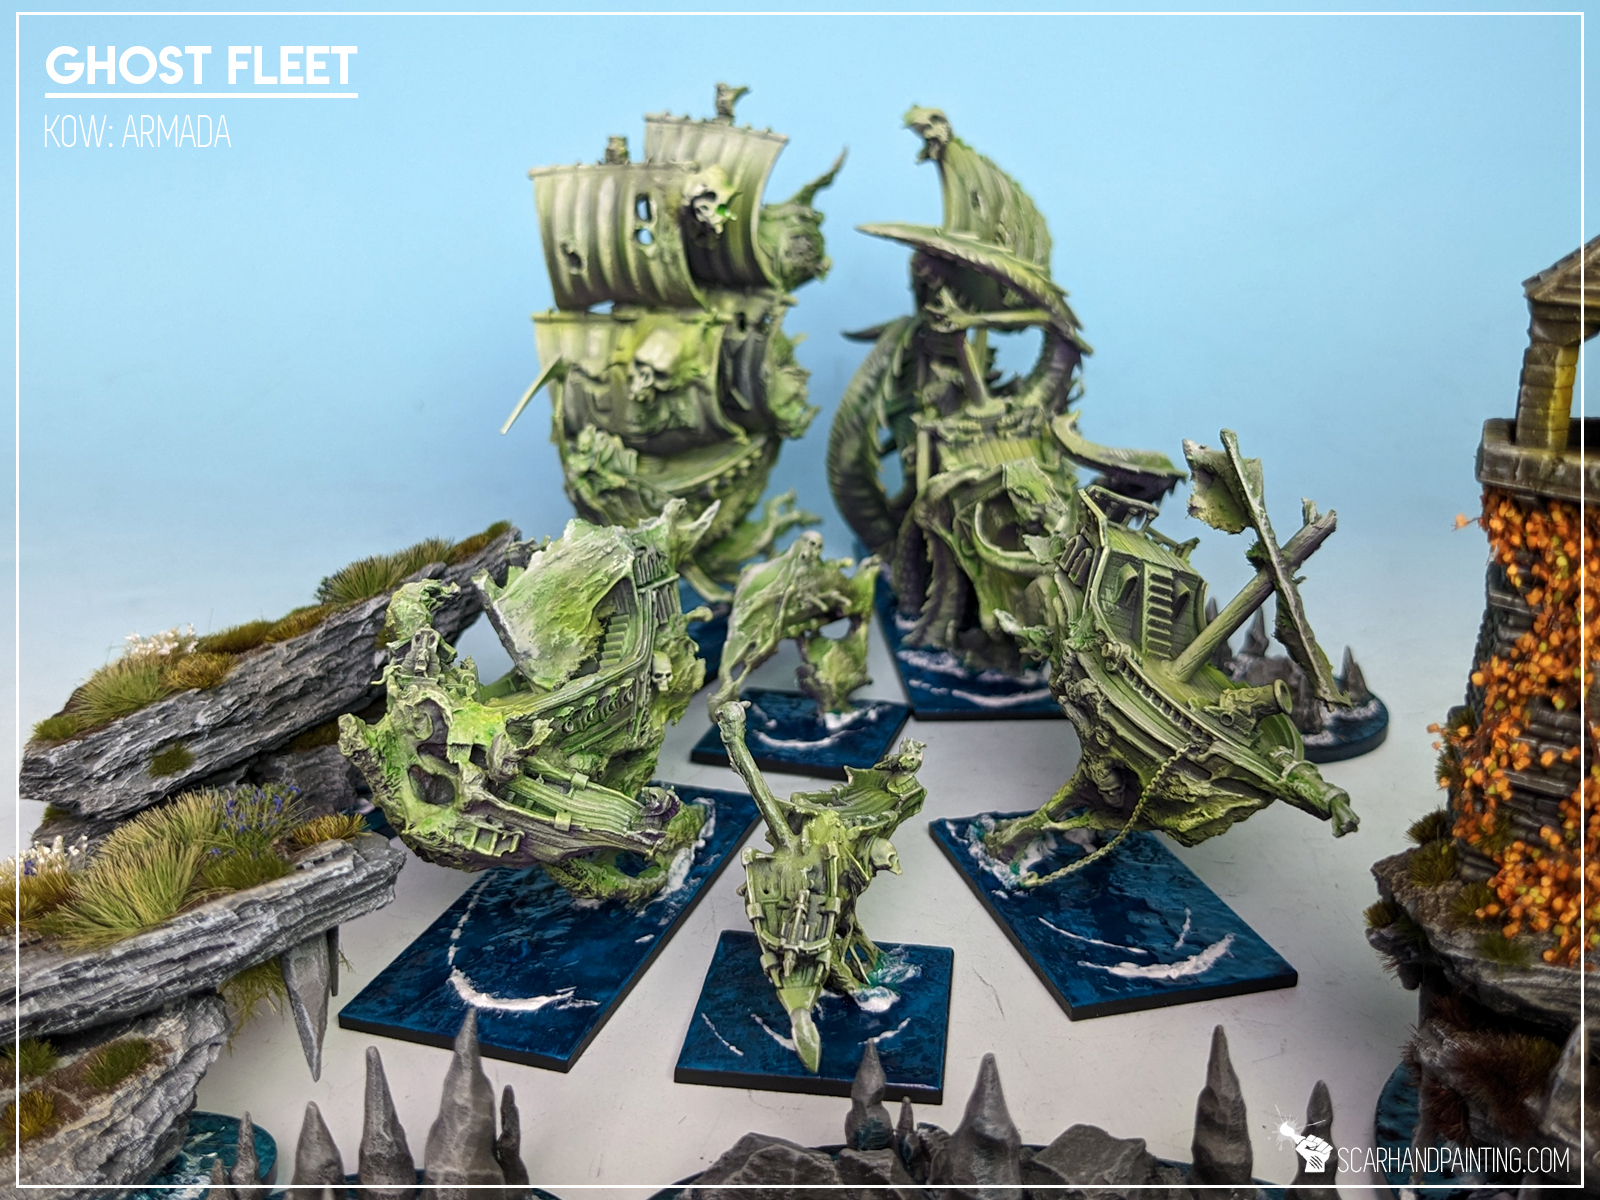
Converting miniatures, am I right? There’s probably nothing more satisfying for Armada hobbyists, other than tinkering with their tiny resin ships. Adding bits and relocating parts to add more personality to one’s miniatures has always been an important part of the hobby, but with Armada it really takes a collection to the next level. This is doubly true for Ghost Fleets, that does not have dedicated miniatures. Still not everyone enjoys converting miniatures. There are many reasons for it, not having enough skill or idea to name some.
What if I told you converting ghost ships is far more easy than you might think? What if I showed you…
Before we start, some notes:
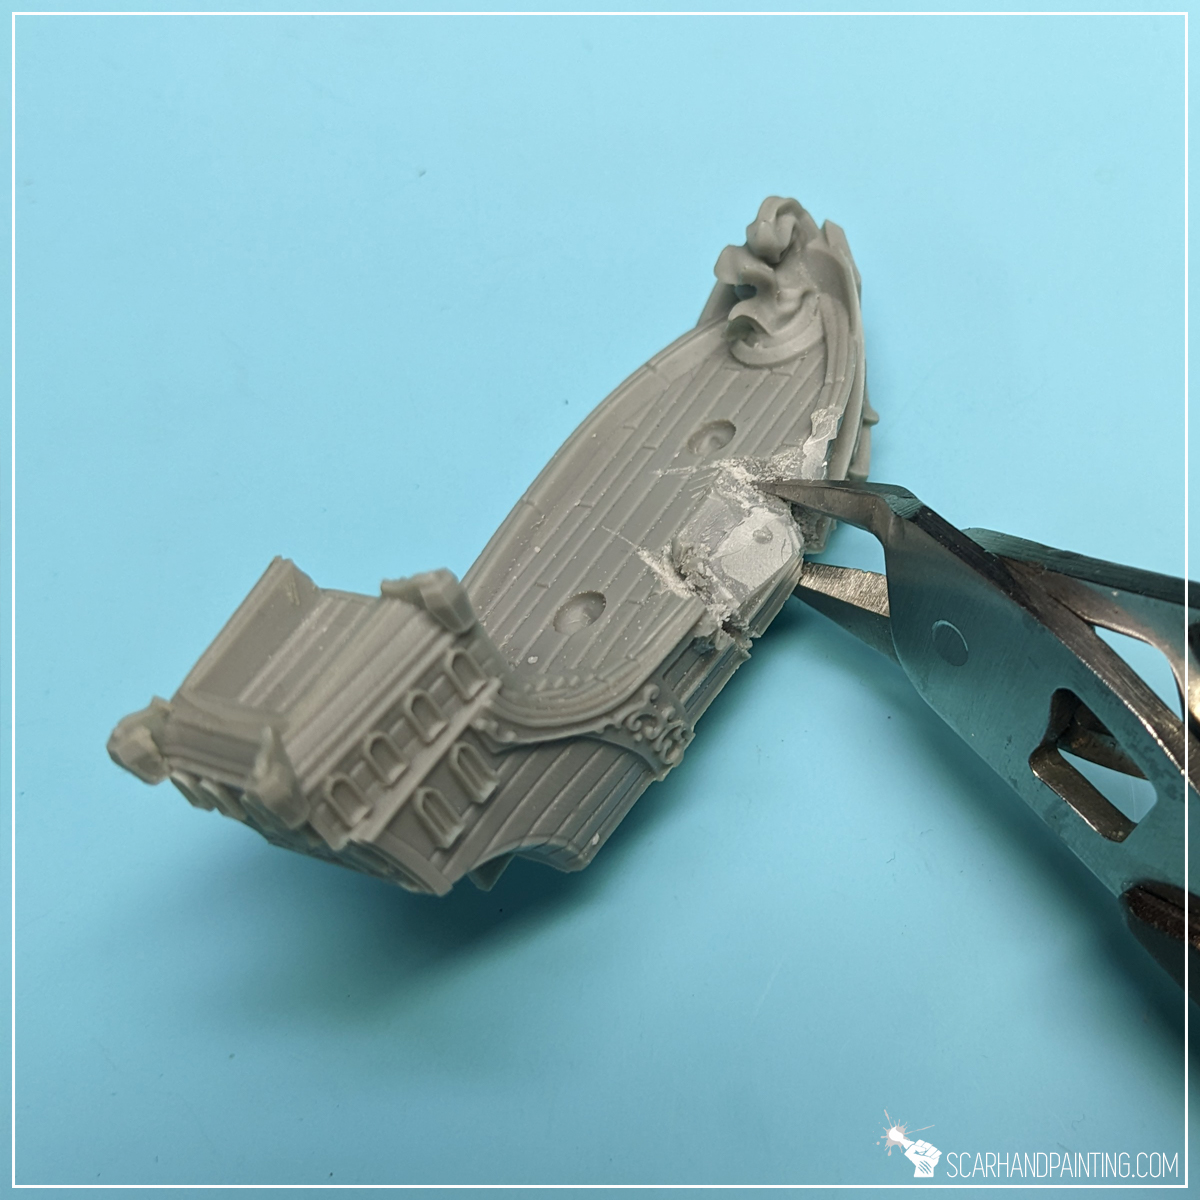
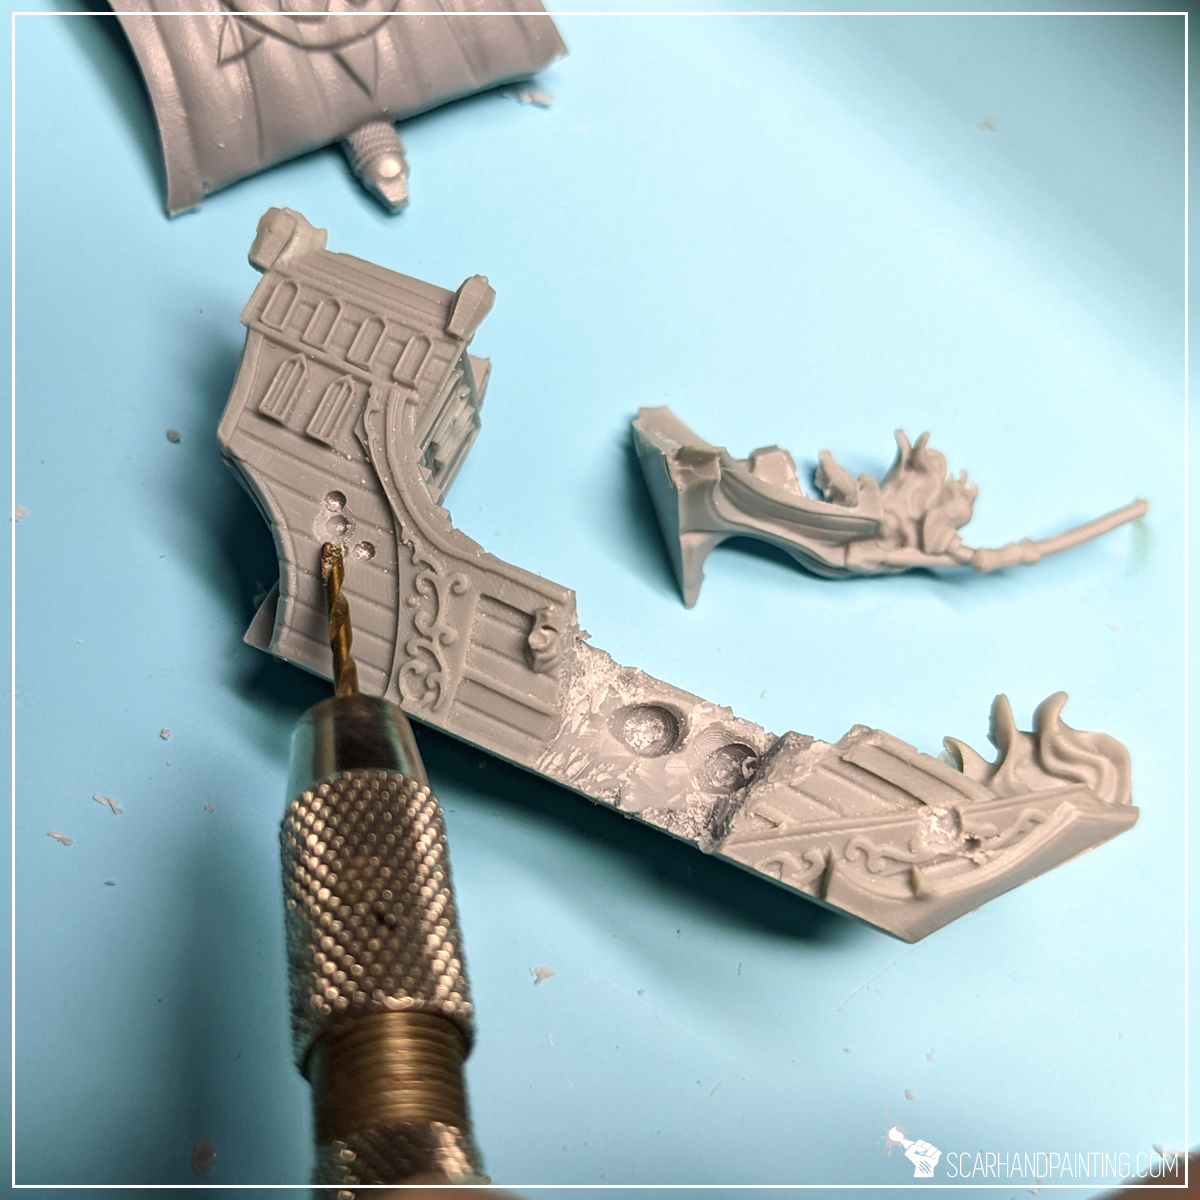
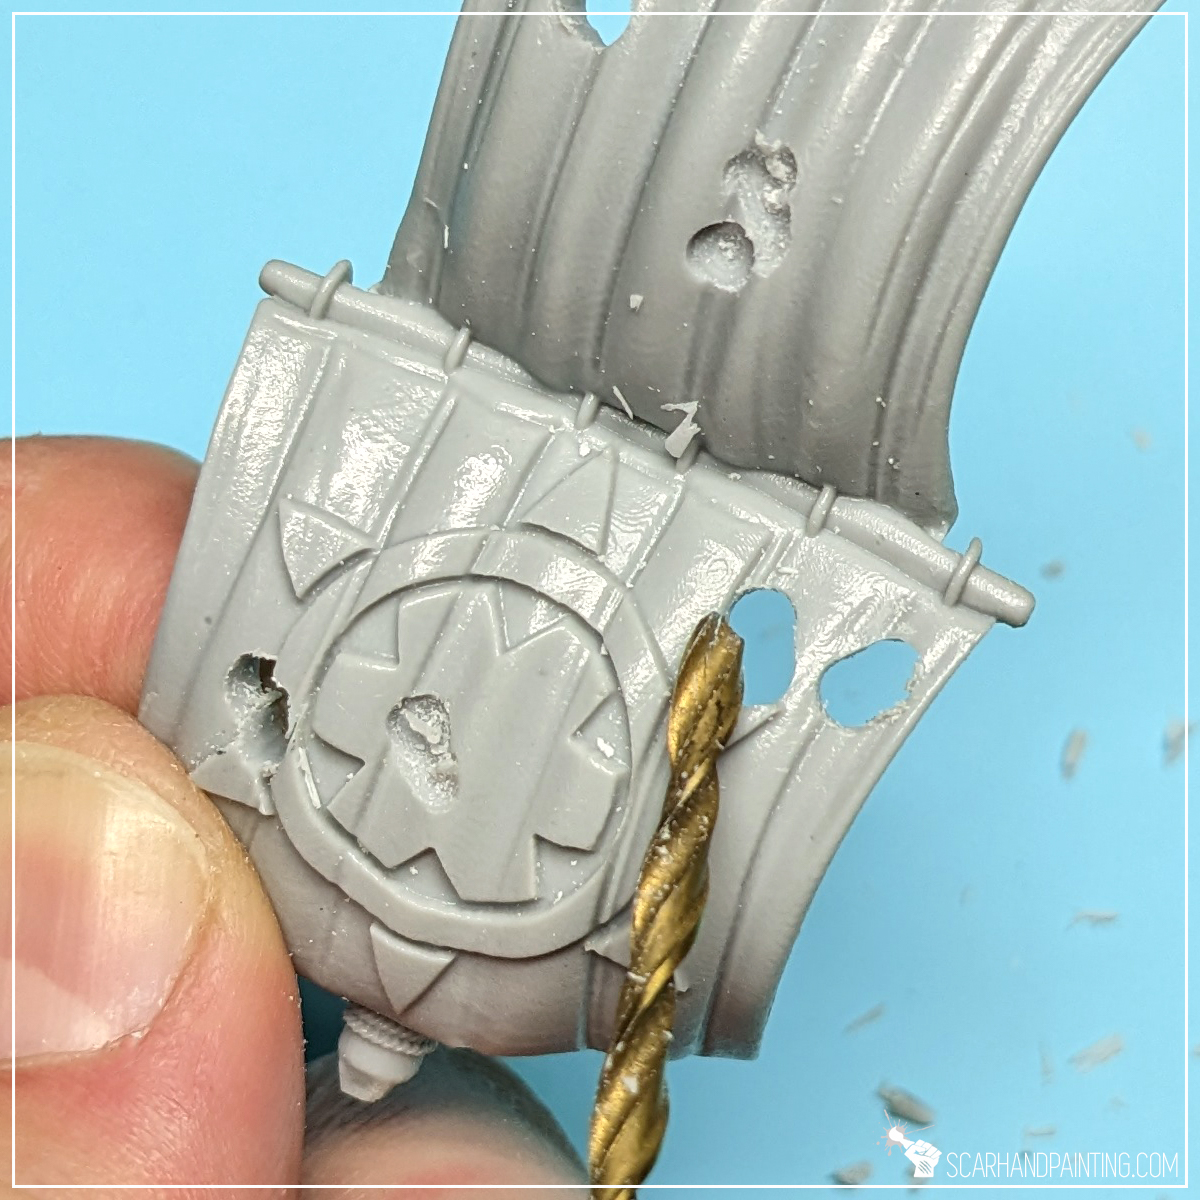
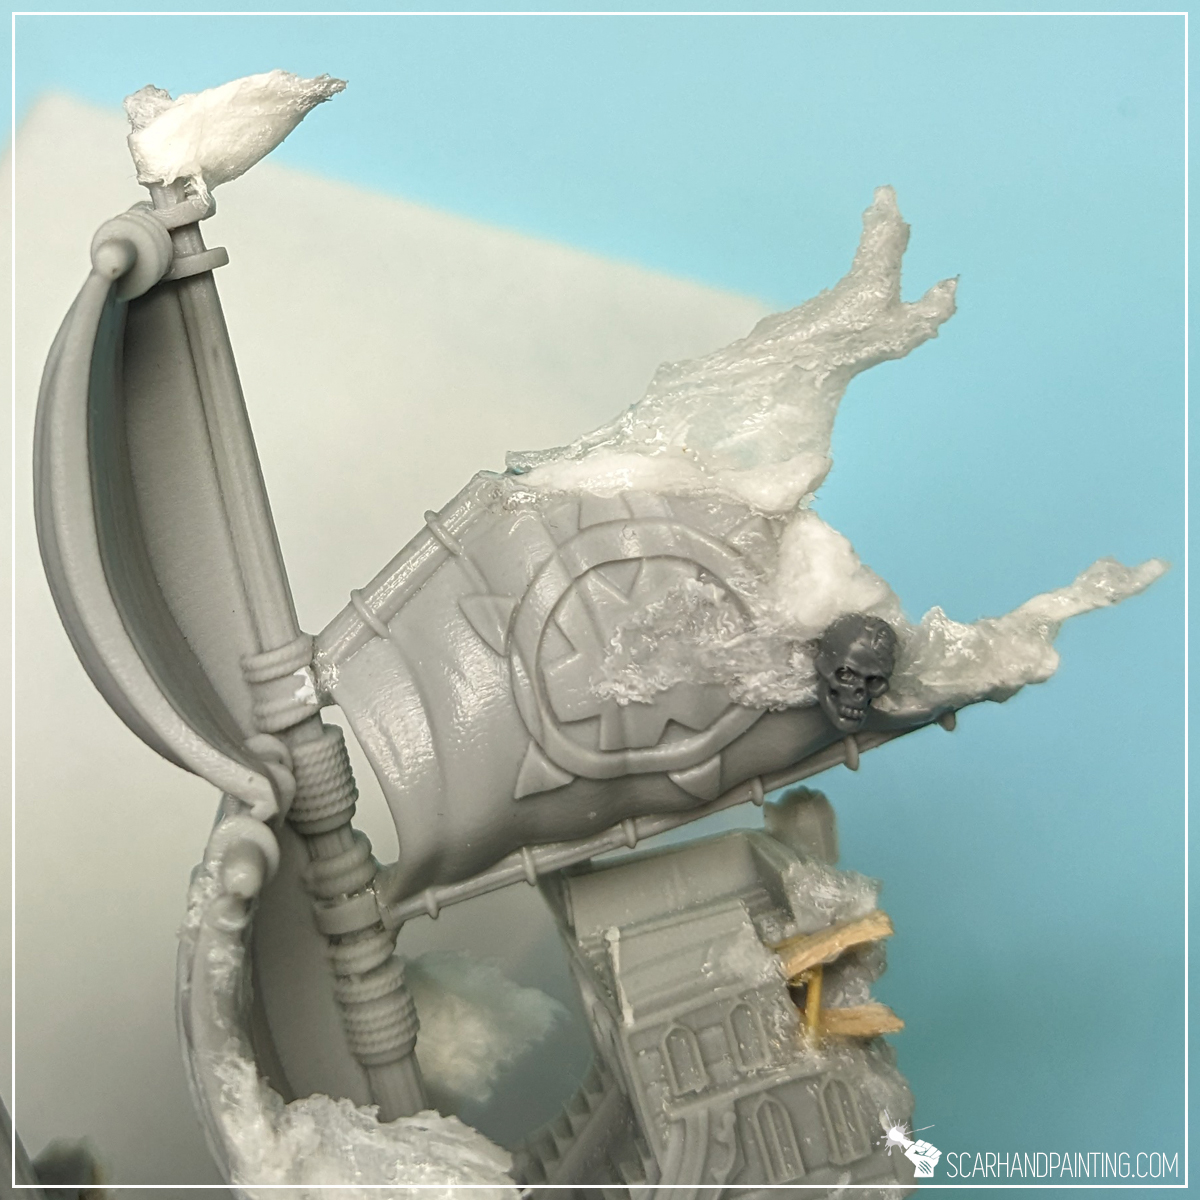
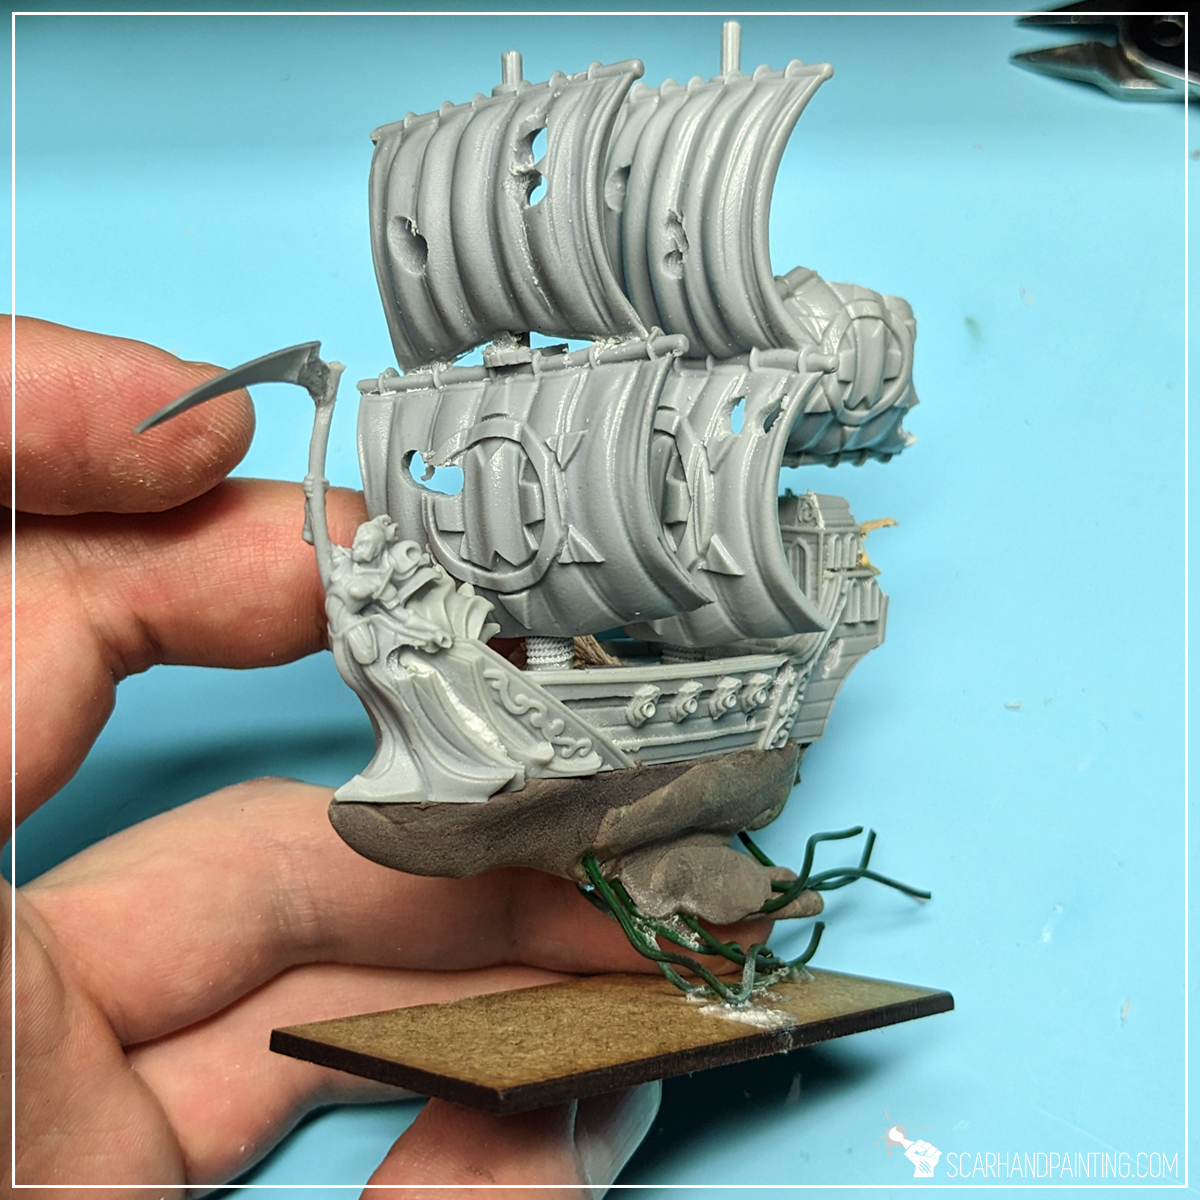
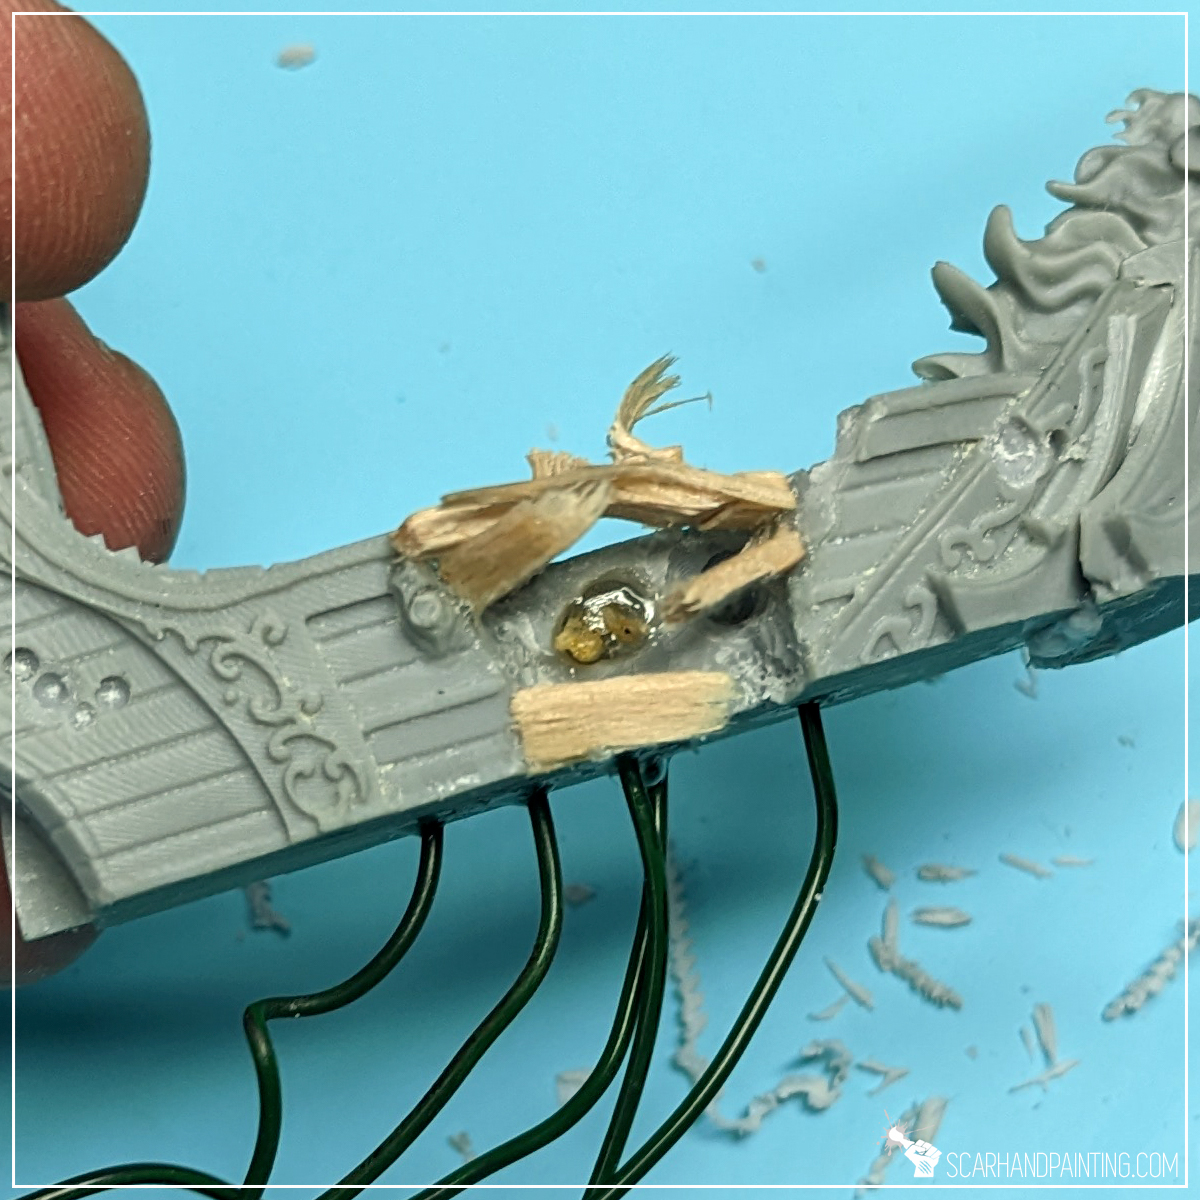
A good way to distinguish ghost ships amongst other fleets is to add significant hull damage. This can be done easily by cutting a chunk of hull with a pair of piers and/or drilling holes with a hand drill. The latter is perfect for damaging sails. For a natural damage look I drilled some holes then moved the drill bit up and down to produce a slightly more irregular shape.

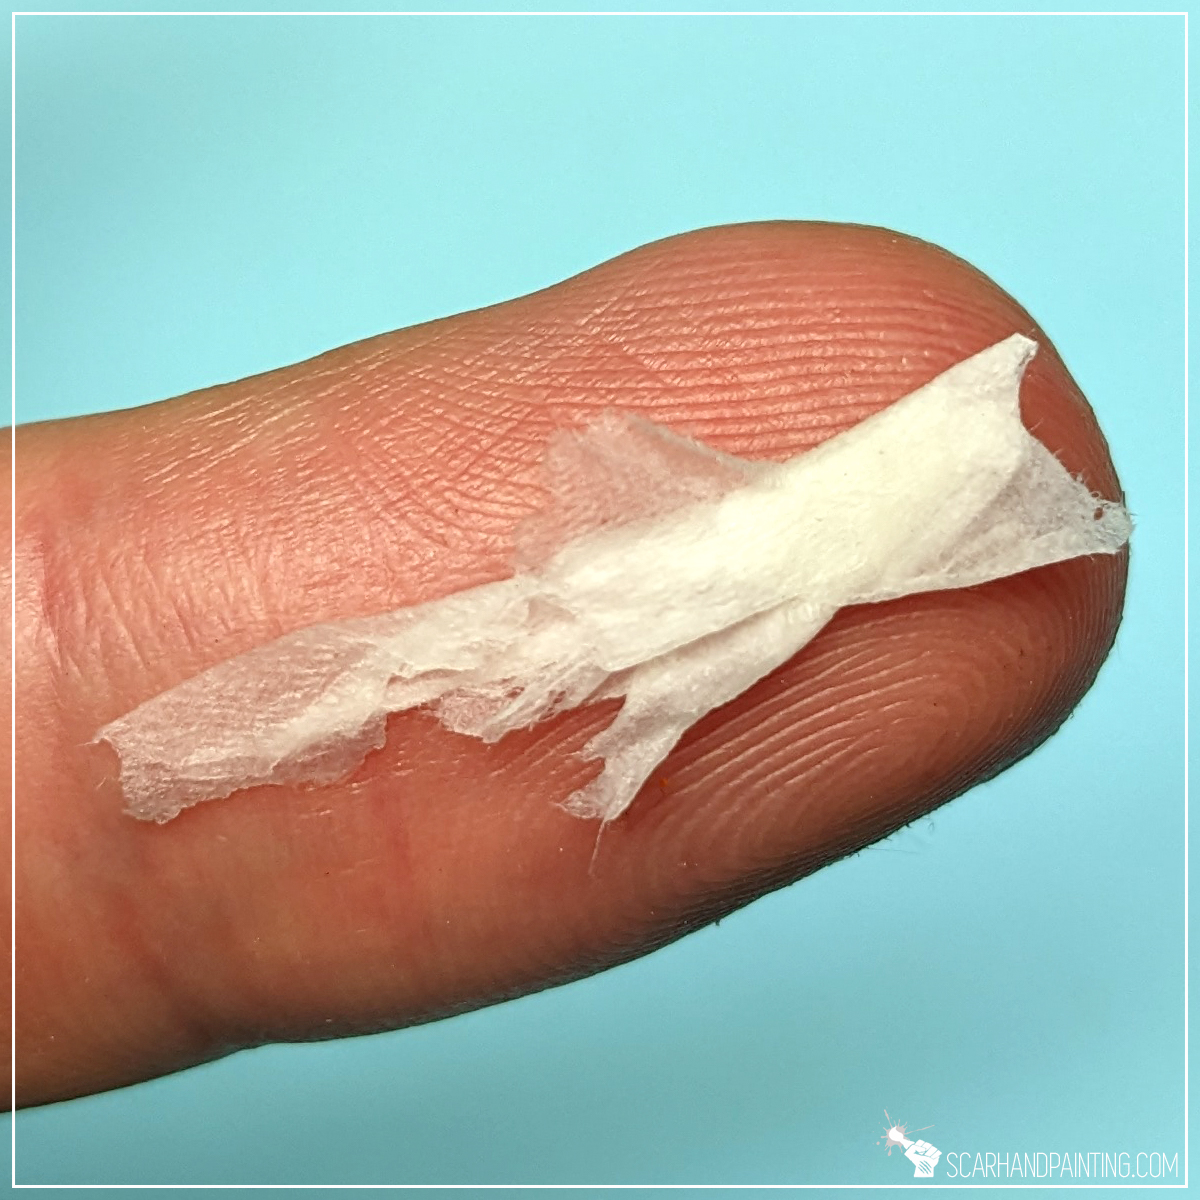
To add more dynamism to the sails and some key features I used a tissue trick. First I moisten a piece of tissue and form a basic shape. I then glued the shape to the ship with Super Glue. I followed by smearing more Super Glue on top of the tissue with a tip of a toothpick. Once hardened the shape made a solid foundation for some more advanced techniques.
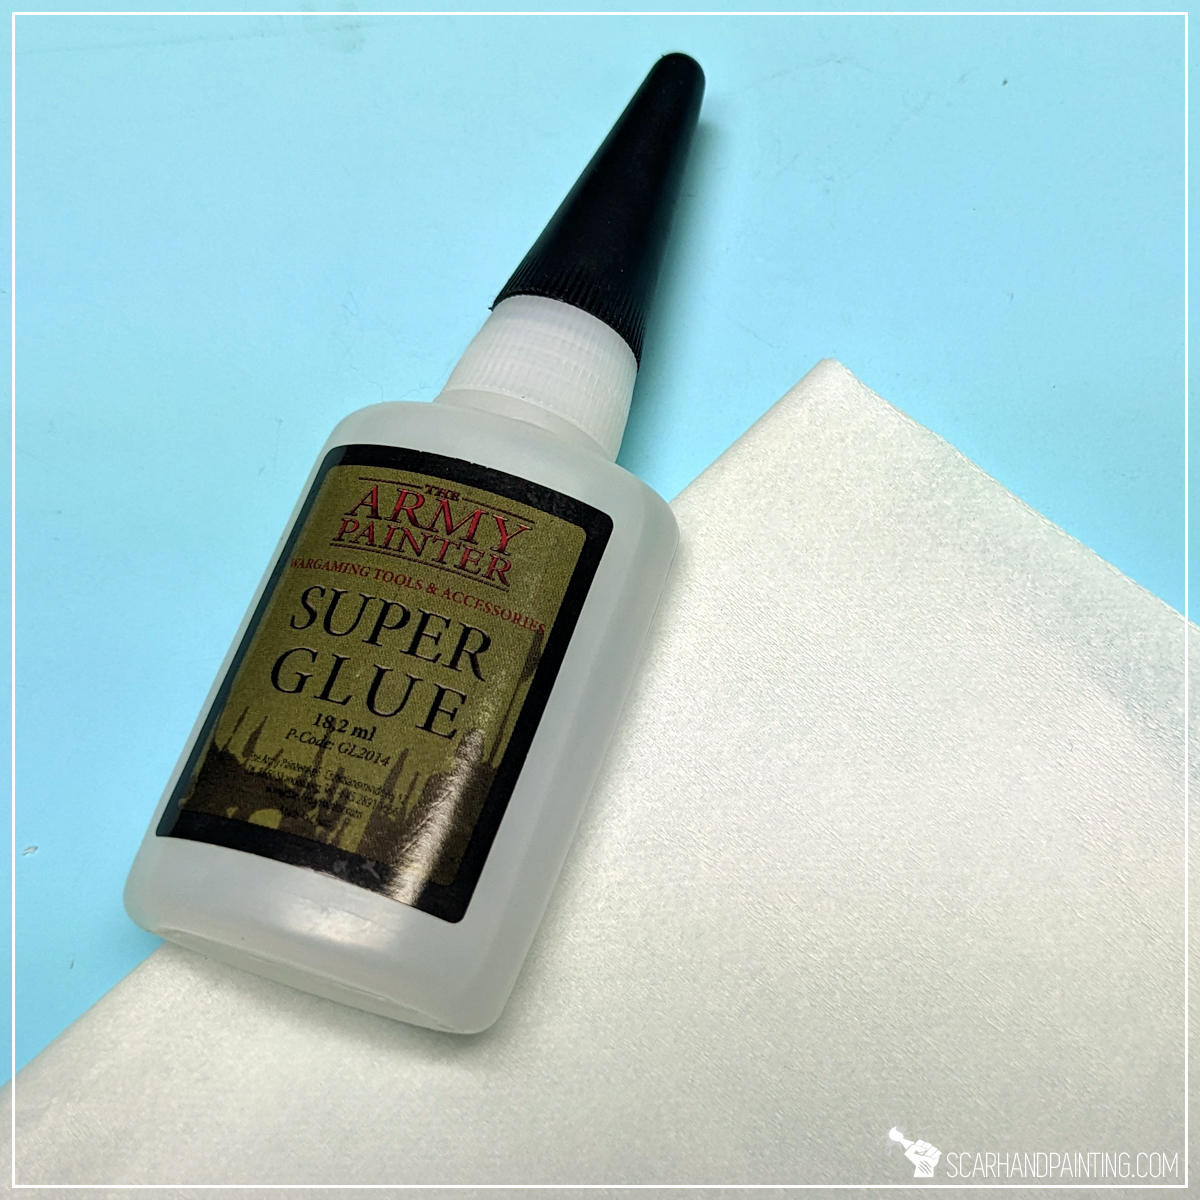
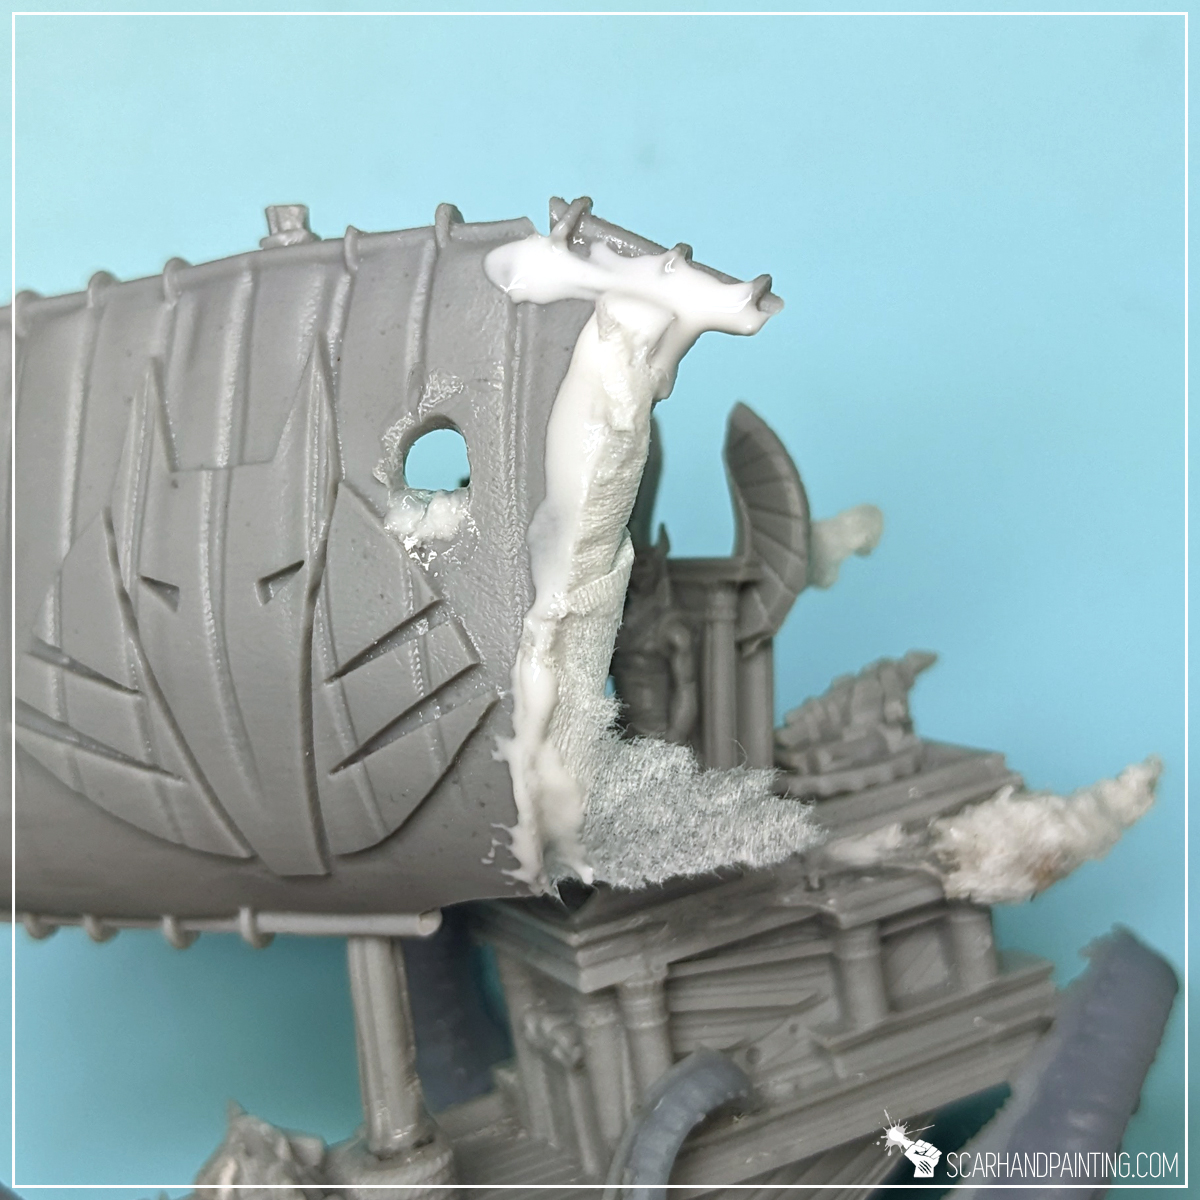
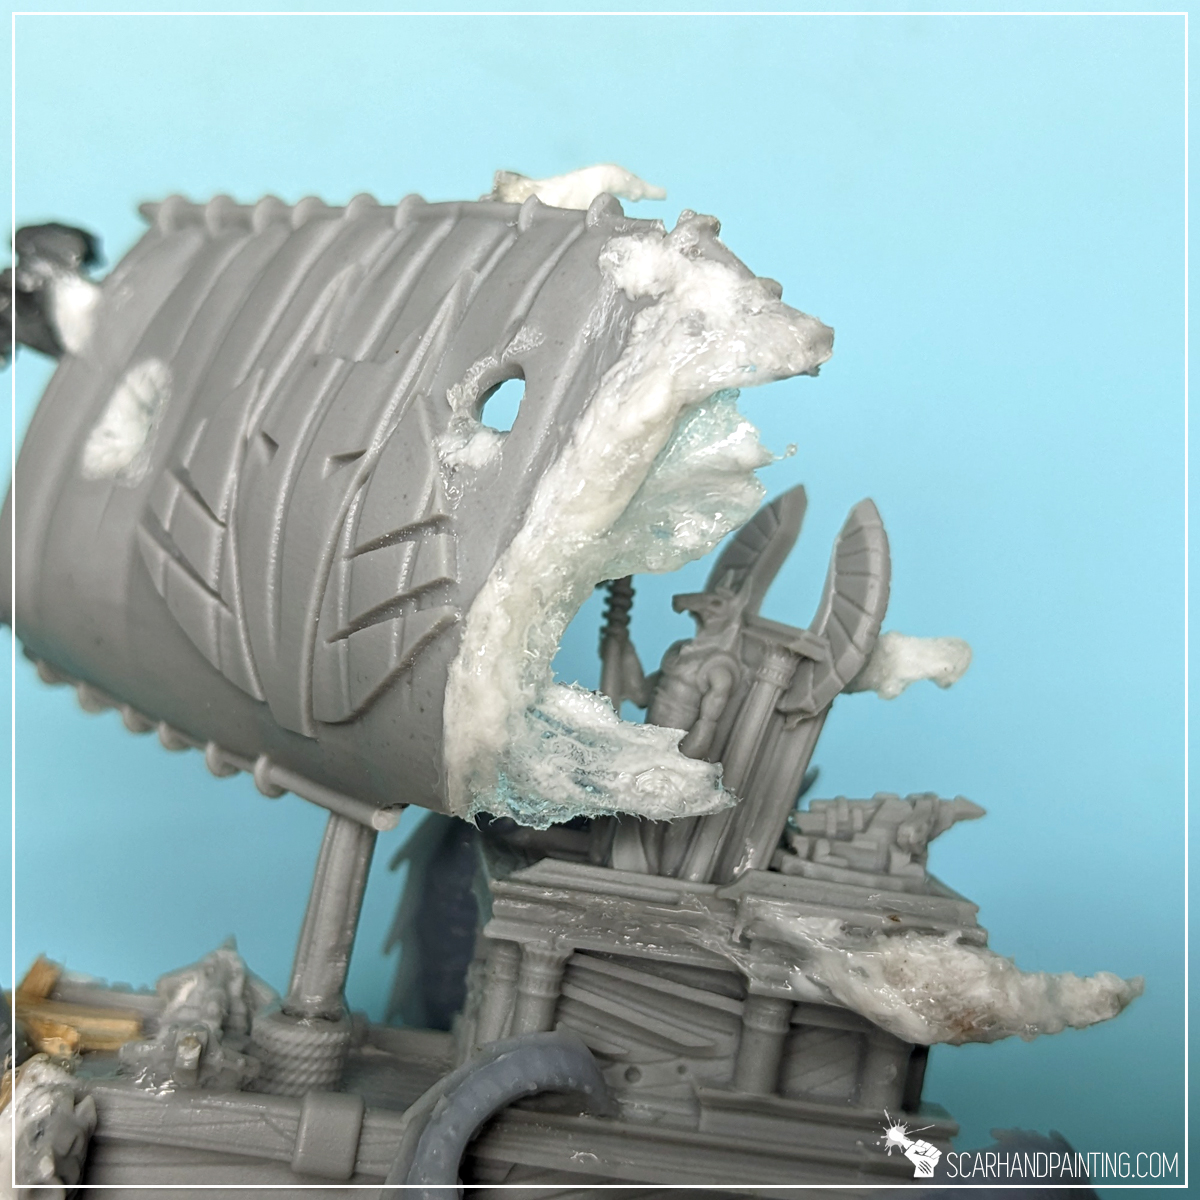
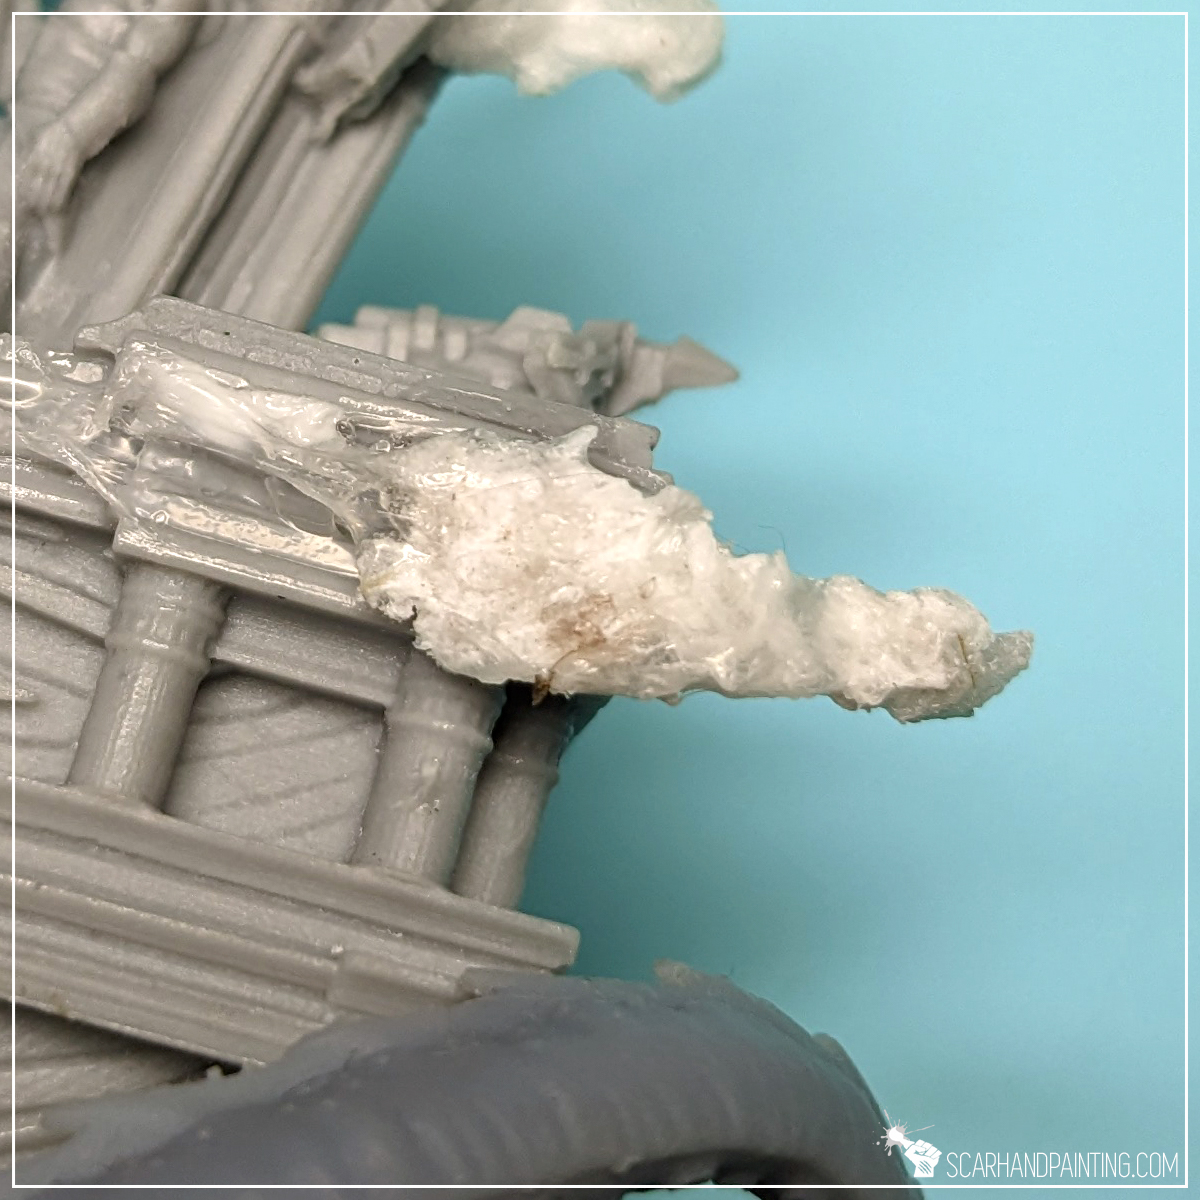
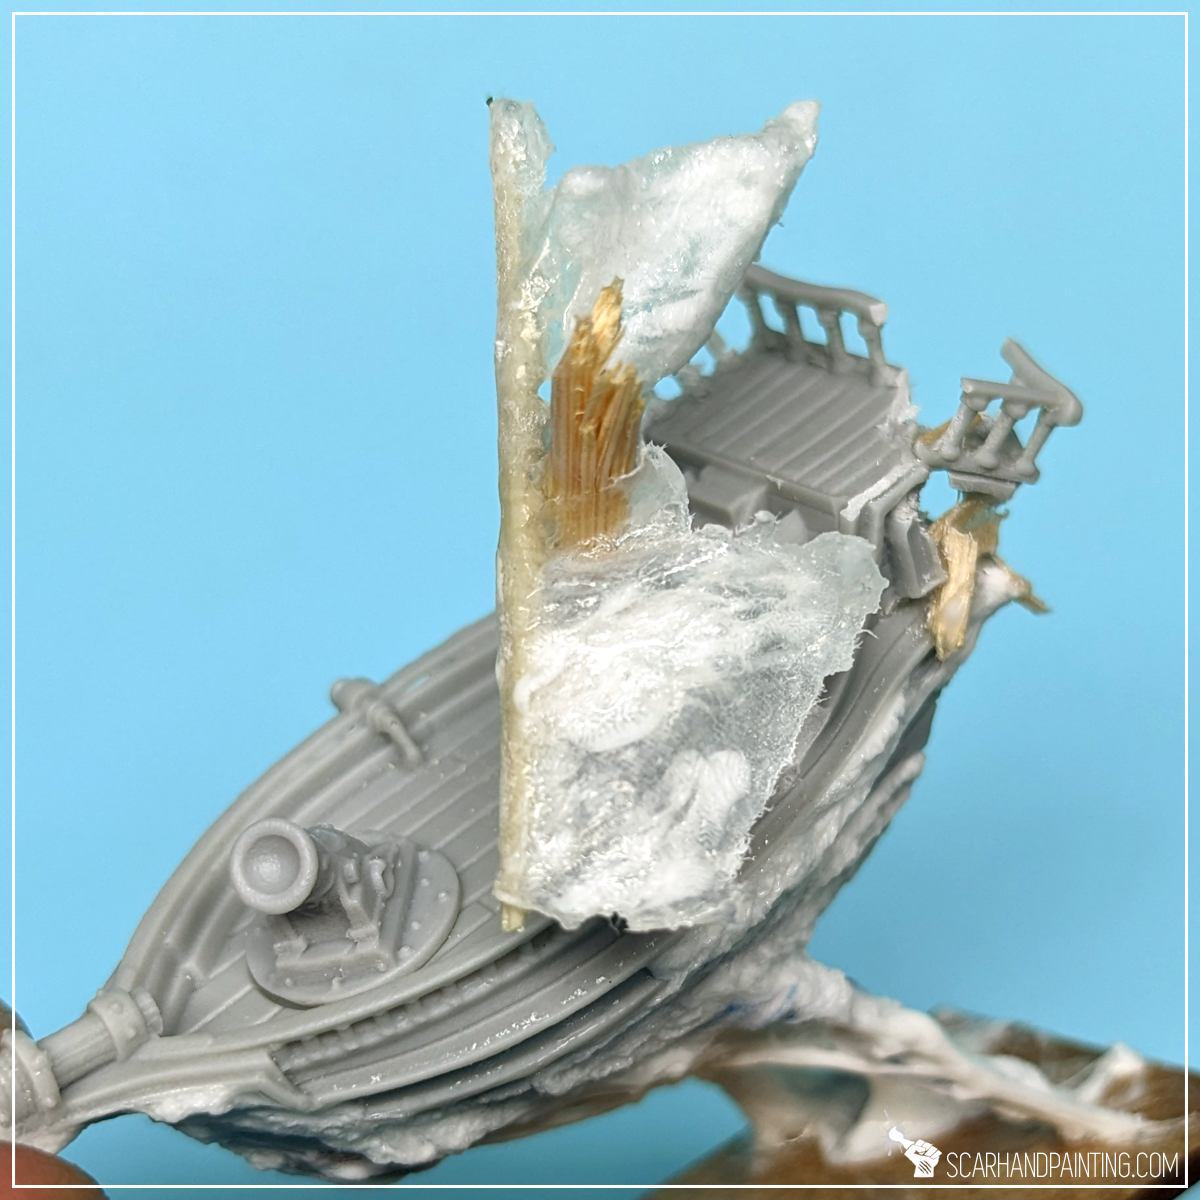
One of the most recognisable ghostly features is the body/hull distortion dragged by the etheric winds. A good way to represent this is by mixing PVA and Super Glue (cyanoacrylate) then smearing and dragging the resulting goo on top of ship features. The way I usually go about it is to apply some PVA glue on the surface, then apply Super glue on top and start smearing with the tip of a toothpick. I always try to smear the ‘glue goo’ in one direction to form dynamic shapes and interesting texture. Once the base shape is formed I let it dry and just let the goo do its thing.
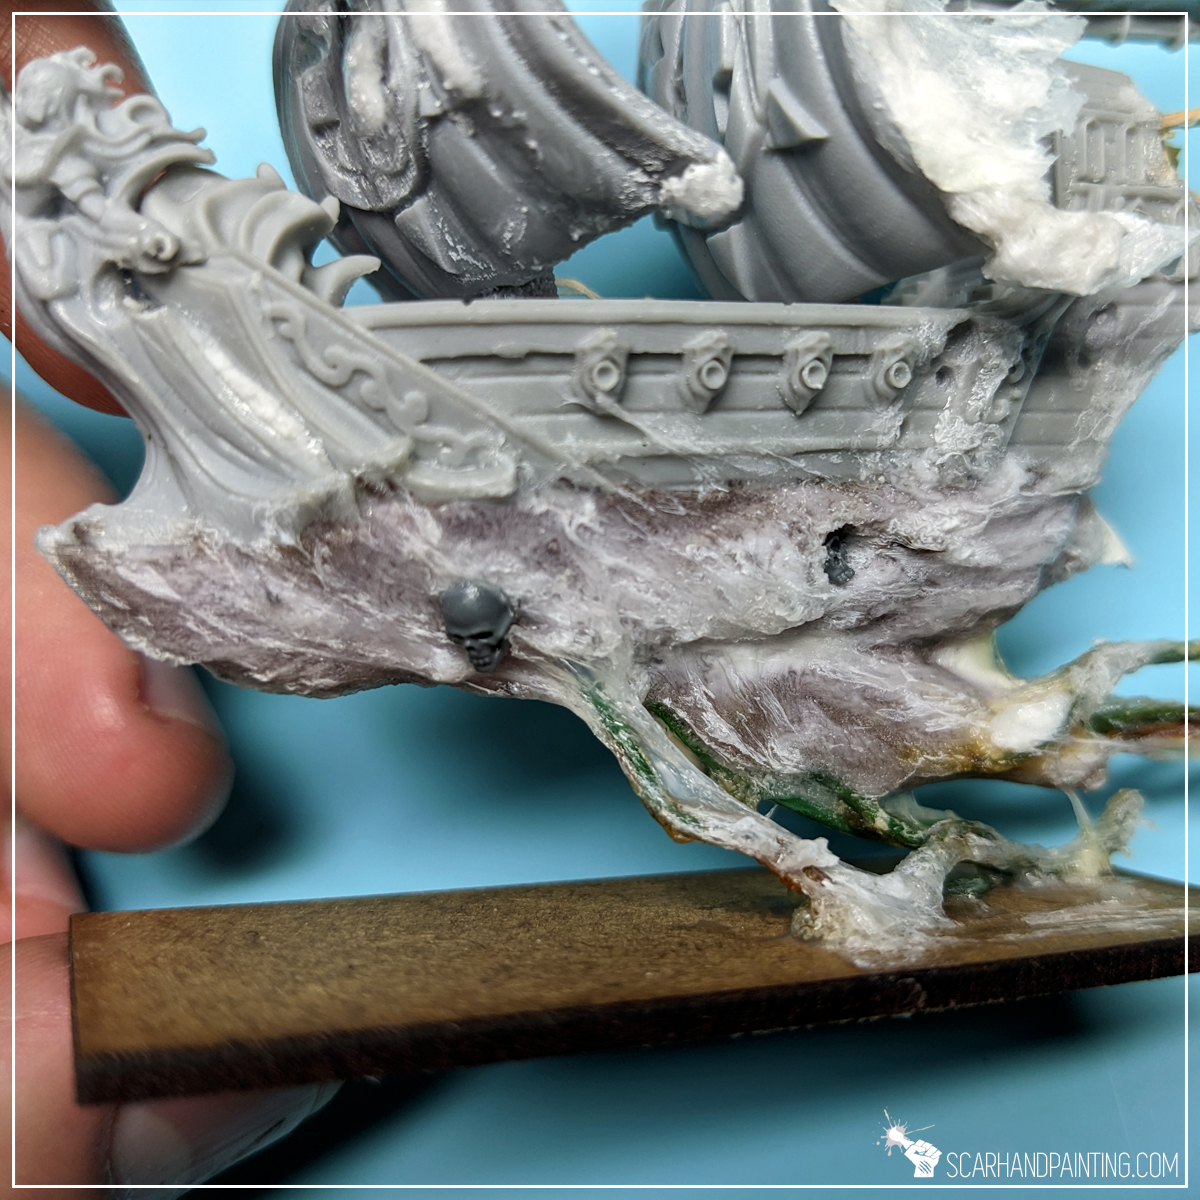
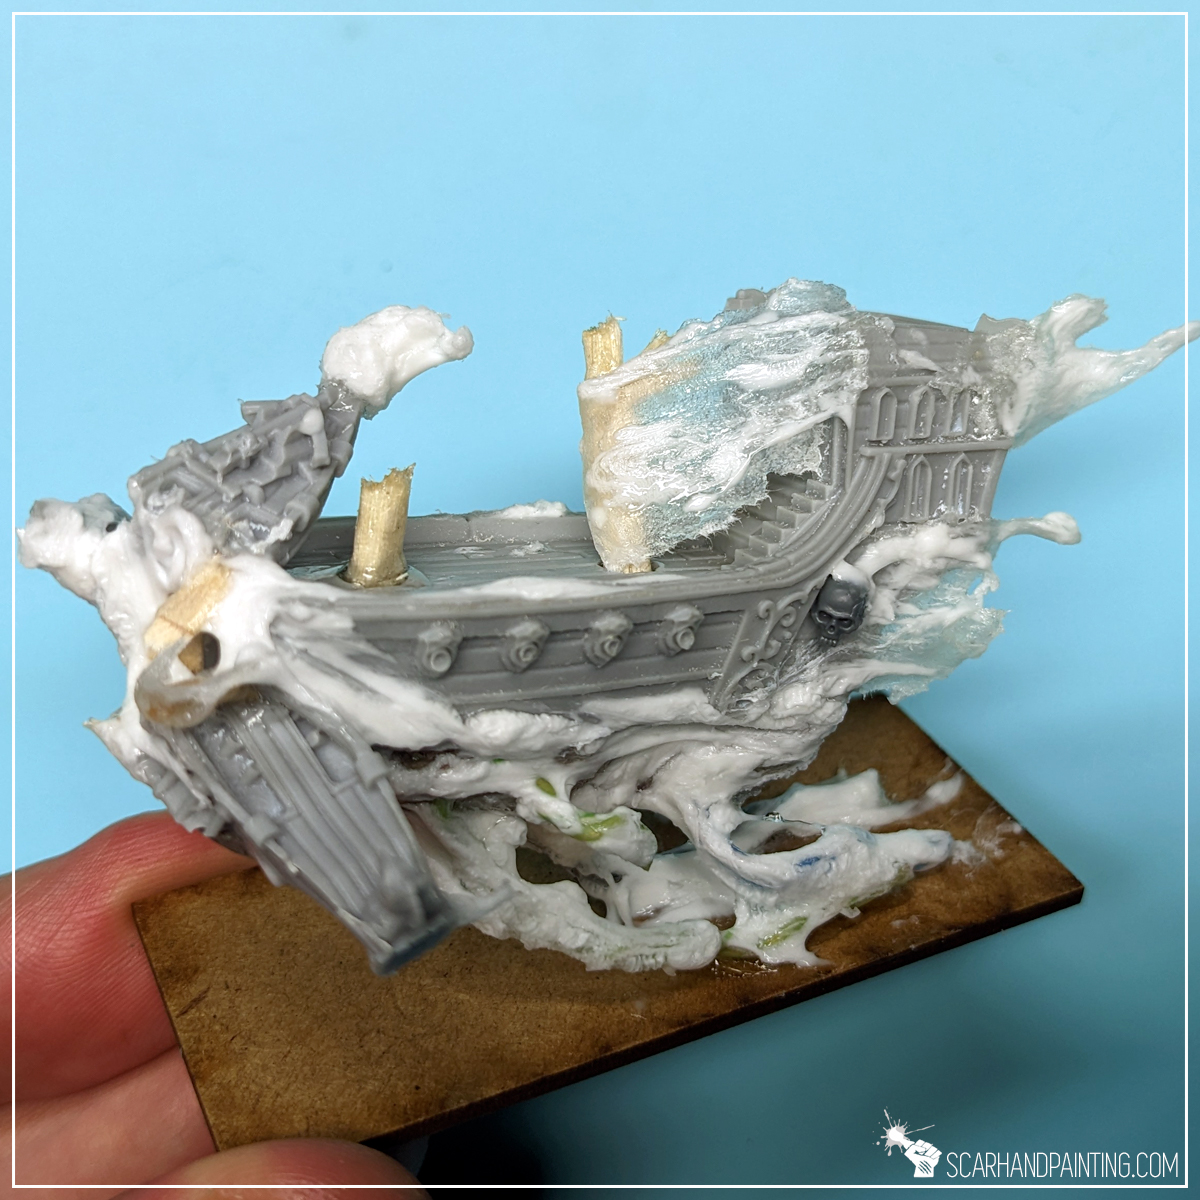
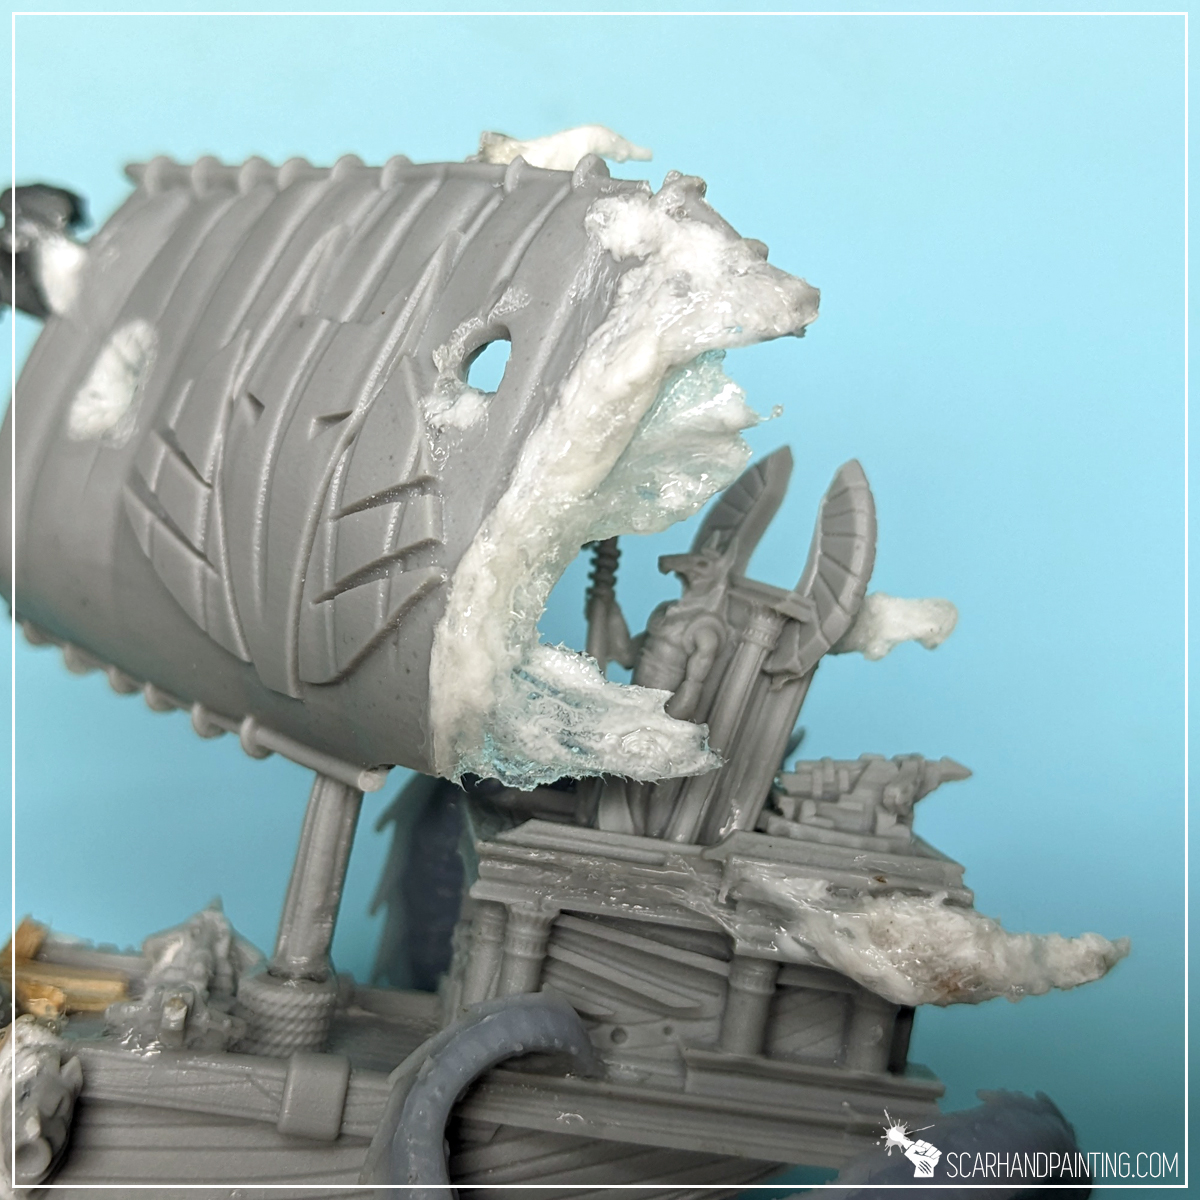
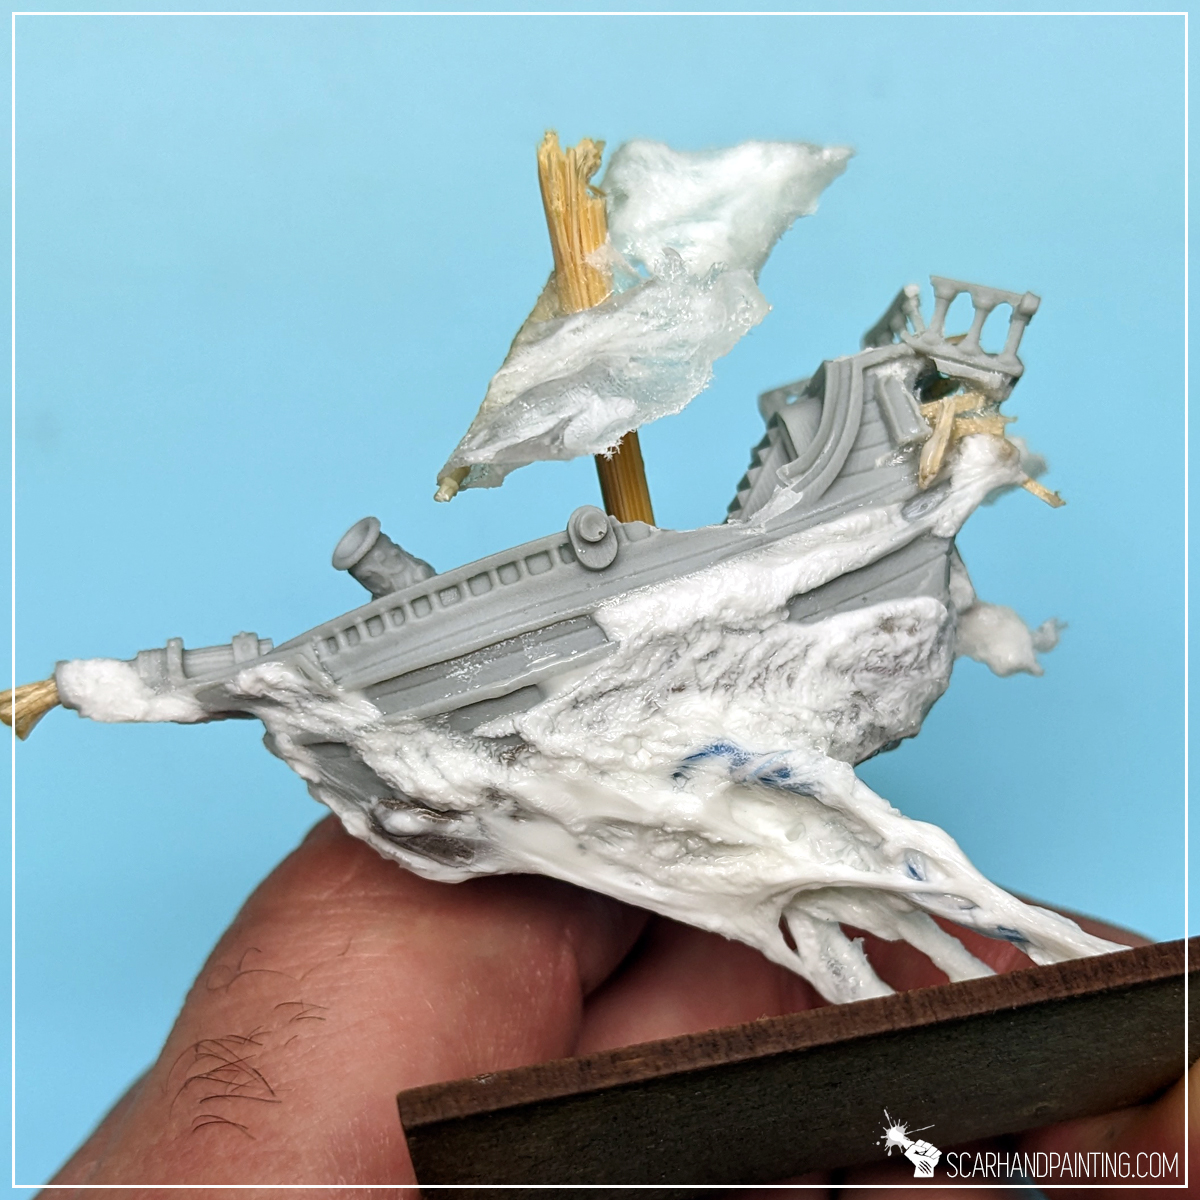
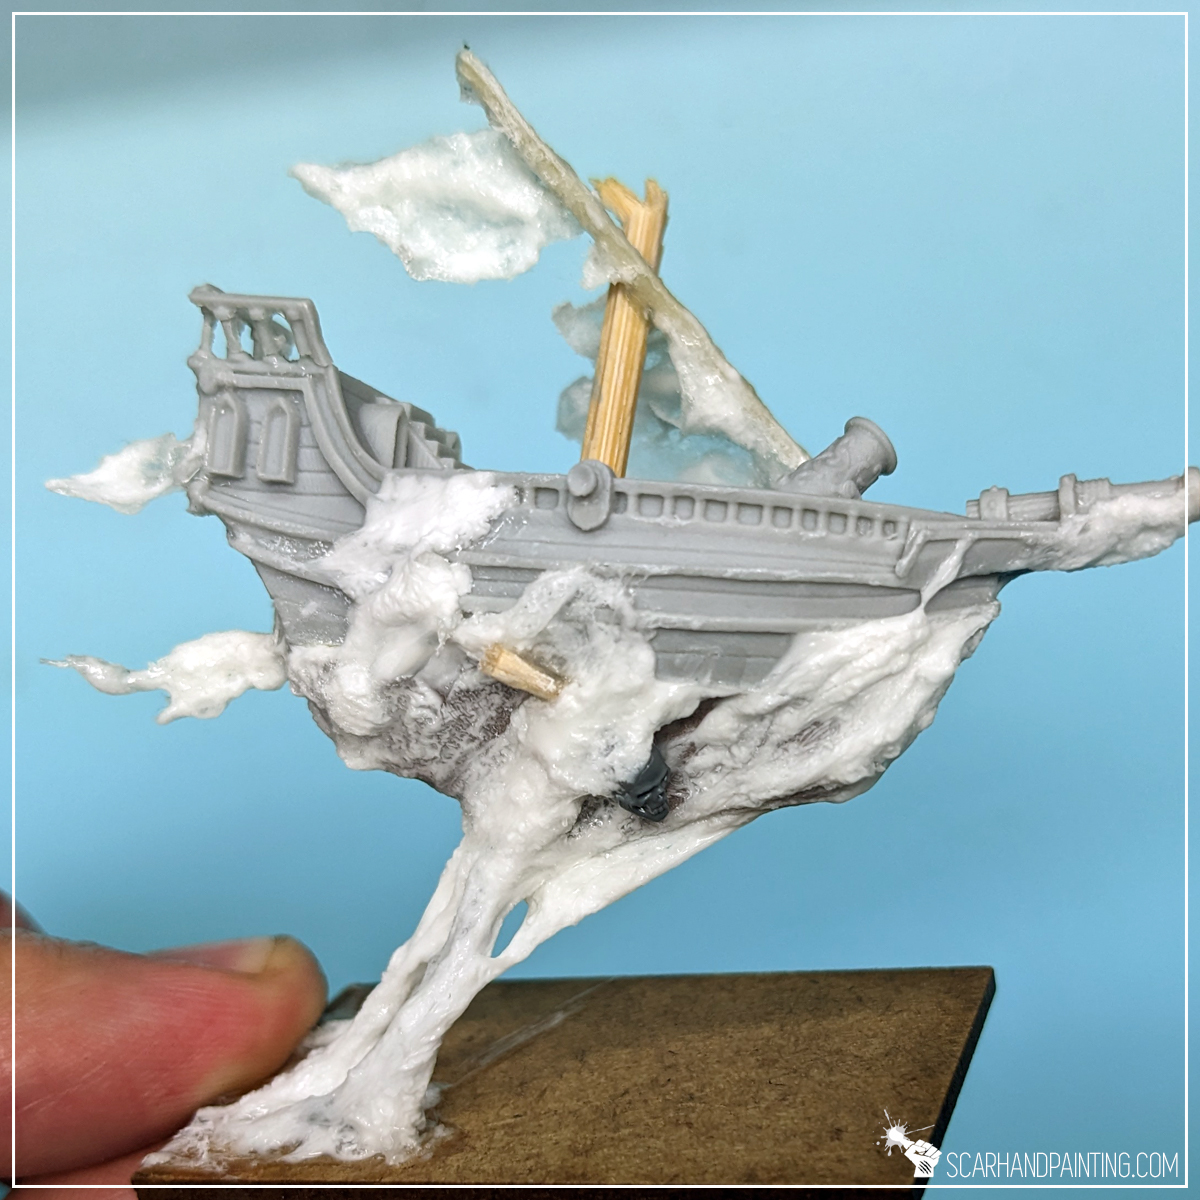
An interesting way of presenting a ghost ship is to take it out of the water. A ship drifting in the air has a truly menacing feel to it. The way I did it was to drill small holes in the underside of the ship, then glue metal wires into them. Once glued firmly I then bent the wires to look like floating under the ship.
Next I modeled an underside of the hull using a Hey Clay, which is a plasticine-like toy for kids. It dries firmly pretty fast, becoming semi hard and very lightweight afterwards. Perfect for this kind of work, with glue goo to further improve its durability and texture.
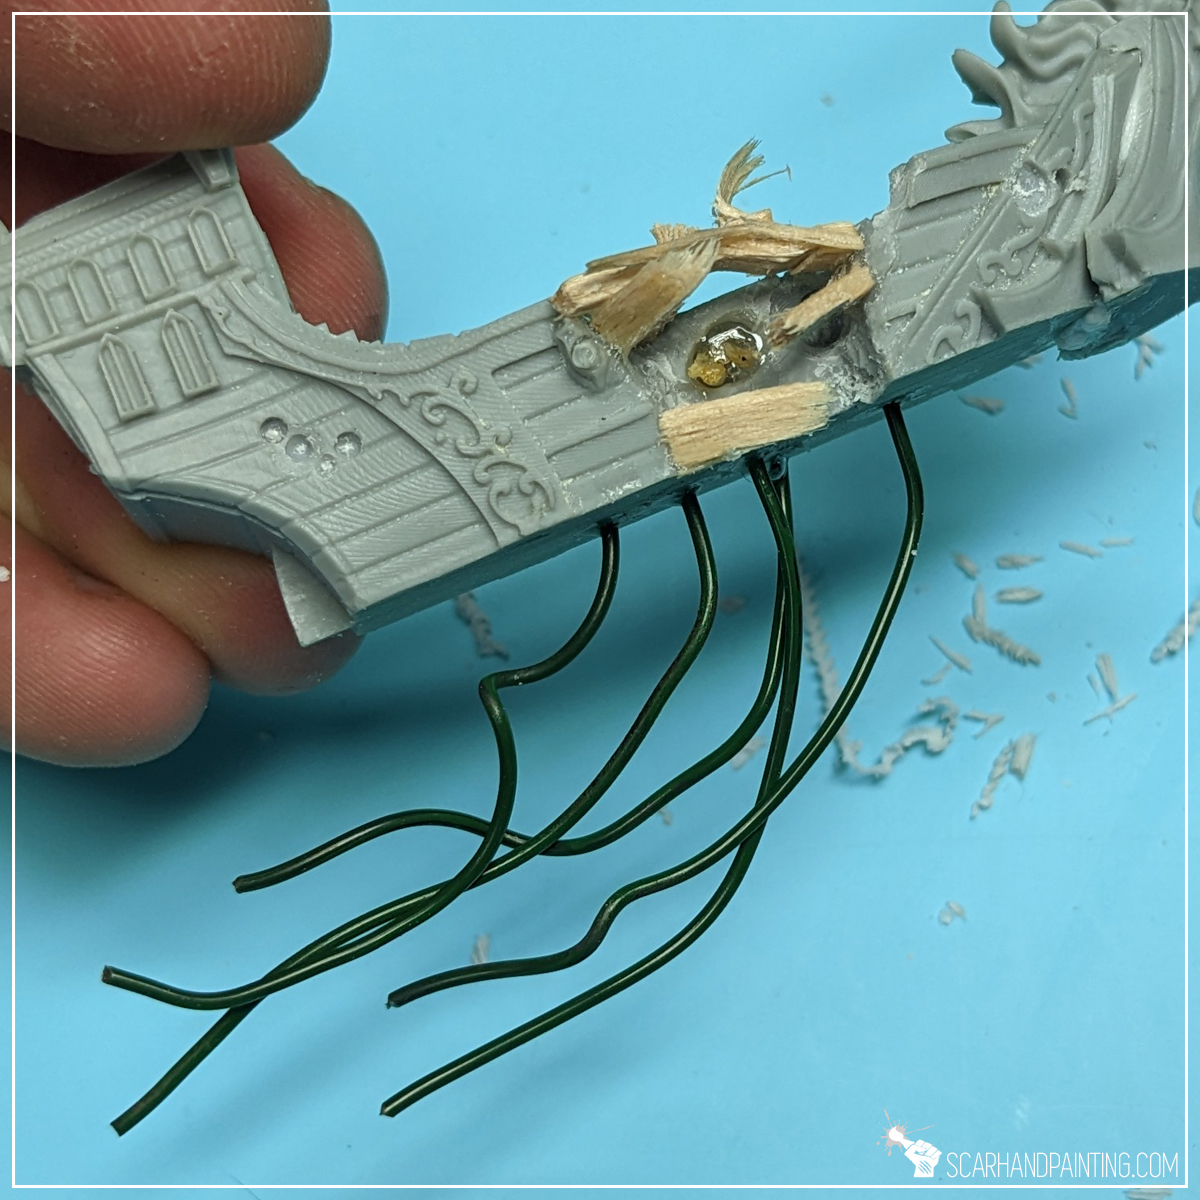
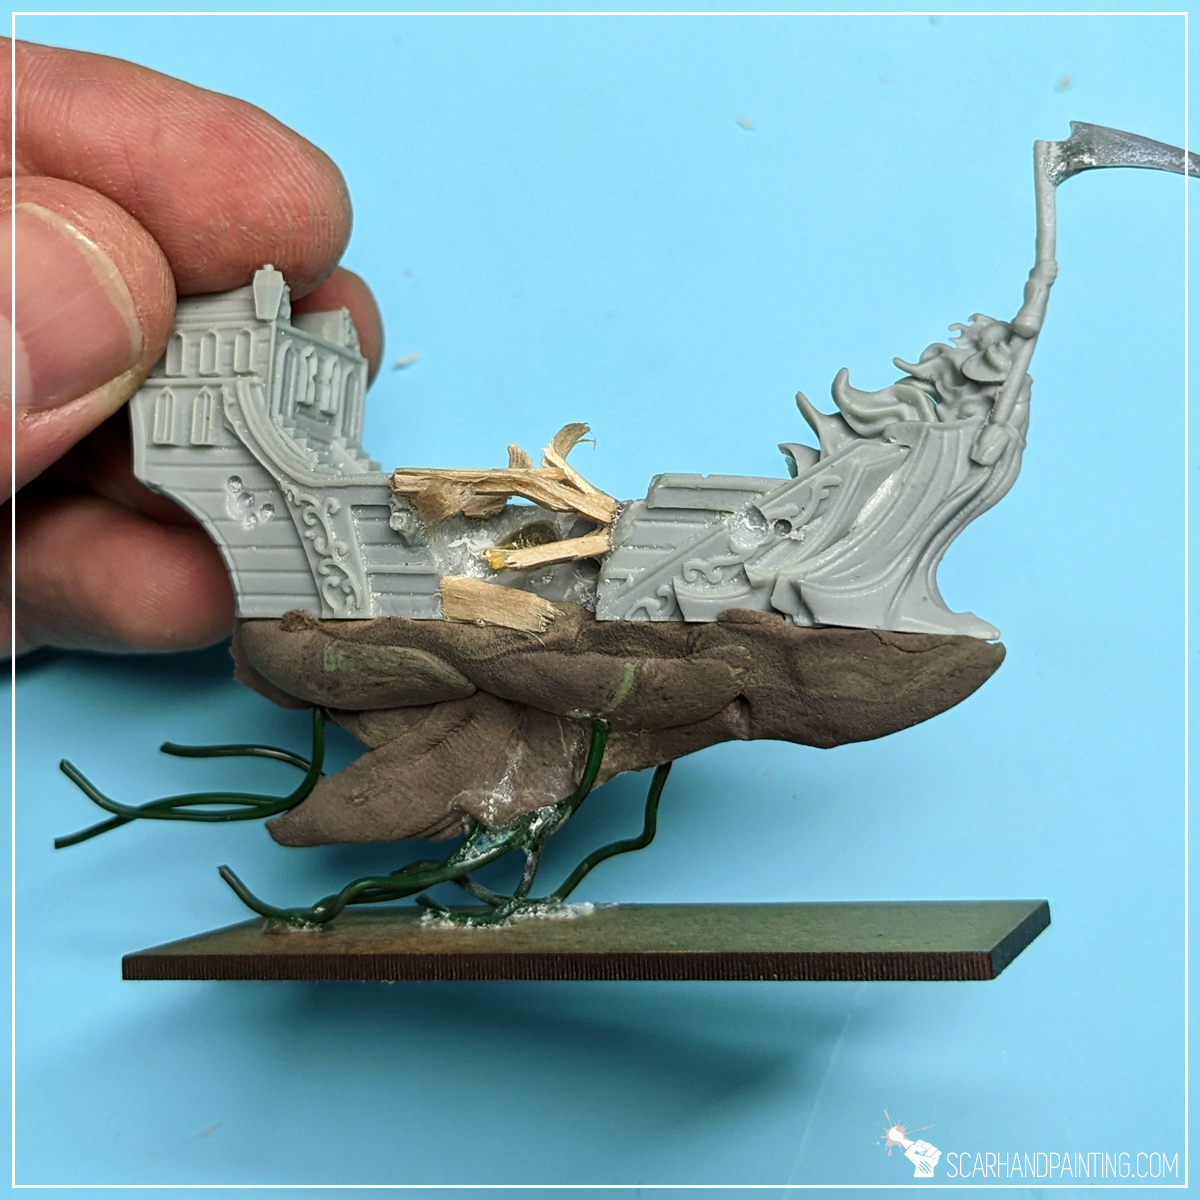
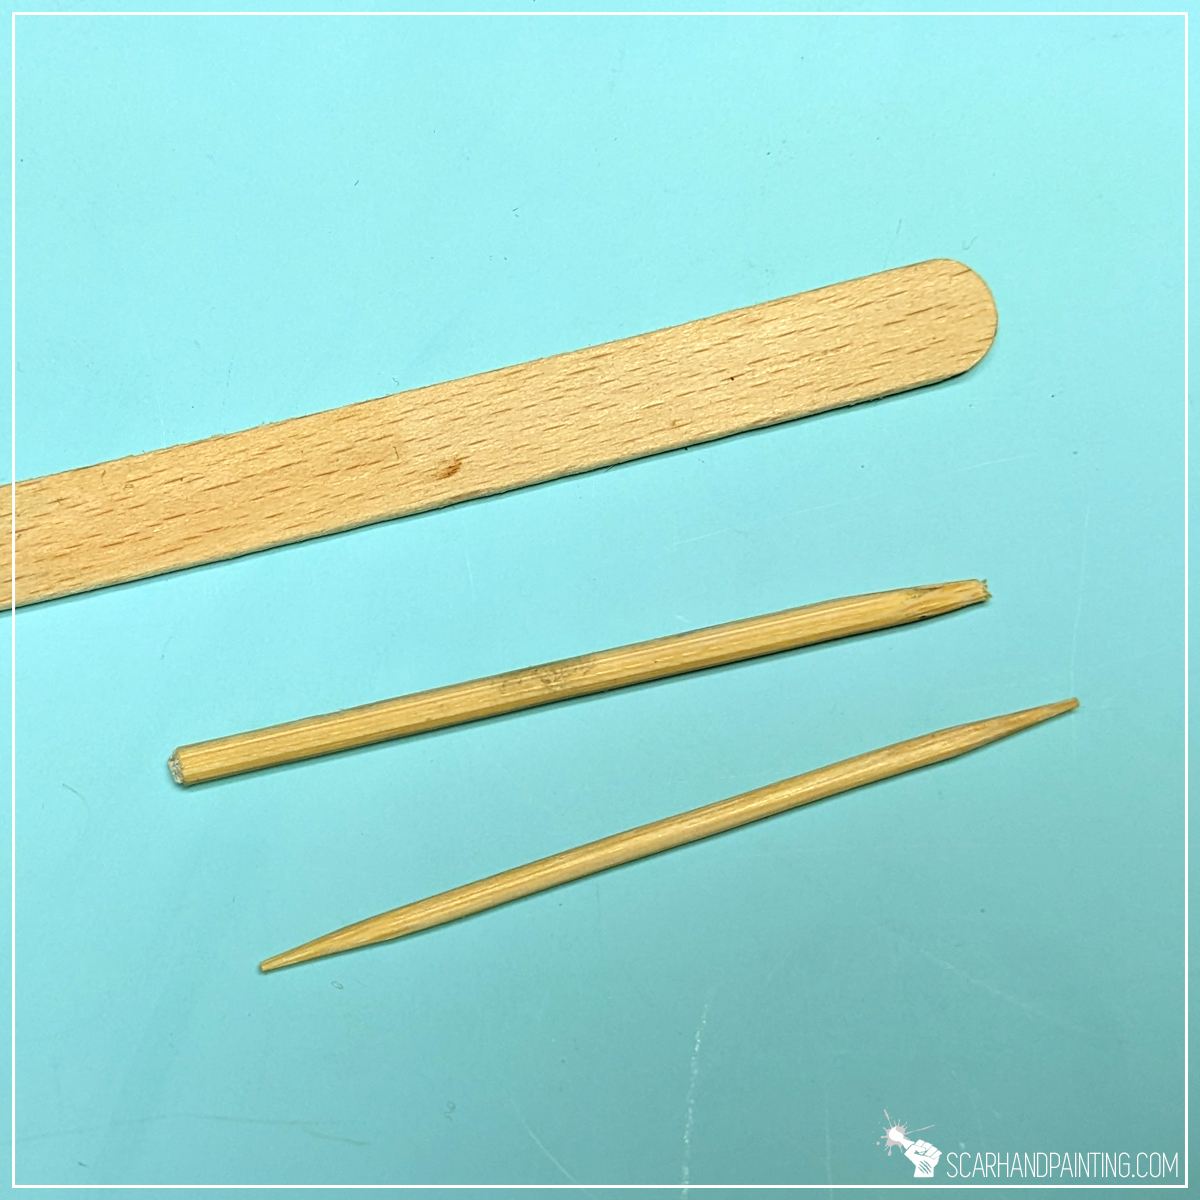
To greatly enhance the theme of battle damage I have added some damaged woodwork. Ice cream sticks, toothpicks and skewer sticks are all a good source of properly shaped wood. First I cut them into small planks and mast elements, then broken each in half to get that extra feel of splintered wood. Once glued onto the ship it was all covered with thin Super Glue. This increased durability, which is pretty important when considering gaming with such stuff in the future.


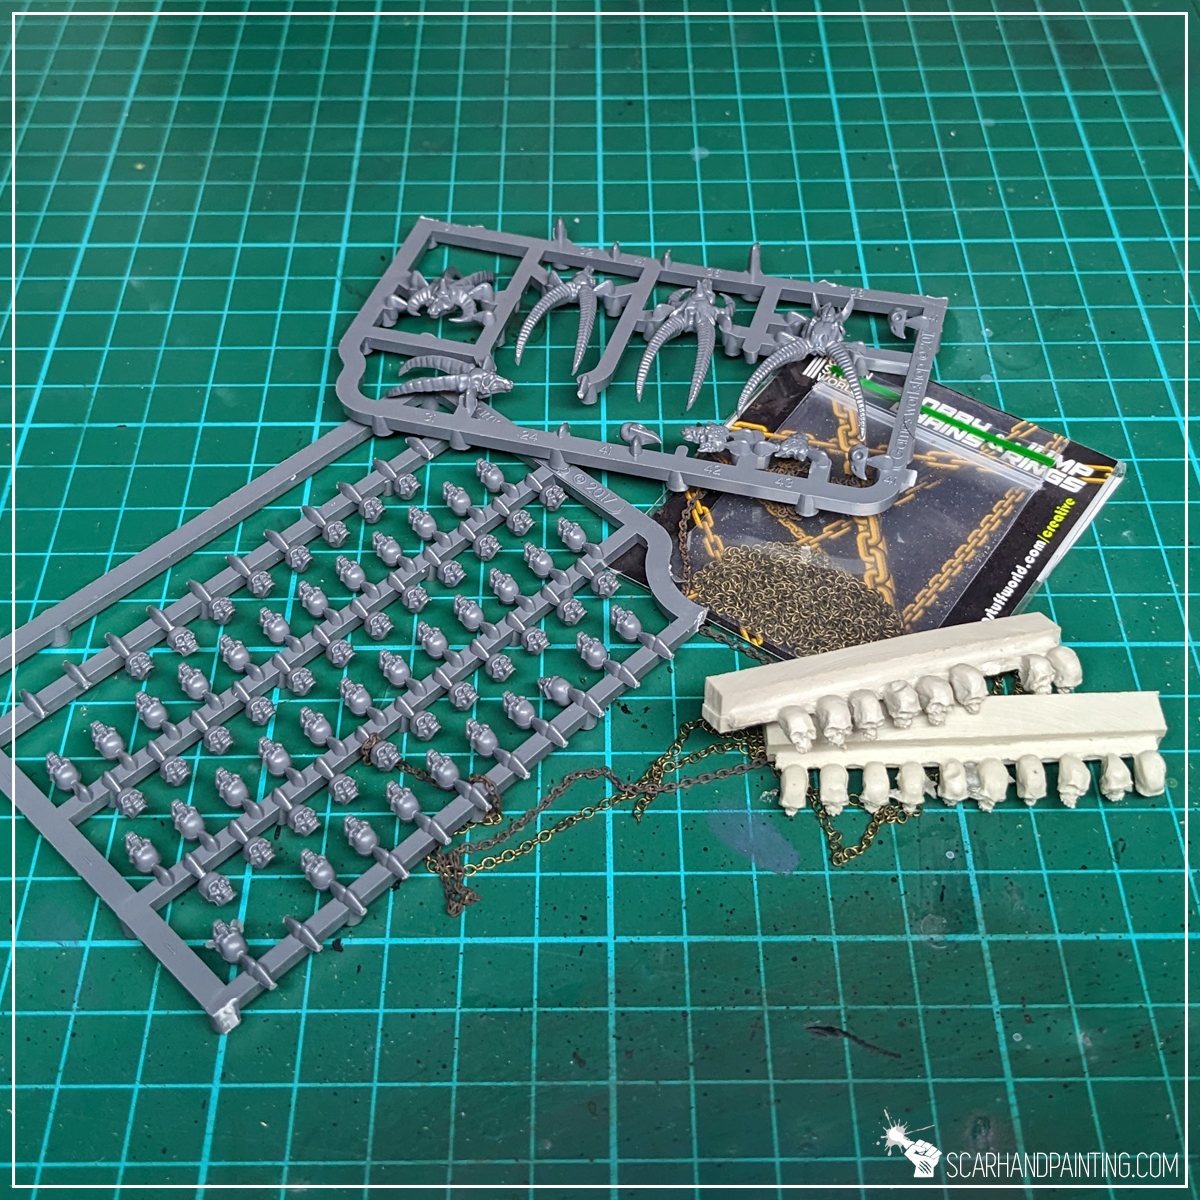
Either 3d printed or pieces of other sets, a few extra bits to add character. I fancied myself an anchor dragged on a chain behind one ship – simple stuff once special chains for miniatures are around. Same for any ghostly visages coming out of hulls and sails. Nothing that a bunch of 28mm scale skulls can’t handle.
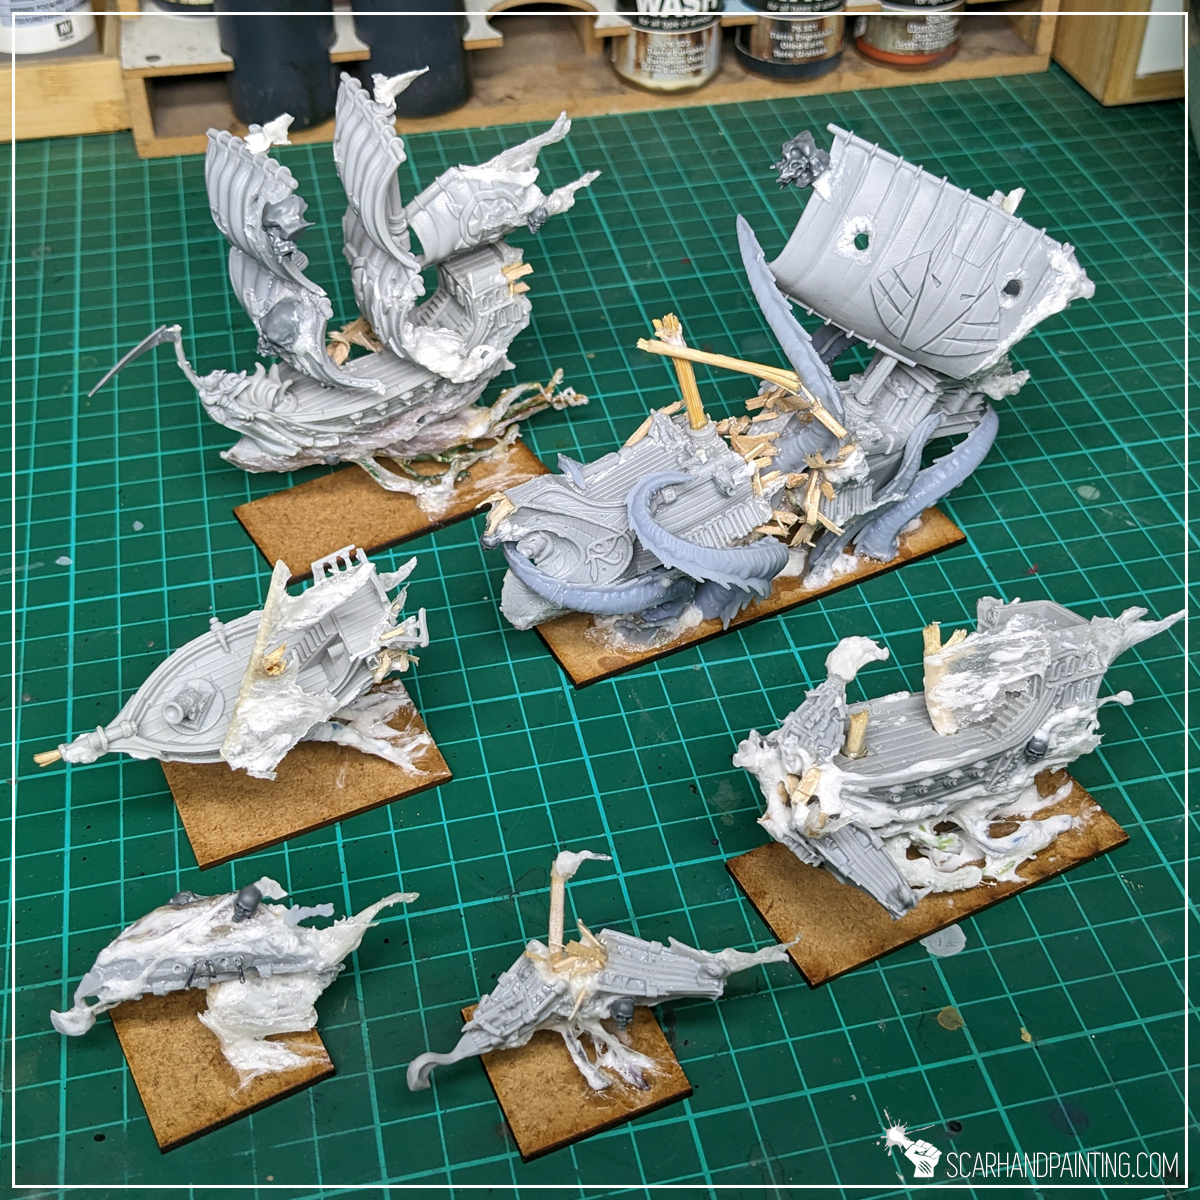
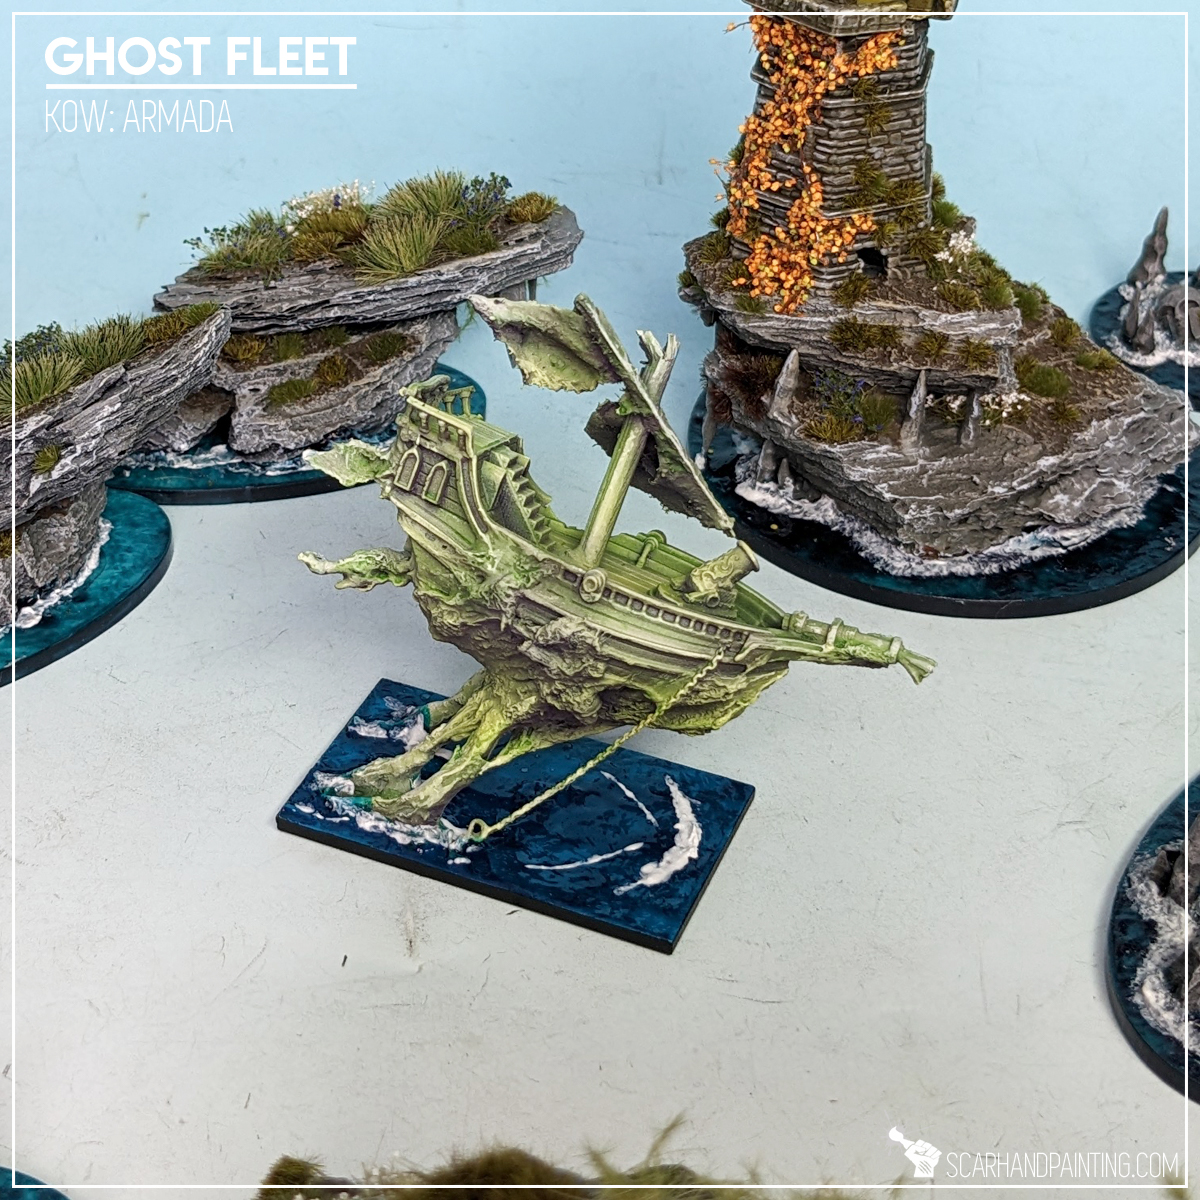
These are basically all the tricks I used while converting Ghost Fleet ships. The end result can be seen below and in Armada: Ghost Fleets gallery.
I hope you find this tutorial interesting. Be sure to let me know your thoughts in the comments below, or at Facebook or Instagram. I would also appreciate it if you considered sharing this content with your friends, who might find it useful. Finally if you are looking for a professional miniatures painting service, be sure to contact me with this contact form. I always reply within 24 hours, after which please check out your spam folder.

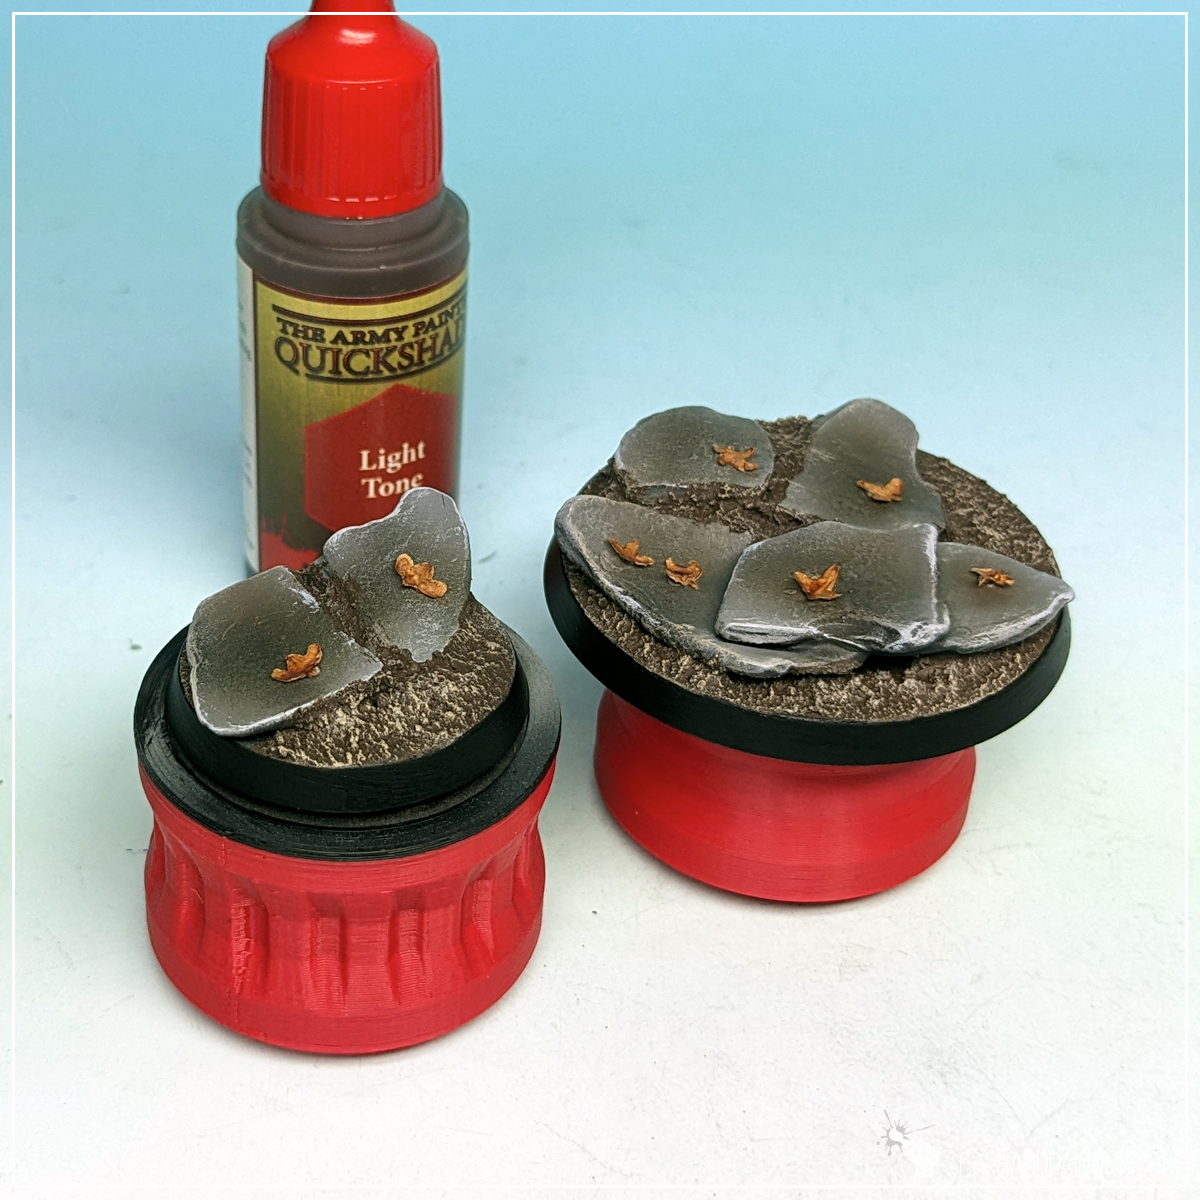
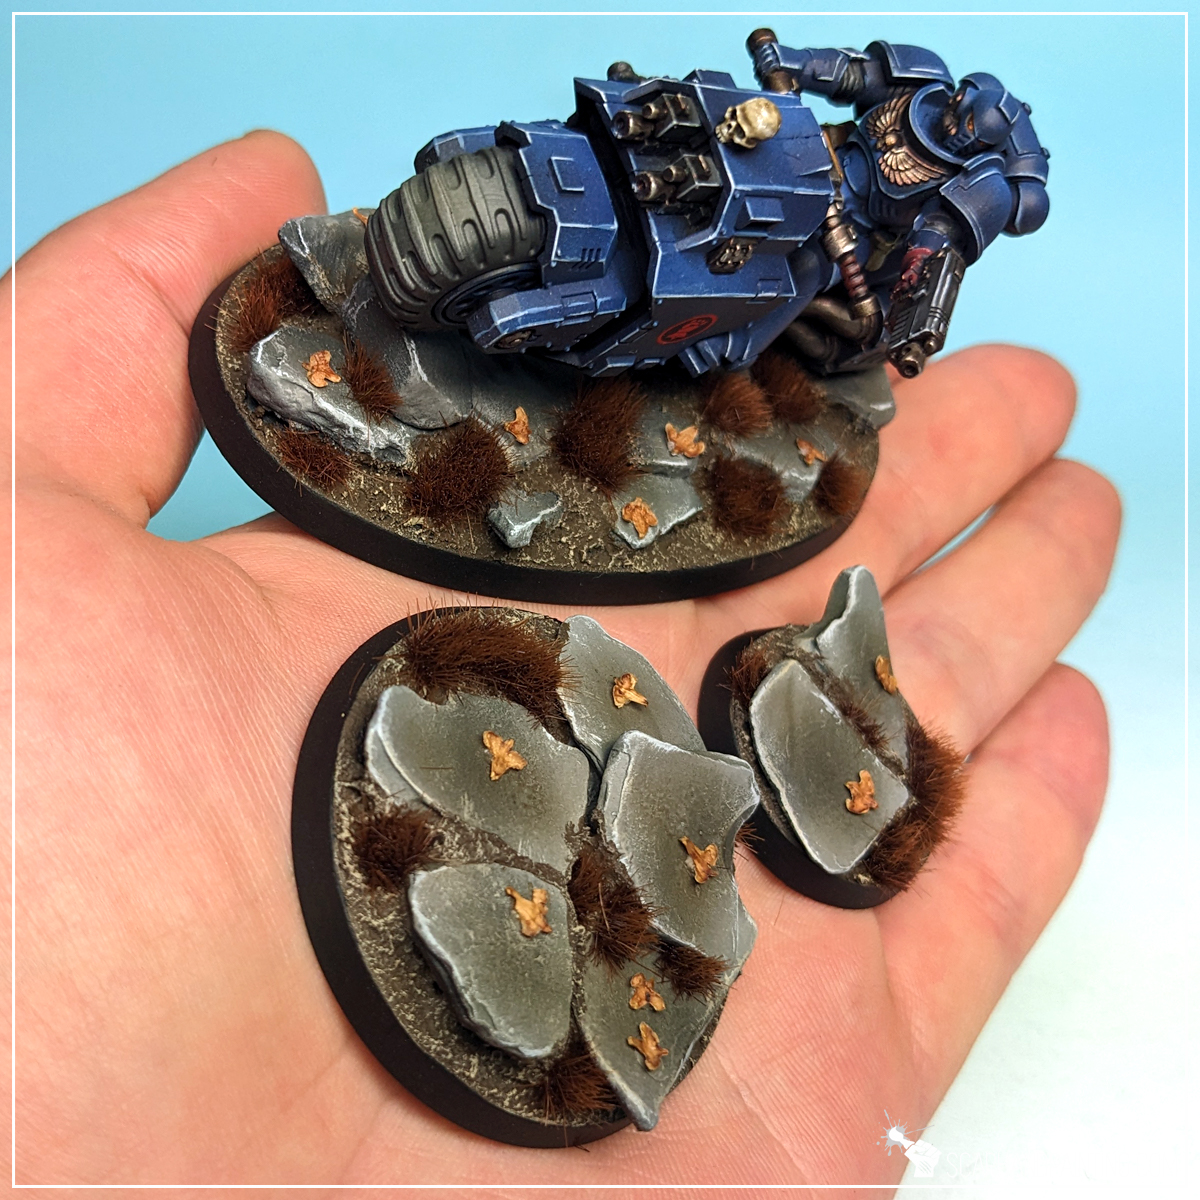
Welcome to Crimson Crags Bases tutorial. Here I will take you on a Step-by-step trip through the process of creating Crimson Crags themed Bases the same way as seen at: Gallery: Warhammer 40,000 Crimson Fists.
Before we start, some notes:
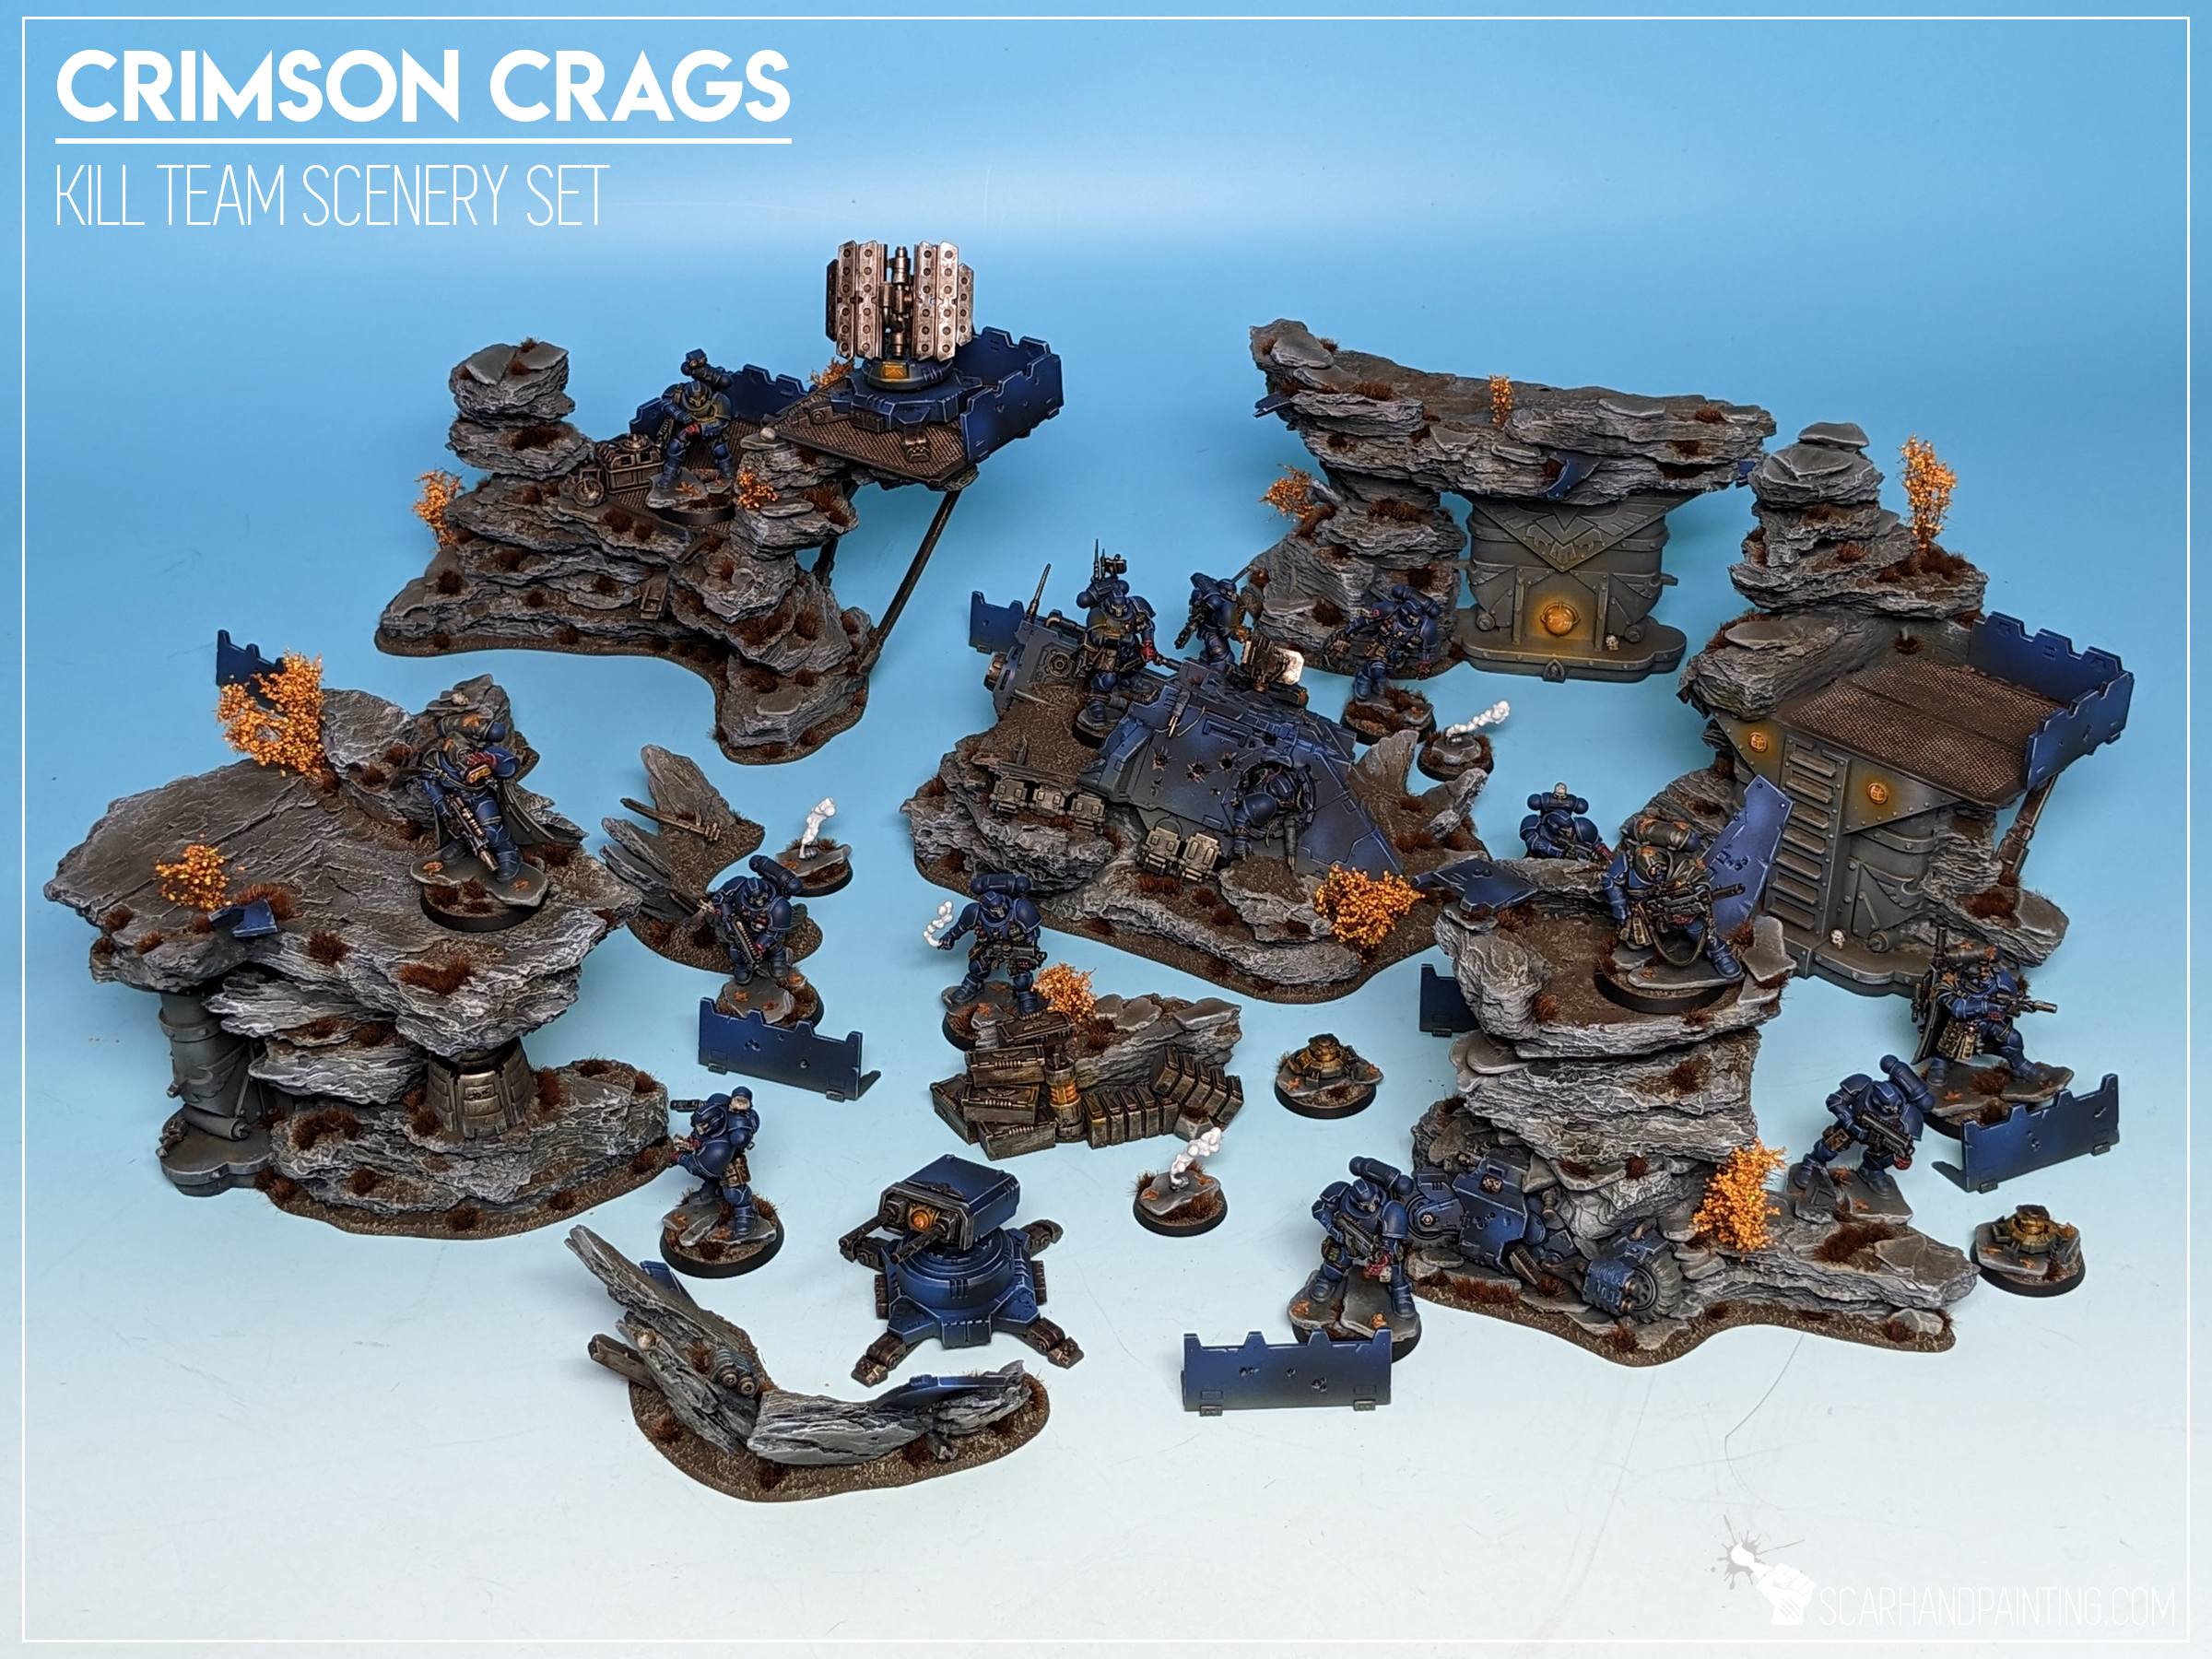
The “Crimson Crags” is a name of a self designed Warhammer 40,000/Kill Team scenery setting themed around my Crimson Fists Astartes collection. The idea behind the setting is reinforced rocky ravines ravaged by war. You can see more examples of the scenery and basing in the Killzone Crimson Crags gallery. I have already covered painting Crimson Fists and modeling the scenery in previous hobby articles. Now is time to present to you the basing.
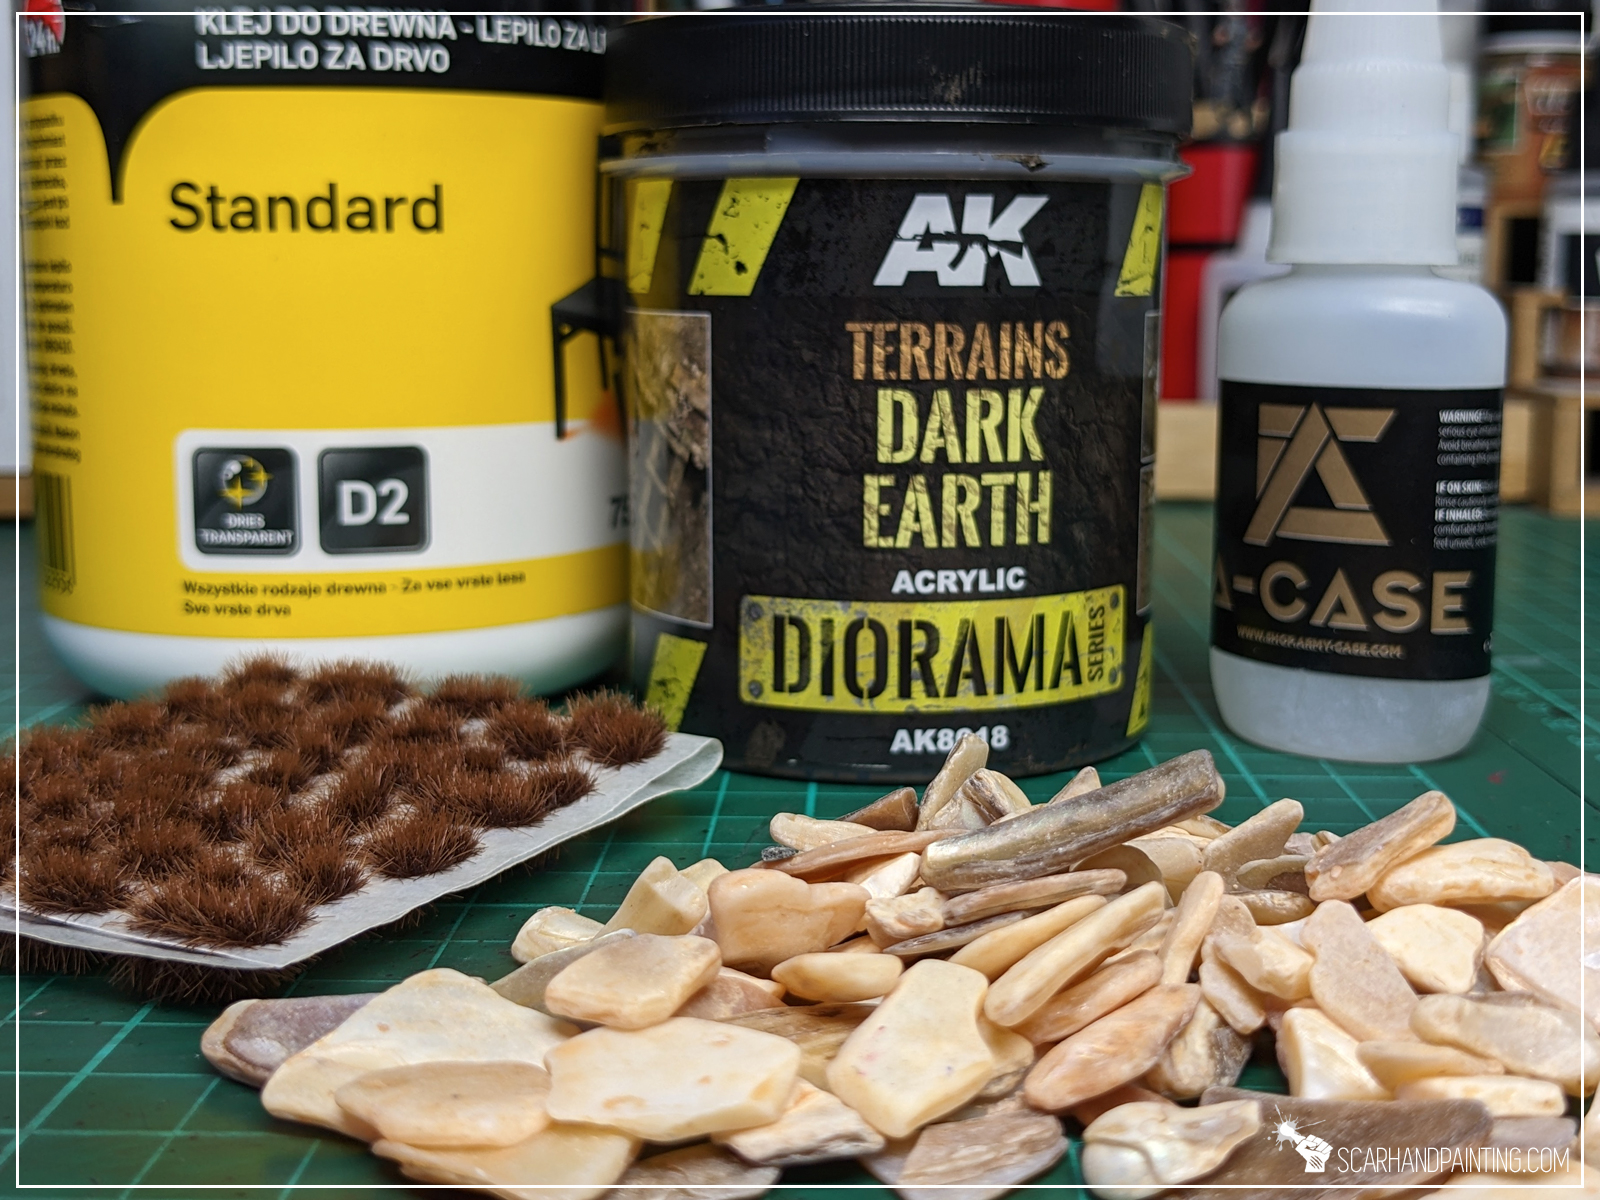
For this tutorial I will be using:
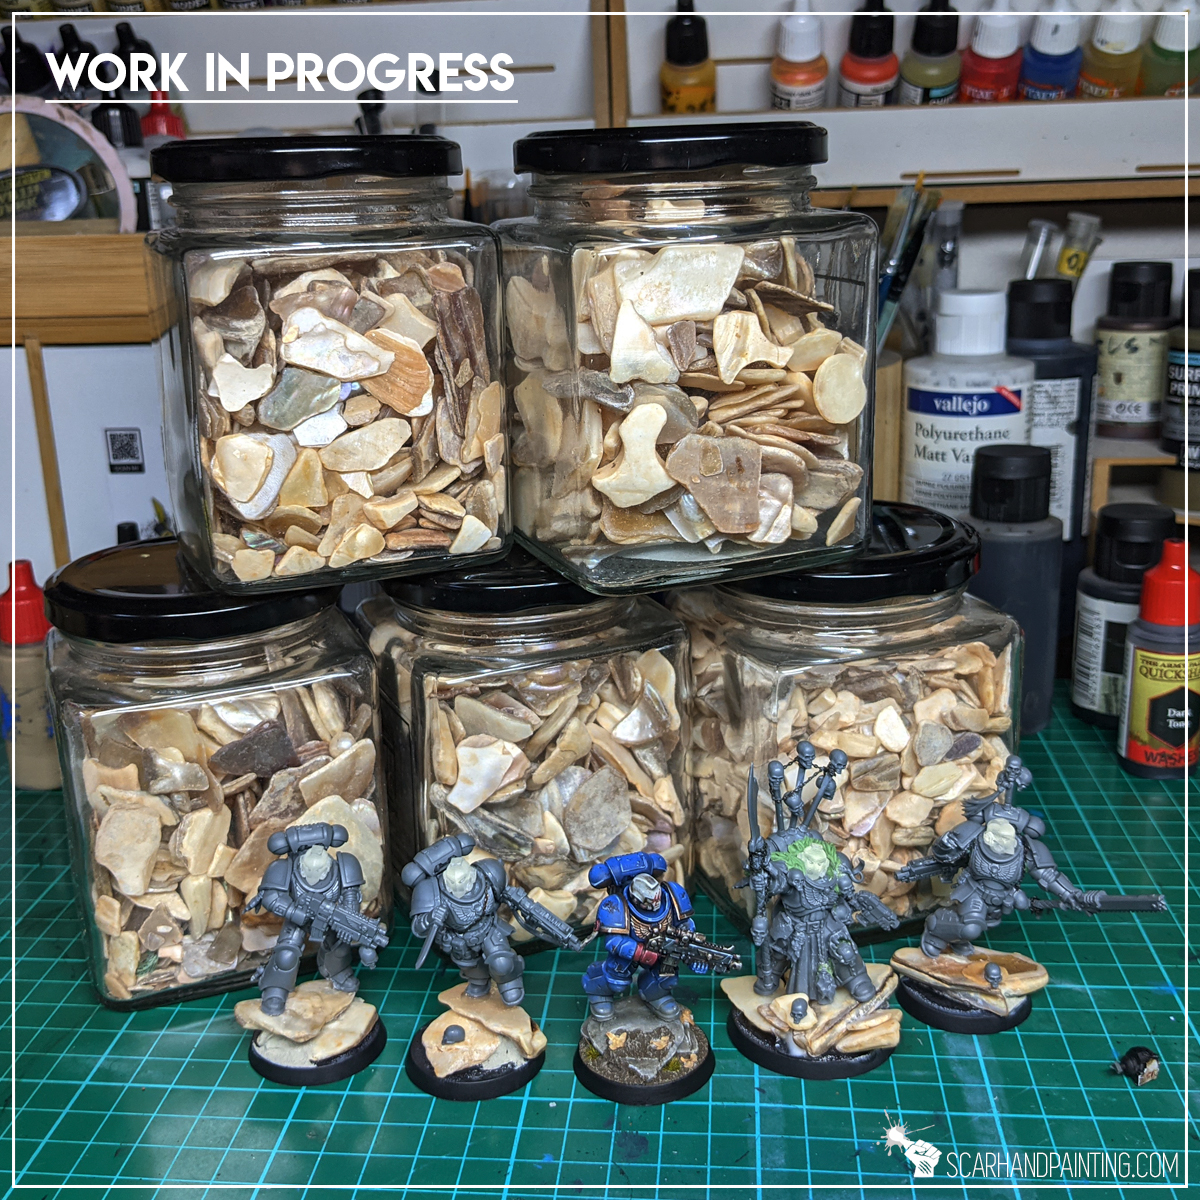
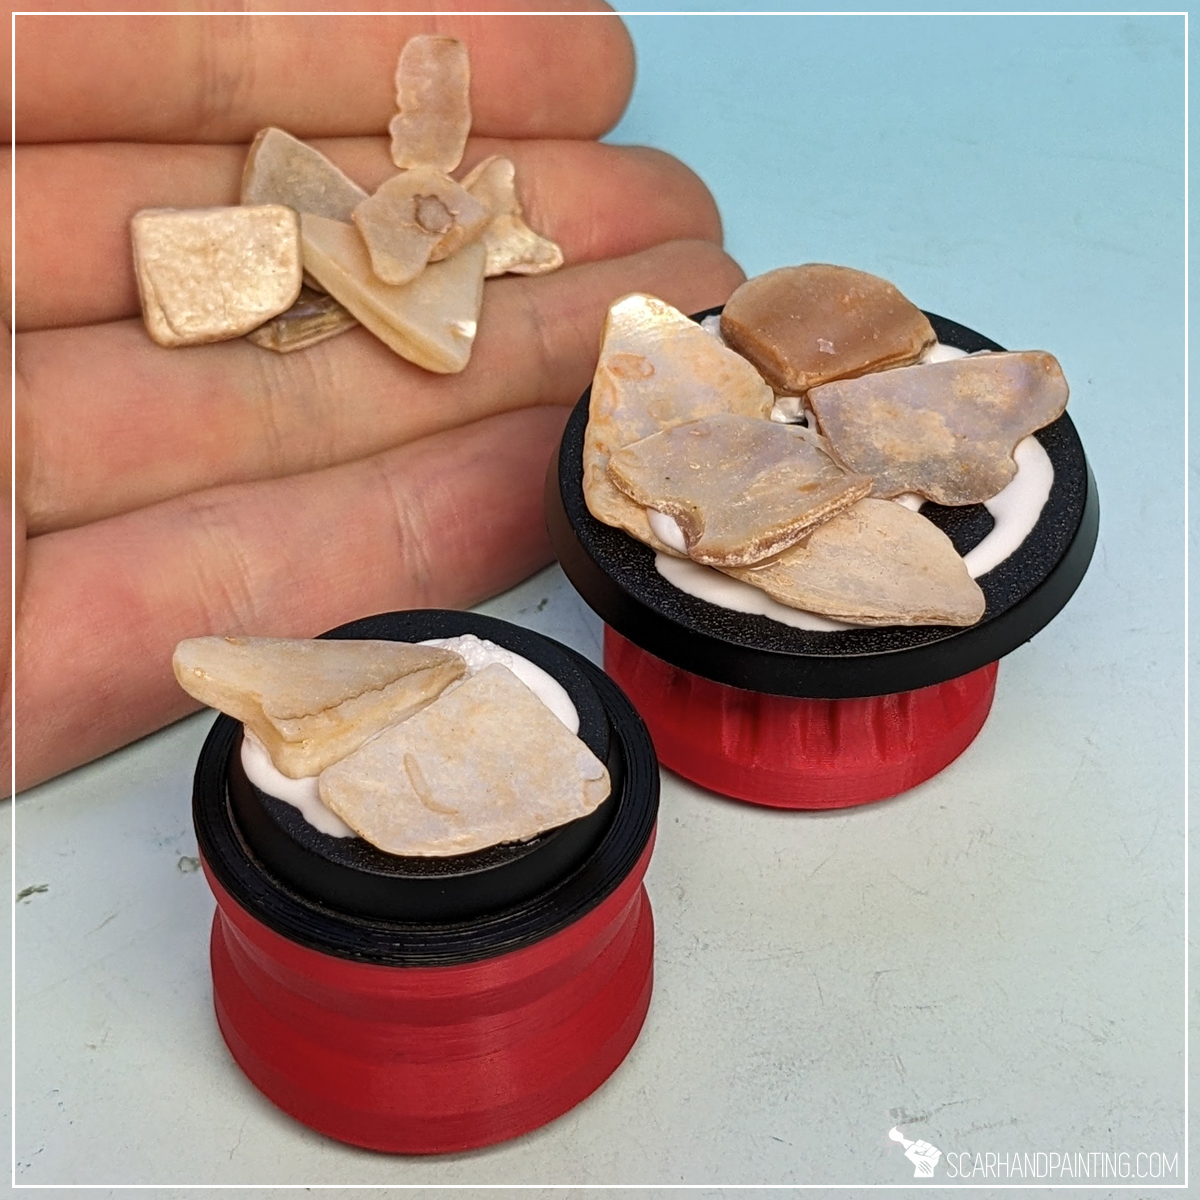
Let’s get it out of the way – yes, I am using natural stones. I like to have my miniatures heavy and stable on the board, plus trying to imitate the effect with self made elements would be rather time consuming. These particular stones are something I’m being asked about a lot, so here’s what I can tell you about them. The stones I’m using are regular decoration gravel from construction/home/garden stores. They are sold in small packages for about 1-2€. Unfortunately I do not know the professional name for this kind of stone, but am sure you will find similar stuff in either Ikea, or other home/garden stores. Below an old pic for reference.
Rocks out of the way, let’s rock! (You see what I did there?).
The modeling process is pretty straightforward, starting with base rock formation, after which the miniatures are mounted on top, everything gets undercoated then painted. Lastly the second part of modeling kicks in with textures and finishing touches.

Step one: Rock formation
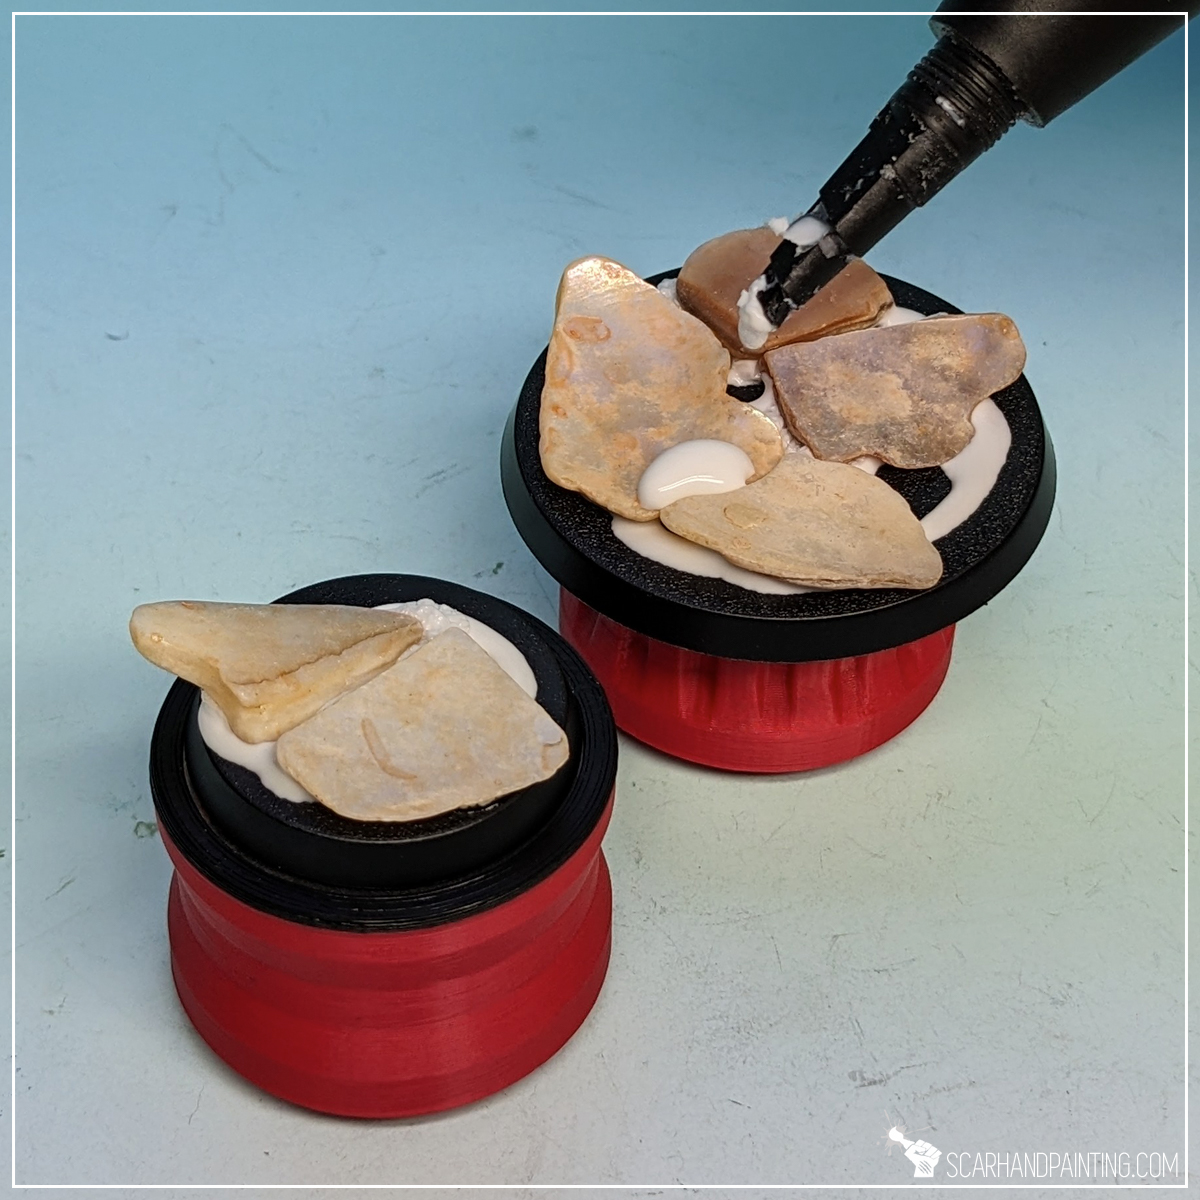
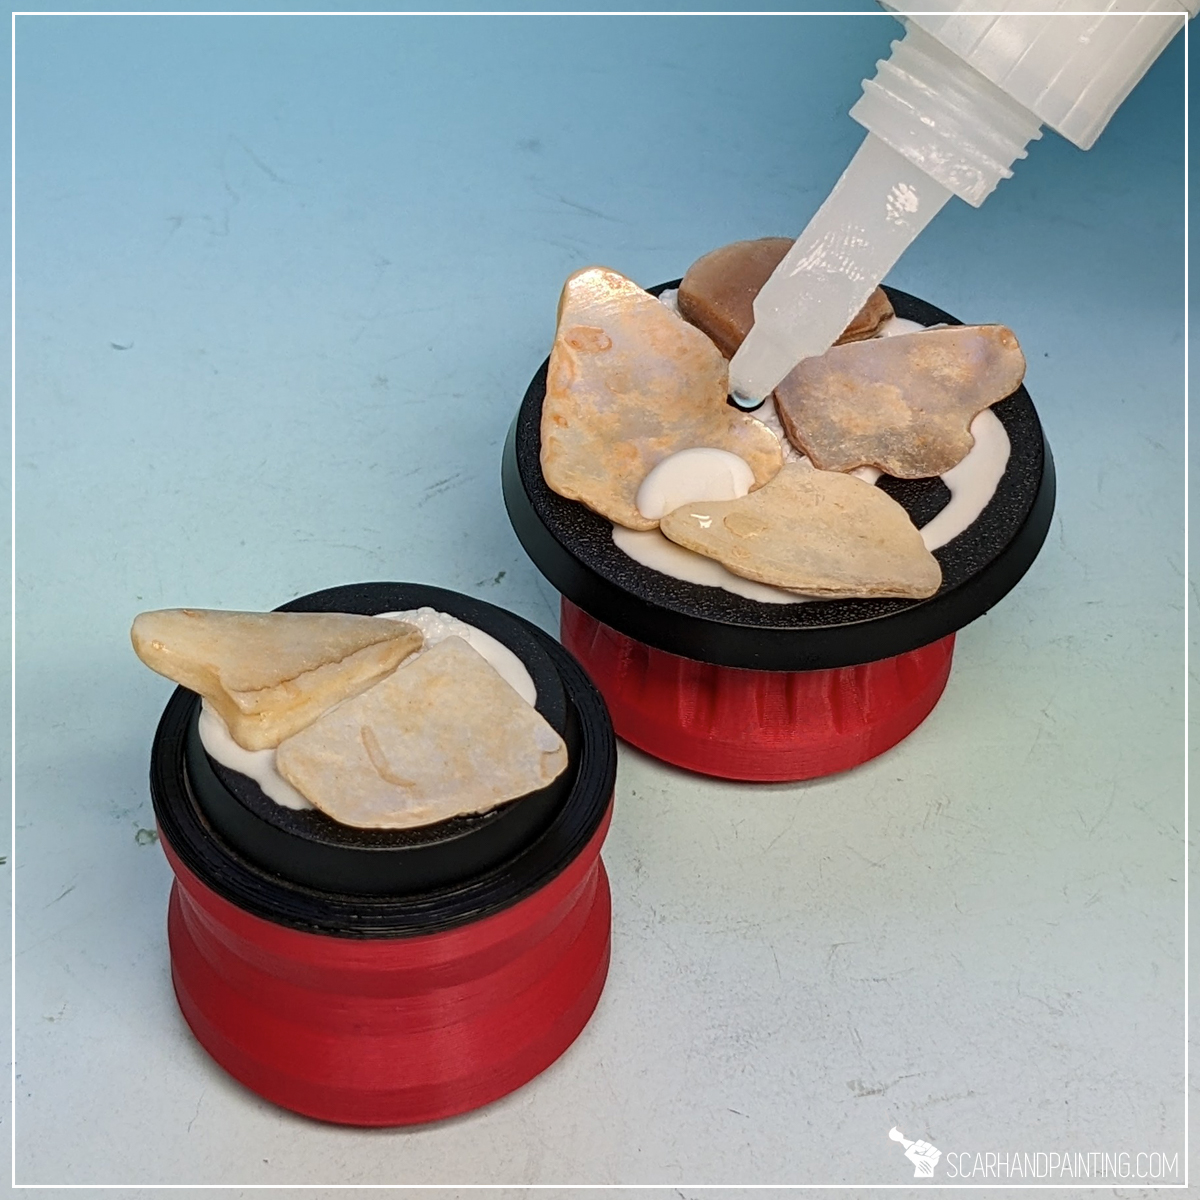
I started by applying PVA glue on top of the base. There’s no need to keep this one smooth – a clumsy random layer will suffice. Next I applied few drops of super glue on top. Finally I put few flat stones on top. Both glues mixed under preassure, filling most gaps between the stones and keeping them in place.

Step two: Increased Volume
Depending on the size and future assignment of the base I sometimes add volume to the rock formation. Some miniatures have one leg slightly raised, or I just want to get a more dynamic posing for my Astartes characters. Having that in mind I applied a drop of PVA glue followed by a drop of super glue and added another stone on top.
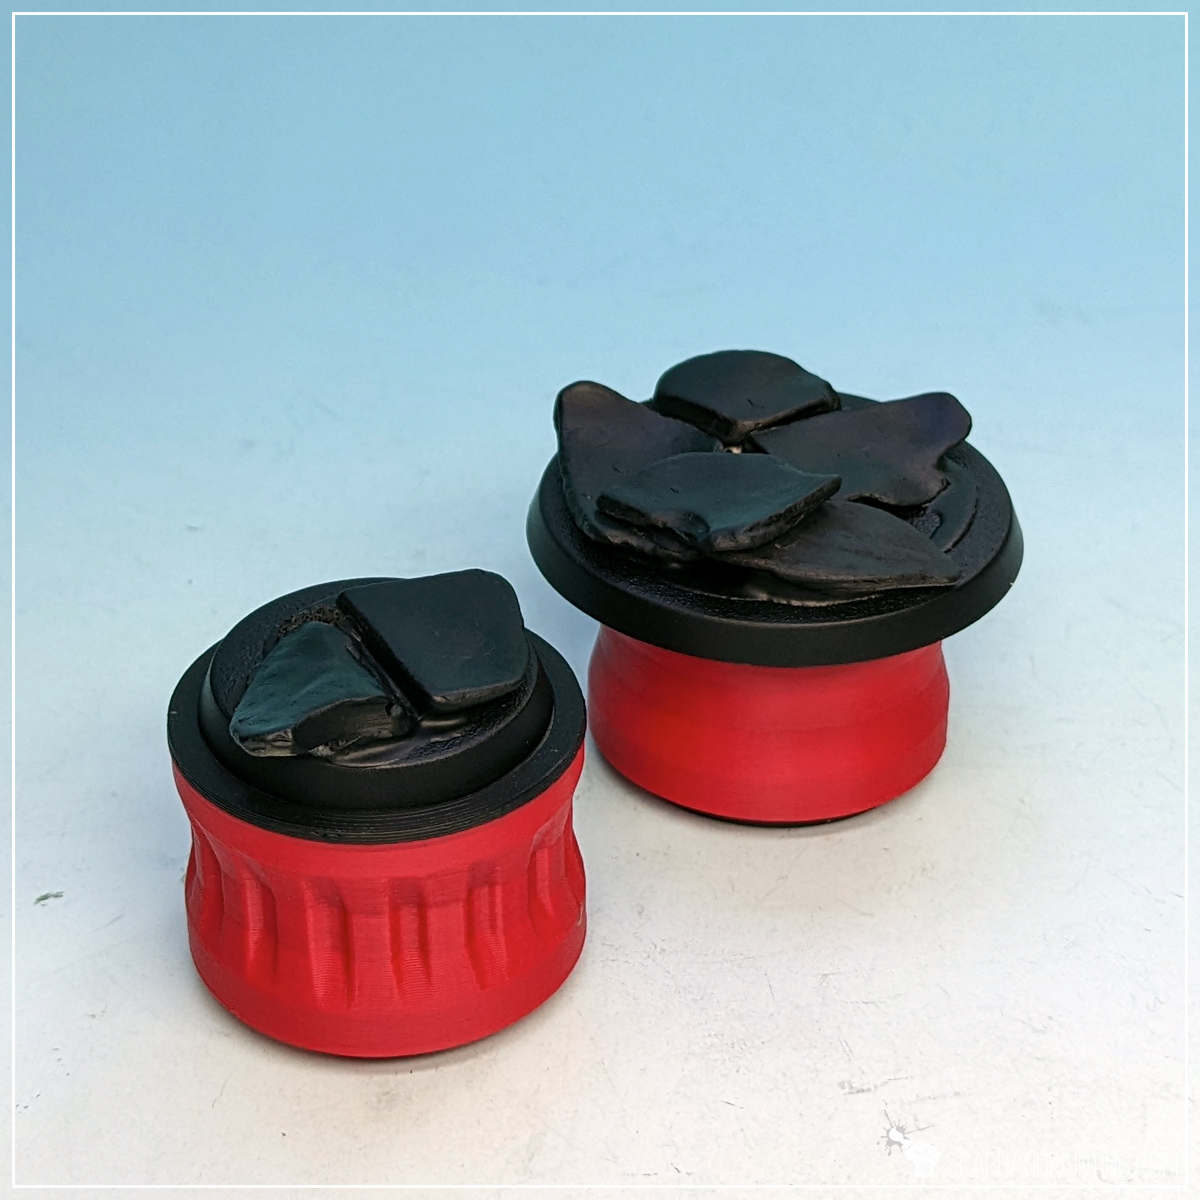
Step three: Undercoat
Once the mix of glue dried up nicely I moved to undercoating. This was done with a smooth layer of Citadel Chaos Black spray primer.
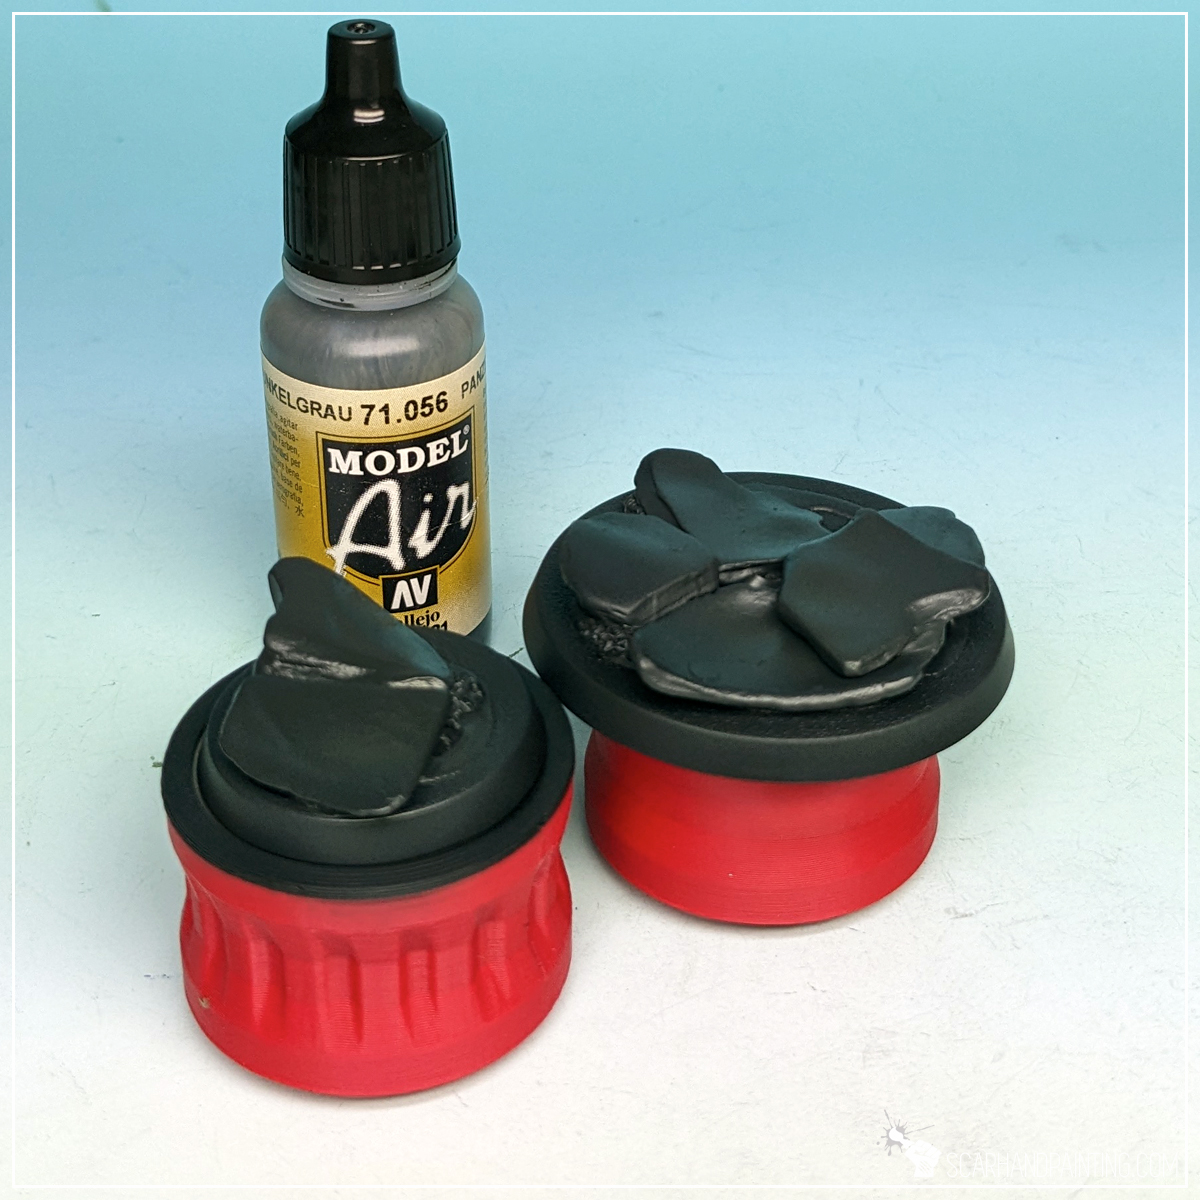
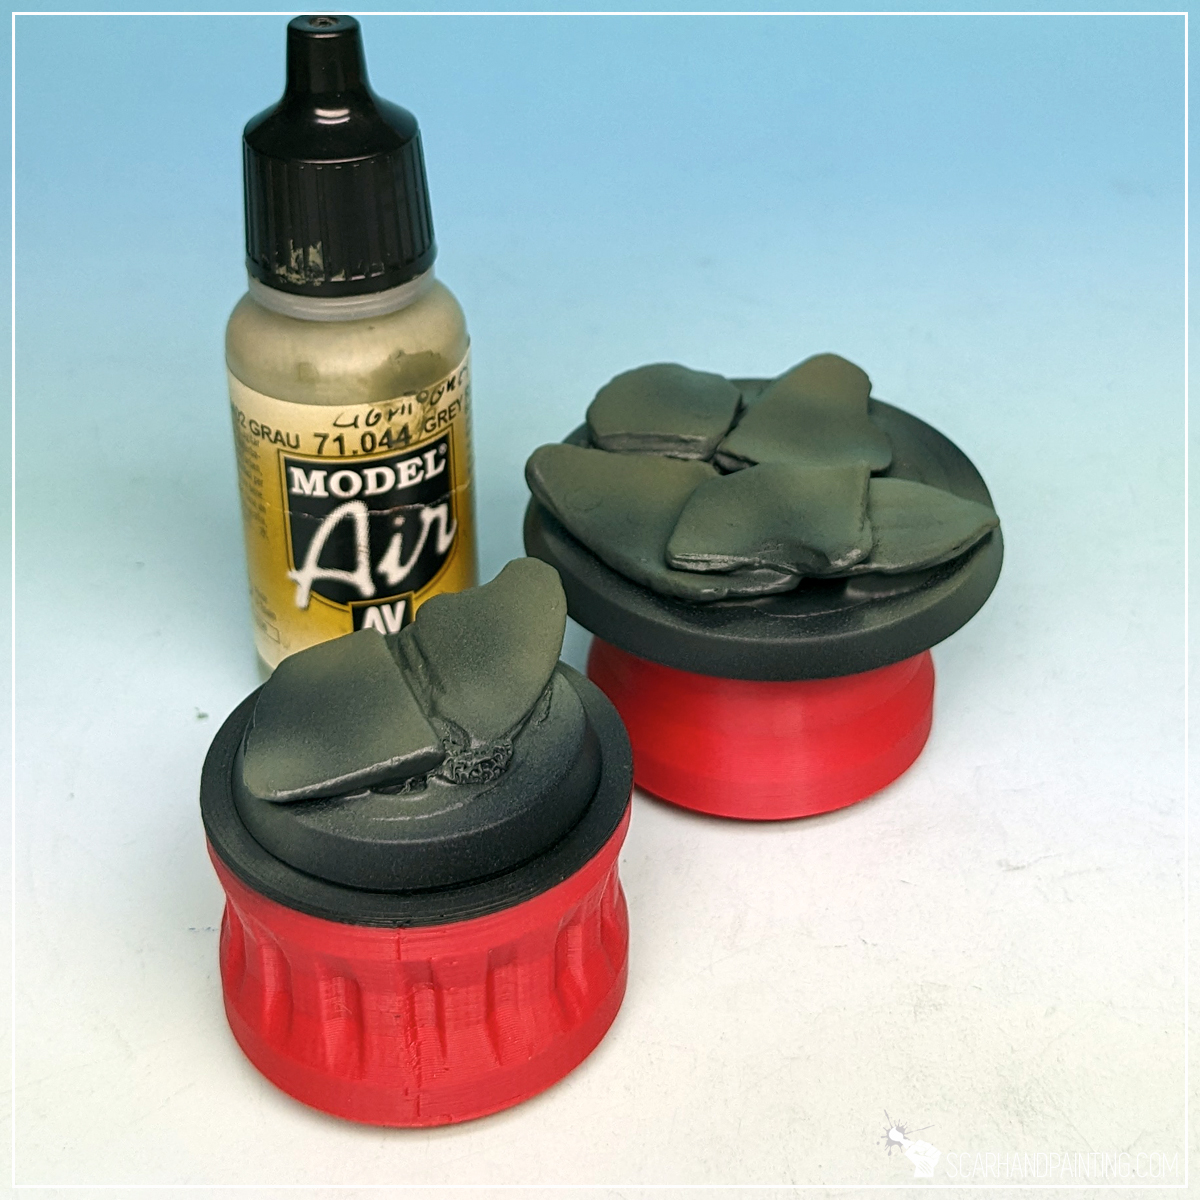
Step four: Base Color
I started painting by airbrushing a strong layer of Vallejo Panzer Dark Grey (air), straight from the pot. I then applied a slightly thinned Vallejo Light Grey Green (air), followed by Vallejo Cold Grey (air). In both cases I tried to reduce the area of paint to add color differentiation.

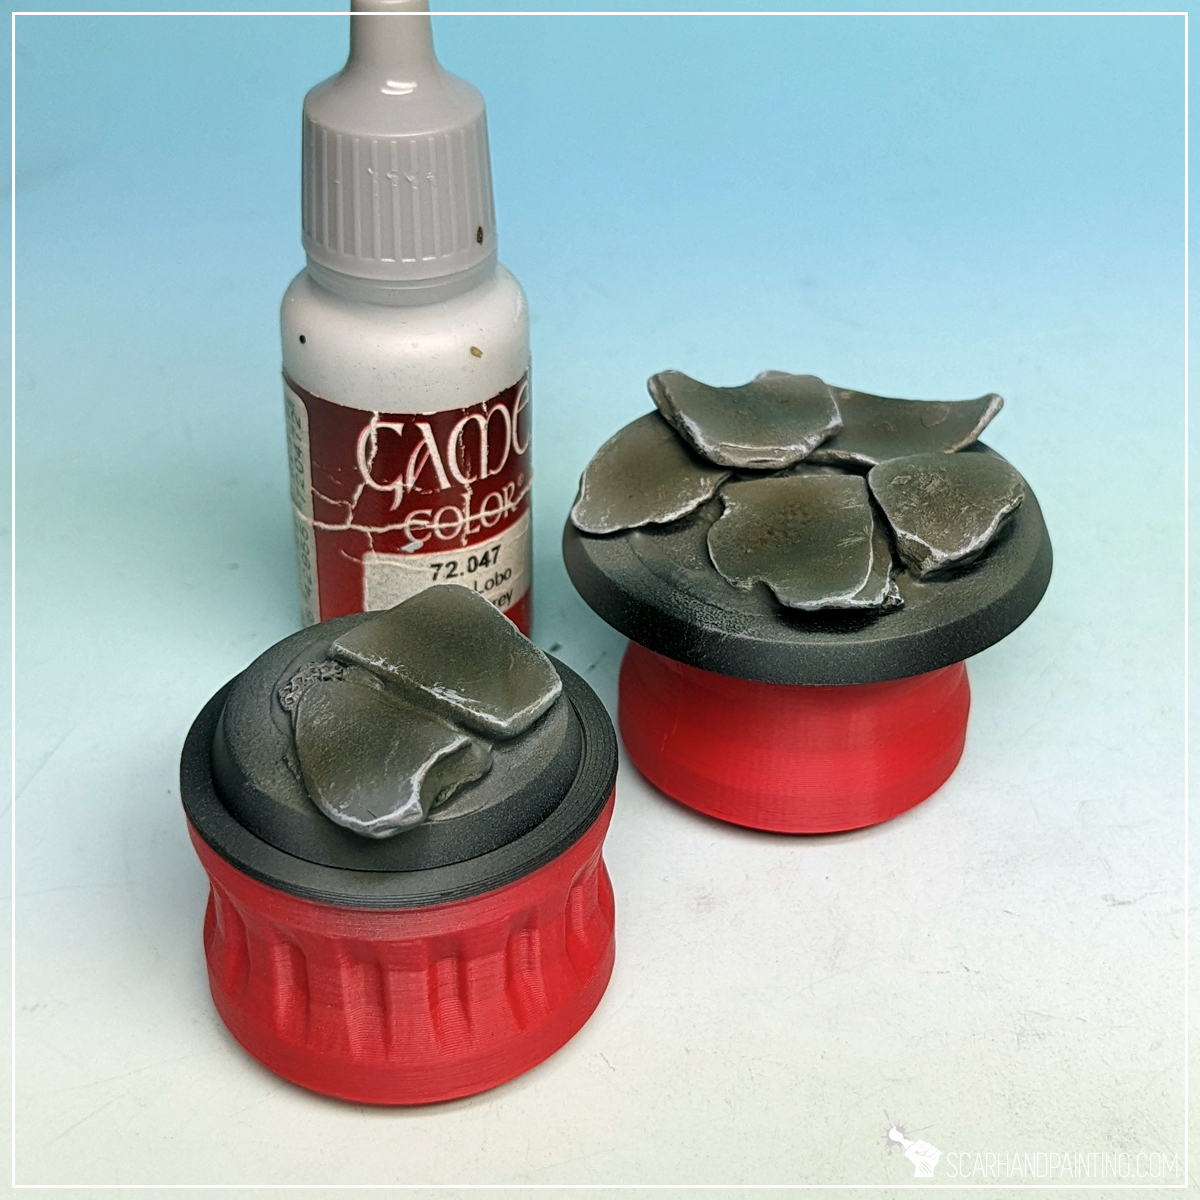
Step five: Highlights
Next I applied a drybrush of Vallejo Medium Sea Grey all over the bases, followed by edge drybrush of Vallejo Wolf Grey. Finally I softly airbrushed Army Painted Strong Tone Quickshade onto the middle points of each individual stone on the base, and slightly around. All of this to add more visual volume.


Step six: Final Highlighs
I then stippled a bit of Vallejo Wolf Grey on the edges of each individual stone, to make them stand out a bit more.
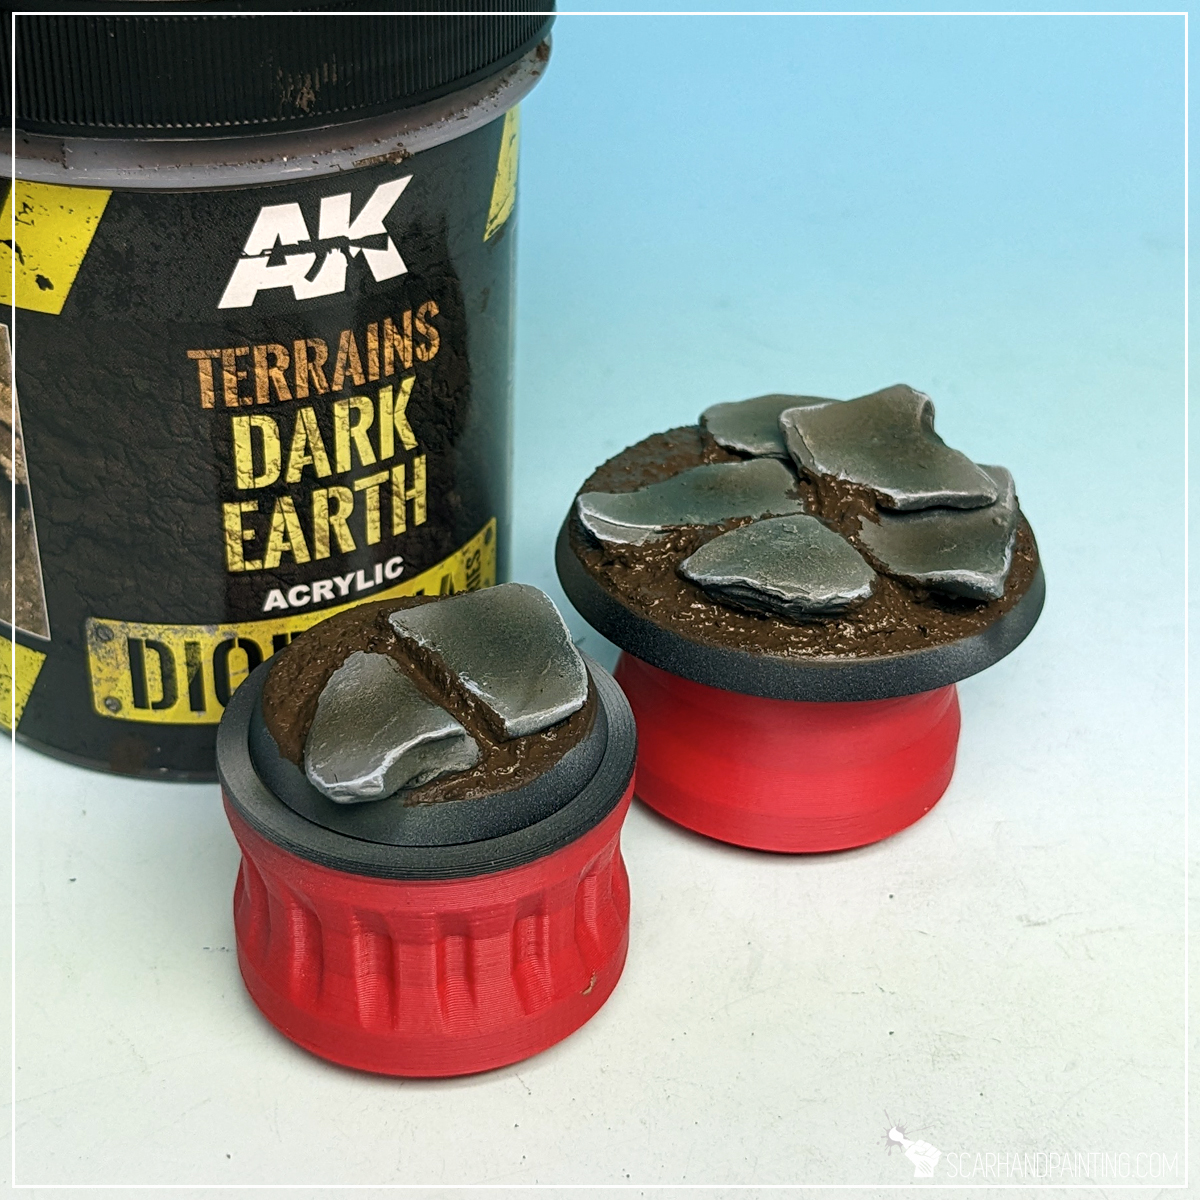
Step seven: Ground Texture
Next I moved to my favorite texture of all time – AK Interactive Dark Earth diorama series that you can learn more about here. I applied a thick layer of the texture, let it dry than drybrushed Citaled Karak Stone on top.

Step eight: Leaves
Then I applied few small drops of super glue and put a Birch tree seed on top of each. Once dry, leaves got painted with Army Painter Soft Tone Quickshade, to add color depth and just some durability.

Step nine: Final Touches
Finally I repainted base’s edges black and airbrushed a strong layer of Vallejo Polyurethane Matt Varnish all over. Job done.
I hope you find this tutorial interesting. Be sure to let me know your thoughts in the comments below, or at Facebook or Instagram. I would also appreciate it if you considered sharing this content with your friends, who might find it useful. Finally if you are looking for a professional miniatures painting service, be sure to contact me with this contact form. I always reply within 24 hours, after which please check out your spam folder.
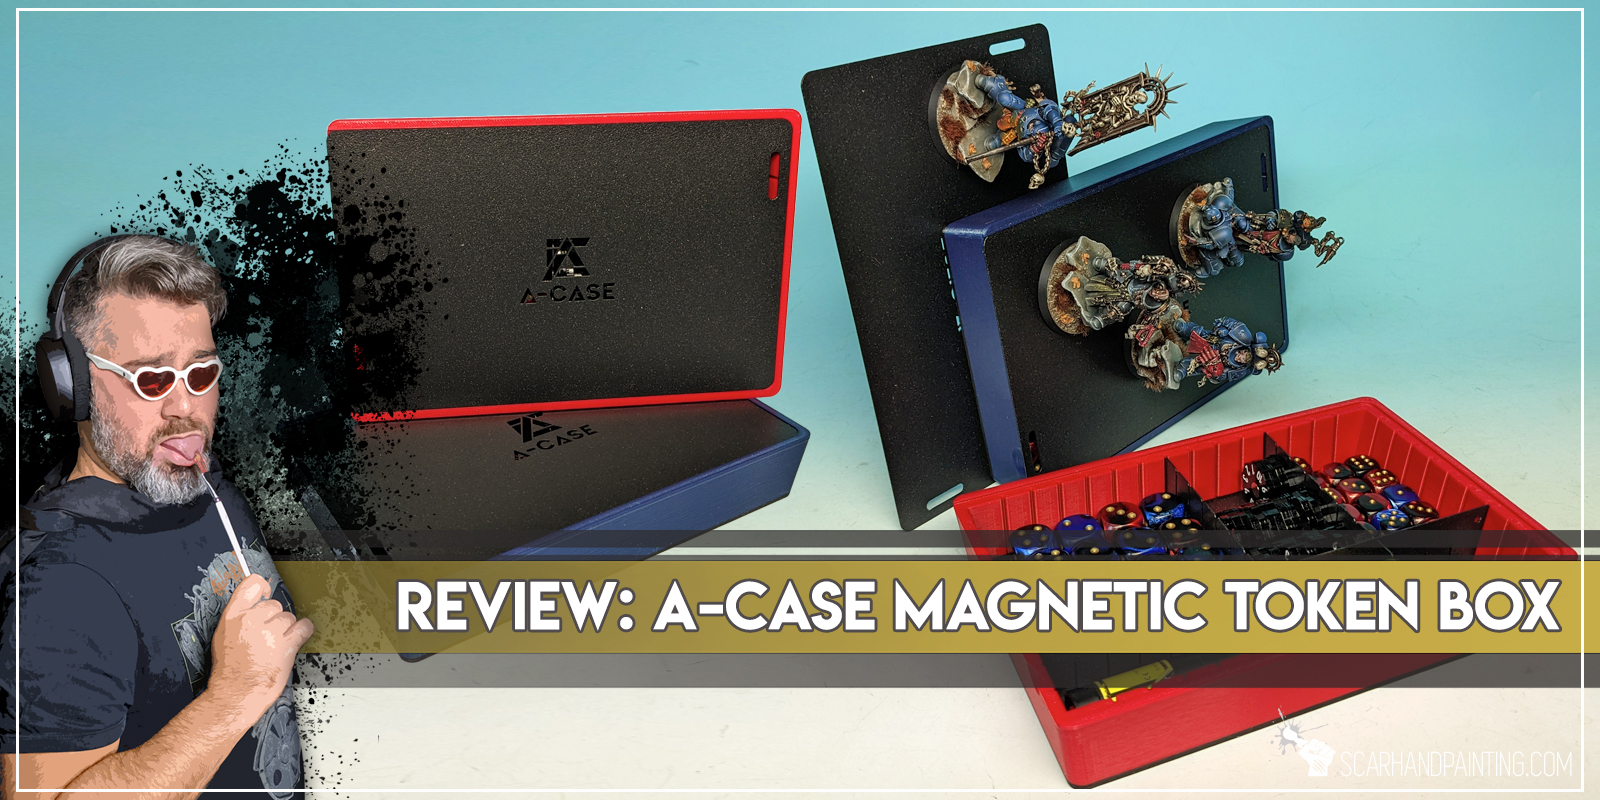
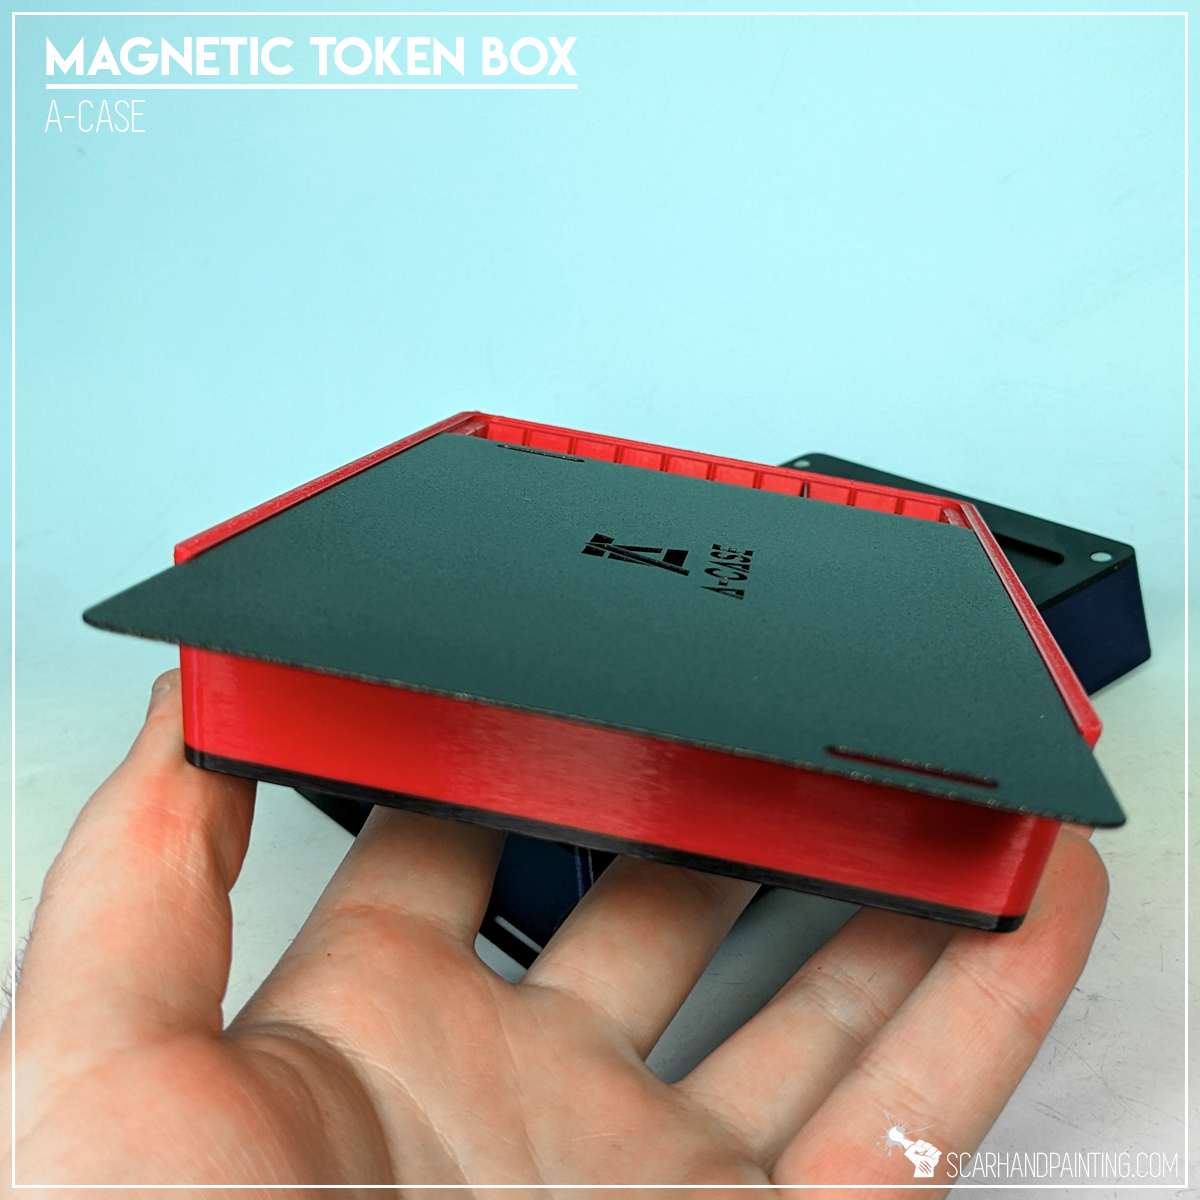
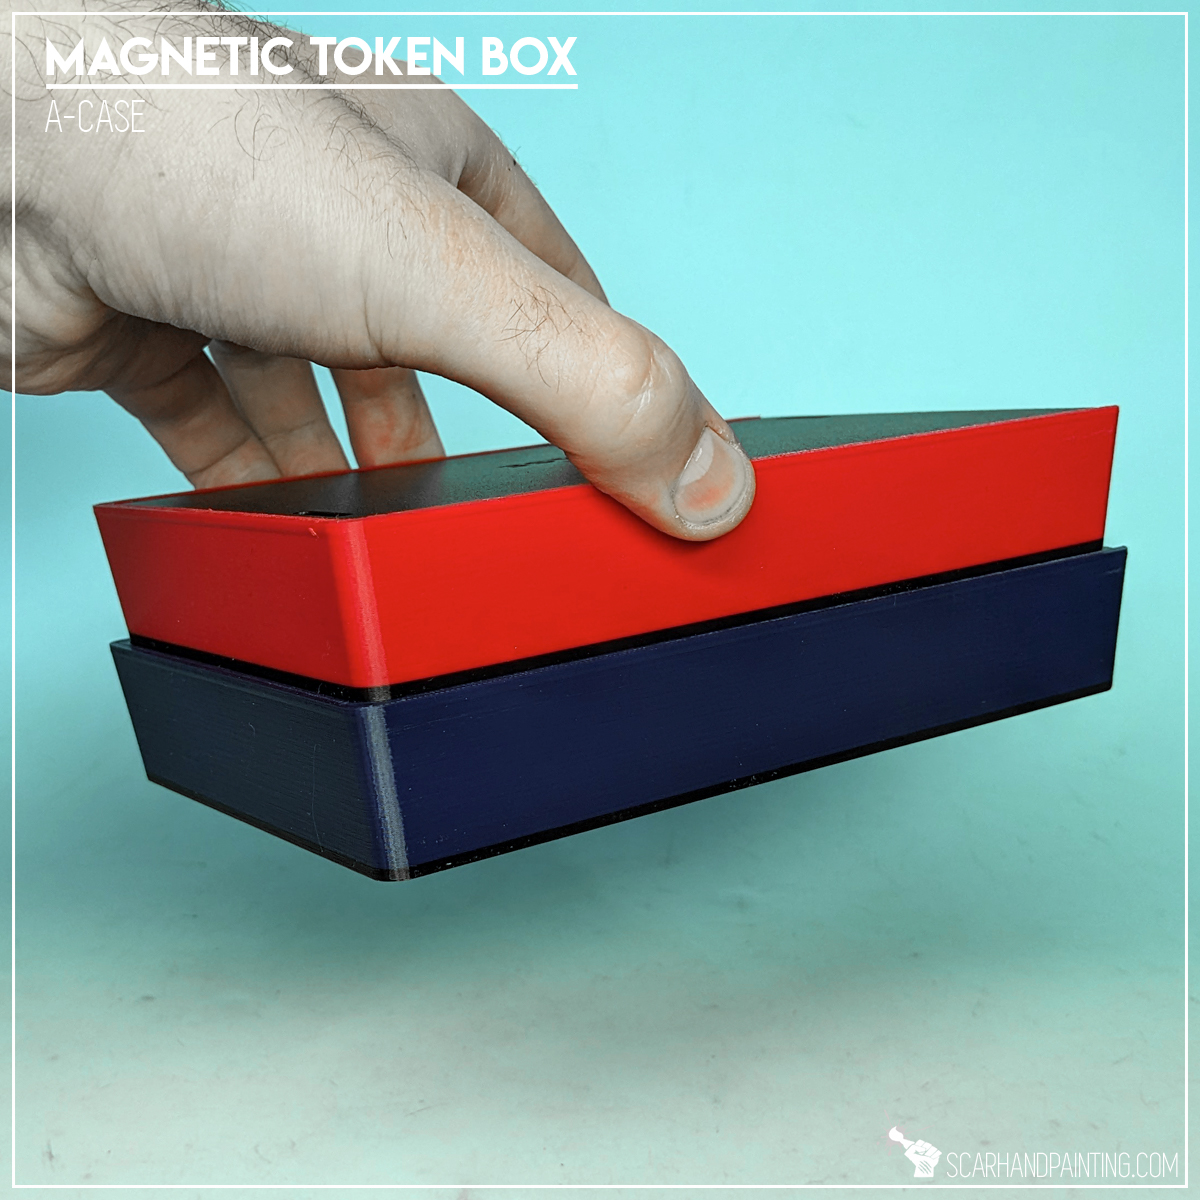
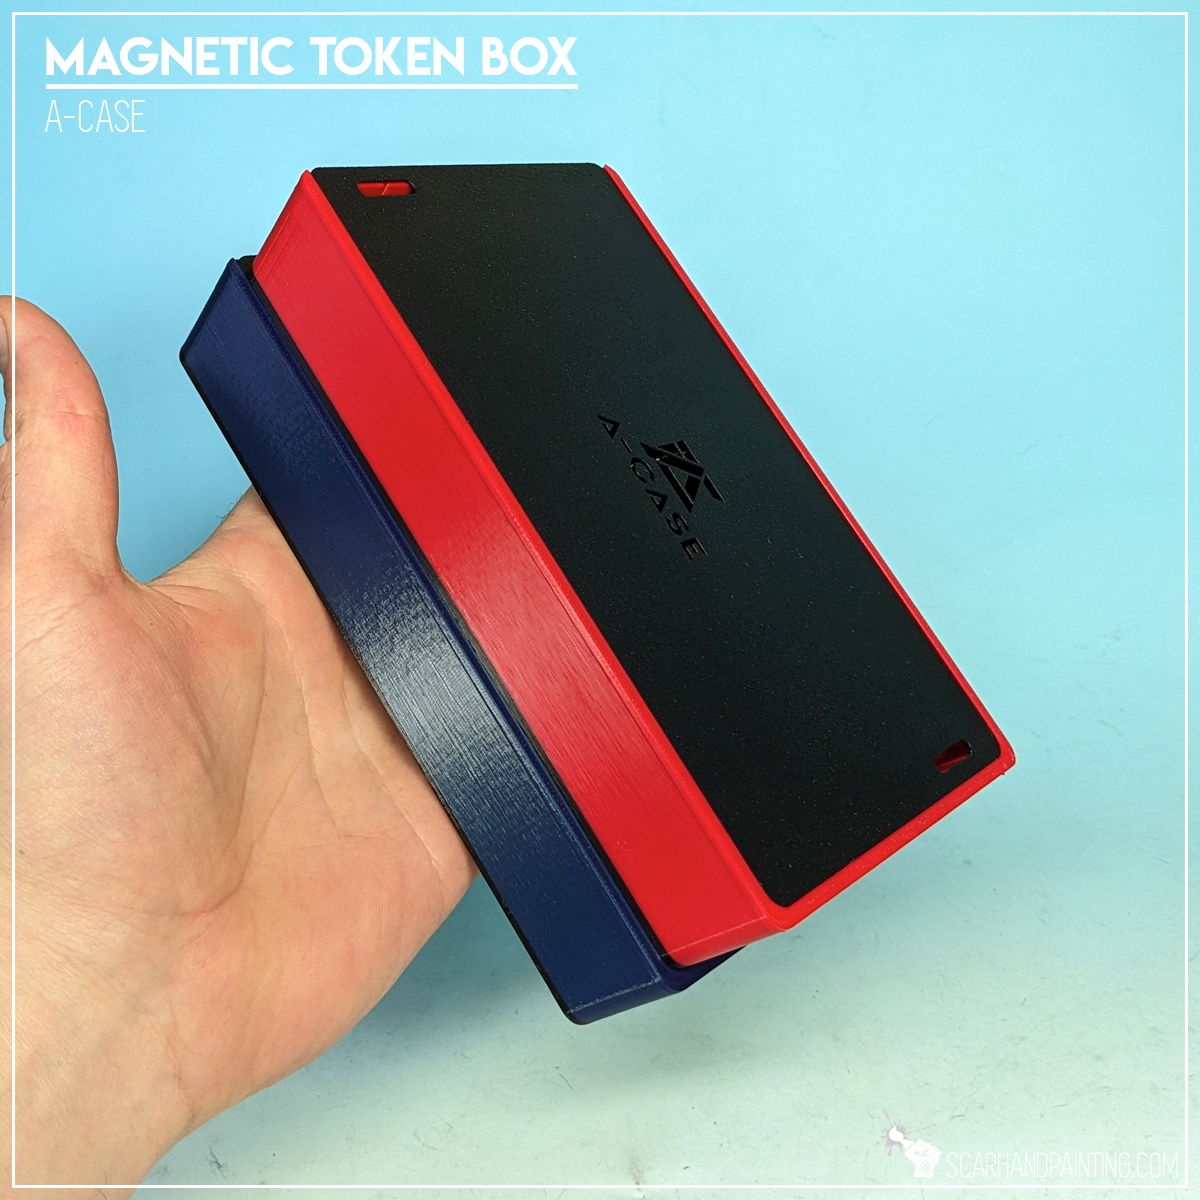
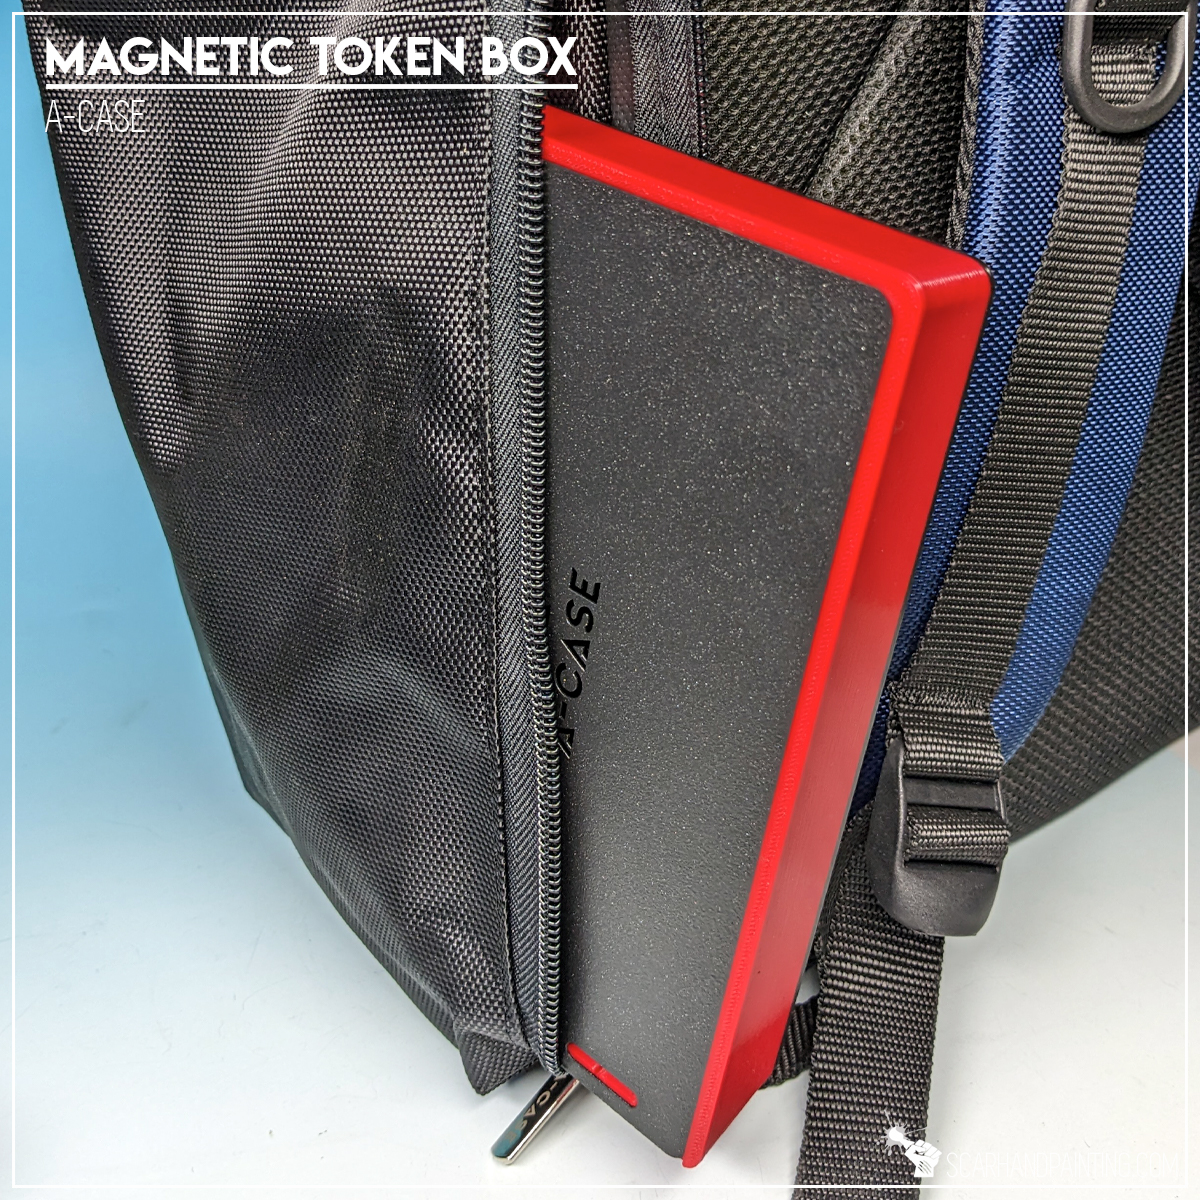
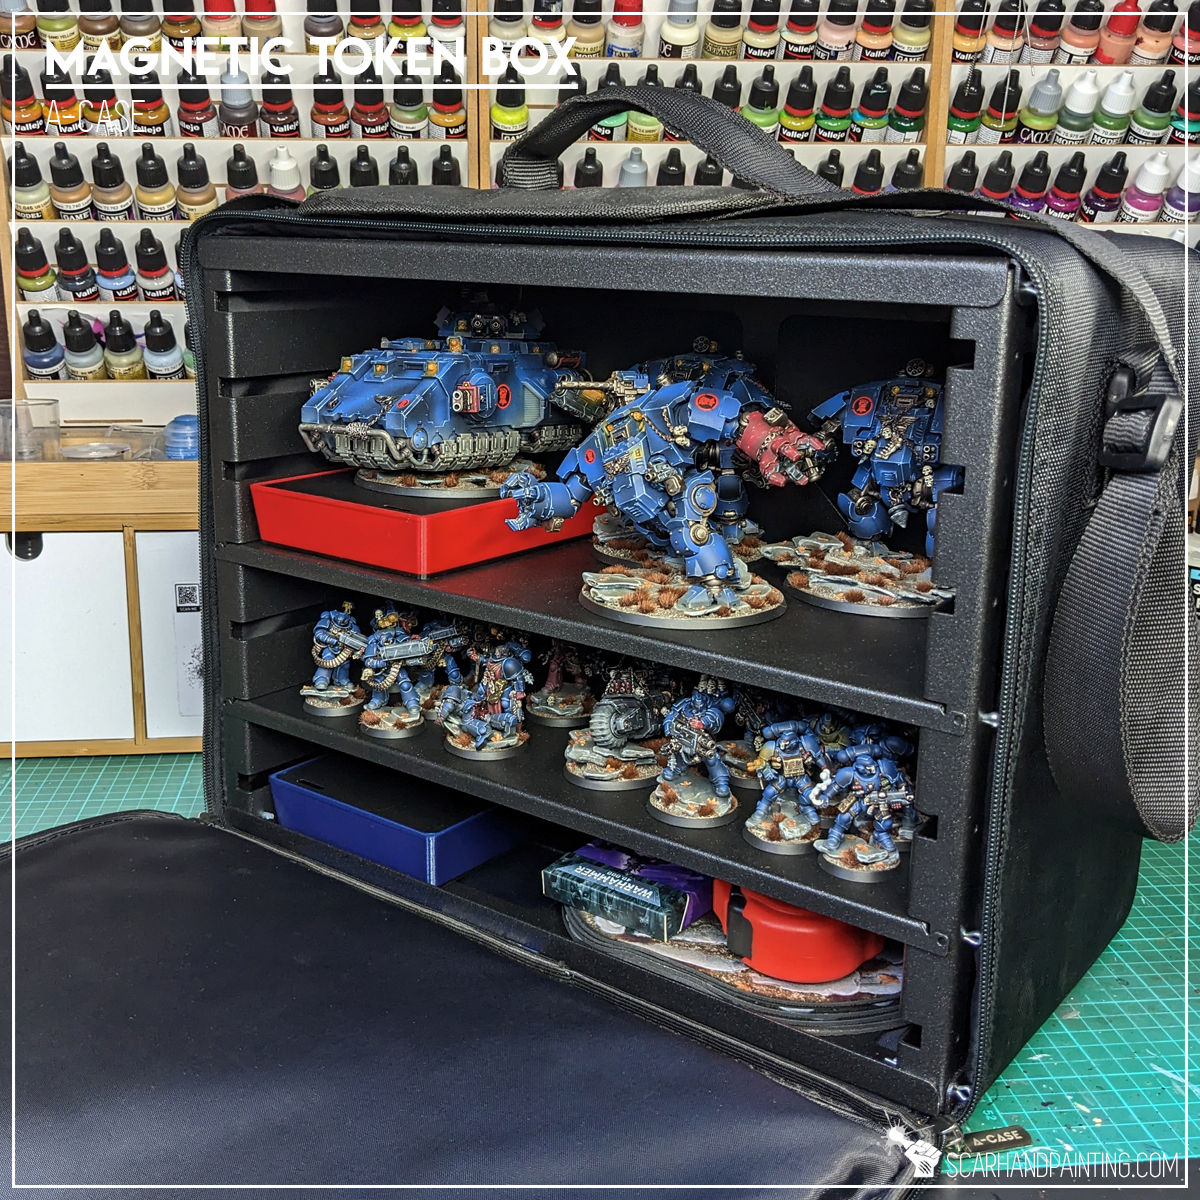
Transporting your miniatures should be smooth and easy. No company seems to embody this philosophy better than A-Case. A relatively small company from Poland, dedicated to producing the very top miniatures transporters. Their entire shtick revolves around magnetism and believe me – Once you go magnetic there’s no going back!
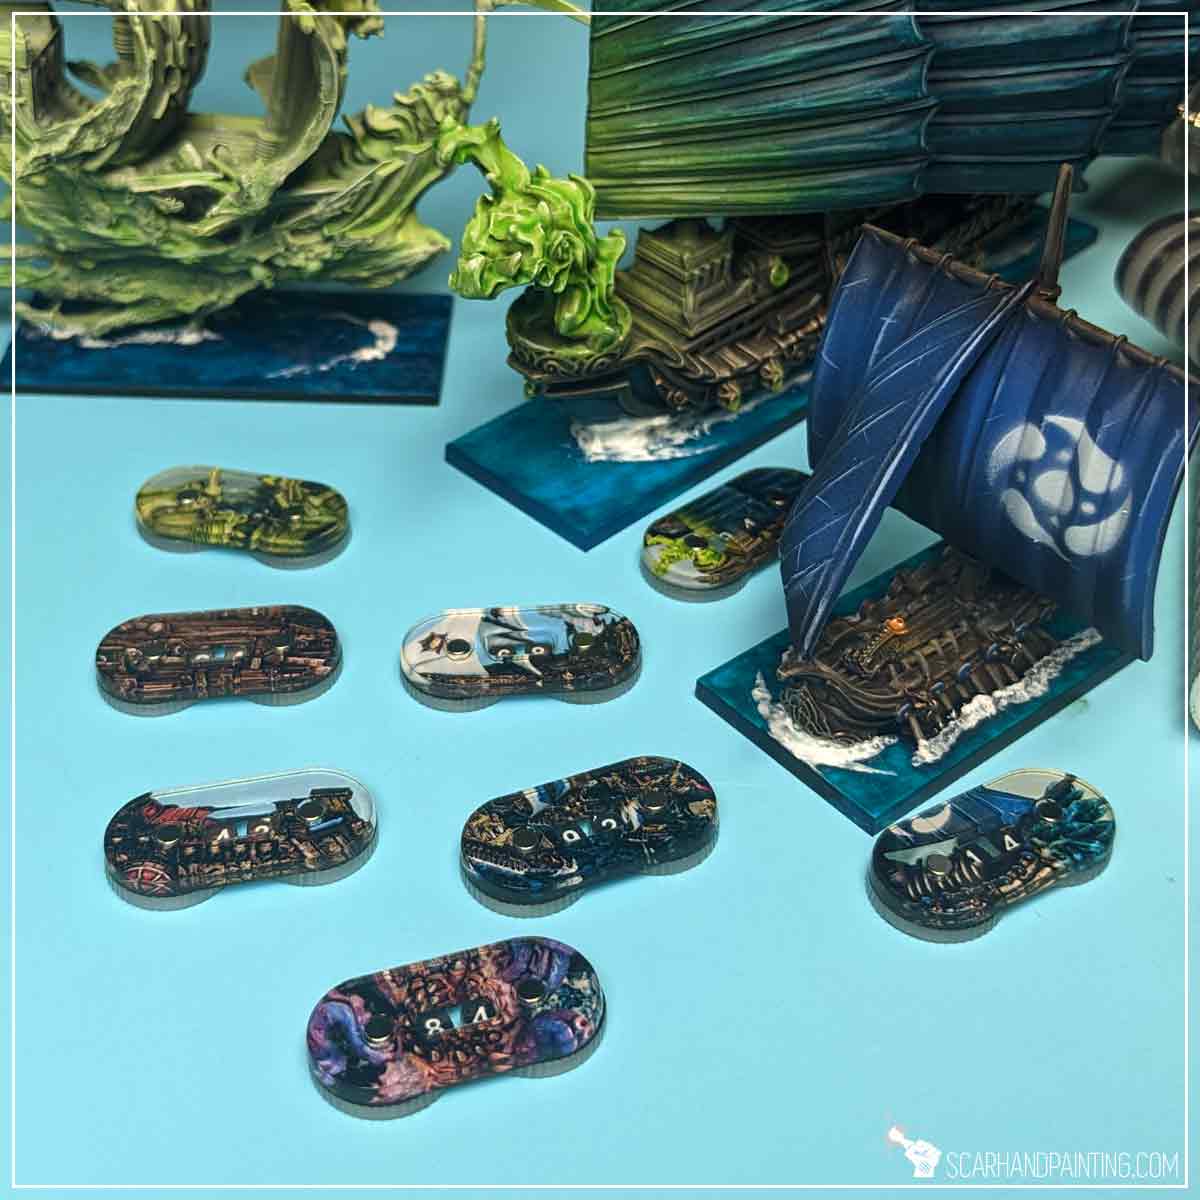
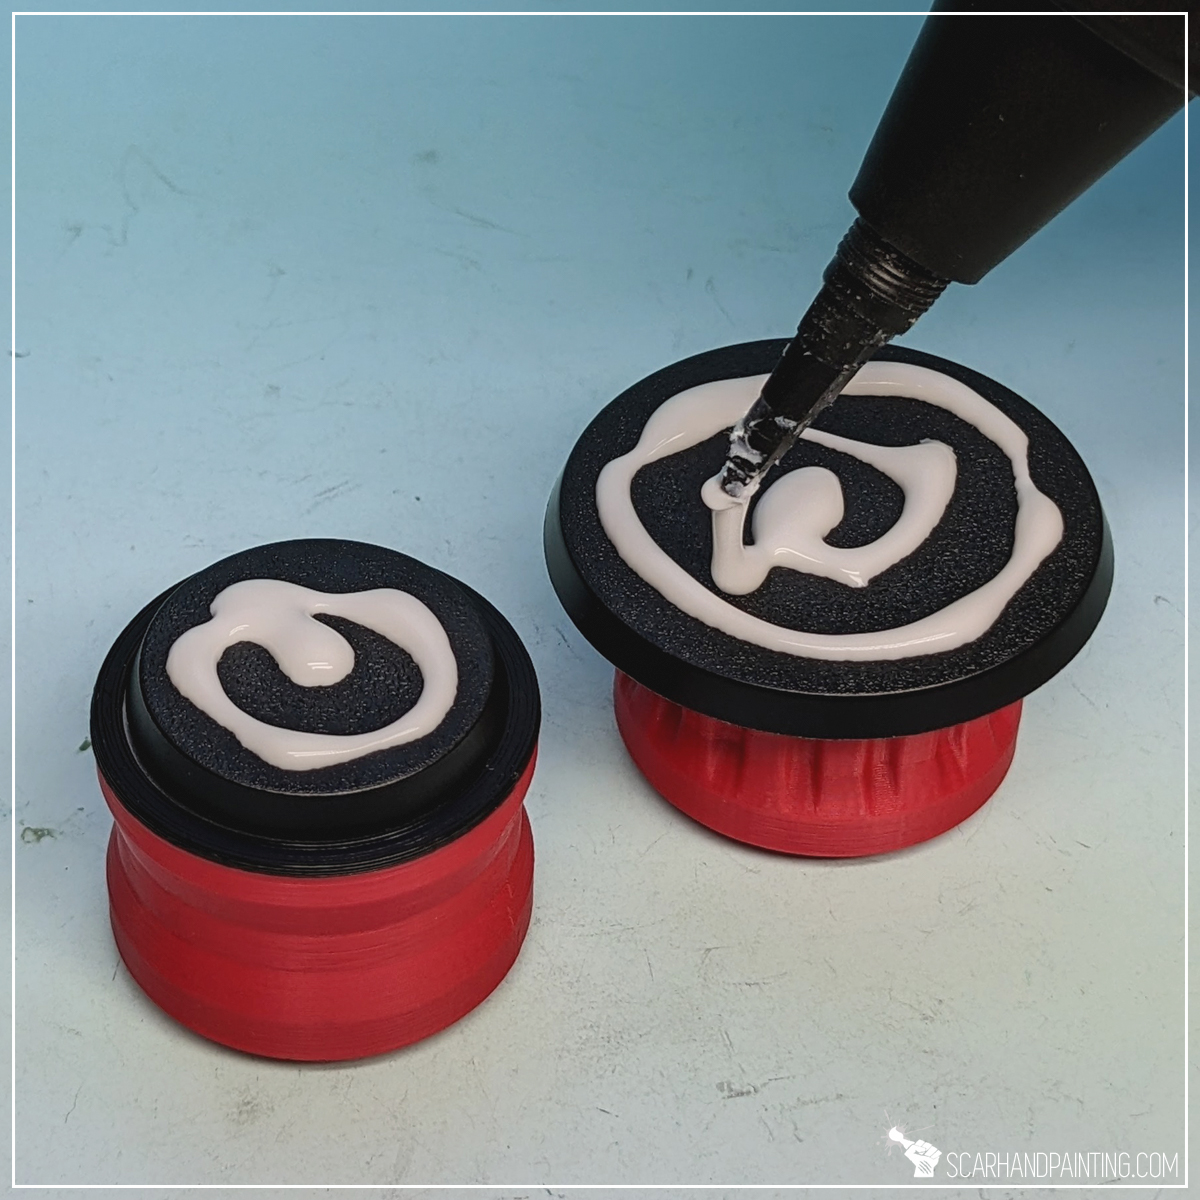
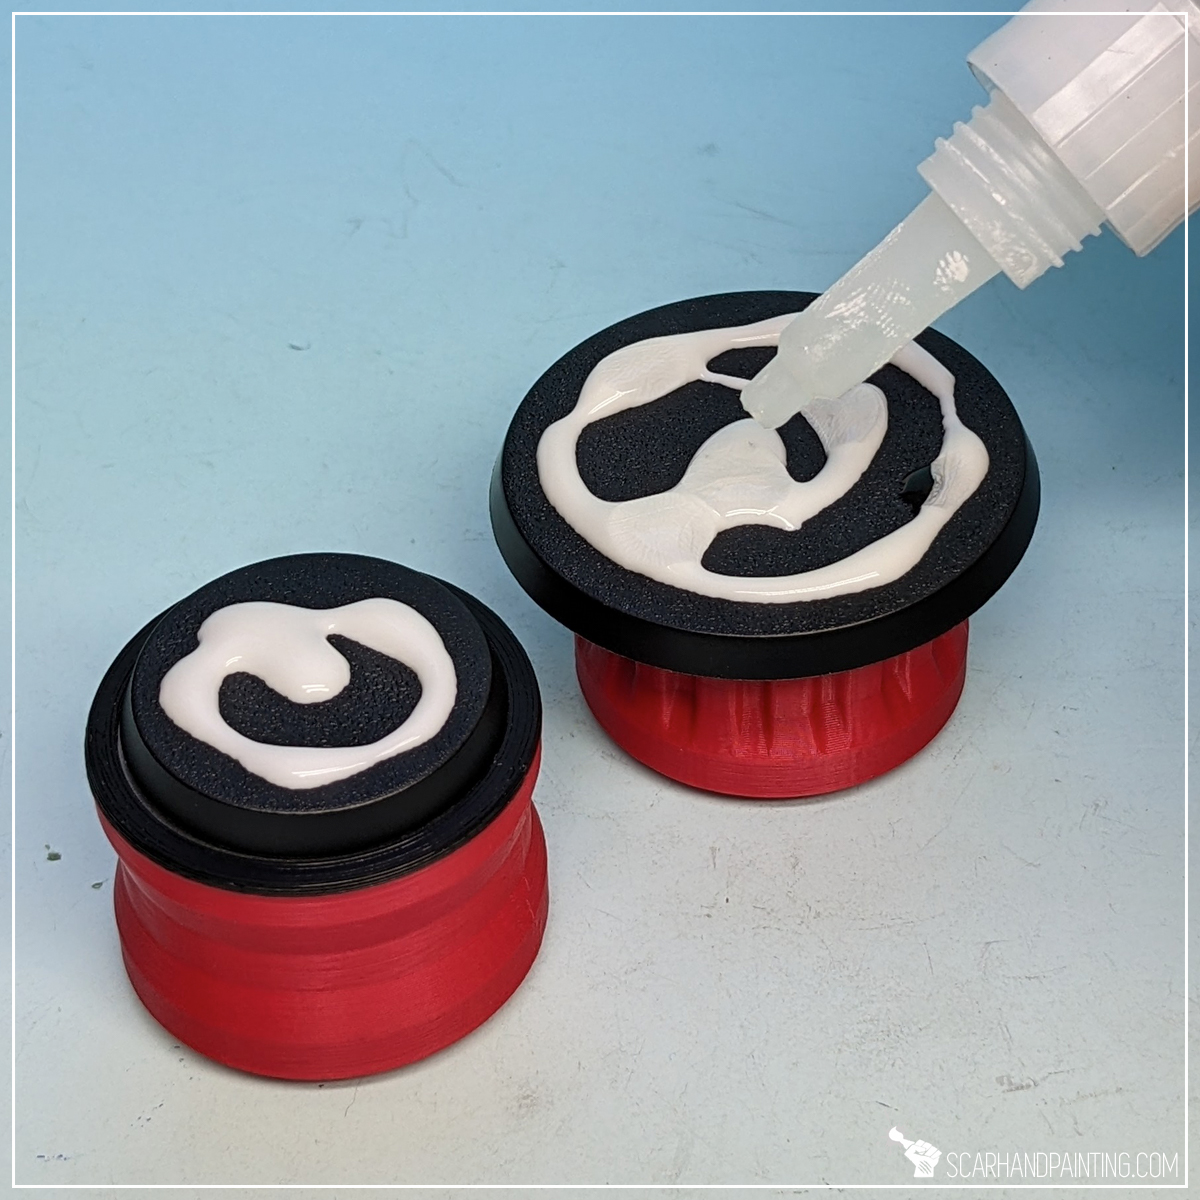
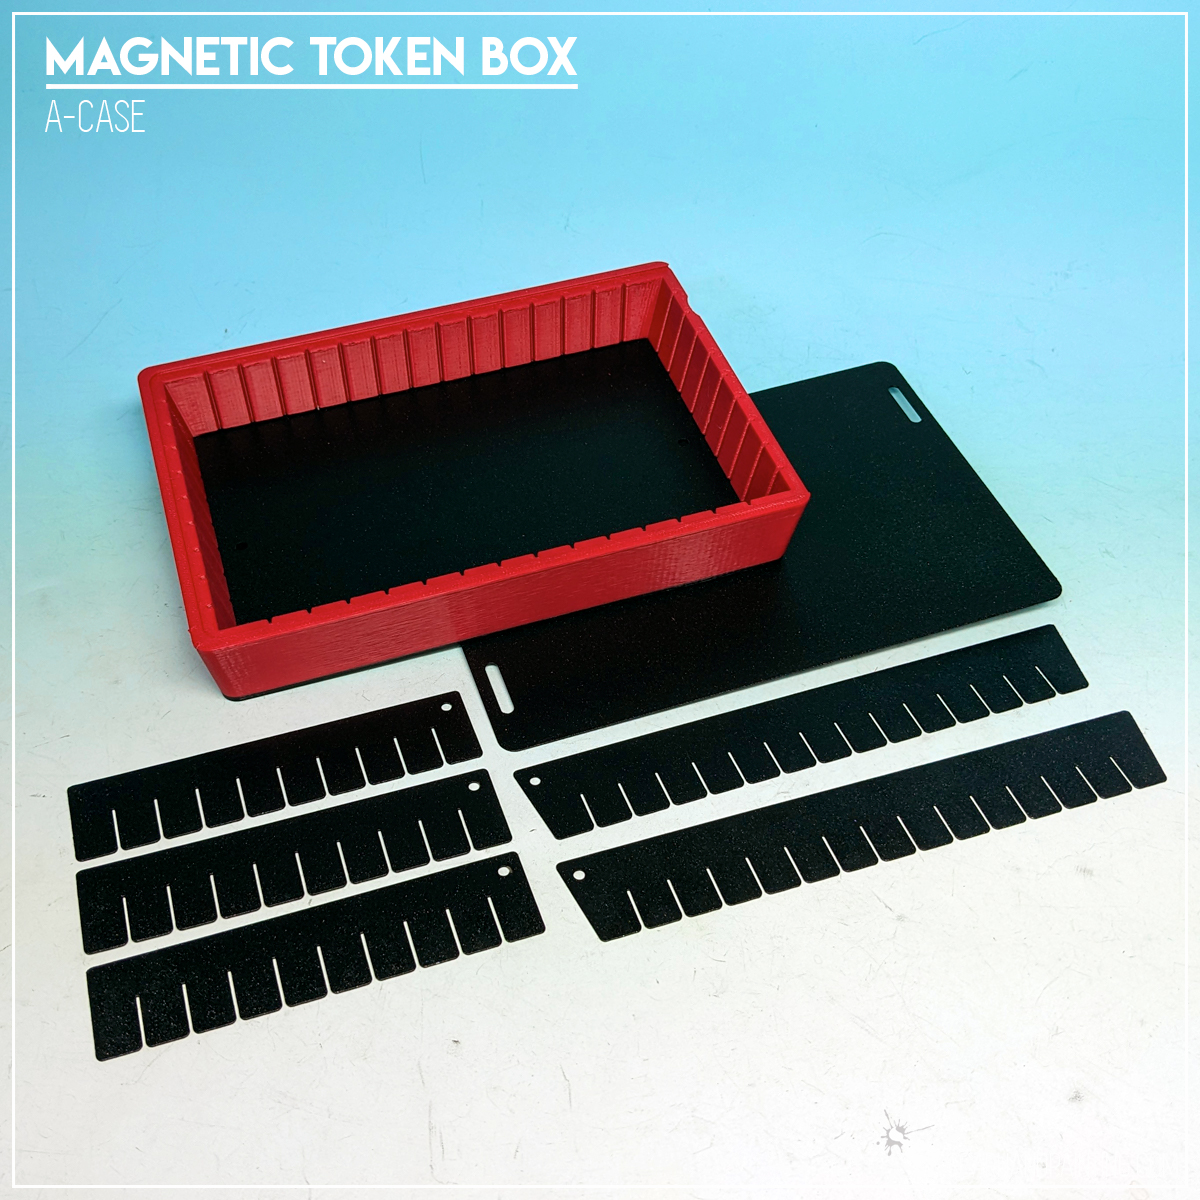
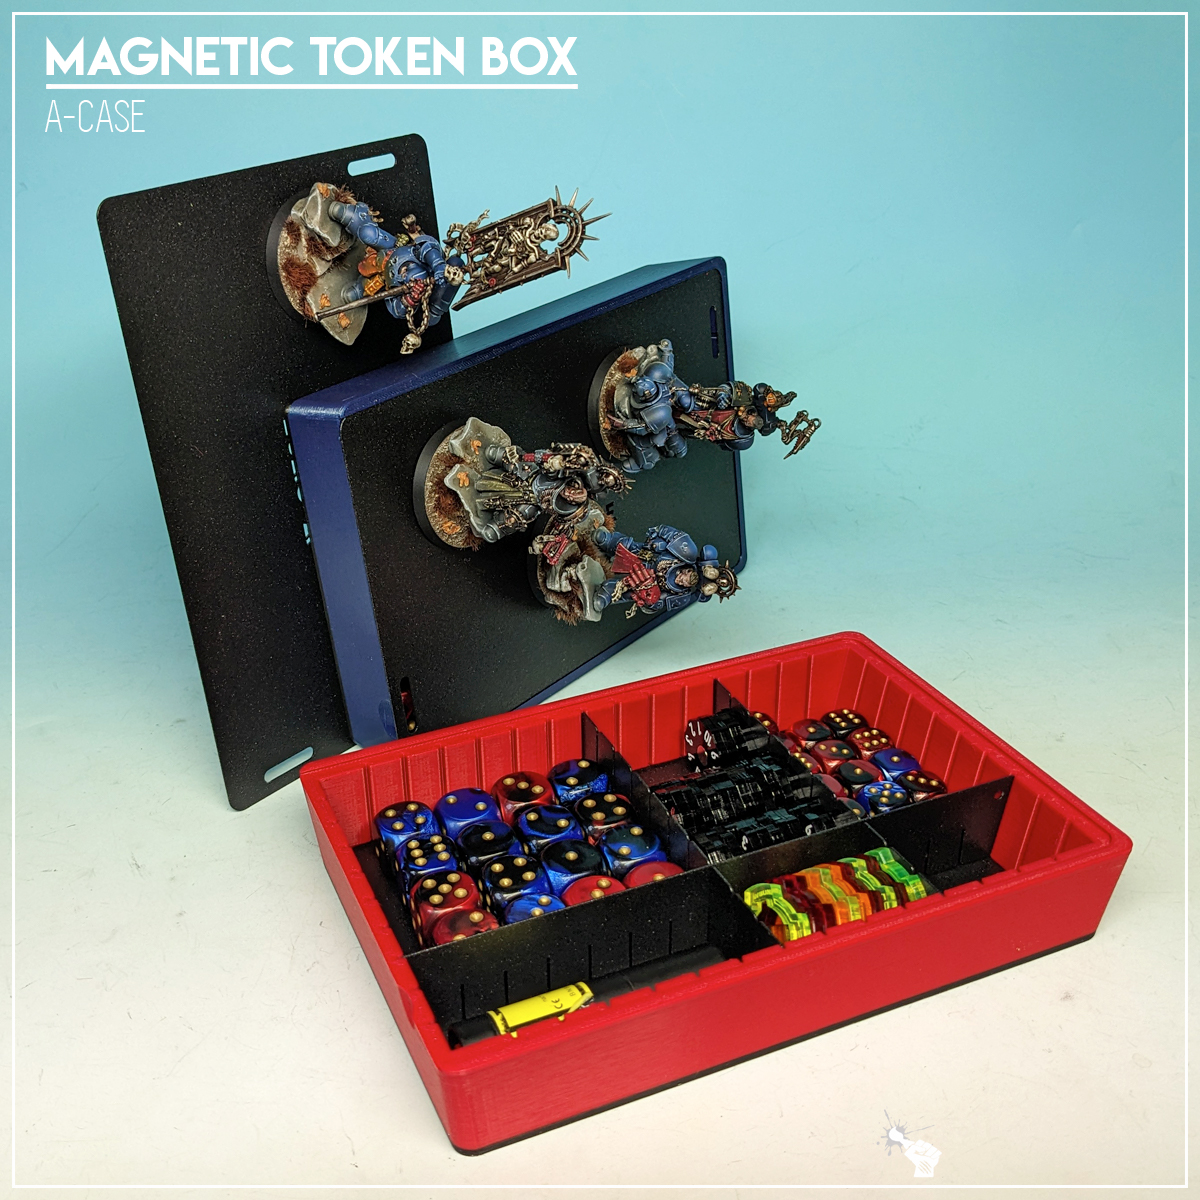
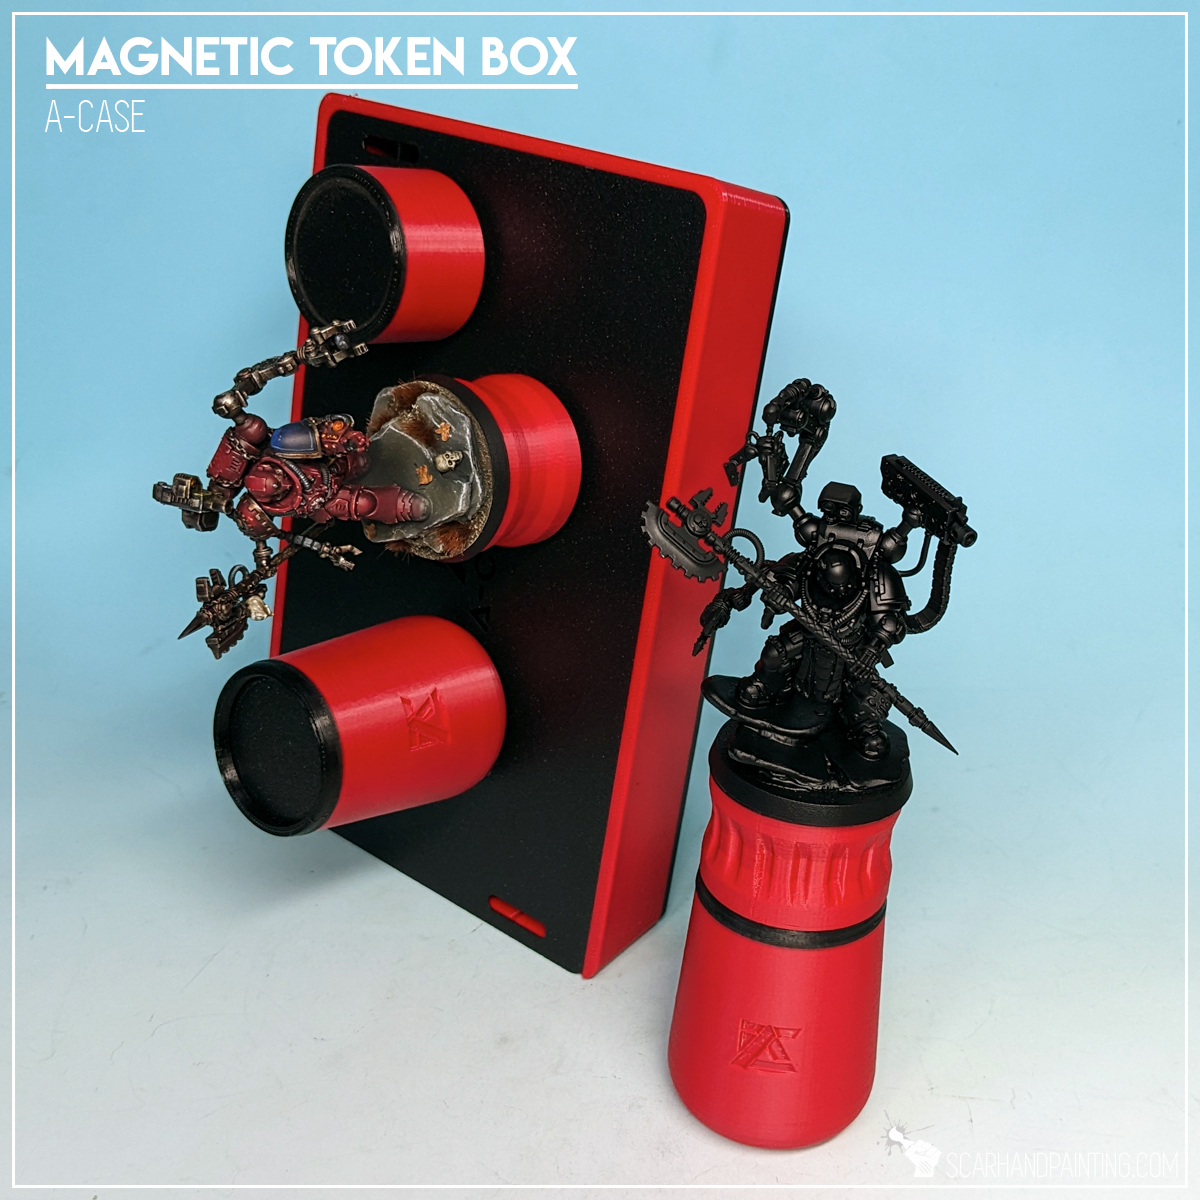
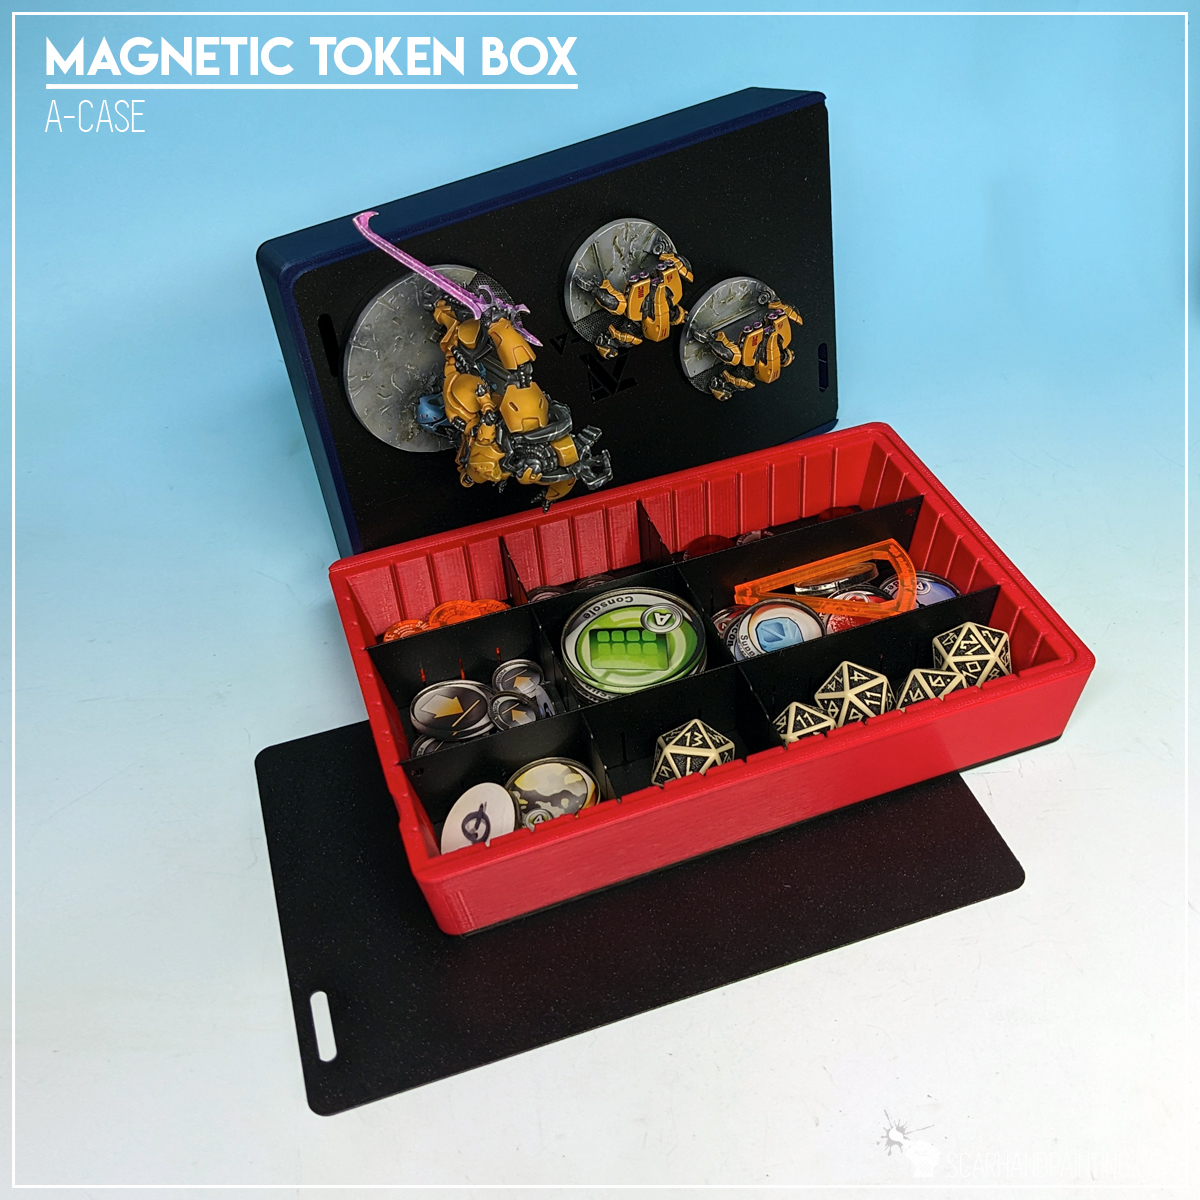
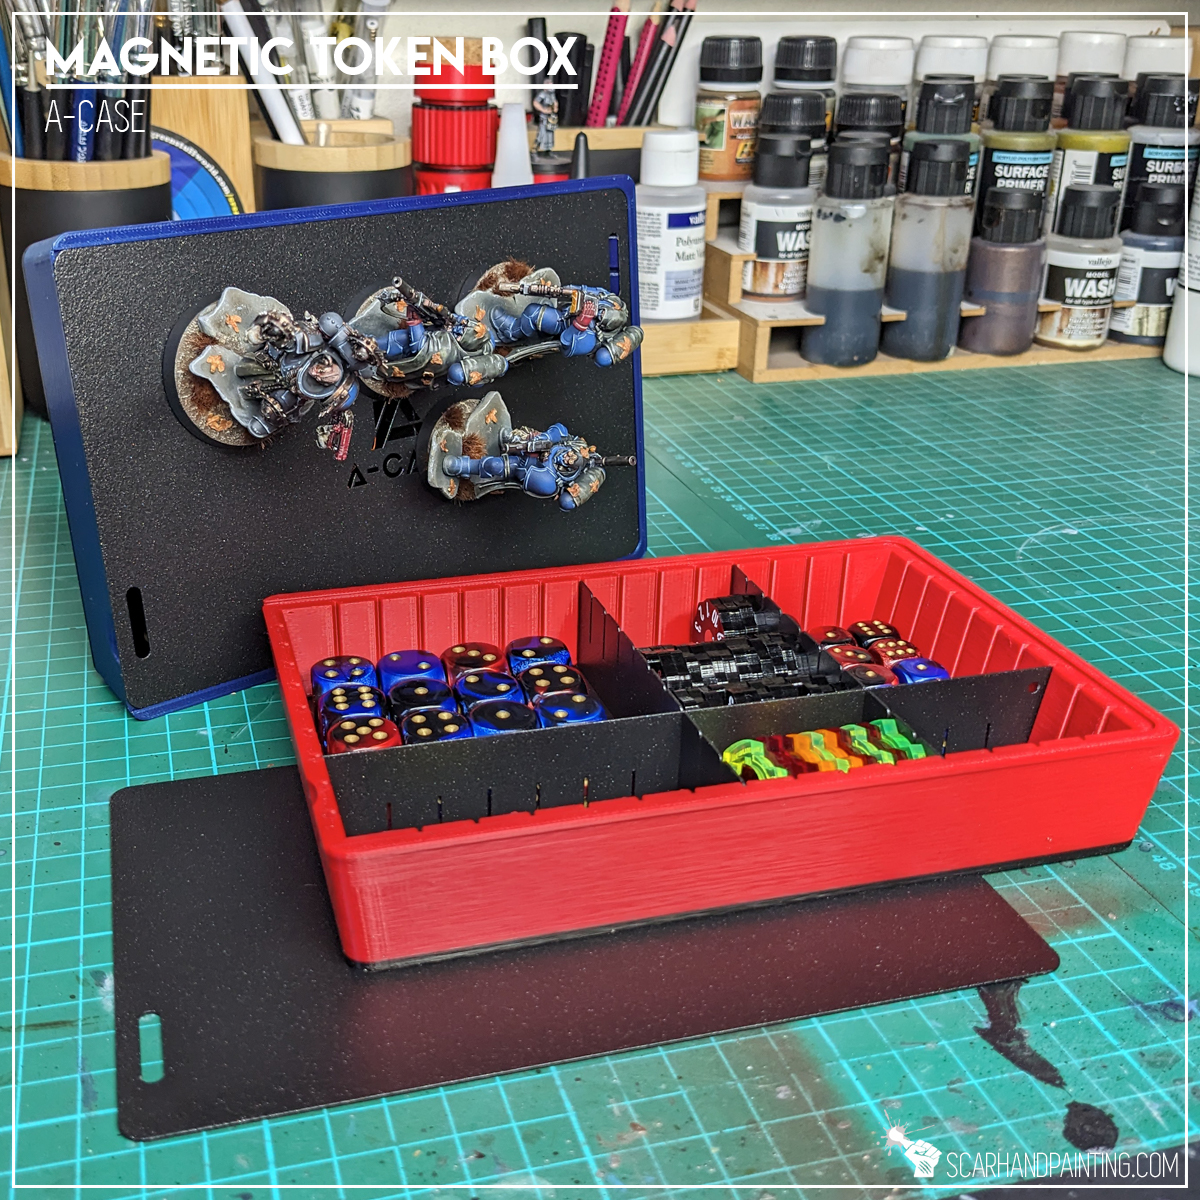
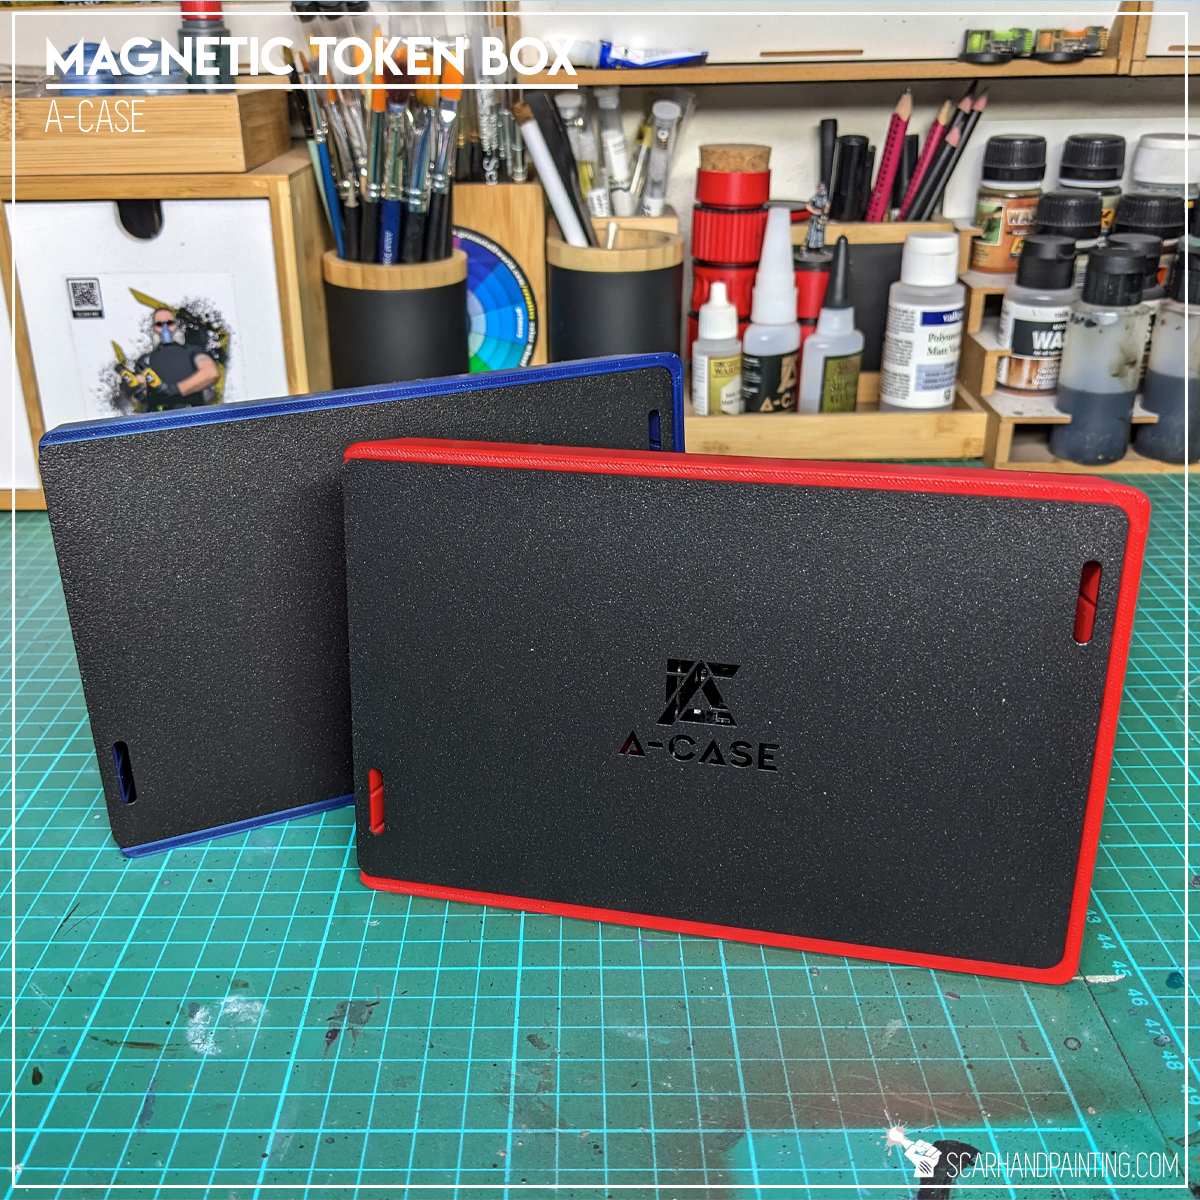
A-Case is best known for their Hybrid series magnetic cases, coming in four different types (and sizes), but there’s more to the line than meets the eye. Lately the company released a Magnetic Token Box, a peripheral accessory fully compatible with their cases. The item is a huge step in improving the comfort of miniatures transportation. Today I will focus on this awesome gadget and present to you its many advantages.


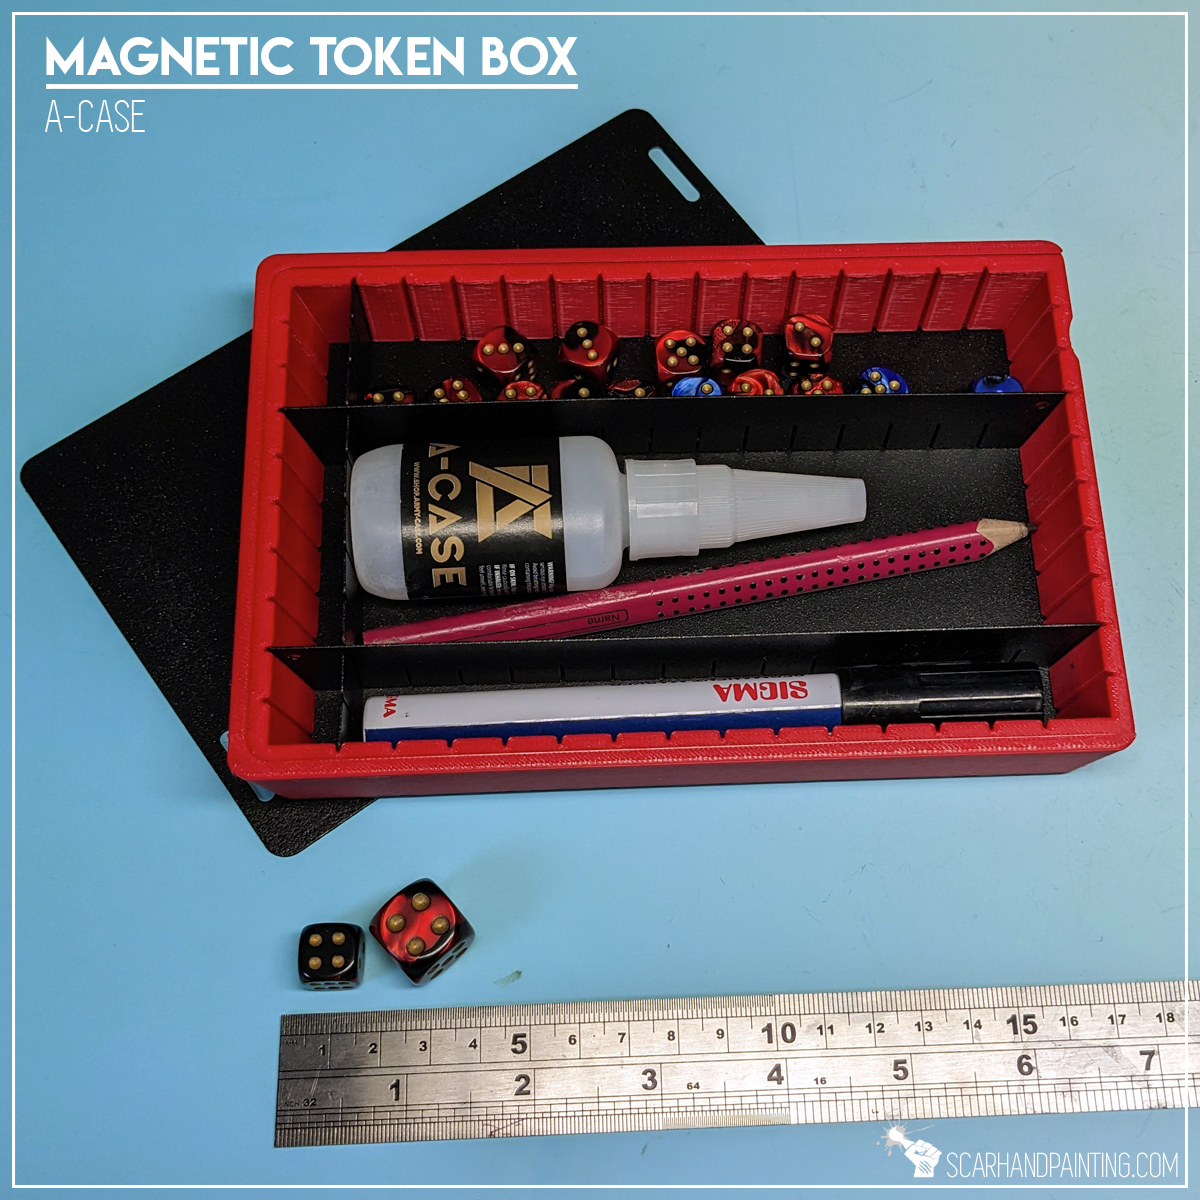
The Magnetic Token Box is an accessory dedicated to transporting a variety of wargaming peripherals, be it dice, laser pointers, gaming tokens and more. Each box is 3d printed with an integrated powder coated metal lid. There are five strong magnets mounted in the underside to immobilize the box inside an A-Case transporter or on top of one another. Boxes come in four colors (Red, Blue, Black and Grey), each 18cm long, 12cm wide and 3cm high (about 7x5x1″). Within you will find adjustable compartments consisting of five powder coated metal walls.
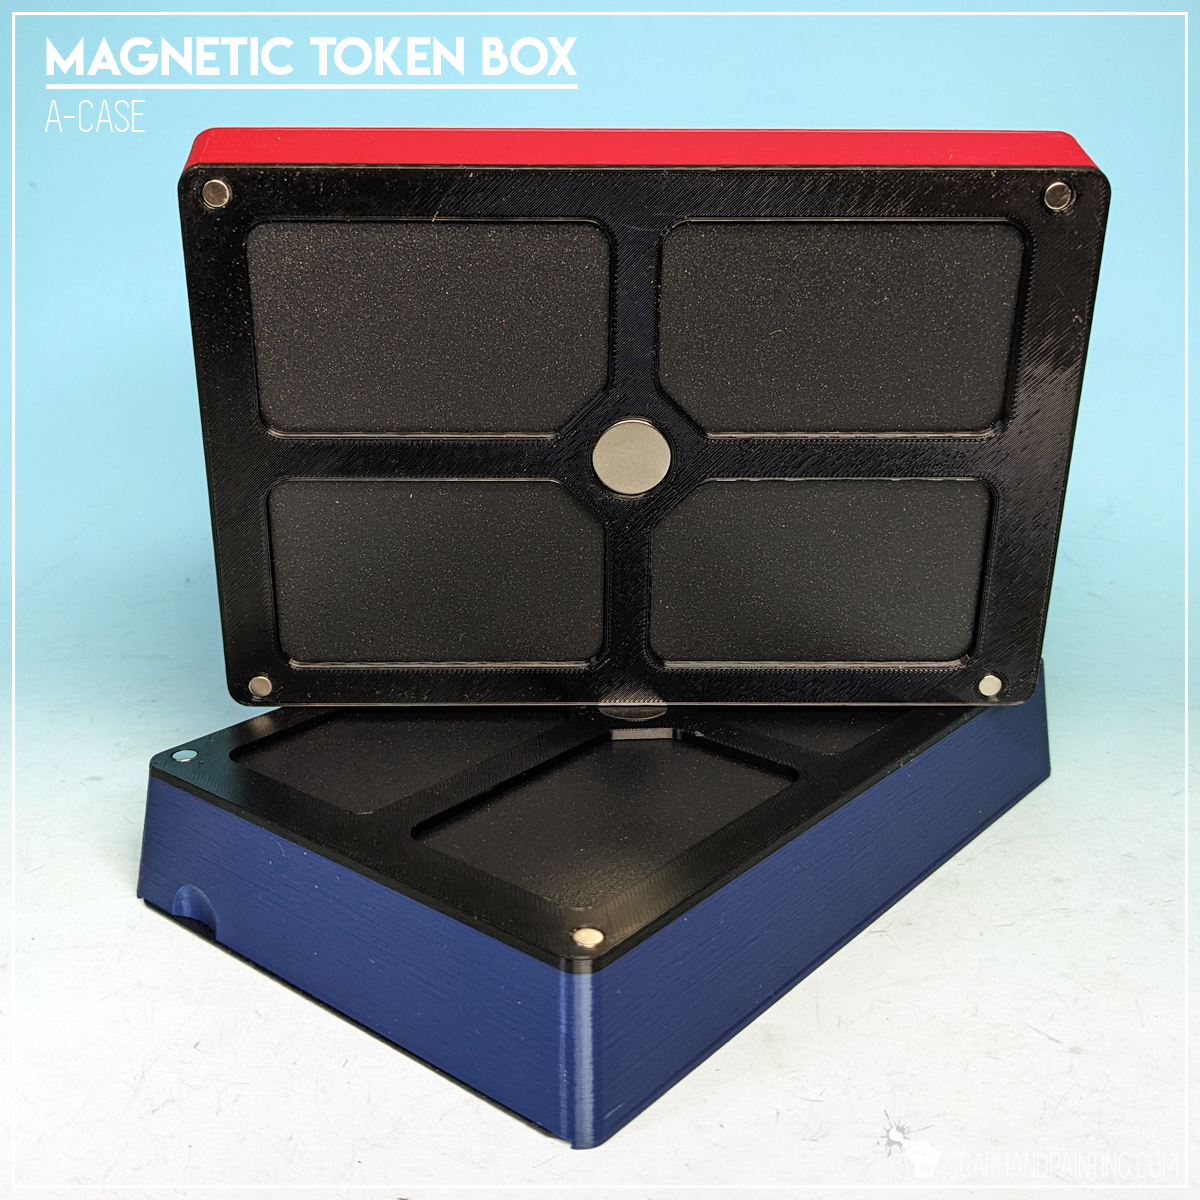
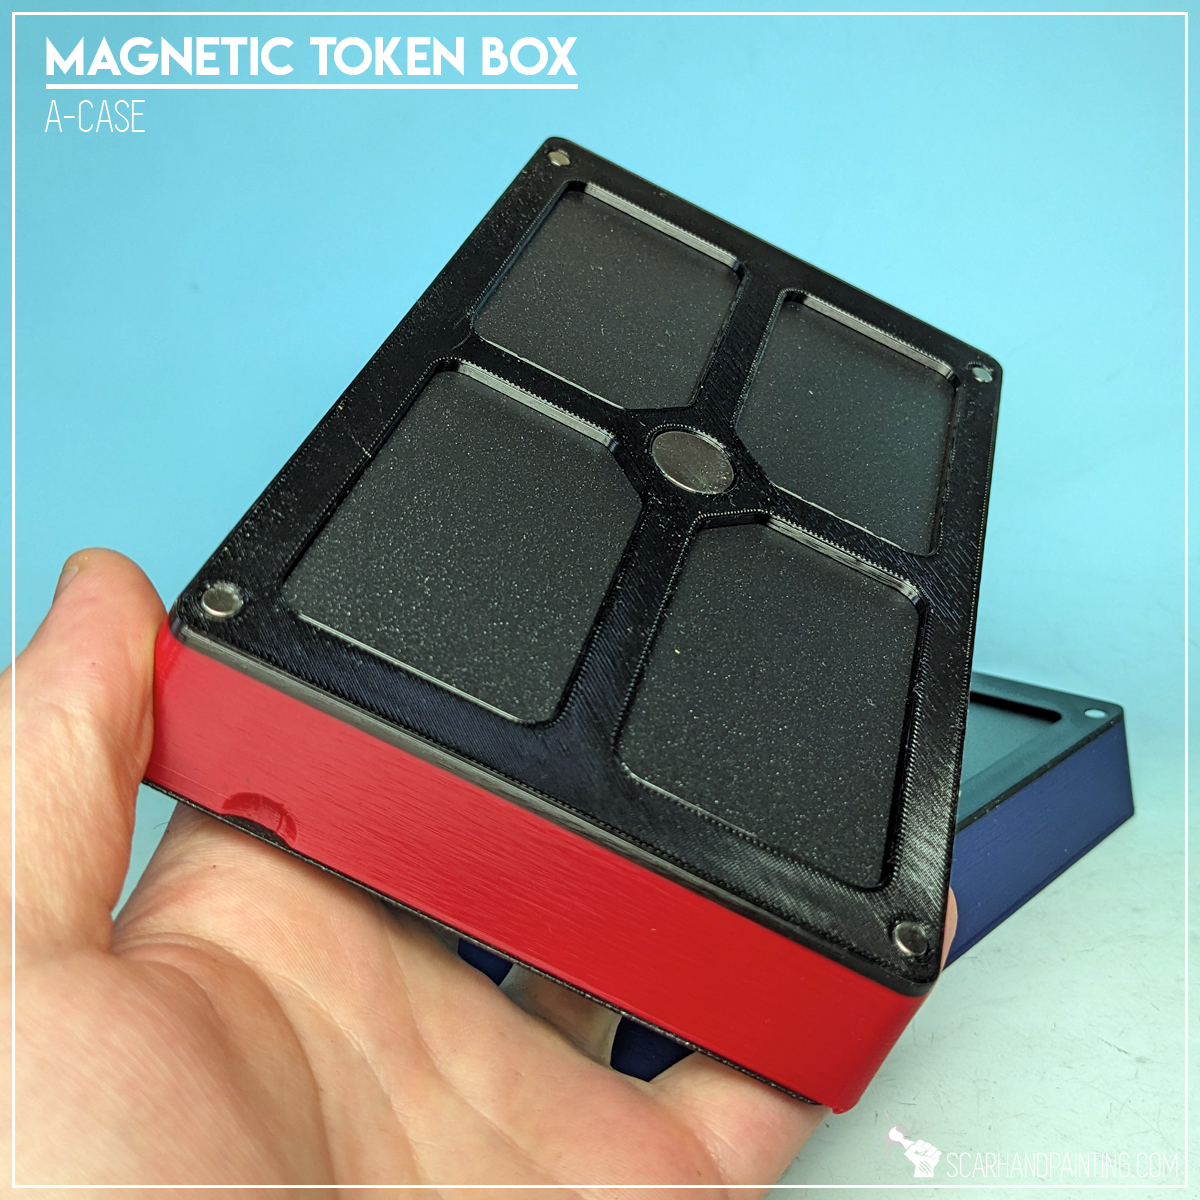
Magnetic Token Box is more than just your typical dice/token holder. It has a wide range of features. The most interesting of, are compatible with the magnetic theme of the A-Case products.

Although I have purchased both boxes used in this review fairly recently, I have been using the beta version of the Magnetic Token Box since last year. I have provided feedback, then watched as the design evolved through multiple iterations, new features being added, size adjusted. I can only say that the actual product got optimized to a point where I consider it perfect for wargaming related needs. The quality is great and the long list of features and possible uses is just mind blowing. It is also pretty well priced for what it offers. Magnetic Token Box is LEGO level of brilliant. I wholeheartedly invite you to try the product out.


I hope you find this review interesting. Be sure to let me know your thoughts in the comments below, or at Facebook or Instagram. I would also appreciate it if you considered sharing this content with your friends, who might find it useful. Finally if you are looking for a professional miniatures painting service, be sure to contact me with this contact form. I always reply within 24 hours, after which please check out your spam folder.
Ahoy Sailors! As you know I am most and foremost a passionate hobbyist. That being said I am also a pirate, a scoundrel and a fanatical enthusiast of Mantic Games Kings of War: Armada – a naval strategy game set in a rich world of Pannithor, pitting multiple wonderfully crafted and strongly themed factions against one another. Today I’m here to share some of my maritime experience.
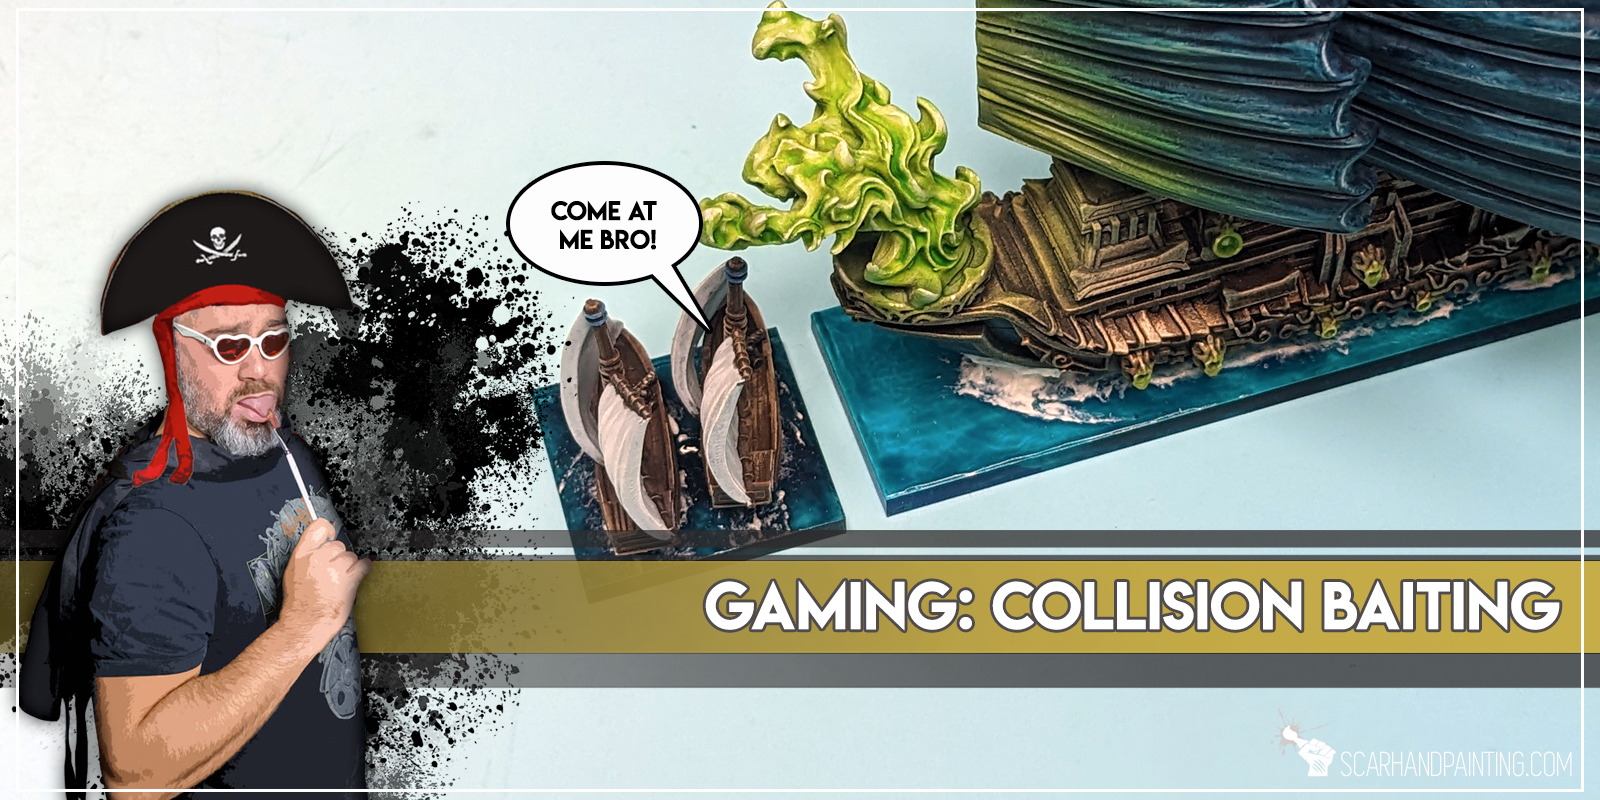
Brutal naval warfare of Armada is pure chaos. Ships colliding with one another is a common sight on the gaming board. Even though the rules forbid colliding on purpose* there are ways to exploit collisions for an advantage. This strategy is known as Collision Baiting and I will show you how to execute it, as well as what is and is not permitted by the rules.
*Unless special rules allow it like RAM (x) etc.
Avoid Collisions While Moving, Rulebook p.16
“If it is not the last Move Step in a ship’s activation, ensure its forward movement in the next Move Step will not result in a potential collision (with terrain or another ship). If this would result in a potential collision, alter the ship’s turn to avoid this as much as legally permitted.
Sometimes however, due to forward momentum, lack of turn angle, poor planning or just bad luck, collisions will be unavoidable (see page 20).“
Collisions Rulebook, p.20
“Players must avoid deliberately ramming or colliding with other ships and terrain, unless a rule says otherwise. Orcs for example, delight in the carnage caused by ramming their ships into the enemy!
However, on occasion, a newly Activated ship may have no option but to collide (perhaps due to poor planning!).
Only consider the bases of the ships (or terrain features) involved when checking for collisions.
If faced with more than one accidental collision target, the player using the Activating ship can choose which one to hit.”

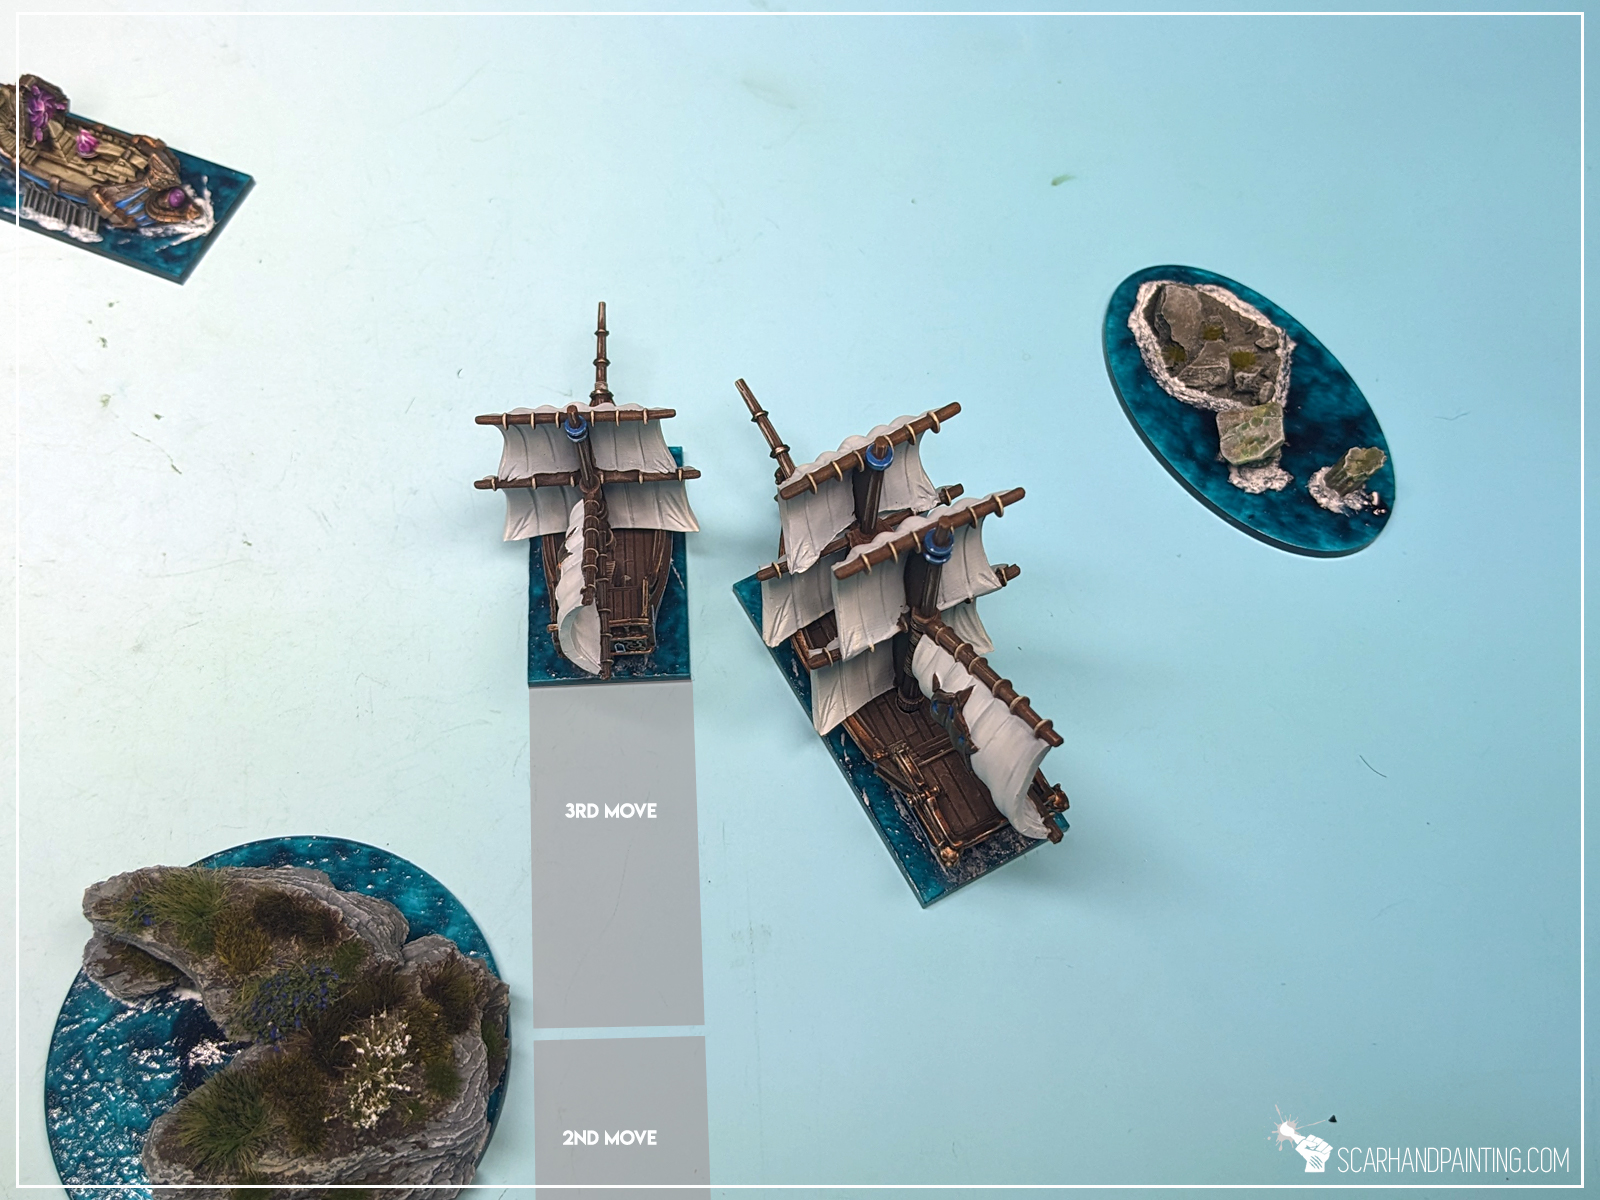
Rules out of the way: During ship’s activation and when moving a ship, a player is not allowed to set a collision course for the NEXT MOVE STEP on purpose, unless there is no other choice or the ship has a special rule that would otherwise allow it. This does not affect the last Move step.
Some basic examples below.

The Gur Panther, moving at Battle Speed, just moved it’s first Move step. With a 30* turn the Gur Panther is capable, and so it must set a course to avoid a collision before it’s second Move.
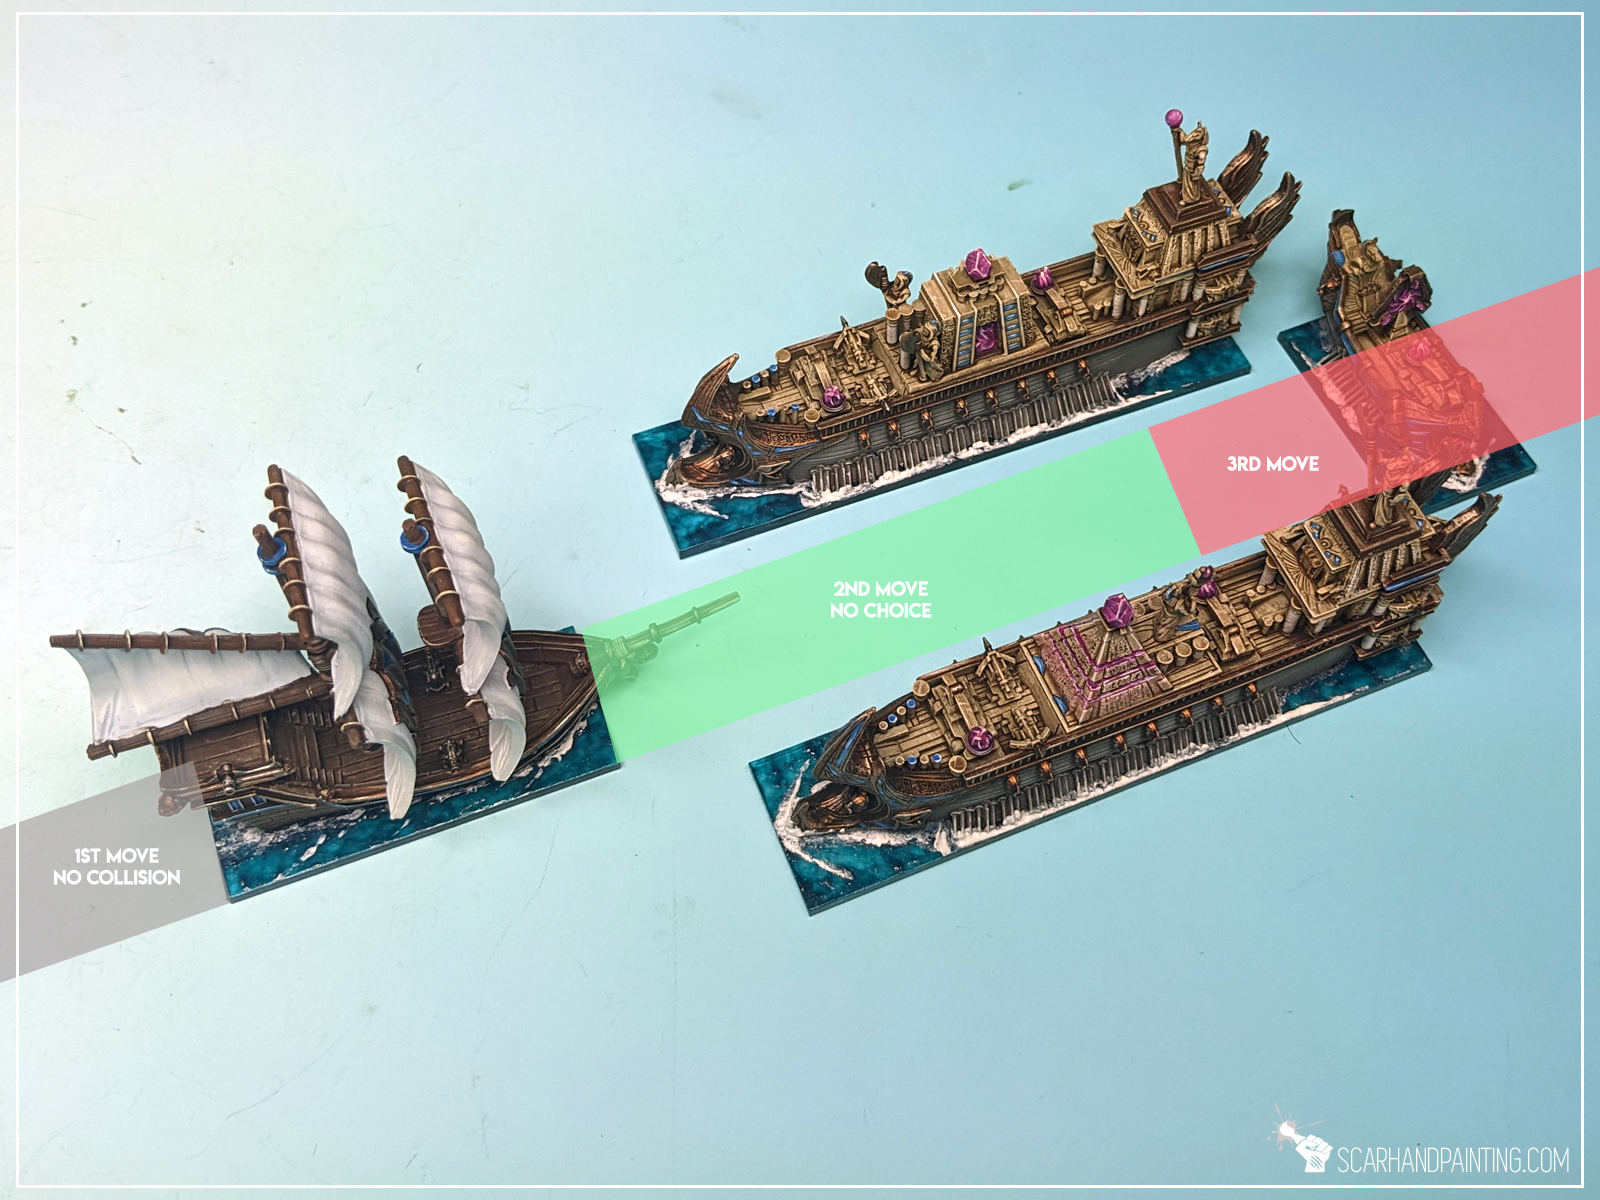
The Gur Panther moving at Full Speed, that had just made it’s first Move. There is no immediate collision threat for the next Move, thus the Gur Panther does not have to turn and is allowed to maintain it’s course. It is legal to stay on course, even though, due to lack of other options, the ship will be forced to collide during third Move step.
After second Move the Gur Panther find’s itself in a position where it cannot avoid a collision. It is forced to stay on course and suffer the consequences.

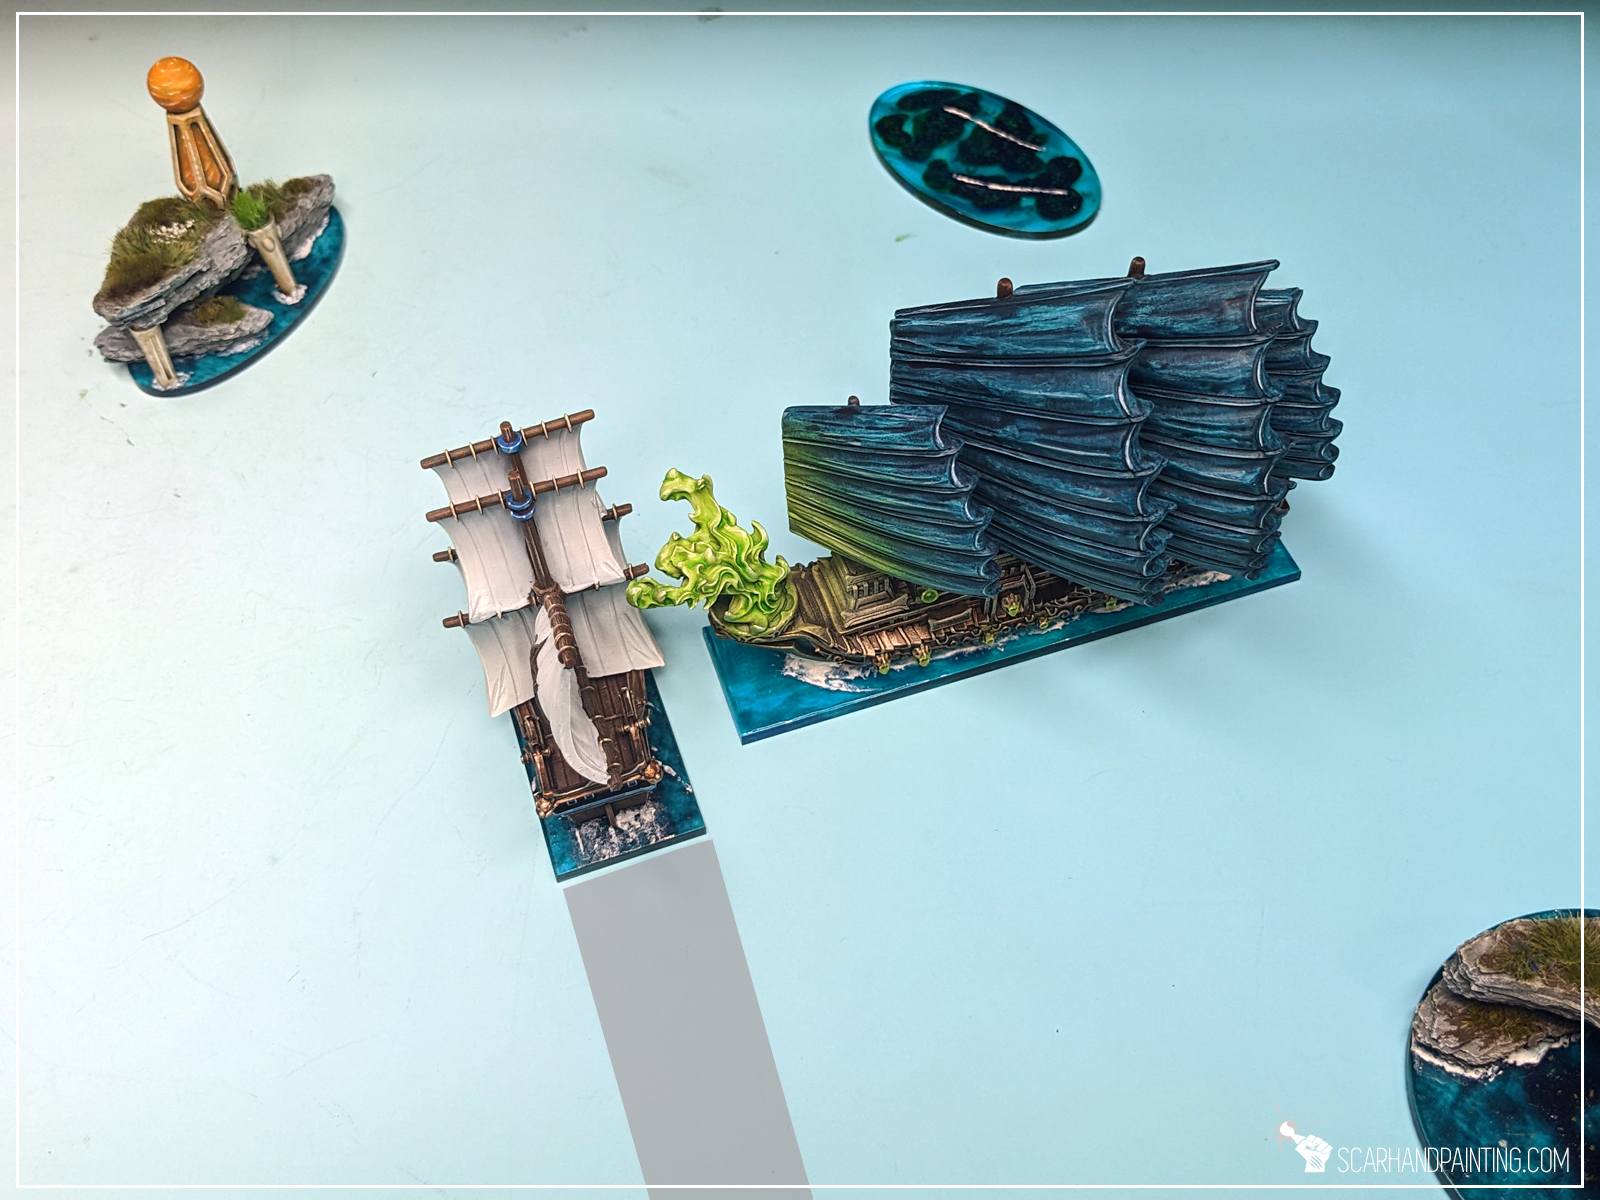
The Monolith made a final Move of it’s activation. During final Move the ship is not forced to avoid potential collisions and can instead ‘prime itself’ for one. With favorable winds and failed Evasion tests the Monolith will crash into the Gur Panther on it’s next activation.
This example shows an “honest mistake” referred to by the rules. Let’s say the wind blew from the North. Gunbrig moved Full Speed to set itself between the Soulhunter and the Gur Panther. Being a small (priority) target makes it more difficult to hit by the Soul Hunter and with wind blowing from the North the plan is to activate right after and move out of the Gur Panther’s way. But oh no! The wind changes direction to North/East. This means the Gur Panther is to activate first and the Gunbrig is in it’s way. A potential collision is imminent.
We now know that under normal circumstances a ship is not allowed to deliberately move to collide during it’s activation. Still this leaves the doors open for a little exploitation. Players are allowed to set up their ships in the way of incoming enemy. This strategy is called Collision Baiting and apart from potential damage and negative mods dealt to enemy ship, it can also prematurely end it’s activation!
The basics is simple: End your ship’s Move upfront and close to enemy ship in a way that will force an Evasion test. If both ships fail their tests – CRASH!
This can be used to deal damage to enemy ships, but also disrupt (end) their next activation. More so, even a passed skill test to Evade will stack a negative -1 To-Hit mod on the enemy ship and can result in course alteration, forcing it to head out for another potential collision! Furthermore a ship cannot shoot throughout the Move step when it Evades.
Few examples below.
The Gur Panther finished it’s Move in front of Drake. Drake activates next and is forced to Evade and risk a collision. The Drake will suffer a -1 To-Hit for all it’s shooting and potentially suffer damage wasting it’s entire activation.
A Sloop Squadron finished it’s Move in front of Drake. Drake activates next and because Sloop Squadron is a Squadron, the Drake can elect to auto fail it’s Evasion test. If the Sloop Squadron fails as well, the resulting collision will not end Drake’s activation, but will still deal some damage and a -1 To-Hit mod.
Collisions with Squadrons do not force enemy ships to alter course, deal only half the damage and do not end ship’s activation. Still the -1 To-Hit mod can make a difference and the enemy ship will not be able to shoot during this Move step.
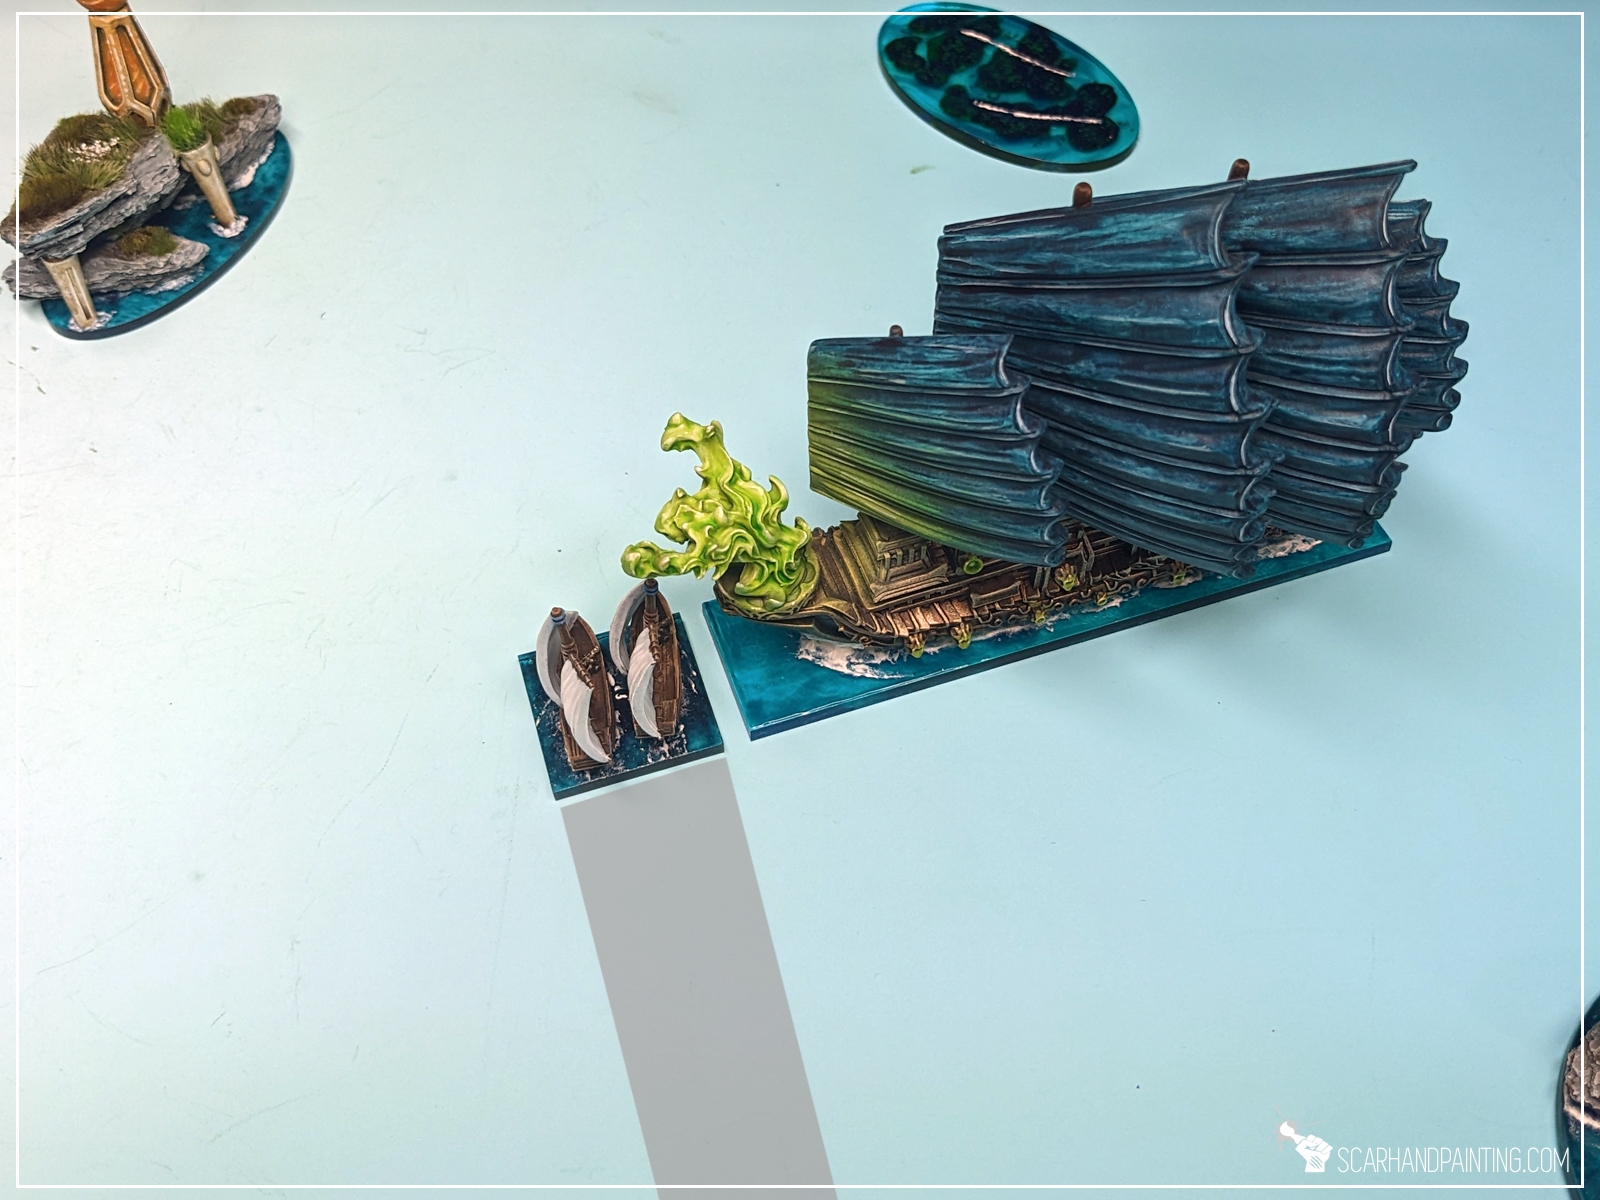
The Gur Panther decides to implement some nasty tactics. It ends it’s final Move step in front of Drake and in a way that will force the Extra Large ship to Evade. If any of the two succeeds Evasion Skill Test, the Drake will turn the minimum distance to clear the Panther – and as a result head straight for the Rocks. Rocks cannot be Evaded and apart from dealing damage and ending Drakes Activation, they will also ground the ship for good. Just brutal!
Now you know the variety of Collision Baiting tricks. Set sail and make enemy ships suffer. Just make sure not to set up in front of enemy ships with RAM (x), as the result might surprise you… in a bad way.

I hope you find this article interesting. Be sure to let me know your thoughts in the comments below or via Facebook or Instagram. I would also appreciate if you considered sharing this content with your friends, who might find it useful. Finally if you are looking for a professional Warhammer miniatures painting service, be sure to contact me with this contact form. I always reply within 24 hours, after which please check out your spam folder.