- contact@scarhandpainting.com


Here are some Colour Recipes for Necromunda scenery pieces from GALLERY: NECROMUNDA UNDERHIVE. Please take note that this is a simple colour scheme, not covering multiple overlapping layers and blends inbetween, that lead to the final product. It is supposed to be used as guidline not a step-by-step.

METAL:
Black Undercoat,
Warplock Bronze (GW), *
Gun Metal (AP),
Shining Silver (AP),
Strong Tone Ink (AP),
Shining Silver (AP), l&p
Streaking Grime (AK),
ORANGE’ish elements:
Black Undercoat,
Cavalry Brown (Val), *
Orange Brown (Val), *
Strong Tone Ink (AP),
Orange Brown (Val), stpl
Lugganath Orange (GW), l&p
Streaking Grime (AK), 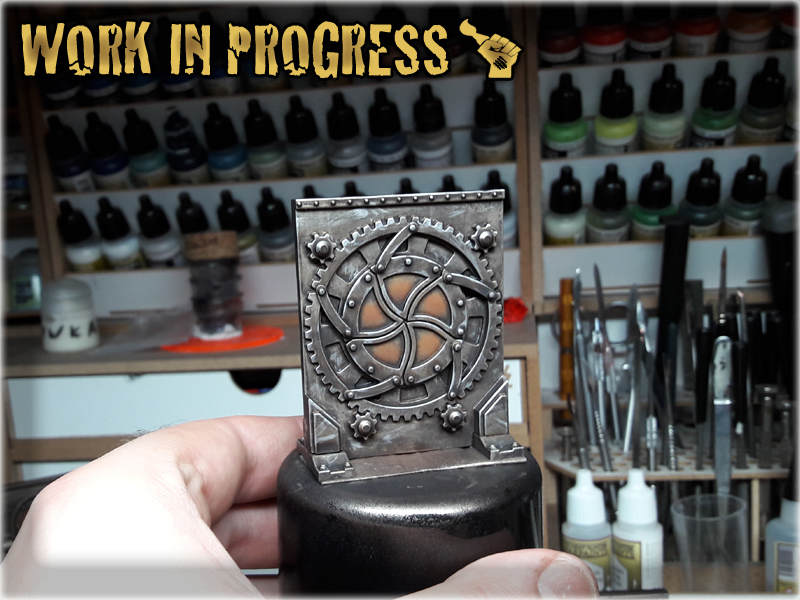 GREEN lights:
Duck Egg Green (Val), *
Light Livery Green (Val), *
Waywatcher Green (GW),
Off White (Val), l&p

l&p – lines and points,
p – points,
b – blend,
drbr – drybrush,
flbr – flatbrush,
stpl – stippling,
*Airbrushed (with multiple layers and mixes)

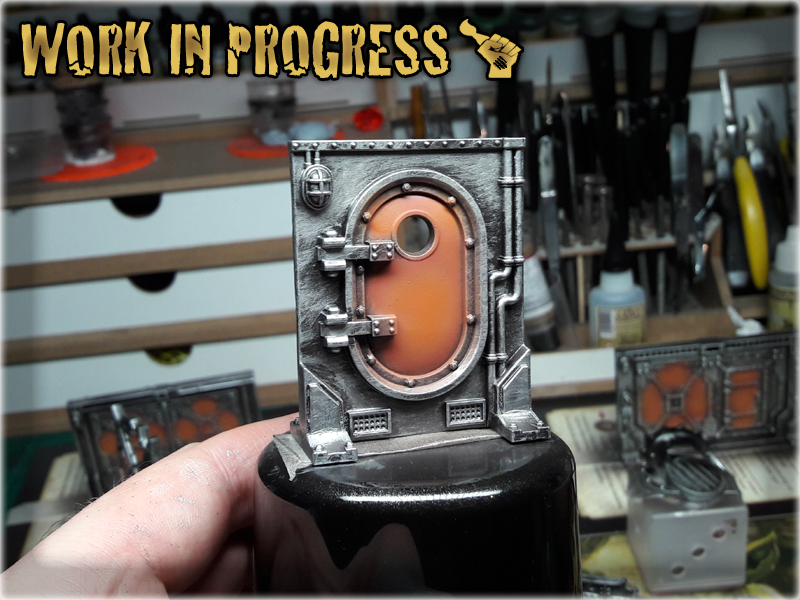
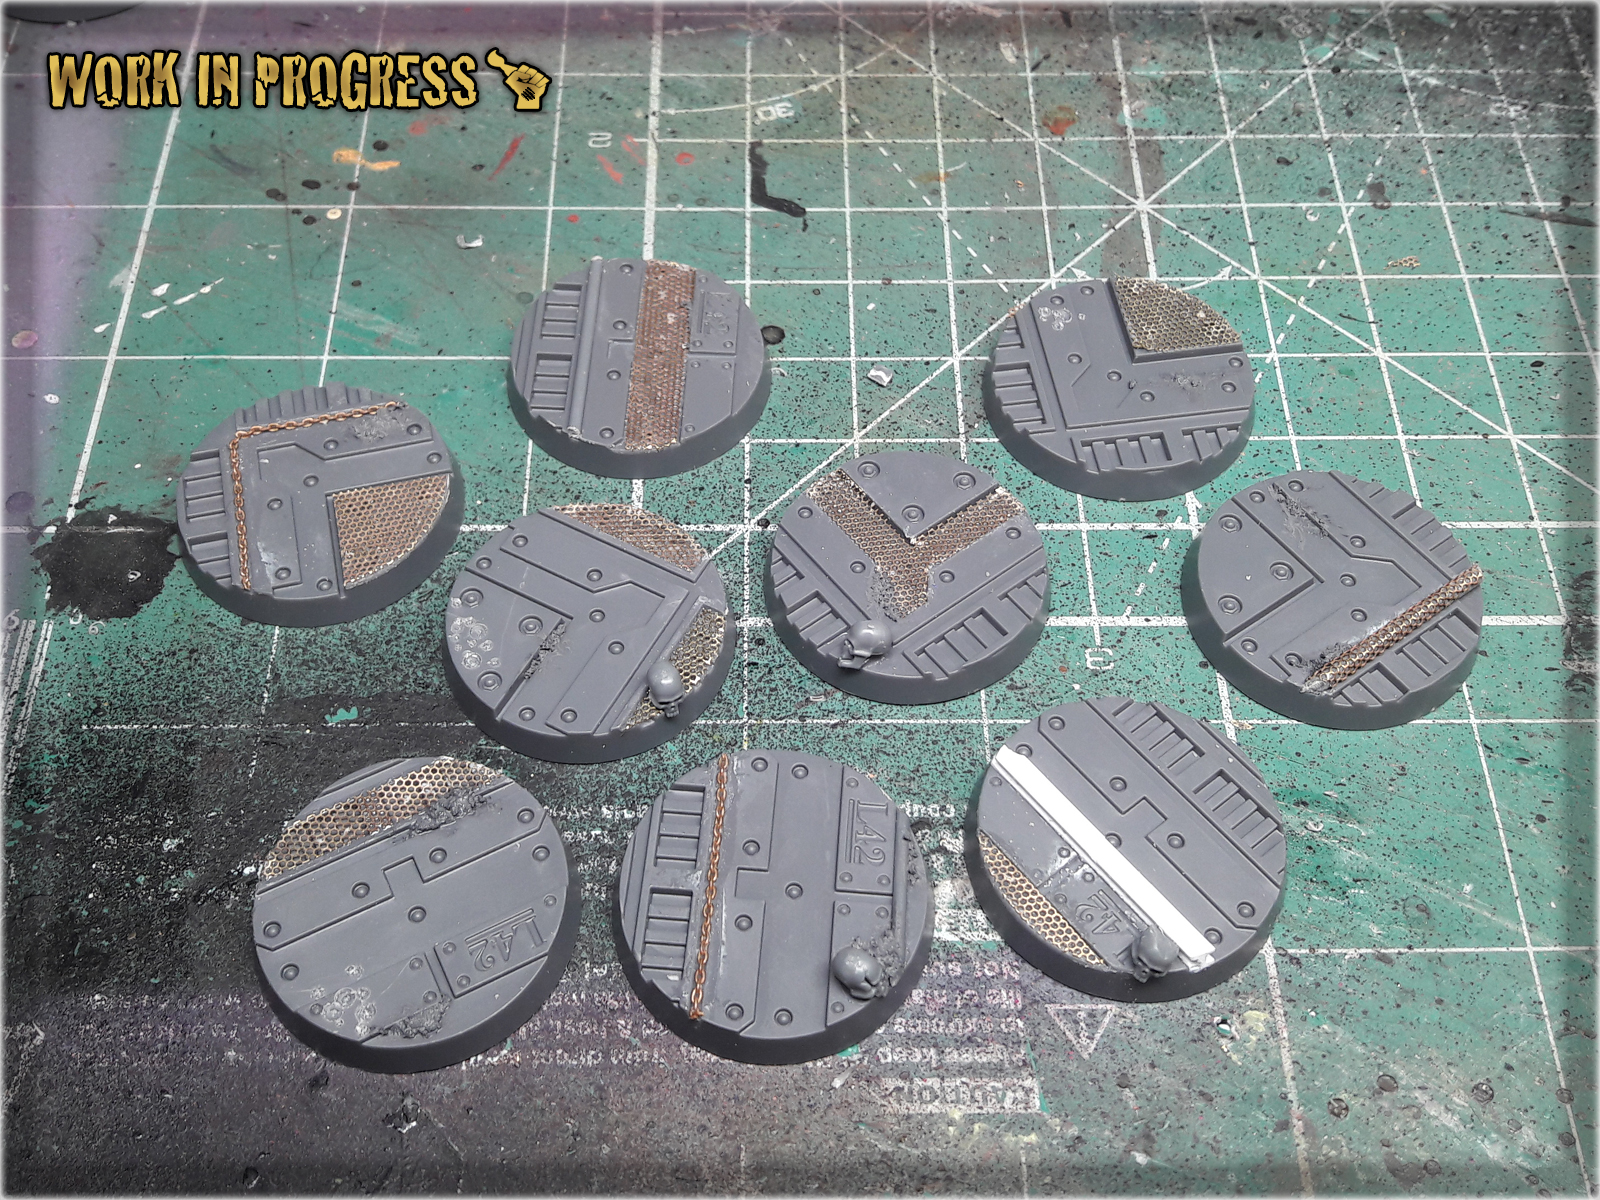
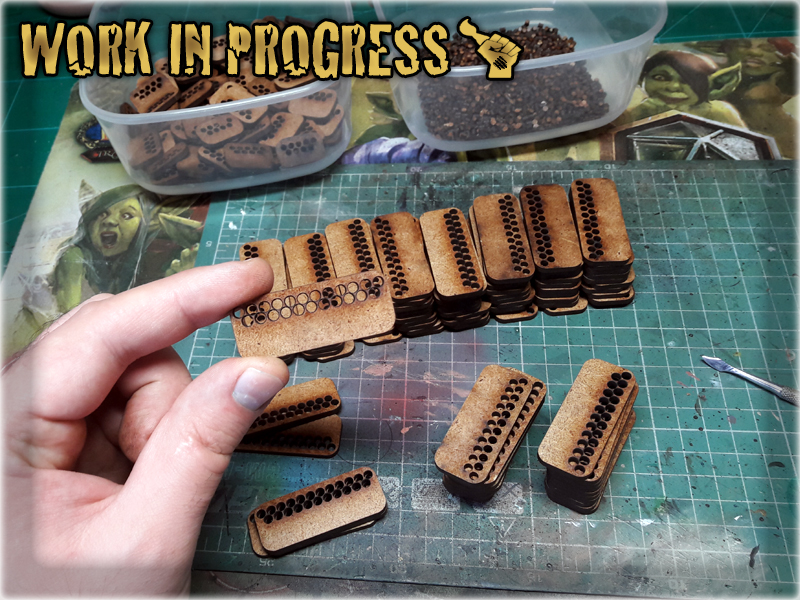
Necromunda: Underhive is a game full of nicely detailed plastic miniatures. As much as I hate endorsing Games Workshop – It should be mentioned that in terms of miniatures – they did a really nice job, extending the set so that it includes 25 industrial themed plastic bases. I appreciate this move from GW, even tho the variety of Necromunda bases designs is scarce. For example my own set came with just two versions among a total of ten bases. This is where I come in with a Tutorial on how to Enchance Necromunda bases in a fast, simple way. Below you will find few ideas on how to do it – but let me say this in advance: keep an open mind cause there’s plenty of awesome stuff that can be used to differentiate your Necromunda bases set (and actually any Industrial bases).
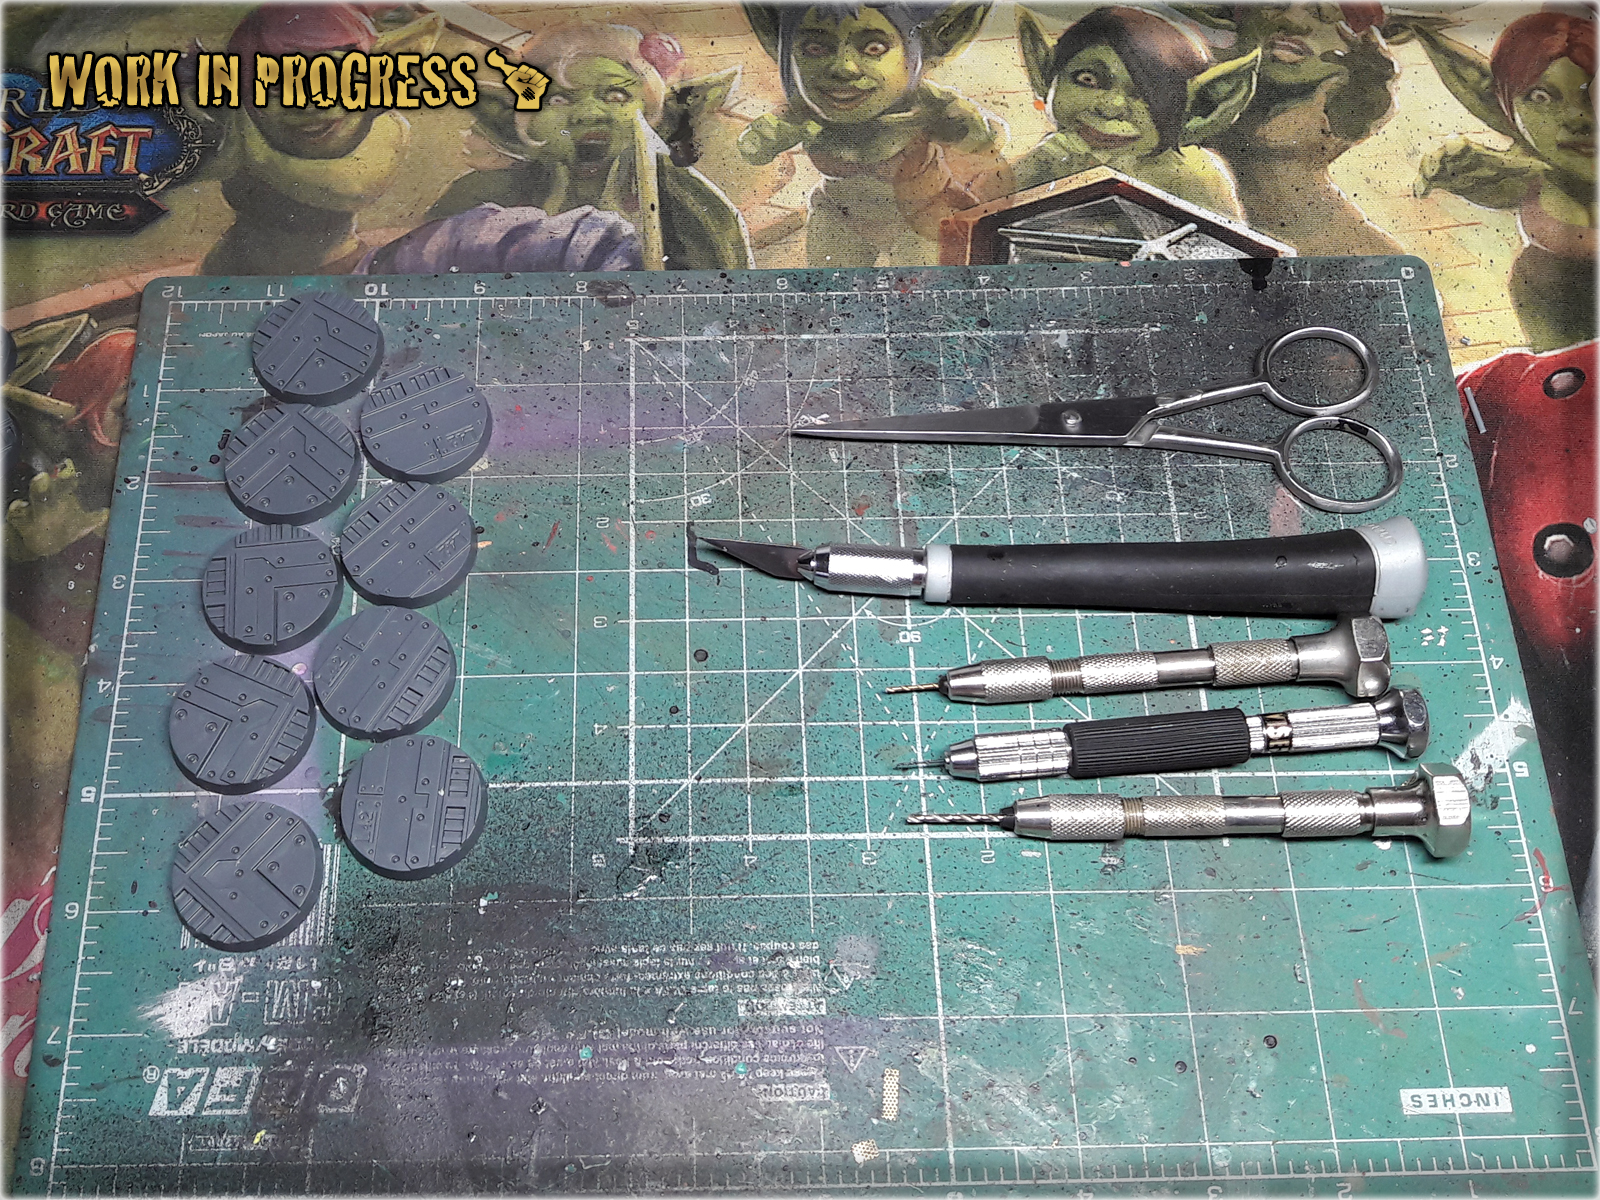
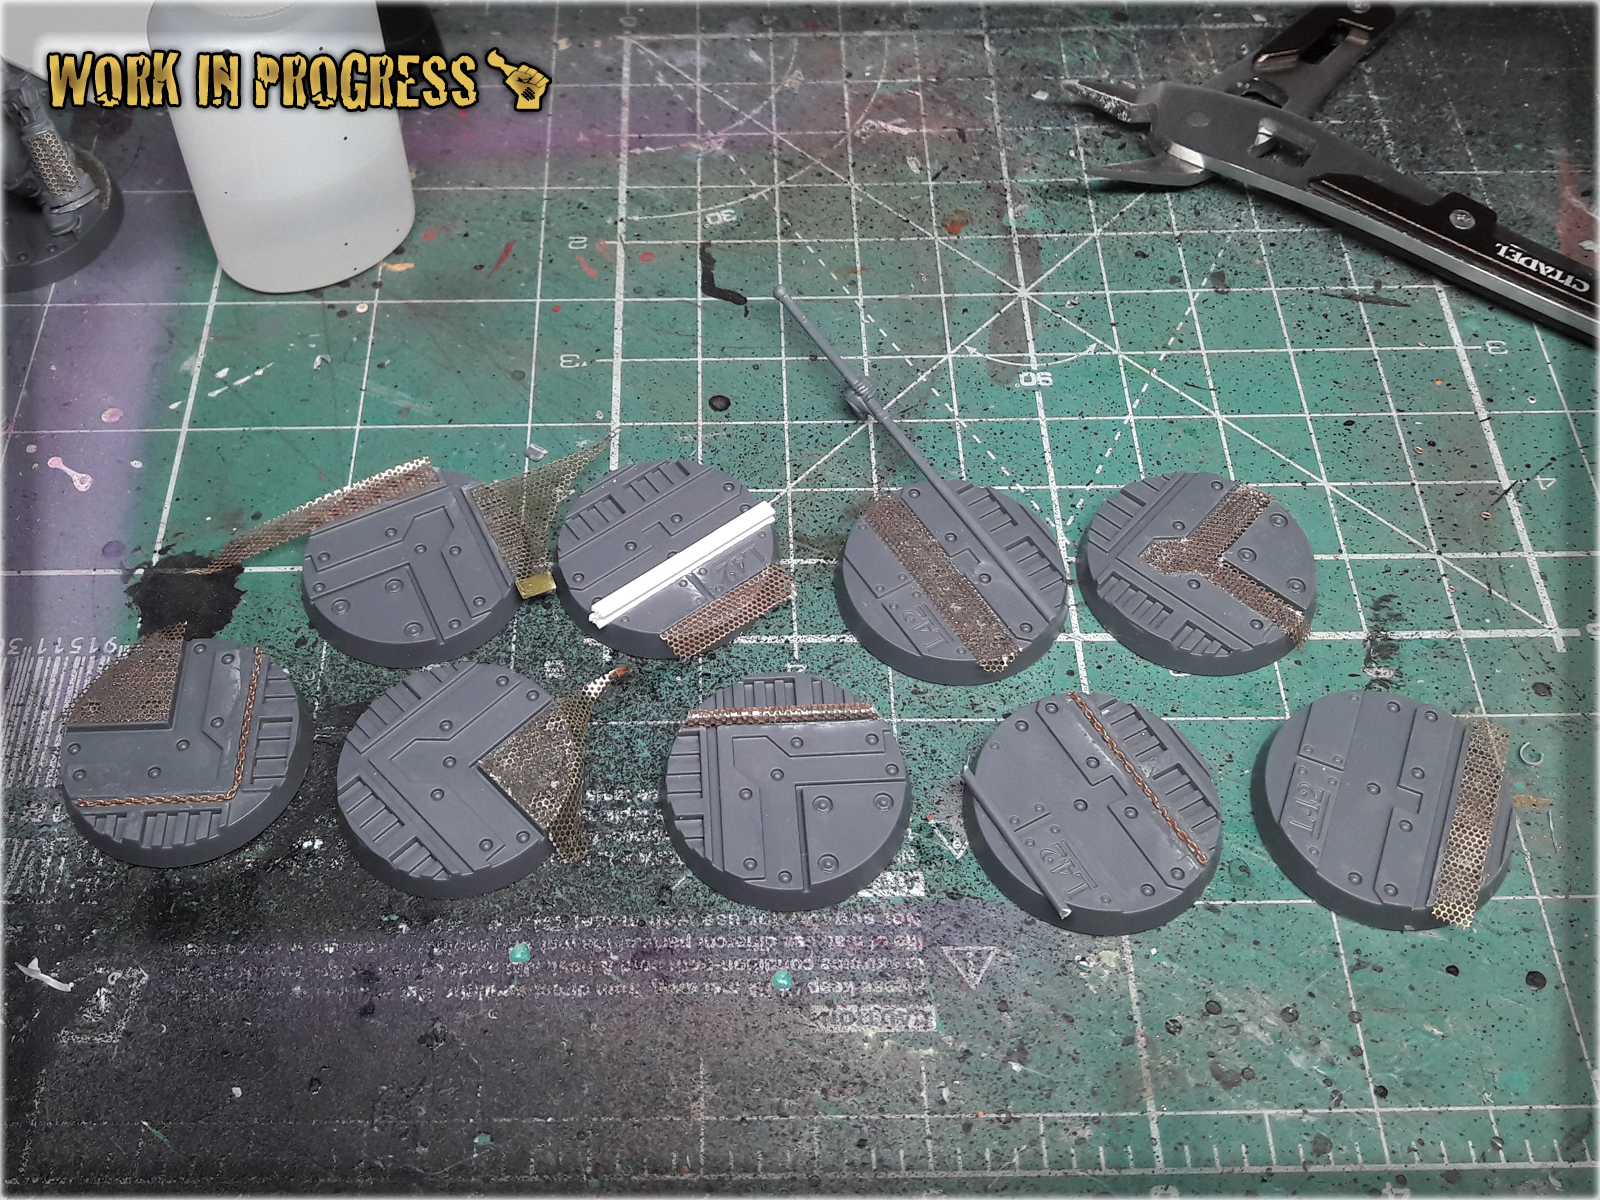
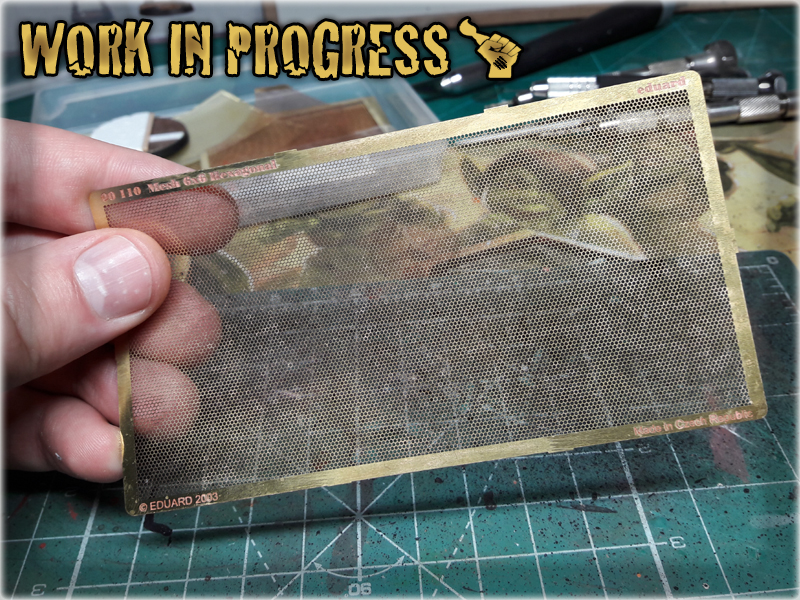
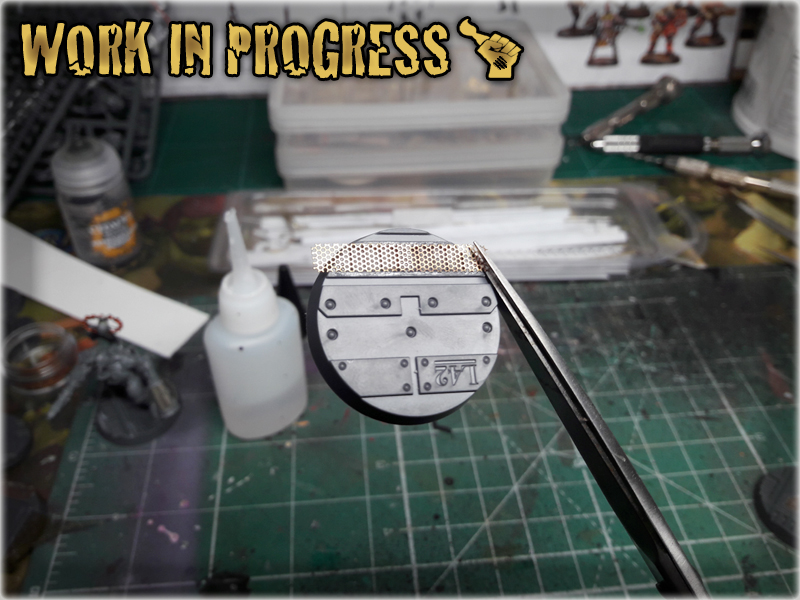
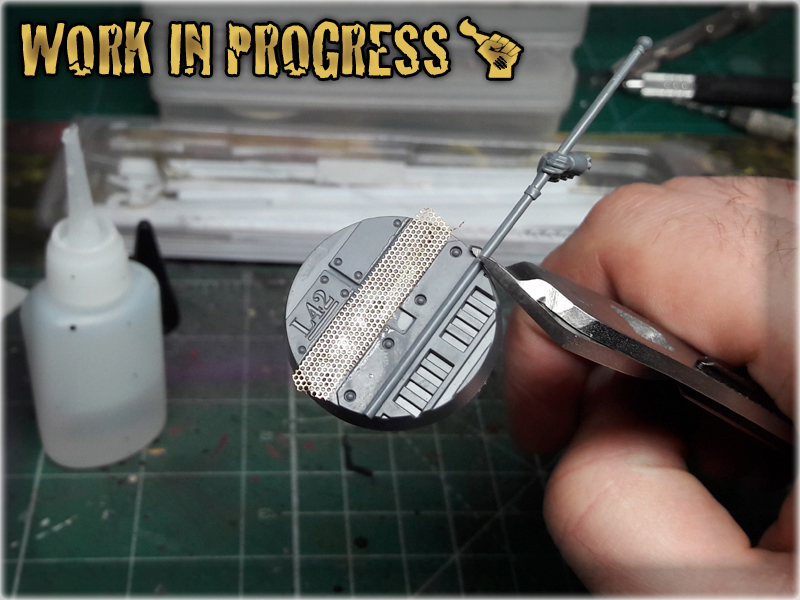
This stuff can be found in most modellers hobby stores. Personally I love it, cause it let’s me add awesome texture to the bases. It is very easy to use. I tend to cut a piece of mesh with scissors and glue it onto a designated surface, leaving an excess to hang outside the base. Once Super Glue dries out I just cut the excess mesh with scissors and file it on the edge – driving a file from top to bottom of the bases edge. This keeps the mesh glued onto the base, but smoothers the edge nicely.
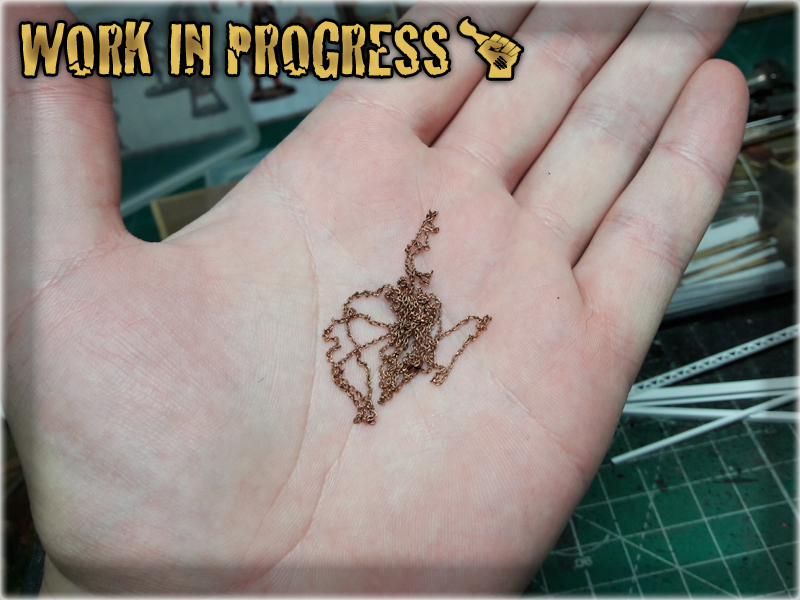
Another item from a hobby store. I just glue it onto the base and cut the excess with plastic cutters. Brass Chain is thin and rather frail so it does not damage the cutters.
Awesome, hobby friendly and easy to use material. It comes in either flat sheets of different thickness, or in prefabricated shapes. For bases I usually use flat sheets, gluing them onto the base, then cutting to fit the edge. In case of Necromunda bases – there’s plenty of industrial texture already, so I uused a prefabricated piece of PCV to add here and there. Same technique – glue onto the base, then cut to match the edge.
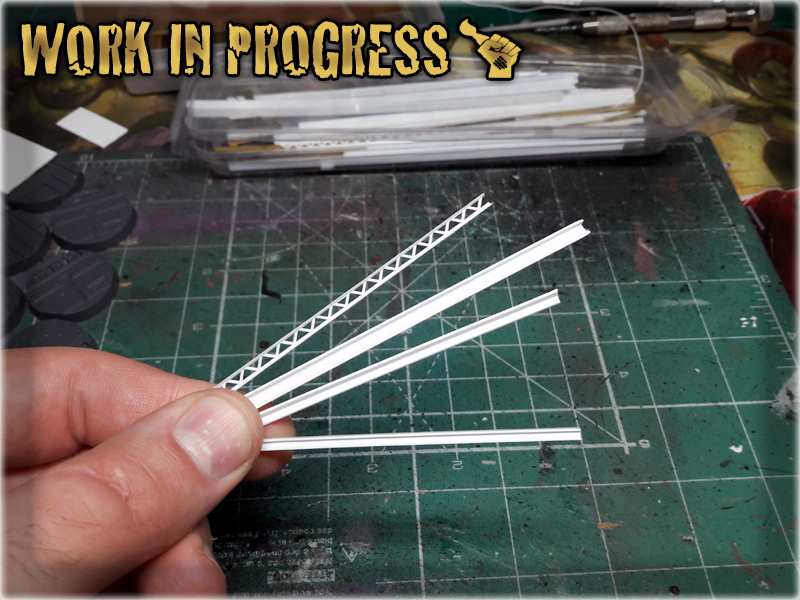
Everybody has some. For Necromunda bases I preffered thin, long spears and banner poles. I just glued them over certain areas and cut with a plastic cutters to match the edge of the base and add variety to the base’s surface.
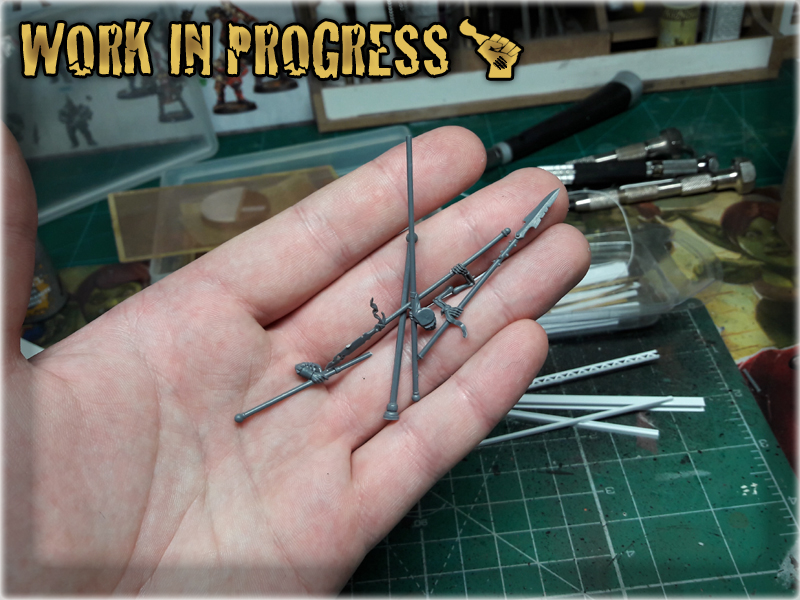
Games Workshop’s Skulls set is something that everyone should get. If you haven’t got yours – damn – just go and order one. For what you get the price is just insane. Either way – some Skulls on the base would certainly make it stand out.
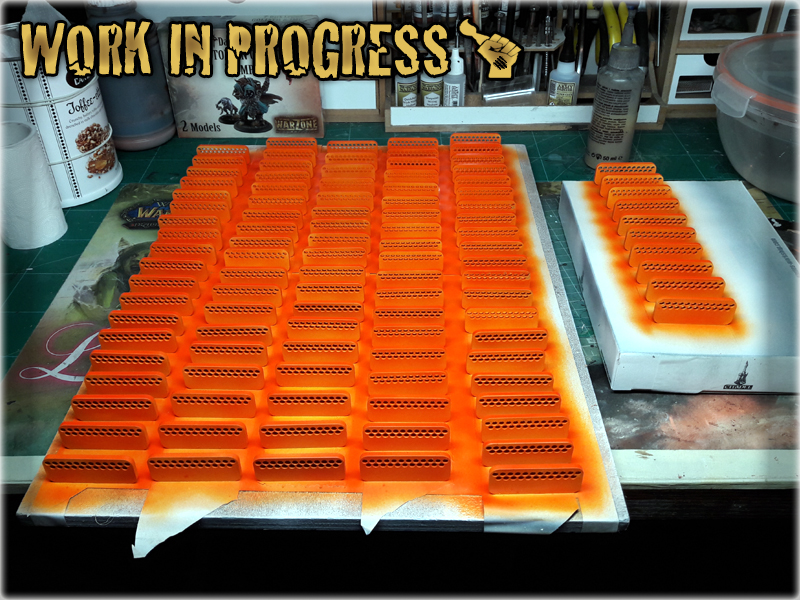
Actually any grain-texture paint would do just fine. I used Astrogranit Debris cause I don’t have many uses for this particular colour and here it is meant to go under a black undercoat anyway. I applied small amount to certain places, just to add texture.
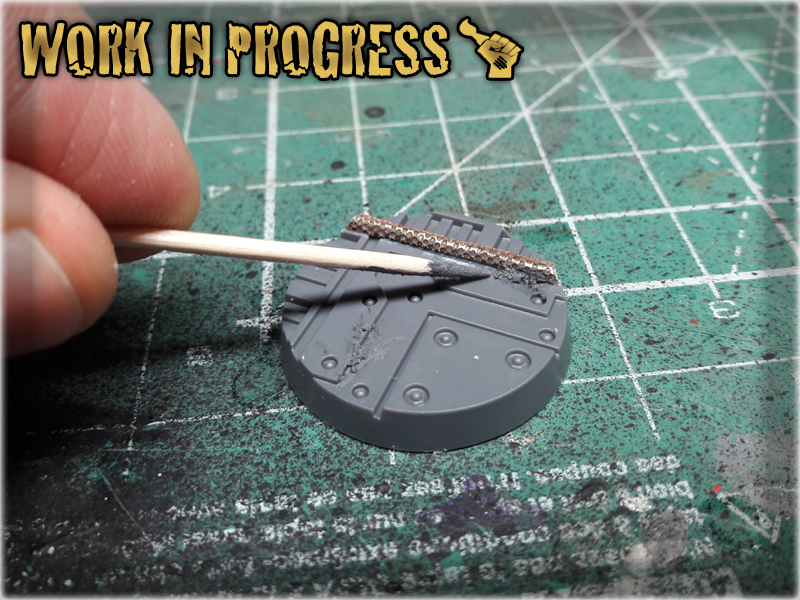
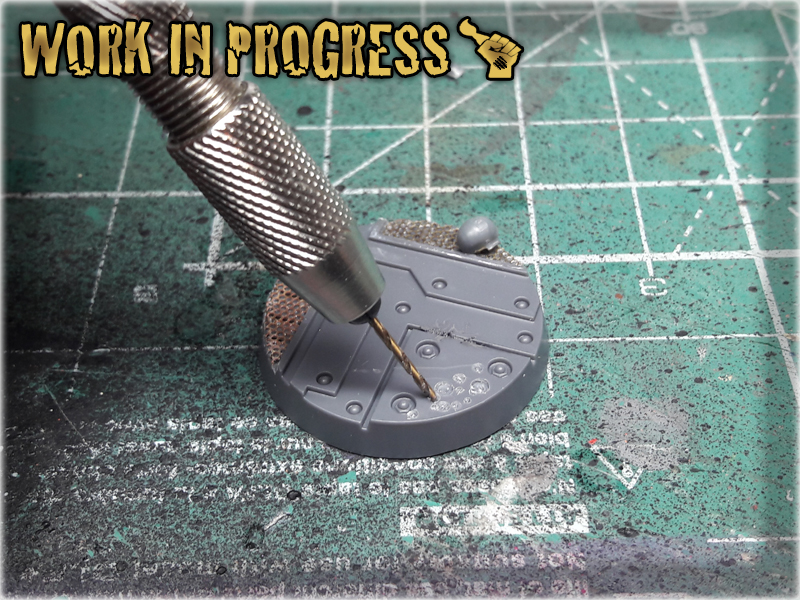
I drilled some holes in different sizes here and there to look like corrosion or some form of acid damage. Easy to do – looks cool once painted.
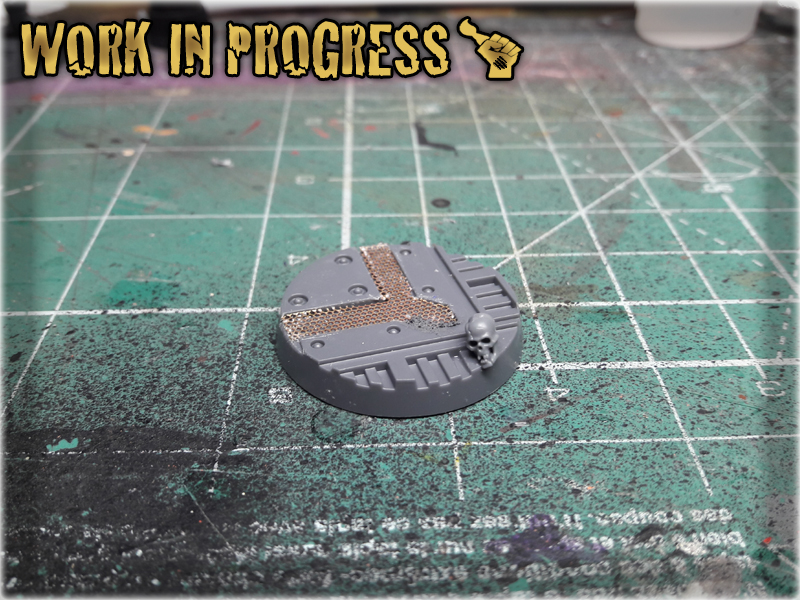
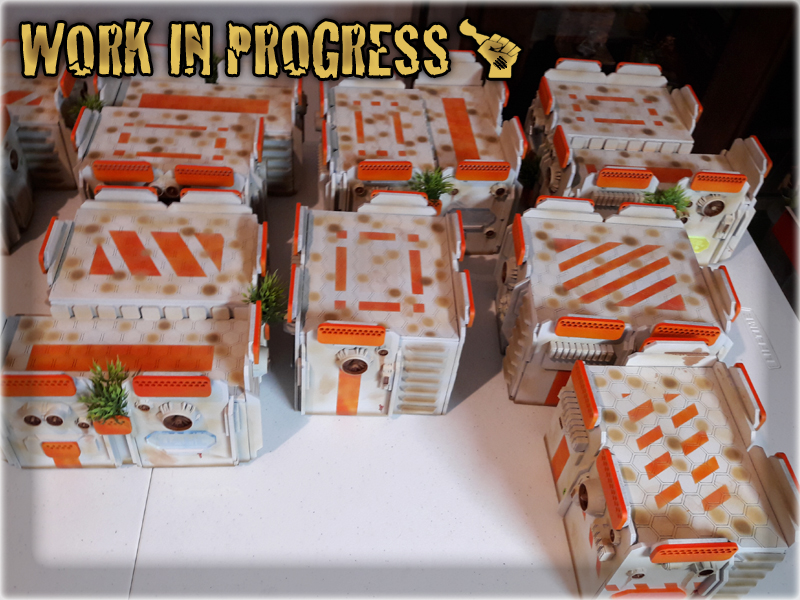
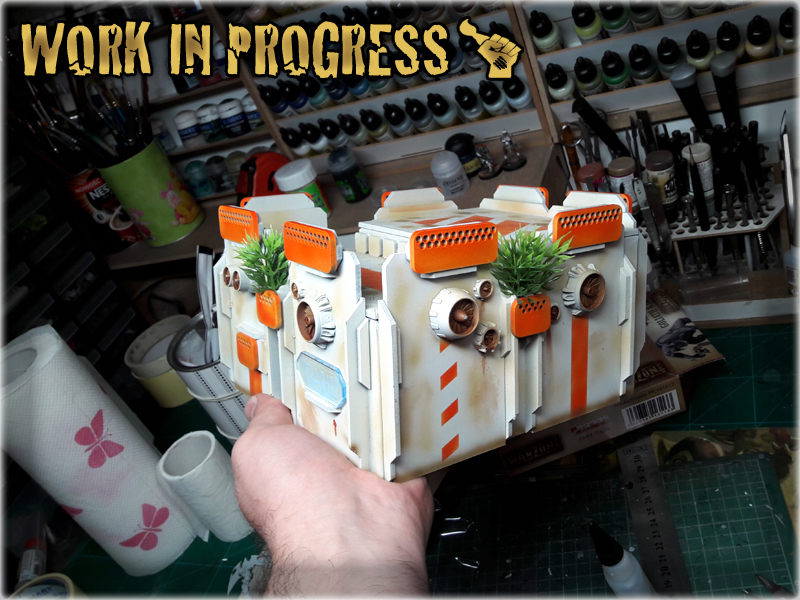
So, there’s that. These are just few ways to enchance Necromunda bases. I bet you can find a lot more ways to differentiate the set. Here’s how mine looks like after the above additions:

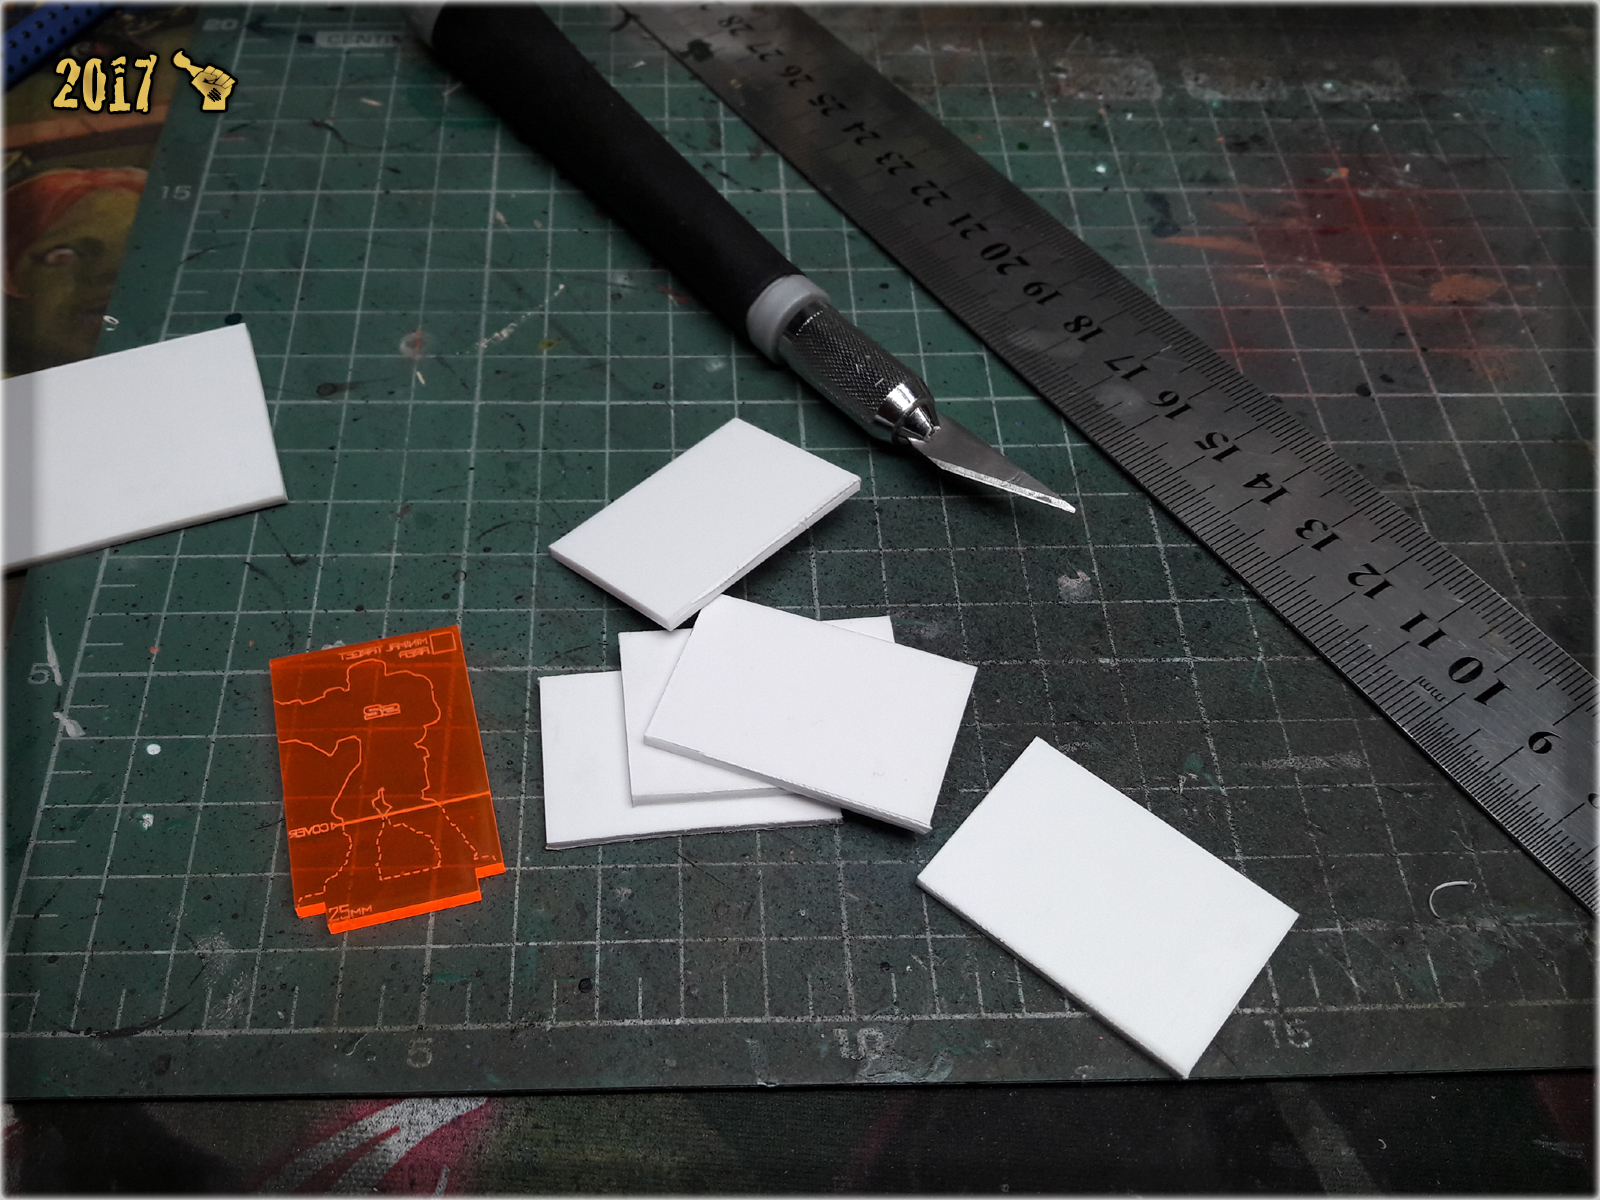
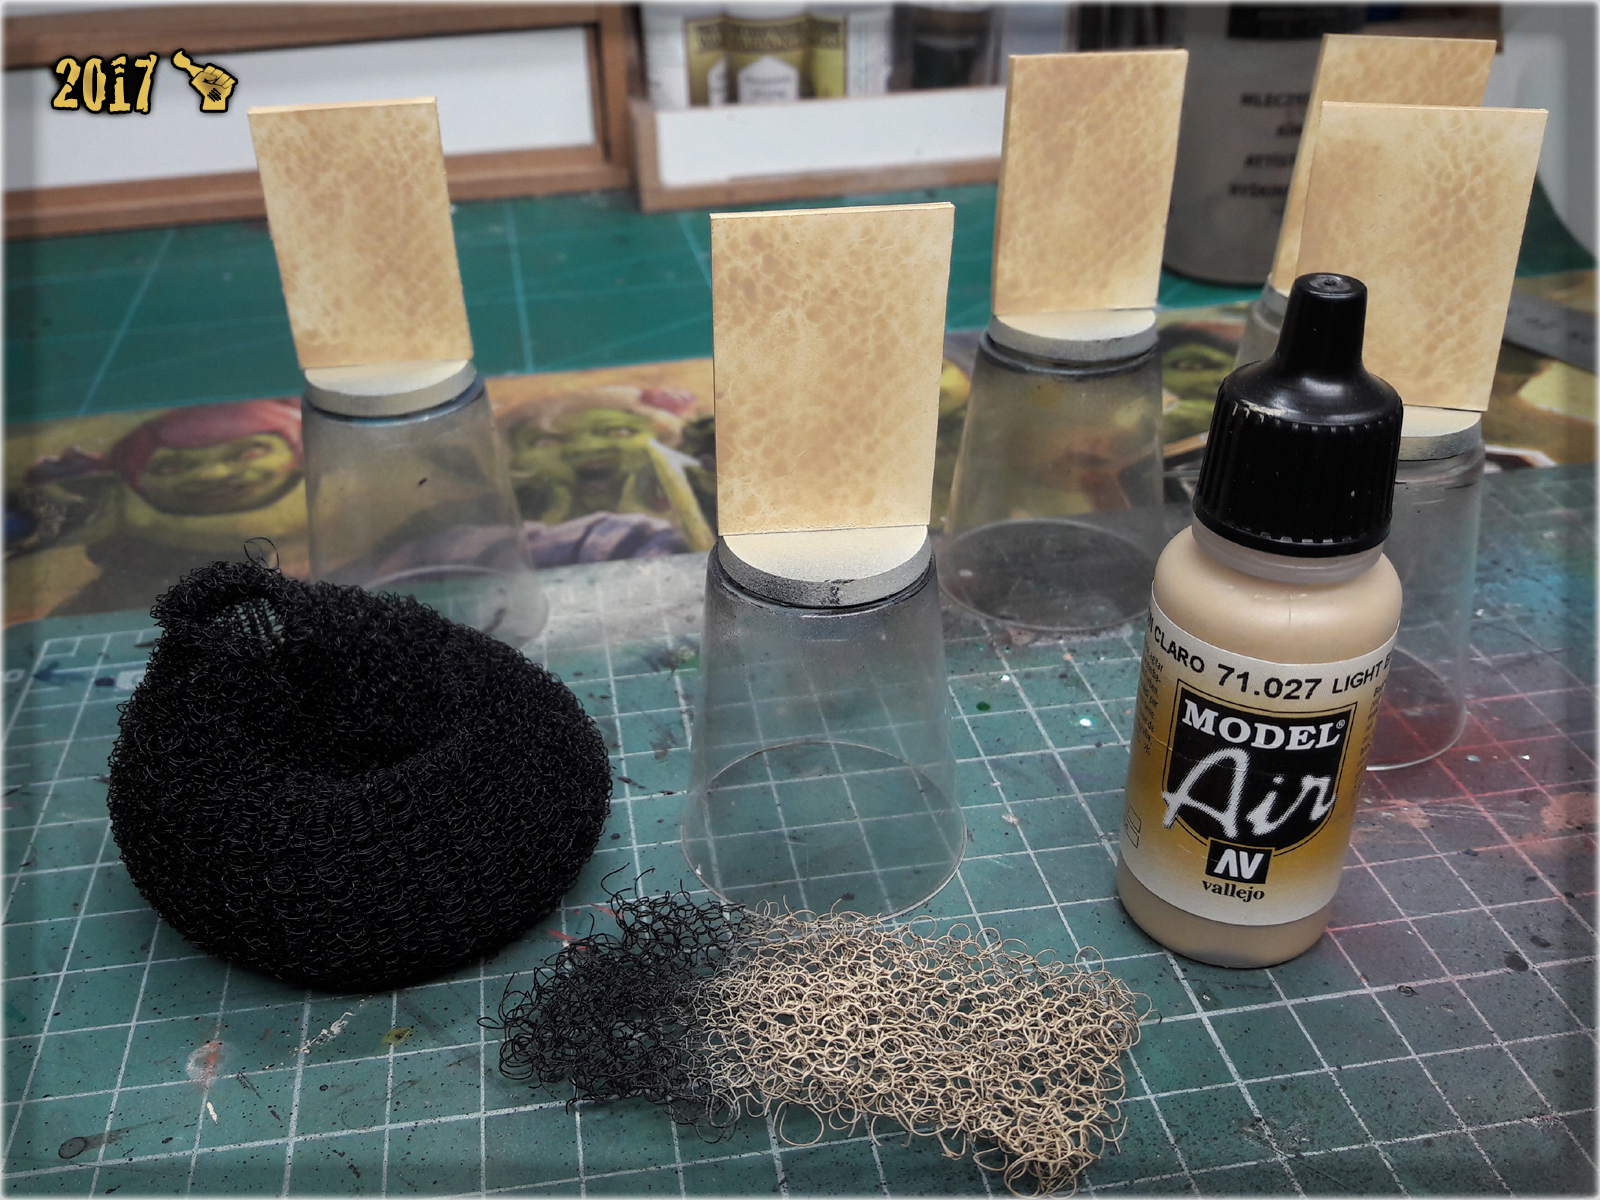
In this article I would like to present to you an easy way to prepare and then paint your own Camo Markers for Infinity the Game.
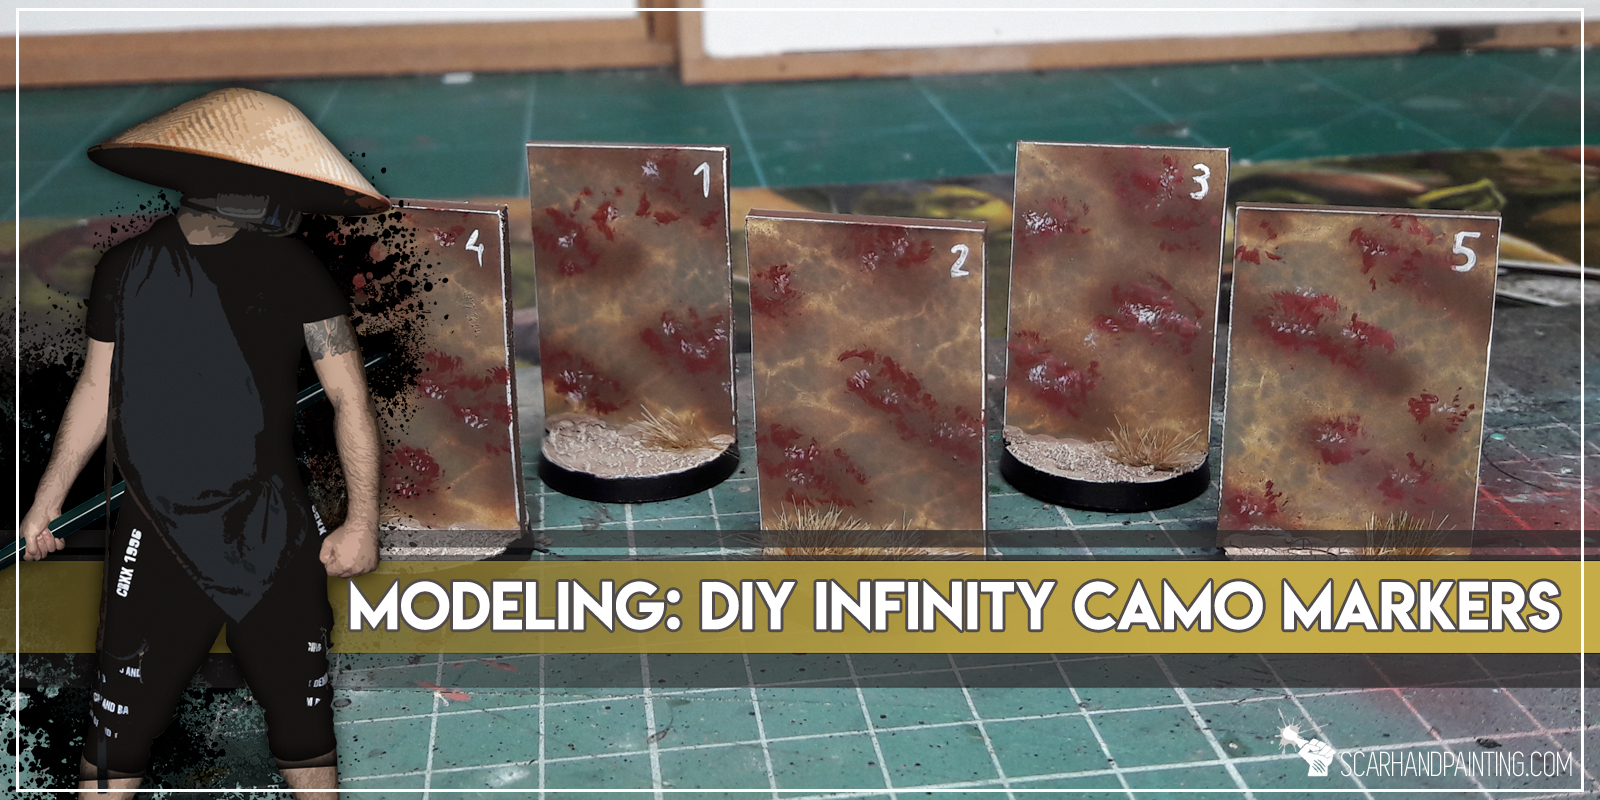
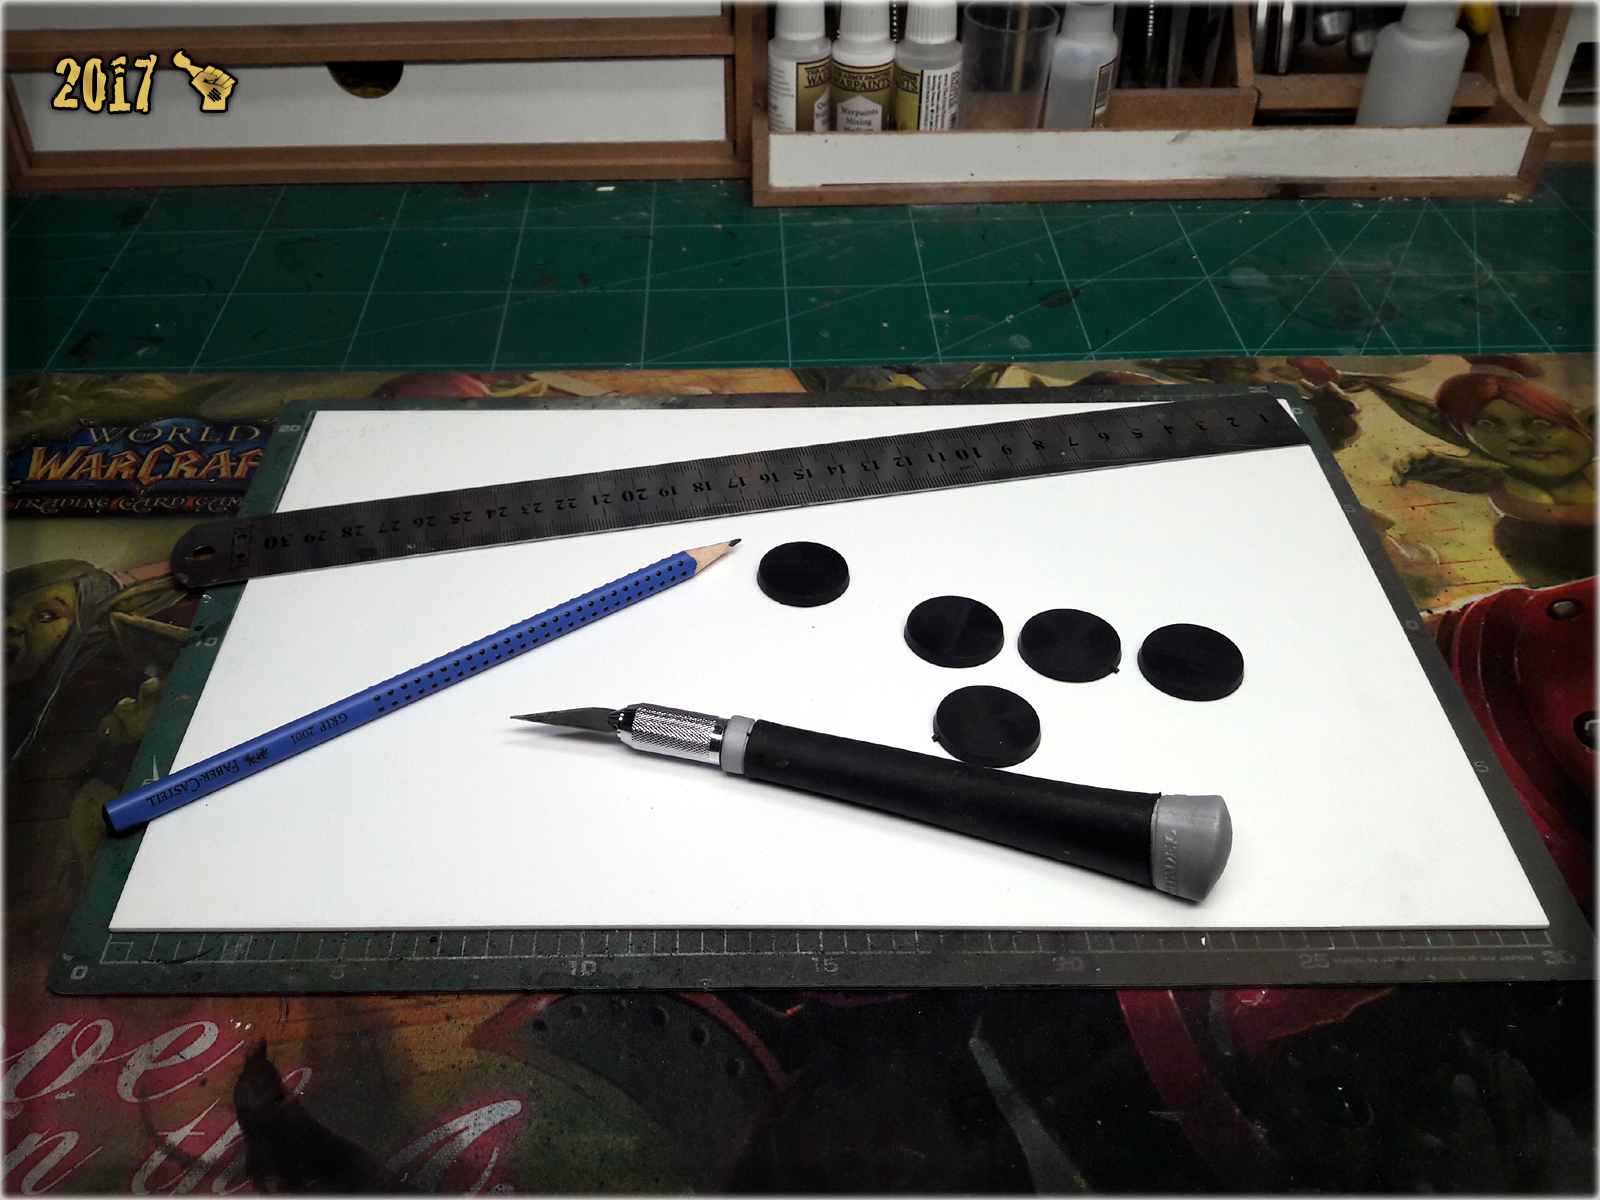
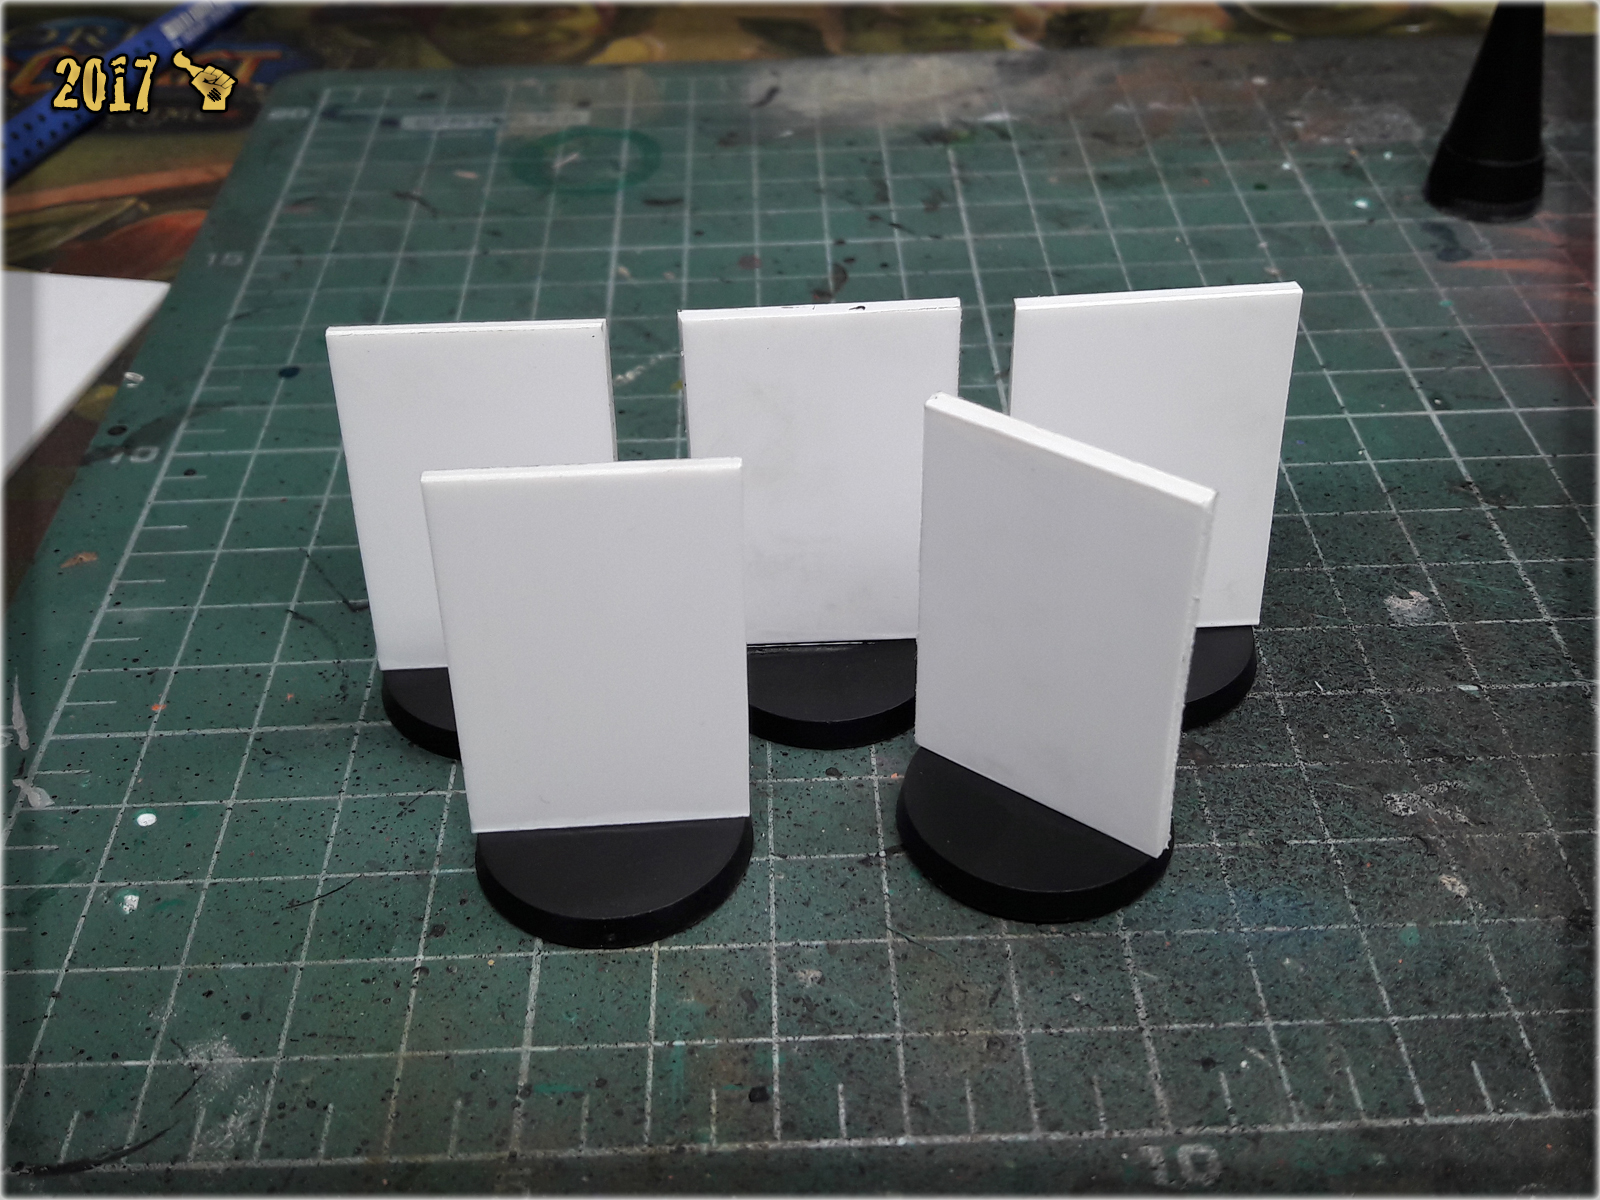
Obviously, the preparation process was pretty simple. Using a ruler, pencil and hobby knife I first drawn and then cut five 25x47mm rectangles made of PCV. I then glued them on top of 25mm round bases. At this point Camo Markers were ready to get painted.

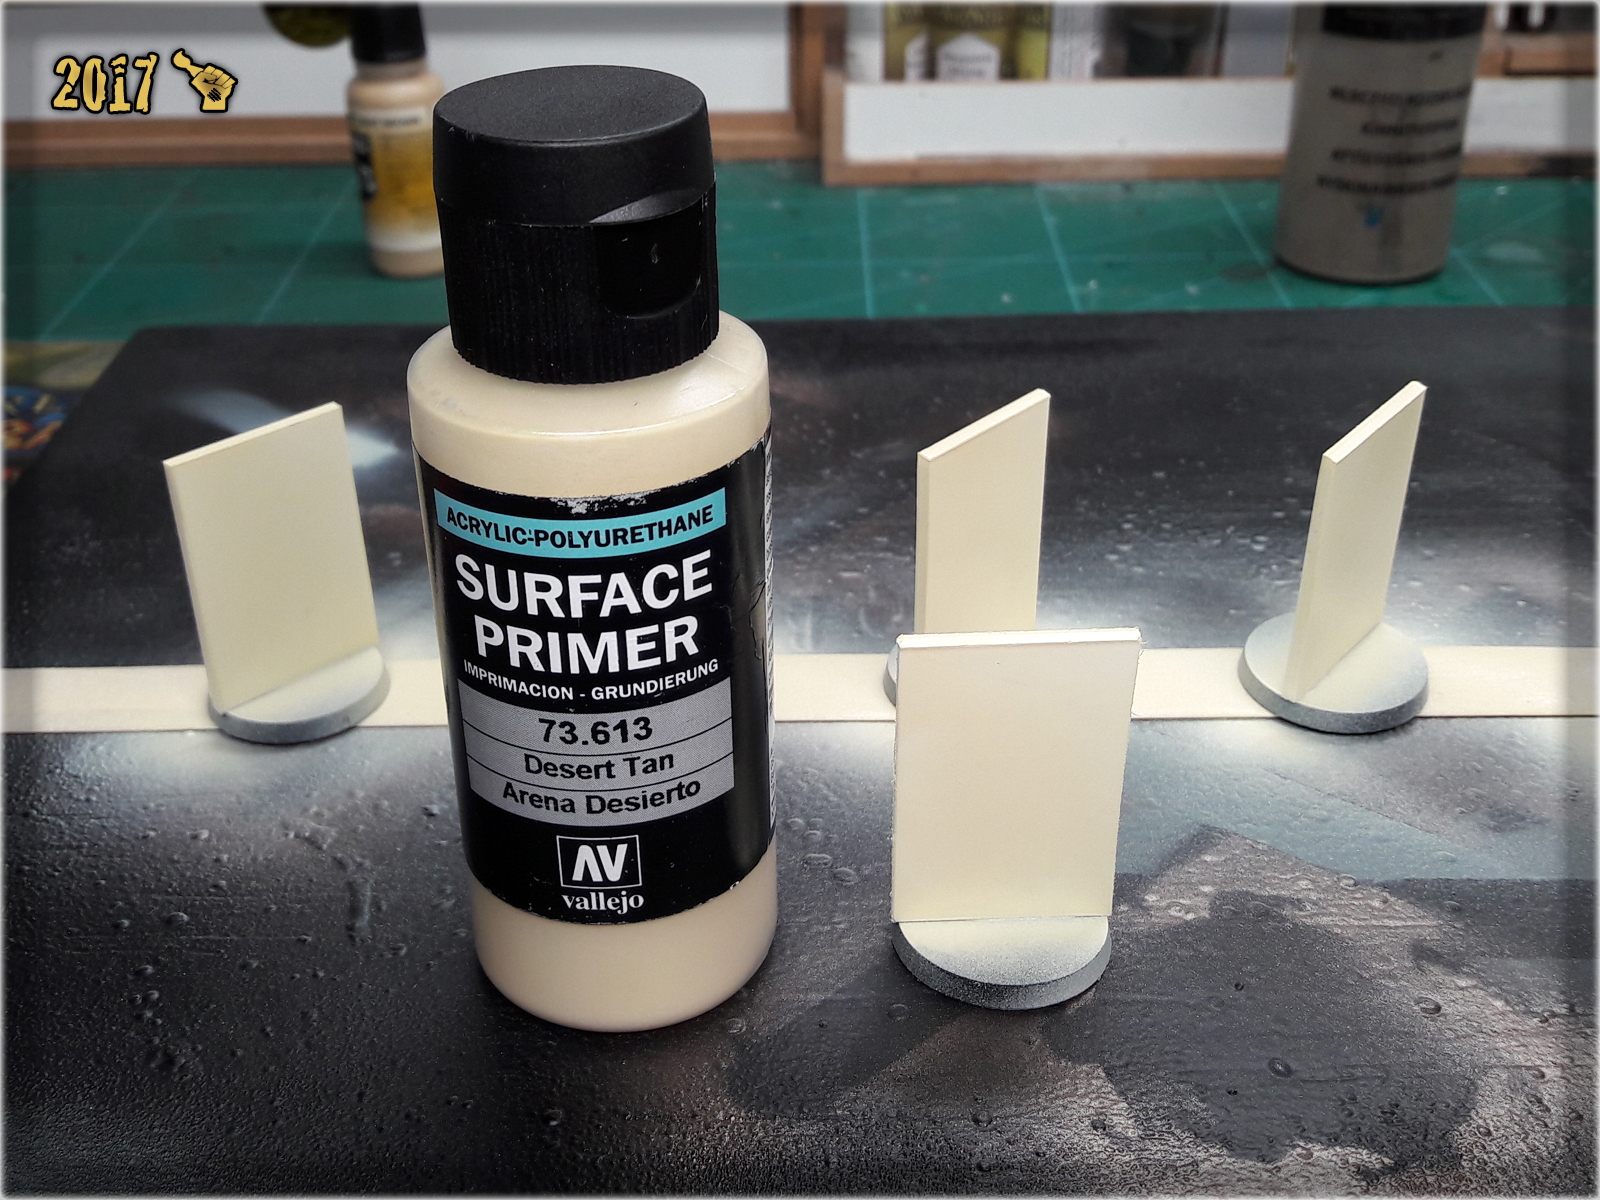
1 First step was to undercoat entire Camo Markers with Vallejo's Desert Tan.
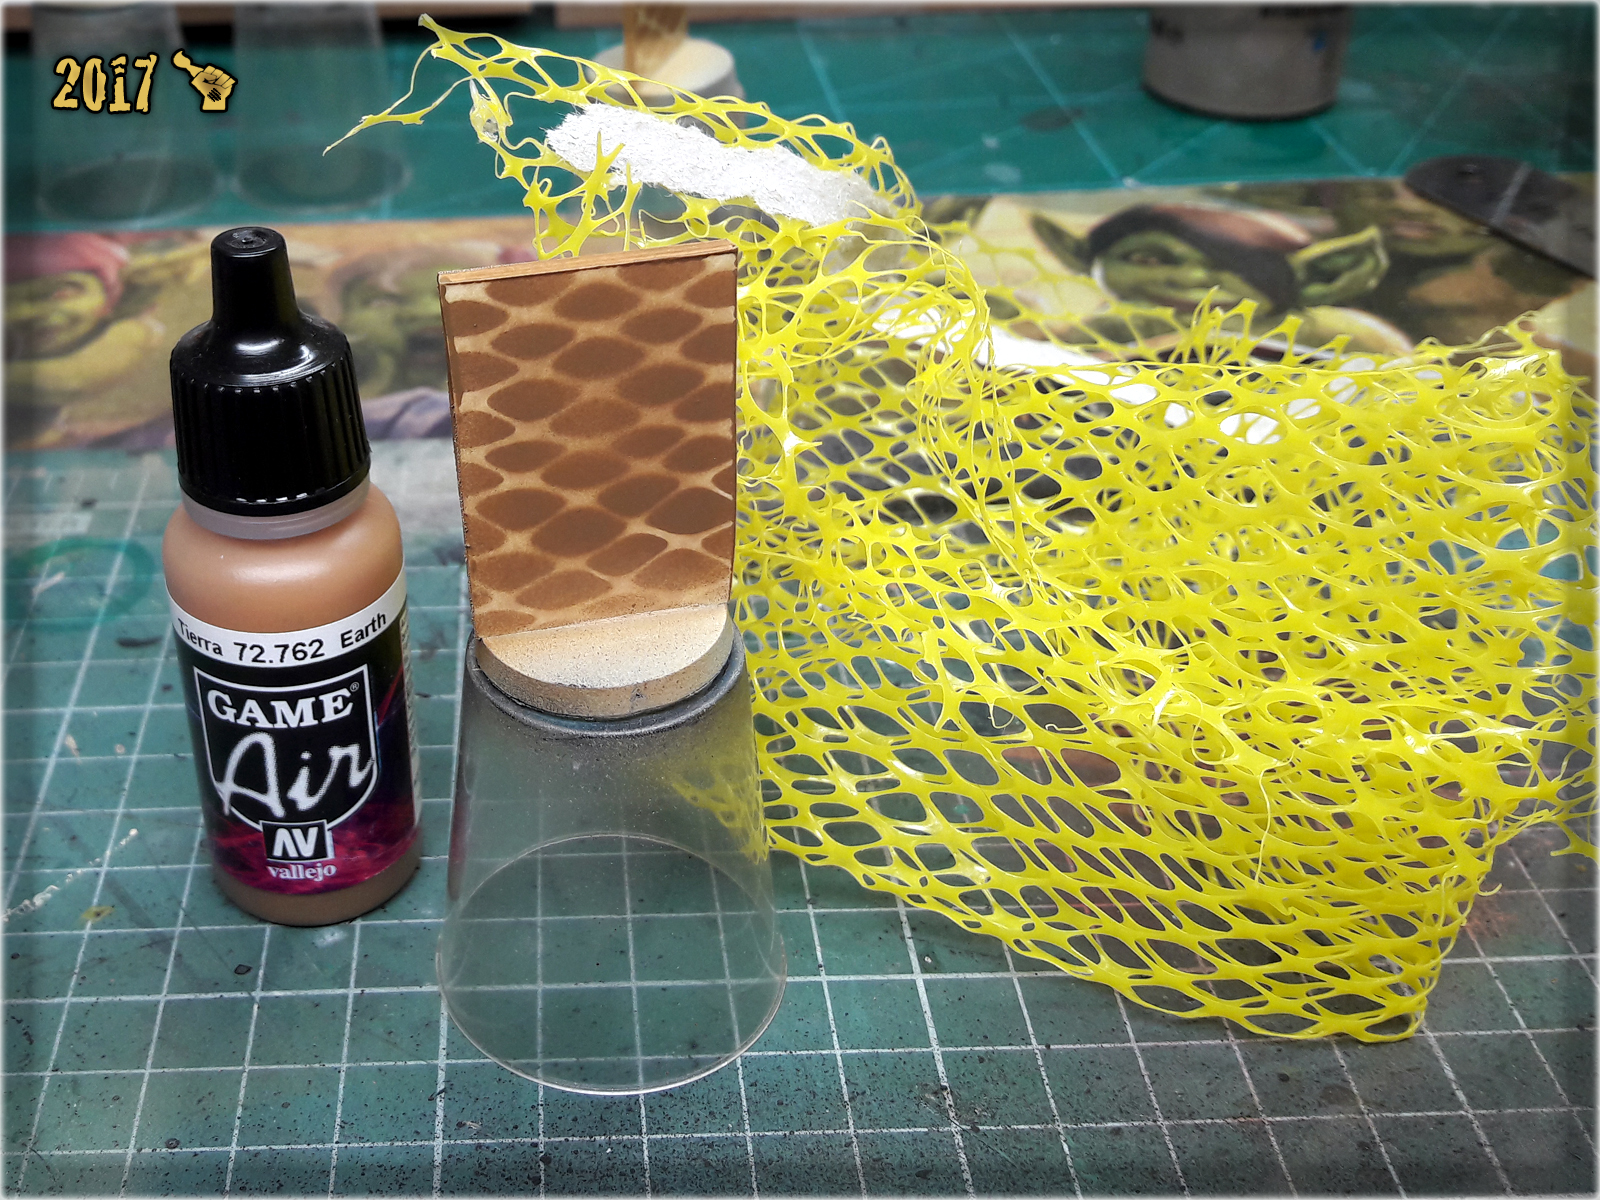
2 Next I used a piece of synthetic hair holder as a stencil and airbrushed Vallejo Light Brown over the Markers.
3 Then I switched to Vallejo Earth and airbrushed it over the markers using a piece of net that I got patatoes in. This net should be easily obtainable in every grocery store and makes for a really cool stencil.
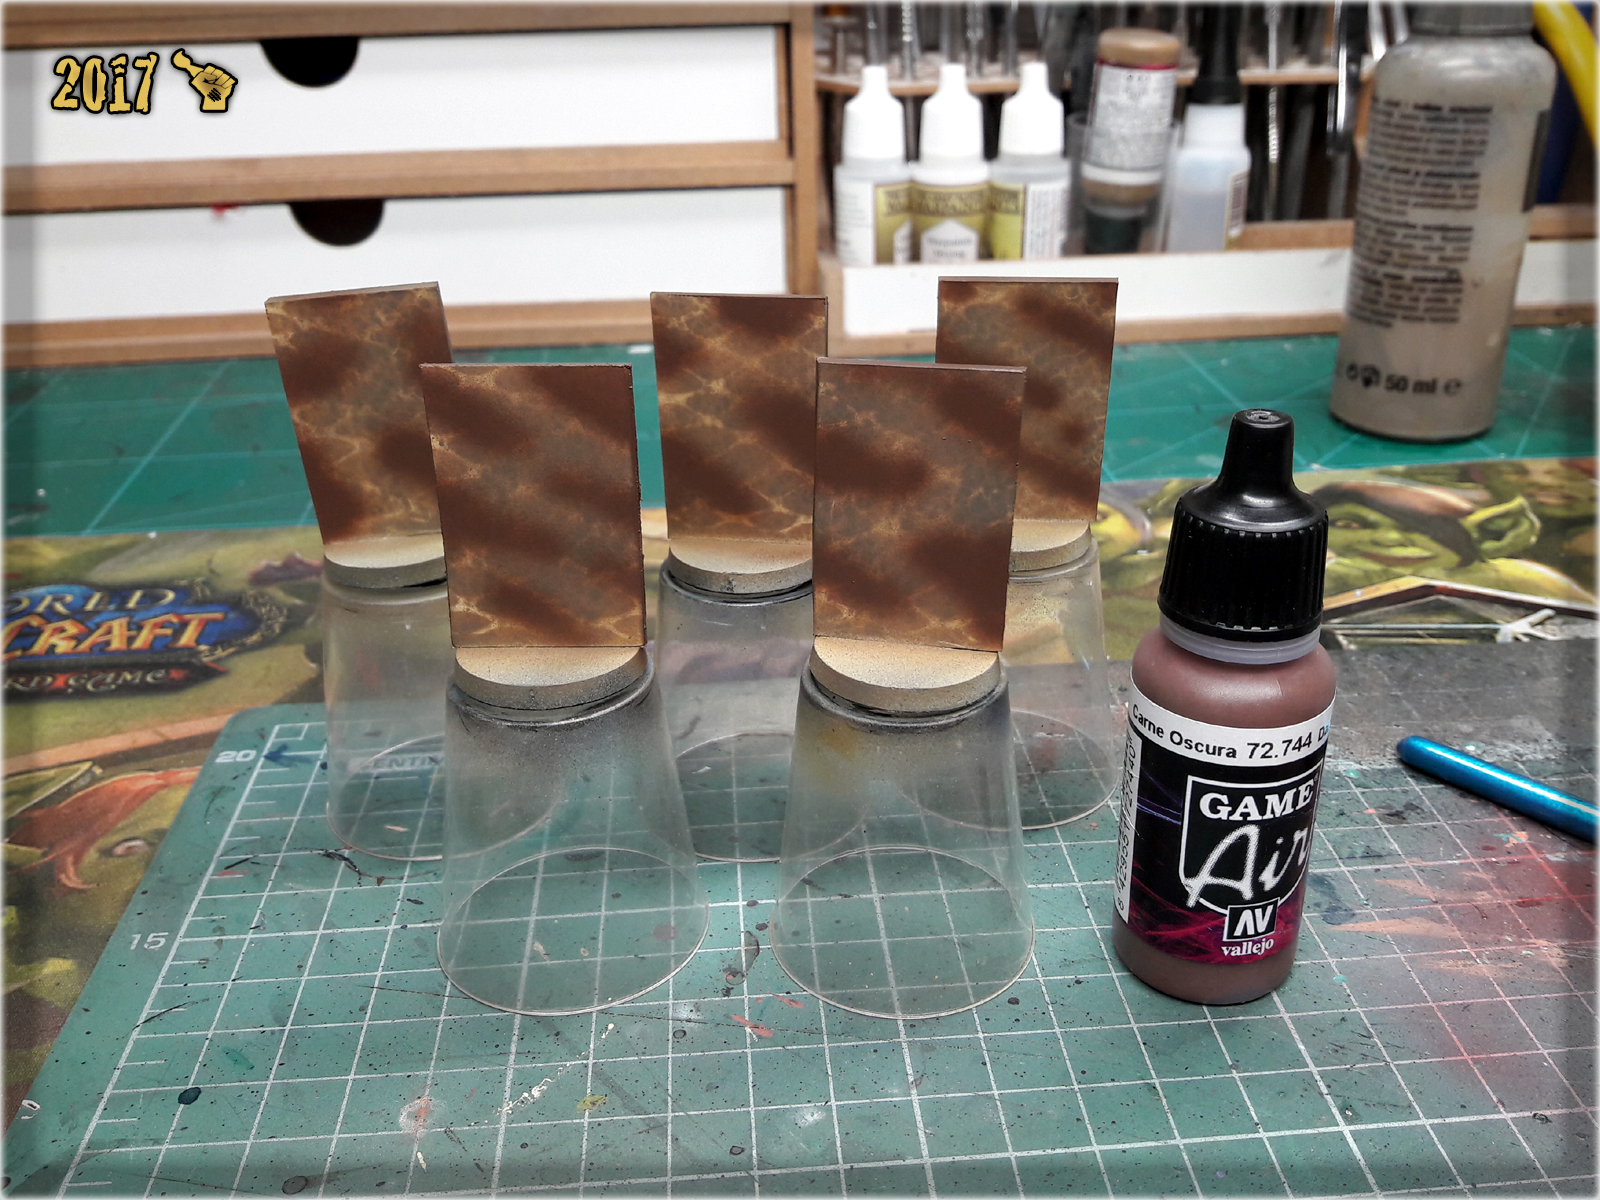
4 I then got back to hair holder stencil and airbrushed a layer of Vallejo Light Grey Green.

5 Next I airbrushed points of Vallejo Dark Flesh.
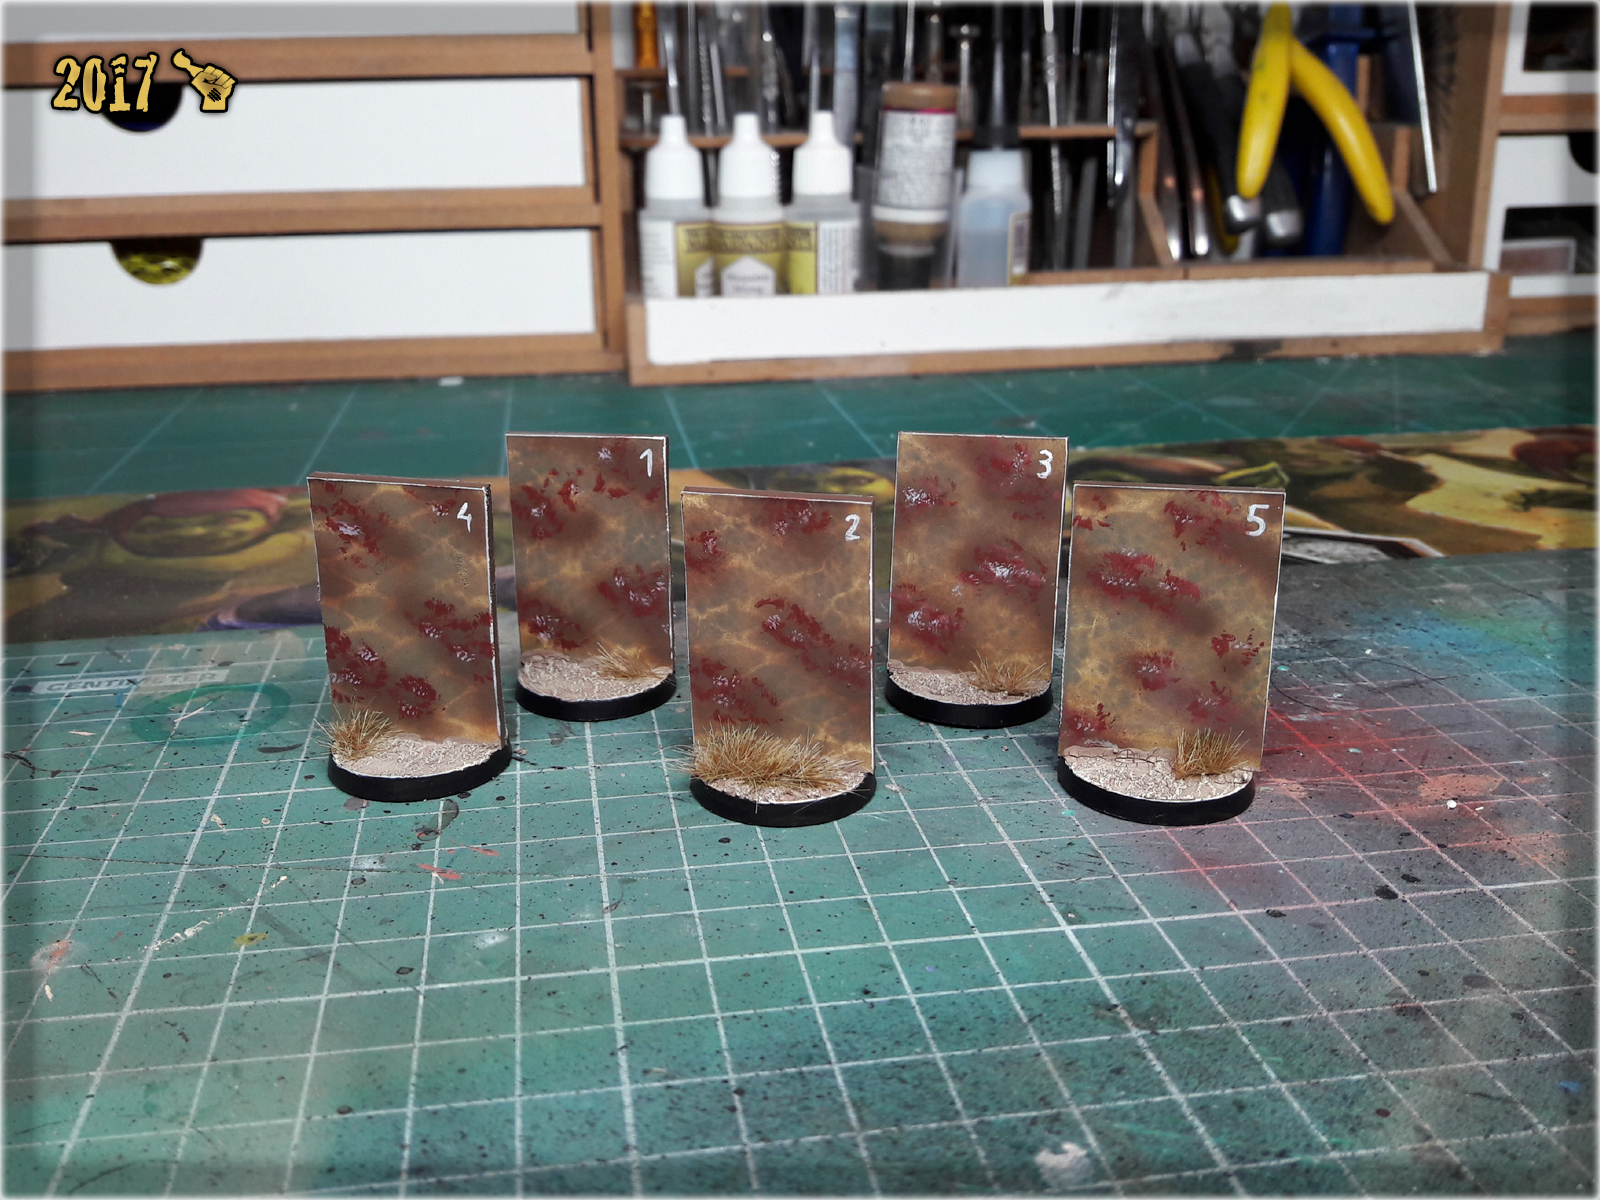
6 Some wet stippling went next. First I applied clumsy dots of Vallejo German Red Brown, then did the same with Games Workshop Pallid Wych Flesh. Afterwards I used Pallid Wych Flesh to mark edges of the markers and provide number to distinguish them from one another on the gaming board.

7 Basing came last. I used Games Workshop Agrellan Earth and Agrellan Badland, then drybrushed them with Karak Stone and Flayed One Flesh. Work done.

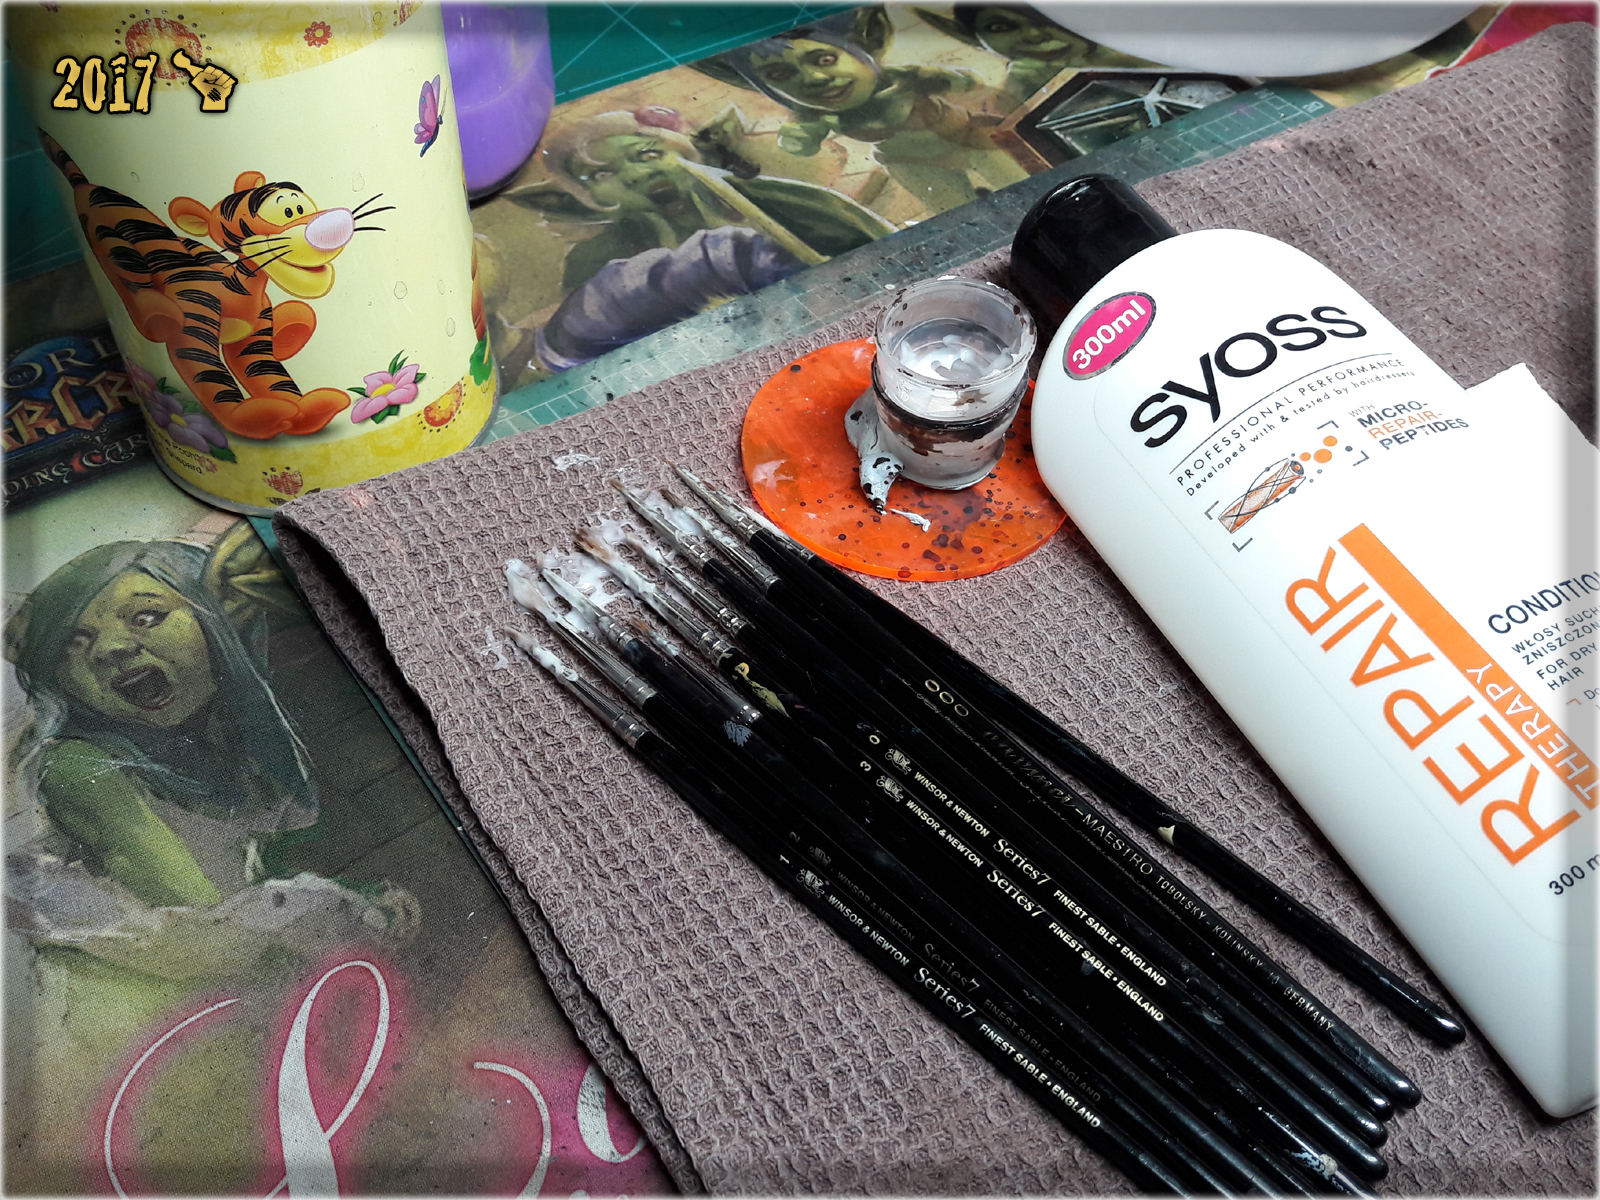
Ever wandered how a brush graveyard looks like? Some of us seen this wast field of broken, damaged brushes – left aside without purpose. A truly sad sight to behold. Now you’re probably looking at the sharp tip of your favorite brush thinking “It won’t happen to you my dear friend. This doesn’t concern you.” Sorry to be a bringer of bad news, but brushes come and go – no way around it. The only thing we can do is to preserve their longevity as much as possible. How to it? The sole purpose of this article is to share some tips that might help you enjoy your brush till it’s late veteranship and avoid this:
On top of thorough cleaning after each use, the proper care is the key to preserve brush’s shape and thus function. It’s not something to repeat at daily basis, still every now and then a “brush spa”should be performed. Here’s how I do it:
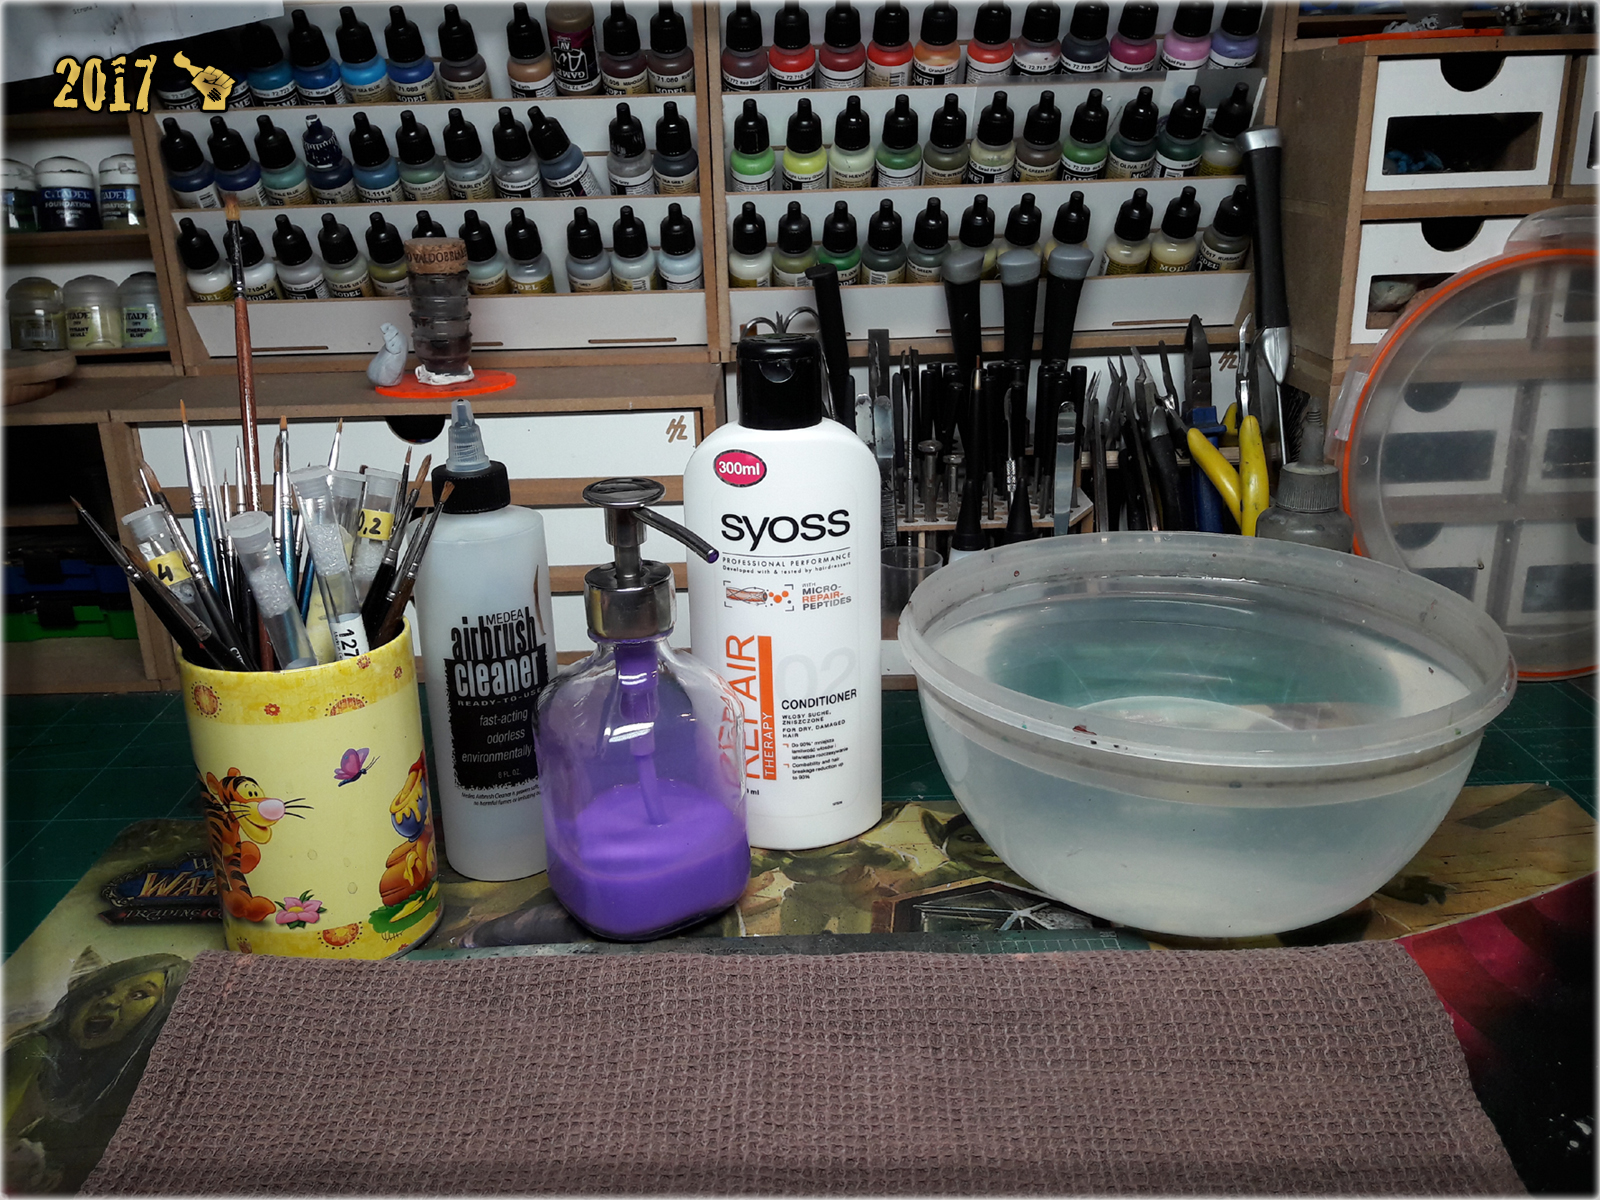
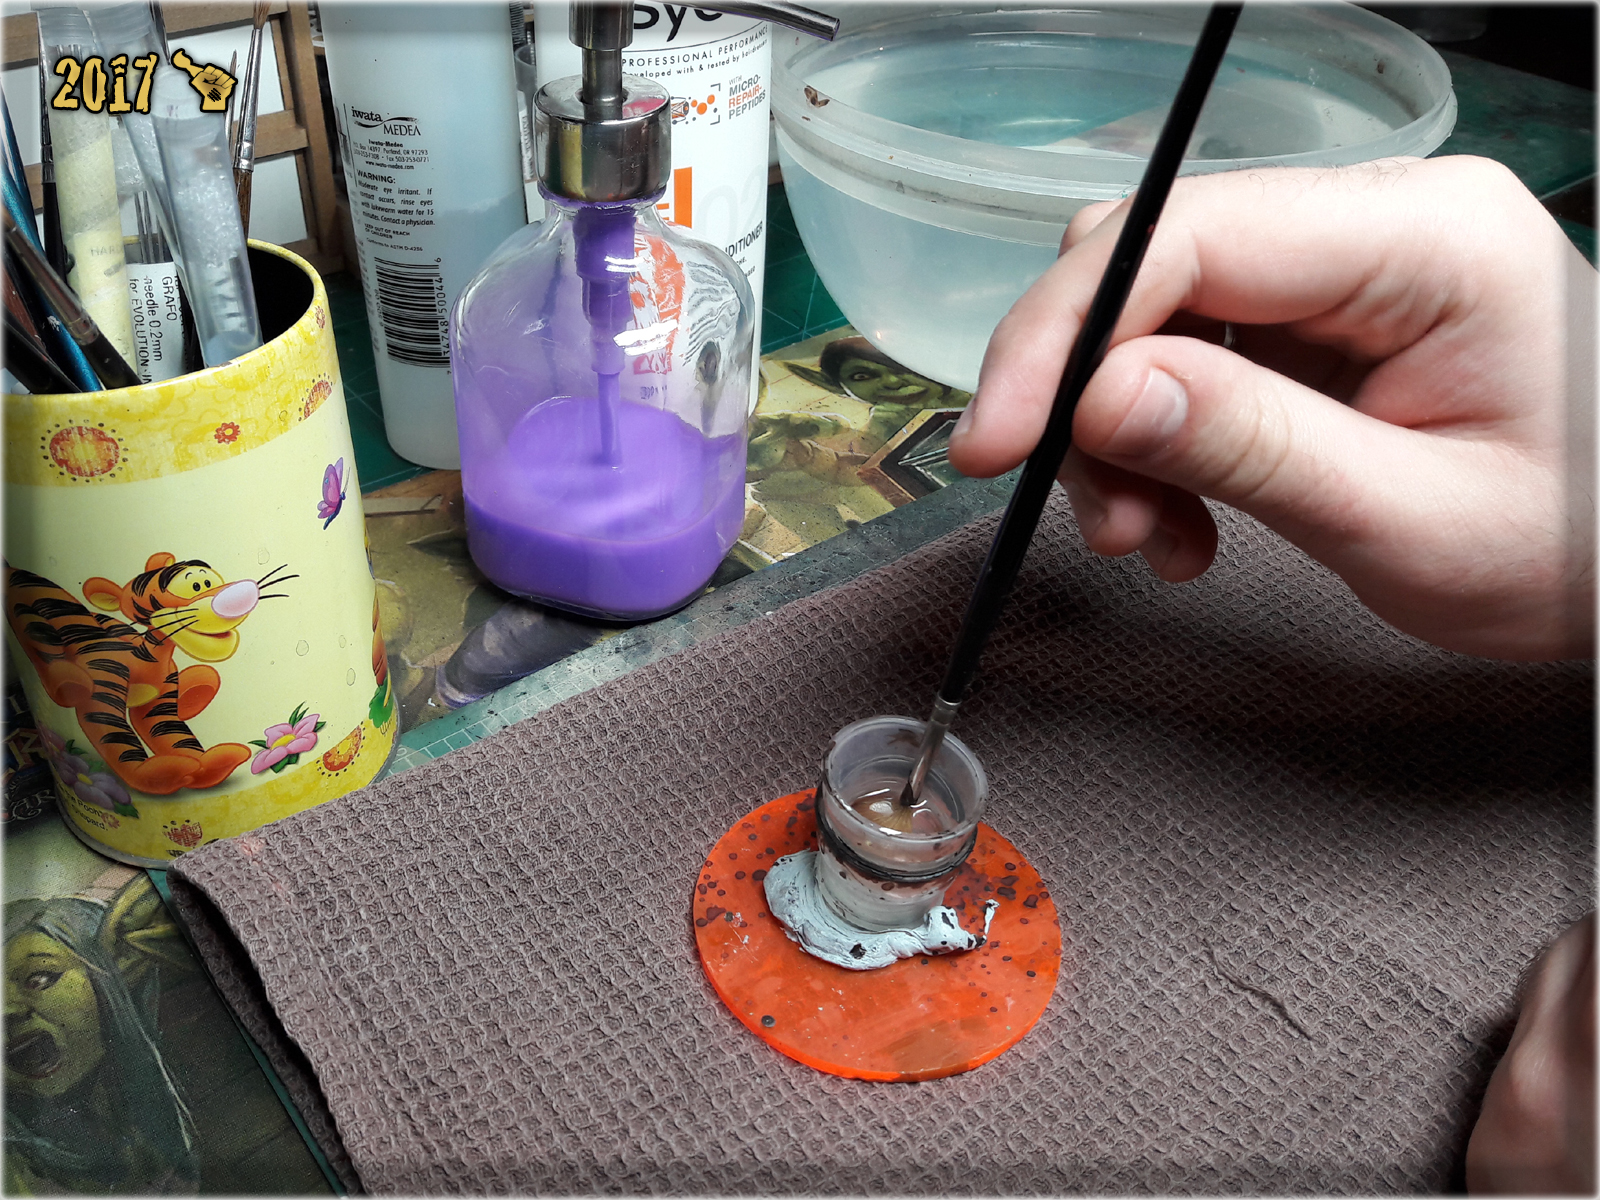
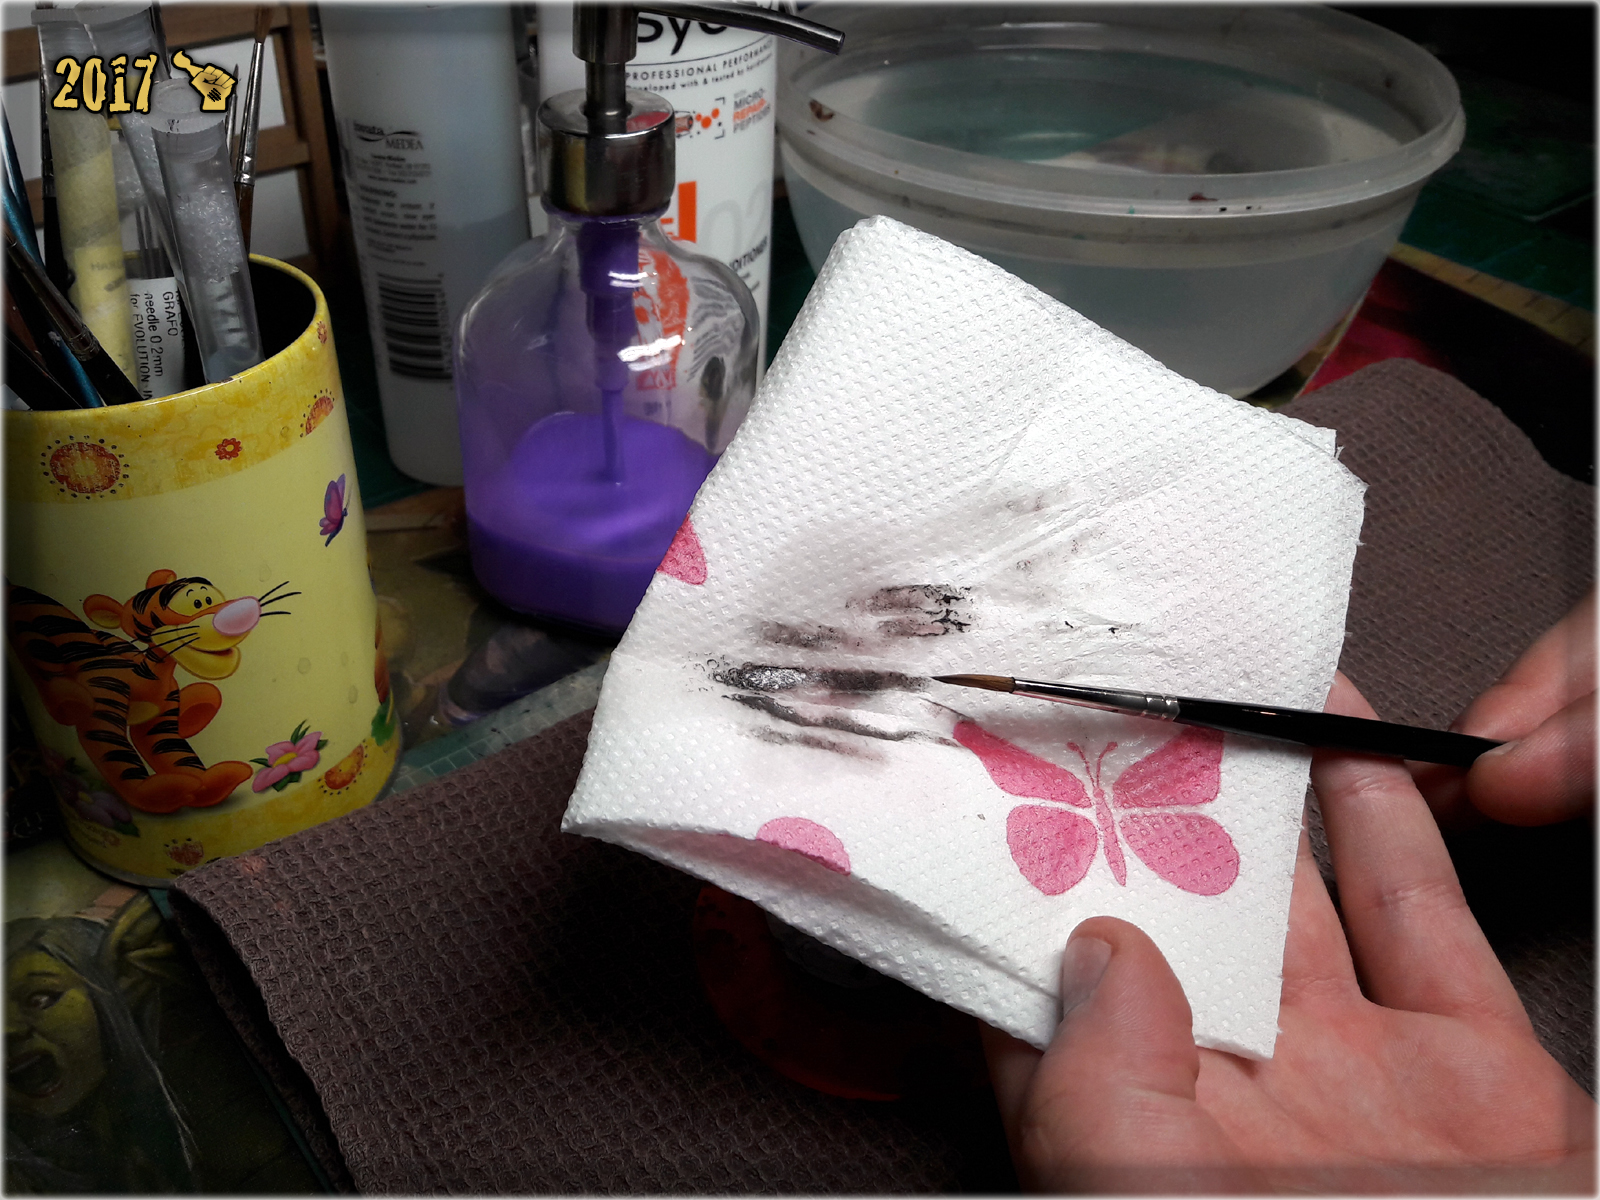
1 First I poured Airbrush Cleaner into a small cup. Next I dipped a tip of the brush, tapping it against a bottom of the cup. The purpose of this step is to ensure that any dried out paint leftovers would get removed from the brush's tip. Once done I cleaned up the tip and metal part of the brush's handle with a paper towel soaked in Airbrush Cleaner. I did this by slowly pulling the brush through the towel, forming it's tip.


2 Step two was to gently clean the tip with soaped fingers and wash it with water.
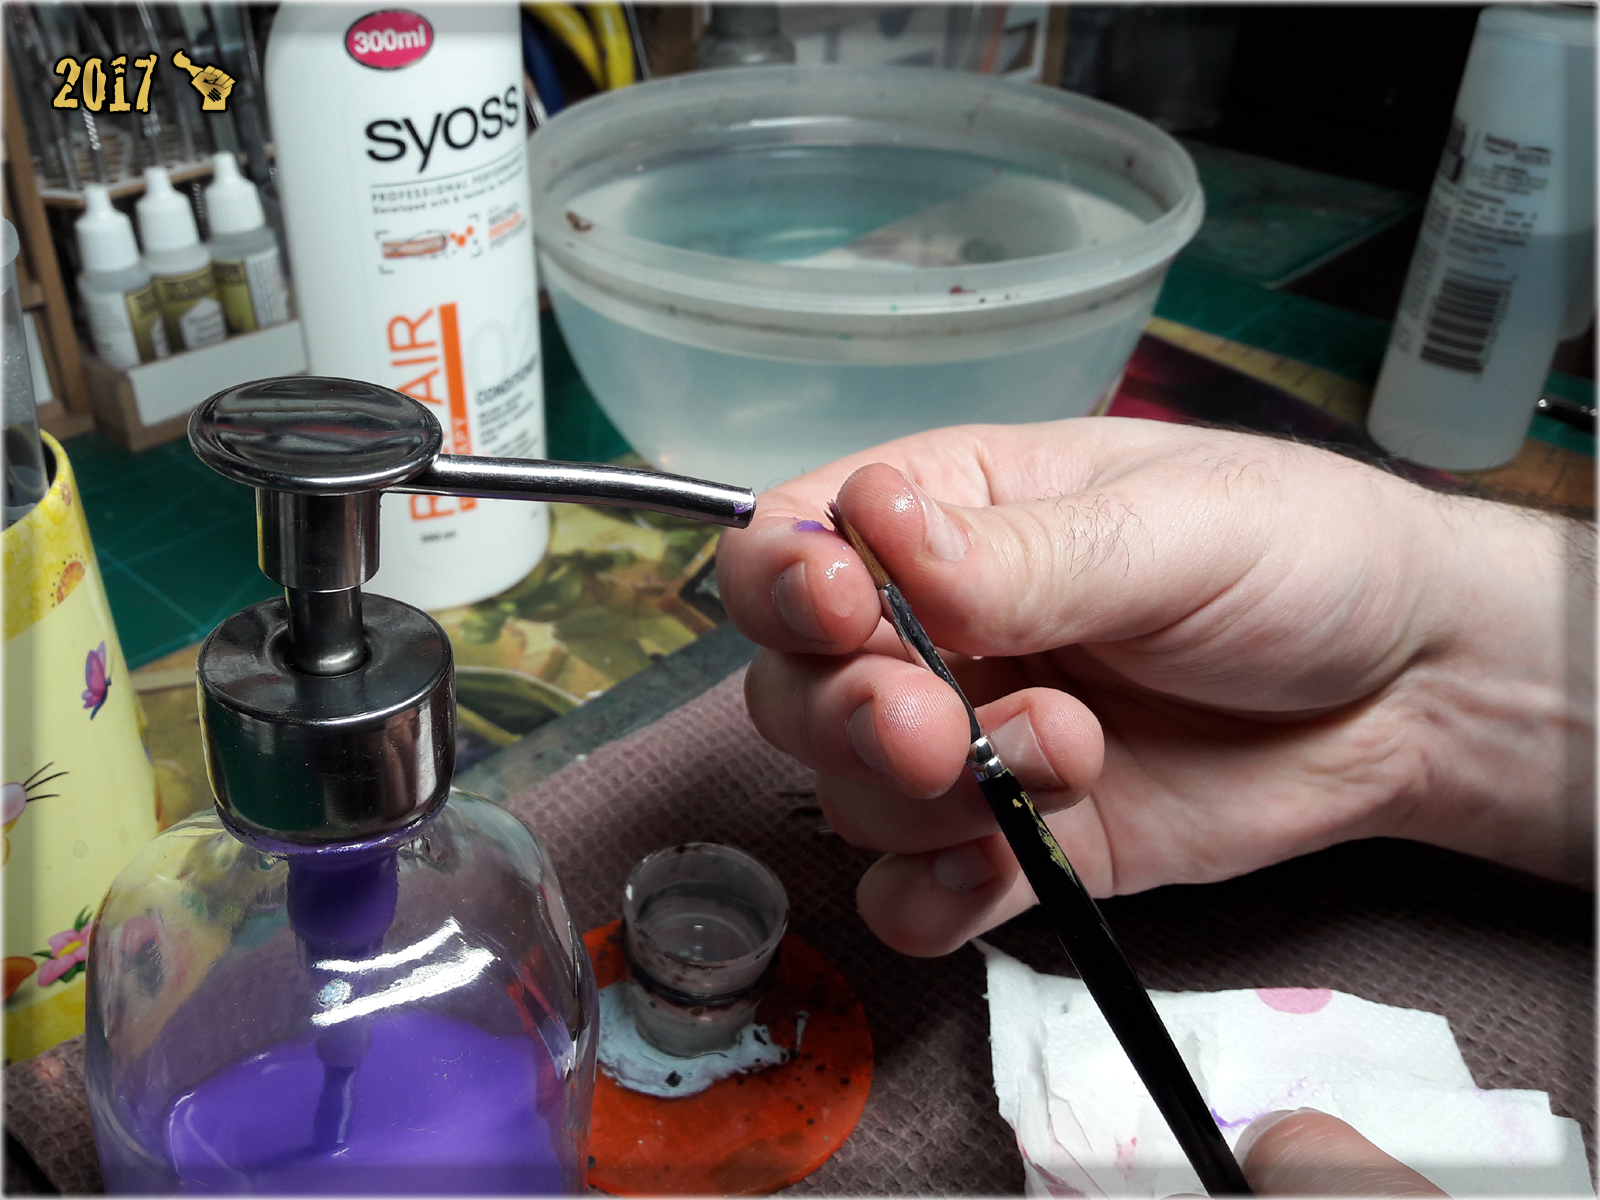

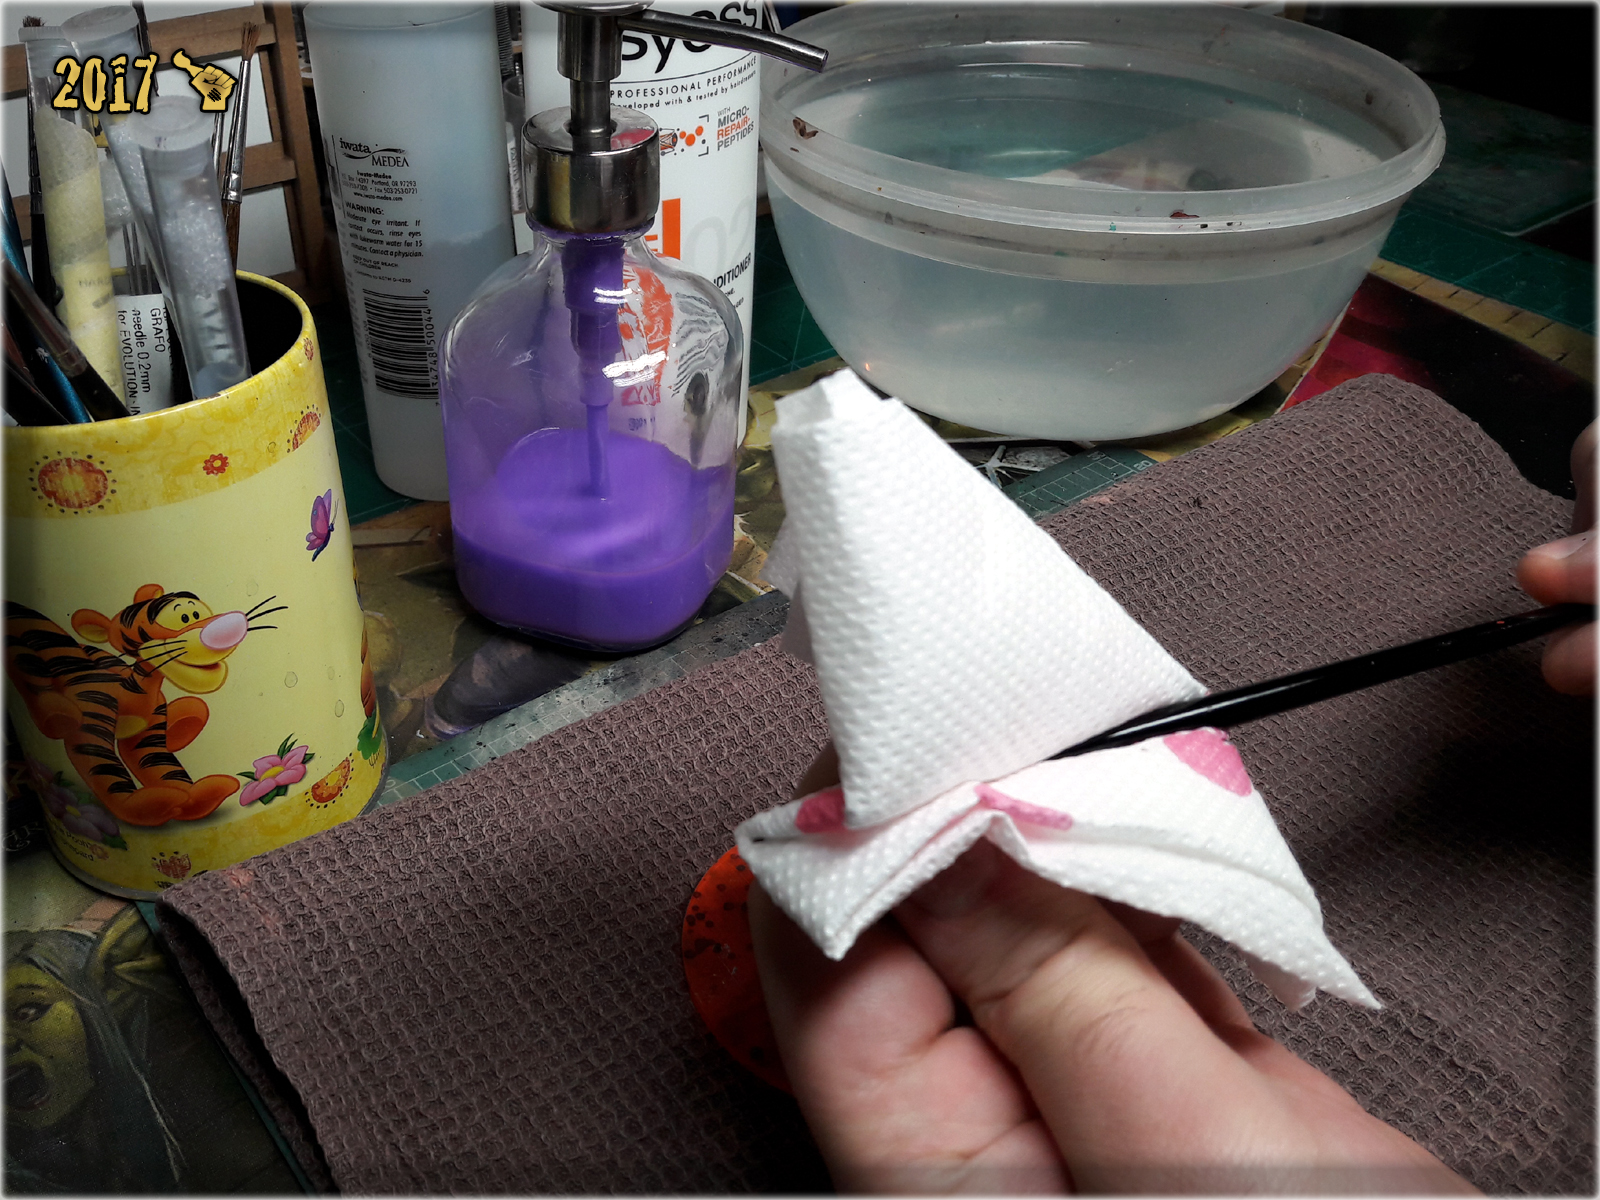
3 Then I moved to step three, covering the tip with a hair repair conditioner. Then I left the brush to soak with conditioner for about 20 minutes.


4 The final step was to once again clean the brush with water and form the tip, using a paper towel.


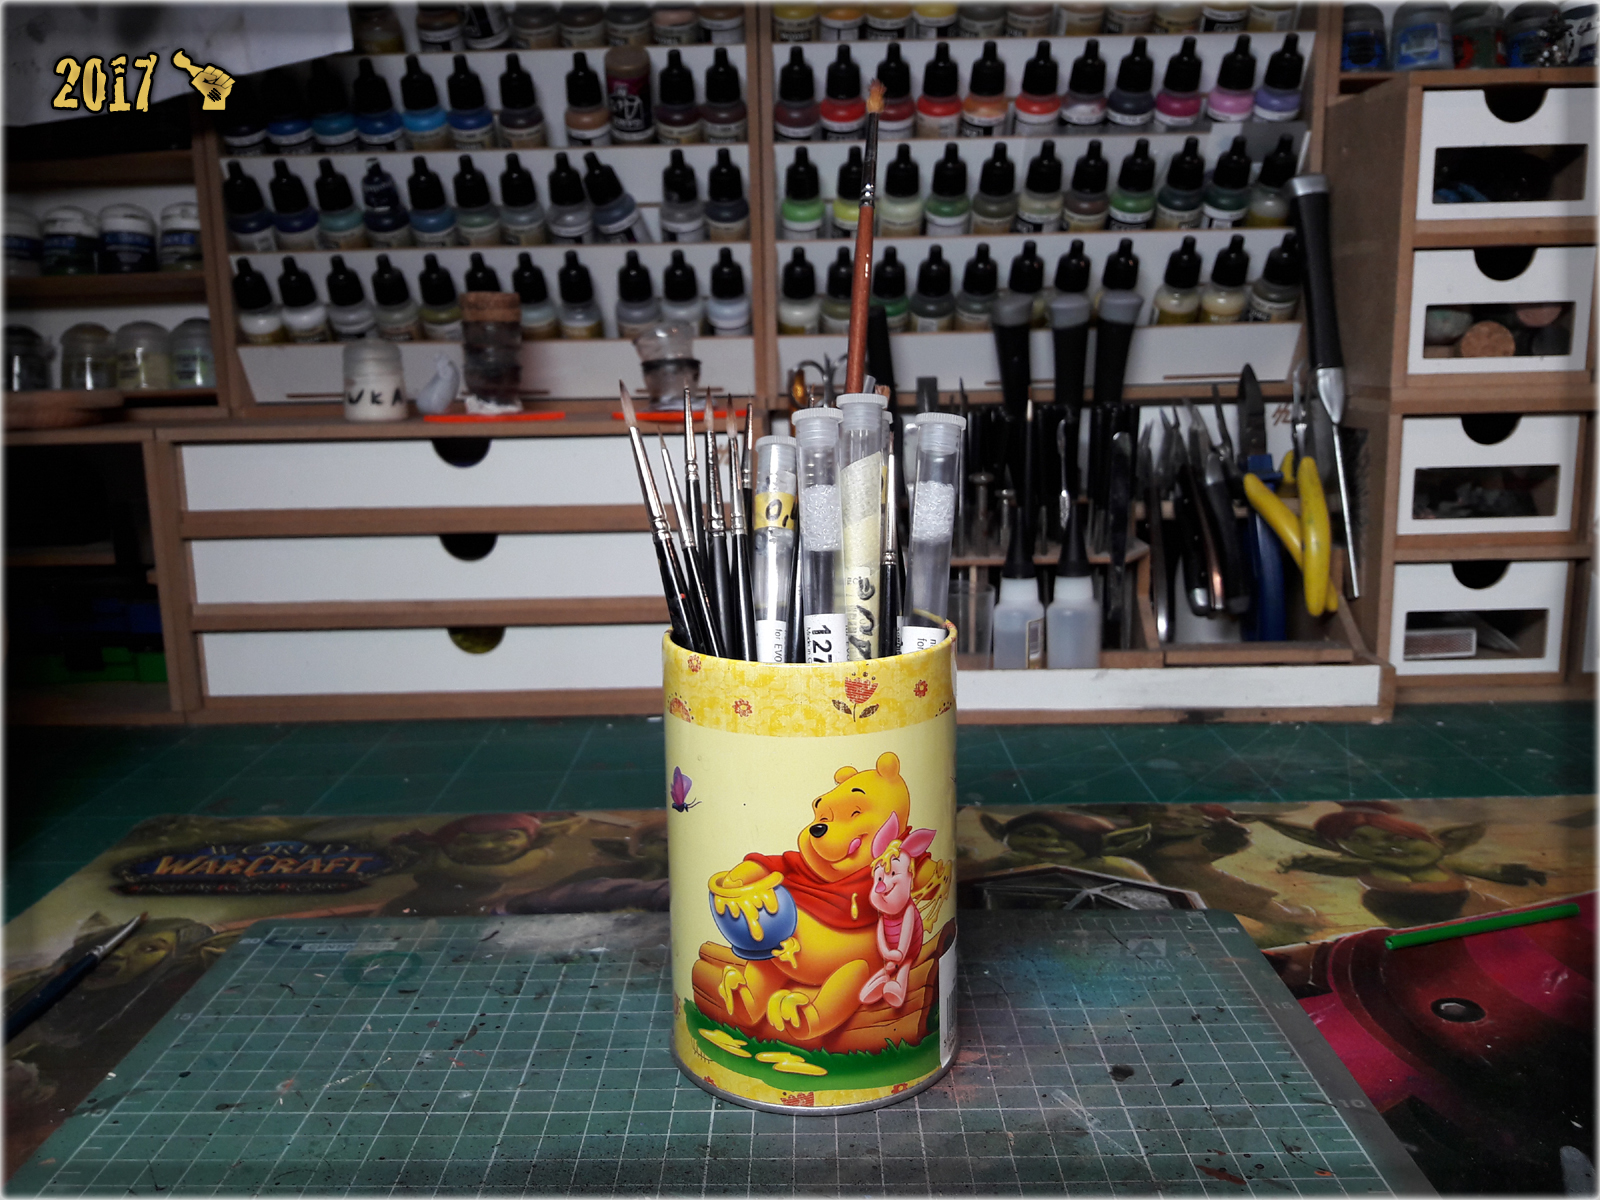
Now my brushes rest happily in a brush cup, smiling to me in wait for next project…
Ok, so you can take care of your brushes to keep them healthy, but what if they’re already ‘on the other side’? Untill recently I was sure that there’s no comming back from the brush’s afterlife, but I was prooven wrong by a friend who linked me a crazy awesome tutorial – and now I will share it with you.

1 I dipped the brush in water...
2 I touched a wet tip of the brush to the hot iron, then started moving it backwards, gently turning it in one direction.


Well – that’s it! Sounds easy? It actually is XD Just take a look at this video…

Six months is a lot of time to gather material for another project related article, and thus The Colony Special Project is back with entire new installment about this Infinity gaming board. I just couldn’t leave this project unattended for much longer.
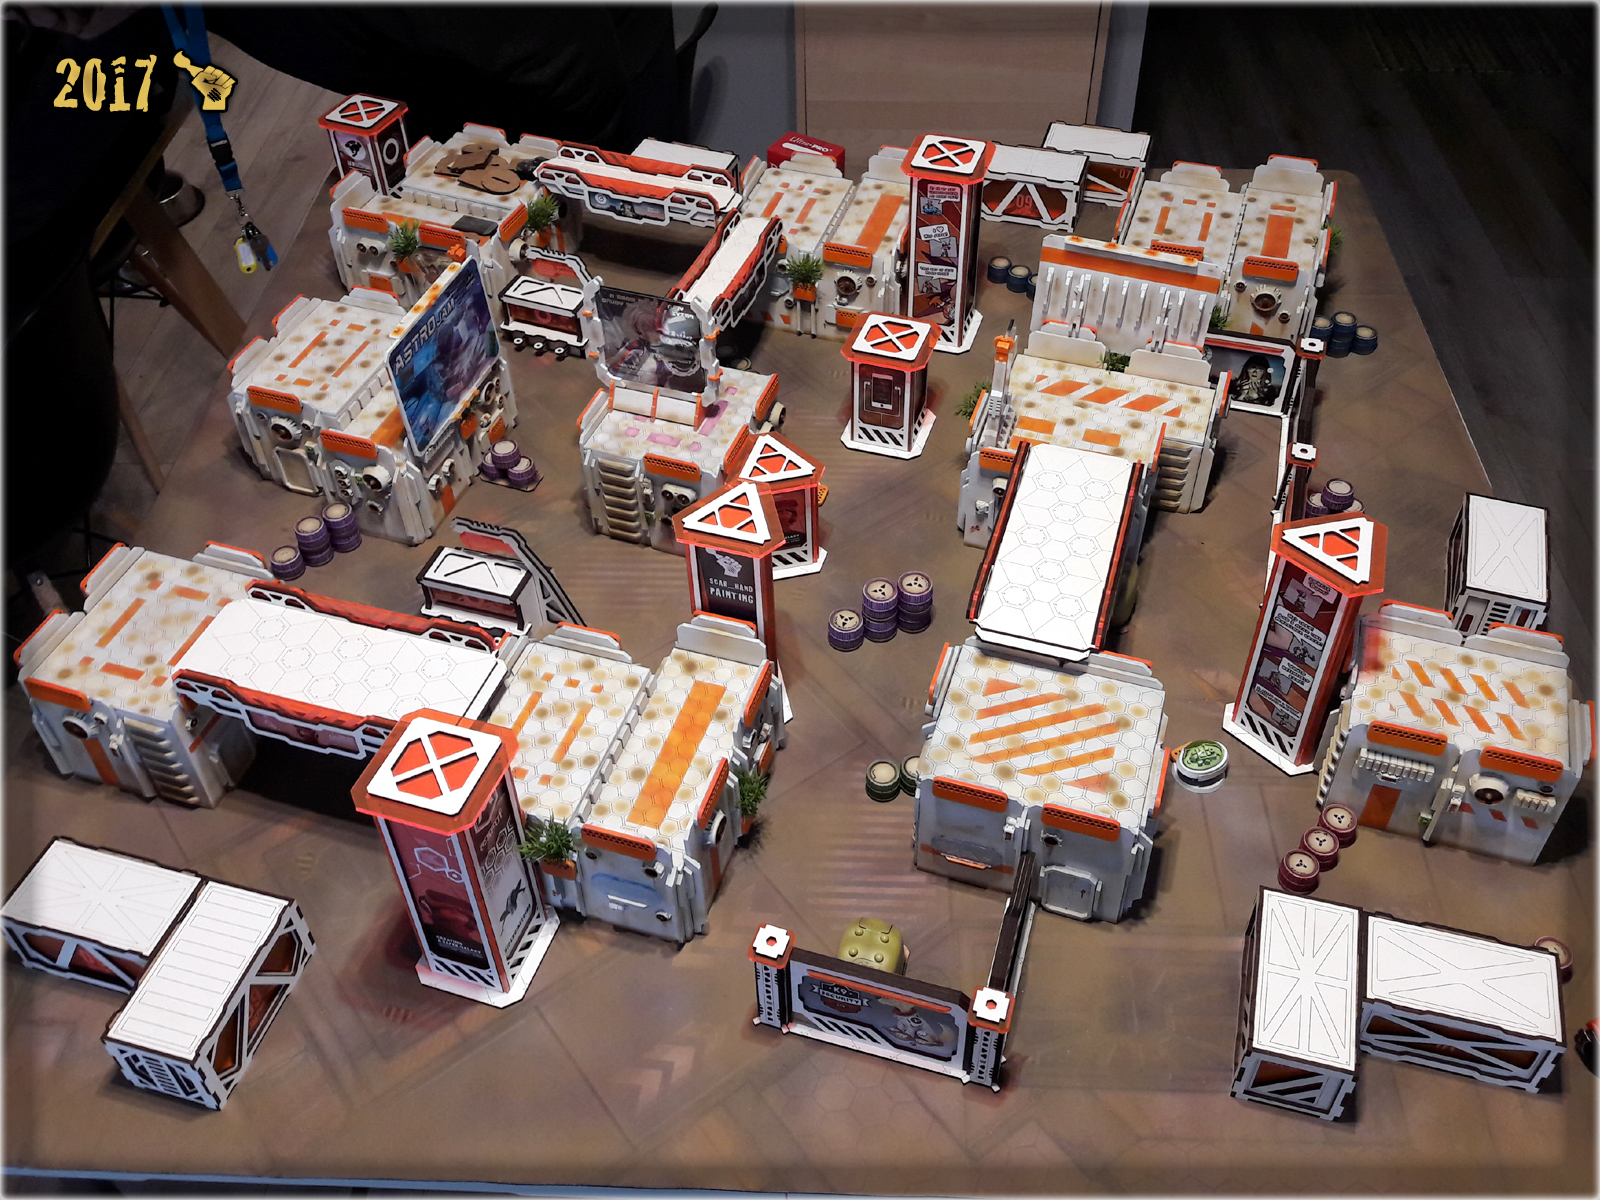
Let me start by telling you this: I love my gaming board. That being said, at some point I felt like something didn’t quite bangt right. The board was finished, I got a lot of awesome, positive feedback about it, still deep down I felt something is off. There’s always place for improvement so my inner artist raged while being unable to pinpoint the exact reason of my discomfort. It took a while for me to understand that the board looked too chaotic to absorb. All the yellow, blue and deep clear-red did not work well with White-Sand-Orange-Green colour scheme.

I started introducing changes by dumping the obvious source of unfitting colours – the Holo Ads, and adding more green to the board with brand new set of Antenocitis Ad Stands. It partially worked but I wasn’t fully satisfied with the result…

The real change sweeped throughout The Colony quite suddenly. Everything, and I can’t stress this enough, because of the Gingermane Studio and it’s scenery. Long story short – there is this guy for whom I paint some Infinity miniatures, and one day he is like ‘I’m designing some scenery pieces, what you think?’ and I’m like ‘OMG I love this shit!’ and he’s like ‘Wanna grab some?’ and I’m like ‘Duuh! Shut up and take my money!’… All of the sudden I find myself knee deep in Gingermane’s scenery pieces which not only look amazing, but also fit right into my gaming board’s theme. They seem to be plucked straight out of my deepest desires – both in case of looks and playability.
This was the exact point at which I decided to finally ‘repair the damage’ I done to my gaming board and contain the colour palette of all the stuff that appears on it…

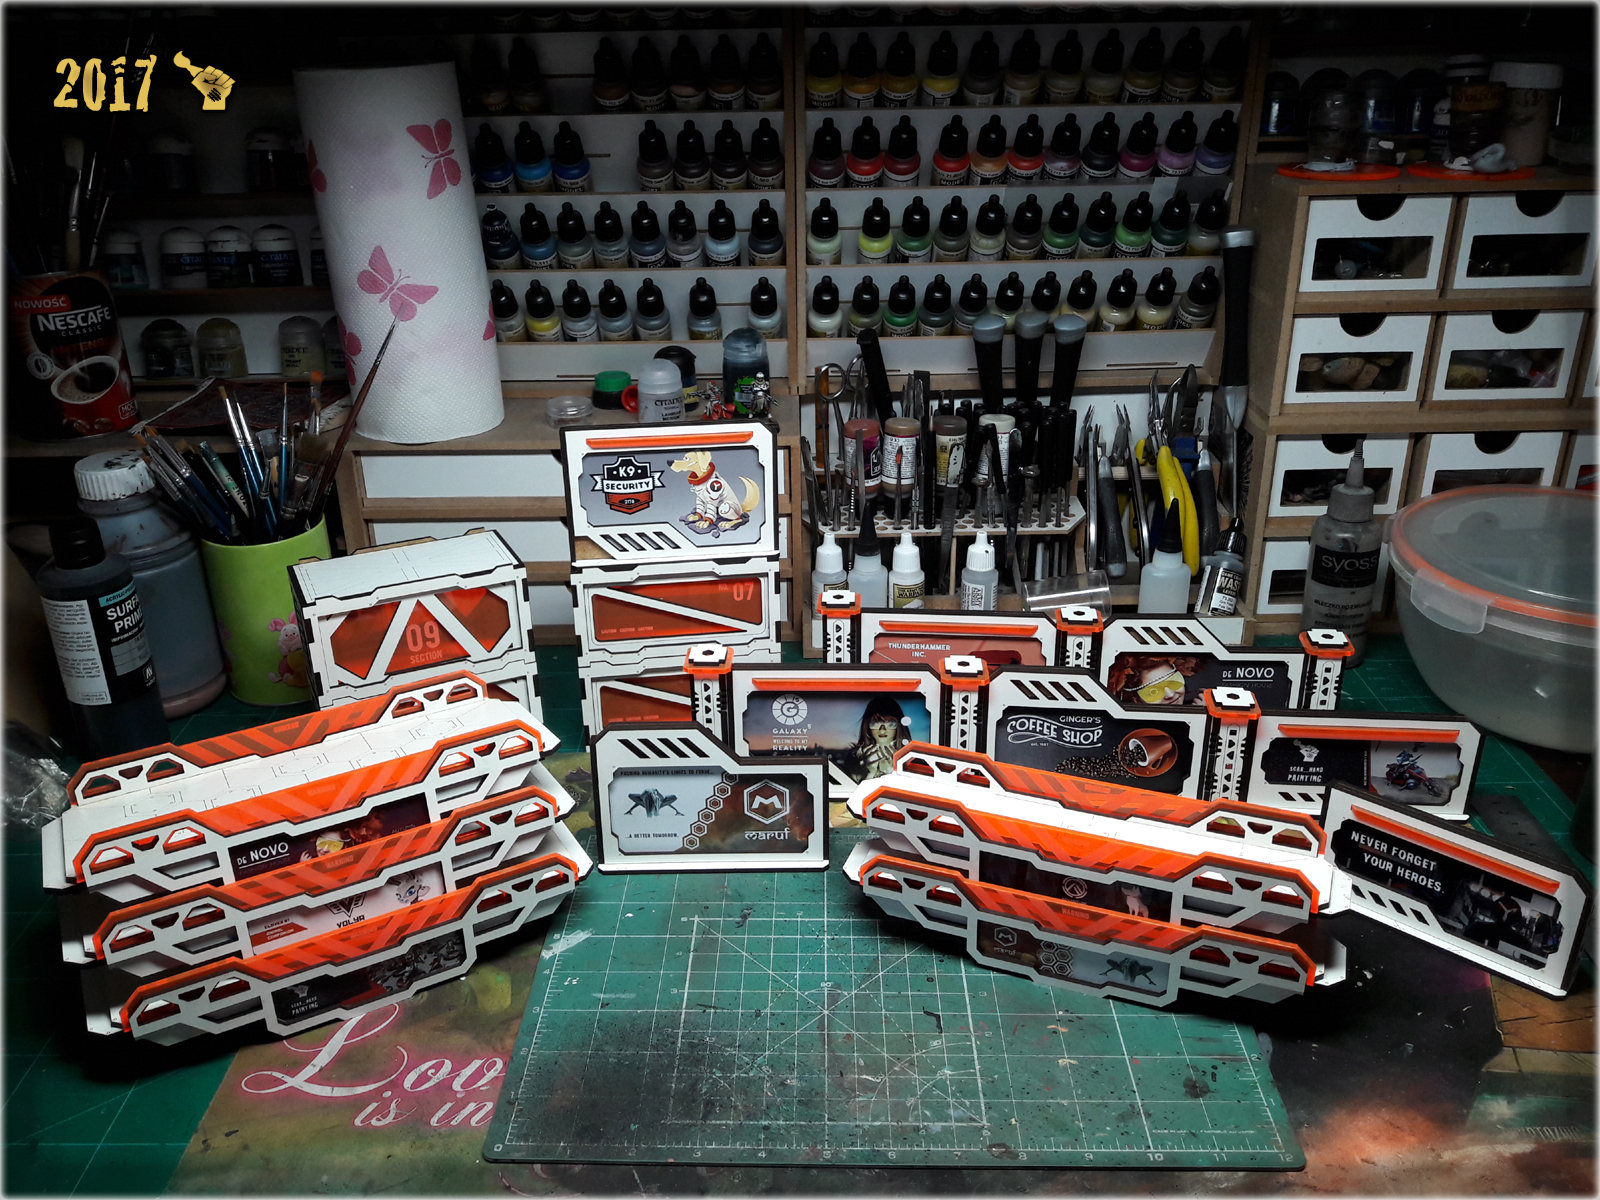
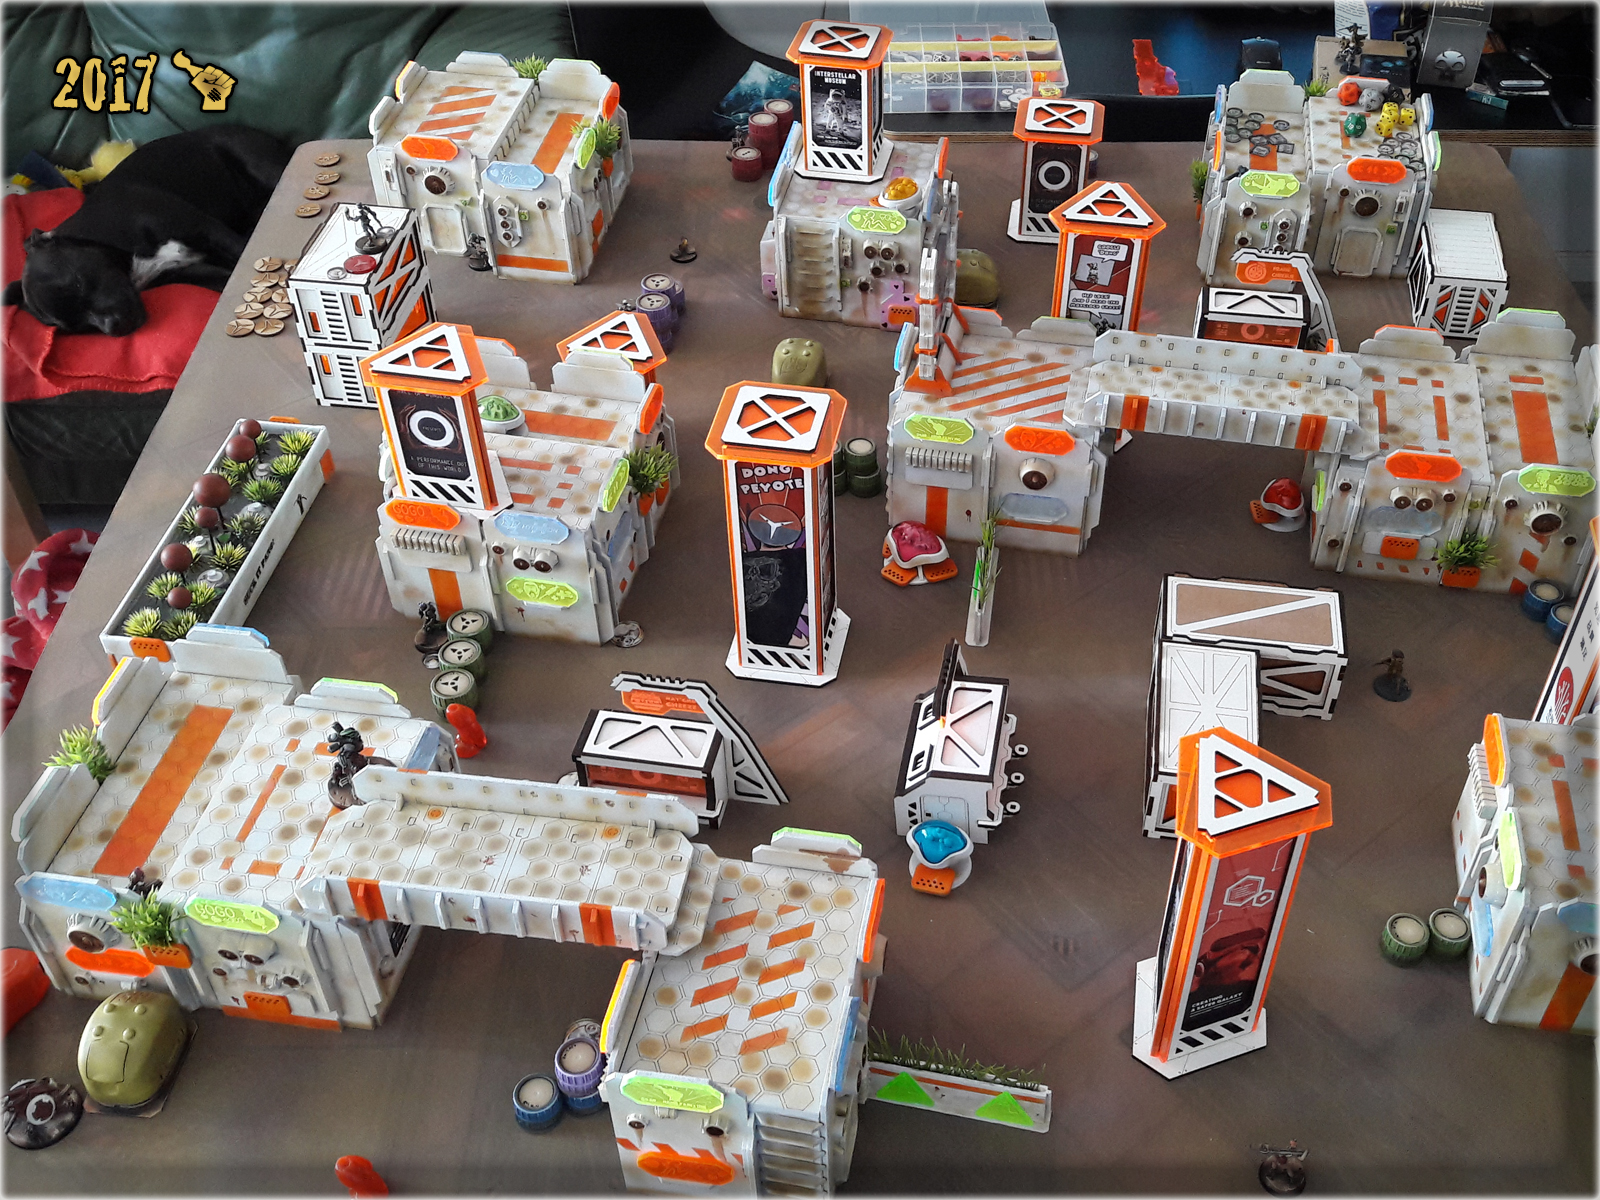
The final decision was made: Coloured Plexi Ads adorning the buildings had to go. Upon reaching this conclusion I instantly contacted my besties from Micro Art Studio and ordered a huge pile of replacement pieces. I’ve figured that a bigger version of ’rounded orange piece’ would work the best for the theme and overall looks. Soon after, I got a delivery of more than a hundred pieces necessary to finalize the ‘grand change’…
Preparing these was harsh. Had to clean them all of soot leftovers and remove small pieces left inside some of the laser-cut holes. Once done I painted all the pieces in a single go, then swaped Plexi Ads with them. The result is exactly how I hoped for.


The road to perfect gaming table streches before me and it’ll take some time till I get there, but I can see the destination. What’s left for me to do is to add dots of Vallejo’s Sandy Yellow here and there to tone down the Gingermane’s white a bit. Afterwards The Colony should be finally complete… at least for some time. I promis to bring you more of The Colony in next installment – probably six months from now :P.


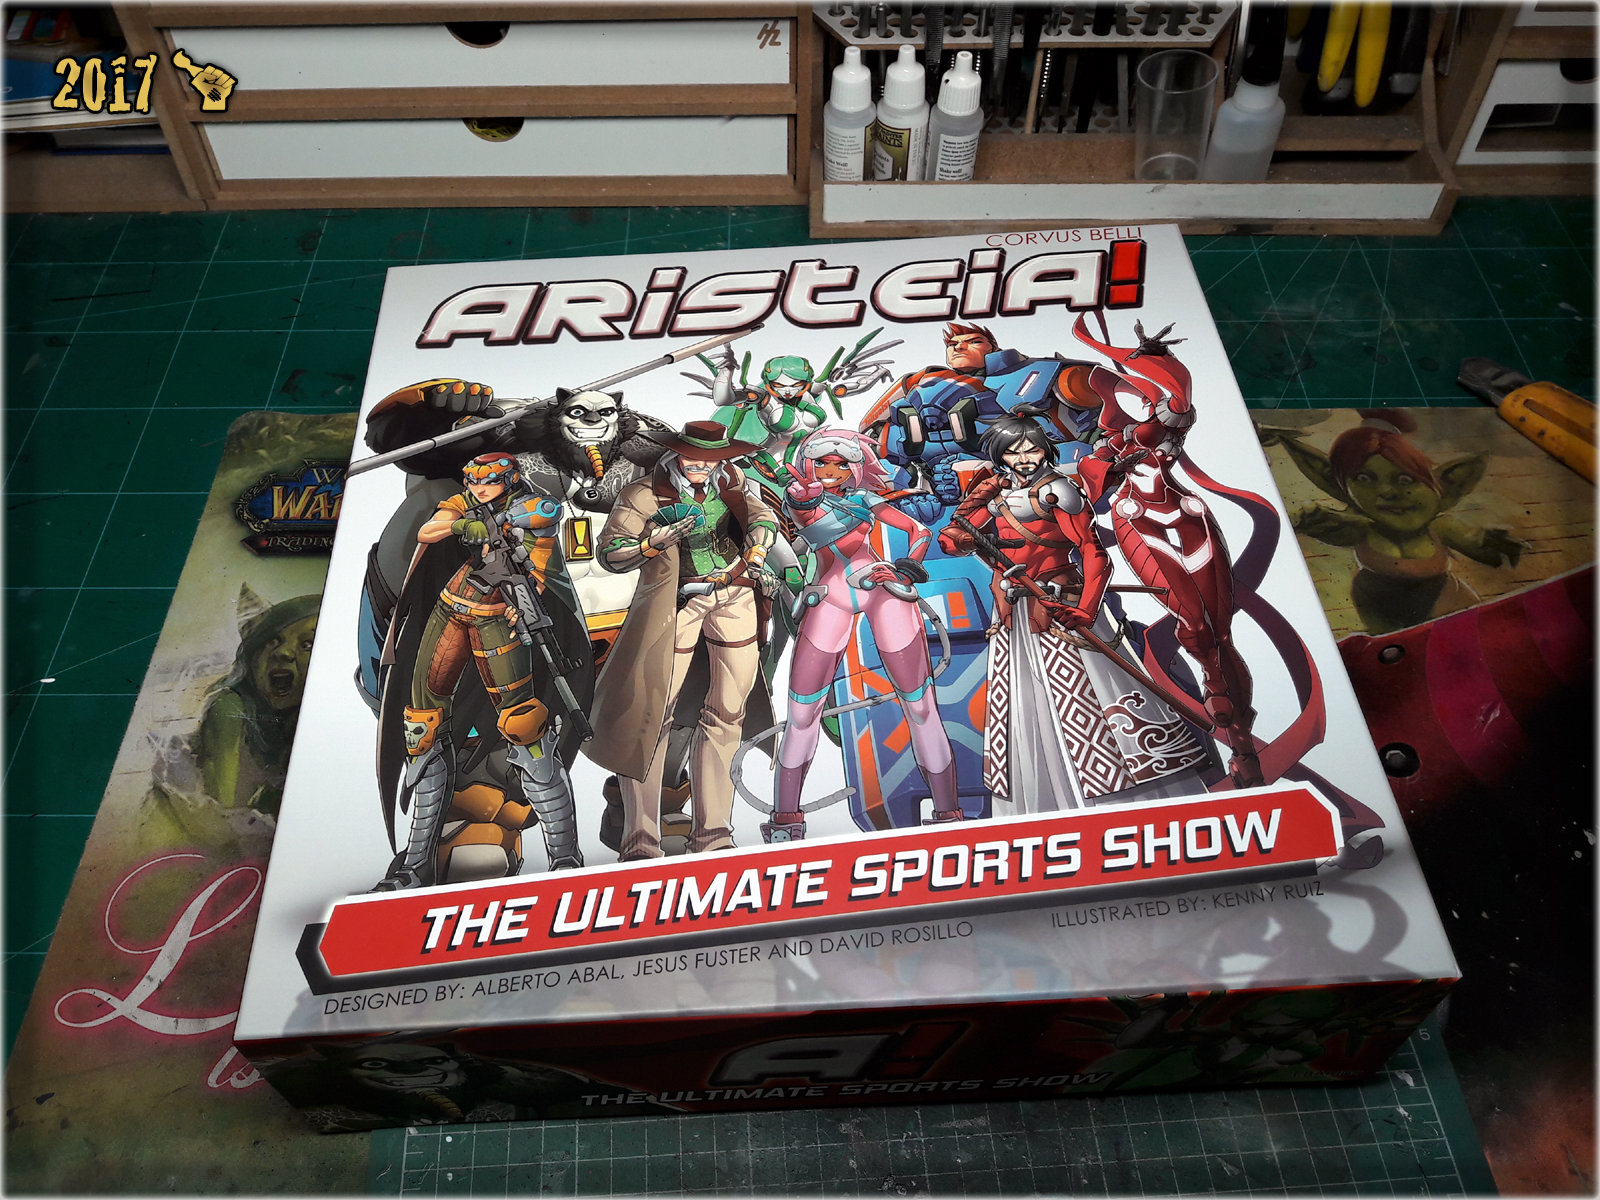
“175 Years into the future, humankind has reached the stars. As the hyperpowers vie for influence in the shadows, citizens use their permanent connection to Maya, the Interplanetary Data Network, to revel in a bespoke deluge of thrills. Of course, no form of entertainment is as sought after as ARISTEIA!, the Human Sphere’s favorite extreme bloodsport.”
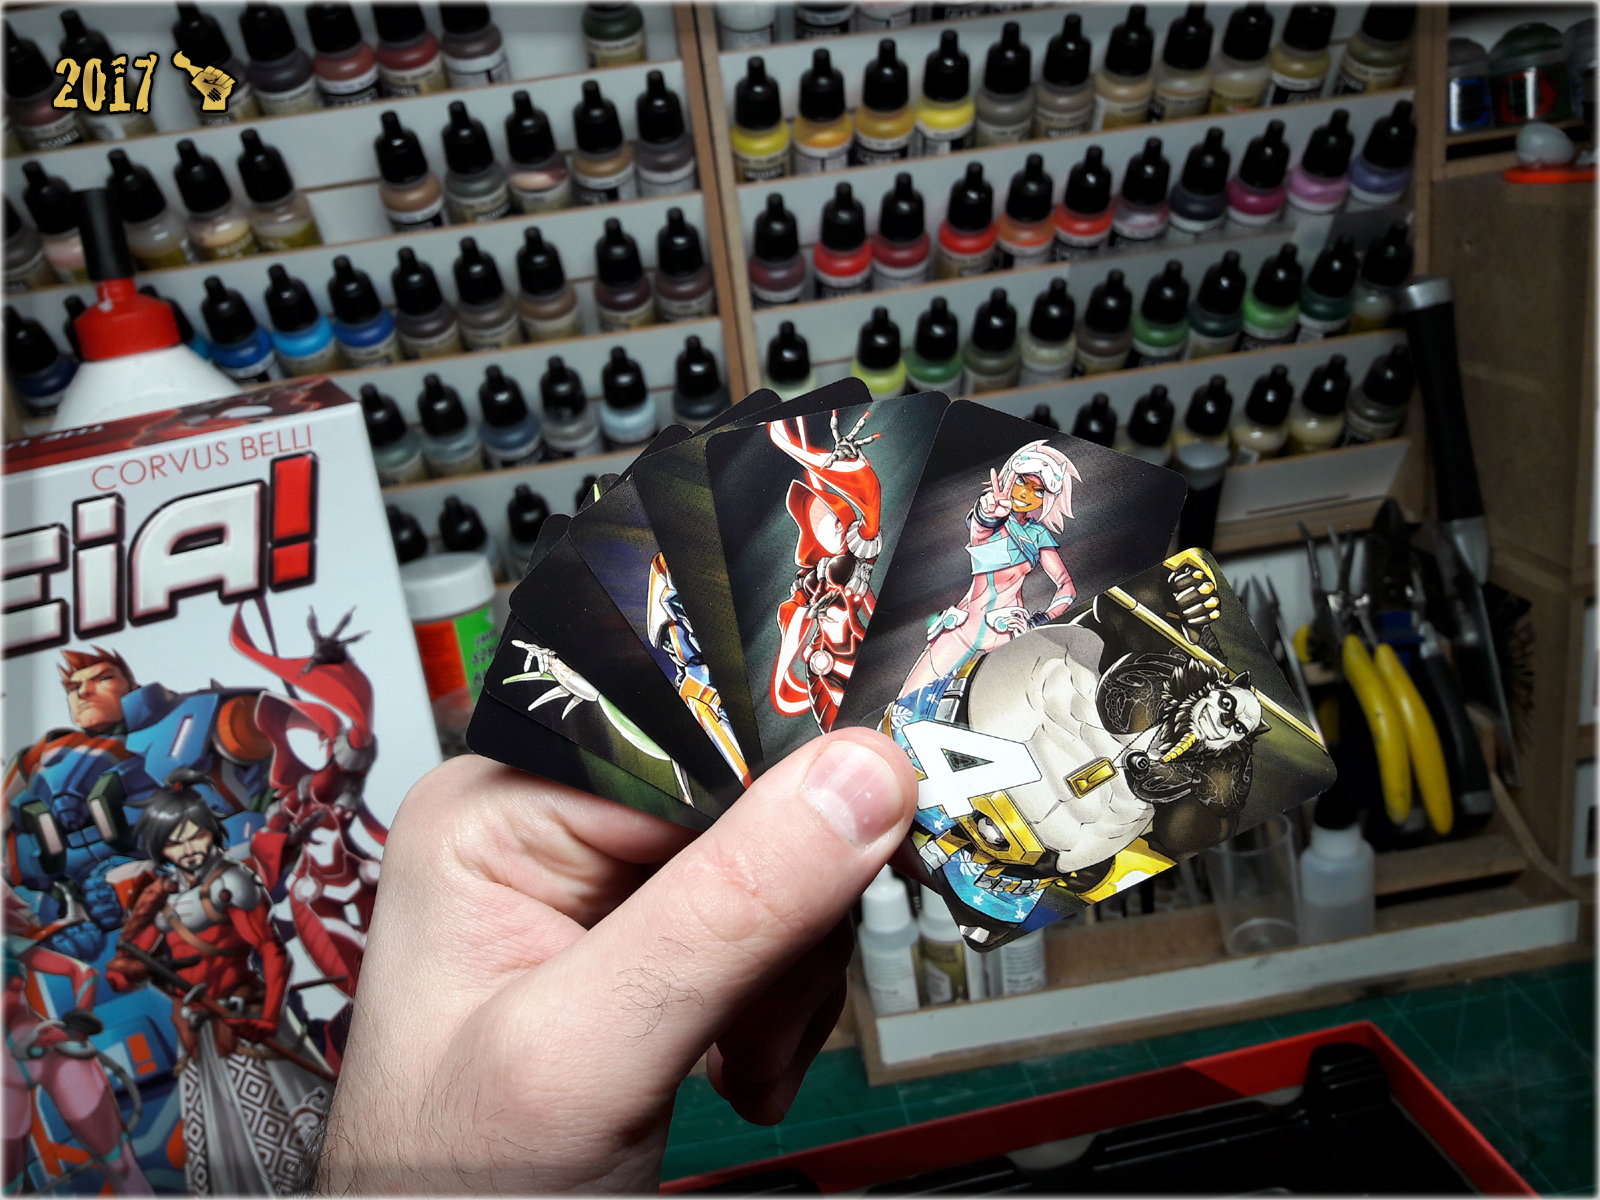
Aristeia! is a game of futuristic gladiatorial combat set in the universe of Infinity the Game. As far as I’m aware this is the first board game released by Corvus Belli, Infinity the Game’s producer. I was raised by a board game industry thus once in a while, if a miniatures filled board game happens to appear in my collection, I use this opportunity to review it. I decided to share my feel of Aristeia! with you. As with all my reviews this one will be totally subjective, so – you have been warned 🙂
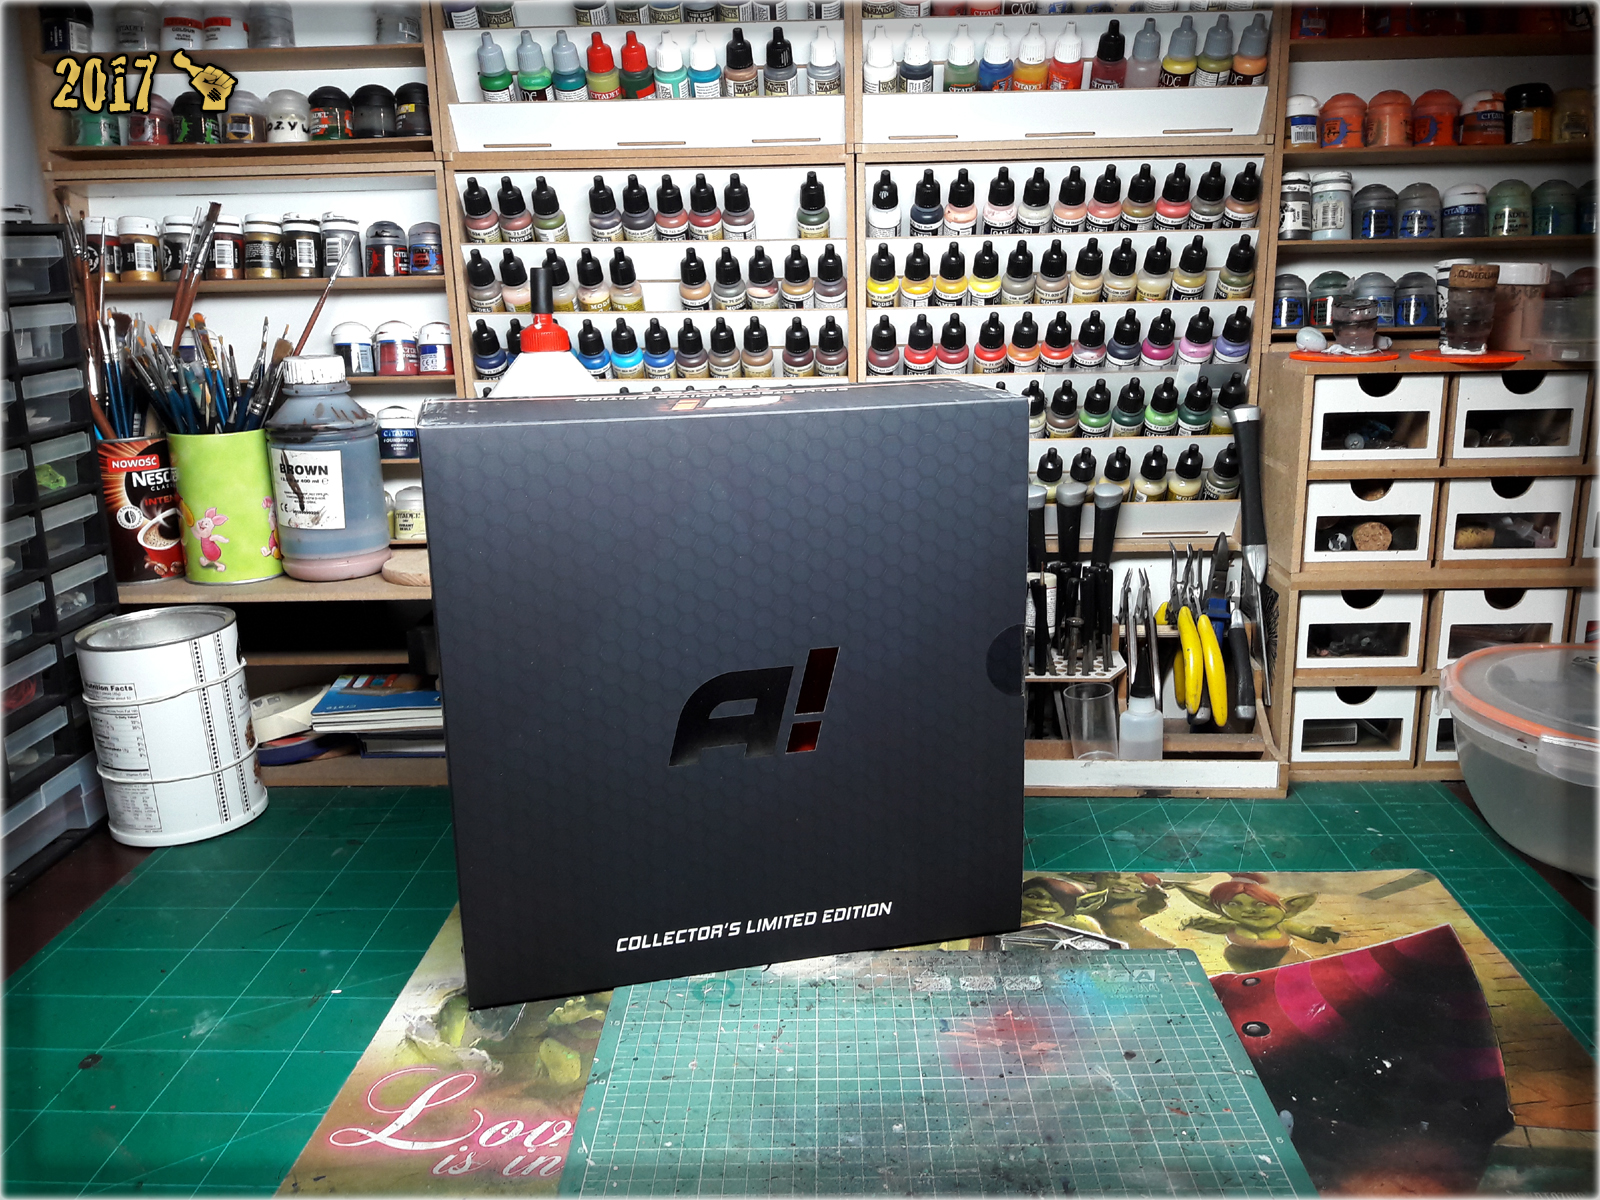
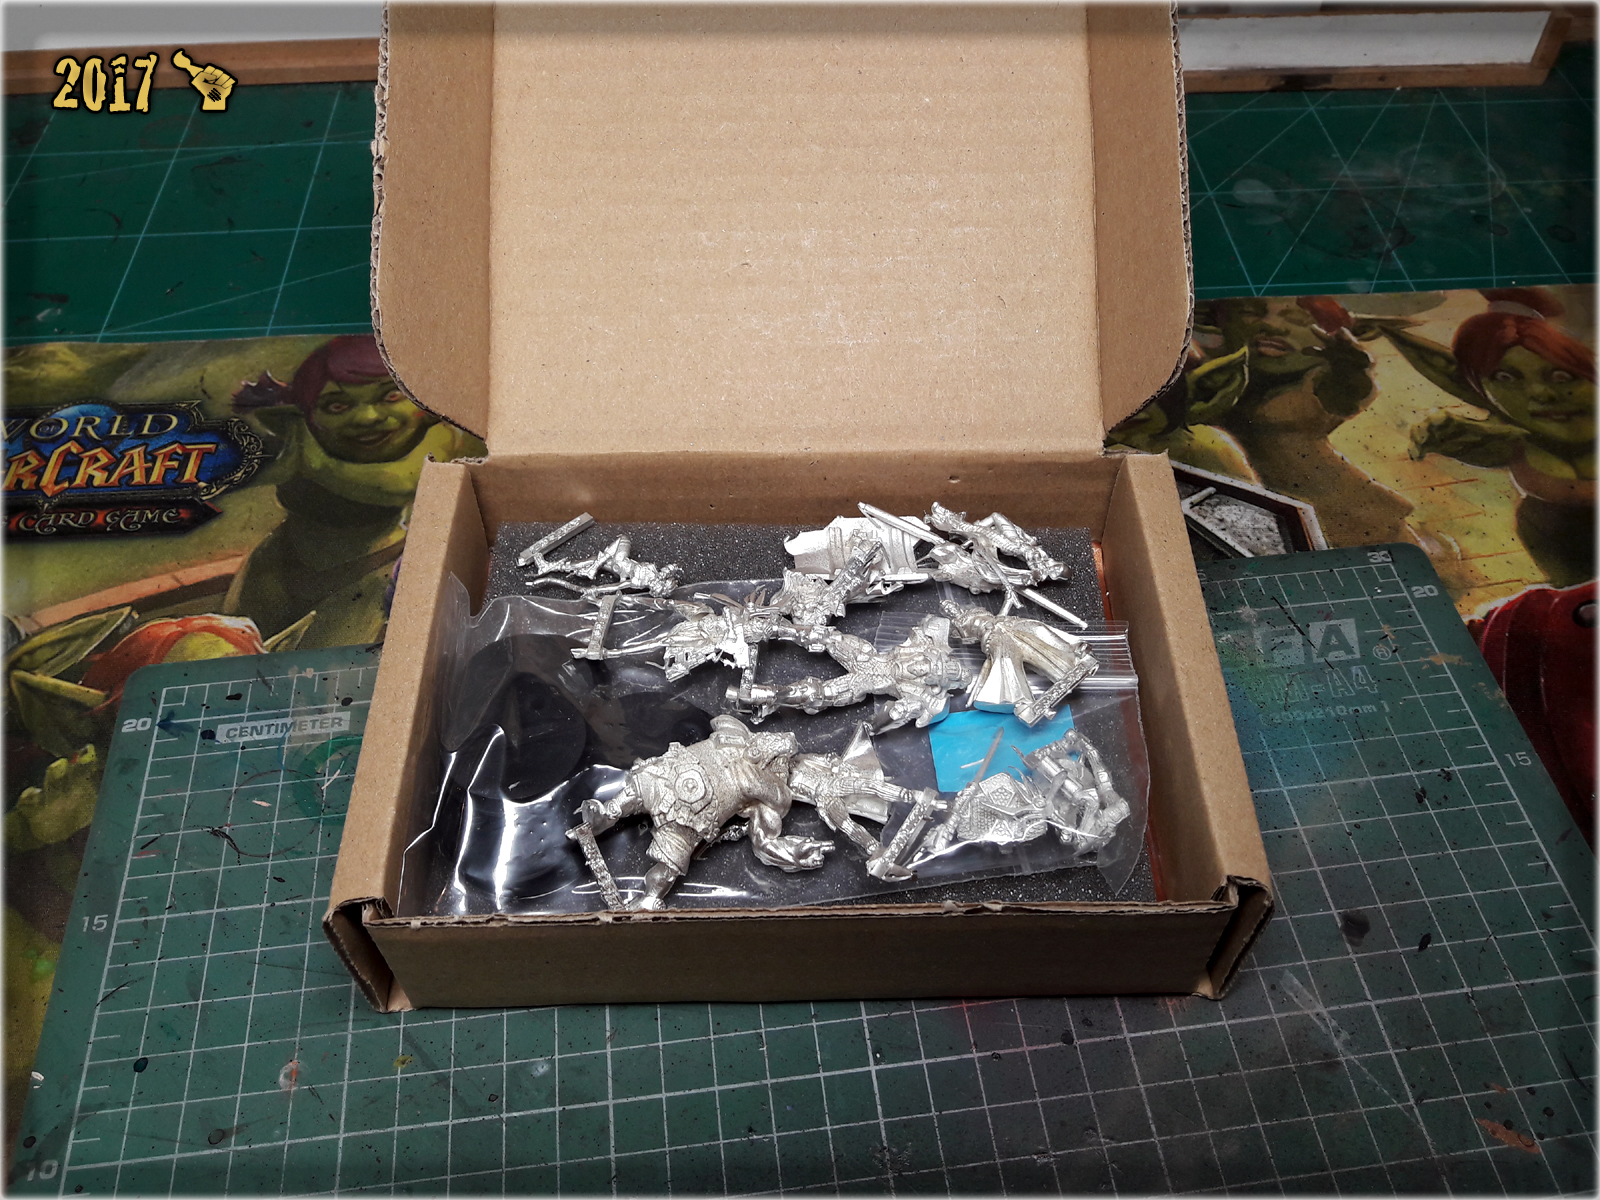
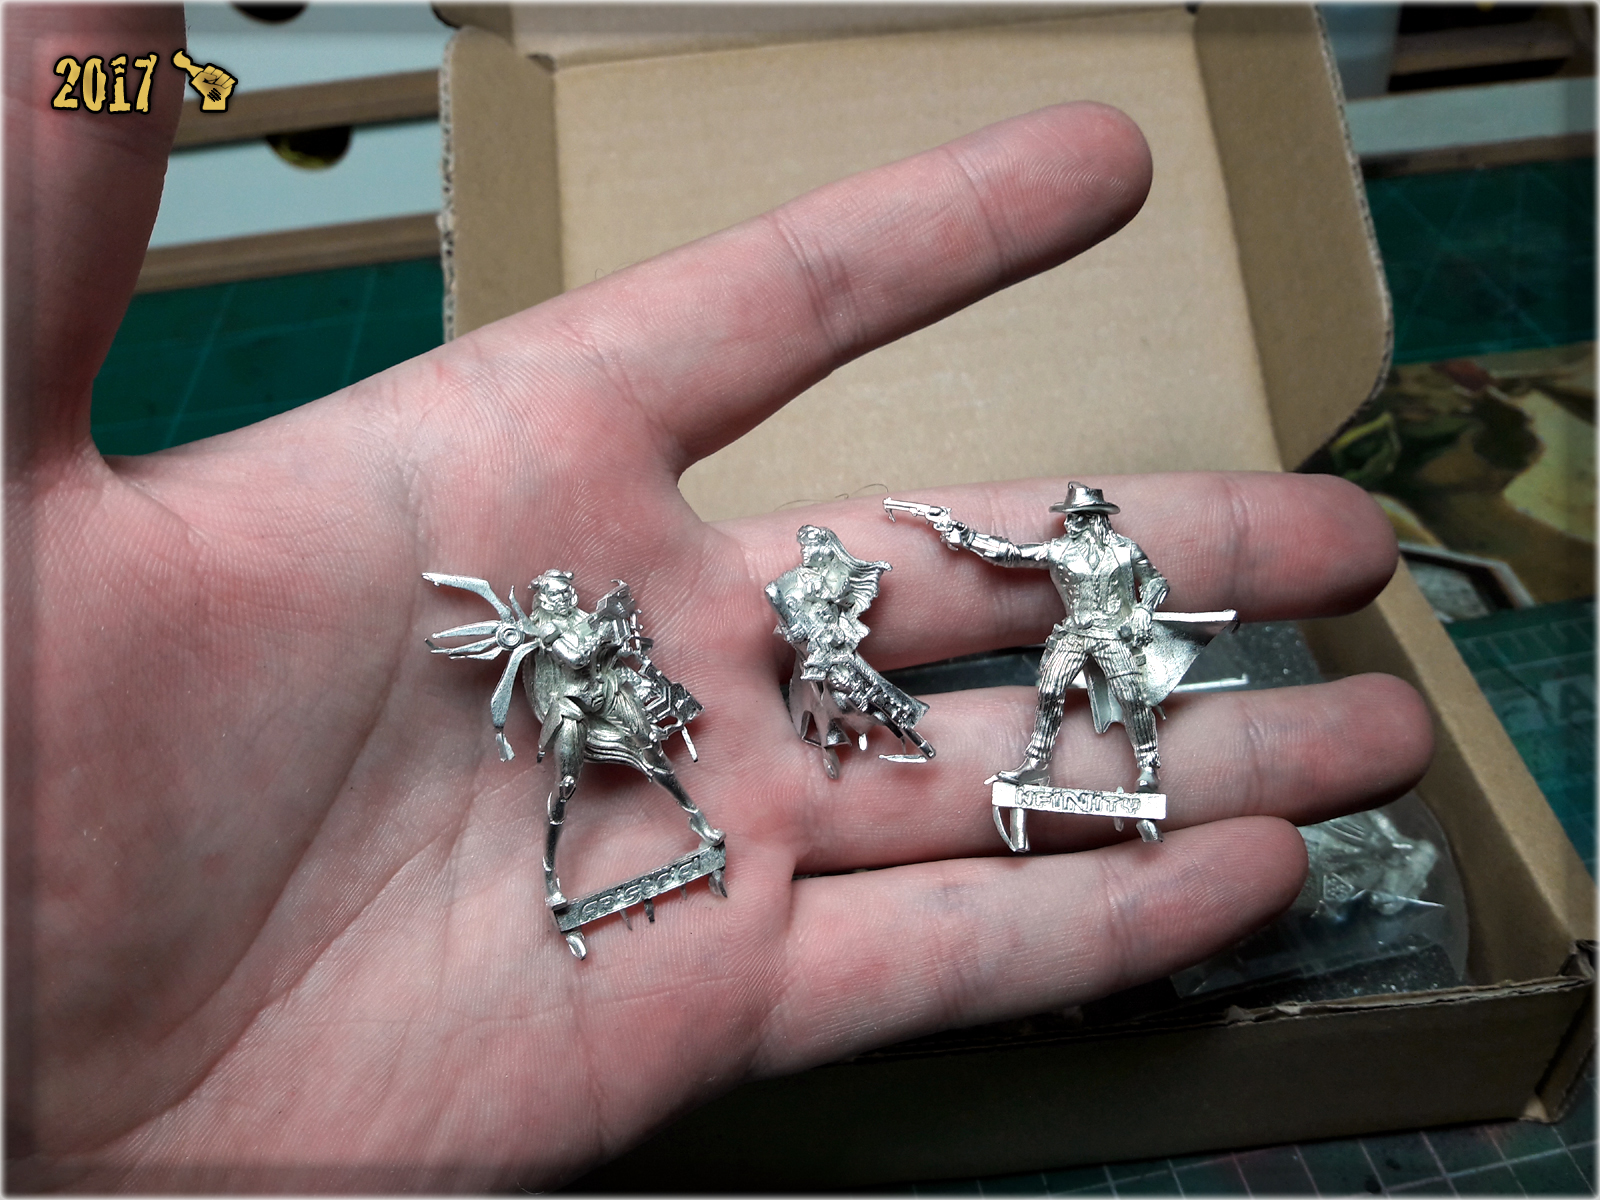
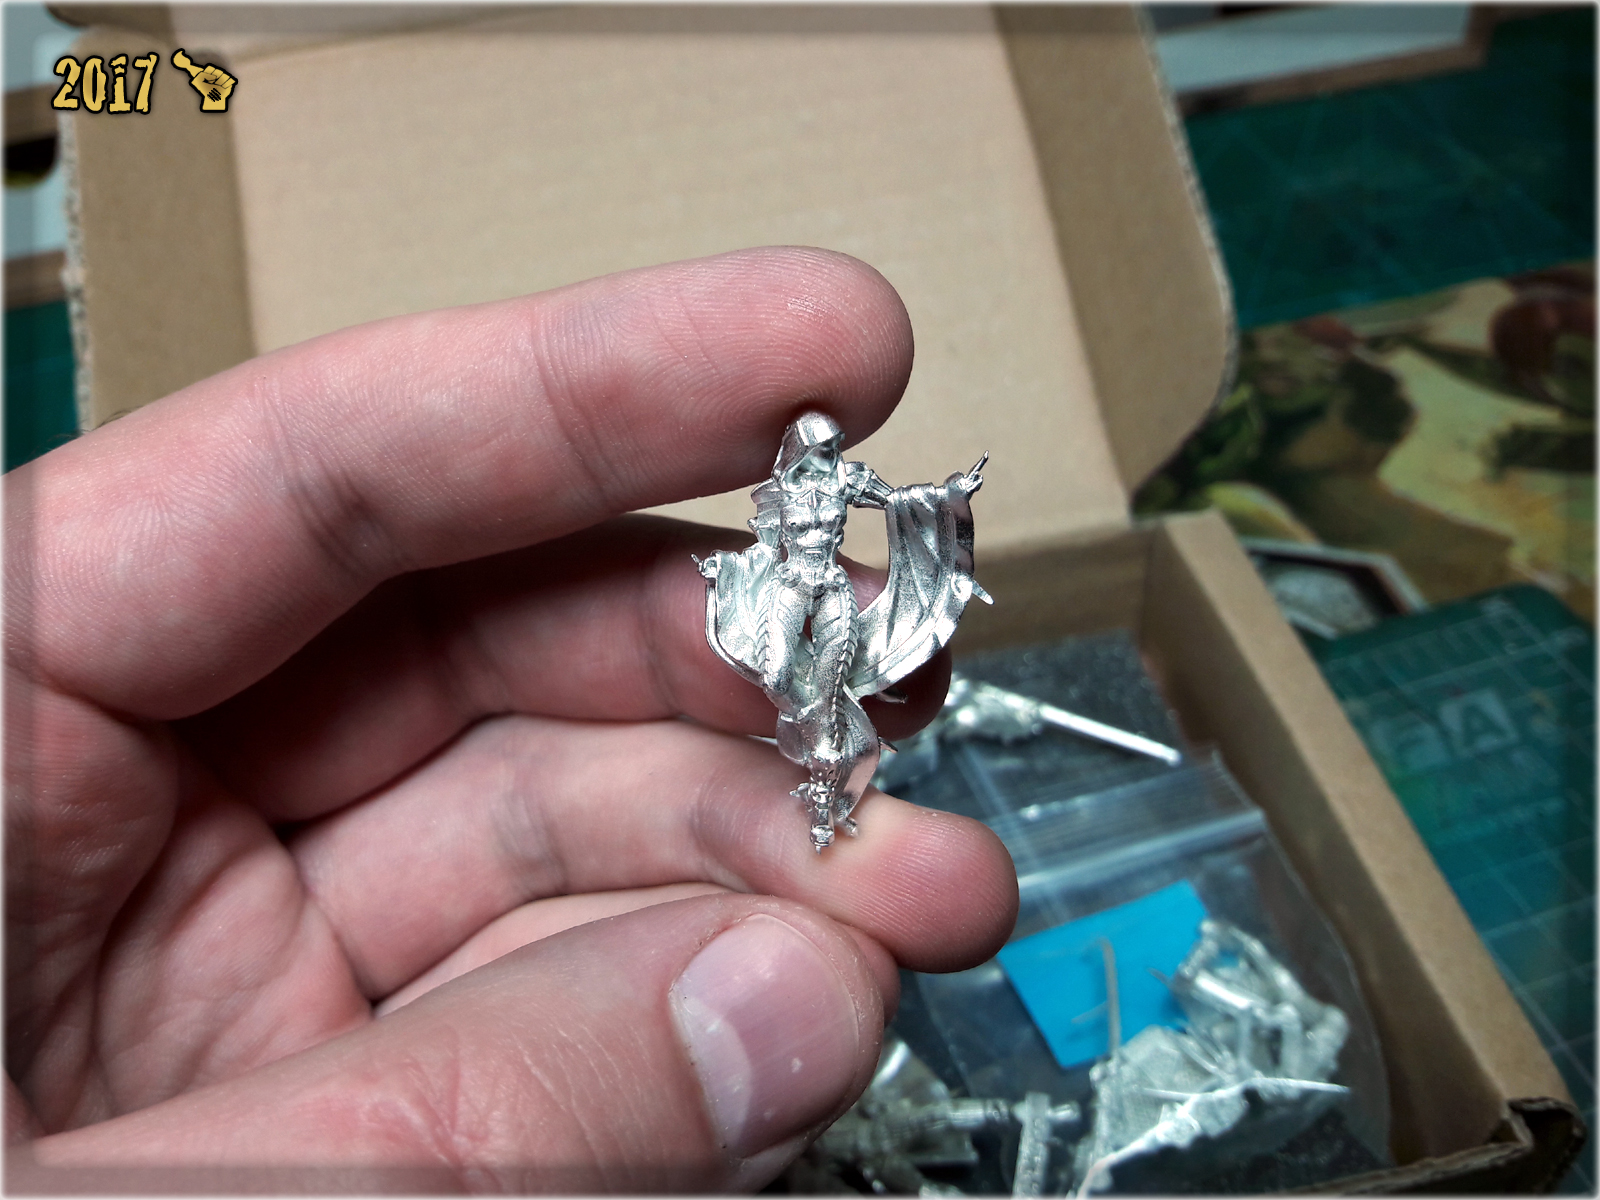
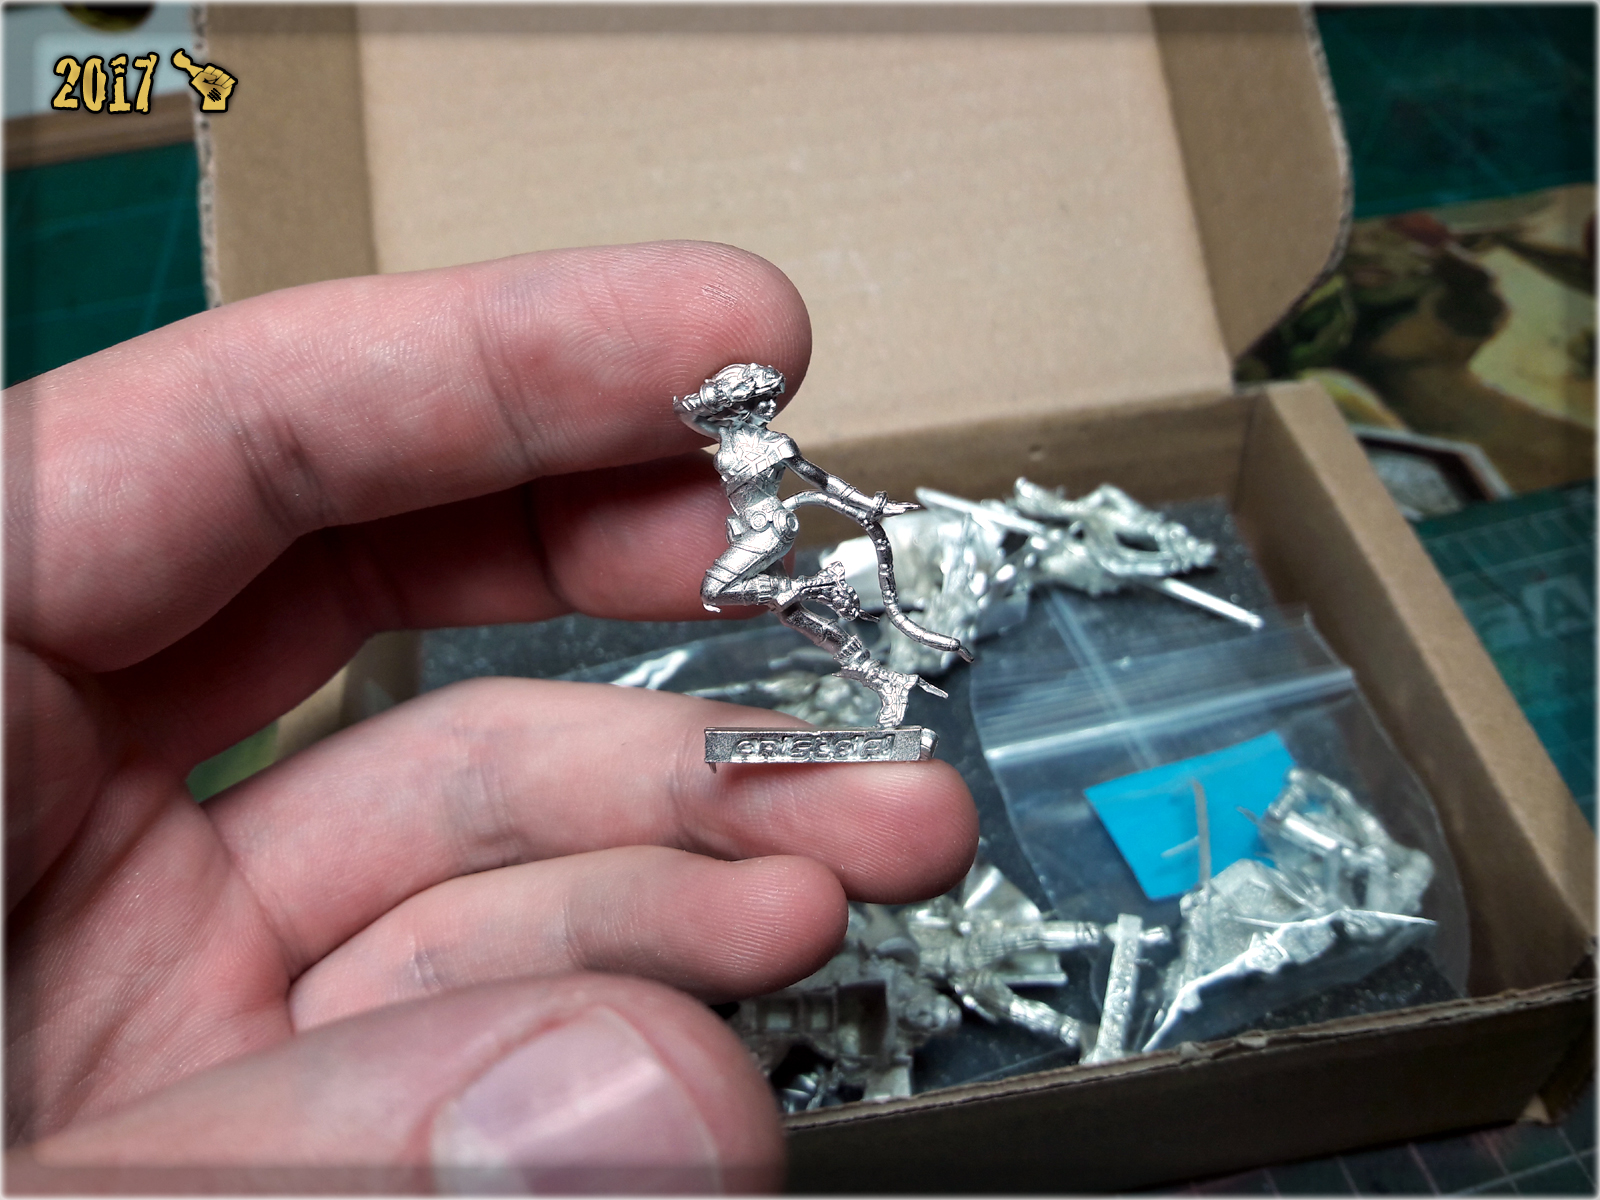
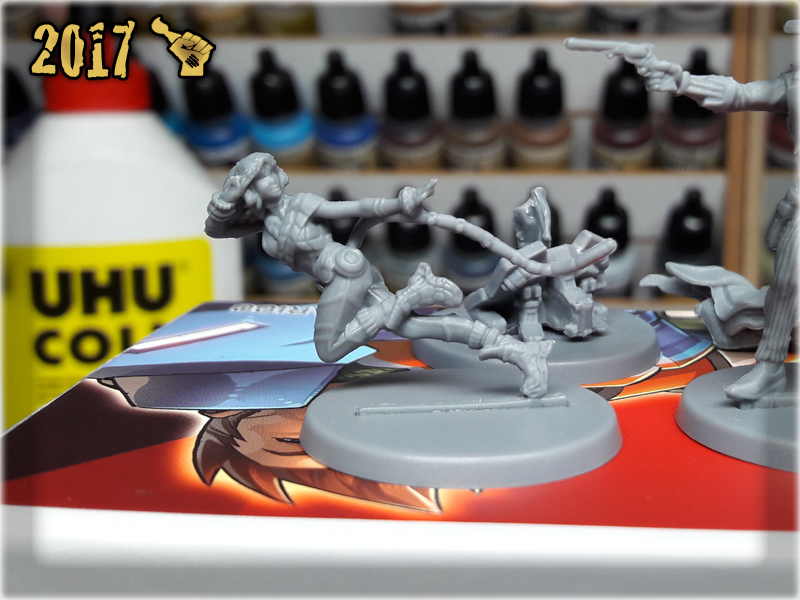
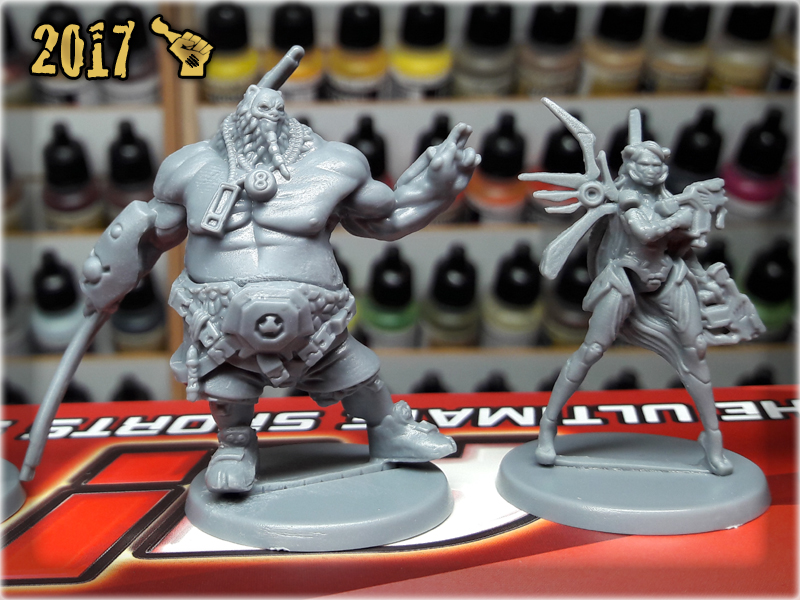
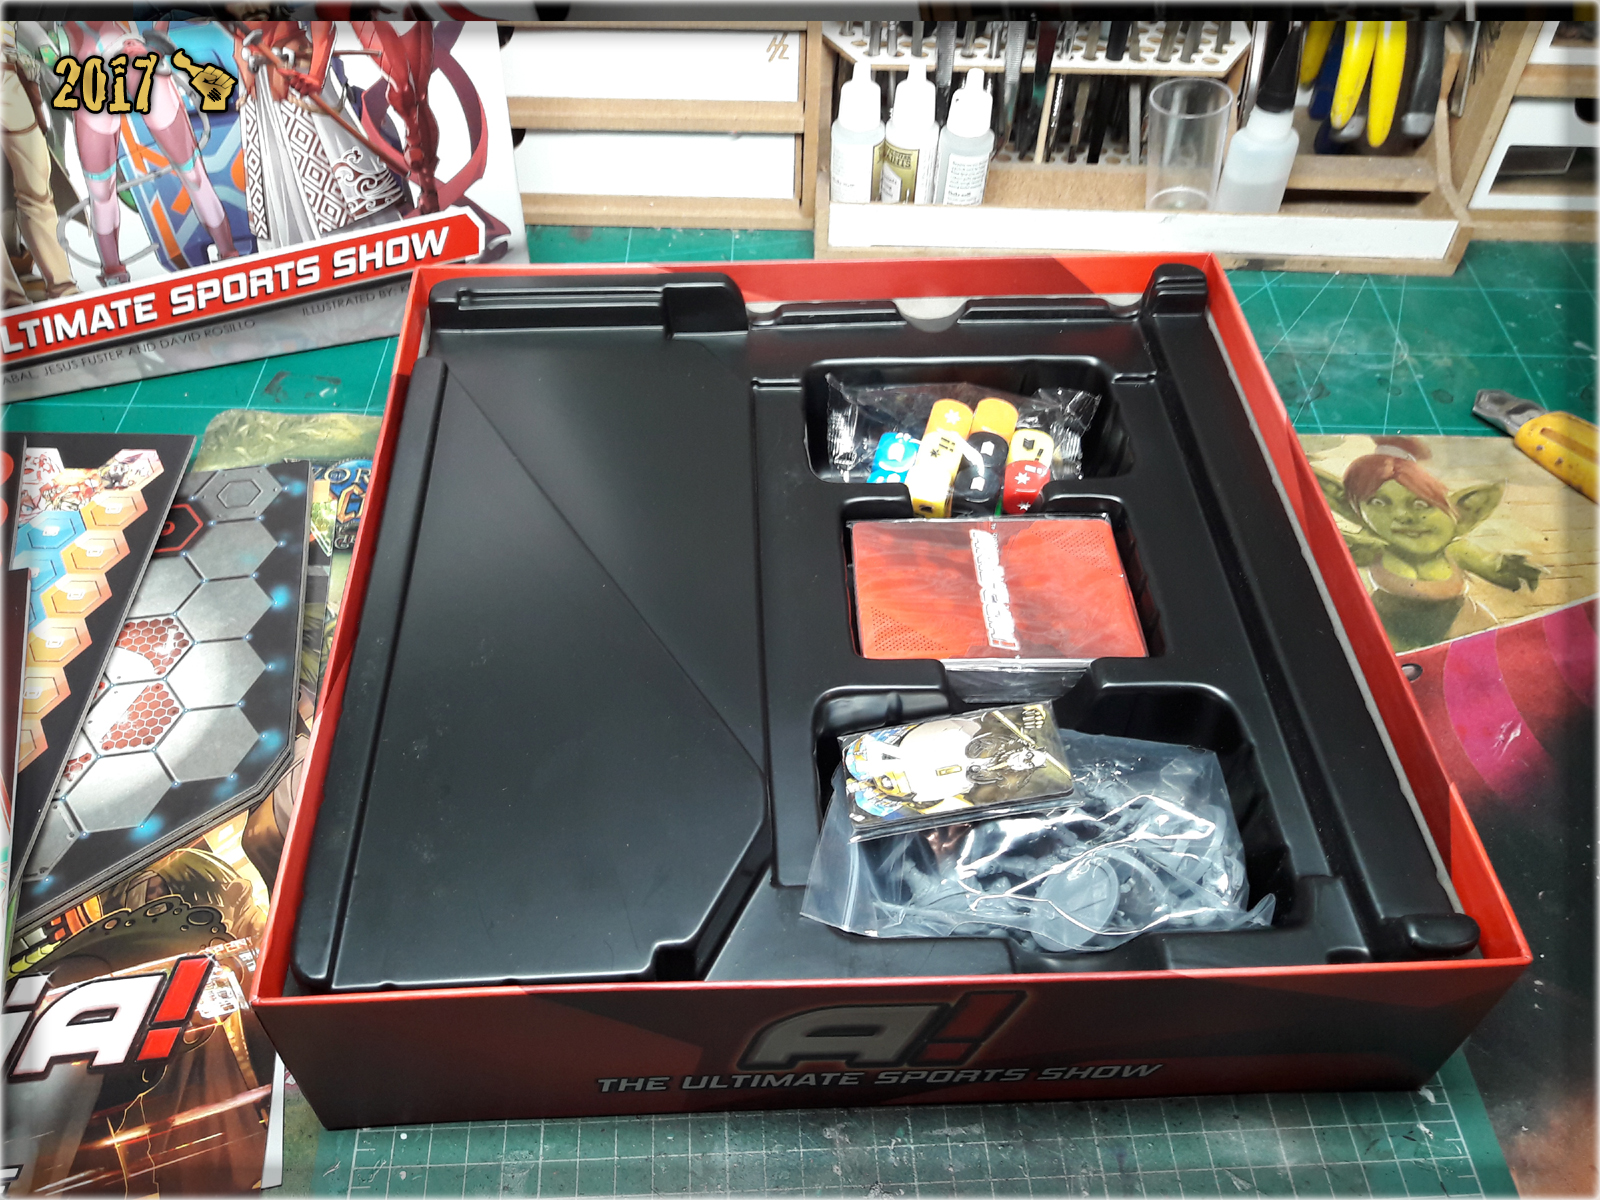
The reason I bought the game in the first place – a set of eight metal Aristeia! characters. I knew what to expect from plastic miniatures, thus decided to spend more and get the best quality product. Metal miniatures are standard for Infinity the Game players, but are something totally new for regular board game muggles. To all of you who might not know Infinity the Game quality – these are one of the best miniatures in the market. They require a lot of preparation and must be put together before use, but would reward all the work put into them with great quality of detail.


Now, let’s leave awesome miniatures behind and see what’s inside the game…
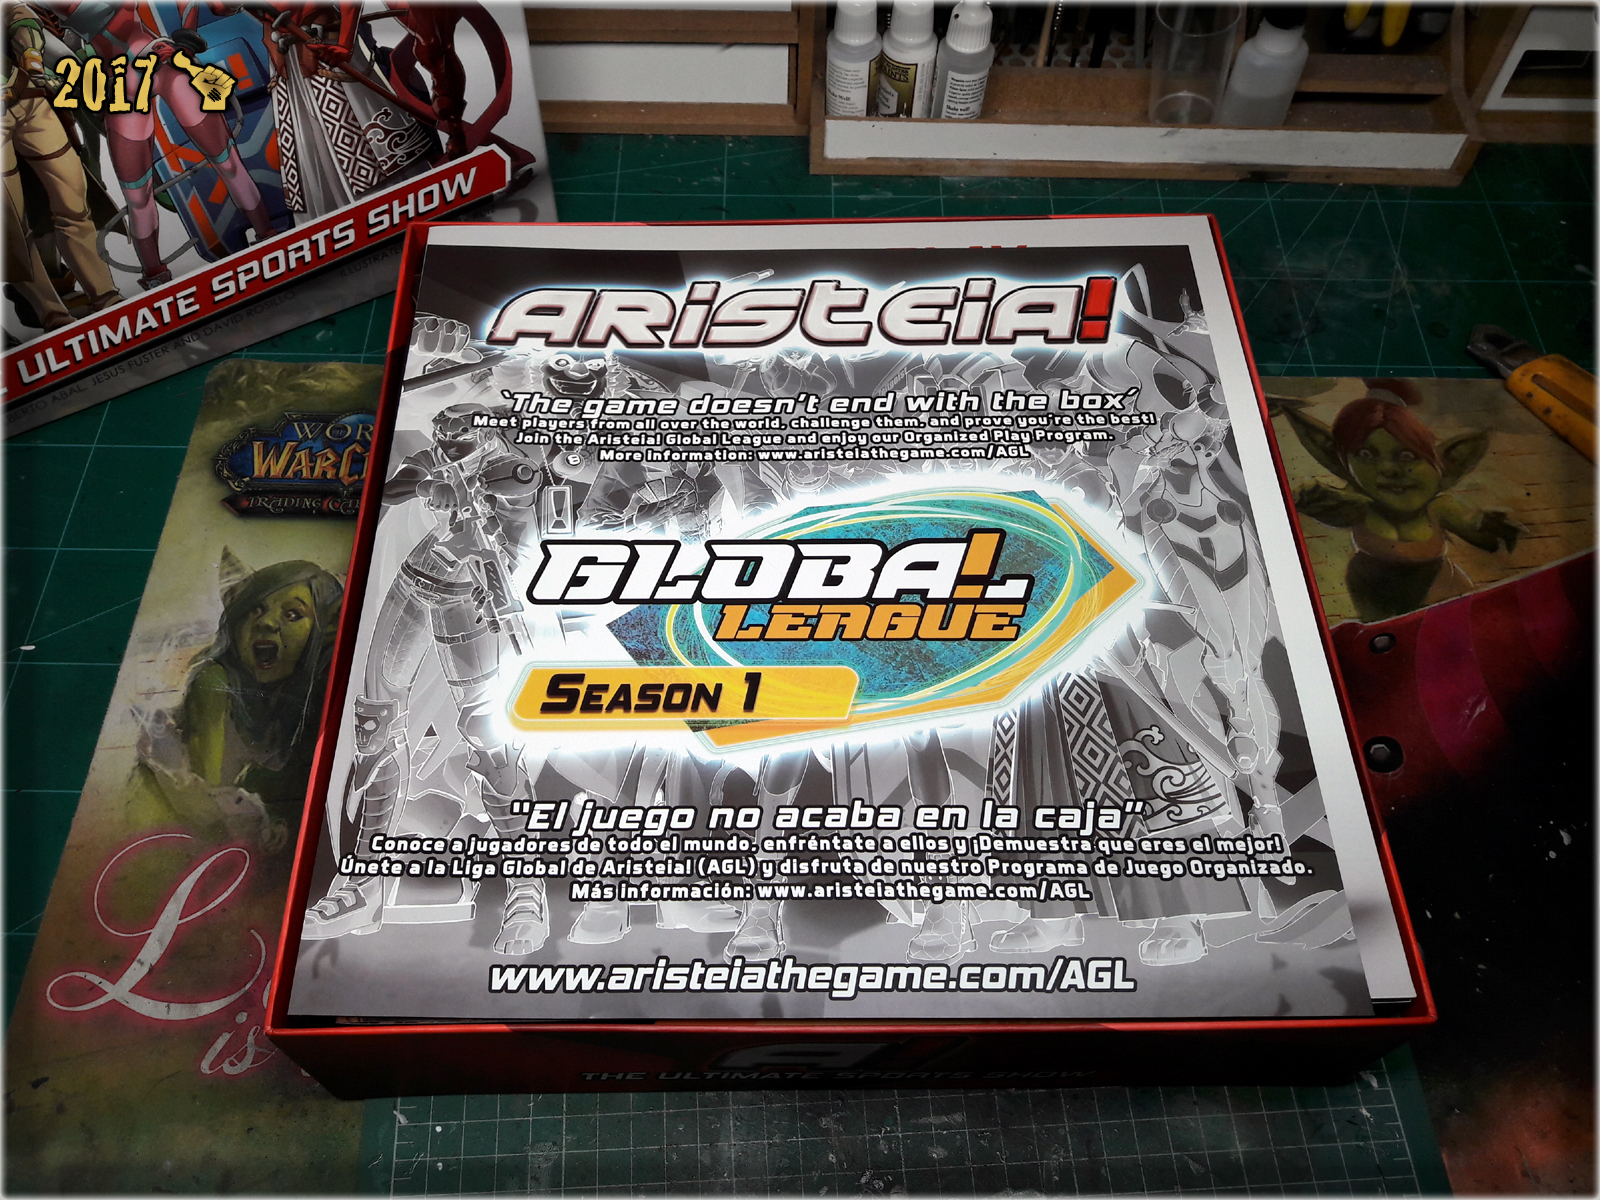
The ‘Box’,
The box is solid, standard board game quality. Hard paper, smooth with no grating. It is not the quality that some of the most popular board game producing companies (FFG, CMON) spoil us with, but is still acceptably durable. In comparison to Corvus Belli’s usual front designs like Operation Icestorm which literally screams ‘Fuck yeah! So much action inside!’, Aristeia front is kind of dull. There seem to be a lot colours with not much coherency whatsoever, which is further emphasized by white background. My reaction to the box is that it would have difficulty catching my attention in a board game store – but hey – totally subjective.
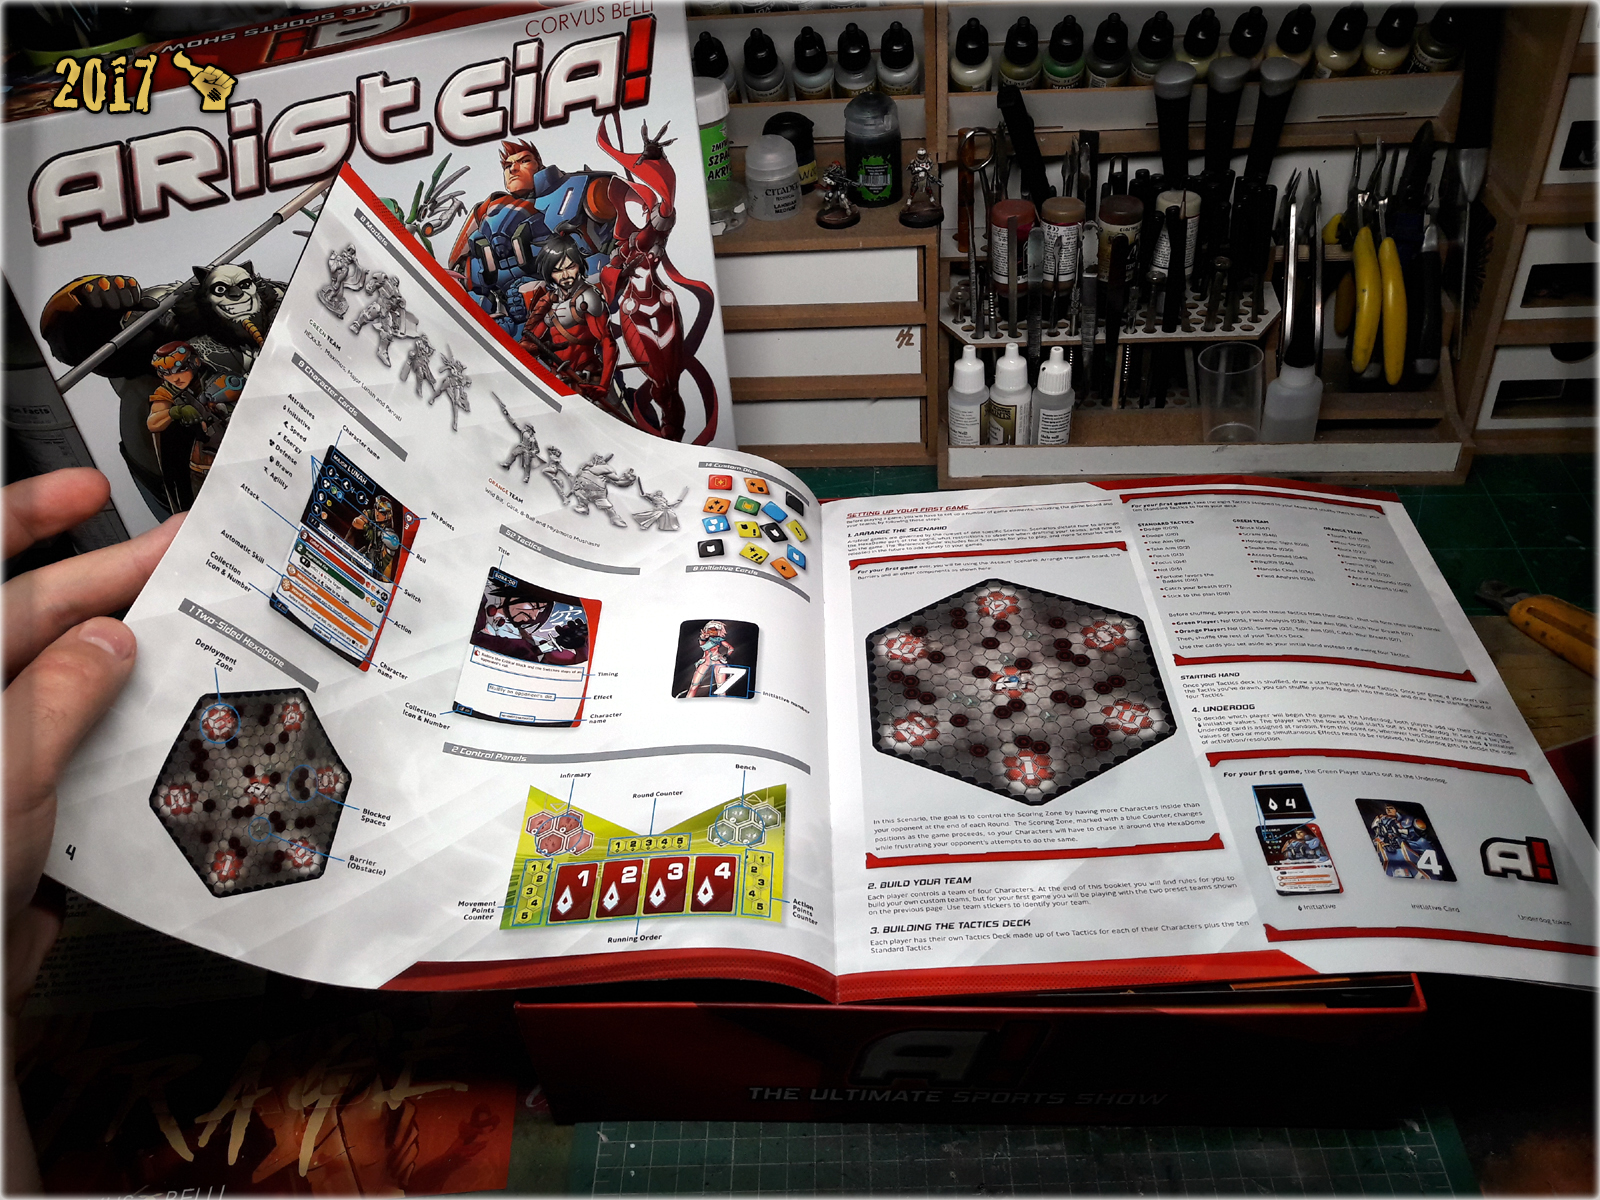
‘How to Play’ ergo Rules,
A 15 pages long, ‘How to Play’ booklet. This one will lead you through game components and then a pre-setup game with pre-defined rolls and actions. Going through this should make you understand the game’s mechanics and feel comfortable going into your first ‘serious’ game. The booklet is designed to introduce some rules at certain point. If you are a seasoned board game player you would probably get bored in the middle and skip ahead to a real deal game… Seem nice for less experienced players tho.


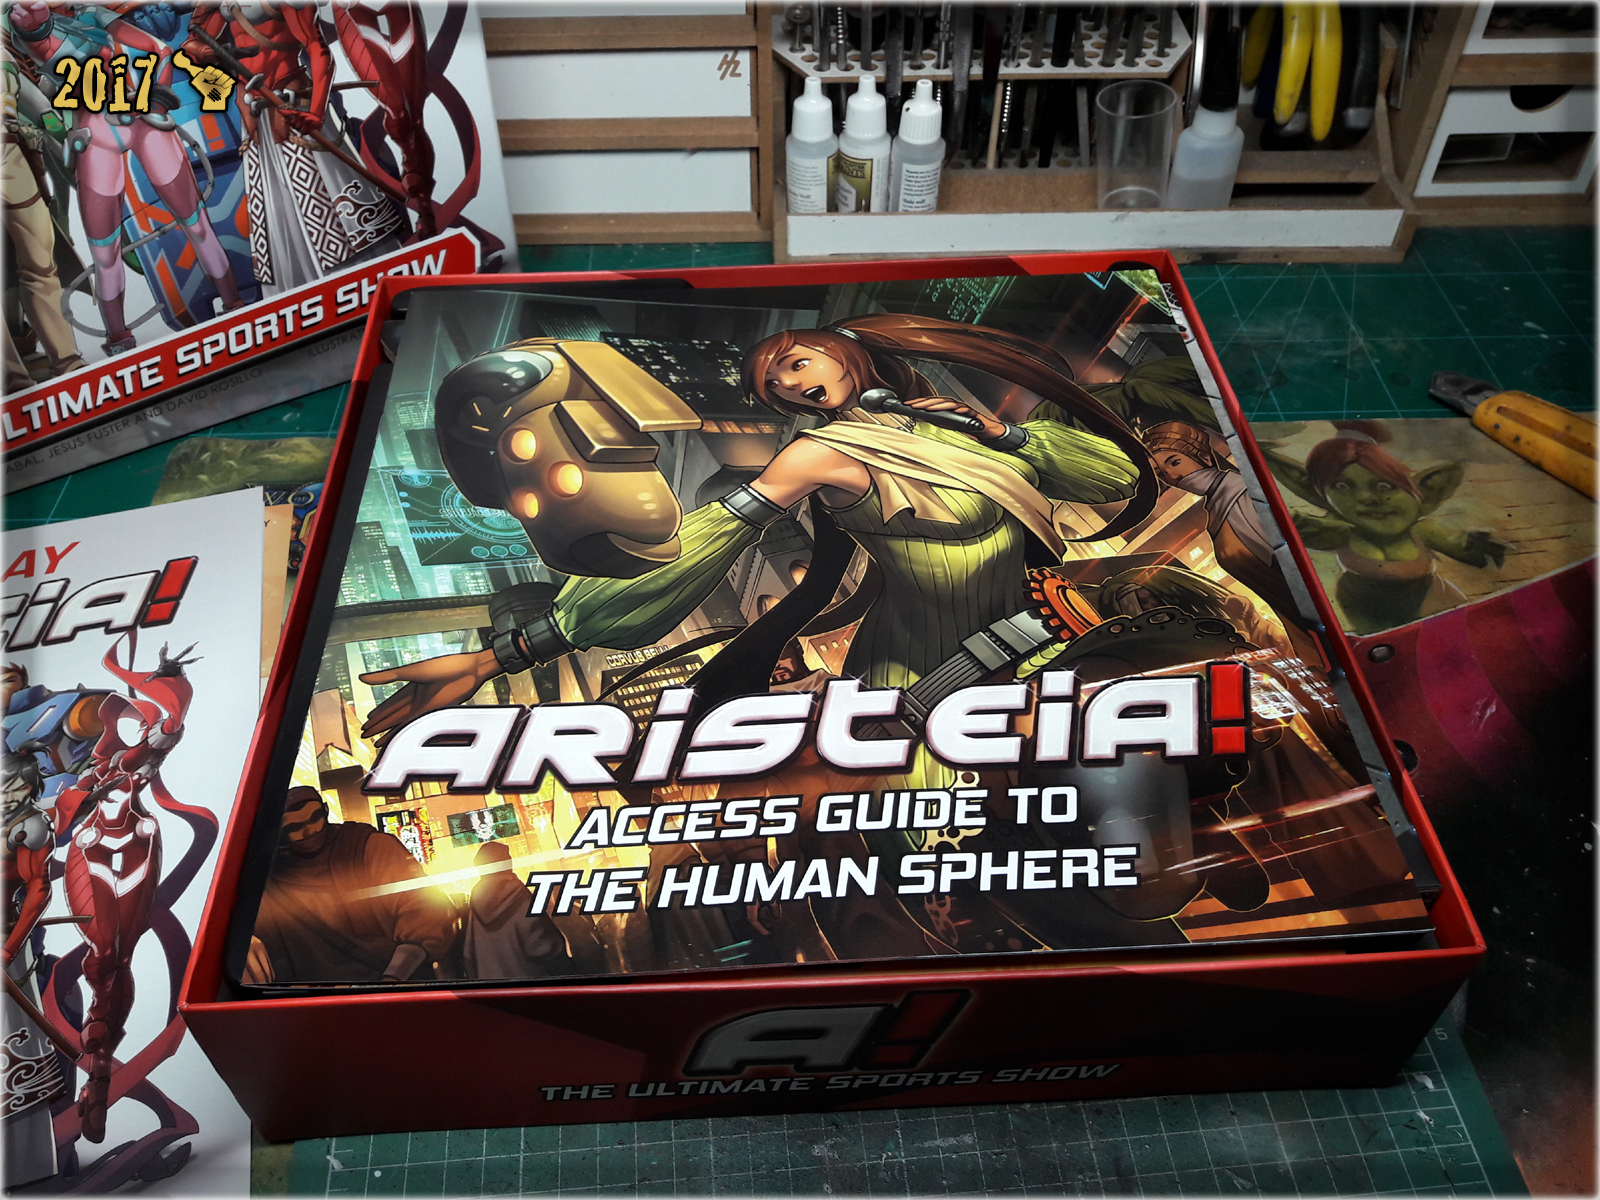
‘Access Guide to the Human Sphere’ ergo Fluff book,
An interresting addition. Corvus Belli is well known for providing a deep background for their products. Aristeia! is not an exception. With this 14 pages long booklet we get to know the setting and the characters of Aristeia! A really nice way to get a bit more into the game and ‘feel’ the characters. Here’s also where you will find the best graphics of the game in high resolution.


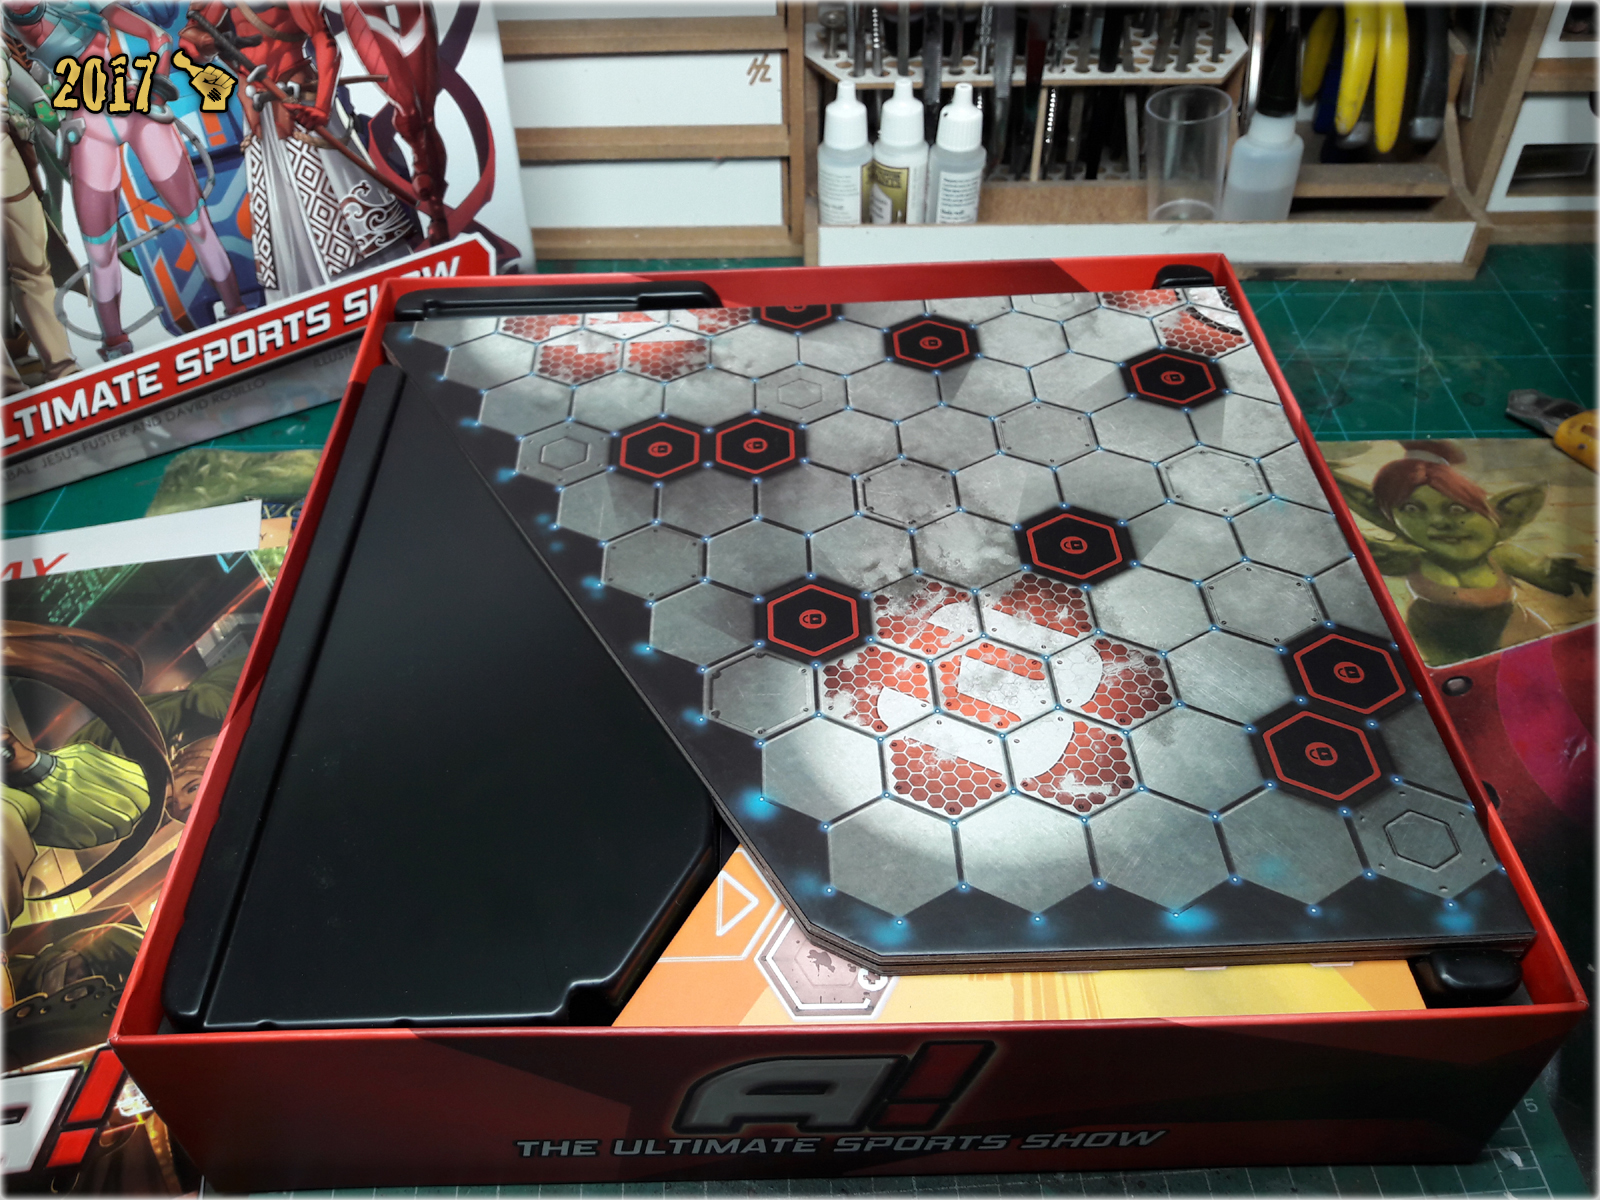
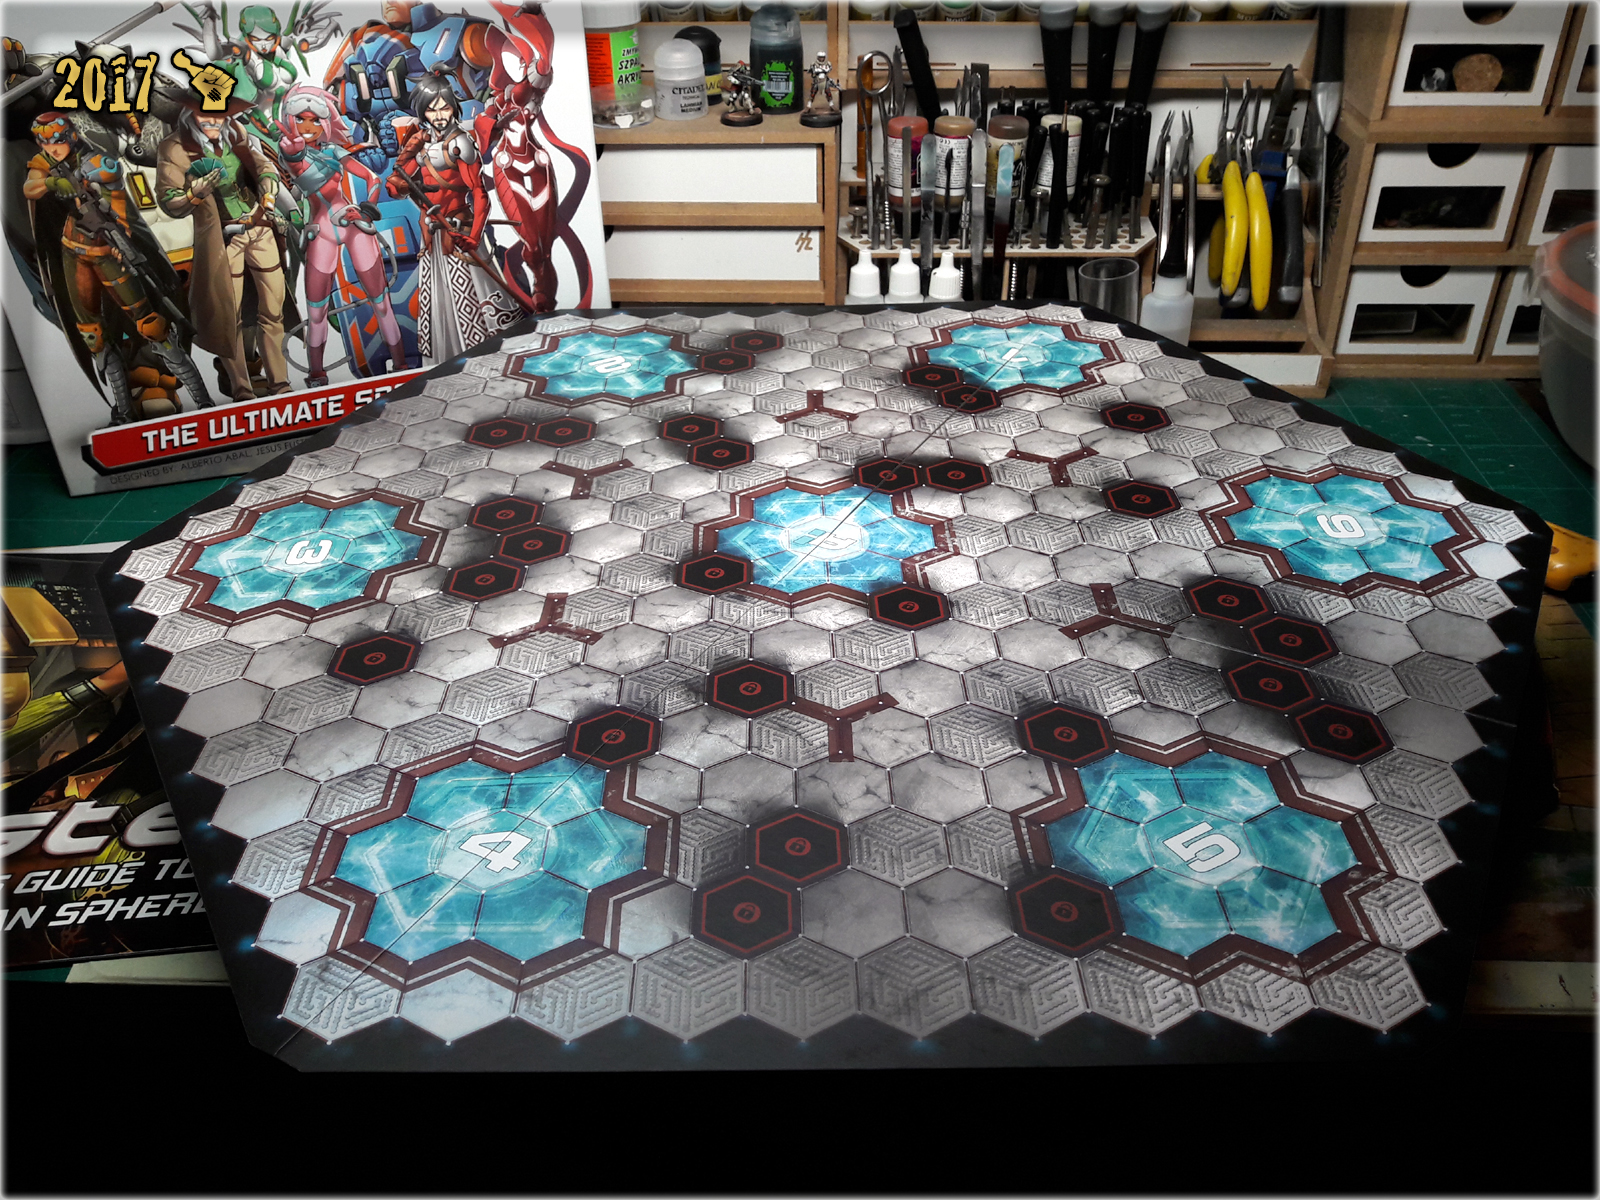
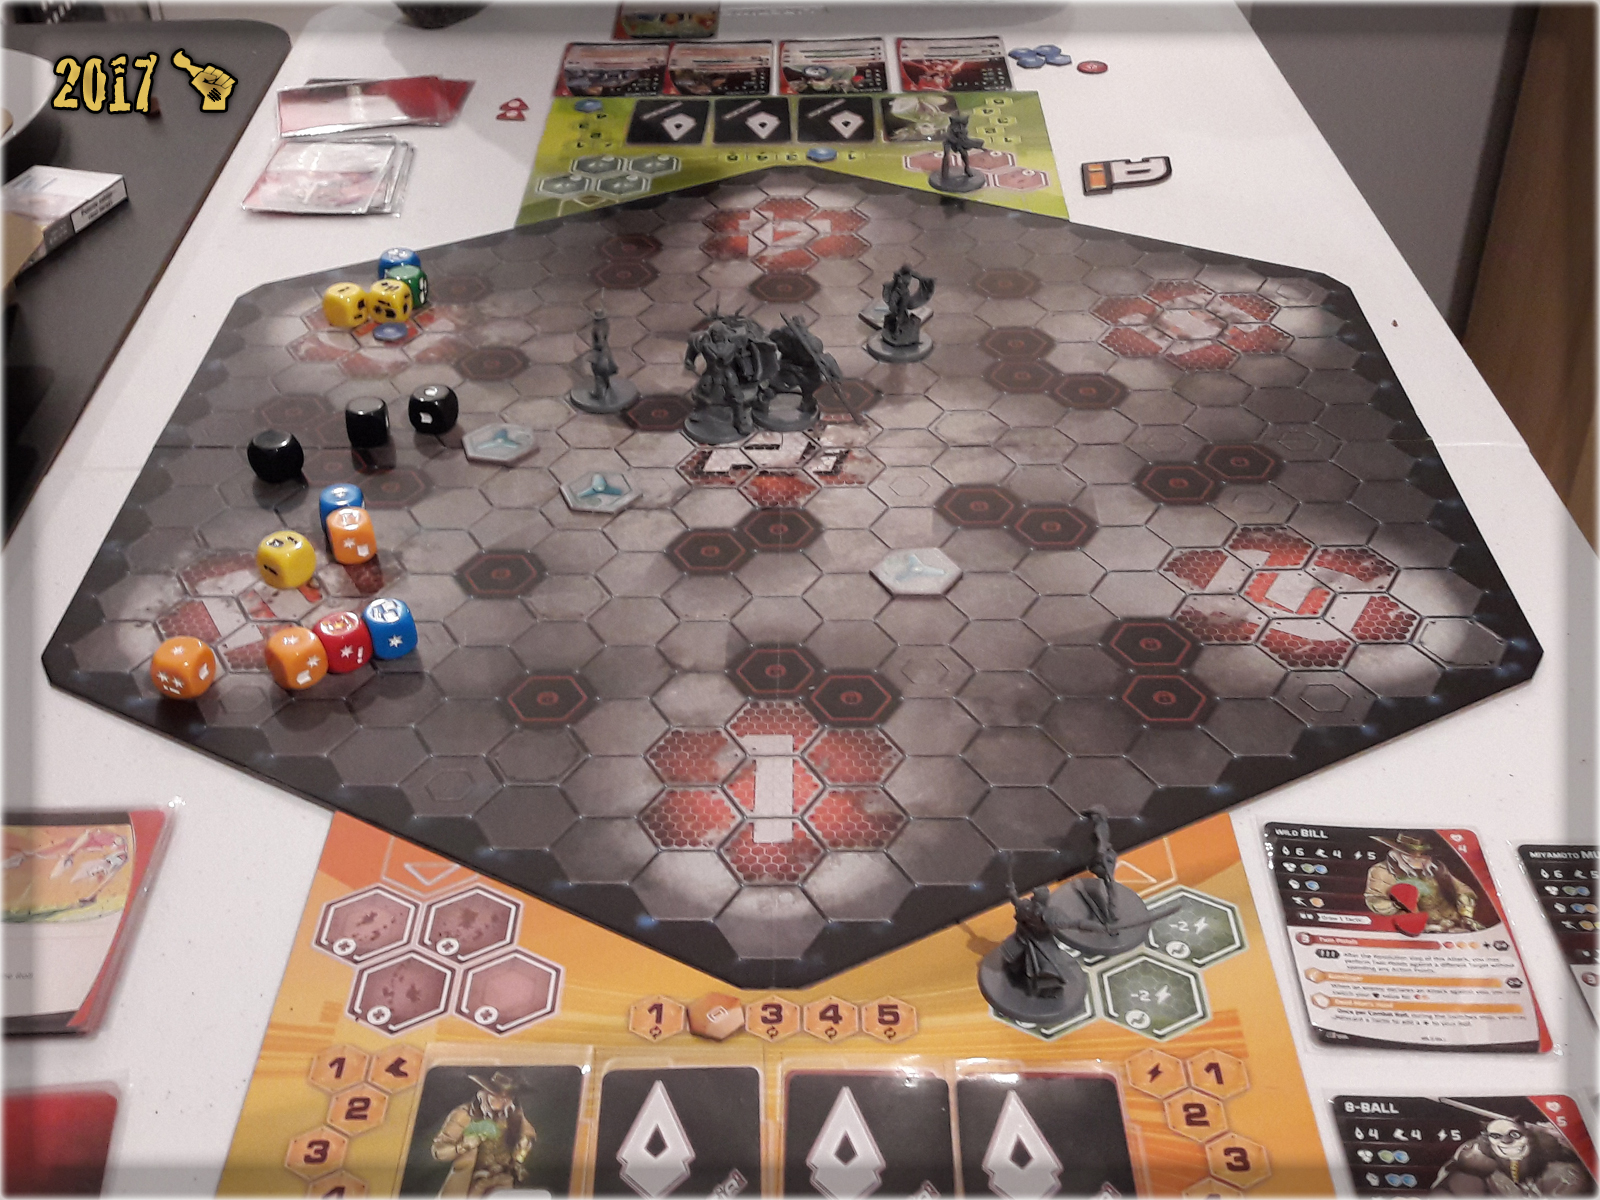
Two-sided Gaming Board,
Made out of hexes and looking like a giant hex is the Hexadome board! Usual board game quality. After setup it lays flat on the table. It is rather clear to understand. I am a bit dissapointed that both sides have identical layout with only difference being the visual design. Hoped for two totally different gaming areas that would provide much more variety and replayability.

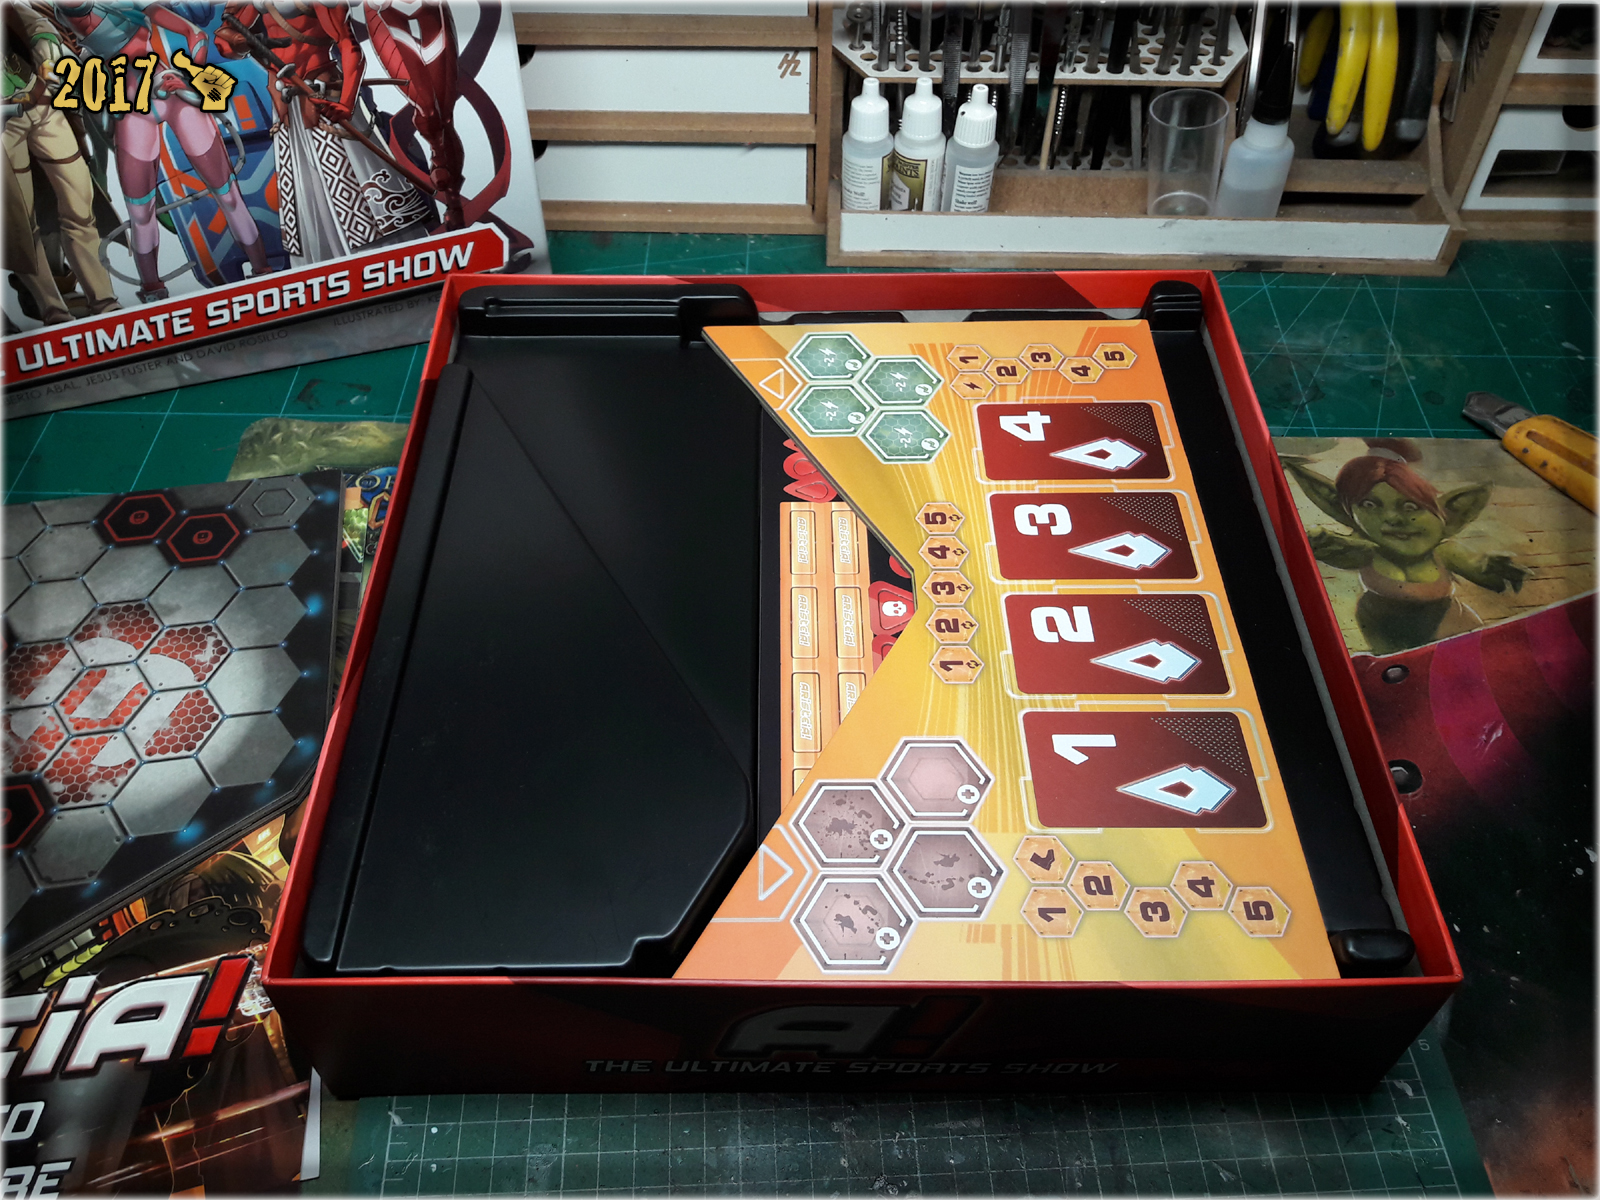
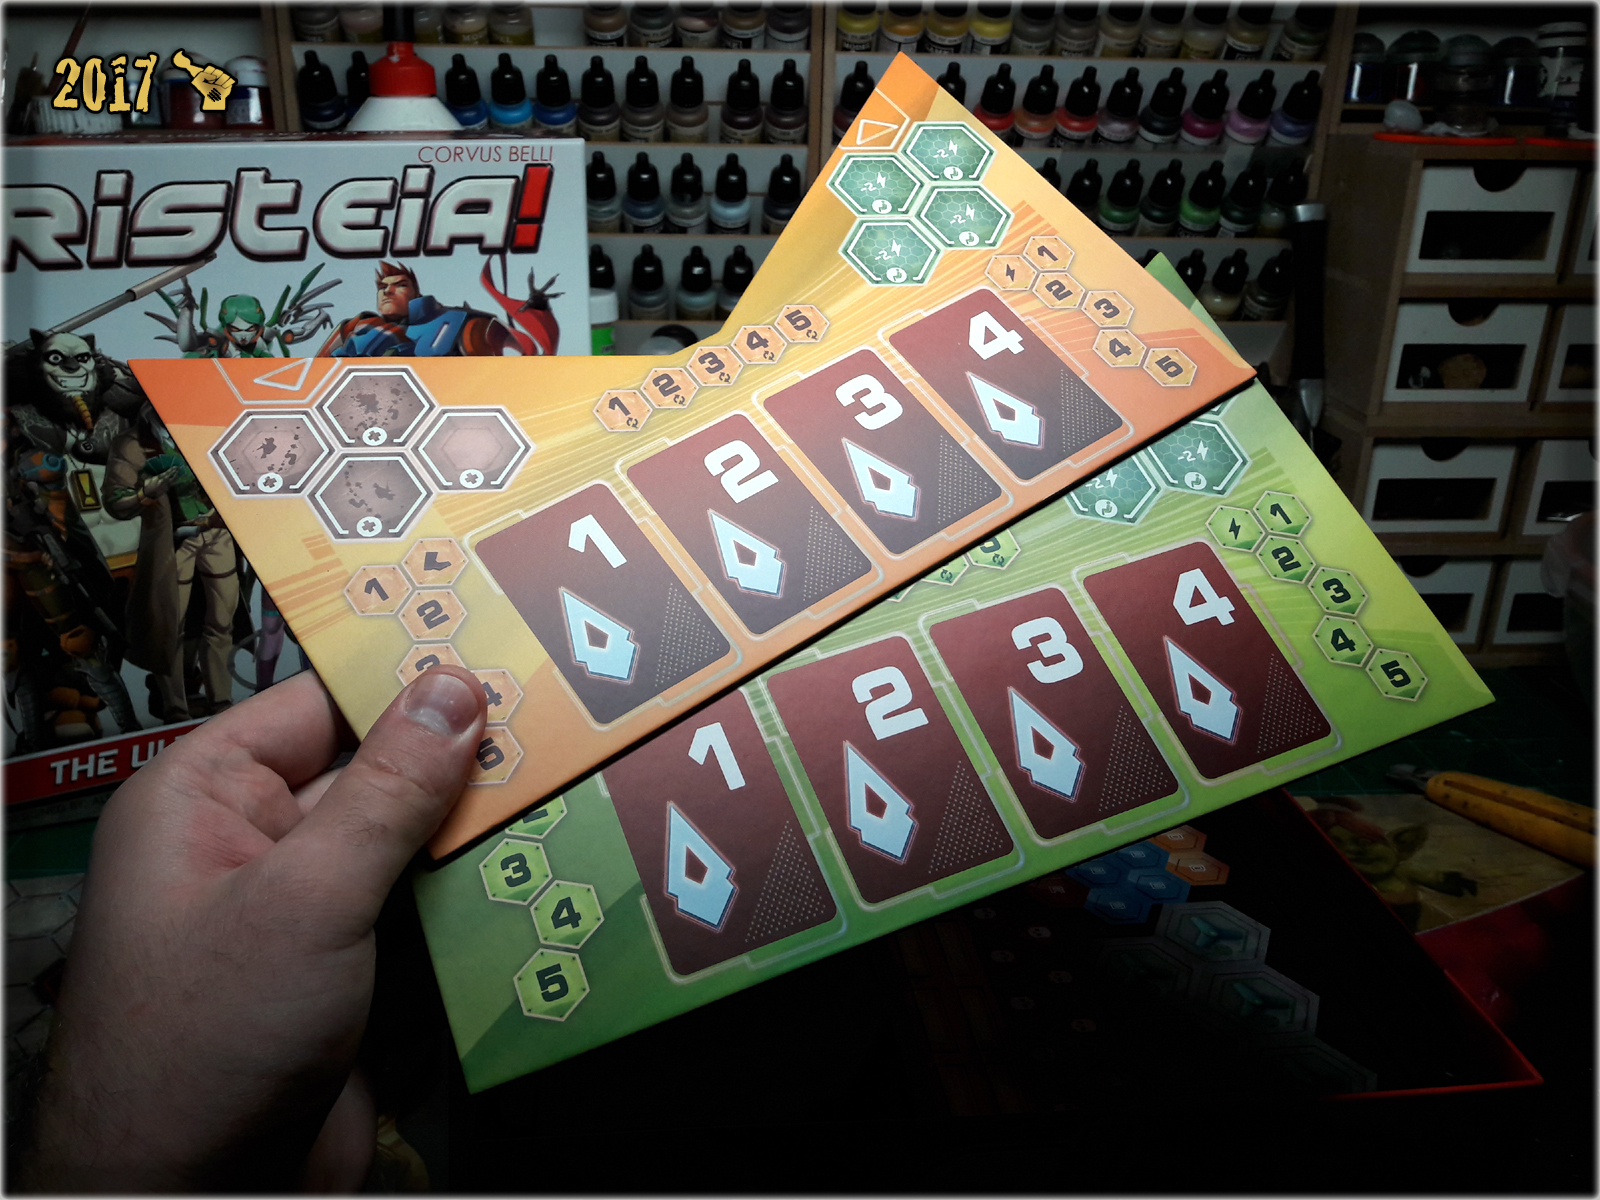
2 Control Panels,
When I look at these I want to quote Dutch from Predator poronouncing “What the hell are *you*?” with utter distaste. Supposedly fancy shaped to fit the board at the start of the game – utterly retarded once you realize that instead of helping they do the opposite. On top of that these look like out of entirely different game – they just don’t fit the visual layout of Aristeia! and mess up entire futuristic sci-fi feel of the game.
If you haven’t read the rules of the game – I advise to skip the list of issues below, not to get confused too much.
Overall Control Panels are a waste of resources, needless gadget – I am trashing my own and adding a ‘Aristeia! Control Panel’ to the list of words that trigger me.
A shitload of Tokens, including Obstacles, Damage, States, Victory Points, Frags, Green/Orange, Blue/Orange, Red/Blue, Red/Green, and Underdog.
When it comes to quality, once again this is just a regular board game quality. No grating, regular hard paper stuff. Gameplay wise these are clear to understand and easy to use, except for the pain in the ass tiny droplets, which really might have been the same size as ‘Damage 3’ tokens. Visually tokens present themeselves poorly. Once again a feature that doesn’t feel right and is far from fitting the supposedly futuristic aspect of the game. Tokens look like from some poor, booring game without theme. Quite dissapointing – and that’s actually strange comming from Corvus Belli, known for caring about visual and theme aspect of their products.
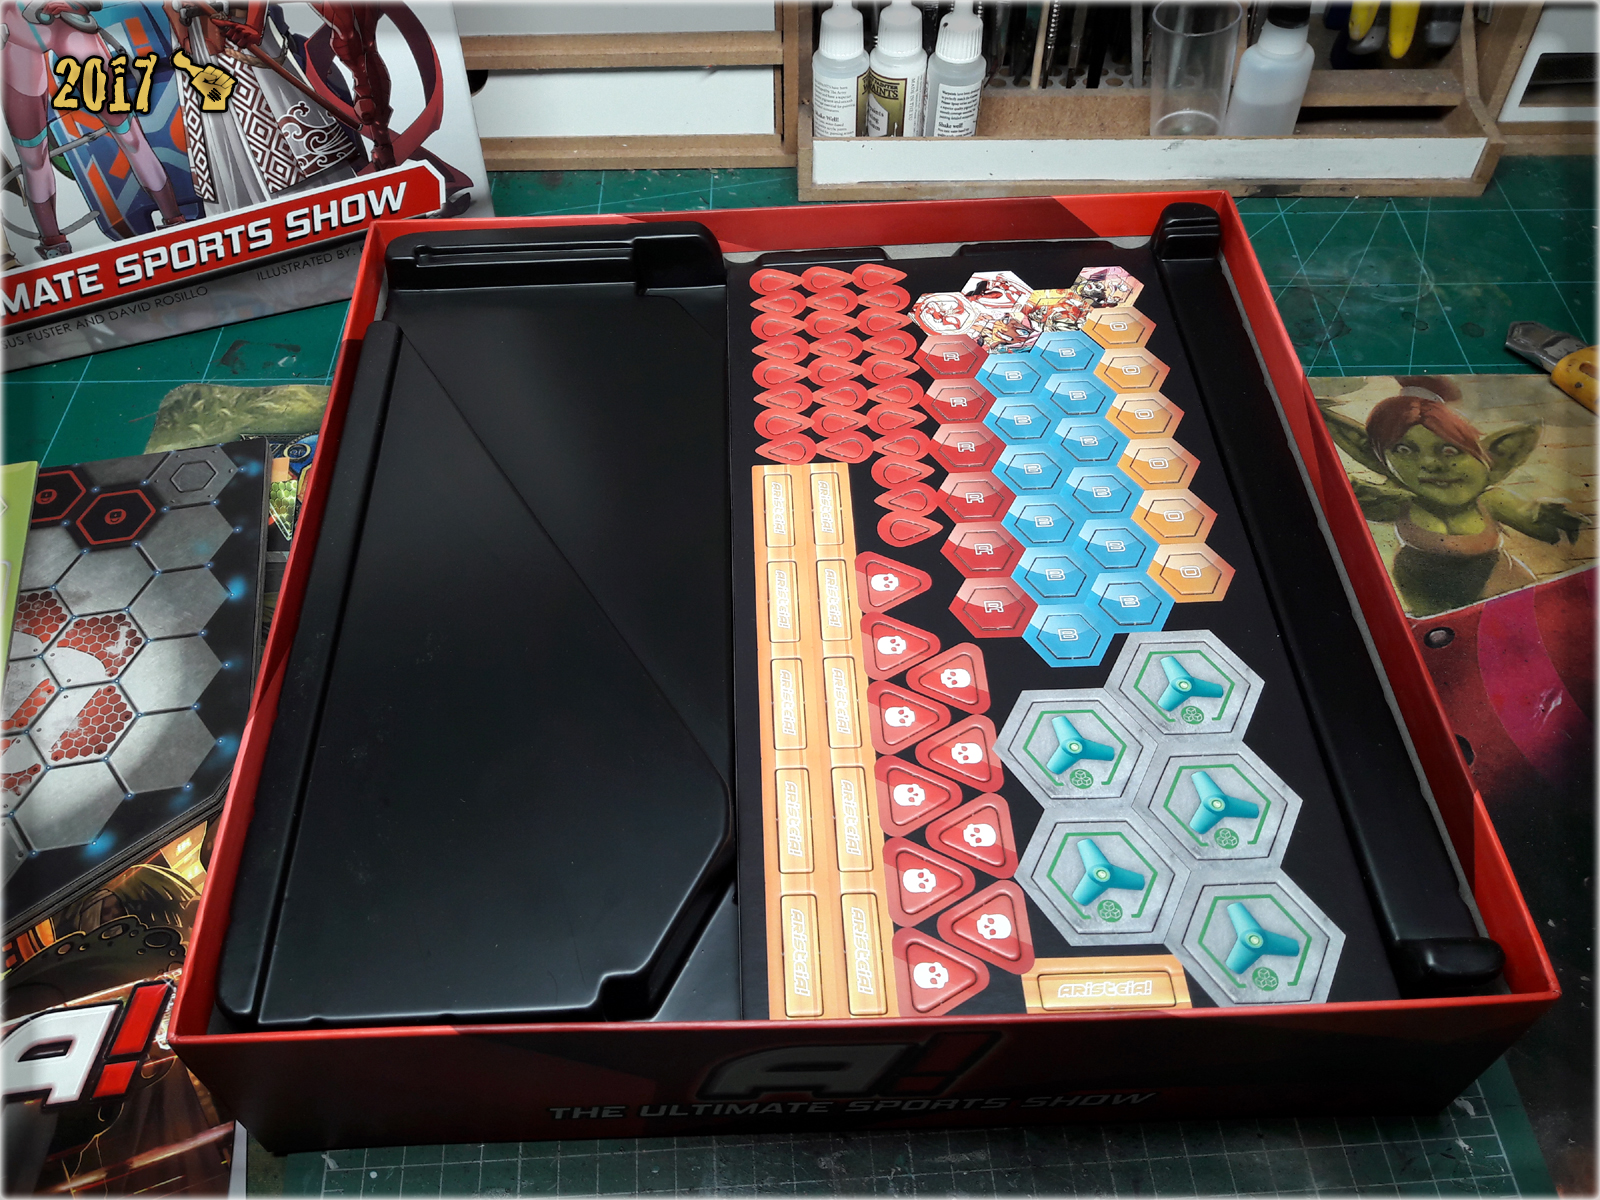
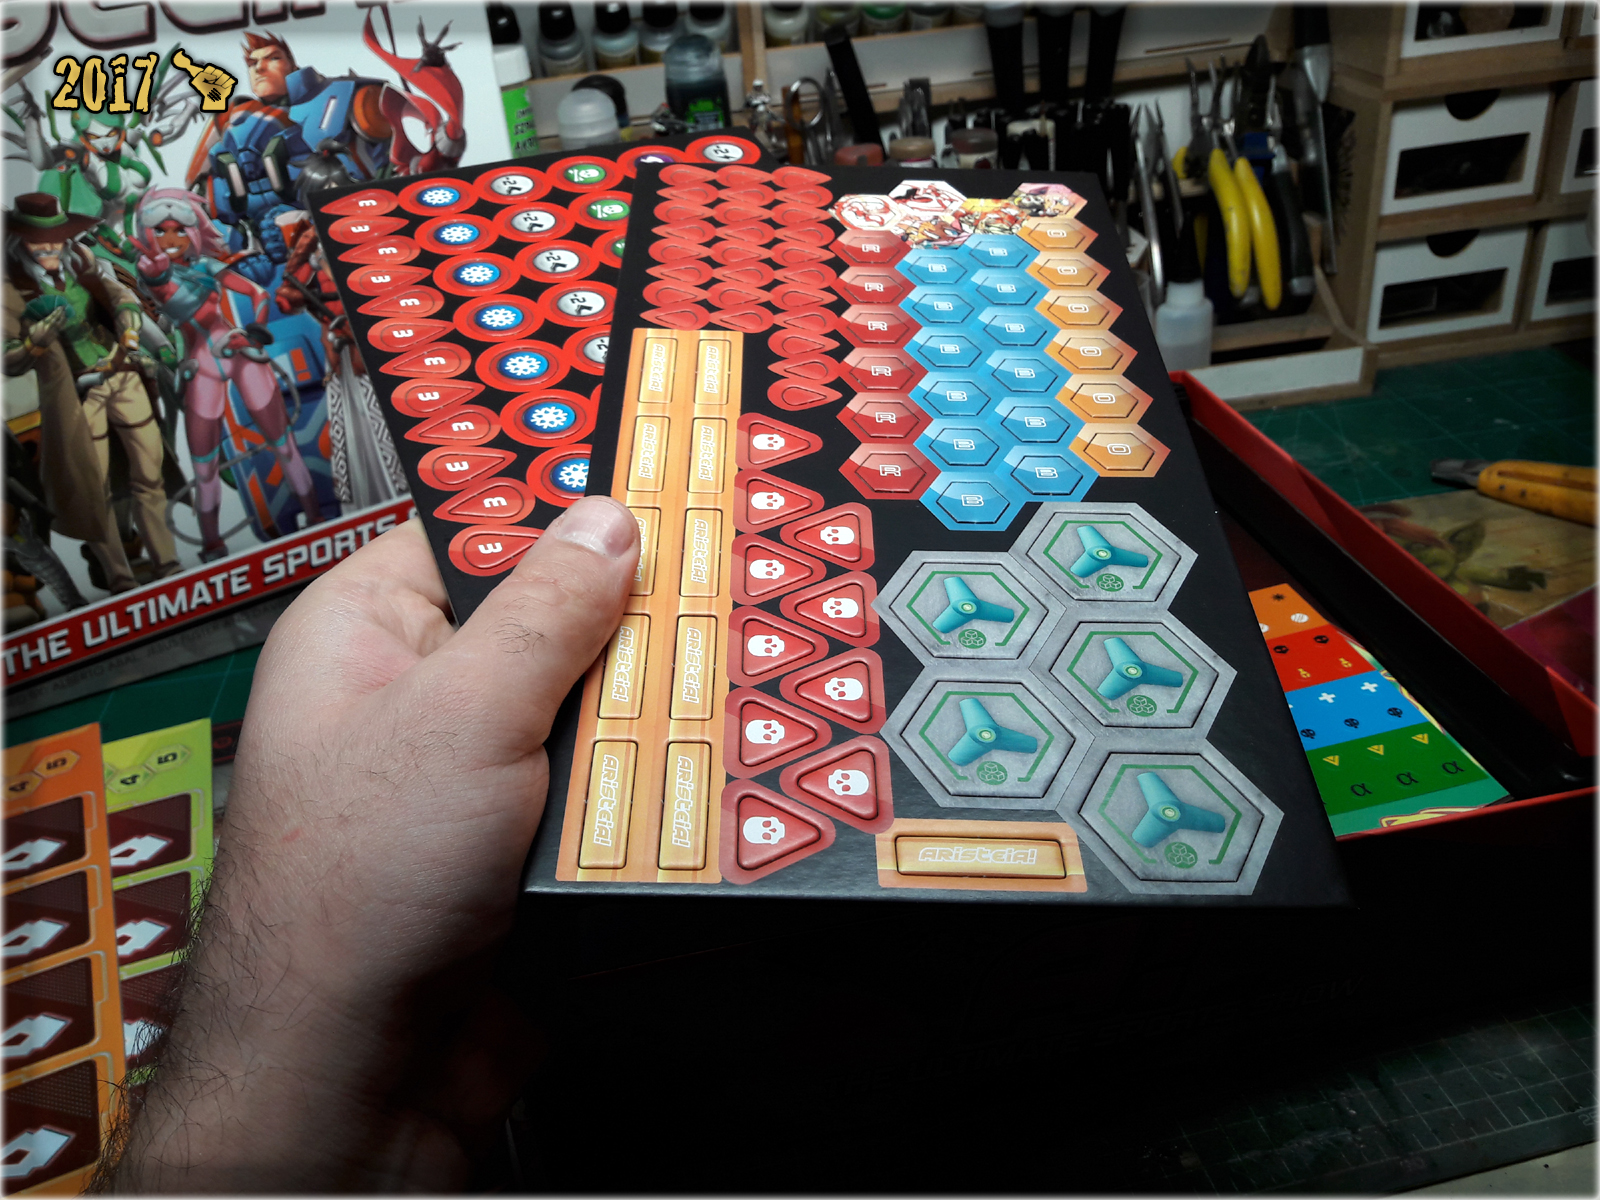
8×8 Stickers, because reasons…
I don’t want to talk about this. I know what they are for. I think they look poor as fck. I get why they are designed in this simple manner. Still look poor as fck.
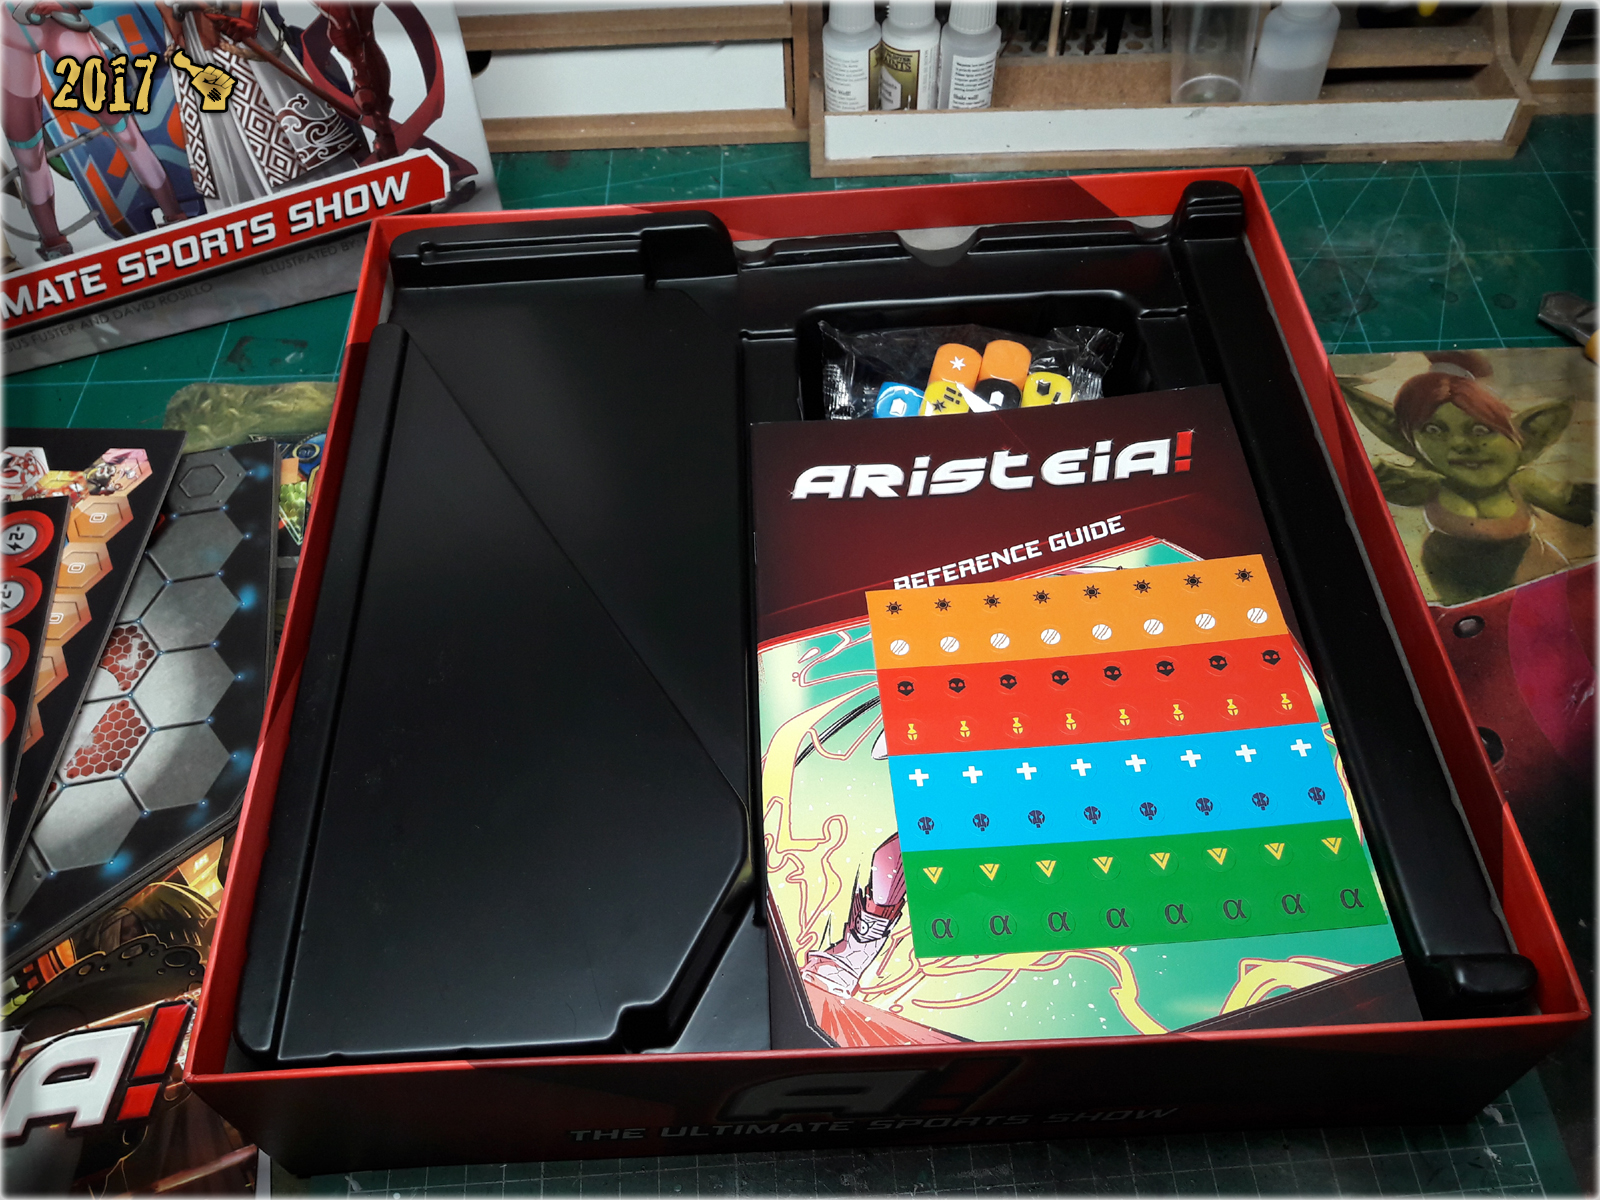
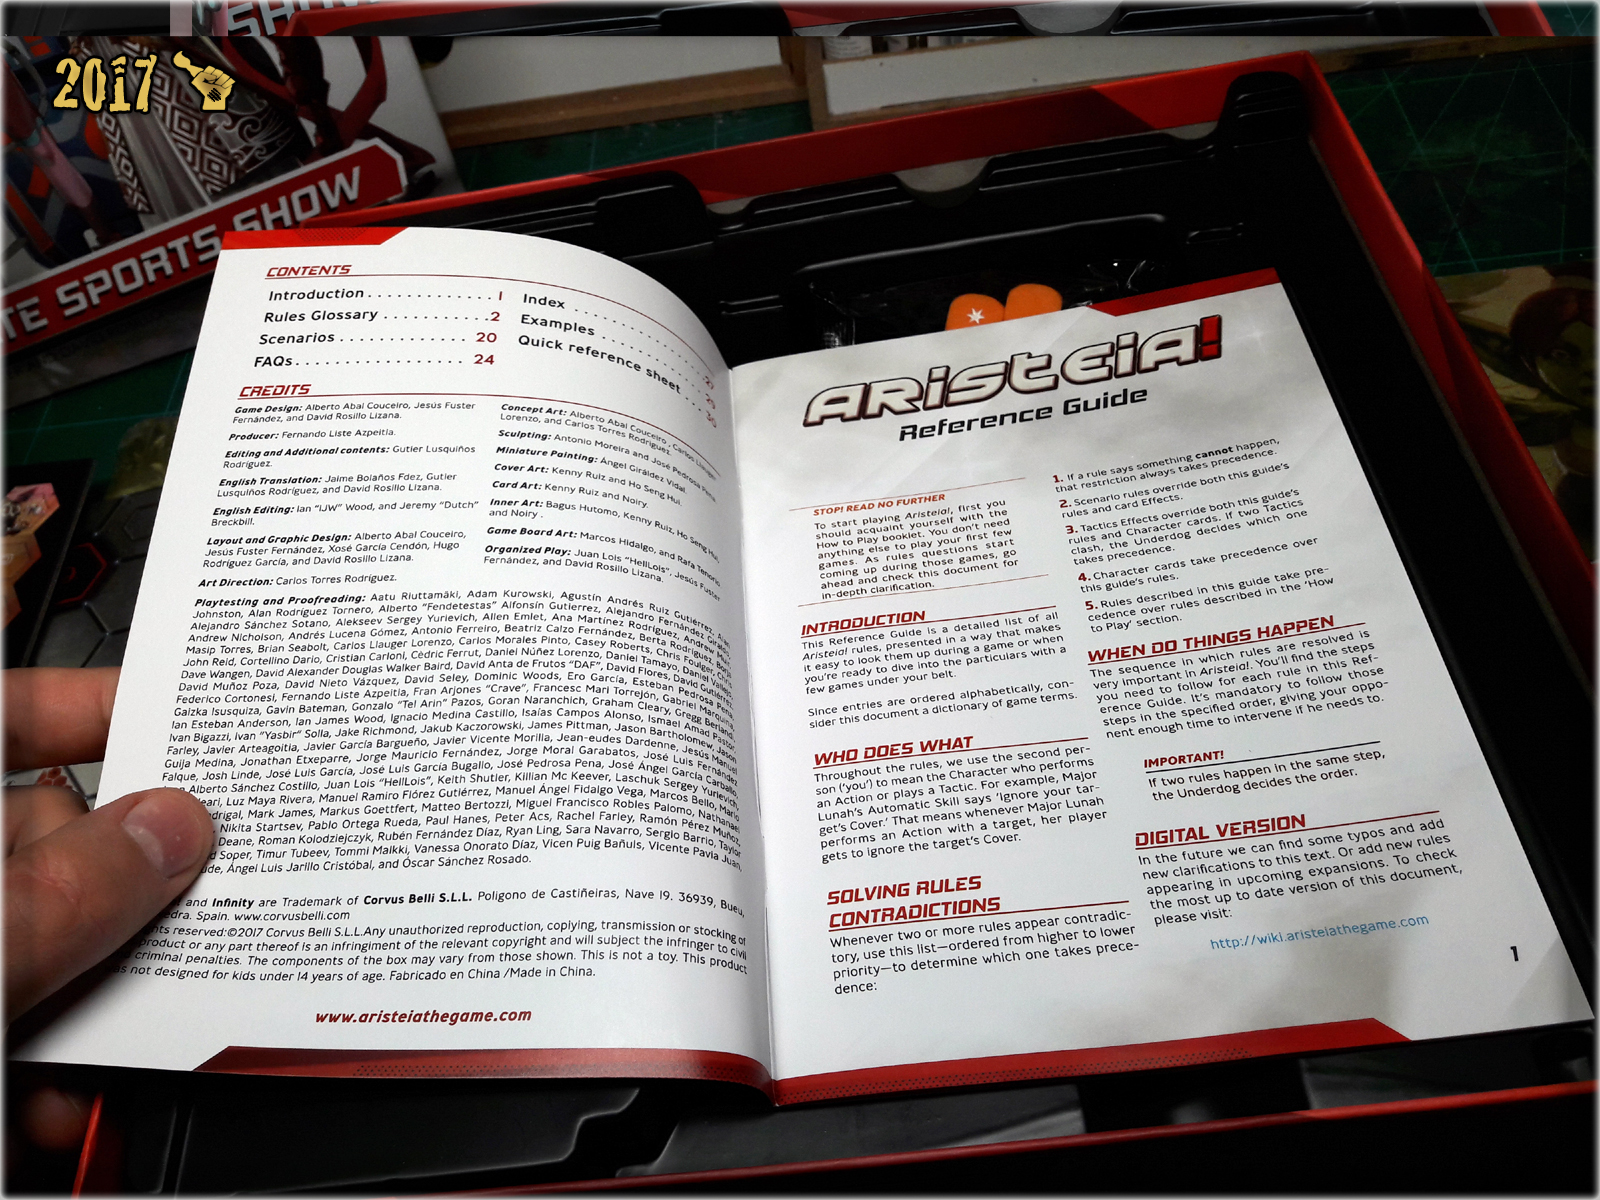
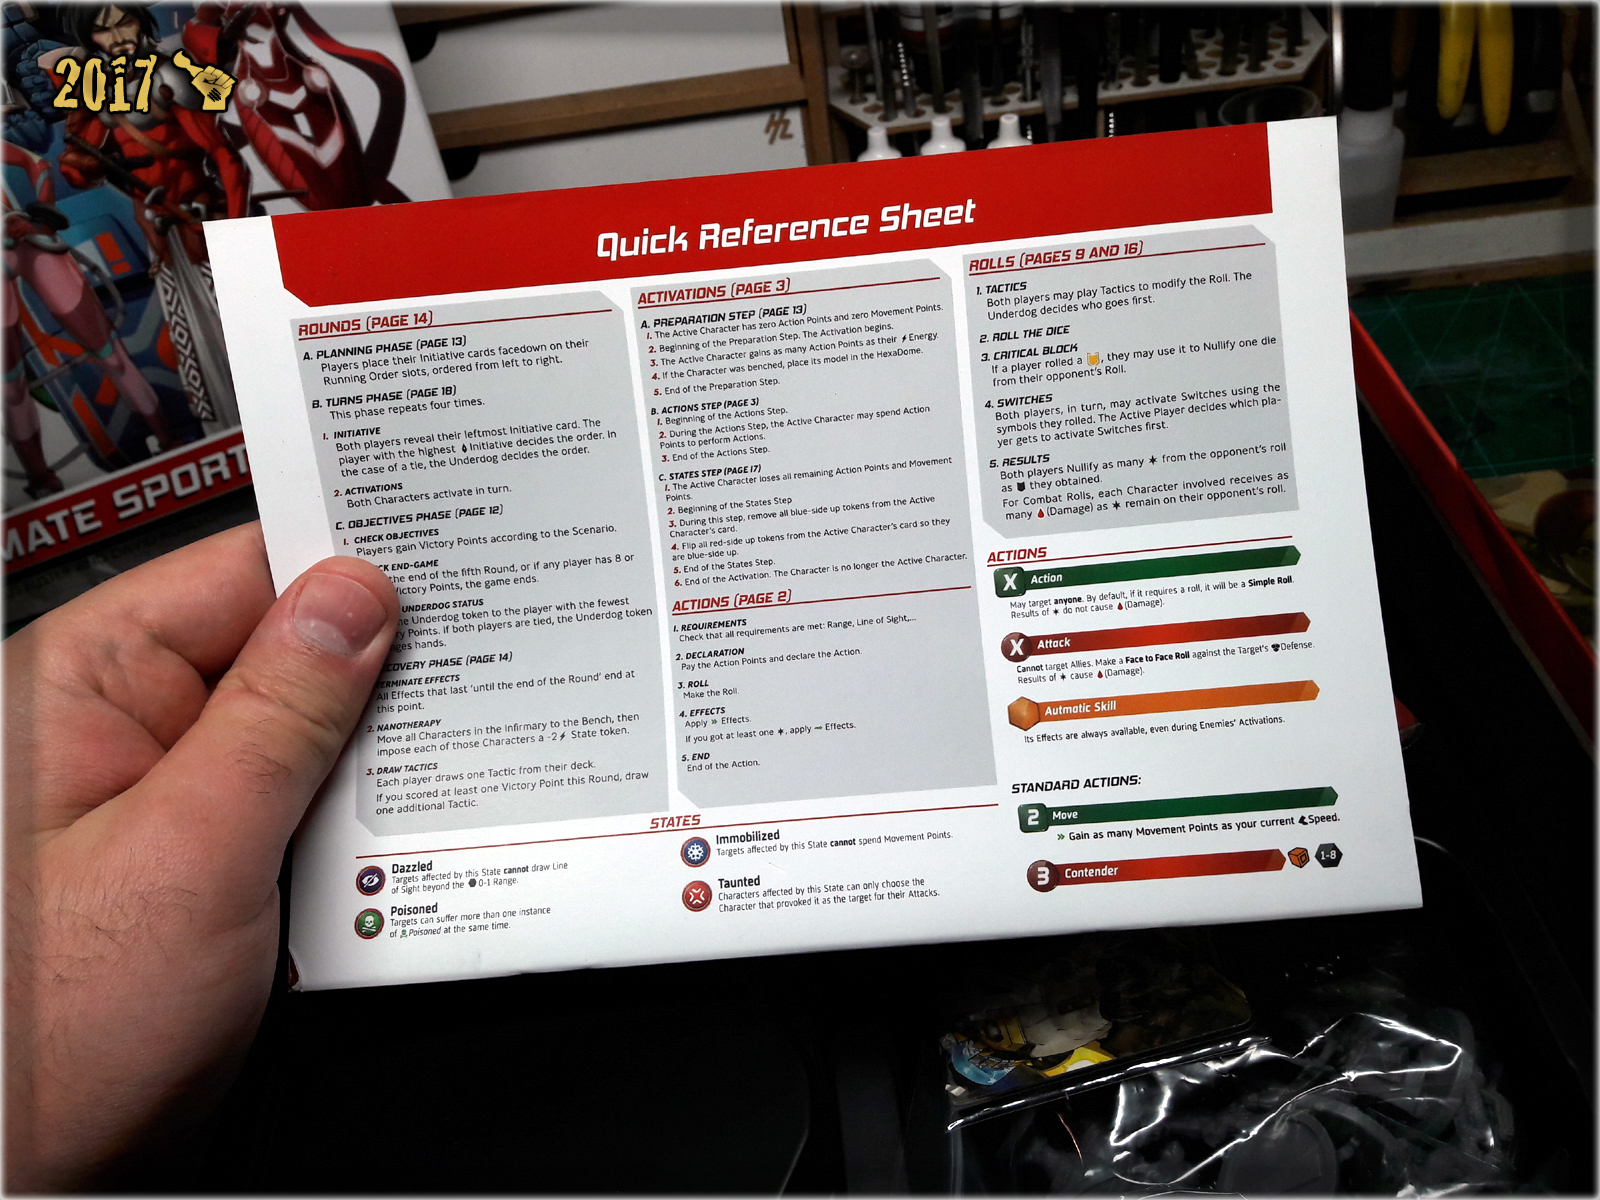
‘Reference Guide’,
I am used to Reference Tables placed at the back of rules. This one is much more interresting, with 30 pages filled with answers, examples, rules claryfications, Scenarios and a list of about 90 topics and key words. There’s a Quick Reference Sheet at the back of this small size booklet and once you are done with ‘How to Play’ you can switch to ‘Reference Guide’ for life. I find this one to be a really great idea, even if it’s not entirely user friendly and rules redirect us to other rules, which then redirect us to other rules – classic ‘Spanish style’. Fear not! You’ll get used to it at some point.
I would still like to get a proper Rulebook and then use ‘Reference Guide’ as an ingame help.

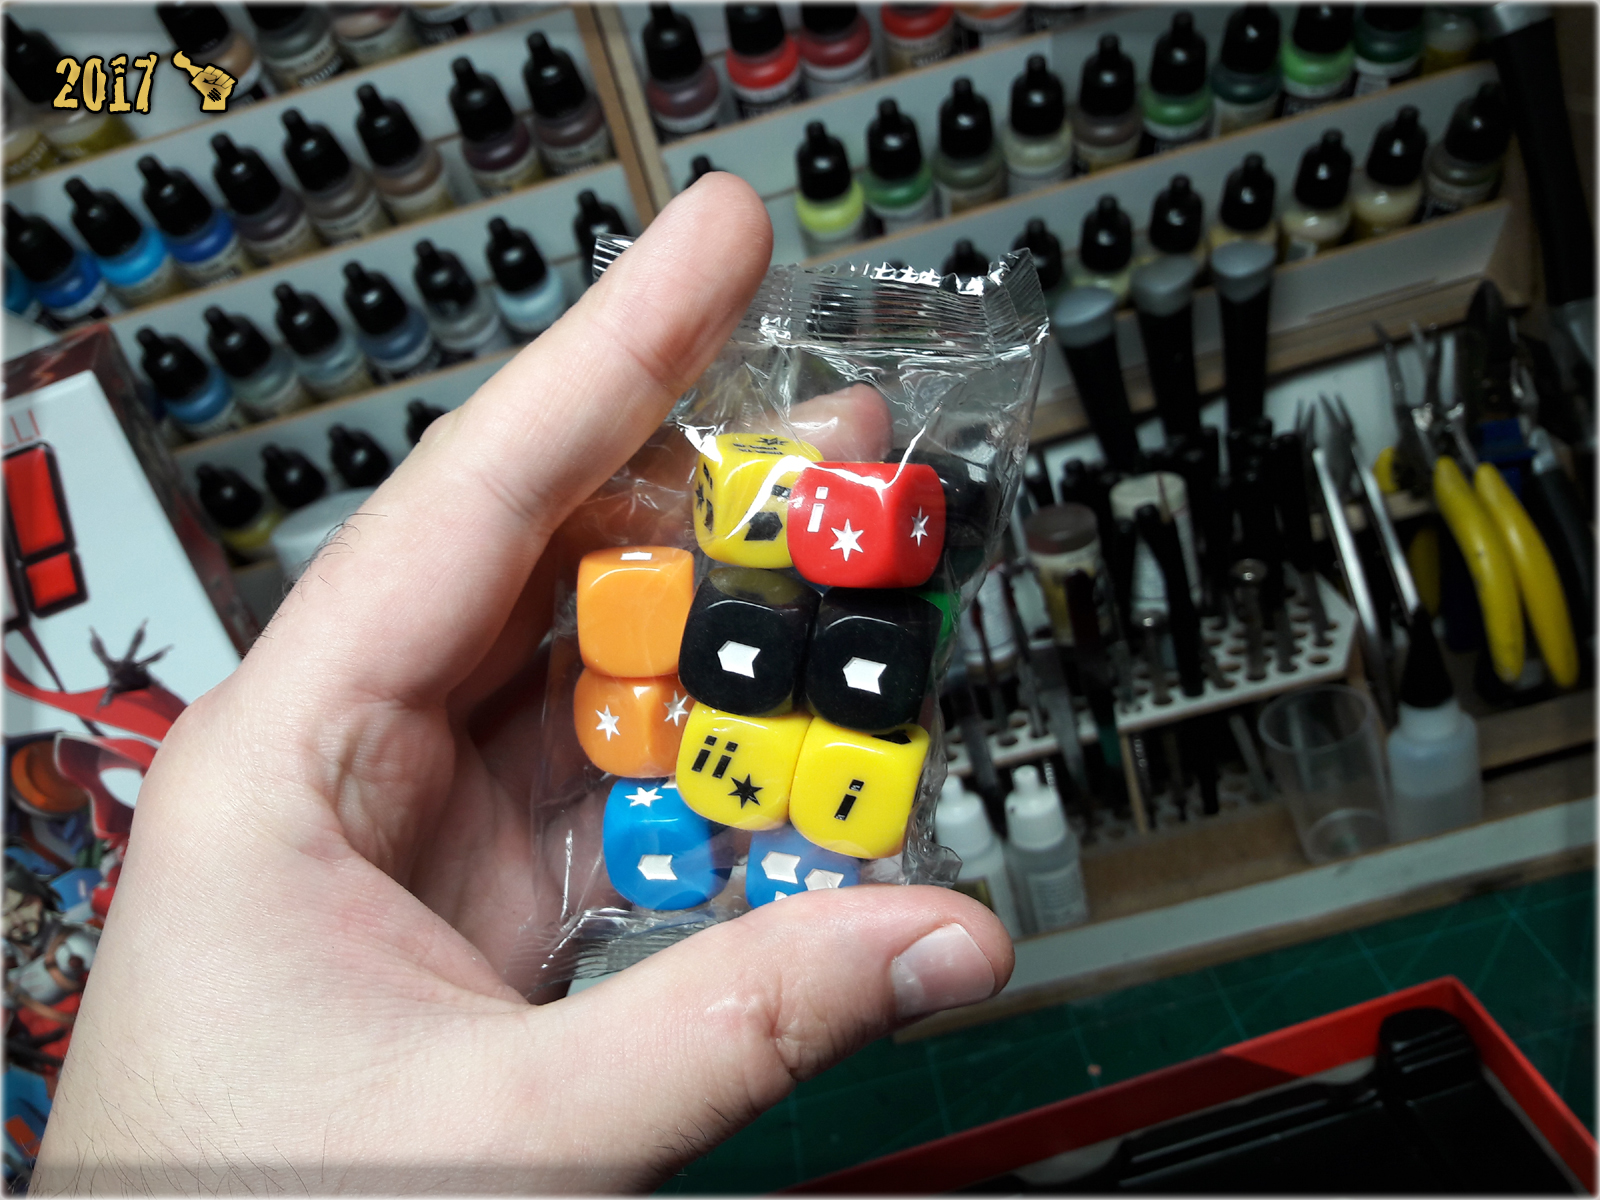
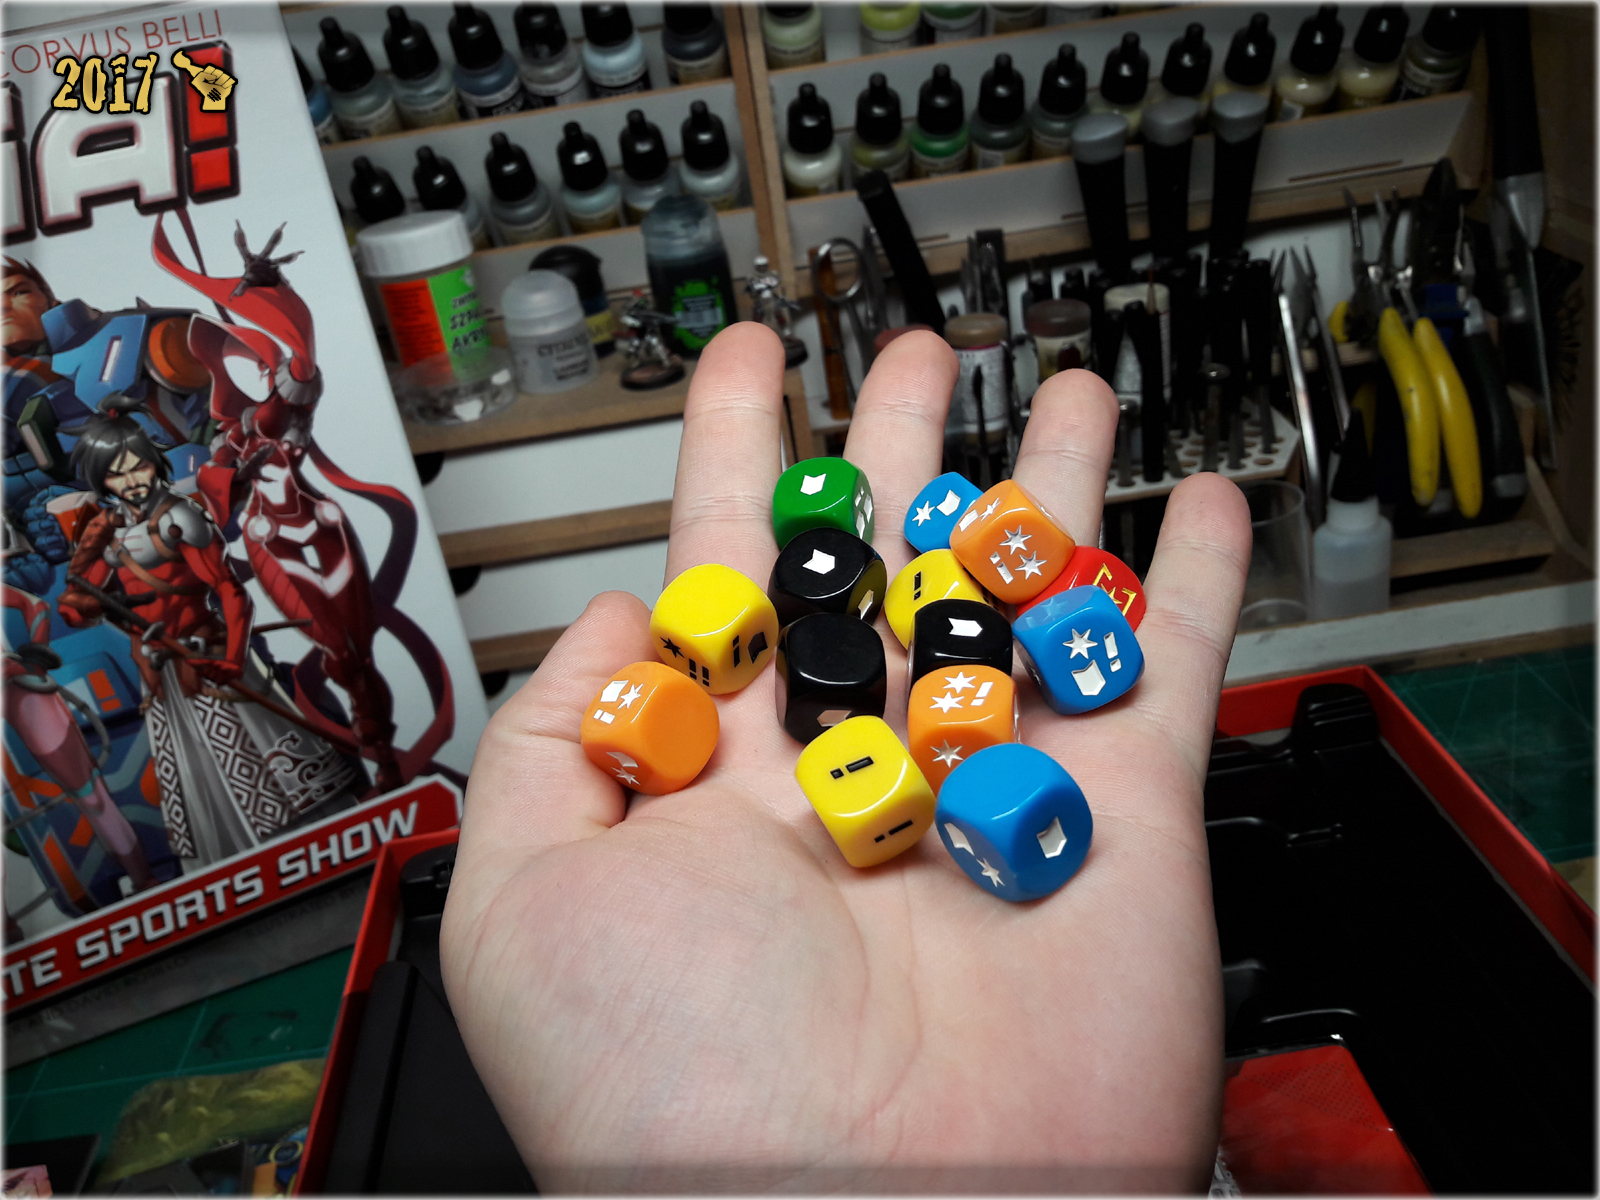
14 custom D6 Dice,
A set of custom, easy to understand dice. Symbols are concave which transtales to almost infinite lifespan of such dice.
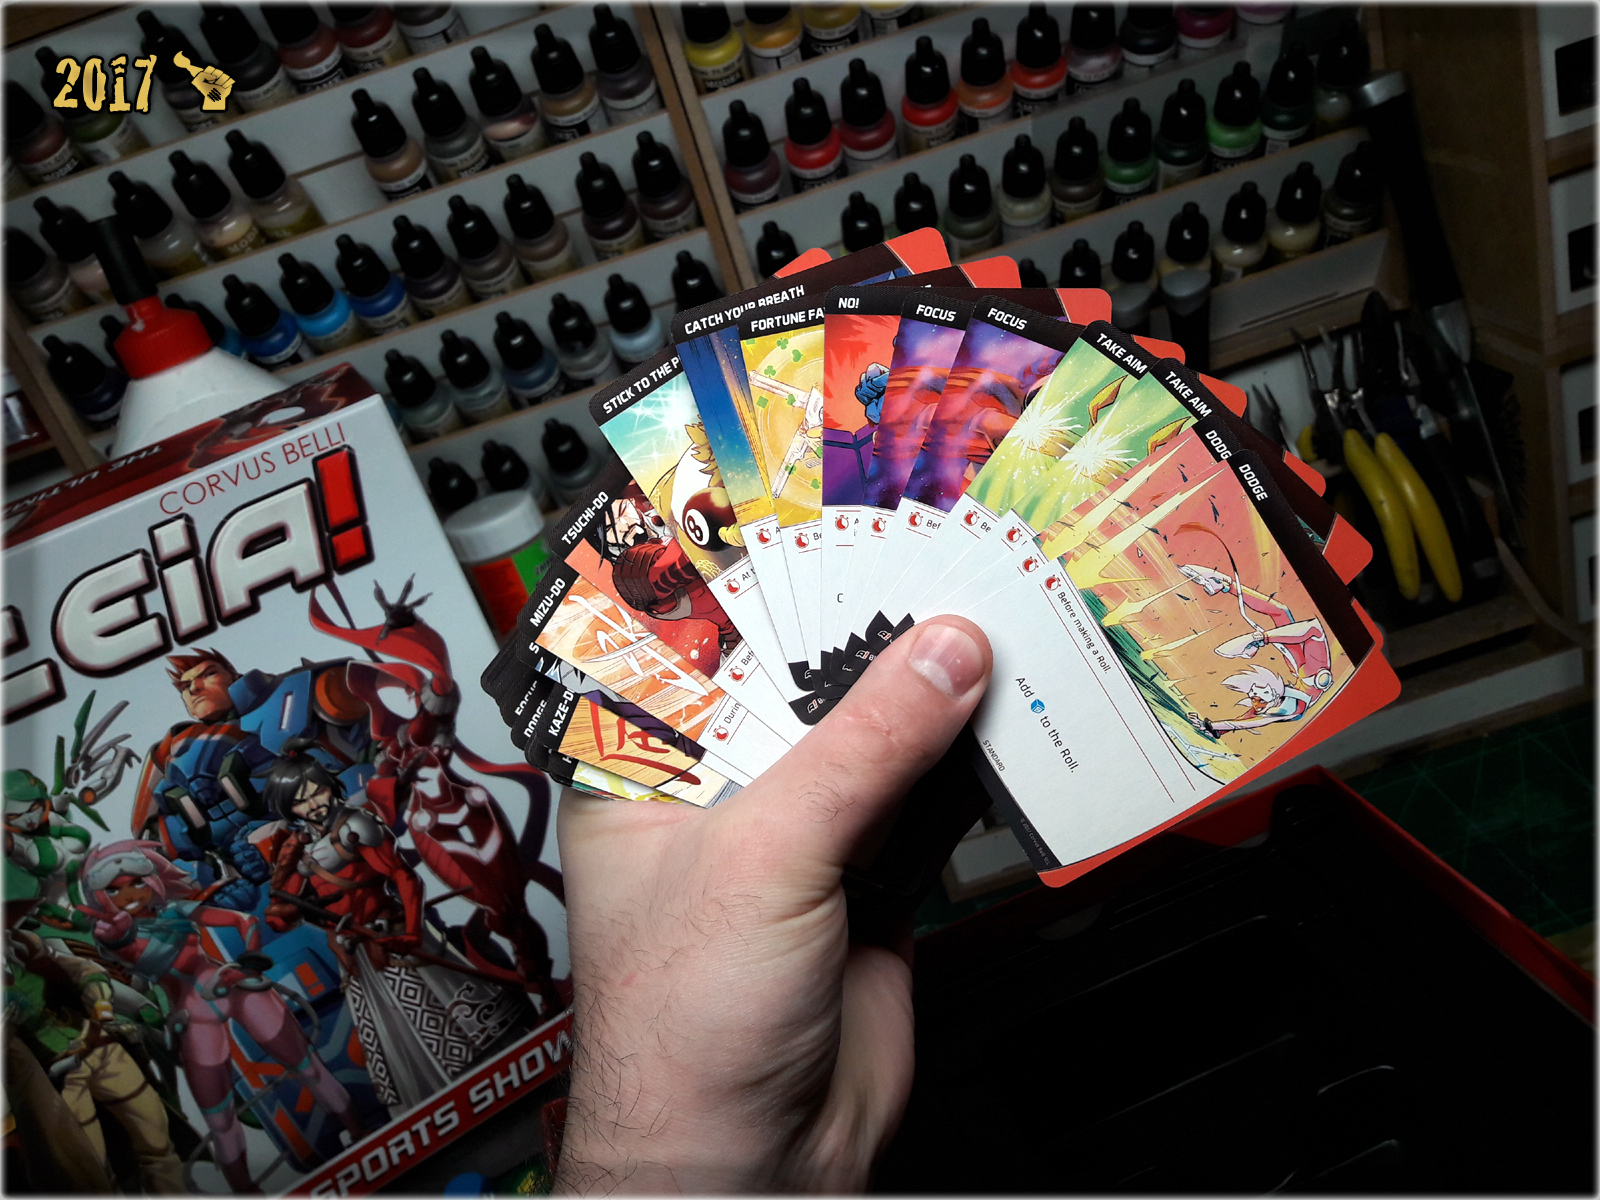
52 Tactics Cards,
Standard size cards with ‘Tactics’ – special actions players can use during the game. This piece is the one that could really use grated paper to provide much more durability. Gameplay friendly, with clear areas and strongly exposed rules section. Visually – I have mixed feelings. A lot is going on in the cards with Aristeia! characters jumping, kicking, shooting, hacking. There’s a comic like expression, suspense and feel to the pictures and yet pastel colours render it a bit silly and flat.
Visuals aside – what I would like to see is a mark in top left corner for all ‘Standard’ Tactics. This would quicken the process of finding Standard Tactics among other cards. Adding two colours distinction between these marks would also make a ‘How to Play’ part of our experience more pleasant, like ‘give orange dot cards to your opponent, take green dot cards yourself – now dig for cards numbered… whatever’.


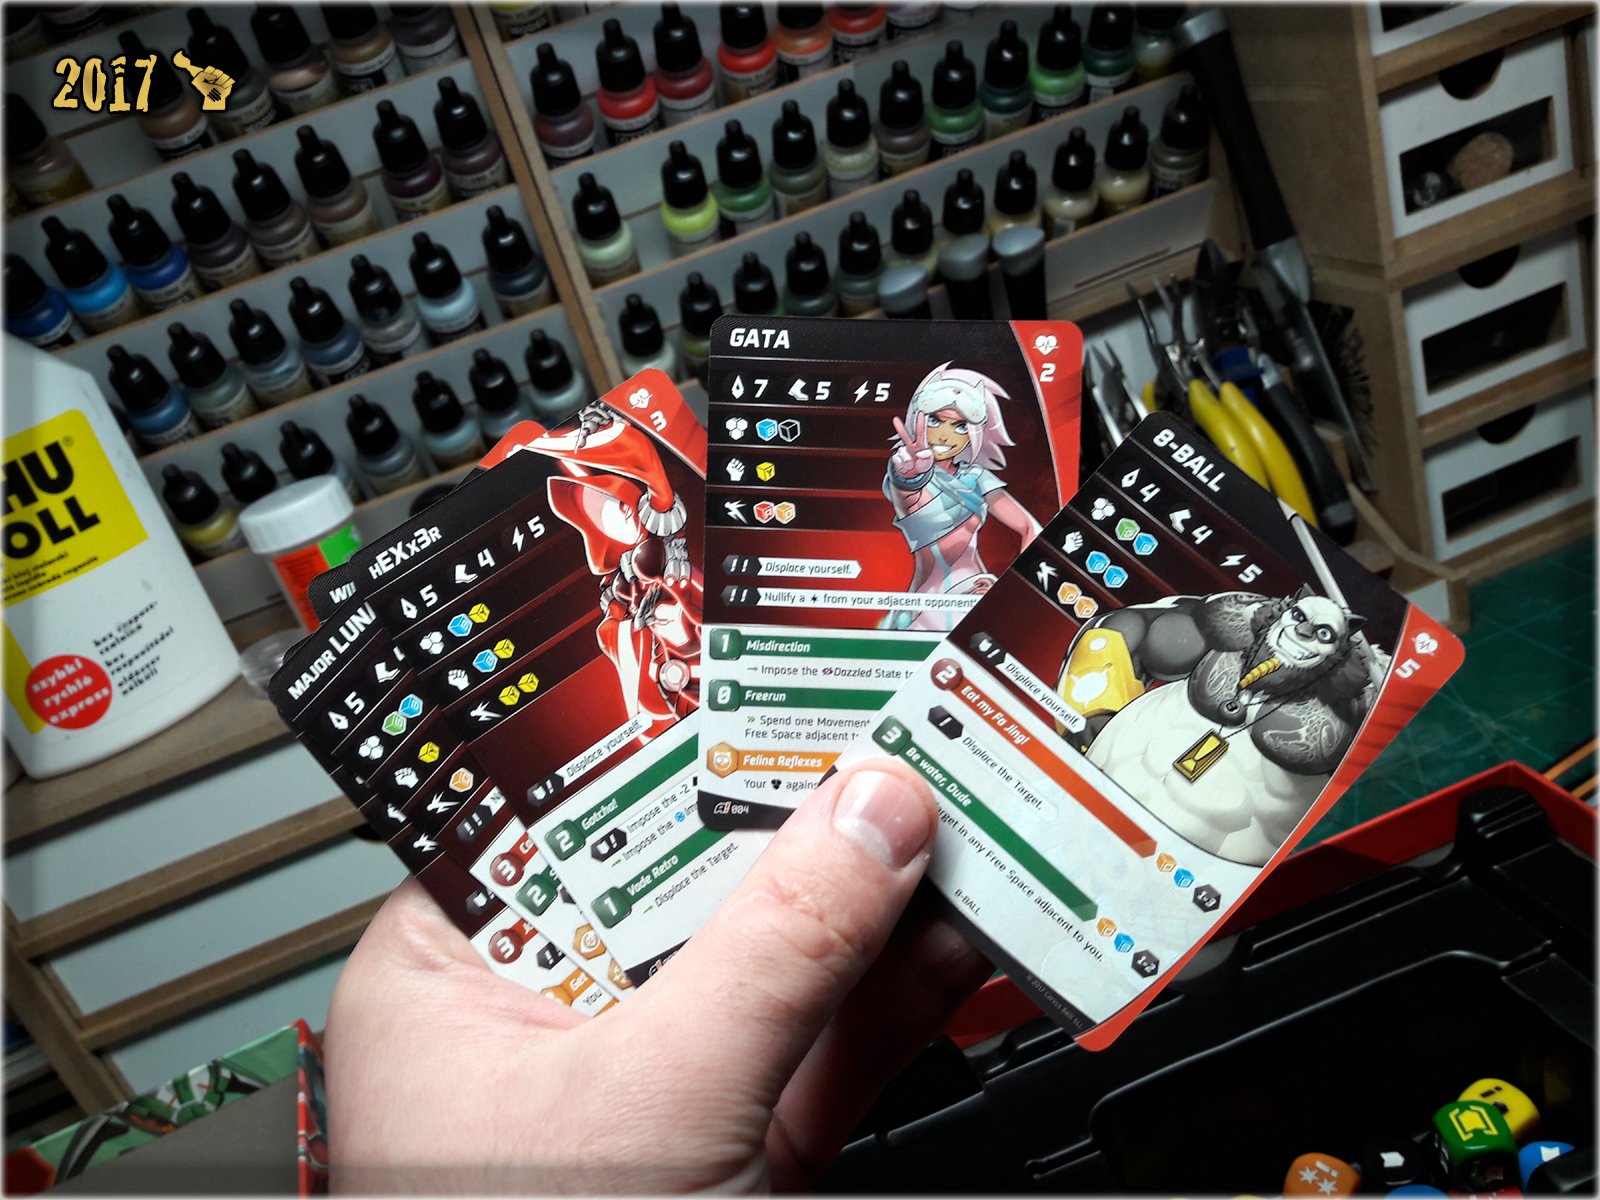
8 Character Cards,
At first might seem a bit overwhelming, but in truth these are simple and easy to understand. Pretty nice design. Quality of paper is the same as Tactics Cards with an exception of visible cut markings on top. A pack of sleeves would render this irrelevant anyway.
8 Initiative Cards,
These are just awesome looking 42/63mm cards. Visually they present themeselves really cool. I think that adding a textured background and more edges is what makes these graphics outshine the rest.
8 Plastic Miniatures,
Bag’o’miniatures – a set of 8 miniatures, made out of soft ‘board game’ plastic. These come already put together (by some Chinese prisoners) and ready to play. Some have issues and all seem to be improperly glued onto the bases. If not for that then quality is almost the same as in Zombicide or most of FFG’s games. If you hoped for quality and detail simmilar to Infinity the Game – these would be a huge dissapointment, otherwise they are a regular board game miniatures and would serve their purpose perfectly.
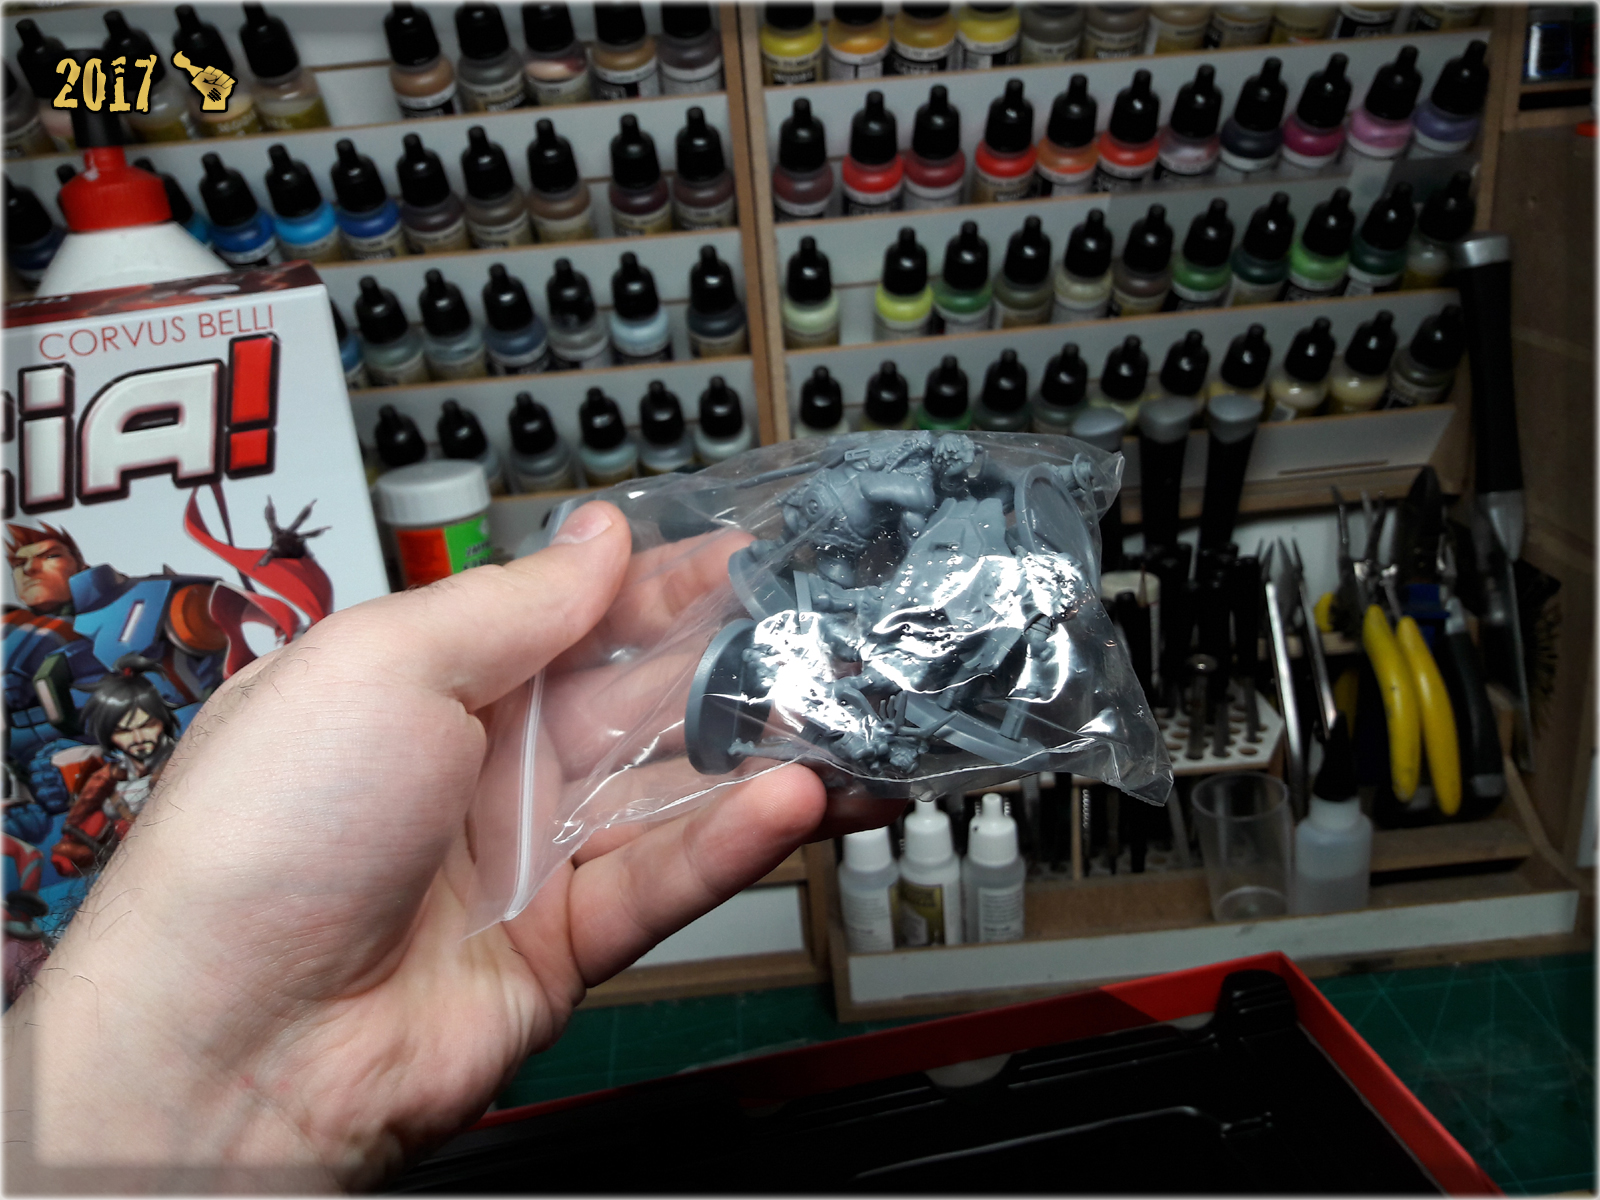


Oops! So this is how one of the miniatures came in. It is not uncommon among board games – not a faulty design or production, just an accident in transportation. Complaint placed – will await a replacement.
Thin plastic box organizer,
So, the Organizer is a great thing that I come to appreciate, if delivered properly. This one is clearly made for the purpose of holding a factory issued game untill it get’s unpacked.
Could have been a cool feature, would go to trash instead.
Aristeia! has a well designed engine, that offers a lot of options to competitive players. Most of the time it made me think about which option to choose from rather than how rules work. Alternate character activation, Tactics Cards and special ‘Switch’ activated effects kept me occupied throughout the round, all the while rotating Scoring Zones and planning my characters Activation sequence pleasantly stimulated my brain cells. I appreciate that Aristeia! has some elements of deck and team building, providing options to construct a deck of Tactics Cards and a team of selected characters. This is yet another feature that competitive players might find interresting. Once I got to know the key words and rules mechanisms of the game seem simple and enjoyable. I especially appreciate a fast and not complicated end phase of every round, which does not disturb action.
The way in which rules are served is a bit of a downside. Some things that are meant to be intuitive ended up being confusing and entire process of being led hand in hand with a pre-designed turn from ‘How to Play’ was exhausting and not very pleasant. In the other hand everything is there in the booklet and many in-game situations are covered so once through it – I quickly knew how to proceed.
Some crunchy mechanics are:

If you hope to bring this game to a friendly meeting and just start playing with your Settlers of Catan friends – I strongly recommend not to. Corvus Belli did a fine job of introducing symbols and intuitive elements, but the game is still full of key words, special skills, triggered mechanisms that might confuse board game muggles. This game is a fine piece for two seasoned players who would like to clash against one another and win eternal glory in the Hexadome!
In my opinion gameplay-wise Aristeia! is very similar to World of Warcraft Miniatures Game, which at some point I enjoyed a crazy lot! This makes me look at Aristeia! from a friendly perspective and I have some hopes for the future of the game.
In a straight out of a box ‘How to Play’ way – nope. Some ballance comes with Experience but you won’t be able to achieve perfect ballance untill you and your opponent both have a box of your own. Once there, you will be able to build a Team and Tactics Deck from among all available components and the game would become ballanced. For less competitive ‘one box’ play I see potential in drafting heroes or just switching teams with gaming buddy from time to time, so that no one would end up feeling like his team is underpowered in certain aspects.
Yes and it is a gargantuan, Pacific Rim sized difference. Just take a look at the pictures and see for yourself…

From what I am aware there are some big plans for Aristeia! Organized Play. We already know what to expect from the first expansion ‘Soldiers of Fortune’, and these are meant to be introduced every seazon. Seasonal expansions would make for good replayability and should keep players interrested. In my opinion Aristeia! has some potential and is certainly much more suitable for competitive play than Infinity the Game. Would it become as popular as X-Wing? I hope not, cause this would mean cancerous individuals soiling community built and cared for by Corvus Belli. Still I keep my fingers crossed for CB’s success, even tho they seem to diverse some of their attention from my favorite game.
Even tho I spent almost half of my life in a Hobby Store Aristeia! is a conundrum to me. In one hand it is clearly an interresting game and I enjoyed the gameplay. Aristeia’s mechanisms aren’t anything that I haven’t seen before, but the way they work with each other translates to a really thinked through set of rules. On top of that the game has a lot of potential both in competitive and hobby aspects. In the other hand some components are just fucking ugly and it hurts my eyes to look at them. Taking Metal Miniatures out of the equation, for me Aristeia! is totally gameplay over looks. Would I purchase this game if not for trust Corvus Belli earned from me? Nope. Would I purchase this game if not for Limited Collector’s Edition miniatures I want to add to my Infinity the Game collection? Nope. Yet this is due to my prefferences, not the game itself and once I actually got Aristeia! I must say it is a nice game. Price also seem legit and I bet that with 59,9€ starting price there will be ways to get the basic set for less than 50€ – and that is not bad for a game set enabling you to participate in Organized Play. On a scale where 10 is awesome, 8 is good, 6 is ok, 5 is mediocre, 3 is bad and I don’t want to even mention 1 I would say Aristeia! is somewhere between 6 and 7, and that’s only because of some ugly components that drag the note down.
If you don’t care about the looks of Tokens and ‘Trigger Word’, if you like illustrations on the cards and feel like going through a bit spanish’ish rules – you should totally give this game a try. If my expectations for visual aspect of the game were met I would totally rate this game an 8. Im sure that Aristeia! will reward you with a fine and interresting gameplay, so long as you approach it with a proper mindset.
Agree/Disagree? There’s a comment section below where you can stand for your opinion 😉
Here are some Colour Recipes for Infinity Haqqislam from GALLERY: INFINITY KAZAKS lvl 4. Please take note that this is a simple colour scheme, not covering multiple overlapping layers and blends inbetween, that lead to the final product. It is supposed to be used as guidline not a step-by-step.
GREEN armour & uniforms:
Black Undercoat,
Dark Green RLM (Val), *
Interior Green (Val), *
Mix Interior Green (Val) 3:2 Dead Flesh (Val), *
Mix Strong Tone Ink (AP) 1:1 Soft Tone Ink (AP),
Mix Interior Green 1:1:1 Flayed One Flesh (GW) Pale Wych Flesh (GW), l&p
BLACK/GREY outfits & weapons:
Black Undercoat,
Skavenblight Dinge (GW),
Fenrisian Grey (GW),
Pallid Wych Flesh (GW), l&p
Dark Tone Ink (AP),
Pallid Wych Flesh (GW), l&p
White, l&p
BROWN elements:
Olive Drab (Val),
Gorthor Brown (GW),
Mix Gorthor Brown (GW) 1:1 Pallid Wych Flesh (GW), l&p
Mix Strong Tone Ink (AP) 1:1 Soft Tone Ink (AP),
Karak Stone (GW), l&p
SKIN:
Bugmans Glow (GW),
Dwarf Flesh (GW),
Dwarf Flesh (GW) + Pale Flesh (Val),
Mix Strong Tone Ink (AP) 1:1 Soft Tone Ink (AP),
Pale Flesh (Val),
Mix Pale Flesh (Val) 1:1 Pallid Wych Flesh (GW), l&p
l&p – lines and points,
p – points,
b – blend,
drbr – drybrush,
flbr – flatbrush,
*Airbrushed (with multiple layers and mixes)
“Three gargantuan spaceships endlessly traverse the Sphere, doing what others cannot or will not do, sticking it to ‘the Man’ and contesting ordinary definitions of normalcy and acceptability. Do you prefer to think for yourself? Do you want to travel? Then you might have a Nomad spirit.”
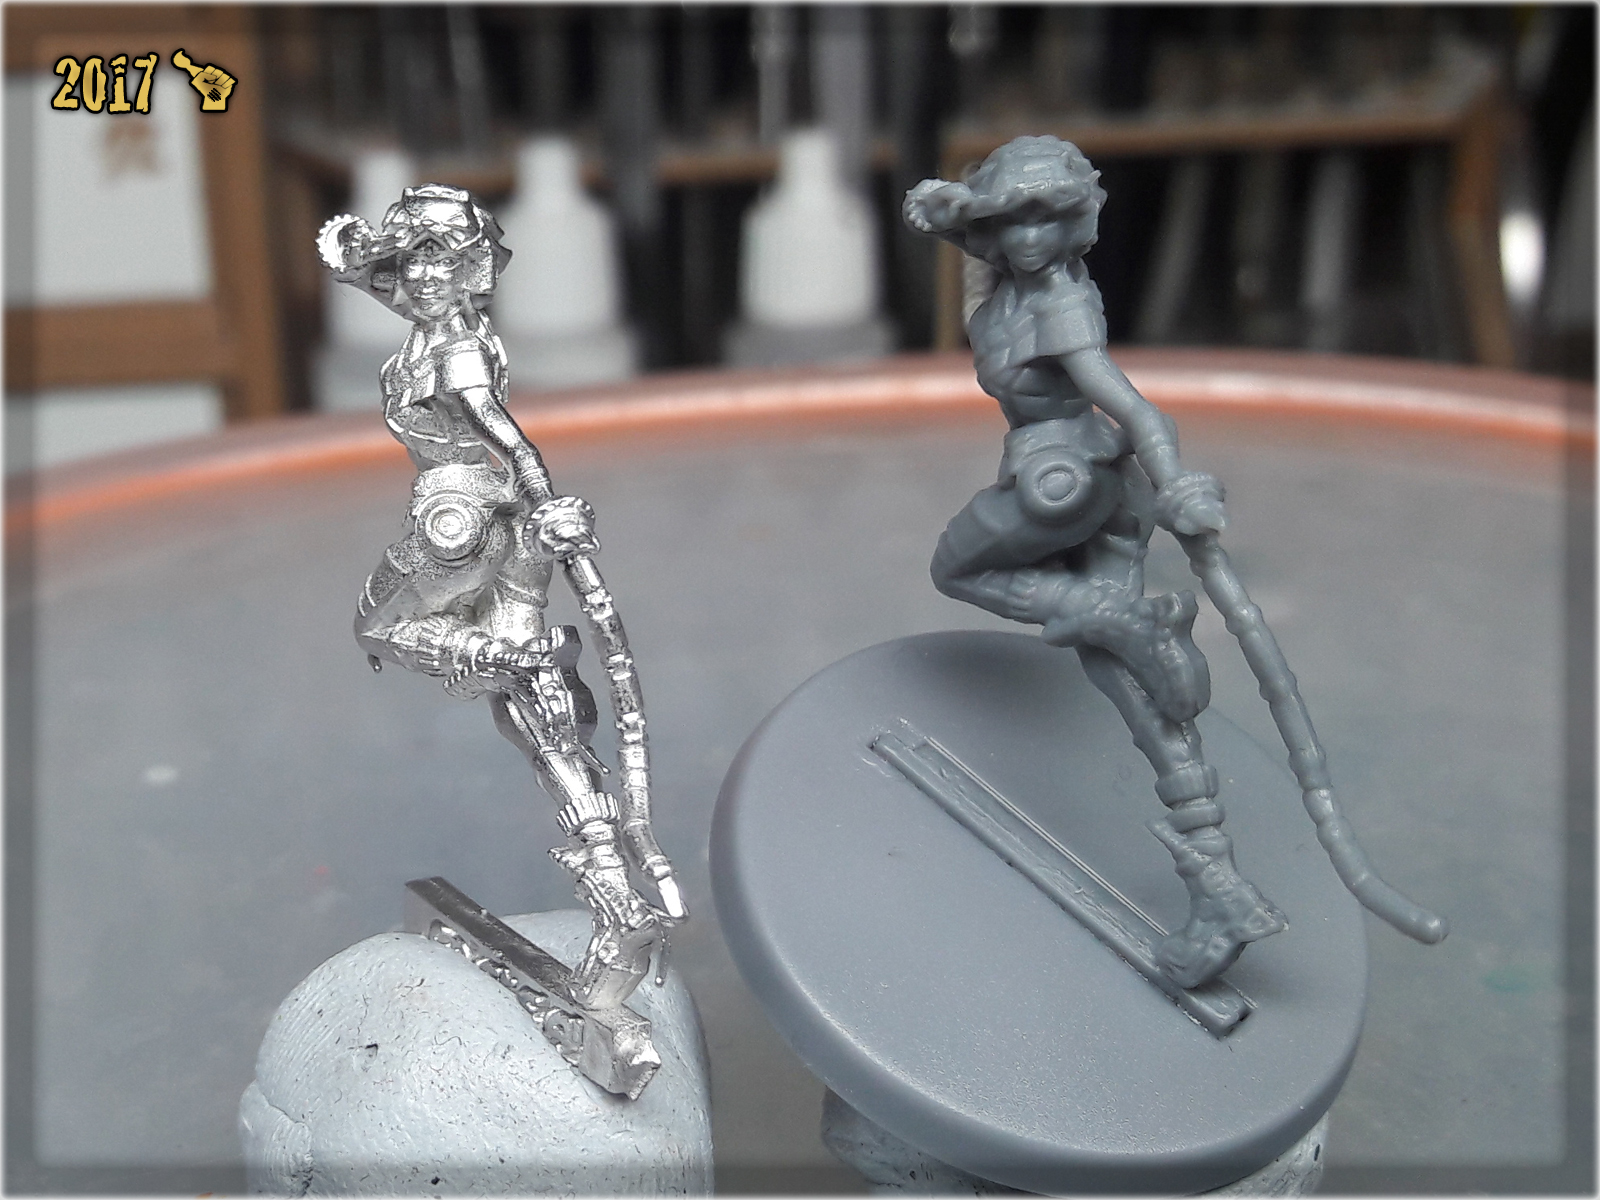
The idea behind “Nomad Zonds” was born as a child of necessity and inspirational spark. What drove me to Infinity the Game and then to Nomads faction was a bunch of awesome looking miniatures. For me this aspect of the game is so important, that I literally ignored Infinity untill first 3d sculpted miniatures appeared and revolutionized the range. That does not mean all of the oldschool miniatures are bad – let’s just say that back in the day there were not enough awesome looking miniatures to sway me. Now, with all of the newly released, sweet looking, stuff – Infinity range looks insane and the game became an important part of my hobby. What holds me back from acquiring entire Nomads range are those few leftovers of the times long past aka #LetsMakeMoranGreatAgain. Due to rescaling and high quality detail of new miniatures, some of the old ones look out of place among all the goodie goodie stuff that Corvus Belli provides for us on monthly basis. Here’s where ‘necessity’ comes in. Instead of waiting for CB to fulfill my hobby’iest desires, I decided to go ahead and do it myself. So the main concept of this project was to avoid original Nomad Zons at all cost and create something that would match the current quality of the range…
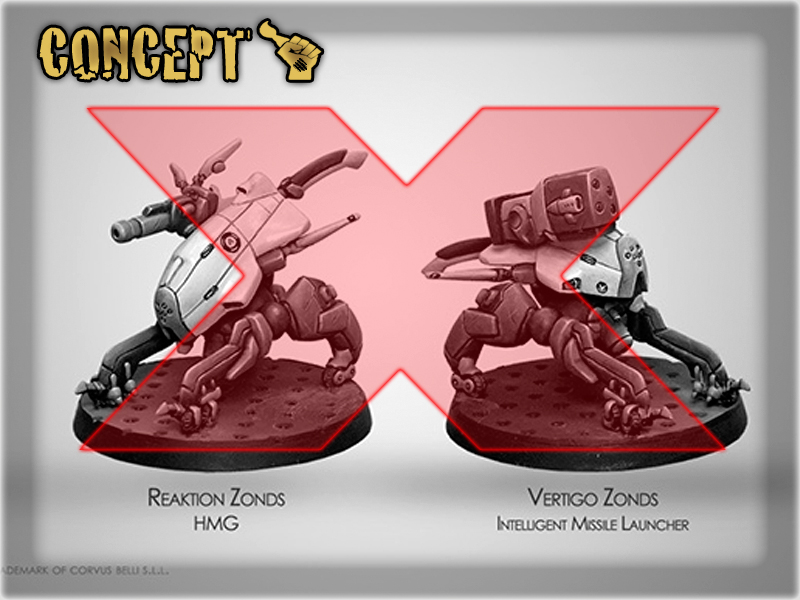
My goal was to create an entire set of silhouette 3 Nomad Zonds to fill all availability once and for all and be able to pick a right tool for a right task at a whim. At the same time I wanted to keep the Zonds somewhat in the boundries of usual four legs, rounded ‘head’ etc. design, to fit the Nomad army and afterwards my Colour Scheme.
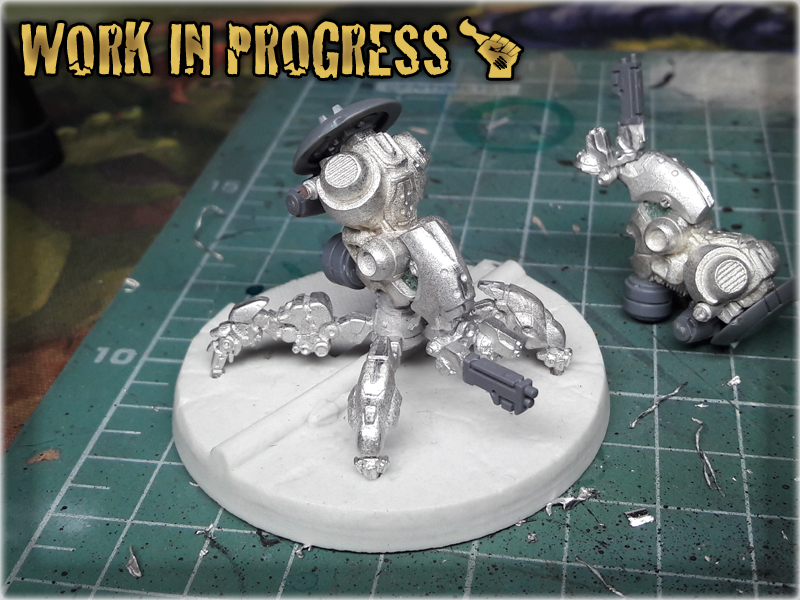
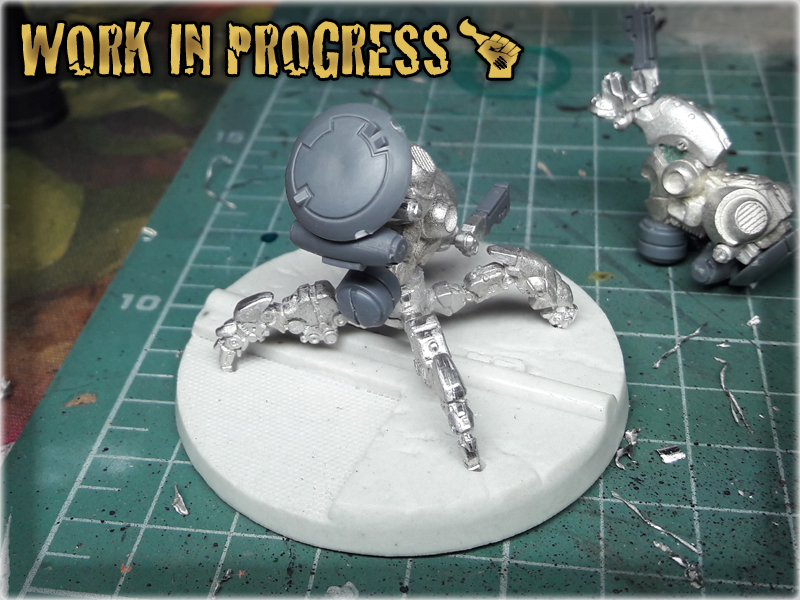
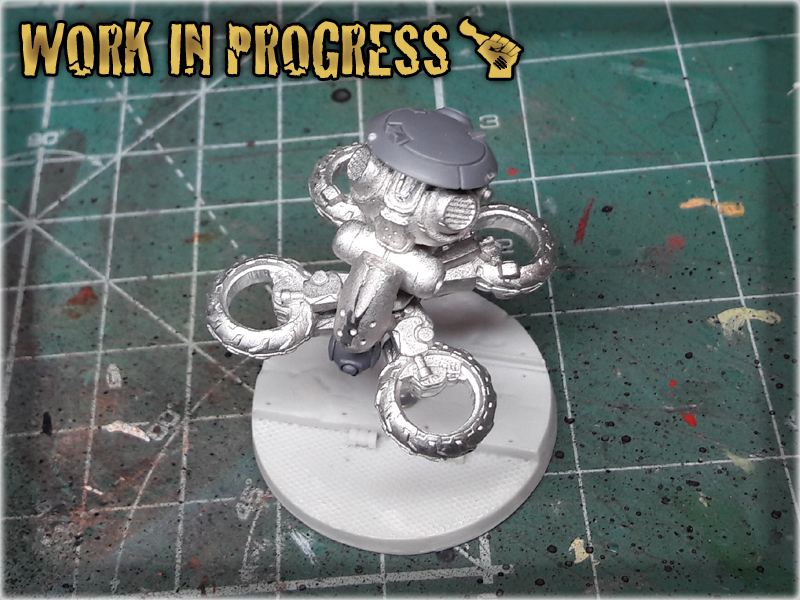
All the required stuff prepared, what was left for me to do at this point was to build this grand new line of Zonds. Lunokhod/Tsyklon legs and axis as a base was an obvious choice. The most Nomad set of legs possible, so I decided to go for it. Legs had to be reposed slightly to match the size of a 40mm base, but otherwise no grand changes required…
Zond’s body is it’s key feature. For this I have picked Haqqislam Bike’s engine. It has the right size, is finely detailed and interresting. I had my eye on this one for a long time now – knowing deep inside it might come in handy at some point. A small cut with hobby cutters between engine and saddle was required to separate these to parts. Afterwards I drilled a hole in the center of upper cannister to mount it on the legs axis…

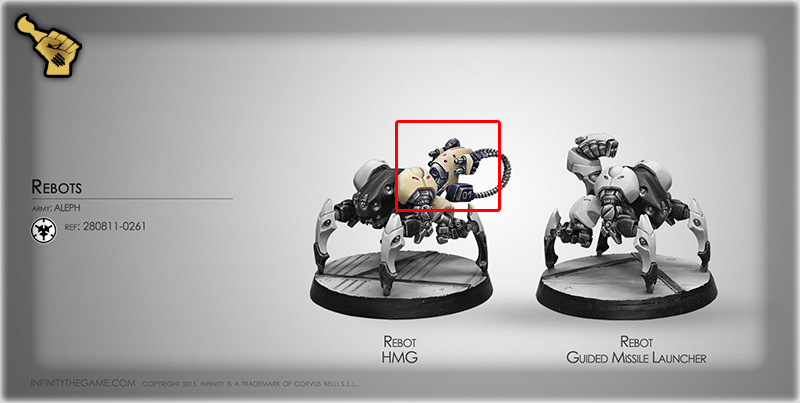
Another important piece – the head. This one was made out of ALEPH Rebot ‘butt-piece’. Fortunatelly a spare butt-piece is thrown into each Rebots box, so it is obtainable for a low price in the long run. Mounted it on a piece of green-stuff and pushed in the excess of greenstuff on the sides to fill the gaps. Drilled a small hole to mount weaponry/lenses underneath…
The main difference between Transductor Zonds and Total Reaktion Zonds is the weaponry. Transductors have a Lunokhod front lense mounted and both side weapond cut off, while Reaktion Zonds maintain both weapons, one of which was extended with a Warhammer 40k Tau bitz…
Warhammer 40k Tau bitz… In my opinion these work best as fillers for Infinity conversions. Slightly bulky, still futuristic enough to match the theme. Used many different random pieces to improove the differences between certain types of Zonds, still the key piece was a XV8 Crisis Battlesuits arm shield. These were used for nice, round top pieces on all of my Zonds…
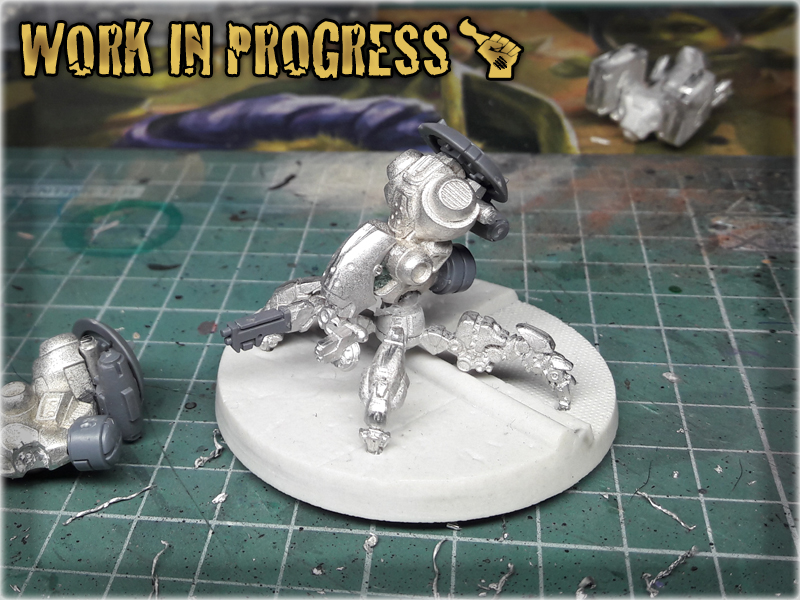

One Zond was meant to fill the roll of a Meteor Zond, or serve as the good old Stempler Zond in times of need. To create a look of futuristic hover engines that would allow the Meteor Zond to Combat Jump I used four front wheels of Haqqislam bikes. Already had plenty of these at my disposal – seemed like a perfect match. I had also mounted a round frontal ‘sensor’ piece instead of the usual Lunokhod lenses and weapons…


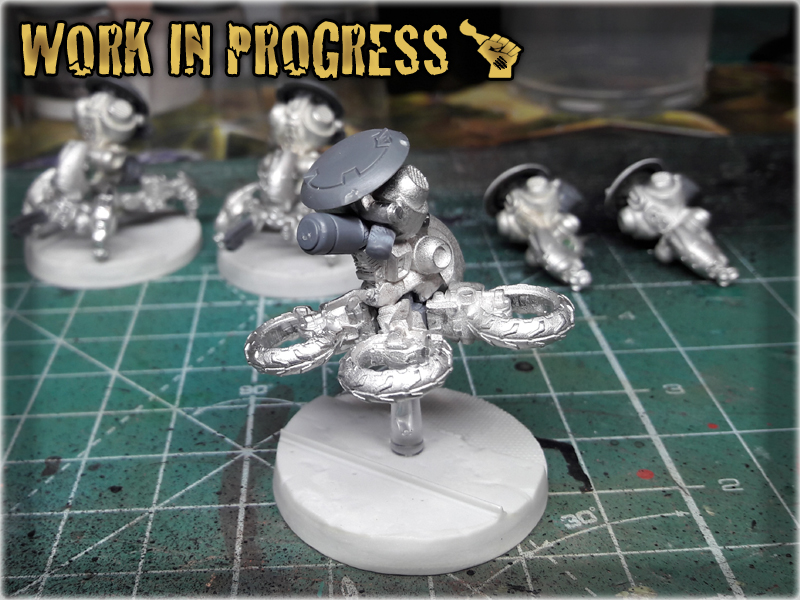
Not much about this part. Painting went pretty fast and easy. I used the standard Nomad Colour Scheme slightly improoved throughout the years of constant practice. Main change is a total abandonment of Metallic colours and using Black-Grey-White Infinity Black instead. In this particular scheme I use airbrush just for the light effects. Drawbacks of using old colour scheme – a lot of regular brush work 🙂


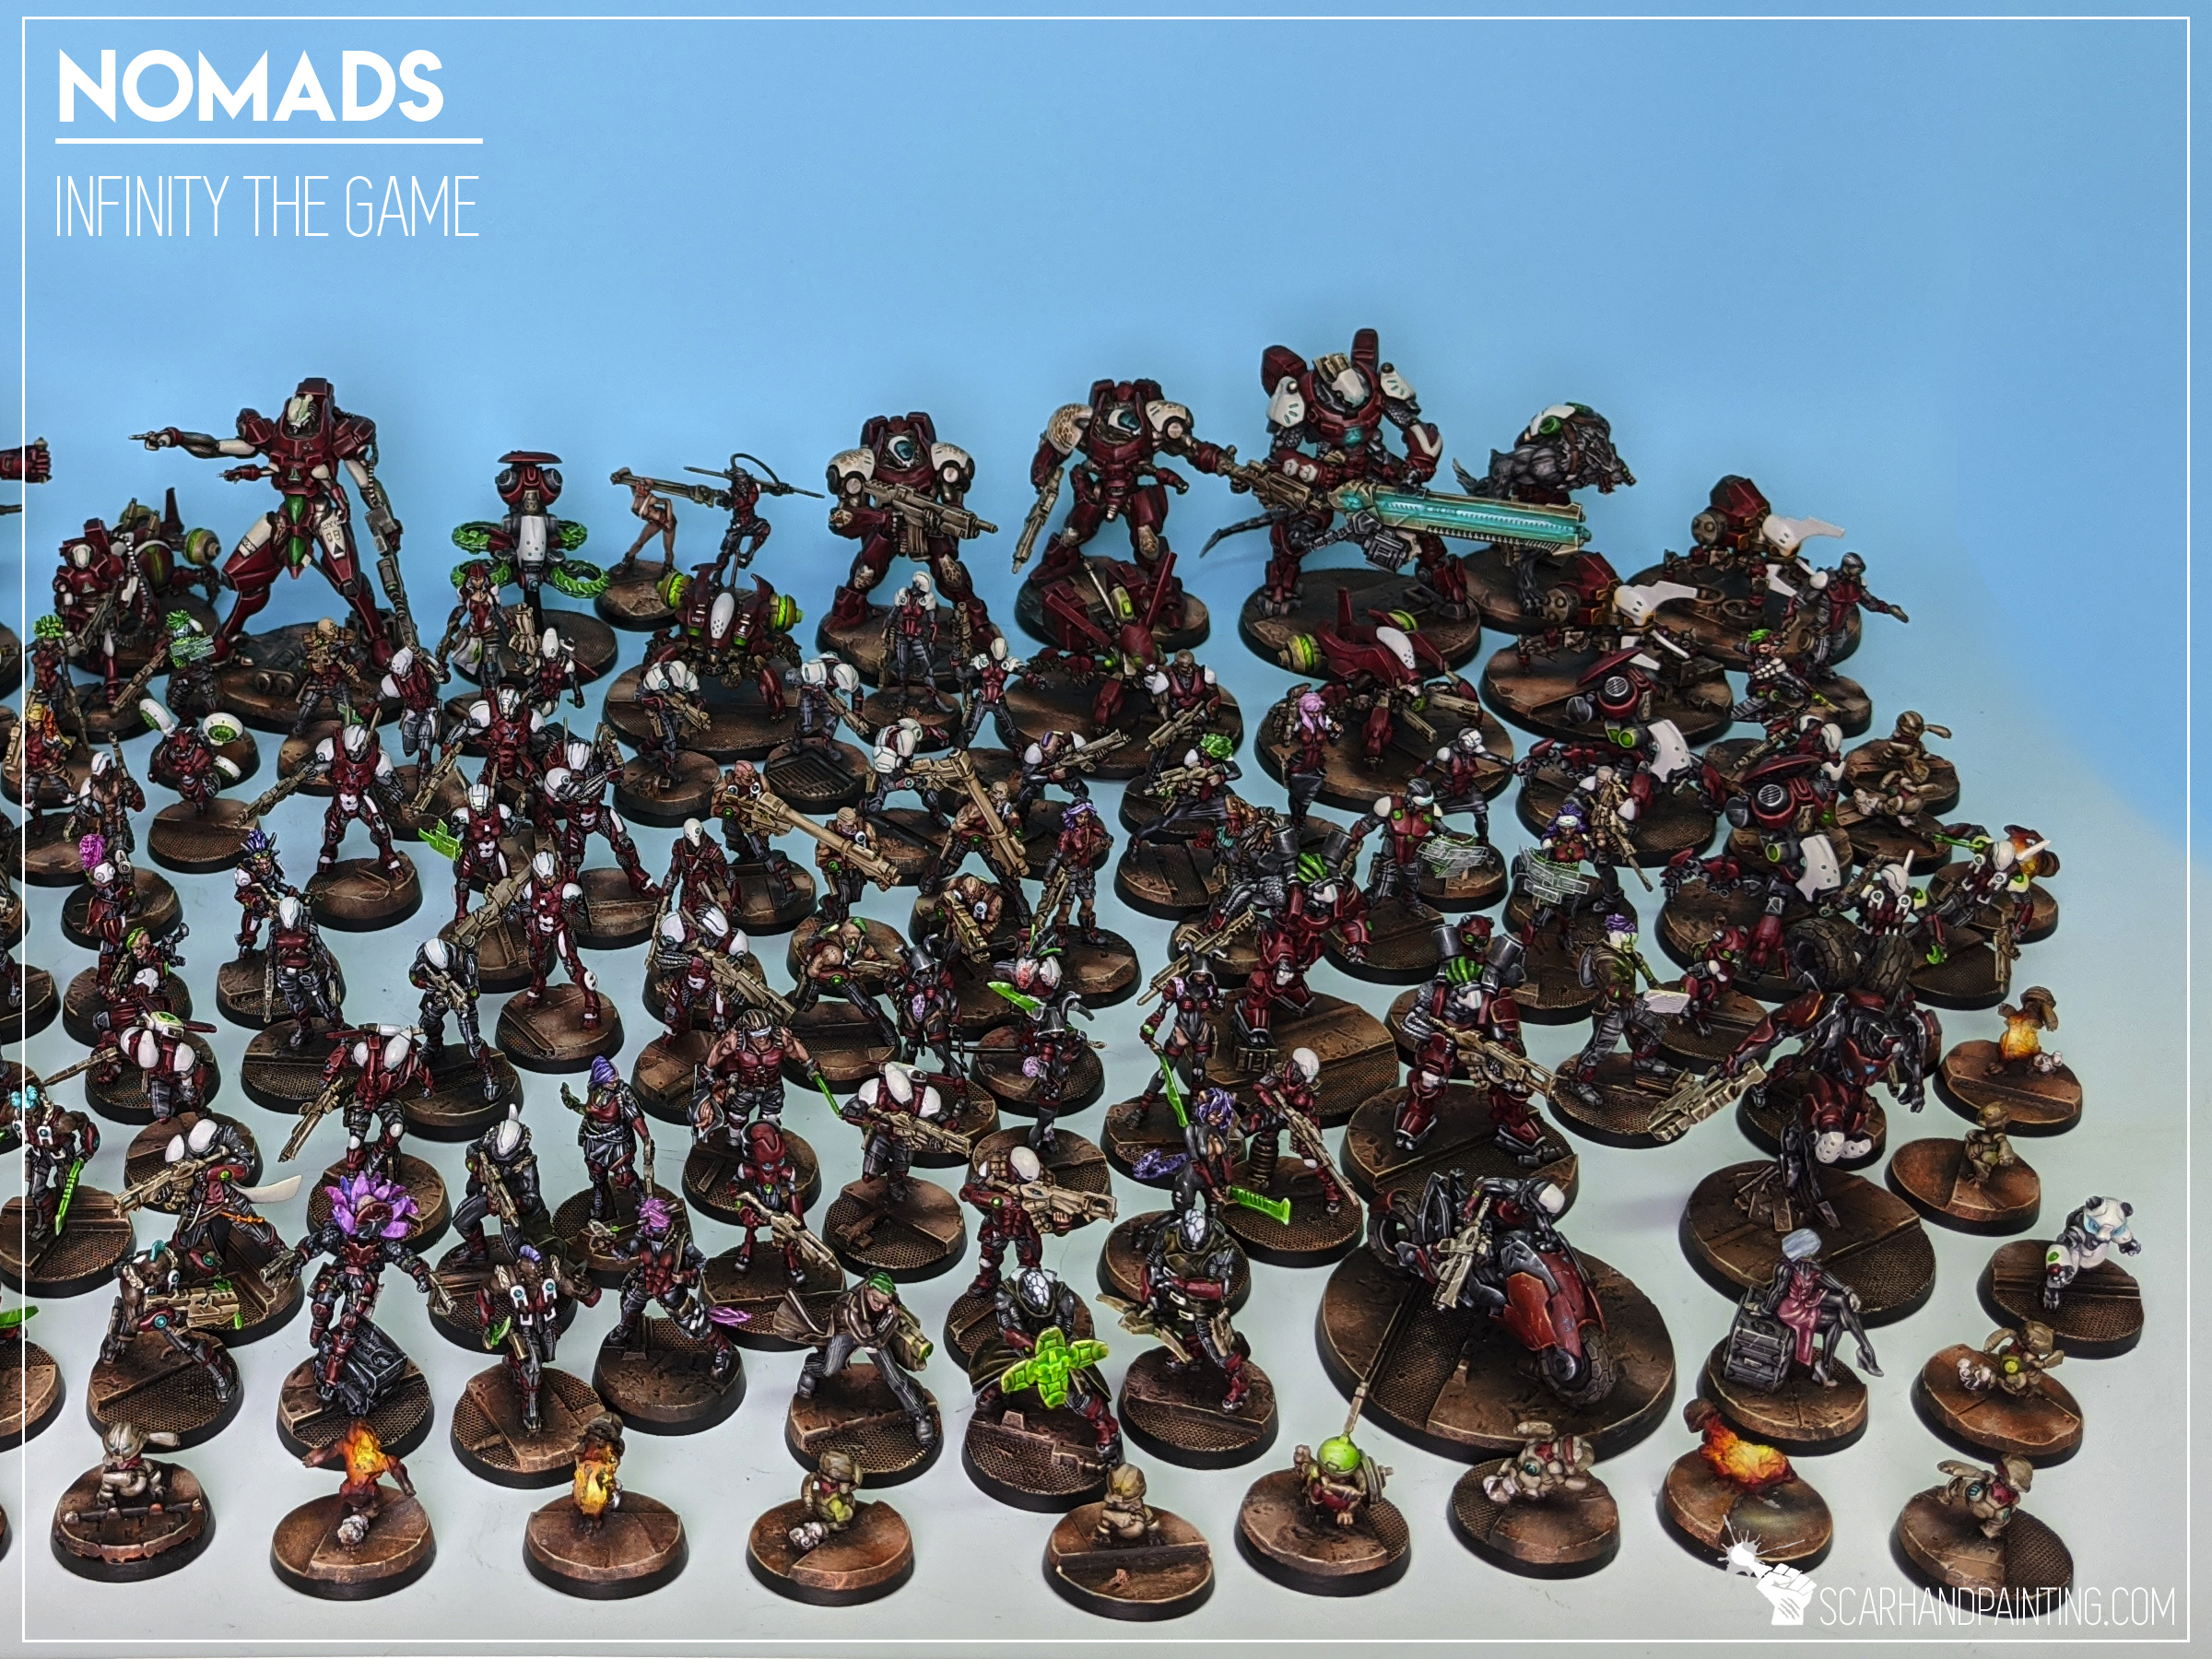
Silhouette 3 Zonds set complete. Let’s call them ‘type: Fireant’. They are ready to be unleashed on countless fields of battle (At this point they already seen some action). You can visit the “NOMAD ZONDS” SPECIAL PROJECT GALLERY for more pictures, and GALLERY: NOMADS to see the rest of this army. Next step would be to design and convert two Baggage Salyut Zonds. What you say about an idea of eight legged, spider like Lunokhods with Fireant bodies? I already see the result in my mind’s eye. See you in next Special Project then…
Here are some Colour Recipes for Infinity Nomads from GALLERY: INFINITY NOMADS lvl 4-5. Please take note that this is a simple colour scheme, not covering multiple overlapping layers and blends inbetween, that lead to the final product. It is supposed to be used as guidline not a step-by-step.
RED armour:
Black Undercoat,
Sanguine Base (P3),
Wazdakka Red (GW),
Mix Wzdakka Red 2:1 Skeleton Bone (AP),
Mix Wzdakka Red 2:1:1 Skeleton Bone (AP), White, l&p
Strong Tone Ink (AP),
Mix Skeleton Bone 1:1 White, l&p
Red Tone Ink (AP),
Red Tone Ink (AP),
BLACK/GREY outfits:
Black Undercoat,
Skavenblight Dinge (GW),
Mix Skavenblight Dinge (GW) 1:1 Administratum Grey (GW),
Mix: Administratum Grey 2:1 Fenrisian Grey (GW),
Mix: Administratum Grey 2:1:1 Fenrisian Grey (GW), Pale Wych Flesh (GW), l&p
Pale Wych Flesh (GW), l&p
Dark Tone Ink (AP),
Pale Wych Flesh (GW), l&p
WEAPONS:
Skavenblight Dinge (GW),
Mix Skavenblight Dinge (GW) 1:1 Administratum Grey (GW),
Mix Administratum Grey 1:1 Flayed One Flesh (GW),
Mix Administratum Grey 1:1: Flayed One Flesh, Pale Wych Flesh (GW), l&p
Mix Strong Tone Ink (AP) 1:1 Soft Tone Ink (AP),
Flayed One Flesh (GW), l&p
Pale Wych Flesh (GW), l&p
SKIN:
Bugmans Glow (GW),
Dwarf Flesh (GW),
Dwarf Flesh (GW) + Pale Flesh (Vallejo),
Mix Strong Tone Ink (AP) 1:1 Soft Tone Ink (AP),
Pale Flesh (Vallejo),
Pale Flesh (Vallejo) + Pallid Wych Flesh (GW) l&p,
WHITE helmets:
BLACK metal:
TUTORIAL: PAINTING ‘INFINITY BLACK’
l&p – lines and points,
p – points,
b – blend,
drbr – drybrush,
flbr – flatbrush,
*Airbrushed (with multiple layers and mixes)

It took me more than a year to bring to you another Gaming article, but here I am and with something special none the less! Infinity the Game is still my favorite – that did not changed. Once again I’m knee deep in an online Campaign. This years hotness is called Strikezone: Wotan and it is a truly crazy ride! So, time to put your brushes down and supplement painting with some good oldschool gaming!
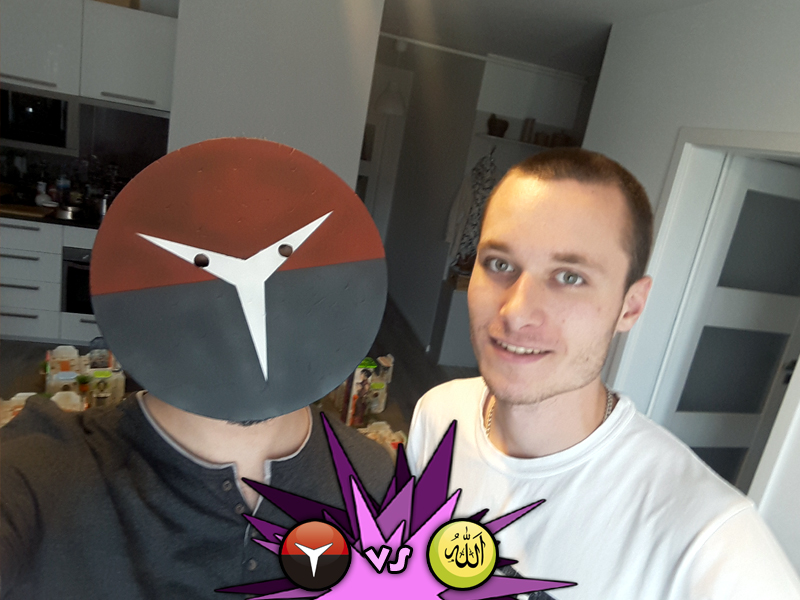
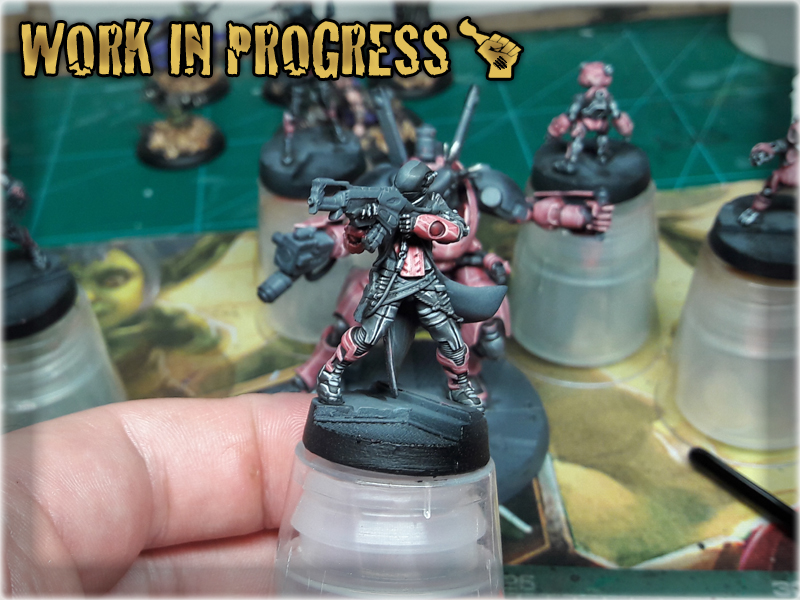
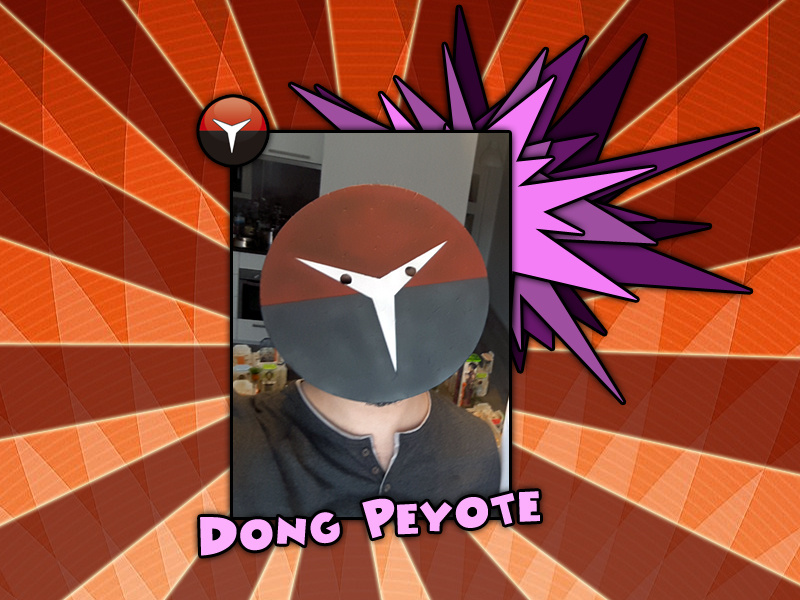
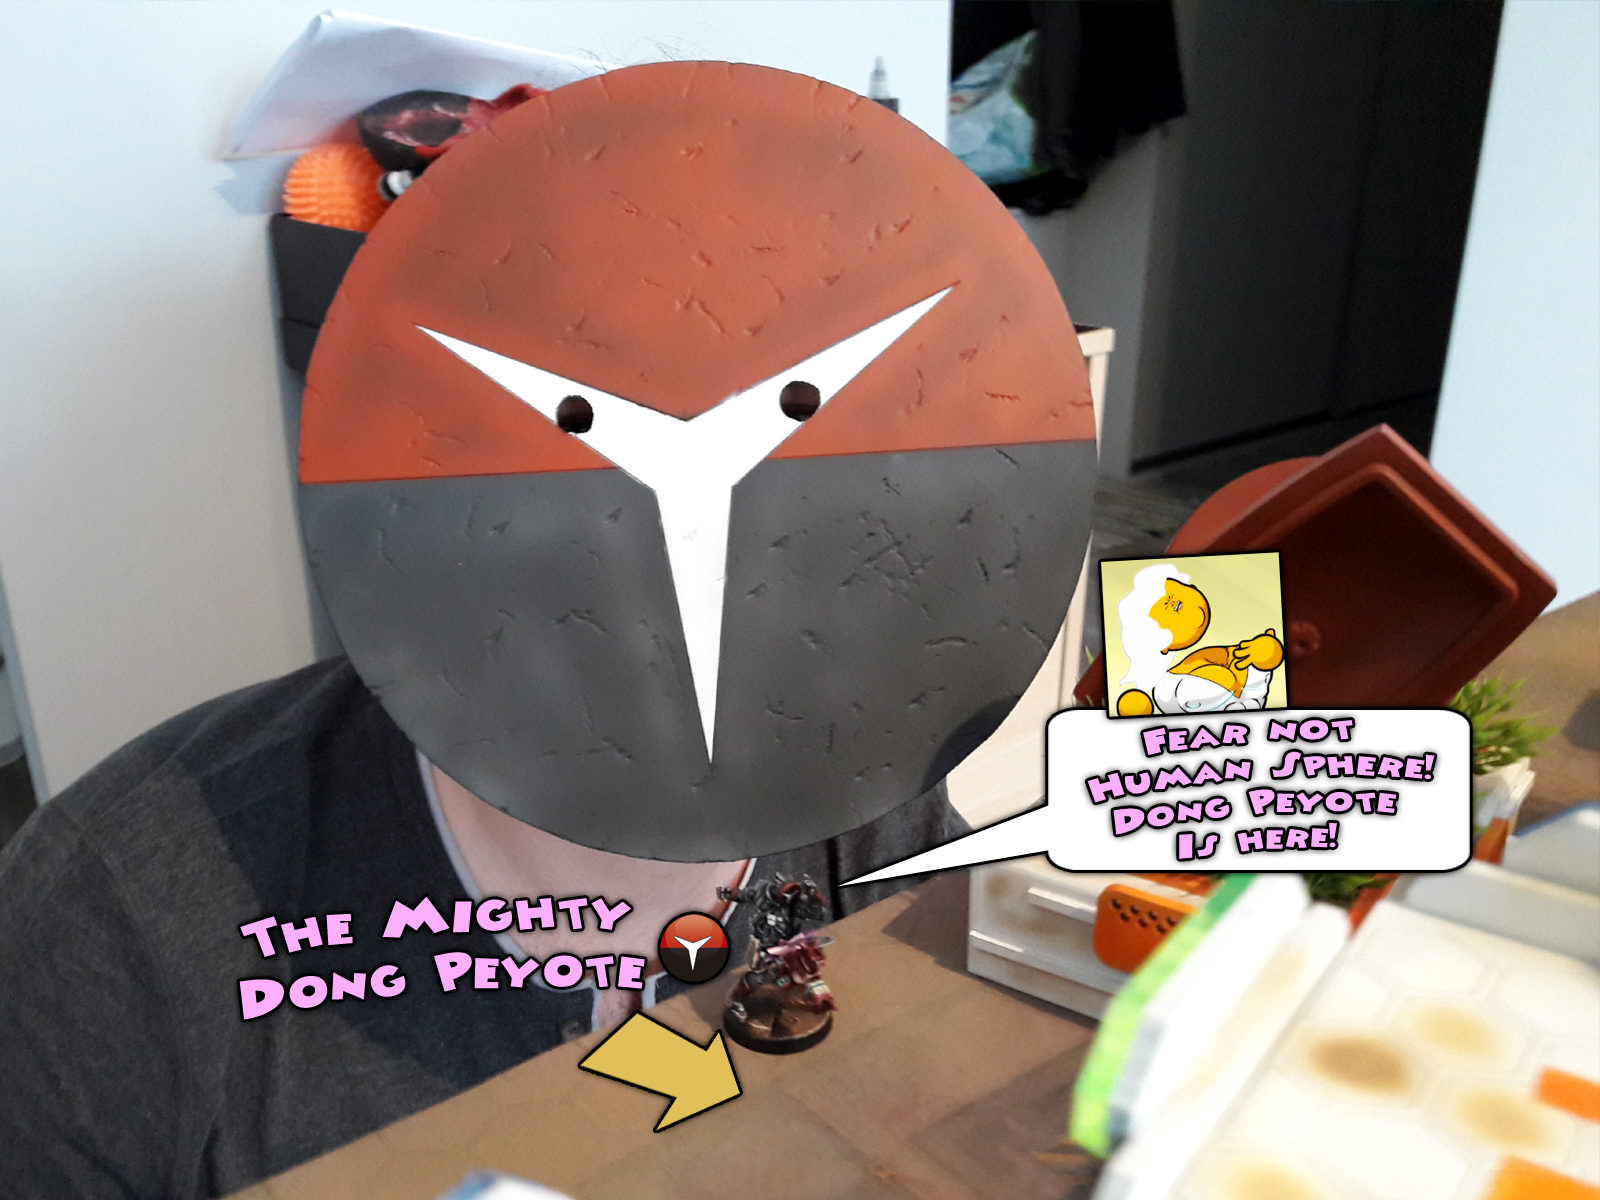
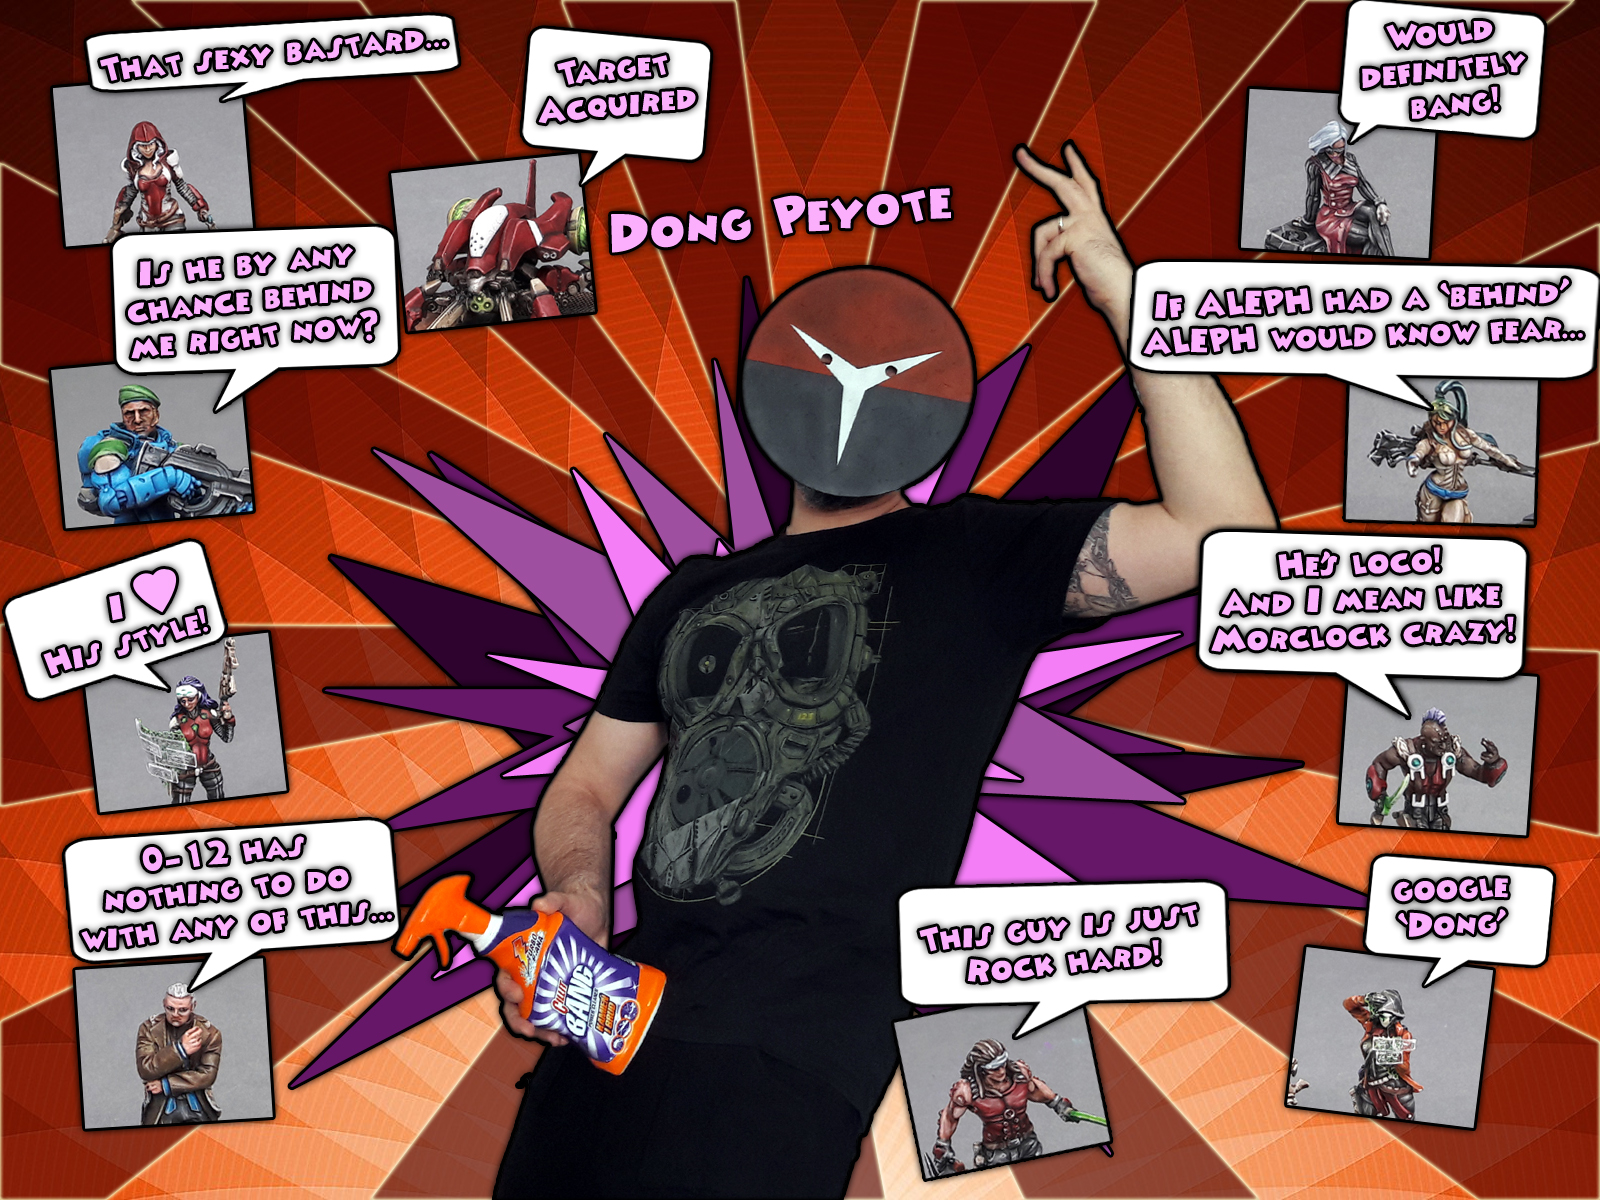
Having recently finished the ‘Dong Peyote’ Special Project I was eager to try out the miniature. It craved blood, watching me intensely from the scenic plinth – like if trying to force me to field it! Not that I tried to resist – in the contruary, I used the weekly gaming meetup with a friend to bring some action to the Mighty Dong Peyote!
Location: The Dong Peyote, Wotan Blockade
Time: day twenty nine of the Strikezone: Wotan campaign
Theater: Dong Peyote Repurposed Freighter
Mission: Annihilation
Special Rules: ‘The Dong Peyote’
Game size: 250pts.

For this fine battle I decided to dump the usual Intruder + smoke combo in favour of a new trick. I asked my opponent if he let me use the ‘Dong Peyote’ miniature, prepared just for the sake of Strikezone: Wotan and was granted a ‘go for it’. I restrained myself from building a list around the new character and decided to cut out enough of my usual 300pts. list to be able to field him, leaving the feel of the list intact.
So, there was the usual stuff like Interventor LT, which I find to work miracles, especially as a potent HD+ hacker. Be it defensive, secured Cybermasked LT, support with LT orders at his disposal, or even offensive hacker with chunky WIP and BTS, not to mention an arsenal of very good programs at his disposal.
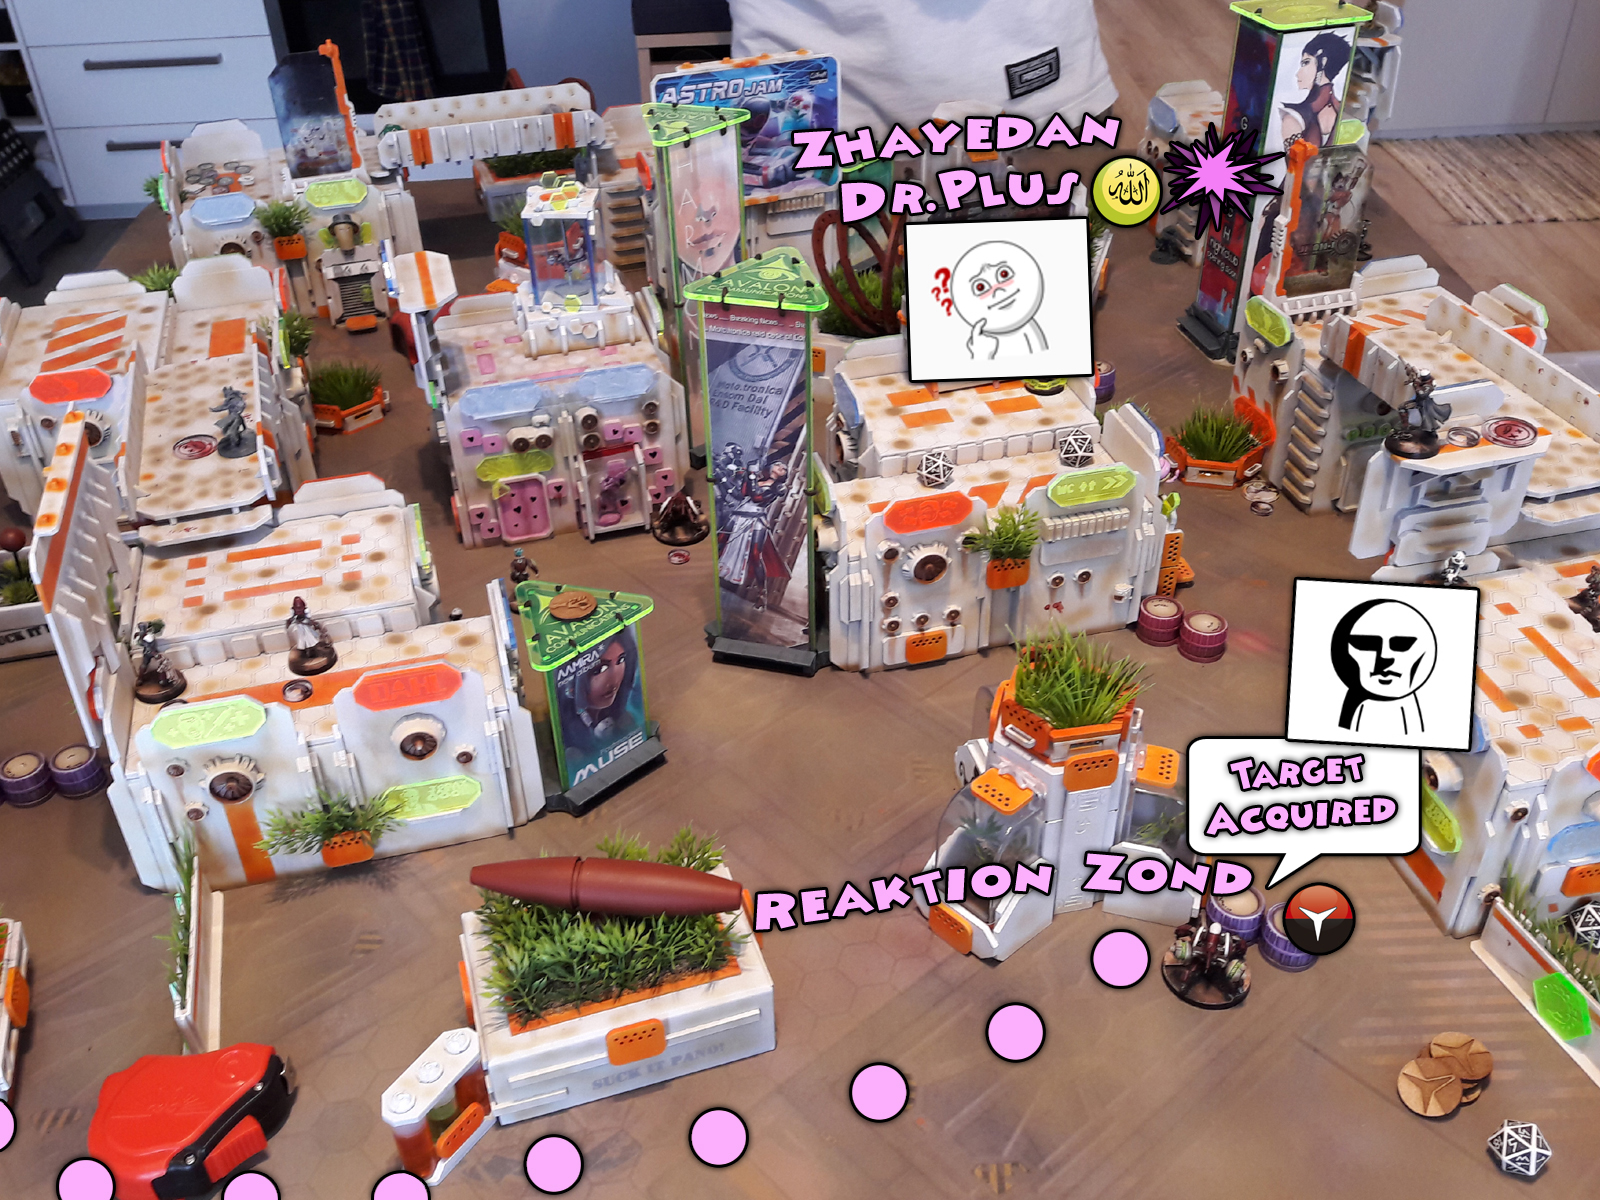
Total Reaktion Zond is also a simple choice with it’s low points cost, Climbing Plus and ability to be Marksman L2 buffed by a hacker. Mobile HMG to snipe enemy targets – a very potent offensive piece.
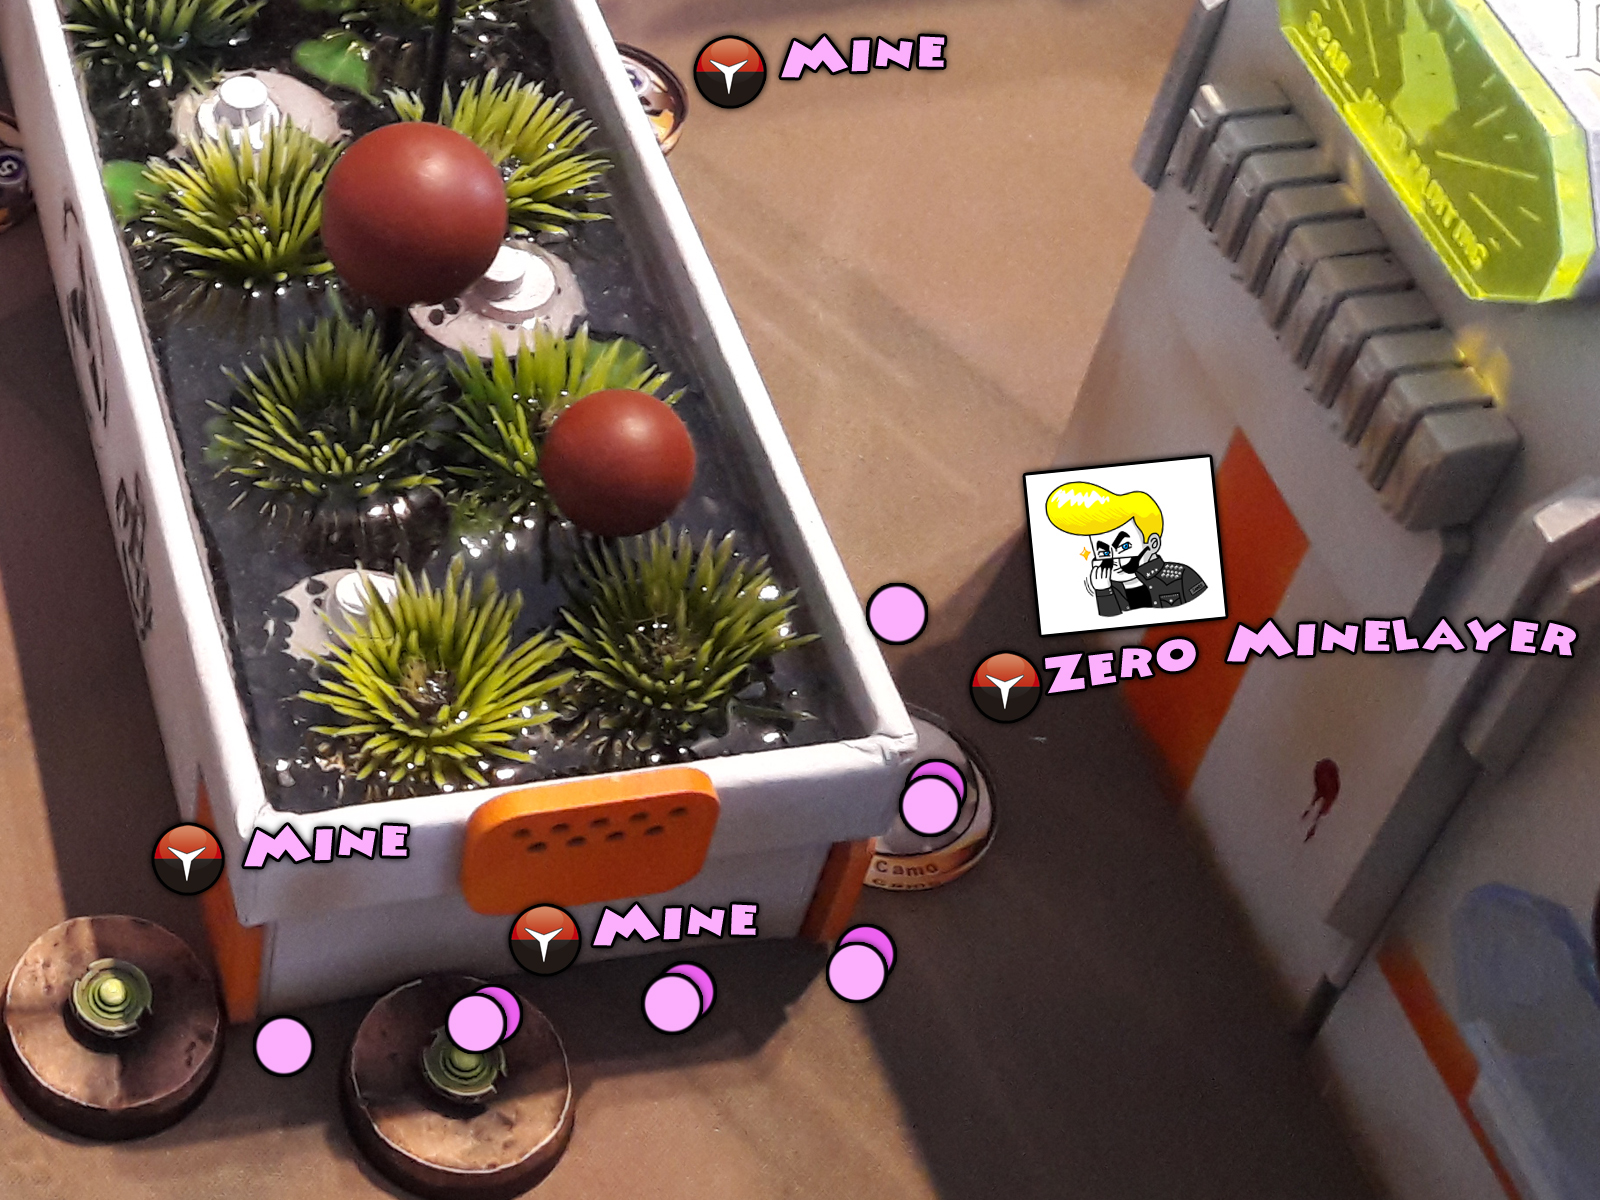
A single Moran Maasai Hunter is new to me, as I usually field two of these. Still in this particular case I dumped one in favour of a cheaper Zero Minelayer, fielding two of the latter to deal with potential enemy Camo and spam the map with my Camo Markers, playing mind games with my opponent.
Single Chainguar as a potent corner ARO piece or a good, reliable counter.
Some Transductor Zonds to provide cheap orders and Mimetised, high BS (WIP) ARO pieces.
A Daktari with a Zondbot on top, to keep most of these guys afloat.
MSR Spektr in second group to be used as a surprise ARO piece, and then maybe to eliminate easy targets in active turn.
Three Morlocks to provide smoke cover and exploid openings in enemy defenses.
This left me with 41 points to be used on the Dong Peyote – a surprise attack piece, that had to outperform it’s big cost in order to help me achieve victory.
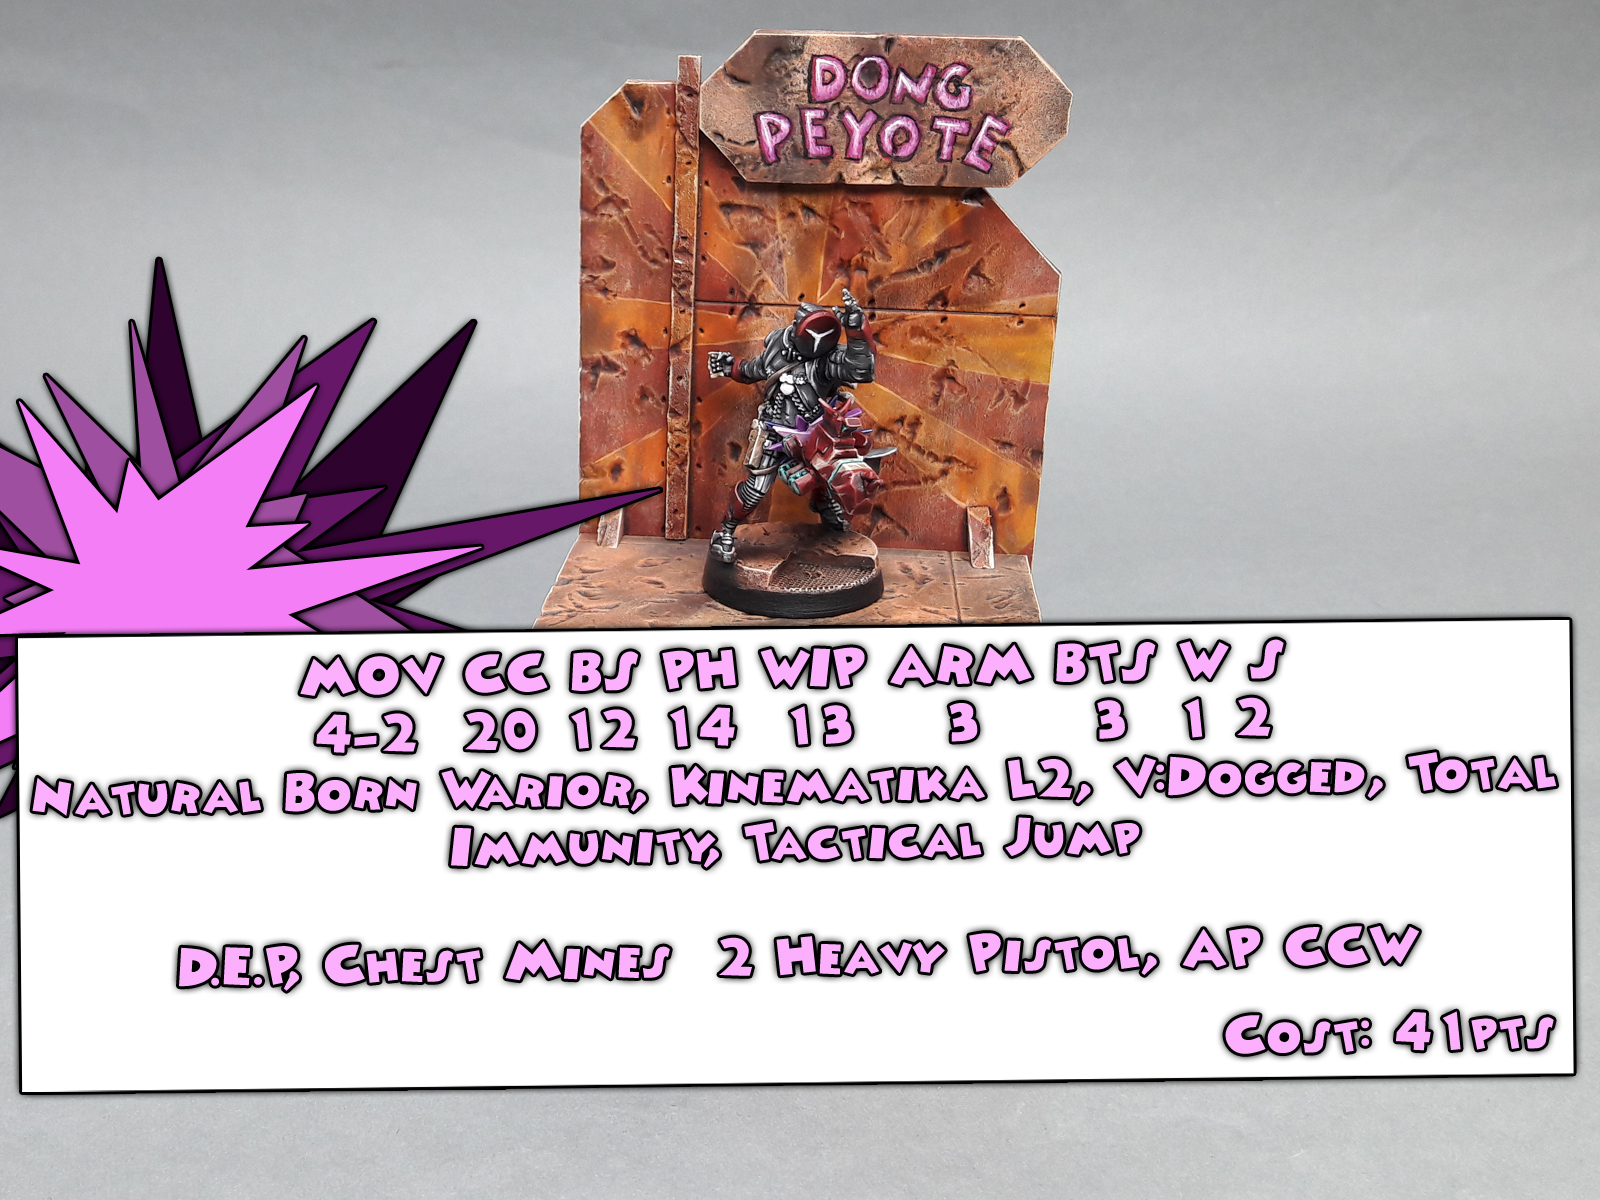
“Fear not Human Sphere – Dong Peyote is here!” Is a phrase that the Dong Peyote uses to announce himself, once he plunges balls deep into enemy lines! He strikes from behind, but not like a shadow – No! He goes hard, guns blazing, fists dealing punches and cock-rocket trailing clouds of smoke as it launches itself to deal tremendous damage! He cares not for the outcome, but for the performance itself! To adorn the Nomad mask and die in a blaze of glory is the ultimate reward!
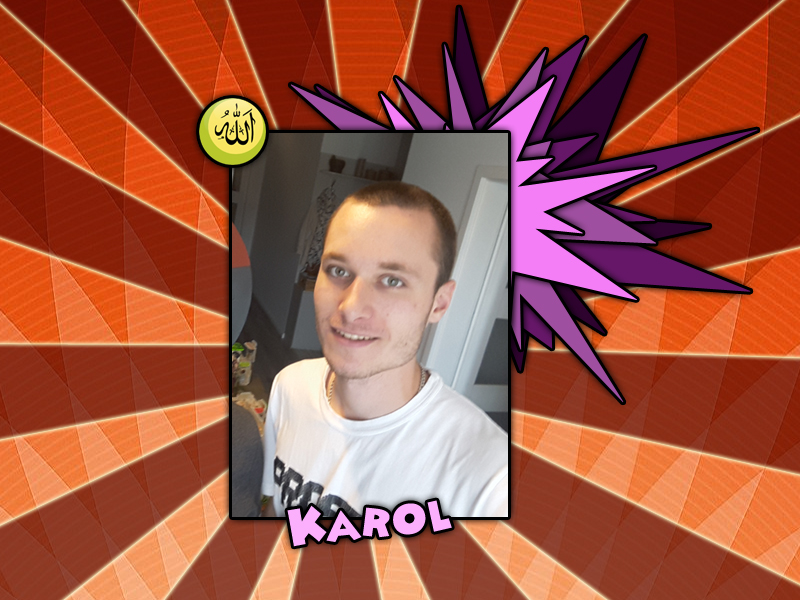

In my experience Karol grasps the ‘tricks’ of the game very well. He loves to use shenanigans like TO Camo to surprise me. He tends to reveal his TO Camoed troops in unpredictable spots to deal major damage to my list. Then, just as I feel secure and drop my guard, he pops out another TO Camoed troop and prooves me wrong. On top of that he usually goes heavy on his deployment zone, keeping troops far away from my Nomads and then unleashing them in waves, using Coordinated Orders. Aaaand he likes snipers.
His list, which I know now, is just that. Two Tuaregs to mess me up. One Janissary HMG Heavy Hitter, some versatile troops to be coordinated with him. Lasiq sniper. Some orders to fuel this. A Doctor Plus on top cause it’s just awesome and tends to come back to live with his Auto Medicit time and time again.
I asked Karol to add a note about his list himself – he will do this in time and I will edit the Batrep with it – am curious of his point of view XD


I won the roll off with a Critical pass of the LT’s WIP of 15. Needless to say that the gods of dice were just as eager to see me using the Dong Peyote as I was myself. Still I decided to forfeit the initiative in favour of luring my opponent to spread his troops, thus enabling me to use the Dong to his full potential and carve a deep path to gloory.
HAQQISLAM TURN ONE:
I used a Command Token to deny Karol the use of more than one of these at his first turn. No more rushing at me with half his troops with the damned Coordinated Orders.
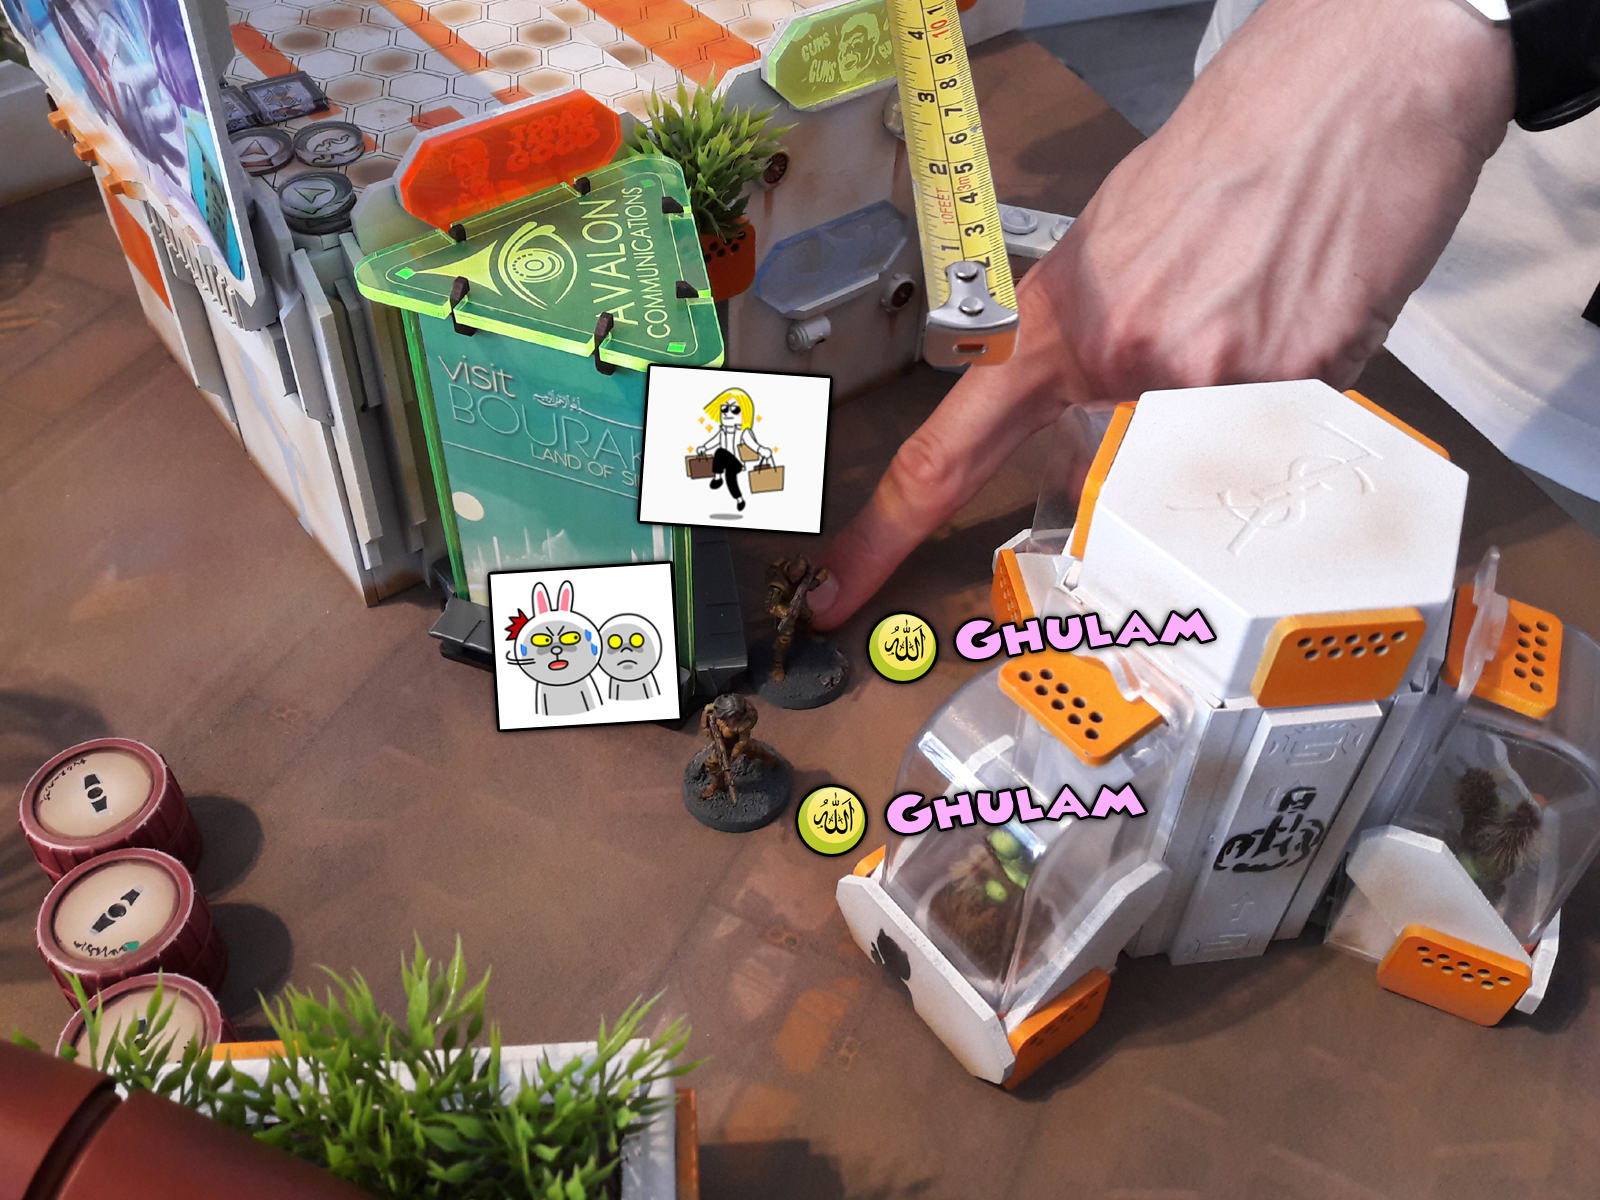
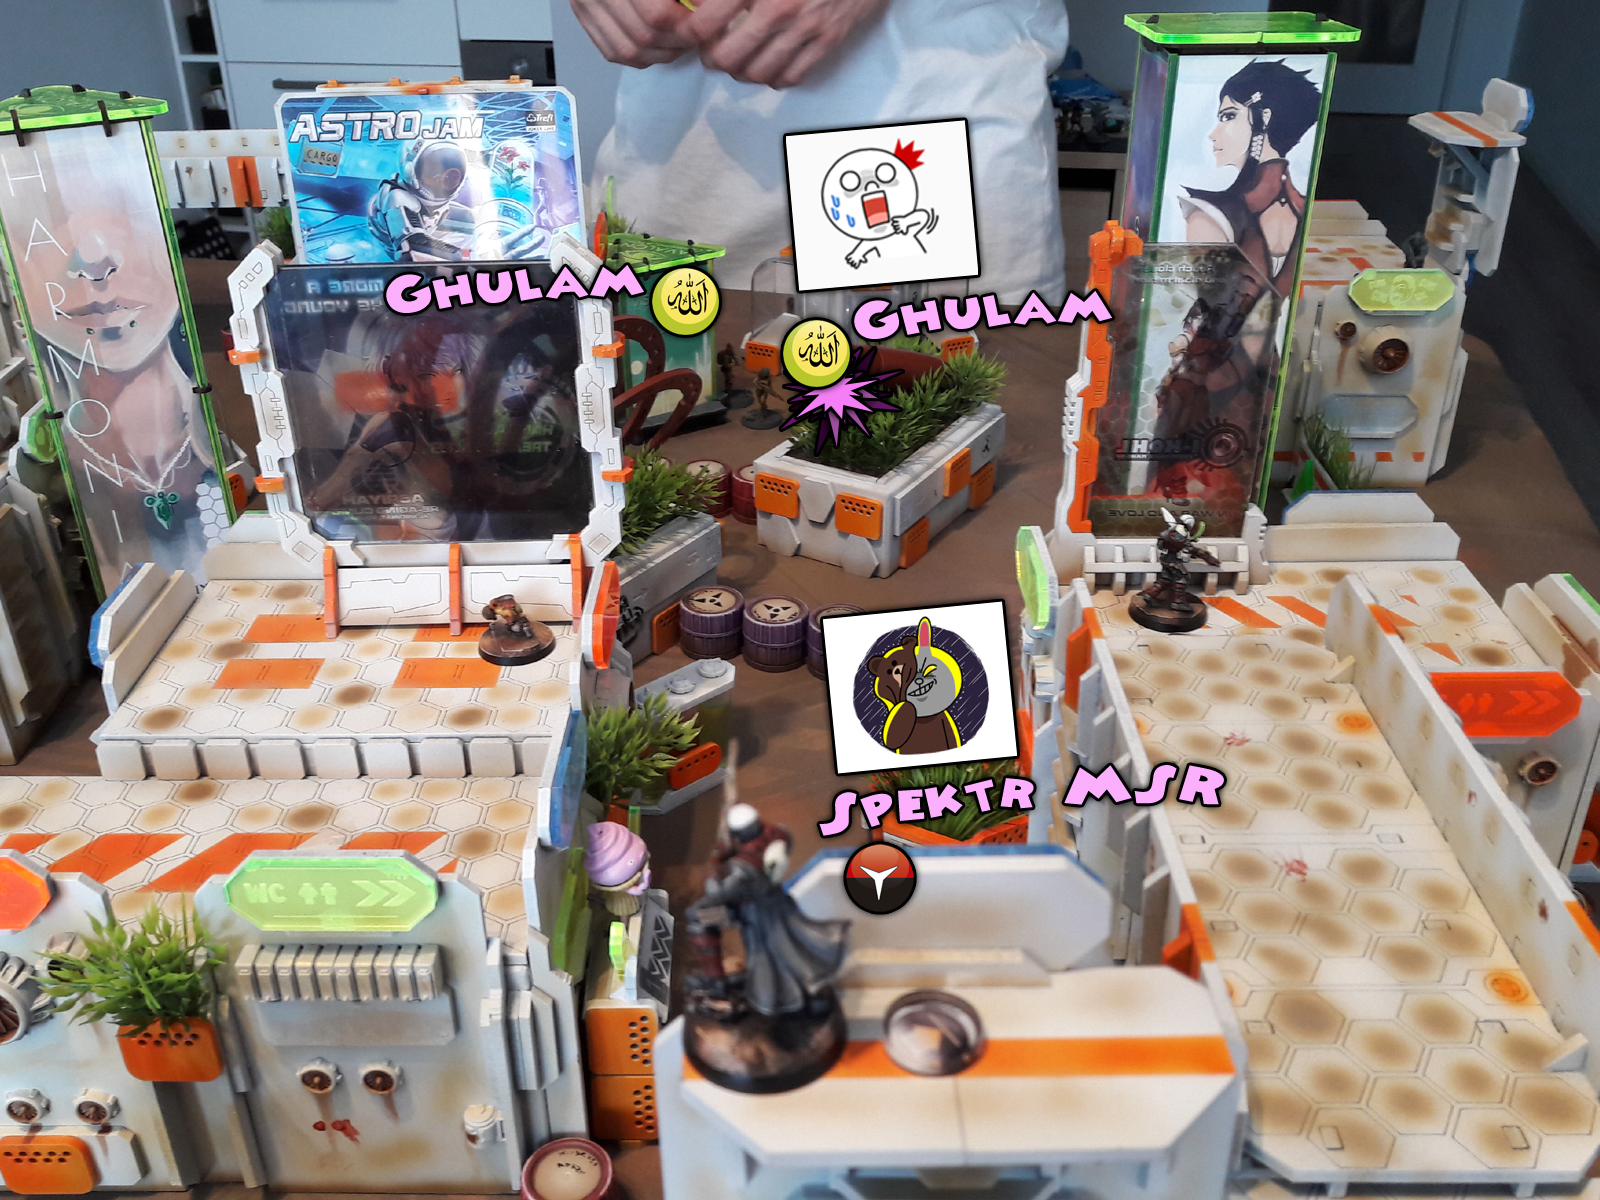
Haqqislam forces opened up with just that – a Coordinated Order, which saw a Janissary, two Ghulams and Khawarij advance. (It took me a while before I decided to reveal a TO Camoed trooper in first order of the first turn… but…) Out of thin air a Spektr MSR appeared to put a bullet through the head of the leading Ghulam. The latter fell to the ground, bleeding and unconcious.
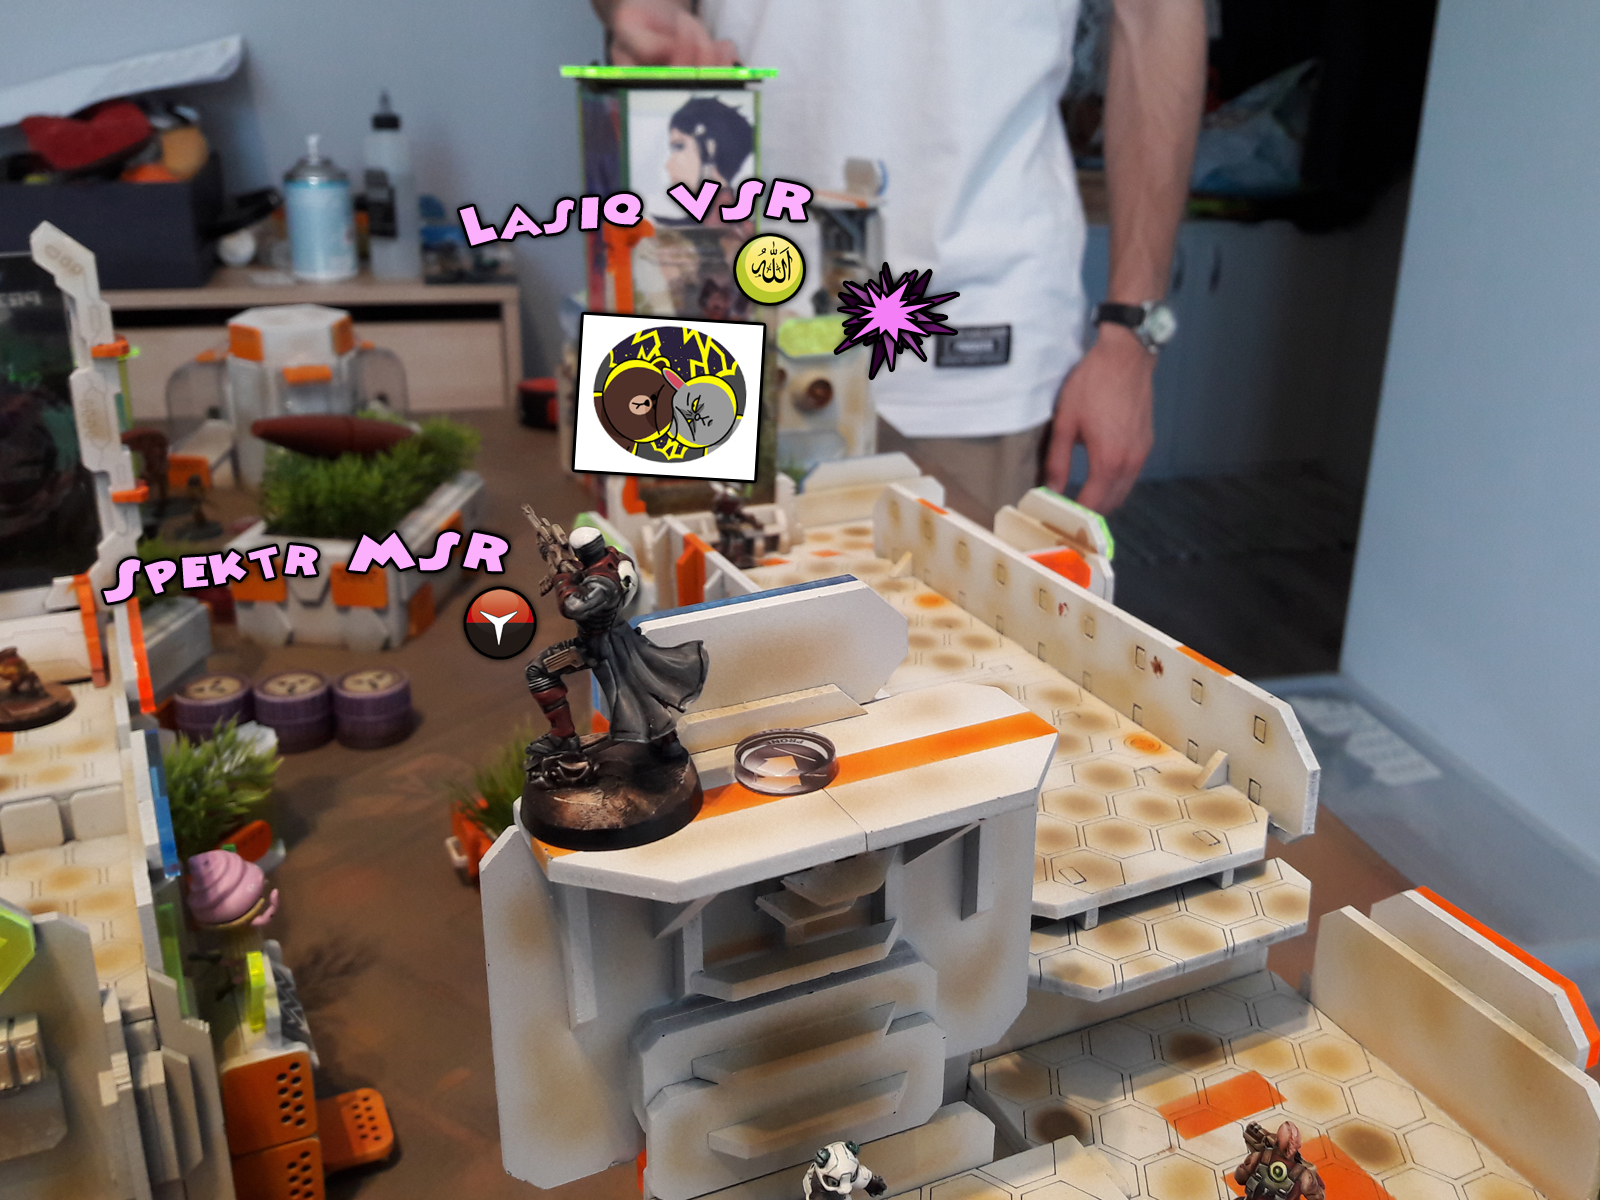
Just like in the ‘Enemy at the gates’ a Lasiq sniper sprang instantly from behind cover to try and deal with this new ARO threat. Unfortunatelly for Lasiq he failed in three attempts in a raw. With his final shot he managed to hit the Spektr, who shrugged the bullet off and used a failed Guts Roll to hide behind solid cover, thus denying the kill.
Zhayedan Doctor+ saw the opening, rushed to try to heal the fallen Ghulam but his medikit sent the poor guy into overdose – the Ghulam died.
In meantime a Camo token (Farzan, which was not known to me at the time) moved closer to Nomad lines in preparation for future outflank options…

NOMADS TURN ONE:
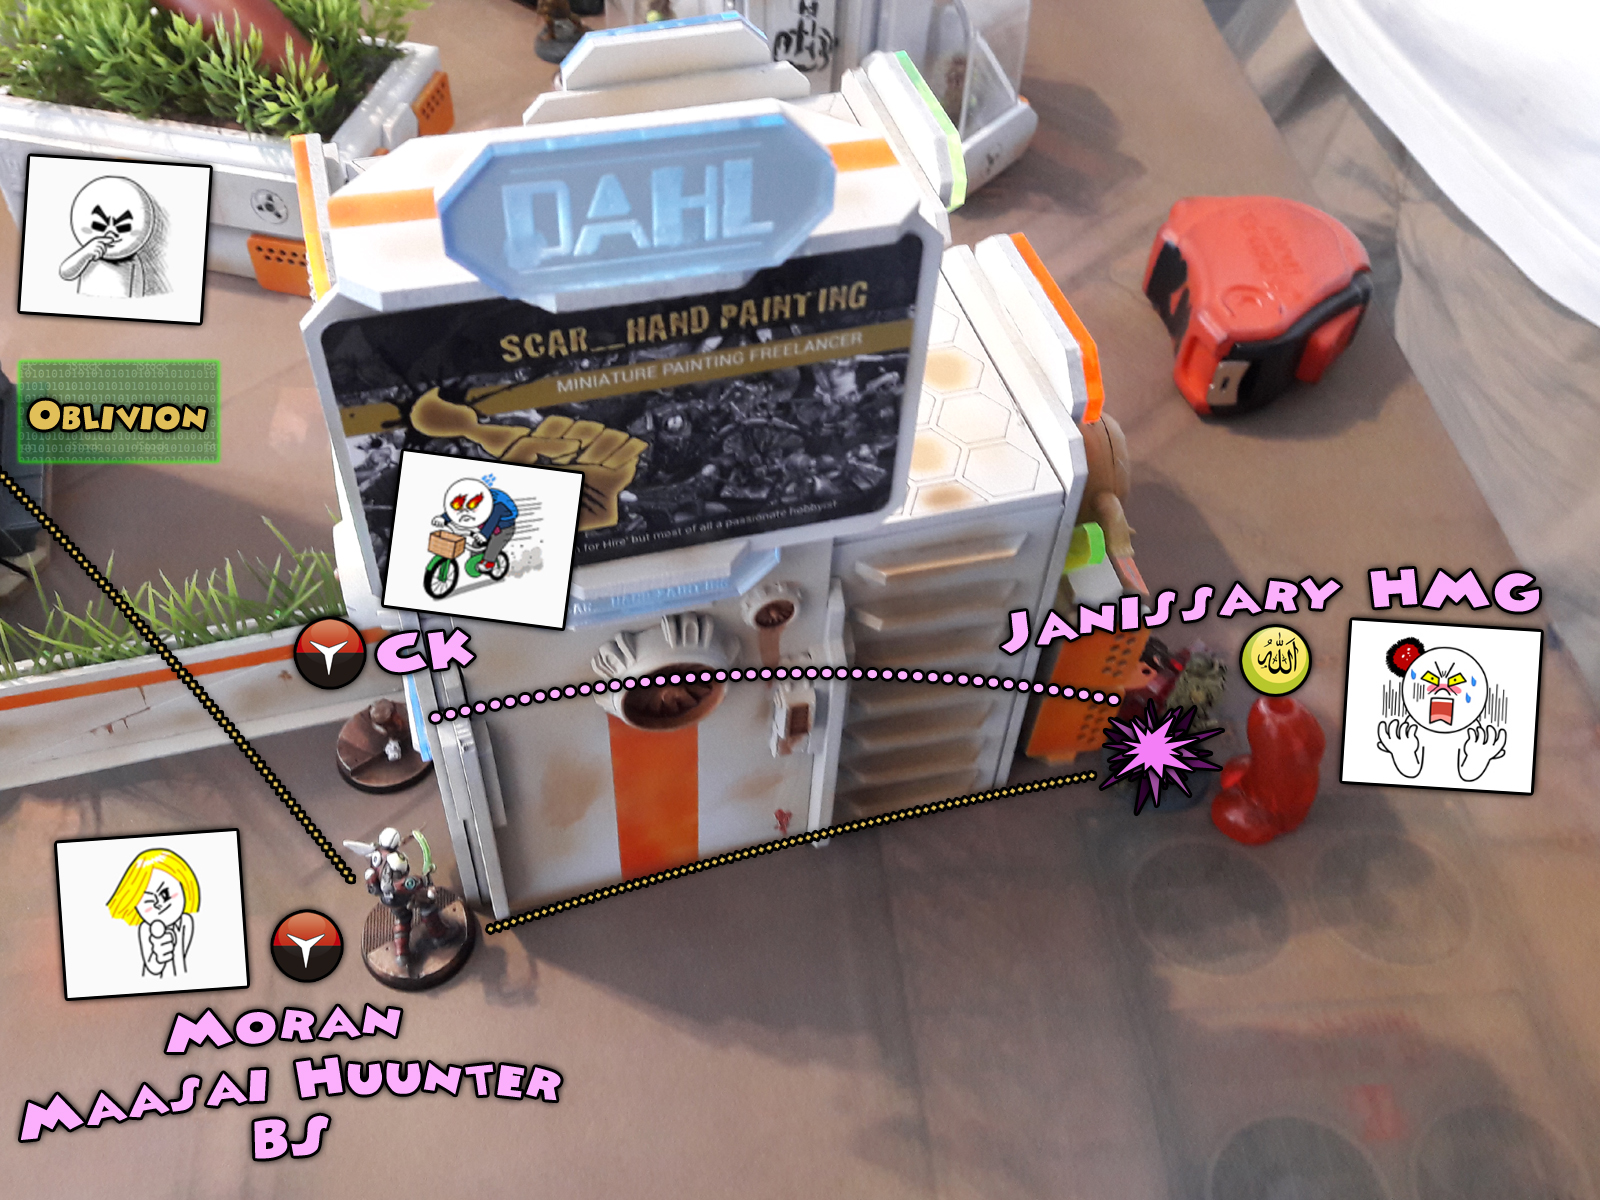
The Haqqislam’s ‘behind’ was pretty well defended, thus the Mighty Dong Peyote withheld his entrance for just one more turn. Instead a Moran Maasai Hunter advanced forward to sneak close to enemy troops rounded up on top and behind a small building. A Repeater and a Crazy Koala in range of both a Lasiq and Janissary meant a potentially good outcome for the Nomads in this part of the table.
A Morlock burst into action, using his 8-4 Metachemistry move to cover entire battlefield, jump out from around a corner and basked both the Zhayedan Doctor Plus and the HMG Janissary in a warm light from his flashlight, cause for unknown reason – he took a flashlight instead of a Chainrifle. The sassy targets stood there, mouths agape, then peppered the Morlock with enough bullets to turn him into a strainer.
A loud facepalm announced the Spektr comming out of his cover just in time to witness the Morlock’s demise. With no targets in sight he just prepared for another turn of ARO.
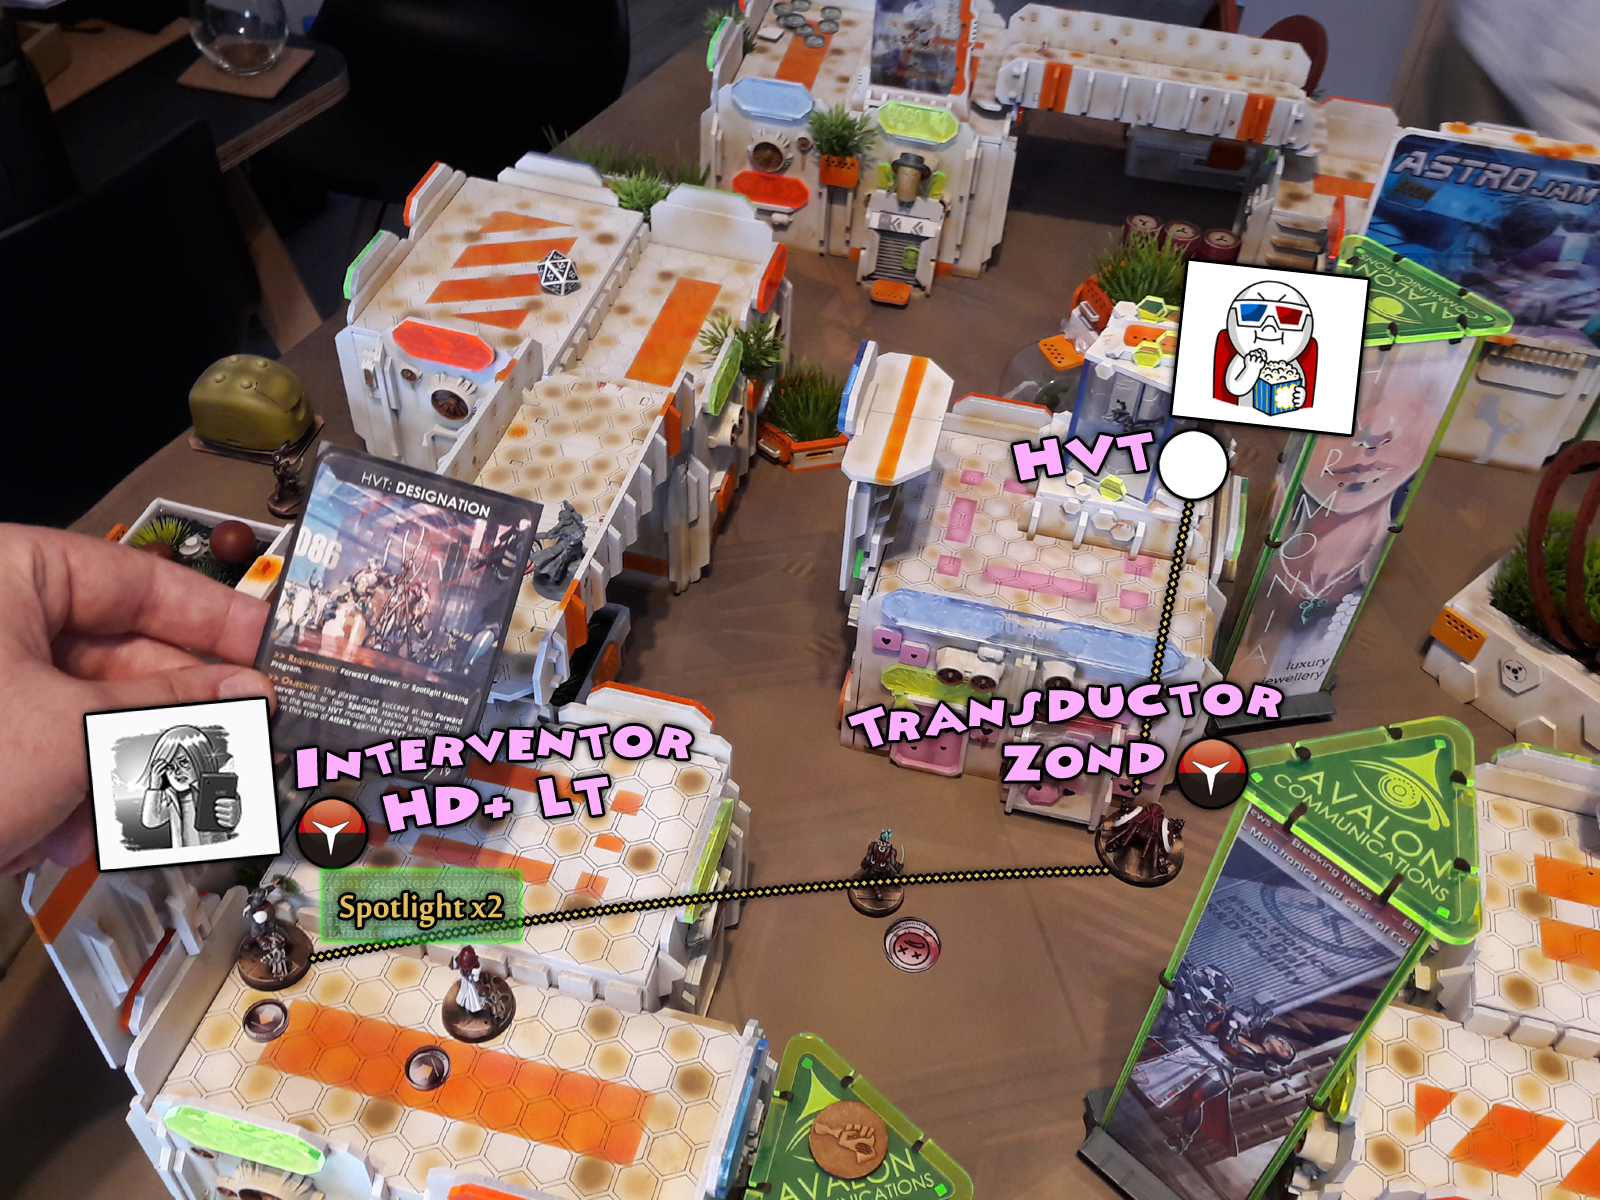
A Transductor Zond moved in, closed on the enemy HVT and let it’s Repeater be used by Interventor LT’s Order to Spotlight the Civilian.
The turn closing to an end, a Zero Minelayer, moved forward, mined the area and then went back to being Camoed, just to mess the Haqq’s up with the ammount of Camo Markers laying around.
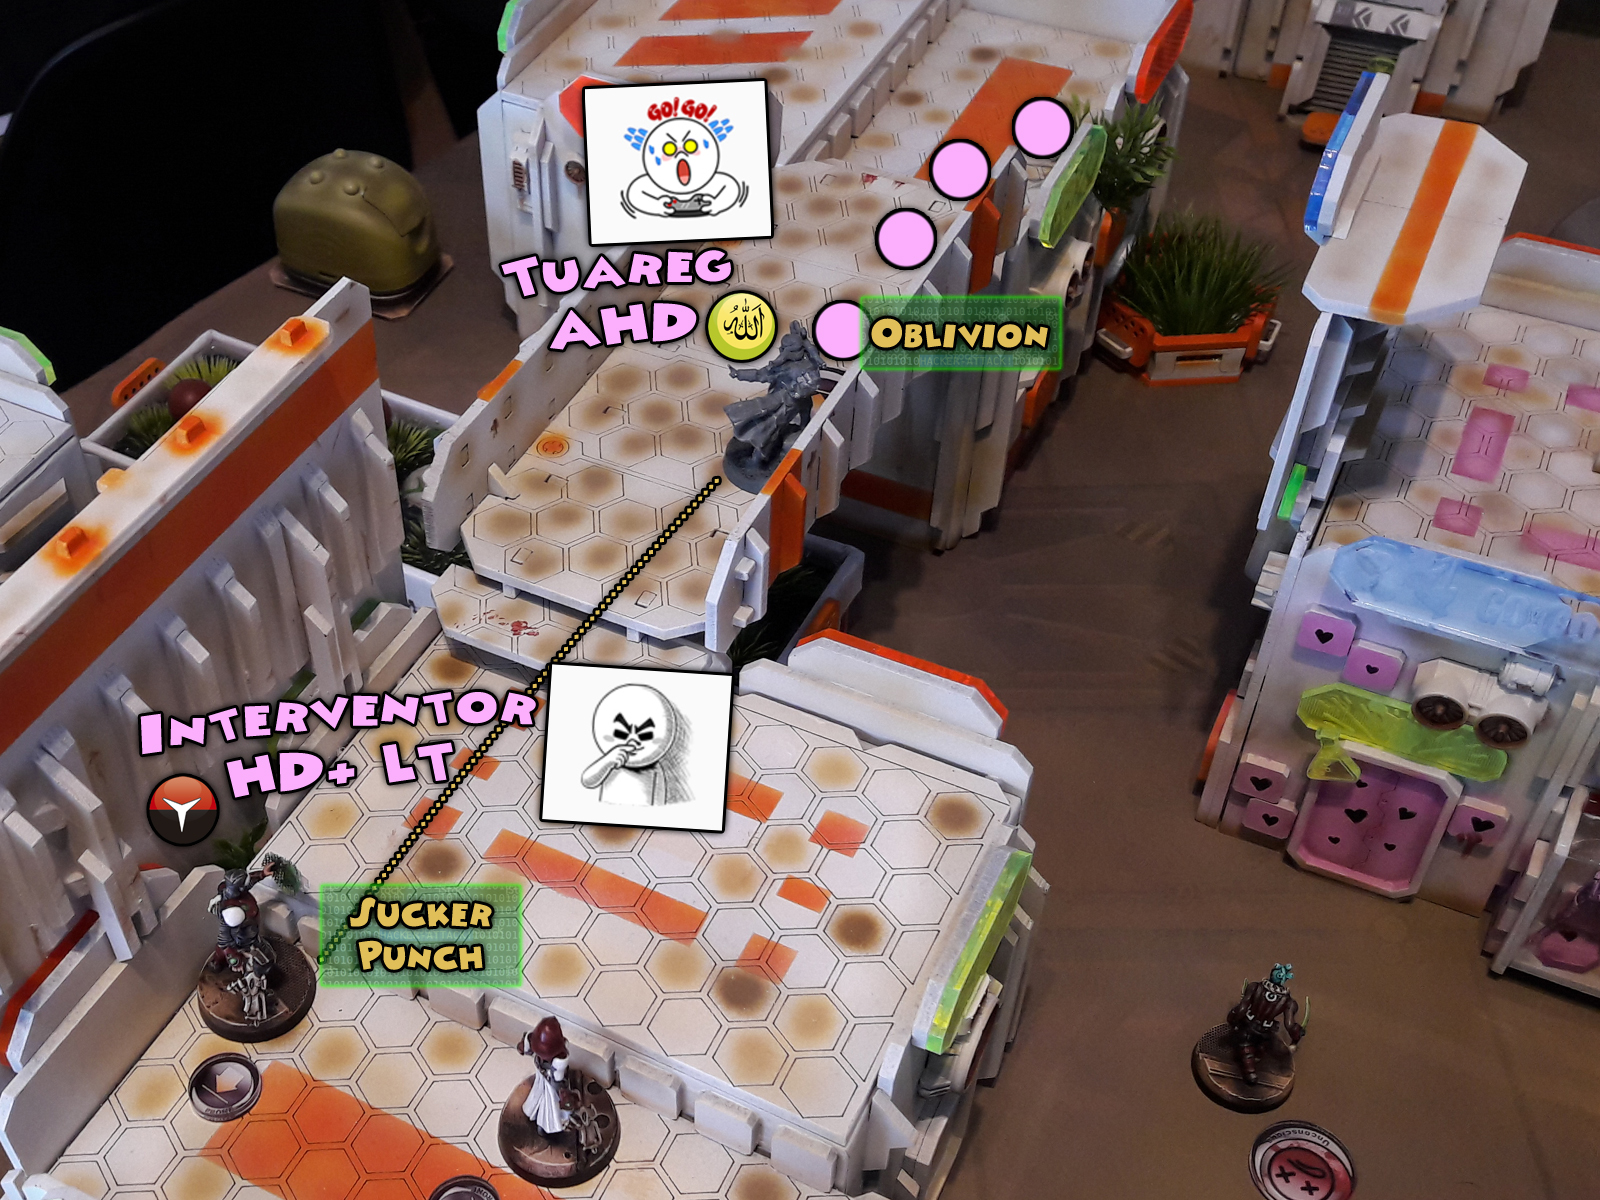
Last order of the turn was spent on a Morlock, who advanced through the middle of the board, just to be stopped by an appearance of a Tuareg AHD’s shot. If not for a splendid reflex of the Morlock and a Smoke Grenade throw that smoked the entire area around him – he might got killed…


HAQQISLAM TURN TWO:
With a Moran and a Crazy Koala covering the Lasiq, a Janissary opened up in a try to deal with both of these threats at once. On top of Crazy Koala bursting into action, the Moran replied with a Boarding Shotgun blast, all the while Interventor LT Oblivioned the Janissary through the Moran’s Repeater. Janissary reacted, sending four HMG bullets in Moran’s direction. Bad luck befell him, as he ate up all three ARO’s and failed to do any damage to the Moran. He was as good as done, going to Unconcious.
Crazy Koala gone, a Tuareg Sniper appeared over the spot where the Lasiq was hiding and shot the shocked Spektr to unconcious. He then continued trying to take out a Transductor Zond from HVT’s range, but failed spectacularly in four orders. He took out a Morlock standing nearby the Zond instead, this one falling to Unconcious without complaints.
AHD Tuareg moved forward, avoiding the Mines nearby, by moving prone. He slowly closed in on the Nomad Interventor LT and hacked to isolate him, but in typical ‘against an Interventor’ situation, he got Sucker Punched to unconcious in return…
NOMADS TURN TWO:
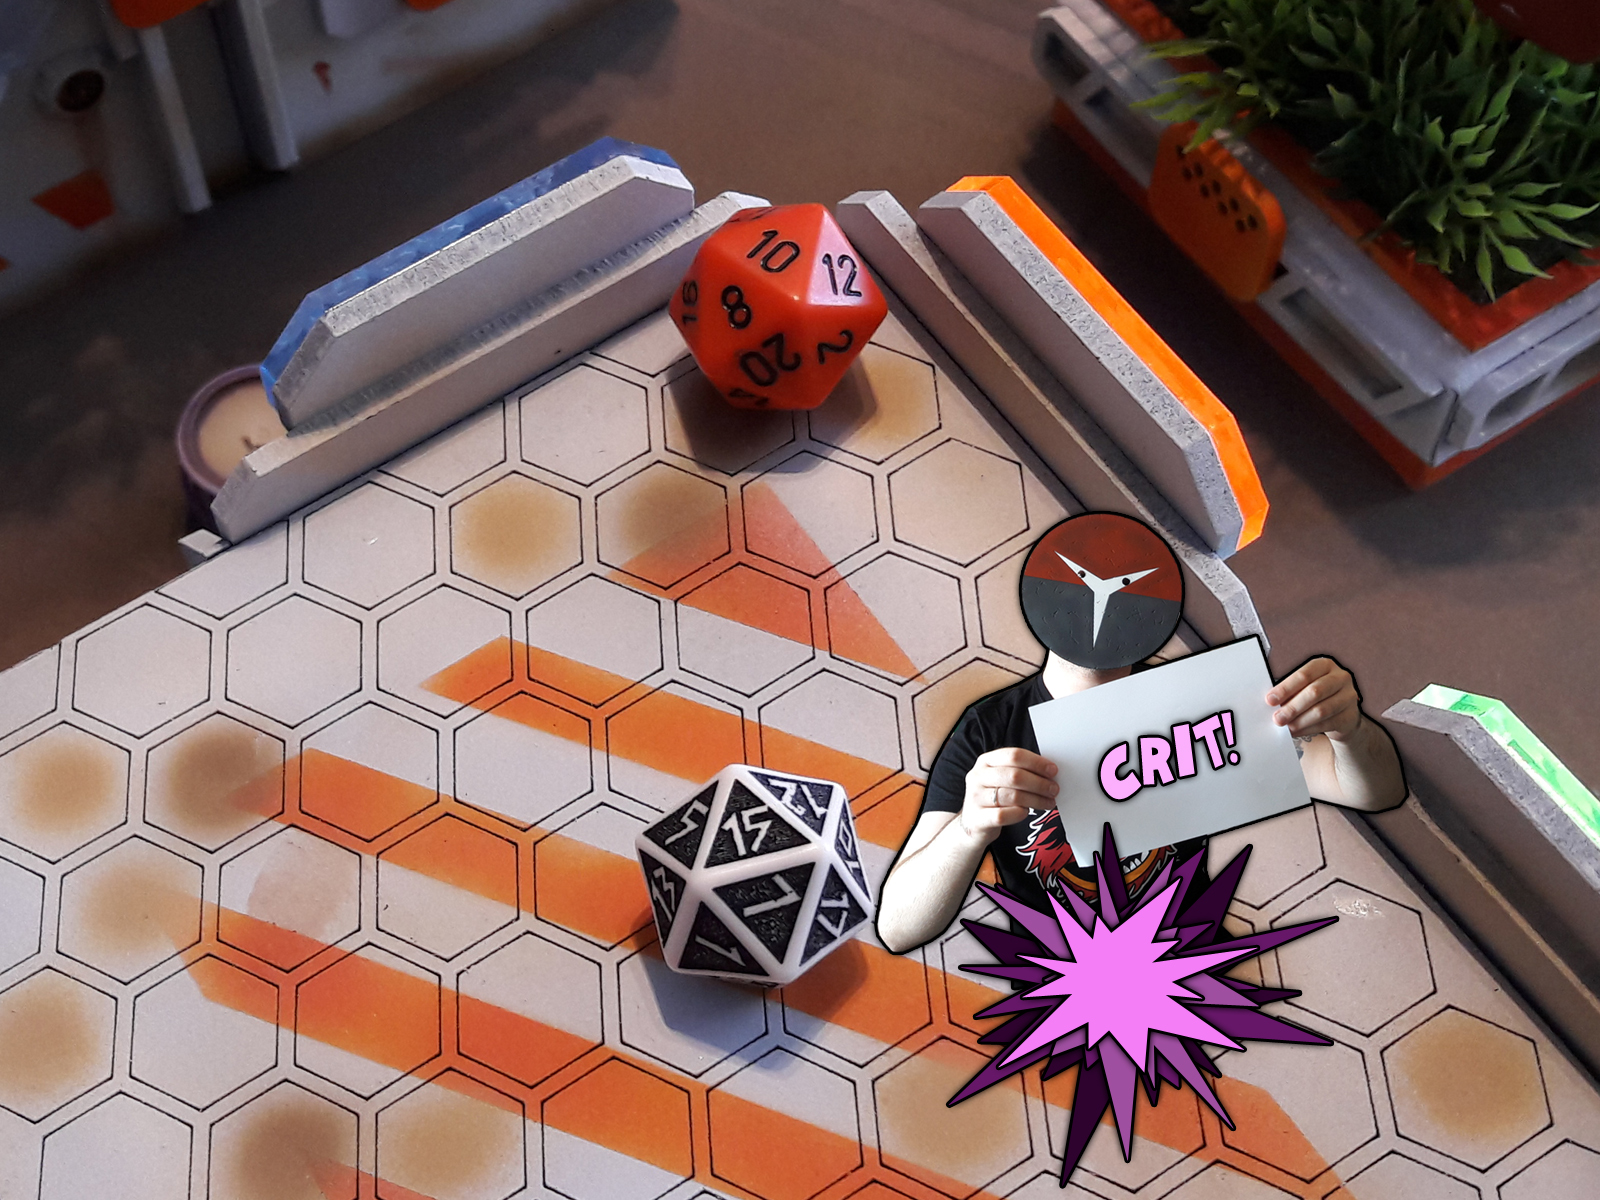
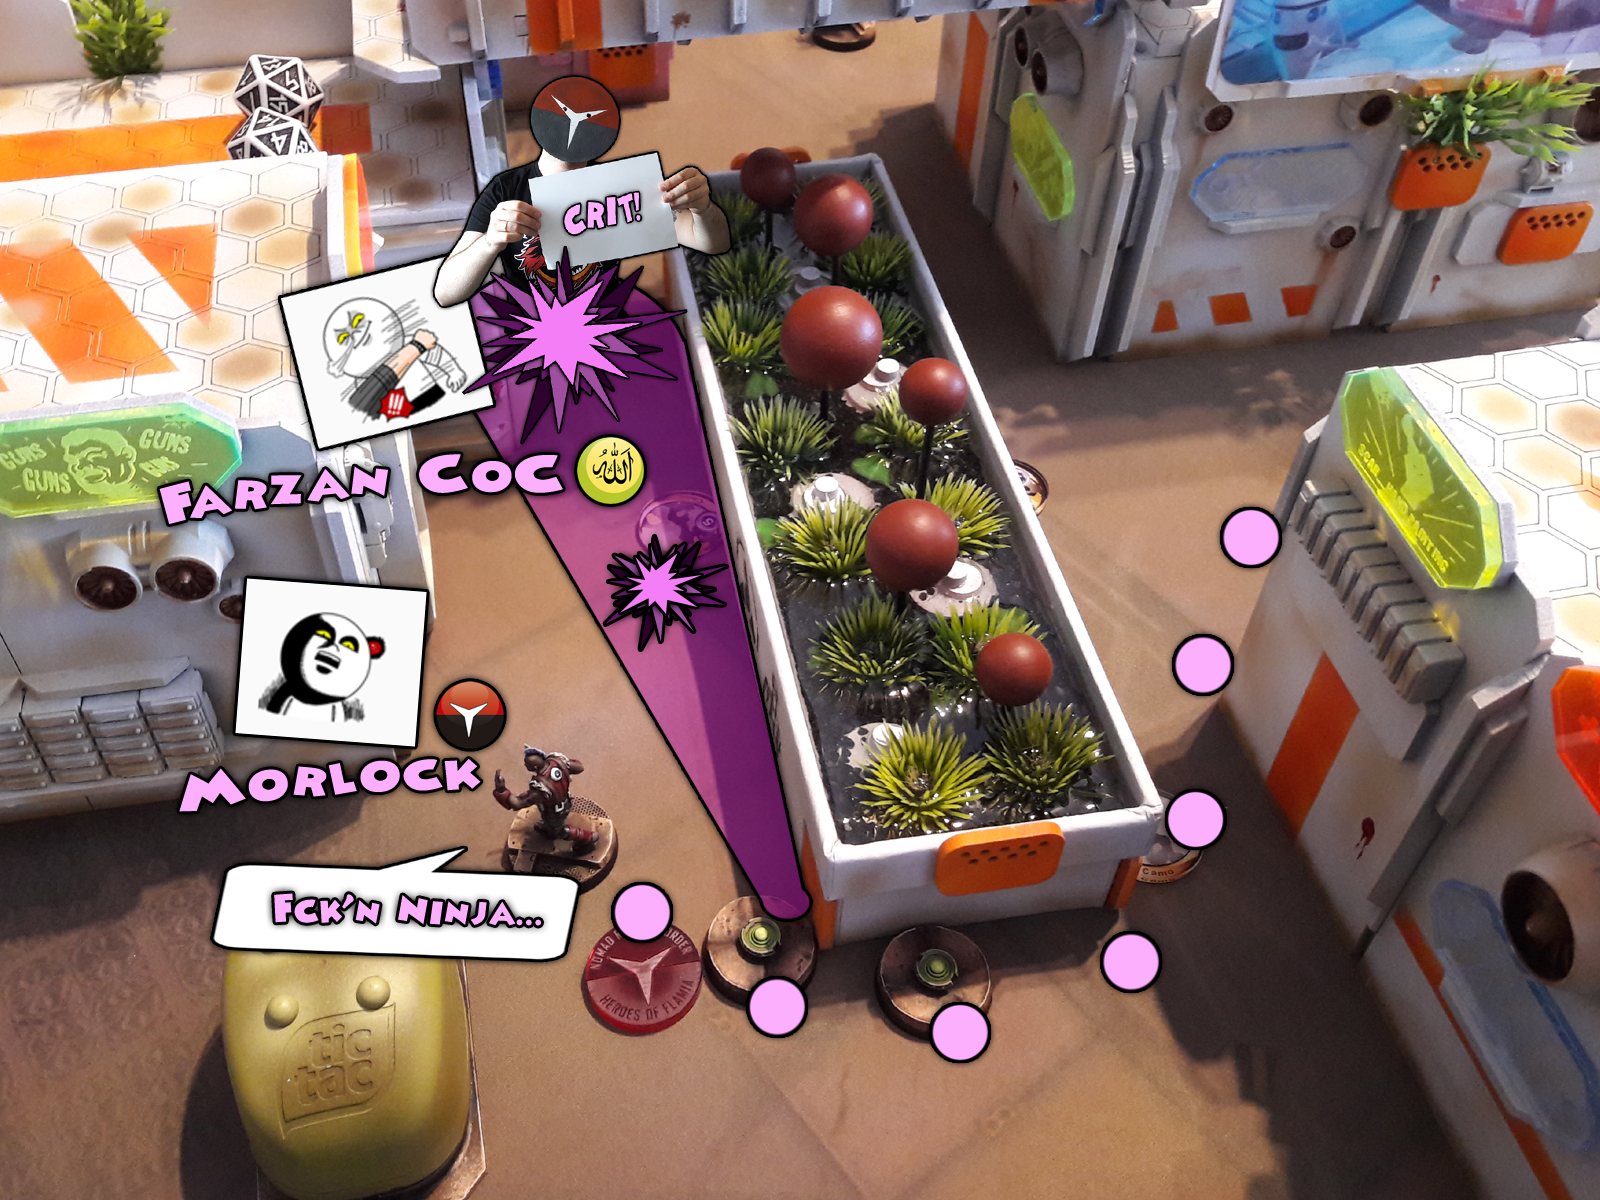
The last of the Morlocks rushed in the direction of the closest enemy. A Camoed Farzan withheld his ARO not to eat up a mine, that layed nearby and basked in the sun. The Morlock, being the last one of his entire group, spent his Irregular Order, Discovering then Shooting the Farzan, who to his surprise, Dodged both the pistol shot and a mine on a Crit…
That triggered me. With a loud announcement of “Fear not Human Sphere – Dong Peyote is here!” I put my ‘dong’ on the board…
In a whirlwind of blasts, punches and a cock rocket shots The Mighty Dong Peyote entered the board…

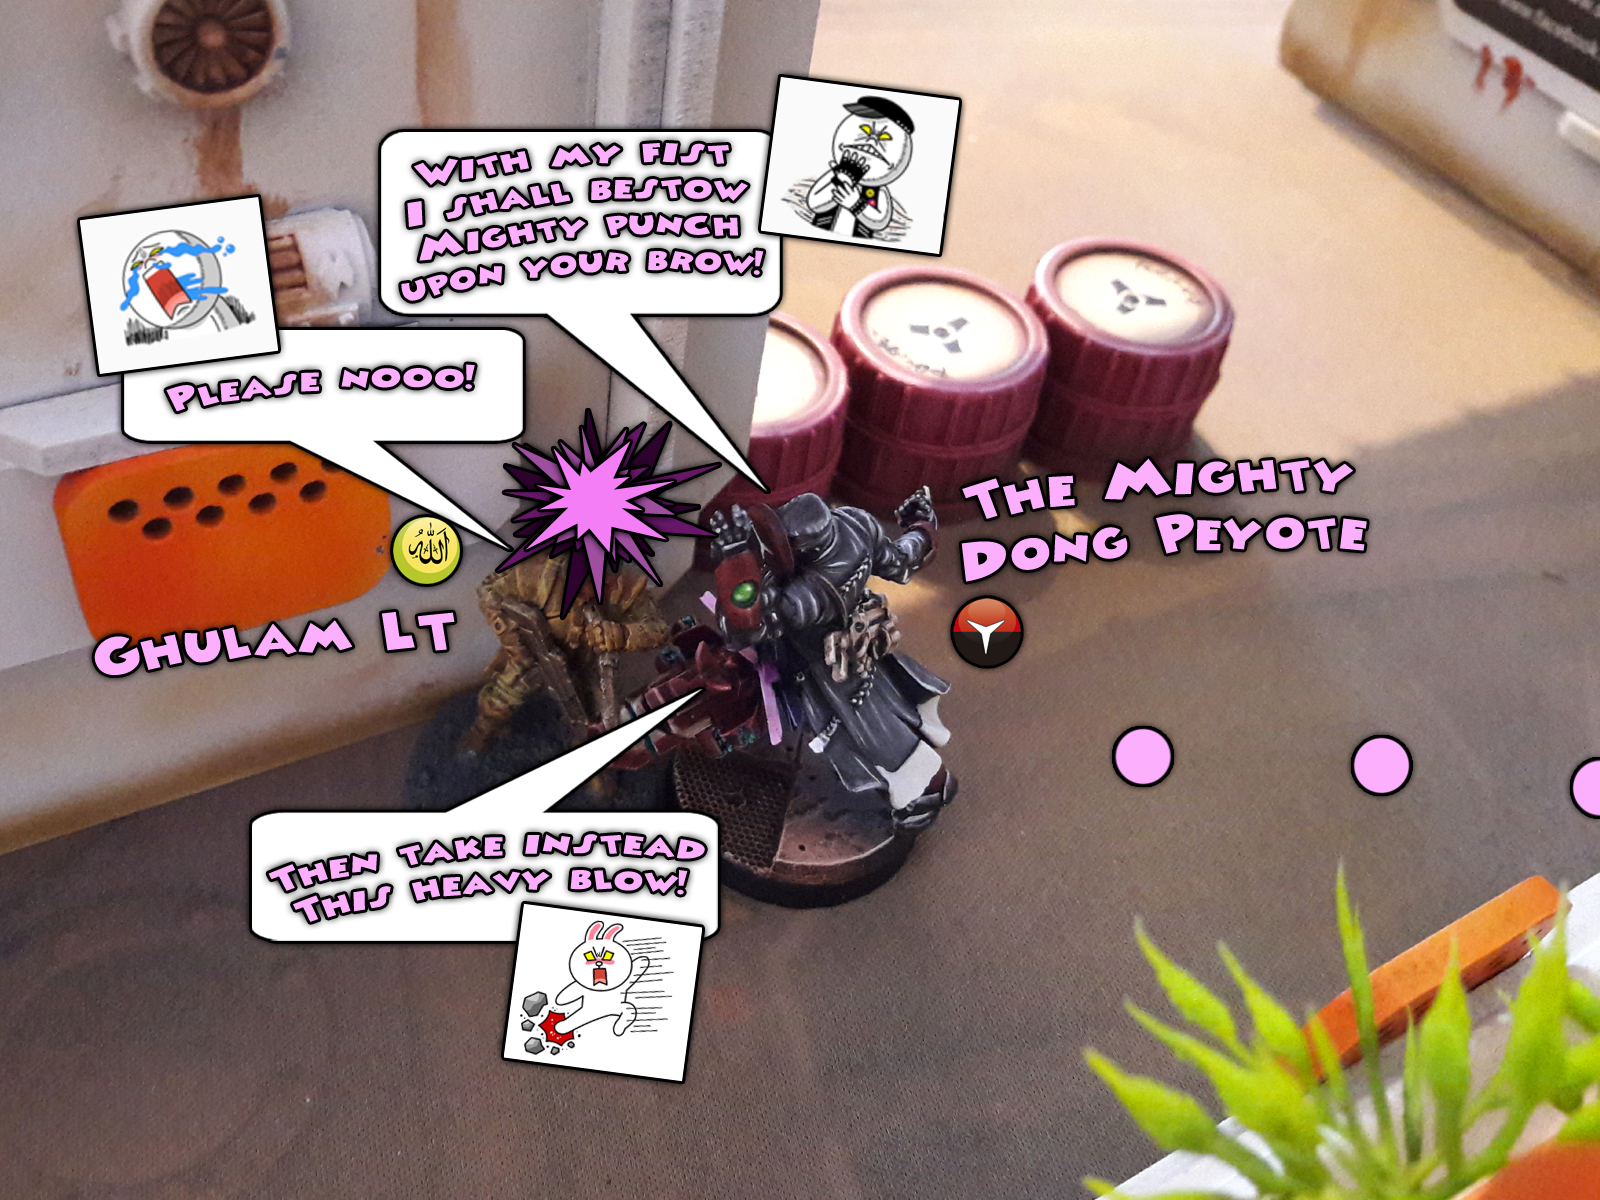

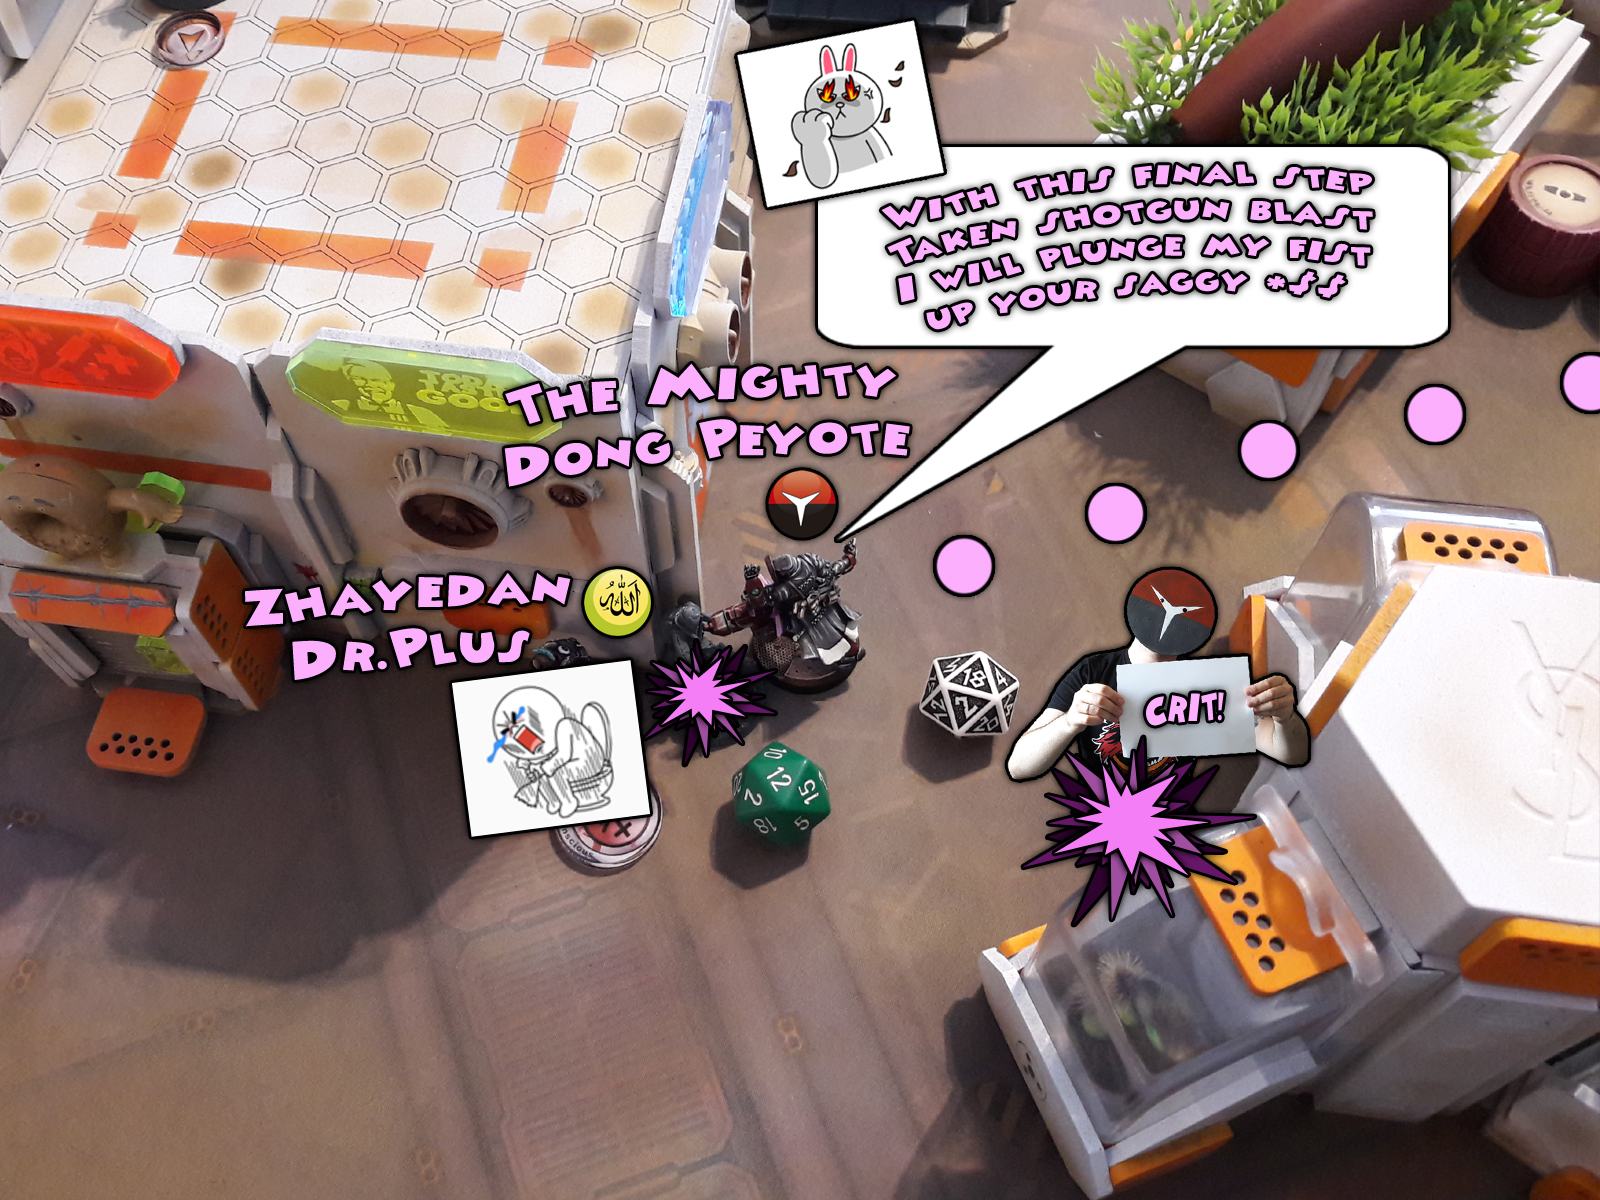
With a kill count worth of four enemy troops and 78 total points, entire order pool spent, the Mighty Dong Peyote finally succumbed to his wounds and died, but not before he screamed #Hoooodoooong! in a Braveheart style, with his last breath…
Wiping the teatrs from his eyes, the Interventor LT used his order to Spotlight the enemy HVT, thus honoured the fallen hero, ensuring a fulfillment of the Classyfied Objective…
HAQQISLAM TURN THREE:
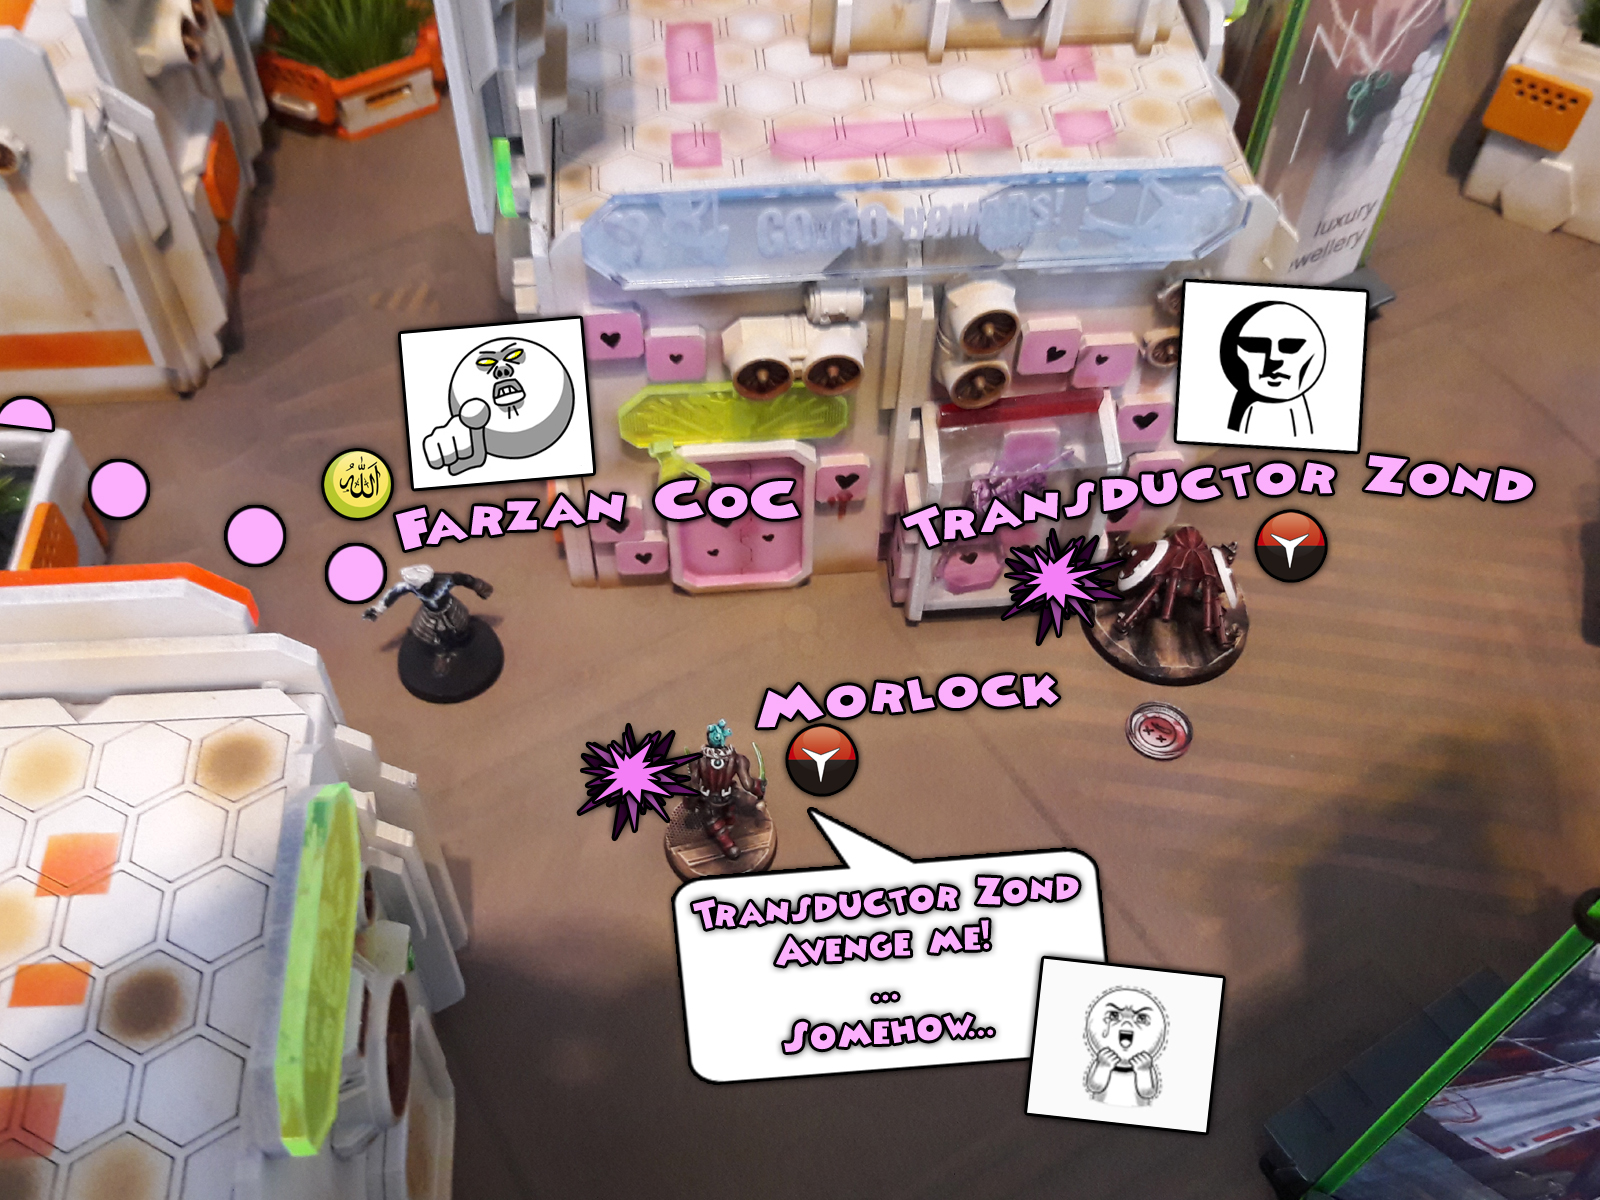
Loosing four troops, LT among them, was a blow to Haqqislammers. Farzan took over command and advanced to enact revenge. He shot the versatile Transductor Zond in the back and closed in on the Nomads.
Just as usual, the Zhayedan Doctor Plus got up with an auto-medikit (he always does!) and took a defensive position, along with Lasiq and Tuareg Snipers.
Haqqislam troops braced for the last Nomad turn to come…
NOMADS TURN THREE:
Last Nomads turn was a real massacre. Interventor LT buffed the Total Reaktion Zond with Marksman L2 and let it loose on the enemy.
The berzerk Zond moved right through the Nomad Deployment Zone, taking out Zhayedan Doctor Plus from behind a cover. Next to fall was the Farzan, peppered with bullets, instantly dead. Lasiq followed short. Tuareg sniper – last to face the Zond – performed a bit better, goping through the first wave of shots without a scratch. He fell down in next order tho. Being the last Haqqislam warrior on the board, Tuareg delivered the last points to the Nomads score…

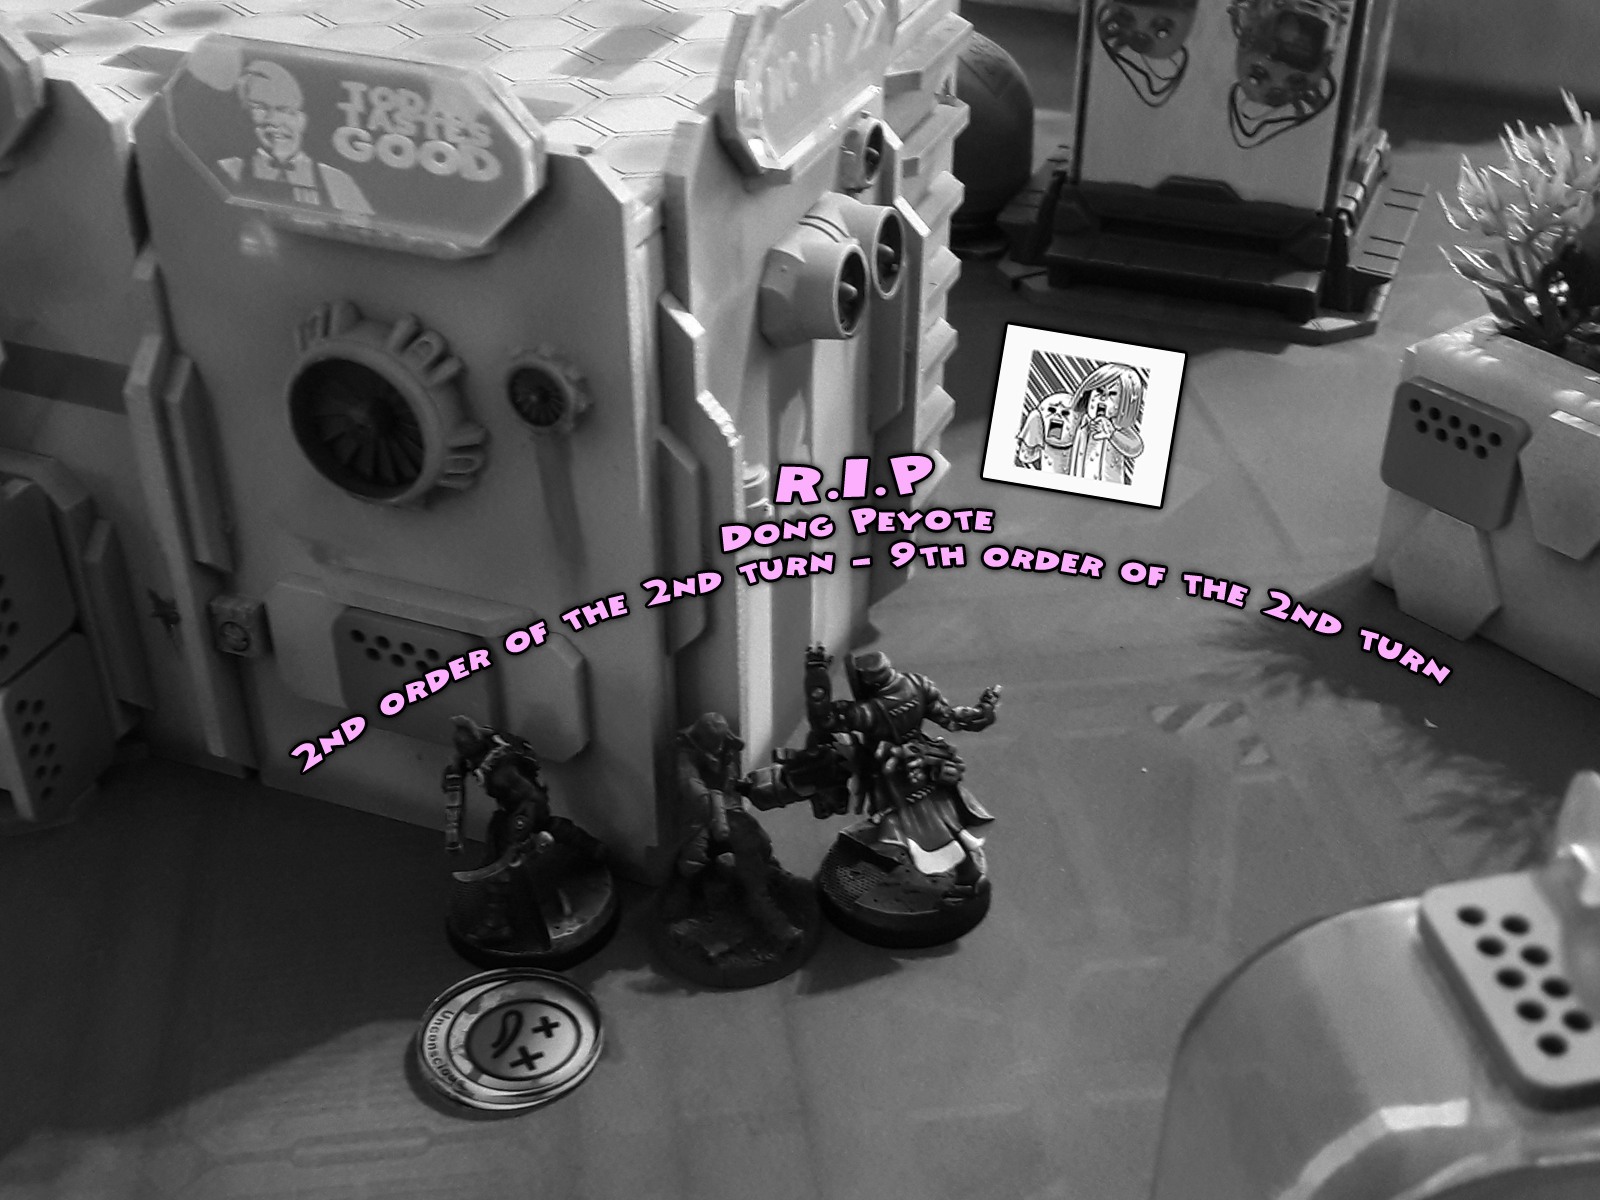
Once the dust settled down the remaining Nomad forces swiped the area. This was a fine victory of 9:1 for the Nomads, but not without a cost. The mighty hero who appeared on the battlefield at the time of the direst need and turned the tables on the Haqqislammers got killed. Strangely, his body was not found among the dead…
This was a very interresting game. I had a blast, while some of Haqqislam units got blasted XD At this point the Strikezone: Wotan is still on the roll and I hope this Battle Report helped Bromads in achieving their goal to keep the Dong Peyote afloat!